Pennock's Fiero Forum
  The Construction Zone
  Ferrari 288GTO build (Page 10)

Post New Topic  Post A Reply
Email This Page to Someone! | Printable Version

This topic is 16 pages long:  1   2   3   4   5   6   7   8   9   10   11   12   13   14   15   16 
Previous Page | Next Page
next newest topic | next oldest topic
Ferrari 288GTO build by dobie1
Started on: 08-31-2014 11:18 PM
Replies: 602 (29167 views)
Last post by: dobie1 on 04-17-2024 10:54 PM
dobie1
Member
Posts: 453
From: BC, Canada
Registered: Jun 2005


Feedback score: N/A
Leave feedback

Rate this member

Report this Post07-23-2020 12:23 AM Click Here to See the Profile for dobie1Send a Private Message to dobie1Edit/Delete MessageReply w/QuoteDirect Link to This Post
Thanks Monkeyman !! You're absolutely right the 288 is a sexy super car. I only hope that when my car is finished it will give justice to the real car.

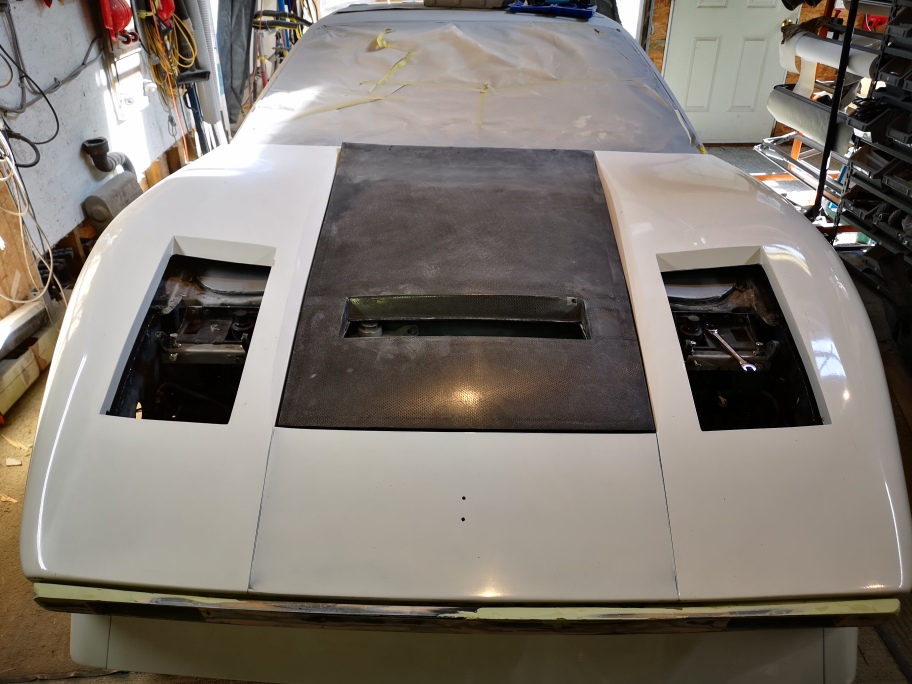
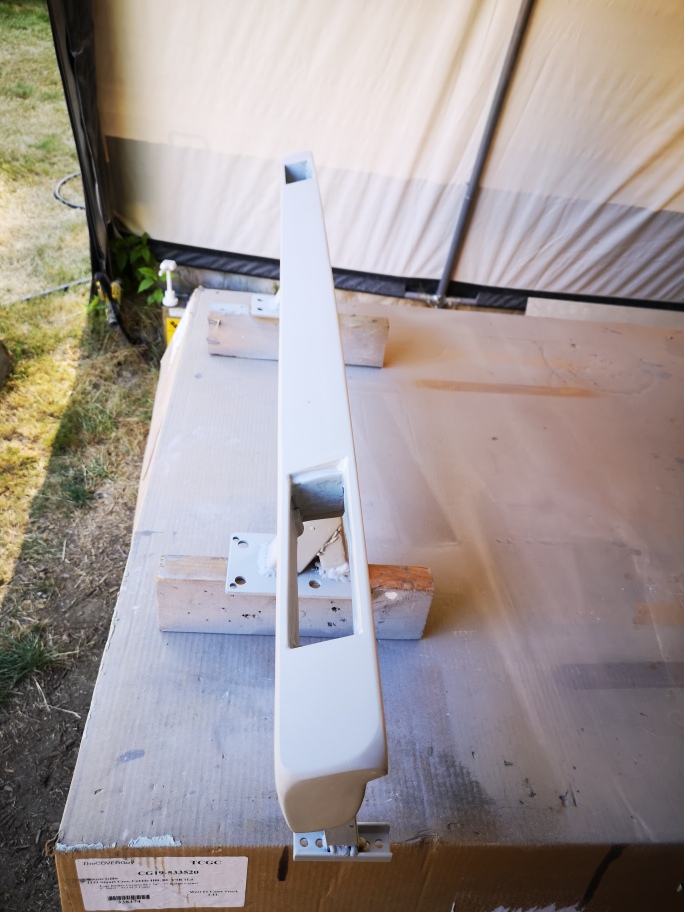
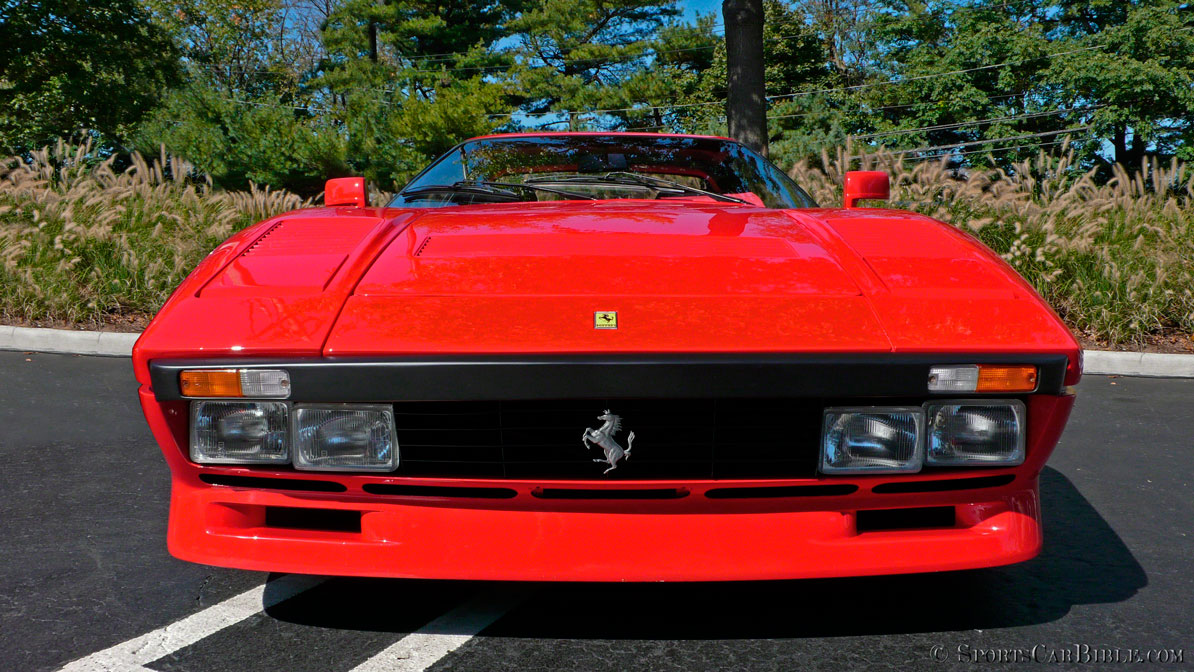
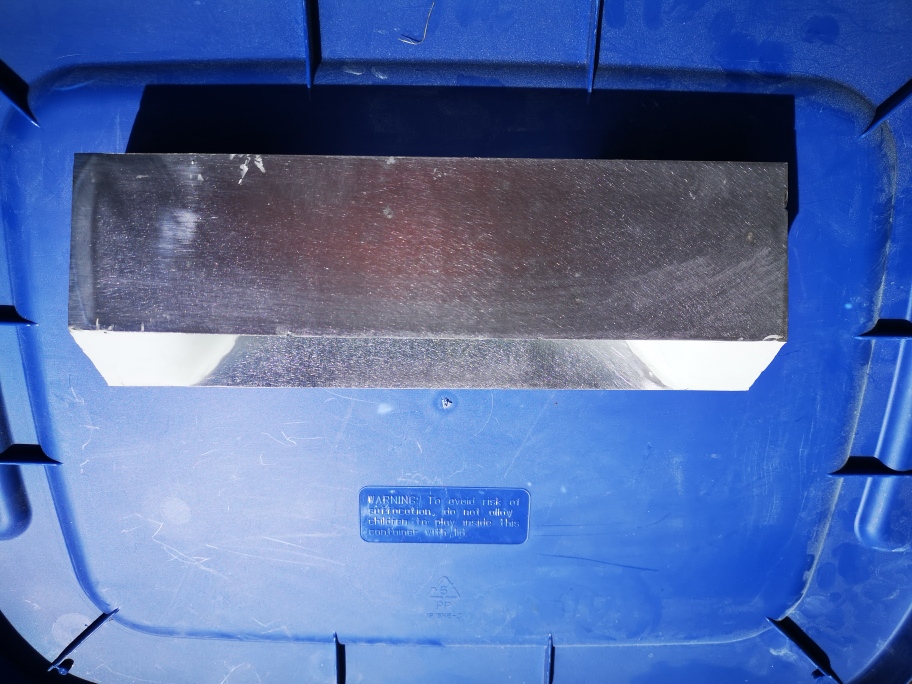
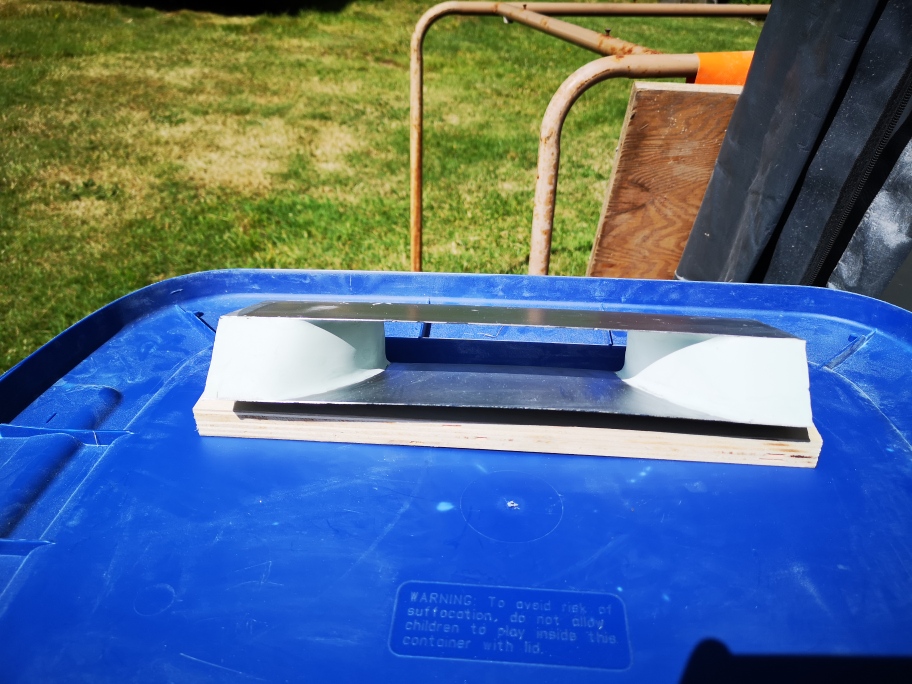
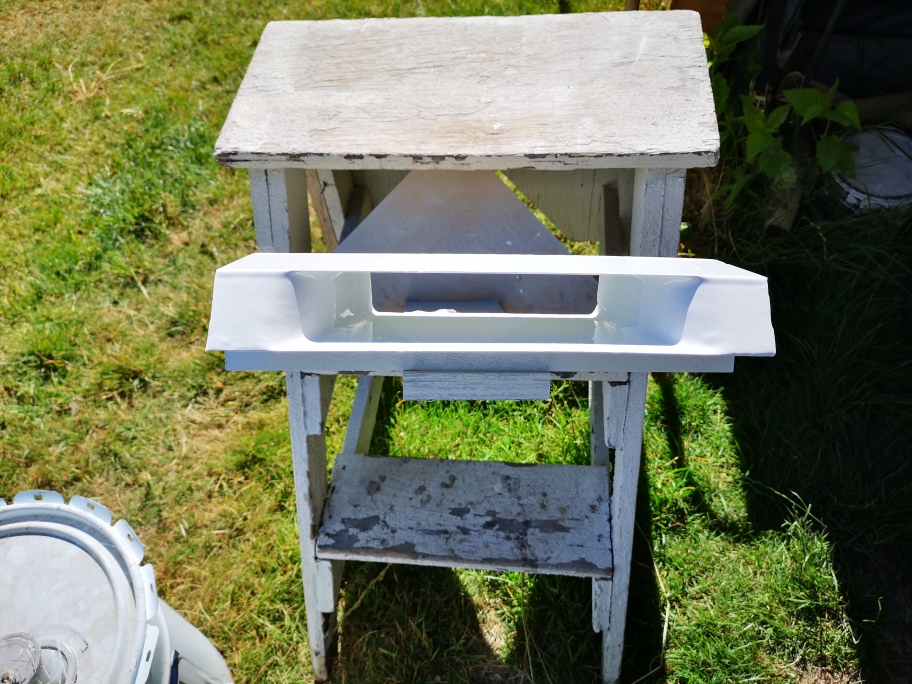
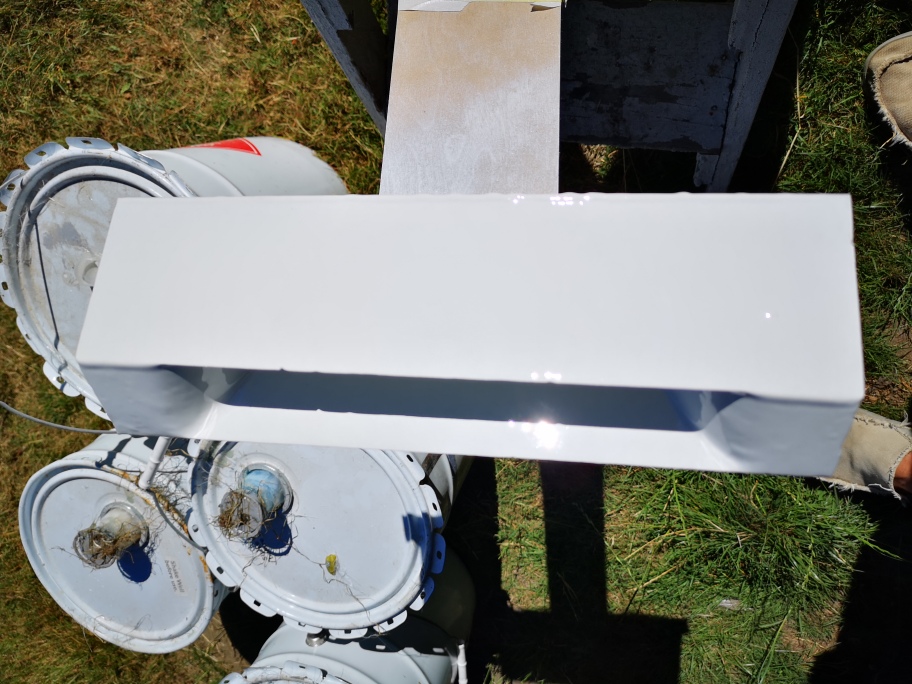
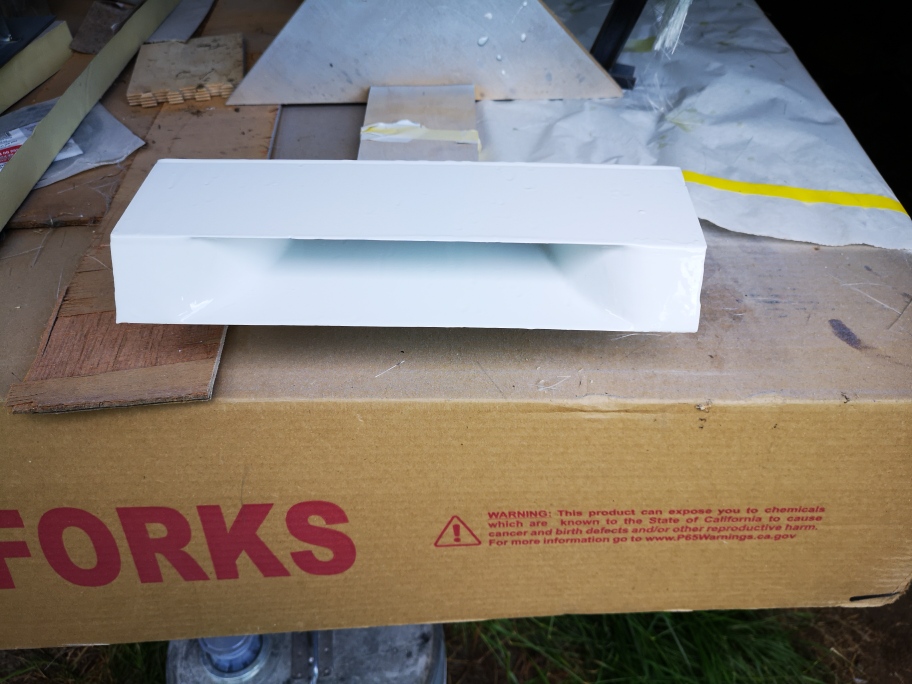
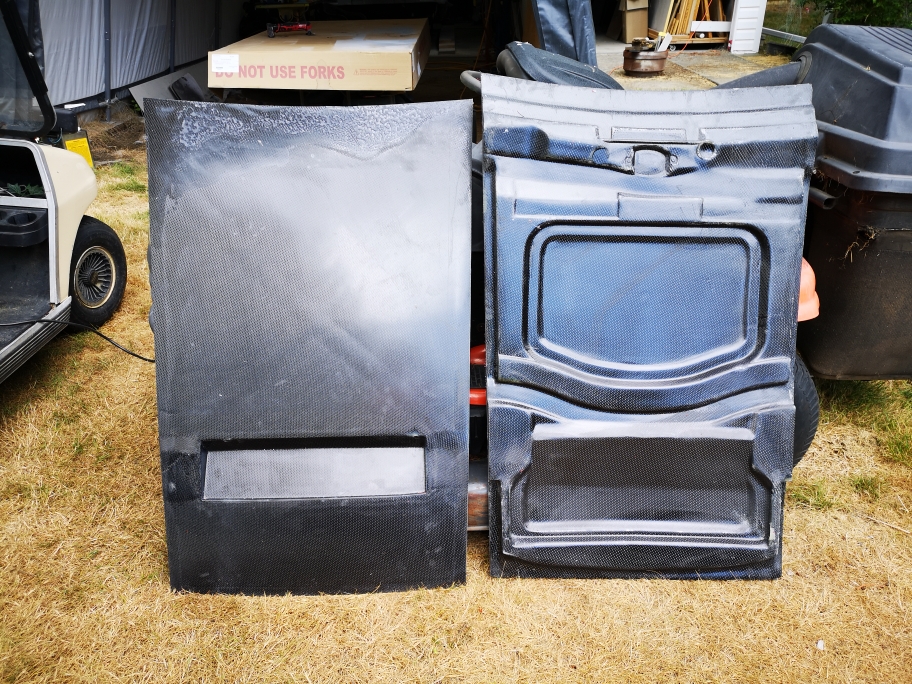
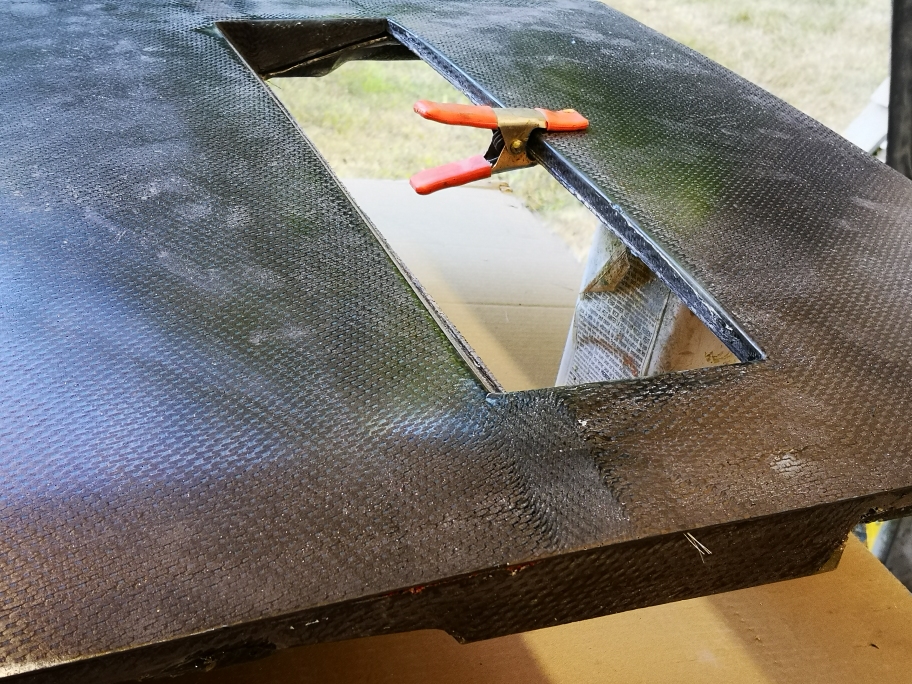
I've been working on the spoiler vent the last few days, although the one I started with came out ok, doing it completely out of 20 gauge steel was more difficult than I originally thought.
So I went back to the drawing board and started with a different approach. I used the steel for the top and bottom but sandwiched the polyester foam between them . I shaped the foam to give me the shape I needed giving me what I was looking for. I sprayed the whole piece with epoxy primer then painted it in the white I used for the other molds. I now have a working plug. I'll make a male mold rather than a female mold which all the other molds I made were.
it may be difficult to see how I'm planning on installing the parts , I plan on cutting two 1 1/2" x 12" opening into the spoiler then attach the vent fill piece into the opening. Then finish the front for painting.
Here is a photo of what Im looking for.


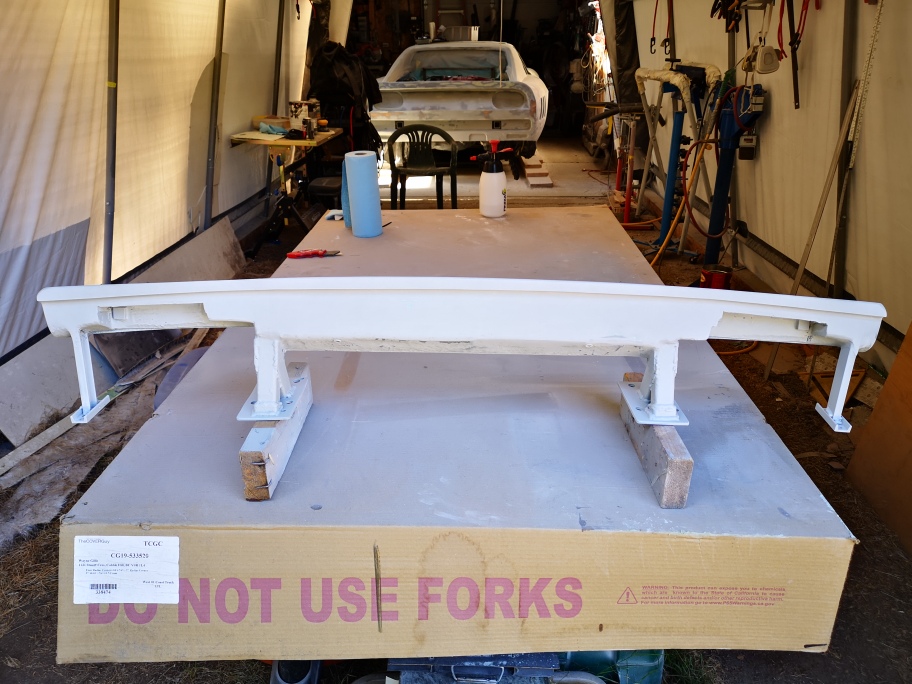
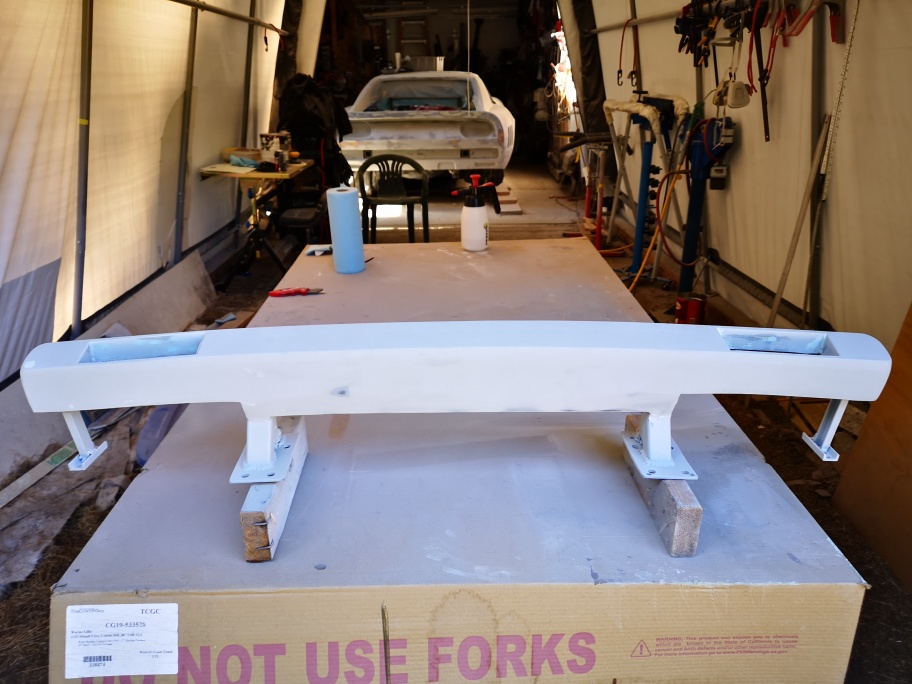
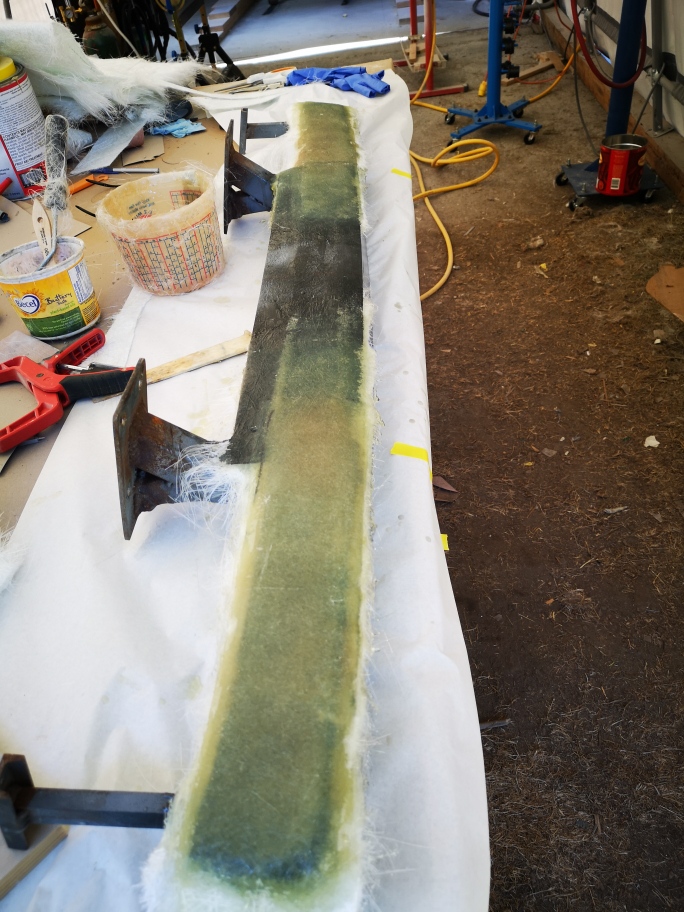
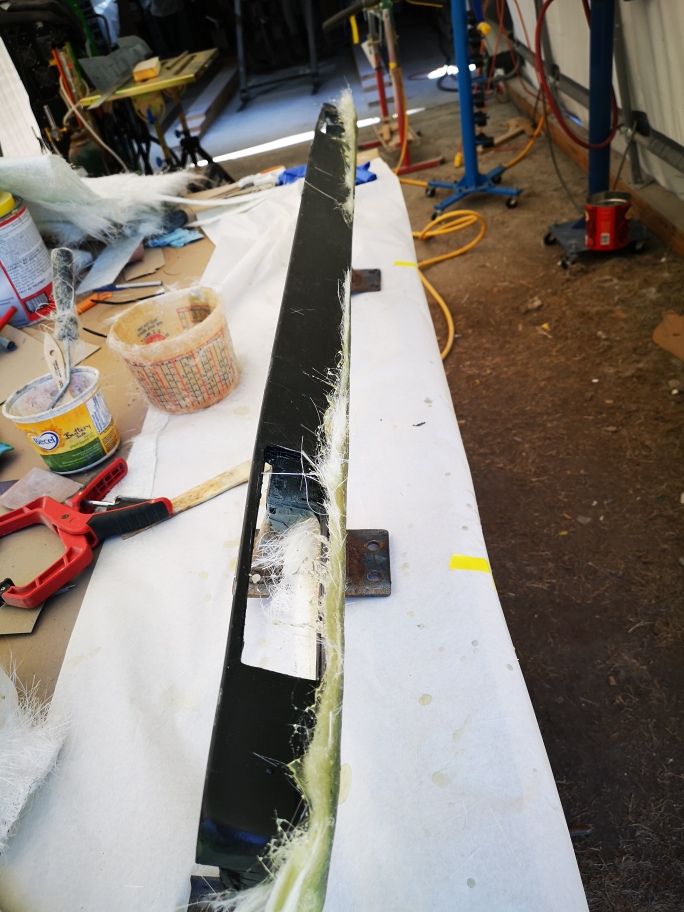
I've also been working on the front bumper , I found the dimensions were not exactly parallel over the full length so I needed to add to the outside of both ends to match the center section. I'll trim it up and finish it up with some bondo before I paint it.


[This message has been edited by dobie1 (edited 07-23-2020).]

IP: Logged
Sage
Member
Posts: 2903
From: USA
Registered: Nov 1999


Feedback score:    (14)
Leave feedback


Total ratings: 69
Rate this member

Report this Post07-23-2020 10:40 AM Click Here to See the Profile for SageSend a Private Message to SageEdit/Delete MessageReply w/QuoteDirect Link to This Post
Vent looks perfect. Finding and fixing those "little" things, like variances in the lines of your bumper....THAT'S what will make your "replica" stand above the crowd.....NOT that the crowd is all that big that makes up the people that would even ATTEMPT a project like yours. You are killin' it!

Everything looks spectacular!

Keep the updates coming.

HAGO!
IP: Logged
shemdogg
Member
Posts: 1750
From: The Ghetto CA USA
Registered: Apr 2017


Feedback score: N/A
Leave feedback

Rate this member

Report this Post07-24-2020 11:46 PM Click Here to See the Profile for shemdoggSend a Private Message to shemdoggEdit/Delete MessageReply w/QuoteDirect Link to This Post
Yeah what he said. Wow thats looking great! Symmetry on these cars are tough. Mines definitely an "asymmetrico" lol
go go go!

shem
IP: Logged
dobie1
Member
Posts: 453
From: BC, Canada
Registered: Jun 2005


Feedback score: N/A
Leave feedback

Rate this member

Report this Post07-29-2020 03:21 PM Click Here to See the Profile for dobie1Send a Private Message to dobie1Edit/Delete MessageReply w/QuoteDirect Link to This Post
Thanks for visiting and the positive comments Ted and Shem Always appreciate the comments.

I have company for a week right now so nothing Really happening in the build at the moment.
I’m panning on starting the Carbon Fiber Vacuum bag front hood build next week. Hope to have lots of pics And build details for everyone.

Stay safe
Wayne

[This message has been edited by dobie1 (edited 07-29-2020).]

IP: Logged
dobie1
Member
Posts: 453
From: BC, Canada
Registered: Jun 2005


Feedback score: N/A
Leave feedback

Rate this member

Report this Post08-05-2020 12:15 AM Click Here to See the Profile for dobie1Send a Private Message to dobie1Edit/Delete MessageReply w/QuoteDirect Link to This Post
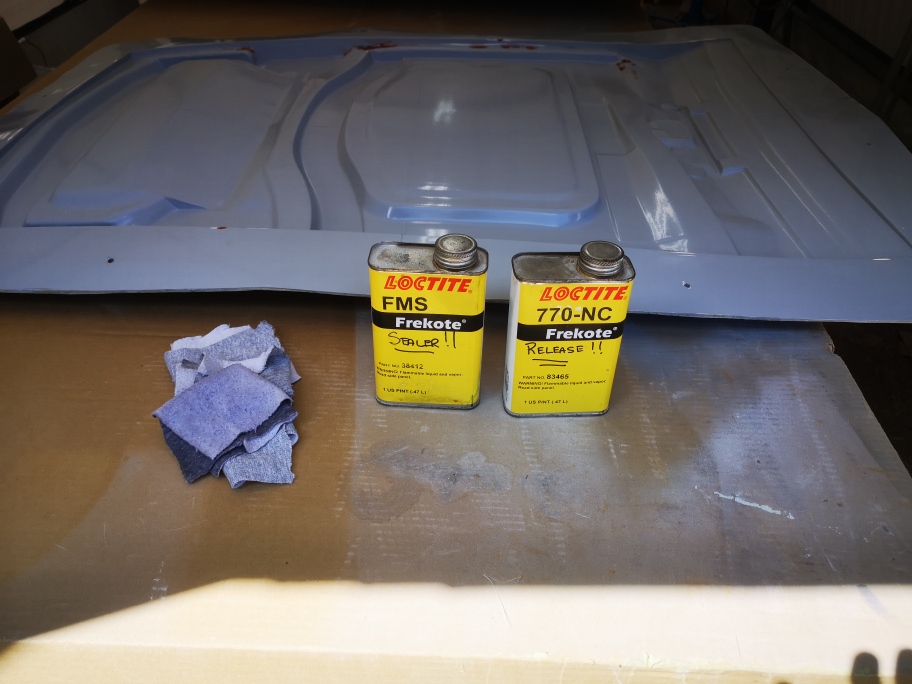
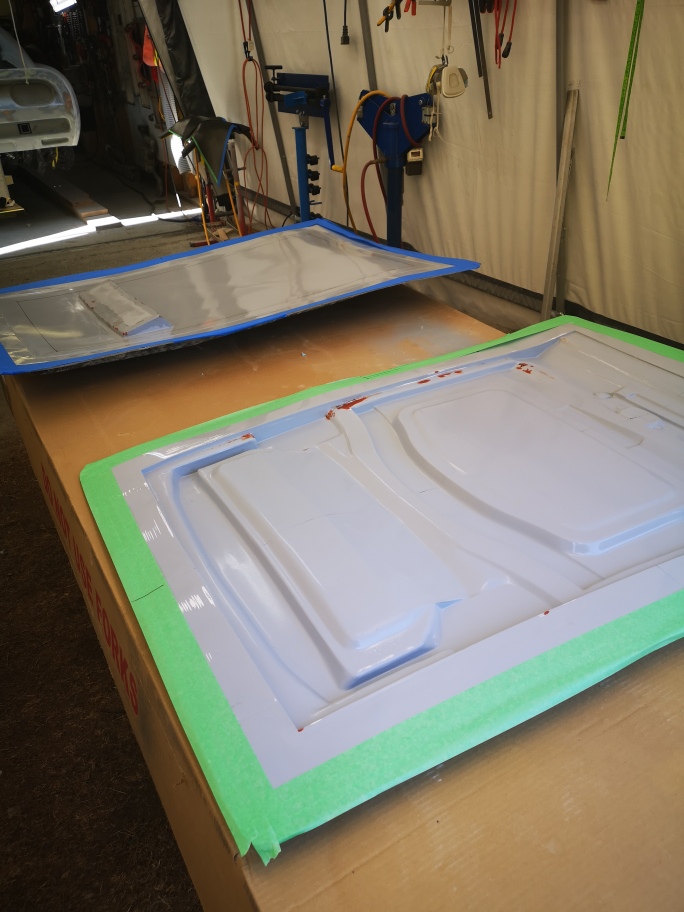
I worked on the hood mold getting it ready for doing a Carbon Fiber Layup. I lightly ground out a few minor flaws on the surface and spread some specially formulated repair putty into the areas. I sanded everything to 1500 grit finish then polished the entire surface. once that was finished I used a chemical mold sealer and then applied a chemical mold release.


The tape is applied to keep the perimeter free from free from mold release as the gum tape will not stick as well.


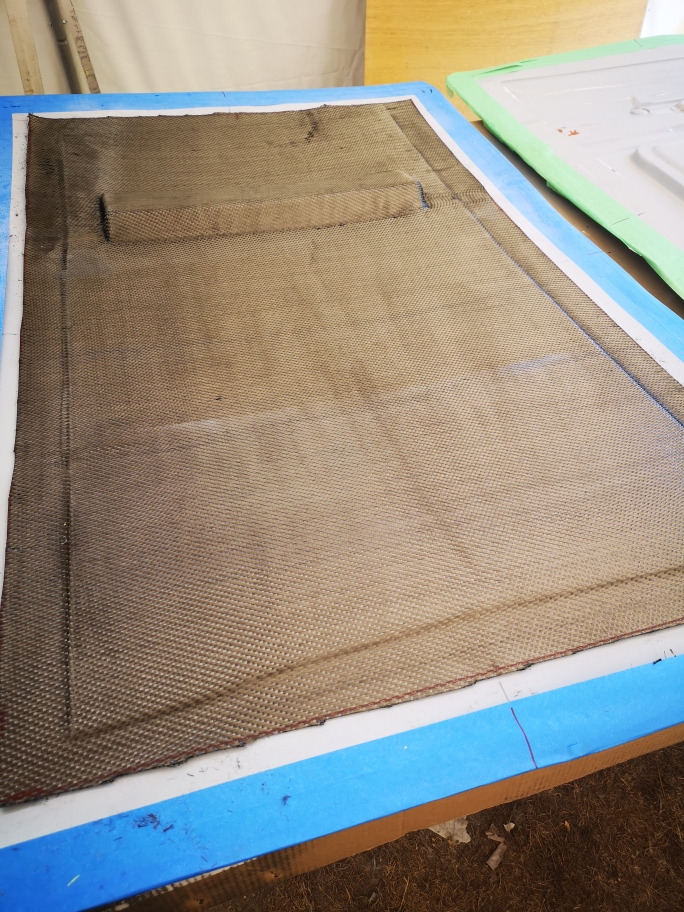
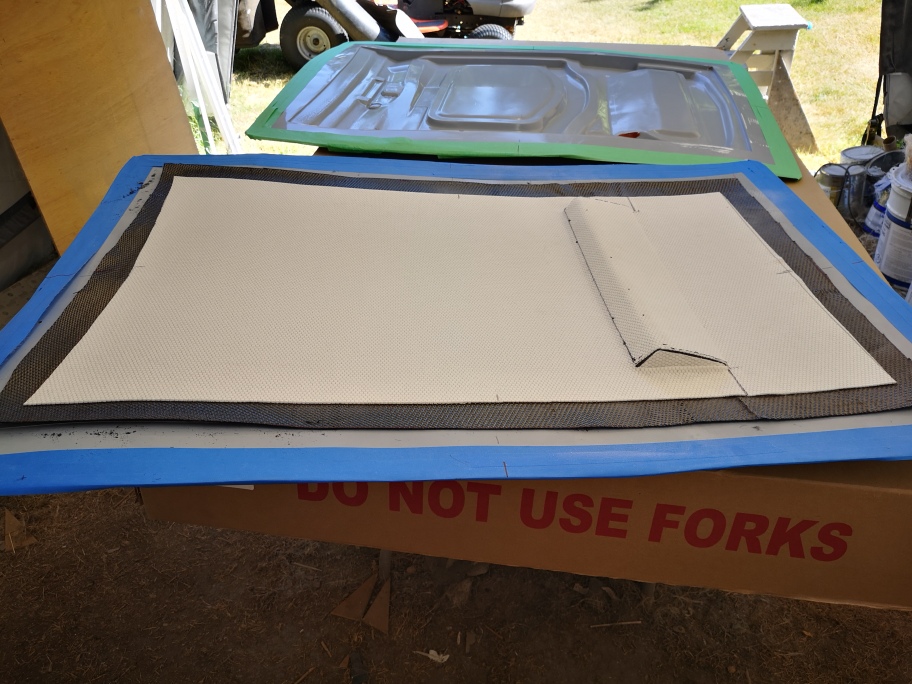
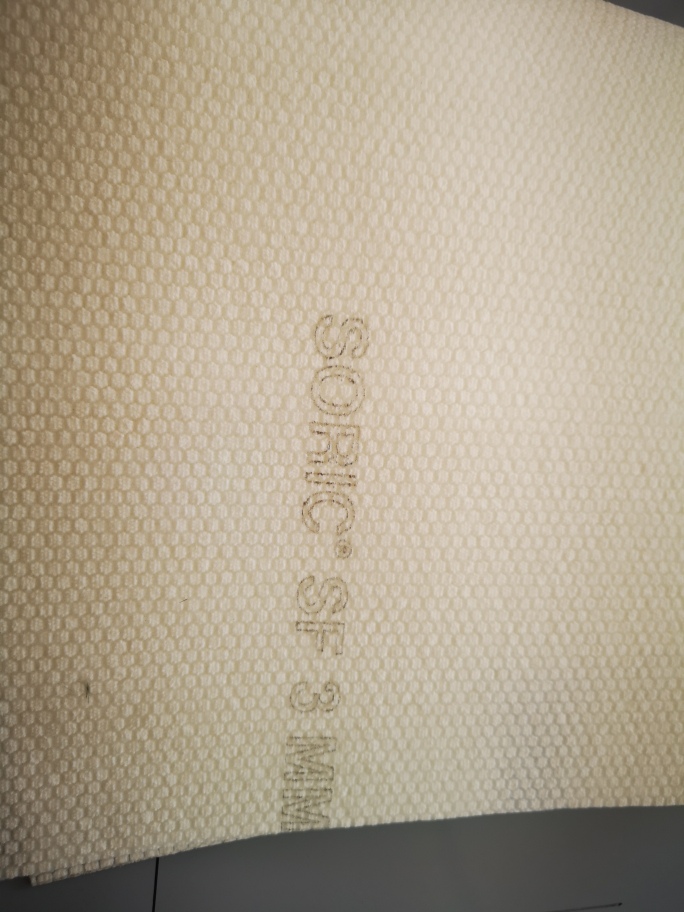
The layup is two layers of 6K 5S Carbon fibre then a layer of Lantor Soric SF ,this is a bulking material with great weight and strength it has channels over the enter surface to aid in resin flow. The sonic is 1" smaller than the width and length to allow it to be sealed in the part, then the last layer of carbon is applied.


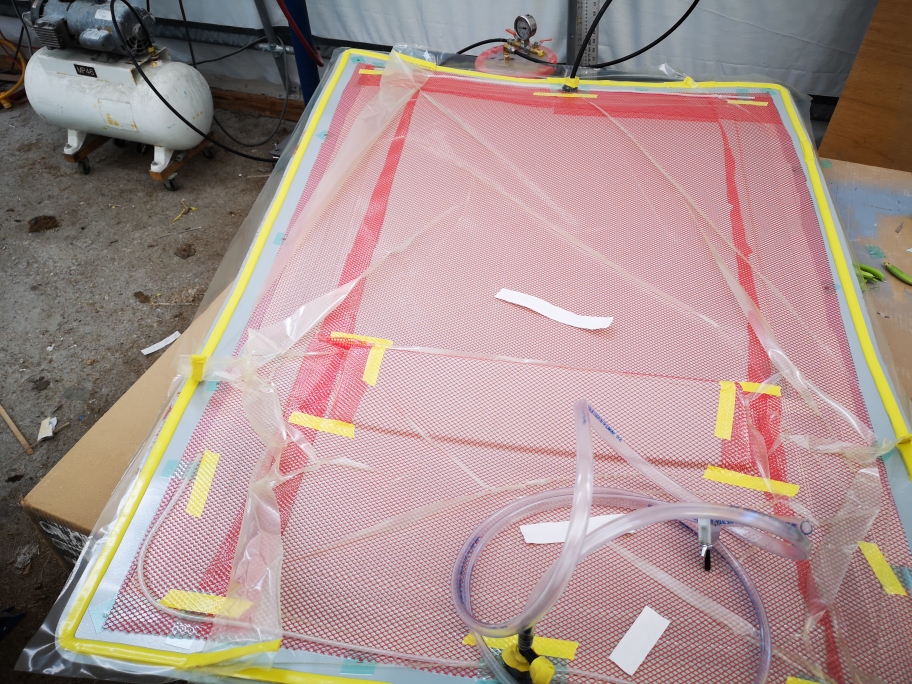
After everything was stacked up and the flow media (red layer) ,vacuum bag attached and the suction and supply lines were attached I tested for a 30" pull the supply line was released and flow starts from one end to the other.


I'll leave everything under suction for 24 hours then well see the first part from the molds. Ill layup the bottom part next then bond the two parts together
fingers crossed.!!!!

Stay safe everyone
Wayne
IP: Logged
RCR
Member
Posts: 4397
From: Shelby Twp Mi
Registered: Sep 2002


Feedback score:    (7)
Leave feedback


Total ratings: 102
Rate this member

Report this Post08-05-2020 08:21 PM Click Here to See the Profile for RCRSend a Private Message to RCREdit/Delete MessageReply w/QuoteDirect Link to This Post
You've come a long way in your process since those beginning days, Wayne.
Everything looks fantastic.


Bob
IP: Logged
dobie1
Member
Posts: 453
From: BC, Canada
Registered: Jun 2005


Feedback score: N/A
Leave feedback

Rate this member

Report this Post08-05-2020 11:27 PM Click Here to See the Profile for dobie1Send a Private Message to dobie1Edit/Delete MessageReply w/QuoteDirect Link to This Post
Thanks Bob
I keep evolving ,watching videos has helped in learning new techniques

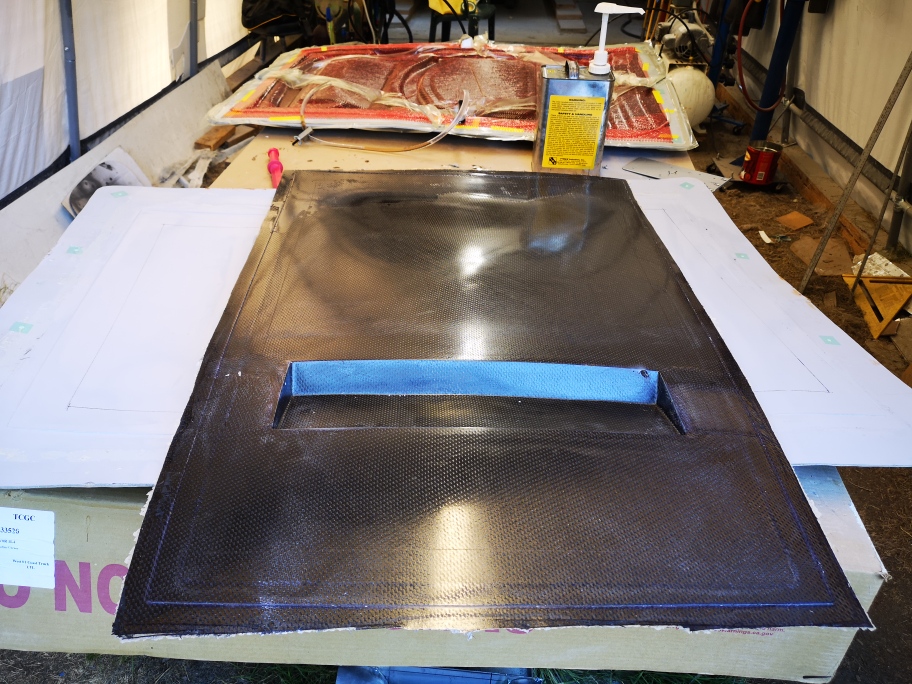
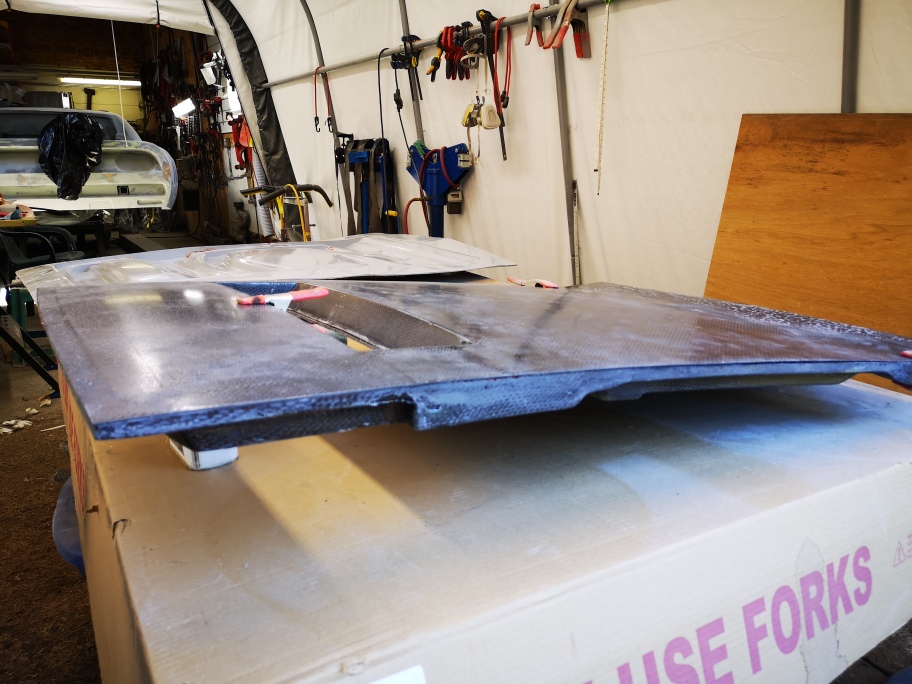
I pulled the part from the top side of the hood mold , a couple small flaws but very happy over all. I'll trim it up to the outer lines and get it ready to bond to the bottom half.


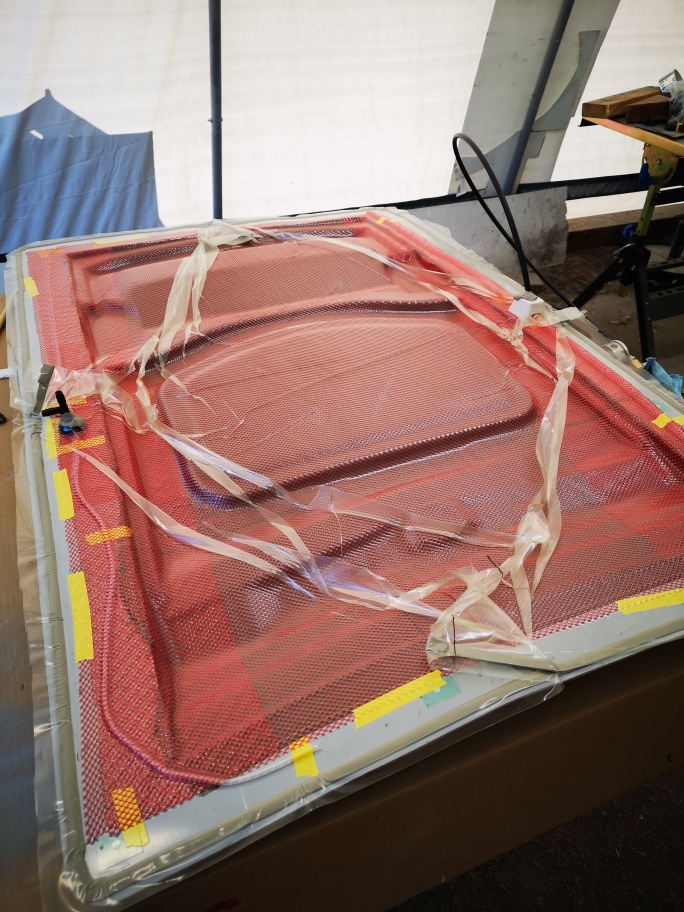
I layed up the bottom half of the mold today a lot of work getting it into all the angles and ensuring no bridging ,cross my fingers.


thanks for stopping bye
stay safe
Wayne
IP: Logged
dobie1
Member
Posts: 453
From: BC, Canada
Registered: Jun 2005


Feedback score: N/A
Leave feedback

Rate this member

Report this Post08-06-2020 09:48 PM Click Here to See the Profile for dobie1Send a Private Message to dobie1Edit/Delete MessageReply w/QuoteDirect Link to This Post
I pulled the second part from the lower mold today and trimmed it up, for the most part am very happy. I'll have to sand and prep a few areas , I also need to laminate some capture nuts on the inside for the hood hinges and lock /striker before bonding the two parts together.


just a side note the original hood that I molded weighed 59 lbs, the new one at this point is 10lbs !!!! the extra hardware and misc glues might add a couple pounds.

Stay safe
Wayne
IP: Logged
PaulJK
Member
Posts: 6638
From: Los Angeles
Registered: Oct 2001


Feedback score:    (25)
Leave feedback


Total ratings: 237
Rate this member

Report this Post08-06-2020 11:19 PM Click Here to See the Profile for PaulJKSend a Private Message to PaulJKEdit/Delete MessageReply w/QuoteDirect Link to This Post
 
quote
Originally posted by dobie1:

just a side note the original hood that I molded weighed 59 lbs, the new one at this point is 10lbs !!!! the extra hardware and misc glues might add a couple pounds.


Wow. OUTSTANDING ! I have a dumb question - will the finished hood be red like the rest of the car or carbon fiber looking ?
IP: Logged
Sage
Member
Posts: 2903
From: USA
Registered: Nov 1999


Feedback score:    (14)
Leave feedback


Total ratings: 69
Rate this member

Report this Post08-07-2020 07:24 AM Click Here to See the Profile for SageSend a Private Message to SageEdit/Delete MessageReply w/QuoteDirect Link to This Post
Fabulous!

Wayne, you have surpassed everything I've seen up to now regarding DIY composite fabrication! OUTSTANDING job!

That hood looks great...and 10-12 pounds?????REMARKABLE!

The bagging is something I've always been "curious" about, and I've seen it done before, but not ever really tried it myself. Stellar work bud.

I still say, you're gonna be "swamped" with guys wanting to buy your kit. Your investment in making molds should pay off handsomely, provided you have time to fill all the orders!

Can hardly wait to see this masterpiece finished and fully assembled, in color. Will be awe-inspiring for sure.

Keep up the good job, and keep the updates coming!

HAGO!
IP: Logged
dobie1
Member
Posts: 453
From: BC, Canada
Registered: Jun 2005


Feedback score: N/A
Leave feedback

Rate this member

Report this Post08-07-2020 08:32 PM Click Here to See the Profile for dobie1Send a Private Message to dobie1Edit/Delete MessageReply w/QuoteDirect Link to This Post
 
quote
Originally posted by PaulJK:


Wow. OUTSTANDING ! I have a dumb question - will the finished hood be red like the rest of the car or carbon fiber looking ?


Hi Paul, no question is dumb😁 I plan on painting both front and rear hoods red same as the body. I’m only doing the hoods in carbon to Keep the weight down, for the pneumatic lift arms ,ultimately I would like to do the whole car in carbon fibre !! But realistically I’ll be doing the Rest of the panels going forward out of fiberglass.

Hi Ted
Thanks for the positive comments,I always appreciate your thoughts.
I keep making the posts on technics I’m using for the build ,I just hope that people aren’t getting overloaded with information or for some board and would rather just see the parts already Finished and installed.

Stay safe everyone
Wayne
IP: Logged
PFF
System Bot
PaulJK
Member
Posts: 6638
From: Los Angeles
Registered: Oct 2001


Feedback score:    (25)
Leave feedback


Total ratings: 237
Rate this member

Report this Post08-07-2020 10:31 PM Click Here to See the Profile for PaulJKSend a Private Message to PaulJKEdit/Delete MessageReply w/QuoteDirect Link to This Post
 
quote
Originally posted by dobie1:

... I just hope that people aren’t getting overloaded with information or for some board and would rather just see the parts already Finished and installed.


I'd rather just see them finished and installed on MY car .
IP: Logged
dobie1
Member
Posts: 453
From: BC, Canada
Registered: Jun 2005


Feedback score: N/A
Leave feedback

Rate this member

Report this Post08-07-2020 11:18 PM Click Here to See the Profile for dobie1Send a Private Message to dobie1Edit/Delete MessageReply w/QuoteDirect Link to This Post
Well Paul you know how when your ready😁
IP: Logged
RCR
Member
Posts: 4397
From: Shelby Twp Mi
Registered: Sep 2002


Feedback score:    (7)
Leave feedback


Total ratings: 102
Rate this member

Report this Post08-09-2020 12:36 PM Click Here to See the Profile for RCRSend a Private Message to RCREdit/Delete MessageReply w/QuoteDirect Link to This Post

:

Amazing job, Wayne. Wow!!

Bob

[This message has been edited by RCR (edited 08-09-2020).]

IP: Logged
RCR
Member
Posts: 4397
From: Shelby Twp Mi
Registered: Sep 2002


Feedback score:    (7)
Leave feedback


Total ratings: 102
Rate this member

Report this Post08-09-2020 03:24 PM Click Here to See the Profile for RCRSend a Private Message to RCREdit/Delete MessageReply w/QuoteDirect Link to This Post

RCR

4397 posts
Member since Sep 2002
Hi Wayne. Got a question for ya... You may have seen my stuck with the fuel door and filler tube.

Curious if you have any pics showing what you are doing??

thanx,

Bob
IP: Logged
dobie1
Member
Posts: 453
From: BC, Canada
Registered: Jun 2005


Feedback score: N/A
Leave feedback

Rate this member

Report this Post08-10-2020 11:05 AM Click Here to See the Profile for dobie1Send a Private Message to dobie1Edit/Delete MessageReply w/QuoteDirect Link to This Post
Hi Bob
Yes I saw your post, and yes I do have a work around. Let me find everything and I'll post some pics.
Wayne
IP: Logged
sourmash
Member
Posts: 4558
From:
Registered: Jul 2016


Feedback score: N/A
Leave feedback


Total ratings: 50
User Banned

Report this Post08-10-2020 11:46 PM Click Here to See the Profile for sourmashSend a Private Message to sourmashEdit/Delete MessageReply w/QuoteDirect Link to This Post
 
quote
Originally posted by dobie1:
I keep making the posts on technics I’m using for the build ,I just hope that people aren’t getting overloaded with information or for some board and would rather just see the parts already Finished and installed.

Stay safe everyone
Wayne


Not getting overloaded here. Some is beyond my understanding, but that just makes those parts useful in the future when I read them again and finally get it. It's ike missing things in a movie or a book the first time through. I was still getting parts of The Godfather II recently that didn't jibe before.

Thank you for the thread.
IP: Logged
dobie1
Member
Posts: 453
From: BC, Canada
Registered: Jun 2005


Feedback score: N/A
Leave feedback

Rate this member

Report this Post08-11-2020 09:45 PM Click Here to See the Profile for dobie1Send a Private Message to dobie1Edit/Delete MessageReply w/QuoteDirect Link to This Post
Thanks for the reply Sourmash , I'll keep the build going!!

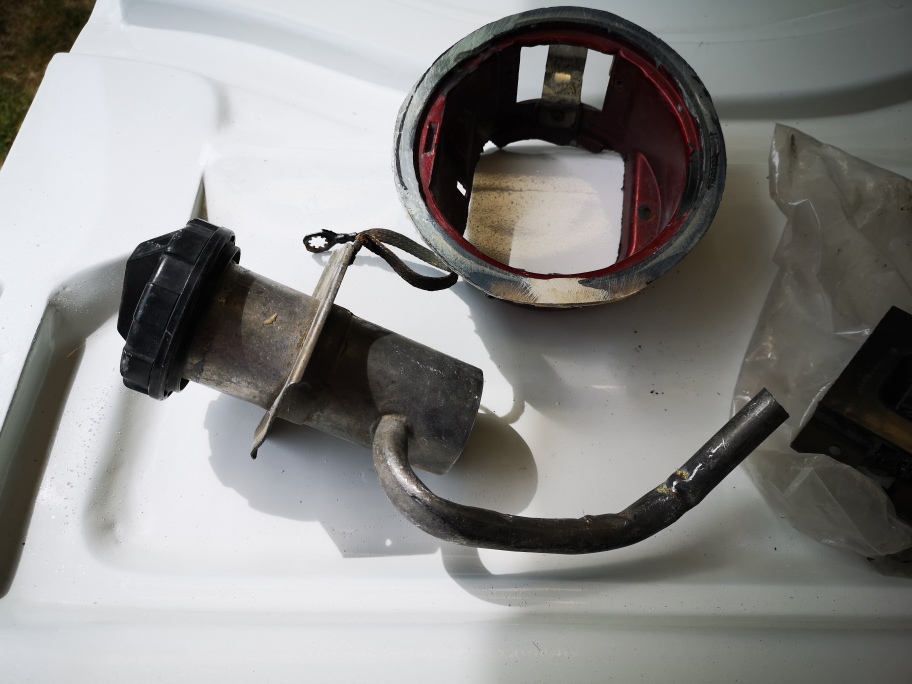
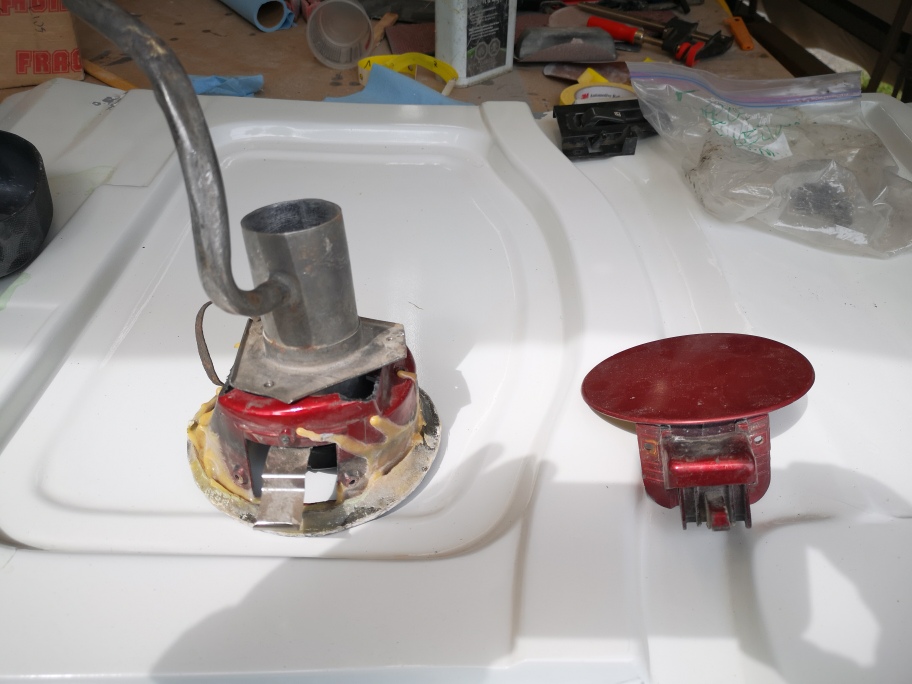
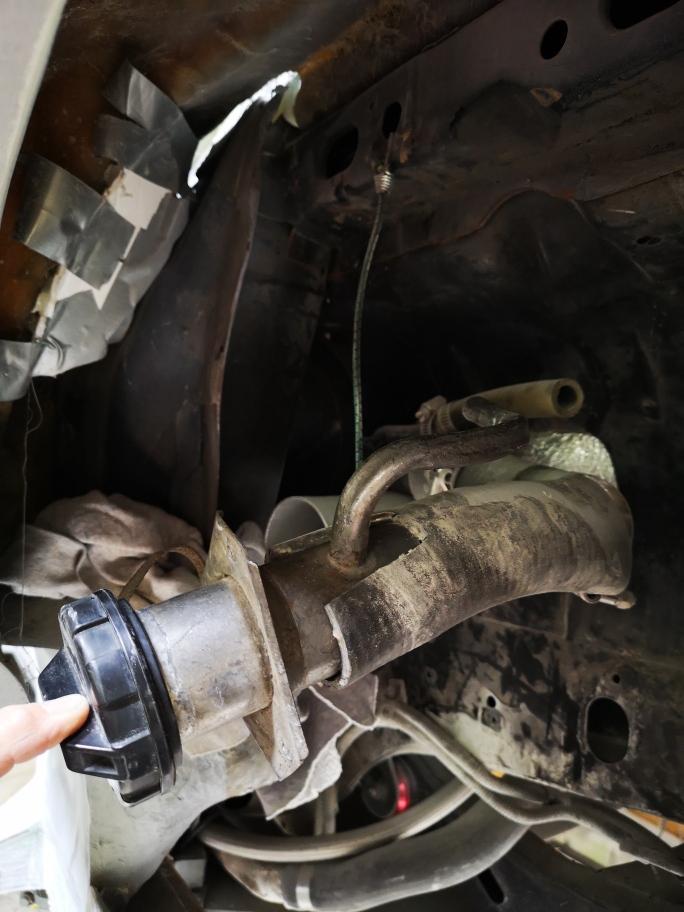
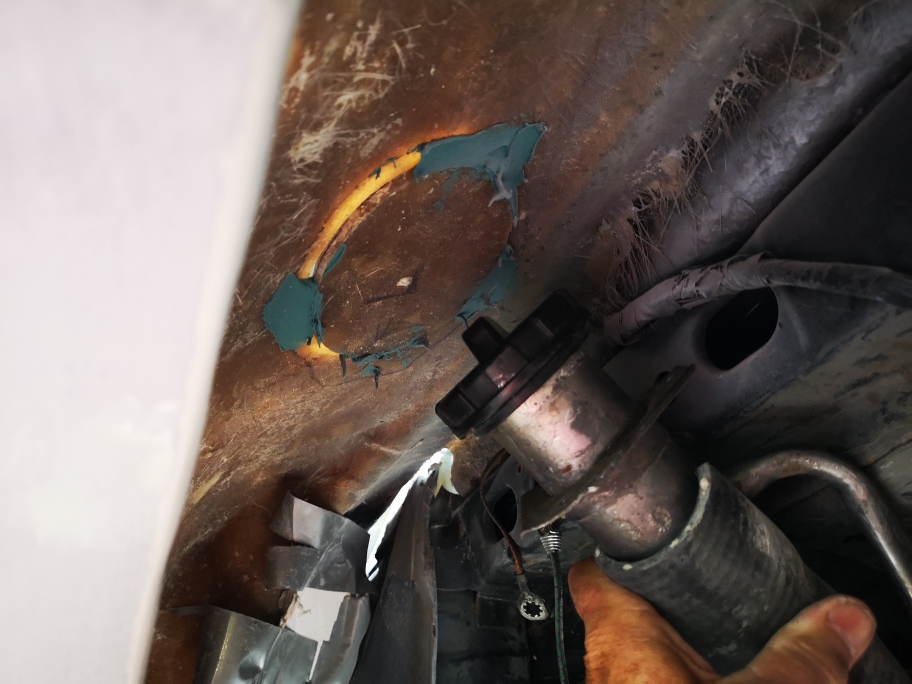
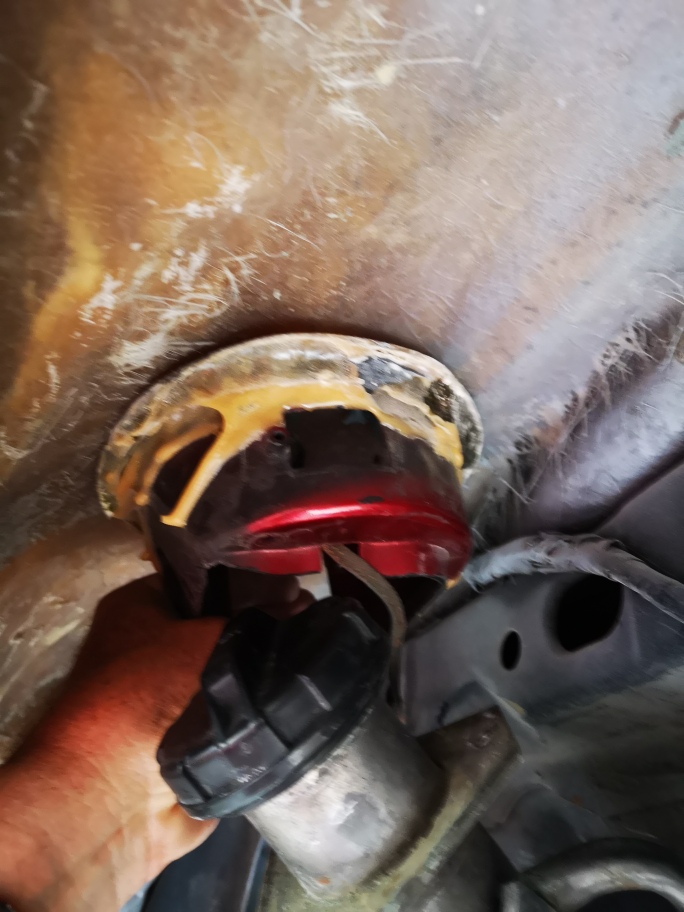
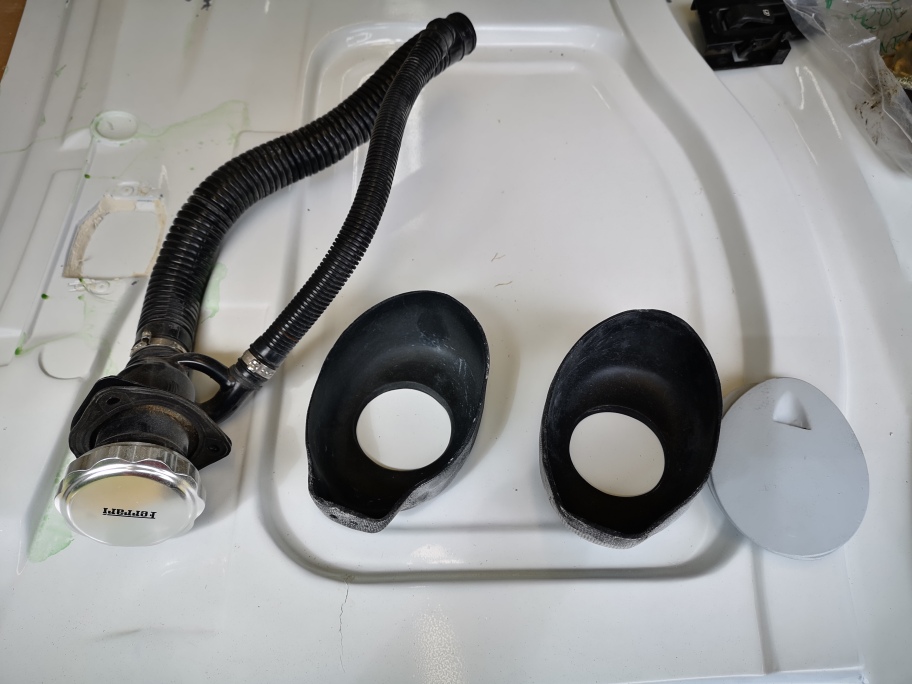
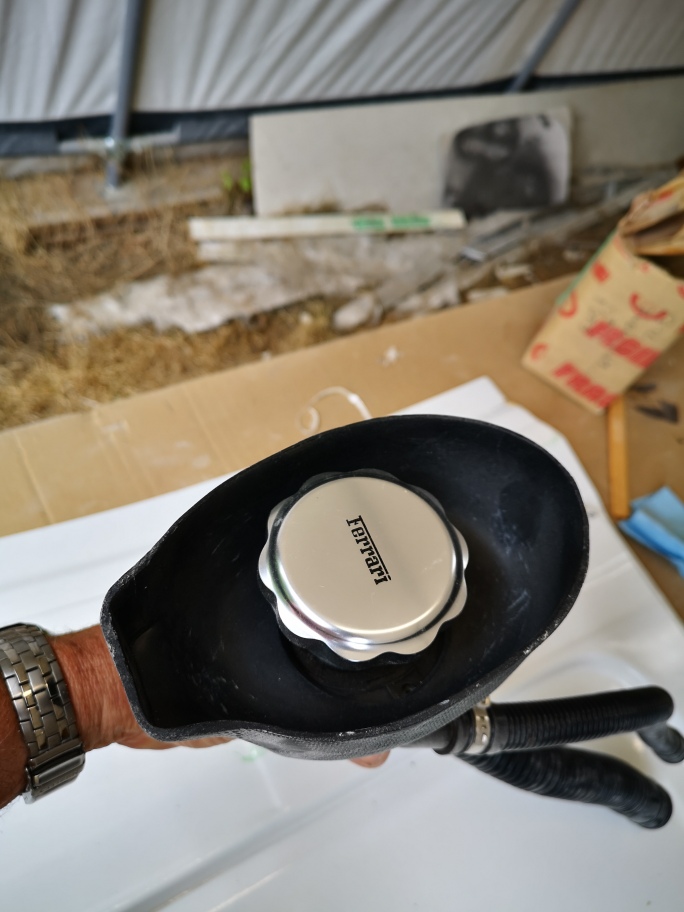
So i'll post a bit on the fuel filler for the benefit of RCR (BOB) I originally used the Fiero fuel lid and fuel pot. I cut the filler pipes and installed a fuel safe rubber extension with a couple of stainless steel T-Bolt clamps. I installed it on the 308 kit much like your kit BOB.

RCR if you want these pieces for your build your more than welcome to have them , PM me with your address.
Also Don O. Is going to take a bunch of pics of his setup for you as well.


I've now gone in a different direction with the GTO build with the dual fuel doors (only one is actually for fuel ) the other will be for something, just not sure yet.


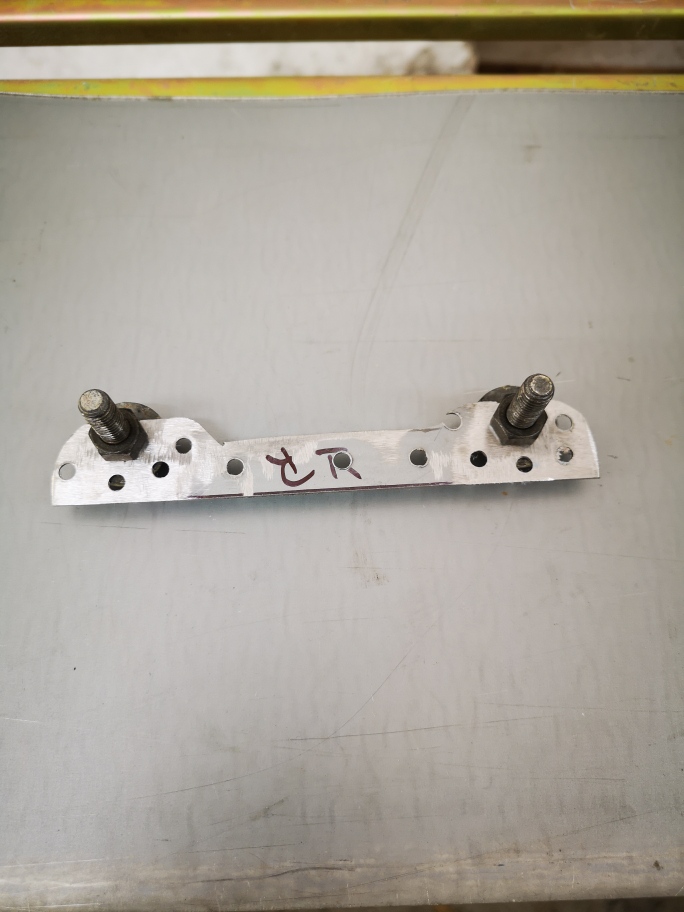
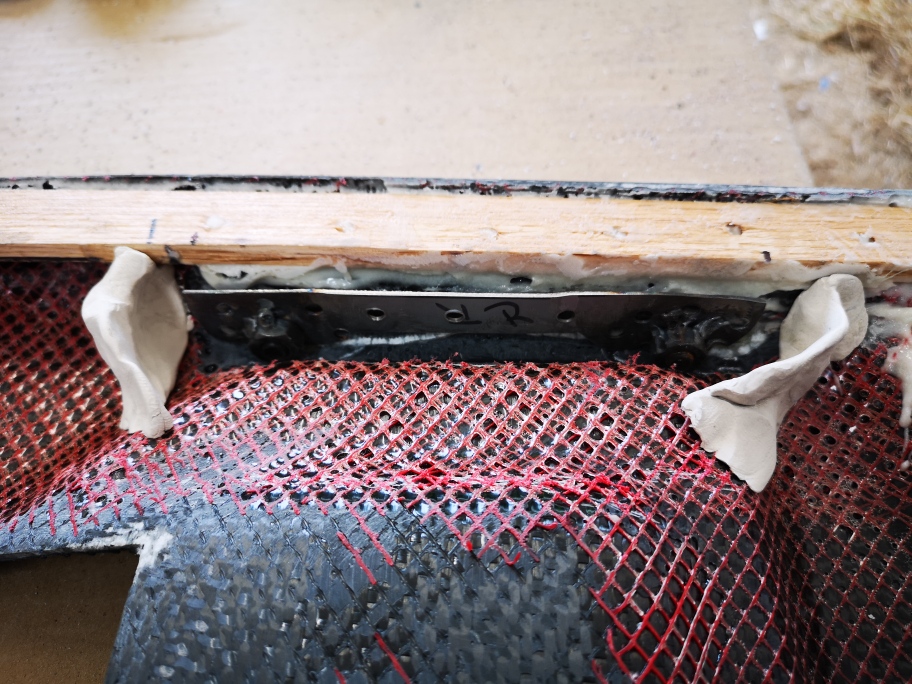
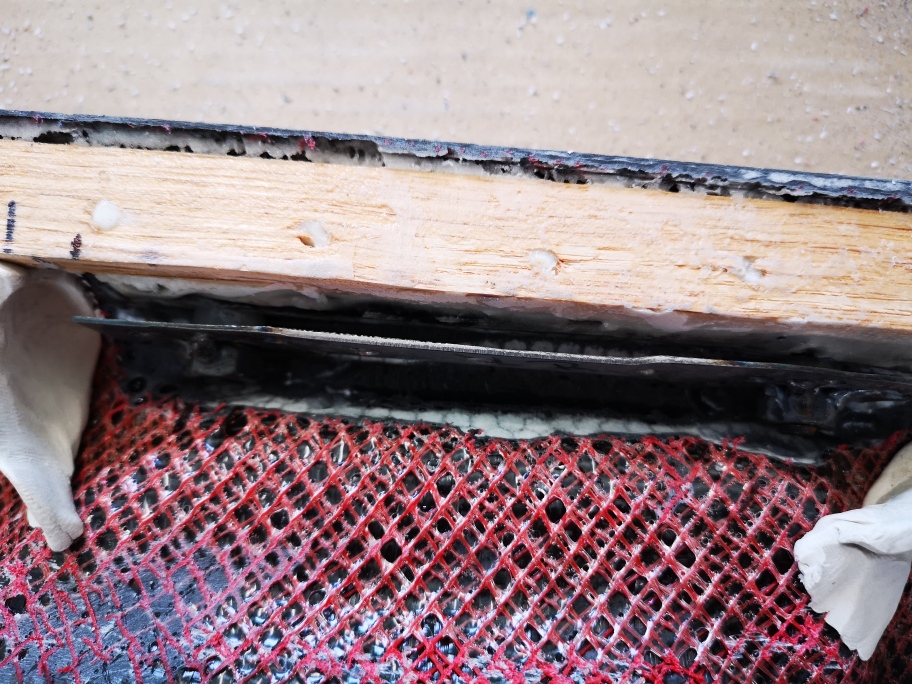
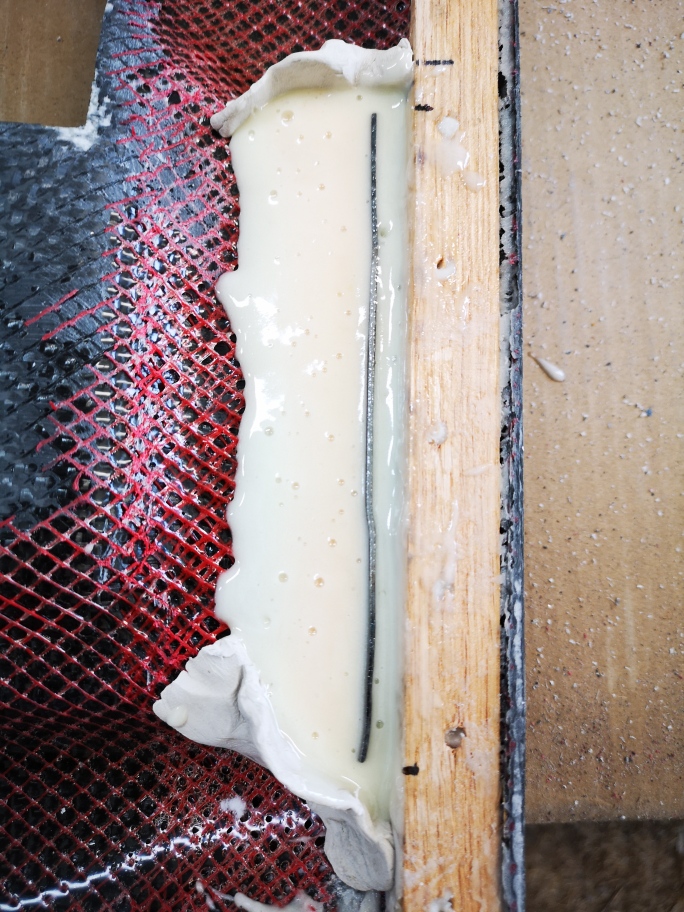
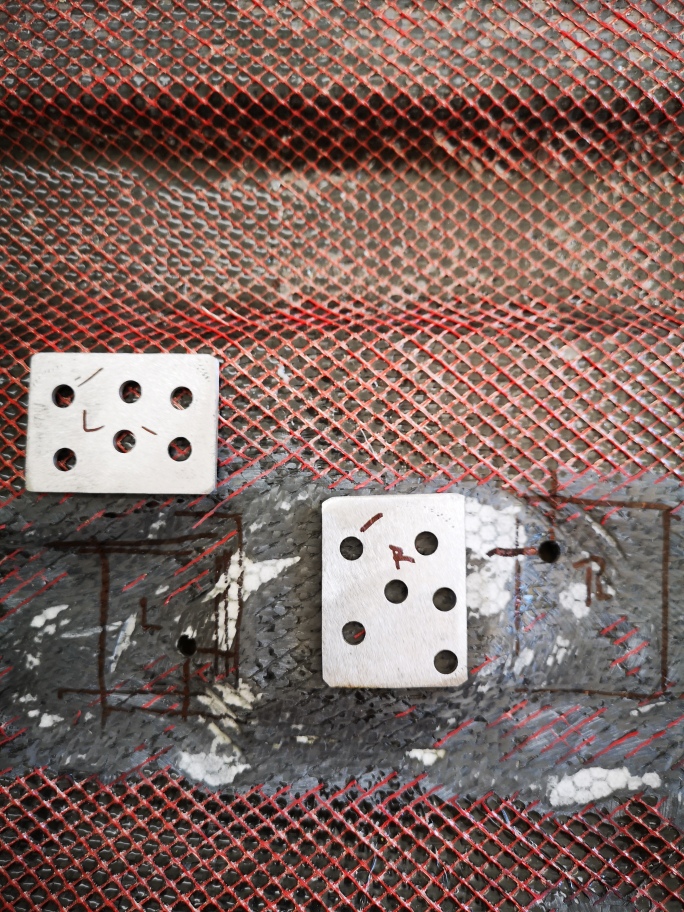
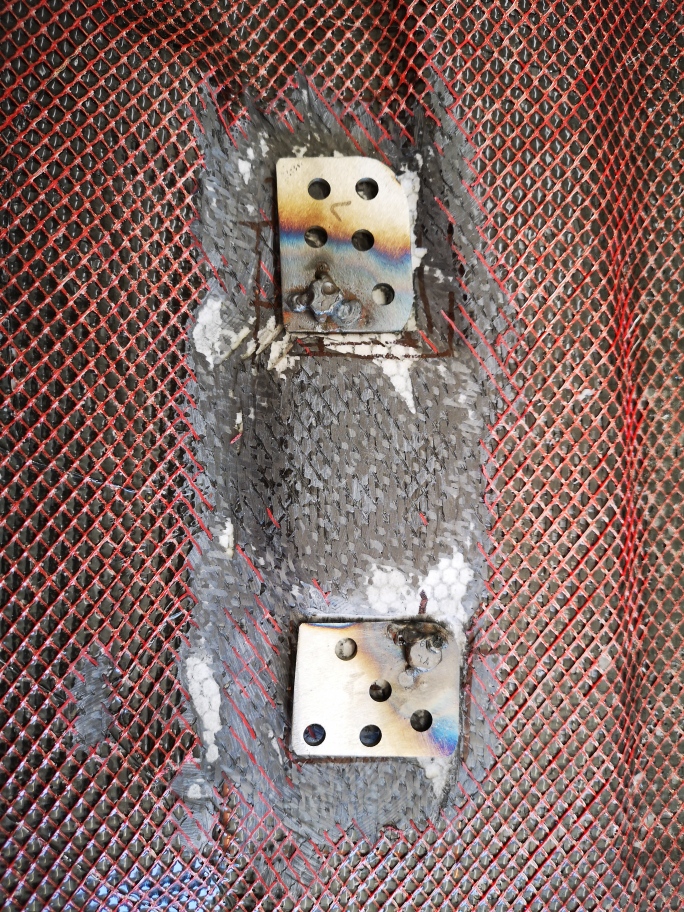
Now back to the build on the hood...
I made up some plates the I welded nuts too, then drilled a bunch of holes into the plate to allow the epoxy resin to flow all around. The epoxy will solidify the entire area giving rigidity over a wider area for the hood hinges.


Clay dams to keep the epoxy slurry in the hinge area


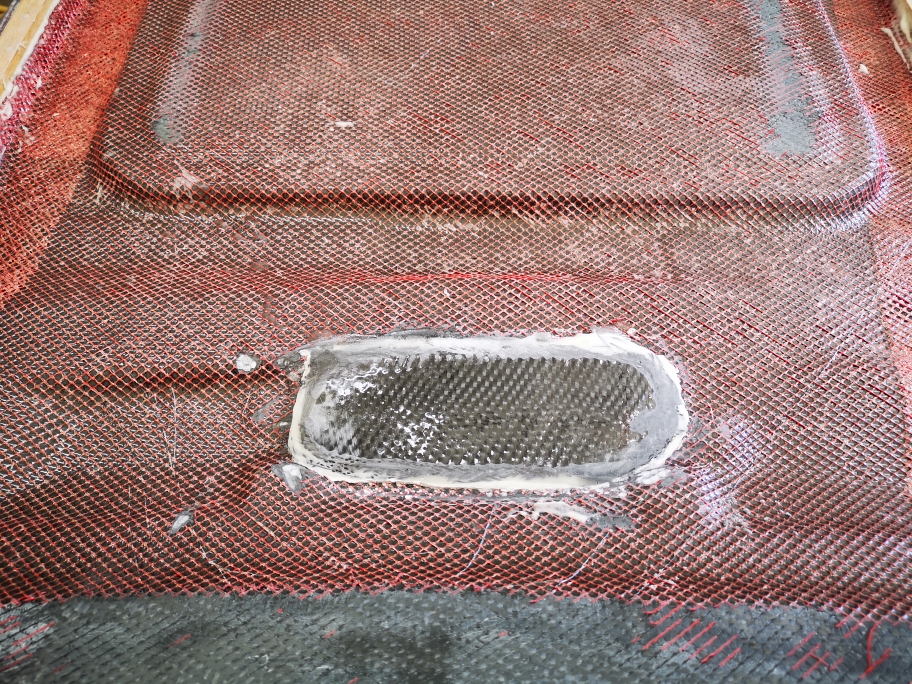
Some of you may notice the red flow media is still on the part, OK I screwed up I forgot to put peel ply down first . Luckly it is inside and will not effect anything.
Thanks for coming by
Stay safe
Wayne

[This message has been edited by dobie1 (edited 08-11-2020).]

IP: Logged
exoticse
Member
Posts: 8650
From: Orlando, Fl
Registered: Jun 2003


Feedback score: N/A
Leave feedback


Total ratings: 108
Rate this member

Report this Post08-11-2020 11:48 PM Click Here to See the Profile for exoticseSend a Private Message to exoticseEdit/Delete MessageReply w/QuoteDirect Link to This Post
Wayne what state you in ?
IP: Logged
dobie1
Member
Posts: 453
From: BC, Canada
Registered: Jun 2005


Feedback score: N/A
Leave feedback

Rate this member

Report this Post08-11-2020 11:56 PM Click Here to See the Profile for dobie1Send a Private Message to dobie1Edit/Delete MessageReply w/QuoteDirect Link to This Post
 
quote
Originally posted by exoticse:

Wayne what state you in ?


I’m in British Columbia ,Canada
IP: Logged
andreww
Member
Posts: 240
From: Toronto, Ontario, Canada
Registered: Sep 2011


Feedback score: N/A
Leave feedback

Rate this member

Report this Post08-12-2020 08:18 AM Click Here to See the Profile for andrewwSend a Private Message to andrewwEdit/Delete MessageReply w/QuoteDirect Link to This Post
 
quote
Originally posted by dobie1:


I’m in British Columbia ,Canada


Huh, never realized you were a fellow Canuck!
IP: Logged
PFF
System Bot
dobie1
Member
Posts: 453
From: BC, Canada
Registered: Jun 2005


Feedback score: N/A
Leave feedback

Rate this member

Report this Post08-12-2020 11:53 PM Click Here to See the Profile for dobie1Send a Private Message to dobie1Edit/Delete MessageReply w/QuoteDirect Link to This Post
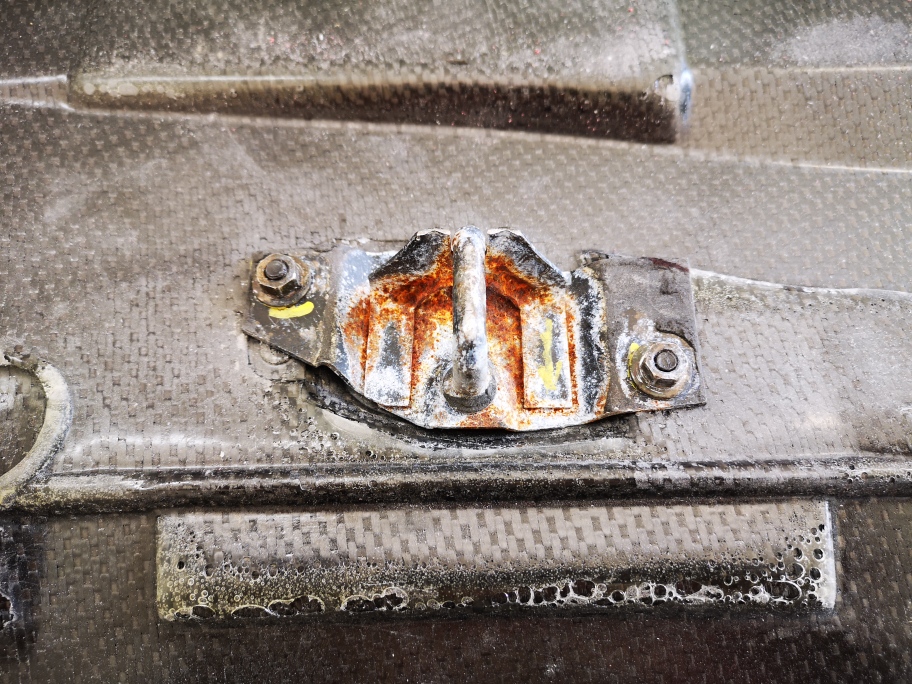
I got the lock catch installed today , as I did in the hinge area cleaned and ground everything to get a good surface for bonding the plates I fabricated with 6m screws welded in.
I made up a epoxy slurry and glued the plates in with 5 min epoxy then layed 3 layers of carbon fiber.over the whole area to give a large area of support for the plates.


I did a trial fit to make sure everything works.


Next task to complete is to fab up some plates for pneumatic arms .


Thanks for visiting

Stay safe
Wayne

[This message has been edited by dobie1 (edited 08-12-2020).]

IP: Logged
dobie1
Member
Posts: 453
From: BC, Canada
Registered: Jun 2005


Feedback score: N/A
Leave feedback

Rate this member

Report this Post08-18-2020 12:15 AM Click Here to See the Profile for dobie1Send a Private Message to dobie1Edit/Delete MessageReply w/QuoteDirect Link to This Post
A bit of a update
I finished up the bumper finally finished sanding and epoxy seal primer then painted it in HotRod black


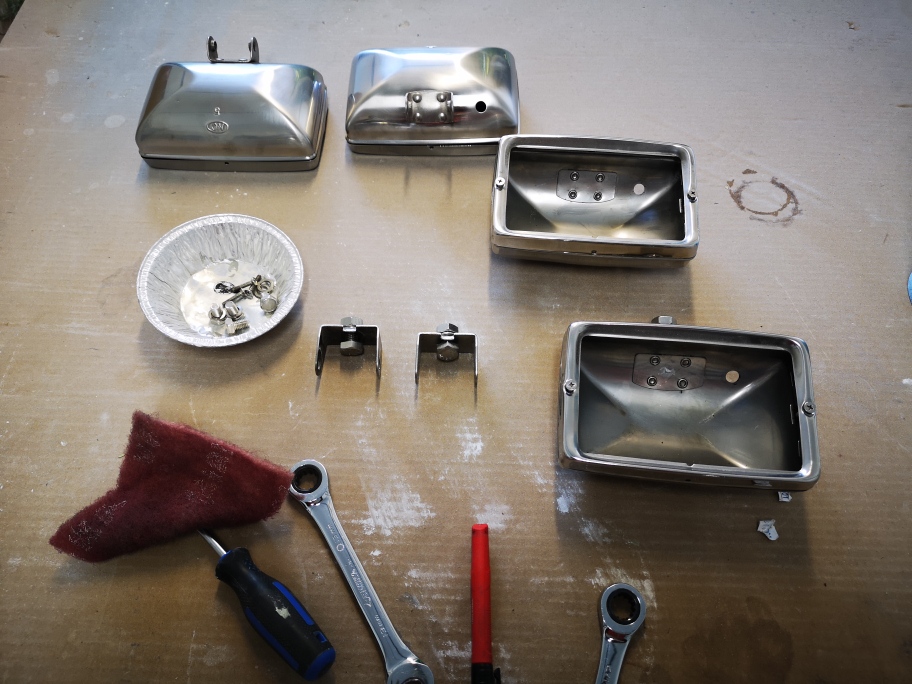
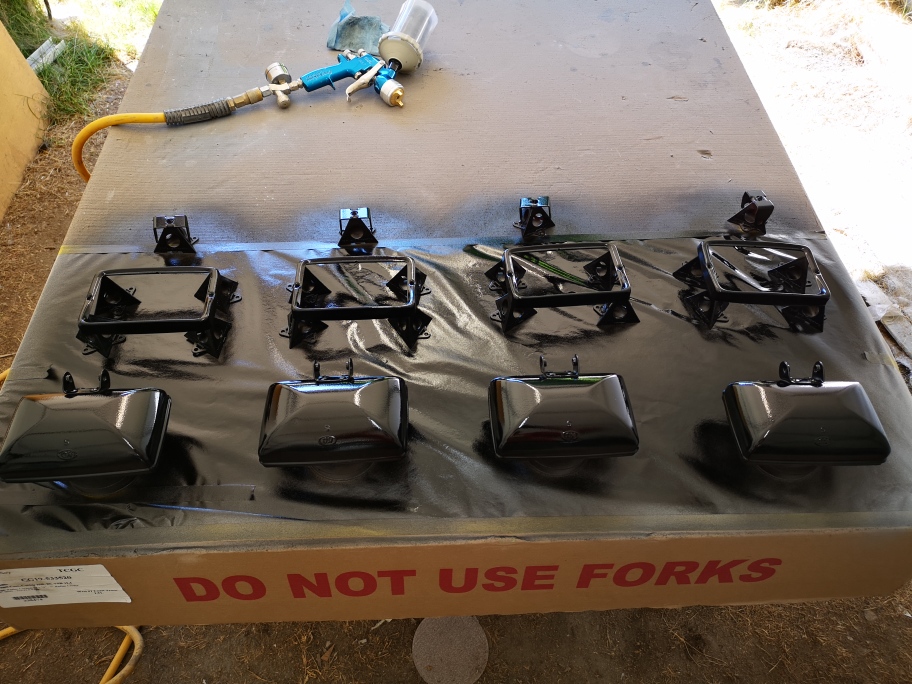
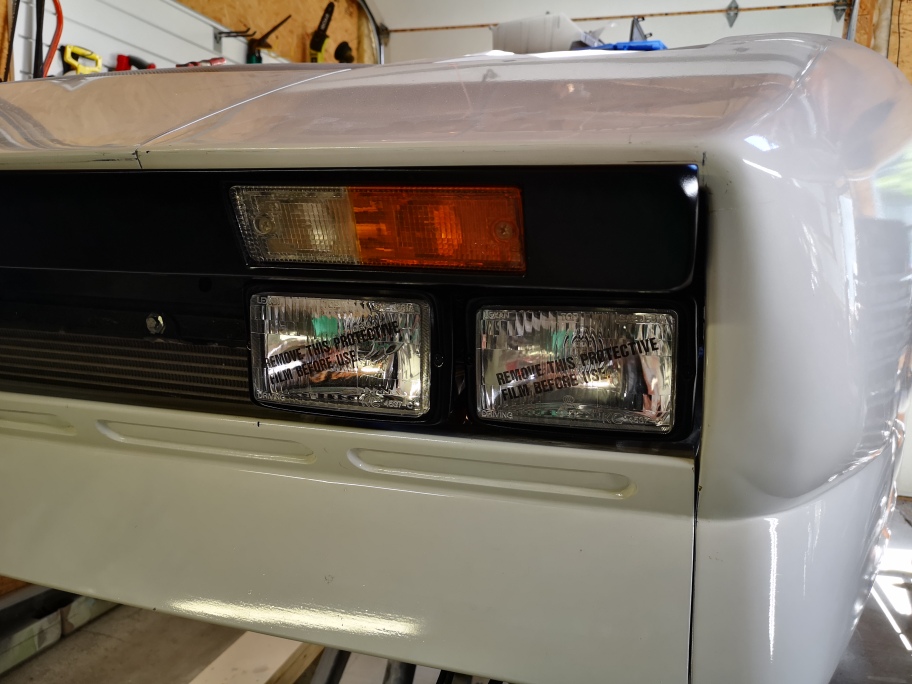
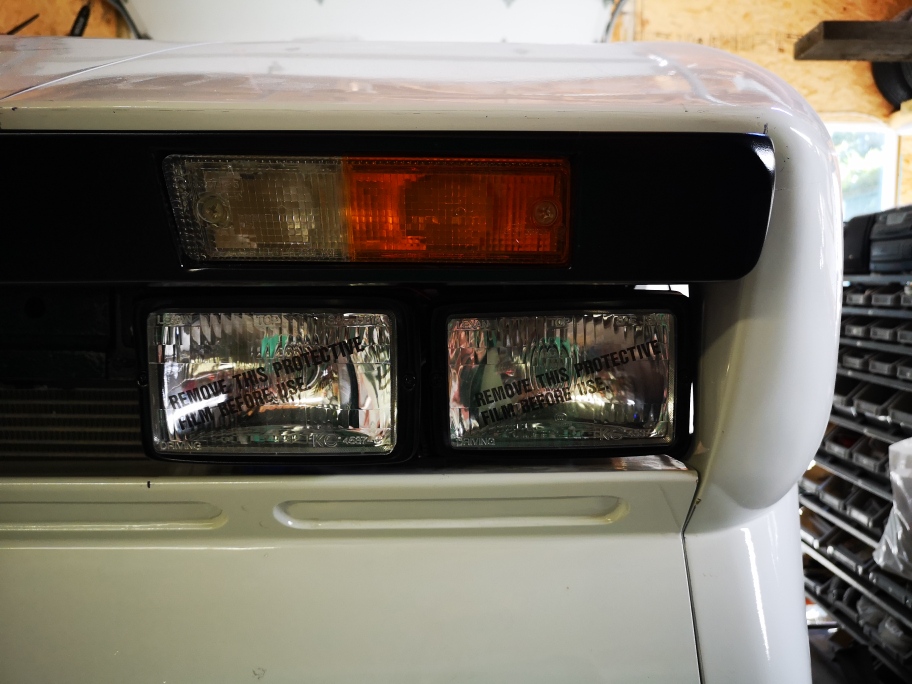
I also worked on the 4 driving lights disassembling them , sanding everything with 320 scotch bright pad then sprayed with epoxy primer then sprayed with HotRod black.
I'm happy with the look they came out just as had hoped ,I mounted two of them for a peek 👍 next I need to redo the mounts for the lights , I don’t think they are sturdy enough to keep the lights steady while the car is being driven at speed. Going from 18 gage steel to 1/8”


stay safe
wayne

[This message has been edited by dobie1 (edited 08-18-2020).]

IP: Logged
Franked
Member
Posts: 51
From: Bay area, California
Registered: Jun 2020


Feedback score: N/A
Leave feedback

Rate this member

Report this Post08-20-2020 09:23 AM Click Here to See the Profile for FrankedSend a Private Message to FrankedEdit/Delete MessageReply w/QuoteDirect Link to This Post
Digging the blacked out grille/lights!
IP: Logged
dobie1
Member
Posts: 453
From: BC, Canada
Registered: Jun 2005


Feedback score: N/A
Leave feedback

Rate this member

Report this Post08-31-2020 11:47 PM Click Here to See the Profile for dobie1Send a Private Message to dobie1Edit/Delete MessageReply w/QuoteDirect Link to This Post
 
quote
Originally posted by Franked:

Digging the blacked out grille/lights!


Thanks Franked ,I think it is the right look .

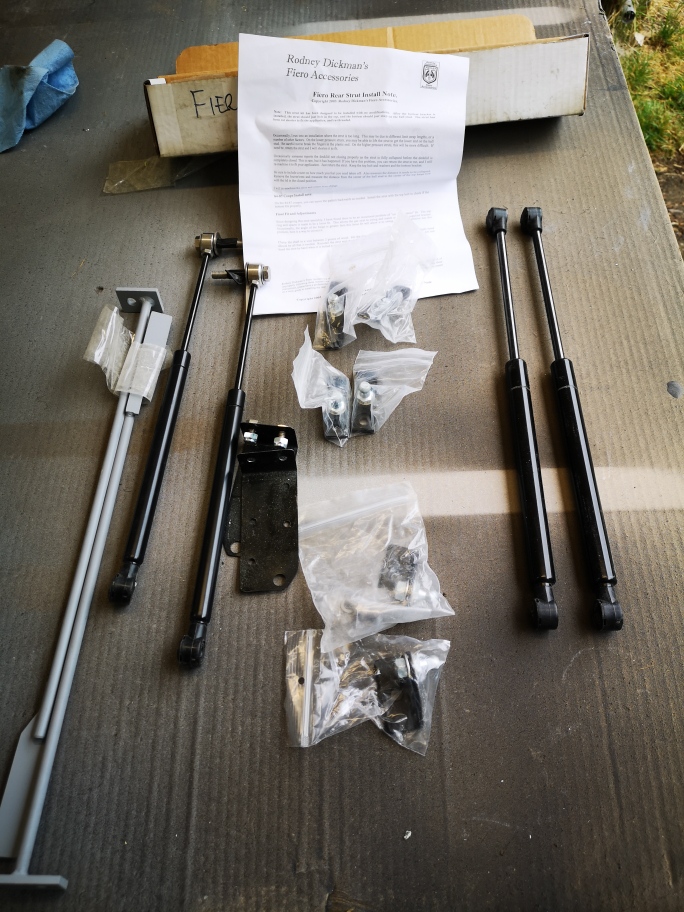
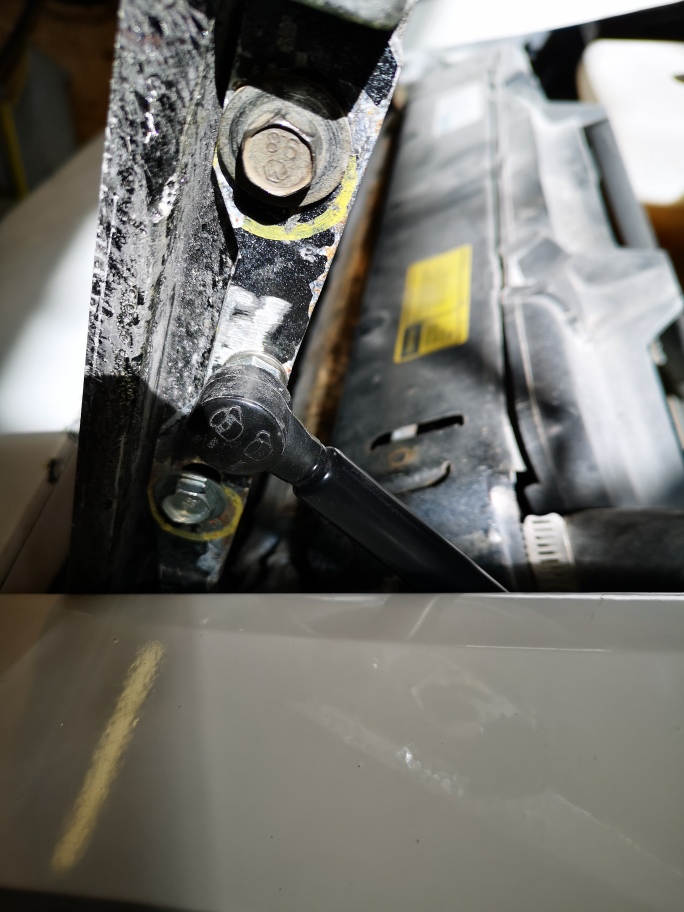
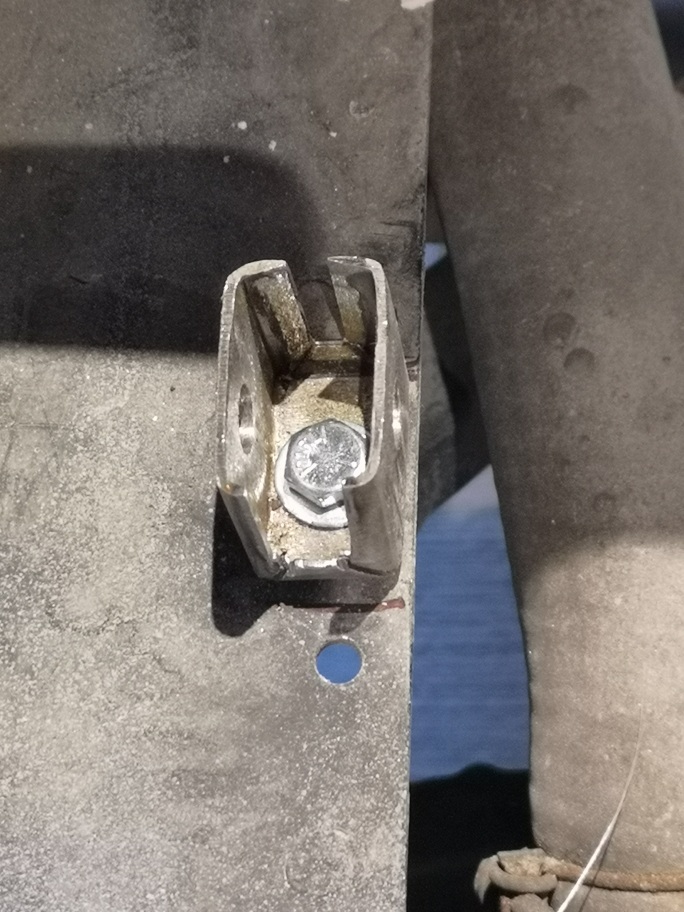
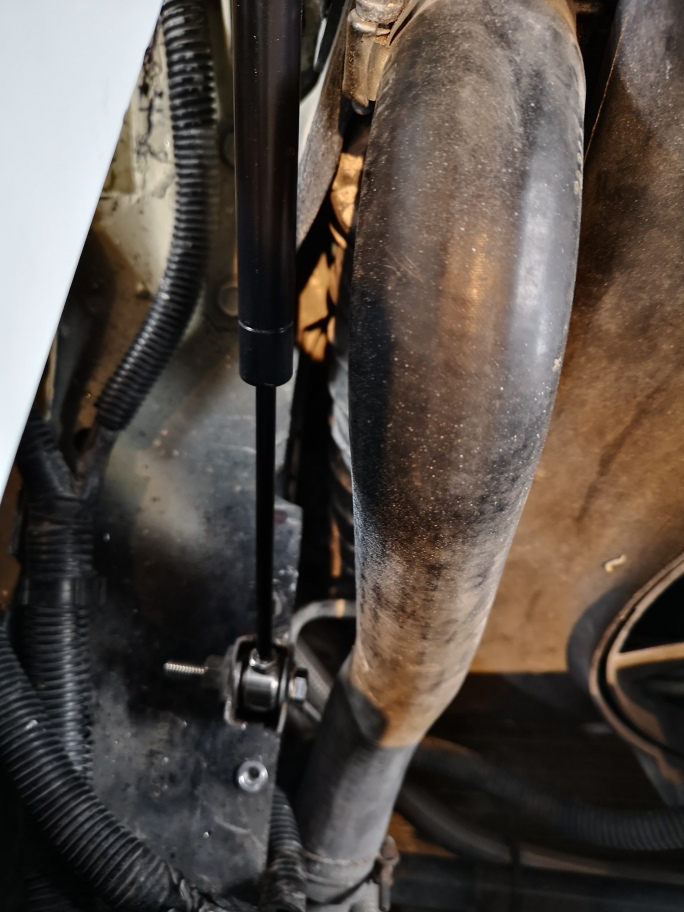
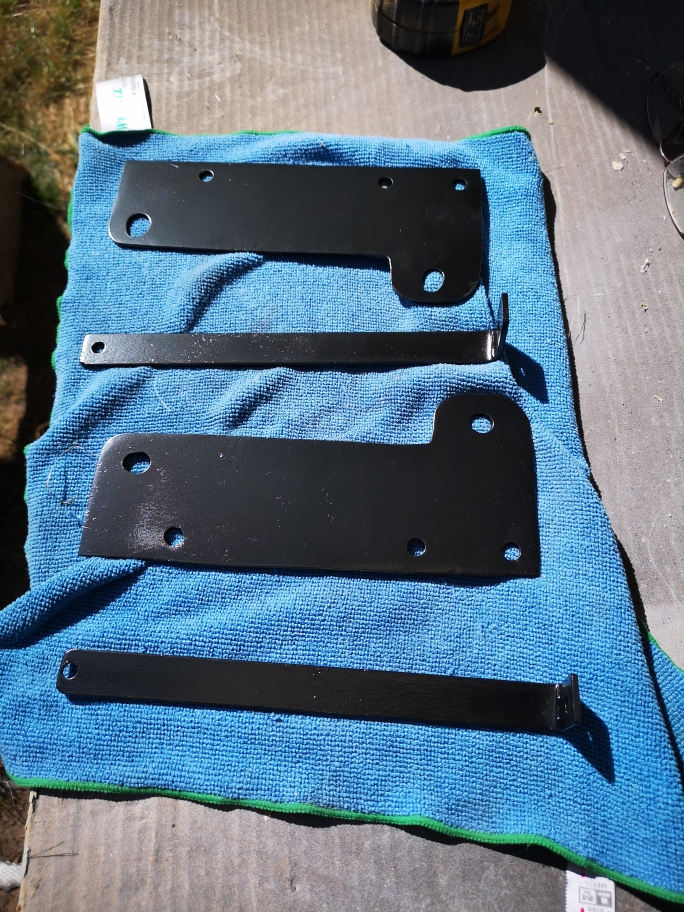
I moved onto fabricating some brackets to mount the pneumatic arms , the difficult part was trying to figure out where to attach everything.
I started with a set of arms that I had originally purchased for the rear deck from Rodney Dickman somehow I ended up with two sets so figured I might as well make use of the extra set.


Then it came down to where to attach the arms to the hood, as there isn't any extra room under the hood I elected to drill and tape to the hood hinge.


Then it just came down to making a bracket to attach the other end to the frame.


I then had to decide if I needed two arms or one ,I decided to mount two as I figured I could always remove one if I found there was too much lift on the hood.

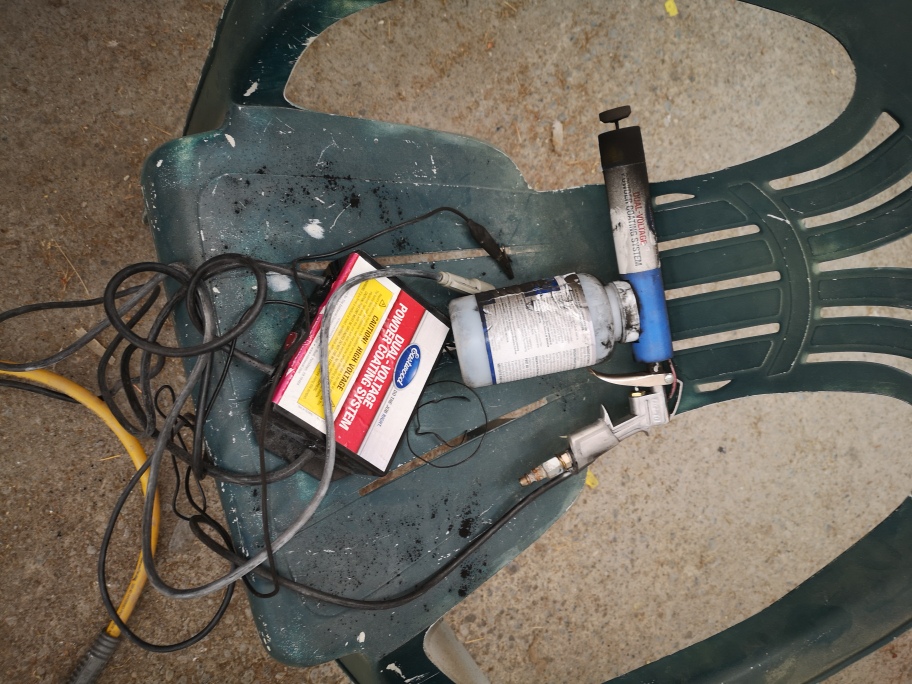
I decide to try out my powder coating equipment on a few pieces to finish them off, the two grill light mounting brackets and the fender standoffs.


after blowing the powder onto the pieces into the oven it went


from start to finish the process was quick it only took 60 mins!!

Voila~


My resin and supplies arrive on Thursday so back to build and finishing the molds

Stay safe
Wayne

[This message has been edited by dobie1 (edited 08-31-2020).]

IP: Logged
RCR
Member
Posts: 4397
From: Shelby Twp Mi
Registered: Sep 2002


Feedback score:    (7)
Leave feedback


Total ratings: 102
Rate this member

Report this Post09-01-2020 08:50 PM Click Here to See the Profile for RCRSend a Private Message to RCREdit/Delete MessageReply w/QuoteDirect Link to This Post
Great stuff, Wayne.

Bob
IP: Logged
dobie1
Member
Posts: 453
From: BC, Canada
Registered: Jun 2005


Feedback score: N/A
Leave feedback

Rate this member

Report this Post09-09-2020 09:41 PM Click Here to See the Profile for dobie1Send a Private Message to dobie1Edit/Delete MessageReply w/QuoteDirect Link to This Post
Hi Bob thanks for stopping by.

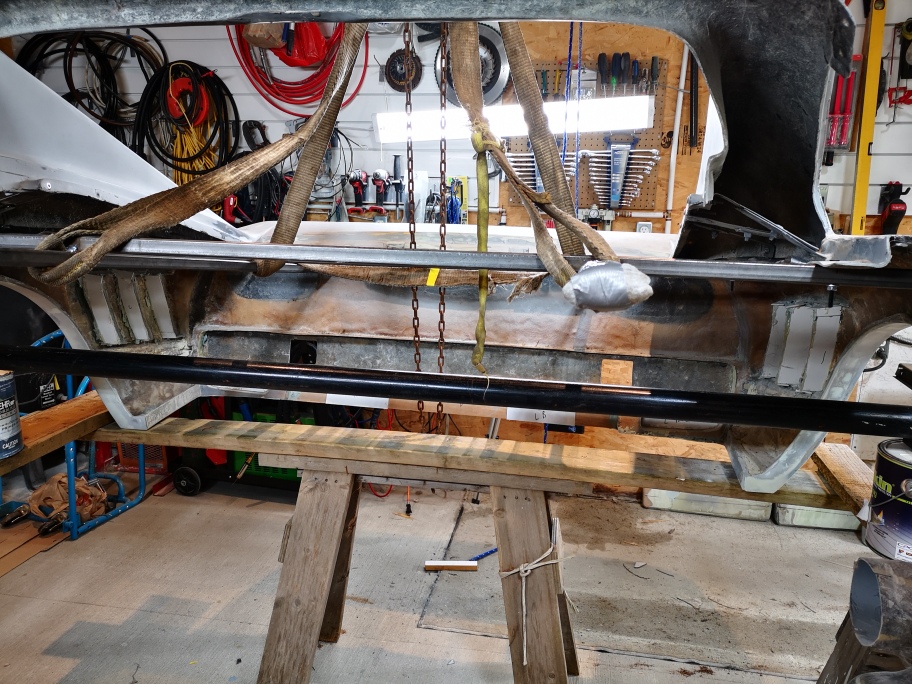
With the help of Don and Phil I have removed the back end from the car To start the moldIn process. Looks like I’m going to be busy for awhile Knee deep in resin and fiber glasse mat😩
I‘ve moved the car out of the shop to give me the room. I need and to keep everything in a more controlled environment as I fibre glass moving into the fall months ahead.

Pics to come. Thanks for stopping by everyone
Stay safe
Wayne
IP: Logged
dobie1
Member
Posts: 453
From: BC, Canada
Registered: Jun 2005


Feedback score: N/A
Leave feedback

Rate this member

Report this Post09-18-2020 12:02 AM Click Here to See the Profile for dobie1Send a Private Message to dobie1Edit/Delete MessageReply w/QuoteDirect Link to This Post
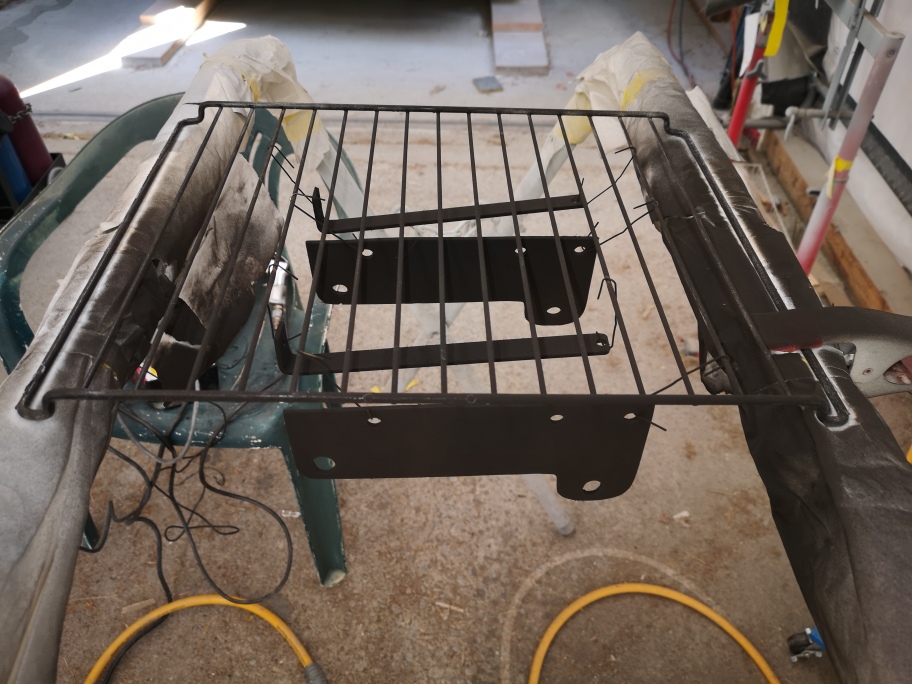
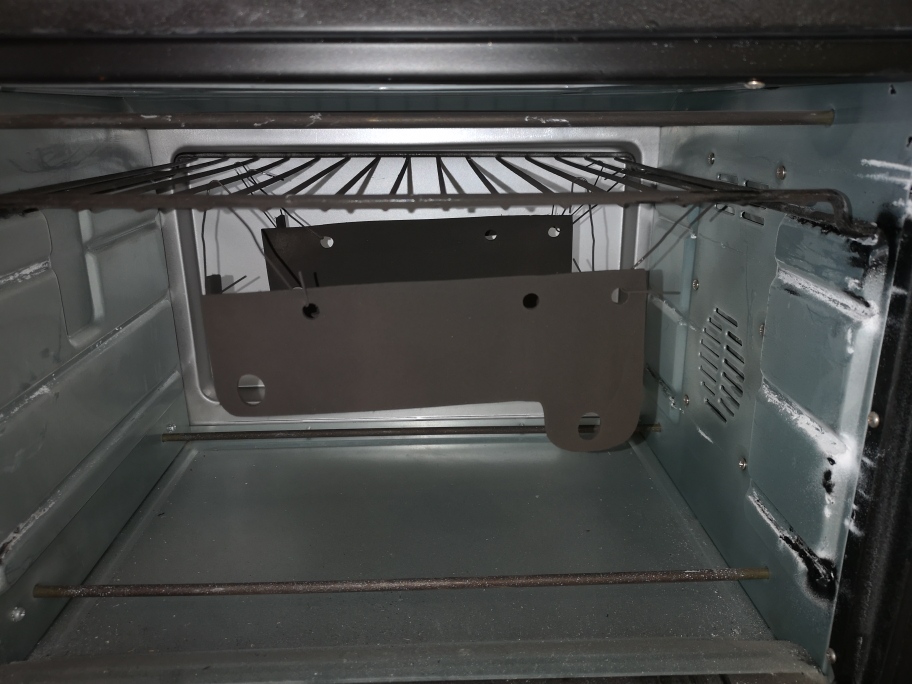
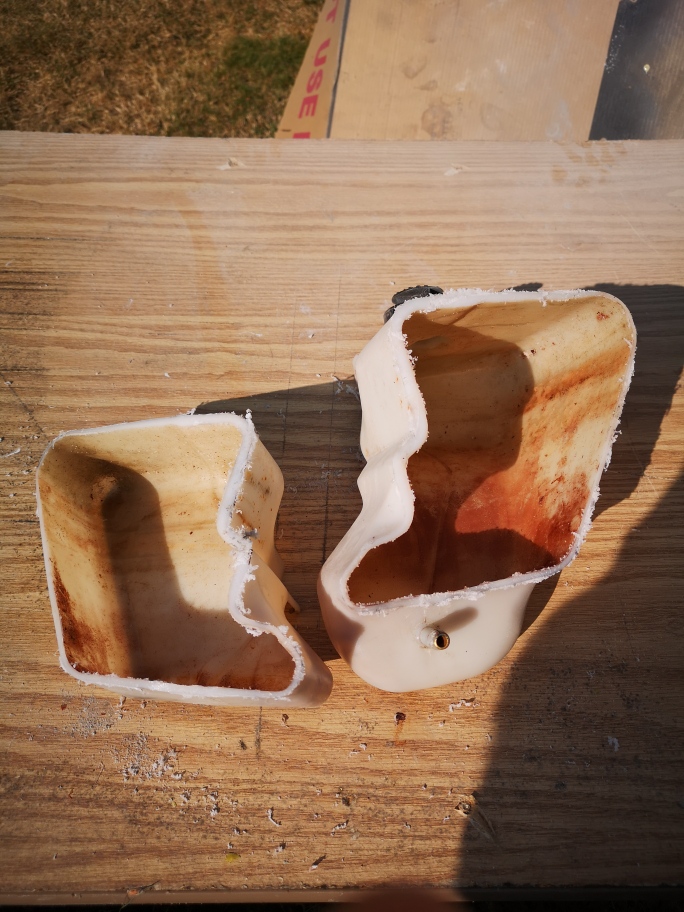
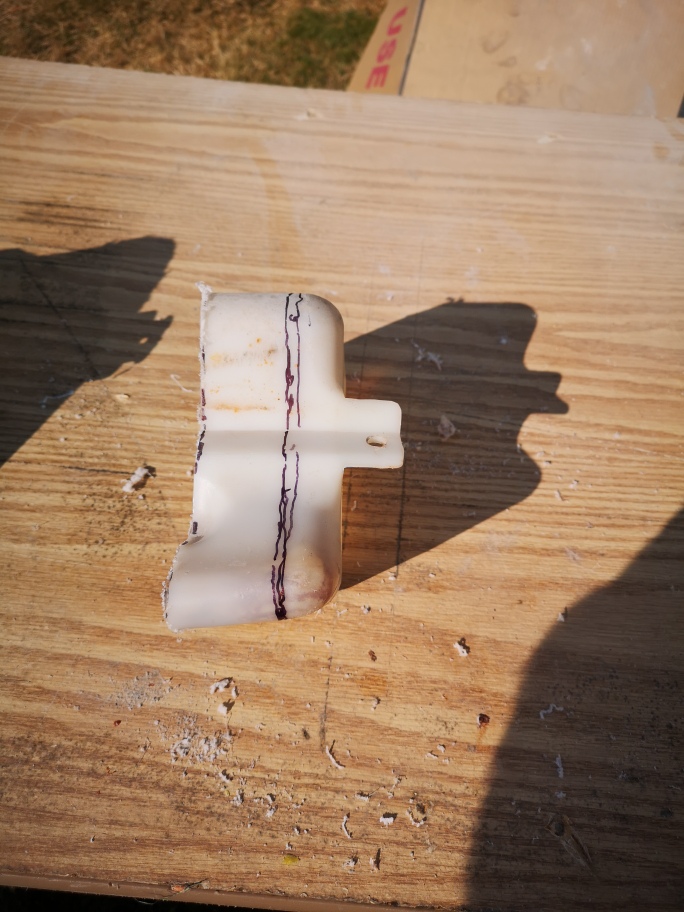
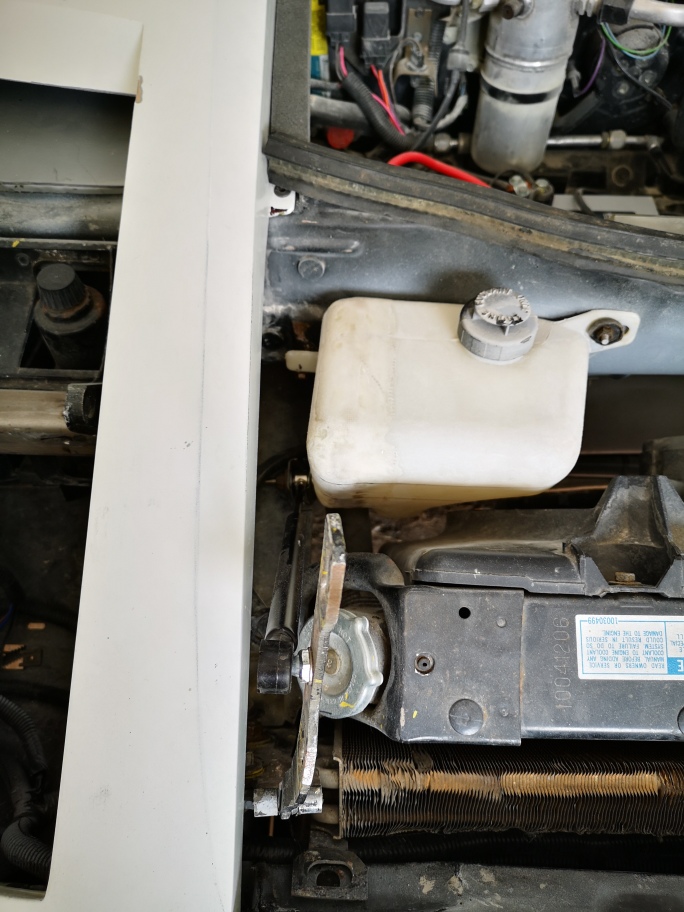
One of the problems that came up when I was trying to reinstall the radiator over flow tank was that with the tank was too big now with the hinge rod installed. To solve this I decided to cut it down by 1 5/8".


final result fits like a glove!!!


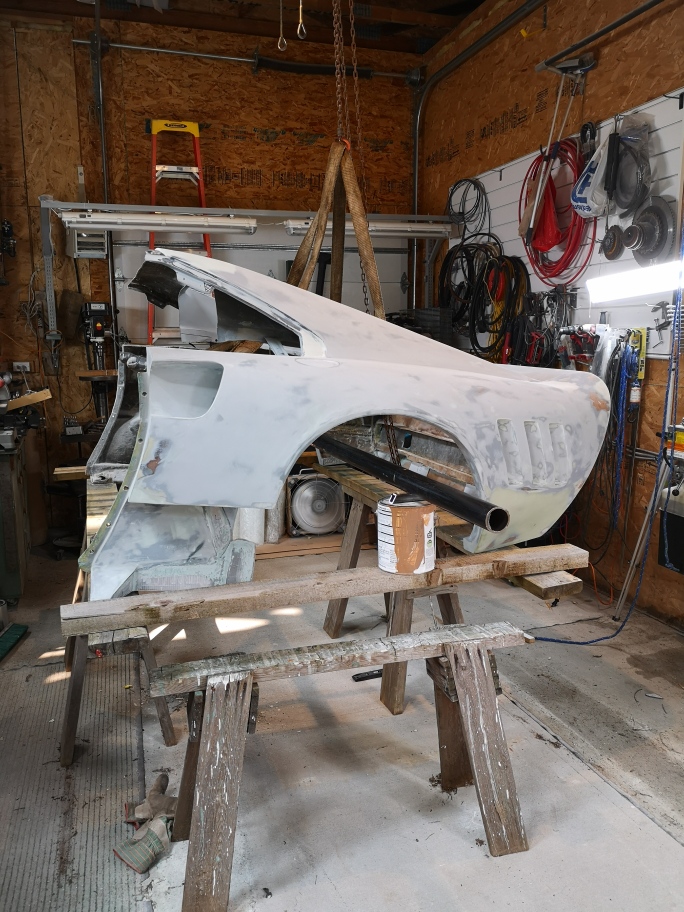
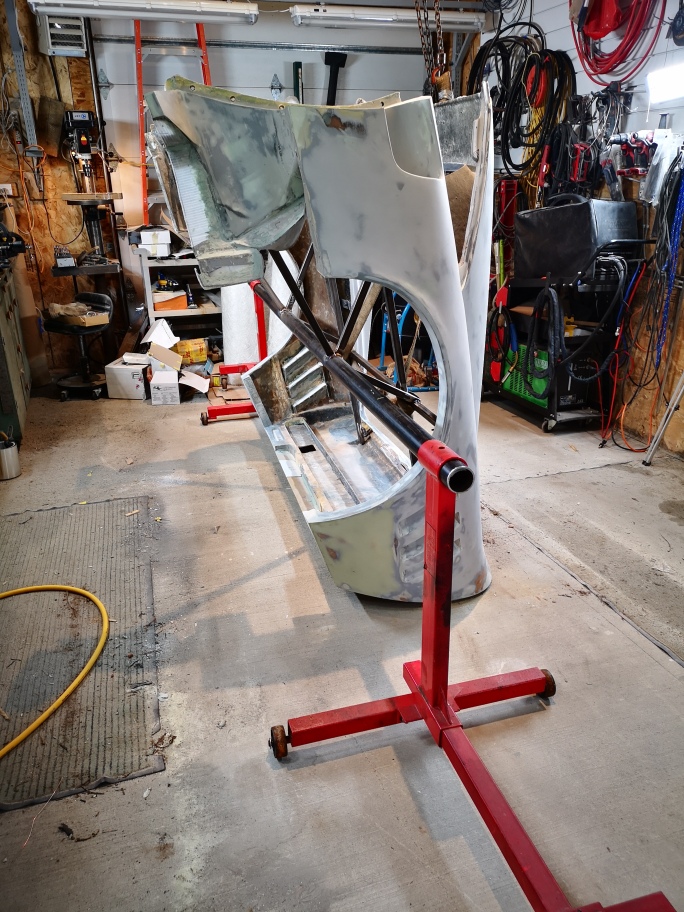
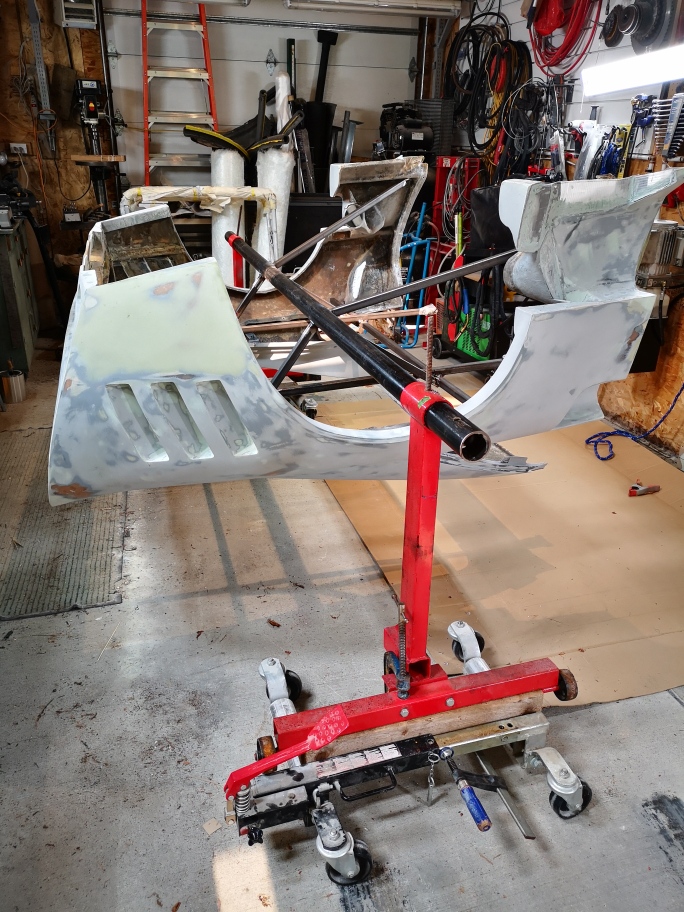
I finally got the rotisserie built to allow me to (fibreglass) building the molds at all angles, I was concerned that the mat wouldn't stay attached in the areas upside down.


I'm hoping to start the final sanding on the rear half before painting it in preparation for molding.

Thanks for stopping by
stay safe everyone.

Wayne


IP: Logged
Sage
Member
Posts: 2903
From: USA
Registered: Nov 1999


Feedback score:    (14)
Leave feedback


Total ratings: 69
Rate this member

Report this Post09-18-2020 09:20 AM Click Here to See the Profile for SageSend a Private Message to SageEdit/Delete MessageReply w/QuoteDirect Link to This Post
WOW! Very nice job on the rotisserie!

Boy~howdy (gotta be "old" to appreciate that little ditty..:-D ) ....that's gonna be sweet!!!

How did you "reassemble" the overflow bottle?

keep the progress (and updates) coming.

HAGO!
IP: Logged
dobie1
Member
Posts: 453
From: BC, Canada
Registered: Jun 2005


Feedback score: N/A
Leave feedback

Rate this member

Report this Post09-19-2020 12:00 AM Click Here to See the Profile for dobie1Send a Private Message to dobie1Edit/Delete MessageReply w/QuoteDirect Link to This Post
Hi Ted

I had to look that one up Ted , I’m old and hadn’t heard it before ,LOL...

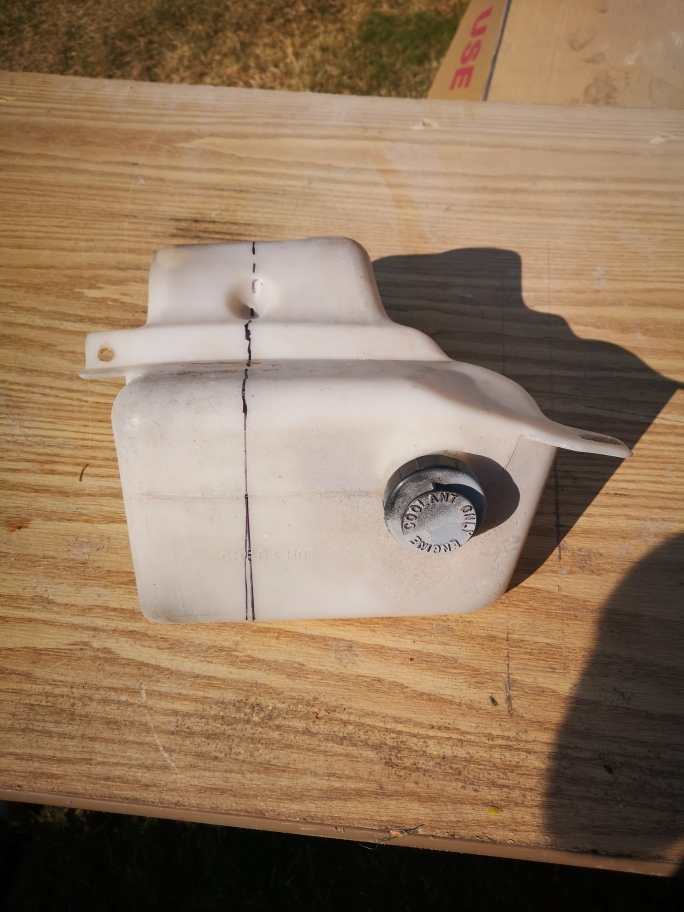
The over flow bottle I used a plastic repair tool that body guys use when repairing car bumpers. You melt a plastic strand into the cut line and blend it into the surrounding plastic. Worked pretty good except when I water tested it there were a few leaks I just couldn’t completely water seal so took some epoxy With Cabosil to thicken and a piece of s-cloth And glassed the complete fill . I sanded it down turned out water proof and pressure tested to 14 psi.

I think that a good soldering gun with a flat blade attached would do the same job as the bumper repair tool. The epoxy lamination just guarantees strength and water tight container.

Stay safe
Wayne
IP: Logged
RCR
Member
Posts: 4397
From: Shelby Twp Mi
Registered: Sep 2002


Feedback score:    (7)
Leave feedback


Total ratings: 102
Rate this member

Report this Post09-19-2020 03:18 PM Click Here to See the Profile for RCRSend a Private Message to RCREdit/Delete MessageReply w/QuoteDirect Link to This Post
I was trying to figure out how you got that bottle together. The pic make it look like a stock item.

I just got one of these for mine:
https://www.amazon.com/Hwbn...&s=automotive&sr=1-7

Quality is actually pretty good. I need to fab a bracket and find some right angle fittings. Should work for you, too.

Bob
IP: Logged
PFF
System Bot
dobie1
Member
Posts: 453
From: BC, Canada
Registered: Jun 2005


Feedback score: N/A
Leave feedback

Rate this member

Report this Post09-21-2020 11:06 PM Click Here to See the Profile for dobie1Send a Private Message to dobie1Edit/Delete MessageReply w/QuoteDirect Link to This Post
 
quote
Originally posted by RCR:

I was trying to figure out how you got that bottle together. The pic make it look like a stock item.

I just got one of these for mine:
https://www.amazon.com/Hwbn...&s=automotive&sr=1-7

Quality is actually pretty good. I need to fab a bracket and find some right angle fittings. Should work for you, too.

Bob


Hi Bob
That actually looks like a really nice unit Bob , I may look at getting one as a reservoir bottle for my intercooler and install it in the second fuel
Filler in the right fender. Thanks for the link.

Wayne
IP: Logged
shemdogg
Member
Posts: 1750
From: The Ghetto CA USA
Registered: Apr 2017


Feedback score: N/A
Leave feedback

Rate this member

Report this Post09-23-2020 10:19 PM Click Here to See the Profile for shemdoggSend a Private Message to shemdoggEdit/Delete MessageReply w/QuoteDirect Link to This Post
I was also wondering how you got that bottle back together lol. Good stuff! Ive used my soldering gun and melted bits of plastic to weld stuff back together. That rotisserie is bad arse! Ive used cabosil for invetred areas and it works good. Some hvac or heavy tape will hold it in there good too. Youre getting close man looking good sir

shem
IP: Logged
dobie1
Member
Posts: 453
From: BC, Canada
Registered: Jun 2005


Feedback score: N/A
Leave feedback

Rate this member

Report this Post09-28-2020 08:37 PM Click Here to See the Profile for dobie1Send a Private Message to dobie1Edit/Delete MessageReply w/QuoteDirect Link to This Post
Thanks Shem, its coming together!!!

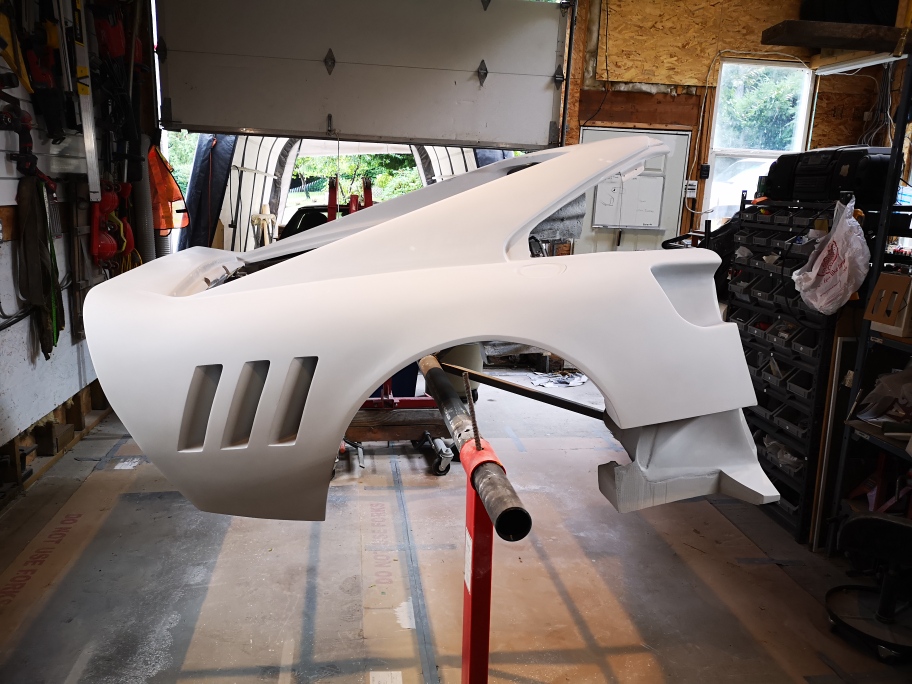
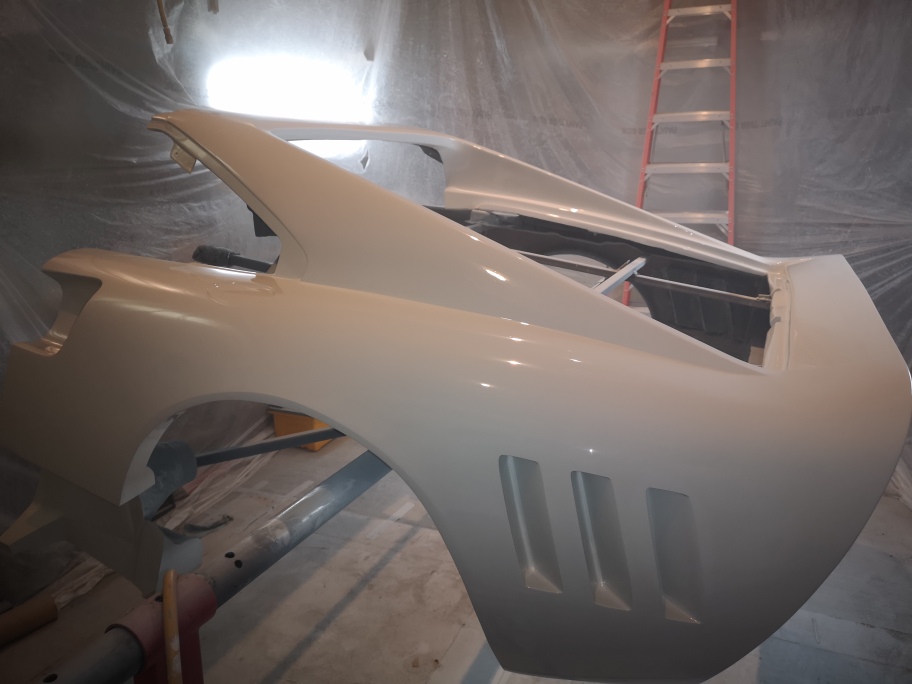
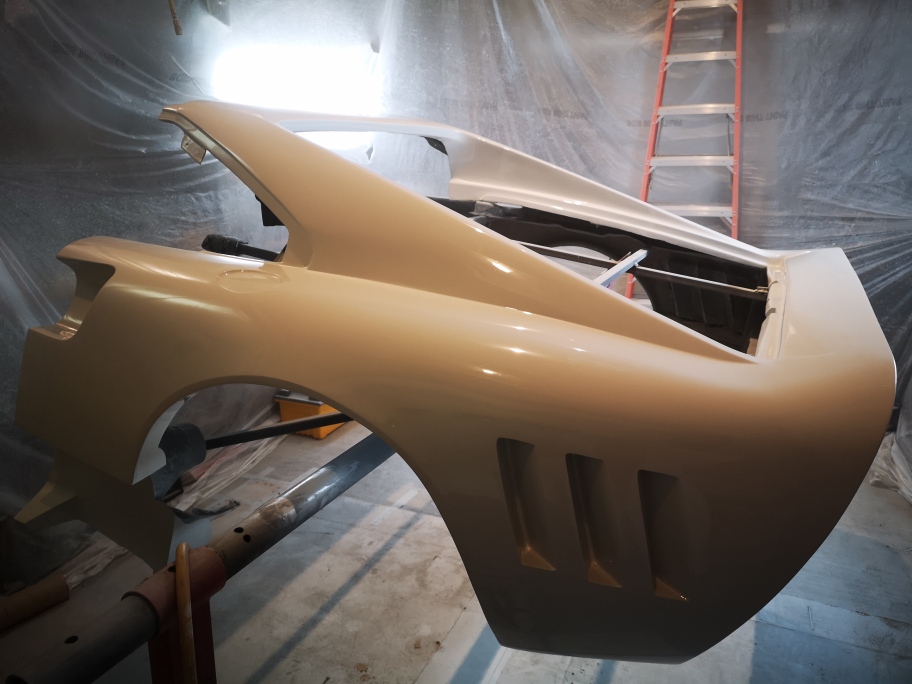
I've been busy finishing the back half of the car to get it into paint !!
unfortunately it's the wrong color for now, but It is for the first time one color other than primer gray.
I have to say taking the extra time to get the body perfect payed off , the paint laid down to give me a perfect surface to mold.
I'm hoping to start molding in a few days as I want to give the paint a few days to fully cure.


the first pics are in Primer ready to paint.


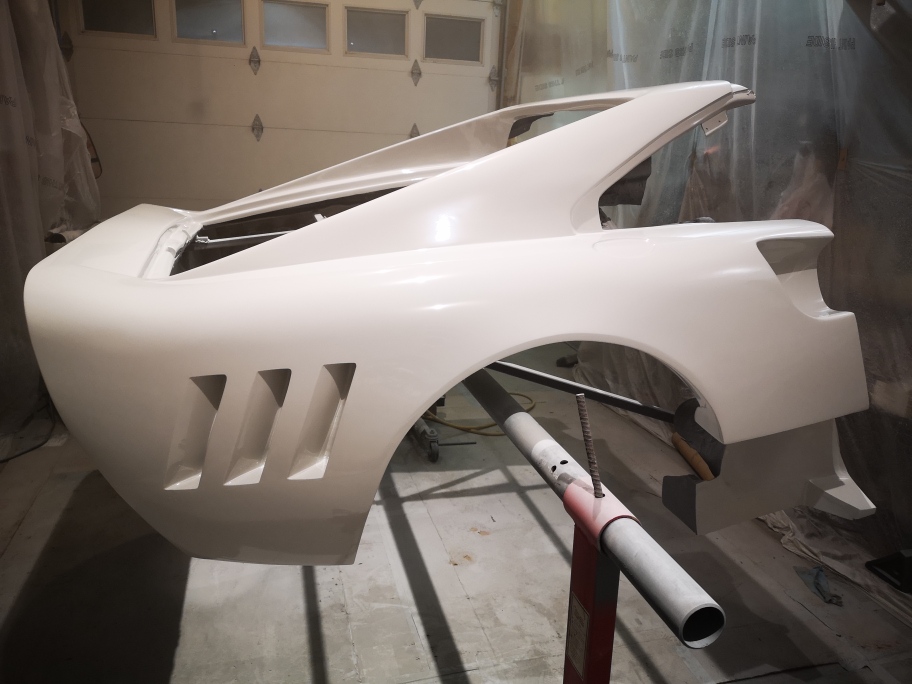
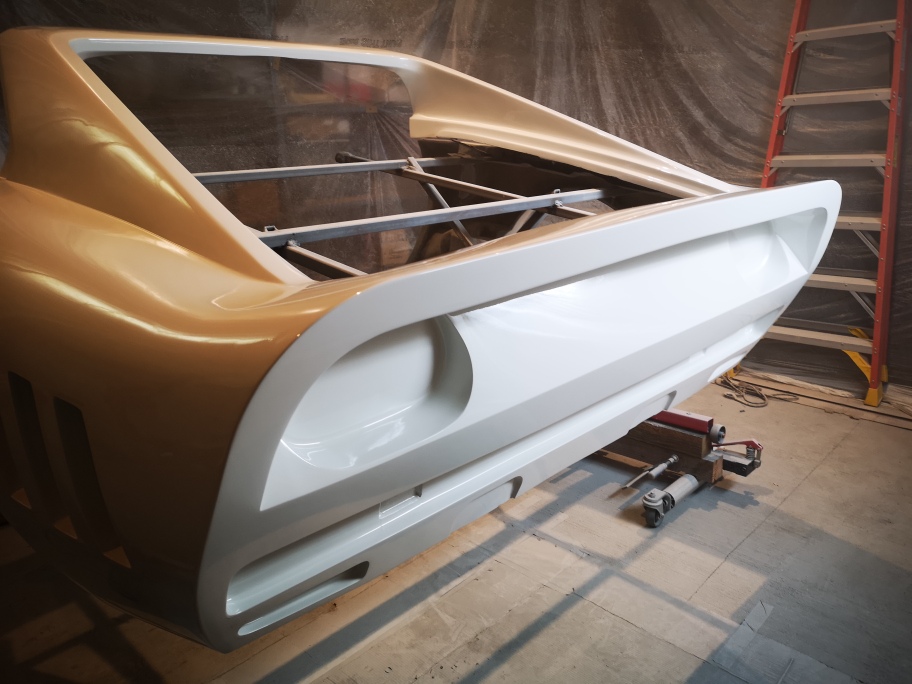
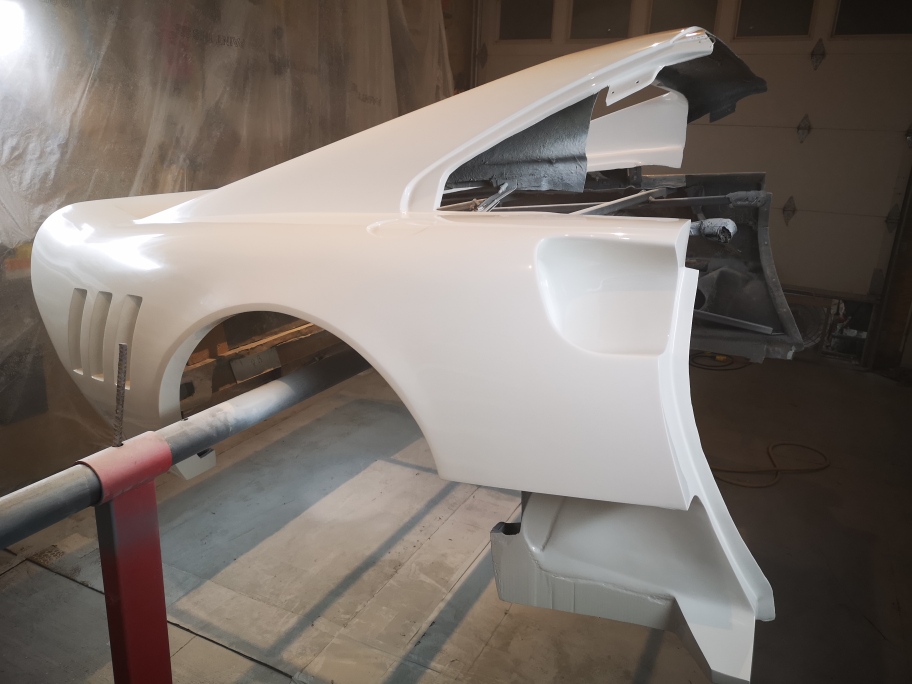
and now for the painted version. pics were taken at night so not as good as some Ive posted


Stay safe everyone and thanks for stopping by

Wayne

[This message has been edited by dobie1 (edited 09-29-2020).]

IP: Logged
RCR
Member
Posts: 4397
From: Shelby Twp Mi
Registered: Sep 2002


Feedback score:    (7)
Leave feedback


Total ratings: 102
Rate this member

Report this Post09-28-2020 09:09 PM Click Here to See the Profile for RCRSend a Private Message to RCREdit/Delete MessageReply w/QuoteDirect Link to This Post


Bob
IP: Logged
Sage
Member
Posts: 2903
From: USA
Registered: Nov 1999


Feedback score:    (14)
Leave feedback


Total ratings: 69
Rate this member

Report this Post09-28-2020 10:59 PM Click Here to See the Profile for SageSend a Private Message to SageEdit/Delete MessageReply w/QuoteDirect Link to This Post
In a word.....gorgeous.

Beautiful.


IP: Logged
andreww
Member
Posts: 240
From: Toronto, Ontario, Canada
Registered: Sep 2011


Feedback score: N/A
Leave feedback

Rate this member

Report this Post09-29-2020 08:54 AM Click Here to See the Profile for andrewwSend a Private Message to andrewwEdit/Delete MessageReply w/QuoteDirect Link to This Post
Man, everything about this build just looks so top notch. I mean your work looks like something that came out of a factory, not a home garage. Loving this build!!!!
IP: Logged
dobie1
Member
Posts: 453
From: BC, Canada
Registered: Jun 2005


Feedback score: N/A
Leave feedback

Rate this member

Report this Post10-04-2020 12:05 AM Click Here to See the Profile for dobie1Send a Private Message to dobie1Edit/Delete MessageReply w/QuoteDirect Link to This Post
Thanks Bob, Ted and Andrew for stopping by and the comments.

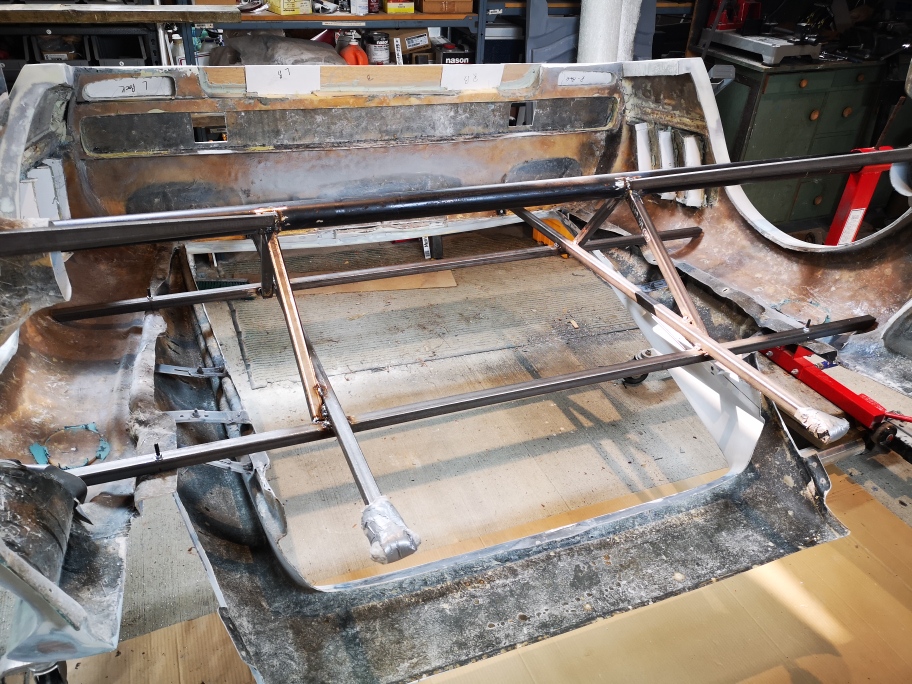
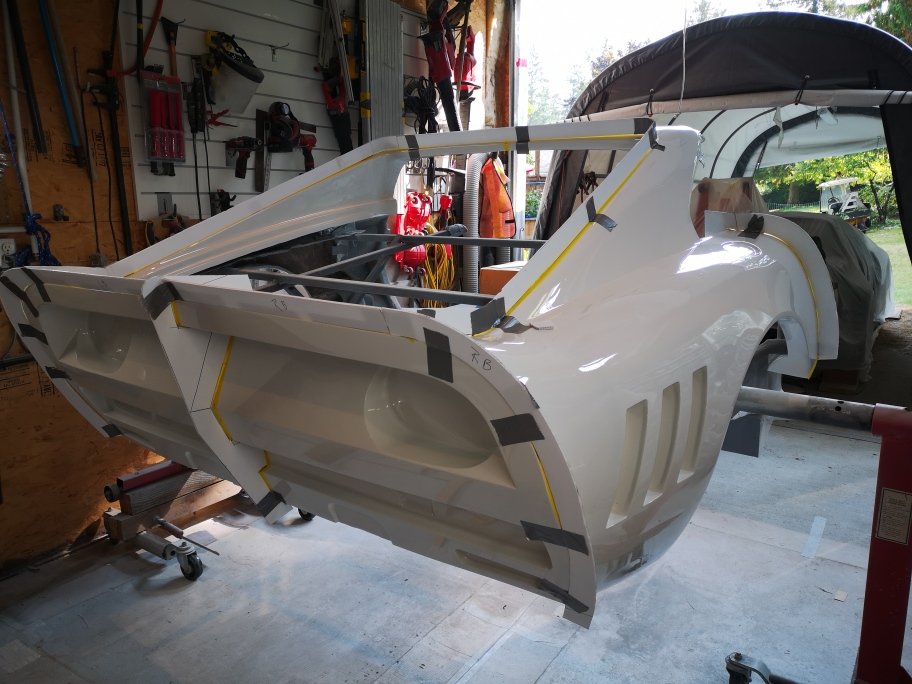
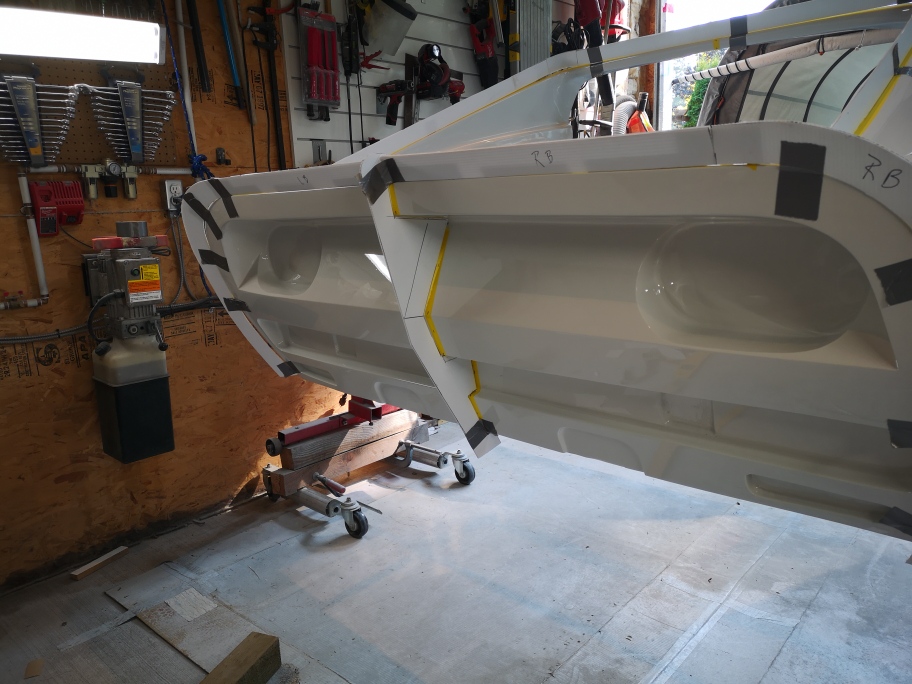
So I started molding the rear of the car today ,my first step to expedite the process was to make the up the flanges .I attached them to the body to get a visual of what each piece will look like and to ensure they can be removed from the part once it is laid up.
I'll start the layup tomorrow ,I hope to have the mold totally finished in 2-3weeks.

stay safe
Wayne


IP: Logged
gatorfrey
Member
Posts: 96
From:
Registered: Sep 2020


Feedback score: N/A
Leave feedback

Rate this member

Report this Post10-04-2020 08:50 AM Click Here to See the Profile for gatorfreySend a Private Message to gatorfreyEdit/Delete MessageReply w/QuoteDirect Link to This Post
I may have missed this somewhere in the thread.
You will be selling these? Any idea yet how much if you do?
Incredable work!
IP: Logged
dobie1
Member
Posts: 453
From: BC, Canada
Registered: Jun 2005


Feedback score: N/A
Leave feedback

Rate this member

Report this Post10-04-2020 12:47 PM Click Here to See the Profile for dobie1Send a Private Message to dobie1Edit/Delete MessageReply w/QuoteDirect Link to This Post
 
quote
Originally posted by gatorfrey:

I may have missed this somewhere in the thread.
You will be selling these? Any idea yet how much if you do?
Incredable work!


“PM Sent”
IP: Logged
Previous Page | Next Page

This topic is 16 pages long:  1   2   3   4   5   6   7   8   9   10   11   12   13   14   15   16 
next newest topic | next oldest topic

All times are ET (US)

Post New Topic  Post A Reply
Hop to:

Contact Us | Back To Main Page

Advertizing on PFF | Fiero Parts Vendors
PFF Merchandise | Fiero Gallery | Ogre's Cave
Real-Time Chat | Fiero Related Auctions on eBay


Copyright (c) 1999, C. Pennock