Congrats man I am sure that must have been very satisfying to hear it roar to life! nice long weekend to tinker with it but it has been raining a good bit here. Good luck
Pete
------------------ "May the grins begin when you turn the key and hear the engine roar over your shoulder" ......Gall57 (slightly modified LOL)
Pete Matos A&N Precision Machine CNC Machining and prototyping Port St.Lucie, Florida A&N Precision Machine on Facebook!
....so we ran another ground cable from the battery, to the engine cradle. Got everything all bolted up and tucked away, and the engine now cranks over as it should when the key is turned!
Ok, the car is almost ready to sit on all 4 again......
New calipers & pads, new hubs, new slotted drilled rotors, new struts, ball joints, tie rod ends, and stainless steel brake lines. That takes care of the rear for the most part!
In searching for a method of connecting the main radiator line, and "Teeing' in" the heater core line.... I found all sorts of methods. Some splicing hoses together, some using metal pipe fittings from Home Depot ect.
I went in the back of the store behind the parts counter to have a look at the selection of radiator hoses they had. SO many had "T's" in them, but just about all of them had the wrong size hoses, or the right size hoses, that flared out to a much larger hose at the "t".
It was then that I spotted this one on the top of the rack. PERFECT! Here is what it looks like when I purchased it:
After cutting off the clamps, here is what I was left with: The angle of the heater hose connection is perfect! It will point it right in the direction it needs to go to connect to the hose coming from the car.
I purchased this at AutoZone locally, but the number should easily cross reference if anyone else needs one. HERE IT IS ON AMAZON
Lastly, the gas tank was pretty rusted on the inside... as the car has sat quite some time. I cleaned it the best I could with different chemicals, and let it dry a couple days. Today I put some POR-15 Gas tank sealer in the tank, swished it around, and have set it up to dry. A couple days ago, I went ahead and painted the outside of the tank to keep it from rusting.
[This message has been edited by JohnWPB (edited 06-05-2016).]
I poured 2 of the small cans in the tank, and duct taped the openings closed. I then danced around with the tank swirling, tilting, rolling, angling, rotating, end over ending, rocking, twisting and probably some other moves for around 15 minutes. I wanted to make absolutely sure the interior was completely coated, and coated good. I poured out the remaining loose liquid as the instructions said.
I then hooked up my Shop-Vac with the hose connected to the exhaust port, and blew it into the tank. The air coming out was warm and dry, and I let the puppy run like that for a few hours. That set it up where it is completely dry to the touch.
I shoved my phone down in the tank, and here is what it looks like on the inside. I WISH I had taken some photo's before, when it was all rusted! It was pretty bad. You can see the texture of the rust in the picture underneath the sealant:
I am very happy and know that I will probably never have to worry about rust inside the tank again.
[This message has been edited by JohnWPB (edited 06-29-2016).]
Interesting.... My build thread has been moved to the Construction Zone..... I never even asked Cliff to move it. I only noticed it, as I followed a bookmark to my thread to post an update. I tried to hit "Reply" and panicked as it said the thread has been closed!!! Luckily I noticed the text just below the last post that is a link to where the thread was moved to. Sure would be nice if Pennock's was like other forums, and when a page is moved it just forwards to the correct page automatically, instead of first going to a CLOSED THREAD.
I am sorry for the delay in responding, With the thread moved, I never got email notice that there were any replies in the thread.
As for being used on plastic..... the POR-15 page does not mention anything about plastic specifically on their site anywhere. I did some research before I bought it however, and did find some information on this website discussing it:
"we were doing some coating in some doors and were using a plastic Coke bottle to put the POR-15 Black Paint into so I coated the entire inside of the plastic Coke bottle let it dry for several days and then put gas with the 10% ethanol into the bottle and have been letting it soak for about 4 months now and the POR-15 is holding tight and you can even flex the plastic bottle and it is still holding tight."
This seemed pretty good to me, and gave it a shot.
When I got the fuel pump in the tank, I filled it up to about half a tank. I put the fuel line in a plastic bottle, and kicked on the key. The gas has never been cleaner coming out of this tank!
Just an FYI, Anyone that is subscribed to this thread, you need to unsubscribe from the closed one in General chat, and Subscribe to the one here in the Construction zone. The other thread looks "normal" but you can not post in it. You also need to do this to receive email notifications of new posts here.
[This message has been edited by JohnWPB (edited 06-05-2016).]
Ok a few small updates..... I decided to use the Fiero thermostat housing on the 3800. The bolt holes ALMOST line up with the 3800 thermostat housing. I had to drill the holes a tiny bit bigger in the Fiero housing so it would fit. The rest was a matter of capping off the 3/4" line and the small pipe. I may take a second Fiero one in the future and really di it right, cutting and welding it and such, but for now, this works.
Next was the transmission selector. It is made from a 25th century metal discovered by Captain Picard himself on an away mission! Damn that is hard steel! I tried 3 different drill bits, and a high speed electric drill, and I could barely see where I scratched the paint off! I took it to a machine shop, and they were able to drill the hole I needed to put the pin in to connect the shift cable to.
Lastly, I purchased a cable nut, and cut the throttle cable to the correct length, and attatched it so it looks like a stock setup. I will get pictures when there is some light to work with.
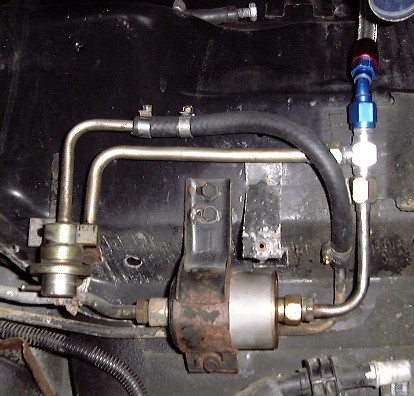
On a final note, I tested the fuel pressure at the rail, and I was pushing between 95 and 100 PSI ! ! ! ! ! Posting a question in Technical chat, it appears that I need a fuell pressure regulator set up. Yea! One MORE thing to make / fabricate! ! ! I had done quite a bit of research in prep for this swap, and this is the first I have seen this. Hopefully it will help someone else reading here looking for swap info in the future.
The info below is from Darth Fiero, and is from THIS THREAD, the second post in the thread.
_________________________________________________________ Originally posted by Darth Fiero
Are you saying you have a stainless steel 3800 fuel rail? If so, that is a returnless fuel rail and it does not have a fuel pressure regulator in it. You will need one in the system somewhere.
Here's a picture of what I did:
Basically, I cut the fuel pressure regulator off a stock L67 (3800 Series 2 SC) fuel rail and used an AN flaring tool (37 deg flares) to flare the 3/8 line coming out of the regulator (after sliding the -6 AN tube nut and tube sleeve on) and connected that to a -6 AN steel TEE fitting. I flared the fuel supply line coming out of the stock Fiero fuel filter and put a nut and tube sleeve on it as well to connect to the bottom feed of the TEE. I then put a 45 deg -6 AN swivel hose end on the AN braided hose I was using down at the TEE. The return line coming out of the fuel pressure regulator is 5/16" and can be connected to the 5/16" return line going back to the Fiero gas tank via clamped on fuel injection spec rubber hose you can get at any auto parts store.
At the fuel rail, you'll need a -6AN male to 3/8" push-connect EFI fitting so you have something to connect the other braided -6 AN hose end to.
You can get all of these parts at Summit Racing Equipment. Below is the list and qty of each item you'll need: 2x -6 AN tube nut (steel) 2x -6 AN tube sleeve (steel) 1x -6 AN male TEE (steel) 1x -6 AN 45deg swivel hose end (aluminum) 1x -6 AN straight hose end (aluminum) 1x -6 AN male to 3/8" EFI push/quick connect (aluminum) About 3 foot or so of -6 AN braided hose (if you mount your fuel pressure regulator near the stock Fiero V6 fuel filter location) 1x L67 (3800 Series 2 SC) fuel rail and regulator
SPECIAL TOOLS NEEDED: 37 deg AN flaring tool Tubing bender Tubing cutter Pneumatic cut-off wheel (to cut the braided AN hose to length with - apply electrical tape to braided line before cutting; then make sure you clean out the hose well after cutting to prevent debris for entering the fuel system)
-ryan
[This message has been edited by JohnWPB (edited 06-10-2016).]
My similar setup using a fuel line from a seller here. Forgot his name. Don't forget the vacuum line.
I don't want to hi-jack John's thread but I was looking at how my fuel pressure regulator is setup by the previous owner on my 3800 and noticed that my vacuum line is in fact missing. Where does that vacuum line need to go to? And what purpose does it serve? I have been running my swap without it for ~5,000 miles with no noticeable issues.
I don't want to hi-jack John's thread but I was looking at how my fuel pressure regulator is setup by the previous owner on my 3800 and noticed that my vacuum line is in fact missing. Where does that vacuum line need to go to? And what purpose does it serve? I have been running my swap without it for ~5,000 miles with no noticeable issues.
Needs to be connected to an engine vacuum source. Otherwise it will not control fuel pressure according to engine loads as related to vacuum state.
[This message has been edited by Alex4mula (edited 06-21-2016).]
Sorry, not much to report on lately. I have taken a break for a week or so. The next step is to get the car towed to an exhaust shop. I just need to do a little research on a good place, that will take the muffler and parts that I have and create the exhaust system.
Next is the fuel pressure regulator, again, a bit of research, and get the parts I need to construct it. Thanks for the vacuum line tips, as I would have not known to do that.
I have spent the past week cleaning up, putting all tools back in their proper place, and such. The past 2 weeks was a mechanical whirlwind, and everything was a MESS! Nice to have things back in order again!
Allow me to jump on the congratulations bandwagon for making it into the construction zone! I was just going to get on your thread and say that for all the work you've done on old blue, you should be put there...but you already were!
Allow me to jump on the congratulations bandwagon for making it into the construction zone! I was just going to get on your thread and say that for all the work you've done on old blue, you should be put there...but you already were!
Yea, right after you texted me and asked why my thread was closed hhahaha! (The General forum version of this thread still exists, just it is now Marked as X CLOSED.) I wish there was a better way to link from that thread to this, as I have had a few emails and texts asking why my thread was closed
[This message has been edited by JohnWPB (edited 06-29-2016).]
Yea, right after you texted me and asked why my thread was closed hhahaha! I wish there was a better way to link from that thread to this, as I have had a few emails and texts asking why my thread was closed
What? Haha, why do you think I texted you? I went to your thread because I hadn't gotten any updates in a while, and saw that it was closed! At first I thought that S-bag had gotten into it like he did my event page for Daytona! LMAO
I haven't been on in a WHILE, and not wanting to read through pages and pages... did you ever check your fuse box? Just curious.
Yes. I pulled every fuse, inspected the blades, and tested each and every one with a test probe. I had no bad connection that I could find, even wiggling the wires on the back, every time I had the probe on the other side testing.
The intermittent wiring issue was never found, but hopefully replacing the computer, complete wiring harness, engine, and all grounds will resolve it.
Nothing for now. I have held off till I get back from Frazee for the Tyler Shipman Memorial Car Show. Then I plan to get moving again. Too bad you are not going to be there this year I will see you in a couple years again when you come back down to the US
A little off topic, but this ismy thread Here is a photo I took at the 2014 Tyler show. I was being hoisted up, while standing on the "tongs" of a fork lift! Yes, that's ALL Fieros up the left side of the screen into the distance.
The first thing I need to do when I get back is get it towed to an exhaust shop and get that taken care of. After that, I can run it a bit more, check the timing, coolant temperature, vacuum leaks, and what not. It's just far too loud with just the headers in place to run for more than a minute or so in my neighborhood.
The A/C is on the list as well. I got the new 3800 conversion A/C lines in the mail from Chuck in Central Florida. Hopefully I will be driving it a little later this summer......
Nope.... too much other stuff going on since I got back, and actually just got back from a 4 day camping trip. I need to get the fuel regulator built, and then get her towed to an exhaust shop. It is sitting under cover, and I am in no hurry to work on it in this friggin heat! It will not be long till things start to cool down a bit......
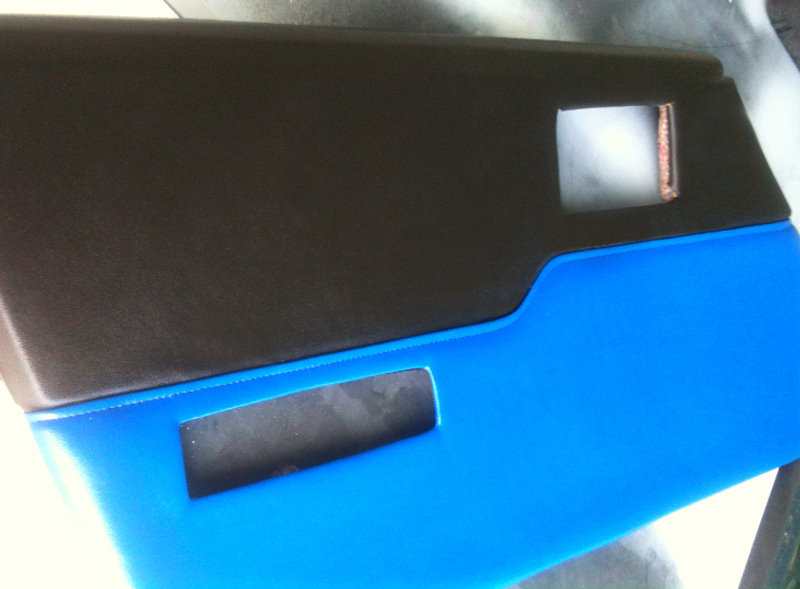
I finished up recovering the door panels. The bottom part is Mr. Mike's lowers in Electric Blue to match the seats, and I did the top part of the door in Black AllSport vinyl.
TONS more work to do of course, but a little at a time I guess......
Hey John,
Great work on your car. You most certainly have the best documentation I have come across; simply amazing. Reading about all of your troubles, I'm just so empathetic to you. MACCO. Nightmare. Powder coating. Nightmare. Starting issues. Nightmare. My Fiero has certainly had its share of issues. My car's battery would die every few days. And not just die, but DIE. It would no longer hold a charge and I would have to buy a new battery. So I feel you with that one. Anyway, everything you've done has been amazing. I too have Mr. Mike's door panels, however, my bottom panel looks nothing like yours! What did you do to make yours look so factory? Mine are wrinkly and I know it's not Mr. Mike's fault. What did I do wrong?
Thanks for the comments, this build has certainly had its up's and WAY downs!
I removed the carpeting from the existing panel, using brake cleaner to remove the adhesive and such. In all honestly, the backing behind the lower panels that Mr. Mike ships is too thin. It's about like a cereal box's cardboard on the back. I had some more cardboard type stuff lying around that I attached to the back, for better support. This made it lay much nicer, until they were ruined by the whole MAACO disaster...
Ok, long time no updates. I have been busy with many other things in life and work over the summer. Not to mention it was WAY to hot to work on the Fiero the past couple months. That has changed now, as it is finally dropping into the upper 70's at night here.
I just called and renewed my AAA membership tonight. I am going to have the car towed to the exhaust shop in the coming couple weeks to get the exhaust installed. Right after I get the fuel rail figured out with the fuel pressure regulator.
I cranked it over tonight, and it fired right up! REALLY loud with no exhaust system at all installed, but it does run.
In the mean time, with the nice weather, I decided to tinker around a little with the car this evening. I ordered some cheap LED's a few weeks ago, and thought I would test them in different areas. they are SUPER thin, around the thickness of a dime. I found a sweet spot right above the engine on one of the "cross members" of the decklid. One strip lights up the entire engine bay, and unless you lean pretty far down, you can not see the LED strip at all. Perfect!
When I say cheal LED strips, I mean CHEAP! ! ! ! !
YOu can find the LED strips on the wish.com website. Unfortunately, I think you have to login in with Facebook, or provide an email to browse their site. It is worth it, as they have a lot of neat cheap crap to browse through. (I lose and break sunglasses all the time. I just bought 6 pair of impact resistance sunglasses for work for $0.89 cents a pair).
Being they are so cheap, quality control is not the greatest reading the reviews. I just ordered 5 packages to make sure I had a few good ones. In my case, 9 of the 10 strips work perfectly.
As mentioned, they are super thin:
I took this photo in total darkness, with my cell phone, and no flash:
This single strip really lights up the engine NICE!
The LED strip seems to get pretty hot, not too hot to handle, but pretty hot. The nature of high power LED's is that they can get really hot, and thus I do not think the engine heat will effect it mounted to the decklid. I can not speak for certain of this, and will not know how well it will hold up for a month or 2 to the heat
You can see the wire powering the LED strip in the photo's. I will be drilling a really small hole, and fishing the wire through the decklid, to come out right next to the battery where the electric trunk popper wire comes out as well.
[This message has been edited by JohnWPB (edited 11-11-2016).]
Looking great John! Your hard work and time put into this car is really paying off. Would love to see this car when me and the wife go down to Jupiter for Stl Cardinal spring training games.
WOW is all I can say. I just read through your adventure from page 1 to here.. and WOW! Never been a fan of that front fascia, but beautiful car and beautiful color. Makes me wish my wrist was no longer broken and I had my car finally. So many wild ideas, and hopefully the money to them now.
Good job on the car! It's awesome you never gave up through all that.
Originally posted by davylong86: Looking great John! Your hard work and time put into this car is really paying off. Would love to see this car when me and the wife go down to Jupiter for Stl Cardinal spring training games.
Thanks, it has been a true labor of love for sure! Leme' know when you are in town, lunch on a Saturday or Sunday is not out of the question
quote
Originally posted by DotTC: WOW is all I can say. I just read through your adventure from page 1 to here.. and WOW! Never been a fan of that front fascia, but beautiful car and beautiful color. Makes me wish my wrist was no longer broken and I had my car finally. So many wild ideas, and hopefully the money to them now. Good job on the car! It's awesome you never gave up through all that. A++
Thanks, I left the rear alone, but just wanted some thing a little different for the front. I like that I can put the Stainless Fiero logo in there, and also a place for fog lights.
[This message has been edited by JohnWPB (edited 11-12-2016).]
I ordered a NOS sunroof seal a few weeks ago here in the mall. I installed it a few days ago, and I no longer have any leaks! The one from the Fiero store never settled down, and I could see light between the glass and the seal when sitting in the car.
During the replacement of the seal, i noticed a lot of scratches and some fogging of the glass around the edges. I remembered seeing that Richard from Pro Source had 10 of them some time ago. I called them, and Richard was glad to help, and I have a brand new original sunroof glass on the way
I have been researching LED headlight replacements over the past week or so. I have the quad-low profile buckets from Danyel installed in my car. They have the typical H9 Hallogen bulbs in them. I found some LED replacements for $39 and free shipping on Amazon.
The LED Headlights came in the mail today, and I installed them in the low beam housings. The car is not yet running, so I could not take it out for a spin and drive it up to a wall to see what the light spread is. However, walking about 50 feet away from the car, and hunching down to about where you would be aligned in an oncoming vehicle, the lights were not bothersome in any way. When I kneeled down, low to the ground, they were too bright to stare into.
It was then when I walked over to the car again, that I thought I saw a line where the light cut off. I grabbed a suitcase from the garage, and put it in front of the car. Sure enough, a PERFECT cutoff line! Looks like I need to adjust the lights up just a little bit, but NO light scatter at all to be seen!
This is how the bulbs came packaged:
A close up of the bulb, and the waterproof fan assembly on the back to keep them cool:
Here is the LED headlight in the drivers side housing, with the standard halogen on the passenger side:
Lastly, here are the 2 LED's installed and the light they cast forward. It appears to be bright white, with just the very slightest tinge of blue.
Lastly, here is the suitcase put out in front of the lights, and you can clearly see the cutoff line:
I am quite happy with the results! I have always disliked the yellow light that headlights on cars give off. Technology has finally caught up to my taste over the past few years
[This message has been edited by JohnWPB (edited 11-14-2016).]
I ordered another set of the LED headlights like I purchased above. They came in today, and I installed them in the High Beam housings. Man are they bright! Without the cutoff that the low beam housings have, the high beams light up everything! I am certainly happy with the results.
I scheduled the rental of a trailer from U-Haul for Saturday morning. I am finally getting the car to the exhaust shop. I have the Camaro muffler here, as well as the wrap and Z06 tips. They gave me a quote of around $500 for them to make up the full custom exhaust. It could possibly be less, or a bit more. If more than $100 more they are gonna call me. It was hard for them to give an estimate without having the car there, so this is the best they could come up with, and the numbers are fine my me!


 Topic Closed