As discussed in the What's up at Archie's thread, I'm starting a build thread on ClayTonto's car.
When the car got to our shop He had already completed a 383 stroker 6 speed swap to his '87 GT. He had already had norm install a flipper nose on the car.
We are in the process of doing a Mad-Arch WideBody installation. We are also installing a PISA wraparound dash & installing digital gages the he supplied & CF tail light assemblies. This is a non-chopped car & we are also designing a rear hatch decklid on the car.
There are several other things we are doing to the car but that's the just of it.
When it got here, it looked like this......
In order to make this thread complete he has given me some copies of the pictures he took when doing the engine/trans swap. I'll post those up here.
If you have any questions about that part of the build, you can ask him about that in this thread also.
He has been a professional sound system designer & here are a few pics of the sound system he had in the car. Note that the system is not in the car right now as he is going to be installing a new one when we're done with the car.
Engine/trans swap pictures
There you go. Next we'll get to our part of the build.
Your car is the 1st of it's kind in several ways (perhaps more to follow due to the making of hatch mold); hatchback using the 350Z glass, Mad-Arch wide body kit, and Norms Flipper.
As enthusiastic as I am for a new swap and the car in general, it pains me to see another set of Sandersons going on a car that'll actually be driven. I really wonder how long it'll take for them to start cracking... 8 months for my first time.
------------------ Christian 87 Pontiac Fiero GT Burgandy/Silver 5.7L ZZ4 5spd, 88 suspension, C6 polished wheels, C5 Z06 brakes, Konis, poly'd, Spec Stg 3, LED taillights Next Mod: LT1 fuel injection with Megasquirt II 301rwhp/345rwtq Stovebolt Powered!!!!! 06 Cobalt SS/SC w/ LSD (the slow DD)
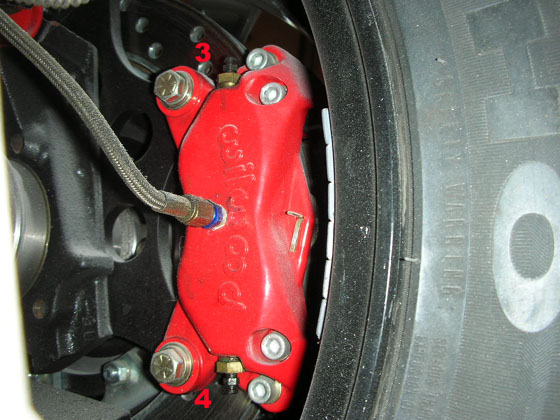
Is it just me or are these calipers on upside down (bleeder is at the bottom)? Since they are Willwoods I suspect they have been put on the wrong sides.
Is it just me or are these calipers on upside down (bleeder is at the bottom)? Since they are Willwoods I suspect they have been put on the wrong sides.
Actually there are 4 bleeders on each of the calipers. Top & bottom & inside & outside.
We started working on this stuff on Jan. 9th. & have been working on it pretty steady.
We've been working in several different areas at the same time. That gives us other things to do while we wait on fiberglass to cure on someparts while we work in other areas. So this will jump around a bit but I'll try to keep it in the order we have been working on it.
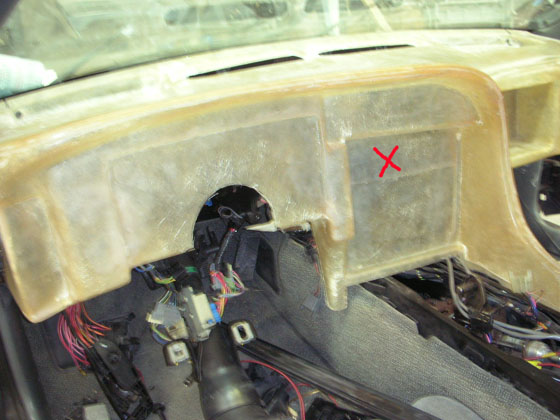
In the interior, we were putting in a big speaker into the area between the seats. That ment that we had to make the area that covered the original ECM thicker for the speaker box & other items behind it. To do that we had to move that center section forward. That ment that we also had to cut & section the piece of the console that is between the seats so that it met up with the center area of the dashboard. The fiberglass of the dash, console & back section were made of thin fiberglass. So in the center speaker area we had to make the glass thicker to support the weight of the speaker. In certain areas of the dash (like the speaker areas & the center gage mounting area) we also had make the glass thicker so we had enough material to finish the areas correctly. For example, in the speaker areas on the top of the dash, we wanted to use the stock speaker covers. By the time we got those areas shaped to where the speaker covers would fit into them like they fit into the stock dash, we were breaking thru the fiberglass of the dash so in those areas we had thicken it up a bit.
Here we have removed the old dash & are doing the initial fitting of the new one.....
While working on this, we were also working on mounting the NOS bottle on custom brackets above the Battery.
Here we're working on extending the center speaker console....
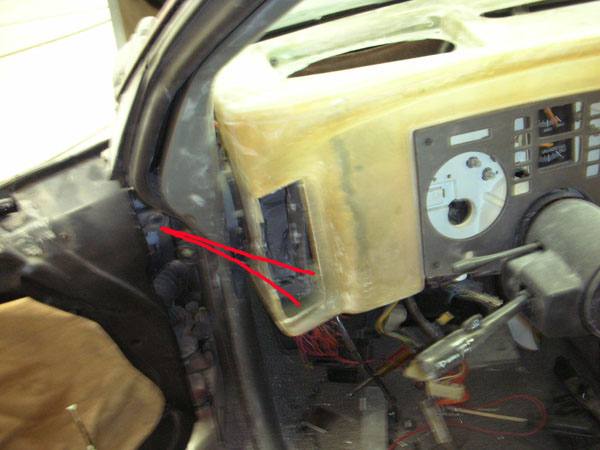
The dash doesn't have any provisions for bolting it in, so we made some mounting brackets & pop rivited them in & they were fiberglassed in a little later on.
Here we built up the thickness of the dash in the areas of the center gage mounting & the speaker grills.
Next comes the fun part of making the ductwork from behind the Fiero dash fit the inside of the new dash.
I've been told that some people duct tape this stuff into place. However, we won't be upholstering this dash here & we'd like to mount everything in place so the dash (& other parts) can be removed & serviced & reinstalled without someone saying "why did they duct tape this stuff in place?".
So after fitting the dash back into the car a couple of times & making some brackets, we set about glassing the brackets into place.
We also fitted the gage panel along the way.....
While the fiberglass setup on the dash, we made & glassed in the back wall of the center speaker box area....
On all this glassing, we don't like to do stuff twice so when we complete one step, we fit everything back into the car to make sure it all fits right before going to the next step.
For example on the center speaker box. Fit it all into the car, measure twice, cut once & fiberglass once.
How long is this car planned to be at Archie's place? Are we still on for our spring 'get-together' or are you having to back down due to mods?
I don't know what you all have planned but all the stuff you're seeing now & for the next several posts is done already. The project is growing a bit as we go & as he keeps finding other things he wants done. But as of right now, we've started making the mold off of the outside of the rear hatch & by the time we're done with designing the rest of the hatch everything else should be done.
In these pics, you can see how much was added to the back end of the center back console to make enough room for the speaker to mount into it.
Here the dash is starting to take shape, gage holes are cut & mounting brackets are being fabbed for the mounting of the center of the dash. We can now modify the center console section to fit inbetween the dash & the rear console area.
I was out of town for most of the day when the center console was modified but here's a pic of it as it was glassed back together.
Here Kris is fitting the shifter boot & other items to the center console.
The Fiero air ducting doesn't come all the way up to the new fiberglass dash in the center section....
And in the air outlets on the ends of the dash....
In the center area, we made a thin metal extension on the end of the Fiero duct to bring it farther back.
On the ends, we fiberglassed a shroud on the ends of the dash. Here's a before & after pic.
We took the console & speaker box area back to fiberglass one more time to glass in some steel in a few places for the screws that are going to hold the parts together. We didn't really want to just screw the fasteners into the fiberglass because the glass would let go of the threads after a while. So we glassed in some steel in the areas where the attachment screws are going to go thru.
Kris also put the hinge on the glove box door.
Then after some filling & sanding we painted the dash a primer gray.....
Notice that even the shifter boot has metal to screw into & doesn't just screw into raw fiberglass.
The we put the interior together.....
Next, we start fabricating the CAI & qtr. window scoops
Some haters think that I'm either too stupid to know what a bleed screw looks like or that I can't count.
But they keep reading my threads, maybe someday they'll learn something but I doubt it.
Archie
They are just used to the (I guess?) newer ones from willwood... I first thought the suspension was upside down when I saw the toe-adjustment linkage. But I figured you would know more than I would.
They are just used to the (I guess?) newer ones from willwood... I first thought the suspension was upside down when I saw the toe-adjustment linkage. But I figured you would know more than I would.
Nice build by the way.
If you notice in the picture there is a sticker that says "fluid". Thats where the brake line goes in. The other two lines are positive pressure bleeders. And your half right on the suspension, the toe adjustment was relocated to the bottom to clear the 6-speed.
The project is growing a bit as we go & as he keeps finding other things he wants done. Archie
Since you mentioned it (and if you don't mind) I would replace the head/park lamps OEM switch and use Watson's Street gauges and window switches. Besides, Clayton has the 2nd generation headlamps from Norm. They don't use the crappy bucket lamps.
They are just used to the (I guess?) newer ones from willwood... I first thought the suspension was upside down when I saw the toe-adjustment linkage. But I figured you would know more than I would.
We're not doing any mechanical work on this car. I think all the suspension & brakes came from Held & the owner of the car put it all together. So they might be the ones to talk to about it.
At this point we have 5 different areas of the car that we’re working on at the same time.
We’re working on the hatch, the tail lights, front grills, the CAI & we’re stiffening up the front clip.
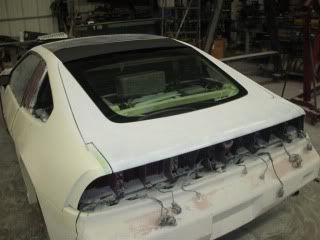
As stated in another thread, we are working on a hatchback type decklid on this car. You’ll be able to se how it develops from scratch thru final product in this thread. While we’re doing that we’ll be installing some C/F looking tail light lenses. Also we’ll put in some grills in the Flipper front clip along with putting a little steel in the clip to stiffen it a bit.. The customer supplied some C/F overlaid qtr. Window scoops & we’ll be building air boxes in those scoops & building a CAI to the aircleaner.
Starting out with work on the hatchback conversion. People who have seen pictures of it in another thread will be surprised to know that we’re building the buck for the outside skin of the hatch starting with a pc. of thin plywood.
This is how you build something fresh & new. It doesn't matter what it looks like on the 1st day as long as it's right on the last day.
These pics show several days of that process.
After a day of sanding & shaping, we put a little primer on it...
I think when this car is painted, it would look badass if the area between the sunroof and rear window was painted black to make it appear as one large window. Similar to what was done on the Scion Tc for example...
quick photoshop
[This message has been edited by Jncomutt (edited 02-20-2009).]
Suggestion: You could move the HVAC controls to the bottom, and make room for a double DIN stereo to future proof that dash. Worst case, you can always find a compartment tray/lockable tray to put trinkets in if you decide to use a single DIN for now.
Is it just me or would the rear window look better with the rounded corners at the top?
It might look better with rounded corners but we wanted to use the 350Z rear window because of the size & curvature in it. The 350Z window is tempered & you're not going to cut a radius in the corners without breaking it.
On Curley's car we used the same window & you don't notice the sharp corners at the top of the window because we did his without a border at the top of the window. However, on his car we had to put an arc in the roof section behind the sunroof to match the arc in the 350Z rear window.
On this design we wanted the rear Hatch kit to be as easy to install as possible & with no body modifications to the Fiero rear clip. So we needed a border at the top of the window so that we could match the arc of the rear window & so we could put steel inside the rear hatch for bolting the hinges to.
On Curley's car, building it without the border at the top ment that we had to put in a steel bar underneath the top blacked out area of the 350Z window & that bar is what the front of the window is bonded to. (see note below)
As you can tell, a lot of planning went into this hatch before work began & consideration of the compromises was part of that.
I think when this car is painted, it would look badass if the area between the sunroof and rear window was painted black to make it appear as one large window. Similar to what was done on the Scion Tc for example...
quick photoshop
Thanks for the suggestion, I can assure you that area will be painted black. This is what I'm shooting for:
quote
Originally posted by Austrian Import:
Suggestion: You could move the HVAC controls to the bottom, and make room for a double DIN stereo to future proof that dash. Worst case, you can always find a compartment tray/lockable tray to put trinkets in if you decide to use a single DIN for now.
Thanks.I am going to run a motorized flip out in-dash, which will cover the dated HVAC controls when open.
[This message has been edited by ClayTonto (edited 02-20-2009).]
Not wasting any time, we also began work on building the CAI system that will run from air boxes in the qtr. Window scoops…..
to the dual inlet 4” air cleaner.
We cut, fitted & mounted the grills in the scoops. Note that after the air boxes are built, you’ll never get to the grills again, so they’re mounted in pretty solid.
The CAI is going to be 4” in Diameter & ducted directly from the qtr. window scoops. So we needed some 4” Dia. Fiberglass tubes that will be a part of the 2 air boxes & allow the 4” dia. Polished aluminum CAI tubes to attach to them.
You can’t buy anything like that anywhere, so we had to make them…..
Next it's back to work on the hatch....
Archie
[This message has been edited by Archie (edited 02-20-2009).]
Once again, I'm sorry there are so many pictures on just one page of this thread.
I was kinda hoping there would be enough replies to take it over to page 2 but I guess not.
I wanted to get all this stuff posted to get the thread up to date so we can post current progress as it occurs.
So now we're back to work on the hatch.....
In addition to the outside surface, we intend to make the area where the window is mounted & the “package tray” area that covers the trunk, all as one part. So it was time to form the package tray area…..
Some sanding filling & smoothing & we’re ready to start the mold making process.
Got to get it just as smooth as you would if it was a finished part.…
After removing the hatch “Buck” from the car, Kris is spraying the 1st of several coats of Duratec on it.
Notice the triangular shaped framework underneath the “Buck”. That’s a box steel framework we had used to weld the buck to the Fiero chassis to keep it from moving around while did all the work to build the “Buck”.
After about 4 coats of Duratec & drying time, Kris spent a full day of wet snading, polishing & waxing of the “Buck”
Remember, the mold that is going to make the finished product is going to come directly off of this surface. So the quality & smoothness you put in right now is going to be ON EVERY PART that you take out of the finished mold. So if you have a nick or scratch on this "buck", it's easier to fix it now than to fix every part that come out of the mold.....
I really like that decklid option - I know you said that you were going to offer vent options for it as well. Any timelines on getting some pics of those?


.jpg)


.JPG)
.JPG)
.JPG)
.JPG)
.JPG)
.JPG)
.JPG)
.JPG)
.JPG)
.JPG)
.JPG)
.JPG)
.JPG)
.JPG)
.JPG)
.JPG)
.JPG)


 Pontiac excitement!


_3.JPG)
_1.JPG)
_1.JPG)
.JPG)
_1.JPG)
.JPG)
_2.JPG)
_2.JPG)
_2.JPG)
_2.JPG)
.JPG)
.JPG)
.JPG)
.JPG)
.JPG)
_1.JPG)
.JPG)
_2.JPG)
_1.JPG)

_1.JPG)
_1.JPG)
_1.JPG)
_1.JPG)
.JPG)
.JPG)
.JPG)

_4.JPG)
_1.JPG)
.JPG)
_1.JPG)
.JPG)
_2.JPG)
_1.JPG)
_2.JPG)
.JPG)
_1.JPG)
.JPG)
.JPG)
_2.JPG)
_2.JPG)
_1.JPG)
.JPG)
.JPG)
_1.JPG)
.JPG)
.JPG)
.JPG)
.JPG)
.JPG)
.JPG)
.JPG)
.JPG)
.JPG)


.JPG)
.JPG)
.JPG)
.JPG)
.JPG)
.JPG)
.JPG)
_1.JPG)
_2.JPG)
_1.JPG)
.JPG)
_1.JPG)
.JPG)
.JPG)


.JPG)
.JPG)
.JPG)
.JPG)
.JPG)
.JPG)
_1.JPG)
_1.JPG)
_1.JPG)
.JPG)
.JPG)
.JPG)
.JPG)
 ooh, shiny stuff
_3.JPG)
_1.JPG)
_1.JPG)
.JPG)
_1.JPG)
_1.JPG)
.JPG)
_1.JPG)
.JPG)


