Pennock's Fiero Forum
  The Construction Zone
  Madcurl's Arch Rival !! (Page 45)

Post New Topic  Post A Reply
Email This Page to Someone! | Printable Version

This topic is 79 pages long:  1   2   3   4   5   6   7   8   9   10   11   12   13   14   15   16   17   18   19   20   21   22   23   24   25   26   27   28   29   30   31   32   33   34   35   36   37   38   39   40   41   42   43   44   45   46   47   48   49   50   51   52   53   54   55   56   57   58   59   60   61   62   63   64   65   66   67   68   69   70   71   72   73   74   75   76   77   78   79 
Previous Page | Next Page
next newest topic | next oldest topic
Madcurl's Arch Rival !! by exoticse
Started on: 04-07-2005 02:39 AM
Replies: 3142 (255962 views)
Last post by: exoticse on 12-03-2016 10:12 PM
DeLorean00
Member
Posts: 4251
From: Sacramento, CA / Reno, NV
Registered: Aug 2005


Feedback score: (2)
Leave feedback


Total ratings: 100
Rate this member

Report this Post10-02-2008 09:03 PM Click Here to See the Profile for DeLorean00Send a Private Message to DeLorean00Edit/Delete MessageReply w/QuoteDirect Link to This Post
 
quote
Originally posted by Archie:

Curley, I think you'll like this.

http://www.youtube.com/watch?v=1mPekTvOEOo


I have that same setup on my decklid of my Fiero 355 kit. It works great.

IP: Logged
Archie
Member
Posts: 9436
From: Las Vegas, NV
Registered: Dec 1999


Feedback score:    (12)
Leave feedback


Total ratings: 546
Rate this member

Report this Post10-02-2008 11:44 PM Click Here to See the Profile for ArchieClick Here to visit Archie's HomePageSend a Private Message to ArchieEdit/Delete MessageReply w/QuoteDirect Link to This Post
 
quote
Originally posted by madcurl:


Yep!!!


Glad you like it. I knew it would be a big surprise for you.

The video was just the initial test to actuators could lift the clip in the only position we could find to install them.

At the time the video was shot the bottom end of the actuators were heald in place by "C" clamps & as you can see the upper mounting plates have not been fiberglassed into place yet.

At the time the video was shot, we were just proving the concept. We will finalize & finish it up tomorrow.

Here's a few still pics.

Archie


IP: Logged
troyboy
Member
Posts: 2075
From:
Registered: Sep 2005


Feedback score: N/A
Leave feedback


Total ratings: 154
Rate this member

Report this Post10-03-2008 12:28 AM Click Here to See the Profile for troyboySend a Private Message to troyboyEdit/Delete MessageReply w/QuoteDirect Link to This Post
IP: Logged
whodeanie
Member
Posts: 3819
From: woodstock,Ga.,USA
Registered: Jan 2008


Feedback score:    (14)
Leave feedback


Total ratings: 120
Rate this member

Report this Post10-03-2008 08:15 AM Click Here to See the Profile for whodeanieClick Here to visit whodeanie's HomePageSend a Private Message to whodeanieEdit/Delete MessageReply w/QuoteDirect Link to This Post
looking good!
those things are loud. I guess it will help draw people to it to see what all the noise is!
HA HA!
just kidding, nice tweek! keep up the great work!
IP: Logged
InTheLead
Member
Posts: 2190
From:
Registered: May 2006


Feedback score:    (7)
Leave feedback

Rate this member

Report this Post10-03-2008 08:36 AM Click Here to See the Profile for InTheLeadSend a Private Message to InTheLeadEdit/Delete MessageReply w/QuoteDirect Link to This Post
that's awesome.. i can pictre a rumble and some transformer noises coming from it as the hood lifts wicked.
IP: Logged
madcurl
Member
Posts: 21401
From: In a Van down by the Kern River
Registered: Jul 2003


Feedback score: N/A
Leave feedback


Total ratings: 314
Rate this member

Report this Post10-05-2008 02:34 PM Click Here to See the Profile for madcurlSend a Private Message to madcurlEdit/Delete MessageReply w/QuoteDirect Link to This Post
Thanks Archie.


I'm picking-up the Corvette side marker electrical ends on Monday.

[This message has been edited by madcurl (edited 10-05-2008).]

IP: Logged
Archie
Member
Posts: 9436
From: Las Vegas, NV
Registered: Dec 1999


Feedback score:    (12)
Leave feedback


Total ratings: 546
Rate this member

Report this Post10-05-2008 03:27 PM Click Here to See the Profile for ArchieClick Here to visit Archie's HomePageSend a Private Message to ArchieEdit/Delete MessageReply w/QuoteDirect Link to This Post
When I posted the video, that was the initial test run of the actuators.

At that time we were trying to find the correct location for the bottom end of the actuators.

If you look closely at the pictures I posted right after the video was posted, you'll see part of the "C" clamp that was holding the bottom end of the actuator in place.

I suspect that some of the noise in the video was the crossbars of the "C" clamps vibrating.

You can see the "C" clamp better in this picture.


This kind of stuff isn't easy to locate & install, you have to find just the right spot where you can mount both actuators symetrically so that the geometry is the same on both units. Once we found the best place to put the bottom of the actuator, we made custom brackets to mount them solidly to the frame.


Once we had everything figured out, we removed the front clip from the car & fiberglassed the top mounting plates into the underside of the front clip.


We also found that the hinges that were used when the flipper front clip was installed were allowing the front clip move side to side quite a bit. So we welded in a pc. of 1.5x1 box tubing to eliminate that movement.


Archie
IP: Logged
Austrian Import
Member
Posts: 3919
From: Monterey, CA
Registered: Feb 2007


Feedback score: N/A
Leave feedback

Rate this member

Report this Post10-05-2008 10:52 PM Click Here to See the Profile for Austrian ImportSend a Private Message to Austrian ImportEdit/Delete MessageReply w/QuoteDirect Link to This Post
Madcurl, suggestion:

While you send the center section to Dakota digital, why don't you make a Double DIN enclosure and "future proof" the install?

If you decide to use a single DIN stereo for now, you can use that extra space as a pocket. Even a pocket with a door. (Mazda Protege, 626, etc. as well as other brands had a single DIN pocket with door, or just pocket)

IP: Logged
madcurl
Member
Posts: 21401
From: In a Van down by the Kern River
Registered: Jul 2003


Feedback score: N/A
Leave feedback


Total ratings: 314
Rate this member

Report this Post10-06-2008 12:32 AM Click Here to See the Profile for madcurlSend a Private Message to madcurlEdit/Delete MessageReply w/QuoteDirect Link to This Post
 
quote
Originally posted by Austrian Import:

Madcurl, suggestion:

While you send the center section to Dakota digital, why don't you make a Double DIN enclosure and "future proof" the install?

If you decide to use a single DIN stereo for now, you can use that extra space as a pocket. Even a pocket with a door. (Mazda Protege, 626, etc. as well as other brands had a single DIN pocket with door, or just pocket)


I'm already on it. I emailed the guys in Canada regarding a extra bezel (not a bin) for the temp control. As for a extra bin above these two, I'm not sure yet. Thanks for the heads-up. I'll look into the extra bin after I recieve the temp bezel.

IP: Logged
PaulJK
Member
Posts: 6638
From: Los Angeles
Registered: Oct 2001


Feedback score:    (25)
Leave feedback


Total ratings: 237
Rate this member

Report this Post10-06-2008 12:59 AM Click Here to See the Profile for PaulJKSend a Private Message to PaulJKEdit/Delete MessageReply w/QuoteDirect Link to This Post
are those dakota digital 24 inch 150 lb Actuators ?
IP: Logged
madcurl
Member
Posts: 21401
From: In a Van down by the Kern River
Registered: Jul 2003


Feedback score: N/A
Leave feedback


Total ratings: 314
Rate this member

Report this Post10-06-2008 01:29 AM Click Here to See the Profile for madcurlSend a Private Message to madcurlEdit/Delete MessageReply w/QuoteDirect Link to This Post
 
quote
Originally posted by PaulJK:

are those dakota digital 24 inch 150 lb Actuators ?


No. 12" @ 110Ib
http://www.dakotadigital.co.../mode=prod/prd58.htm


edit:correction
Watson's Street Works has the 10" @ 250Ib
http://www.watsons-streetwo...com/power_stuff.html

[This message has been edited by madcurl (edited 10-06-2008).]

IP: Logged
PFF
System Bot
PaulJK
Member
Posts: 6638
From: Los Angeles
Registered: Oct 2001


Feedback score:    (25)
Leave feedback


Total ratings: 237
Rate this member

Report this Post10-06-2008 04:24 AM Click Here to See the Profile for PaulJKSend a Private Message to PaulJKEdit/Delete MessageReply w/QuoteDirect Link to This Post
Many thanks
IP: Logged
InTheLead
Member
Posts: 2190
From:
Registered: May 2006


Feedback score:    (7)
Leave feedback

Rate this member

Report this Post10-06-2008 12:45 PM Click Here to See the Profile for InTheLeadSend a Private Message to InTheLeadEdit/Delete MessageReply w/QuoteDirect Link to This Post
Soooo.. how much for the car when it's finished
IP: Logged
ChopTop
Member
Posts: 1067
From: Lansing MI
Registered: Nov 2000


Feedback score: N/A
Leave feedback

Rate this member

Report this Post10-06-2008 01:54 PM Click Here to See the Profile for ChopTopSend a Private Message to ChopTopEdit/Delete MessageReply w/QuoteDirect Link to This Post
I know it's too late, but for some reason I really like the lower taillight reflector detail idea on this car, along with the whole exhaust treatment look.
http://www.autoblog.com/pho...cus-rs-live/1074695/

Along with painting it Corvette Jetstream Blue.
http://forums.corvetteforum...hoto.php/photo/58427

[This message has been edited by ChopTop (edited 10-06-2008).]

IP: Logged
madcurl
Member
Posts: 21401
From: In a Van down by the Kern River
Registered: Jul 2003


Feedback score: N/A
Leave feedback


Total ratings: 314
Rate this member

Report this Post10-07-2008 02:31 AM Click Here to See the Profile for madcurlSend a Private Message to madcurlEdit/Delete MessageReply w/QuoteDirect Link to This Post
 
quote
Originally posted by ChopTop:

I know it's too late, but for some reason I really like the lower taillight reflector detail idea on this car, along with the whole exhaust treatment look.
http://www.autoblog.com/pho...cus-rs-live/1074695/


I like that one too and it looks similar to the Lexus. It might look better on Whodeannie's choptop? As for mine, it took me nearly 6-months to a year trying to decide on which one to use. Maybe on #015 I'll change things around.

[This message has been edited by madcurl (edited 10-07-2008).]

IP: Logged
madcurl
Member
Posts: 21401
From: In a Van down by the Kern River
Registered: Jul 2003


Feedback score: N/A
Leave feedback


Total ratings: 314
Rate this member

Report this Post10-07-2008 07:54 PM Click Here to See the Profile for madcurlSend a Private Message to madcurlEdit/Delete MessageReply w/QuoteDirect Link to This Post

madcurl

21401 posts
Member since Jul 2003
Additional fender/tire clearance needed for #020 (half dollar used).

235/35/19


245/35/18


The 245s will be shipped out to Archie's along with 1/2 spring spacers from WCF (just in case) and #015 will finally get it's original rims back.
IP: Logged
Archie
Member
Posts: 9436
From: Las Vegas, NV
Registered: Dec 1999


Feedback score:    (12)
Leave feedback


Total ratings: 546
Rate this member

Report this Post10-08-2008 10:21 AM Click Here to See the Profile for ArchieClick Here to visit Archie's HomePageSend a Private Message to ArchieEdit/Delete MessageReply w/QuoteDirect Link to This Post
In all the excitement around mounting up the actuators, I never got a chance to post up the other finishing work we were doing at the same time & we've been doing since.

Here we are modifying the rear center console to make the mounting easier on the interior shop.

Also notice that earlier on we built a speaker box to box in the back of the 2 speakers that go in this part.
you can see the back side of the box in these pics.


Here we're working to get the fit between the ctr. radio surround, ctr. console & the rear speaker console to fit together nicely & make it easier for the interior shop to work with.


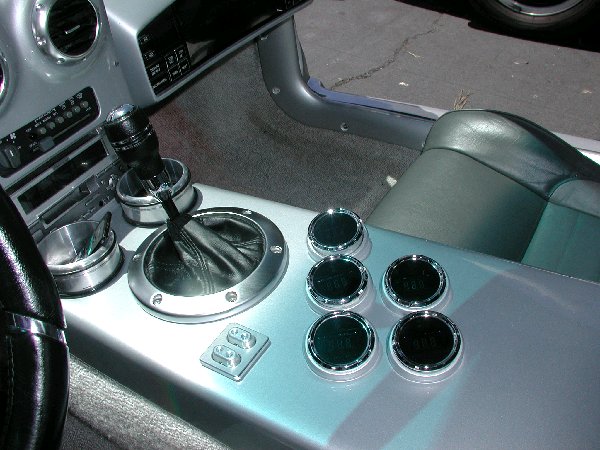
The cup holders won't work here. Because of the hardware below the console they can only be recessed in less than an inch & they would interfere with the access to the heater controls. So Curley decided to leave them out for now. We're also deciding where to mount the shifter boot.


This is where the shifter boot will mount....


Kris made a plate to mount on the underside of the console to bolt the shifter boot to. You could screw it into the fiberglass but that would come loose after a while & that wouldn't do. This plate will be fiberglassed in later.


........
IP: Logged
Archie
Member
Posts: 9436
From: Las Vegas, NV
Registered: Dec 1999


Feedback score:    (12)
Leave feedback


Total ratings: 546
Rate this member

Report this Post10-08-2008 10:45 AM Click Here to See the Profile for ArchieClick Here to visit Archie's HomePageSend a Private Message to ArchieEdit/Delete MessageReply w/QuoteDirect Link to This Post

Archie

9436 posts
Member since Dec 1999
Kris also made a Fiberglass filler panel to cover the area between the front edge of the Fiero dash panel & the base of the new Eclipse windshield. This required taking the dash in & out a few times to make the fit as good as we could.


And he was also working on mounting the gage pods.


Here we see some of the fiberglass extensions that are intended to make it easier for the interior shopto mount the center console assembly.


Here's some more on the gage pod mountings.....


Now we're getting closer to being ready to mount it for the last time....


Archie

------------------

Sig by Custom2M4

IP: Logged
whodeanie
Member
Posts: 3819
From: woodstock,Ga.,USA
Registered: Jan 2008


Feedback score:    (14)
Leave feedback


Total ratings: 120
Rate this member

Report this Post10-08-2008 11:04 AM Click Here to See the Profile for whodeanieClick Here to visit whodeanie's HomePageSend a Private Message to whodeanieEdit/Delete MessageReply w/QuoteDirect Link to This Post
looking great!!!!!!!!!!!!!!!
IP: Logged
madcurl
Member
Posts: 21401
From: In a Van down by the Kern River
Registered: Jul 2003


Feedback score: N/A
Leave feedback


Total ratings: 314
Rate this member

Report this Post10-08-2008 02:33 PM Click Here to See the Profile for madcurlSend a Private Message to madcurlEdit/Delete MessageReply w/QuoteDirect Link to This Post
 
quote
Originally posted by Archie:

Kris also made a Fiberglass filler panel to cover the area between the front edge of the Fiero dash panel & the base of the new Eclipse windshield. This required taking the dash in & out a few times to make the fit as good as we could.


Archie


Looking good Archie and the Crew. Kris is doing a excellent job and it looks OEM... just the way I like it.


------------------


"Friends don't let friends drive stock"

[This message has been edited by madcurl (edited 10-08-2008).]

IP: Logged
Falcon Fiero
Member
Posts: 2778
From: Colorado
Registered: Jun 2002


Feedback score: N/A
Leave feedback


Total ratings: 67
Rate this member

Report this Post10-08-2008 04:34 PM Click Here to See the Profile for Falcon FieroSend a Private Message to Falcon FieroEdit/Delete MessageReply w/QuoteDirect Link to This Post
 
quote
Originally posted by Archie:

K


OOOhh....Blue car!
IP: Logged
PFF
System Bot
Archie
Member
Posts: 9436
From: Las Vegas, NV
Registered: Dec 1999


Feedback score:    (12)
Leave feedback


Total ratings: 546
Rate this member

Report this Post10-08-2008 09:19 PM Click Here to See the Profile for ArchieClick Here to visit Archie's HomePageSend a Private Message to ArchieEdit/Delete MessageReply w/QuoteDirect Link to This Post


Archie
IP: Logged
madcurl
Member
Posts: 21401
From: In a Van down by the Kern River
Registered: Jul 2003


Feedback score: N/A
Leave feedback


Total ratings: 314
Rate this member

Report this Post10-08-2008 09:28 PM Click Here to See the Profile for madcurlSend a Private Message to madcurlEdit/Delete MessageReply w/QuoteDirect Link to This Post
Sweet! The Fiero DNA feel, but tweaked.
IP: Logged
PaulJK
Member
Posts: 6638
From: Los Angeles
Registered: Oct 2001


Feedback score:    (25)
Leave feedback


Total ratings: 237
Rate this member

Report this Post10-09-2008 03:44 AM Click Here to See the Profile for PaulJKSend a Private Message to PaulJKEdit/Delete MessageReply w/QuoteDirect Link to This Post
The shiny trim looks terrific and the billet power window switches are awesome ! Are you gonna use some kinda dark-colored, glossy material on the console surface, curly (?) Black or dark gray might really set off the shiny stuff.
IP: Logged
Scurvy
Member
Posts: 865
From: Richmond, Va
Registered: Nov 2005


Feedback score: N/A
Leave feedback

Rate this member

Report this Post10-09-2008 12:38 PM Click Here to See the Profile for ScurvySend a Private Message to ScurvyEdit/Delete MessageReply w/QuoteDirect Link to This Post
 
quote
Originally posted by Archie:


Archie


The one thing that always gets me with redoing the interior is the HVAC controls. Is there any way to make some kind of door or cover to go over top of it to hide it 90% of the time?

[This message has been edited by Scurvy (edited 10-09-2008).]

IP: Logged
madcurl
Member
Posts: 21401
From: In a Van down by the Kern River
Registered: Jul 2003


Feedback score: N/A
Leave feedback


Total ratings: 314
Rate this member

Report this Post10-09-2008 12:57 PM Click Here to See the Profile for madcurlSend a Private Message to madcurlEdit/Delete MessageReply w/QuoteDirect Link to This Post
 
quote
Originally posted by PaulJK:

The shiny trim looks terrific and the billet power window switches are awesome ! Are you gonna use some kinda dark-colored, glossy material on the console surface, curly (?) Black or dark gray might really set off the shiny stuff.


Thanks. I've done gray and black. It's time for a change, but nothing is written in stone.


IP: Logged
madcurl
Member
Posts: 21401
From: In a Van down by the Kern River
Registered: Jul 2003


Feedback score: N/A
Leave feedback


Total ratings: 314
Rate this member

Report this Post10-09-2008 01:05 PM Click Here to See the Profile for madcurlSend a Private Message to madcurlEdit/Delete MessageReply w/QuoteDirect Link to This Post

madcurl

21401 posts
Member since Jul 2003
 
quote
Originally posted by Scurvy:


The one thing that always gets me with redoing the interior is the HVAC controls. Is there any way to make some kind of door or cover to go over top of it to hide it 90% of the time?


The only one I've looked into is the 2001 Audi TT's stereo door. Back in 2002 or so the part was very pricey so I decided against it. I'm guessing the price is much higher now so I'm opting for the bezel surround from the guys in Canada. This will even out the two parts and will hide the ugly HVAC control. The only other option is one offered by Amida (spelling?), which is similar to the Ferrari HVAC that is mounted on the armrest. In my case, that's out of the question.

Plan B: use two bezels, but sized to fit HVAC controls.

[This message has been edited by madcurl (edited 10-09-2008).]

IP: Logged
Archie
Member
Posts: 9436
From: Las Vegas, NV
Registered: Dec 1999


Feedback score:    (12)
Leave feedback


Total ratings: 546
Rate this member

Report this Post10-09-2008 07:33 PM Click Here to See the Profile for ArchieClick Here to visit Archie's HomePageSend a Private Message to ArchieEdit/Delete MessageReply w/QuoteDirect Link to This Post
Curley, I think you'll like this TOO.

http://www.youtube.com/watch?v=JM_mst-PPPM

IP: Logged
Jake_Dragon
Member
Posts: 32844
From: USA
Registered: Jan 2001


Feedback score: (5)
Leave feedback


Total ratings: 403
Rate this member

Report this Post10-09-2008 07:41 PM Click Here to See the Profile for Jake_DragonSend a Private Message to Jake_DragonEdit/Delete MessageReply w/QuoteDirect Link to This Post
 
quote
Originally posted by Archie:

Curley, I think you'll like this TOO.

http://www.youtube.com/watch?v=JM_mst-PPPM


Ok the only thing left is the doors!
IP: Logged
Archie
Member
Posts: 9436
From: Las Vegas, NV
Registered: Dec 1999


Feedback score:    (12)
Leave feedback


Total ratings: 546
Rate this member

Report this Post10-09-2008 07:52 PM Click Here to See the Profile for ArchieClick Here to visit Archie's HomePageSend a Private Message to ArchieEdit/Delete MessageReply w/QuoteDirect Link to This Post
 
quote
Originally posted by Jake_Dragon:


Ok the only thing left is the doors!


Hold your tongue, I don't even want to figure out how to make the door work automatically on this car.

Archie
IP: Logged
madcurl
Member
Posts: 21401
From: In a Van down by the Kern River
Registered: Jul 2003


Feedback score: N/A
Leave feedback


Total ratings: 314
Rate this member

Report this Post10-09-2008 08:27 PM Click Here to See the Profile for madcurlSend a Private Message to madcurlEdit/Delete MessageReply w/QuoteDirect Link to This Post
 
quote
Originally posted by Archie:

Curley, I think you'll like this TOO.

http://www.youtube.com/watch?v=JM_mst-PPPM


Yes. I came to the right shop, "to get the job done right."
IP: Logged
PFF
System Bot
fiero go fast
Member
Posts: 1728
From: Royersford, PA
Registered: Apr 2002


Feedback score: N/A
Leave feedback


Total ratings: 60
Rate this member

Report this Post10-10-2008 07:37 AM Click Here to See the Profile for fiero go fastSend a Private Message to fiero go fastEdit/Delete MessageReply w/QuoteDirect Link to This Post
 
quote
Originally posted by Archie:

Curley, I think you'll like this TOO.

http://www.youtube.com/watch?v=JM_mst-PPPM


Alright, now lets see both the hood and "decklid" at the same time from a distance.

Great work Arch.
IP: Logged
whodeanie
Member
Posts: 3819
From: woodstock,Ga.,USA
Registered: Jan 2008


Feedback score:    (14)
Leave feedback


Total ratings: 120
Rate this member

Report this Post10-10-2008 08:45 AM Click Here to See the Profile for whodeanieClick Here to visit whodeanie's HomePageSend a Private Message to whodeanieEdit/Delete MessageReply w/QuoteDirect Link to This Post
 
quote
Originally posted by Archie:


Hold your tongue, I don't even want to figure out how to make the door work automatically on this car.

Archie


now you need to put in connectors that you can get to from the outside of the car for the battery charger! otherwise you will be screwed if the battery goes dead.
just a thought!
it looks great!
IP: Logged
InTheLead
Member
Posts: 2190
From:
Registered: May 2006


Feedback score:    (7)
Leave feedback

Rate this member

Report this Post10-10-2008 09:10 AM Click Here to See the Profile for InTheLeadSend a Private Message to InTheLeadEdit/Delete MessageReply w/QuoteDirect Link to This Post
 
quote
Originally posted by whodeanie:


now you need to put in connectors that you can get to from the outside of the car for the battery charger! otherwise you will be screwed if the battery goes dead.
just a thought!
it looks great!


Megatron doesn't need a battery charger!

[This message has been edited by InTheLead (edited 10-10-2008).]

IP: Logged
Archie
Member
Posts: 9436
From: Las Vegas, NV
Registered: Dec 1999


Feedback score:    (12)
Leave feedback


Total ratings: 546
Rate this member

Report this Post10-10-2008 09:41 AM Click Here to See the Profile for ArchieClick Here to visit Archie's HomePageSend a Private Message to ArchieEdit/Delete MessageReply w/QuoteDirect Link to This Post
 
quote
Originally posted by fiero go fast:


Alright, now lets see both the hood and "decklid" at the same time from a distance.

Great work Arch.


Sorry, can't do that right now.

We only have one controller right now. Curley has the 2nd one ordered but they are on back-order.

He's picking the car up in about 10 days, so he'll be installing the 2nd controller.

So the plan right now is to disconnect the rear actuators from their mounts & use the Fiero latch to keep it closed & to have the front actuators operational when he drives it home. We need the actuators on the front clip to keep it tightly closed.

He's going to do the rest of the interior, hooking up the new gages, window & mirror switches & Caddie gages & the like when he gets it home.

Archie
IP: Logged
Archie
Member
Posts: 9436
From: Las Vegas, NV
Registered: Dec 1999


Feedback score:    (12)
Leave feedback


Total ratings: 546
Rate this member

Report this Post10-10-2008 09:49 AM Click Here to See the Profile for ArchieClick Here to visit Archie's HomePageSend a Private Message to ArchieEdit/Delete MessageReply w/QuoteDirect Link to This Post

Archie

9436 posts
Member since Dec 1999
 
quote
Originally posted by whodeanie:


now you need to put in connectors that you can get to from the outside of the car for the battery charger! otherwise you will be screwed if the battery goes dead.
just a thought!
it looks great!


I always worry about a battery going dead, so I try to make it so everything is serviceable. His battery is mounted up front & we've setup the front actuators so that 1 screw can be removed to allow the front clip to be opened if needed. He can always add battery lugs when he's finishing it up if he wants to or we can do it if he wants & if we have time.

This car has a NStar in it & so far we've done nothing mechanical to the driveline or charging or cooling systems.

Archie
IP: Logged
doublec4
Member
Posts: 8289
From: Oakville, Ontario, Canada
Registered: Jun 2003


Feedback score:    (20)
Leave feedback


Total ratings: 150
Rate this member

Report this Post10-10-2008 10:39 AM Click Here to See the Profile for doublec4Send a Private Message to doublec4Edit/Delete MessageReply w/QuoteDirect Link to This Post
with regards to the actuators... I know the front clip is hefty and the rear hatch is also probably pretty hefty? But wouldn't simple gas struts essentially do the same thing.... and eliminate the actuators which are probably heavier and obviously more complex, and eliminate the potential problems with a dead battery, (and also just eliminate the long wait for your hoods to open) ... or is this just for the "pimp my ride" wow factor...

[This message has been edited by doublec4 (edited 10-10-2008).]

IP: Logged
Archie
Member
Posts: 9436
From: Las Vegas, NV
Registered: Dec 1999


Feedback score:    (12)
Leave feedback


Total ratings: 546
Rate this member

Report this Post10-10-2008 12:20 PM Click Here to See the Profile for ArchieClick Here to visit Archie's HomePageSend a Private Message to ArchieEdit/Delete MessageReply w/QuoteDirect Link to This Post
 
quote
Originally posted by doublec4:

with regards to the actuators... I know the front clip is hefty and the rear hatch is also probably pretty hefty? But wouldn't simple gas struts essentially do the same thing.... and eliminate the actuators which are probably heavier and obviously more complex, and eliminate the potential problems with a dead battery, (and also just eliminate the long wait for your hoods to open) ... or is this just for the "pimp my ride" wow factor...


Well Curley wanted power actuators & not gas struts.

I usually try to avoid using gas struts because when they are closed they are always putting pressure against the item they are mounted to.

On the Lambo door kits, the struts are always pushing when the door is closed so they're always putting pressure against the door. Usually the door hinges are made strong enough to take that pressure.

However, I know many people who have the single gas strut on their stock Fiero decklids & the struts have started to distort the decklid after a while. Next time you go to a Fiero show, do what I do & go around & look at Fieros with the decklids closed & many times you can tell which ones have a strut on them by the fact that one side of the decklid is higher than the other side.

I've seen a lot of kit cars that have gas struts on them that have this same problem. That's expecially true of kit cars from warmer climates.

Archie
IP: Logged
doublec4
Member
Posts: 8289
From: Oakville, Ontario, Canada
Registered: Jun 2003


Feedback score:    (20)
Leave feedback


Total ratings: 150
Rate this member

Report this Post10-10-2008 01:20 PM Click Here to See the Profile for doublec4Send a Private Message to doublec4Edit/Delete MessageReply w/QuoteDirect Link to This Post
Wouldnt the original torsion rods also create constant force against the rear decklid? or is it more uniformly distributed?
IP: Logged
madcurl
Member
Posts: 21401
From: In a Van down by the Kern River
Registered: Jul 2003


Feedback score: N/A
Leave feedback


Total ratings: 314
Rate this member

Report this Post10-10-2008 01:25 PM Click Here to See the Profile for madcurlSend a Private Message to madcurlEdit/Delete MessageReply w/QuoteDirect Link to This Post
 
quote
Originally posted by doublec4:

with regards to the actuators... I know the front clip is hefty and the rear hatch is also probably pretty hefty? But wouldn't simple gas struts essentially do the same thing.... and eliminate the actuators which are probably heavier and obviously more complex, and eliminate the potential problems with a dead battery, (and also just eliminate the long wait for your hoods to open) ... or is this just for the "pimp my ride" wow factor...


I agree that the gas struts would have been cheaper, quicker, and easier access, but like always due to usage they are prone to loose strength or internal pressure, so I opt for the dual actuators based upon the owner of the Pantera car to whom I spoke to at the 25th.

He too used gas struts and had issues with them not able to keep his deck lid up. #020 is no doubt heavier with added glass and metal construction. Therefore, I'm not 100% sure if four gas struts would even help. As for the weight of each actuator I'm guessing they don't weigh much heavier than the gas struts especially if four struts are needed.

The actuators on #020 rear deck lid and mounting points for another project in the wings #015. However, I will use Watson's Street Works 250Ib actuators.

Edit: Archie already answered the question, hehe.

[This message has been edited by madcurl (edited 10-10-2008).]

IP: Logged
Previous Page | Next Page

This topic is 79 pages long:  1   2   3   4   5   6   7   8   9   10   11   12   13   14   15   16   17   18   19   20   21   22   23   24   25   26   27   28   29   30   31   32   33   34   35   36   37   38   39   40   41   42   43   44   45   46   47   48   49   50   51   52   53   54   55   56   57   58   59   60   61   62   63   64   65   66   67   68   69   70   71   72   73   74   75   76   77   78   79 
next newest topic | next oldest topic

All times are ET (US)

Post New Topic  Post A Reply
Hop to:

Contact Us | Back To Main Page

Advertizing on PFF | Fiero Parts Vendors
PFF Merchandise | Fiero Gallery | Ogre's Cave
Real-Time Chat | Fiero Related Auctions on eBay


Copyright (c) 1999, C. Pennock