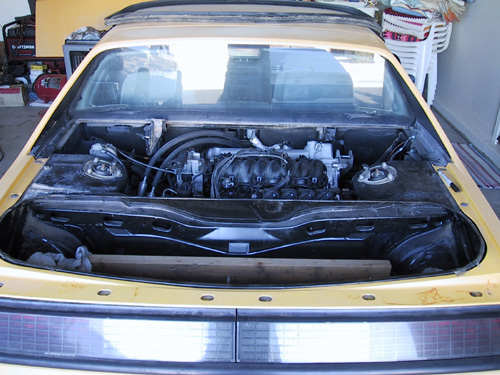
Well the work begins. I have had for several months an 88 yellow coupe with just under 80,000 miles waiting for an engine swap to happen. The car has no options other than a/c. Unfortunately the compressor and flex lines where missing. I had hopes of finding an ls1 or even better an ls6 to mate with a 4t65e-hd but instead I came across a low mileage aurora engine for a good price and so the plan changes. Now I will try to shoehorn this thing into the car using the stock izuzu five speed. I hope to use several components from chrfab. The Holley 950 commander and if they have one, a flywheel. I can cut and weld ok but I don�t have a lathe or a mill so I will be asking friends to fab some parts for me. This will take some time because there are several other projects at the home that need attention too. Thanks to all of the information already shared here I hope not to make too many blunders. I am inviting any and all ideas and or constructive criticism. Here are a couple of pics of where it's at now.
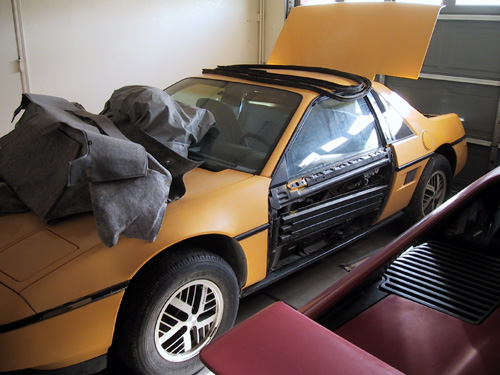
the car. the door skin is off because we needed to make a key for the doors and trunk.
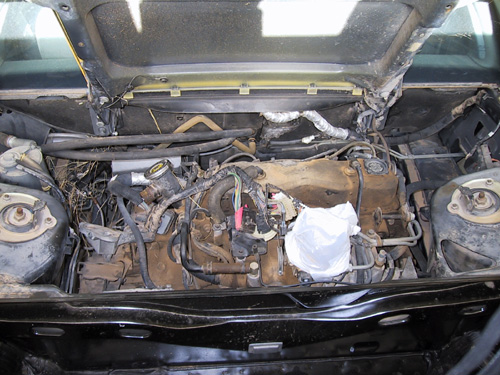
the duke. only 80,000 miles on her. the first owner a gal who treated her right. the second owner drove her hard but only for a few months. when he decided to add performance parts, he ran out of dough and she sat for three years like this.
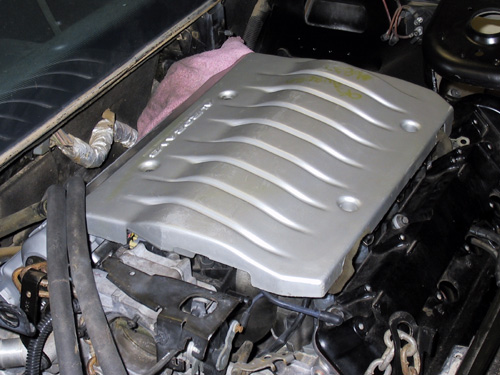
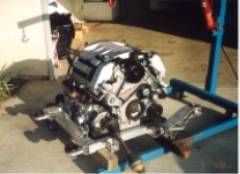
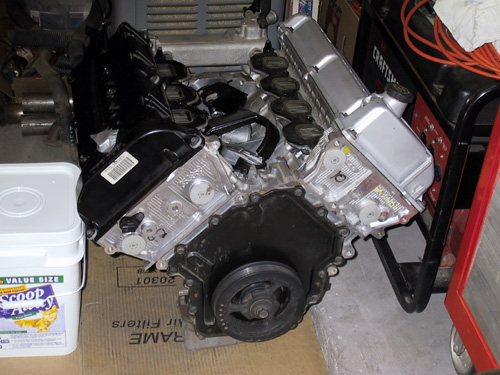
the "new" engine. hopefully the bottom end will check out good, the top end looks brand new. if anyone has brackets and components for sale I will be looking to pick them up.
[This message has been edited by cptsnoopy (edited 07-05-2023).]
I almost bought one of these. There is a guy up near San Francisco who has one. The Aurora caught on fire under the dash and burned the wiring and ICU but he says the engine and everything is fine. He only wants $300 for the complete engine and 4T80e tranny. I was about to go get it when he mentioned that the reservoir had melted off the power steering pump. Obviously power steering is not a major worry on a Fiero but I was wondering if anything else might have been damaged on the engine by the heat. Still might be a good thing for you, especially if you are interested in an automatic tranny...
Anyway... you might want to contact Rickady88GT. He just did a 3.5 in his 88. Exact same process as yours, just two less cylinders. He has worked out most of the bugs on this swap and doesn't mind sharing his experiences...
It sounds like that engine got hot. being Aluminum I would be very worried... Not to concerned about an automatic at this point. Unless I get the entire car but it has to have good wiring etc. thanks for the input. Rickady88GT already mentioned on another thread how difficult it might be to get all the extra stuff unless I find a donor car. I am hoping to get lucky...
My next conversion will be a North Star auto or the new 3.6DOHC 5speed but it wont be anytime soon. I wont do it without the entire car. I like all the little extras that you get with the new cars and to keep it smog legal in CA you need alot of little parts that will easely cost 2X the price of the engine and tranny I can part out what I dont use and try to break even on the drive train. If you have any questions just ask or e-mail me. Mine is a little diferent than yours but I may sill be able to help.
I'm not sure if the Isuzu will work with the Aurora/N*. The clutch throwout arm on the Getrag requires "clearancing" to not interfere with the water manifold. The Isuzu has a much larger throw out arm, so be aware of the possibility that it won't work.
------------------ '87 Fiero GT: Low, Sleek, Fast, and Loud '90 Pontiac 6000 SE AWD: None of the Above
Luck, Fate and Destiny are words used by those who lack the courage to define their own future
I figured it would not cost anything to give a try and see how bad it is. I will report back when I try to mate the two together. I spent the day getting an engine hoist and jack stands. I had hoped to have the cradle behind the car by tonight and clean the mess tomorrow. At this rate I'll be lucky to roll the engine free sometime tomorrow.
Thanks for the offer Rickady88GT, I'll be asking questions for sure... In fact here is a quick question for you, Will or anybody. There is an intake manifold on ebay:
Would this be a bolt on item? I have read somewhere that I need to get the throttle body from earlier years to avoid getting an IAC stepper motor because of the Holley commander system. Is that true? Should I try to get this thing or pass on it?
[This message has been edited by cptsnoopy (edited 04-29-2004).]
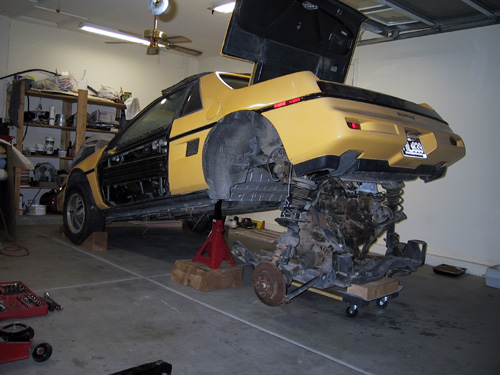
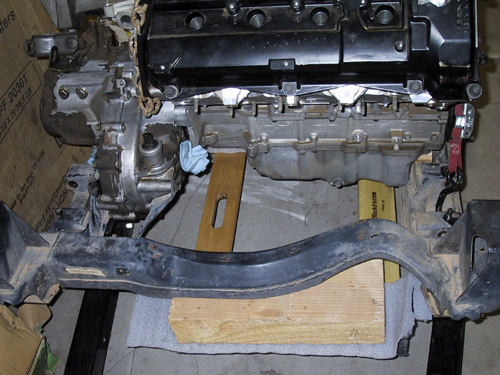
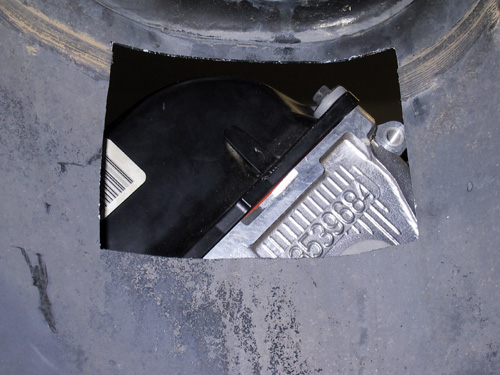
Got a little done today. Car is up, cradle is out and the duke is off the cradle. I will try to mate the 4.0l engine to the trans next just to see if it will work. Here are todays pics.
This is the car up in the air and engine hoist out of the way. Ready to roll that sucker out of there...
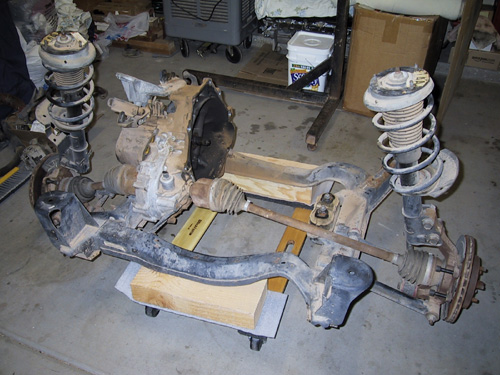
This is the Izuzu trans on the cradle. Now its time to see if this combo might work...
[This message has been edited by cptsnoopy (edited 05-11-2012).]
They are all exactly the same width and hight but the V6 has one row of cylnders cut off. So the S* is a little shorter in length. this is a Corvette L98 a S* and the Stock 2.8 all side by side.
maybe they could make a 4.6, short star? i tried squeezing this thing in the cradle with the tranny in the stock postion. it would not go because of the front engine mount support that is welded onto the cradle. it sure is a tight fit. Rickady88GT were you able to leave your trany on the stock mounts? or at least not move it to the left?
here is the trany actually bolted to the engine, err, three bolts that is...
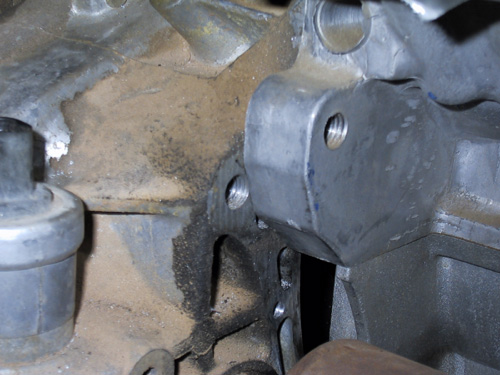
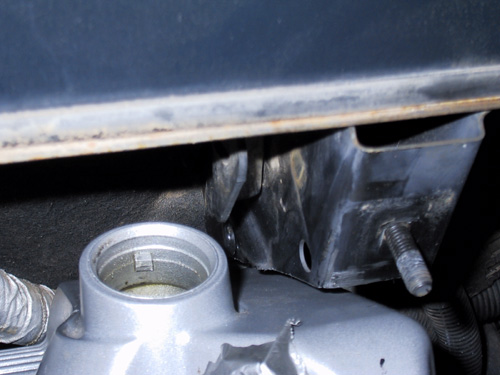
the izuzu trany required a little bit of trimming on the upper right side of the bell housing to clear the water pump manifold.
this is the area before trimming (from a different angle). this is the trans before i removed it from the duke.
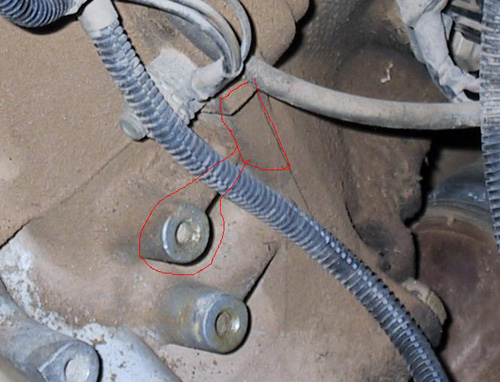
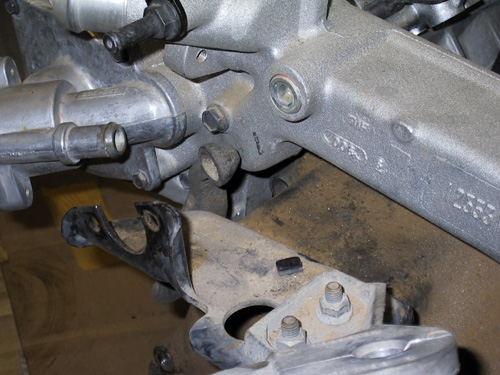
from what i can see, there will be two centering pins and four total bolts holding this thing together. this bolt on the right side will need to be modified somewhat like the getrag/northstar mod. the other three bolts lined up.
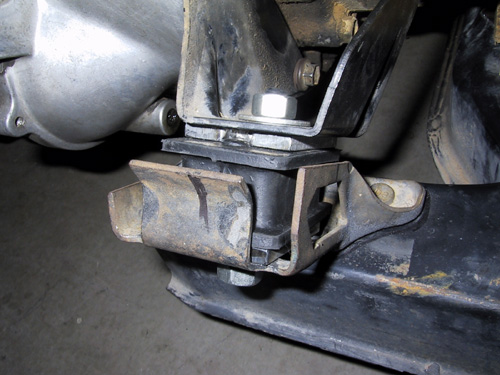
hey will, here is the answer to the clutch arm question. it just won't work were it is! I think i can fab a new arm and set the slave cyl lower to match...
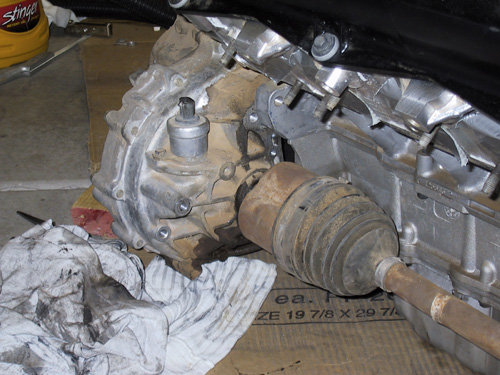
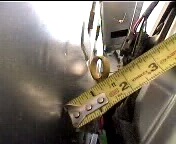
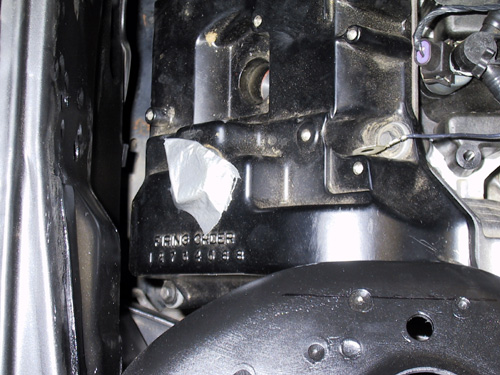
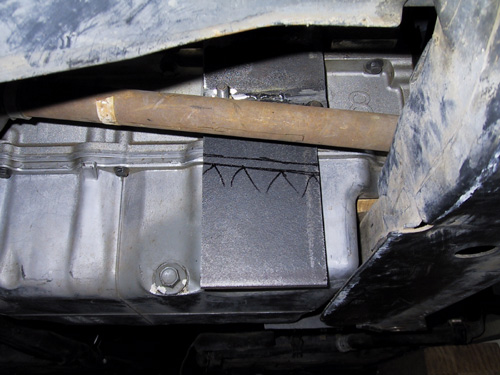
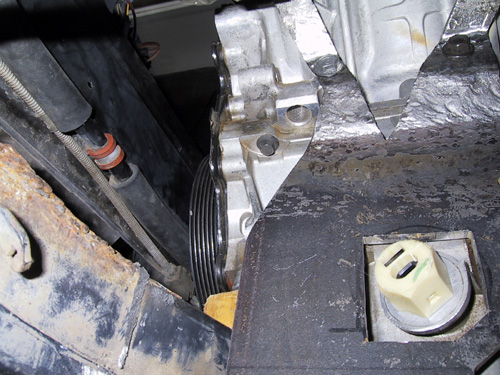
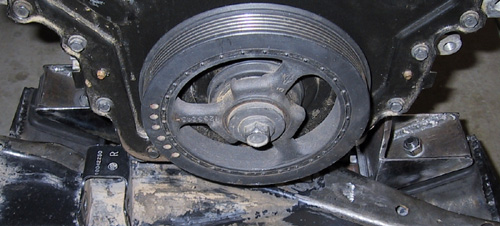
i was concerned that the tripot would not fit. luck was on my side... it fits but it comes very close the the oil pan.
here is the clearance between the tripot and the oil pan. i am not sure that it will work through the range of the suspension.
[This message has been edited by cptsnoopy (edited 05-11-2012).]
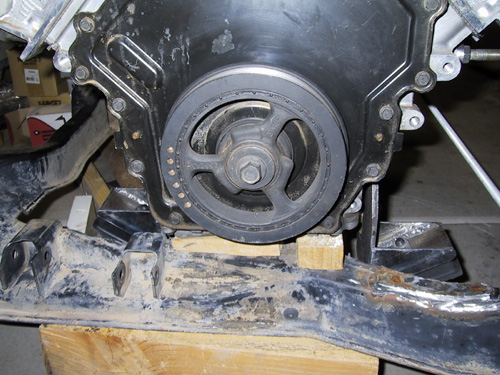
i put the engine on the cradle today with the trany in the stock mounts. the front of the engine was resting on a couple of small pieces of wood on the cradle. the front of the engine was about 3/4 to 1 inch higher than it will be when mounted. i slid the cradle under the car and started lowering. suprise! the usual laundry list of stuff to be done. passenger side decklid hinge support will need trimming. the decklid support spring will need to be removed. a gas strut added to the pass. side to hold the decklid up. the dogbone mount will have to go. some trimming may have to be done to the pass. side strut tower. in addition to the clutch arm needing to be changed to pivot further back and the slave mounted to match. I thought about moving the trany further left but the left axle is so short, i will try not to move it more than 3/8 to 1/2 inch. hopefully the tripots have that much play. if not then i wont move it left at all. the foward cradle crossmember will be cut out and a new crossmember welded in several inches forward of the old location. pretty much the same stuff everyone else has been doing looks like the way to go. got a question regarding the izuzu trany input shaft. it looks like the shaft is too short for a t/o bearing. is this true? there is only about 1/8 inch of material forward of the clutch splines. does the getrag use a t/o bearing? maybe the flywheel is thick enough to make up the space between the crank and the input shaft... i will look at the duke to see what they did there...
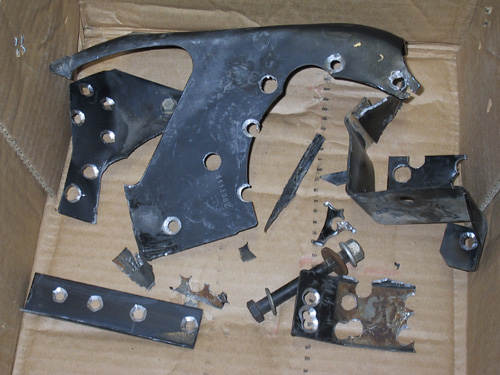
its been a while since I actually went out and worked on the car. I removed the dogbone mount from the pass side strut tower and rear cross brace. I am not too happy with the method but the pieces are removed. I used a small pilot drill to drill out the middle of the spot weld and then a 1/2 inch drill to drill out just deep enough in the bracket to remove the weld. sounds good in thought but I am not the craftsman my mind seems to think I am... The good news is that it ought to work ok. Since I want to leave the trany in its stock location I will be trimming back the pass side strut tower as much as I can get away with and then welding a cap over the cut out area. That will happen after I put together the coilover shocks to see how much room there is.
this is the rough finish after removing the dogbone bracket
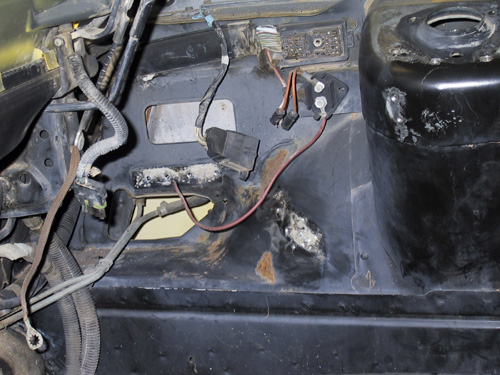
this is the battery tray area after removing the tray
this is the remains after the butcher job...
[This message has been edited by cptsnoopy (edited 05-11-2012).]
Looks fun. I ground mine off with a 4inch grinder. Little to no finnish work after the brakets came off. I plan to do the same thing you plan, when I do a N*. I will (plan) to use coil overs and then cut/reshape the strut. As far as the stock Fiero mounts go I cut off the front mounting pad that whent under the crank pully and I cut out/replaced the entire frony crossmember that had the tranny mount on it but the 0ne Fiero mount for the left rear mount is the stock Fiero mount. I slotted the holes so it is not in the exact Fiiero location but it is close as far as left to right goes. But front to back may or may not be the same? I centerd the engine in the bay. I dont remember where it sat on the first trial fit but I now have two inches on both the trunk side and firewall side. Have fun
------------------
Rickady88GT QuadCam 3.5 V6
[This message has been edited by Rickady88GT (edited 05-26-2004).]
How much of the dogbone mount did you really have to remove?
The normal mounting for the coil pack is on the black cam cover all the way toward the front of the engine (to the right as it sits in the engine bay). The coil pack comprises most of the interference between the Northstar and the dogbone mount.
There is a SECOND set of coil pack mounts that let you move the coil pack toward the transmission (to the left as it sits in the engine bay) by 4 inches or more. Once that's done, it looks like minimal trimming of the dog bone mount would be necessary to clear the cam cover. I just discovered this fairly recently...
------------------ '87 Fiero GT: Low, Sleek, Fast, and Loud '90 Pontiac 6000 SE AWD: None of the Above
Luck, Fate and Destiny are words used by those who lack the courage to define their own future
I used a 4 inch grinder on a small motorcycle trailer I put together last year. My wrists were sore for several weeks from the vibrations. kinda like tennis elbow. because of that i elected to go the more crude route of using the drill. I am hoping that it won't be too difficult to cover up the holes when it is time to finish the engine bay. I can't remember at the moment who posted a picture of their cradle with the forward crossmember cut out. but they left about 10 to 12 inches on the drivers side that still had the tranny mount in place. That person then welded their new crossmember all the way across from left to right and butted up to the forward edge of the remaining crossmember. It looked like it would hold up well. I am looking to do something along those lines, i think. Your original thought about not having the doner car is certainly holding true. I am waiting on the guy who sold me the intake manifold to let me know if he can supply the rest of the accessories that I need to fit the engine to the cradle. the big holdup now is needing an A/C compressor to see what clearance I will need for the front crossmember. i must have A/C out here as I am getting to old to survive the 4-55 A/C method any more. (2-55 in this car...) when i test fitted the engine/trans on the cradle and under the car, the cradle had the front motor mount cut out but the forward crossmember was still in place. this offset the engine slightly to the rear and about 1/2 to 3/4 inch toward the drivers side. so i am not too sure what kind of clearance i really have until i can cut and move the forward crossmember. this leads to Will's question. I am not sure exactly how much of the dogbone mount really needed to be removed but the portion that sits on the pass side strut tower was the first part that i ran into. i did not see a way in my mind to use the stock dogbone mount location so i removed the whole thing. once i get the cradle set up i will be able to see how it might work. i still need to pick up a coil pack along with alot of other goodies so i can see how they will fit. again, thanks for the good info. +'s sent
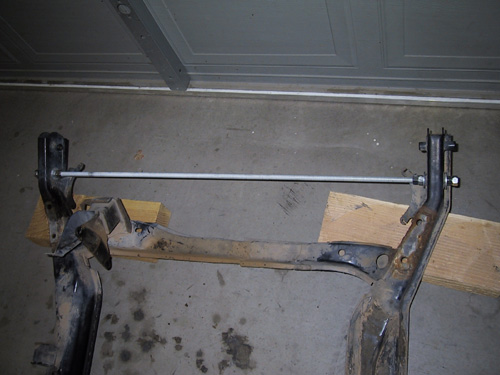
i managed to find an A/C compressor, not the correct one but close enough for checking clearances. to keep the cradle the same width during the cutting and welding of the front cross member i used a piece of 1/2 inch all-thread stuck through the drag-link holes and double nutted each end. hopefully it'll be close enough. i cut out most of the front cross member and set the engine and trans on the cradle. i bolted the trans to the stock mounts and blocked up the front of the engine as level as i could. this time the engine is very close to where it will be after installing the custom engine mounts. after lowering the car over the engine, it appears that i will have just enough room after notching the pass side strut tower for coilover shocks. the pass side deck-lid mount support will be cut just below the upper bolt and down at about a 45 degree angle towards the firewall. this will leave just enough room for the driver�s side deck-lid support spring if i don't need to adjust it any tighter.
this is the 1/2" all-thread in place to hold the cradle at the correct size
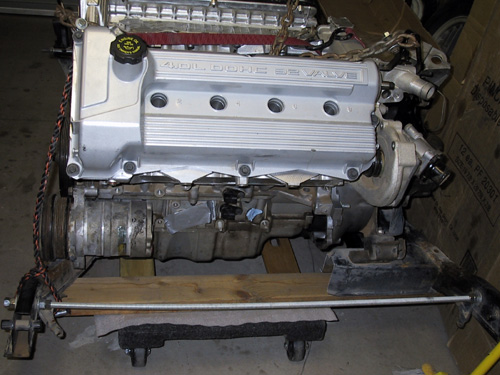
this is the engine/trans sitting on the cradle after the front cross member was cut out. the part holding the trans mount remains
this is the other side of the engine and cradle, lots of room for the axles and exhaust (i hope)
[This message has been edited by cptsnoopy (edited 05-11-2012).]
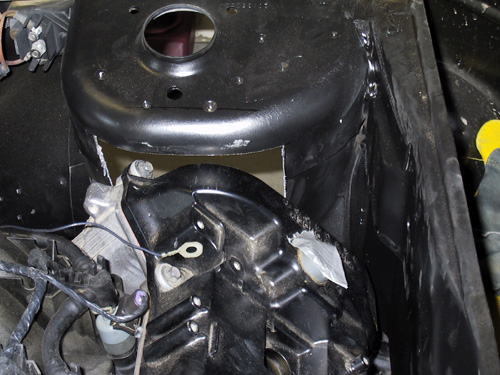
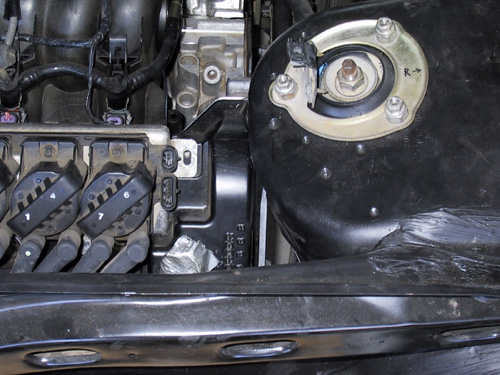
i cut the pass side strut tower, approx 6" X 6". then the pass side deck lid hinge support at an angle to match the rocker cover. i want to thank those who posted on removing the deck lid support springs with a tie down strap. it worked like a champ!
the car fit over the engine very well with one more thing to consider. the oil fill cap will either have to be modified so that it does not stick up above the rocker cover or I will have to cut the deck lid spring support out. i don't want to cut the support out because it is helping to support the deck lid hinge. i'll have to see what can be done with the oil fill cap. it would be nice to do what Rickady88GT did with his shortstar covers but I think these would be harder to mod like that. I noticed online that someone has cut in an oil filler cap on the middle of the rear rocker cover. i will try to do that also.
today's pics with the cradle bolts in...
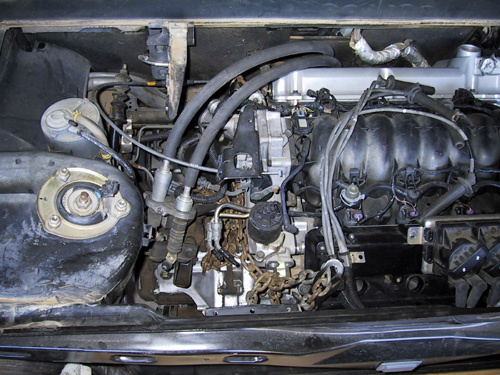
here is the mockup. this is a rough idea of what it should look like after the motor mounts are fabbed and bolted in.
this is the pass side strut tower from a side view.
this is the pass side strut tower from a top view.
this is the pass side strut tower view from inside the wheel well.
this is the oil filler neck and the pass side deck lid spring support.
[This message has been edited by cptsnoopy (edited 05-11-2012).]
How much of the dogbone mount did you really have to remove?
Will, I looked at the stock dogbone mount and it looks like it would not quite fit the way i have this setup. it would interfere with the PCV hole in the rocker cover at the bottom of the mount.
[This message has been edited by cptsnoopy (edited 06-02-2004).]
Looks like you are having fun I see that hinge mount is VERY close to the cam cover? I would sugest haveing at least .75inch minimum between that hinge mount and engine. Unless you solid mount it. That just looks to close for comfort. Even with two dogbones the engine will move up and smash the cam cover on the decklid mount? You will have 250+ torque in that bad boy, that is enough to join the cam cover with the decklid mount if they are to close.
you are right about that one. the clearance for now is 1/4" I'll have to make that bigger on the next trim. for now the plan is to use rubber or poly engine mounts.
Master Tuner Akimoto,
thanks. the fun will be in trying to weld the inset piece back in. I am thinking a beefy straight across strut tower brace may be in order.
i was able to put the suspension in with the stock springs and all... It will still need to have coilovers to get a reasonable amount of clearance though. for now I can eyeball where the water lines, exhaust and fuel lines might be routed.
wow reallllly great write up on this.. this is also going to be one of my projects soon (have I said that?? ohh well its late and bushing smokes got to me) I will be doing this same thing but to a 87GT with a getrag. please keep up the great documenting. it'll either make me or break me.. if my has to be done in a month 3800Sc doesnt kill me first!!!! L8
------------------ Ferrari 308 GTB rebody on a modified 86SE chasis Soon to have a highly hooped up 3800SC..Ohh yeah baby!! Contacts _ AIM / Zildjianfx _ Yahoo / djdraggin Remember, always brush your milk, drink your teeth, dont do sleep and get eight hours of drugs.
I am waiting for parts to come in. that way i can figure out how to mount the engine to the cradle without getting in the way of the exhaust, a/c, water lines, etc. I am still trying to find a used alternator if for nothing else to use as a core for checking clearances and then for getting a new alternator. so far i have received a few things but i have a ways to go. I am hoping to pick up the spec clutch and flywheel that Will and GXSRBOBBY are getting made for us. that and i am spending alot of time at work to help catch up on the parts bill... when i get a chance i'll do some more and post pics.
Originally posted by cptsnoopy: here is the clearance between the tripot and the oil pan. i am not sure that it will work through the range of the suspension.
Just a heads up, you can get neoprene boots that don't have "sharp" corners in them, that will probably give you an extra 1/4-1/2" clearance.
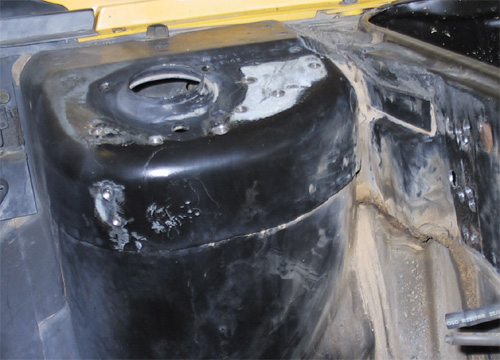
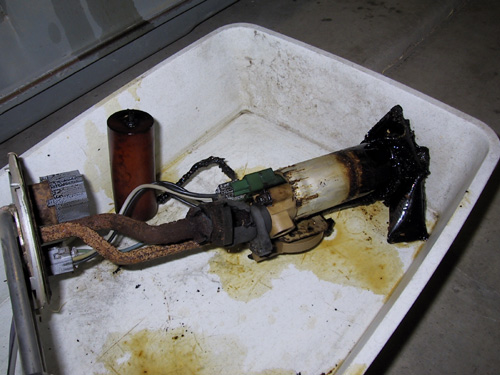
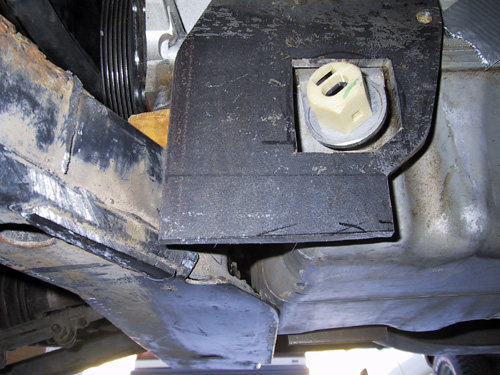
ok then... the fuel tank is nasty!!! here is a pic of the fuel pump/sending unit. any ideas on how to clean up a fuel tank that has this gunk in it? the outside of the tank looks great, the inside has lots of this dark crud sticking to the walls. any magic solvent to break this junk up without melting the plastic baffles? the plastic looks to be in ok shape for now.
[This message has been edited by cptsnoopy (edited 05-11-2012).]
well, poop anyway. I am going to the junk yard tomorrow to see if they still have the 87 . i'll have to hope for the best. this one might be able to be cleaned but i doubt if breathing the odors is worth it.
EDIT: later the next day... went the yard only to find the 85 and 87 GT's had been removed and just two 84's were out there. no gas tanks to be had today... i tried to get some washers for the coilover conversion but after I removed the drivers side, i found the passenger side washer was missing. I bought the one washer for 89 cents and went home... kinda dismal...
[This message has been edited by cptsnoopy (edited 08-05-2004).]
I gave up on the gas tank for now. Since it will be a little while before I really need it I will keep my eyes open for a local one that will work. I almost got the fuel sending unit cleaned up and working but as I was cleaning the wiper arm, I snagged a small piece of metal and broke it off rendering the unit useless. It was really gummed up and rusted so I don�t know how well it would have worked if I did not break it.
I put the engine back in the car today and installed the suspension minus the springs. I wanted to see where the axles would travel as they go up and down, stop to stop. It looks like there will be just enough room to install the rubber mounts at the passenger side of the car, front and rear. Here are some more pictures. My apologies for those of you with dial up connections. I know this must take forever to load.
[This message has been edited by cptsnoopy (edited 05-11-2012).]
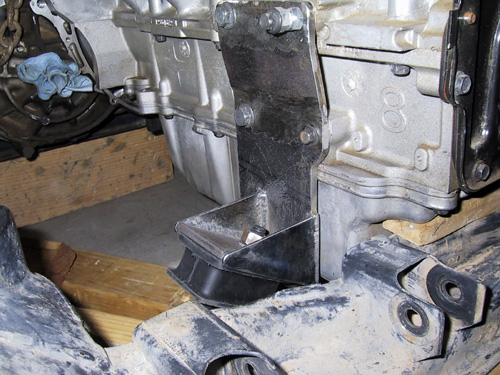
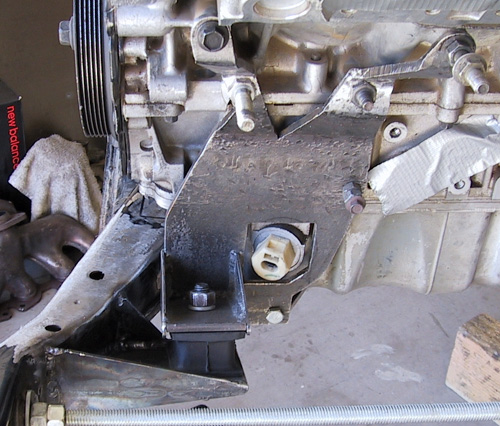
still working on the lower motor mounts. got the pads and gussets welded on today. please excuse the hardware as I don't have the proper bolts just yet to secure the mounts to the engine. I will try to get the cradle mounts for these two motor mounts welded up tomorrow. then i can start working on the forward crossmember and the upper front and rear rubber mounts. when the mounts are finished I am hoping the engine will be supported even with the trans disconnected. as i am not an engineer, this will be interesting to see. Note: the mounts are not quite finished yet, I plan on adding stiffners to the side were needed. special thanks to darthfiero for the cheap 1/2 ton dodge motor mount suggestion.
view from passenger side of engine.
front of engine, lower mount
front of engine, lower mount, different view
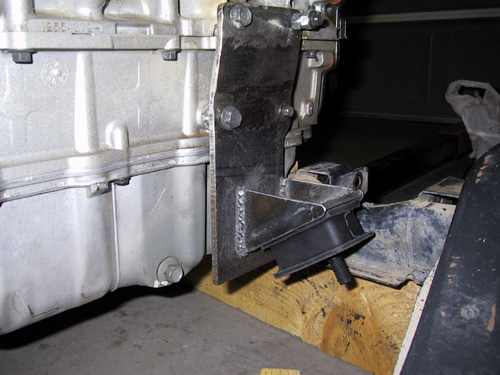
rear of engine, lower mount
rear of engine, lower mount, different view
[This message has been edited by cptsnoopy (edited 05-11-2012).]
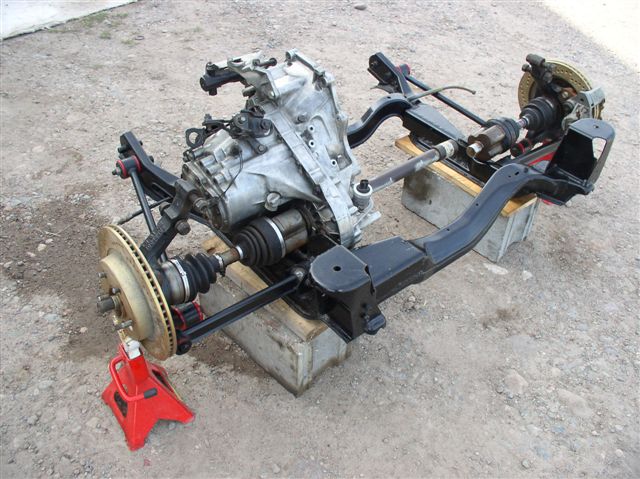
Have you put the right side drive axle in the tranny and hung the suspension on the cradle? That motor mount on the right rear (pass side/trunk) looks like it is in the way of the long axle? The axle will ride right inbetween the susp mounts and be an inch or two above the cradle with the susp fully extended. You may have to make a longer mount that will not be in the way of the drive shaft? You may have to look close but this is a pic of the S*. Look at where the drive shaft will be. This is an auto but the drive shaft runs in the same place for manual or auto.
------------------
Rickady88GT QuadCam 3.5 V6
[This message has been edited by Rickady88GT (edited 08-22-2004).]
I put the cradle with suspension (minus springs) on the car and made marks (that's what the black lines are on the previous pics of the rear mount are. the gusset on the pass side is close but I can grind it down if I need to. there is still the possiblility that I messed up the measurements and will have to change it later though. thanks for the thoughts.
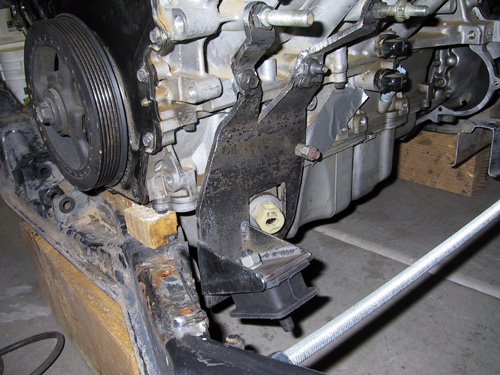
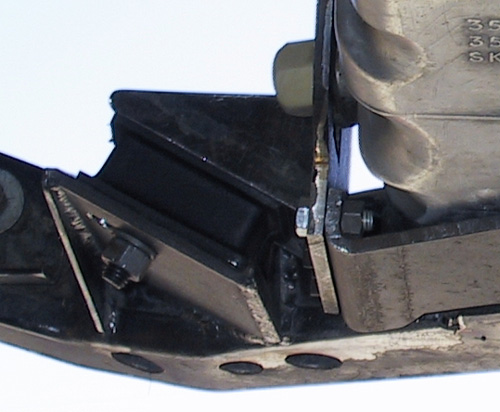
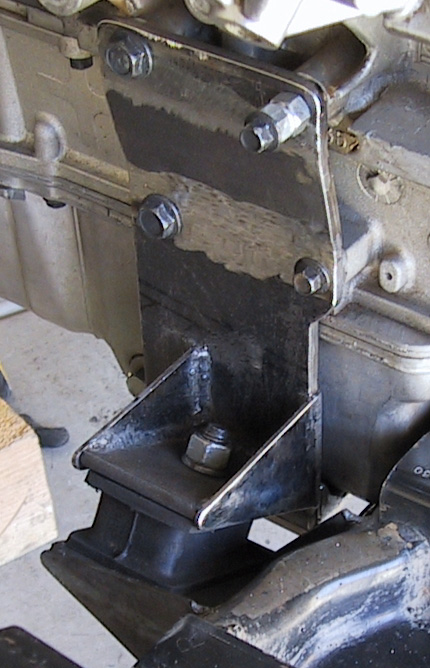
i hope this works ok, it took enough time to fab... these are more pics of the lower pass side engine mounts, front and rear. Just as a note the forward mount bolted to the engine was a straight piece of 1/4" steel that was heated and bent to form the angles. the rear mount was cut in pieces first and then fitted to the engine, then welded to form the proper angles. that was much easier and quicker than heating and bending... again, the plan is to somehow fab mounts to the front and rear crossmembers that will attach near the middle of the engine heads to support the engine on four mounts and to have the tranny use its stock mounts. hopefully that will support the engine enough to not need a dogbone mount...
note: a couple of the pics are too tall to show, just click on the icon to see them...
view from the front.
forward engine mount pass side.
rear engine mount pass side.
[This message has been edited by cptsnoopy (edited 05-11-2012).]
Cool. Are you going to incorporate the front cradle brace into that front mount?
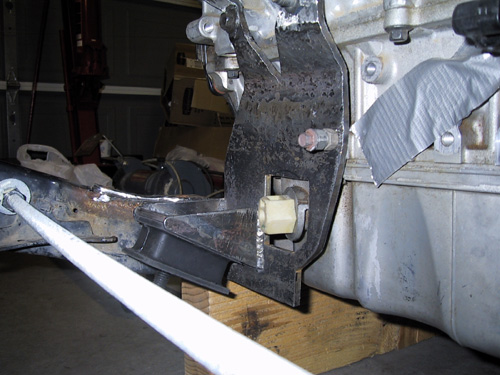
that is the plan for now. I am working on the tranny mounts right now. the forward one was coming apart so I borrowed another one of darthfiero's ideas and used the same type of mount to replace the rotten rubber. it took two pieces of 1/4" steel "pads", one on top and one on the bottom to make up the difference in space. the rear mount has a smaller space to fill so it will be different. when I finish those I will figure out how to replace the front cradle brace. what's left of the original brace that holds the trany mount and the front pass engine mount should hopefully both tie into the new brace...
[This message has been edited by cptsnoopy (edited 05-11-2012).]


 I can part out what I dont use and try to break even on the drive train.


 In fact here is a quick question for you, Will or anybody. There is an intake manifold on ebay: