Pennock's Fiero Forum
  The Construction Zone
  Aurora 4.0l / Izuzu 5 speed swap into 88 coupe (Page 19)

Post New Topic  Post A Reply
Email This Page to Someone! | Printable Version

This topic is 26 pages long:  1   2   3   4   5   6   7   8   9   10   11   12   13   14   15   16   17   18   19   20   21   22   23   24   25   26 
Previous Page | Next Page
next newest topic | next oldest topic
Aurora 4.0l / Izuzu 5 speed swap into 88 coupe by cptsnoopy
Started on: 04-27-2004 07:21 PM
Replies: 1012 (72866 views)
Last post by: cptsnoopy on 11-05-2023 09:50 PM
qwikgta
Member
Posts: 4659
From: Virginia Beach, VA
Registered: Jan 2001


Feedback score:    (21)
Leave feedback


Total ratings: 84
Rate this member

Report this Post06-26-2011 12:47 AM Click Here to See the Profile for qwikgtaSend a Private Message to qwikgtaEdit/Delete MessageReply w/QuoteDirect Link to This Post
how it going?

Started my build thread.

Sent you a PM

Rob
IP: Logged
cptsnoopy
Member
Posts: 2585
From: phoenix, AZ, USA
Registered: Jul 2003


Feedback score:    (8)
Leave feedback


Total ratings: 60
Rate this member

Report this Post06-26-2011 01:10 AM Click Here to See the Profile for cptsnoopySend a Private Message to cptsnoopyEdit/Delete MessageReply w/QuoteDirect Link to This Post
Hey Rob,

It's goin but slow. The temps are reaching 113 on a daily basis now and it is hard to do any sanding without dripping sweat all over the hood... . I will be out of the country for a couple of weeks and then concentrating on work for another couple of weeks before I can get some more "quality" time on the project. Good luck on yours, I think you will like it. I'll post a pic tomorrow (when I can get to the camera) to show you how far along mine is. Very close to the Epoxy primer stage. Then some filler or Bondo.

Charlie


IP: Logged
Will
Member
Posts: 14226
From: Where you least expect me
Registered: Jun 2000


Feedback score: (1)
Leave feedback


Total ratings: 237
Rate this member

Report this Post06-26-2011 08:34 PM Click Here to See the Profile for WillSend a Private Message to WillEdit/Delete MessageReply w/QuoteDirect Link to This Post
 
quote
Originally posted by cptsnoopy:

A little while later...


Fly much?
IP: Logged
cptsnoopy
Member
Posts: 2585
From: phoenix, AZ, USA
Registered: Jul 2003


Feedback score:    (8)
Leave feedback


Total ratings: 60
Rate this member

Report this Post06-27-2011 02:52 AM Click Here to See the Profile for cptsnoopySend a Private Message to cptsnoopyEdit/Delete MessageReply w/QuoteDirect Link to This Post
 
quote
Originally posted by Will:


Fly much?


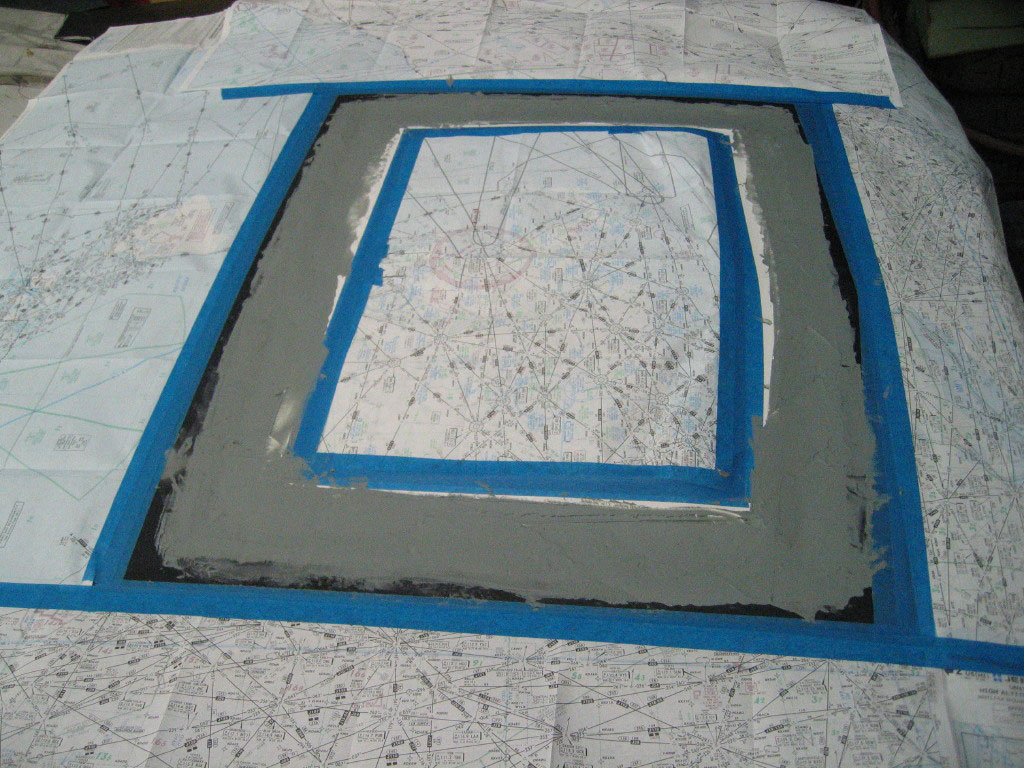
Lol, When I was still living with my father he mentioned that the Jepp charts made great masking paper. So as a tradition I save all my old ones for the same. I fly but not as much as I should.

Charlie

IP: Logged
cptsnoopy
Member
Posts: 2585
From: phoenix, AZ, USA
Registered: Jul 2003


Feedback score:    (8)
Leave feedback


Total ratings: 60
Rate this member

Report this Post08-03-2011 11:20 PM Click Here to See the Profile for cptsnoopySend a Private Message to cptsnoopyEdit/Delete MessageReply w/QuoteDirect Link to This Post
It still lives, just need to get a little cooler temps to actually get something done on it...

Charlie


http://www.youtube.com/watch?v=pJtfKPIY8Qc

http://www.youtube.com/watch?v=p86KOfn4rto
IP: Logged
Patrick
Member
Posts: 36403
From: Vancouver, British Columbia, Canada
Registered: Apr 99


Feedback score: (1)
Leave feedback


Total ratings: 458
Rate this member

Report this Post09-11-2011 11:59 PM Click Here to See the Profile for PatrickSend a Private Message to PatrickEdit/Delete MessageReply w/QuoteDirect Link to This Post
 
quote
Originally posted by cptsnoopy:

I wanted to share a new tool for removing the roof panel from our cars...

Here are a couple of pictures:
This is what the tool looked like next to the glass. The little tab was under the edge of the roof panel.


This is how the tool was following along under the edge of the panel.


These are the tools used to make the tool. the hose clamp was the material. the file to sharpen the edges before bending the tab.


A "+" for you. Great tip, I used it today. Thanks!
IP: Logged
cptsnoopy
Member
Posts: 2585
From: phoenix, AZ, USA
Registered: Jul 2003


Feedback score:    (8)
Leave feedback


Total ratings: 60
Rate this member

Report this Post09-12-2011 01:03 AM Click Here to See the Profile for cptsnoopySend a Private Message to cptsnoopyEdit/Delete MessageReply w/QuoteDirect Link to This Post
Hey Patrick,

Thank you and + back atcha!

Glad it helped. That windshield seal glue can be a real pita...

Charlie

[This message has been edited by cptsnoopy (edited 09-12-2011).]

IP: Logged
Patrick
Member
Posts: 36403
From: Vancouver, British Columbia, Canada
Registered: Apr 99


Feedback score: (1)
Leave feedback


Total ratings: 458
Rate this member

Report this Post09-12-2011 02:26 AM Click Here to See the Profile for PatrickSend a Private Message to PatrickEdit/Delete MessageReply w/QuoteDirect Link to This Post
 
quote
Originally posted by cptsnoopy:

That windshield seal glue can be a real pita...


Charlie, I really appreciated your tip because I was having a heck of a time getting the leading edge of the roof to let go all along the top of the windshield. Your idea for the "tool" worked very well. I was pretty happy getting the sunroof off my parts car (for a swap) without cracking the pillars.

Thanks again!

IP: Logged
Fiero2m8
Member
Posts: 1928
From: Niagara, Ontario, Canada
Registered: Feb 2006


Feedback score:    (10)
Leave feedback

Rate this member

Report this Post09-12-2011 11:33 PM Click Here to See the Profile for Fiero2m8Click Here to visit Fiero2m8's HomePageSend a Private Message to Fiero2m8Edit/Delete MessageReply w/QuoteDirect Link to This Post
Ok Charlie, need an update here as September is hopefully a little cooler

------------------

Indy Northstar-Stretch

IP: Logged
cptsnoopy
Member
Posts: 2585
From: phoenix, AZ, USA
Registered: Jul 2003


Feedback score:    (8)
Leave feedback


Total ratings: 60
Rate this member

Report this Post09-13-2011 03:42 AM Click Here to See the Profile for cptsnoopySend a Private Message to cptsnoopyEdit/Delete MessageReply w/QuoteDirect Link to This Post
 
quote
Originally posted by Fiero2m8:

Ok Charlie, need an update here as September is hopefully a little cooler


Last week it was 110 and over the weekend it has started cooling off a little. It was less than 100 degrees today. Yes, if it was not for work this month I would be spending much more time on the car. After installing the hood vent and getting the seam filled pretty well I tipped the hood over and started sanding all the original black paint off. I wanted to just score it a bit and primer over it but I got carried away and now it is almost done being sanded but I spent way too much time on it. Once I get it in for primer I will start on the roof skin/A-pillars and then move to the deck-lid. That should complete most of the really badly sun damaged parts. The rest should not take nearly as much labor for a decent paint job. The only other major thing I need to do is the front end bushings. They are not too bad now because of the low mileage but I suspect they will crumble apart pretty quickly once I start driving it. While I'm at it I guess it will need some lowering springs just to level the car out. Getting closer but I doubt it will be painted and driving until after Jan of next year...

Charlie


IP: Logged
Letsbuildanexotic
Member
Posts: 253
From: Tucson
Registered: Nov 2010


Feedback score: N/A
Leave feedback

Rate this member

Report this Post09-21-2011 04:02 PM Click Here to See the Profile for LetsbuildanexoticSend a Private Message to LetsbuildanexoticEdit/Delete MessageReply w/QuoteDirect Link to This Post
Hey Snoopy, what's up? I'm the guy you gave your old 4.0L to (still got it), I didn't get a chance to use it, after analyzing the swap it was a bit on the pricey side for me, so I went with a 4.9L. Wanted to see how your project was going, looks like you got a bit farther since the last time I saw it. Stay in touch, I'd like to see it when your done and hopefully mine will be up in running soon as well.

Take care,

Chris
IP: Logged
PFF
System Bot
cptsnoopy
Member
Posts: 2585
From: phoenix, AZ, USA
Registered: Jul 2003


Feedback score:    (8)
Leave feedback


Total ratings: 60
Rate this member

Report this Post09-23-2011 03:20 AM Click Here to See the Profile for cptsnoopySend a Private Message to cptsnoopyEdit/Delete MessageReply w/QuoteDirect Link to This Post
 
quote
Originally posted by Letsbuildanexotic:

Hey Snoopy, what's up? I'm the guy you gave your old 4.0L to (still got it), I didn't get a chance to use it, after analyzing the swap it was a bit on the pricey side for me, so I went with a 4.9L. Wanted to see how your project was going, looks like you got a bit farther since the last time I saw it. Stay in touch, I'd like to see it when your done and hopefully mine will be up in running soon as well.

Take care,

Chris
Hi Chris, I don't blame you. That's a lot of moving parts in the N* engine. From what I read, the 4.9 is a great engine to install and not nearly as complex or costly to setup. How far along are you with the swap? Have you already got it on the road? My car would likely be driving already if I had not decided to do the body swap too. I'll keep in touch and hope to be going on drives again soon.

Charlie


IP: Logged
Letsbuildanexotic
Member
Posts: 253
From: Tucson
Registered: Nov 2010


Feedback score: N/A
Leave feedback

Rate this member

Report this Post09-23-2011 12:07 PM Click Here to See the Profile for LetsbuildanexoticSend a Private Message to LetsbuildanexoticEdit/Delete MessageReply w/QuoteDirect Link to This Post
Everything is mounted and the car is coming down on the cradle for it's first fit test by hell or by high water TODAY! Wiring is 90% done, I had to rebuild my transmission, that's done, the engine still needs a rebuild but does run, so I'm gonna wire her up, fire her off, and work out all the electrical bugs before I rebuild it. I'm horrible with pictures but if I remember I'll snap some pics and post them somewhere, maybe a mini build thread or something. I'll keep ya posted, I have to run your way twice to green up the engine (I always green up my engines all in one shot, ride to phoenix and back twice is over 500 miles).

Take care,

Chris
IP: Logged
cptsnoopy
Member
Posts: 2585
From: phoenix, AZ, USA
Registered: Jul 2003


Feedback score:    (8)
Leave feedback


Total ratings: 60
Rate this member

Report this Post02-20-2012 05:26 PM Click Here to See the Profile for cptsnoopySend a Private Message to cptsnoopyEdit/Delete MessageReply w/QuoteDirect Link to This Post
Just a bump, temps are nice here and I've managed to switch to a better schedule. Hoping for progress in March.

Charlie
IP: Logged
Bloozberry
Member
Posts: 7760
From:
Registered: Jan 2009


Feedback score: N/A
Leave feedback


Total ratings: 311
Rate this member

Report this Post02-20-2012 08:13 PM Click Here to See the Profile for BloozberrySend a Private Message to BloozberryEdit/Delete MessageReply w/QuoteDirect Link to This Post
March? There's another 9 days in Feb... let's see some progress!
IP: Logged
cptsnoopy
Member
Posts: 2585
From: phoenix, AZ, USA
Registered: Jul 2003


Feedback score:    (8)
Leave feedback


Total ratings: 60
Rate this member

Report this Post02-22-2012 01:25 AM Click Here to See the Profile for cptsnoopySend a Private Message to cptsnoopyEdit/Delete MessageReply w/QuoteDirect Link to This Post
That's the problem with sanding. It takes a long time to show a little progress.... lol

Charlie
IP: Logged
GSXRBOBBY
Member
Posts: 3122
From: Southern Indiana USA
Registered: Aug 2003


Feedback score: N/A
Leave feedback


Total ratings: 105
Rate this member

Report this Post03-07-2012 01:30 AM Click Here to See the Profile for GSXRBOBBYClick Here to visit GSXRBOBBY's HomePageSend a Private Message to GSXRBOBBYEdit/Delete MessageReply w/QuoteDirect Link to This Post
Glad to see you still going on your project!
IP: Logged
Bloozberry
Member
Posts: 7760
From:
Registered: Jan 2009


Feedback score: N/A
Leave feedback


Total ratings: 311
Rate this member

Report this Post03-31-2012 09:20 AM Click Here to See the Profile for BloozberrySend a Private Message to BloozberryEdit/Delete MessageReply w/QuoteDirect Link to This Post
I took a week off to visit my brother in Phoenix the week before last and tee'd it up to visit Charlie while I was there. (I even brought some Canadian snow along with me.) Some of the first words he spoke upon my arrival were that there's nothing like expecting visitors to make you clean up your shop! His garage was spotless. His car looks awesome, sounds great, and you can tell by the attention to small details everywhere that this car is simply going to rock once it's finished.


It was a pleasure to meet you Charlie... now get back to work!
IP: Logged
cptsnoopy
Member
Posts: 2585
From: phoenix, AZ, USA
Registered: Jul 2003


Feedback score:    (8)
Leave feedback


Total ratings: 60
Rate this member

Report this Post04-01-2012 02:51 AM Click Here to See the Profile for cptsnoopySend a Private Message to cptsnoopyEdit/Delete MessageReply w/QuoteDirect Link to This Post
 
quote
Originally posted by GSXRBOBBY:

Glad to see you still going on your project!

Hi Bobby,

Thanks,

I hope all is going well with you and yours!

Charlie

IP: Logged
cptsnoopy
Member
Posts: 2585
From: phoenix, AZ, USA
Registered: Jul 2003


Feedback score:    (8)
Leave feedback


Total ratings: 60
Rate this member

Report this Post04-01-2012 02:57 AM Click Here to See the Profile for cptsnoopySend a Private Message to cptsnoopyEdit/Delete MessageReply w/QuoteDirect Link to This Post

cptsnoopy

2585 posts
Member since Jul 2003
 
quote
Originally posted by Bloozberry:

I took a week off to visit my brother in Phoenix the week before last and tee'd it up to visit Charlie while I was there. (I even brought some Canadian snow along with me.) Some of the first words he spoke upon my arrival were that there's nothing like expecting visitors to make you clean up your shop! His garage was spotless. His car looks awesome, sounds great, and you can tell by the attention to small details everywhere that this car is simply going to rock once it's finished.


It was a pleasure to meet you Charlie... now get back to work!


Thank you for the Kind words Dave! It was great meeting you and your family. And yes, thank you for providing incentive to dust off the project and getting me inspired to get-r-done! I decided to start with extending the wires from the doors to the body... should be fun.

Weather wise, it was nice and warm today. I think it was around 90 degrees and I was happy to see that the air conditioning still works in the house...

Charlie
IP: Logged
cptsnoopy
Member
Posts: 2585
From: phoenix, AZ, USA
Registered: Jul 2003


Feedback score:    (8)
Leave feedback


Total ratings: 60
Rate this member

Report this Post04-26-2012 01:29 AM Click Here to See the Profile for cptsnoopySend a Private Message to cptsnoopyEdit/Delete MessageReply w/QuoteDirect Link to This Post
I'm giving up.... I mean I'm giving in... I'm getting some help with the sanding so my project will actually have a body on it before I croak.... Hopefully updates soon.

Charlie
IP: Logged
PFF
System Bot
cptsnoopy
Member
Posts: 2585
From: phoenix, AZ, USA
Registered: Jul 2003


Feedback score:    (8)
Leave feedback


Total ratings: 60
Rate this member

Report this Post05-10-2012 10:44 PM Click Here to See the Profile for cptsnoopySend a Private Message to cptsnoopyEdit/Delete MessageReply w/QuoteDirect Link to This Post
I just posted this in the mall:

 
quote
I finally gave in and sent my body parts to a guy to have them prepped and painted so I can actually drive and tune my 8 year garage queen with the Shelby Aurora engine in it...
Most of my parts are in decent shape with the exception of the wing stands and the right (passenger) outer door skin. I am hoping to get these parts from someone within a week or so and if possible (I know it's a long shot) locally...
The Body I am using is an 86GT but I am pretty sure the parts can be from an 87 or 88GT also... If anyone can help out please post or PM what you have and what you want for them... Thank you very much!

Charlie


If anyone can help with two nice wing-stands and a right door skin for an 86-88GT it would be much appreciated! These parts will be repainted so only the integrity of the parts is important.

Charlie

[This message has been edited by cptsnoopy (edited 05-10-2012).]

IP: Logged
pavo_roddy
Member
Posts: 4351
From: State with a city named Gotham
Registered: Apr 2004


Feedback score: N/A
Leave feedback


Total ratings: 71
Rate this member

Report this Post05-15-2012 02:56 PM Click Here to See the Profile for pavo_roddySend a Private Message to pavo_roddyEdit/Delete MessageReply w/QuoteDirect Link to This Post
HI all

How big is the 4.0 Olds Aurora engine? Is it bigger or smaller than a 3.4 DOHC?

Thanx all,

Air-eek

------------------
Me, I sell engines, the cars are for free, I need something to crate the engines in....
Enzo Ferrari....

Aerodynamics are for people who can't build engines....
Enzo Ferrari...

Today they are called garage's, yesterday, they were stable's! Eric Jacobsen.... An advancement, of other
voices I came across.

S.F??, hint, it's a car manufacturer....

Do not walk infront of me, I may not follow. Do not walk behind me, I may not lead. Walk beside me and be my friend forever.
-unknown- found here: http://crystal-cure.com/love-quote.html

Life's best tour guides? Contrast and mixture. One sets things apart yet cohesively, the other seperates associatingly.

IP: Logged
Will
Member
Posts: 14226
From: Where you least expect me
Registered: Jun 2000


Feedback score: (1)
Leave feedback


Total ratings: 237
Rate this member

Report this Post05-15-2012 03:37 PM Click Here to See the Profile for WillSend a Private Message to WillEdit/Delete MessageReply w/QuoteDirect Link to This Post
Bigger. It has slightly wider heads on a wider bank angle and is longer as well.

It is lighter than the 3.4, though.

[This message has been edited by Will (edited 05-15-2012).]

IP: Logged
pavo_roddy
Member
Posts: 4351
From: State with a city named Gotham
Registered: Apr 2004


Feedback score: N/A
Leave feedback


Total ratings: 71
Rate this member

Report this Post05-15-2012 03:39 PM Click Here to See the Profile for pavo_roddySend a Private Message to pavo_roddyEdit/Delete MessageReply w/QuoteDirect Link to This Post
HI all

Thanx, though I was hoping it actually may have been smaller..

Thanx all!!

Ear-ick
IP: Logged
cptsnoopy
Member
Posts: 2585
From: phoenix, AZ, USA
Registered: Jul 2003


Feedback score:    (8)
Leave feedback


Total ratings: 60
Rate this member

Report this Post05-17-2012 09:57 PM Click Here to See the Profile for cptsnoopySend a Private Message to cptsnoopyEdit/Delete MessageReply w/QuoteDirect Link to This Post
The Lambo door hinges were a great idea and they work fine until I tried to fit the fenders. Some time consuming modifications will be required just to maybe get lucky and have them work.
The guy that made them has since made a new design that will fit better out of the box. Beta testing can be a biatch sometimes...

Charlie


Passenger side very close to done now. Lots of material removed from the hinge arm but it still looks and feels strong enough. This may work yet.. Still have to do the drivers side... At least another couple of days for that...

[This message has been edited by cptsnoopy (edited 05-19-2012).]

IP: Logged
cptsnoopy
Member
Posts: 2585
From: phoenix, AZ, USA
Registered: Jul 2003


Feedback score:    (8)
Leave feedback


Total ratings: 60
Rate this member

Report this Post05-24-2012 11:43 AM Click Here to See the Profile for cptsnoopySend a Private Message to cptsnoopyEdit/Delete MessageReply w/QuoteDirect Link to This Post
Some pics of the Lambo door hinge modifications and wire extensions.

Front to rear of the passenger side lambo door hinge. It's not easy to see but there is very little clearance between the gas struts and the hinge arm.


Notice the nuts used as spacers to move the gas struts further away from the hinge arm. These are the crux of the problem. The struts push the fender outward once the door is opened by this amount...


I asked Jessie about this and he recommended shaving the hinge arm to give more room between the gas struts and the hinge arm. below are examples of what I did to both hinges. After shaving the hinge arm I was able to remove all the nut spacers.. Now the gas struts just touch the fender when the door is swung fully open.


Once that was done it was apparent that the top edge of the hinge body also hit the fender just before the door was fully swung outward... More grinding...


A couple of pics of the mock up while modifying the door hinges and fitting the fender and door skins, all of which require modification.


The lambo door hinges require extending the wires to the various electric options if installed. A manual door has two wires for the ajar light switch. My doors now have pw, pl and pm. That makes 13 wires that needed a 10" extension. The first pic is of the passenger side wire extensions before soldering them to the door side of the wires. The next pic shows how much extra wire is hanging from the door with extensions... The last pic is of the driver's side wire extensions. I figure that they are going to be used a lot more so I got high strand count, very flexible wire to do this side. Once those are soldered in I will start looking into mounting the temp sensor and routing power to the self dimming mirror with temp and compass.


Charlie

IP: Logged
cptsnoopy
Member
Posts: 2585
From: phoenix, AZ, USA
Registered: Jul 2003


Feedback score:    (8)
Leave feedback


Total ratings: 60
Rate this member

Report this Post06-01-2012 12:04 PM Click Here to See the Profile for cptsnoopySend a Private Message to cptsnoopyEdit/Delete MessageReply w/QuoteDirect Link to This Post
1.5" Held drop spindles are on order. I am hoping I can adapt the 12" brakes to work without too much trouble. The additional width from using the rear bearing setup might cause issues with spacing... I'll report what I find.
The body parts are pretty much prepped (from what I am told) and are awaiting a slot in the painter's schedule. It could be up to 6 weeks to get them all in and out of the paint booth with fitting parts in between other projects... That should give me plenty of time to get the drop spindles installed and working...

Charlie
IP: Logged
Bloozberry
Member
Posts: 7760
From:
Registered: Jan 2009


Feedback score: N/A
Leave feedback


Total ratings: 311
Rate this member

Report this Post06-02-2012 06:57 AM Click Here to See the Profile for BloozberrySend a Private Message to BloozberryEdit/Delete MessageReply w/QuoteDirect Link to This Post
The rear bearing assemblies on the front of HT's drop spindles push the wheel mounting flange 4.6mm further out.
IP: Logged
topcat
Member
Posts: 5486
From: Charleston SC
Registered: Dec 2001


Feedback score:    (7)
Leave feedback


Total ratings: 148
Rate this member

Report this Post06-02-2012 08:19 AM Click Here to See the Profile for topcatSend a Private Message to topcatEdit/Delete MessageReply w/QuoteDirect Link to This Post
I had similar fit issues with those same hinges - i decided to go back to stock instead of the modifying to the hinges and or fenders.

 
quote
Originally posted by cptsnoopy:

The Lambo door hinges were a great idea and they work fine until I tried to fit the fenders. Some time consuming modifications will be required just to maybe get lucky and have them work.
The guy that made them has since made a new design that will fit better out of the box. Beta testing can be a biatch sometimes...

Charlie


Passenger side very close to done now. Lots of material removed from the hinge arm but it still looks and feels strong enough. This may work yet.. Still have to do the drivers side... At least another couple of days for that...


IP: Logged
cptsnoopy
Member
Posts: 2585
From: phoenix, AZ, USA
Registered: Jul 2003


Feedback score:    (8)
Leave feedback


Total ratings: 60
Rate this member

Report this Post06-02-2012 09:34 AM Click Here to See the Profile for cptsnoopySend a Private Message to cptsnoopyEdit/Delete MessageReply w/QuoteDirect Link to This Post
 
quote
Originally posted by Bloozberry:

The rear bearing assemblies on the front of HT's drop spindles push the wheel mounting flange 4.6mm further out.


Thank you Dave! I read that in another thread you posted in plus that the C4 hats were actually thinner than the stock hats so the total was under 4mm a side. (since I'm running the C4 rotors). Are you using the 12" brakes also and did you have any caliper slider limit issues or is your setup different regarding brake caliper brackets etc? On the front of mine I am using the dogbone looking bracket with countersunk bolts that move the caliper straight out from center with no up or down offset. I should have the spindles in a week and I can mock up the system before installing but I am not confident that it will all work without some modifications. I should have asked Richard at HT if I can simply use my stock 88 front hubs as they only have 70K on them. My guess is that the bolt pattern will be different from the rear but I really have no idea...
I hope all is well up North.

Charlie

IP: Logged
PFF
System Bot
cptsnoopy
Member
Posts: 2585
From: phoenix, AZ, USA
Registered: Jul 2003


Feedback score:    (8)
Leave feedback


Total ratings: 60
Rate this member

Report this Post06-02-2012 09:39 AM Click Here to See the Profile for cptsnoopySend a Private Message to cptsnoopyEdit/Delete MessageReply w/QuoteDirect Link to This Post

cptsnoopy

2585 posts
Member since Jul 2003
 
quote
Originally posted by topcat:

I had similar fit issues with those same hinges - i decided to go back to stock instead of the modifying to the hinges and or fenders.


Yep, it was a bit of a shock especially after looking at the pictures they were showing of cars that appeared to have them installed and working well... That would be why I went ahead and bought them. Jessie explained the changes to the new design and it sounds like he addressed all the issues I ran into... I like the look and the personality they give our cars so I hope the new design does well...

Charlie


IP: Logged
Bloozberry
Member
Posts: 7760
From:
Registered: Jan 2009


Feedback score: N/A
Leave feedback


Total ratings: 311
Rate this member

Report this Post06-02-2012 08:45 PM Click Here to See the Profile for BloozberrySend a Private Message to BloozberryEdit/Delete MessageReply w/QuoteDirect Link to This Post
 
quote
Originally posted by cptsnoopy:
Are you using the 12" brakes also


Yes.

 
quote
Originally posted by cptsnoopy:
... and did you have any caliper slider limit issues


No, but it's very close on one side.

 
quote
Originally posted by cptsnoopy:
...is your setup different regarding brake caliper brackets etc?


I bought the Fiero Addiction brackets which clock the calipers somewhat, but as it turns out, the HT '88 drop spindles are clocked in the opposite dierction by about the same amount so the calipers now sit roughly at the 9 o'clock position on the RH side of the car and at the 3 o'clock when looking at the LH side.


quote
Originally posted by cptsnoopy:
I should have asked Richard at HT if I can simply use my stock 88 front hubs as they only have 70K on them. My guess is that the bolt pattern will be different from the rear but I really have no idea.


I think you're right about that... they have different bolt patterns. Besides, I think it best to ditch the stock '88 wheel bearing assemblies anyway... too hard to find and too expensive if you do.
IP: Logged
cptsnoopy
Member
Posts: 2585
From: phoenix, AZ, USA
Registered: Jul 2003


Feedback score:    (8)
Leave feedback


Total ratings: 60
Rate this member

Report this Post06-03-2012 05:55 PM Click Here to See the Profile for cptsnoopySend a Private Message to cptsnoopyEdit/Delete MessageReply w/QuoteDirect Link to This Post
Thank you Dave. It sounds like they will work ok.

Charlie

[This message has been edited by cptsnoopy (edited 06-03-2012).]

IP: Logged
cptsnoopy
Member
Posts: 2585
From: phoenix, AZ, USA
Registered: Jul 2003


Feedback score:    (8)
Leave feedback


Total ratings: 60
Rate this member

Report this Post06-08-2012 02:20 AM Click Here to See the Profile for cptsnoopySend a Private Message to cptsnoopyEdit/Delete MessageReply w/QuoteDirect Link to This Post
A package showed up at the door...


1.5" Drop spindles!


This ought to be fun...

Charlie
IP: Logged
fieroguru
Member
Posts: 12128
From: Champaign, IL
Registered: Aug 2003


Feedback score:    (45)
Leave feedback


Total ratings: 258
Rate this member

Report this Post06-08-2012 06:42 AM Click Here to See the Profile for fieroguruSend a Private Message to fieroguruEdit/Delete MessageReply w/QuoteDirect Link to This Post
Looking good! Can you take a picture of the top side (they are upside down in the pics)?
IP: Logged
cptsnoopy
Member
Posts: 2585
From: phoenix, AZ, USA
Registered: Jul 2003


Feedback score:    (8)
Leave feedback


Total ratings: 60
Rate this member

Report this Post06-08-2012 11:19 AM Click Here to See the Profile for cptsnoopySend a Private Message to cptsnoopyEdit/Delete MessageReply w/QuoteDirect Link to This Post
 
quote
Originally posted by fieroguru:

Looking good! Can you take a picture of the top side (they are upside down in the pics)?


I hope this is what you're looking for...


Charlie


IP: Logged
Will
Member
Posts: 14226
From: Where you least expect me
Registered: Jun 2000


Feedback score: (1)
Leave feedback


Total ratings: 237
Rate this member

Report this Post06-08-2012 11:54 AM Click Here to See the Profile for WillSend a Private Message to WillEdit/Delete MessageReply w/QuoteDirect Link to This Post
 
quote
Originally posted by fieroguru:

Looking good! Can you take a picture of the top side (they are upside down in the pics)?


Judging by the position of the steering arm, I'd say it was right side up in the first photos.
IP: Logged
cptsnoopy
Member
Posts: 2585
From: phoenix, AZ, USA
Registered: Jul 2003


Feedback score:    (8)
Leave feedback


Total ratings: 60
Rate this member

Report this Post06-08-2012 12:18 PM Click Here to See the Profile for cptsnoopySend a Private Message to cptsnoopyEdit/Delete MessageReply w/QuoteDirect Link to This Post
 
quote
Originally posted by Will:


Judging by the position of the steering arm, I'd say it was right side up in the first photos.
Lol, made me look!

I went back up to Blooze's photo since his is installed and it appears that these 5 pics are in the upright orientation...

Charlie


IP: Logged
Bloozberry
Member
Posts: 7760
From:
Registered: Jan 2009


Feedback score: N/A
Leave feedback


Total ratings: 311
Rate this member

Report this Post06-08-2012 09:02 PM Click Here to See the Profile for BloozberrySend a Private Message to BloozberryEdit/Delete MessageReply w/QuoteDirect Link to This Post
You have it right Charlie. The steering arm hole for the ball joint is tapered so it gets larger towards the bottom side.

Just a note about those Allen head cap screws... if I were you, I'd change them out for hex head bolts. Years from now when you go to replace your first bearing assembly, you stand less of a chance of stripping the head of a hex head bolt than the very small surface area of an Allen key socket, especially given the amount of torque those fasteners get.
IP: Logged
Previous Page | Next Page

This topic is 26 pages long:  1   2   3   4   5   6   7   8   9   10   11   12   13   14   15   16   17   18   19   20   21   22   23   24   25   26 
next newest topic | next oldest topic

All times are ET (US)

Post New Topic  Post A Reply
Hop to:

Contact Us | Back To Main Page

Advertizing on PFF | Fiero Parts Vendors
PFF Merchandise | Fiero Gallery | Ogre's Cave
Real-Time Chat | Fiero Related Auctions on eBay


Copyright (c) 1999, C. Pennock