So you're planning to use a clear top of some type for the airbox then????
Russ
This sounds a little weird but I have been thinking a pyrex cooking pan if it was large enough to cover the whole setup. I would make a perimeter wall with a gasket and clamps to hold it down. Strong stuff and able to handle the heat. I don't know if it would look ok or not though. Also, I would rather not cut the decklid just yet but it may have to happen. Still tossing around ideas.
Just came in from running the motor (to keep the coolant and oil circulated) and man does that thing sound good!
It may or may not work out in real world driving but until I find out otherwise, I have high hopes for it.
I have not worked on it much for the last couple of weeks due to other commitments but I hope to get started on it again when I get back into town next Monday.
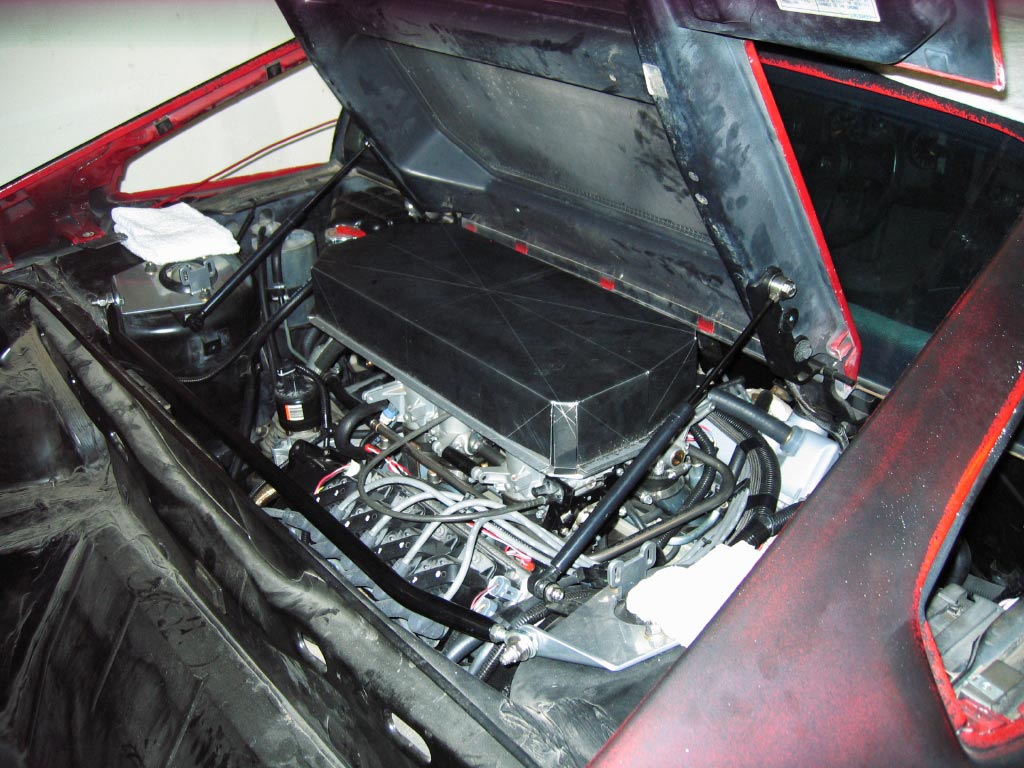
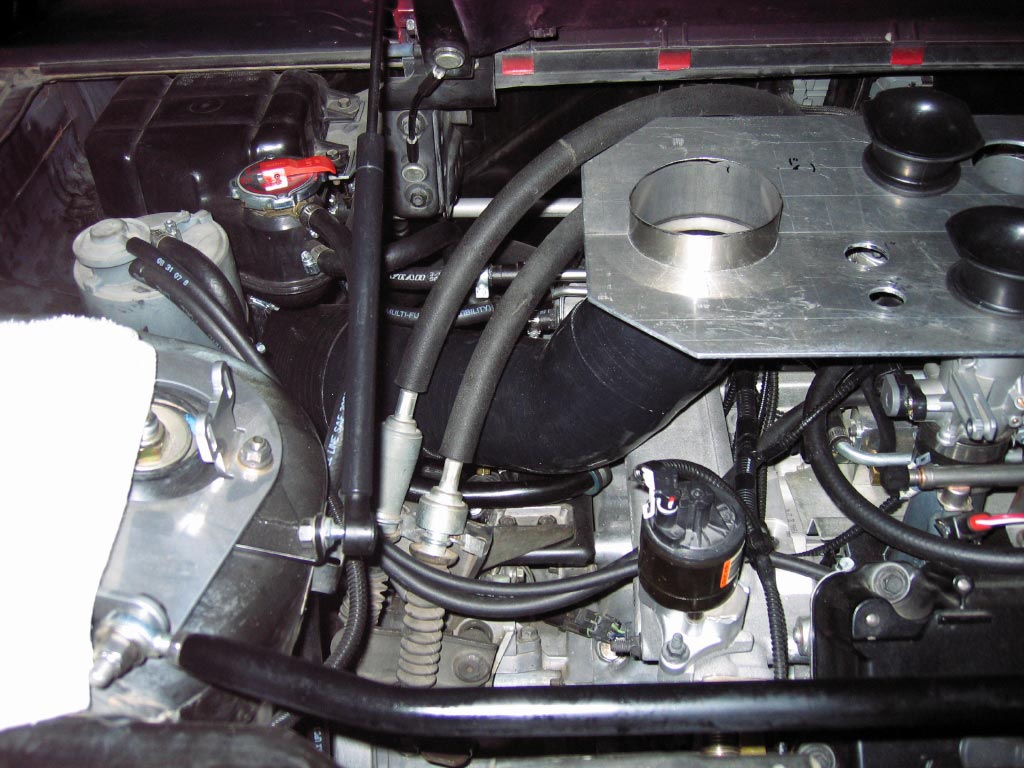
I have decided to make a concealed under the hood intake plenum for now. If the vel-stacks stick up too high and cause issues I will cut them down to the base plate of the plenum. If that is not enough then I will cut a hole in the deck-lid and give the plenum ample room to distribute the air. If I ever come across a way to make a clear lid to the plenum that will hold up to the heat then I will work on that but for now I just want to drive the thing!
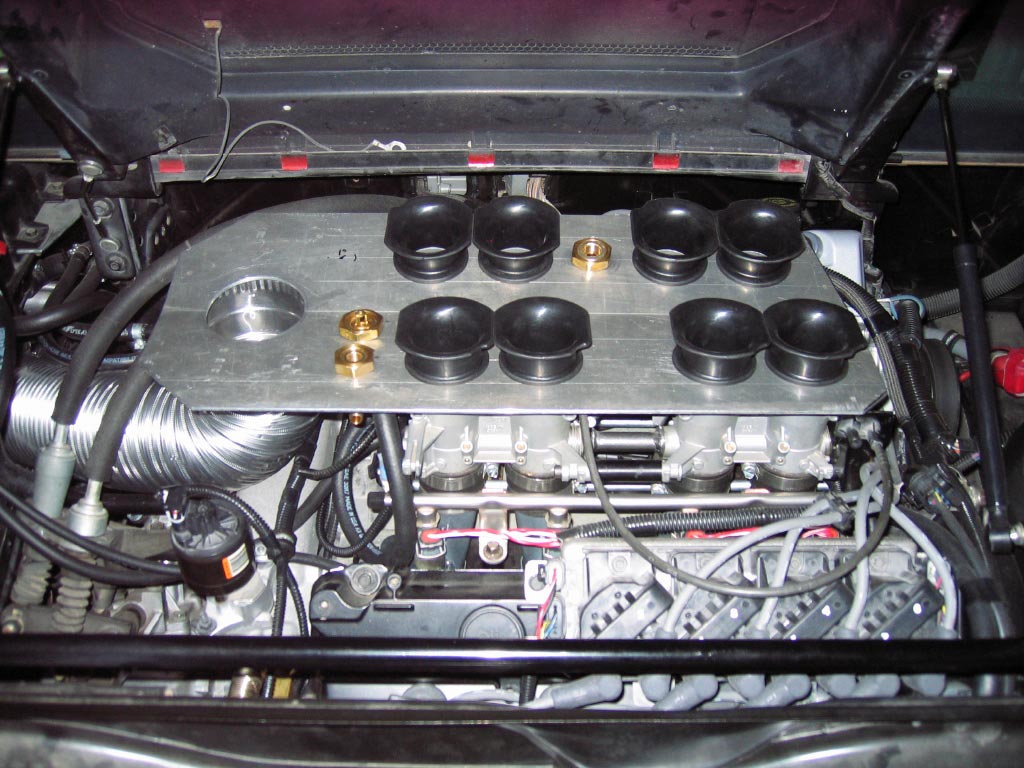
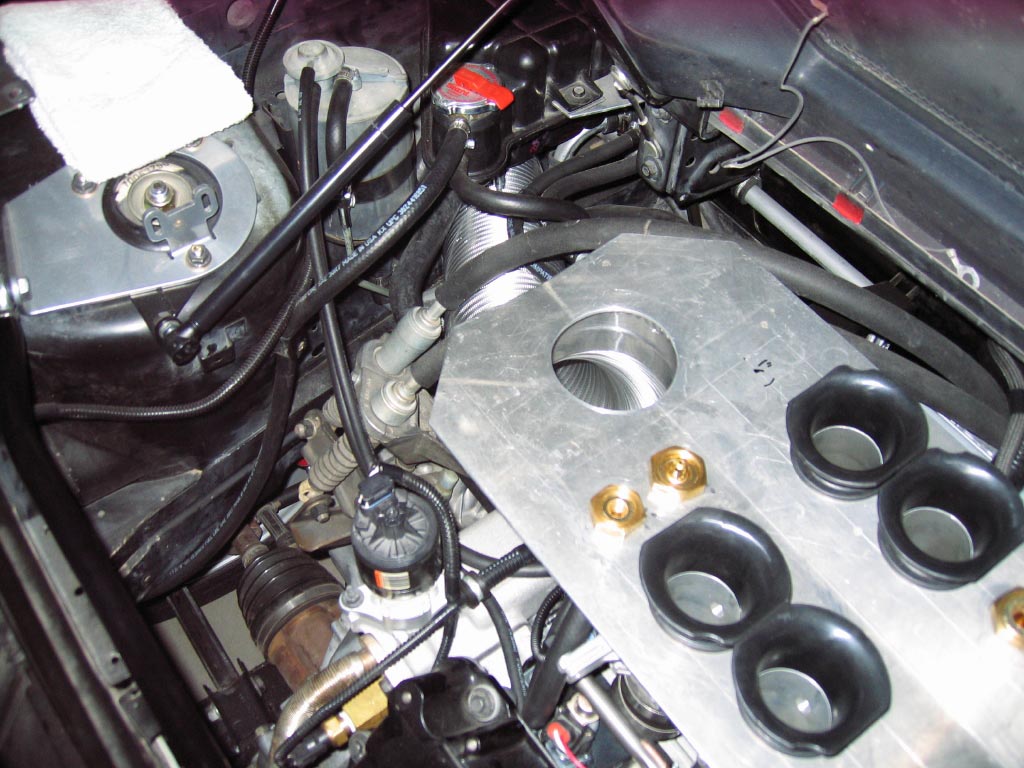
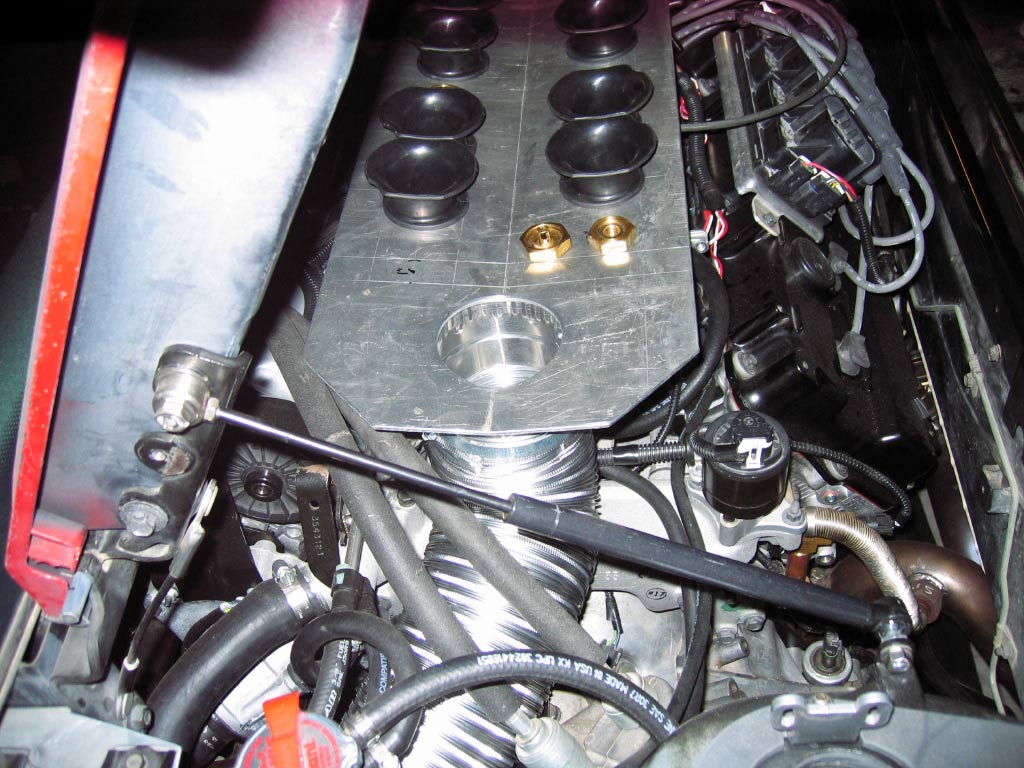
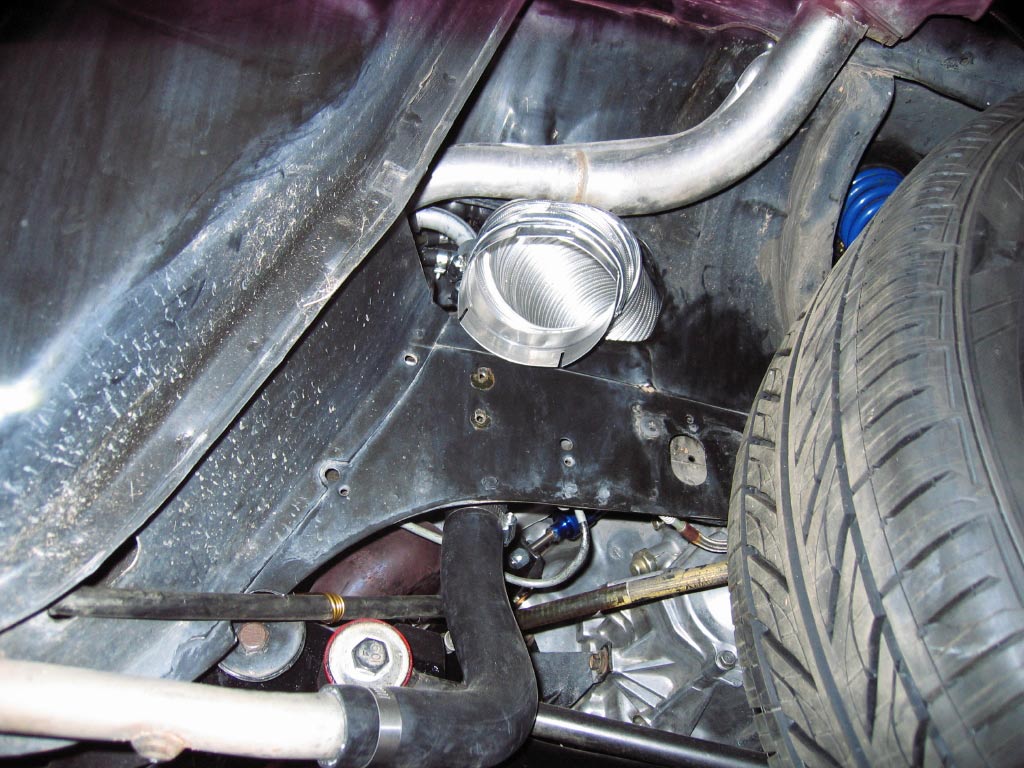
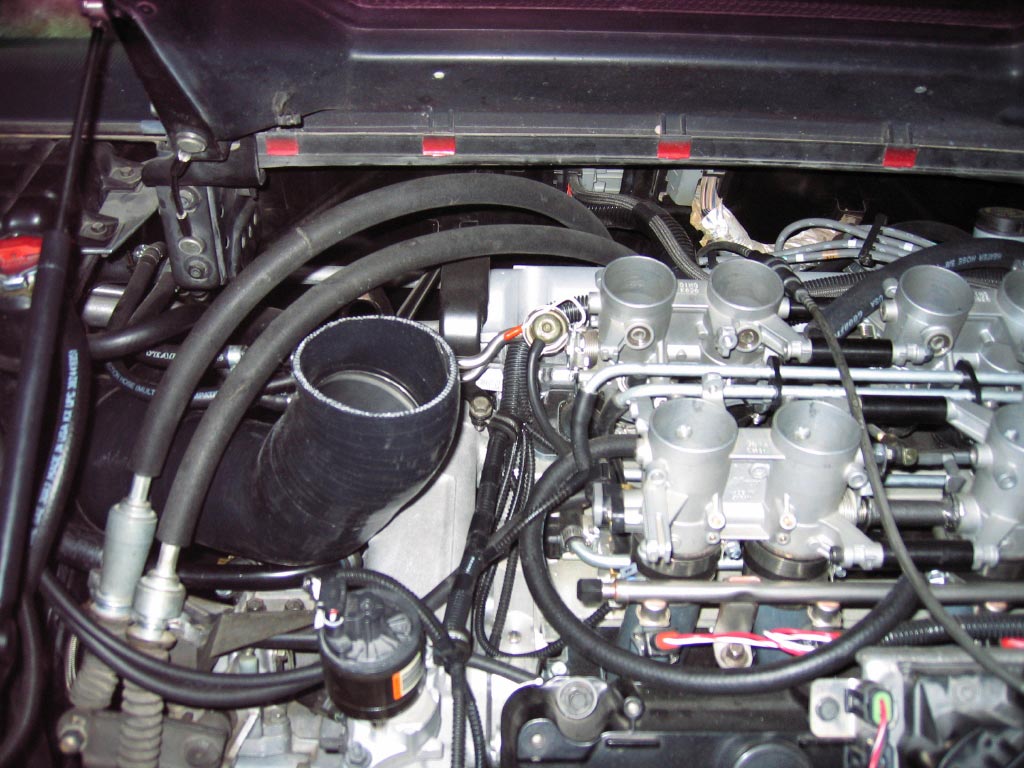
Little bit of work done on the plenum base plate. Trimming is finished to allow the deck-lid to close and fittings were modified to mount the temp sensor and allow crankcase/IAC air to the engine. I have some thin scrap aluminum sheet (approx. 28 to 30 gauge) to try the first "lid" for the intake plenum. Should be interesting. If it fits and works ok I will use it until I can fab a good looking one from clean metal. In the meantime to check how large the intake tubing can be I routed some 4" drier exhaust hose from the plenum base plate to the left rear wheel well. It sort of fits. It is very close but the fuel fill pipe and the water log both slightly interfere. I looked at it after setting it in place and it is obvious that 4" is more than enough. I may end up using 3.5" or ovaling the 4" to provide for better clearance. Either way it'll be plenty.
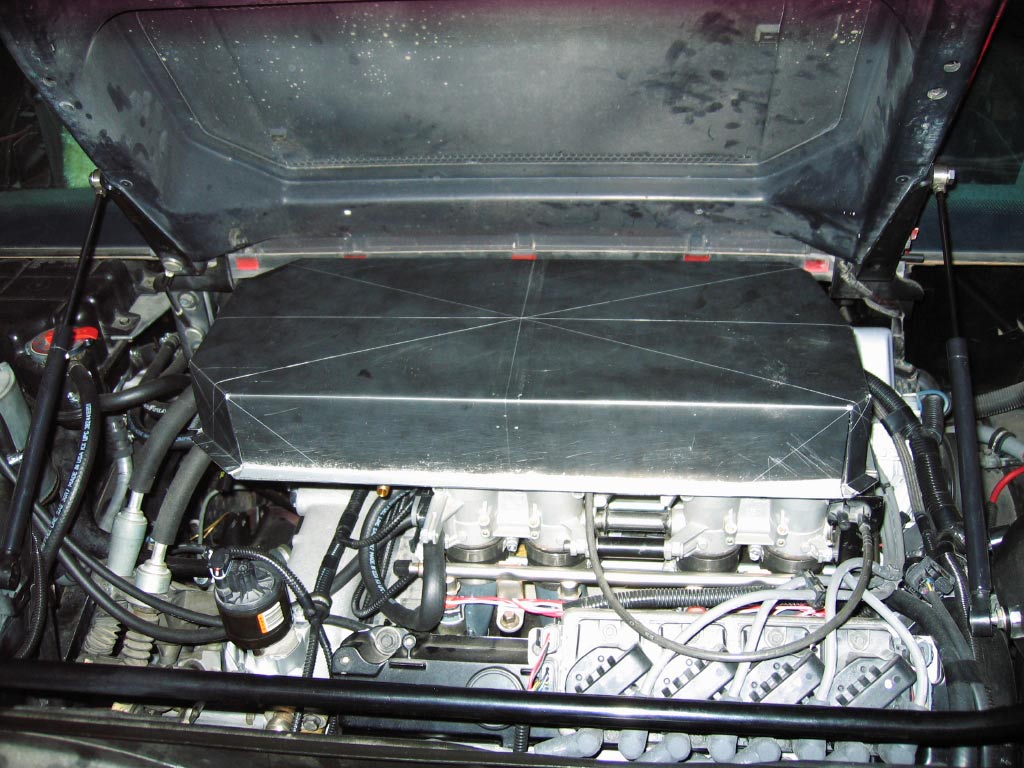
I spent way more time that I thought it would take to layout this cover. The scrap aluminum sheet cleaned up pretty well so maybe it will end up staying on the car. It would be cool for show purposes to reproduce this in clear Plexiglas. I am more concerned about getting to try the car out and look for serious issues than to spend any more time on making it look pretty. If all goes well, that will come later.
Yes, but I don't know if there is enough clearance for engine movement under torque. I felt about a fingers worth of clearance up front and a little less at the rear of the box. I have the engine tied down pretty good but I suspect there may be enough travel to cause contact. It appears that there is enough clearance above the velocity stacks to provide unrestricted air flow. Tomorrow I plan on getting over to a Turbo shop to try and find parts to make up the intake tubing and filter.
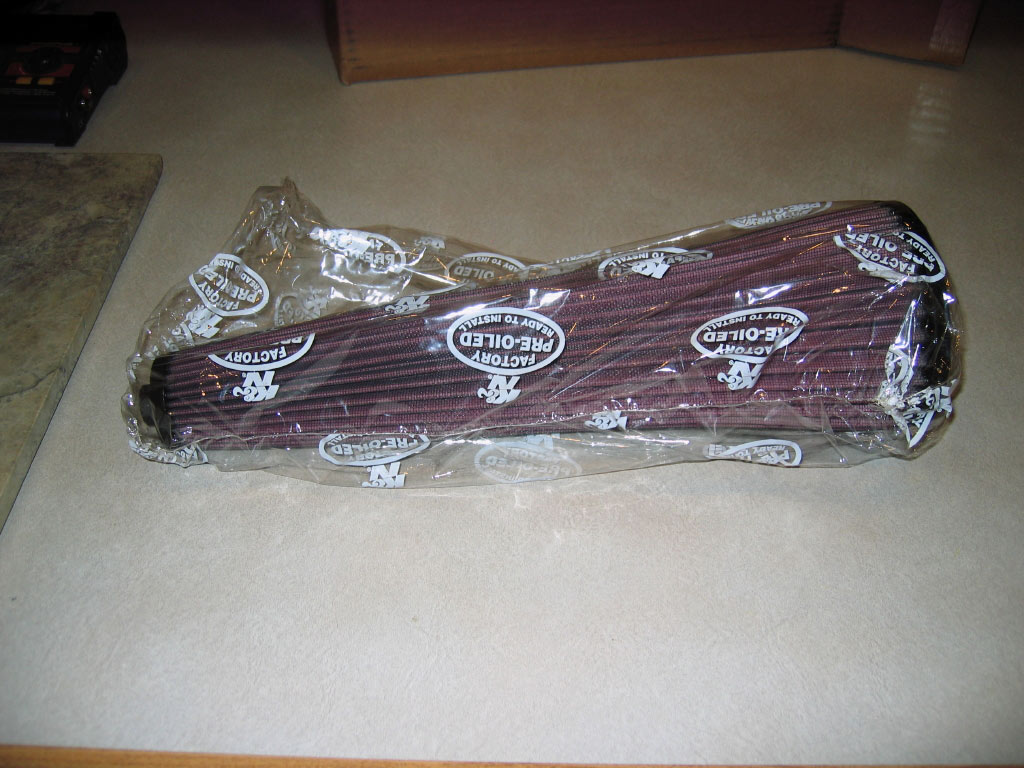
I received two different filters to have options on how to get clean and cool air to the intake plenum. I think I'll go with the racing cone filter as it flows double what the other filter can. It can also be placed in a 4.75" tube which makes it ideal for this setup. I am just now working on getting the material figured out. I was thinking aluminum to match the rest of the system but now I am thinking black plastic pipe (would you believe it is from my leaf vacuum?) that happens to be 4.5"ID on one end and about 4.8"ID on the other. I just need an elbow to get it pointed up to the plenum and then figure out how to seal it all up. My plan is to use exhaust heat wrap to insulate the plastic tubing. I hope to accomplish two things by doing that. First, it should keep the air temp reasonable from the stock scoop area and also protect the plastic tubing from melting in the engine bay heat. I don't know if that will work but I am going to give it a try.
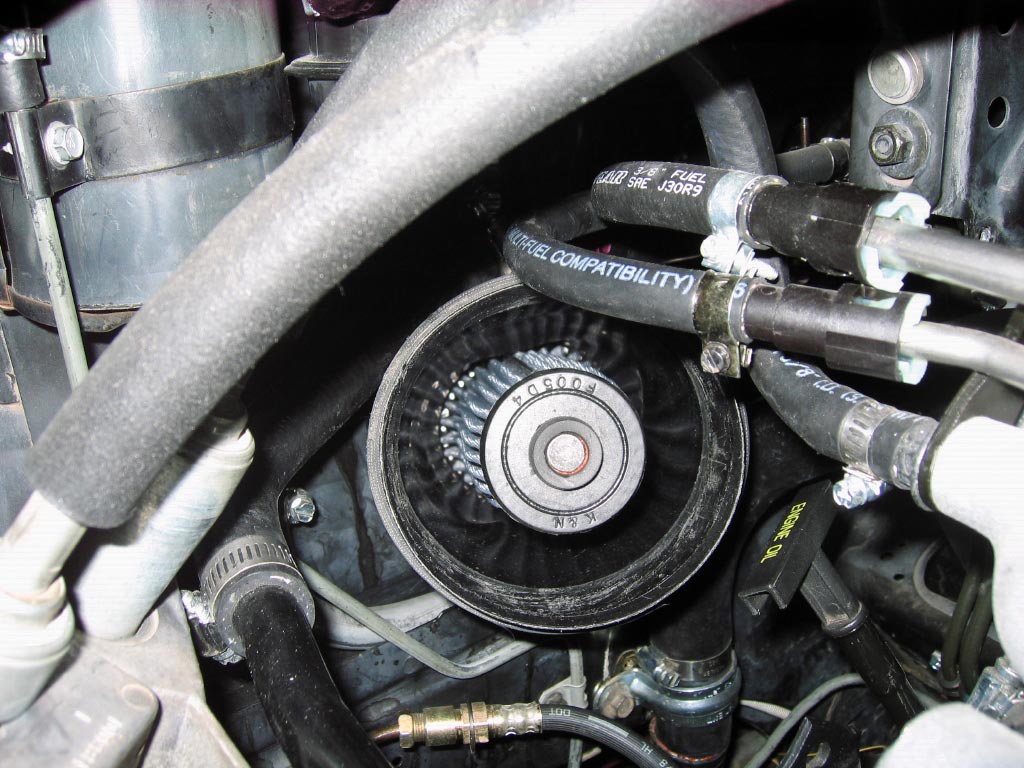
K&N racing "cone" filter. 4-7/8" outside diameter at the large end and 2" diameter at the small end. Flows just over 1000 CFM
K&N filter: 6" OD large end, 5" OD small end, 5" long and 4.5" ID flange. Flows around 500 CFM
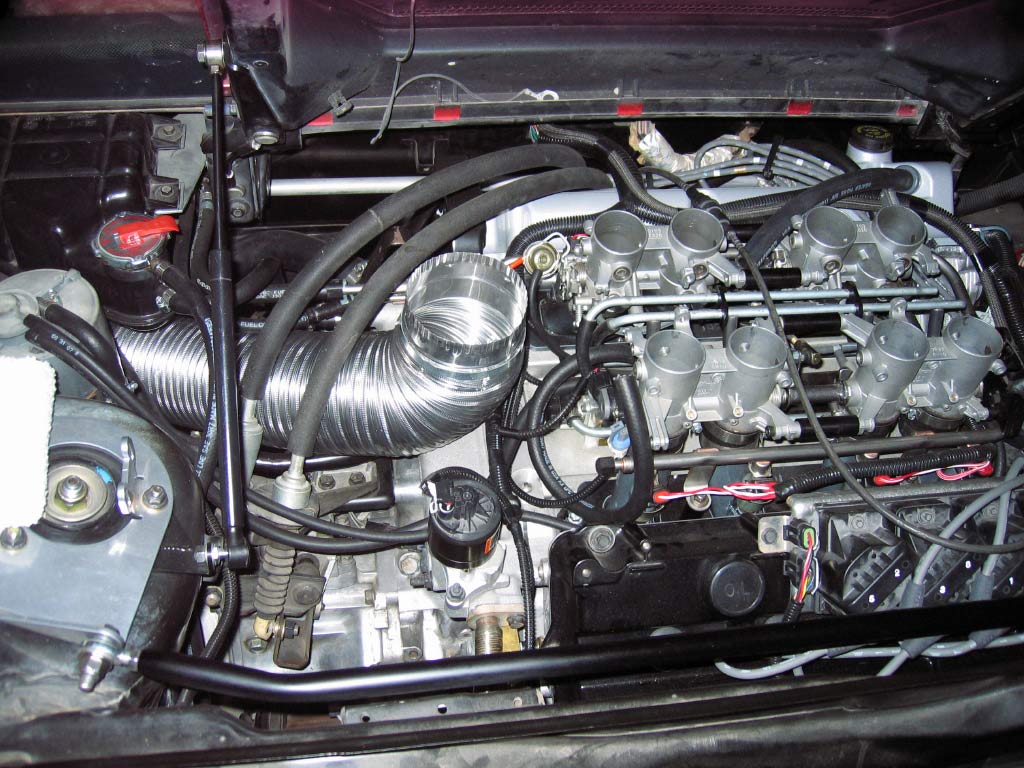
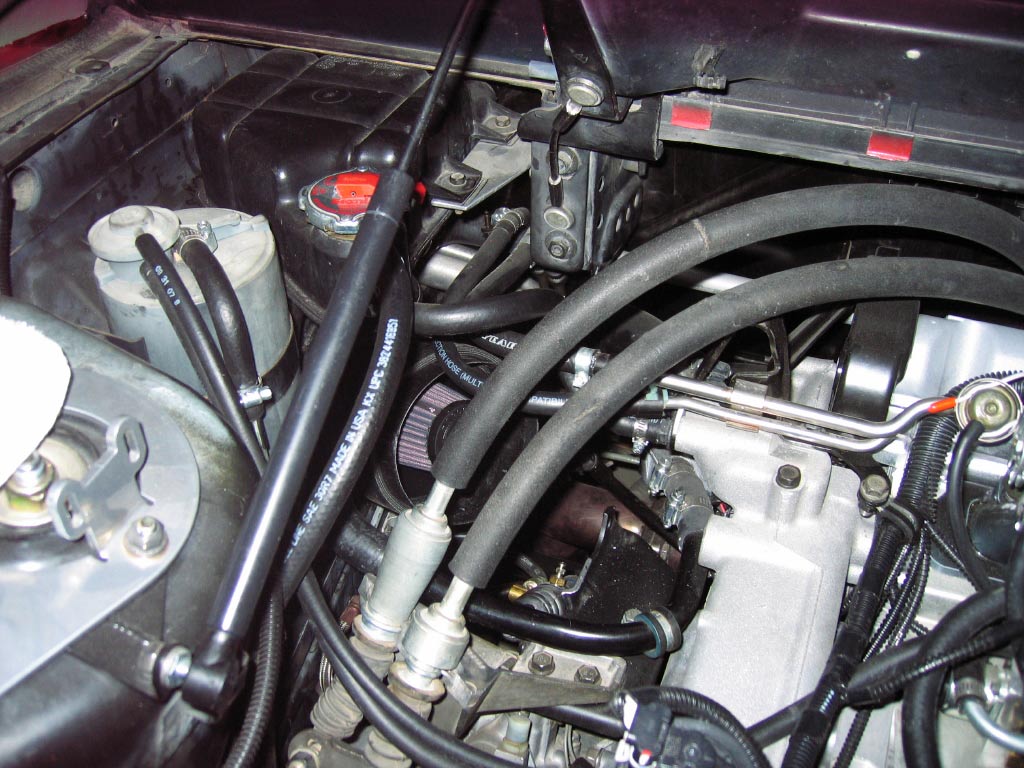
Seems like getting the final pieces together is taking forever. I mocked up the intake using plastic tubing. Looks like 18 inches of 4.5" ID silicone tubing will be used for the filter housing and it will stick through the left side of the frame about 6". A reducer to 3.5" will be needed then a couple of 45's for an offset and finally a 90 to bring the air up into the plenum. Only $220 worth of silicone tubing and parts... The stuff is shipped, just waiting on its arrival to see if I can cobble it all together.
This is one part that like the wiring, it seems to take longer than it should. I ended up mocking up the cold air intake using plastic pipe and plastic elbows. Afterwords, I ordered online the silicone pipe,elbows,joiners and clamps that I thought I would need. I finally got around to cutting them down to fit. Here are a couple of pics.
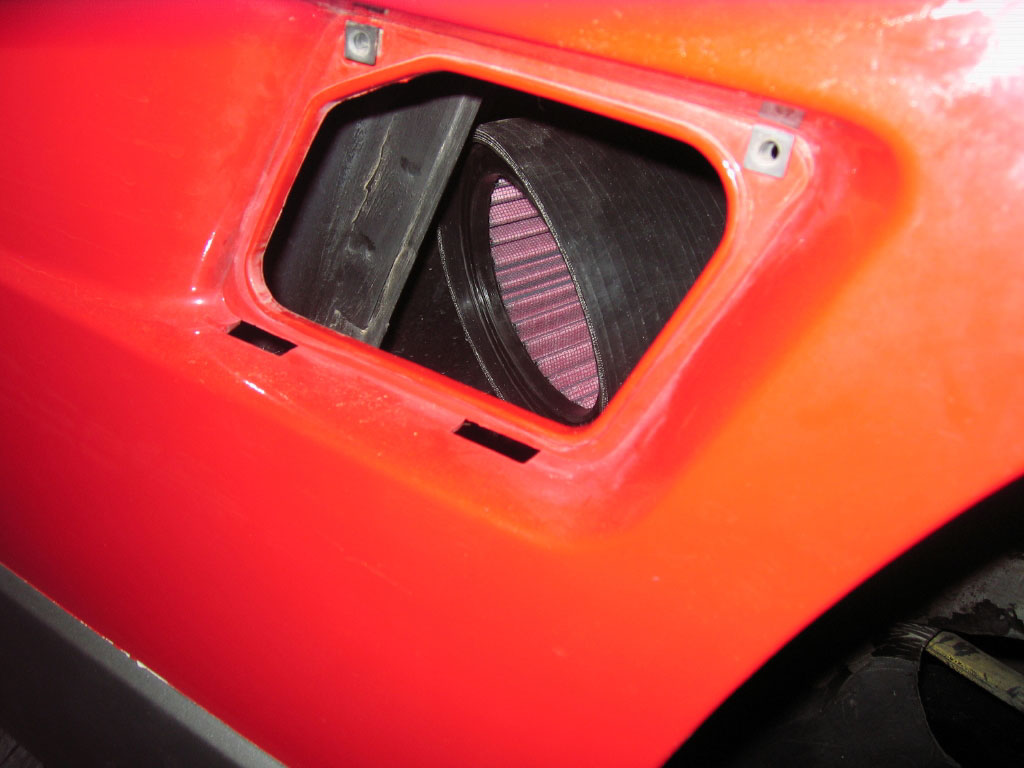
This is a view of the filtered air end of the 4.5" pipe. You can see that it is squeezed a tad as it goes through the side of the space frame but from what I can tell, there will be plenty of flow through there. (at least 750cfm)
This is a further away shot of the same thing.
It's hard to tell from the photo but there is a 4.5" to 3.5" reducer installed now.
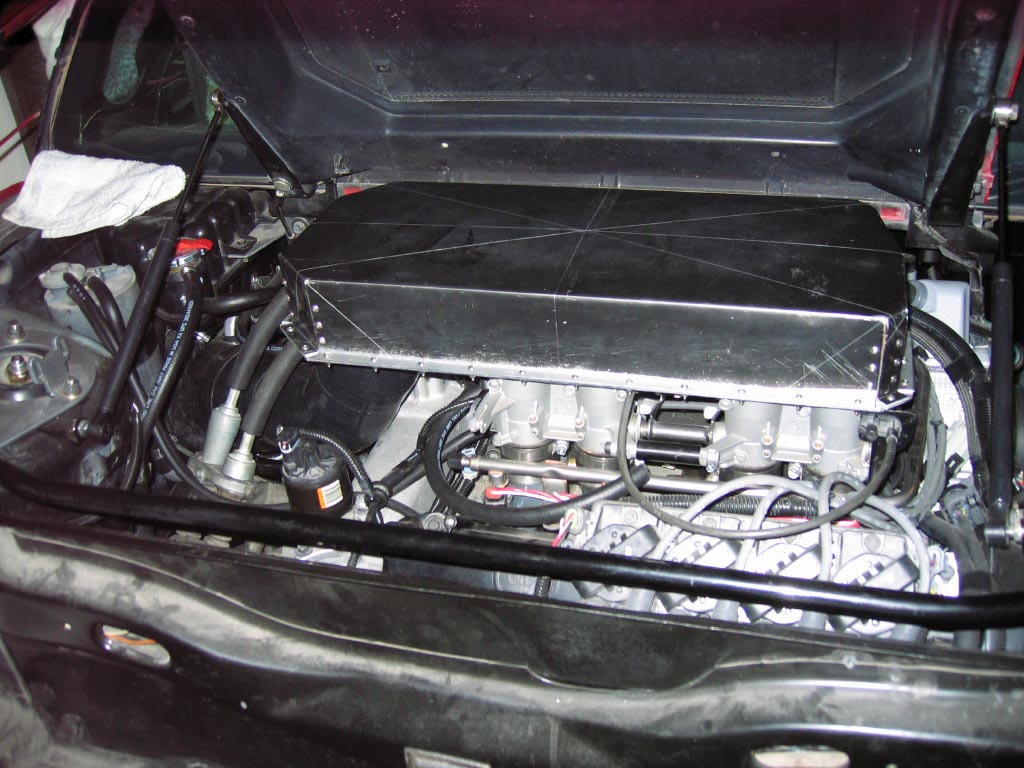
Elbows added.
Base of plenum added.
Intake side of the filter cartridge.
Charlie
[This message has been edited by cptsnoopy (edited 07-24-2009).]
68 3mm screws later, the intake plenum is roughed in. Just need to try it out on the road as I think it will be hitting the decklid from lack of clearance. If it somehow works out, then I will see about painting it.
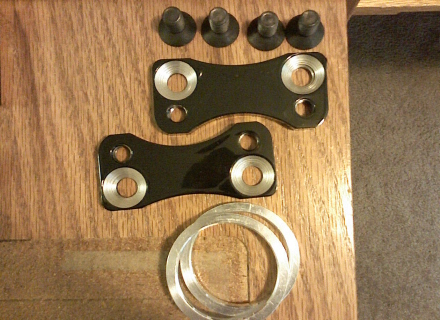
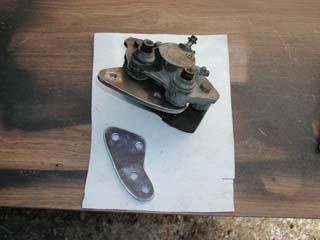
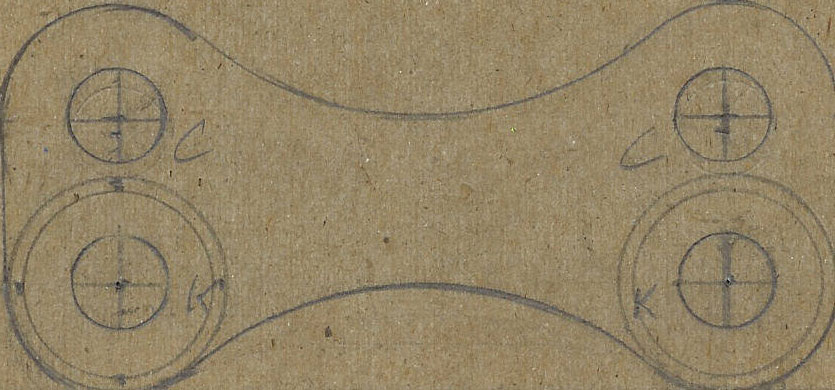
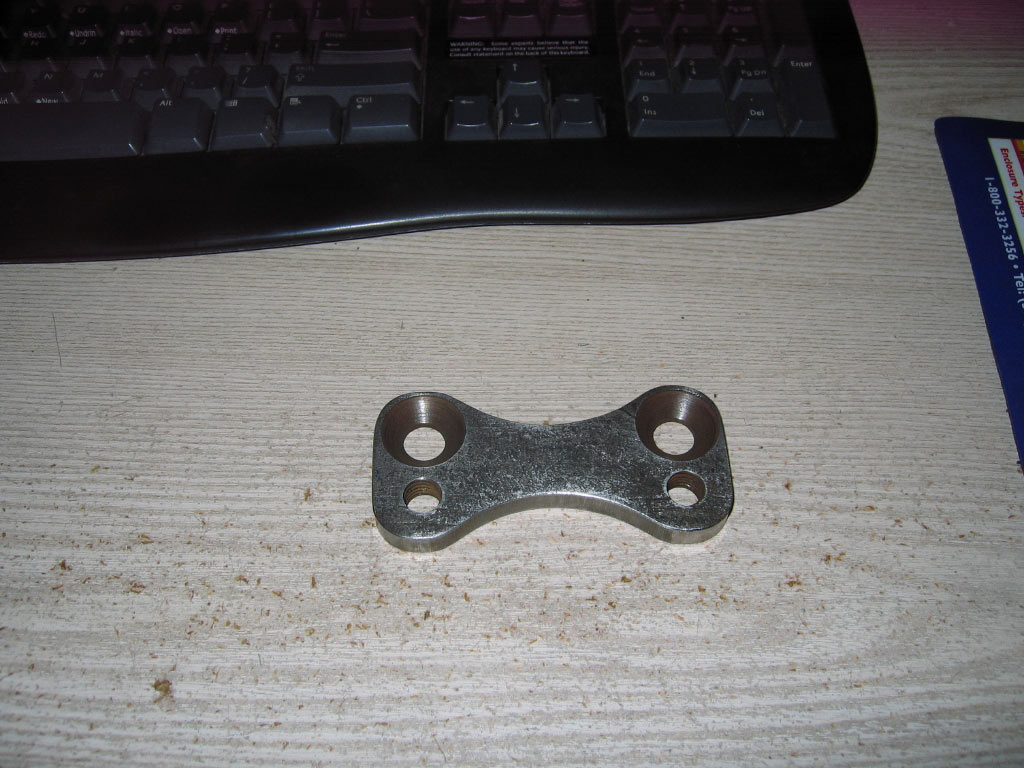
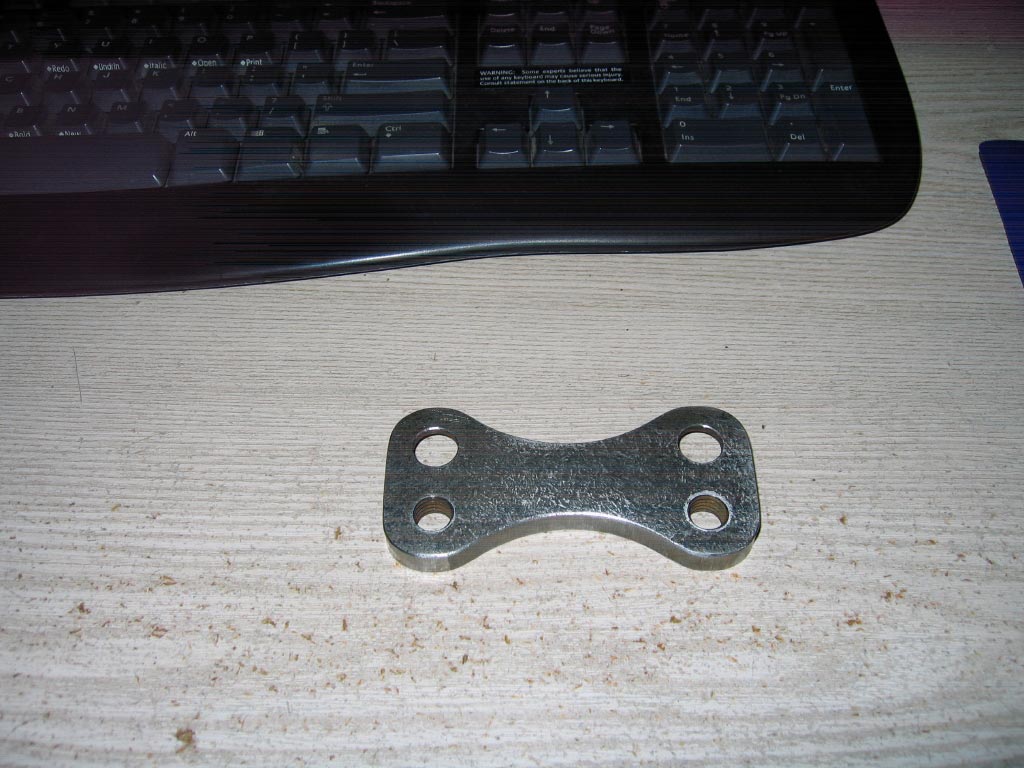
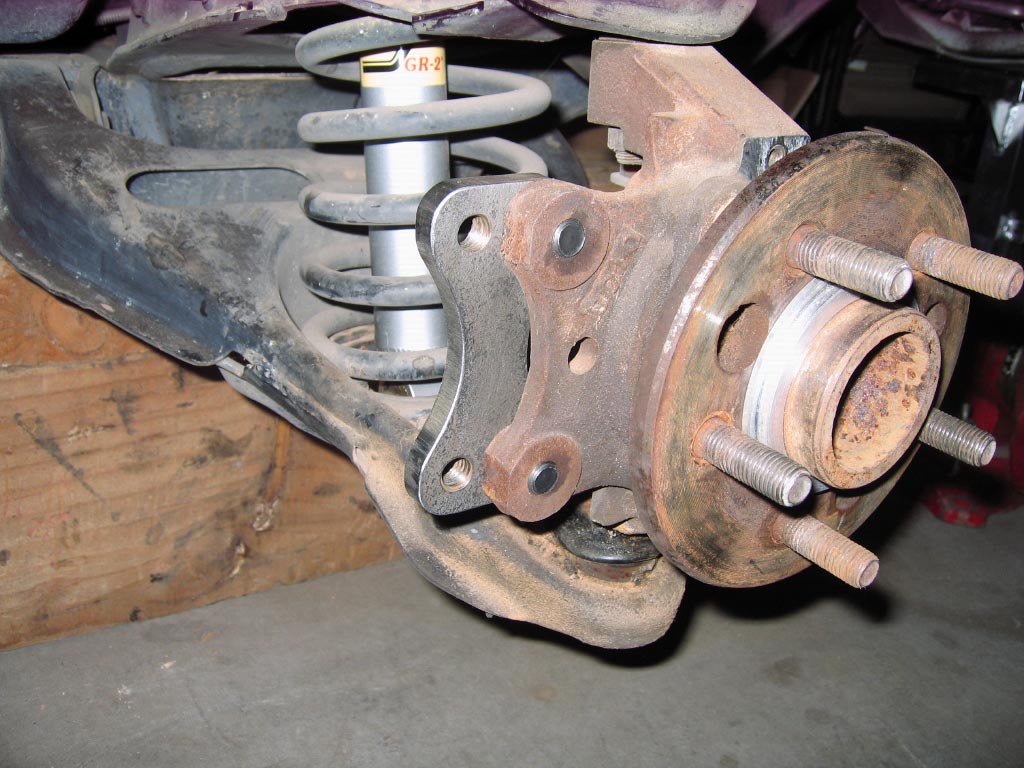
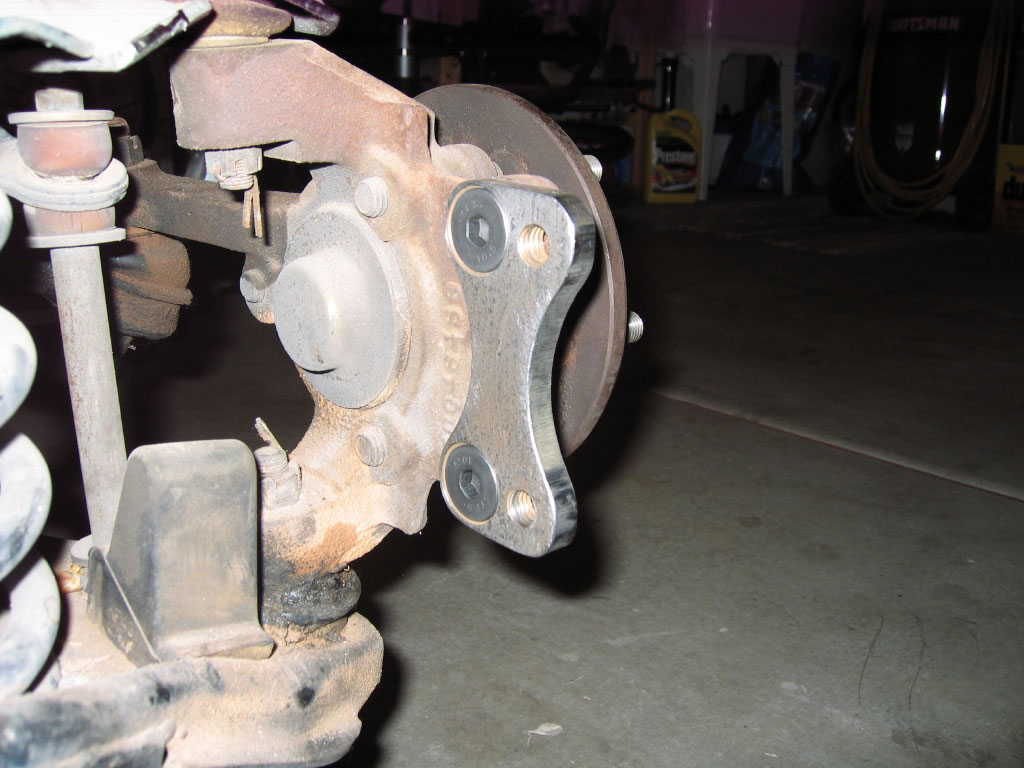
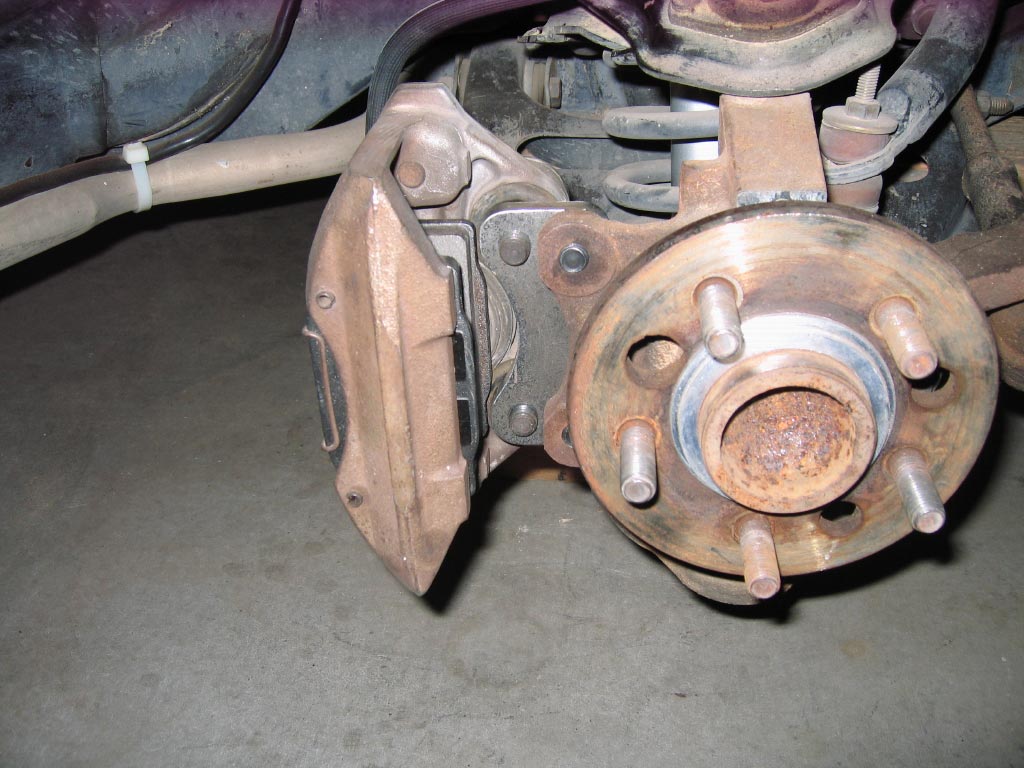
I spent several hours tonight pondering what to do about the front brakes. I am using the 12" corvette rotor upgrade set that GSXRBobby made for a bunch of us and it was known at the time that the front calipers/brake lines would interfere when the wheels were at full turn. The brake line hits the upper control arm and the upper spring perch. The upper caliper slide hits the upper spring perch. I would have to grind down three different areas to get enough clearance to run the setup without changing the location of the calipers. This is in addition to grinding the lower tip of the lower control arm to keep it from rubbing on the inner edge of the 12" brake rotor. I have decided to either purchase a couple of the brackets that "Fieroaddiction" has designed or try to fab up a pair myself. It appears that putting the caliper back to the horizontal position like stock will address the clearance issues.
If anyone has the Fieroaddiction 12" inch brake setup on their 88, can you please post whether or not there are any issues with clearance with the front brakes and suspension?
I have spent several hours searching PFF tonight for answers to that question and I have not seen a definite answer.
Charlie
[This message has been edited by cptsnoopy (edited 08-01-2009).]
Don't know about other designs as II made my own brackets, but I'm using stock 88 hoses and had no clearance issues at all on the fronts. same brackets work front and rear but the rears are flipped over.
I went out and ran the suspension up and down a couple of times with the wheels turned all the way to each side and both right and left interfere with the upper control arm and the upper spring perch. I then took the adapter off and rolled the caliper to the horizontal position (like stock but further away from center) and it clears fine. Also the stock hose will still work so I am going to try and make the adapters that only move the caliper out but do not offset it up or down. It will require counter sinking the bolts for the adapter/knuckle but it should be work fine. Finding the counter-sunk 12mm bolts will be the hardest part I imagine.
So what's the latest? Busy working or busy playing?
I am doing the same - making my own 88 caliper brackets to get away from the caliper/upper A-arm interferance with my current WCF set.
The stock 88 rotor measured 10.432" and vette one was 12.007". To keep the rotor pads in the same relative position the new hole distance should be 0.7875". The stock caliper distance has the edge of the brake pad inset from the edge of the rotor, so you can go out further if you would like. I pushed the pad out flush with the edge of the vette rotor and came up with 0.947" so anywhere in between would be fine... I am going to mock up some at .925" and see how it works out.
I am still looking for a lower cost counter sink bit, the ones in McMasterCarr are about $32 for a 1" bit (the head on the above bolts is 24mm in diamter). I might just end up using one from work.
[This message has been edited by fieroguru (edited 08-02-2009).]
You're welcome. Glad I could help! I sent you a PM with some more info and a couple of mockup pics you might find interesting.
I have been a lurker in this build thread a long time... keep up the good work! My wife and I are trying to relocate to the Phoenix area in the next year or two (I have to find a job out there 1st) and will look you up when I make the move!
I had big plans to have the caliper adapters done by now but my water heater had other plans for me. It took a couple of days to replace the water heater so I got behind. The fuel pump/fuel tank in my 86 was higher on the priority list and now that it is done I hope to get back to the fun projects. The countersunk bolts and countersinking bit arrived so everything is ready to go.
Luckily, the water heater is in the garage and since I was working on the project Fiero I noticed the leak within hours after it started. That helped to minimize casualties.
The hardest part was moving all kinds of stuff to make a path to it large enough to get it out and put the new one in.
Charlie
[This message has been edited by cptsnoopy (edited 08-07-2009).]
Looking good very good! Did you use a hand held grinder or a bench grinder?
Thanks, Bench grinder but it took about 4 to 5 hours. My Dewalt sawzall batteries died and were too warm to take a charge. Otherwise I was going to chew away most of the material with the sawzall and the finish with the grinder.
I am starting to wonder about this 12" corvette Brake upgrade. Maybe the rotors we got are not the right ones? I ground the right and left LCA's down but I don't think the drivers side will clear when doing a hard right turn and the with the suspension compressed. The pass side has .046" more clearance (.193") than the drivers side (.147") with the car sitting normal and wheels are straight. There is a rumor that WCF has found a different set of 12" rotors that do not dish in as much and provide enough clearance to miss the LCA's throughout the full suspension range. If anyone can verify this please let me know. Thanks in advance.
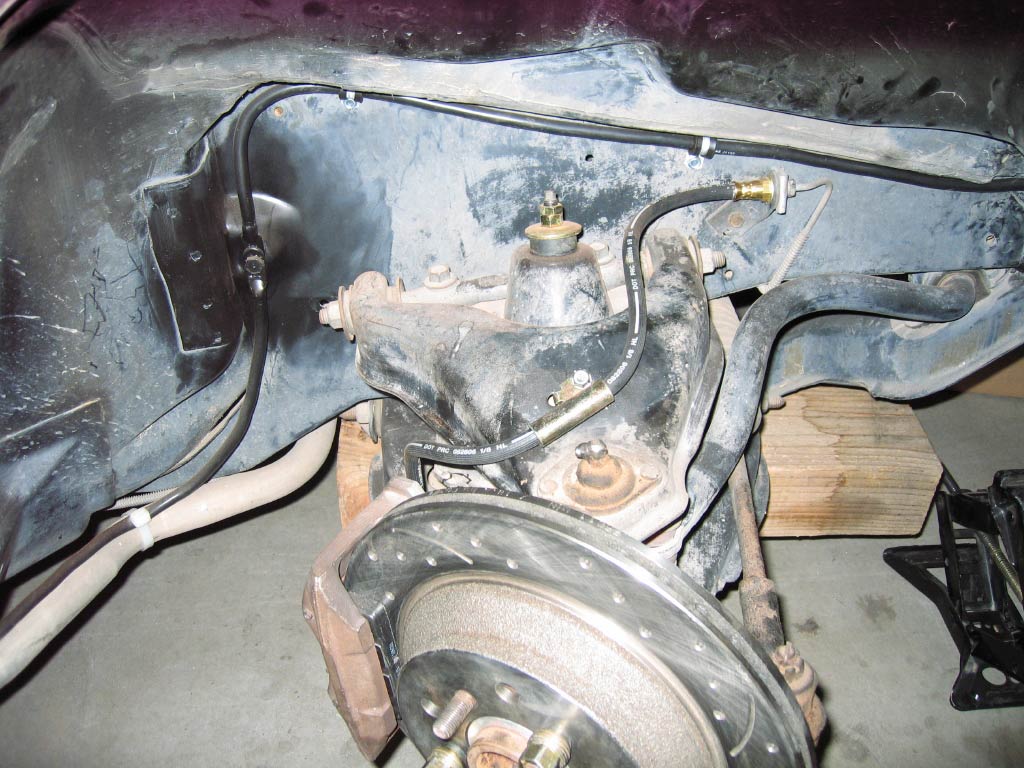
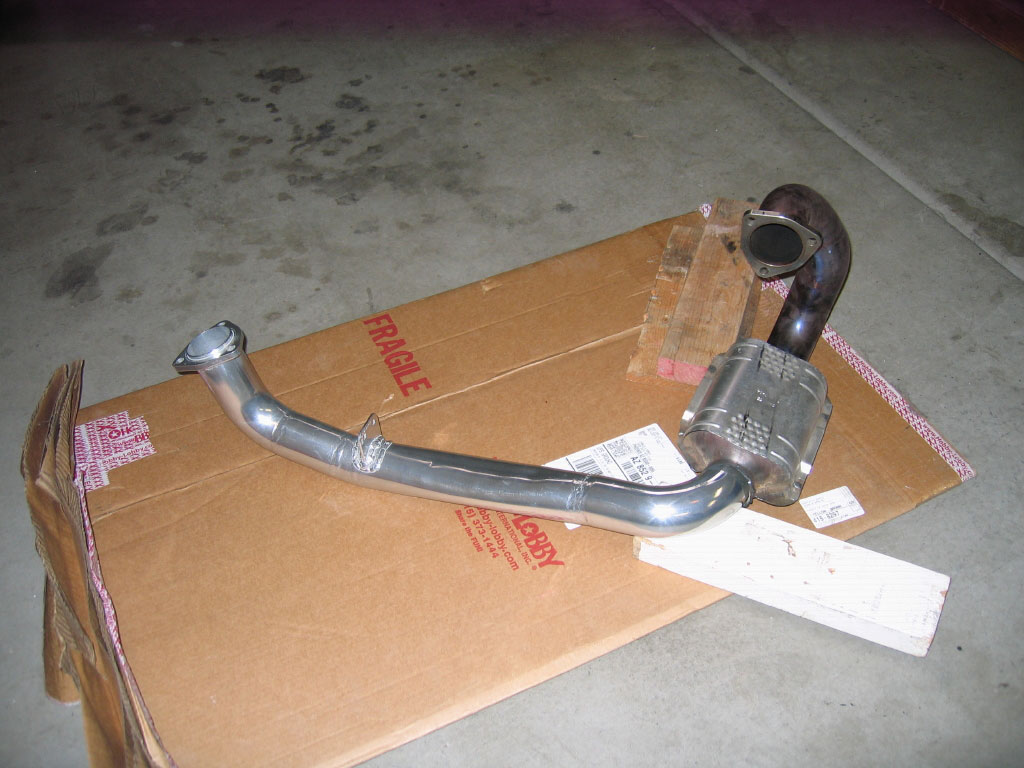
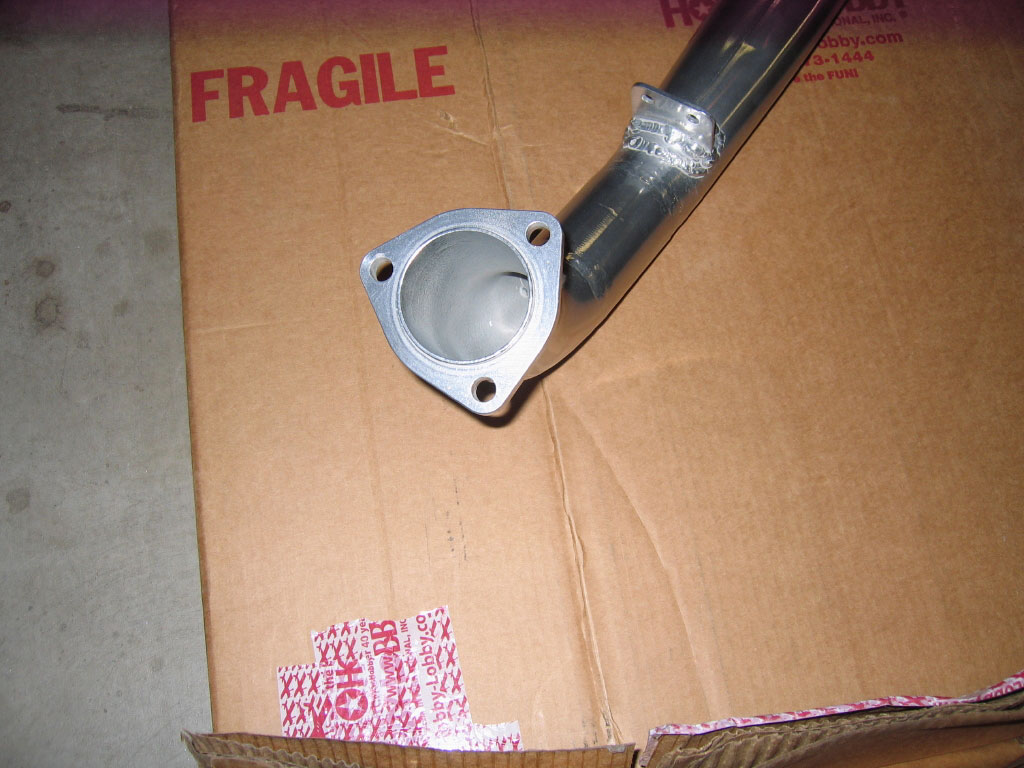
On a brighter note, I got my exhaust pipe back from Jet-Hot coatings. It looks nice and should prevent my oil from overheating as this pipe comes within 1/8 of the oil pan as it goes under the engine. This will also help keep the pass inner tripot from getting too hot as it also comes close to this pipe.
The interferance with the lower A-arm is more common on the lowered 88's, but still a fairly common issue. I did the same clearance work on the nose of the A-arm on mine to get adequate clearance and did notice a slight difference from driver side to passenger side.
A thin spacer behind the rotor could correct this issue as well, but I would be interested in other 12" rotor options as well.
I am going to do a little looking around. If I can find a 12" rotor with about 1/4" less offset then I will stick with 12" otherwise if WCF will sell me just the extra brackets needed and 2 13" viper rotors, I will just install the 13" rotors in front and leave the 12" rotors in the rear. As it is, WCF may just know which 12" rotors to get so I don't have to go to the 13" setup in front. If you look at the 13" setup, the offset is close to the same as the stock Fiero rotor offset. This will give another 3/8" clearance for the LCA and additional clearance from the upper spring perch than the 12" setup.
No clearance issues or hose problems with the bracket design I made. didn't need countersunk bolts either . I'm using 88 Vett std front rotors all around BTW. Get your batterys recharged and get back to work. Russ
No clearance issues or hose problems with the bracket design I made. didn't need countersunk bolts either . I'm using 88 Vett std front rotors all around BTW. Get your batterys recharged and get back to work. Russ
Hi Russ,
After looking at mine I am curious how you did not have issues with the caliper/brake hose hitting at full turn? My original Bobby brackets are very similar at where they place the caliper in relation to the knuckle. The ones I made that use countersunk bolts allow plenty of clearance for the caliper but the real question is why the rotors that Bobby found are dished in (offset) too much. I don't know if it is because we got the wrong year or if they all come close on the 88's. Do you remember how much clearance you have from inside face of your front rotors to the outer tip of the LCA? That is an issue I and others have with these rotors from Bobby.
You can't see it now, but I am about to crawl under the car and attempt to tack weld the exhaust pieces back together...
It's been a wile, but I do seem to recall that I had to ding over the very tip of one side LCA lip just a scosh. other side was ok. it only amounted to maybe 1/8" interference as I recall however.
BTW. I used some header wrap on the ex cross-over section under the pan. seemed too close to me as well.
I received similar info so the consensus is, even though it looks close, you can usually get enough clearance by grinding/pounding to drive it without rubbing. After checking the position of the caliper on the sliders, it is apparent that the rotor is correct as the caliper cannot move any further outward. A change in rotor would require a change in the brackets. So, I'll leave the passenger side alone and I will grind/pound the drivers side until I get at least as much clearance as the passenger side.
I got the exhaust welded and installed last night/this morning and I can actually move the car under its own power for the first time!
(still a lot of work before it can be driven on the road though... )
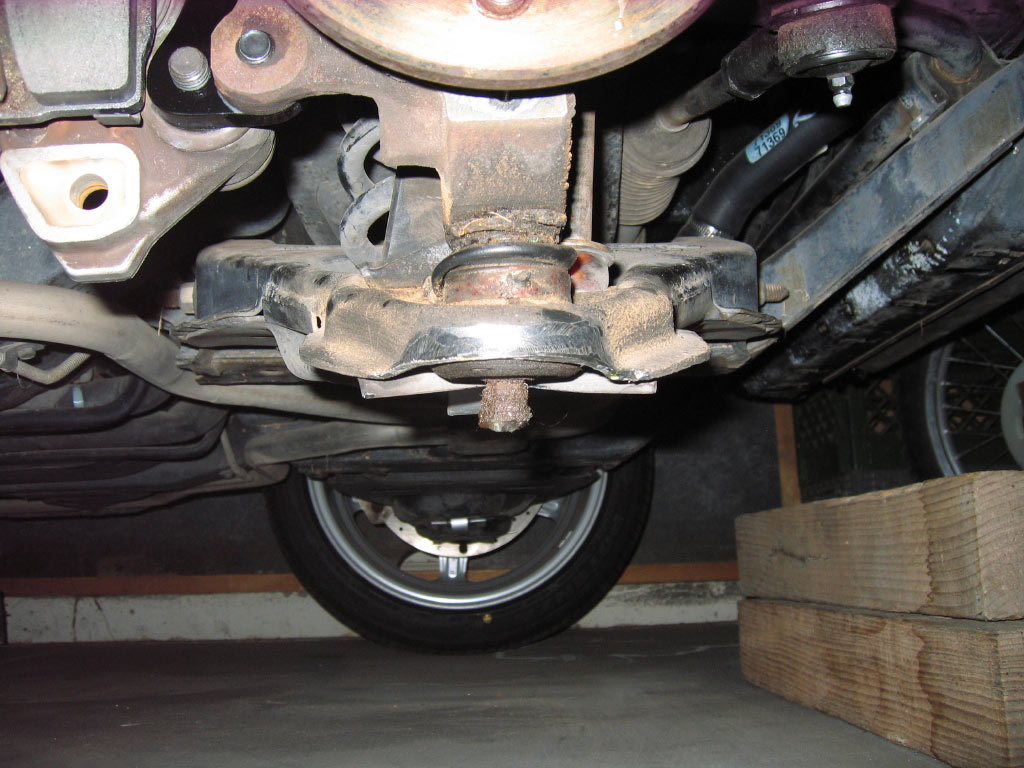
I drove the car out of the garage and onto the street so I could turn it around and back it in. It was getting difficult to squeeze between the wall of the garage and the car to do the grinding. The nice thing to report is that the clutch seemed ultra smooth and has light pedal force. Hopefully no slipping when driven for real. The brakes also seemed nice and firm but smooth. So far so good. Once I got it backed into the garage I went after the drivers side LCA again with the grinder. I hope I did not take too much off but now there is at least 1/4" or more clearance with the suspension decompressed all the way. This is a little more than the passenger side had so I hope it will all work out ok. Need to finish putting the power window motors and door locks in then I can think about getting going on the paint again.
That was fun... The power windows and door locks are now installed. The power windows work great (new aftermarket motors) but the power door locks work like you would expect...
I will look around and see if there are any door lock solenoids available to install. That and some cleaning and lubing out to help it out.
Sadly I noticed for the first time since I got this car that the drivers side door glass has numerous chips (very small) in it. It looks like some kids where attacking it with rocks or a BB gun while it sat in the PO's back yard for several years. I have another drivers side door out back so I will check out the glass and if it is in perfect condition, I guess I will need to change that out.
Edit: took the old spare driver's door glass out and cleaned the dirt off of it. It has enough wear marks and pitting from old worn out "wipers" (or whatever they are called) that it is unusable. I'll have to stick with the one I have until I come across a clean piece of glass.
Charlie
[This message has been edited by cptsnoopy (edited 08-14-2009).]
Thanks to JazzMan, Oliver Scholz and GSXRBobby for their helpful writeups on tightning the tilt-steering columns. Did that on the 86 last night and if it was not for the outer bearing retainer sticking on the steering shaft I would have had no troubles at all. It just took a leather mallet blow (or two) to the end of the steering shaft with everything else ready to come loose to free it up and get the tilt housing off. Charlie
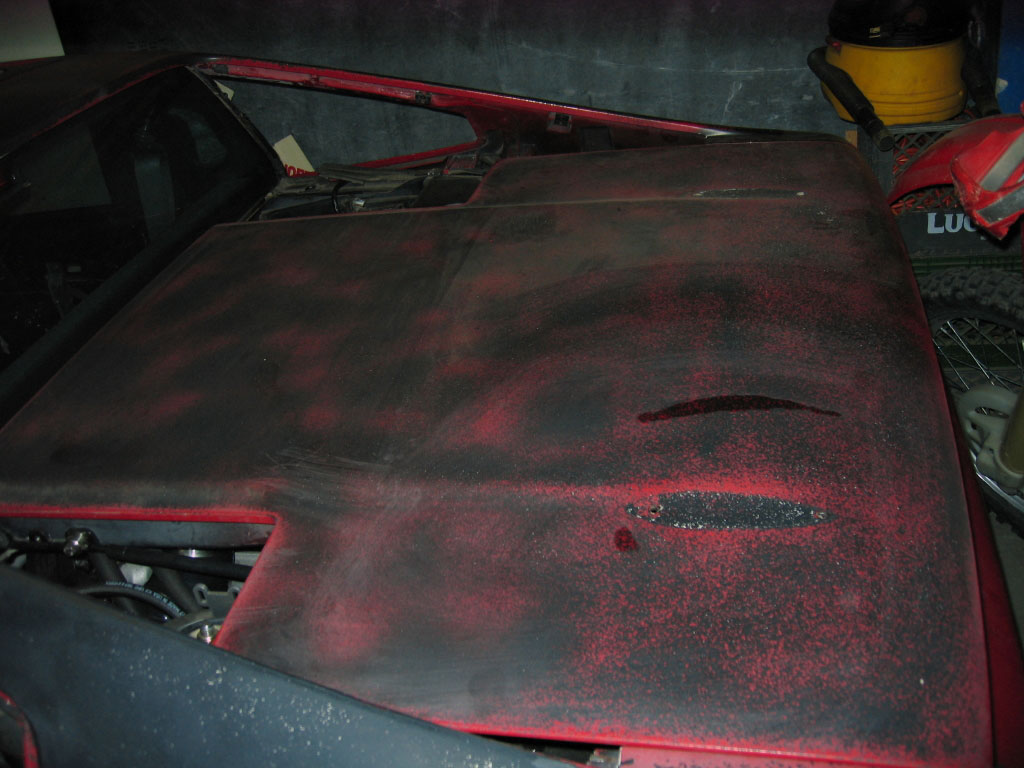
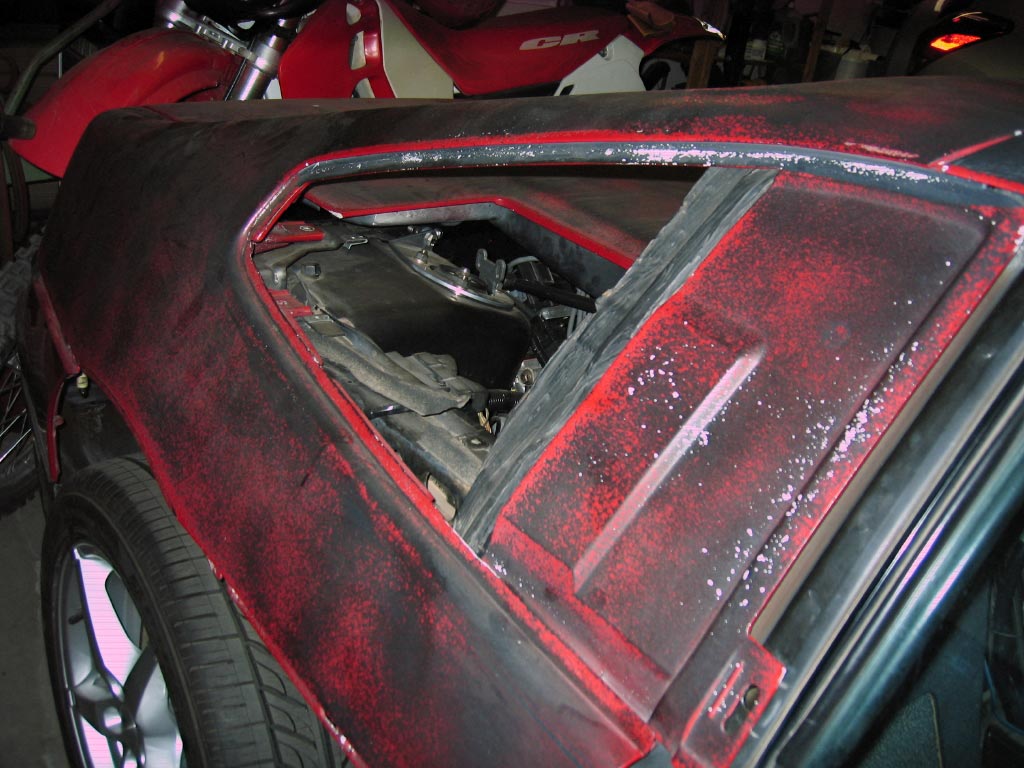
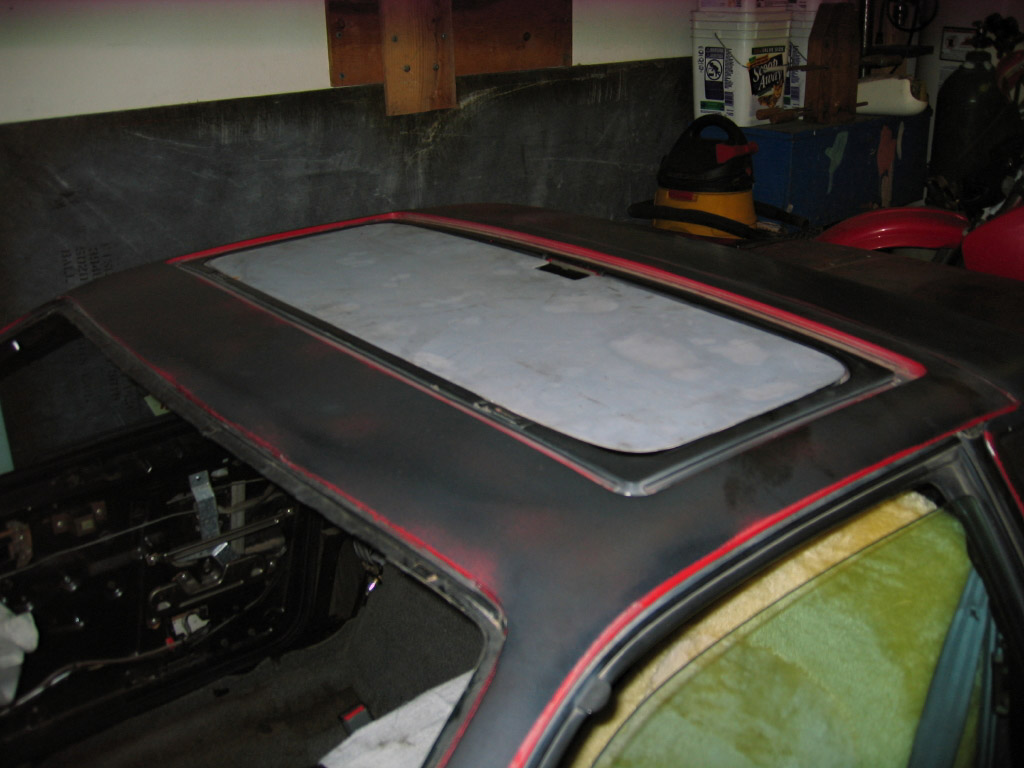
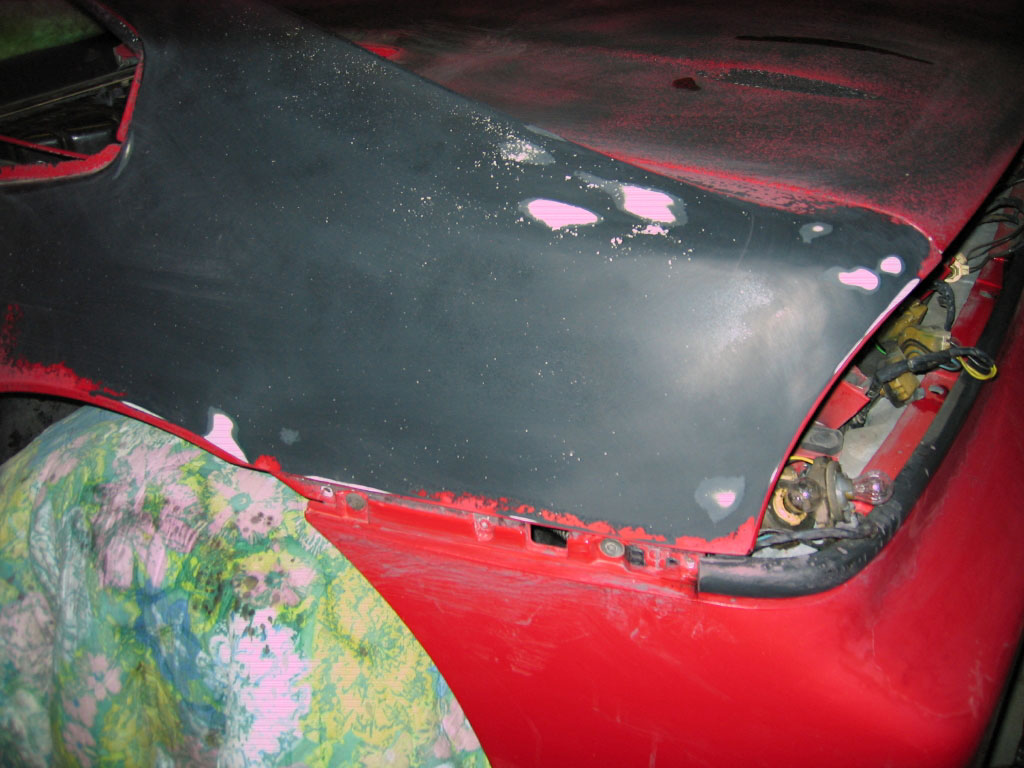
I have run out of excuses, it is time to start sanding. We had the roof panel, rear clip and decklid media blasted to see if it would be helpful. So far I think it is going to be ok. I am trying to knock down the bits of paint that did not come off with the media blast. This is the first time block sanding for me and it shows. I am burning through the black primer in various spots. Hopefully as I get more time doing this I will make less mistakes. The nice part is so far there is no fiber sticking out anywhere. The first three pics are of the panels that were media blasted and no sanding has yet been done. The last picture is the left rear of the car where I am trying to take off the rest of the red paint down the black primer.
On another paint related note. I am now leaning towards a Trans-Am style of white body and dual metallic blue stripes. I need to investigate a little more to see if that is really the look I want but it is a start in the right direction.