After reading through this whole thread, I could only thing I could think of was your name must be Murphy. I know I wouldn't have your patience to see this through. I admire your perseverance!
When you finally get your DIY dew wipes finished, would you consider posting a how-to thread with resources and all?
weloveour86se covered it already. I linked to the thread in another post this morning. The things you'll need are the dew wipe material, rivets, some cheap weather stripping from Lowe's (for the inserts) and some heavy duty velcro. As I also mentioned, an industrial hole punch is also a tremendous help.
The answer is yes, someone had already tried them. Gokart used them, but he didn’t stop there. He also tried the functional heat extractors from a 2002 GTP. My wife drives one and I’ve always wondered what those extractors would look like on a Fiero.
I spent some time in the salvage yard this week looking for parts for my wife's Grand Prix. I noticed a couple 90s model Firebirds with these non-functional hood-mounted heat extractors. Has anyone ever used these on a Fiero?
Since they're plastic it would be easy to cut an opening into them and glass them into/onto the hood. The yard charged me only $8 for both and there's another set if I need it.
My Quad tended to run hot when it was still in my GTZ so I'm concerned about keeping it cool in the Fiero. I've looked at a lot of different hood and decklid vents and only seen a couple I like.
I think these would be perfect if the edges were more parallet, like this:
I'm no expert at fiberglass or body work so this would be a massive amount of work. It's tempting to follow this tangent now as I prep the car for paint, but there's also a good argument for painting the car, finishing the other tasks and getting it on the road, then going back and doing tweaks.
[This message has been edited by Quad Raider (edited 12-16-2018).]
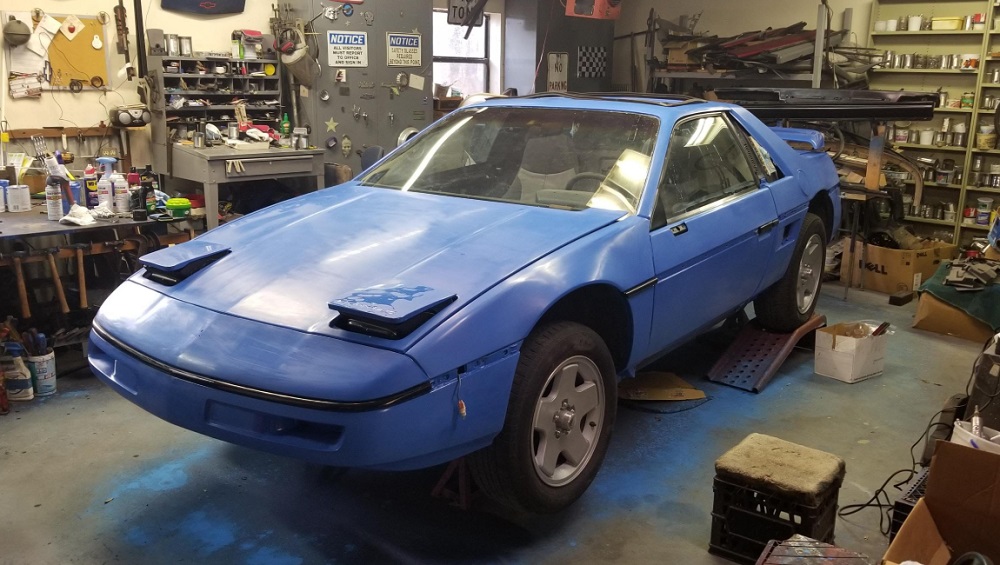
I was on vacation this week so I got a lot of work done, including the first coat of paint. I'm using Rust-oleum sail blue out of quart cans. I always planned to paint the car some shade of blue, even before I decided to use Rust-oleum instead of automotive paint. Once I decided to go with RO, I picked sail blue because it was available in both rattle cans and quart cans pretty much anywhere I looked. For some reason over the last several years quart cans of it have become rare.
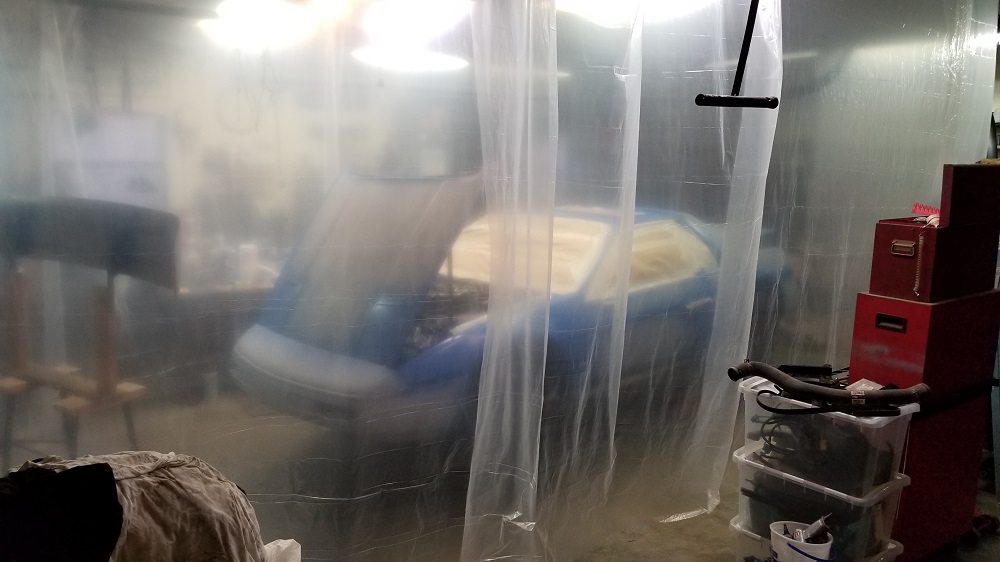
I had one full can and half of another (from that time I tried using a roller), so I figured I had plenty for such a small car. More on that coming up. After sanding the car one more time, wiping it down with acetone and then wiping it again with tack cloths, I set up a homemade paint booth.
Now, before we go any further, here's a note about my expectations. I EXPECTED the first coat to look rough. I expect my second and third coats to look better, but not anywhere close to professional. I expect to get the paint job to look good enough for my tastes, by color sanding the whole car as many times as necessary and reshooting anything that needs it. In other words, it will look as good as the effort I put into it.
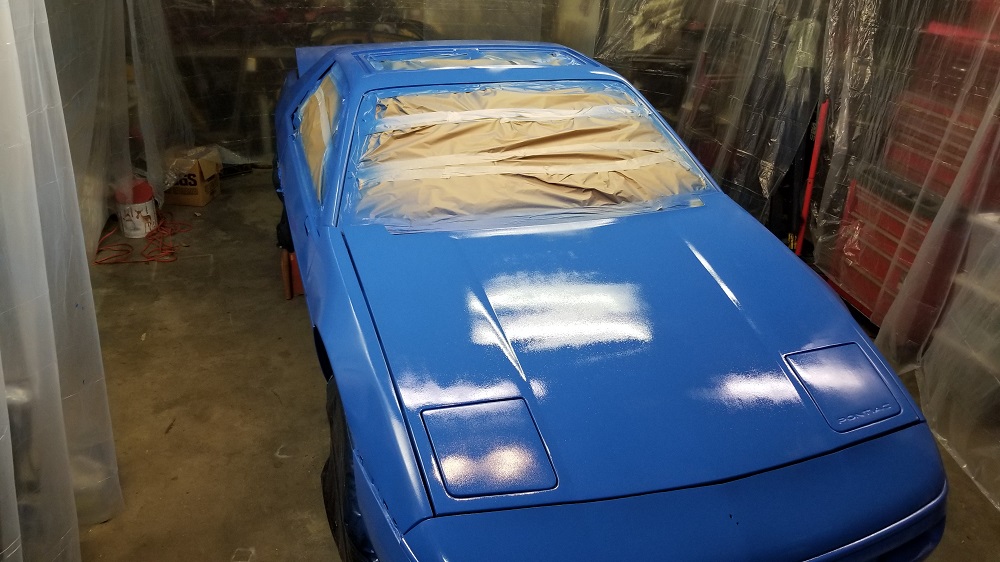
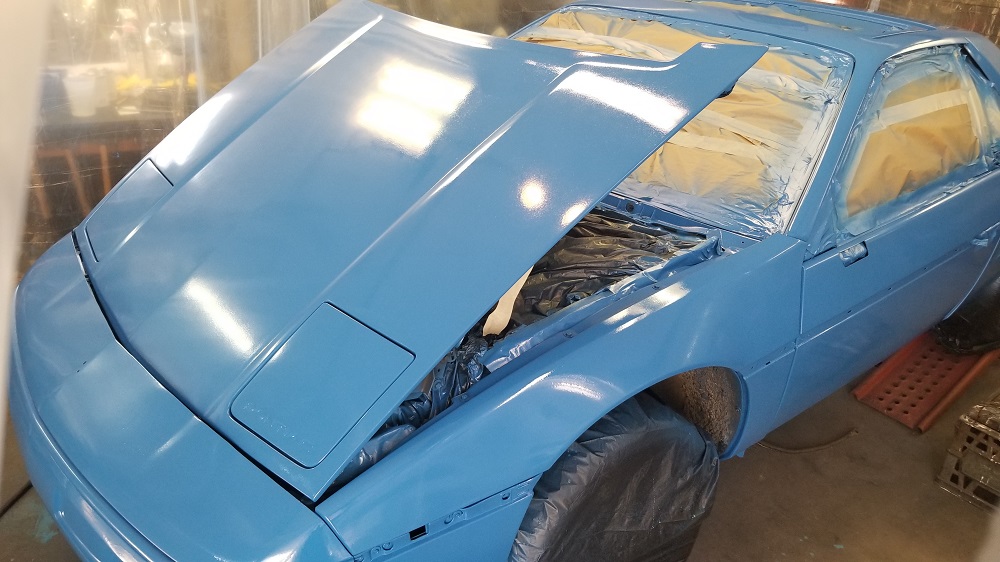
So on Thursday, I got everything ready, mixed up my first batch of paint and acetone and started spraying. I immediately realized I hadn't used enough acetone because the paint came out too thick and led to major orange peel. I started on the driver's side roof then moved to the front of the car, then the passenger side roof, then the rest of the car. You can see the orange peel on the hood.
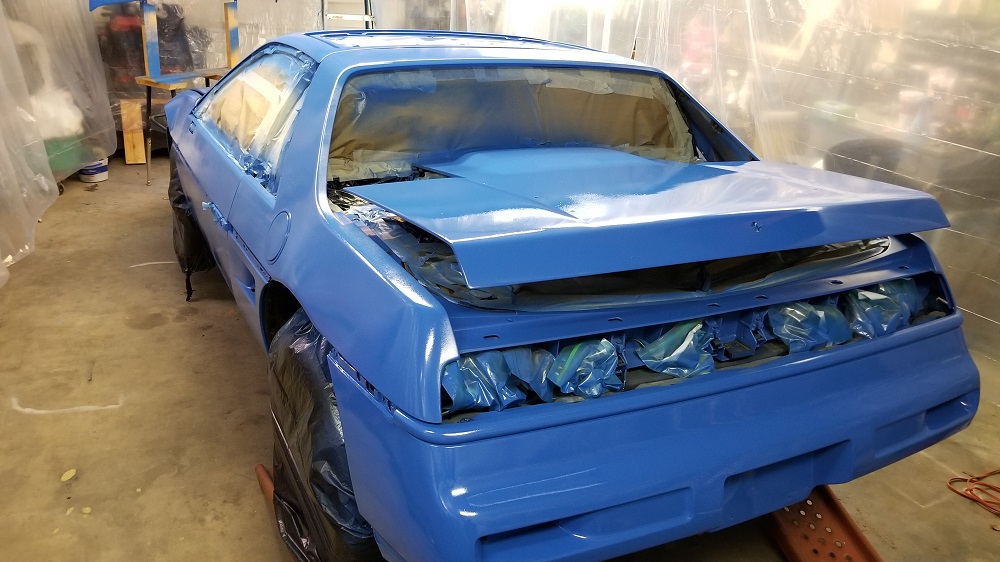
By the time I got around to the back of the car, I had the mixture just about right and the paint went on very smoothly.
Because I hadn't thinned the first two cups of paint much, I ran out after getting just one coat on the car. I then spent Friday trying to find a couple more quart cans of RO sail blue in the Tulsa area and finally ended up ordering two cans from Amazon. They arrived today. Tomorrow I will begin color sanding the car and fixing some of the other boo-boos. For instance, as you can see in the first photo, I have the wing mounted on a wooden platform to be able to spray both the botton and top. I sprayed it first, then backed into it a couple of times while painting the car, so I'll have to fix those smudges.
Even though I have a huge amount of work to do to finish the paint job, I had so much fun getting to this point I can't wait to get back at it tomorrow. It's such an emotional lift to get the car all one color again and to see how good it can look when the paint goes on properly.
I've looked at a number of YouTube vids on painting a car with Rustoleum. I even remember a magazine (Hot Rod?) that did one a few years ago. Yes, it will look as good as the effort you put into it. I applaud you for your creativity, frugality, and perseverance! Look forward to your updates!
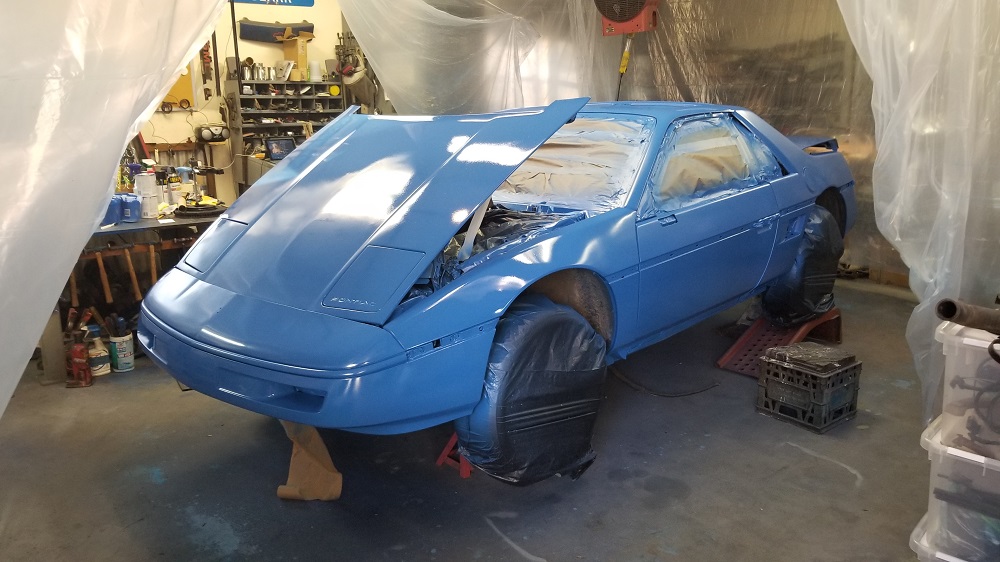
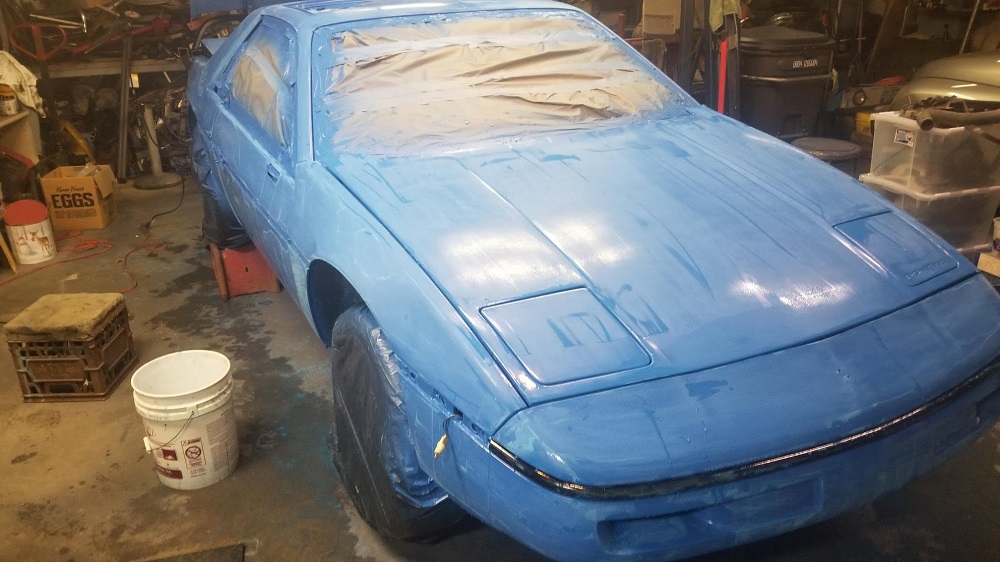
Here's what it looks like now. I wet sanded the whole car after that first coat because it was so rough. I also did more research on how to mix the paint and acetone and decided to go with a ratio of 8:4:1, eight parts paint to four parts acetone and one part hardener.
I am absolutely thrilled with the results. It's not a professional quality job, but it's good enough for me.
There's a bit of orange peel over about 50% of the car, but I can't make up my mind yet about whether to lightly color sand it, buff it or just leave it. I'm not going to do anything to it until next weekend at the earliest.
Conditions were just about perfect yesterday. Relatively dry air, temperature about 65 and no wind, so I opened one of the garage doors during the process. I used a Harbor Freight HVLP gun that I'd bought at a pawn shop over the summer. I don't even remember what I paid for it, but it was cheap.
I probably didn't have my air compressor set properly and that contributed to the orange peel. I also made some rookie mistakes, like brushing the roof with the air hose a couple of times and somehow getting a big drop of water on the hood.
It is such a tremendous sense of accomplishment, all the sanding and experimenting was worth it. I cannot wait to get the trim, mirrors and lights installed, and to paint the black strip on the front and rear fascias.
Looks really good. I have a rustoleum universal brand spray bomb paint job on my car. I thought I was going to have to redo it last year, but it responded really well to a machine buff using Meguiars Ultimate compound and a good wax job. Lasted all Summer with a nice gloss.
I decided to color sand the car. In the process I fixed some of the imperfections in the paint. I also painted the black molding strip on both fascias.
I’m planning to buy a buffer and polishing compound this week and hope to finish up the whole process this weekend. Then I’ll reinstall all the trim. After that, it’s onto removing the dash to refinish it and to install the wiring harness for the power equipment I added to the doors.
I went over to the shop Saturday with the idea that I'd color sand one more time with 1500 grit, wash the car then buff it. I ended up sanding the whole car twice, then again on Sunday. In the process I discovered three small places where I burned through the paint.
After fixing the burns, I looked over the whole car again and could tell I've made great progress in removing the orange peel. I think I'll try one more round of sanding to remove all of it, then I'll try buffing.
Taking sandpaper to newly applied paint was really counter-intuitive, but now I've lost track of how many times I've sanded the whole car. It's been at least five. Since I'd never done it before, I didn't know how much pressure to put on the sanding block or even how to tell when I was done. I will sand the car one more time, really concentrating on each small area as I go.
The places I burned through are all edges: the edge of the passenger side front fender, the corner of the drivers side headlight door and the base of the B pillar on the drivers side.
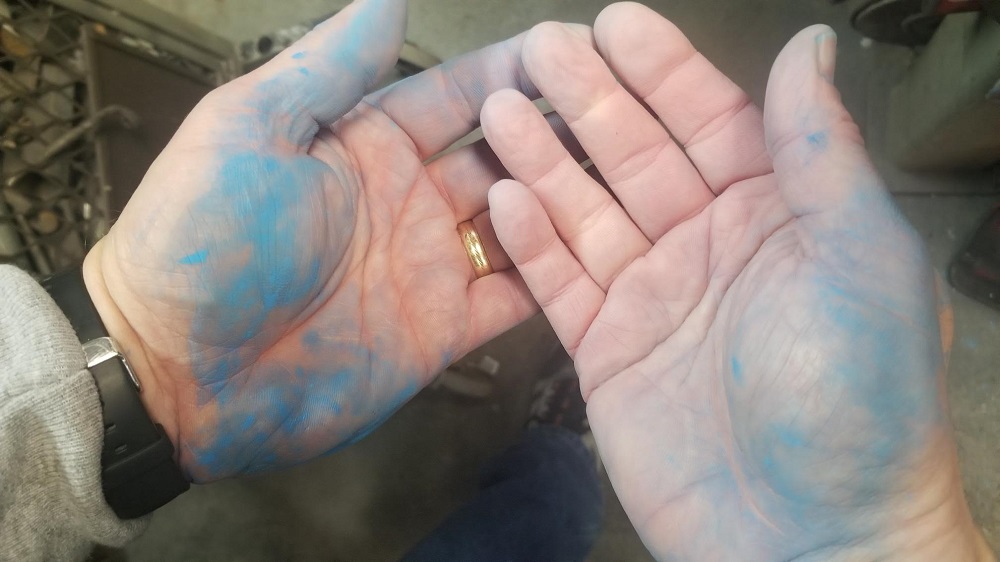
When I finished the first day of color sanding, I stopped at the grocery store on the way home. "Did you kill a Smurf?" the cashier asked me.
I had tried to think of a name for my car for eight years. I think Smurf Murder is perfect. The custom license tag would be SMRFMDR
[This message has been edited by Quad Raider (edited 01-21-2019).]
Here's a little project that frugal Fiero owners will like. Instead of spending money on a holder for the spray gun, I made this.
The rotor is from one of the other cars in the family. I bolted a piece of all-thread to it to make a rack to hold parts for painting but didn't use it and it was just sitting around the garage. The plastic part is from the radiator fan mount for my Beretta GTZ.
When I parted out the car to get it ready to go to the recycler, I saved that fan mount because I knew it would be good for something. I cut the other two arms off of it and opened up the center hole and the paint gun fits perfectly.
[This message has been edited by Quad Raider (edited 01-21-2019).]
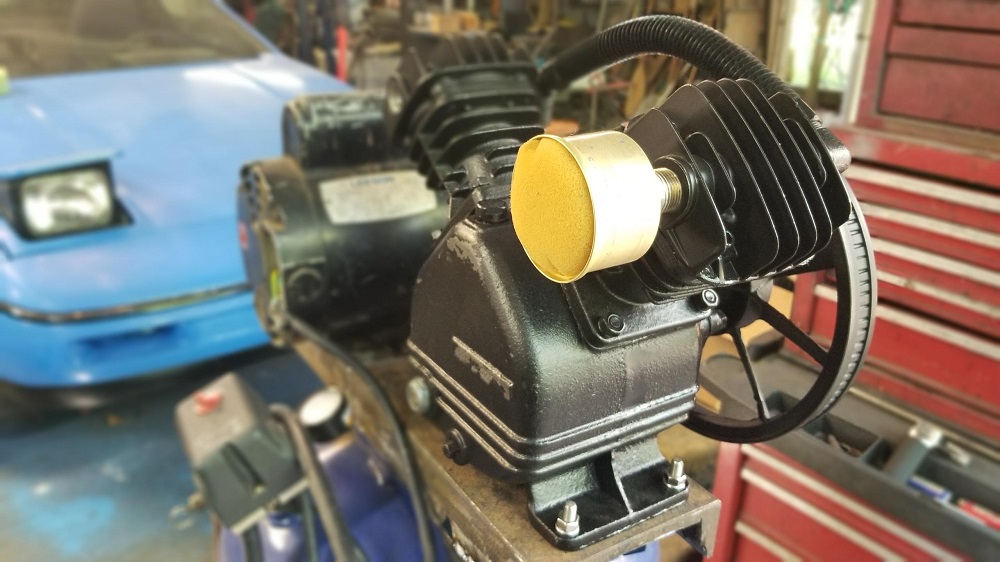
That's the piston and fan from my air compressor. It's a Campbell Hausfeld that I bought in 2001. I haven't been able to find replacement parts, probably because it's so old.
I'm still considering what to do about my broken air compressor. In the meantime, I've been color-sanding the car. I think I've finally learned how to do it so yesterday I started at the front of the car and focused on sanding until the orange peel was gone. I finished the left half of the front fascia and the left front fender. Probably won't get over to the shop again until tomorrow.
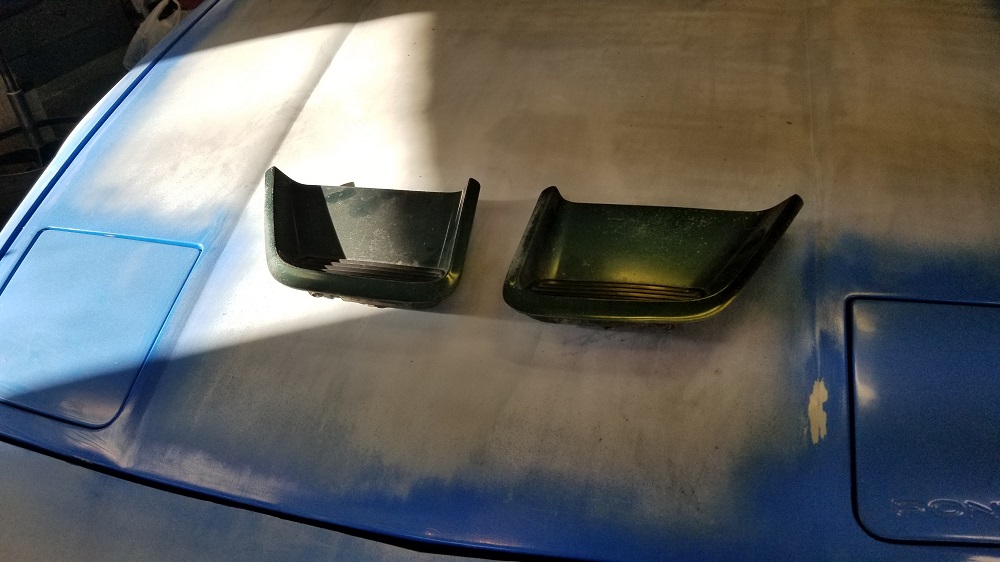
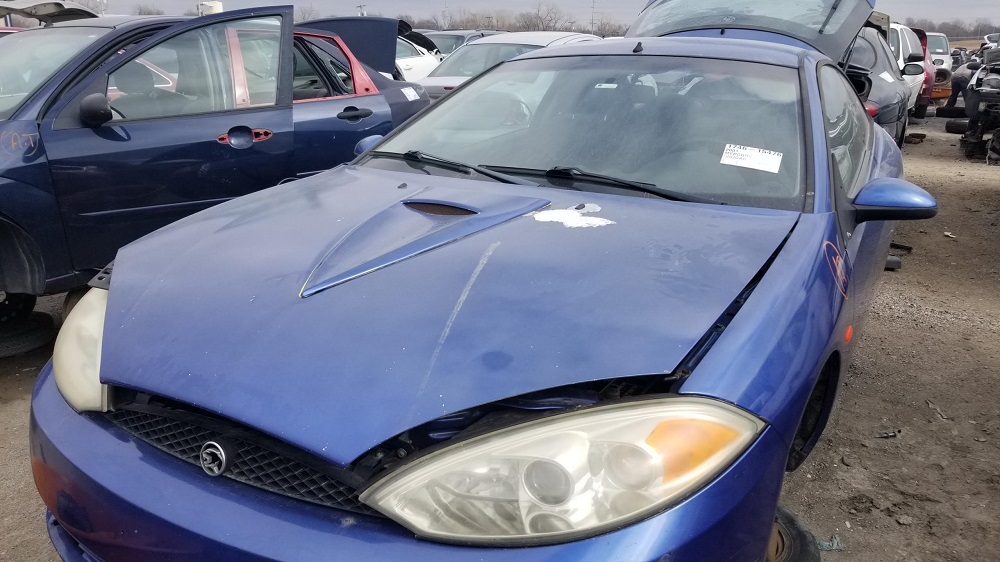
I made a trip to the salvage yesterday and something caught my eye. It's this non-functional hood scoop on a 2001 Mercury Cougar.
It was attached to the car with some screws and a couple speed nuts so it was easy to remove and the yard charged me only $8.
It wasn't until I got back to the shop that I realized the overall shape of it looks almost exactly like the Pontiac logo. It also looks good on the hood.
I searched the forum to see if anyone else has ever used one of these and didn't find anything.
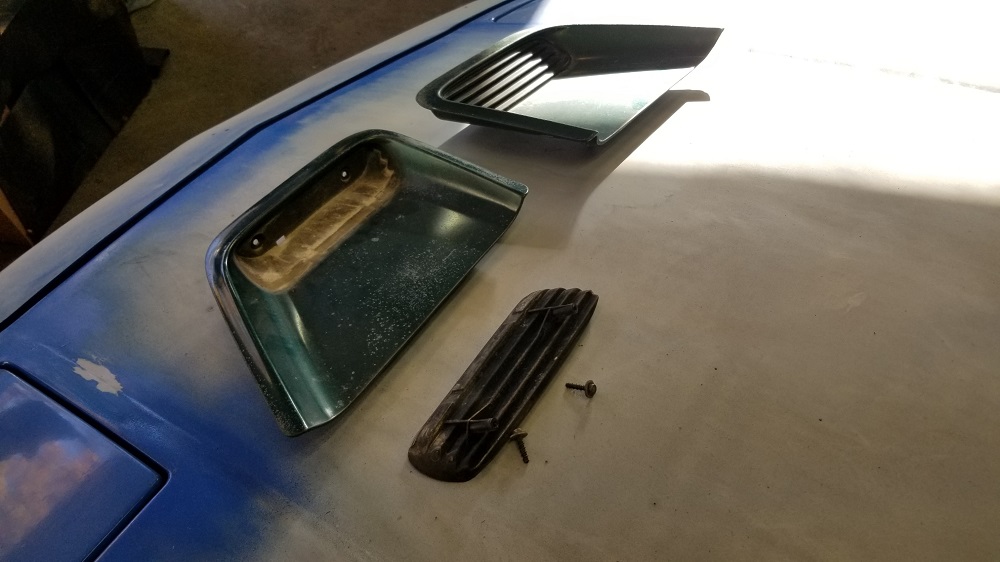
I'm considering two options. One would be to cut out the top end out of it (the part that faces the windshield) but keep it otherwise intact, the other would be to cut out the top end of it, then cut out the concave inner section, flip it over and reattach it and sand the whole thing smooth.
One downside is that the hole in the hood would be relatively small because the front of the extractor would be so narrow up there.
About that scoop you found. At first I wasn't sure, but you may be onto something.
How would it look as a roof scoop? Might be too long, but if it fits it could lend a McLaren-ish air to the car. Pop it up there, let's see how it looks!
It won't fit on my roof since I converted my car to a sunroof. I probably won't get over the to the shop to check it out any further for at least a few days.
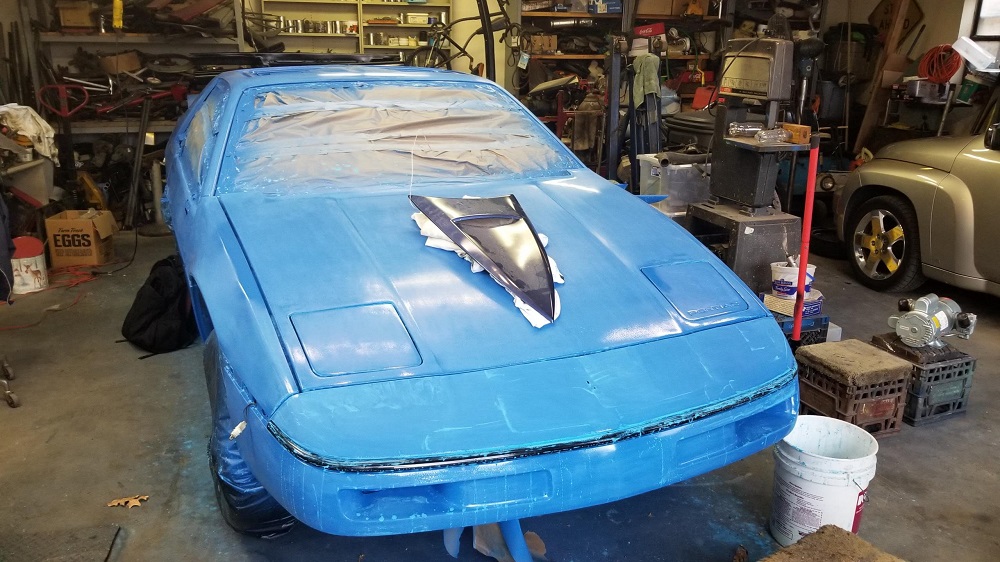
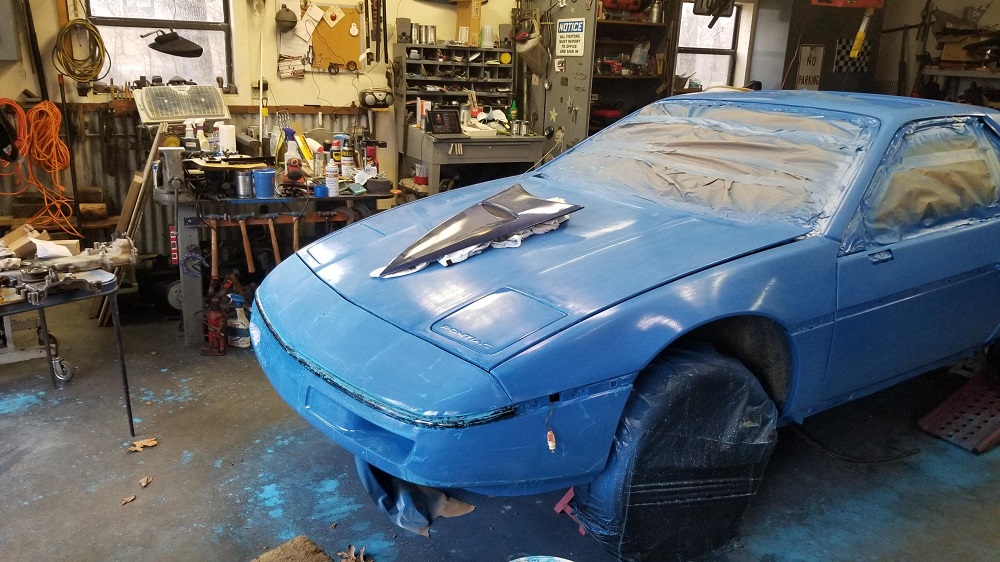
As you can see from the previous picture, I'm still not finished with the paint job. I rattle-canned the scoop and look how good it looks compared to the rest of the car.
I've probably color sanded the whole car at least ten times. The first six or seven times I didn't know what I was doing so they don't really count. Once I got the knack of it, and switched from 1500 to 800 grit paper, I made real progress.
Now I'm trying to learn how to buff the car.
I can still see some faint orange peel, but as you can see I'm not getting the fabulous shine I was hoping for. I don't know if I'm using the wrong compound, the wrong buffing pad or if Rust-oleum just won't buff out.
It's also possible I need to do the car with 1500 and 2,000-grit paper, THEN try buffing. Any advice would be welcome.
Regardless, every time I look at the car two thoughts come to mind: one, I'm so glad it's all one color (and a color of my choosing) -- two, DAMN, what a great looking car.
[This message has been edited by Quad Raider (edited 02-26-2019).]
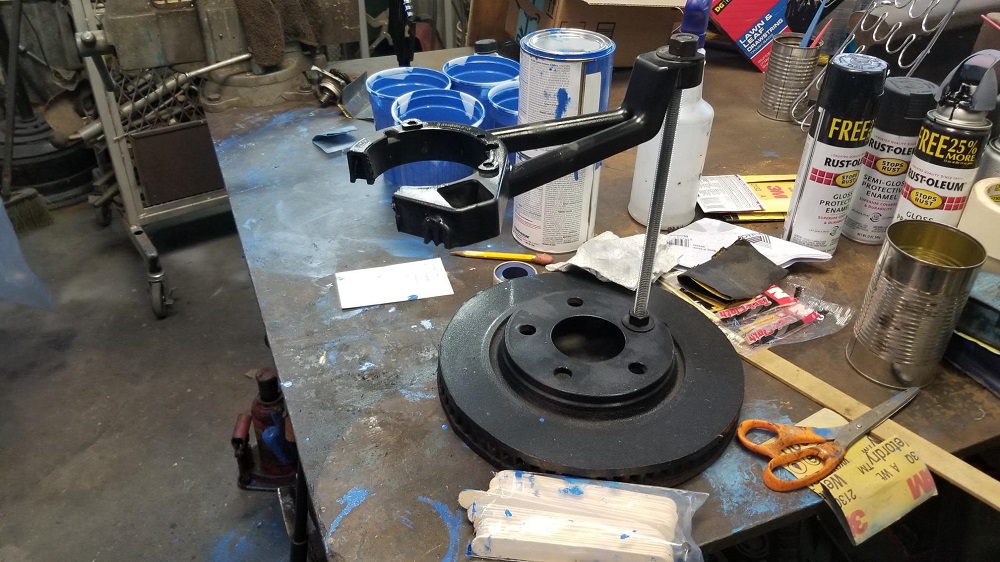
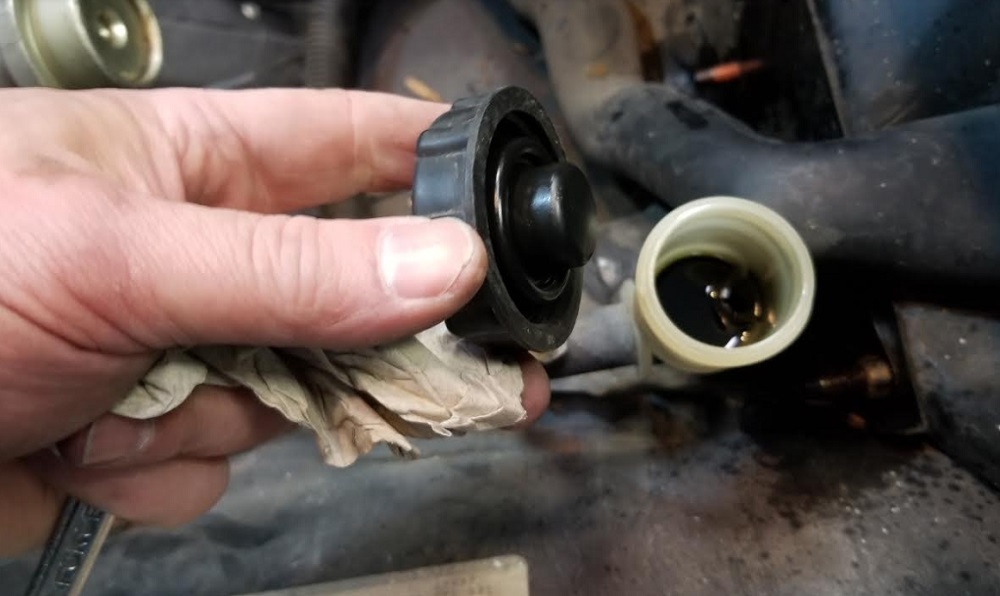
I took a break from color sanding and did the brake booster switch over. I had read several threads on here about switching over to the '96 Blazer brake booster, but then read a couple of threads about using any booster from a mid-90s full size GM pickup/SUV. Along the way I spent a couple hours in the salvage yard comparing and contrasting different boosters and realized they're all about the same.
I ended up getting a booster from a mid-90s Silverado. One day while noodling around the internet I came across a thread by Lunatic on another forum, which demonstrates how to eliminate the need for modifying the push rod. You just disassemble both boosters, switch over the push rod and reassemble the bigger one:
The step by step instructions and photos were great. The only trouble I had was putting the booster back together again. I just could not get the front cover to twist back into position without a lot of pounding with a hammer.
[This message has been edited by Quad Raider (edited 02-26-2019).]
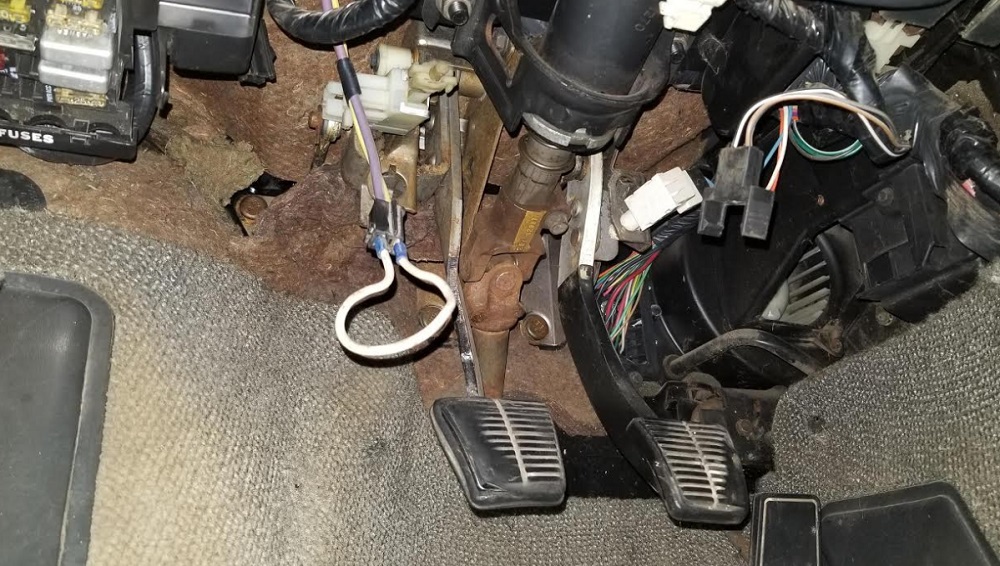
While contorting myself to get under the dash to reattach the brake push rod, I discovered this:
Looks like the clutch safety switch quit working and the previous owner had someone wire this jumper. I've seen a few threads about leaving it this way, but using the same circuit to install a cutoff switch as a theft prevention device. I may do that eventually.
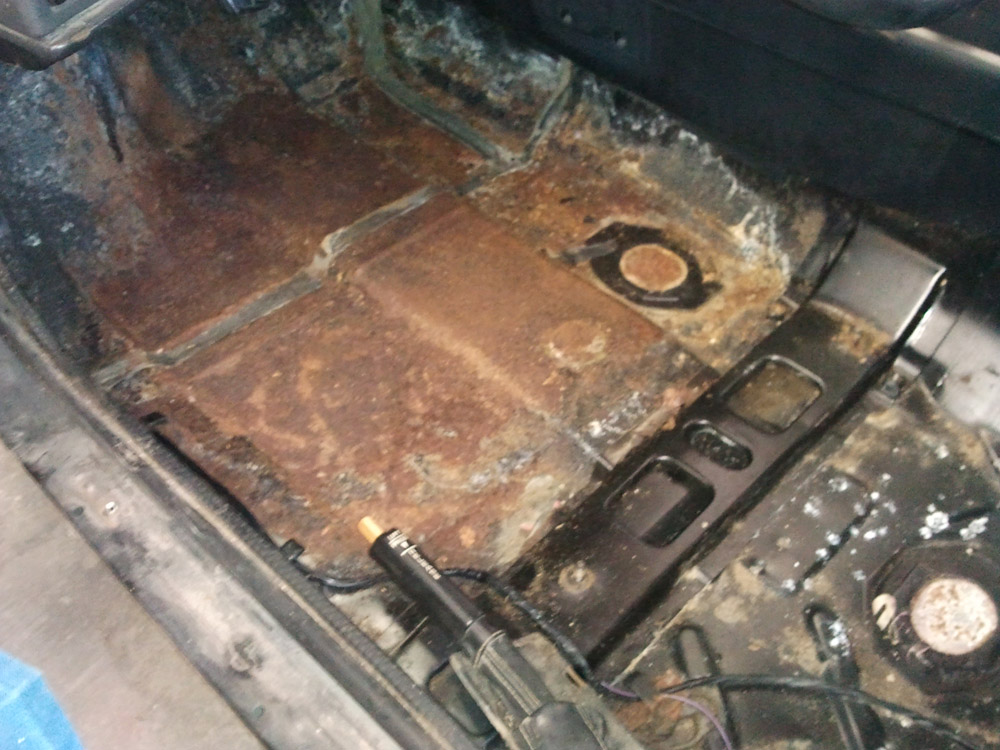
I also made another discovery. Somehow in the 8+ years I've been working on the car, I'd never checked the fluid level in the clutch reservoir.
As you can see, it's just about empty. This caused a light bulb to go off. Years ago when I pulled up the driver's side carpet I was surprised to see a huge patch of surface rust. I'd assumed the previous owner spilled a soda down the console. But recently I came across a thread about the clutch master cylinder leaking and the fluid running down the firewall and under the carpet.
I mentioned it here:
[QUOTE]Originally posted by Quad Raider:
Here are couple more random photos I'd thought were lost.
The first is what the driver's side floor pan looked like when I first pulled the carpet out. The car had very little rust, except for this.
I think the original owner must've spilled a coke down the console, because the bottom of the car looks great and there aren't any holes.
So now I know the real culprit. I'll set this aside for now because I want to finish the body.
Someone on the Fiero Facebook group posted this Hot Rod article about using the Prius electric power steering setup because it has a fail safe mode that kicks in when there's no signal from the computer. That means, other than having to connect power to it, it's a stand-alone installation. Since I've never actually driven a Fiero, including my own, I don't have the proper perspective to decide if I want to try it.
That should give you the shine you're looking for.
Thank you very much.
I think I’ll try sanding it with 1500 grit one more time, then seriously consider clear coating it. At the beginning of this process I was sure I’d be satisfied with a decent paint job, but now I see that it’s so close to a great paint job, I might as well go for it.
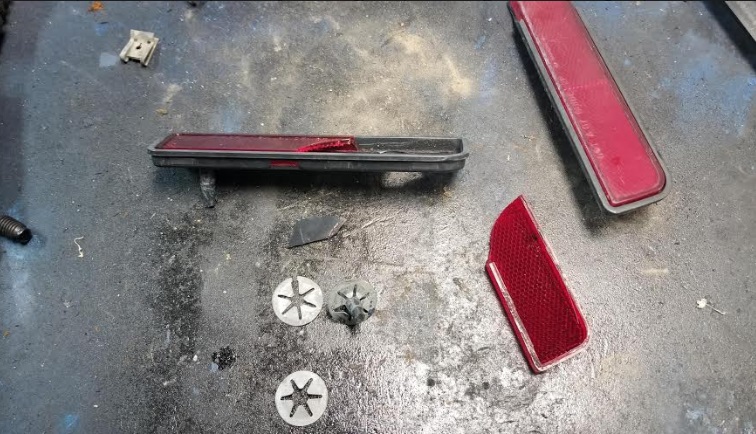
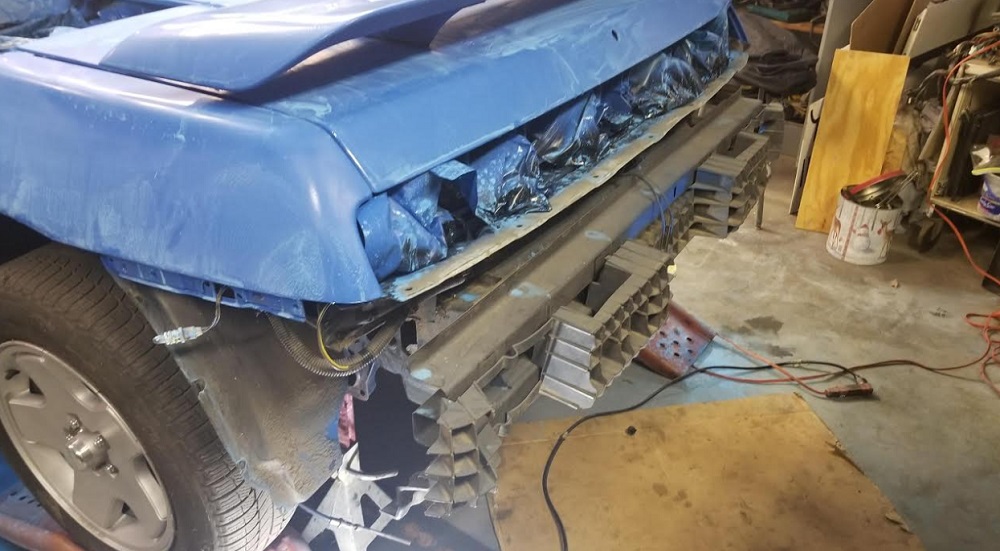
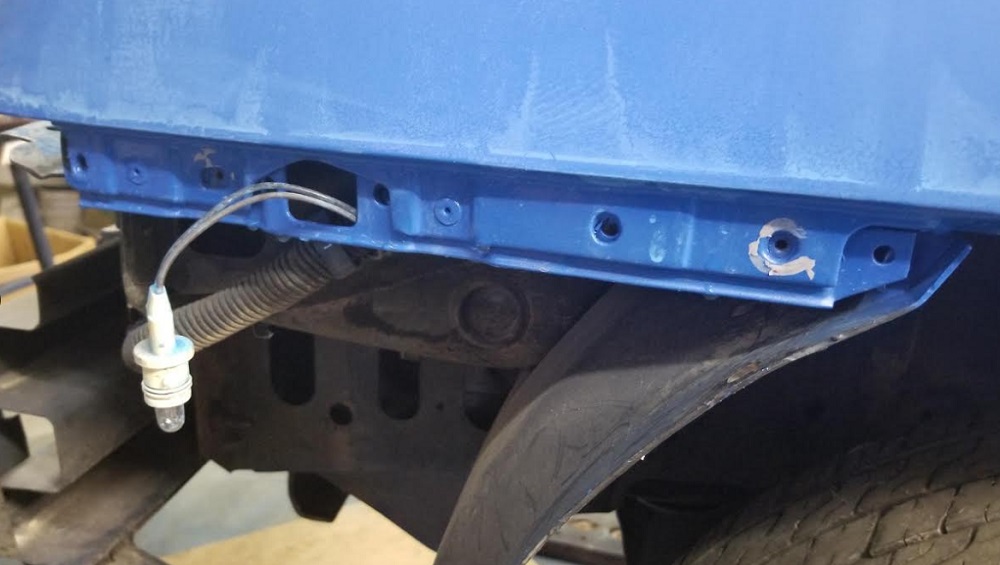
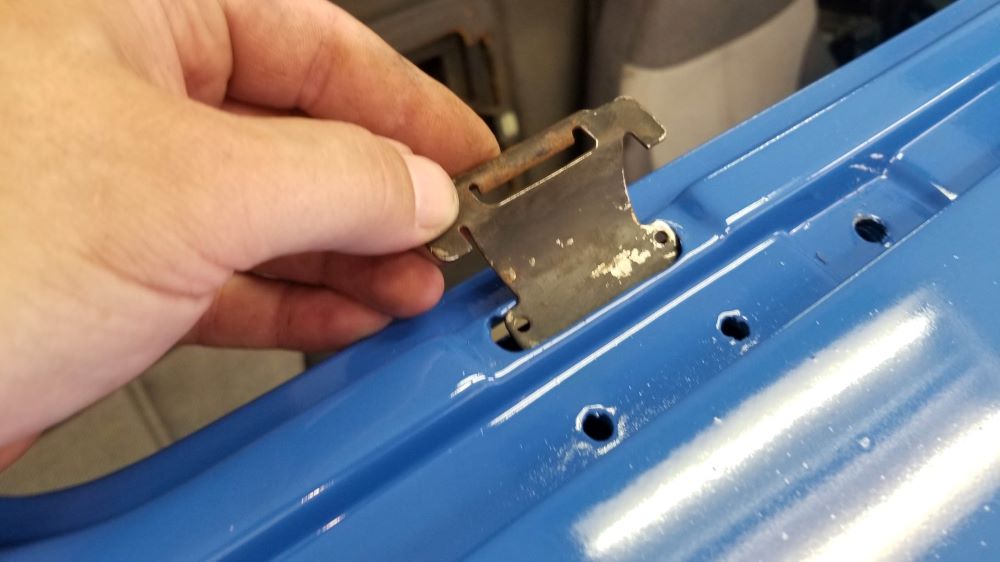
I learned some hard lessons this week. Before reinstalling the rear fascia, make sure you've attached the reflectors first. Also, be very gentle with the 30-year-old plastic. Also, don't pound the steel clips flat before installing, they're supposed to be bent slightly to fit over the pins on the reflectors.
I was irritated that I had to remove the fascia to install the relfectors, but I was disgusted when I broke one trying to install the clips. That led to a 30-minute detour which involved getting one of my spare rear fascias out of the attic to remove the reflectors from it. In the process I saw that I'd removed the reflectors from the OE fascia I stored up there, which means they’re sitting somewhere in the shop.
I also learned that you have to install speed nuts on the front fenders and the rear clip in order to reinstall the side marker lights.
In the process, I color sanded the car one more time with a DA sander and a 3,000-grit pad. The car looks amazing, as long as it's wet. I'm leaning toward adding a clear coat.
We had a winter storm this morning which brought 2" of snow and bitter cold temperatures, so I'm in no hurry to get back over to the shop now.
[This message has been edited by Quad Raider (edited 03-03-2019).]
Work on the Fiero has come to a stand still for a couple of reasons. One, I've decided to clear coat the car but it will have to wait until I can replace or repair my air compressor.
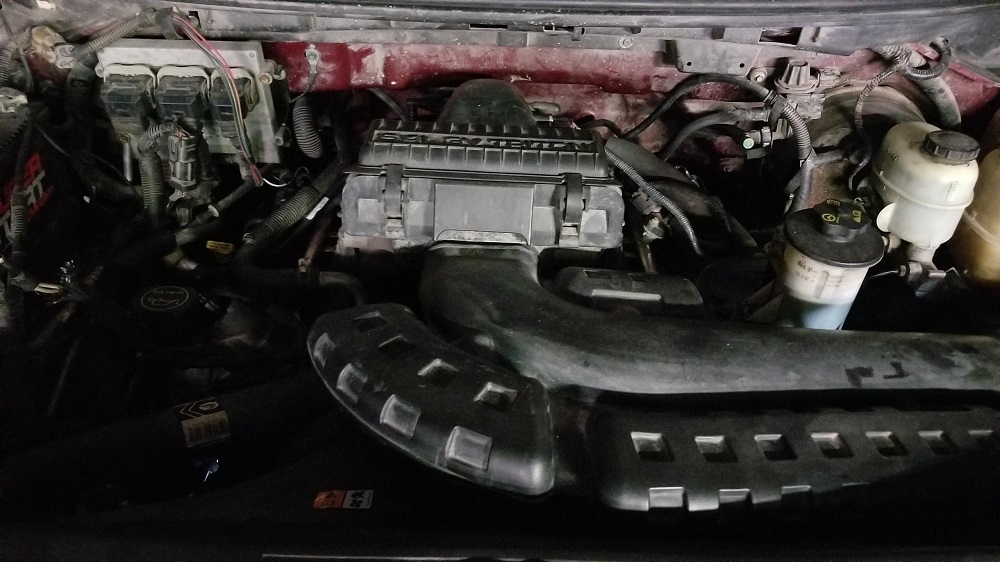
Two, I'm working to finish my best friend's 2005 Ford F150. I changed out the cam phasers, timing chains, guides and tensioners and got it all back together only to find that it runs like crap. I don't know Fords very well, but I will never own one after working on this thing. Bad cam phasers are a common problem, but so is a vacuum leak either at the doodad that controls the 4WD for the front wheels or the brake booster, or both. The fitting for the stupid brake booster vacuum line is on the back of the intake manifold buried under the firewall.
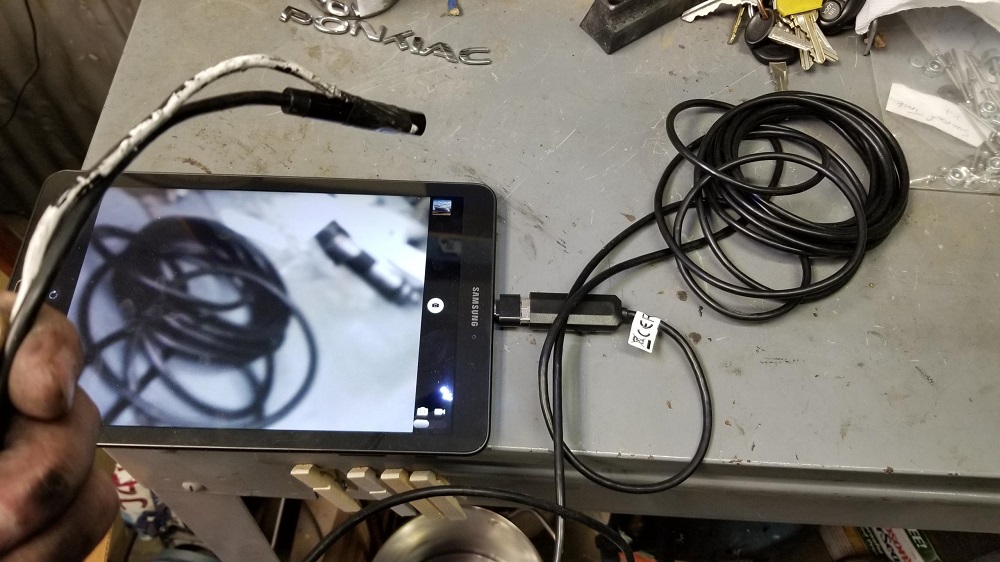
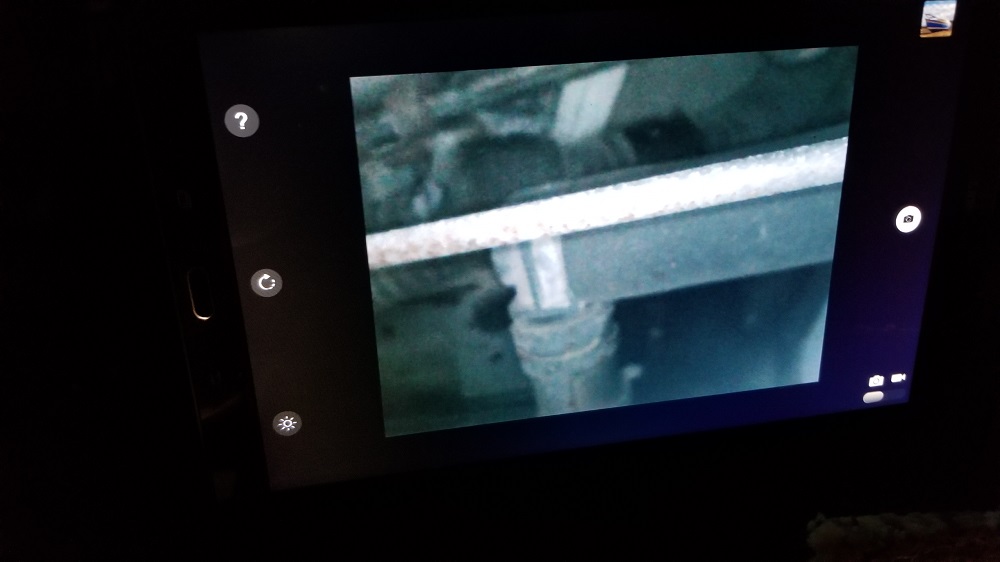
You can't see it, you can't even get your hand back there to feel it. Checking the F150 forums I found that many people buy Harbor Freight borescopes to see back there, so I bought a Chinese one for $11 on Amazon.
I had to download an app for it, but it actually works. It will not work on Apple devices, but luckily I have an Android phone and tablet. The cable is 15 feet long but it's not very stiff so I taped the camera to a piece of wire. The camera has six very bright and very small LEDs around it with an adjustment knob on the plug. It's designed to be plugged into a PC laptop but came with a couple of adapters for smartphones and tablets.
That is the fitting.
I figured I'll find all kinds of uses for this when I'm working on the Fiero and for 11 bucks it has a surprisingly good picture. It will also record video.
[This message has been edited by Quad Raider (edited 04-03-2019).]
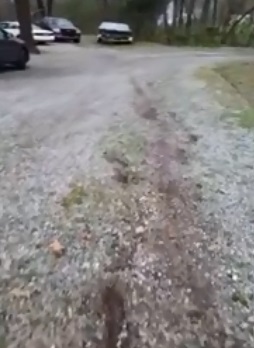
Work on all my projects is on hold, because I did something really stupid last Sunday. I always, ALWAYS chock a vehicle before I get under it. Except on Sunday. I don't have a reason for why I didn't other than simple carelessness. I'm lucky I have only minor injuries. I know I could have been badly hurt or even killed.
As a warning to everyone else, here's what happened. I got under my friend's pickup in order to remove a vacuum fitting on the back of the engine. While I was under there, I knocked the transmission out of park and the truck started to roll down the driveway. I realized what was happening so I grabbed the bottom of the truck and swung my legs under the truck so they wouldn't be run over by the front wheel.
For a moment, I held the truck still, but then it started to roll. It's a 4x4 with a lot of ground clearance, but I knew the cross member and A arm wouldn't clear my fat belly, so I just held on, trying to use my heels to slow the truck down. The truck dragged me off the concrete pad in front of the garage onto the gravel driveway. A few seconds into the ordeal I realized I was growling at the top of my lungs, out of a mixture of adrenaline and rage at being so stupid.
The truck rolled all the way down the hill, just missing my car and our speed boat. It impacted the trailer holding our catamaran, bending parts of it but not damaging the boat. Instead of just holding on until the truck came to a stop, I decided I needed to just let it roll over me. The result is a scrape across my chest and gut, road rash on my lower back and a deep scrape on my left elbow, but that's it. I have some spectacular bruises but they don't hurt. I went to the ER to be checked out and they didn't find any problems.
The truck shredded my t-shirt and the ground scraped a hole in my jeans.
My sister shot video of the trail I left in the gravel. The gouges are from my heels.
I'm almost completely healed up, except for my left elbow, but it will be ok in a few more days.
So how do I feel? Lucky, grateful and stupid. The worst part is knowing I made my family worry thanks to my carelessness.
Glad you made it out alive. Thanks for the reminder to all of us. jon
------------------ Astronomy says we will find a coded signal from outer space. Then we'll KNOW that life exists there, for coded signals aren't by chance.
Biology says there are coded genetic signals in every cell, but we KNOW that no intelligence created life.
I'm the original owner of a white ' 84 2M4 purchased Dec 10, 1983 from Pontiac. Always garaged, no rust, 4-wheel drifts are fun!
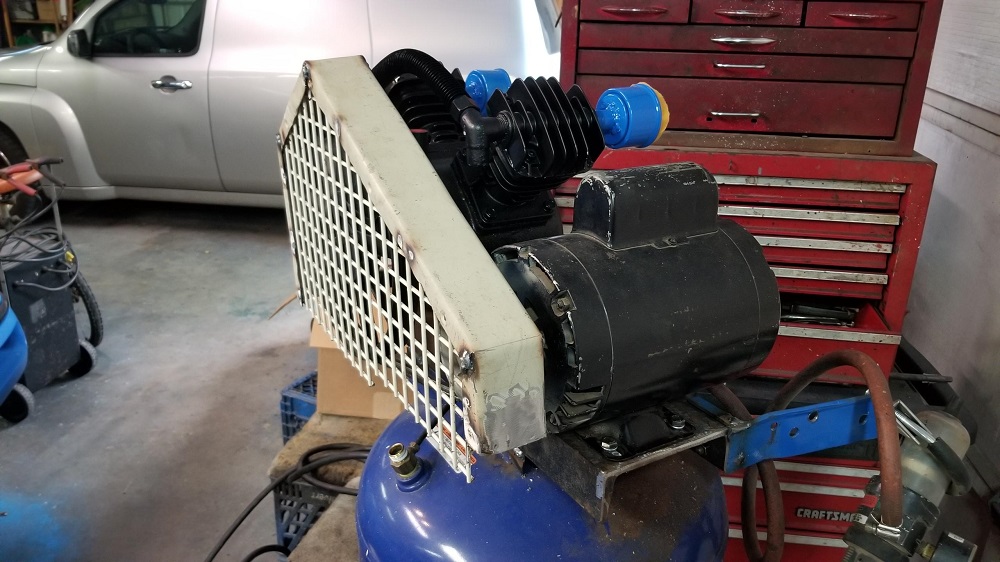
Finally rebuilt my air compressor. I bought a two-cylinder replacement pump from Home Depot and then had to fab a new mounting plate.
Since the replacement pump came with no air filters, I had to get creative. I welded a big washer to a short section of threaded pipe, then riveted a cat food can to the washer and used a punch to open up the center hole. The filter material is foam rubber cut from an old seat cushion.
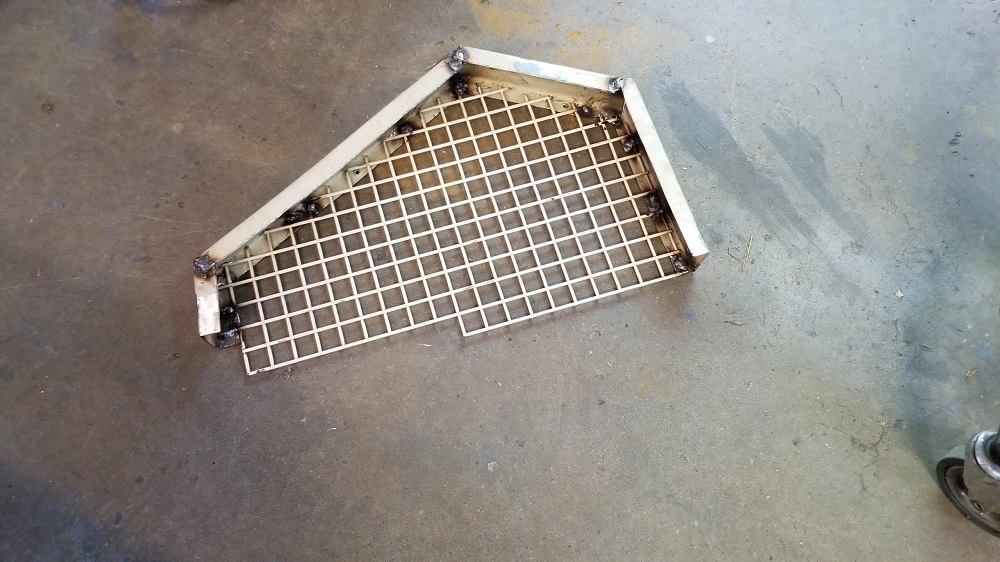
Also had to fab a guard, since the replacement pump is belt driven instead of direct drive like the one it replaced. I don't remember where I got this 1" square steel mesh. I have three or four sheets of it, 2' x 5', and the stuff was perfect for this.
I test fit it and ran the compressor to make sure nothing rubbed.
For the feed line from the pump to the tank, I first tried bending some 3/8" steel brake line, but because the fitting on the tank has some odd-sized threads I had to use a series of adapters so the brake line wouldn't fit. That sent me on a journey to find some hydraulic hose, which finally landed me at a place in Tulsa that makes braided steel line to order while you wait. The braided steel line is great because it can take the heat from the compressor with no problem.
I've since painted the top half of the unit, including the guard, and added two handles that double as a place to coil the hose. Most importantly, it works and it's much quieter than the factory setup was.
I'm now considering building a whole compressor from scratch using an 80-gallon tank. But that's another project for after the Fiero is done.
Next up, I need to try one last time to fix the truck from hell or get it towed, then it's back to finishing the paint on the Fiero.
[This message has been edited by Quad Raider (edited 05-19-2019).]
Just a quick note to say I haven’t had time to work on the car. We had massive flooding in Oklahoma at the end of May, which meant long hours at my job. I did get my air compressor finished and it works great. I also finished working on the truck from Hell.
I bought a gallon of clear coat and am ready to focus on finishing the paint job. I hope to make some progress this weekend.
Clear coat is applied shortly after the base coat is sprayed while it is still tacky. Applying over dry paint is not recommended and it may flake off within a year or so. As for the engine swap did it start and run OK?
------------------ " THE BLACK PARALYZER" -87GT 3800SC Series III engine, custom ZZP /Frozen Boost Intercooler setup, 3.4" Pulley, Northstar TB, LS1 MAF, 3" Spintech/Hedman Exhaust, P-log Manifold, Autolite 104's, MSD wires, Custom CAI, 4T65eHD w. custom axles, Champion Radiator, S10 Brake Booster, HP Tuners VCM Suite. "THE COLUSSUS" 87GT - ALL OUT 3.4L Turbocharged engine, Garrett Hybrid Turbo, MSD ign., modified TH125H " ON THE LOOSE WITHOUT THE JUICE "
Thanks for the warning, Dennis. The base coat is Rust-oleum and everything I’ve read says it must have at least a week’s drying time before being clear coated.
My plan is to clear coat the wing as an experiment, to test the clear coat and to test my rebuilt compressor.
I haven’t completed the engine swap yet. I have one of my spare Quads installed in the car, but I haven’t modified the two wiring harnesses yet, plumbed the fuel lines/radiator hoses, etc. I have all the parts for the rebuild of my HO Quad but I want to finish the paint job and the interior first.
I finally got some time to prep and clear coat the car. Wish I could have done it during the winter or early spring, because summer in Oklahoma and spraying a car in an un-air conditioned shop do NOT mix.
I sprayed one coat on Sunday, then a second coat last night, because the can says to wait at least 6 hours between coats. I'm very happy with the results. I did get some orange peel on parts of the car, but it's much less noticeable than orange peel in the color coat was.
More than 50% of the car came out glassy smooth (with some minor imperfections). The instructions on the can say I can sand and buff the clear, but I have to wait 14 days. One good thing about the heat we're having now, it should help the clear cure completely.
Painting a car in a garage in the summer in Oklahoma has many drawbacks, not least of which is the uninvited guests.
I used Majic clear coat that I found at Tractor Supply. I decided to use it after reading the guidelines on the company site. I figure if it's tough enough for farm equipment it's tough enough for a Fiero. It's ready to spray right out of the gallon can, too.
I read somewhere that overspray is much worse with clear than it is with color and I confirmed that. This stuff made a thick cloud that took a long time to dissipate. I was glad I went to the trouble to hang plastic again. This time around I used a box of clingy drop cloths. They're made to be ripped off one at a time, but I left them attached to make a solid wall all the way around the car.
The downside was that while applying the first coat, the plastic came in contact with parts of the car. The second coat eliminated most of those blemishes.
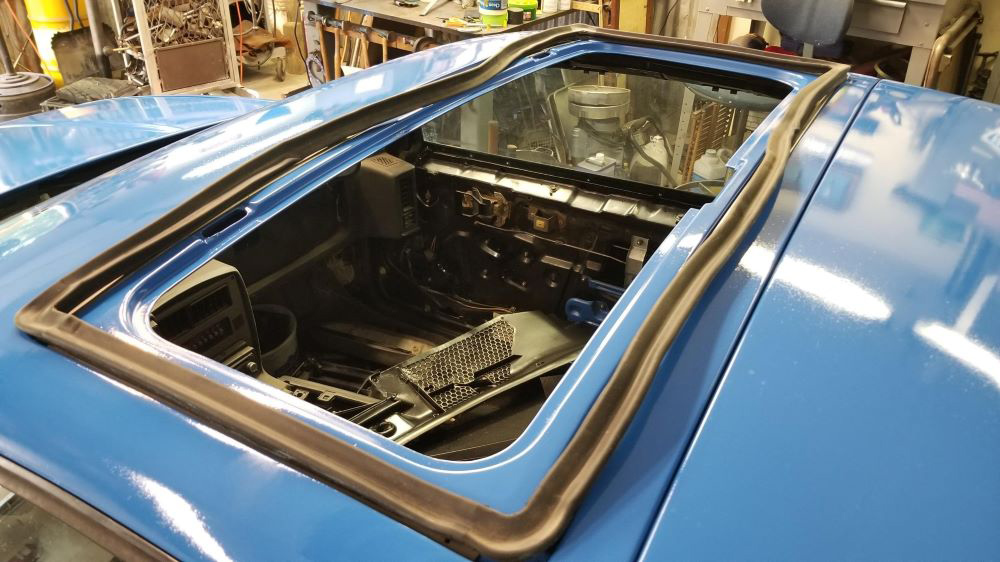
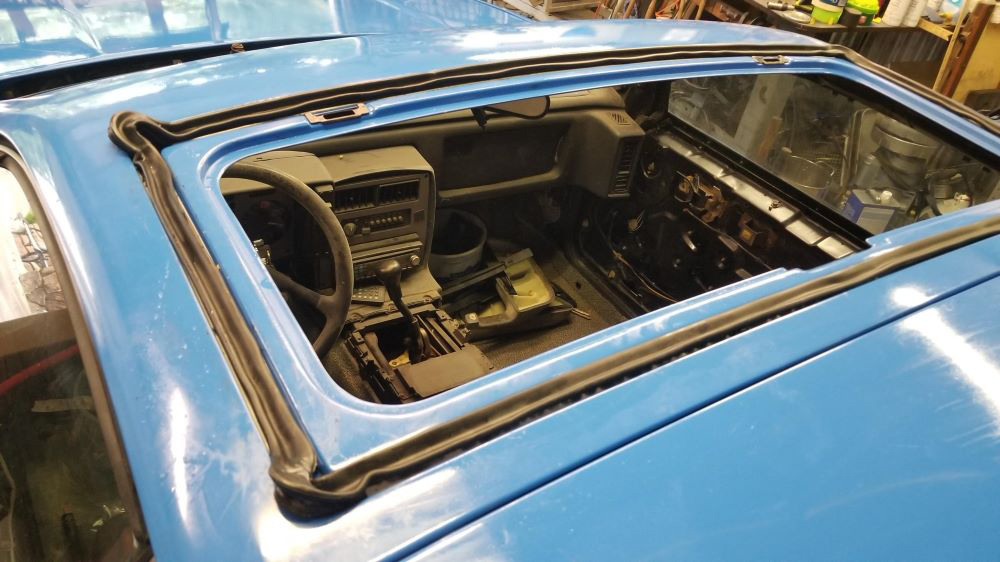
I have some other tasks to complete in the shop while I'm waiting for the clear to cure. Next up will be installing the sun roof and the headliner, then removing the dash to add the harness for the power equipment in the doors. While the dash is out I will refurbish and modify it, adding drink holders and possibly a glove compartment.
This is the Fiero owner formerly known as Quad Raider. After updating my email address, I couldn’t log in as Quad Raider. I tried everything I could think of to solve the problem and finally just created another log-in. I like Quadfather better than Quad Raider, anyway.
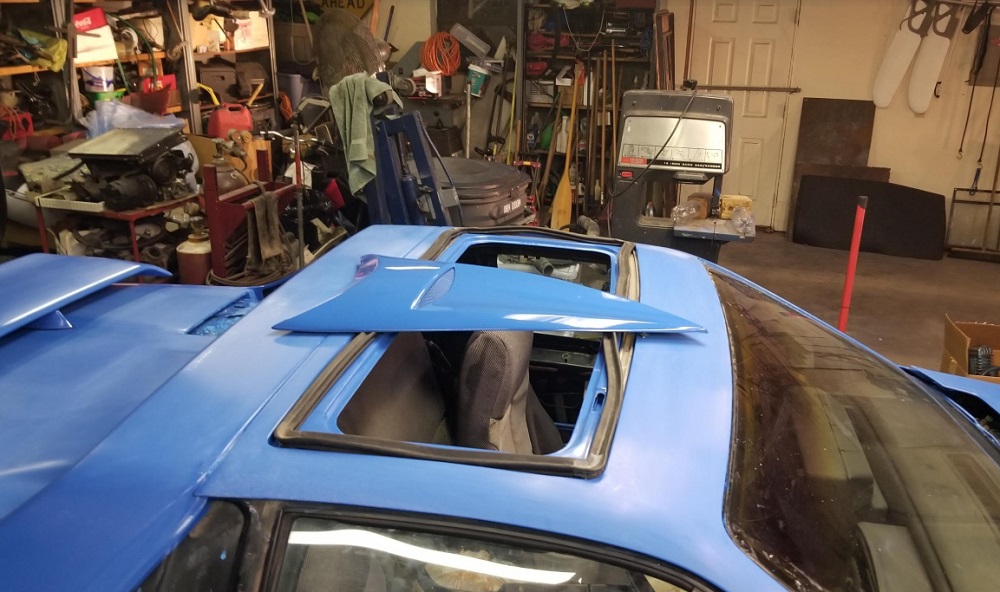
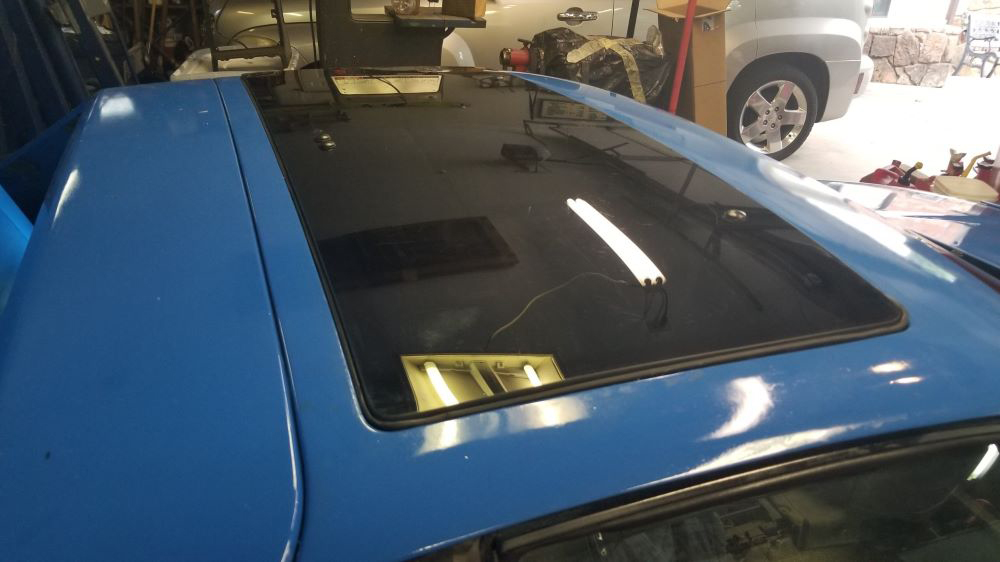
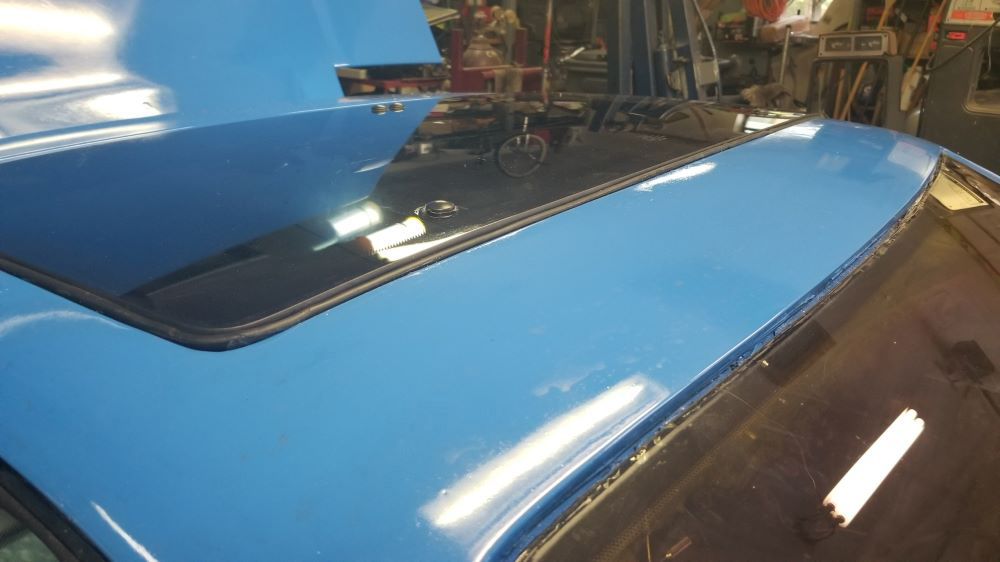
As far as the car goes, I’ve installed the sunroof, after installing new stainless tracks and and a new seal. I’ll post photos soon.
I’m now working on upholstering the headliner, which has turned into its own ordeal.
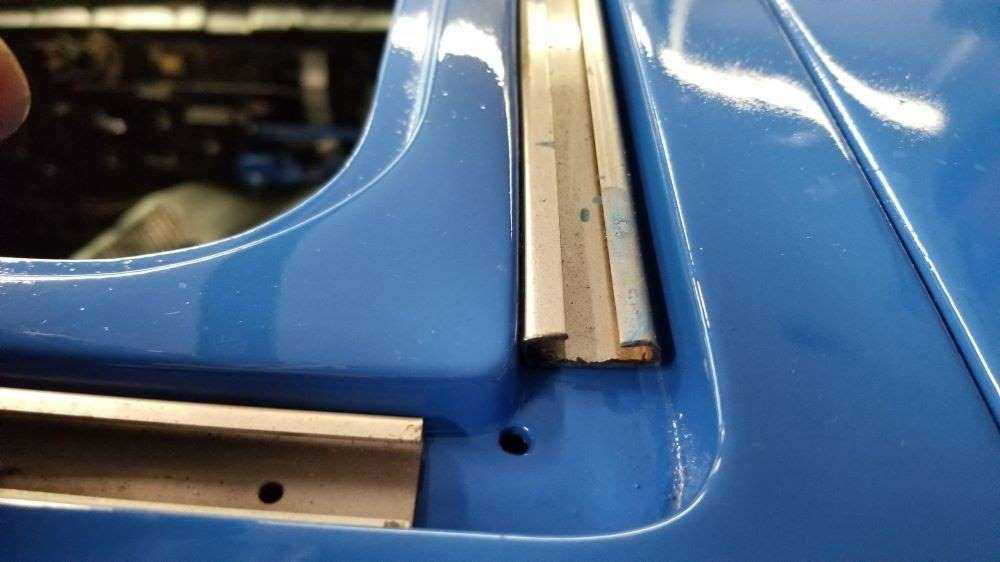
I've made significant progress over the last few months with the biggest accomplishment being the installation of the sunroof and hardware. In 2014 I ordered a set of stainless steel tracks from silver 85 sc. His kits are great because they come with all the rivets, washers and nuts required for the installation.
Tip: it's easier to install all the rivets if the roof panel isn't bolted down yet. I pried up the panel about two inches and could reach underneath it to hold the rivets while installed the track. I decided not to use all the rivets provided in the kit because I used sealant to glue the tracks to the roof panel.
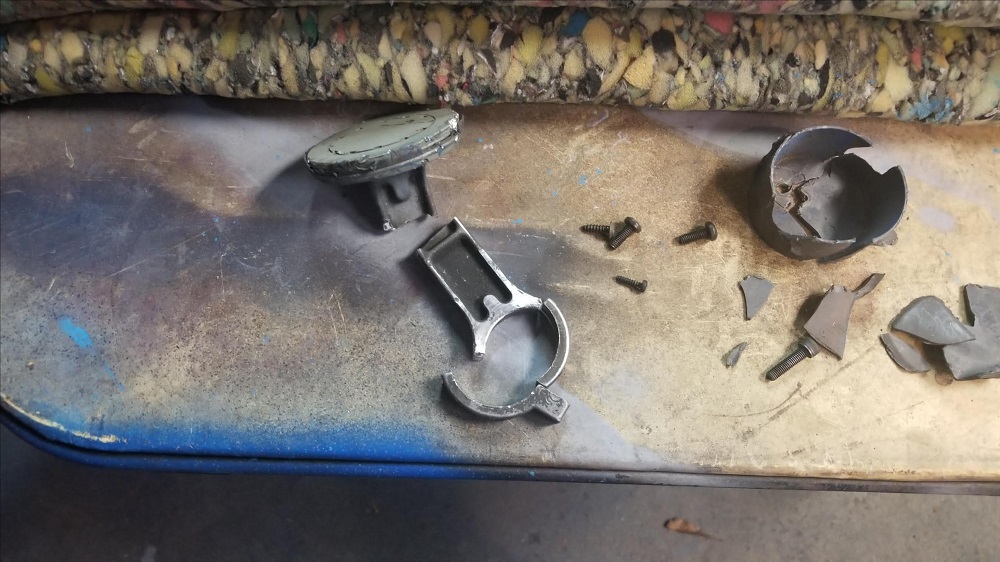
The hardest part of the job was finding all the parts that I removed from the salvage yard cars, including the metal hinge clips.
I bought a new seal from the Fiero Store. It had been in a box since 2014 and had a kink in it, so I clipped it to a wire and let it hang in the shop for a few days to try to straighten it out.
Getting the seal to fit inside the track was a challenge. Because I worked from one end to the other, I accidentally stretched the rubber so that the seal was too long for the track.
I pulled it out and started over, installing the edges first and working toward the center, being careful not to stretch the rubber. The final result looks pretty good.
[This message has been edited by Quadfather (edited 09-19-2019).]