Where did the bracket that bottom left (south east) of the SC come from? Its obviously plugs into the already heater hoses... I was doing this a little differently (will post pics tommorow / friday)
I actually purchased that bracket from Loyd at fastfieros. he cut off the dogbone section, he said it would interfere with the lid and cut it off nice and clean. It would make since seeing how I (we) already have to re-locate the the coil packs.
Do you have any contact information for ed? Thanks! ++++++
Joe
[This message has been edited by RandomTask (edited 08-04-2005).]
IP: Logged
12:09 AM
The Fieromaster Member
Posts: 4124 From: Painesville, Ohio USA Registered: Jun 2001
You kinda lost me a bit there... Bottom left and south east... Im not sure if you meant south west or what so here is a picture of both brackets. Im assuming you want info on Bracket One... This is the heater line/tensioner bracket. Couple things wrong with this bracket. One is that the tensioner doesnt come off. Its a mystical installed at GM in one piece monster bracket. TWO is that the tensioner tightens in the wrong direction for my application. The arrow shows wich way the tensioner puts pressure. I need the whole thing different. I need the tensioner in the vertical position and pulling to the LEFT.
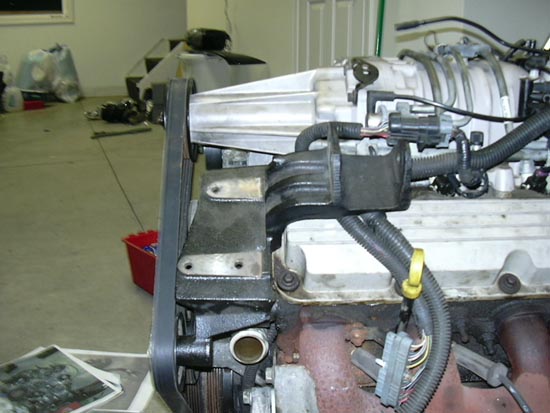
Below is what im going with, you can see the tensioner puts pressure in the OPPOSITE direction of the stock one. ALSO you will see that there are no heater line brackets. The Fiero heater system has ONE hose on the trunk wall and one on the fire wall. It pumps OUT of the pump, through a line that follows the frame and into the fire wall and to the heater core. A line comes out of the core then through the fire wall where a rubber line takes the coolant to the filler neck UNDER the thermostat, bypassing it. This is so heater can have hot coolant even with Stat closed. The set up most use, as will i, is a modified Fiero thermostat/filler neck and route the heater lines the SAME way. This allows the heater lines, and core, to burp properly.
In the above picture you can see everything is gone and there is a PLUG in the coolant line where it exits the manifold, and a small bend where it comes out of the pump. The bend on the pump is where the factory back line will hook up to. The fire wall side line will hook to a modified thermostat housing... just like the Fiero.
Hope that clears stuff up! If you WANT my coolant bracket/tensioner bracket you can have it
Contact info for ed...
gtped@msn.com
He is located in North Royalton Ohio. If you can take pics of stuff you need or BEST describe it you would be better off... cause he has SOOOO many parts. LoL
IP: Logged
09:12 AM
The Fieromaster Member
Posts: 4124 From: Painesville, Ohio USA Registered: Jun 2001
Originally posted by RandomTask: I actually purchased that bracket from Loyd at fastfieros. he cut off the dogbone section, he said it would interfere with the lid and cut it off nice and clean. It would make since seeing how I (we) already have to re-locate the the coil packs.
Im actually thinking about doing an aluminum version of that bracket, for that reason. Its only beefy because its supposed to be a dog bone bracket. The one i took off was aluminum. SOOO once eveything is running and copasetic im going to draw that bracket up in cad and eliminate the coil mount area and make it smaller and more attractive. Oh yea and LIGHTER!!!
IP: Logged
09:19 AM
RandomTask Member
Posts: 4547 From: Alexandria, VA Registered: Apr 2005
Im actually thinking about doing an aluminum version of that bracket, for that reason. Its only beefy because its supposed to be a dog bone bracket. The one i took off was aluminum. SOOO once eveything is running and copasetic im going to draw that bracket up in cad and eliminate the coil mount area and make it smaller and more attractive. Oh yea and LIGHTER!!!
Just so you will know... The aluminum SC tensioner assembly hits the back firewall, and it also will hit the bottom of the decklid hinge. I did modified it enough to finally clear on the white 88GT with the blue engine to work, but it took some cutting on that decklid hinge. You cannot use the decklid torsion rods at all with that SC tensioner either.
Loyde
IP: Logged
10:48 AM
The Fieromaster Member
Posts: 4124 From: Painesville, Ohio USA Registered: Jun 2001
Oh i know i took that off... i have the steel one from the 98 GTP on there now... above is the install thread for that parrt. I wanted to make an aluminum version of steel one so its not as bulky as the steel one....
IP: Logged
06:44 PM
The Fieromaster Member
Posts: 4124 From: Painesville, Ohio USA Registered: Jun 2001
Well i went with Mike to get his 4.9L check out his thread ( https://www.fiero.nl/forum/Forum1/HTML/053672.html ). On the way back we stopped at a junk yard that was IMPOSSIBLE to find. We kept driving back n forth trying to see where the place was... The reason we couldnt find the adress is because it was UNDER the massive Highway bridge we were driving over, with the big valley underneath! Anyway... 1994 Regal computer for 35$. I went with the Regal computer for a couple reasons. ALL W body cars had the computer in the engine compartment and all 3800 series I cars had their computer in the cabin out of weather... EXCEPT... The 94-95 Regal. This W body car was the only one with a 3800, so they left the PCM where the other W bodies were... Engine compartment! SO what you get is a weather proof 3800 series I computer. Although i may mount it in the cabin anyway, if it fits.
I dont remember WHY but Darth said that it was easier for me to wire?? Im gonna PM him and find out more then get back to you!! Pics will come tomorrow!! Did allot of posting tonight for Mikee!
IP: Logged
09:58 PM
Aug 5th, 2005
3.8 SC Member
Posts: 577 From: On the Great Lakes-Ohio Registered: Dec 2003
Nice, meeting you and Crazy Mike, today. Now, I know why he is called Crazy Mike. You have a good start on the 3800 swap. Just take your time and if you have any questions or need help, just let me know. BTW, Great place, you have there, I would give anything to have a garage like that.
Don Z.
------------------ WWW.CLEVELANDFIEROS.COM https://www.fiero.nl/forum/Forum1/HTML/052322.html#lastpost My rear defuser
IP: Logged
11:06 PM
Aug 6th, 2005
crazyfieromike Member
Posts: 581 From: mentor ohio 44060 usa Registered: Mar 2002
Nice, meeting you and Crazy Mike, today. Now, I know why he is called Crazy Mike. You have a good start on the 3800 swap. Just take your time and if you have any questions or need help, just let me know. BTW, Great place, you have there, I would give anything to have a garage like that.
Don Z.
It was good to meet you to. its always good to know other local fiero people. and as far as me crazy never i dont know what your talking about
Well all... lot of work forward and more to come this week... Still have to post pics from this weekend too but i havent had the time. Don Z stopped out and we went over a bunch of stuff on the engine and pulled a bunch of things we didnt need off. EGR, MAP sensor, Boost Control all went out the window. Since Darth Fiero is programming my PCM Chip (sending to him monday, paid him today), i wont need EGR or CAT and such. I still need to get a hand full of freeze plugs to put in the block for the EGR and for the coolant pipes we removed. I also ordered a set of glasspack mufflers so i can build my exhaust. Being that i am trying to finish this with little money I am going with an exhaust like LiL Devil made for his car...
Does anyone know where I might be able to pick up that stock flange that bolts to the trunk side manifold? My local junkyard won't sell me just a cut of the exhaust...
IP: Logged
01:10 PM
The Fieromaster Member
Posts: 4124 From: Painesville, Ohio USA Registered: Jun 2001
I am having a similar problem... If you are UNLUCKY like me and have the ball style flange... Which is the rounded outlet one so that the exhaust can flex there (kinda like the crossover flanges), your in DEEP DOOKEY!! I cant get one of them. HOWEVER if your flange is FLAT though you can talk to ED Morad. He has a couple of exhaust portions. He WAS gonna sell a flange to me, however, he didnt have the ball one.... POO!!!!
Contact Ed at.... gtped@msn.com
Other Cool Stuff!!!
I was checking out a local place for another post i was repling in and it turns out that this shop (Hutter Racing) makes a WICKED looking GTP cold air induction system. Well i know the owner and his wife because they are family friends AND his wife LOVES Fieros. Well their son is the one who makes the intake... I wrote him an email asking if hed consider an intake for the Fiero 3800SC Cars. I will let you know what he says back, perhaps ill have to get more of an interest though... hope it would be strong interest though!!
[This message has been edited by The Fieromaster (edited 08-07-2005).]
Here is the dogbone I bought from Rodney Dickman. Its threaded so you can adjust the size to accomodate slack on the stock V6. I cut the threaded portion down and then used it for the 3800.
Also, here is how I hooked up my throttle cable. I don't kow if its the best way, but Its seemed to be be fine for now...
First I ground on the stock bracket a bit, Perhaps I should have painted it when I originally did it, guess I'll have to get to that..
Then I opened up the stock cable hole just slightly (17/64")
I bought this thing from the local parts store. It was a HELP! part (Part Number 03336)
Here it is installed on the cable, after cutting off the stock V6 eyelet. I'll probably shorten the set screw later on, but its functionality I was counting on for now...
And Here is the final product...
[This message has been edited by Jncomutt (edited 08-10-2005).]
IP: Logged
04:16 PM
The Fieromaster Member
Posts: 4124 From: Painesville, Ohio USA Registered: Jun 2001
WOW... thanks a ton that was a big help for something i didnt even take into consideration yet!!! A big fat + for you!
Also, I got my mufflers in today, i will taks some pics of these AND post stuff from the previous weekend tommorow. I finally rotated off that damn 2nd shift. It was driving me bonkers. NO time to do ANYTHING!
As my Fiero is sitting now, the front is on ramps and the back is supported by jack stands. The rear cradle bolts are out and the fronts are soaking in PB Blaster. Will take them out maybe tommorow and drop the cradle at least on the dolly then. I wont tell you all HOW to take your cradle out step by step because i dont want to be liable if someone gets hurt doing it this way. I will be using a cherry picker to lift the rear of the car. It will be on the 2,000 lb setting on the cherry picker wich MAY be to LOW for the weight of the car... This is one reason i WONT say DO IT THIS WAY! Just dont want anyone getting hurt. However i will have pics of it comming out though.
Well more to come soon.. also... here is my new sig (one of a couple) that was done by EMC209i....
------------------ "Raced That, Wrecked Better"~In Memory Of Jesse Cesek~ 1980-2000 US Armored Cavalry - Fox 2/81 - Death By 120 - 1 Shot 1 Kill
Myself and Don Z. (3.8SC) are going to do ours together... i will get LOTS of pics of that AND will also do my best to document EVERY wire splice... The cool part is I am going OBD I and Don is going OBD II so we should get everything documented for BOTH id like to think... Thats a big THANKS to Don that is needed too cause he will be a massive help for that!
IP: Logged
06:03 PM
RandomTask Member
Posts: 4547 From: Alexandria, VA Registered: Apr 2005
Myself and Don Z. (3.8SC) are going to do ours together... i will get LOTS of pics of that AND will also do my best to document EVERY wire splice... The cool part is I am going OBD I and Don is going OBD II so we should get everything documented for BOTH id like to think... Thats a big THANKS to Don that is needed too cause he will be a massive help for that!
I'll try to load my pics tonight to show you what I did for wiring...
I am wired for OBD 1, and did all the wiring myself. I still have all my pinouts and notes if you would like me to scan them to add to this thread..
EDIT: I'm gonna go thru and make some diagrams for MY setup in photoshop. These will be for 5speed, with NO EGR, and set up without Cruise Control. Those other circuits will have to be added later on...
[This message has been edited by Jncomutt (edited 08-11-2005).]
IP: Logged
08:48 PM
RandomTask Member
Posts: 4547 From: Alexandria, VA Registered: Apr 2005
So I'm towards the very very end of my wiring and I have one last question. I have the fuel pump relay (+) (not the through positive, but the green w/ white stripe) running off of E3 on the C500 (Ignition) I also am running the MAF (+) off of E3 and the ignition coil (+) off of E3. Is this how you guys did it and is this OK? If it is ok, could I put the 02 sensor (+) feed onto E3 as well? What about the (+) feed for the ECM that goes into the BLUE connector #19? It just seems like a lot to be running off of that one wire.
So it would be: MAF + Fuel Pump Relay + Ignition Power + Ignition on B#19 + 02 +
I'm running OBD II
Thanks!
Joe
[This message has been edited by RandomTask (edited 08-11-2005).]
IP: Logged
09:52 PM
The Fieromaster Member
Posts: 4124 From: Painesville, Ohio USA Registered: Jun 2001
Jncomutt... That would help out allot seeing as im going for OBD I also. Mcaanda (who seems to gone on Hiatus from this post) sent me some drawings and notes for the wiring... I can compair them and see what the differences are...
I thank all you guys allot... this is how i wanted this thread to go. A place for ALL the info to come together as ONE so others can have a guide AND an idea to what they are getting into.
+'s all around
IP: Logged
09:55 PM
The Fieromaster Member
Posts: 4124 From: Painesville, Ohio USA Registered: Jun 2001
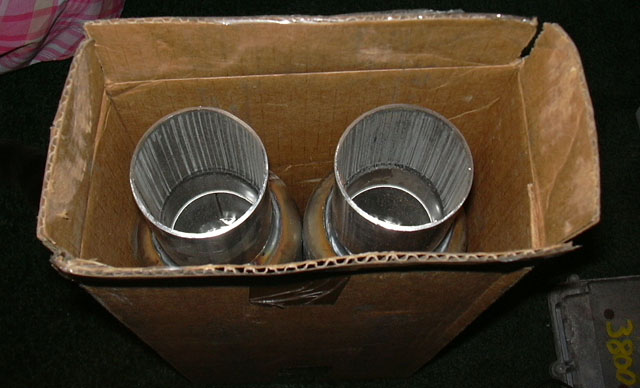
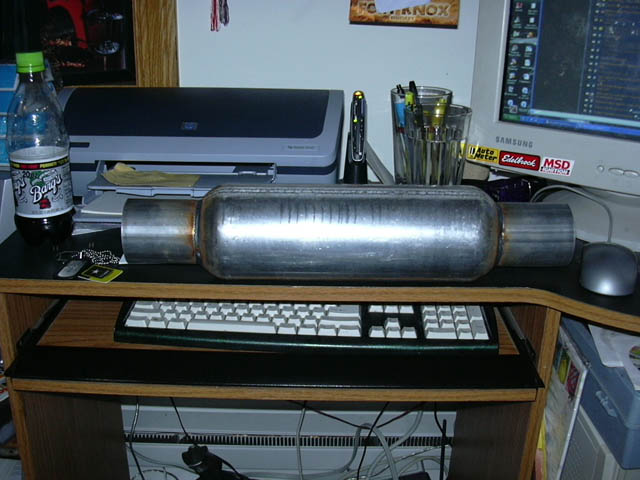
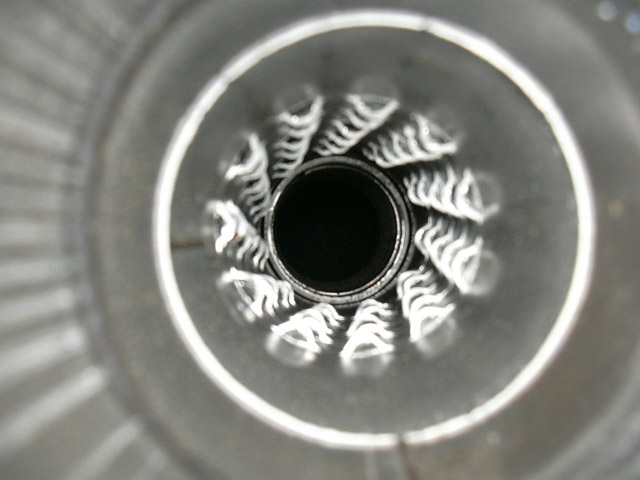
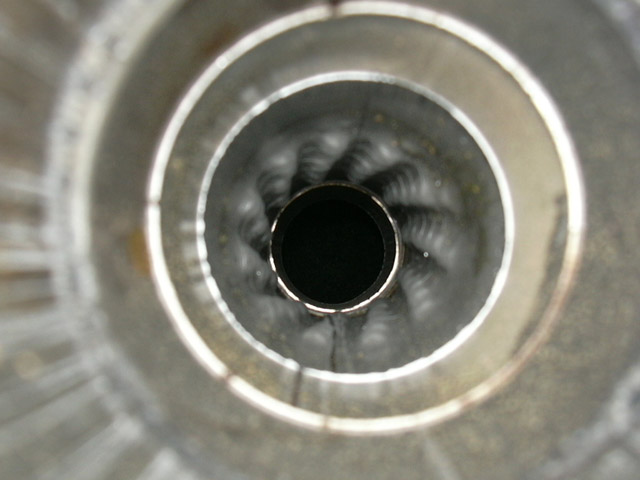
Here are the mufflers i ordred, they are the same as the exhaust in the pic i posted a little ways up. The are 2.5" cores with 4" chambers. From what i read they ARE quiet... just got to see WHICH way the flow goes?!?
Here they are in the box... *excited like little school girl*
Here i tossed one up on my desk you can see the root beer bottle for size compairisons... and various other junk on my desk, lol
Here is the delema... is THIS SIDE the inlet... (i think it is)
OR is THIS side the inlet? (i THINK this is the outlet)
They are stamped "Made In Canada" but no flow... oh well, better then made in China eh?
IP: Logged
10:20 PM
RandomTask Member
Posts: 4547 From: Alexandria, VA Registered: Apr 2005
Ok, I got some diagrams made. Every person will choose to do this differently, so if there are problems in these diagrams, or if I forgot to ADD a comment, Please let me know. I would rather change my harness now if someone has a better plan or update the pictures so that we reach an evolving diagram into something final and more complete.
I have a lot more notes/info but I don't have them done yet. I pulled these pictures off Darth Fiero's site and then imported the pdf into jpg format.
EDIT: Fieromaster has a more complete diagram set below....
[This message has been edited by Jncomutt (edited 08-12-2005).]
A whole, monsterous, expensive, insane........................... $20.00 each
Haha... Ive priced the WHOLE exhaust out at about 80$ or so... may be more like 60$ depending on how spending goes at Summit racing saturday when i go down there. Although thats WITHOUT the cat. Add in the cat and its $80.00 more
[This message has been edited by The Fieromaster (edited 08-13-2005).]
IP: Logged
10:44 PM
Ken_86gt Member
Posts: 574 From: WILLIAMSBURG Registered: Jan 2004
So I'm towards the very very end of my wiring and I have one last question. I have the fuel pump relay (+) (not the through positive, but the green w/ white stripe) running off of E3 on the C500 (Ignition) I also am running the MAF (+) off of E3 and the ignition coil (+) off of E3. Is this how you guys did it and is this OK? If it is ok, could I put the 02 sensor (+) feed onto E3 as well? What about the (+) feed for the ECM that goes into the BLUE connector #19? It just seems like a lot to be running off of that one wire.
So it would be: MAF + Fuel Pump Relay + Ignition Power + Ignition on B#19 + 02 +
I'm running OBD II
Thanks!
Joe
This is what I am using, no guarantee, there are probably better ways Fuel pump relay Grn/Wht C2-3 ECM and ground the BLK/WHT wire ........Feed through Hot ORG/ORG BLK C203-B .......Tan/WHT to fuel pump, I deleted the oil pressure switch wires ORN/BLK and Tan/WHT ........I think the ECM should keep the relay energized. ignition coil only C500-E3
Updated to better solution: All injectors C203-J change fuse to 10 amps MAF and rear O2 C203-K change fuse to 15 amps
[This message has been edited by Ken_86gt (edited 08-13-2005).]
IP: Logged
10:49 PM
The Fieromaster Member
Posts: 4124 From: Painesville, Ohio USA Registered: Jun 2001
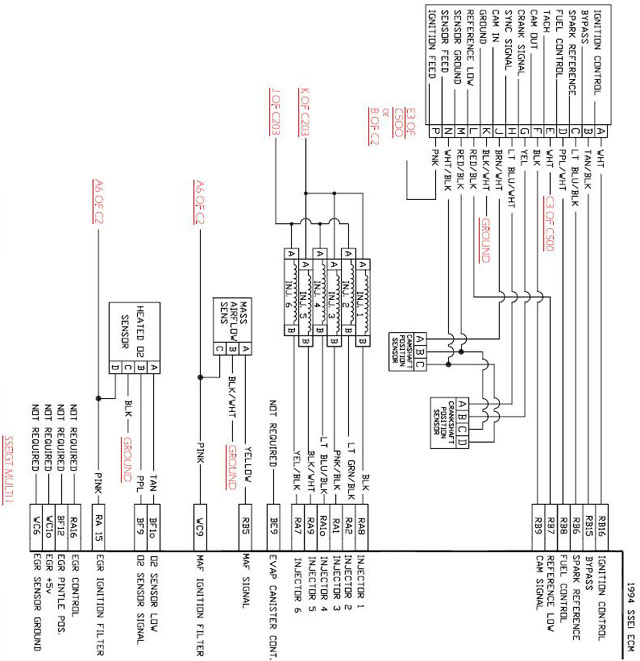
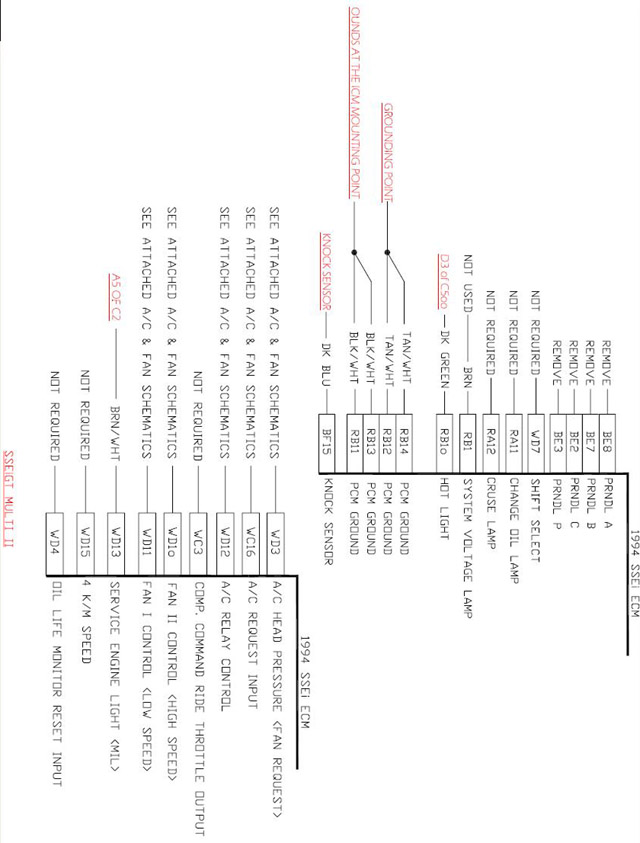
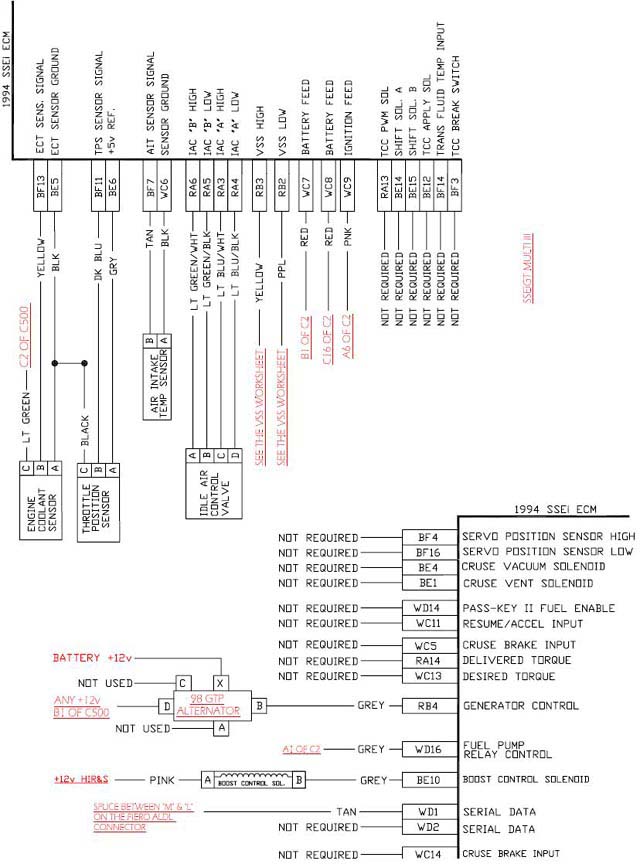
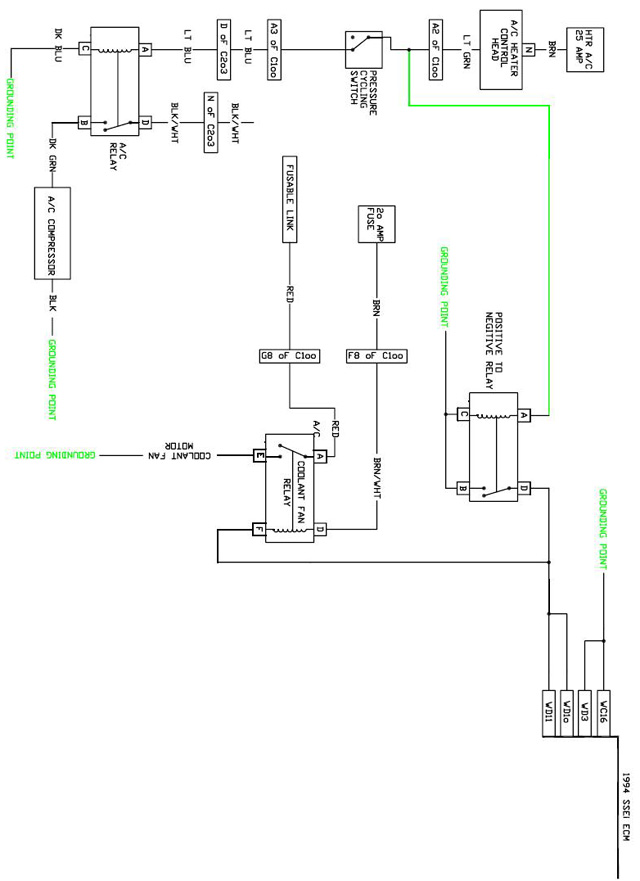
Ok i hope that this is OK with Mcaanda... cause im gonna post it... a VERY special thanks goes out to him, and you should ALL love him (those of you reading this) for doing this wiring diagram. Mcaanda, if you didnt want me to post this i appologise, as we never discussed posting it here. I will take it down if you wish though.
Here we go... OBD I ECM, some vehicals will vary. Be sure to DOUBLE check to make sure your pin outs match!
Also, i have these in a PDF file (larger images and more legible then this) if you would rather have that, dunno if anyone on here is willing to host it for me though...? Sorry bout the quality... had to Print Screen copy it then past it into photo shop! I cant save images from my PDF viewer
Again, thanks to Mcaanda, this is the diagram i will follow.
[This message has been edited by The Fieromaster (edited 08-11-2005).]
IP: Logged
11:05 PM
PFF
System Bot
The Fieromaster Member
Posts: 4124 From: Painesville, Ohio USA Registered: Jun 2001
Ok, I got some diagrams made. Every person will choose to do this differently, so if there are problems in these diagrams, or if I forgot to ADD a comment, Please let me know. I would rather change my harness now if someone has a better plan or update the pictures so that we reach an evolving diagram into something final and more complete.
I have a lot more notes/info but I don't have them done yet. I pulled these pictures off Darth Fiero's site and then imported the pdf into jpg format.
Are you still wiring up things your not using like the EGR, MAP sensor, and so on? Or are you just omitting them TOTALLY from your wiring harness??
Dont forget that the OBD I knock sensor is NOT compatible with OBD II.... i.e. if your using OBD II engine on OBD I PCM like me, and you (if i got that straight) you need OBD I knock sensors... AND OBD I only uses ONE but you can replace both so you can wire other up if one fails OR you wanna try reading from other side of block
IP: Logged
11:12 PM
RandomTask Member
Posts: 4547 From: Alexandria, VA Registered: Apr 2005
This is what I am using, no guarantee, there are probably better ways Fuel pump relay Grn/Wht C2-3 ECM and ground the BLK/WHT wire Feed through Hot ORG/ORG BLK C203-B Tan/WHT to fuel pump, I deleted the oil pressure switch wires ORN/BLK and Tan/WHT I think the ECM should keep the relay energized. ignition coil only C500-E3 Rear O2 and Rear injectors C203-J Front injectors and MAP C203-K
*humps kens leg*
Thanks!
IP: Logged
11:29 PM
Ken_86gt Member
Posts: 574 From: WILLIAMSBURG Registered: Jan 2004
Are you still wiring up things your not using like the EGR, MAP sensor, and so on? Or are you just omitting them TOTALLY from your wiring harness??
Dont forget that the OBD I knock sensor is NOT compatible with OBD II.... i.e. if your using OBD II engine on OBD I PCM like me, and you (if i got that straight) you need OBD I knock sensors... AND OBD I only uses ONE but you can replace both so you can wire other up if one fails OR you wanna try reading from other side of block
I totally removed any wiring of the EGR or MAP (only used for boost guage with OBD1), as well as cruise, etc. This was all removed from the chip as well. I transferred the Knock sensors from the OBD2 style to the 'fan swich connector' style, but only have one wired as I don't see how you would be able to monitor both separately as you probably would with OBD2.
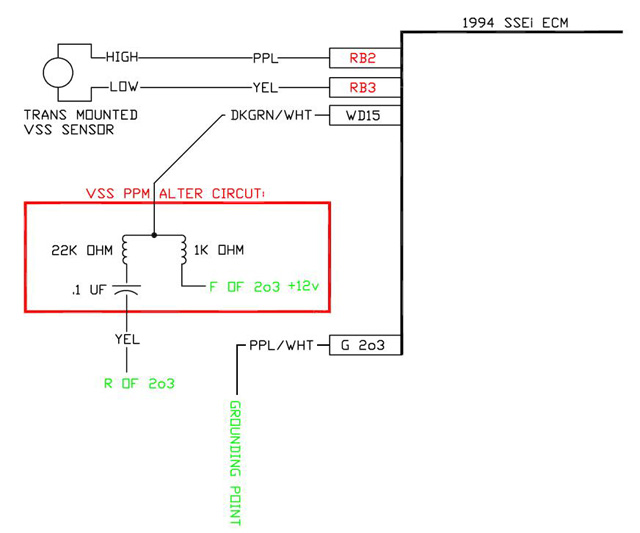
You also have a PM. I notice your wiring is a bit different. For the speedo for instance, I spliced into the RB2/RB3 wires and sent them to the C203, not using the WD15 as you show. Just looking to compare notes
[This message has been edited by Jncomutt (edited 08-12-2005).]
IP: Logged
01:33 AM
The Fieromaster Member
Posts: 4124 From: Painesville, Ohio USA Registered: Jun 2001
Ill have to check that out, because i havent gotten to look at that JUST yet. It is what Mcaanda used on his setup... What PCM are you using, from what car/year. What car is it going into??
lol... Thats a good question. Its an 84 car, but the entire chassis has been stripped and replaced with a later year harness. I'm not exactly sure of the year for each piece of it, but I have a good idea. I will have to work the bugs out later but for now i just have the harnesses plugged together in their stock form. I believe the main harness is 87GT
IP: Logged
05:56 PM
87FieroGT Member
Posts: 496 From: Harlingen, TX, U.S.A. Registered: May 99
A whole, monsterous, expensive, insane........................... $20.00 each
Haha... Ive priced the WHOLE exhaust out at about 80$ or so... may be more like 60$ depending on how spending goes at Summit racing saturday when i go down there. Although thats WITHOUT the cat. Add in the cat and its $80.00 more
Same setup going on my 4.9L too... Cheaper is gooder..
[This message has been edited by crazyfieromike (edited 08-13-2005).]
IP: Logged
10:44 AM
3.8 SC Member
Posts: 577 From: On the Great Lakes-Ohio Registered: Dec 2003


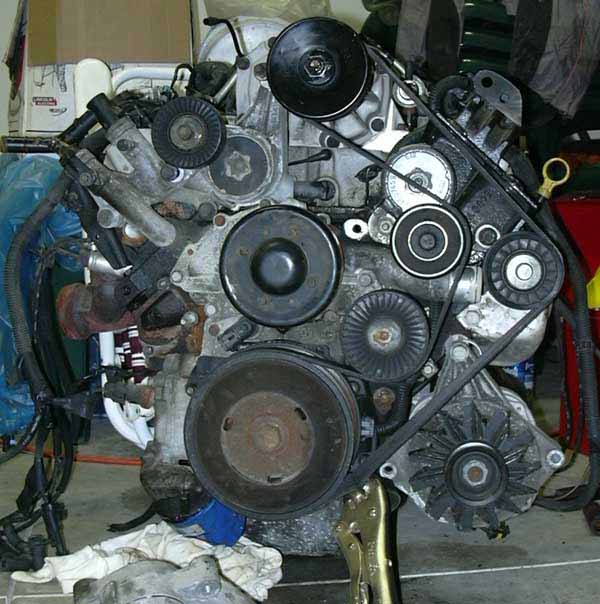


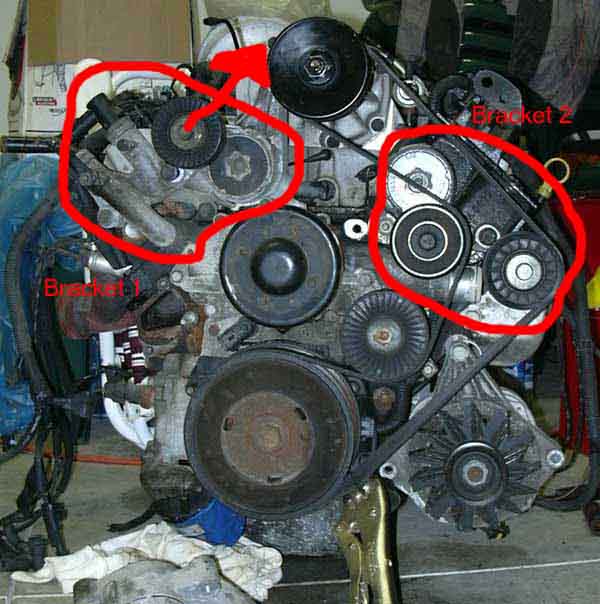
 Im not sure if you meant south west or what so here is a picture of both brackets. Im assuming you want info on Bracket One... This is the heater line/tensioner bracket. Couple things wrong with this bracket. One is that the tensioner doesnt come off. Its a mystical installed at GM in one piece monster bracket. TWO is that the tensioner tightens in the wrong direction for my application. The arrow shows wich way the tensioner puts pressure. I need the whole thing different. I need the tensioner in the vertical position and pulling to the LEFT.
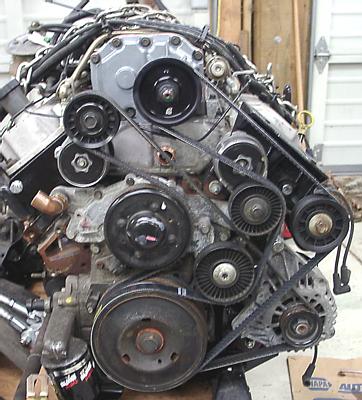


.JPG)
.JPG)
.JPG)
.JPG)
.JPG)
.JPG)
.JPG)

.JPG)
 $20.00 each