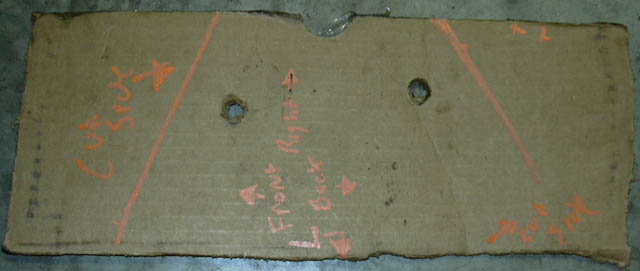
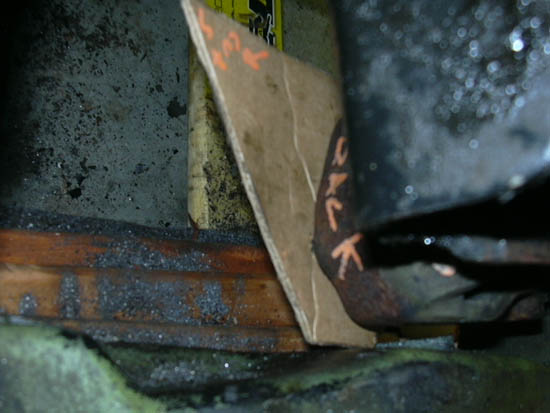
Ok... The plans were to cut a shape close to the mount on the surface of the angle that the mount sits, then bend the other part of the angle in tight agains the mount and weld in place for strength. To do this i had to draw on my template to see HOW close i could get to mount without rubbing on it. I set the BA (boat anchor) mount in the holes on the cardboard and drew lines with a paint marker to get the shape for the mount surface... I also used the paint marker to mare all over the BA mount so i would know which was is which (front, back, left, right) See Below..
Then i marked down where to cut (which side of line) and IMPORTANTLY which way was which on the template is which, just like above on the mount. Here is the template.
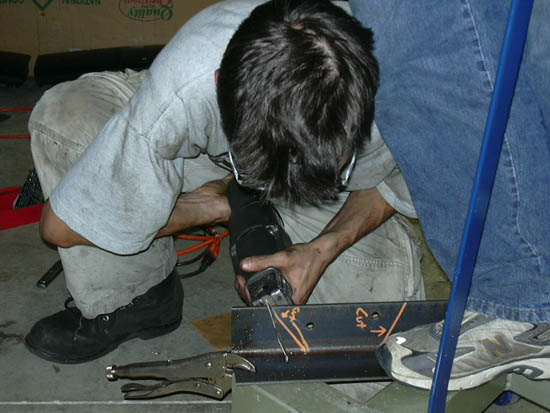
I then used the sawzall...
quote
Originally posted by crazyfieromike: craigs to weeak to use sissors to cut cardboard lol
...Bite me Mikee lol.... To cut the cardboard at the angles drawn (no pics, sorry)
Then test fit the template to make sure EVERYTHING is copasetic..
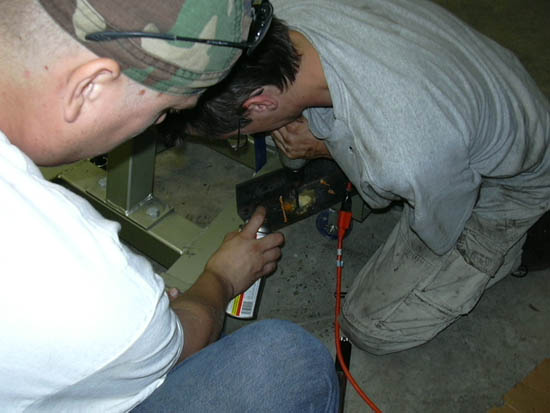
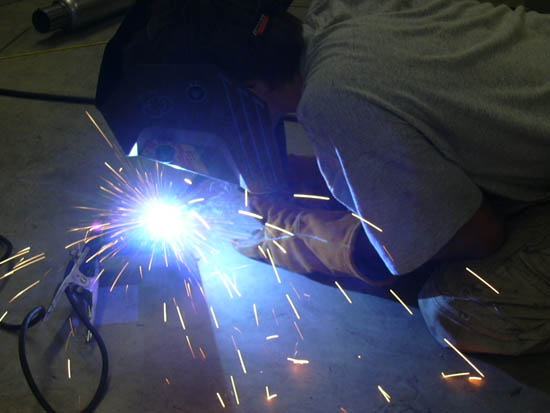
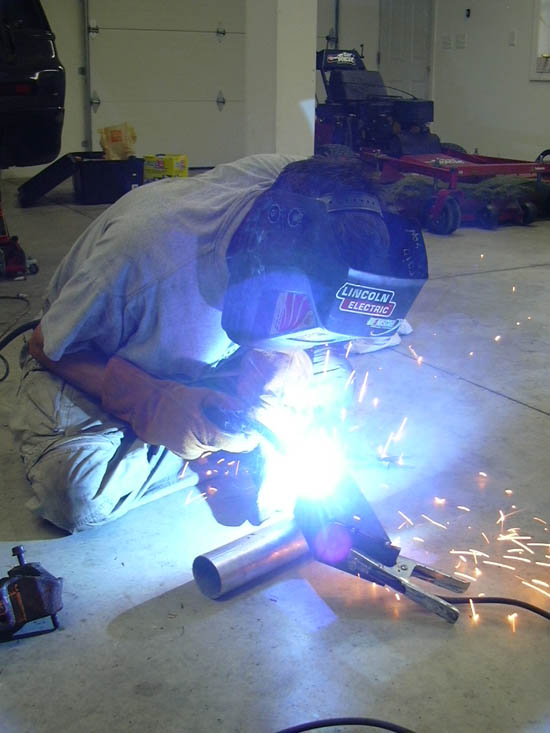
Looked good to us. So we blew the holes in the angle first, Mikee figured to save bit we would lube it with the GOD of all lubes, PB Blaster. Jess (his wife) is on action photo duty since he is on lube duty...
We then made sure the mount fit and that our angles were still feasable... Looked good so we marked em out on the steel...
We then cut the angles in the steel, Mikee is sacrificing his foot as a bench vice...
More pics soon, outta room in this post.
IP: Logged
05:46 PM
The Fieromaster Member
Posts: 4124 From: Painesville, Ohio USA Registered: Jun 2001
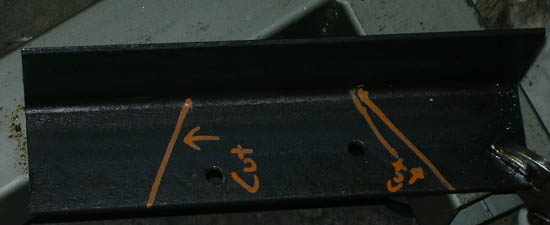
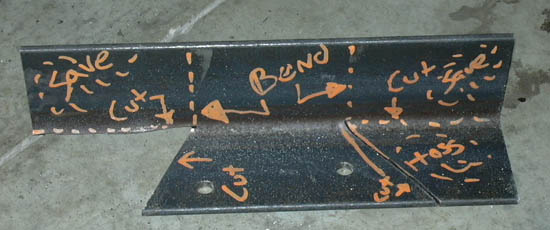
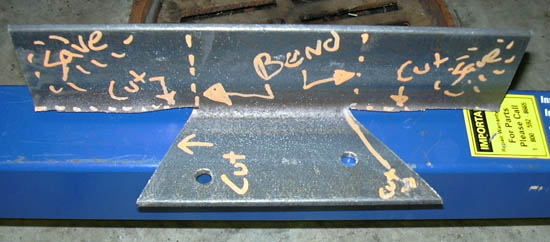
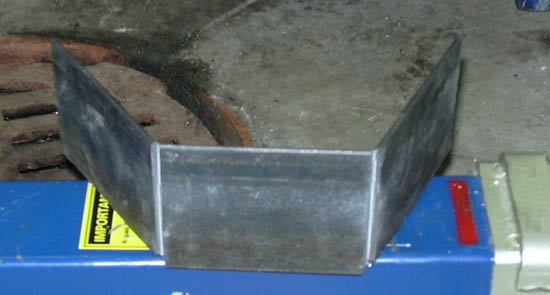
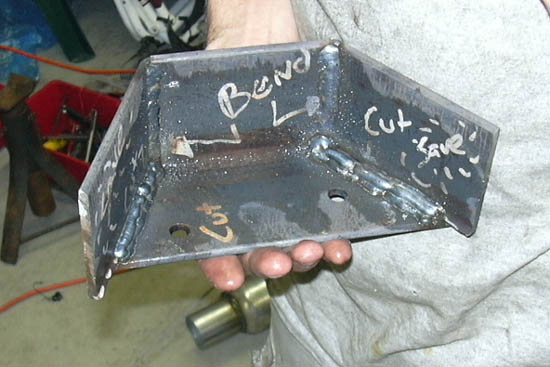
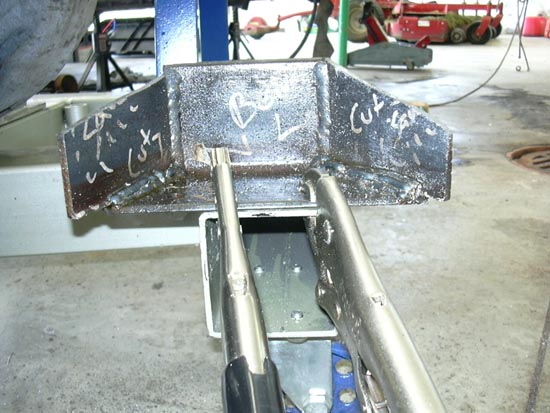
OK... then after that was cut i went to work drawing on the angle of what to cut, what to save, and where to bend. This is a good idea so you dont screw up. Although the angle was only 10$.
Here you can see kinda what i mean as i cut down the piece of steel so that i can remove the unwanted part and so we can bend it there.
Then Mikee grabbed the pliers and broke the piece free as i cut out the back of it.
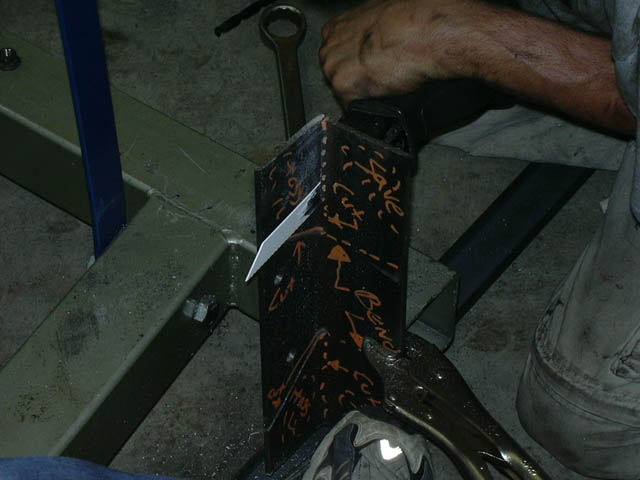
Here is what the piece looked like with the missing area. You can get the idea of what we are doing now by the scribbles on the steel...
Do the same thing on the other side and your left with this...
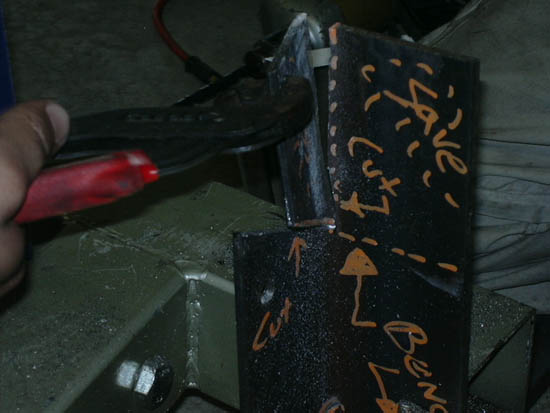
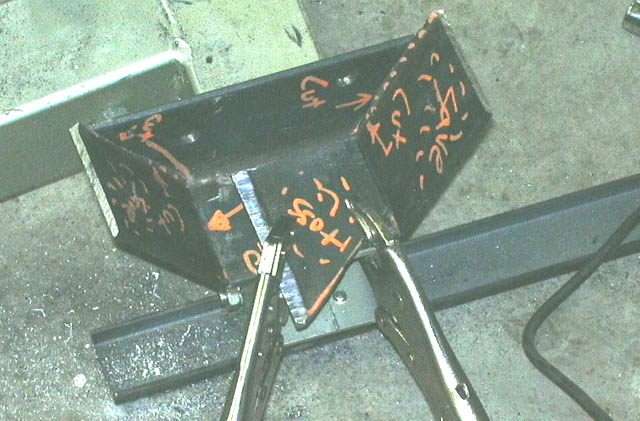
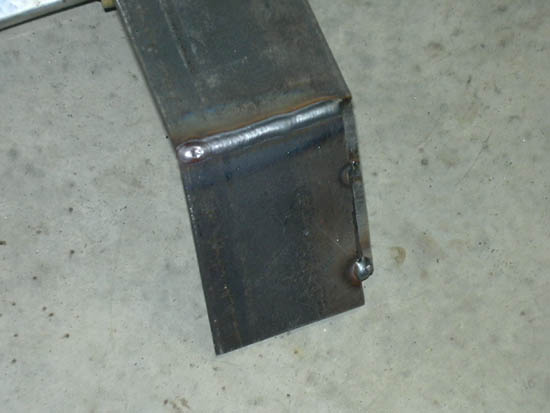
To bend the steel you could HEAT it then bend it, but we are torchless so we cut a little out of the back side where the bend was using a piece of the old steel as a straight cut edge... We will weld it back together there later... Here is our Ghetto bending jig, again, no vice. Just used the cherry picker legs, the straight edge of scrap we cut out and a pair of large channel locks...
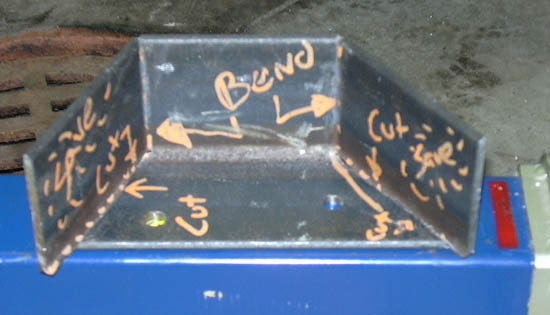
Here is the finish bent product...
Out of room... stay tuned...
[This message has been edited by The Fieromaster (edited 08-19-2005).]
IP: Logged
06:05 PM
The Fieromaster Member
Posts: 4124 From: Painesville, Ohio USA Registered: Jun 2001
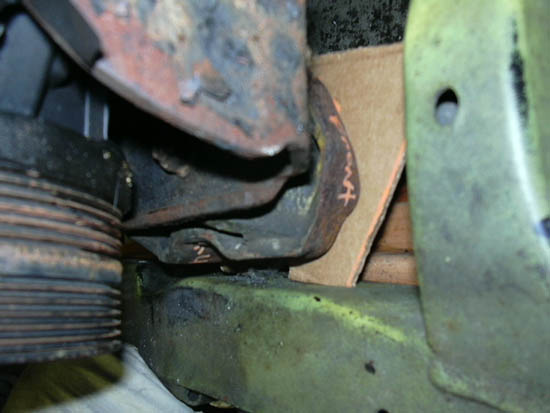
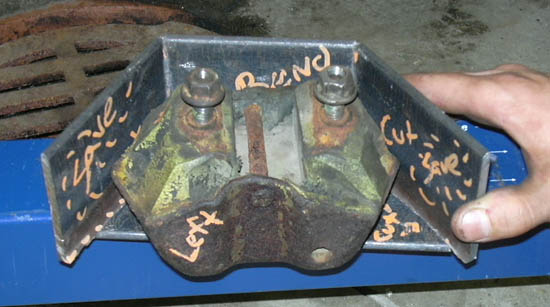
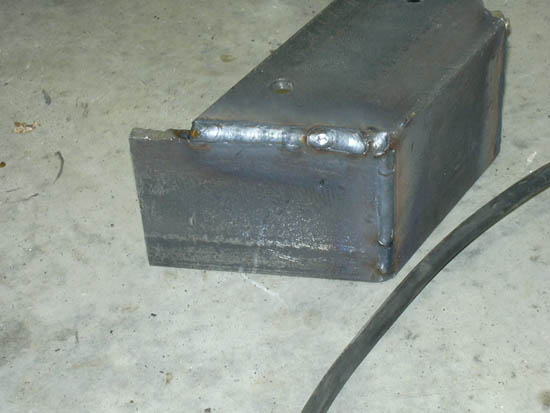
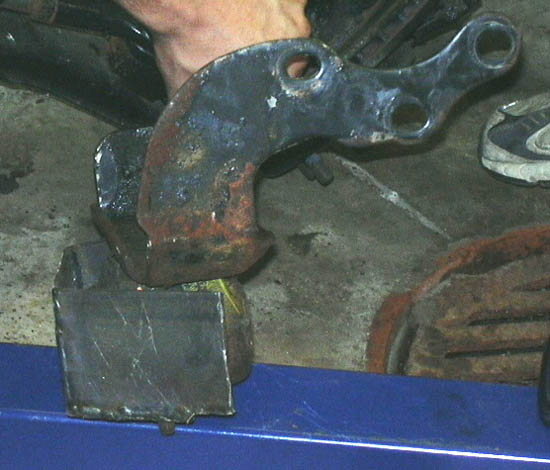
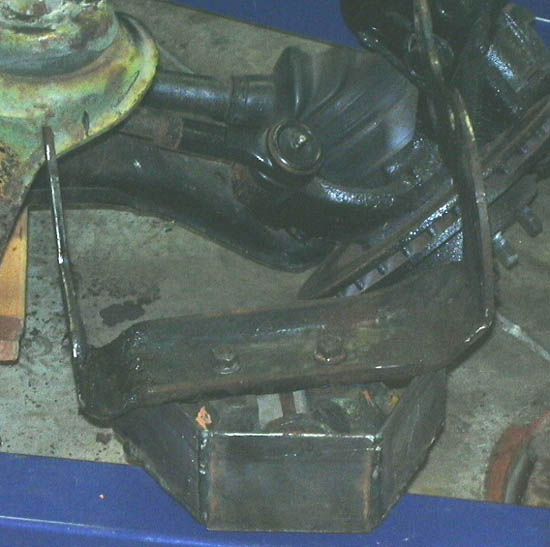
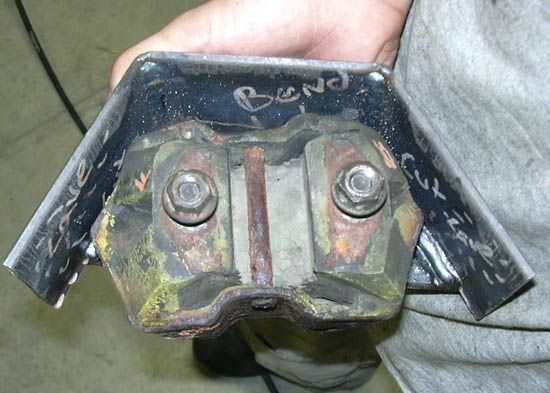
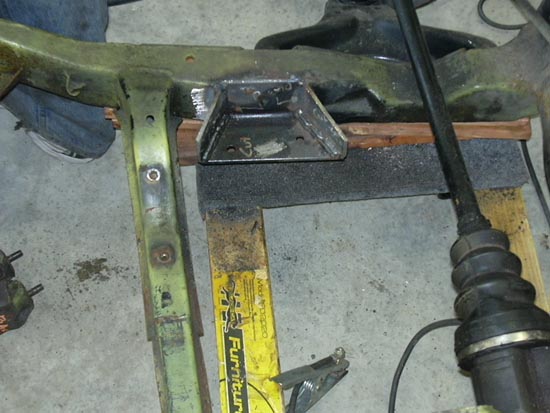
Here we have the Boat Anchor mount in the bracket for the fial test. All is copasetic as hoped!! She fits like a glove!
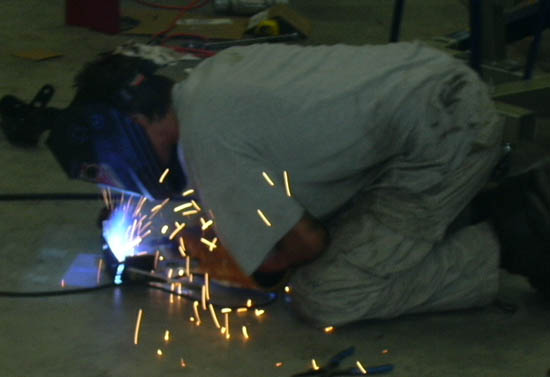
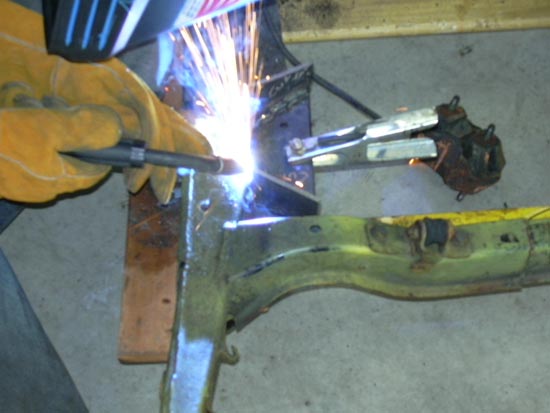
Now for the fun part, more welding! I love to weld! Well basically all we are gonna do is just fill in both sides of the bottom areas where mount surface touches the bent in section. There is a nice little gap there that allowed for AWESOME penatration on the weld. On the inside i added a couple outter passes and top passes to the root pass to make sure its all sturdy, thats why its a little uglier!
OH yeah... I tacked the thing all together REAL GOOD so nothing distorted while welding, that would SUCK!
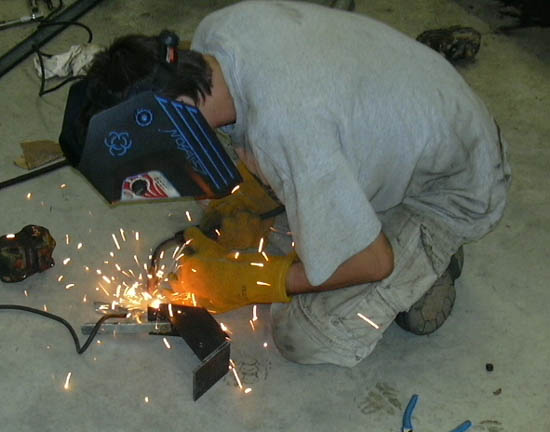
Here come the mount welding Mikee Action Shots...
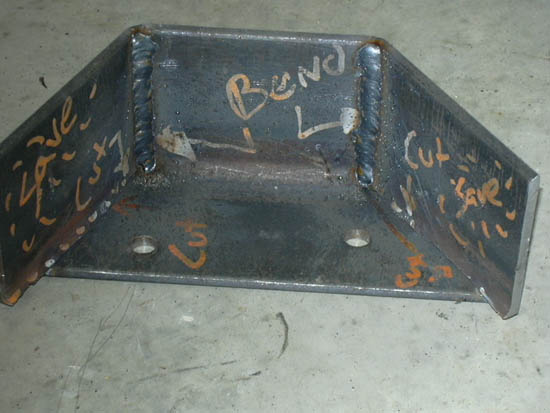
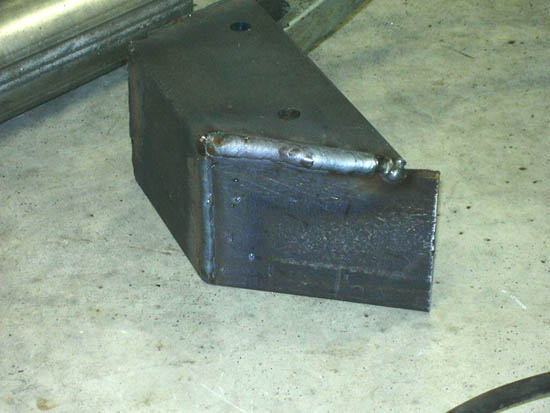
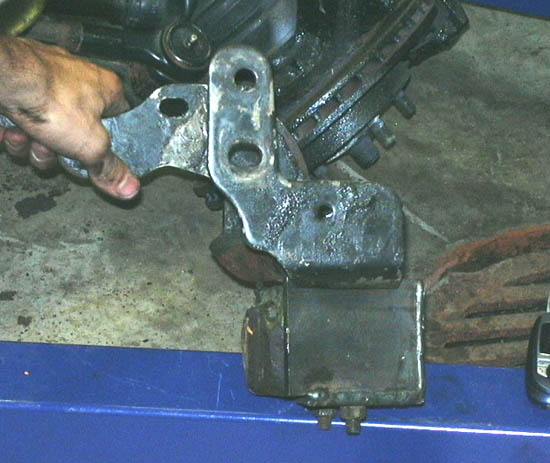
Here is the backs where we cut so we could bend it... Not too shabby.
Along with the back side i welded the inside with a weave to get a little more meat in the corner there.
Here it is after i added the "meat"
Damn... outta pic room already!?!?
IP: Logged
06:21 PM
The Fieromaster Member
Posts: 4124 From: Painesville, Ohio USA Registered: Jun 2001
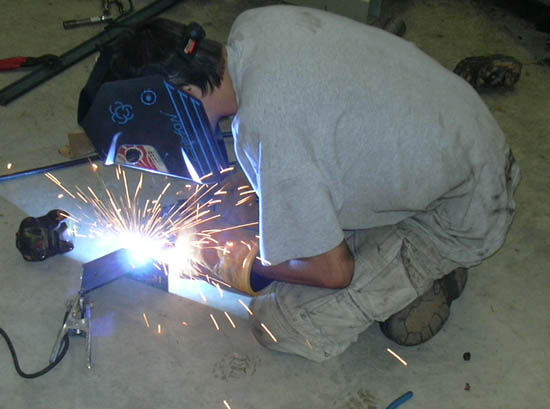
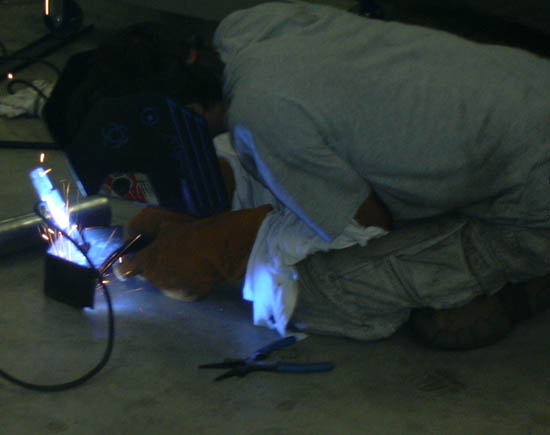
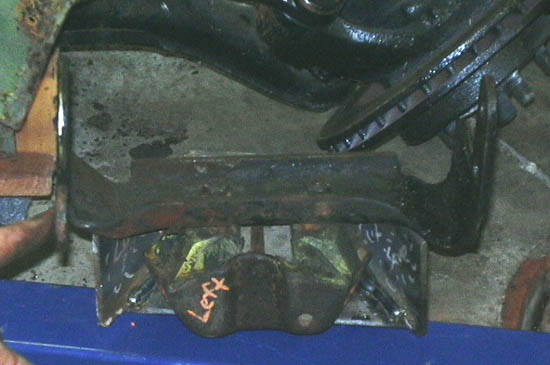
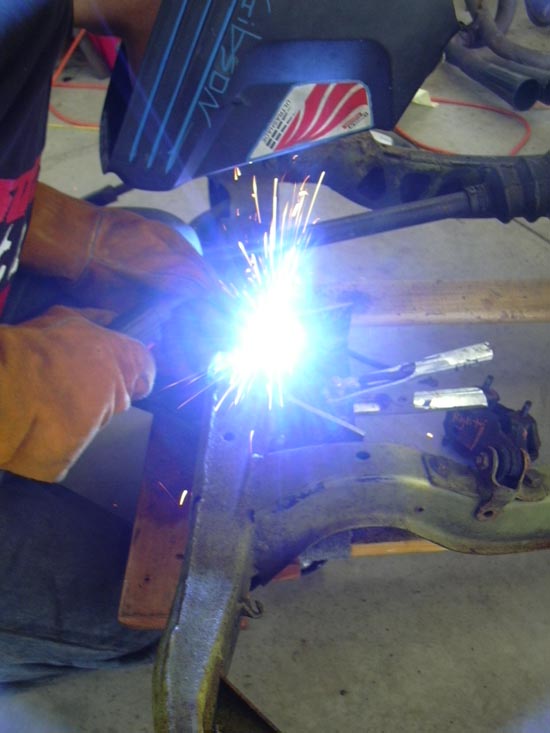
Here are the bottoms all welded on the outside. What looks like a stop point on first one is where the tack was, that one (tack) was a little big.. hehehe!
I then welded the root, and 2 passes on each side on the inside to get a good strong hold.
and then all the sudden.... POP... Ooooooopsie...
Well here is the mount when it was all said and done... Assembled to the 3800 Bracket
arg... finish the last of the pics next post... that limit.. arg.
IP: Logged
06:46 PM
The Fieromaster Member
Posts: 4124 From: Painesville, Ohio USA Registered: Jun 2001
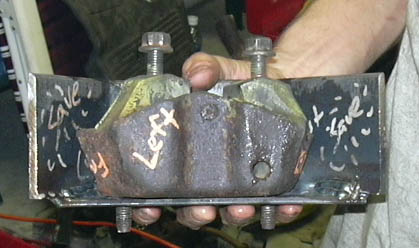
And in grand finalle for today, the brackets with JUST the Boat Anchor mount on em...
Well everyone... I plan to weld all around that mount to mate it to the cradle, also i am going to drill some holes in the back of it and some even smaller ones in cradle in the SAME spot that the holes in mount are and "Plug Weld" it to the cradle for extra super rip stop strength!!
And also today i got my PCM chip back from DarthFiero so im gonna put that back in too.
IP: Logged
06:51 PM
crazyfieromike Member
Posts: 581 From: mentor ohio 44060 usa Registered: Mar 2002
i just wish we could have programed our robots at work to weld it for us i just dont understand why we cant use the expensive welding robots to do our welding lol
[This message has been edited by crazyfieromike (edited 08-19-2005).]
IP: Logged
06:53 PM
The Fieromaster Member
Posts: 4124 From: Painesville, Ohio USA Registered: Jun 2001
Eh, a long while ago Mikee we could have sent it through poweder coat too. Those days are LONG gone... no from home projects allowed anymore. It would not have been worth the time to get the robot to do it cause you have to put it in the EXACT same position and after we moved it, seeing as it dont have a fixture the program would be scrap.
IP: Logged
06:57 PM
crazyfieromike Member
Posts: 581 From: mentor ohio 44060 usa Registered: Mar 2002
Eh, a long while ago Mikee we could have sent it through poweder coat too. Those days are LONG gone... no from home projects allowed anymore. It would not have been worth the time to get the robot to do it cause you have to put it in the EXACT same position and after we moved it, seeing as it dont have a fixture the program would be scrap.
sure it would robot makes bad azz welds hehehe
[This message has been edited by crazyfieromike (edited 08-19-2005).]
IP: Logged
06:59 PM
3.8 SC Member
Posts: 577 From: On the Great Lakes-Ohio Registered: Dec 2003
Sorry, I won't be able to come out to play this weekend. I have to finish stripping the 84 Fiero down, then get things cleaned up in the garage for the T-roof install.
Don Z.
------------------ WWW.CLEVELANDFIEROS.COM https://www.fiero.nl/forum/Forum1/HTML/052322.html#lastpost My rear defuser It will be painted at the end of summer!
IP: Logged
10:10 PM
Aug 20th, 2005
RandomTask Member
Posts: 4547 From: Alexandria, VA Registered: Apr 2005
Well today we did a bunch and are at an EXTREMELY exciting stage... WooHoo but we will get to that in a minute.
Earlier this week i got my PCM chip in the mail from Darth Fiero... he has a print out that you fill out so you dont forget to tell him anything and he can remove all the proper codes.
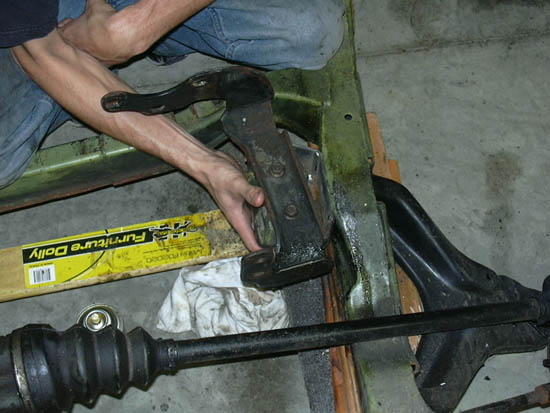
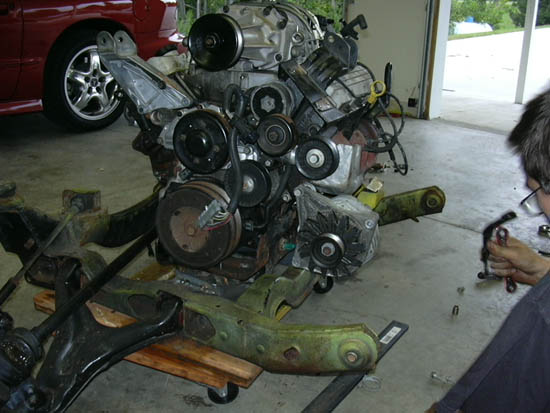
After cutting off the stock mount and building our own we had to make sure we could grind the engine mount off so it was flush against the cradle. Talk about a PAIN in the arse with the sawzall. But we got it and it finally it was NICE and flush.
We found out that the Van mount came in contact with our custom mount after we bolted it all together so we just cut a small angle to make sure that it wouldnt contact any longer.
Here is mike cleaning up the steel on the mount so it can weld clean...
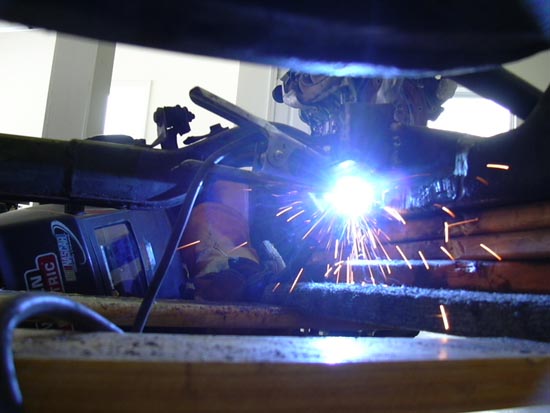
We then proceded to weld on our custom mount...
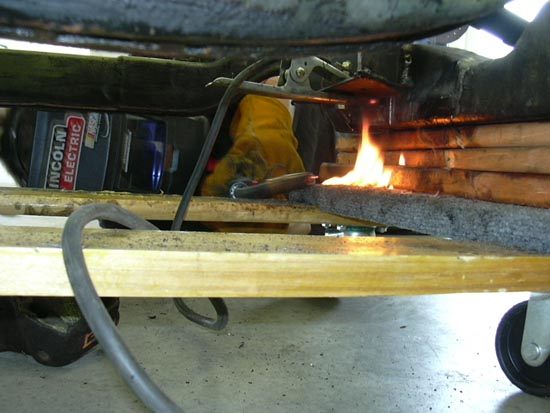
Here we came across our first of the FEW small fires on our furnature dolly... must be all that PB Blaster and the carpet. OOPS!
IP: Logged
06:04 PM
The Fieromaster Member
Posts: 4124 From: Painesville, Ohio USA Registered: Jun 2001
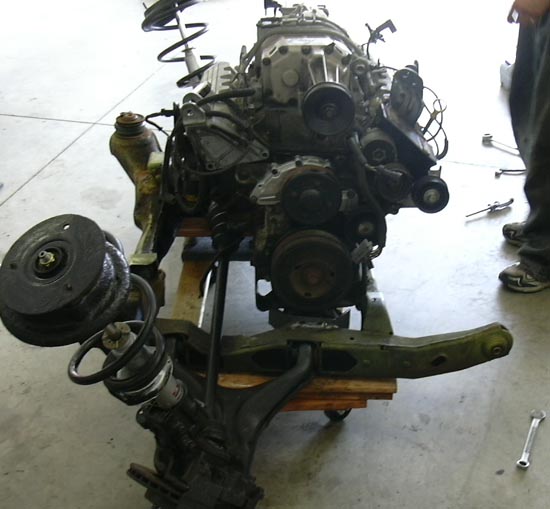
Here is that point i was talking about before.... WOO HOO, The engine finally for the first time is mounted with NO SUPPORT of any kind (cherry picker, blocks, etc)
Here is the bottom of the mount...
IP: Logged
06:24 PM
The Fieromaster Member
Posts: 4124 From: Painesville, Ohio USA Registered: Jun 2001
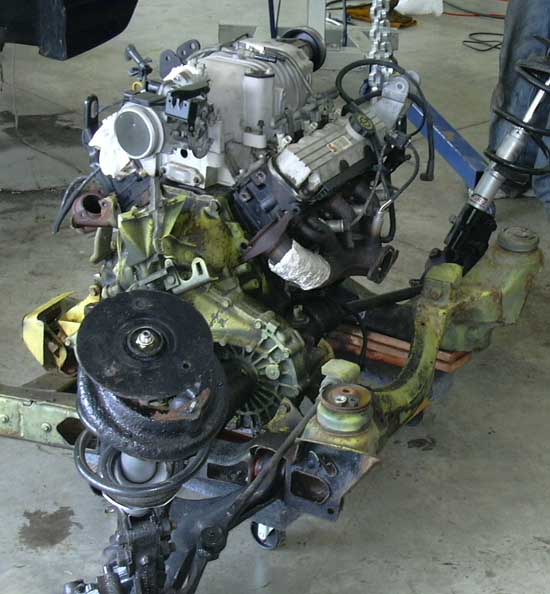
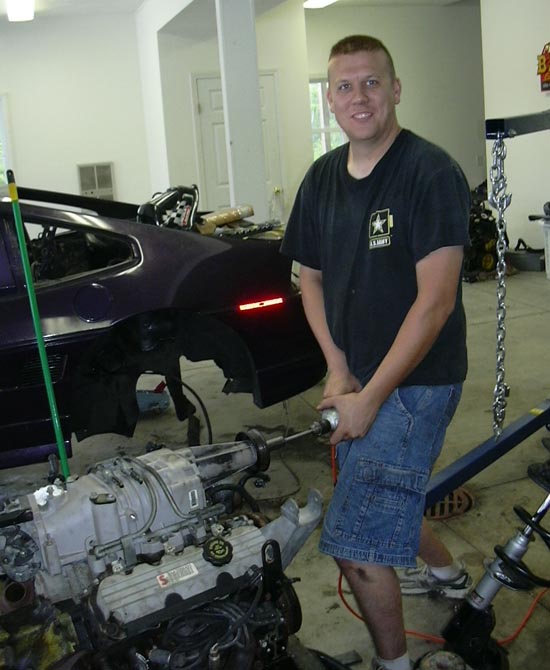
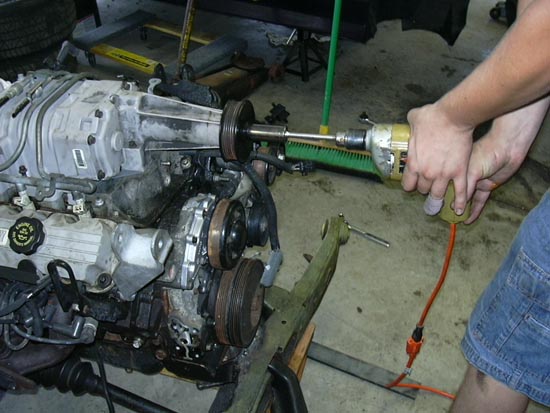
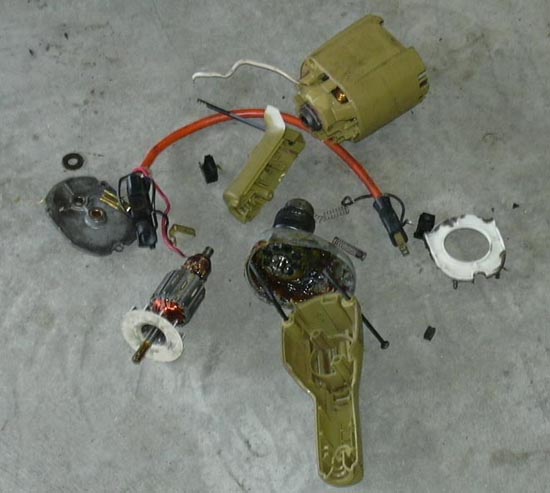
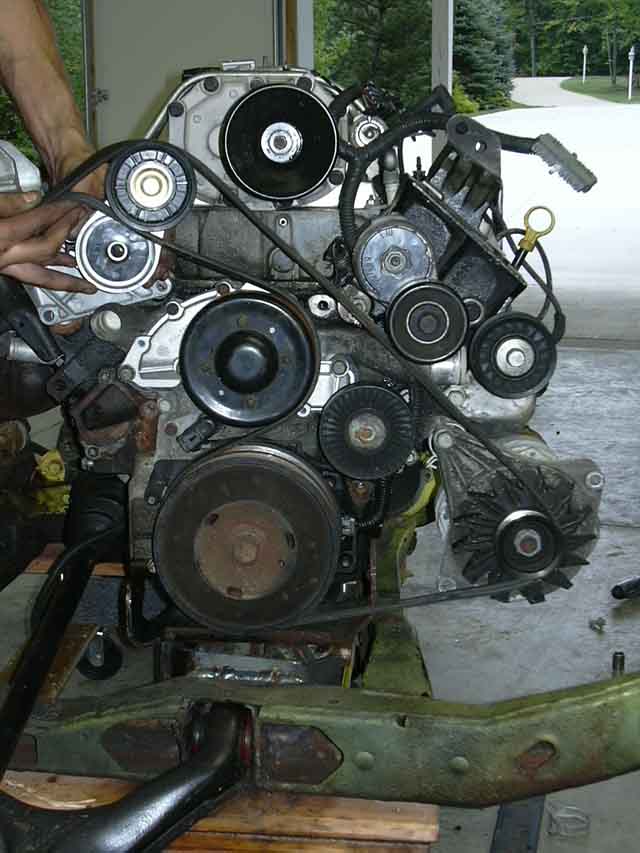
Mikee and I are disturbed, as we said. We found out two things... A- How to not worry about the belt routing AND how to give you your no horsepower consuming ELECTRIC Supercharger!!
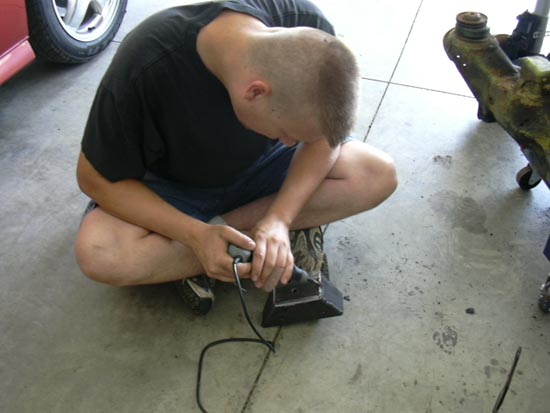
Here is the first casualty of war... Mikees drill...
We then started working on the belt routing. Pretty simple plan we are just are going to mount the alternator where the AC was and then put a tensioner about where the old AC was at.
The tensioner is part number 305217 from Auto Zone... I have NO IDEA what it is off of though... sorry!
Here is the alternator just temp mounted about where it will go.
Here i am holding the tensioner where about it will go on the engine. I will be mounting it flush and shaving down the dog bone mount for the tensioner.
Thats about it for now.... Tomorrow i am going to try to get the dog bone bracket shaved down so that the tensioner will line up good.
Stay tuned...
[This message has been edited by The Fieromaster (edited 08-20-2005).]
IP: Logged
06:42 PM
The Fieromaster Member
Posts: 4124 From: Painesville, Ohio USA Registered: Jun 2001
You may be getting a bit reckless so a slow down could be in order. One thing I notice it the rubber mounts that you are probably going to rip out. Polly will hold up better and I heard of a few using rubber to only have them ripped. If you go to change the pulley it is pressed on a perfectly rounded shaft with no taper. It will fight you the whole way off and that is about 1 inc so you will need a special puller. Loyde rents it out if needed. Are you programming a plain 3800 computer?? Honestly you seem to be doing allot of extra work. I bought the mounts in Polly from Purplereign and mounted the engine. You may put yours in and it will be higher than you want. Mine sits lower than a standard 2.8. Rick B
Originally posted by Rborecky: You may be getting a bit reckless so a slow down could be in order. One thing I notice it the rubber mounts that you are probably going to rip out. Polly will hold up better and I heard of a few using rubber to only have them ripped.
Yeah the rubber mounts are just there to get everything lined up correctly and make sure it runs good. I planned on going with a polly mount for sure, not to mention possibly making some tranny brackets in CAD out of thicker steel because the stock ones i have look like paper mache'
quote
Originally posted by Rborecky: If you go to change the pulley it is pressed on a perfectly rounded shaft with no taper. It will fight you the whole way off and that is about 1 inc so you will need a special puller. Loyde rents it out if needed.
For now im leaving the stock pulley on because i dont have the extra funds for it. I just want to get it to run correctly then ill be all set.
quote
Originally posted by Rborecky: Are you programming a plain 3800 computer??
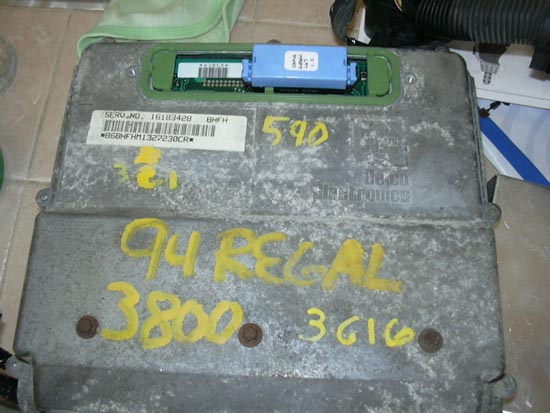
Yes, it doesnt have to be a SC computer. I went with OBD I for a few reasons, but one is i had a 96 PCM which NO ONE can program, also with the OBD I i dont need some components making the engine compartment cleaner. I got the 95 PCM because i guess it wires just like an OBD II and it is weather proof. 94-95 Regal is the ONLY 3800 OBD I PCM that is weather proof.[/QUOTE]
quote
Originally posted by Rborecky: Honestly you seem to be doing allot of extra work. I bought the mounts in Polly from Purplereign and mounted the engine. You may put yours in and it will be higher than you want. Mine sits lower than a standard 2.8. Rick B
Yeah i stated that i would NOT do this again and would SURLEY buy mounts from PurpleReign if i did it again. I just wanted to try something different to see how it worked out. Never knoiw maybe the angle the mounts sit and the way force is applied to them the will work better. I mean they are in a totaly different location on the 3800 then the 2.8 . . . Rick, are you still interested in dynoing your car out here too? Let me know. I talked to the guy at the shop (Hutter Racing) and he said he would deffinetly do what he could to make us a cold air induction system. They have flow benches and a dyno so they can provide all the proof that it makes HP gains. His CAI for the GTP makes 15 more HP. . . . .
quote
Originally posted by ohio86se: the tensioner p/n 305217 is from a 1988 pontiac gp. thats the one im using also
The part number you had is correct for AutoZone... 305217, However that is not the part number they had listed for the 88 Grand Prix... that was like 305201 or something and looked TOTALLY different... I checked NAPA too their 88 GP tensioner looked totally different too. It is tough to explain but it mounted backwards. The pulley was BEHIND the tensioner arm rather then in front and the arm was SUPER long. It didnt look like what you had pictured BUT the 305217 (which the guy at AZ could not tell me what it went to) was perfect to what you pictured in your thread. I picked up the with the number you listed though, even had the right pulley on it. THANKS A TON for getting the number, this i was totally clueless on and DIDNT want to buy a 95$ GTP tensioner from the dealer... thats HORSE FECES!!
Now that i think of it you probably could use the 88 GP one because maybe you would have to take off less material from the dog bone bracket?? Could be something to look into?
fieromaster, oh well thats what the AZ guy said it was for a 88 gp...... whats even weirder i own a 95 ford winstar and looked at the tensioner...well ill be darn its the same as im using on 3800sc. ummmm
sorry about that. im glad i have the correct p/n though
good job on documenting your swap.
------------------
" DRIVE IT LIKE YOU LOVE IT"
IP: Logged
02:57 PM
California Kid Member
Posts: 9541 From: Metro Detroit Area, Michigan Registered: Jul 2001
Great of you to share your conversion project with the Forum !
Thought I should let you know that I've heard from quite a few people that the SuperCharger bearings are known to fail at between 100,000 and 120,000 miles. You may want to consider rebuilding it before finishing your engine install.
Great of you to share your conversion project with the Forum !
Thought I should let you know that I've heard from quite a few people that the SuperCharger bearings are known to fail at between 100,000 and 120,000 miles. You may want to consider rebuilding it before finishing your engine install.
Thanks for the tip, i plan on replacing the bearings soon however since im gonna rip it back out this winter ill probably do it then.
quote
Originally posted by ohio86se:
fieromaster, oh well thats what the AZ guy said it was for a 88 gp...... whats even weirder i own a 95 ford winstar and looked at the tensioner...well ill be darn its the same as im using on 3800sc. ummmm
sorry about that. im glad i have the correct p/n though
good job on documenting your swap.
Thats ok man... no harm no foul... Thanks for the compliment too. Thats all i wanted to do is get all info on here so everyone has access.
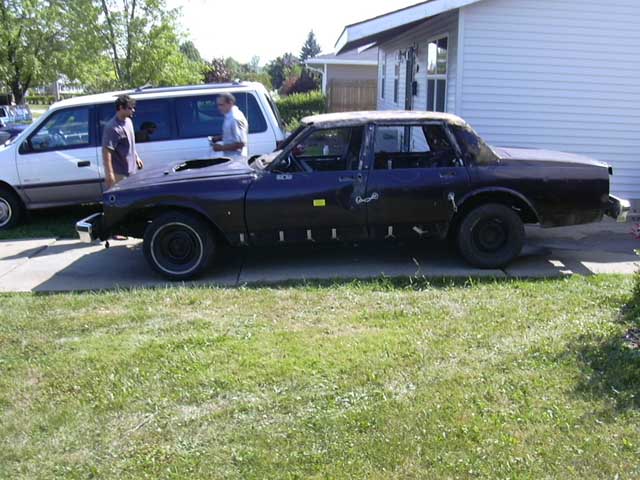
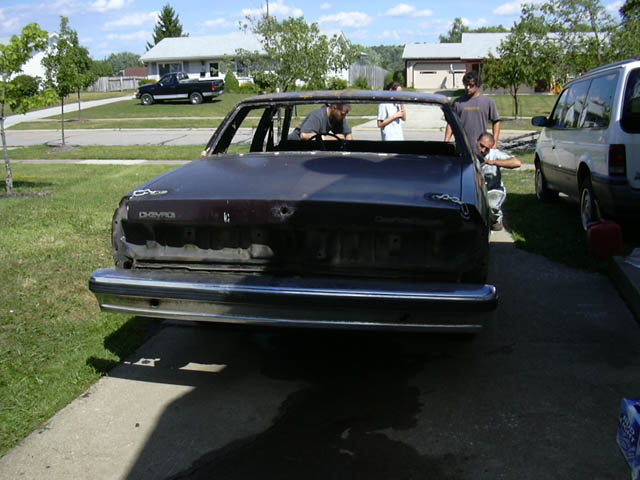
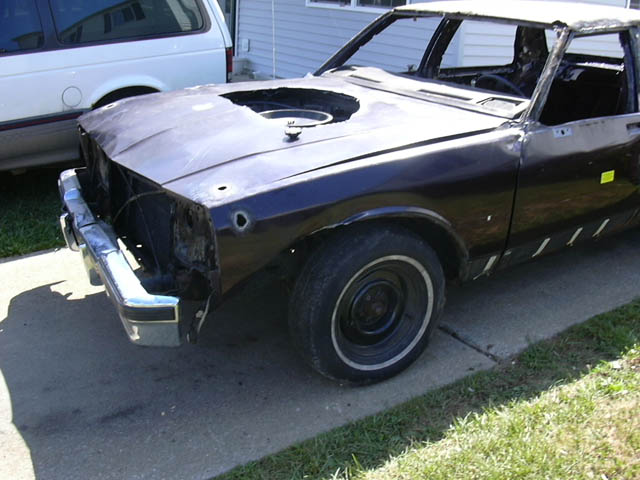
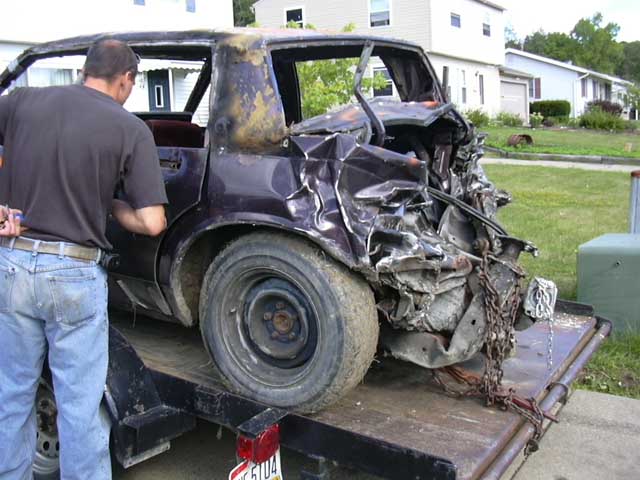
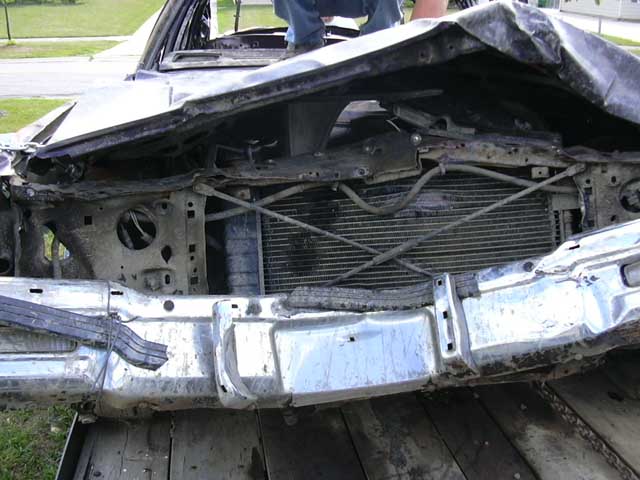
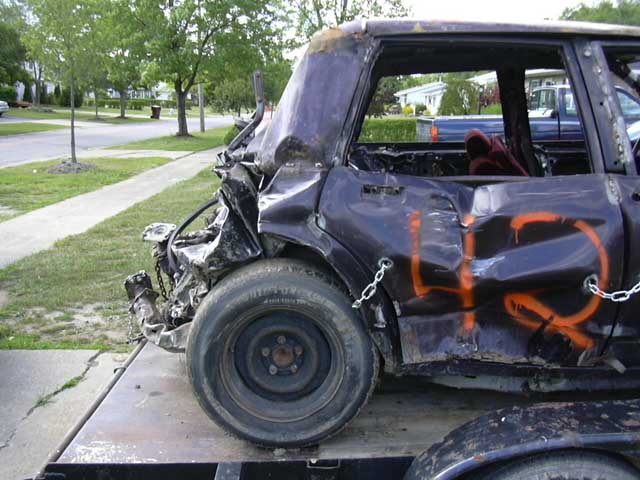
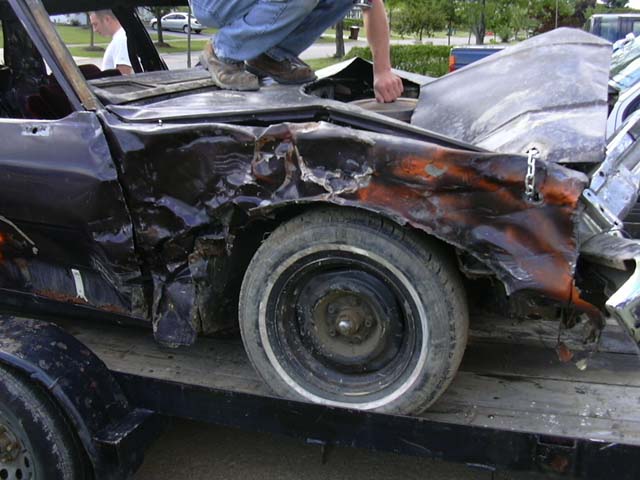
Didnt get any work done on sunday cause i helped a buddy with gettting his Derby car ready. It was wicked, he never has been in a Demolition Derby before and took 1st in his heat and 4th over all!! Not bad for a Caprice Classic. Here are a few before and after pics to show how much fun he had.
[This message has been edited by The Fieromaster (edited 08-22-2005).]
IP: Logged
10:15 PM
Aug 24th, 2005
The Fieromaster Member
Posts: 4124 From: Painesville, Ohio USA Registered: Jun 2001
Got my oil filter adapter in FINALLY from GM Parts Direct. They may be cheap bud DAMN they are slow. The more i look at it the more i worry that it may not fit JUST right with my engine mount... ARG! Oh well, I will check it out tomorrow. I just got home from work... ICK 2nd shift!
IP: Logged
02:17 AM
RandomTask Member
Posts: 4547 From: Alexandria, VA Registered: Apr 2005
Nothing for wiring yet... I may start on that soon because I will have very little weekend time now that Katrina came through the south... This put orders for welders, generators, and such at my work through the ROOF. So im gonna be bustin my butt to keep up.
As for other updates, i have the tensioner installed on there but we cut it a little short so i will have to put some aluminum in to make up the gap. Will take pics tonight for you all... promis!
You will still have to figure out something because your not running the power steering pump.
However it is the absolute EASIEST if you go with 98+ Grand PRIX GTP engine as that has the correct idler/tensioner setup for the supercharger... Also if you keep the AC pump it is much easier too.
If you have any questions once you get your motor just jump in here and post some pics... ill do what i can!!
Sure... That works for me I got the deadline of 6 weeks from the guy i rent from cause im taking up allot of garage space... OOOPSIE!! Hes been totally cool about it too. Just got allot to do still... ARG!
Havent even BEGUN wiring yet!!
IP: Logged
05:47 PM
Sep 7th, 2005
RandomTask Member
Posts: 4547 From: Alexandria, VA Registered: Apr 2005
So I sheared a trans mount bolt in half... ooops... Lesson? USE GRADE 8/10.9 OR BETTER ON ALL MOUNT BOLTS! I have a pic and will post it eventually.
Quick Question, What are you guys using for an intake? I heard somewhere of someone using a CRX Intake, is this true? If so, what year CRX/specs do I need to buy for?
Thanks!
IP: Logged
10:42 AM
The Fieromaster Member
Posts: 4124 From: Painesville, Ohio USA Registered: Jun 2001
CRX intake is pretty small from what i understand and its LONG.... Long plus smaller Diameter is BAD for SC performance.
I want to go with a 4" tube it the stock air pick up locations if possible. I hear a few guys actually getting better power with just a filter on the TB because the tube style ones were so small and long...
Just my two cents!
IP: Logged
05:37 PM
RandomTask Member
Posts: 4547 From: Alexandria, VA Registered: Apr 2005