First off i want to say this isnt inteded to start any "what motor to do" flame war, or step on anyone who sells harness's or parts for the swap. In fact some of those people i will need for my swap.
This is going to be a step by step dummies guide to a series II install!! With tons of pictures too!! Since i have never done this swap and am pretty NEW to it your all going to learn WITH me... so in the end it should turn out to be basically a how to install thread!! I will size down all my photos to be nice BUT if anyone wants a larger version i can email you one!
Here goes...
The engine is from a 1996 Buick Riviera, this is the only thing i dont have any pics of!! (ok its not a TOTALY documented swap, i dropped the ball on the deinstall from the Riv) It came out pretty easy through the TOP... wich is how the guy helping us at the yard wanted it. Just pull all the tranny mounts, totally pull the passenger side engine mount from the frame. UNPLUG your harness from the firewall, then trace the cars side of the harness back to where it enters the firewall and cut it there... You will be left with a 2 foot section of the cars side of the wiring harness... This will be usefull because you can splice all this to the fiero and still unplug the engine for various reasons. I made a WOOPSIE when i cut 2 relays off this harness... DONT do that, i think one may have been the fuel pump relay. DOH! Get everything you can!!!
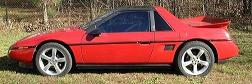
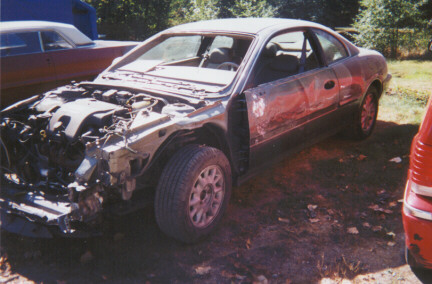
Here come the pictures... To start here is a good shot of a 96 Riv that frightningly looks IDENTICAL to the one my engine came from, Damage and everything!!
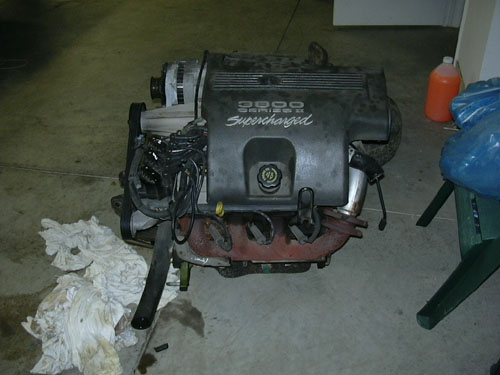
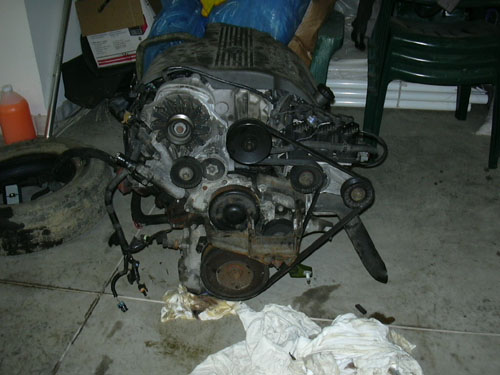
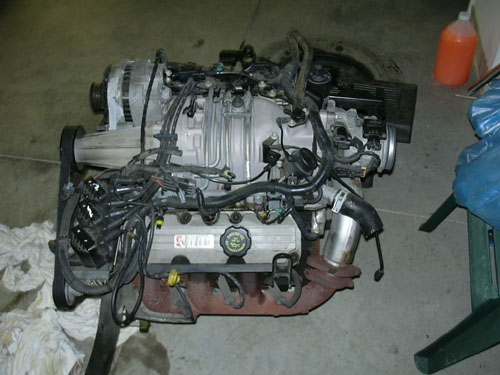
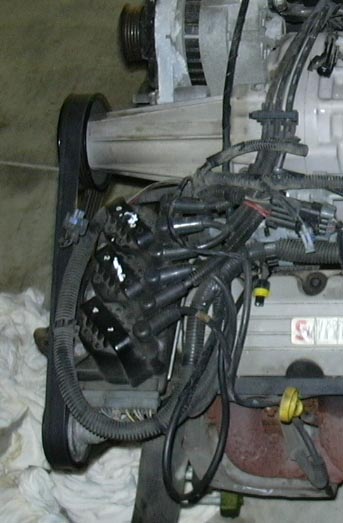
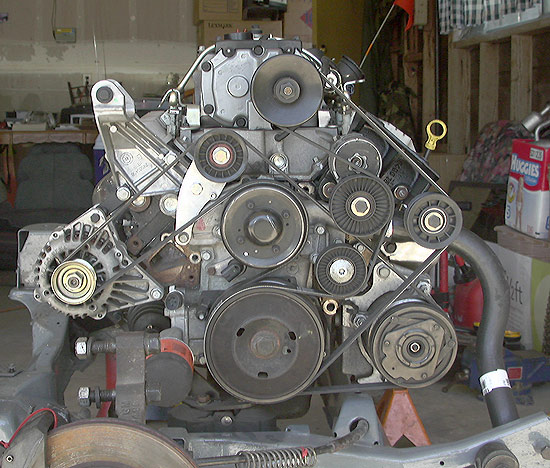
Once you rip out your engine it should look like the following!
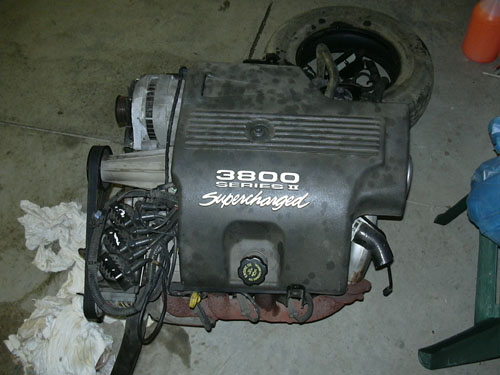
Here is a no cover shot.... im debating still moddifying the cover so i can use it... Good for a SLIGHT attempt at sleeper vehical, or a more stock appearence, however when i go to show it off, id like to remove the cover so she looks like this. (technical note, if you dont have the shiney grey thing on the top there you got screwed!!)
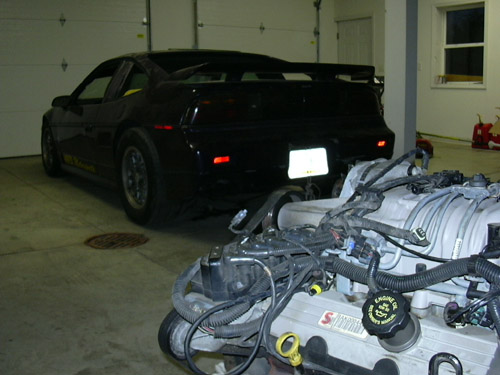
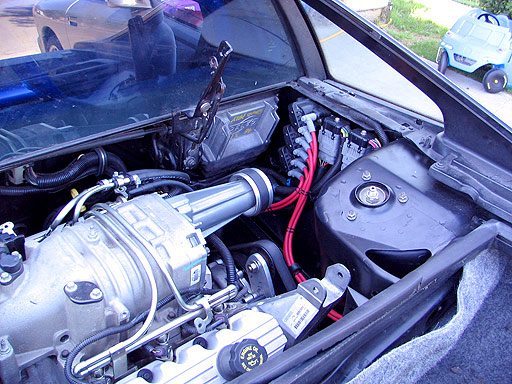
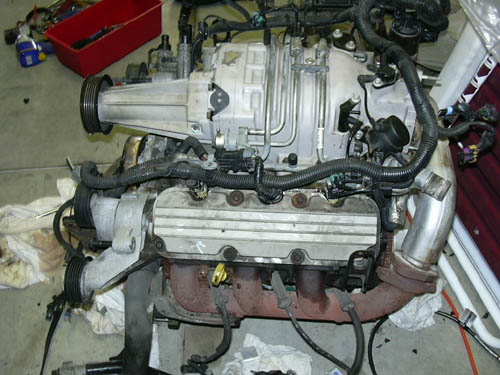
Here is a cool shot of the engine and her future home!
Ok, ok, now for the fun... I pulled the charger because A; I wanted to polish the outside and make it look WICKED umongst the rest of the engine wich i want to paint black.... However, powder coat on this thing is THICK and i mean thicker then George Bush's head!!! SO i was gonna wire wheel it off with a dremel (nice for hard to reach stuff) now that i have a few baron of paint spots im stuck going for it, so i may try sand blasting OR chemical stripping, any suggestions are much loved! And for reason B; I found some porting instructions online to make it a little more efficient... so ill give that a shot too!!!
[This message has been edited by The Fieromaster (edited 07-15-2005).]
IP: Logged
11:50 AM
PFF
System Bot
The Fieromaster Member
Posts: 4124 From: Painesville, Ohio USA Registered: Jun 2001
They did work but i must have over went a bandwith or somthing? CRAP... I fix ASAP! Thanks for the link.
All moved to PFF hosting... now is all good!
TODAYS update!
James (Fieromaster88) has been telling me to just get the engine in and running RIGHT before i toy around with it too much SOOOOO i decieded to do this. Im putting the blower back on and I am going to start moving wiring to conceal it a bit more. I am not a fan of the clustered engine compartment.
KC (Low_Key) has told me that he test fit a Series II computer and it FIT under the center consol so im going to wire it that way.... My other option was too the trunk. This would benifit as its stock wire routing and also you could adapt the rear cooling fan to cool the ECU! Stan (StansGT) has his by the battery, however i want my battery in the stock location for now unless i have someone tell me some excellent benifit from moving it!!!
I also am going to post any part numbers for parts i use so that you can try the same parts. So soon as my G/F gets back with SC gaskets ill add them to start a list.
Here is a list of things to do at this moment....
1- Remount the blower 2- Plug everything back together and decied for sure wich way to run the wiring (trunk or cabin) ~~~~~ A= If in the trunk i can make a box for it and custom fab the cooling fan in rear to blow into box to keep ECU cool ~~~~~ B= Running it into the cabin keeps the stock look and cleans up engine wire mess, but may have to extend some wires. 3- Wire the ECU to the extra harness section robbed from the body side of the car! - NEED to find out if i cut off any NEEDED relays when i hacked the 2 off! 4- Get info on custom burned ECU chip to get rid of Tranny, Emmisions, EGR, and other codes i may get.
once i test mount the motor to the cradle i have a few other things to do BUT i am thinking about them now anyway to get a jump on them... they are...
1- Replace water pump (its got 80K preventitive maintenance) 2- Forgot to grab the starter, or it was gone, DOH need to get one 3- Oil filter location, may need filter extension from another car 4- Clutch... what to use with Isuzu to last till winter when i go get a Getrag 5- Coil pack location, why not stock spot? Make box for them and cool with rear fan? 6- Flywheel info... needs machined and balanced but need to research that. (good thing i grabbed the flexplate to match the balance needed)
For now thats it... My g/f's dad has a mill and lathe so this winter i am going to experiment with making some parts... fuel rails and such... if you have any suggestions let me know. The Grand Prix guys talk about a wipple supercharger but want like 2k for the mounts and stuff... i should look at making those too!
[This message has been edited by The Fieromaster (edited 07-15-2005).]
IP: Logged
11:55 AM
NorthFloridaFiero Member
Posts: 918 From: Tallahassee Florida USA Registered: Aug 2004
Fieromaster..... Could you also post prices of any additional hardware and if needed, and special parts/part stores that you had to use? This would help come up with a total cost. I realize engine costs will vary. But the additional hardware should at least be close.
Thanks
IP: Logged
12:20 PM
The Fieromaster Member
Posts: 4124 From: Painesville, Ohio USA Registered: Jun 2001
First off i did a BIG edit above to my post before this one... check it out if you havent.
NorthFloridaFiero - Glad i can help... i will have TONS of pics... i have 2 64meg cards and if you need any BIGGER versions i can mail you them!
JKFiero - Will do that along with my part number list. I will also include instructions on HOW to modify stock parts so they work. Anything that i have to make that others may not be able to i would possibly sell, as long as i have the time to produce products with quality and quickly. (work eats up allot of time)
IP: Logged
12:32 PM
The Fieromaster Member
Posts: 4124 From: Painesville, Ohio USA Registered: Jun 2001
Official Parts List... Prices, Places And Part Numbers Galore!!!
Edited 8/03/05 8:38 AM
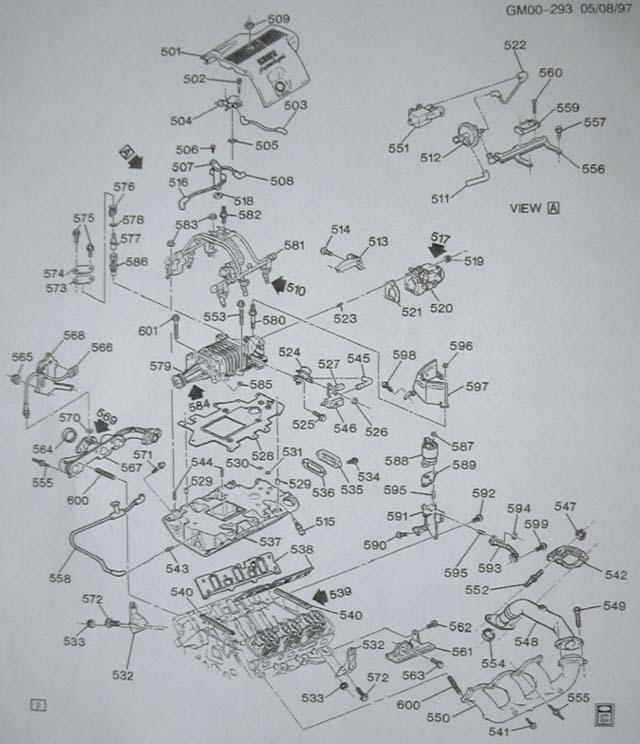
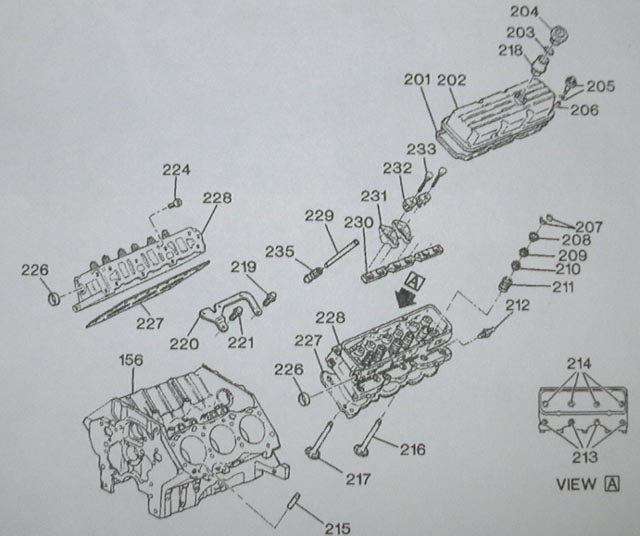
First off I am going to include a printout the dealer gave me of the 3800 Series II engine. This has numbers associated with it... they ARE NOT the part numbers BUT if you call the dealer they can referance the numbers to get the number you need... This picture will stay BELOW all the part numbers. If i get somthing from a different vendor (mount, or bracket) you better believe i did the research on it so BUY what i say I will include their contact info too!
I will update this list EVERY time i get a new number or price! I will also include IF applicable, where in the breakdown pics its located by giving you the NUMBER from the breakdown! WIll be forematted like this (with a sample part)...
Description ~ How Much $ ~ Part Number ~ Where I got it ~ Where it refrances to engine breakdown pics.
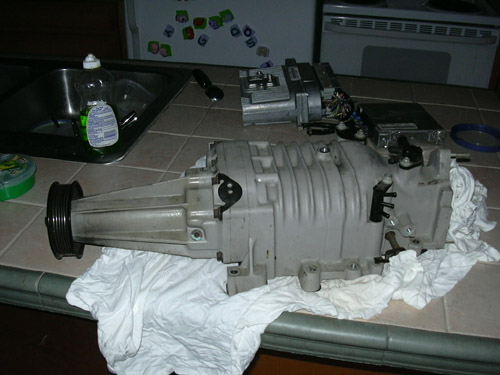
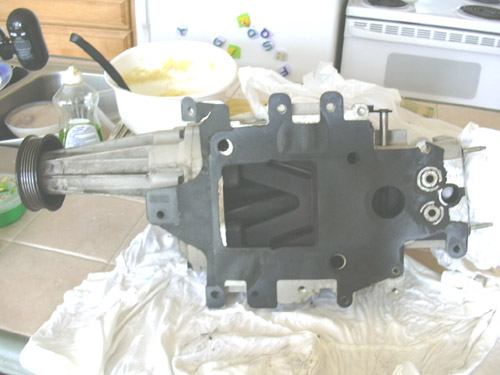
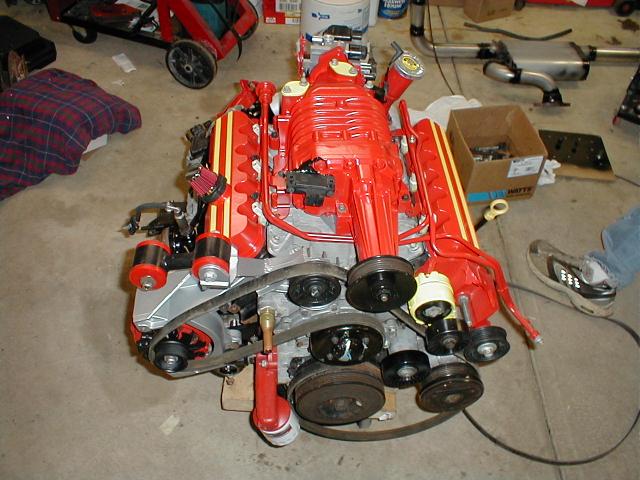
Here are a few pics of the series II blower as it sits on my counter!
This Style Blower is only in the 1996. The Black Line on right side is blocked on the 97-04 engine. It is the only Year they painted the hole blower. It is a M90.
IP: Logged
01:27 PM
The Fieromaster Member
Posts: 4124 From: Painesville, Ohio USA Registered: Jun 2001
this thread looks like itll turn out very helpfull to anyone interested in do ining this swap but me i am to lazy to read all of this so i ll just make the guy that wrote this help me if i ever get un broke enough to do it to mine lol seriously loooks good craig
IP: Logged
01:44 PM
RandomTask Member
Posts: 4547 From: Alexandria, VA Registered: Apr 2005
1- Remount the blower 2- Plug everything back together and decied for sure wich way to run the wiring (trunk or cabin) ~~~~~ A= If in the trunk i can make a box for it and custom fab the cooling fan in rear to blow into box to keep ECU cool ~~~~~ B= Running it into the cabin keeps the stock look and cleans up engine wire mess, but may have to extend some wires. 3- Wire the ECU to the extra harness section robbed from the body side of the car! - NEED to find out if i cut off any NEEDED relays when i hacked the 2 off! 4- Get info on custom burned ECU chip to get rid of Tranny, Emmisions, EGR, and other codes i may get.
once i test mount the motor to the cradle i have a few other things to do BUT i am thinking about them now anyway to get a jump on them... they are...
1- Replace water pump (its got 80K preventitive maintenance) 2- Forgot to grab the starter, or it was gone, DOH need to get one 3- Oil filter location, may need filter extension from another car 4- Clutch... what to use with Isuzu to last till winter when i go get a Getrag 5- Coil pack location, why not stock spot? Make box for them and cool with rear fan? 6- Flywheel info... needs machined and balanced but need to research that. (good thing i grabbed the flexplate to match the balance needed)
For now thats it... My g/f's dad has a mill and lathe so this winter i am going to experiment with making some parts... fuel rails and such... if you have any suggestions let me know. The Grand Prix guys talk about a wipple supercharger but want like 2k for the mounts and stuff... i should look at making those too!
For your first list, add to it- figure out your belt routing setup. The pulley thats under your coils will interfere with your decklid. Loyd over at www.fastfieros.com or darthfiero www.gmtuners.com are both excellent sources for getting your ECU reprommed. From what I've heard, you should keep EGR on your car. It helps it run cooler and as such, reduce KR.
As far as your questions go...
1- Replace water pump (its got 80K preventitive maintenance) Doing some other seals like valve covers couldn't hurt either.
2- Forgot to grab the starter, or it was gone, DOH need to get one You use the starter off of a v-6 fiero..
3- Oil filter location, may need filter extension from another car Yup, that filter will interfere with the front motor mount. Try getting one out of a grand prix
4- Clutch... what to use with Isuzu to last till winter when i go get a Getrag I'm pretty sure the isuzu and getrag use the same clutch and pressure plate, just the T/O bearing is different, can someone confirm this? You should contact SPEC, they will be able to tell you (www.specclutch.com)
5- Coil pack location, why not stock spot? Make box for them and cool with rear fan? Again, same with that pulley, will interfere with the decklid. You can get away with moving the battery further towards the side, (relocating it upfront is better) and put the coil pack where the battery was.
6- Flywheel info... needs machined and balanced but need to research that. (good thing i grabbed the flexplate to match the balance needed) Get it out of a '96 V-6 Camaro. Machine it down to 0.840" from the mounting surface on one side, to the friction (where ther disc applies to) on the other side.
I think your two biggest headaches (as are mine) are the wiring as well as the pulley situation. I'll try to get more pics up of mine on how I resolved these.
IP: Logged
01:56 PM
jscott1 Member
Posts: 21676 From: Houston, TX , USA Registered: Dec 2001
As for the clutch...yes all Fiero Trannies use the same clutch. Just the T.O. bearing are unique to the particular transmission. But get the best clutch you can, I recommend the spec too.
IP: Logged
02:05 PM
RandomTask Member
Posts: 4547 From: Alexandria, VA Registered: Apr 2005
Thanks for the help RandomTask... ++++ !!! I'll have to check into the pulley thing. I may go that route with the coil packs too... ill do some poking around to see what i can figure out. Would mount them to the engine side of the trunk wall but that would need wiring harness lenghtening im sure! I will check autozone for the flywheel too...
IP: Logged
02:23 PM
Rborecky Member
Posts: 675 From: Cleveland,Ohio U.S. Registered: Oct 2003
Incase you need some references to things we stumbled on check here. https://www.fiero.nl/forum/Forum1/HTML/049118.html I used the same car and if you are not going to use the trans I may want to buy it if the price is right. 4t60E hd is my axle set up and I want a extra incase I tear this one up doing wheelies. Holler if you need any parts also as we have a great connection with Ed Morad if you dont already know him. Rick B
IP: Logged
04:14 PM
Deabionni Member
Posts: 4088 From: Kalkaska, MI Registered: Mar 2004
Also, you are going to have to replace the bracket that you have there with the one that is installed on the GTP. ( Firewall issues will abound with that one installed.) Check this part number here, as I had to do the same as you.
GTP Bracket Part #: 245o7211
GMPD had it for ~45.oo when I bought one ~ a year ago.
quote
Originally posted by The Fieromaster: his would benefit as its stock wire routing and also you could adapt the rear cooling fan to cool the ECU! Stan (StansGT) has his by the battery, however I want my battery in the stock location for now unless i have someone tell me some excellent benefit from moving it!!!
Reasoning enough to move it
GL, and great thread!
--Allen
------------------
IP: Logged
06:48 PM
The Fieromaster Member
Posts: 4124 From: Painesville, Ohio USA Registered: Jun 2001
MCaanda... AWESOME info.... ill add all those part numbers to my post above... ++++ 4 you
The participation in this thread is AMAZING and much, much, appreciated!
I will post the pics (allot of em) of the stuff i got done today some time tomorrow...
I put the blower back and took some pics of the gaskets and how much porting could be done, also swapped the valve covers over as the oil fill would be on the cabin side rather then trunk side.
IP: Logged
10:36 PM
Jul 16th, 2005
The Fieromaster Member
Posts: 4124 From: Painesville, Ohio USA Registered: Jun 2001
Incase you need some references to things we stumbled on check here. https://www.fiero.nl/forum/Forum1/HTML/049118.html I used the same car and if you are not going to use the trans I may want to buy it if the price is right. 4t60E hd is my axle set up and I want a extra incase I tear this one up doing wheelies. Holler if you need any parts also as we have a great connection with Ed Morad if you dont already know him. Rick B
Your in the Cleveland area too eh? Is your swap complete now? I dont know Ed Morad, so if you could enlighten me on his products id be much oblidged!! Might have to come out and check out your swap??
quote
Originally posted by RandomTask: From what I've heard, you should keep EGR on your car. It helps it run cooler and as such, reduce KR.
Why have you heard that... just wondering because the EGR would totally heat up the blower and components by allowing hot gas into the system... I would figure that would RAISE KR because hot air helps cause pre-detonation. Wich is why people get intercoolers.... Just curious, because what youve been told makes me wonder...
[This message has been edited by The Fieromaster (edited 07-16-2005).]
IP: Logged
09:26 AM
PFF
System Bot
The Fieromaster Member
Posts: 4124 From: Painesville, Ohio USA Registered: Jun 2001
Yestarday i put my charger back on, all fresh gaskets... the part numbers are in the on-going list above!! Anyway i started by scraping all the gasket material off the parts... if for some reason your new to this, it's very important to do. Well upon cleaning my parts i discovered the Gremlins that would surley have caused me trouble... They were hiding in the motor that i was going to put in my car... Think of that... waiting, sabotage!! Well i got them i did i did!
Discovered their nest...
Infiltrating their hive....
Even more hide deeper!!!!
Yes... they were all dead, but just to think those little buggers found a place like that to hide in the first place!
Ok so now that i got rid of the evil little gremlins and installed the chager I decided to change the valve covers around. I dont like the idea of having to fill the oil on the back side of the engine!! So here are the steps.
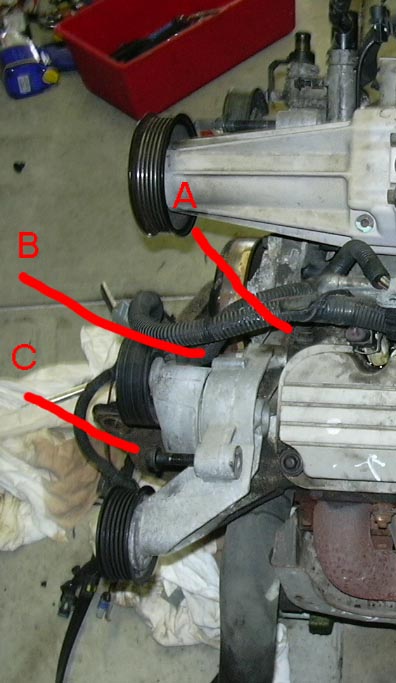
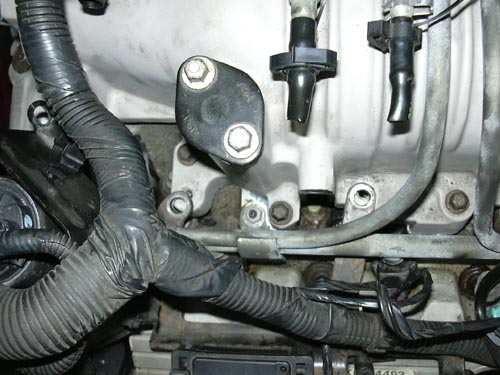
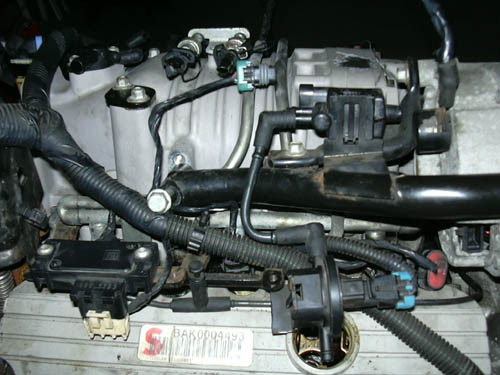
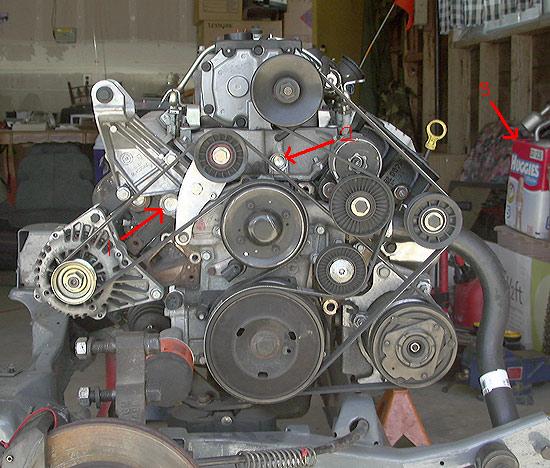
Here is the coil pack it needs to come off... A- because its in the way of the valve cover comming off, B- I am going to mount it where the battery goes... Mcaanda's car makes me drool... reason enough for me!
The pack has 3 bolts holding it on, they are below in the pic as best as possible. Bolt - A - is under the blower snout and easy to get to. I put bolt - A - back in because from what i could see its an open hole to the inside of the block, or coolant passages... NOT good for me. Id suggest you leave it there too... Bolt - B - is to the left of the tensioner... it goes THROUGH the bracket and holds the tensioner on too... It HAS to stay! So put it back. Bolt - C - basically does nothing but hold itself in when your done... so far i see no reason for keeping it, but i will because i am uncertain as of now! Although if i get the GTP pulley for there as suggested by Mcaanda then i wont need it anyway.
That cover is now ready to come off... All you have to do is LOOSEN the bolts... dont pull them out. They have nifty gasket/plug/holder in er things... Basically they wont fall out because clips "lock" them gently in place. Pull the cover up and rock the top toward the charger and it will clear the engine lift bracket perfect!
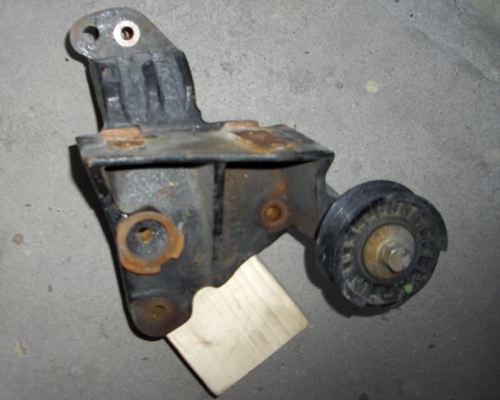
For the other side, there is a engine lift bracket of ENOURMOUSNESS. It also has the wire for the O2 sensor on it. Chuck that ugly bracket by pulling the 2 bolts off it. They threaded on a stud end of the exhaust manifold bolts. Get rid of the giant hunk o metal!
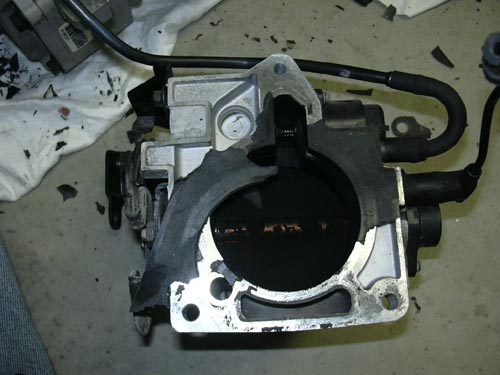
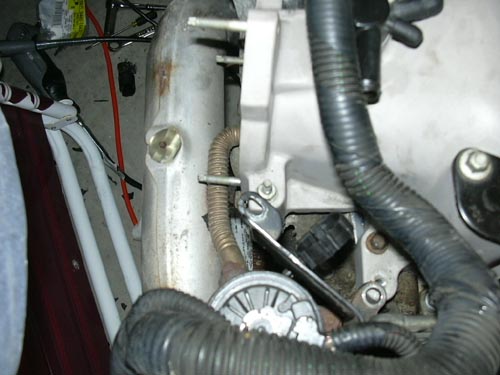
Now you have to pull the bracket that has the Map sensor egr heat sheild and another vacuum valve on it... unsure of what its for. I dont remember but will when everythings back together. There are 2 bolts in the charger for it (they DONT hold the charger down also so dont worry about pulling em out) and one bolt on a stud near the Throttle body... the bolt only holds the brackets and egr sheild down BUT the stud under it DOES hold the charger down... dont take that out! The pics for this are below... i already have the bolts out so just look at the shiney parts of the brackets and youll see where they go. The mess o bracket...
AT MY 8 PIC POST LIMIT.... Will continue with this valve cover removal below... probably typing it as your reading this... so dont ask nothin bout this part till i post the rest LOL!!!
IP: Logged
11:21 AM
The Fieromaster Member
Posts: 4124 From: Painesville, Ohio USA Registered: Jun 2001
ok where the hell was i.... god forbidden 8 pic limit got me all twisted up.. lucky i copies my post at the last minute to clip board or i would have lost it all and thrown my PC off the balcony!!!
OK anyway...
Here are the 2 bolt locations that go into the charger...
Here is the bolt that holds everything down next to the charger inlet (or t-body on assembeled motor)
Once you get them all off you CAN wiggle it free and put it up on the charger without damaging everything...
[color=red]IMPORTANT NOTE[/colior] I should have noted, although its obvious, i removed my alternator a WHILE ago... This would need to be removed PRIOR to removing this bracket... its easy as well... 2 bolts in fron and on bolt that goes into the side of the charger housing.... When i put it back on i will take pics for you to see... that should make up for my absent mindedness!!! SORRY!!!!
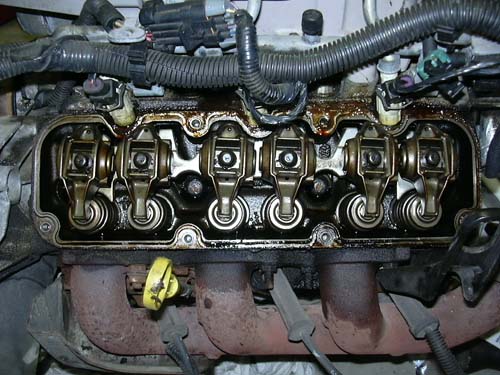
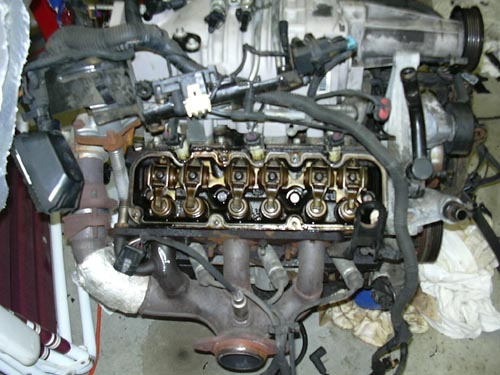
Well once you get all this loose you remove it the same way as the other side... lift up and rock it toward chager and around this sides engine lift bracket. Here is a picture of the valve cover off.... you can see the bolts all stay in it, which is NICE!!! New gasket part numbers are listed above in the parts post.
Here are a couple of photos of each side of the valve train... you can see where the gasket was most likley leaking where the oil got under it and burned in place.... scrape ALL this off and clean it up before mounting them back on!! I always use a small layer of gasket sealer (RTV) just cause i am anal about that stuff...
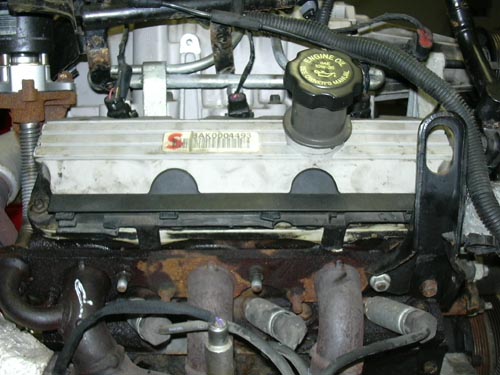
Here is what will be the Firewall side of the engine... it is the side that HAD the oil fill on it!
Here is the trunk side... the oil fill will go on this side... you can see all the brackets lifted up out of the way so that you can get cover on and off...
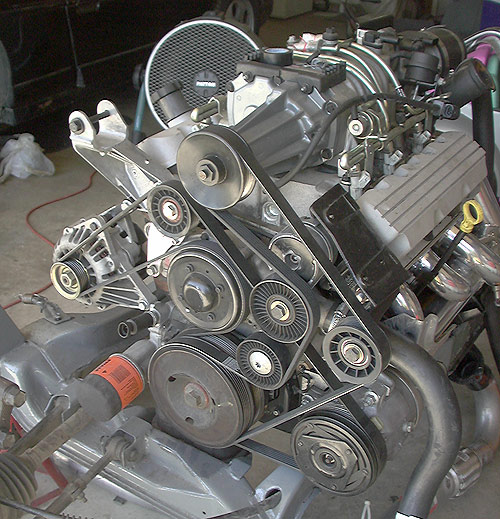
With the firewall side assembled the engine looks VERY clean on this side... Too bad its not the one everyone will see when you open the deck....
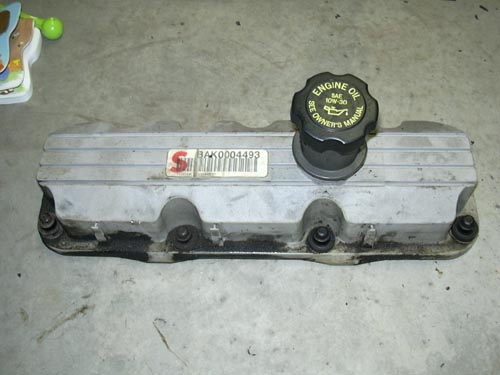
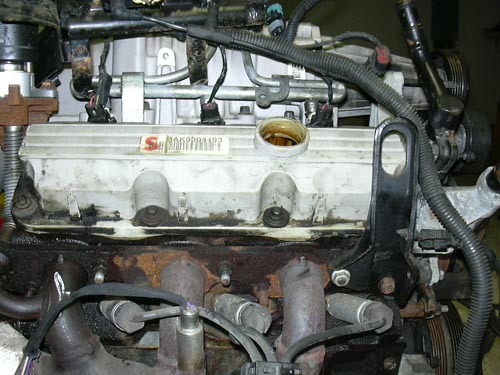
Here is the trunk side with its newley aquired oil filler valve cover!!
MORE TO COME... ASAP... OUT OF PIC POSTING ROOM!!!!!!!!!
IP: Logged
12:00 PM
The Fieromaster Member
Posts: 4124 From: Painesville, Ohio USA Registered: Jun 2001
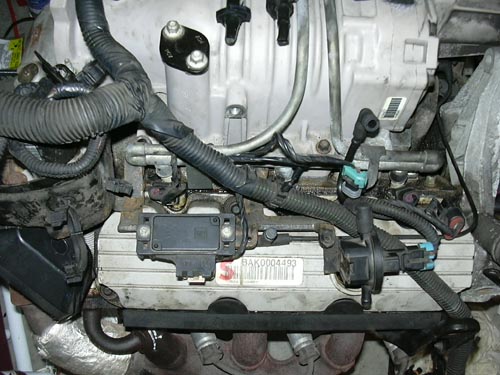
Here is a neat part of having this valve cover in the front!!! There is a piece (if you grabbed it) that goes on this valve cover that not only covers the lower and more visable cover bolts BUT it also is a plug wire holder that conceils them VERY WELL and keeps them off the manifold...
This is what the valve cover looks like normally, if you see the two clean parts at the bottom of it that look bent out? Those are what the wire cover clips onto to hold it down. The other cover DOESNT have this.
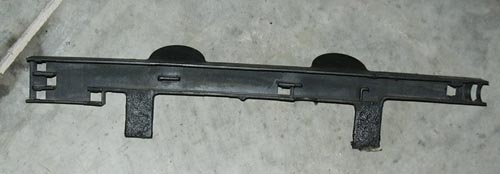
Here is the wire holder...
Here it is installed... looks allot sharper. Just the little details like this will help my end result of a CLEAN engine bay!
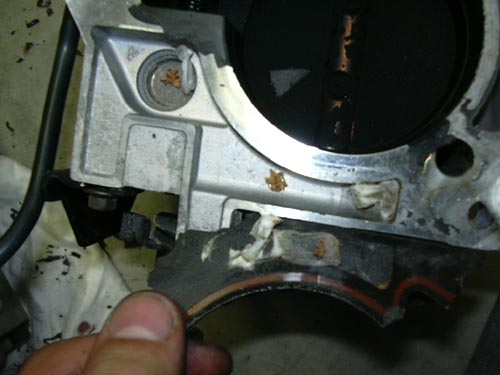
OK now for the PROBLEMS with doing this... not hard to over come but problems none the less!! The fill hole is now blocked by this vacuum valve... It cnnects onto more vacuum manifold parts. Youll understand just look at the pics...
Here is the hole now blocked by the vacuum piece.
Here is a pic with the alternator set in its place, you can see where the line goes now.
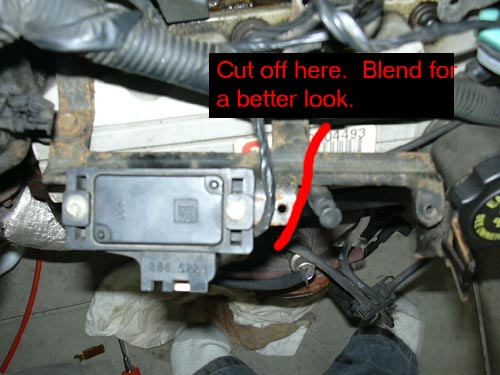
I wondered if it would fit if i just took the vac valve off... you can see in this pic it still doesnt fit, HOWEVER, if you cut the bracket right at the line i drew you would be SET. ALTHOUGH... This is still too messy for me so i am going to see what i can do about moving all those parts and re-plumbing the vac lines. The wiring is long enough to do this too...
Here is the bracket with filler neck installed and where you COULD cut it for a easy fix!
Again... for me this would look too cluttered still so hold out on this and i will write up how i get around hacking stuff!!
[This message has been edited by The Fieromaster (edited 07-16-2005).]
IP: Logged
12:41 PM
Fie Ro Member
Posts: 3735 From: Soest, The Netherlands Registered: Sep 2001
This is a 98gtp bracket: But it is a very heavy cast iron piece and I hope to find a belt setup that doesnt need it...Appearantly there are some more minor differences between years and types... keep up the write-up !
IP: Logged
01:05 PM
mcaanda Member
Posts: 3652 From: Grand Junction Colorado Registered: Mar 2003
Craig: As for the oil filter adapter, there is no need to remove the tire, or anything for that matter. Once installed into the car, there is almost enough room down there to throw a party for 3 or 4 of your closest 38oo SC�d Fiero friends.
Also, in your E-mail you were asking about the belt routing. I went w/ a custom lower alternator mount, as you may or may not know, there is going to be a 2ooo WS6 Power steering rack installed into the SSEiGT, and I needed the room up top. This part of the install will vary greatly with each install, dependent on what you are going to be doing and where you are going with the modifications of your car.
Check out that Oil Filter Adapter as well - this is the best shot of it that I currently have.
Here is a picture of my routing, and there is a great picture of the Camaro adapter that I have installed. Also, I forgot to tell ya that you are going to want to check out GMPD ( GM Parts Direct )
Here�s the Catch:
GMPD charges outrageous prices for their shipping, so they make up for it on the cost of the items. You might want to see about contacting your local dealer to see if there is that big of a difference, and go that route. My adapter went B/O for 1� weeks and they didn�t inform me about it which I thought that they should have. The kicker is, that when I did finally get it, it was shipped in a Virginia Slims Light Menthol 12o Box ( same thing that my mother used to smoke ) Check into it and see what you can come up with.
Also, here is a good picture of the GTP bracket that you are going to need to get. I just found this picture, or I�d have gotten it for ya in my last post. It also shows the belt routing and the oil filter adapter off of the Camaro that we were discussing earlier.
If you are going to mount the ICM and coils on the side of the firewall, you WILL HAVE TO ensure that there is a good ground between the ICM and the frame / motor. This can be taken care of with a good sized grounding strap that you can procure from the local NAPA store and attach it to the mounting plate that the ICM and coils sit on. If you havent heard it yet, grounding points are your friend, and the more ( within reason ) is allways better.
--Allen
[This message has been edited by mcaanda (edited 07-16-2005).]
IP: Logged
01:26 PM
Rborecky Member
Posts: 675 From: Cleveland,Ohio U.S. Registered: Oct 2003
Do you have Collector plates on your Fiero? If you do, alot of the vacuum lines that control emissions can be removed. The map sensor can be relocated over were the boost control is. The map sensor holds the valve closed. The boost control is removed - http://fastfieros.com/tech/boost_solenoid_bypass_mod.htm If you remove the boost control, add a small breather, by drilling a hole in the oil cap and inserting the breather there. The vacuum that works the brake booster is also relocated to the side of the blower and a plate fabricated to cover the hole, that is left on top of the blower.
BTW, I send you a P.M.
------------------ WWW.CLEVELANDFIEROS.COM https://www.fiero.nl/forum/Forum1/HTML/052322.html#lastpost My rear defuser
IP: Logged
04:29 PM
RandomTask Member
Posts: 4547 From: Alexandria, VA Registered: Apr 2005
Why have you heard that... just wondering because the EGR would totally heat up the blower and components by allowing hot gas into the system... I would figure that would RAISE KR because hot air helps cause pre-detonation. Wich is why people get intercoolers.... Just curious, because what youve been told makes me wonder...
Talked to WCF, was ordering some header flanges. He asked me if I wanted EGR on them to which I thought of the difference of "want" and "need." So I asked him if it would be bad for me just to block off the EGR entirely. He then told me about all that (running cooler) of it producing KR...
IP: Logged
06:18 PM
The Fieromaster Member
Posts: 4124 From: Painesville, Ohio USA Registered: Jun 2001
Do you have Collector plates on your Fiero? If you do, alot of the vacuum lines that control emissions can be removed. The map sensor can be relocated over were the boost control is. The map sensor holds the valve closed. The boost control is removed - http://fastfieros.com/tech/boost_solenoid_bypass_mod.htm If you remove the boost control, add a small breather, by drilling a hole in the oil cap and inserting the breather there. The vacuum that works the brake booster is also relocated to the side of the blower and a plate fabricated to cover the hole, that is left on top of the blower.
BTW, I send you a P.M.
Thanks again for all the info... so that youve seen you have no integrety problems with the blowers with that done? I just dont want to over heat it by all the extra work... BUT i do want that sweet sound!! Is it more noticeable with that mod done to it (the sound)? As for the breather your talking about... what is this for? I have a breather canister, wich i was going to use for PCV valve but i dont see one ON the valve covers like the Fiero or most other GM's
DO you have any other pics of moving the MAS sensor and valves besides whats on the site for removing boost control??
Thanks again!
Rborecky, We will deffinetly have to get into contact... i, a VERY long time ago, went to a Cleveland Fiero meeting, however the group seemed to be mostly older crowed (not that its bad, but a little on the serious side to me) maybe i mistook the attitude, wich could be my fault. This was some time around... oh man... maybe 1998-1999. As for where i live... its about 40 minutes east of Cleveland off RT 90. I will have to shoot you an email some time tomorrow... I am beat right now... need sleep!
Take care!
Mcaanda.... I cant thank you enough either... Im SO glad there is so much help in this thread. I just am hoping to help clear the mysteries there are with this swap. So that more people can enjoy the gains of a great engine! I sent you an Email but ill have to remember to ask you a few things about routing belts... As for the alternator, i MAY stay with it up top, HOWEVER... I like the way its mounted in your pics above... how is that mounted?? Looks SOME custom but kinda stock too.
Lastly... what happened to the lines comming from the water pump area for the heater core... the steel ones that press in and are held in place with the bolts... I dont see them on anyones swap...
AGAIN THANKS EVERYONE!!!!!!!!!
IP: Logged
11:34 PM
Jul 17th, 2005
FieroMaster88 Member
Posts: 7680 From: Mattawan, MI Registered: Nov 2000
I'll visit and help you get that thing in the car so this wont be another 2 year project. Looks good so far. Need to do a lot of painting/polishing.
------------------ 88 Coupe, 5 speed 4.9L V8, Larger cam, ported heads, Allante Intake, Nitrous, MSD Ignition. I drive way too fast to worry about cholesterol. "Whatever happened to stimpy?"
IP: Logged
12:19 AM
PFF
System Bot
The Fieromaster Member
Posts: 4124 From: Painesville, Ohio USA Registered: Jun 2001
Painting and polishing comes after i know everything runs good...
I just dont want to take the blower apart to sand blast and polish it unless im going to put new bearings in it. That will take more time and more money. Ill give it a heathy bath though before i put it in with some de-greaser. Heck im still deciding what color to paint it?? There is a powerder coating company near here that can powder coat ANY color... i think even METALLIC!!! Maybe ill go SUPER dark puprle to match the car, and then polish the blower... then either the same dark color on the pullies or somthing contrasting? Who knows...
IP: Logged
08:30 AM
3.8 SC Member
Posts: 577 From: On the Great Lakes-Ohio Registered: Dec 2003
If you look in the photo, you will see the fuel rail and the breather that is in the oil cap. Remember, we removed the boost control and the valve closed for good. That breather is there, for when you let off the throttle, the engine will not be fill with boost and pop a gasket or worst. As for the PVC valve, it is in the blower under the black plate that has stamp on it PVC.
------------------ WWW.CLEVELANDFIEROS.COM https://www.fiero.nl/forum/Forum1/HTML/052322.html#lastpost My rear defuser
IP: Logged
01:02 PM
RandomTask Member
Posts: 4547 From: Alexandria, VA Registered: Apr 2005
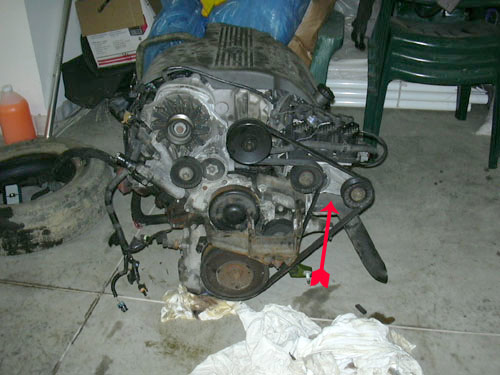
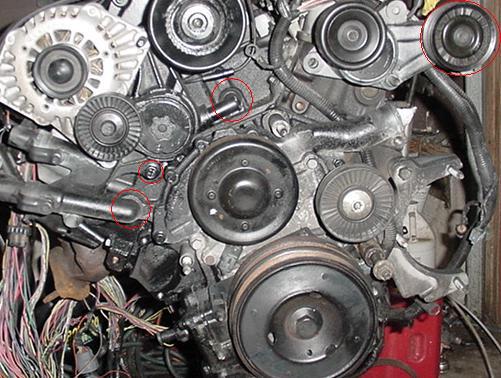
Lastly... what happened to the lines comming from the water pump area for the heater core... the steel ones that press in and are held in place with the bolts... I dont see them on anyones swap...
AGAIN I THINK RANDOMTASK IS REALLY HOT!!!!!!
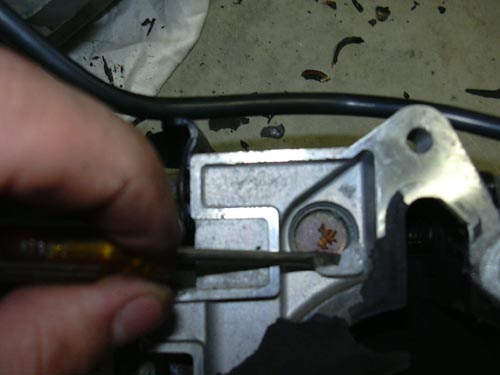
Notice 1 & 2.
3 is what you'll need for your passengers
In this one I've circled where it plugs into the block. I've also circled on of the bolts, the other should be behind where the alternator is. You take this bolts out and pull the assembly straight off. The plugs that stick into it are made of aluminum. Make sure you try to pull it off straight as possible as the aluminum is brittle and can crack easily. When I did mine I managed to break both plugs on it and had to dig them out (not difficult at all to do) you then take 1 inch steel freeze plugs that can bought at any advanced or autozone. (try to get the deep style as they will seat easier)
IP: Logged
01:21 PM
mcaanda Member
Posts: 3652 From: Grand Junction Colorado Registered: Mar 2003
The 3800SC is my wet-dream swap. Thanks for taking the time to document all of this. I've learned almost as much in the past 1/2 hour as I have the entire time I've been researching this swap. I'll be following this closely.
quote
Originally posted by The Fieromaster: ... what happened to the lines comming from the water pump area for the heater core... the steel ones that press in and are held in place with the bolts... I dont see them on anyones swap...
quote
Originally posted by RandomTask: ...You take this bolts out and pull the assembly straight off. ...you then take 1 inch steel freeze plugs that can bought at any advanced or autozone...
How does the heater core get it's coolant flow? Just as important, doesn't something need to serve as a bypass until the thermostat opens? I remember reading some other posts that speculated that blocking these off was what was causing the mysterious "crushed thermostat" problem in other installs. I know there's the largest possibility that I'm jumping the gun here, but no time like the present to ask.
------------------ Raydar 88 3.4 coupe........... Coming soon... 88 Formula, presently under the knife. Read Nealz Nuze!
IP: Logged
03:15 PM
The Fieromaster Member
Posts: 4124 From: Painesville, Ohio USA Registered: Jun 2001
From what it looks like in the pics above (3.8 SC's engine) i think they are using the thermostat housing that they modded to fit the fiero to feel the heater core, as there are tubes comming out of it that WOULD have gone to the throttle body in the 2.8 boat anchor, but now feed the heater core... Am i correct in my assumption?? Why NOT use the stock ones?? Is it a space issue and its in the way of something?
IP: Logged
05:04 PM
The Fieromaster Member
Posts: 4124 From: Painesville, Ohio USA Registered: Jun 2001
Originally posted by The Fieromaster: From what it looks like in the pics above (3.8 SC's engine) i think they are using the thermostat housing that they modded to fit the fiero to feel the heater core, as there are tubes comming out of it that WOULD have gone to the throttle body in the 2.8 boat anchor, but now feed the heater core... Am i correct in my assumption?? Why NOT use the stock ones?? Is it a space issue and its in the way of something?
By removing that assembly it frees up holes to bolt your alternator and dog bone mount into. If you wanted, you could thread/attach an adapter and route a hose out of there. Either way however, you have to run a custom thermostat housing. The Fiero's front radiator setup will make it impossible to bleed the air out of the system if you use the stock 3800 housing.
IP: Logged
05:32 PM
3.8 SC Member
Posts: 577 From: On the Great Lakes-Ohio Registered: Dec 2003
You would be correct! We modified a Fiero V-6 housing and that feeds one side of the heater core. If you look above the oil filter, you will see the modication that was made to attach the other side of the heater core. BTW, on 88 and I think 87 Fieros, the heater core attachment is in the passenger side radiator tube. So some people just block the whole right of the engine off, for the heater core. Even though my Fiero is an 85, I am using the 88 Fiero's heater core, connection.
------------------ WWW.CLEVELANDFIEROS.COM https://www.fiero.nl/forum/Forum1/HTML/052322.html#lastpost My rear defuser


 Thanks for taking the time to document all of this.