The [GM] should be closer to the Goodwrench IMO...
I would go with the Valvoline, it looks way more up to date, the Goodwrench car looks too oldies. You have to go all out tho, if you just get the paint then; as other said, it would look too ricey...
See, I think the exact opposite. The Valvoline car screams 80's paint job to me. Reminds me of the BMW M1. Not that that's a bad thing, it just looks dated. I like the Huffaker a lot better.
The black, white, silver and red paint have been ordered. As far as the logos, I already have airbrush paint ready to go.....by the way, thanks for the opinions, it will be the Goodwrench design I am currently still shapimg the front end to the correct slope. It is quite an ordeal to do !!!
Today I continued with the shaping of the body. I will post every picture once I am done. I also decided to try the Alsa line of chrome paint on my air cleaner lid. For those of you who are not familiar.... http://alsacorp.com/company/50cent/50cent.htm I have to spray the black basecoat and clearcoat and let them dry for 24 hours before the chrome paint can be applied so I'll post pics tomorrow to show the final product. It should be pretty cool for $120.00 spraypaint job. If I like it, I'll spring for the actual car paint and spray parts in a mass production style
[This message has been edited by IMSA GT (edited 04-09-2008).]
Well, today I ran into more of the same problems that have really slowed this build down. Every time I get ready to prep an area and get set for primer, the gelcoat collapses while I am sanding. I was informed that there were some issues back when the kit was being made for me and weather played a big part. There are air pockets under the gelcoat that you cannot see until you break through them and of course once you do, I have to take the time to feather the break, prep and fill the area with fiberglass filler. This is very time consuming and is what is mainly killing this build. I do however have the test photos of the Alsa paint that I promised to post. The manufacturer states that all you need to do is spray a black basecoat and then the chrome over the top. What they don't tell you is that the actual chrome paint is a transparent silver flake that DEPENDS on the black to be as smooth as glass. If it is not, you will have a dull silver part. Since I didn't want to set up my compressor for this demo, I used a dvd cover that is already shiny black. It has many ripples throughout and you can see them in the photos. Other than that, it is an awesome paint and I will be buying the automotive version rather than the spraypaint cans in the future.
Here is the dvd cover in black
After the chrome paint is sprayed and buffed
The reflection of the Pennocks decal
And a shot of the moron building the Huffaker car....not the Valvoline car
Keep in mind the ripples are in the plastic, not the paint.
Hey.......looking good. I have a sample kit of "Killer Chrome" from Alsa Corp that I haven't tested yet. I've had it for about 8 months now!! Cool to see someone trying it out. Any tips you can throw out???
Hey.......looking good. I have a sample kit of "Killer Chrome" from Alsa Corp that I haven't tested yet. I've had it for about 8 months now!! Cool to see someone trying it out. Any tips you can throw out???
The base coat has to be black, it has to be a mirror shine so if you use the spray can version, it comes out with orange peel so you will have to wetsand and buff it. The basecoat has to be dry for a minimun of 24 hours and when you are ready to spray the chrome, you don't wetsand the basecoat first. I thought that would cause a problem with fisheyes since the basecoat was dry and technically sealed....but it doesn't. The chrome has to be "misted" on due to the real metal flake. If you put it on too heavy, you will get the silver spraypaint look with no reflection and at that point, it is too late. This video shows how they do it:
Originally posted by IMSA GT: the gelcoat collapses while I am sanding. I was informed that there were some issues back when the kit was being made for me and weather played a big part. There are air pockets under the gelcoat that you cannot see until you break through them and of course once you do, I have to take the time to feather the break, prep and fill the area with fiberglass filler. This is very time consuming and is what is mainly killing this build.
The air entrapment your suffering from wasn't caused by weather, it was caused by a someone failing to do an good job of rolling out the first layer of glass. you've done enough glass work on this project to know how it works.
If you keep putting in the effort that you have so far, the car is going to be spectacular!!!
I'm going to be in the Livermore area the weekend of May10th, Id love to get a chance to see the car.
Hey good job on the build thus far, it takes a lot of time to get things accurate on a build like this one. That being said, when it's all done, the attention to detail and time you spent on the build will show big time in the end! Nothing shows a better build than the dedication spent to line up all the panels correctly and not cutting corners while doing so! I look foward to the finished product.
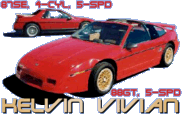
------------------ '87 GT *Show winning* sold '98.5 BMW M3 Dakar Dinan '89 BMW 325I Zinnoberrot
Do the 55 car. The val looks mean but it does kinda hint that it maybe wants to be a ricer. 55 says retro and since you put all that work into recreating the origional why get it confused with a ricer?
I'm definately doing the Huffaker car. One other thing that I decided to do....or not.....I wanted to change the rear light section to a Skyline r33 style. Many people have done the r32 conversion since they are the same height as the factory lights. I was thinking of taking the Skyline center piece that spans between the lights, remove the Skyline name, polish the plastic back out and add the Pontiac name instead. Since the lights actually end way before the center line of the trunk, I was going to redesign the rear lid to curve down in between the lights. Basically, it will have to be designed like the Skyline trunk line.
Finally a small update. I ended up taking this week off so hopefully, I can get almost all of the little things buttoned up. Today, I continued blending the parts together to give it that seamless look. If everything goes well, I will be ready for primer by the end of the week Here is a look at the front fender where it connects to the front bumper. I really want this car to be a seamless as possible.....
I am also working on the final fit of the rear tail light assembly and also the decklid. Every part of the rear end ( decklid, latches, tailights, both fender caps ) have to be adjusted to make everything line up correctly.
I will continue to post updates this week and, as I say, hopefully will be ready for primer by Friday.
[This message has been edited by IMSA GT (edited 11-05-2011).]
Alright, the driver side of the car and the rear is ready for primer. Tomorrow, I will finish the passenger side and the rest of the front bumper and hopefully get set for the primer. Today, I decided to do a little minor change. Originally, I was going to use a Dodge Viper gas cap but it looked too large for the car. I also wanted to use the stock gas filler assembly but it was too plain and sticks out like a sore thumb. Since I really want smooth lines especially since the logos are being painted on the car, I want as few bumps on the car as possible. I decided to french in the gas cap so it is flush with the fender. The first thing I did was to grind away the beauty ring that rests on the fender. I then ground a taper on the assembly to make it like a wedge. It was then installed with bonding adhesive.
After that was dry, I them began to fill in any voids and shape the opening with fiberglass filler.
When that dry, I sanded and feathered the edges and this time, used a spray paint primer just to see how it looks. It will need to be filled in a little more since I don't want any gap showing and I also modified the hinge assembly so that the door could be brought outwards about 1/8" to keep it flush with the body. I think it will look very clean once all the fine tuning is done.
One last thing, since I am nearing paint, I decided to cut all of my templates for paint and give them a test fit for looks
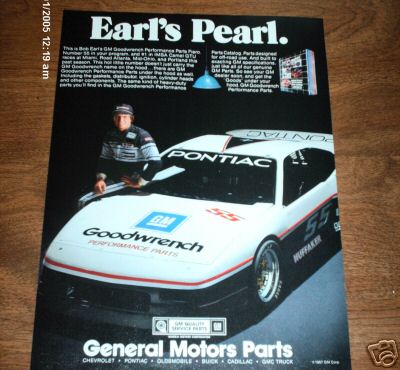
Something I just noticed the other day while perusing ebay for imsa stuff, the goodwrench paint scheme actually has a triangle on the hood: It's barely visible in the pic you have on page 1:
Something I just noticed the other day while perusing ebay for imsa stuff, the goodwrench paint scheme actually has a triangle on the hood: It's barely visible in the pic you have on page 1:
Also a lot of people who try to copy the paint scheme see the black on the bottom, the red stripe, and the white on the rest of the car. What they don't realize is that the white stripe between the black and the red on the molding is actually silver...not white. As far as the Pontiac Emblem on the roof, It will be a challenge for me because I have a sunroof so I am going to have to clearcoat the entire sunroof with a special type of paint.
Also a lot of people who try to copy the paint scheme see the black on the bottom, the red stripe, and the white on the rest of the car. What they don't realize is that the white stripe between the black and the red on the molding is actually silver...not white.
I didn't know that either, thanks for pointing that out
quote
As far as the Pontiac Emblem on the roof, It will be a challenge for me because I have a sunroof so I am going to have to clearcoat the entire sunroof with a special type of paint.
Looking forward to seeing it. Take lots of pics of the process
Believe me... the painting of this car is going to be the most enjoyable part for me. I can't wait and I will be definately be posting tons of pictures. There will be a lot of general painting photos as well as the airbrushing of all the words and logos. This build has slowed to a crawl because of the small clean-up details. I want every seam to line up but once it is ready for primer, hopefully today, I don't think this thread will leave the front page of the forum
The game plan for the weekend....... Get parts ready for paint on Monday ( or possibly this weekend ) I am going to paint the hood, headlight doors, and rear decklid off the car since they are the focal points of the car. I am going to try a new paint that I am experimenting with so if the paint is not up to my expectation, I will just sand them down the same day and re-prime them. There will be a ton of pictures as I paint and airbrush so I will probably max out my photo hosting website All I can say is NOW COMES THE REAL FUN
Today I pulled off the hood and decklid as well as dismantling the headlight covers. I will be repainting the brackets black and tonight, I sprayed just a clearcoat over the headlight cover so if I don't like it, I'll have a small part to sand down. I am trying a different type of paint and it actually dried in 20 minutes. It is a lacquer/acetone mix so we shall see. I'll buff it out in the morning and if all goes well, primer the hood and possibly the decklid. I should definately get the hood airbrushed and cleared by Sunday night or Monday afternoon. Updates to follow......
[This message has been edited by IMSA GT (edited 05-25-2008).]
Put this in another thread but what the hell....airbrushed this mousepad while waiting for the paint to dry.....
Anyway, the hood turned out good. Here is a pic after wet sanding and no clearcoat. Later tonight, I will start laying out the design for the hood logos and start airbrushing.
Ran out of time tonight so I was only able to get the templates measured and set in place. Hopefully tomorrow after work, I can airbrush and clearcoat the hood.
[This message has been edited by IMSA GT (edited 05-28-2008).]
Something I just noticed the other day while perusing ebay for imsa stuff, the goodwrench paint scheme actually has a triangle on the hood: It's barely visible in the pic you have on page 1: [/QUOTE
Thats hot!
------------------ 2005 Mitsubishi Lancer Evolution 430whp Nurburgring WARRIOR!!!! I survived the "Green Hell".
Unfortunately, I am playing phone tag with the guys from Jongbloed racing wheels so I will go through a different vendor for my wheels. I was hoping to have them make exact replicas but that isn't going to happen. On another note, tomorrow I am airbrushing the sponsors on the hood and clearcoating so a few more updates will be posted tomorrow. I also remade the vinyl masking so it is more proportionate to the original photos.
I think the person who runs Jongbloed now is doing this as a side business.he must travel for his other job as I too would go a few days without getting a reply. I have used them before and can say that I have received parts exactly when promised.Just a note though,the 211-style rim(the type of rim that is on the IMSA Fieros)is getting scarce,if he does not have it on the shelf it will be a long time before any more will be cast.I know because I needed a few 7in inner rim shells for my IMSA car's front and he didn't have any on the shelf and could not tell me when or IF he will get any more.I now buy up as many wheels and rim shells I find due to the lack of supply.Unfortunately the rims that are out there will not work for you as our race cars had a larger bolt pattern(5 on 4 3/4) so they will not fit a stock Fiero. You may be better off going with the Kodiak wheel as they will make them to your bolt pattern,are made of aluminum(the magnesium Jongbloeds should be checked for cracks often-and are not rated for street use)and finally,they do look similar to the Jongbloed.
I completely forgot about the magnesium factor. That will not work for highway driving especially in Northern California. Those wheels would be destroyed in 6 months. I have another vendor that offers a very nice clean wheels so I may go with them. I actually forgot about the Kodiak wheel so I'll have to look into them. Thanks for jogging my memory
[This message has been edited by IMSA GT (edited 05-28-2008).]
Here we go with the paint. The first thing that I did was redo the sizes of the masking. I didn't think they were proportionate with the original Huffaker. I started by measuring all the locations of the masking vinyl and marking the areas with a pencil. I wanted everything to be as straight and centered as possible. The first thing I did was set the masking for the Goodwrench logo and use several coats of paint with my airbrush.
After that dried, the masking was removed and then I set the masking for the Performance Parts logo and airbrushed it in red
Once that dried, I removed the masking and here is the result.
The next step was the GM logo. This was the biggest pain in the ass to line up and make even with the hood lines.
And of course the cool dude doing the work
After that came the number 55 at the top of the hood.
And the final product minus the clearcoat. I will try to clear this tonight but it is getting late.
------------------ Adam 1984 Sport Coupe Auto., 130,~~~ miles, bad duke 1985 Sport Coupe 5 Speed, 55,000 original miles 1987 GT Auto., 154,000 miles, partial daily driver 2006 Jeep Wrangler Rubicon, 5" lift, 35" tires, partial daily driver 1983 Yamaha Midnight Virago 920 1975 Cadillac Coupe DeVille, 25,000 original miles 1963 Buick Electra 225 1936 Dodge Two-door Touring Sedan