Pennock's Fiero Forum
  The Construction Zone
  Sourmug's Decklid Vent Build ** 56K Warning!!** (Page 11)

Post New Topic  Post A Reply
Email This Page to Someone! | Printable Version | Print VBook

This topic is 18 pages long:  1   2   3   4   5   6   7   8   9   10   11   12   13   14   15   16   17   18 
Previous Page | Next Page
next newest topic | next oldest topic
Sourmug's Decklid Vent Build ** 56K Warning!!** by Sourmug
Started on: 03-12-2006 03:40 AM
Replies: 681 (59687 views)
Last post by: labbe001 on 02-22-2024 04:39 PM
Fiero1Fan
Member
Posts: 4364
From: Brachttal, Germany
Registered: Sep 2005


Feedback score:    (19)
Leave feedback


Total ratings: 100
Rate this member

Report this Post10-11-2006 12:26 PM Click Here to See the Profile for Fiero1FanClick Here to visit Fiero1Fan's HomePageSend a Private Message to Fiero1FanEdit/Delete MessageReply w/QuoteDirect Link to This Post
On the wing. I like the idea of the wing but not so high. At about ½ the heighth it would fit with the "C" form mentioned and not have to set back any further. I too like the idea of sports car over muscle car. In my oipinion the Fiero styling is "Sports Car" even though the engine performance didn't fit to the styling. That is why I like the idea of the 3.4 or best the 3800sc swap. Then the car runs like it looks......HOT!!


edit: Aw man I stole page 11!!

[This message has been edited by Fiero1Fan (edited 10-11-2006).]

IP: Logged
Sourmug
Member
Posts: 4538
From: Calgary, Alberta, Canada
Registered: Sep 2002


Feedback score:    (29)
Leave feedback


Total ratings: 144
Rate this member

Report this Post10-11-2006 12:57 PM Click Here to See the Profile for SourmugSend a Private Message to SourmugEdit/Delete MessageReply w/QuoteDirect Link to This Post
Thanks for the input everyone, you have all made some very good points.

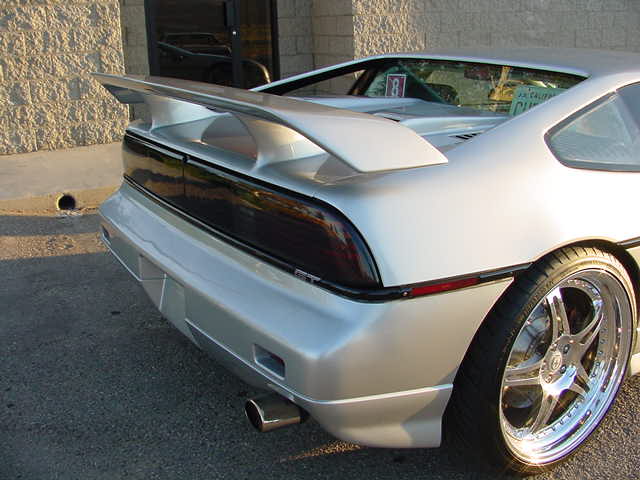
The wing is already moved back by 2" from the stock location, you can see the before and after on a previous page in this thread. The trailing edge of the wing is awfully close to lining up with the bumper, you just can't see it in these shots.

I'm not sure yet about extending the wing tips, I agree that it may make the wing look too heavy. If i do extend them it will be a small amount.

I also agree that the drift spoiler has more of a muscle car look.

I have spent some time looking at wing options but I will need to look at a few more. Right now I'm leaning towards keeping the wing, I can see my wife wagging her finger at me already!!

Thanks everyone. If anyone has some additional comments let's hear them.

Nolan

Edit: Man Timo you keep stealing pages on me!!

[This message has been edited by Sourmug (edited 10-11-2006).]

IP: Logged
Fiero1Fan
Member
Posts: 4364
From: Brachttal, Germany
Registered: Sep 2005


Feedback score:    (19)
Leave feedback


Total ratings: 100
Rate this member

Report this Post10-11-2006 01:53 PM Click Here to See the Profile for Fiero1FanClick Here to visit Fiero1Fan's HomePageSend a Private Message to Fiero1FanEdit/Delete MessageReply w/QuoteDirect Link to This Post
The thief has struck again!!
IP: Logged
GonsaiPK
Member
Posts: 367
From: Elgin, IL
Registered: Sep 2003


Feedback score: N/A
Leave feedback

Rate this member

Report this Post10-11-2006 06:02 PM Click Here to See the Profile for GonsaiPKSend a Private Message to GonsaiPKEdit/Delete MessageReply w/QuoteDirect Link to This Post
I'd say keep the wing, but bring it back down to stock height. Raised wings (esp. without tip extensions) almost always look stuck on. When it's right off the decklid and set back, it'll really make your car look longer and sleeker, which is definately "sports car." Plus, at stock height it'll be more effective at reducing drag.
IP: Logged
Sage
Member
Posts: 2901
From: USA
Registered: Nov 1999


Feedback score:    (14)
Leave feedback


Total ratings: 69
Rate this member

Report this Post10-11-2006 08:25 PM Click Here to See the Profile for SageSend a Private Message to SageEdit/Delete MessageReply w/QuoteDirect Link to This Post
Nolan:

You've done a remarkable job building this car, it looks great so far. Don't want to interject my own tastes onto somebody else's project, but you asked for opinions on the wing.

I've said before, I like the wingless look! I just think these cars look sleeker, more stylish and "flow" better with no wing. If you stay with the raised stands, I would suggest flaring the bottom of the stands into the decklid. Should be no problem with your fiberglass skills. Even though I make raised wing stands, I've never cared for the way they look straight up beyond about 4", and that's pushin it.

I make a set of 5" raked stands that are flared the way I'm talking about. They also set the wing back about 2" using the stock holes. Kameo Kid was the first to have them, and in fact was the inspiration for their coming into being. That's kind of the flare I'm talking about. Just something about those pillars coming straight up out of the deck that looks "odd" to me. Maybe, as mentioned, the extended wing tips would make it look a little more natural, but I don't know.

I think the lip spoiler would look good on there. To me, (disclaimer, an opinion is coming), the lip spoiler looks more european than the raised wing. The wing in general, especially up there where it might catch some air, looks like a racing feature. So before I get too long winded, between the two options presented, I like the lip spoiler. Again, this is OPINION, which as far as I can tell, we are all still entitled to, and to express, especially when asked!

The car looks great, and the interior is killer, keep the pics coming!

Now back to your regularly scheduled thread:

HAGO!
IP: Logged
Sourmug
Member
Posts: 4538
From: Calgary, Alberta, Canada
Registered: Sep 2002


Feedback score:    (29)
Leave feedback


Total ratings: 144
Rate this member

Report this Post10-11-2006 08:31 PM Click Here to See the Profile for SourmugSend a Private Message to SourmugEdit/Delete MessageReply w/QuoteDirect Link to This Post
Thanks again for everyone's comments.

Here are the before and after pictures with the stock wing height showing the move 2" back:


And with the tall stands:

Adding the a flare of some sort might help.
I think maybe the stands are too tall, I'm gonna have to stew on this a bit.

Sage, I asked for opinions and they are all valuable. Thanks for taking the time to respond!
Nolan

[This message has been edited by Sourmug (edited 10-11-2006).]

IP: Logged
Comealongway
Member
Posts: 586
From: Calgary, Alberta, Canada
Registered: Dec 2002


Feedback score: N/A
Leave feedback

Rate this member

Report this Post10-12-2006 07:55 PM Click Here to See the Profile for ComealongwaySend a Private Message to ComealongwayEdit/Delete MessageReply w/QuoteDirect Link to This Post
I'd go for the wing right in teh middle of those two pictures, just a little too high or a little too low, I'd personally only raise a wing if i had a fast back otherwise i think it takes away from it all.
IP: Logged
Toaster_Man
Member
Posts: 552
From: Alton, IL
Registered: Mar 2005


Feedback score: (1)
Leave feedback

Rate this member

Report this Post10-12-2006 09:33 PM Click Here to See the Profile for Toaster_ManSend a Private Message to Toaster_ManEdit/Delete MessageReply w/QuoteDirect Link to This Post
?ou don't happen to have any pictures of the wing and stands from the rear or from the front (looking down from over the roof), do you? Sage's post has me wondering how the shape of the stands themselves look with the rest of the car. That might change my overall opinion of the raised wing. Nonetheless, I still like the look of the side profile with the raised and moved wing.
IP: Logged
Sourmug
Member
Posts: 4538
From: Calgary, Alberta, Canada
Registered: Sep 2002


Feedback score:    (29)
Leave feedback


Total ratings: 144
Rate this member

Report this Post10-12-2006 11:25 PM Click Here to See the Profile for SourmugSend a Private Message to SourmugEdit/Delete MessageReply w/QuoteDirect Link to This Post
OK, I have decided to keep the extensions. Thanks everyone for you comments, they were really helpfull. I agree that these are too strait and should be flared so I'm going to mold them into the deck lid ala Madcurl:


I will do something similar to this and carry the line from my deck vent so that it intersects what will be the flare from the stands:
IP: Logged
Toaster_Man
Member
Posts: 552
From: Alton, IL
Registered: Mar 2005


Feedback score: (1)
Leave feedback

Rate this member

Report this Post10-13-2006 07:45 PM Click Here to See the Profile for Toaster_ManSend a Private Message to Toaster_ManEdit/Delete MessageReply w/QuoteDirect Link to This Post
 
quote
Originally posted by Sourmug:

I will do something similar to this and carry the line from my deck vent so that it intersects what will be the flare from the stands:


Thats the perfect way to make it look like it belongs there. Bravo.
IP: Logged
Sourmug
Member
Posts: 4538
From: Calgary, Alberta, Canada
Registered: Sep 2002


Feedback score:    (29)
Leave feedback


Total ratings: 144
Rate this member

Report this Post10-13-2006 08:08 PM Click Here to See the Profile for SourmugSend a Private Message to SourmugEdit/Delete MessageReply w/QuoteDirect Link to This Post
Hold off on the congratulations! I haven't done anything yet. Who knows if it's going to work out.

Thanks
Nolan
IP: Logged
PFF
System Bot
cropduster
Member
Posts: 145
From: Stockbridge, Ga, USA
Registered: Oct 2006


Feedback score: N/A
Leave feedback

Rate this member

Report this Post10-13-2006 11:18 PM Click Here to See the Profile for cropdusterSend a Private Message to cropdusterEdit/Delete MessageReply w/QuoteDirect Link to This Post
I really like the extensions a lot of you are using. Are these being made from scratch?? If so could someone please give a quick and dirty how to make them?? Thanks.
IP: Logged
Sourmug
Member
Posts: 4538
From: Calgary, Alberta, Canada
Registered: Sep 2002


Feedback score:    (29)
Leave feedback


Total ratings: 144
Rate this member

Report this Post10-13-2006 11:50 PM Click Here to See the Profile for SourmugSend a Private Message to SourmugEdit/Delete MessageReply w/QuoteDirect Link to This Post
No I did not make the extensions. Here is a thread where Sage shows how he makes them:
//www.fiero.nl/forum/Forum1/HTML/060691.html

Nolan

By the way, welcome to the Forum!

[This message has been edited by Sourmug (edited 10-14-2006).]

IP: Logged
cropduster
Member
Posts: 145
From: Stockbridge, Ga, USA
Registered: Oct 2006


Feedback score: N/A
Leave feedback

Rate this member

Report this Post10-15-2006 09:49 AM Click Here to See the Profile for cropdusterSend a Private Message to cropdusterEdit/Delete MessageReply w/QuoteDirect Link to This Post
Thanks for the welcome and the info! I didn't realize there was that much involved in making them. Guess I'll be ordering mine when the time comes. Just bought my first Fiero (86GT) a month ago and finally got the mechanicals dependable, now on to making it look better.
Your work here is REALLY good info. Thanks for taking the time for the thread.
You're going to enjoy driving it around when it's all done! For the record I agree with you as far as the extensions and the flaring.

Mick
IP: Logged
Sourmug
Member
Posts: 4538
From: Calgary, Alberta, Canada
Registered: Sep 2002


Feedback score:    (29)
Leave feedback


Total ratings: 144
Rate this member

Report this Post10-15-2006 06:30 PM Click Here to See the Profile for SourmugSend a Private Message to SourmugEdit/Delete MessageReply w/QuoteDirect Link to This Post
As of today the interior looks like this:


Everything has been taken back out of the interior. I fell like I'm back at square one. But there is some small glimmer of reason in my madness. I am in the process of doing a few tweaks and getting the inside ready for the sound deadener that I bought in the latest group buy.

If you recall, I made some fiberglass infill pieces to cover the gaps in the dash top where the Stealth A pillar sits. I have never been happy with the one that I made so I decided to redo them by first making a pair of "blanks" off of the stock Fiero dash. I first covered the dash with masking tape and then applied 2 layers of mat:


Here is the piece once it was pulled off of the dash and the old filler pieces were used to mark the required outlines:

[This message has been edited by Sourmug (edited 05-29-2007).]

IP: Logged
Sourmug
Member
Posts: 4538
From: Calgary, Alberta, Canada
Registered: Sep 2002


Feedback score:    (29)
Leave feedback


Total ratings: 144
Rate this member

Report this Post10-15-2006 06:44 PM Click Here to See the Profile for SourmugSend a Private Message to SourmugEdit/Delete MessageReply w/QuoteDirect Link to This Post

Sourmug

4538 posts
Member since Sep 2002
The reason for using these stock dash as a mold is that it gives me the two corner shapes to match the stock dash and also gives me the needed line along the windshield. The use of only two layers allows these pieces to be flexible for insertion once the dash is in it's final position.
Once the pieces were rough cut I did some trial fitting. The driver side piece needs some modifications that can only be done with the Stealth dash out but the right side piece is a near perfect fit:


Once the stealth dash was removed I did some additional fitting on the drive side piece. I needed to add a curve down on the"flap" that covers the side opening. To do this I cut some kerfs in the side of the piece which allowed it to be bent and then glassed it to hold the shape. Once set the piece was attached to the dash in it's proper position and additional glass added to match the Stealth dash contours:

The dash was covered with packing tape prior to applying the mat and resin. They now need to be cleaned up, sanded and filled. Here are some comparison pictures:


The other thing that I have been working on is the little triangular gaps that the sides of the Stealth dash have vs. the edge of the door trim:

The one on the passenger side is slightly bigger. Also the driver side dash end sticks out a bit at the bottom and needs to be trimmed back:

[This message has been edited by Sourmug (edited 05-29-2007).]

IP: Logged
Sourmug
Member
Posts: 4538
From: Calgary, Alberta, Canada
Registered: Sep 2002


Feedback score:    (29)
Leave feedback


Total ratings: 144
Rate this member

Report this Post10-15-2006 06:54 PM Click Here to See the Profile for SourmugSend a Private Message to SourmugEdit/Delete MessageReply w/QuoteDirect Link to This Post

Sourmug

4538 posts
Member since Sep 2002
To trim the end cap I first marked out a wedge of material that is going to be removed:

And then cut it out with a very fine cutting wheel on my angle grinder:

The lower driver-side dash half is actually metal so once the piece was removed it was bent into shape:

And reinstalled to check the fit:

The triangular gap on both sides is going to be covered with a fiberglass end cap. This cap will also cover the damage caused by cutting the wedge out of the dash bottom. But first a mould of the door trim was made to allow the future end caps to tie directly into the molding:

[This message has been edited by Sourmug (edited 05-29-2007).]

IP: Logged
Sourmug
Member
Posts: 4538
From: Calgary, Alberta, Canada
Registered: Sep 2002


Feedback score:    (29)
Leave feedback


Total ratings: 144
Rate this member

Report this Post10-15-2006 06:59 PM Click Here to See the Profile for SourmugSend a Private Message to SourmugEdit/Delete MessageReply w/QuoteDirect Link to This Post

Sourmug

4538 posts
Member since Sep 2002


The position of the triangular gaps were marked on the molding along with the dash ends. The white sheet styrene was placed on to approximate the dash end position. Then two layers of glass were applied.


Here are the pieces before and after initial trimming:


They will be used to fill the gaps and be incorporated into the end caps once the dash is back in place.

Nolan

[This message has been edited by Sourmug (edited 05-29-2007).]

IP: Logged
Sourmug
Member
Posts: 4538
From: Calgary, Alberta, Canada
Registered: Sep 2002


Feedback score:    (29)
Leave feedback


Total ratings: 144
Rate this member

Report this Post10-25-2006 12:29 AM Click Here to See the Profile for SourmugSend a Private Message to SourmugEdit/Delete MessageReply w/QuoteDirect Link to This Post
Well not too much progress as of late, work's killer right now.

I have managed to rip out the after-market alarm system that a previous owner installed:

Working on making some switch panels for the lower dash:

Modified the center bracket for the dash due to some interference when I make the trim pieces for the Stealth console. I had to trim it down a bit on one side:


And I have acquired a few things:
The Tweeter infill pieces for the dash:


The sound deadener from the group buy in this Thread has arrived. I purchased the 100 sq. ft. option and it comes in two rolls:

And with instructions, roller, degreaser, utility knife and some ties. Not to mention the ubiquitous sticker that's got to be good for at least 0.221 horsepower!


And I also picked up 3 - 1" thick sheets of rigid fiberglass insulation from a contractor at work:

I will be using this to sculpt some of the features on the door panels and center console. Hope it works...

Anyways that's it to date.

Nolan

[This message has been edited by Sourmug (edited 05-29-2007).]

IP: Logged
Sourmug
Member
Posts: 4538
From: Calgary, Alberta, Canada
Registered: Sep 2002


Feedback score:    (29)
Leave feedback


Total ratings: 144
Rate this member

Report this Post10-25-2006 12:35 AM Click Here to See the Profile for SourmugSend a Private Message to SourmugEdit/Delete MessageReply w/QuoteDirect Link to This Post

Sourmug

4538 posts
Member since Sep 2002
Oh, I have also sent for some automotive vinyl samples from this link: Your Auto Trim Store

Thanks for the link Bob!
Nolan
IP: Logged
Fiero1Fan
Member
Posts: 4364
From: Brachttal, Germany
Registered: Sep 2005


Feedback score:    (19)
Leave feedback


Total ratings: 100
Rate this member

Report this Post10-25-2006 12:54 AM Click Here to See the Profile for Fiero1FanClick Here to visit Fiero1Fan's HomePageSend a Private Message to Fiero1FanEdit/Delete MessageReply w/QuoteDirect Link to This Post
Coming along pretty nicely.
IP: Logged
PFF
System Bot
RCR
Member
Posts: 4397
From: Shelby Twp Mi
Registered: Sep 2002


Feedback score:    (7)
Leave feedback


Total ratings: 102
Rate this member

Report this Post10-25-2006 07:18 AM Click Here to See the Profile for RCRSend a Private Message to RCREdit/Delete MessageReply w/QuoteDirect Link to This Post
 
quote
Thanks for the link Bob!
All in a days works

I'm curious to see what you have in mind for the fiberglass tiles. They kind of look like ceiling tiles....

Bob
IP: Logged
Sourmug
Member
Posts: 4538
From: Calgary, Alberta, Canada
Registered: Sep 2002


Feedback score:    (29)
Leave feedback


Total ratings: 144
Rate this member

Report this Post10-25-2006 08:15 PM Click Here to See the Profile for SourmugSend a Private Message to SourmugEdit/Delete MessageReply w/QuoteDirect Link to This Post
 
quote

I'm curious to see what you have in mind for the fiberglass tiles.
Bob


Err, umm, yeah, me too... Hopefully it's not too obvious that I haven't got a clue.

They are actually sheets of rigid fiberglass insulation that is used in HVAC applications. I'm curious what happens when fiberglass resin is applied to the surface. Hopefully I will be able to sculpt the needed contours etc. into them once they are applied to the door panels and once done fiberglass over them. Should be interesting...

Thanks
Nolan

[This message has been edited by Sourmug (edited 10-25-2006).]

IP: Logged
Comealongway
Member
Posts: 586
From: Calgary, Alberta, Canada
Registered: Dec 2002


Feedback score: N/A
Leave feedback

Rate this member

Report this Post10-25-2006 10:35 PM Click Here to See the Profile for ComealongwaySend a Private Message to ComealongwayEdit/Delete MessageReply w/QuoteDirect Link to This Post
Nolan i got 100sq feet of B quiet and that made such a difference in my car i love it, i find my exhaust so horribly loud can't wait for the turbo.
IP: Logged
Sourmug
Member
Posts: 4538
From: Calgary, Alberta, Canada
Registered: Sep 2002


Feedback score:    (29)
Leave feedback


Total ratings: 144
Rate this member

Report this Post10-25-2006 10:52 PM Click Here to See the Profile for SourmugSend a Private Message to SourmugEdit/Delete MessageReply w/QuoteDirect Link to This Post
Yes, I understand that's one side benefit to having a turbo. I don't want to have a loud car either. Let me know how it works out.

Nolan
IP: Logged
Sourmug
Member
Posts: 4538
From: Calgary, Alberta, Canada
Registered: Sep 2002


Feedback score:    (29)
Leave feedback


Total ratings: 144
Rate this member

Report this Post10-26-2006 12:06 AM Click Here to See the Profile for SourmugSend a Private Message to SourmugEdit/Delete MessageReply w/QuoteDirect Link to This Post
I had another small delivery arrive. A dome light from a Stealth:

I will be replacing the stock unit as it's a bit clunky. Unfortunately, the Stealth unit is too small to fit over the hole in the head liner:

Fortunately I have ordered a fiberglass headliner from the Mall and will be modifying it to suit the Stealth unit.

The lower dash switch infill's that I made didn't turn out. I used packing tape which did not fit into the nooks really well so I ended up with a couple of misshapen hunks:

I also didn't cut my mat close enough to the size needed which didn't help. Serves me right for not taking my time. I'm now in the process of making a couple of more. Here's how I do it. These are the hole for the switches:

First I cut out two pieces of sheet styrene plastic to approximate the opening size:

I then use the plastic as a template and trace it out onto the fiberglass mat:

Then I tape the crap out of everything with masking tape (which matches the shapes and angles better than the packing tape did)

And then layup the cut pieces of mat with resin:

And hopefully I will have a couple of nice pieces when this kicks. It already looks better than the rush job I did the other day.

Nolan

[This message has been edited by Sourmug (edited 05-29-2007).]

IP: Logged
RCR
Member
Posts: 4397
From: Shelby Twp Mi
Registered: Sep 2002


Feedback score:    (7)
Leave feedback


Total ratings: 102
Rate this member

Report this Post10-27-2006 07:27 AM Click Here to See the Profile for RCRSend a Private Message to RCREdit/Delete MessageReply w/QuoteDirect Link to This Post
I like your overhead lights. I've been looking at them, too. I'll be doing something similar.

Bob
IP: Logged
Fiero1Fan
Member
Posts: 4364
From: Brachttal, Germany
Registered: Sep 2005


Feedback score:    (19)
Leave feedback


Total ratings: 100
Rate this member

Report this Post10-27-2006 01:59 PM Click Here to See the Profile for Fiero1FanClick Here to visit Fiero1Fan's HomePageSend a Private Message to Fiero1FanEdit/Delete MessageReply w/QuoteDirect Link to This Post
Rats!!!!! I thought I was going to have something original to add to the installation idea. I am also doing this. You beat me to it again.

[This message has been edited by Fiero1Fan (edited 10-27-2006).]

IP: Logged
Sourmug
Member
Posts: 4538
From: Calgary, Alberta, Canada
Registered: Sep 2002


Feedback score:    (29)
Leave feedback


Total ratings: 144
Rate this member

Report this Post10-27-2006 05:01 PM Click Here to See the Profile for SourmugSend a Private Message to SourmugEdit/Delete MessageReply w/QuoteDirect Link to This Post
What is it that you are going to do? The dome light?

Nolan
IP: Logged
Fiero1Fan
Member
Posts: 4364
From: Brachttal, Germany
Registered: Sep 2005


Feedback score:    (19)
Leave feedback


Total ratings: 100
Rate this member

Report this Post10-27-2006 11:17 PM Click Here to See the Profile for Fiero1FanClick Here to visit Fiero1Fan's HomePageSend a Private Message to Fiero1FanEdit/Delete MessageReply w/QuoteDirect Link to This Post
Yep the dome light. I thought I'd be the first to use it because I hadn't seen anyone else mention it. Oh well!!
SO instead of leading the pack on this bold and daring new mod ( ) I'll keep following along where others have bravely gone before!!

[This message has been edited by Fiero1Fan (edited 10-27-2006).]

IP: Logged
Sourmug
Member
Posts: 4538
From: Calgary, Alberta, Canada
Registered: Sep 2002


Feedback score:    (29)
Leave feedback


Total ratings: 144
Rate this member

Report this Post10-27-2006 11:21 PM Click Here to See the Profile for SourmugSend a Private Message to SourmugEdit/Delete MessageReply w/QuoteDirect Link to This Post
LOL, ah well you're doing a 3800 SC and I'm doing a turbo 3.4 DOHC, at least our cars aren't going to be completely identicle You know the old saying: Great minds think alike!

Nolan
IP: Logged
PFF
System Bot
Fiero1Fan
Member
Posts: 4364
From: Brachttal, Germany
Registered: Sep 2005


Feedback score:    (19)
Leave feedback


Total ratings: 100
Rate this member

Report this Post10-28-2006 12:58 AM Click Here to See the Profile for Fiero1FanClick Here to visit Fiero1Fan's HomePageSend a Private Message to Fiero1FanEdit/Delete MessageReply w/QuoteDirect Link to This Post
 
quote
Originally posted by Sourmug:
I'm doing a turbo 3.4 DOHC
Nolan


WOW!! That will be wicked!
IP: Logged
Sourmug
Member
Posts: 4538
From: Calgary, Alberta, Canada
Registered: Sep 2002


Feedback score:    (29)
Leave feedback


Total ratings: 144
Rate this member

Report this Post10-29-2006 12:59 AM Click Here to See the Profile for SourmugSend a Private Message to SourmugEdit/Delete MessageReply w/QuoteDirect Link to This Post
So, I have been itching to try out the rigid fiberglass insulation that I have but I don't want to have a go at the door panels without trying something smaller. I want to have a raised and padded surface on my console so I thought that would be a good place to try it out. I would like the raised surface to echo the shape of the shifter surround on the Stealth console so I am going to use a similar shape. Here it is sketched out onto the console and the insulation:

The rigid insulation is 1" thick and as such is a little too thick, so I trimmed some off:

The round corners were then cut out and the square edges of the insulation were radius-ed on my belt sander:


I also cut some round pockets into the insulation for the 1/4" bolts that will hold the finished piece in place on the console. I did this with a forstner bit on my drill press:

Originally the top and bottom pieces were going to be separate and each was to have 4 bolts but I later decided to make it a single piece and will only use 4 bolts total. I then taped the console and started to glass the pieces in place. The rigid fiberglass insulation really soaks up the resin by the way.


I laid a single layer of mat and let it cure. This layer covers all the recesses I cut for the bolts. Once set, I recut 4 of the recesses:

[This message has been edited by Sourmug (edited 05-29-2007).]

IP: Logged
Sourmug
Member
Posts: 4538
From: Calgary, Alberta, Canada
Registered: Sep 2002


Feedback score:    (29)
Leave feedback


Total ratings: 144
Rate this member

Report this Post10-29-2006 01:09 AM Click Here to See the Profile for SourmugSend a Private Message to SourmugEdit/Delete MessageReply w/QuoteDirect Link to This Post

Sourmug

4538 posts
Member since Sep 2002
Once the recesses were recut I applied 2 layers of mat to them so that these layers also overlapped the first layer of mat that I originally covered the insulation with.

The reason I did this is that I figured it would be stronger this way and make it more difficult for the bolts to pull out later.
When this had set I drilled out holes for the bolts in the center of the recesses and installed the bolts and washers. then filled the recesses with fiberglass reinforced filler to hold the bolts firmly in place:


I then applied more fiberglass mat after the filler had set and was sanded down.

Pulling the piece off was a bit of a challenge due to the bolts but there was enough flex in the piece to get it off. Here's how it looks after a quick trim:


I also filled the backside in at the base of the fiberglass just to reinforce it a bit as the final sanding will weaken the edge a bit:

Then the back edges were sanded and the face was sanded to remove any high spots and a layer of filler was applied:

[This message has been edited by Sourmug (edited 05-29-2007).]

IP: Logged
Sourmug
Member
Posts: 4538
From: Calgary, Alberta, Canada
Registered: Sep 2002


Feedback score:    (29)
Leave feedback


Total ratings: 144
Rate this member

Report this Post10-29-2006 01:13 AM Click Here to See the Profile for SourmugSend a Private Message to SourmugEdit/Delete MessageReply w/QuoteDirect Link to This Post

Sourmug

4538 posts
Member since Sep 2002
Here's how it looks now after sanding:


It's more or less ready for the application of a thin layer of dense foam padding and the vinyl upolstery. Just waiting for the vinyl samples to arrive.

That's it for now.

Nolan

[This message has been edited by Sourmug (edited 05-29-2007).]

IP: Logged
RCR
Member
Posts: 4397
From: Shelby Twp Mi
Registered: Sep 2002


Feedback score:    (7)
Leave feedback


Total ratings: 102
Rate this member

Report this Post10-29-2006 07:09 AM Click Here to See the Profile for RCRSend a Private Message to RCREdit/Delete MessageReply w/QuoteDirect Link to This Post
Looks great Nolan. I'm a bit surprised at how well the insulation worked. I didn't think it would be shapeable due to how I thought it was made. It must be denser than I thought. How easy is it to shape? I may have to pick some up.

Bob
IP: Logged
Sourmug
Member
Posts: 4538
From: Calgary, Alberta, Canada
Registered: Sep 2002


Feedback score:    (29)
Leave feedback


Total ratings: 144
Rate this member

Report this Post10-29-2006 11:21 AM Click Here to See the Profile for SourmugSend a Private Message to SourmugEdit/Delete MessageReply w/QuoteDirect Link to This Post
Hi Bob:

This insulation is much denser than the "normal" batt type insulation and is like a rigid board. The layers will separate but again, not as easily as regular insulation. It is easy to cut with a sharp knife and is also readily shaped. It is ideal? No, as I said it does soak up a lot of resin and is a little tricky when applying the mat and resin. However it did seem to work.

Nolan
IP: Logged
Sourmug
Member
Posts: 4538
From: Calgary, Alberta, Canada
Registered: Sep 2002


Feedback score:    (29)
Leave feedback


Total ratings: 144
Rate this member

Report this Post11-11-2006 06:37 PM Click Here to See the Profile for SourmugSend a Private Message to SourmugEdit/Delete MessageReply w/QuoteDirect Link to This Post
Just a bump to keep this out of the archives.
IP: Logged
RCR
Member
Posts: 4397
From: Shelby Twp Mi
Registered: Sep 2002


Feedback score:    (7)
Leave feedback


Total ratings: 102
Rate this member

Report this Post11-12-2006 08:17 AM Click Here to See the Profile for RCRSend a Private Message to RCREdit/Delete MessageReply w/QuoteDirect Link to This Post
I'm catching back up to you....Not!!

Bob
IP: Logged
Sourmug
Member
Posts: 4538
From: Calgary, Alberta, Canada
Registered: Sep 2002


Feedback score:    (29)
Leave feedback


Total ratings: 144
Rate this member

Report this Post11-12-2006 01:27 PM Click Here to See the Profile for SourmugSend a Private Message to SourmugEdit/Delete MessageReply w/QuoteDirect Link to This Post

[This message has been edited by Sourmug (edited 11-12-2006).]

IP: Logged
Previous Page | Next Page

This topic is 18 pages long:  1   2   3   4   5   6   7   8   9   10   11   12   13   14   15   16   17   18 
next newest topic | next oldest topic

All times are ET (US)

Post New Topic  Post A Reply
Hop to:

Contact Us | Back To Main Page

Advertizing on PFF | Fiero Parts Vendors
PFF Merchandise | Fiero Gallery | Ogre's Cave
Real-Time Chat | Fiero Related Auctions on eBay


Copyright (c) 1999, C. Pennock