I have come a fairways on my decklid vent build and thought that I would share it all with you. This modification is definitely not for the faint of heart as the decklid has to be cut up pretty extensively to fit the new piece, but the pictures will speak for themselves. I have no prior experience in bodywork and have never attempted anything like this before. the only other project that I have done with fiberglass is my battery box in this thread : https://www.fiero.nl/forum/A...050818-2-062364.html My purpose for this thread is to encourage people who are not confident about doing this on their own. Hey, if I can do it so can you! Anyways, on with the information:
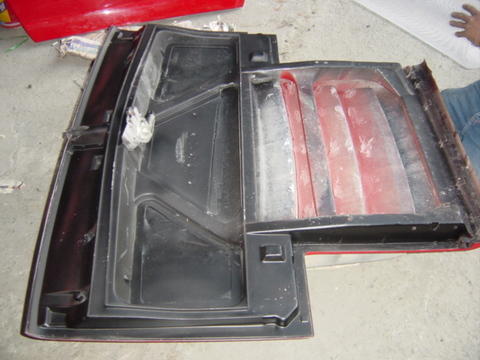
The price seemed reasonable and I must admit that he shipped the piece quickly. When I picked up the piece from the post office I was concerned because the packaging was extensively damaged, so much so that Canada Customs attached a form indicating that they had to repair the packaging. When I got it home and unwrapped it this is what I found:
Needless to say, I was quite disappointed. I contacted gdjetski and he had indicated that he had never had a vent arrive in such poor condition and he refunded $60.00 of the original $100.00 amount, he could have just as easily blown me off but he seems to be an honest person. Afterwords I asked if he had any pictures or instruction on how to install the vent and he sent me a number of pictures. It was interesting to notice that in one of the pictures he sent the vent shown also had cracks as seen in this picture:
I think that these vents vents have a structural weakness at the edges and I would suspect that most of them will arrive with some sort of damage. Just a warning to those of you who may be interested in doing this as well.
[This message has been edited by Sourmug (edited 05-08-2007).]
Additionally I wanted to move the wing back 2" on the decklid. I had seen some threads where people had done this and I liked the look. I drew a line thought the centers of the existing bolt holes at each wing support location and marked out for new holes 2" to-wards the rear. I then used a brad-point drill bit so that the bit would not shift while I started drilling:
As can be seen, the new front bolt hole is too close to the bulkhead to allow for a nut and washer. The rear hole now sits so that it penetrates two layers of fiberglass that have about a 1" air gap between them. It is important to me that this looks like something that came from the factory, or at-least as close as I am able so I also cut out notches at the front of the bulkhead as well as larger holes at the rear hole that would allow for nuts and washers. These holes and notches were then finished with plastic tubing that was cut to size and bonded with Corvette Panel Adhesive. The tubing was then trimmed to final size once bonded:
While this was being done I also tackled the structural cracks. I first ground out the cracks a small amount using a Dremel tool and cutting disk. Once that was done I flexed the decklid so that the cracks would "open" up and applied Corvette Panel Adhesive to both sides. The decklid was allowed to return to normal shape so that the cracks would close up and adhere together. Excess adhesive was removed to create a more or less flat surface.
Here are a before and after shot:
[This message has been edited by Sourmug (edited 05-08-2007).]
To further reinforce the cracks the surface of the bulkhead was sanded so that the paint was removed. It is very important that the paint be removed and that the surface has a slightly rough finish so that the fiberglass will adhere firmly. I made a template of the surface and used it to cut out fibreglass matting. The cut woven fiberglass fabric (not the random strand mat) was applied: Once set this had filler applied to is and it was sanded smooth.
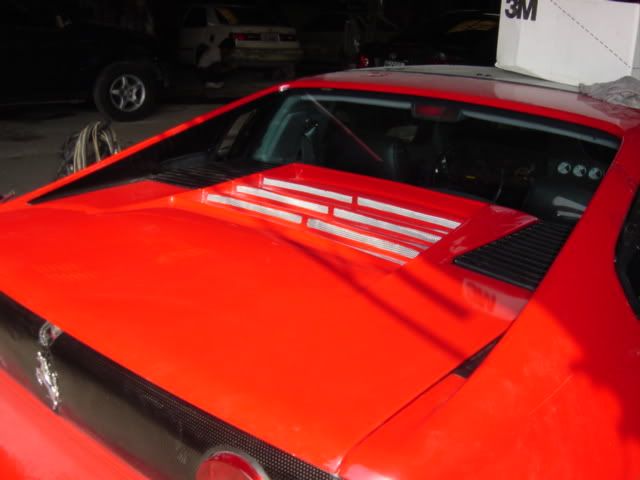
Once this was complete I then began the test fitting of the decklid vent:
The rear portion of the vent overlapped the new wing bolt holes and so it was trimmed down using and jigsaw:
That's it for tonight, I'll post some more tommorrow. Nolan
[This message has been edited by Sourmug (edited 05-08-2007).]
Cool, Looks like your going for it----Thanks for taking the time to post pics--this has me wanting to do something different to mine---I saw something similar to this years ago--it was on ebay--a guy in Korea or somewhere like that was selling them, he had a great pic of the finished product--looked really nice. Keep `em ` coming........
The packaging was REALLY flimsy cardboard that had absolutely no rigidity at all. The piece was given no support and of course cracked at the locations shown above. The crack locations are areas that are not rigid or reinforced enough on their own to withstand the flexing that occurred during transit. Again, I suspect that most of the vents delivered will have some cracking unless he changes the way he packages them. Additionally the piece is quite thin and could use an extra layer or two of matting.
Back to the information:
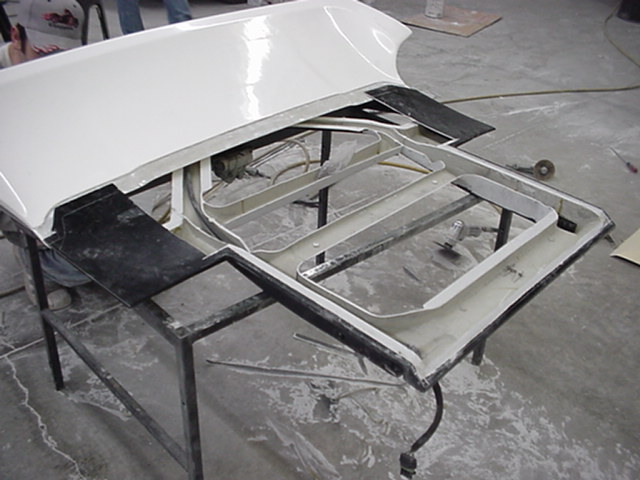
With the vent taped the decklid I traced out its outline onto the decklid. Once that was done it was removed and holes were drilled at the corners to allow me to start cutting the top of the lid with jigsaw. Here I am removing the lid and thinking I must be crazy, I mean either this is going to work or I'm going to ruin a perfectly good decklid: And here is my trusty shop assistant Cedric:
So taking a deep breath I began to cut, a little bit here and a little bit there
I should also point out that there is a wiring harness for the decklid release that runs from the front of the decklid to the rear bulkhead through the passenger side decklid support. Care needs to be taken to not damage this harness during the cutting process.
I had also cut the openings for the vents prior to bonding as the piece was smaller and easier to maneuver than the entire decklid. It turns out that I had to re-cut the openings but more on that later
[This message has been edited by Sourmug (edited 05-08-2007).]
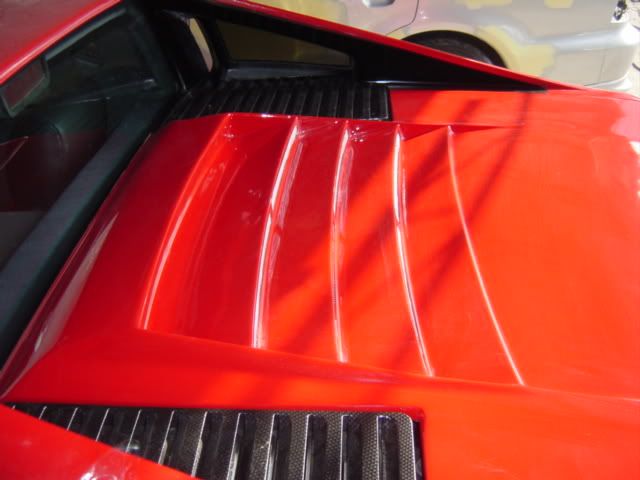
I continued to check the fit, mark and cut until the vent fit snugly in place. The "sawtooth" cut into the support members as seen above was intended to match the sawtooth shape of the vent. I got it reasonably close but it took a number of test fits to get it to work and in some areas I did take out more material that what was actually required. Hear are some shots of the underside:
Once I was satisfied with the fit, I bonded the vent to the decklid again using the Corvette Panel Adhesive. I used a number of clamps, screws, heavy objects, basically everything but the kitchen sink to hold the vent in place. The fiberglass vent is not and exact fit, close but not exact, and it is a bit if effort to get is to fit properly.
I'm sure that those of you who are more experienced at this than I am are shaking their heads but hey it worked!
I forgot to mention that I ground out some of the top layer of fiberglass where the two long "tabs" shapes that I had cut the trailing edges of the vent into would sit. This was done to have a more flush installation that would require less filler later. I also reinforced the back of the cracked areas with fiberglass matting prior to bonding.
Here it is with the clamps, screws and weights removed and some initial sanding done:
[This message has been edited by Sourmug (edited 05-08-2007).]
In the last picture you can see that when I was grinding for the tabs I actually cut thorough the decklid in a few spots. I was not too concerned as I was going to be fiberglassing the underside anyways.
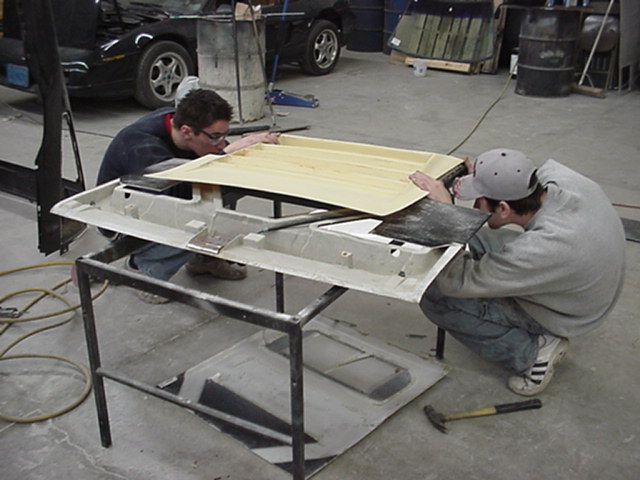
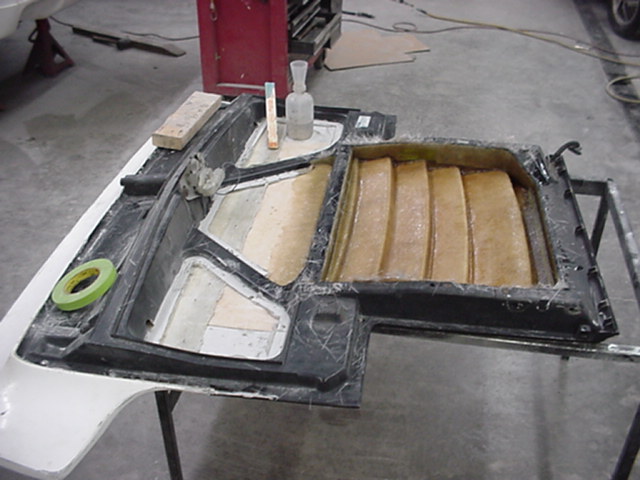
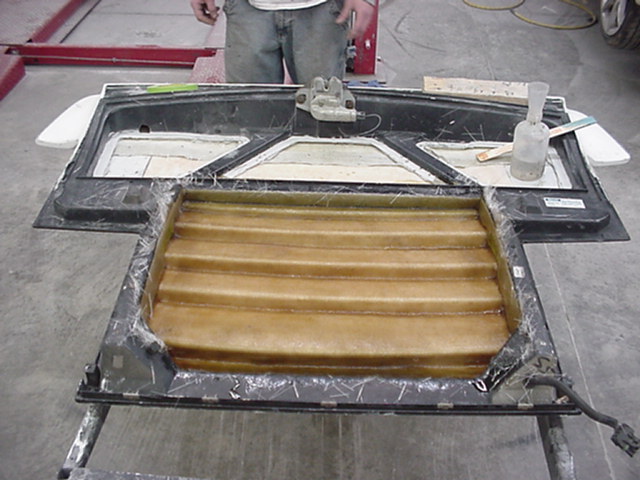
Part of the challenge of this mod is where the cut lines are located. The trailing edge requires a cut through a panel that would be fully visible with the decklid open. Here is a picture that gdjetski sent to me: You can see a cutline that runs across the width of the decklid part way between the rear bulkhead and the middle bulkhead. This line also extends into the two outside panels. I used a strip that was cut from the decklid during the fitting phase and adhered to to the vent and the decklid to provide support to the trailing edge of the vent. Once this was done and the vent was bonded I layed in fiberglass mat to reinforce the panels that had been cut and to make a uniform surface over the underside of the panels:
The panels were then filled using a non clog filler, smoothed, filled smoothed etc, etc until the surface was uniform. Fiberglass was also applied to the saw tooth portion of the vent to adhere it to the inside support rails of the decklid:
[This message has been edited by Sourmug (edited 05-08-2007).]
In this thread Archie's guys are installing the same deckid vent for one of his customers. Archie mentions that this vent piece was one of the thinest pieces of fiberglass that he has ever used and that it needs to be reinforced. Once the openings are cut he is absolutely correct, the piece is flimsy and flexes in the centre. So I applied some additional fiberglass to the underside of the vent.
Here are a couple ov pictures from Archie's thread showing how they cut the decklid and fiberglassed the underside:
[This message has been edited by Sourmug (edited 05-08-2007).]
One thing I noticed is that Archie originally kept the intermediate cross-member but had removed it in the final installation. I don't know what their reasons were for doing so but I kept the cross-member as I felt that it helped to maintain some rigidity. I simply cut one side in a curve to match the vent curve and applied fiberglass over the cross-member.
I did add some additional fiberglass on the underside for more stiffness but I felt that more support was needed. I purchased a piece of 1/2" aluminum bar-stock cut and bent it to match the vent curve and applied it like so:
The bar-stock was then fiberglassed in as well:
As you can see, the holes that I had previously cut for the vent openings has to be re-cut. Sigh, oh well live and learn. Well that's it for now. I will post some more later.
Nolan
[This message has been edited by Sourmug (edited 05-08-2007).]
I have one of those vents that came with the car when I bought it. I have been wondering how to do this and had just about decided to leave it off. Now agfter seeing you do this I will do it also. Thanks for the write up!! + 4 u.
edit: Sorry I had already given you a +. Wish I could give another one.
[This message has been edited by Fiero1Fan (edited 03-12-2006).]
Thanks for the comments everyone, they are appreciated!
Fiero1Fan: thats the reason that I wanted to post this build so that others would say that they could do it too and give it a try.
To continue: The next phase consisted of sanding and filling, repeated as required. There are a lot of nooks and crannies on this vent, it's hard to get into them all for sanding. The corners particularly at the front of the lid are impossible to get any type of mechanical sander into so it must all be done by hand. This is a tedious process to say the least, my hats off to anyone who does this for a living. One of the unpleasant issues is all the dust that is generated. Lots of very fine dust that gets everywhere.
After this long process i finally ended up with this:
I also thought that I should post pictures of the tools and materials that I am using. Here are the resin, the Corvette panel adhesive and a fiberglass impregnated filler for more strength: Here are the non-clog filler which is what I am mostly using and the glazing putty for small imperfections which I will discuss later: Here is a picture of the assorted power tools that I have used: and finally a sample of the various sandpapers, files, sanding blocks and shapes that I have found useful:
Nolan
[This message has been edited by Sourmug (edited 05-08-2007).]
Once the sanding was complete the whole surface was vacuumed, blow off with compressed air and whipped down with an acetone moistened cloth. Then the first layer of primer was applied. The primer I used is a sandable primer that will fill in minor scratches and imperfections. Once the primer was applied it becomes much easier to spot imperfections and areas that require additional sanding. in this picture there are small holes (bubbles): Once the primer was set I applied glazing putty to the various dips, dents, and holes etc: As you can see there was a surprising amount of filling to be done. You just cant see some of it until the primer is applied.
Nolan
[This message has been edited by Sourmug (edited 05-08-2007).]
The whole surface was sanded including the touch-up areas: The the surface was vacuumed, blown off and wiped down once again and a second coat of primer applied:
And this is as far as I have progressed as of this afternoon. I will continue to post as this progresses. If you have any suggestions on how this could be improved, better techniques etc. I would enjoy hearing from you.
Nolan
[This message has been edited by Sourmug (edited 05-08-2007).]
Originally posted by Sourmug: If you have any suggestions on how this could be improved, better techniques etc. I would enjoy hearing from you.
Nolan
Next time avoid the spray can primer . As long as you remove it before paint. Unless that is just on the underside and you are spray painting the whole underneath . Looks good though!
For primer, you can go to Auto Value and get their sandable primer you spray with an air gun. Igot mine from Auto Value in Crowfoot cetre but they will all have it. Partsource or even Candian Tire and NAPA should as well. You need some reducer etc. as well but it will allow you to spray the coats of primer on and not have to sand it all off again before applying your final paint. The spray can primer may end up lifting when you spray your final automotive paint on it.
Pretty cheap for the paint and it is worth it. It also goes on thicker so it will fill more of the tiny scratchs and fill in the imperfections better than the spray can.
Beautiful work, Nolan .... come do my Formula next (I'm allergic to fiberglass ). Do you think there will be a problem with water coming in through the openings and getting the engine and elctronics wet ?
I'm not too worried about water entering the vent, I know that some will but I like the looks of the vent. Time will thell though. The car isn't going to be winter driven and is garage parked so it doesn't sit outside very often and snow won't be sitting on the decklid.
+'s for all who don't already have 'em.
Nolan Edit to say: Only this thread was put together in a day, the vent has taken much, much longer
[This message has been edited by Sourmug (edited 03-13-2006).]
Arte444: That was 88GTFormula you were posting the models for. I remember the thread. (At least I think I do...:dizzy
Bob
yup, that was me... i fudged the plug i spent all that time on... I might design a few other things here when i get a better pace to do it other than my bedroom... lol. Its all a matter of time...
Beautiful work Nolan!!!! I can't wait to see it painted, just beautiful. Good for you taking the time to take all the pictures, materials etc... its wicked to see the entire process, as it happened, Thanks!! + for you!
and good call moving the wing, you wouldn't think something so subtle would look so cool Keep up the good work!!!
Just a bump for those who have not seen this. I will probably post some update pictures this weekend.
fieroman_5000:
We specifically moved 3 years ago so that I could build what is almost a 3 car garage for the Fiero. I don't know how houses are where you live but all the new ones here seem to come with tiny attached 2 car garages. I wanted to have a shop to work in.
Phil86SE:
Unfortunately my car wont be ready this year as it is a looong term project. It looks like this now:
Nolan
[This message has been edited by Sourmug (edited 03-17-2006).]
OK. I decided to give the decklid a light coat of black paint just to see how it looks overall. In general I'm pretty happy with how it looks:
I'm glad that I did this as it has now revealed further small imperfections:
Some of these are really the quality of the decklid and some are finishing issues with my work. I'm going to work at getting most of these out of the finished product but I probably wont be successful in getting them all. This is sure a good learning project and again my hats of to those who do this for a living.
More to follow later.
Nolan
[This message has been edited by Sourmug (edited 05-08-2007).]
Here is another little project that I have underway, I am also installing some Trans Am vents into the front fenders. The vents that I am using are the smaller size vents and came from a 1990 Car. I used the method that Zoom88 used in his thread: https://www.fiero.nl/forum/A...050410-2-057783.html This is quite easy to do actually but if you have never done anything like this it does take some fortitude to make the initial cut. Zoom was also kind enough to send me a copy of the template that he used.
Here are some pictures of the vents after I installed them and did the initial filing and sanding:
Here a shot from the backside:
The instructions in Zooms thread are really easy to follow. I have converted the relevant bits of Zoom's thread to both word and PDF formats if anyone would like a copy.
[This message has been edited by Sourmug (edited 05-08-2007).]
I also have sprayed the vents with a rattle can sand-able primer. Since this was just to see how the sanding and filing looks and I have a couple of cans laying around I figured it would be no big deal. I will be sanding this layer of primer off and using the proper automotive primer prior to final finishing.
In the mean time I have sanded the underside of the decklid and filled in the divot's, holes, hollows, pits etc. etc. that became evident under the light coat of black paint. And i have started sanding it....again.
Nolan
[This message has been edited by Sourmug (edited 05-08-2007).]
I will send you a copy of the PDF. Yes the template is reusable. What I was thinking of doing is scanning the template (once I dig it up) and marking a few key dimensions on it. If you have access to a photo copier that will scale the copy up and down you could easily reproduce it by scaling it so that the marked dimensions are correct. I'll have to dig it up and do this.
Thanks for the compliments, I hope you give it a try.


.JPG)
.JPG)
.JPG)
.JPG)
.JPG)
.JPG)
.jpg)


.JPG)
.JPG)
.JPG)
.JPG)
.JPG)
.JPG)
.JPG)
.JPG)
.JPG)
.JPG)
.JPG)
.JPG)
.JPG)
.JPG)
.JPG)
.JPG)
.JPG)


.JPG)
.JPG)
.JPG)
.JPG)
.JPG)
.JPG)
.JPG)
.JPG)
.JPG)
.JPG)
.JPG)
.JPG)
.JPG)
.JPG)
.JPG)
.JPG)
.JPG)
.JPG)
.JPG)
.JPG)
.JPG)
.JPG)
.JPG)
.JPG)
.JPG)


.JPG)
.JPG)
.JPG)
.JPG)
.JPG)
.JPG)
.JPG)
.JPG)
.JPG)
.JPG)
.JPG)
.JPG)
.JPG)
.JPG)
.JPG)
 . As long as you remove it before paint. Unless that is just on the underside and you are spray painting the whole underneath


.JPG)
.JPG)
.JPG)
.JPG)
.JPG)
.JPG)


.JPG)
.JPG)
.JPG)
.JPG)
.JPG)

 And i have started sanding it....again.


