Pennock's Fiero Forum
  Technical Discussion & Questions - Archive
  Sourmug's Battery Box Build

T H I S   I S   A N   A R C H I V E D   T O P I C
  

Email This Page to Someone! | Printable Version


Sourmug's Battery Box Build by Sourmug
Started on: 04-28-2005 11:07 PM
Replies: 30
Last post by: jstricker on 05-01-2005 06:19 PM
Sourmug
Member
Posts: 4538
From: Calgary, Alberta, Canada
Registered: Sep 2002


Feedback score:    (29)
Leave feedback


Total ratings: 144
Rate this member

Report this Post04-28-2005 11:07 PM Click Here to See the Profile for SourmugSend a Private Message to SourmugDirect Link to This Post
I have been looking over the various battery relocation threads. So I say to my self "you can make one of those"! Here is my little project. This is the first time I have ever used fibreglass but all of you have inspired me. On to the build...

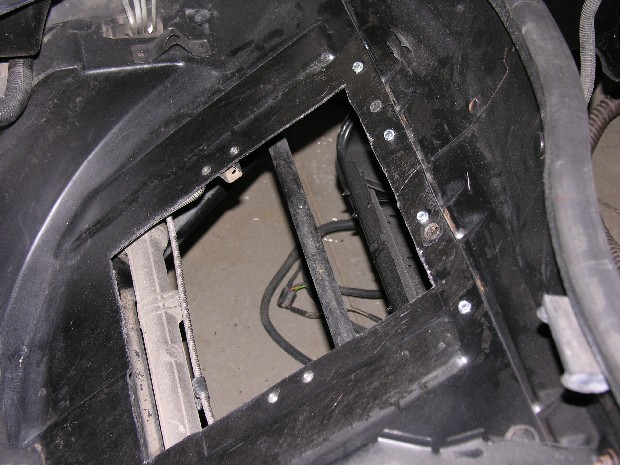
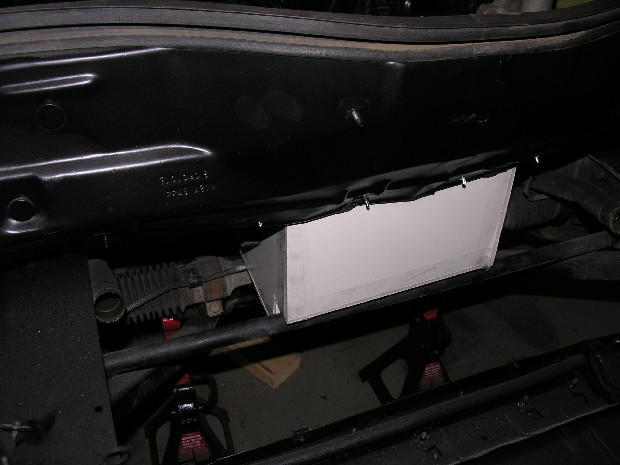
This is the hole that I cut into the spare tire tub. The dimensions are 10" wide X 11.75" high and the top starts at 1.25" down from the seam.

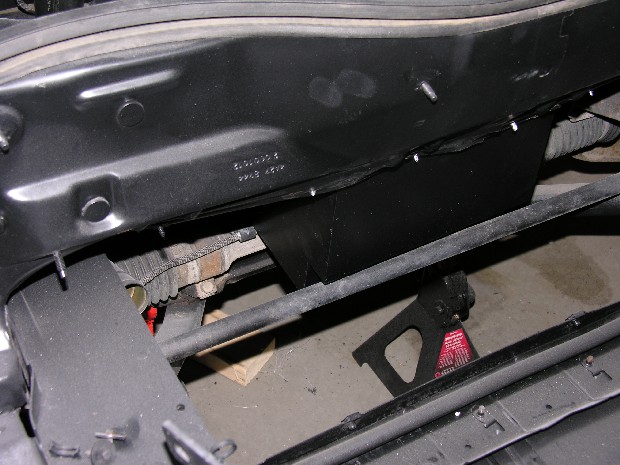
Here is a shot from the radiator side, note the radiator is not installed (obviously).

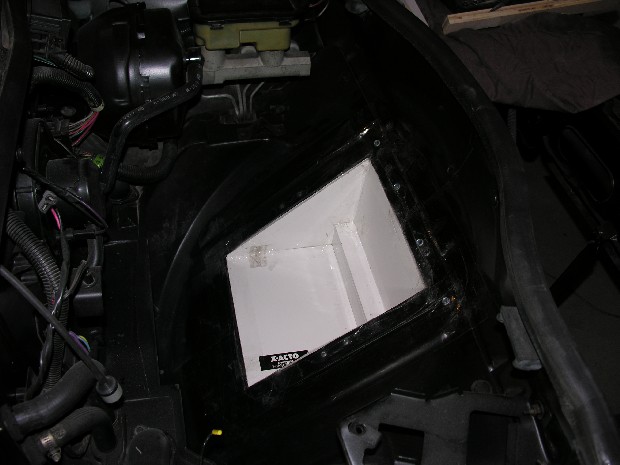
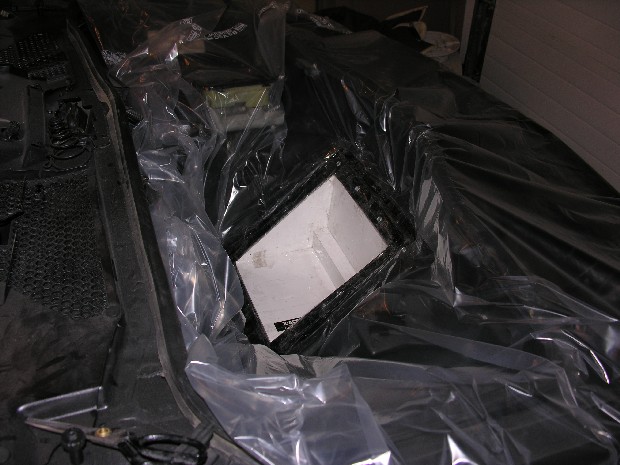
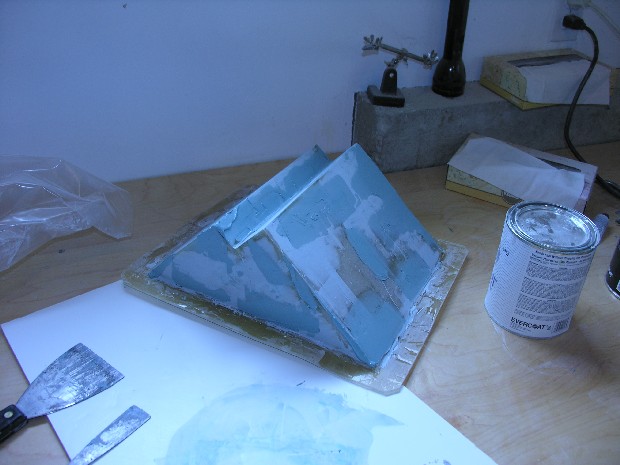
The next step was to fabricate a mold using foam core presentation board. I gradually assembled the mould piece by piece in the car except for the sides. I cut the sides as right-angle triangles and then attached them to the rest of the mold outside the car to make every thing square. I them cut the notch for the front sway bar. Note: the stearing rack stabilzer is removed for this to fit. I don't intend on putting one back on.

The four extra screws just above the opening are self tapping screws that I used to get everything to lie flat.

[This message has been edited by Sourmug (edited 04-29-2005).]

IP: Logged
PFF
System Bot
Sourmug
Member
Posts: 4538
From: Calgary, Alberta, Canada
Registered: Sep 2002


Feedback score:    (29)
Leave feedback


Total ratings: 144
Rate this member

Report this Post04-28-2005 11:23 PM Click Here to See the Profile for SourmugSend a Private Message to SourmugDirect Link to This Post
The next step was to cover the inside of the mold completely with packing tape so that the fibreglass won't stick to it. Then I popped it into the car and used packing tape to attach it to the tub. Before fibreglassing I covered the front of the car with poly.

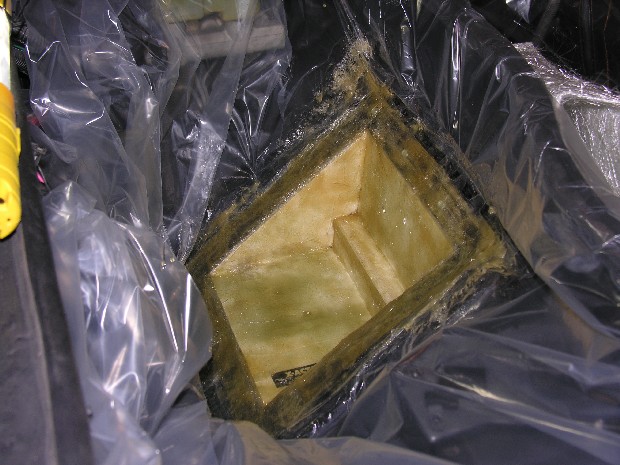
I then applied two layers for chop mat and resin. Sticky, sticky, sticky!

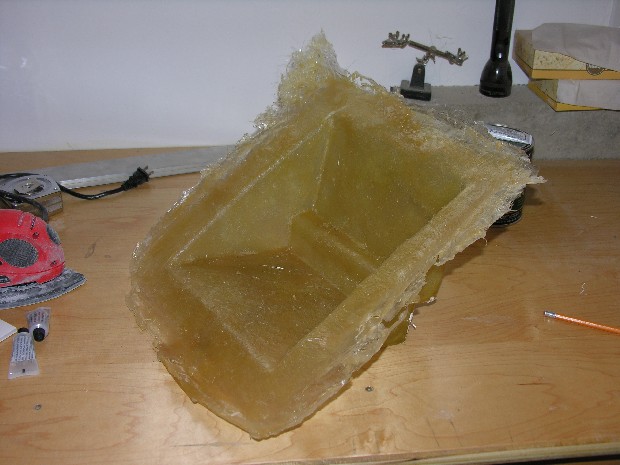
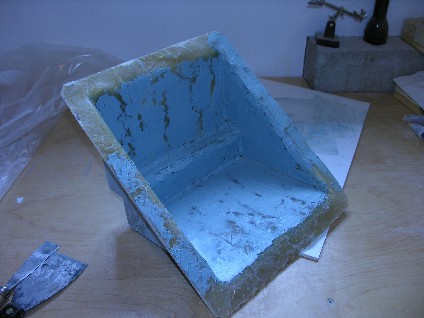
Once it had set up, I removed the poly and popped it out of the car.

Here is the box removed from the mold:
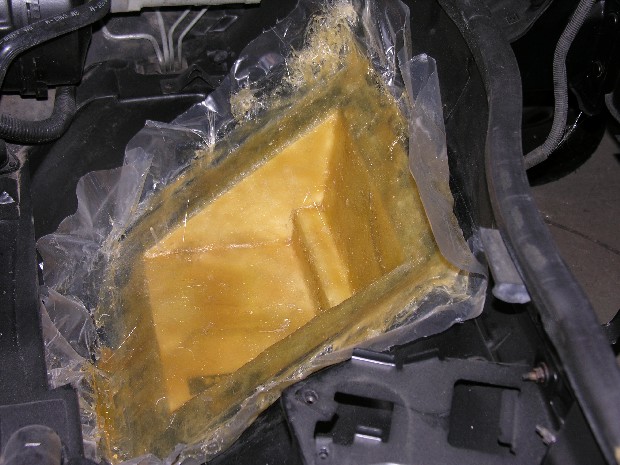
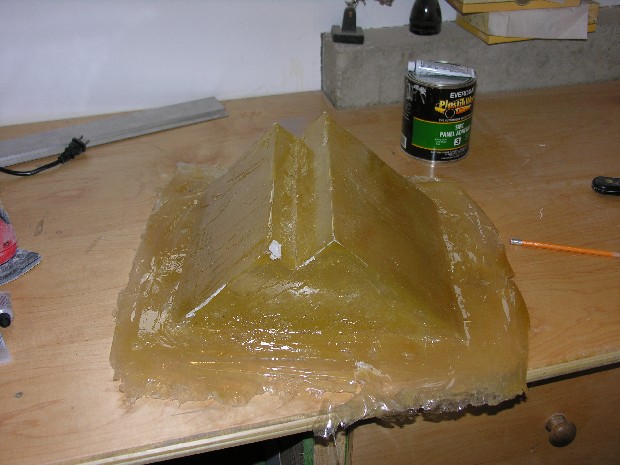
And the backside:

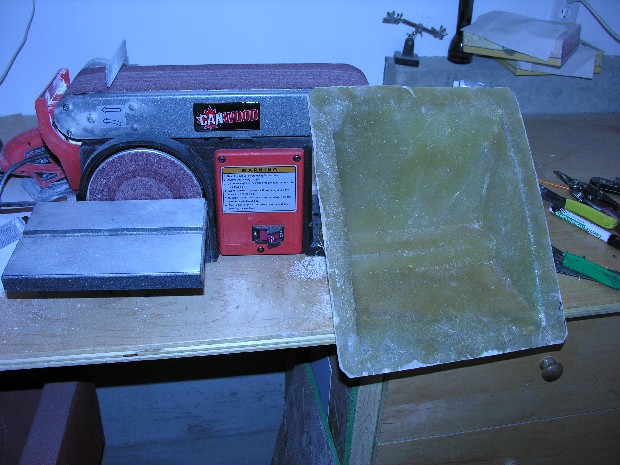
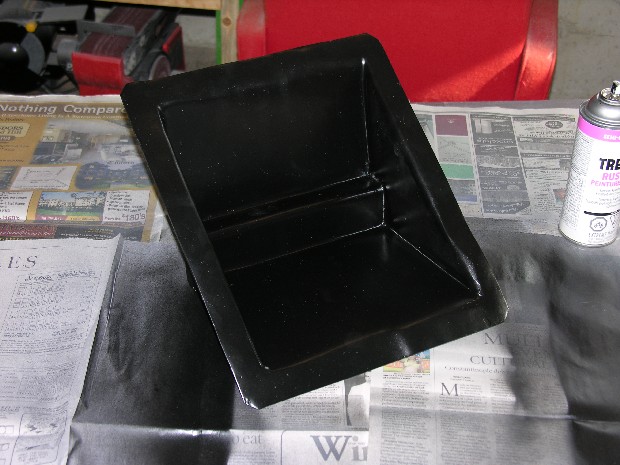
I then marked it up so it could be cut to size with about a 1'' to 1.25" flange for bolting it in:

[This message has been edited by Sourmug (edited 04-28-2005).]

IP: Logged
Sourmug
Member
Posts: 4538
From: Calgary, Alberta, Canada
Registered: Sep 2002


Feedback score:    (29)
Leave feedback


Total ratings: 144
Rate this member

Report this Post04-28-2005 11:33 PM Click Here to See the Profile for SourmugSend a Private Message to SourmugDirect Link to This Post

Sourmug

4538 posts
Member since Sep 2002
The next thing is to cut it and go over the edges to make them nice and straight. The belt sander works well for cleaning the edges:

OK, the not so fun part, filling and sanding, sanding, more filling, sanding sanding... you get the idea.

[This message has been edited by Sourmug (edited 05-01-2005).]

IP: Logged
Sourmug
Member
Posts: 4538
From: Calgary, Alberta, Canada
Registered: Sep 2002


Feedback score:    (29)
Leave feedback


Total ratings: 144
Rate this member

Report this Post04-28-2005 11:36 PM Click Here to See the Profile for SourmugSend a Private Message to SourmugDirect Link to This Post

Sourmug

4538 posts
Member since Sep 2002
Then the same with the front:

And after it's painted:

IP: Logged
Sourmug
Member
Posts: 4538
From: Calgary, Alberta, Canada
Registered: Sep 2002


Feedback score:    (29)
Leave feedback


Total ratings: 144
Rate this member

Report this Post04-28-2005 11:40 PM Click Here to See the Profile for SourmugSend a Private Message to SourmugDirect Link to This Post

Sourmug

4538 posts
Member since Sep 2002
And finally, how it sits in the car:

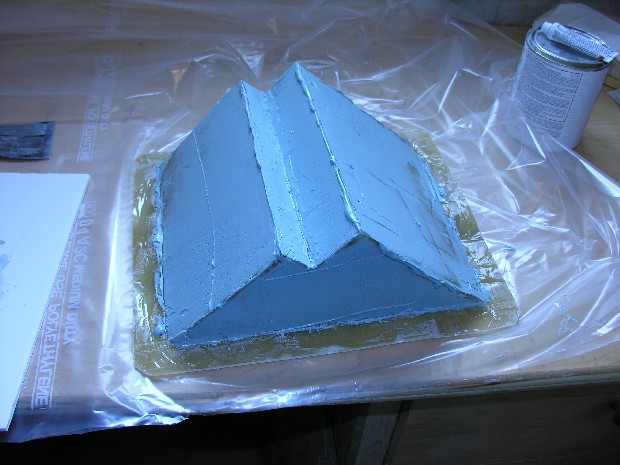
This is as far as I have gone. There is about 0.5" clearance from the box notch to the sway bar so I think it should be O.K. I haven't run the cables or actually screwed the box in place. All in good time as the car is in about a million pieces and is awaiting the 3.4 DOHC

Nolan

IP: Logged
$Rich$
Member
Posts: 14575
From: Sioux Falls SD
Registered: Dec 2002


Feedback score:    (20)
Leave feedback


Total ratings: 397
Rate this member

Report this Post04-28-2005 11:50 PM Click Here to See the Profile for $Rich$Send a Private Message to $Rich$Direct Link to This Post
great job, too much work for me though , i just gave norm $65 for one of his including the wires, i just put mine in like a week and a half ago, cutting the hole made me itchy for like 2 days!!!
IP: Logged
Blacktree
Member
Posts: 20770
From: Central Florida
Registered: Dec 2001


Feedback score:    (12)
Leave feedback


Total ratings: 350
Rate this member

Report this Post04-28-2005 11:59 PM Click Here to See the Profile for BlacktreeClick Here to visit Blacktree's HomePageSend a Private Message to BlacktreeDirect Link to This Post
You say this is the first time you've worked with fiberglass? Coulda fooled me.

Great job man!

IP: Logged
Erik
Member
Posts: 5625
From: Des Moines, Iowa
Registered: Jul 2002


Feedback score: (3)
Leave feedback


Total ratings: 168
Rate this member

Report this Post04-29-2005 12:01 AM Click Here to See the Profile for ErikSend a Private Message to ErikDirect Link to This Post
Great Job! I made mine out of galvanized sheetmetal
IP: Logged
Pink_Ninja
Member
Posts: 55
From: Edmonton, Alberta, Canada
Registered: Apr 2005


Feedback score: N/A
Leave feedback

User Banned

Report this Post04-29-2005 01:19 AM Click Here to See the Profile for Pink_NinjaSend a Private Message to Pink_NinjaDirect Link to This Post
Youve done an excellent job!

Nothing beats the sense of acomplishment you get from building something with your own two hands.

Any moron can buy a kit and bolt it in.

IP: Logged
Kekipi
Member
Posts: 1832
From: Kapaa, HI
Registered: Apr 2004


Feedback score: N/A
Leave feedback


Total ratings: 65
Rate this member

Report this Post04-29-2005 07:13 AM Click Here to See the Profile for KekipiSend a Private Message to KekipiDirect Link to This Post
 
quote
Originally posted by Pink_Ninja:

Youve done an excellent job!

Nothing beats the sense of acomplishment you get from building something with your own two hands.

Any moron can buy a kit and bolt it in.


Hey, I resemble that remark.

IP: Logged
1MohrFiero
Member
Posts: 4363
From: Paducah, Ky
Registered: Apr 2003


Feedback score:    (37)
Leave feedback


Total ratings: 157
Rate this member

Report this Post04-29-2005 07:38 AM Click Here to See the Profile for 1MohrFieroSend a Private Message to 1MohrFieroDirect Link to This Post
Very Impressive! Don't stop now, send us more. This is a great do it yourself thread.

------------------

84 Sport Coupe
87 GT 5 Spd

IP: Logged
PFF
System Bot
Arns85GT
Member
Posts: 11159
From: London, Ontario, Canada
Registered: Jul 2003


Feedback score: (1)
Leave feedback


Total ratings: 202
Rate this member

Report this Post04-29-2005 08:40 AM Click Here to See the Profile for Arns85GTSend a Private Message to Arns85GTDirect Link to This Post
Nice job

Thanks for posting your methods. That is good for the memory bank. I think the other way is to either fabricate aluminum or galvanized. It would be good to compare the two methods. Maybe somebody else will post a metal version of what you have done.

Again, nice job, and thanks.

Arn

IP: Logged
Alex4mula
Member
Posts: 7403
From: Canton, MI US
Registered: Dec 1999


Feedback score:    (11)
Leave feedback


Total ratings: 153
Rate this member

Report this Post04-29-2005 08:58 AM Click Here to See the Profile for Alex4mulaSend a Private Message to Alex4mulaDirect Link to This Post
Wow! Very nice work I would have done mine but I didn't have the time nor willingness for the messy work. Also this thread was not available then

------------------
Palm Beach Fieros
http://pbfieros.tripod.com

IP: Logged
normsf
Member
Posts: 1682
From: mishawaka, In
Registered: Oct 2003


Feedback score: N/A
Leave feedback


Total ratings: 57
Rate this member

Report this Post04-29-2005 10:59 AM Click Here to See the Profile for normsfClick Here to visit normsf's HomePageSend a Private Message to normsfDirect Link to This Post
Hello, very nice work. Now you can appreciate how much work goes into these. Heck I might just have to raise my price, just kidding thanks Norm
IP: Logged
Sourmug
Member
Posts: 4538
From: Calgary, Alberta, Canada
Registered: Sep 2002


Feedback score:    (29)
Leave feedback


Total ratings: 144
Rate this member

Report this Post04-29-2005 12:10 PM Click Here to See the Profile for SourmugSend a Private Message to SourmugDirect Link to This Post
Thanks for all the nice comments.

Norm I fully understand the amount of work involved so your price is very reasonable. Thanks for the compliment but I know my glassing skills are no where near yours.

Yes I could have bought a box but then I would have missed out on the experience of making one. I have enjoyed doing it and I want to be able to make some body modifications for myself. Part of owning a Fiero for me is to build the car the way I want, learn how to do things and then do them myself

Nolan

IP: Logged
Sourmug
Member
Posts: 4538
From: Calgary, Alberta, Canada
Registered: Sep 2002


Feedback score:    (29)
Leave feedback


Total ratings: 144
Rate this member

Report this Post04-30-2005 12:43 AM Click Here to See the Profile for SourmugSend a Private Message to SourmugDirect Link to This Post
Bump, for those who haven't seen it.
IP: Logged
DR650SE
Member
Posts: 1793
From: Cleveland, Oh
Registered: Oct 2001


Feedback score: N/A
Leave feedback


Total ratings: 58
Rate this member

Report this Post04-30-2005 03:45 AM Click Here to See the Profile for DR650SEClick Here to visit DR650SE's HomePageSend a Private Message to DR650SEDirect Link to This Post
Wow, that looks good. I think at some point i may try to do this and so thanks for the thread, you must be a glassing natural. I've never worked with the stuff before and so I want to start out small. Again, great work and nice step by step.

------------------
AIM: DR650SE
86 SE V6 4SPD
Pics from Iraq
http://community.webshots.com/user/dr650se

[This message has been edited by DR650SE (edited 04-30-2005).]

IP: Logged
crzyone
Member
Posts: 3571
From: Alberta, Canada
Registered: Dec 2000


Feedback score: N/A
Leave feedback


Total ratings: 176
Rate this member

Report this Post04-30-2005 04:42 AM Click Here to See the Profile for crzyoneSend a Private Message to crzyoneDirect Link to This Post
Soooo, I take it you are no longer interested in my battery tray

Nice work, I fiberglassed the sub boxes in my car, I hate working with glass. Very sticky. Not good at it.

IP: Logged
D-zone
Member
Posts: 32
From: Montreal, PQ, Canada
Registered: Apr 2004


Feedback score: N/A
Leave feedback

Rate this member

Report this Post04-30-2005 07:18 AM Click Here to See the Profile for D-zoneSend a Private Message to D-zoneDirect Link to This Post
Really empresive work you can be proud of your creation. I will take your model to do mine (if I do it...)I have two questions....

Why have you done this in the car instead of removing the mold and doing it on a bench??
Did you get hard time removing the tray from the mold???

Thanks,

IP: Logged
mrfixit58
Member
Posts: 3330
From: Seffner, Fl, USA
Registered: Jul 99


Feedback score: N/A
Leave feedback


Total ratings: 113
Rate this member

Report this Post04-30-2005 08:43 AM Click Here to See the Profile for mrfixit58Send a Private Message to mrfixit58Direct Link to This Post
Great job! It looks like you've been working with fiberglass for years.

Note to all those who as "Why not just buy a kit". Well, if you take the extra time to learn how to make something that doesn't show, you gain the skills, knowledge, and confidence to tackle something that does show. You never know...


------------------
Roy

double-click on this link to follow my interior build-up //www.fiero.nl/forum/Forum1/HTML/023174.html

Blue 87 GT w/ 4th generation Firebird interior.
Suncoast Fieros

Judged "Best Custom Interior" at the 20th Anniversary Show @ Pontiac, Mich - 7/2003
Judged "Best Custom Interior" at the 8th Annual Fiero Fun Weekend @ Daytona - 3/2004
Judged "Best Custom Interior" at the 9th Annual Fiero Fun Weekend @ Daytona - 3/2005

[This message has been edited by mrfixit58 (edited 04-30-2005).]

IP: Logged
Sourmug
Member
Posts: 4538
From: Calgary, Alberta, Canada
Registered: Sep 2002


Feedback score:    (29)
Leave feedback


Total ratings: 144
Rate this member

Report this Post04-30-2005 12:07 PM Click Here to See the Profile for SourmugSend a Private Message to SourmugDirect Link to This Post
D-zone

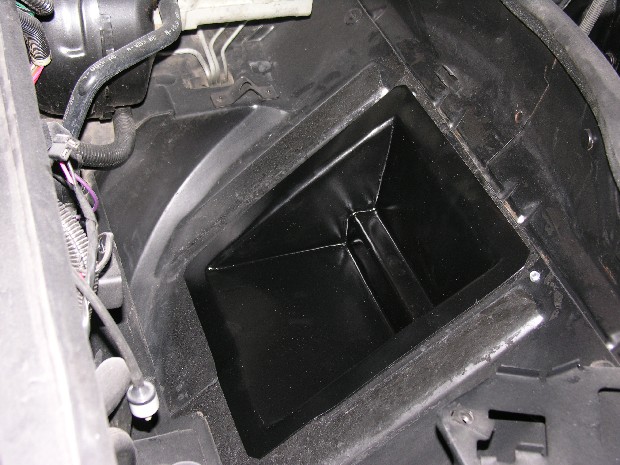
I did it in the car because the spare tire tub is not completely flat. In the bottom corner there is a small bulge that you can see on the completed piece, I wanted to make sure that it matched the tub as close as possible. It wasn't too hard to get the mold off and the part out, the packing tape doesn't stick to the cured firbreglass but it did take "some" effort.

Thanks everyone!

Nolan

IP: Logged
PFF
System Bot
Sourmug
Member
Posts: 4538
From: Calgary, Alberta, Canada
Registered: Sep 2002


Feedback score:    (29)
Leave feedback


Total ratings: 144
Rate this member

Report this Post05-01-2005 11:26 AM Click Here to See the Profile for SourmugSend a Private Message to SourmugDirect Link to This Post
And... one last bump!
IP: Logged
Erik
Member
Posts: 5625
From: Des Moines, Iowa
Registered: Jul 2002


Feedback score: (3)
Leave feedback


Total ratings: 168
Rate this member

Report this Post05-01-2005 11:37 AM Click Here to See the Profile for ErikSend a Private Message to ErikDirect Link to This Post
so how does the battery fit? With that step in the box it looks like the battery will stick out away from the front of the box an inch or so.That wont cause interference with the spare tire will it?
IP: Logged
Sourmug
Member
Posts: 4538
From: Calgary, Alberta, Canada
Registered: Sep 2002


Feedback score:    (29)
Leave feedback


Total ratings: 144
Rate this member

Report this Post05-01-2005 11:41 AM Click Here to See the Profile for SourmugSend a Private Message to SourmugDirect Link to This Post
It seems to fit pretty well. The notch is needed because of the sway bar. I have to devise a hold down clamp yet and finish mounting it in the car but so far so good.

[This message has been edited by Sourmug (edited 05-01-2005).]

IP: Logged
Erik
Member
Posts: 5625
From: Des Moines, Iowa
Registered: Jul 2002


Feedback score: (3)
Leave feedback


Total ratings: 168
Rate this member

Report this Post05-01-2005 01:48 PM Click Here to See the Profile for ErikSend a Private Message to ErikDirect Link to This Post
 
quote
Originally posted by Sourmug:

It seems to fit pretty well. The notch is needed because of the sway bar. I have to devise a hold down clamp yet and finish mounting it in the car but so far so good.

perhaps that step can be used as one of the spots for the battery hold down to fasten to

[This message has been edited by Erik (edited 05-01-2005).]

IP: Logged
TONY_C
Member
Posts: 2747
From: North Bellmore, NY 11710
Registered: May 2001


Feedback score: (2)
Leave feedback

Rate this member

Report this Post05-01-2005 02:00 PM Click Here to See the Profile for TONY_CSend a Private Message to TONY_CDirect Link to This Post
 
quote
Originally posted by Erik:

so how does the battery fit? With that step in the box it looks like the battery will stick out away from the front of the box an inch or so.That wont cause interference with the spare tire will it?

Will the spare tire even fit with the battery there? It looks good though but why did you bother to notch out the bottom? Why didn't you just make the bottom shorter to clear the sway bar?

IP: Logged
Sourmug
Member
Posts: 4538
From: Calgary, Alberta, Canada
Registered: Sep 2002


Feedback score:    (29)
Leave feedback


Total ratings: 144
Rate this member

Report this Post05-01-2005 02:44 PM Click Here to See the Profile for SourmugSend a Private Message to SourmugDirect Link to This Post
The notch will also provide room for the side connections to the battery, I plan on putting them away from the spare tire. Yes, maybe the notch could be used for a hold down of some sort.
IP: Logged
BERKELUSA
Member
Posts: 262
From: Manchester, New Hampshire USA
Registered: Apr 2005


Feedback score: N/A
Leave feedback

Rate this member

Report this Post05-01-2005 03:06 PM Click Here to See the Profile for BERKELUSAClick Here to visit BERKELUSA's HomePageSend a Private Message to BERKELUSADirect Link to This Post
Great build-up and well ducumented with pics! (how we should all do it eh?)

Fiberglas is fun stuff.. If it just wasnt so smelly / itchy / sticky / hazardous and got on everything ya freakin touched !

I'll be build mine from 1/8" wall x 1-1/2" L-angle iron when the time comes and a plywood bottom, Probably skinned over in sheet-metal, Got away from Glas.. Waaay too expensive and more time vs. just welding up a few steel brackets..

Also considering that a 20' stick of angle is only $12 here..

Again great job for your "first time with fiberglas", You would never know it..

Hope you wore a mask when sanding off the edges! or were all gonna live longer than you !

hahaha
Rob

IP: Logged
cire36
Member
Posts: 674
From: Rio Rancho, NM
Registered: Feb 2002


Feedback score: N/A
Leave feedback

Rate this member

Report this Post05-01-2005 03:13 PM Click Here to See the Profile for cire36Send a Private Message to cire36Direct Link to This Post
Incase anyone is interested, Vasaline is a great mold release. It is easy to apply and the glass wont stick to it. When you pull your part off, the Vasaline stays on the mold, not the glass. I use this along with aluminum tape for a smooth as glass surface finish. When you cant get tape to lay flat, the Vasalins works good all by its self.

Just thought I'd share.

IP: Logged
Erik
Member
Posts: 5625
From: Des Moines, Iowa
Registered: Jul 2002


Feedback score: (3)
Leave feedback


Total ratings: 168
Rate this member

Report this Post05-01-2005 04:13 PM Click Here to See the Profile for ErikSend a Private Message to ErikDirect Link to This Post
 
quote
Originally posted by Sourmug:

The notch will also provide room for the side connections to the battery, I plan on putting them away from the spare tire. .

Hey good idea ..dont need the battery terminals shorting out on the spare tire

IP: Logged
jstricker
Member
Posts: 12956
From: Russell, KS USA
Registered: Apr 2002


Feedback score:    (11)
Leave feedback


Total ratings: 370
Rate this member

Report this Post05-01-2005 06:19 PM Click Here to See the Profile for jstrickerSend a Private Message to jstrickerDirect Link to This Post
Just to give you an idea, here's the hold down I like to use. I do NOT believe this will fit under the spare tire, but I've never checked it for certain, I do know it holds the battery securely and looks nice.

John Stricker

 
quote
Originally posted by Sourmug:

The notch will also provide room for the side connections to the battery, I plan on putting them away from the spare tire. Yes, maybe the notch could be used for a hold down of some sort.

IP: Logged
PFF
System Bot


All times are ET (US)

T H I S   I S   A N   A R C H I V E D   T O P I C
  

Contact Us | Back To Main Page

Advertizing on PFF | Fiero Parts Vendors
PFF Merchandise | Fiero Gallery | Ogre's Cave
Real-Time Chat | Fiero Related Auctions on eBay


Copyright (c) 1999, C. Pennock