I believe I have found it. It is called a "Extractor, Pipe Plug" and I believe the size would be 1/4", correct me if I am wrong. The stock number is E81 and the price is $20.70.
Thanks.
No, it is bigger than 1/4, you can use 1/4 ratchet to remove the oil sender plug but the plug on the head is between 1/4 and 3/8. I would measure it if I were you. otherwise I should know the size in a few weeks as I will be doing another 3.4 swap for someone.
I have another ? Perhaps I misssed it. Did you have to sand down the block and other parts prior to painting. Also, what grit sandpaper did you use and what kind of paint?
Sorry for asking so much. This will be my first swap and although I am mechanically inclined, I am not much of a painter and I want to make sure I get this right the first time.
Thanks
Maybe we can compare notes or I'll lend you a hand with your's Alex. I'm going to do this swap too. Since my 2.8 broke on the way over to D7, I need an engine now and after looking at this thread it seems like the most logical thing to do rather than dump almost the same $ into rebuilding my old 2.8 from the crank out. I've located a couple of 3.4 used motors here in Tampa area and have gotten pricing on a reman. short and long block. I'm pretty intent on having this swap done in a few weeks. I'm going to order Rodney's starter drill jig because I don't trust myself to drill perfectly perpendicular holes. I'm pretty good with painting parts though Randy
I have found two motors in Orlando about 20 miles from my house. The are both between $500 and $550. I e-mailed them with a few questions about the motors. They offer a 30 day warranty on their engines. I'll keep you posted on that. The other options is to buy a crate engine. I found found one for $1895 plus 235 shipping to a business address or to a terminal drop off. If I can get away with a good used engine I can use therest of the money on newer parts like headers and accesories. I will surely be making a decision on the engine around the first week of April. Lets keep in touch.
I have another ? Perhaps I misssed it. Did you have to sand down the block and other parts prior to painting. Also, what grit sandpaper did you use and what kind of paint?
Sorry for asking so much. This will be my first swap and although I am mechanically inclined, I am not much of a painter and I want to make sure I get this right the first time.
Thanks
I didn't have to sand the block but had to cleeeeeeeeeeean it, they clean it some more, then some more, and even a little more. The engine is rough, paint should stick fine, just have to get ALL oil/grease off of it. I think cleaning everything is what took some time.
quote
Originally posted by randye:
and after looking at this thread it seems like the most logical thing to do rather than dump almost the same $ into rebuilding my old 2.8 from the crank out. Randy
When I was pricing around another 2.8 or rebuild $750ish, 3.1 stroker kit $499, used 3.4 with warranty $400+$50 core. So it was a no brainer.
When I was pricing around another 2.8 or rebuild $750ish, 3.1 stroker kit $499, used 3.4 with warranty $400+$50 core. So it was a no brainer.
Alex and I have both found used 3.4 engines with varying warranties running about $500 here in Central Florida.
I have started pricing out complete new bearings, (main, rod and cam), new timing chain, rings, all gaskets, lifters and pushrods, and oil pump. What I have so far looks like I could easily "refresh" a moderately worn 3.4 short block and use my old 2.8 heads, which are in good shape other than needing some valve stem seals, with an all-up cost of approx. $900 !
My broken 2.8 has all new sensors, new distributor, new coil, new FS exhaust system, new manifolds and new hoses on it, so those get recycled as well as the new water pump I just put on it.
I haven't added the cost of an 88' flex plate yet, or other "goodies" I want to add to the build, like Rodney's steel vac lines, new injectors, misc. new bolts and nuts and powder coating my upper manifold and valve covers, (and possibly 1.6 roller rockers), so the total cost is bound to go up some, but all in all this sure looks like very inexpensive swap that will keep the basic stock Fiero look I want and add a bit more performance with a reliable "fresh" engine.
Since I'm still running the 125C auto trans, It looks like I can do this entire swap "out the top" without dropping the cradle.
I can barely wait to get started!
Anything else other than paint and cleaning supplies I should add to the list??
Randy
------------------ Everyone thinks I'm psychotic, except for my friends deep inside the earth.
I have a ? If I take my used engine an applied degreaser, can I take it to the nearest car wash and pressure wash it or is that against the law? The reason I ask is because the stuff that will come out of the engine will go in to the drain.
I have a ? If I take my used engine an applied degreaser, can I take it to the nearest car wash and pressure wash it or is that against the law? The reason I ask is because the stuff that will come out of the engine will go in to the drain.
I would think that if you're not dumping a bunch of oil and coolant down the drain it would be fine.
I see people use engine degreaser and the sprayer on the motor IN the car all the time...dunno why the motor OUT of the car should be any worse.
BTW...Don't mess around with "GUNK" brand degreaser or any of those other "cleaners". Just get yourself a few cans of the cheap store brand carb cleaner at Advance / Discount auto parts, (red & black can). That stuff will RIP the worst grease dirt and crud off of anything....it will also strip paint so be careful... Clean off the residue with soapy water afterwards...rinse and dry. Before you try to paint, wipe down the parts with lacquer thinner or acetone and let them air dry. If you're in a REAL big hurry, use a hairdryer or heat gun on low
If you use just carb cleaner to clean everything, better buy stock in it as it goes soooo fast, does work great though. I used the gunk NON-FOAMY stuff and a brush. works preaty well.
i have a good running 2.8 in my car right now so im in no hurry to get the swap done. I also have a body and interior im putting together this spring so money is a lil tight bc of that fact. just had a buddy with the motor for sale and had to jump on it.
If you use just carb cleaner to clean everything, better buy stock in it as it goes soooo fast, does work great though. I used the gunk NON-FOAMY stuff and a brush. works preaty well.
Thanks Gary and sardonyx!
Guess I'll go ahead and drop the cradle since it seems to be the easier way, plus it will lessen the risk to my new paint...
As far as cleaning goes, I have a portable pressure washer and I've used the cheapo carb cleaner many times to loosen the crud up and then blast it off. Works fine...really Approx. 6 spray cans of the stuff at approx. $2 per can usually does an average engine block. This stuff will eat the hide off a buffalo Detergent and water, along with some scrub brushes gets the remaining film off nicely. I'm not painting a show car engine, (yours is outstanding by the way). Just probably give it a nice even coat of engine enamel, probably in a light color like silver or GM blue so it's easy to spot any oil leaks later on. I'll toss the intake manifolds and valve covers in the blast cabinet and get them ready for the beauty treatment....
I'm think that a few "upgraded" parts like a roller timing chain set, 1.6 roller rockers, performance push rods and lifters might be a good addition while I'm putting in fresh bearings, rings and gaskets. Probably hang a high volume oil pump on it too. Have to remember to put in the Rodney exhaust studs I bought for my 2.8 and never installed
I read the posts regarding the stock vs performance cam, so I'll leave well enough alone and use the stock cam.
The engine I found was checked out by the salvage yard and shows 155-170 compression on the cyls and good oil pressure & no smoke. It's a 130k mile engine so I'm hoping the internals look good enough not to require machine work, just hone the cyls and re-ring it. I'll see what the crank journals look like as well when I get the rods and main caps off.
Since I plan on new head gaskets anyway, I'll see what the valves look like and choose between my old 2.8 heads or the salvage ones. I know my old 2.8 heads are in good shape so they'll probably be transfered.
With all that, I'm hopeful of having a fairly reliable motor..we'll see....
I'm also tossing around the idea of a 4T60 or 440T4 trans swap along with this motor swap but not sure how much work that would be right now. GKDINC says he has been running his SBC with the 125C trans for quite awhile, so I figure I ought to be ok with my 125C with the 3.4
Well, as I posted earlier, I found a 3.4 in good condition and today I got it back here to "Scuderia Randy" and I'm eager to get started.
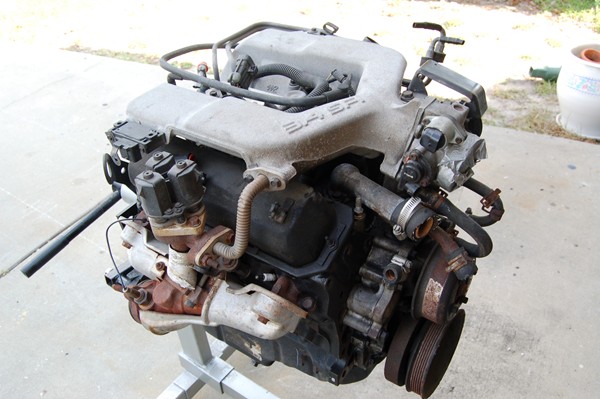
As the salvage yard said, it's a 103k motor with 155-170 compression readings and gaged 55-60 psi oil pressure. No knocks, no smoke and a 60 day warranty. $426 later and it was in the truck... Overall the motor looks pretty clean, but I'll know a lot more once I start pulling it apart. The salvage yard even solvent pressure cleaned it before I came to pick it up...not a spotless job, but it looks like they got all the heavy and really slimy stuff of it which will make things much easier.
The plan is to install new main and rod bearings, new rings and head gaskets, front and rear seals and a new timing chain set. New lifters and pushrods and some 1.6 roller rockers will be going in also. Still undecided about cam bearings, but I might just do those as well so I'm sure about everything.
My tastes in "decor" are a little different than yours, so the mill is definately going to look a lot more "conservative", but hopefully it will look as good as I hope it runs
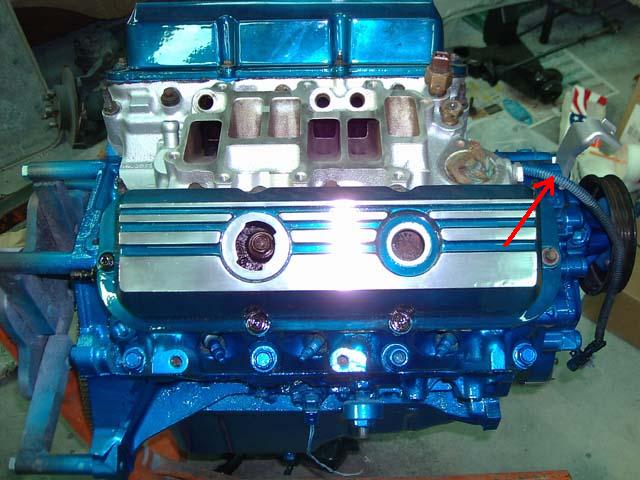
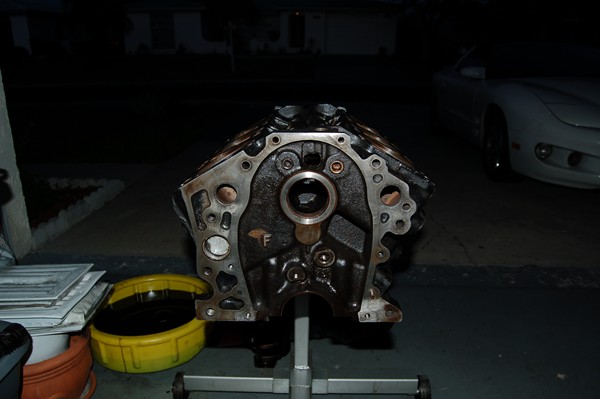
What is the wiring that comes off the top of the block, (red arrow pointing to it), and do I need it? Looks like it was for the 3.4 DIS. Should I leave it in place, or is there a way to remove it and plug the hole in the block? How about simply clipping the wires and leaving the connector in the block?
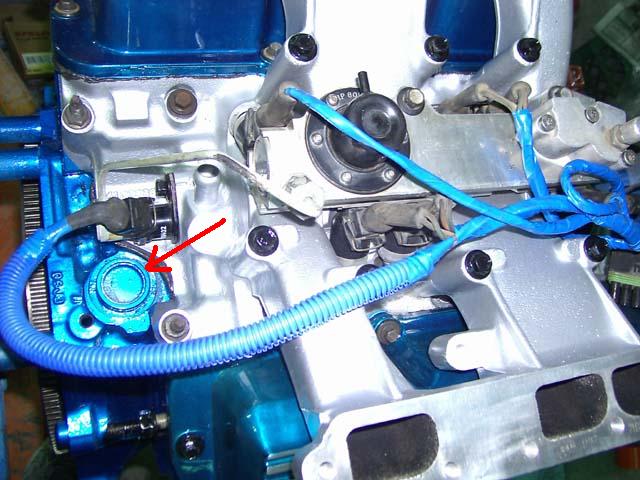
2nd Dumb question: I can't seem to get the distributor plug out of the block. The hold down bracket is removed and I've grabbed the darn thing with channel locks, but all it does is spin... What's the secret to this?
What is the wiring that comes off the top of the block, (red arrow pointing to it), and do I need it? Looks like it was for the 3.4 DIS. Should I leave it in place, or is there a way to remove it and plug the hole in the block? How about simply clipping the wires and leaving the connector in the block?
2nd Dumb question: I can't seem to get the distributor plug out of the block. The hold down bracket is removed and I've grabbed the darn thing with channel locks, but all it does is spin... What's the secret to this?
Randy
You can leave the extras sensors in the block as plugs, if you dont want the wire, clip it.
Yeah you have to twist and PULL HARD as it has most likely never been out since new. The plug is just like the bottom of a distributor, as the plug runs the oil pump, just like the distributor does/will.
You can leave the extras sensors in the block as plugs, if you dont want the wire, clip it.
Yeah you have to twist and PULL HARD as it has most likely never been out since new. The plug is just like the bottom of a distributor, as the plug runs the oil pump, just like the distributor does/will.
Thanks! Guess I should have had a clue what the underside of that plug was like when I pulled the oil pump and the drive rod for it out of the block ....which gives me a thought !! Why couldn't you just take a long 1/4" extension and run it up thru the oil pump drive rod hole and tap the plug out?? Seems to me that if the extension fits into the socket on the drive gear it wouldn't hurt anything........just athought...think I'll try it out unless you know better.
Thanks! Guess I should have had a clue what the underside of that plug was like when I pulled the oil pump and the drive rod for it out of the block ....which gives me a thought !! Why couldn't you just take a long 1/4" extension and run it up thru the oil pump drive rod hole and tap the plug out?? Seems to me that if the extension fits into the socket on the drive gear it wouldn't hurt anything........just athought...think I'll try it out unless you know better.
Thanks Again..
Randy
OK..It works great! No need to wrestle with those channel locks, twisting and pulling. Just remove the hold down bracket, remove the oil pump and drive rod and then use a 1/4" drive long extension up thru the hole and seat it into the drive socket on the plug and tap away. The plug came out after 2 light taps. Couldn't have been easier.
Getting the cam sensor out was a little more complicated. The flange on it was broken away and so I had to dril a small hole in it and insert a sheet metal screw and then pull it out with pliers
Dear God.....I've been mapping out how I want to do a Fiero. Hopefully moving to a house, rather than aa apartment, this month or next. Thanks to a broken leg and an ankle I've read about 200 threads in the past couple of weeks. I gotta tell you sardonyx247 this is the most informative engine-swap thread I've encountered.....incredible. I've earmarked it for my swap.
What bolts are using to hold the engine in the engine stand and where can I get them? If you have a part number, even better.
Thanks
I bought some M12 X 1.75 bolts (3.00 lg.) at ACE Hardware. They have a GREAT selection of fasteners. Metric, SAE, stainless and even hardened high strength...LOVE the place!
[This message has been edited by randye (edited 04-03-2007).]
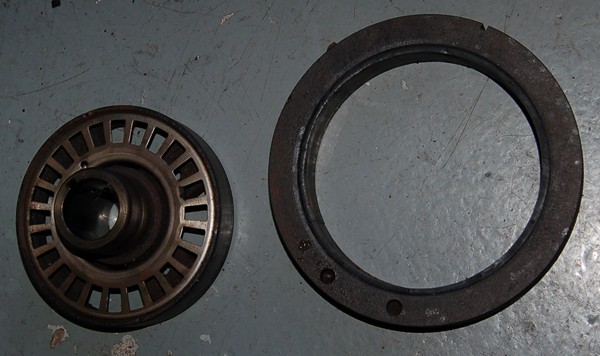
Looks like I just made my first major screw-up How NOT to pull off a harmonic balancer:
I'm assuming the thing is now toast. Placing the puller hooks behind the outer ring appears to be a big no-no. It just pulls the rim off along with the rubber ring inside it. I should have known better, but..... Others have mentioned using the balancer from the 2.8 on the 3.4. Is this possible, or even recommended, or do I have to add a new 3.4 balancer to the parts list now?
I'm assuming the thing is now toast. Placing the puller hooks behind the outer ring appears to be a big no-no. It just pulls the rim off along with the rubber ring inside it. I should have known better, but..... Others have mentioned using the balancer from the 2.8 on the 3.4. Is this possible, or even recommended, or do I have to add a new 3.4 balancer to the parts list now?
Randy
Yes, to both questions. That balancer is toast, and other than the grate thing for the crank sensor on the 3.4, the 2.8 and 3.4 balancers are the same.
Dropped off my block crank and heads at the machine shop today.
Block will be cleaned, and new cam bearings installed and a broken head bolt extracted...looks like the bolt had been broken in the head for a VERY long time! (I'll hone the cyls. and reinstall new plugs when it gets back)
Heads are getting cleaned and a complete valve job.
Crank is getting ground 10/10.....the journals were a little scored from the PO not changing oil, so just some precaution.
Just thought I'd mention that I sent sardonyx247 a message asking if he minded me "glomming" onto his thread, if only to add my learning experience to an already fantastic thread and give some detail on rebuilding the 3.4 from the crank, out.
No response yet...sardonyx247 check your PMs
If nobody minds..especially sardonyx247, I'll continue, but I'll be happy to start anothet thread if needed. Just thought having a lot of info in one place might be helpful.
Yeah anything I might of missed or just didn't take a pic of it. feel free to add. Internal pics would be good too. I have another 3.4 swap about to start so I may be adding too.
I'll have a good deal of internal pics to share as I rebuild my 3.4 from the crank, out. If I make any mistakes on this, I hope some of the more experienced motor gurus will corect me
First a photo of the pile of parts removed from the 3.4 after getting it home from the salvage yard: What a MESS!, but about all that will be saved from this pile is the cylinder heads.
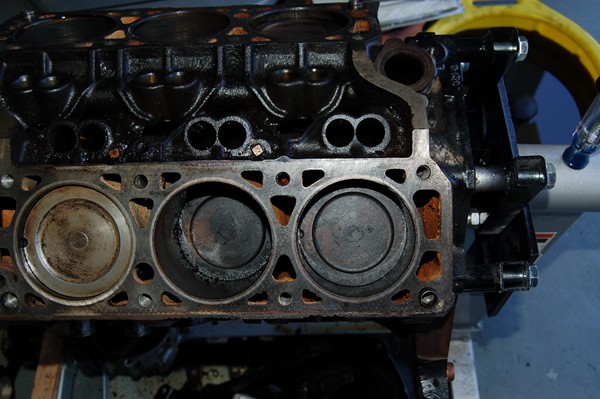
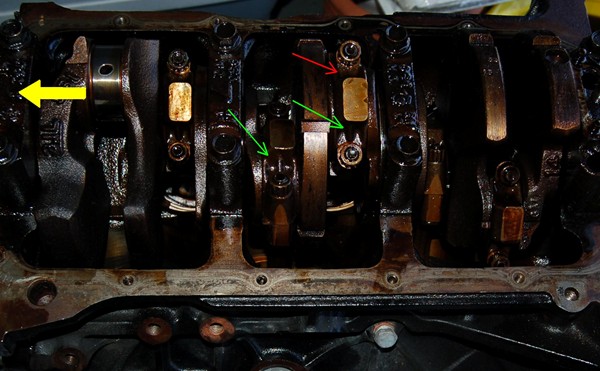
Here's the top side showing one piston I just wiped with some solvent to see how bad the carbon build-up is. Important to note here is the small semicircular notch in the pistons. They all face toward the front of the motor. If you're going to remove the rods and pistons it's important to get them installed back in the same order and orientation. Lots of rust in those coolant passages!!
The bottom side of the motor showing the crankshaft and rod caps. The yellow arrow is toward the front of the block. You need to keep the rod caps in the same orientation and mated to the same rods. Note that each rod cap has a small gusset or web on one side shown by the green arrows. Red arrow shows the rod cap side with no gusset. If you remove the pistons and rods from the block make sure you keep the rod caps with their respective rods and just put them back on the rod bolts temporarily and put the nuts back on finger tight to keep them together. You can see that I've already removed the #1 cylinder rod and piston, (near the yellow arrow)...the journal on the crank looks ok so far. Be VERY careful when removing the rod caps and tapping the pistons out so that you don't nick the crankshaft bearing journals with the rod bolts! Remove the rod cap nuts using a 13mm 12 point socket and then tap on the ends of the rod bolts using a small bock of wood and a hammer. Once the rod cap is loose, gently pull it off and place some short pieces of rubber tubing over the threads on the rod bolts, then using a longer piece of wood or a hammer handle gently tap the piston out of the block,,,don't let it fall on the floor!