BUILD 1: A COMPLETE BUDGET SERIES II 3800 SUPERCHARGED FIERO SWAP AND/OR 3800 REPAIR GUIDECLICK TO VIEW MOST OF BUILD 1 ON AMAZON CLICK HERE TO VIEW MY EBAY STOREFRONT WITH LISTS OF MANY OF THESE PARTSCLICK HERE FOR A PRICING GUIDE AND A CUSTOMIZABLE BUILD SHEET (maintained infrequently)NOTE: THIS
BUILD 1 LIST IS COMPLETE AND INDEPENDENT OF
BUILD 2, BUT
BUILD 2 INCLUDES THIS
BUILD 1 LIST UNLESS NOTED!
BUILD 2 ALSO INCLUDES CONVERTING FROM A SERIES II TO A SERIES III
NOTE: The ideal donor car or motor to buy is a 1998-2002 Pontiac Grand Prix GTP or Regal. If you do not get an engine from a GTP or Regal, there are many parts listed below that you will need in addition to make it fit in a Fiero.
Preface: The output of this engine is expected 280 crank horsepower with optional easy, minor modifications. Those modifications are:
-3.4" supercharger pulley - for slightly increased air
-180 degree thermostat - for slightly cooler combustion
-Tune the computer (delete VATS security, increase shift speed, increase torque limiter, delete ABS, radiator fan setpoints, adjust fuel, MAF calibration, timing, check local laws before disabling EGR/Rear O2 Sensor etc.) (ECU/PCM)-Autolite 104 Spark Plugs (2 heat range colder than stock spark plugs) - for slightly higher knock resistance
This build thread also assumes you optionally
DELETE the following:
-Swap the valve covers so that the oil fill cap is on the other side so it is accessible from the Fiero engine bay.
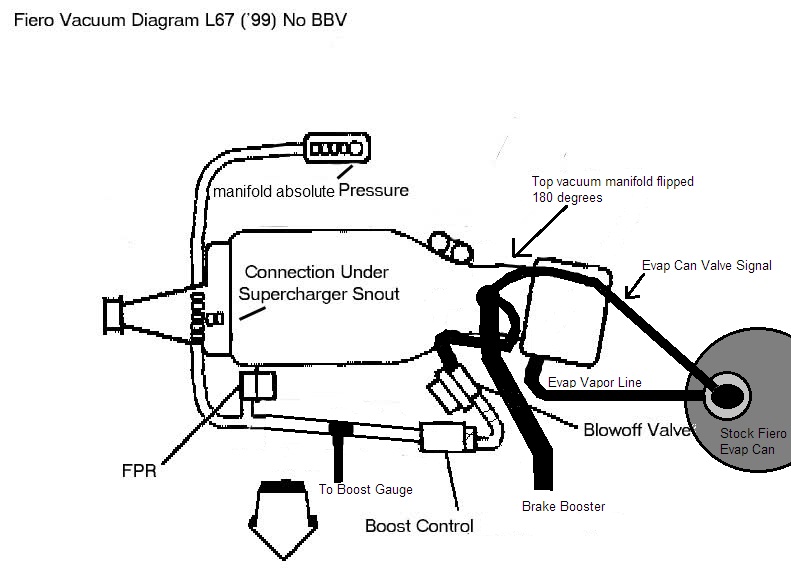
-"Coffee can" vacuum accumulator canister for stock cruise control - stock Fiero cruise control allegedly works by hooking the vacuum line directly to the supercharger port, since the 3800 has more vacuum than the stock Fiero engine.
-Fiero vacuum lines except brake booster and cruise control (unless deleting cruise or switching to the 3800 cruise control module)
-Alternator bracket/coolant circuit (relocated and cooling circuit bypassed)
-Power Steering Pump
-Optional: Stock Fiero intake - requires new intake mounted.
-Optional (check local laws): EGR system - requires welding and sealing shut holes in exhaust and lower intake manifold, detailed in
build 2.
Requires reprogramming the computer to delete EGR codes and functionality.-Optional (check local laws): Catalytic Converter and Rear O2 Sensor.
Requires programming the computer and deleting rear O2 sensor codes and functionality.-Optional (check local laws): EVAP System/vacuum lines - requires plugging supercharger hole with freeze plug and JB weld, reprogramming the computer, plug the extra EVAP hose on the fuel tank header, and venting the gas tank cap (You can easily do this by removing the valve in the gas tank filler cap.)
You can swap this build in less than 1 month and expect a 13-13.5 second quarter mile and a 1.9 60' time without modifying the tune.THE LIST:The numbers in (x) are the quantity of parts you need to order.
-----PARTS YOU NEED TO TAKE OFF THE DONOR CAR------Engine
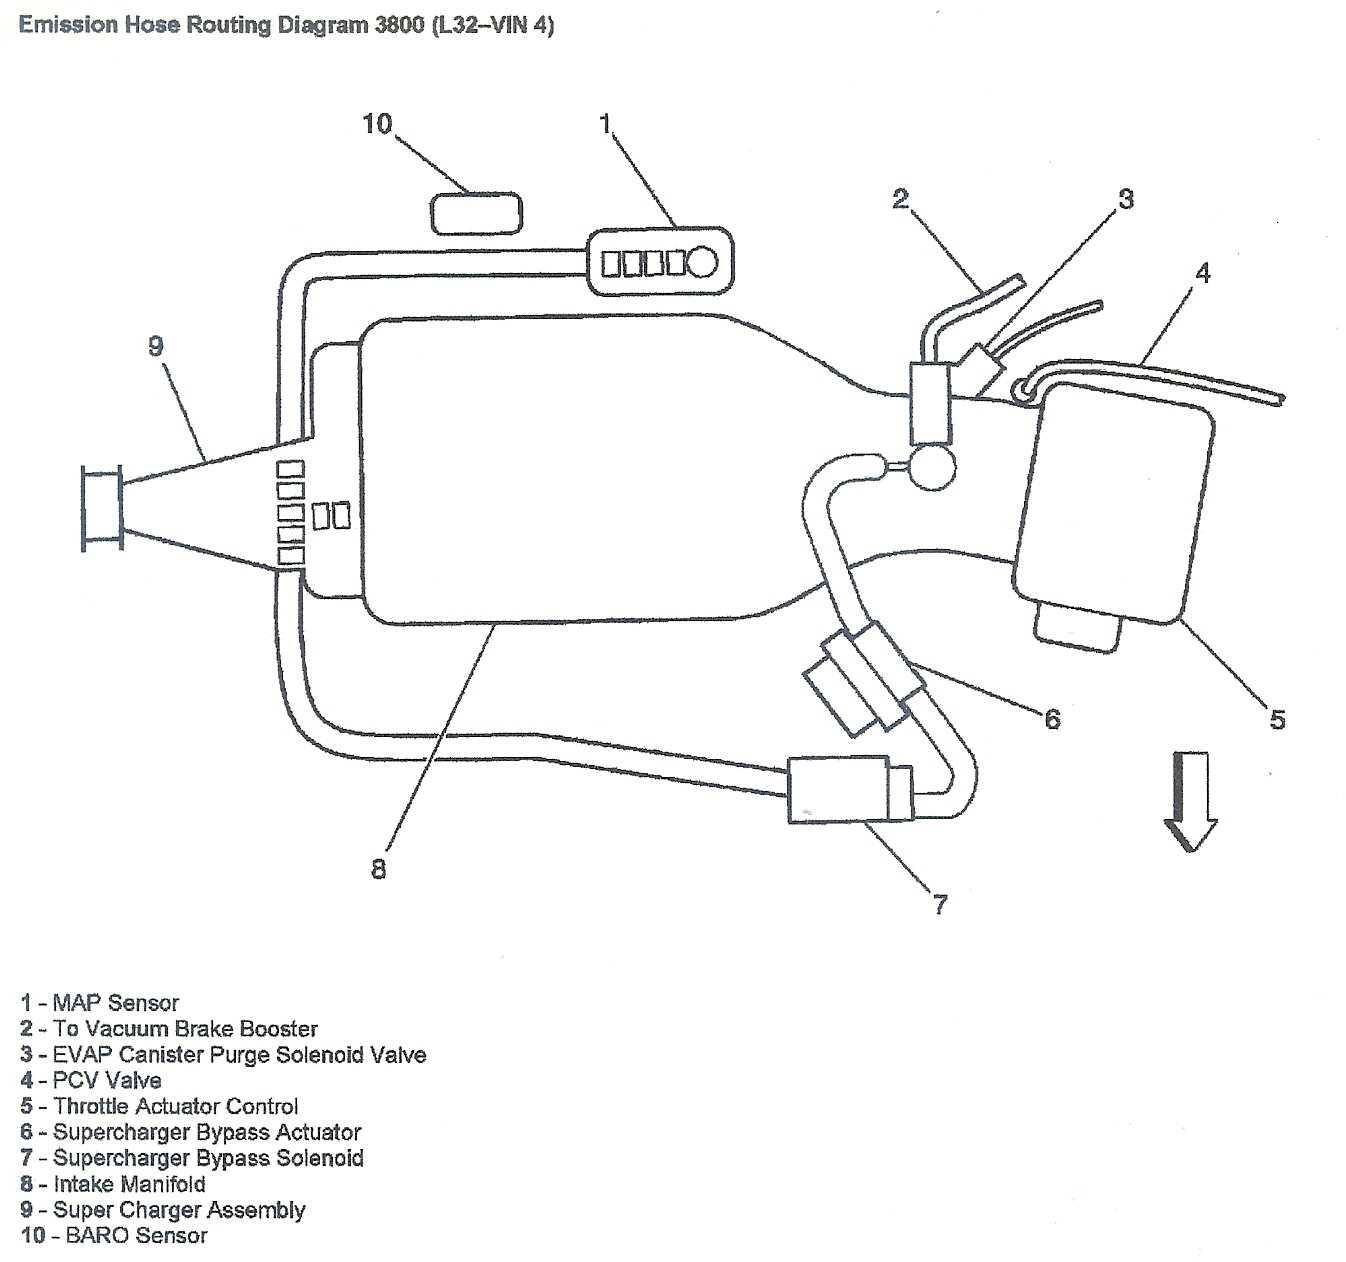
-Map Sensor Vacuum Lines
-Transmission (optional; bolted to engine anyways)
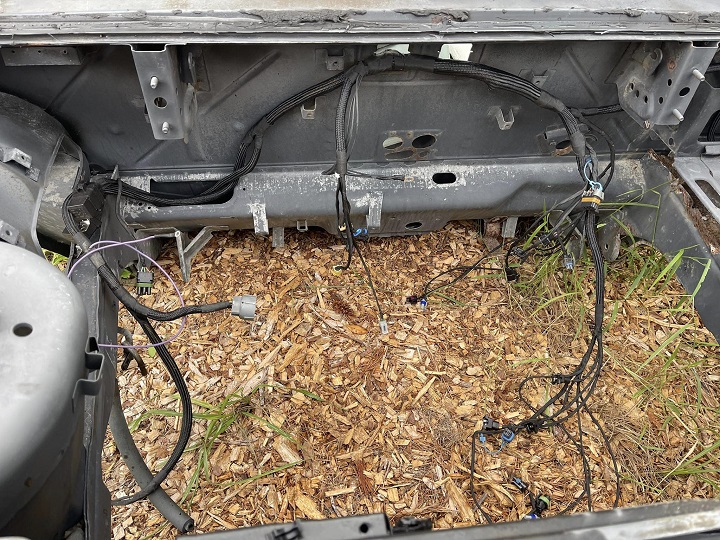
-Wiring Harness up to the Firewall + OBD II Connector from inside the car (cut the wires) + Fiero Wiring Harness
-Computer
-A/C Hose up to the firewall
-3" Exhaust flange (cut it off from the car side)
-Extra fuses and relays from the fuse box
-Power washer fluid pump, tank, and hoses if you want some cheap methanol injection (not covered in this guide)
-Electronic Cruise Control Module and Cruise Cable
-Both CV front axles (from a Pontiac grand prix GTP, others may or may not work)
Find a donor car here (search for an engine for a 1998-2002 Pontiac Grand Prix supercharged, enter in your zip code and select sort by distance):
https://car-part.com/ OR
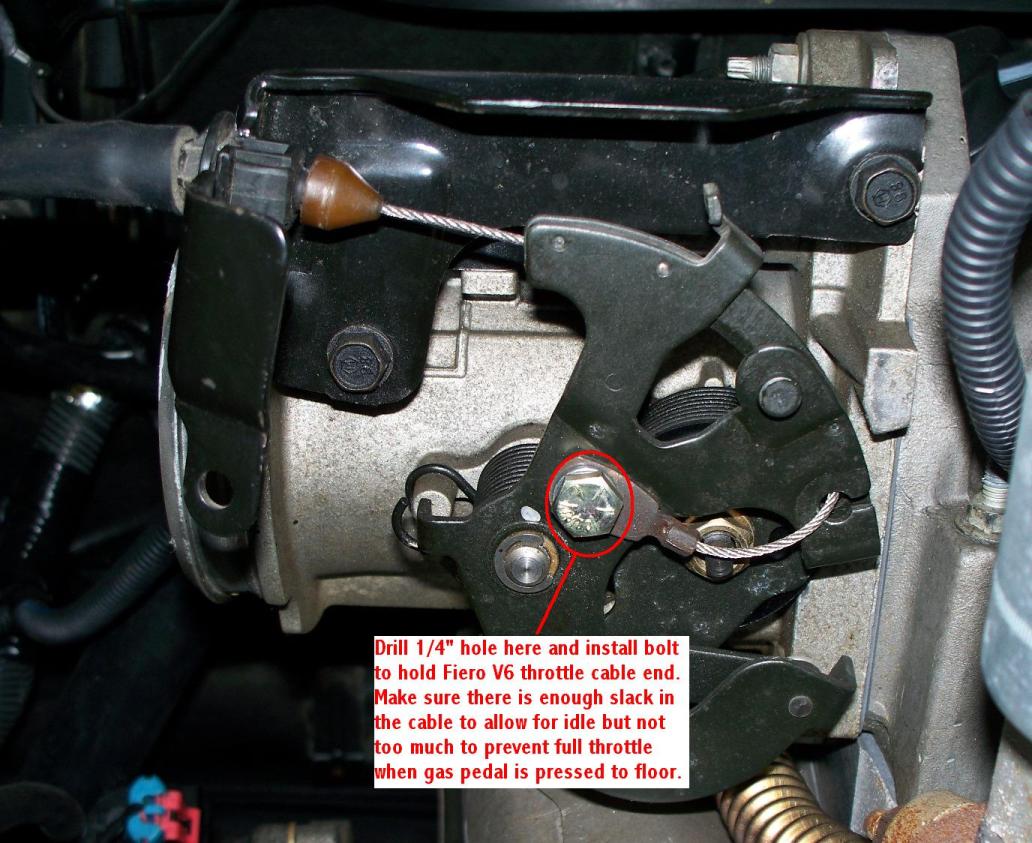
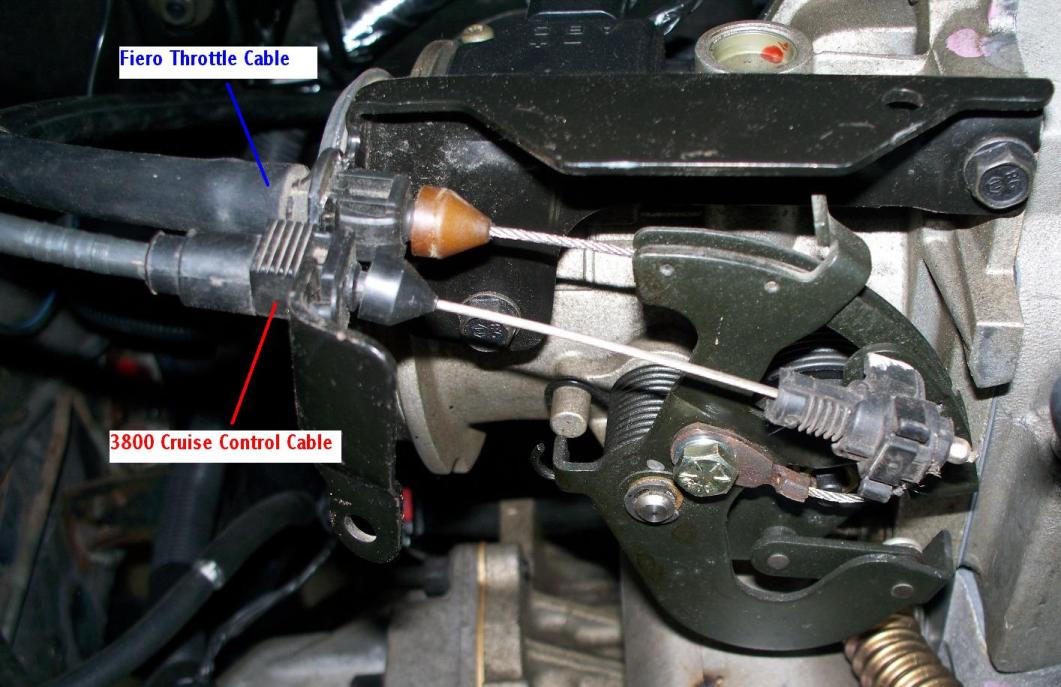
Junkyard Search-----AIR-----NOTE: Throttle cable mounting to a 3800 Series II motor - see
Assembly Diagrams section Supercharger 3.7" pulley belt - 66.3", 6 ribs (1x):
Roadmax 6k663AP -
https://www.amazon.com/dp/B..._US&ref_=as_li_ss_tlNOTE: You may have to go up or down a size in 0.5" increments to ensure tight fitment; final fitment may vary. Search in RockAuto with a * for a wildcard (K0606** or 6k6** or 6pk6** or 6**k6 for 60"-69" belt lengths) -
https://www.rockauto.com/en...h/?partnum=6k6%2A%2AOptional: Supercharger 3.4" pulley belt - 66", 6 ribs (1x):
Gates K060660 -
https://www.amazon.com/dp/B..._US&ref_=as_li_ss_tlNOTE: You may have to go up or down a size in 0.5" increments to ensure tight fitment; final fitment may vary. Search in RockAuto with a * for a wildcard (K0606** or 6k6** or 6pk6** or 6**k6 for 60"-69" belt lengths) -
https://www.rockauto.com/en...h/?partnum=6k6%2A%2AOptional: 3.4" Supercharger Modular Pulley System (1x):
ZZPerformance 3.4 MPS -
https://ebay.us/aTa3fFAlternate - Smoothflow 3.4 Polished Finish Pulley System MPS (Modular Pulley System) -
http://www.smoothflowpulleys.com/3800_MPS.htmlNOTE: DON'T JUST ORDER A BARE PULLEY! ORDER THE PULLEY SYSTEM WITH THE HUB THAT IS PRESSED ON TO THE SUPERCHARGER SHAFT!
NOTE: It is not recommended going smaller than a 3.4" pulley on a stock setup without more modifications to the engine first. See
BUILD 2.
Optional: Supercharger Pulley Puller (1x):
https://ebay.us/aQacLXNOTE: Re-installing the pulley can be difficult. Put an ice bag on the shaft and the new pulley hub in the oven and used a hammer and a block of wood to pound it on. There may be better tools for this installation.
NOTE: You can rent something like this from autoparts stores but they usually do not fit right.
Optional: Flexible air duct flex 4" dia, 41inch long, to replace stock Fiero/3800 air intakes(1x):
Spectre SPE-9751 -
https://www.amazon.com/dp/B..._US&ref_=as_li_ss_tlNote: This is a very easy fitting universal intake hose. See alternatives below for more ideas.
REPLACED IN BUILD 2 Alternative: Walker 42423 4" dia INSIDE, 18" long (1x):
https://www.amazon.com/dp/B..._US&ref_=as_li_ss_tlAlternative: Walker 43381 4" dia INSIDE, 36" long (1x):
https://www.amazon.com/dp/B..._US&ref_=as_li_ss_tlNote: For the above 2, you would need some couplings with a larger than 4" inner diameter.
Alternative: UCREATIVE U-SH-45-102-T (1x):
https://www.amazon.com/dp/B..._US&ref_=as_li_ss_tlAlternative: GM GENUINE 25173861 / Dorman 696-426 (2x):
https://www.amazon.com/dp/B..._US&ref_=as_li_ss_tlOptional: Air filter (1x):
K&N RE-1040 -
https://www.amazon.com/dp/B..._US&ref_=as_li_ss_tlNOTE: This entirely replaces the stock air intake and water separator. Air filter is fastened under fender well behind drivers' seat and behind the stock intake vent. This is the BIGGEST filter that I can fit behind the side intake scoop.
Optional: Air Filter Cleaning Kit for filter above (1x):
K&N Kit-99-5050 -
https://www.amazon.com/dp/B..._US&ref_=as_li_ss_tlOptional: Air filter wrap for above filter (1x):
FILTERWEARS K298K -
https://www.amazon.com/dp/B..._US&ref_=as_li_ss_tlNOTE: Keeps water out and your filter clean. Your filter gets VERY DIRTY in wet weather without one. See filter wrap size chart:
https://www.knfilters.com/search/wrapOptional: 1.9 Rockers (1x):
https://ebay.us/kpeqbMNOTE: NOT COMPATIBLE WITH ANY AFTERMARKET CAMSHAFT!!!! If you want some decent performance gains (5-7%) with minimal effort, these quite literally bolt on to the engine. Might be a good idea to replace valve springs if the engine is over 100,000 miles (see
build 2).
Valve cover seals (1x):
Ultra-Power VS50465R -
https://www.amazon.com/dp/B..._US&ref_=as_li_ss_tlNote: These wear out, consider replacing them to avoid an oil leak.
-----FUEL-----NOTE: Larry Curchoe will build and sell you a fuel system (may be more applicable to
BUILD 2) -
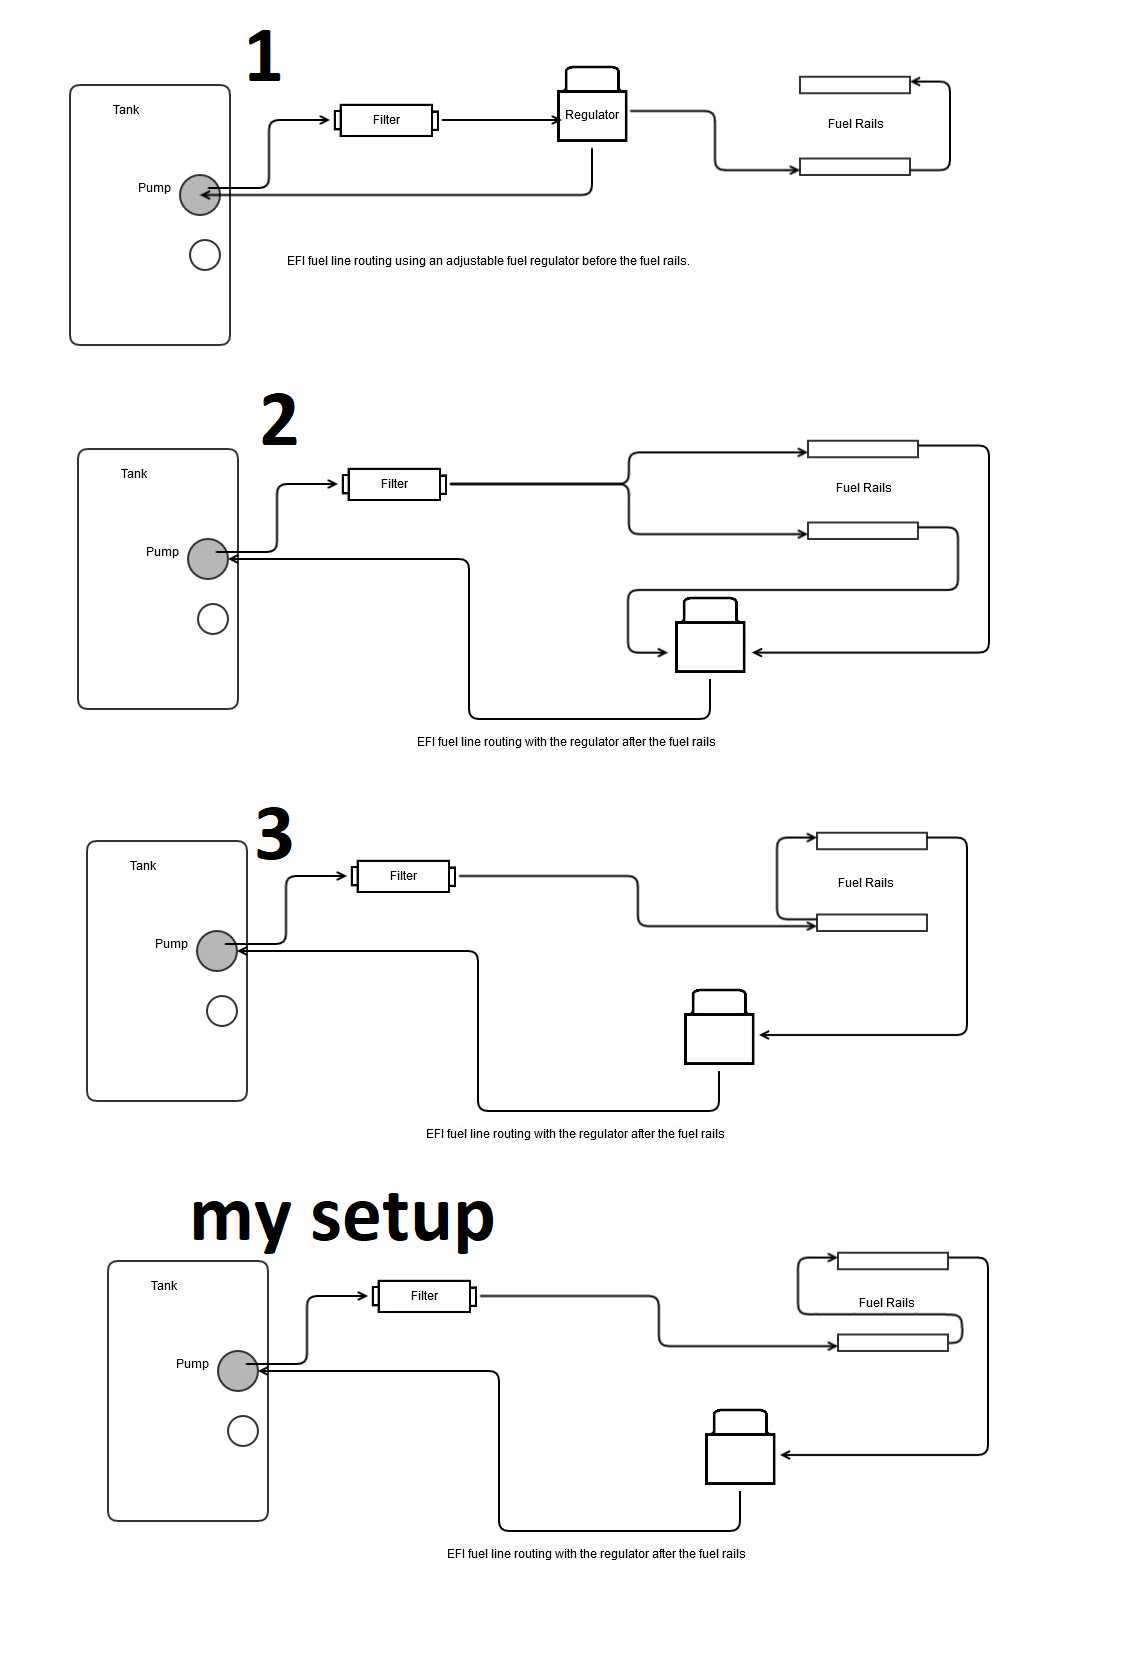
https://www.facebook.com/larry.curchoe/NOTE: This setup below connects directly to the 3800 stock fuel rails and the stock Fiero lines.
NOTE: FOR COMPLETE E-85/Ethanol CONVERSION and custom fuel rail setup, SEE
BUILD 2. This list replaces all Fiero hoses to allow for running ethanol, since most states have up to 15% ethanol in all fuel now.
NOTE: Check out how to modify Series III/Gen 5 rails for a Series II/Gen 3 -
https://www.gmtuners.com/fiero/returnless.htmFuel pump (1x):
Walbro 255 LPH F20000169 -
https://www.amazon.com/dp/B..._US&ref_=as_li_ss_tlAlternate (quieter): Quantum 255 LPH HFP-343 -
https://www.amazon.com/dp/B..._US&ref_=as_li_ss_tlNOTE: BE CAREFUL WITH THE QUANTUM PUMPS. THE INLET CAN BE CLOSE TO THE BOTTOM OF THE FUEL TANK AND SUCKED AGAINST THE TANK, NOT ALLOWING FOR FUEL FLOW AT HIGH FUEL DEMANDS. TRIM THE BOTTOM LIP OFF OF THIS FUEL PUMP TO GIVE MORE CLEARANCE FOR DRAWING FUEL FROM THE BOTTOM OF THE TANK, WHILE STILL ALLOWING ROOM FOR THE SCREEN TO FIT - REMOVE SCREEN BEFORE TRIMMING.
NOTE: The 3800sc requires slightly more fuel than the stock Fiero pump can put out. You might be able to get by without changing this if you do not modify the 3800sc at all. It can always be changed later, as the tank can be pulled separately.
NOTE: SEE
BUILD 2 FOR E85 CONVERSION. YOU WIILL NEED A 340+ LPH PUMP INSTEAD!
NOTE: Many fuel pumps out there are FAKES. Buy directly from the manufacturer's website or from this post.
REPLACED IN BUILD 2Fuel tank lock ring and seal (1x):
Dorman 579-001 -
https://www.amazon.com/dp/B..._US&ref_=as_li_ss_tlStock fuel rail hose release tools (1x):
Performance Tool W83148 -
https://www.amazon.com/dp/B..._US&ref_=as_li_ss_tlNOTE: These are a pain to use, see this video -
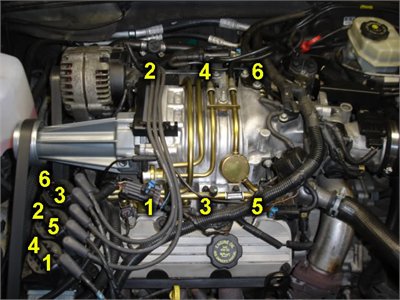
https://www.youtube.com/wat...kff2RlPWB_O&index=13SEE DIAGRAM BELOW FOR CORRESPONDING NUMBERS
0 - Optional (Check local laws): Block off / remove the EVAP circuit by cutting the EVAP fuel sender 1/4" hose and hose-clamping in a 1/4" bolt.
1 - Push-Lok Ethanol Fuel Hose 3/8" (1x):
Fragola 871006 (10ft) -
https://www.amazon.com/dp/B..._US&ref_=as_li_ss_tl2 - Fuel Filter (1x):
Wix 33481 -
https://www.amazon.com/dp/B..._US&ref_=as_li_ss_tlNOTE: With welded 16mm x 1.5 (M16-1.5) female inlet/outlet
3 - M16 x 1.5 Adapter to -6 AN (1x):
Edelbrock Russell 648060 -
https://www.amazon.com/dp/B..._US&ref_=as_li_ss_tl4 - 90° -6 AN Female swivel Push-Lok Barb Male (1x):
EVIL ENERGY CS00465D90 -
https://www.amazon.com/dp/B..._US&ref_=as_li_ss_tl5 - Stock 3800sc Fuel Rail 3/8" Supply Line To above -6AN Push-Lok adapters (1x):
Vibrant 16886 -
https://www.amazon.com/dp/B..._US&ref_=as_li_ss_tl6 - Stock 3800sc Fuel Rail 5/16" Return Line To above -6AN Push-Lok adapter (1x):
Vibrant 16885 -
https://www.amazon.com/dp/B..._US&ref_=as_li_ss_tlNOTE: Only required for Series II return style fuel rails, NOT Series III.
REPLACED IN BUILD 2 7 - 1/4" barb to 3/8" barb (1x):
Beduan 1yf-02920-srb -
https://www.amazon.com/dp/B..._US&ref_=as_li_ss_tl8 - 1/4" Fiero Ethanol fuel tank return hose (1x 5'):
UCREATIVE U-FH-30R7-5-14 -
https://www.amazon.com/dp/B..._US&ref_=as_li_ss_tlNOTE: For ethanol fuel
9 - 5/8 ID molded Ethanol hose with a right angle (1x):
Gates 28467 -
https://www.amazon.com/dp/B..._US&ref_=as_li_ss_tlNOTE: For ethanol fuel
10 - 1.5" Fiero Ethanol Fuel tank filler neck hose (1x):
Gates 21660 -
https://www.amazon.com/dp/B..._US&ref_=as_li_ss_tlNOTE: For ethanol fuel
11 - 180° bend -6AN to Pusk Lock 3/8" Barb (2x):
Dexepe OCH-AN6-180#1-BK-LC -
https://www.amazon.com/dp/B..._US&ref_=as_li_ss_tlNOTE: Only need 1 for a Series III Returnless style.
REPLACED IN BUILD 2  -----SPARK-----
Spark Plug Wire Kit for Custom Lengths (1x):
Taylor Cable 83253 (45 degree boots) -
https://www.amazon.com/dp/B..._US&ref_=as_li_ss_tlNOTE: You need a vise and a spark plug crimper below
Spark plug wire crimper to use with bench vise (1x):
MSD 3503 -
https://www.amazon.com/dp/B..._US&ref_=as_li_ss_tlOptional: Colder Spark Plugs - two ranges colder than stock Autolite 606 plugs, gap to 0.035"-0.040" (6x):
Autolite 104 -
https://www.amazon.com/dp/B..._US&ref_=as_li_ss_tlNote: Colder plugs decrease hot spots in the combustion chamber that could lead to KR reducing your timing and thus power.
REPLACED IN BUILD 2 Optional: Spark Plug Gap Tool (1x):
Performance Tool W80540 -
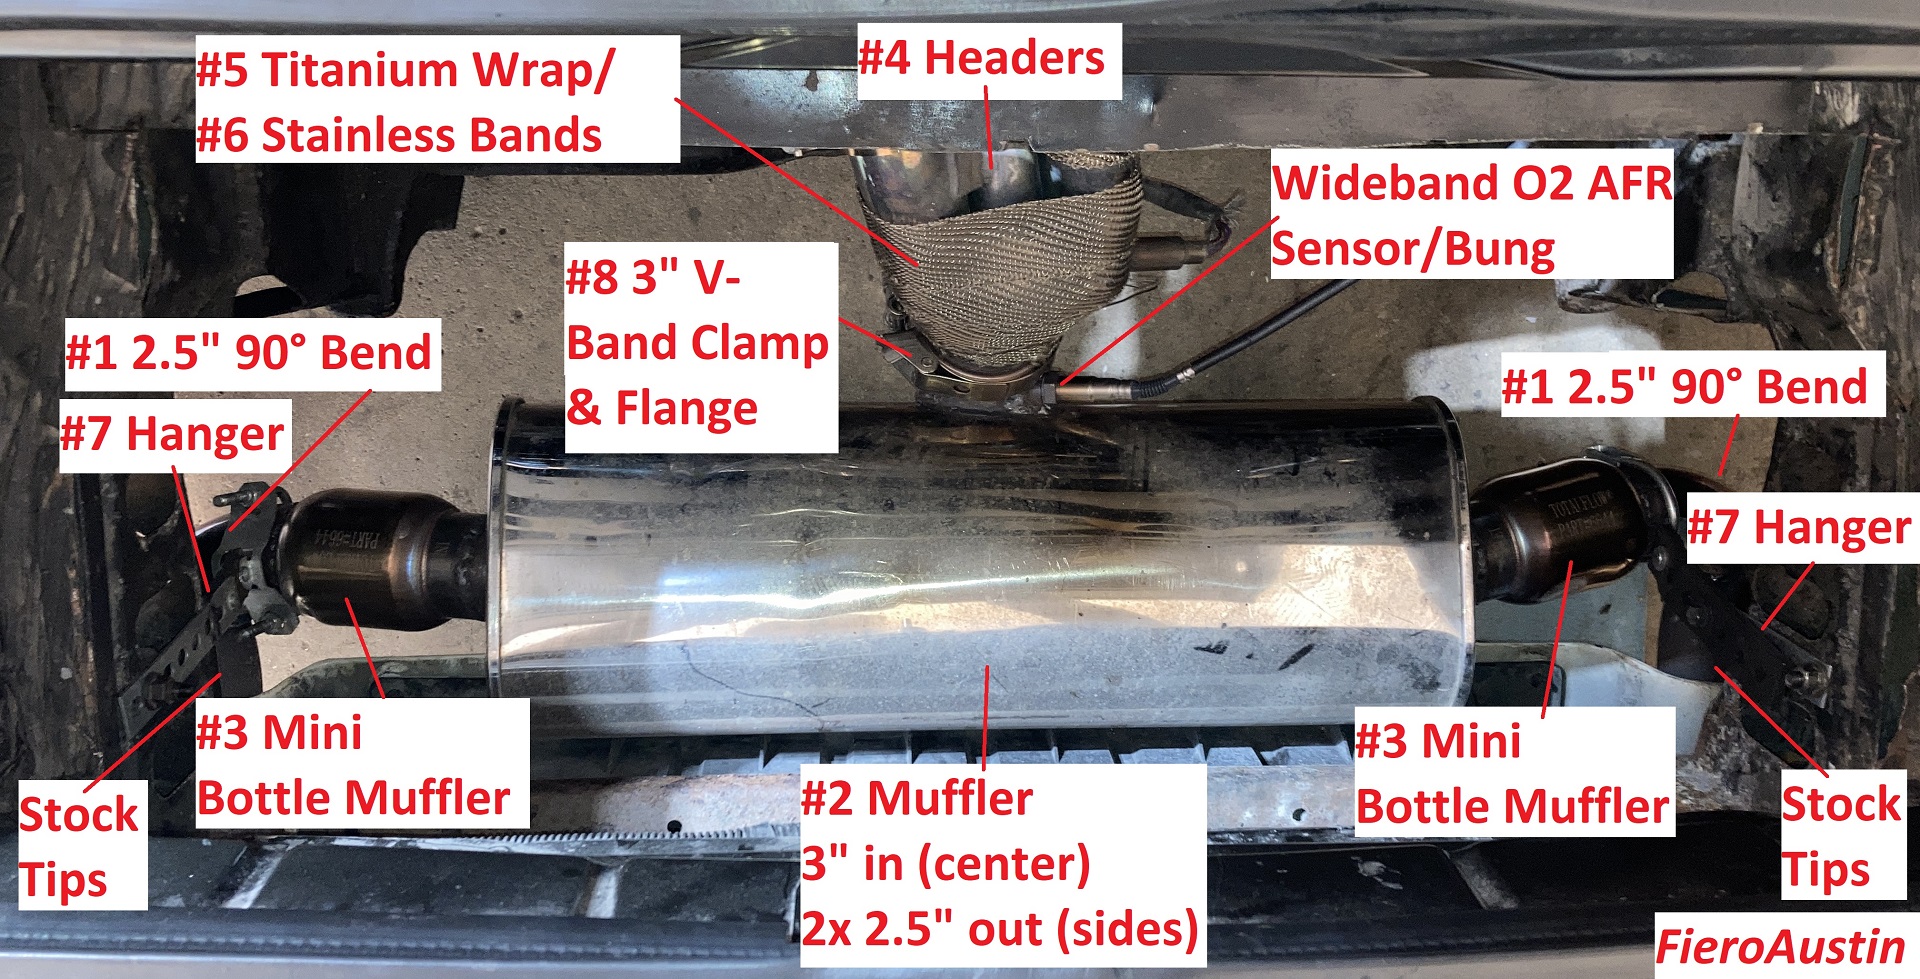
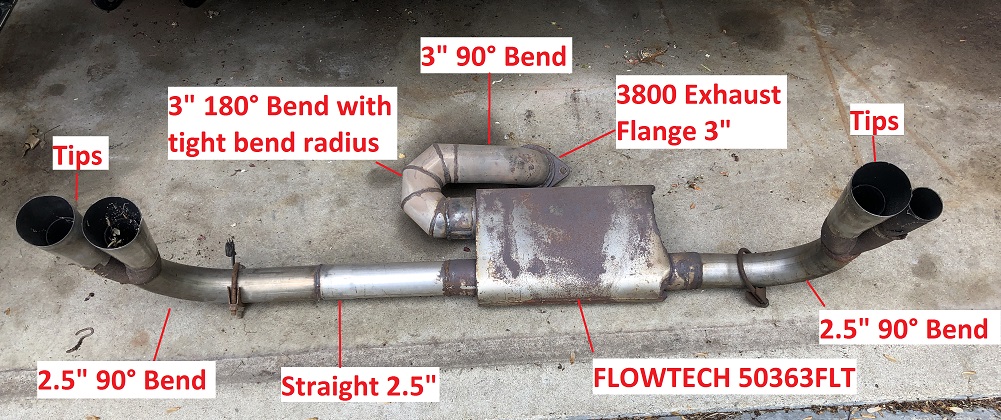
https://www.amazon.com/dp/B..._US&ref_=as_li_ss_tl-----EXHAUST-----NOTE: This exhaust system mates to the stock 3800 exhaust headers, which allegedly can support up to 300hp.
You will have to custom-weld your exhaust. There is no bolt-on exhaust for an engine swap (does someone want to start making these?). Final fitment can vary between year models of Fieros, engine mounts, etc. Go to an exhaust shop and get one welded up after the engine is in the car.
NOTE: The best pipes are mandrel bent stainless steel.
Muffler - 3" right in, dual 2.5" right + left out, 13" body length (1x):
Spintec 343SC -
https://ebay.us/MFESbZOR
Flowtech 50363FLT (may be discontinued) -
https://ebay.us/XDcSTtOR
Magnaflow 12158 (2.5" inlet, stainless, but is a good size) -
https://www.amazon.com/dp/B..._US&ref_=as_li_ss_tlNOTE: These below mufflers will not fit easily because they longer (especially with OE Fiero Routing, max dimensions 15x9.5x5"), but it may be possible to use them in an exhaust setup similar to what is pictured:
MagnaFlow 12265/12266/12267 (Stainless) -
https://www.amazon.com/dp/B..._US&ref_=as_li_ss_tlBORLA 40474 (Stainless) -
https://www.amazon.com/dp/B..._US&ref_=as_li_ss_tlOR
BORLA 400499 (Stainless) -
https://www.amazon.com/dp/B..._US&ref_=as_li_ss_tlOR
Walker 18375 (QUIET, 2.5" INLET, 2.25" OUTLET, CAN BE EASIER FOR A TIGHTER BEND RADIUS) -
https://www.amazon.com/dp/B..._US&ref_=as_li_ss_tlOR
Cherry Bomb SA2265-CE (2.5" INLET, 2.5" OUTLET, CAN BE EASIER FOR A TIGHTER BEND RADIUS) -
https://ebay.us/hC2z1GNOTE: You will have to weld a bend in your own exhaust. Pictured below.
REPLACED IN BUILD 2 Donor car exhaust flange (1x):
YOU MUST CUT OFF THE EXHAUST FLANGE FROM THE DONOR CAR TO USE IN THIS EXHAUST SETUP!
90° bend 3" diameter (1x):
X AUTOHAUX a22111700ux0403 -
https://www.amazon.com/dp/B..._US&ref_=as_li_ss_tlNOTE: Must be VERY TIGHT bend radius, likely needed custom weld job. You will have to cut and re-weld this at a sharper angle.
REPLACED IN BUILD 2 180° bend 3" diameter (1x):
X AUTOHAUX a22111700ux0413 -
https://www.amazon.com/dp/B..._US&ref_=as_li_ss_tlNOTE: Must be VERY TIGHT bend radius, likely needed custom weld job. You will have to cut and re-weld this at a sharper angle.
90° bend 2.5" diameter (1x 2-PACK):
X AUTOHAUX a22111700ux0402 -
https://www.amazon.com/dp/B..._US&ref_=as_li_ss_tlStraight 2.5" diameter, 1 ft (1x):
X AUTOHAUX a22111700ux0435 -
https://www.amazon.com/dp/B..._US&ref_=as_li_ss_tl2.5" diameter generic exhaust hanger U-bolts (1x 2-pack):
PALOZO EC-2.5 -
https://www.amazon.com/dp/B..._US&ref_=as_li_ss_tlNOTE: Could use the stock Fiero rubber exhaust hangers to hang these from
2.5" diameter Exhaust Tips (2x):
Re-used stock Fiero exhaust tips
Optional: 96-02 Camaro/Firebird Oil Pan for Stock Exhaust Routing NOT PICTURED (1x):
Spectra Premium GMP46A -
https://www.amazon.com/dp/B..._US&ref_=as_li_ss_tlNOTE: ONLY If you want to make exhaust like the stock Fiero routing, you need 1996-2002 Camaro or Firebird oil pan
Optional: 96-02 Camaro/Firebird Oil Pan Pickup Tube for Stock Exhaust Routing NOT PICTURED (1x):
Melling 292S -
https://www.amazon.com/dp/B..._US&ref_=as_li_ss_tlNOTE: ONLY If you want to make exhaust like the stock Fiero routing, you need 1996-2002 Camaro or Firebird oil pan
 -----COOLANT AND HOSES-----
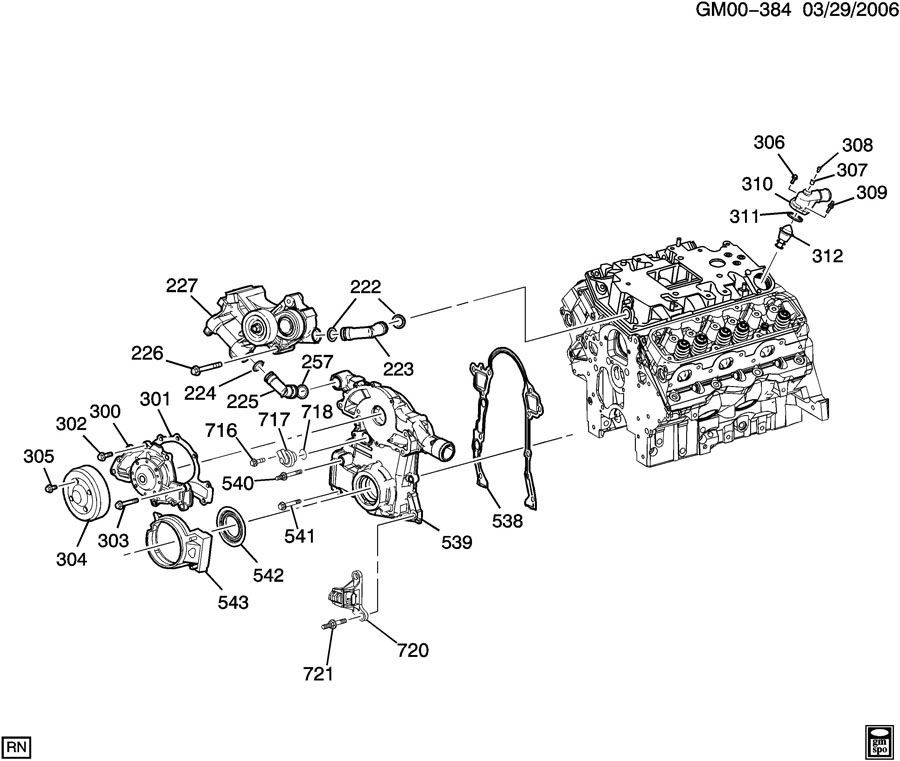
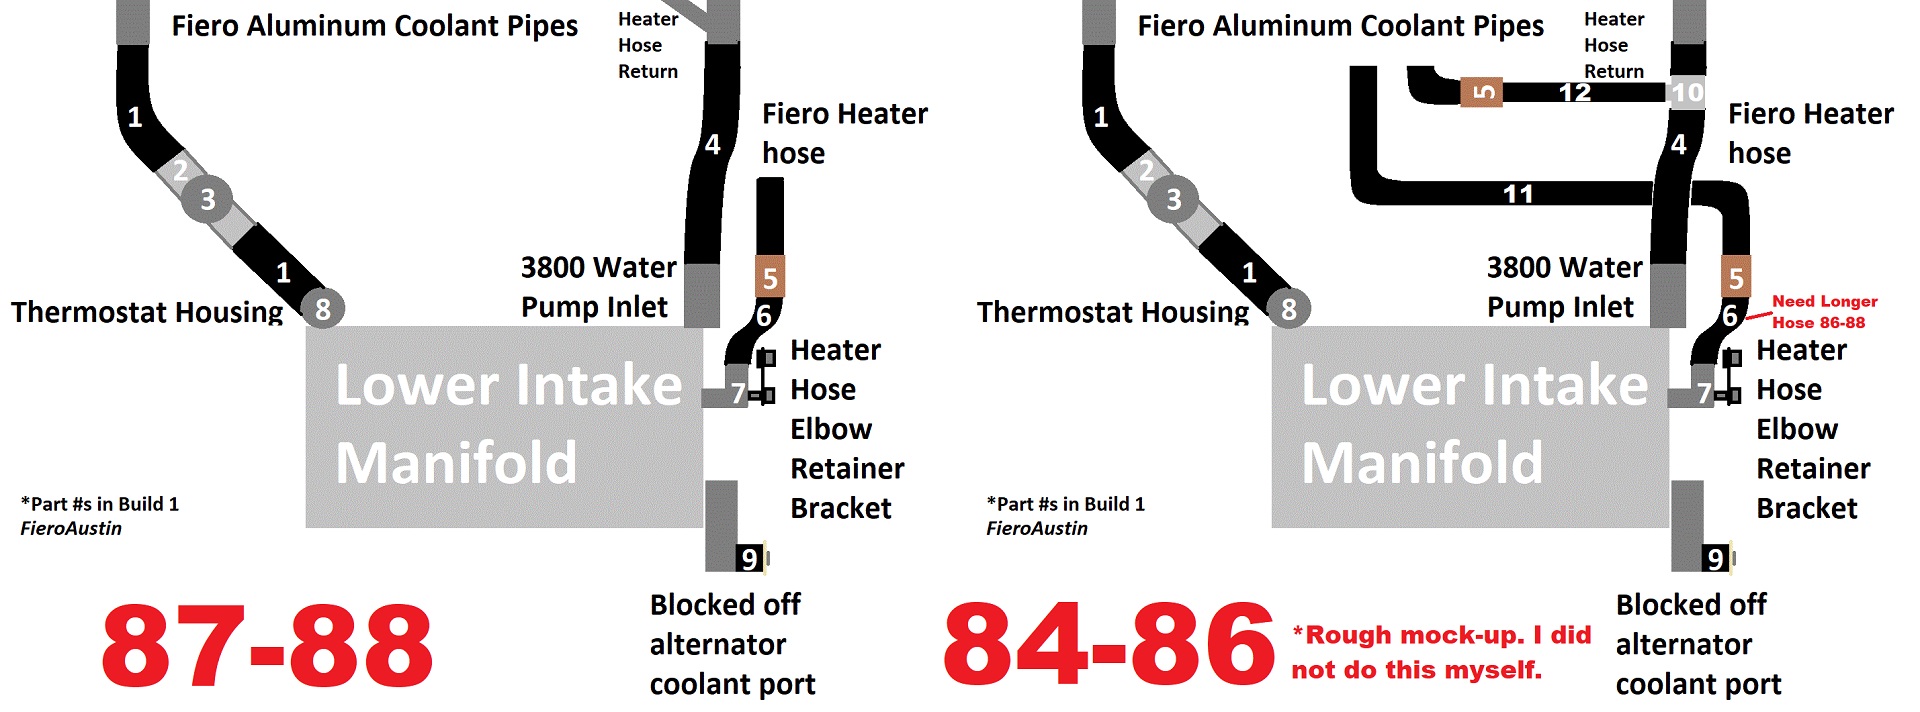
SEE DIAGRAM BELOW FOR PART #s
NOTE: THE BELOW DIAGRAM AND PART #s RELATED TO THE HEATER HOSE ONLY WORK FOR AN 87-88 FIERO. YOU WILL NEED A DIFFERENT HEATER HOSE FOR OTHER MODELS. TRY GETTING A T FITTING LIKE THE BUILT IN STYLE FOR 87-88 FIEROS.
NOTE: See this video on cooling system modifications.
https://www.youtube.com/wat...kff2RlPWB_O&index=341 - 3800 Thermostat housing to drivers' side coolant hose 1.25" to 1.25" (1x):
Dayco 71082 -
https://www.amazon.com/dp/B..._US&ref_=as_li_ss_tlNOTE: Cut a few inches off the end(s). Duralast E71082 also works.
2 / 3 - Radiator filler neck 1.25" inlet and 1.25" outlet (1x):
HCHCSPEED JP2826-SL -
https://www.amazon.com/dp/B..._US&ref_=as_li_ss_tlNOTE: To fill coolant. Plug the overflow nipple. There are many other ways to do this.
NOTE: To Avoid buying a ridiculously expensive custom thermostat housing (
https://westcoastfiero.com/...l-thermostat-housing) or to avoid making a new one. If you go the modified 3800/fiero thermostat housing route, it may work better for routing your heater core lines on an 84-86 Fiero instead of into the 3800 Lower Intake Manifold or instead of into the 3800 coolant inlet on the right side of the diagram below.
4 - 3800 Water pump 1.5" to Passengers' Fiero coolant hose 1.25" (1x):
Gates 21205 -
https://www.amazon.com/dp/B..._US&ref_=as_li_ss_tlNOTE: Cut a few inches off the small end. DAYCO 71126 also works.
5 - Barb coupling for below heater hose to stock Fiero heater hose 5/8-5/8" ID (1-2x):
ICT Billet AN627-10A -
https://www.amazon.com/dp/B..._US&ref_=as_li_ss_tlNOTE: Instead you could optionally use a barb ball valve shutoff for shutting off hot coolant circulation to the cabin of the car during the summer: Sharkbite 22462LFA -
https://www.amazon.com/dp/B..._US&ref_=as_li_ss_tl 6 - Heater Hose (1x):
1987-1988 Continental 63113 -
https://ebay.us/BtMRNa |
https://www.amazon.com/dp/B..._US&ref_=as_li_ss_tl or DAYCO C87641 -
https://www.autozone.com/co...641&redirectUrl=trueNOTE: This works well for 87-88 Fieros; earlier Fieros may need a longer heater hose to the firewall and a T in the return coolant pipe similar to an 87-88. Goes with the 5/8" barb above; you'll have to fabricate and mount a retaining bracket detailed in
LostNotForgotton's VideoNOTE: The 7/8" 3800sc heater hose elbow can squeeze on to 5/8" stock 87-88 Fiero heater hose line
OR
1984-1986 TBD
NOTE: Instead of fabricating a retainer bracket in the video above, some choose to tap the coolant hole in the lower intake manifold with threads and put a pipe 3/4 MNPT to 3/4" OD barb fitting in, and a 5/8 ID molded hose with a right angle, and a 3/4" OD Barb fitting to join to the stock Fiero hose. I do not recommend as the hole is undersized for the proper sized tap and would ideally be honed out/drilled larger before a proper tap can fit with with a 59/64 drill bit, however this process is prone to cracking the aluminum intake to be potentially irreparable:
NPT tap set (1x): Drill America POUCSNPT5 -
https://www.amazon.com/dp/B..._US&ref_=as_li_ss_tl 3/4 MNPT to 3/4" OD barb fitting (1x): Sharkbite UC134LFA -
https://www.amazon.com/dp/B..._US&ref_=as_li_ss_tl 5/8 ID molded hose with a right angle (1x): Gates 28467 -
https://www.amazon.com/dp/B..._US&ref_=as_li_ss_tl 59/64 drill bit (1x): Drill America DWDRSD59/64 -
https://www.amazon.com/dp/B..._US&ref_=as_li_ss_tl NOTE: You may want to buy other large drill bits in steps leading up to a 59/64" so you can drill out the heater hose coolant port in steps. Again, I do NOT recommend drilling for risk of cracking.
7 - Aluminum Heater Hose Elbow (1x):
Dorman 47065HP -
https://www.amazon.com/dp/B..._US&ref_=as_li_ss_tlNOTE: These CRACK if they are plastic! REPLACE with aluminum above!
8 - Optional: 180° Thermostat (1x):
Gates 33428S -
https://www.amazon.com/dp/B..._US&ref_=as_li_ss_tlOR
MotoRad 239-180 -
https://www.amazon.com/dp/B..._US&ref_=as_li_ss_tlOR
Motorad Failsafe 723-9180 -
https://www.amazon.com/dp/B..._US&ref_=as_li_ss_tlNOTE: Motorad thermostats with a small hole like the may be easier to burp the system but could cause longer warm up, P0128 code, & slight warm up power loss.
9 - 1" expansion frost plug for plugging water pump hole that used to go to the alternator coolant circuit (1x):
Dorman 02600 / 570-005 -
https://www.amazon.com/dp/B..._US&ref_=as_li_ss_tlor
Dorman 555-018 -
https://www.amazon.com/dp/B..._US&ref_=as_li_ss_tl10 - 1.5" to 5/8"(TBD) T Fitting (1x):
TBD
NOTE: For 84-86 ONLY
11 - 5/8 (TBD) Hose:
TBD
NOTE: For 84-86 ONLY
12 - 5/8" (TBD) Hose:
TBD
NOTE: For 84-86 ONLY
Coolant/Antifreeze (2x 1 gallon of concentrate; 14qt total diluted ~50/50 needed):
Peak PXA0B3 -
https://www.amazon.com/dp/B..._US&ref_=as_li_ss_tlNOTE: You can use whatever color you want, as long as you don't mix two colors and flush the system completely.
Optional: Bigger radiator (1x):
Champion 166-CC828 -
https://www.amazon.com/dp/B..._US&ref_=as_li_ss_tlNOTE: Radiator install video -
https://www.youtube.com/wat...kff2RlPWB_O&index=28NOTE: This or the bigger fan below (easier) is pretty much REQUIRED when running in hot weather for a long period of time (80° F +). Definitely need for
build 2.
NOTE: Here are some cheaper ones. YOU GET WHAT YOU PAY FOR!
https://www.amazon.com/dp/B..._US&ref_=as_li_ss_tlhttps://www.amazon.com/dp/B..._US&ref_=as_li_ss_tlhttps://www.amazon.com/dp/B..._US&ref_=as_li_ss_tlOptional: Better radiator fan (1x):
Proform 67016 -
https://www.amazon.com/dp/B..._US&ref_=as_li_ss_tl or
https://ebay.us/ILknzcNOTE: 8 blade plastic.
OR
Permacool 19115 -
https://www.amazon.com//dp/..._US&ref_=as_li_ss_tlNOTE: 6 blade metal. See install instructions here (loads slowly):
https://web.archive.org/web...1049c8ce4f2eed79da72NOTE: See install video here -
https://www.youtube.com/wat...index=28&pp=gAQBiAQBOptional: Hood vents for increased radiator air flow (1x):
GM 10030564 & 10030565 -
https://ebay.us/q4rHReAlternate: Paul Angel's (not making them much currently):
https://angelonearth.net/customfiberglass/NOTE: Contact Paul at imthadriver@gmail.com
Hose clamp kit (1x):
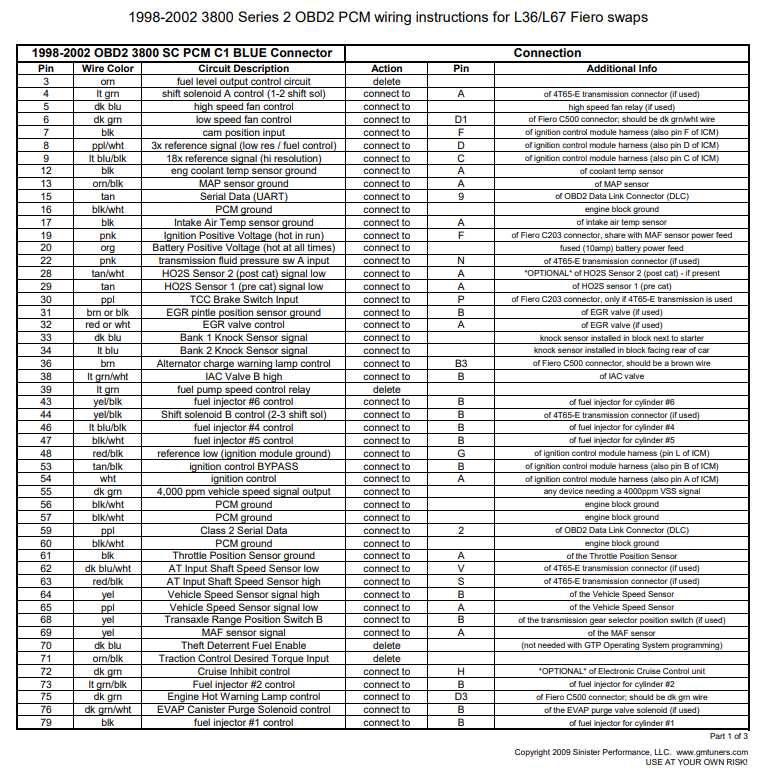
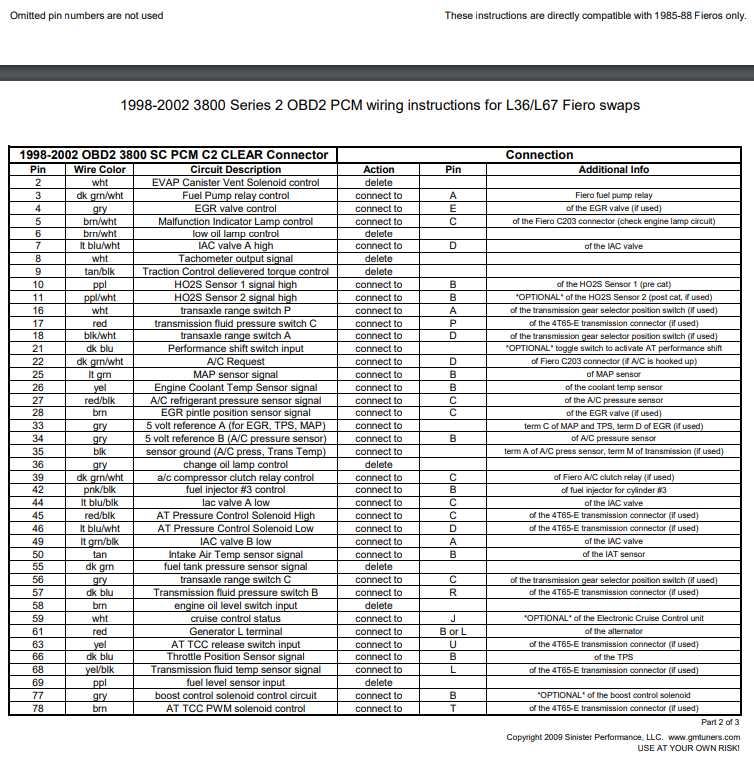
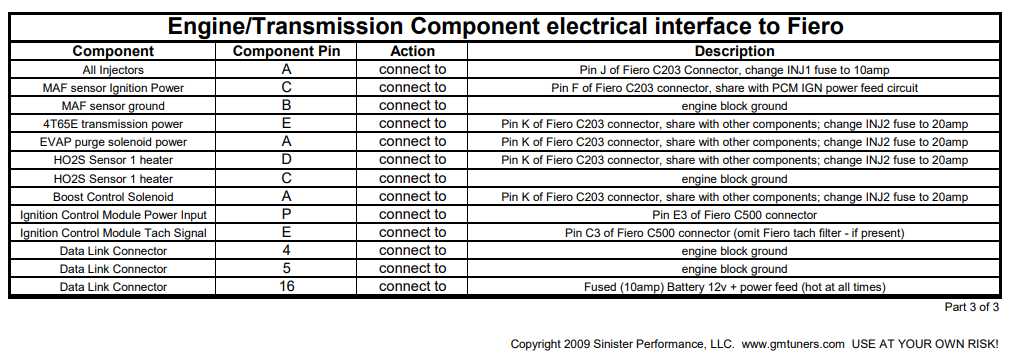
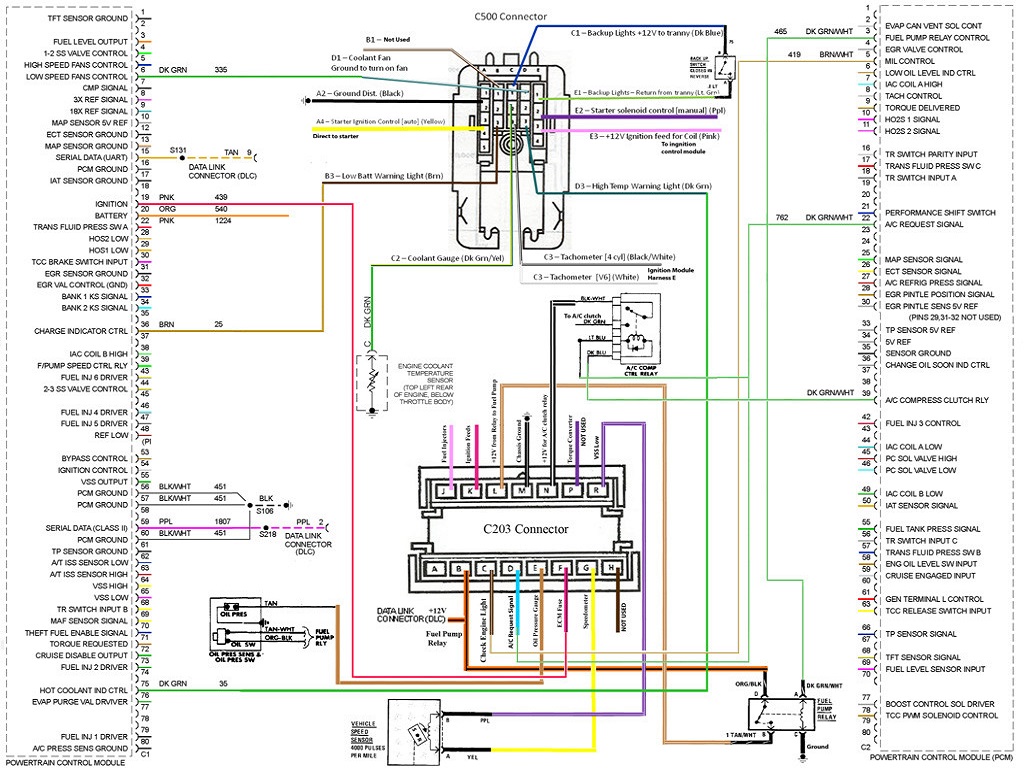
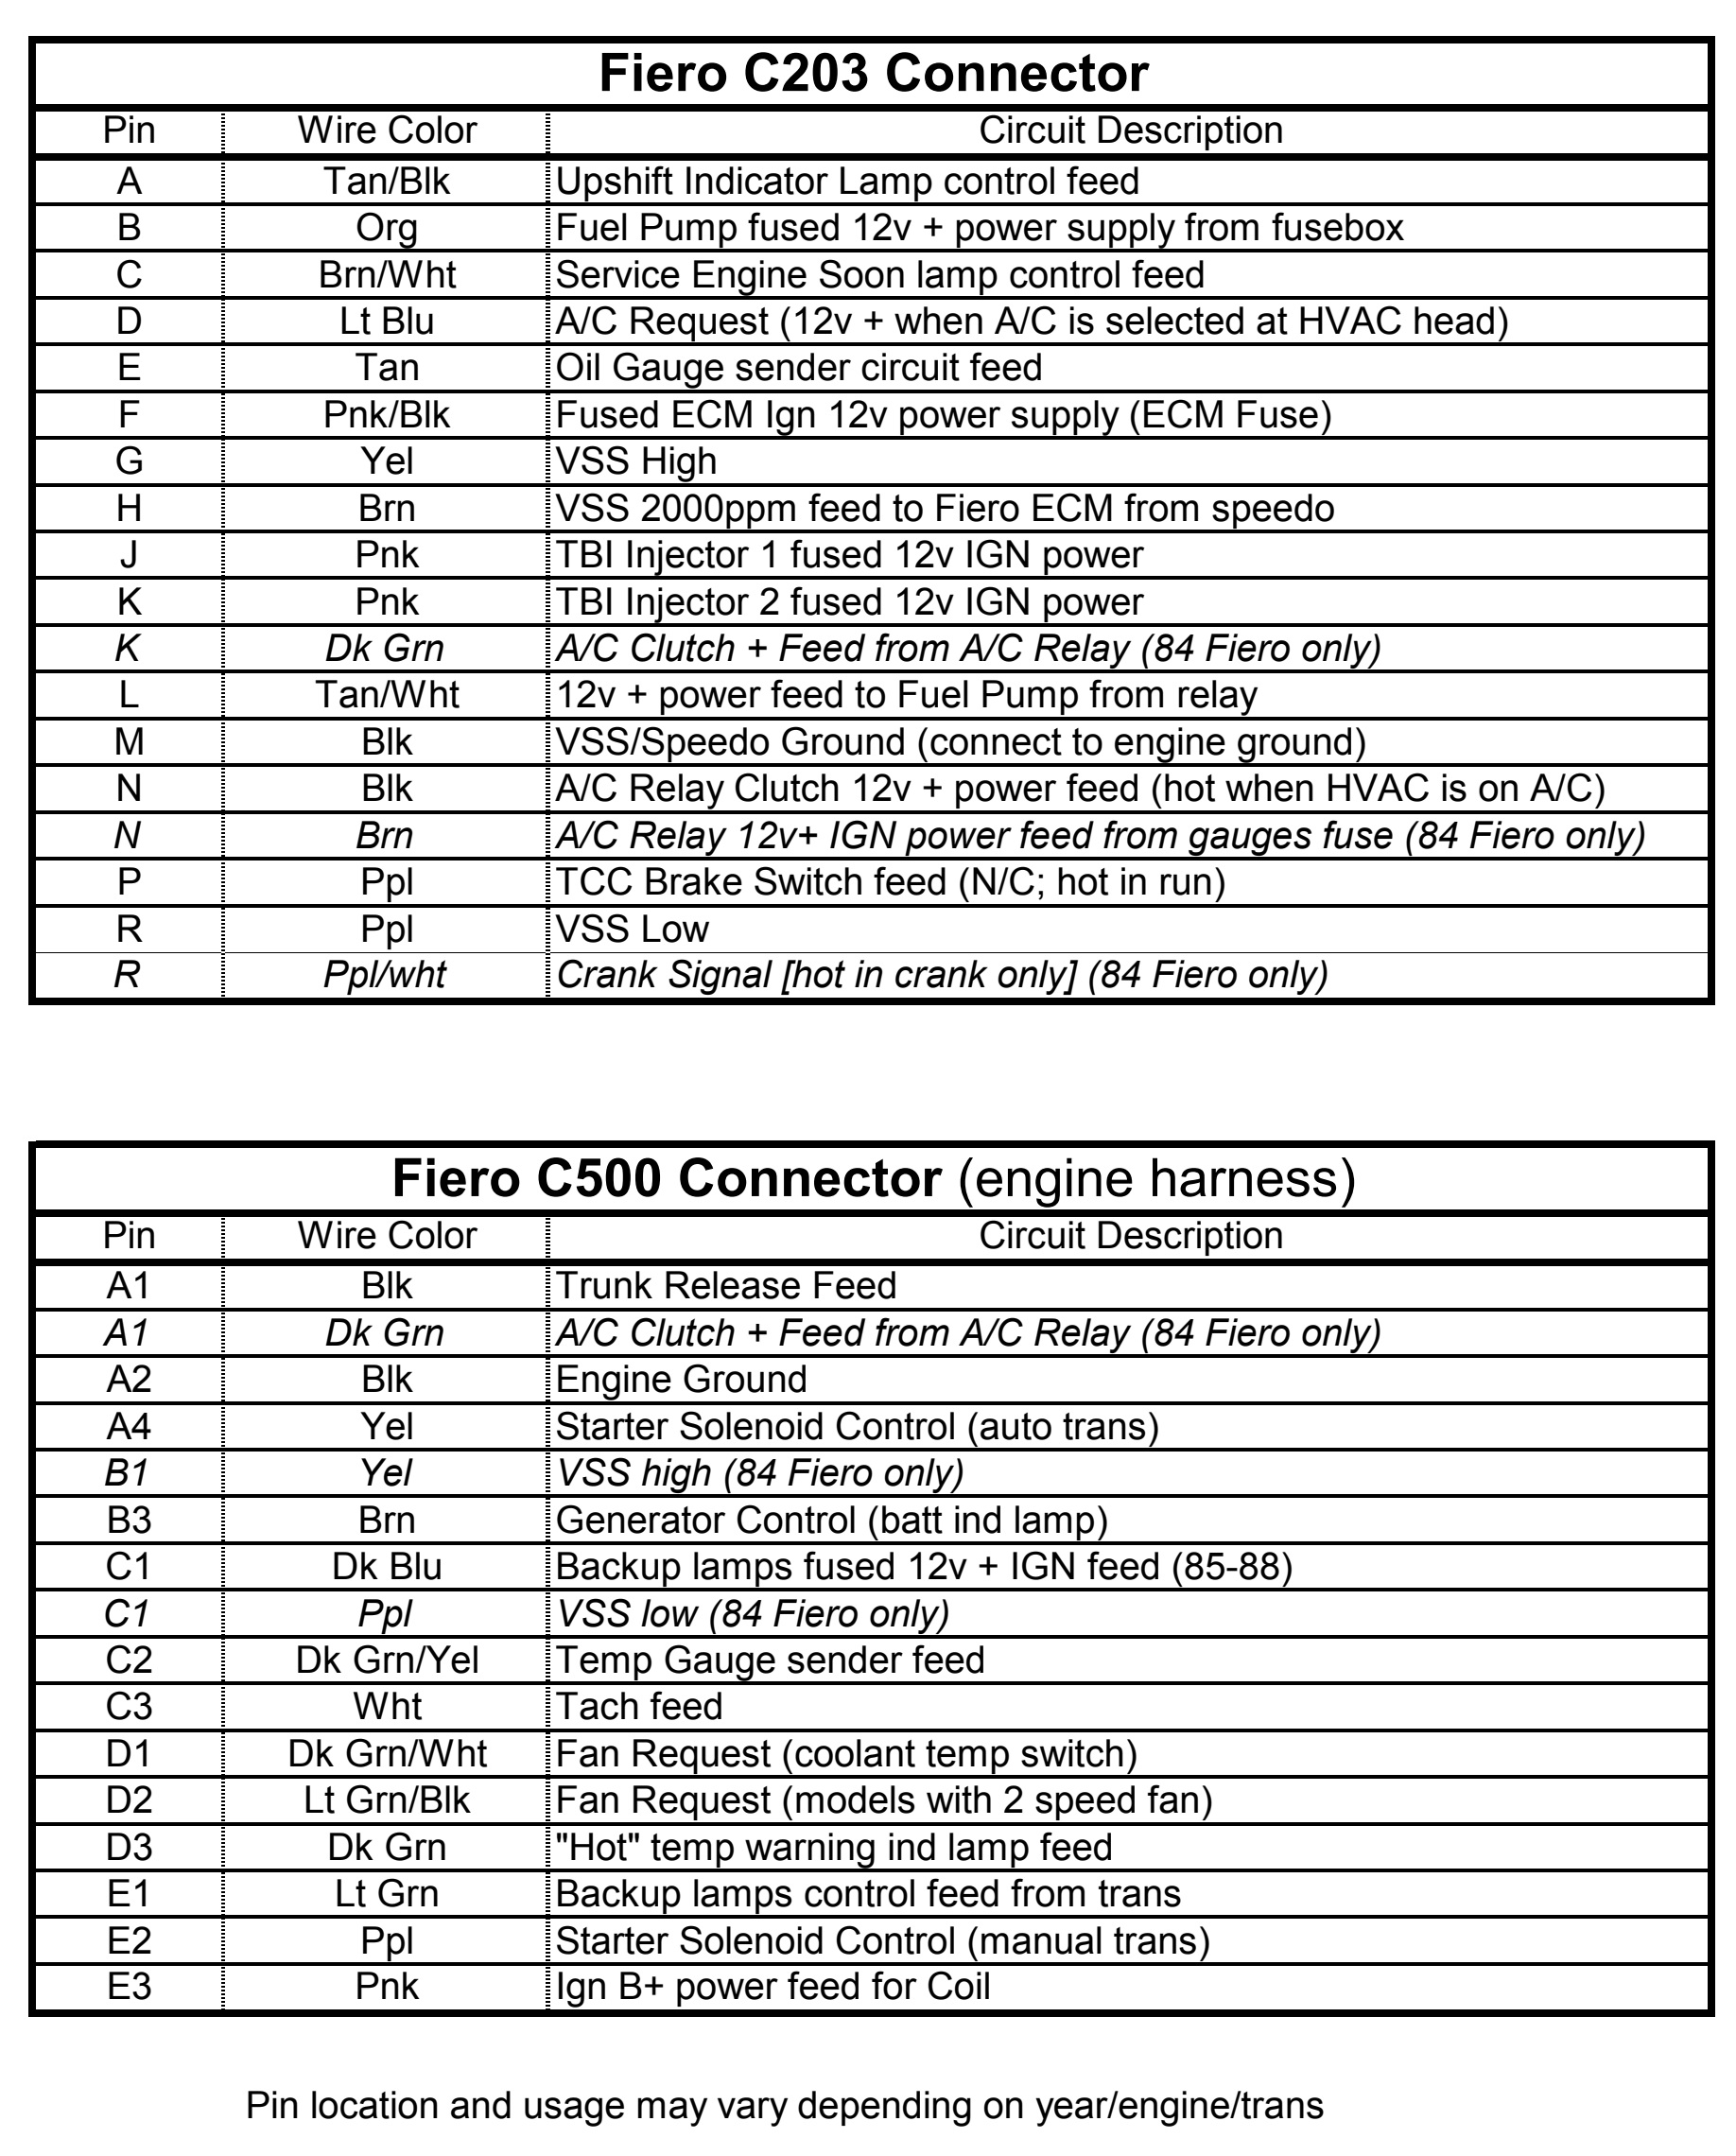
https://www.amazon.com/dp/B..._US&ref_=as_li_ss_tl-----HARNESS/SENSORS/COMPUTER (ECU/PCM)-----NOTE: See Harness section for building your harness with detailed instructions and diagrams here -
https://www.fiero.nl/forum/...HTML/139530.html#p11NOTE: See tuning video here -
https://www.youtube.com/wat...kff2RlPWB_O&index=33NOTE: Want to buy a harness and PCM tune? I highly recommend this. Contact one of the below guys:
James L. Brown -
https://www.facebook.com/Fiero3800harnesses/Dan McIlmoyle -
https://www.facebook.com/danny.mcilmoyleWest Coast Fiero (expensive!) -
https://westcoastfiero.com/...ess-for-conversions/Joe Welch (olejoedad) -
https://www.fiero.nl/cgi-bi...cgi?sendto=olejoedadHarness from the donor car (1x):
https://car-part.com/NOTE: Again best harnesses and engines are from a 1998-2002 Pontiac grand prix GTP
Harness from the Fiero (1x):
www.car-part.comNOTE: If you do not have a Fiero harness, avoid buying a 1984 harness; it has some differences that make it more difficult.
3-pin Oil pressure sender (1x):
STANDARD MOTOR PRODUCTS PS245T -
https://www.amazon.com/dp/B..._US&ref_=as_li_ss_tlNOTE: Comes from a 1988 Fiero V6 already, so if you have this car you do not need this sensor.
1/4" NPT Male to Female Elbow for oil pressure sender (1x):
Legines 3420*BB -
https://www.amazon.com/dp/B..._US&ref_=as_li_ss_tlNOTE: May be difficult to install the oil pressure sensor above with the
FieroRog alternator relocator bracket installed. This should help with relocating that. I am not sure this exact part will give enough clearance for the oil sensor (may be pinned against the oil filter housing)
-----NEEDED IF BUILDING YOUR OWN HARNESS-----HPTuners + 2 credits (1x):
https://www.hptuners.com/mpvi3/NOTE: Required for deleting VATS security, delete ABS/EGR/Rear O2 (check local laws), and tuning - see video:
https://www.youtube.com/wat...kff2RlPWB_O&index=34NOTE: If you are buying a harness, all the harness providers also include programming the computer, making this unnecessary. ZZP also does this at a much higher cost.
3-pin Oil pressure sender connector (1x):
Standard Motor Products HP4480 -
https://www.amazon.com/dp/B..._US&ref_=as_li_ss_tlNOTE: Comes from a 1988 Fiero V6 already, so if you have this car you do not need this sensor.
4t65e-HD/4T65e/4T60e Transmission Speed Sensor to Fiero Speedometer Buffer Circuit (1x):
https://reddevilriver.com/h...peedo-buffer-circuitNOTE: See harness section for schematic; you can build this circuit yourself if you have the know-how.
NOTE: You may want a 125mph FIero speedometer. Search in junkyards -
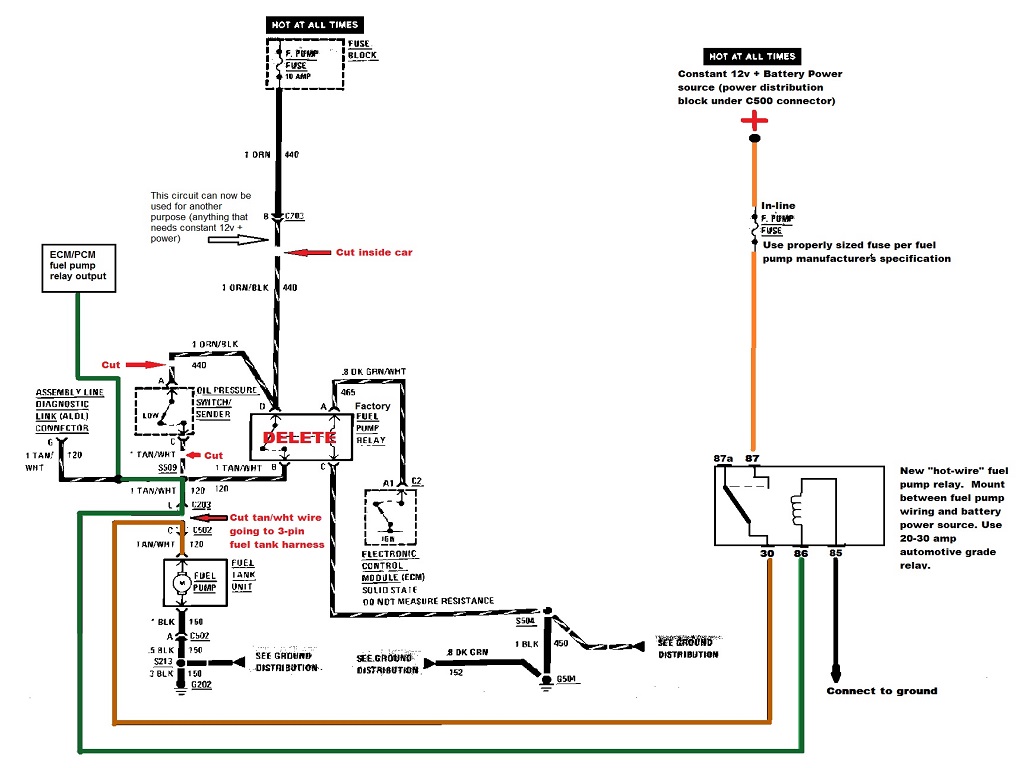
https://car-part.com/In-line 20A fuse holders (2x):
Bussmann BP/HHG -
https://www.amazon.com/dp/B..._US&ref_=as_li_ss_tlNOTE: One for fuel pump.
Fuel pump relay (1x):
https://www.amazon.com/dp/B..._US&ref_=as_li_ss_tlNOTE: Only required if building your own harness
NOTE: Can use stock Fiero relays instead.
-----TRANSMISSIONS----------MANUALS-----NOTE: Check out how to bypass the auto transmission controls in a 3800 engine -
https://www.gmtuners.com/fiero/transbypass.htmSpec 3+ Clutch (1x):
First, choose your clutch type and your transmission donor car here:
https://specclutch.com/products/Below are common ones for swaps.
1985-1988 2.8L Fiero 5spd - Spec SC883F -
https://ebay.us/mBm1hd1985-1988 2.5L Fiero - Spec SC783F -
https://ebay.us/toj3Zh1984 2.5L 4spd / 1985-1987 2.8L Fiero 4spd - Spec SC773F -
https://ebay.us/H0Ov4pNOTE: For manuals, (F23, F40, Getrag, etc.) everyone seems to use a Spec 3+ clutch, however sometimes Spec sends the wrong clutch. It must be MATCHED for your specific manual transmission (you need to know make, model, and year of car it came out of); not just any transmission will do and you can NOT order them online easily from what I understand. And sometimes even Spec puts the wrong clutch in the box. Best to call them up and verify your exact application first. Your clutch may rub the transmission if they get it wrong.
F23/F40 Shifter Bracket (1x):
fieroguruperformancellc@gmail.com
https://fieroguruperformance.com/?page_id=906OR
West Coast Fiero -
https://westcoastfiero.com/...adapter-with-cables/OR
https://fierospace.com/prod...-shift-cable-bracketF23/F40 Shifter Cable (1x):
http://rodneydickman.com/pr....php?products_id=341OR
https://westcoastfiero.com/...t/f23-shift-adapter/Flywheel Bolts (1x):
SEE MOUNTING AND BRACKETS SECTION FOR
FieroRog KIT
OR
https://westcoastfiero.com/...series-i-ii-and-iii/F23 from a Cavalier mounts (1x):
Contact
FieroRogF23 from a Cobalt with a Cavalier bell housing mounts (1x):
https://fierospace.com/prod...cavalier-bellhousingNOTE: Contact
Brian Sanburn or at
https://fierospace.com/F40 Mount Kit (1x):
https://fierospace.com/prod...-3800-full-mount-kitOther F23/F40 or transmission mount parts, and more
https://fierospace.com/-----4t65e-HD/4T65e/4T60e TRANSMISSION-----4t6x Transmission Cooler Line Fittings (different options are below):
2004.5+ GTP Transmission
3/8"-18 NPSM (1x): TBD
9/16"-18 UNF (1x): TBD
OR
2000(2000.5+ GTP)-2004.5 Transmission
1/4"-18 NPSM (1x): TBD
3/8"-18 NPSM (1x): TBD
OR
1990-1999 (2000.5- GTP) Transmission
1/4"-18 NPSM to -6 AN male (1x 2-pack): ICT Billet 551114 -
https://www.amazon.com/dp/B..._US&ref_=as_li_ss_tlNOTE: O-ring and straight thread 1/4" NPSM side go directly into transmission.
Transmission line elbow -6AN to 3/8" 90 deg barb (1x 2-pack):
EVIL ENERGY EV01111D90 -
https://www.amazon.com/dp/B..._US&ref_=as_li_ss_tlNOTE: to mate with the above fitting
Transmission Hose to Fiero Steel Hose (1x 5ft):
Derale 13016 -
https://www.amazon.com/dp/B..._US&ref_=as_li_ss_tlNOTE: Replaces stock 4t65e-HD/4T65e/4T60e steel transmission lines
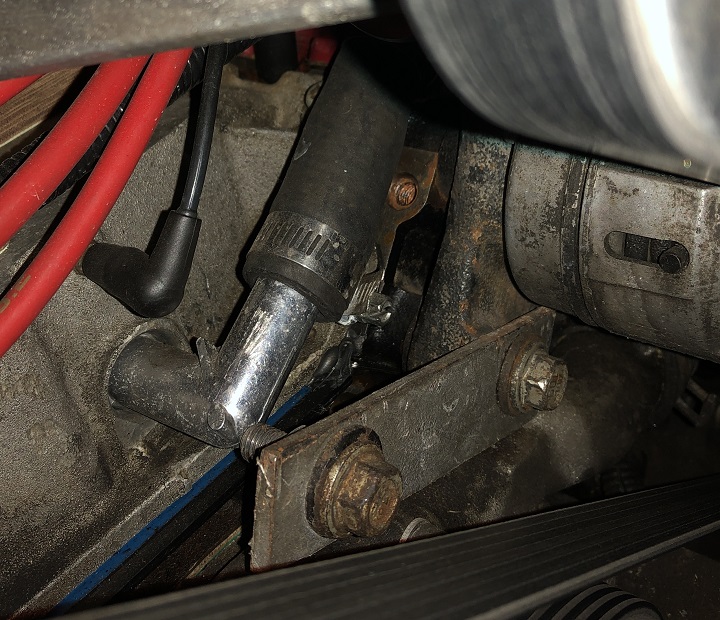
4t65e-HD/4T65e/4T60e Shifter bracket (1x):
Chuck Peterson makes these -
https://www.facebook.com/chuck.peterson.566OR
West coast Fiero:
https://westcoastfiero.com/...ion-shifter-adapter/NOTE: It is not possible to get into 1st gear with the West Coast Fiero bracket and the 3800 transmission shift arm. The shifter in the car was made for a 3-speed.
OR
Make your own out of a modified Fiero shift bracket and a chevy sonic shift arm, pictured below (1x):
GM 95160885 / 96888404 / 95147085 / 96639205 / 95198043 -
https://ebay.us/J3BnMp |
https://ebay.us/hTwZhqNOTE: It is not difficult to construct your own. Unbolt the shifter arm and bolt it on in the reverse direction of the shifting action. Flip the sonic shift arm upside down and bend/press the Fiero shifter bracket flat.
NOTE: James L. Brown has designs for these and may start producing them -
https://www.facebook.com/Fiero3800harnesses/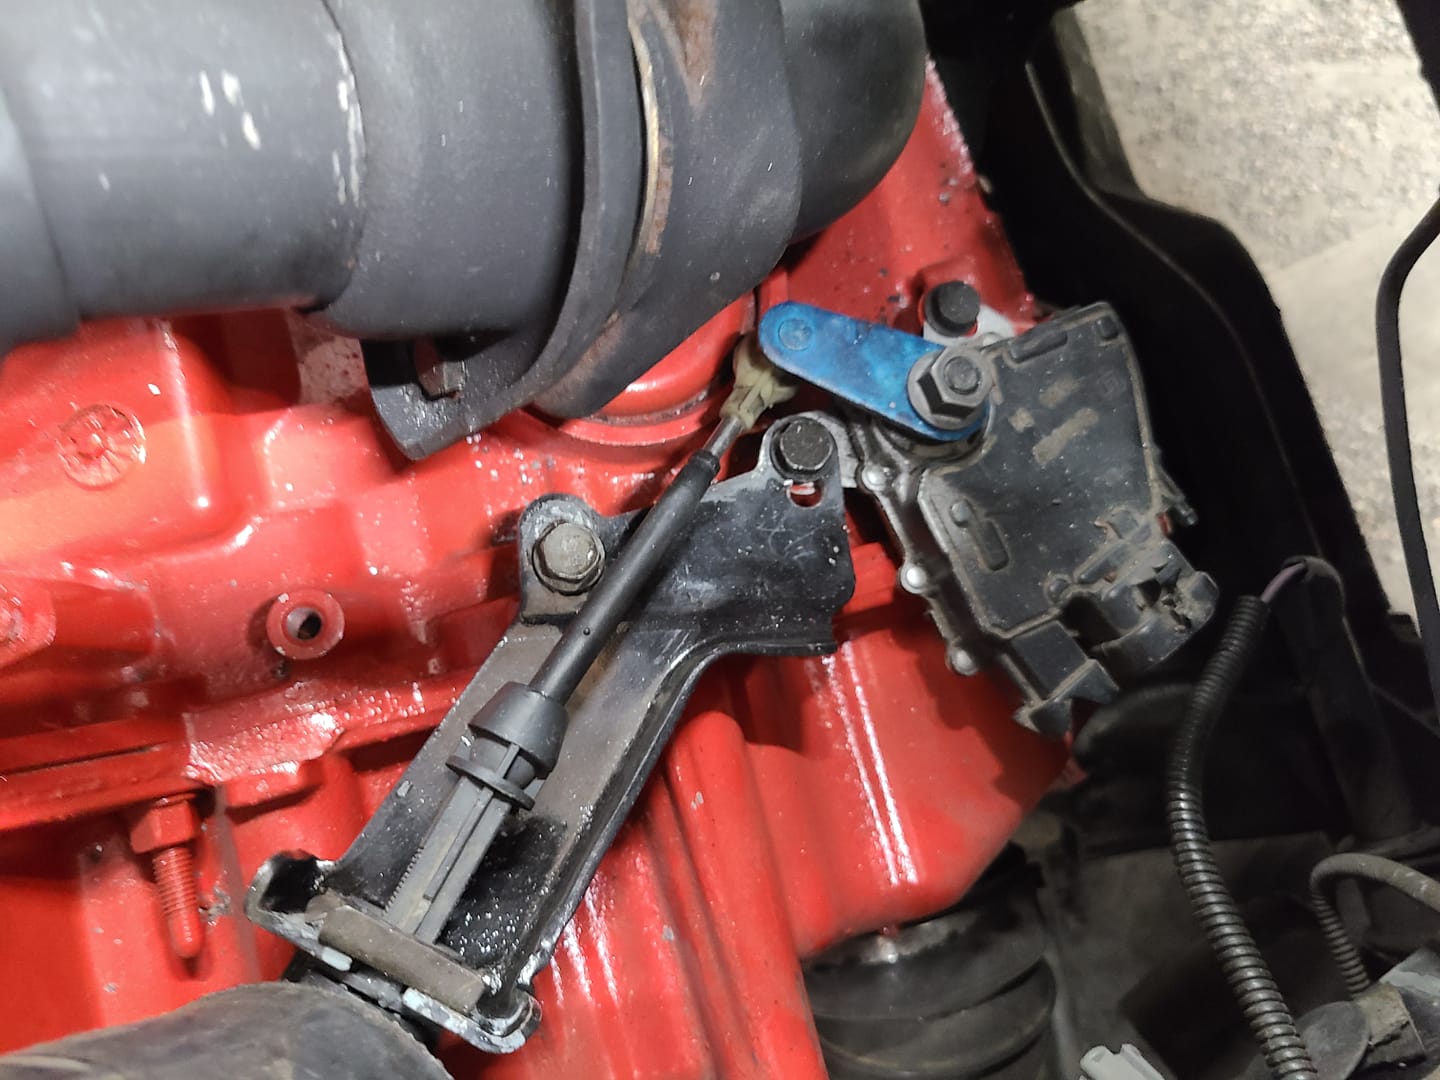 -----TRANSMISSION AXLES----------Buying Axles-----
Fiero Manual Axles (2x):
Re-use stock axles!
OR
F23/F40 Manual Axles (2x):
fieroguruperformancellc@gmail.com
https://fieroguruperformance.com/?page_id=906or
West coast Fiero -
https://westcoastfiero.com/...ct/f40-custom-axles/OR
4t65e-HD/4T65e/4T60e Passenger's Axle (1x):
Stephen Poe:
https://www.facebook.com/stephen.poe.5011 OR
West Coast Fiero -
https://westcoastfiero.com/...to-4t60-e-and-4t65-eNOTE: You must supply them the following information:
-Your Transmission Type
-Your Engine Type
-Your Fiero Type (make/model)
-Your engine mount/transmission mount type
-Measurements from both transmission output shaft surfaces to the inside surfaces of the Fiero hubs with no axles installed, with wheels on ground.
4t65e-HD/4T65e/4T60e Driver's Axle (1x):
Re-use Automatic Fiero driver's side axle
OR
GSP NCV10509 -
https://www.amazon.com/dp/B..._US&ref_=as_li_ss_tl-----Building 4t65e-HD/4T65e/4T60e Passenger's Axle-----NOTE: Building axles yourself? See LostNotForgotton's axle building video:
https://www.youtube.com/wat...kff2RlPWB_O&index=15NOTE: Here is a great writeup, but I do not know if
FieroRog mounts will work with these axles:
https://www.gmtuners.com/swap/axles.htmNOTE: THESE AXLES BELOW ARE FOR 4t65e-HD ONLY. THESE AXLES REQUIRE YOU USE THE
FieroRog OR WEST COAST FIERO ENGINE AND TRANSMISSION MOUNTS LISTED IN THIS BUILD THREAD AND IN
LostNotForgotton's VIDEO. FINAL FITMENT CAN VARY. LOOKUP WHICH TRANSMISSION YOUR DONOR CAR CAME WITH:
https://en.wikipedia.org/wi...ransmission#4T65E-HDRe-use Driver's side GTP Axle OEM (1x):
GM 26054707 / Cardone 60-1255 -
https://www.amazon.com/dp/B..._US&ref_=as_li_ss_tlor
https://car-part.com/NOTE: It is a gamble whether some Cardone remanufactured axles used OEM parts; if you get one without OEM parts, it may not work for building your axles.
Re-use Passenger's side GTP axle OEM (1x):
GM 26073392 / Cardone 60-1256 -
https://www.amazon.com/dp/B..._US&ref_=as_li_ss_tlor
https://ebay.us/oLP27Cor
https://car-part.com/NOTE: It is a gamble whether some Cardone remanufactured axles used OEM parts; if you get one without OEM parts, it may not work for building your axles.
Re-use any manual Fiero axle OEM (1x):
https://car-part.com/NOTE: YOU MUST USE OEM PARTS FROM THE DONOR CAR. MIXING OTHER MANUFACTURERS PARTS WILL NOT FIT TOGETHER! THERE IS A CHANCE THE DONOR CAR HAD OEM AXLES SWAPPED OUT FOR NON-OEM!Axle Boot Inner with grease (1x):
Dorman 614-004 -
https://www.amazon.com/dp/B..._US&ref_=as_li_ss_tlAxle CV Boot Clamps (1x):
MIKKUPPA QAT094 -
https://www.amazon.com/dp/B..._US&ref_=as_li_ss_tlAxle CV boot clamp tool (1x):
https://www.amazon.com/dp/B..._US&ref_=as_li_ss_tl-----ACCESSORIES/AC/OTHER/MISC-----Optional: Fiero Factory Service Manuals (1x):
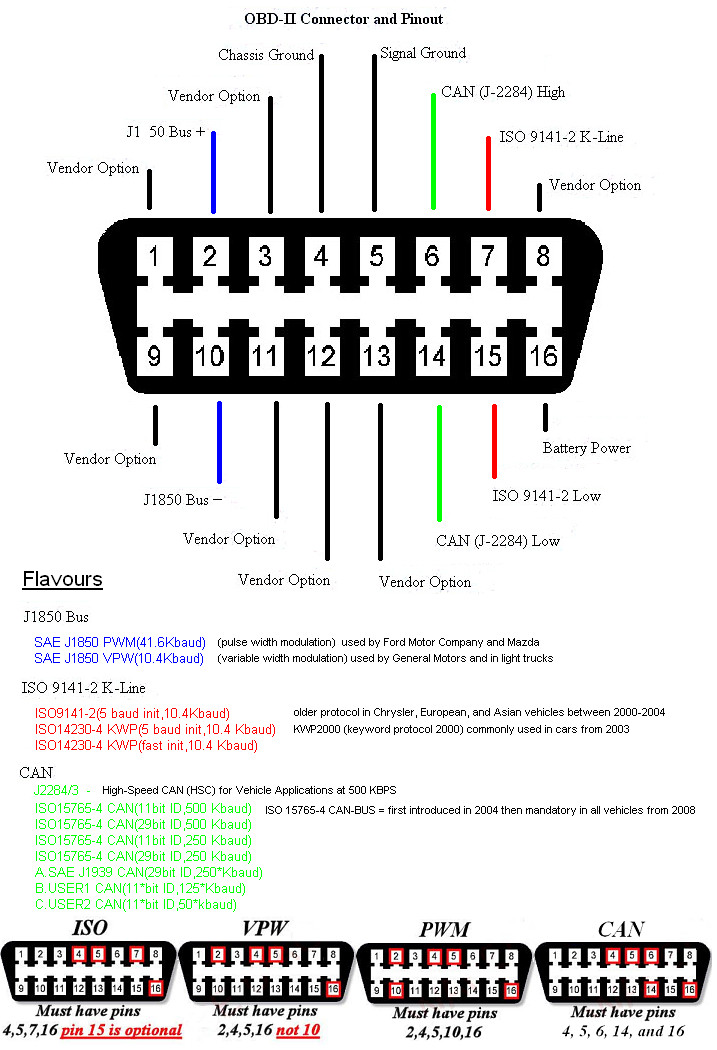
https://www.rockauto.com/en...artnum=DPRGM2**8*FSMOptional: OBD2 Bluetooth Scanner (1x):
OBDLink CX -
https://www.amazon.com/dp/B..._US&ref_=as_li_ss_tlNOTE: To be used with free phone app - REALLY helps with troubleshooting
Optional: Sound Deadening Material for Firewall (1x):
KILMAT KLM8018 -
https://www.amazon.com/dp/B..._US&ref_=as_li_ss_tlOR
Design Engineering 050502
https://www.amazon.com/dp/B..._US&ref_=as_li_ss_tlNOTE: The Design Engineering is very difficult to form. Take a Dremel with gloves and safety glasses to notch out the Fiero firewall obstacles.
NOTE: This is ONLY necessary if your panels (firewall) are vibrating. You only need about 25% coverage. This sound mat is very heavy; it ONLY serves to DAMPEN a vibration by changing the weight of the object that is vibrating; it does not magically absorb sound waves. If you want to make the cabin quieter, you should first focus on SEALING the cabin entirely by plugging holes that could be exposed to the outside air.
1/2" Torque Angle Meter (1x):
Performance Tool M205 -
https://www.amazon.com/dp/B..._US&ref_=as_li_ss_tlNOTE: Required for torqueing OEM bolts on balance shaft sprocket, connecting rods, crankshaft mains, cylinder heads, flywheel, oil filter adapter, rocker arms, timing cover, timing chain sprocket, harmonic balancer, and water pump. See torque specs here -
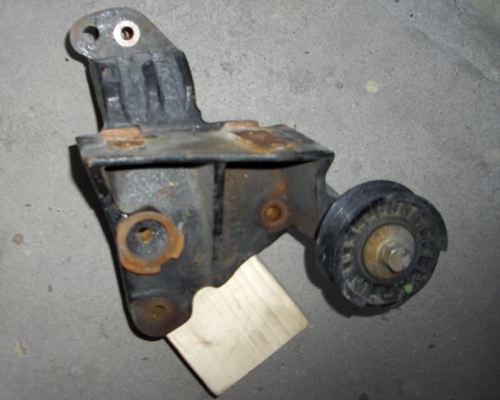
https://www.torkspec.com/to...3.8L-231ci-V6-3800IIAccessory Belt Tensioner Pulley (1x):
CONTINENTAL 49247 -
https://www.amazon.com/dp/B..._US&ref_=as_li_ss_tlNOTE: From a 1995 Ford Winstar 3.8, only needed if using
FieroRog alternator relocation bracket
Accessory Belt - 81.5", 6 ribs (1x):
GATES 6K815AP -
https://www.amazon.com/dp/B..._US&ref_=as_li_ss_tlNOTE: You may have to go up or down a size in 0.5" increments to ensure tight fitment; final fitment may vary. Search in RockAuto with a * for a wildcard (K0608** or 6k8** or 6pk8** or 8**k6 for 60"-69" belt lengths) -
https://www.rockauto.com/en...h/?partnum=6k6%2A%2AOptional: Engine Blower Blockoff Kit (1x):
https://www.campsitecarbon....blower-block-off-kitNOTE: Only for 85-87 Factory V6 Fieros with an engine blower removed (a small electric motor/fan in the trunk; if you don't have one you don't need it!)
Optional: Magnetic Oil Drain Plug (1x):
Dorman 090091 (65372) -
https://www.amazon.com/dp/B..._US&ref_=as_li_ss_tlNOTE: For extra safety to pick up metal shavings in the oil.
Optional: AC/DRYER (1x):
Four Seasons 33181 -
https://www.amazon.com/dp/B..._US&ref_=as_li_ss_tlOptional: Custom A/C hose made by a radiator shop (1x):
Larry Hubbert makes hoses -
https://www.facebook.com/larry.hubbert.77/Chuck Peterson makes hoses -
https://www.facebook.com/chuck.peterson.566 or
https://www.fiero.nl/forum/Forum4/HTML/069681.htmlJames L. Brown makes hoses -
https://www.facebook.com/Fiero3800harnesses/NOTE: To build your own, see LostNotForgotton's video -
https://youtu.be/ZyPZkCPJzN...qJnkff2RlPWB_O&t=530NOTE: Have a radiator shop make one. You need an R12 style port for the AC Pressure sensor. Cut one off of another 3800 AC hose and have it braised onto the Fiero side. Also use a GTP compressor side AC hose fitting for the compressor that came with the GTP. Beware, there were at least 2 types of compressors/AC hoses on 3800 engines.
NOTE: Joe Norton used to make A/C hoses but has stopped production.
Optional: R134a AC Seals (3800 side) (1x):
Four Seasons 26728 -
https://www.amazon.com/dp/B..._US&ref_=as_li_ss_tlOptional: R134a AC Seals (Fiero Side) (1x):
Four Seasons 26735 -
https://www.amazon.com/dp/B..._US&ref_=as_li_ss_tlNOTE: If you do want to utilize the AC system, you will need to charge it with R134a or newer refrigerant. The Fiero did not come equipped with this, so you will need to swap all your AC System O-Rings with Hydrogenated Nitrile (HNBR), and your orifice tube.
Optional: R134a AC Orifice Tube (1x):
ACDELCO 15-5754 -
https://www.amazon.com/dp/B..._US&ref_=as_li_ss_tlLonger 45" battery ground cable (1x):
Schumacher BAF-445S -
https://www.amazon.com/dp/B..._US&ref_=as_li_ss_tlAlternator (1x):
ACDELCO 335-1088 -
https://www.amazon.com/dp/B..._US&ref_=as_li_ss_tlNOTE: You need a year 2000+ alternator for any 3800 car to fit with
FieroRog alternator bracket. This is the highest current (125A) model made; relocating the alternator without the cooling circuit can make a lower current alternator struggle to keep up. Your donor car may have this already; the bigger cars (park avenue, bonneville) have higher current alternators already. Do NOT get an off brand and/or remanufactured alternator; they tend to be junk.
Optional: Alternator voltage boost circuit (1x):
https://zzperformance.com/p...ator-voltage-boosterOR
https://easyperformance.com...ltage-booster-moduleNOTE: The relocated alternator does not get cooled. It looses efficiency and does not charge as well. This boost circuit may help with that by increasing the alternator voltage by 0.6 Volts. You can do this for free here:
https://zzperformance.com/b..._sid=0a5a8d6d2&_ss=rOptional: A/C Compressor Bypass Pulley (1x):
Dorman 34195 -
https://www.amazon.com/dp/B..._US&ref_=as_li_ss_tlNOTE: Bypasses the AC Compressor if not using AC to save some horsepower and weight.
For engine removal and installation:
See Toolbox section
https://www.fiero.nl/forum/...HTML/139530.html#p17Jacks (2x):
https://www.amazon.com/dp/B..._US&ref_=as_li_ss_tlJack stands (2x):
https://www.amazon.com/dp/B..._US&ref_=as_li_ss_tl-----MOUNTING AND BRACKETS-----NOTE: This build uses
FieroRog brackets. There are alternatives (like West Coast Fiero). You could build your own, but some parts in this build thread may not fit those if the transmission does not stay in the stock location.
NOTE: For Fiero manuals, you do not need cradle side transmission mounts, although you may want to replace the old rubber anyways.
NOTE: Rodney Dickman poly motor and transmission mounts are now discontinued, but they were located
here. Poly motor mounts and a deleted balance shaft may make the car vibrate badly. V6 POLY ENGINE MOUNTS THESE ARE NOW BEING MADE HERE:
https://fierospace.com/prod...6-front-engine-mountNOTE: James L. Brown -
https://www.facebook.com/Fiero3800harnesses/ is now producing poly mounts again.
NOTE: The 1988 Rodney Dickman engine cradle mount does not quite fit the
FieroRog engine bracket right on some applications. May require drilling some ~1/2" offset holes. MAY IMPACT AXLE LENGTH REQUIREMENTS. Earlier year Fiero cradle/mount combinations may work better.
Optional: Adjustable Dogbone Mount - bolts to
FieroRog alternator relocation bracket (1x):
http://rodneydickman.com/pr...o.php?products_id=72OR
http://rodneydickman.com/pr....php?products_id=226NOTE: I do NOT Recommend a solid mount for vibration.
Rear Frame Floating Cradle Nut Kit (1x):
http://rodneydickman.com/pr....php?products_id=276NOTE: It is CERTAIN that the original nuts for the rear cradle will snap off the frame. You may have to cut a slot in the frame to get them out. Use 2 pairs of big vise grips to grab the nut through the cut hole in the frame in order to torque against it. The nut kit above sits inside the frame so in case the welds break loose next time, the mount is long enough that it can torque against the frame.
NOTE: This may be discontinued. It is not hard to weld a nut to a long drilled piece of steel yourself.
-----Rubber Cradle Side Motor/Transmission Mounts-----Engine Cradle Mount for 84-85 4cyl, 86-87 4cyl manual transmission, 85-87 V-6 (1x):
Westar EM-2472 -
https://www.amazon.com/dp/B..._US&ref_=as_li_ss_tl OR
Engine Cradle Mount for 86-87 4cyl automatic, 1988 4cyl & 1988 V-6 (1x):
Westar EM-2548 -
https://www.amazon.com/dp/B..._US&ref_=as_li_ss_tlNOTE: These rubber mounts are on the engine cradle side and mount to steel
FieroRog mounting brackets on the transmission/engine side. I would highly recommend NOT re-using the stock Fiero engine and transmission mounts as they are probably old and worn out.[/b]
OR
ALTERNATIVE POLY ENGINE CRADLE MOUNT (1x):
https://fierospace.com/prod...6-front-engine-mountNOTE: Alternative poly mount only works for original V6 cars. These could cause bad vibrations being transferred from the engine.
Front Transmission Mount (1x):
DEA A2466 -
https://www.amazon.com/dp/B..._US&ref_=as_li_ss_tlRear Transmission Mount (1x):
Westar EM-2467 -
https://www.amazon.com/dp/B..._US&ref_=as_li_ss_tl-----Engine/Transmission side brackets-----4t65e-HD/4T65e/4T60e Automatic
FieroRog Bracket Kit (1x):
Order from
FieroRog here
https://www.fiero.nl/cgi-bin...orum=4&thread=068855 or here
https://www.facebook.com/pr...p?id=100041431256035NOTE: Comes with:
-front automatic 4t65e-HD/4T65e/4T60e transmission mount bracket (1x)
-rear automatic 4t65e-HD/4T65e/4T60e transmission mount bracket (1x)
-Engine mount bracket (same for manuals) (1x)
-Alternator relocation bracket (same for manuals) (1x)
-Dogbone engine mount bracket (same for manuals) (1x)
-bolts
OR
Manual Fiero Transmission
FieroRog Bracket Kit (tell
FieroRog what manual transmission type) (1x):
Order from
FieroRog here
https://www.fiero.nl/cgi-bin...orum=4&thread=068855 or here
https://www.facebook.com/pr...p?id=100041431256035NOTE: Comes with:
-Engine mount bracket (same for autos) (1x)
-Alternator relocation bracket (same for autos) (1x)
-Dogbone engine mount bracket (same for autos) (1x)
-bolts
-Custom machined down to 0.830-0.840" and balanced flywheel from a 3.8 manual Camaro (1x) (or make it yourself; GM 12576459 / 24503285 / AMS 167533 -
https://www.amazon.com/s?k=..._US&ref_=as_li_ss_tl )
-Flywheel bolts - yield (8x): GM 24505092 -
https://www.amazon.com/dp/B..._US&ref_=as_li_ss_tl or
https://ebay.us/CE4PVb or
ARP 134-1001 or 234-1001(stronger) (3x 3-pack) -
https://www.amazon.com/dp/B..._US&ref_=as_li_ss_tlNOTE: Rumor is some crankshafts may need to be drilled deeper to fit.
NOTE: FOR MANUALS ONLY! DIFFERENT THAN AUTOMATIC TRANSMISSION FLEXPLATE BOLTS!
-Clutch bolts: GM 24571667 -
https://ebay.us/wMA4hSor
ARP 150-2202:
https://www.amazon.com/dp/B..._US&ref_=as_li_ss_tlOR
F23/F40 Manuals Brackets:
fieroguruperformancellc@gmail.com
https://fieroguruperformance.com/?page_id=906OR
https://westcoastfiero.com/f23-f40-specific-parts/-----PARTS NEEDED IF YOU DO NOT BUY A 1998-2002 PONTIAC GRAND PRIX GTP OR REGAL DONOR CAR-----NOTE: Some of these parts can be found at junkyards. Find a donor car here:
https://car-part.com/NOTE: The transmission castings on a Regal may vary slightly and may need a spacer to work.
NOTE: SEE
BUILD 2 AND
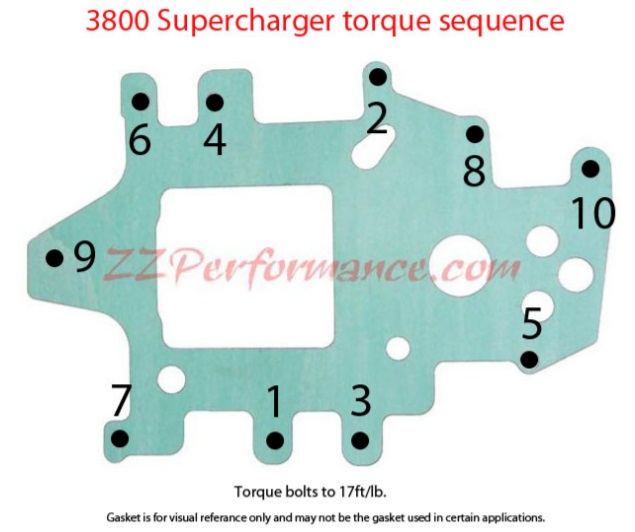
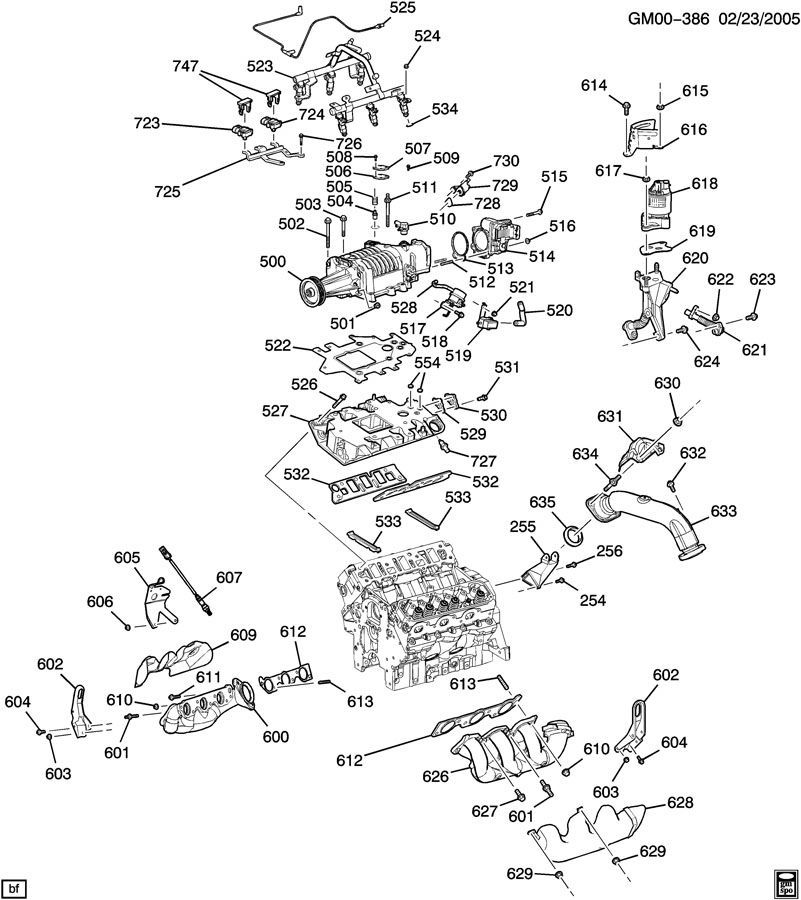
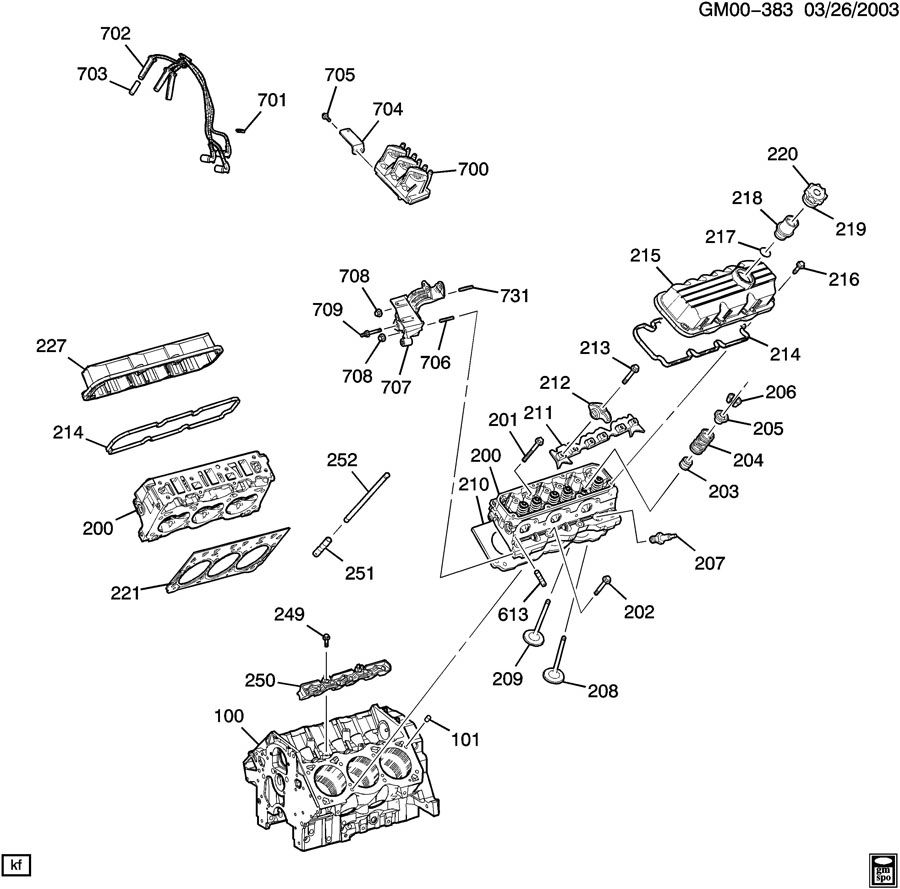
3800sc Assembly Diagrams and Torque Specs FOR HOW TO CONVERT A SERIES II TO A SERIES III (OR USE A SERIES III IN A FIERO), AND NA TO SUPERCHARGED (TOP SWAP)
GTP Axles (See "NEEDED IF BUILDING YOUR OWN HARNESS" section).
NOTE: Some axles from various cars may be interchangeable and compatible.
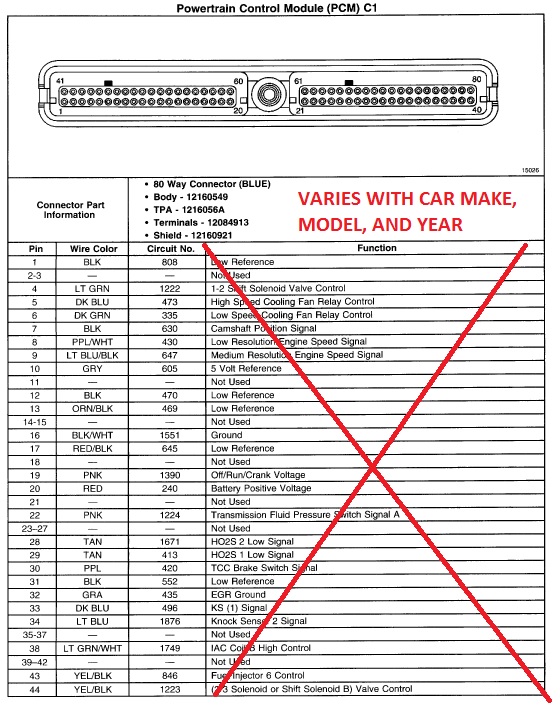
1998-2002 Computer (ECU/PCM) (1x):
GM 09357440 -
https://www.amazon.com/dp/B..._US&ref_=as_li_ss_tlor
https://ebay.us/YRzXator
Junkyard SearchNOTE: Only if you don't have one from the donor car, get at junkyard for $25 from ideally a 1998-2002 Grand Prix GTP.
2-Bar MAP sensor (1x):
Standard Motor Products AS4 -
https://www.amazon.com/dp/B..._US&ref_=as_li_ss_tlNOTE: ONLY if you bought a 3800 NA block/harness and you don't already have a 2-bar MAP sensor
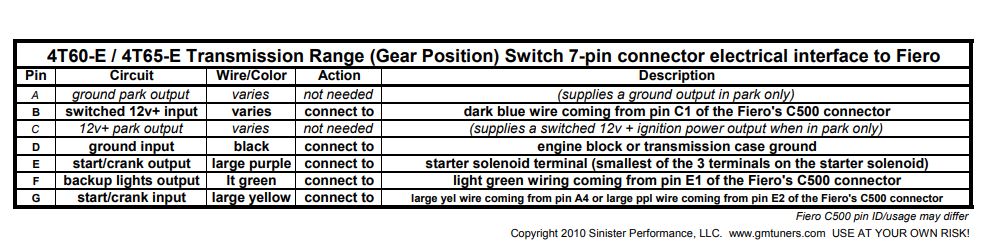
GTP/Regal External Transmission Gear Selector Neutral Safety Switch / Range Sensor Switch (1x):
Standard Motor Products NS122 -
https://www.amazon.com/dp/B..._US&ref_=as_li_ss_tlNote: Some other cars already came with this switch. Look to see if it is sitting below your transmission gear selector lever on the top of the transmission.
GTP/Regal External Transmission Gear Selector Neutral Safety Switch / Range Sensor Switch Connectors for above (1x):
88862288 -
https://www.amazon.com/dp/B..._US&ref_=as_li_ss_tlNote: Only if building your own harness
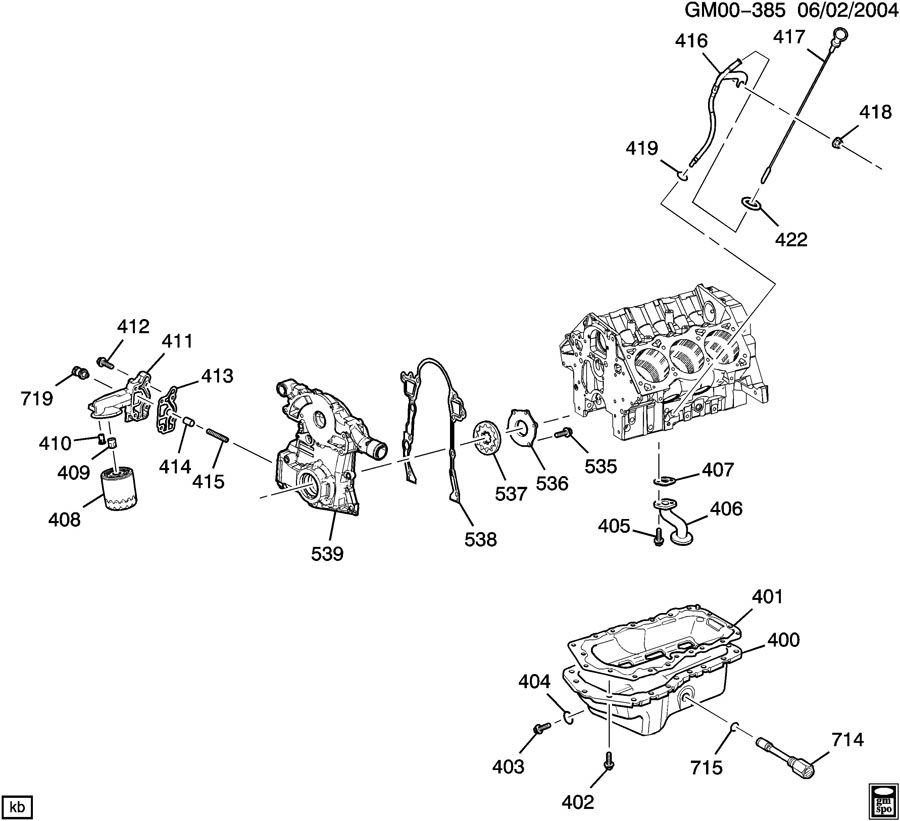
GTP/Regal Steel Oil Pan (1x):
SPECTRA PREMIUM GMP11B -
https://www.amazon.com/dp/B..._US&ref_=as_li_ss_tlGTP/Regal Oil Pan Gasket (1x):
Apex AOP356 -
https://www.amazon.com/dp/B..._US&ref_=as_li_ss_tlNOTE: This needs trimming to fit over non-GTP oil pickup tube; depending on your car, you can get either get a GTP oil pickup tube or get a non-GTP oil pan gasket to avoid trimming this gasket)
GTP/Regal Oil Pan Pickup Tube/Gasket (1x):
Melling 256S -
https://www.amazon.com/dp/B..._US&ref_=as_li_ss_tlNOTE: Could instead trim down oil pan gasket to fit the other style pickup tube
GTP/Regal oil filter bracket (1x):
GM 12569219 ; 24508441 -
https://www.amazon.com/dp/B..._US&ref_=as_li_ss_tl or
https://ebay.us/Cv9T6f or
https://ebay.us/cumdE1 or
https://car-part.com/NOTE: See what cars this came on here -
https://www.gmpartsgiant.co...dapter-12569219.htmlNOTE: You can not make any bracket BUT this GTP/Regal style work with the
FieroRog brackets. More info at
http://www.gmtuners.com/swap/3800.htmNOTE: If you install a 5% overdrive balancer pulley, you will need this oil filter spacer to make it work -
https://ebay.us/IMP58nNOTE: You may want to install the ZZP Oil Volume Kit if you must install the GTP oil filter bracket:
https://zzperformance.com/products/oil-volume-kit
Oil Filter Housing Gasket (1x):
MAHLE B31639 -
https://www.amazon.com/dp/B..._US&ref_=as_li_ss_tlNOTE: The ZZP Oil Volume kit comes with this.
GTP/Regal angled coil pack bracket (1x):
GM 24507211 ; 24504360 -
https://ebay.us/GjwLdZ or
https://ebay.us/8kbMmg or
https://car-part.com/NOTE: See what cars came with this here -
https://www.gmoempartsoutle.../gm-bracket-24507211NOTE: Cut engine mount dogbone off, shown here -
https://youtu.be/mmfWbG37By...qJnkff2RlPWB_O&t=178.
GTP/Regal Supercharger Tensioner Pulley (1x):
Dayco 89367 -
https://www.amazon.com/dp/B..._US&ref_=as_li_ss_tlNOTE: Should come on a GTP/Regal angled coil pack bracket above. You will have to buy this if it is missing from the coil pack bracket.
GTP/Regal Supercharger Idler Pulley (1x):
Gates 38009 -
https://www.amazon.com/dp/B..._US&ref_=as_li_ss_tlNOTE: Should come on a GTP/Regal angled coil pack bracket above. You will have to buy this if it is missing from the coil pack bracket.
Optional: Torque Converter (1x):
DACCO B21JXFM -
https://www.amazon.com/dp/B..._US&ref_=as_li_ss_tl or
https://ebay.us/lwhUadNOTE: See here for stalls -
https://atracom.blob.core.w...al/2013/2013-049.pdfNOTE: A Bonneville SSEI or Park Avenue Ultra (JSFM) torque converter may be too low stall for a Fiero. Could idle at 20mph.
NOTE: A GTP/Regal torque converter (JTFM) might be OK, or a higher stall (JZFM or JXFM) Converter would be better. JXFM was highest stall. Works great in a 3800 Fiero (JXFM did NOT come on supercharged 3800s)
NOTE: YOU ALSO NEED TO FILL THE TORQUE CONVERTER BACK UP WITH TRANSMISSION FLUID BEFORE THE INSTALL!
GTP/Regal 3-pin Temperature sender (1x):
Standard Motor Products TX66 -
https://www.amazon.com/dp/B..._US&ref_=as_li_ss_tlNOTE: You may not need this; check to see if your car is already equipped with this 3-pin sensor (instead of a 2-pin)
GTP/Regal 3-pin Temperature sender connector (1x):
Standard Motor Products HP4440 -
https://www.amazon.com/dp/B..._US&ref_=as_li_ss_tlNOTE: Only needed if building your own harness.
NOTE: You may not need this; check to see if your car is already equipped with this 3-pin sensor (instead of a 2-pin)
Northstar Throttle Body, adapters, and throttle bracket:
-See
BUILD 2 Air section
NOTE: Only needed for Series III/GenV motors.
-----PARTS THAT WEAR OUT & MAINTENANCE PARTS FOR A 3800SC-----NOTE: These are highly recommended to change out because they wear out on a 3800. DO IT ONCE AND DO IT RIGHT!
CLICK HERE TO VIEW PARTS THAT WEAR OUT ON A 3800SC ON AMAZONCLICK HERE TO VIEW ALL 3800 REPAIR PARTS ON AMAZON* = especially susceptible on a 3800
-----BELOW WEAR PARTS NOT DUPLICATED IN ANY BUILD-----*Supercharger Coupler (1x):
https://ebay.us/w2PVEfor
Dorman 917-022 -
https://www.amazon.com/dp/B..._US&ref_=as_li_ss_tl*Supercharger snout bearing set (1x):
https://www.amazon.com/dp/B..._US&ref_=as_li_ss_tl*4t65e-hd shift solenoids (3x):
GM 24219819 -
https://www.amazon.com/dp/B..._US&ref_=as_li_ss_tlNOTE: See
Install Video here*Valve covers:
Plastic Front (1x): Dorman 264-964 -
https://www.amazon.com/dp/B..._US&ref_=as_li_ss_tlPlastic Rear (1x): GM 12590364 -
https://www.amazon.com/dp/B..._US&ref_=as_li_ss_tlor
Aluminum Set (1x):
https://ebay.us/zrsiqF or
https://www.amazon.com/dp/B..._US&ref_=as_li_ss_tlNote: The grey plastic valve covers are prone to cracking.
Knock Sensor (2x):
STANDARD MOTOR PRODUCTS KS45 -
https://www.amazon.com/dp/B..._US&ref_=as_li_ss_tlTransmission oil filter kit (1x):
ATP TF-161 -
https://www.amazon.com/dp/B..._US&ref_=as_li_ss_tlTransmission Oil Pan Gasket (1x):
8mm bolt holes/13mm bolt heads - ATP JG143 (1x):
https://www.amazon.com/dp/B..._US&ref_=as_li_ss_tlor
6mm bolt holes/10mm bolt heads - TBD - ABOVE CAN ALSO WORK
NOTE: There are two styles of transmission oil pans. You need to look at your pan and see what socket fits on your bolt.
NOTE: AVOID CORK OR PAPER GASKETS INCLUDED IN FITLER KITS!
Oil 10W30 (4.5 quarts):
Valvoline 881165 -
https://www.amazon.com/dp/B..._US&ref_=as_li_ss_tlNOTE: DO NOT USE HIGH MILEAGE OIL WITH NEW SEALS. HIGH MILEAGE OIL WILL DESTROY AND SWELL NEW SEALS. CAN CAUSE VALVE COVER OIL LEAKS.
Oil filter (1x):
ACDELCO PF47E -
https://www.amazon.com/dp/B..._US&ref_=as_li_ss_tlSupercharger oil (2x):
GM 12345982 -
https://www.amazon.com/dp/B..._US&ref_=as_li_ss_tlOptional: Ultraviolet dye and light for fluid leaks
UV Flashlight (1x): EOWCO E1 -
https://www.amazon.com/dp/B..._US&ref_=as_li_ss_tlUV Fuel/Oil/Power Steering/Transmission Fluid Dye (1x): ACDelco 1148963 -
https://www.amazon.com/dp/B..._US&ref_=as_li_ss_tlUV Coolant dye (1x): GM 12378563 -
https://www.amazon.com/dp/B..._US&ref_=as_li_ss_tl-----BELOW WEAR PARTS DUPLICATED IN BUILD 1 (ABOVE):-----Colder Spark Plugs - two ranges colder than stock Autolite 606 plugs, gap to 0.035"-0.040" (6x):
Autolite 104 -
https://www.amazon.com/dp/B..._US&ref_=as_li_ss_tl180° Thermostat (1x):
MotoRad 239-180 -
https://www.amazon.com/dp/B..._US&ref_=as_li_ss_tl*Valve cover seals (1x):
Ultra-Power VS50465R -
https://www.amazon.com/dp/B..._US&ref_=as_li_ss_tl*Aluminum Heater Hose Elbow (1x):
Dorman 47065HP -
https://www.amazon.com/dp/B..._US&ref_=as_li_ss_tlNOTE: These CRACK if they are plastic! REPLACE with aluminum above!
Spark Plug Wire Kit for Custom Lengths (1x):
Taylor Cable 83253 (45 degree boots) -
https://www.amazon.com/dp/B..._US&ref_=as_li_ss_tlNOTE: You need a vise and a spark plug crimper below
Spark plug wire crimper to use with bench vise (1x):
MSD 3503 -
https://www.amazon.com/dp/B..._US&ref_=as_li_ss_tl-----BELOW WEAR PARTS DUPLICATED IN BUILD 2 (BELOW):-----Automatic Transmission Service Overhaul Kit (1x):
GM Genuine Parts 19258573 -
https://www.amazon.com/dp/B..._US&ref_=as_li_ss_tlNOTE: Required for shift solenoids
NOTE: Required for hardened input shaft, 4th clutch shaft, and pump shaft
NOTE: Could get more expensive kits with clutch packs if you choose to change those. See overhaul video here -
https://www.youtube.com/wat...kff2RlPWB_O&index=15Transmission Fluid Dexron III - 7.4 quarts (maintenance) or 10 quarts (total drain including replacing the torque converter) (2x 6-pack):
Citgo 633131001 or 633131001182 Transgard High Viscosity Multi Vehicle ATF -
https://ebay.us/36mRLvNOTE: This difficult to find transmission fluid on the market - it is synthetic (long lasting), high viscosity (thick/sticky/lubricates well), and rated for Dexron III (not Dexron IV which is too thin to lubricate well).
NOTE: Sometimes the part numbers get mixed up at retailers; make sure it is the HIGH VISCOSITY.
*Intake Manifold Gasket Set (1x):
ACDelco 89017825 -
https://www.amazon.com/dp/B..._US&ref_=as_li_ss_tlGrey Gasket Maker (1x):
Permatex 85144 -
https://www.amazon.com/dp/B..._US&ref_=as_li_ss_tlNOTE: Use this on intake manifold gasket lifter valley seal corners AND on throttle body.
Series III/GENV Supercharger Upper Intake Manifold Plenum Gasket Set (reusable) (1x):
Apex AMS3735 -
https://www.amazon.com/dp/B..._US&ref_=as_li_ss_tlOR
Series II / Gen3 Upper Intake Manifold Plenum Gasket Set (1x):
FEL-PRO MS95744 -
https://www.amazon.com/dp/B..._US&ref_=as_li_ss_tlNOTE: Required for Intake Manifold Gaskets
NOTE: The ZZP Phenolic Spacer and interooler kits each come with 2 garlock gaskets included, so this is not necessary if you order that. Extra ZZP Garlocks available here:
https://zzperformance.com/p..._sid=ecdfe73d9&_ss=r*Flexplate Bolts (yields) (8x):
GM 24501365 -
https://www.amazon.com/dp/B..._US&ref_=as_li_ss_tl or
https://ebay.us/8zWGbdNOTE: ONLY NECESSARY if you remove the automatic flexplate. These bolts YIELD and need to be replaced. These DO NOT WORK on a manual transmission, see
FieroRog Flywheel bolts in the MOUNTING AND BRACKETS section of this
build 1Oil Pump Kit (1x):
Melling K195 -
https://www.amazon.com/dp/B..._US&ref_=as_li_ss_tlHead Gasket:
OEM style (messy, not reusable):
RHS (1x): FEL-PRO 9918 PT -
https://www.amazon.com/dp/B..._US&ref_=as_li_ss_tlLHS (1x): FEL-PRO 9917 PT -
https://www.amazon.com/dp/B..._US&ref_=as_li_ss_tlOR
MLS Head Gasket, reusable unless heat cycled (1x right/left side):
RHS stock height (1x): Cometic C5721-066 -
https://www.amazon.com/dp/B..._US&ref_=as_li_ss_tlLHS stock height (1x): Cometic C5720-066 -
https://www.amazon.com/dp/B..._US&ref_=as_li_ss_tlOR
RHS stock bore, .04 higher compression/.02" shorter than stock (1x): Cometic C5721-060 -
https://www.amazon.com/dp/B..._US&ref_=as_li_ss_tlLHS stock bore, .04 higher compression/.02" shorter than stock (1x): Cometic C5720-060 -
https://www.amazon.com/dp/B..._US&ref_=as_li_ss_tlOR
See the options available here for shorter, over bore, etc.: INTENSE HGP-0xx -
http://www.intense-racing.com/PROD/HGP-0xx.htmlNOTE: Pistons should measure out of cylinder hole ~0.025". You want .038"-.046" of quench according to INTENSE racing. For 0.035" quench + 0.025" out of hole = 0.060" thick gasket 0.04 extra compression and slightly more power.
NOTE: The arrow and the "L," or Left-Hand Side (LHS) gasket goes on the cylinder 1/3/5 side of the engine (towards the Fiero firewall, away from the donor car firewall). If you look at the rear cover from the rear of the engine, it goes on the left hand side.
NOTE: Your decks and heads must be perfectly flat and clean to install these MLS gaskets. Consider decking your surfaces, detailed in the
Assembly videos section build 2. Otherwise they may leak.
NOTE: MLS should be reusable (unless heat cycled), and is not messy to clean off.
NOTE: Cometic indicated they have black Viton seal coating on the MLS gaskets and you should NOT use a copper spray on these. INTENSE racing says they do use copper spray. It is difficult sealing the coolant passages with these without a copper spray.
Head Bolts - yields (1x):
FEL-PRO ES 74033 -
https://www.amazon.com/dp/B..._US&ref_=as_li_ss_tlOR
Reusable head studs (1x):
ARP 193-4001 -
https://www.amazon.com/dp/B..._US&ref_=as_li_ss_tlNOTE: Instructions for installing ARP Head Studs -
https://tech.arp-bolts.com/...uctions/193-4001.pdfNOTE: DO NOT USE ARP THREAD SEALANT! INSTEAD USE A PERMATEX ULTRA BLACK GASKET MAKER AND CLEAN HEAD SURFACES WELL
NOTE: Required for head gasket
HEAD STUD SEALANT - DO NOT USE ARP THREAD SEALANT! (1x):
Permatex 82180 -
https://www.amazon.com/dp/B..._US&ref_=as_li_ss_tlNOTE: Be sure not to get ANY on the head deck surface. Clean it off with a rag sprayed with brake cleaner if you do.
NOTE: You can get a different form factor of this, such as one that fits in a caulk gun for ease.
NOTE: How-to video on sealing head studs -
https://youtu.be/z4XB0vyGkz...2qJnkff2RlPWB_O&t=26NOTE: Required for head studs
ARP 7/16"-14 Thread Chaser (1x):
ARP 911-0004 -
https://www.amazon.com/dp/B..._US&ref_=as_li_ss_tlNOTE: For cleaning the old sealant out of the head bolt threads.
NOTE: Do NOT use a tap to clean out your head bolt threads. You can damage/weaken the threads.
NOTE: Required for head bolts/head studs
*Camshaft Bolt - yields (1x):
GM 24501366 -
https://www.amazon.com/dp/B..._US&ref_=as_li_ss_tlOR
https://intense-racing.com/...H-BCM&Category_Code=OR
https://ebay.us/IpZ2xPOR
https://zzperformance.com/products/camshaft-boltNOTE: ONLY IF CHANGING CAMSHAFT
*Crankshaft / Harmonic balancer Bolt - yields (1x):
GM 24504736 -
https://www.amazon.com/dp/B..._US&ref_=as_li_ss_tlNOTE: This is very involved to swap out; see video here -
https://www.youtube.com/wat...kff2RlPWB_O&index=51NOTE: yields, required for removing the balancer/front cover/timing chain/camshaft/balance shaft
*Rocker Bolts - yields:
Non-reusable kit (3x 5-pack): GM 24503515 -
https://ebay.us/T9ErY3OR
Reusable kit (1x): S23BLTS-12 -
https://ebay.us/gRhFwZNOTE: Comes with 1.9 Rockers
NOTE: Required if changing camshaft or head gasket or timing chain
High Strength Threadlocker for Rocker Bolts and plastic Lifter Retainers (1x):
Loctite 272 -
https://www.amazon.com/dp/B..._US&ref_=as_li_ss_tlNOTE: Also used for lifter retainer bolts.
NOTE: Required for reusable rocker bolts / 1.9 rockers
*Timing chain
Melling 381A -
https://www.amazon.com/dp/B..._US&ref_=as_li_ss_tlNOTE: Replaced with double roller and no tensioner in
build 2, requires deleting balance shaft
*Timing chain tensioner damper - deleted in
build 2) (1x):
GM 24503893 -
https://www.amazon.com/dp/B..._US&ref_=as_li_ss_tlNOTE: This is very involved to swap out; see video here -
https://www.youtube.com/wat...kff2RlPWB_O&index=51OR
ZZP 3800 Upgraded Tensioner
https://zzperformance.com/p...0-upgraded-tensionerExtra thick front cover gasket (1x):
ZZP ZZ-FCGG -
https://ebay.us/yoYNHsNOTE: needed for double roller timing chain
or
GM 12587003 -
https://www.amazon.com/dp/B..._US&ref_=as_li_ss_tlNOTE: The GM gasket is not extra thick, not compatible with double roller.
NOTE: Required if changing camshaft, timing chain, or balance shaft deletion
Crankshaft Seal REAR (1x):
National 320691 -
https://www.amazon.com/dp/B..._US&ref_=as_li_ss_tlCrankshaft Seal FRONT (1x):
GM 12582313 -
https://www.amazon.com/dp/B..._US&ref_=as_li_ss_tlNOTE: This is very involved to swap out; see video here -
https://www.youtube.com/wat...kff2RlPWB_O&index=51Fuel injector o-ring pack (1x):
Dorman 90100 -
https://www.amazon.com/dp/B..._US&ref_=as_li_ss_tlNOTE: These may not be required, but you always need a spare or two. The factory o-rings with these DEKA injectors seem slightly undersized for some applications. Use the thick brown o-rings from the pack.
Intake/Exhaust Valve Stem Seals (1x set of 12):
FEL-PRO SS 72144 -
https://www.amazon.com/dp/B..._US&ref_=as_li_ss_tlWater Pump (1x):
US MOTOR WORKS US5075 -
https://www.amazon.com/dp/B..._US&ref_=as_li_ss_tlor
Electric Water Pump (1x):
Meziere WP140 -
https://ebay.us/qajFeQAluminum Water Pump Gasket (1x):
Fel-Pro 35804 -
https://www.amazon.com/dp/B..._US&ref_=as_li_ss_tlNOTE: Required for Water Pump
Thread Sealant for bolts going in to water/oil jackets (1x):
Permatex 80632 -
https://www.amazon.com/dp/B..._US&ref_=as_li_ss_tlNOTE: Required for water pump, front cover gasket, timing chain, camshaft, timing chain tensioner, lower intake manifold, etc.
-----
FieroAustin
1988 GT 3800sc Series III E85 Intercooled 2.56" Pulley
Amazon Recommendation Store for 3800s/Fieros/Tools
https://amzn.to/3hNViaa3800sc Instructions
https://www.fiero.nl/forum/Forum2/HTML/139530.html3800sc Instructions MOBILE
https://drive.google.com/fi...JzC-2ZzbvLYMYE3QbmVqeBay Recommendation Store
http://ebay.us/hdJWbhDonate to me
https://paypal.me/FieroAustinYouTube
https://www.youtube.com/fie...n?sub_confirmation=1Join YouTube membership
https://www.youtube.com/FieroAustin/joinJoin Facebook Group
https://www.facebook.com/be...pporter/FieroAustin/Consulting on Facebook
https://www.facebook.com/FieroAustin/[This message has been edited by AustinH (edited 12-06-2025).]