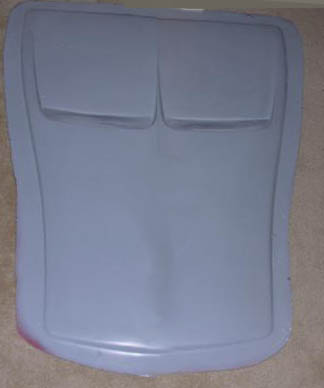
Once the flange was cut to size I flipped the hood over to see how the scoop fits compared to the trunk seal lip. I also want to see where the openings could be cut for air flow:
Once the flange out line and the approximate inside flange edge were marked I grabbed some paper to make a template: The paper was taped down and I used a lumber crayon to trace the curve of the trunk seal lip: I used the flange of the scoop to estimate the positions of the curved lines forming the intended hood opening. These lines ate approximately 1" inside the outside edge of the scoop and should be reasonably close to the inside edge of the flange. The hood was then flipped back over and the front egde of the scoop marked and the template was taped for a trial fit.
Edit : WOOT! I own page three!
[This message has been edited by Sourmug (edited 05-08-2007).]
Rats, even after trimming, there is still some overlap of the flange with the front/back lines on the hood:
I would like to remain reasonably close to the original contours of the hood. My concern is that when the scoop is attached and glassed in there will be a bulge at this overlap. So, perhaps I should remove a strip down the center of the scoop so that the two halves are close together. This would move the flange further away from the lines and make smoothing the edges much easier.
Any thoughts?
Nolan
[This message has been edited by Sourmug (edited 05-08-2007).]
I thought about moving the two halves right together so that there would be no gap. pumpkincarriage was kind enough to photoshop this picture:
But I don't think that I like how it looks.
I decided to cut out an 1 1/2" strip out of the center and modify the template so that the holes in the hood are closer together as well:
I marked out the strip and cut the scoop into two pieces. After the cutting is complete I find some gaps between the gelcoat and the fiberglass. Arrgg! I took a ball-peen hammer and started tapping the raised surfaces and this is what I find... Air bubbles:
Shades of the rear deck lid. Is there some reason that people can't get the fiberglass to lay into the mold properly? Or is it just a crappy hand laid job? Man it's frustrating but at least it's fixable.
[This message has been edited by Sourmug (edited 05-08-2007).]
Remove the center space all together. Leaving either one larger opening or you still have both openings but only a arm coming down to the hood that would look good and support the middle of the scoop. Like Amber did here.
but then shorten it a bit too.
edit: oops, too late.
[This message has been edited by Fiero1Fan (edited 03-28-2006).]
I though of doing that but it looses some of it's appeal to me. I like the effect of the two separate scoops rather than the single look. I dunno, I guess it's just a personal taste thing. Out of curiosity, why do you think it should be shortened? I assume you mean front to back?
Nolan
[This message has been edited by Sourmug (edited 03-28-2006).]
Yes. I think it might look better if the whole piece was shorter. Ignore that it will over hang at the moment and just move the pieces down about 10" and see how that looks. I have photoshop but can't get it to work like I want it to.
I will have a look at it when I get home from work tonight.
Edit: I had a look at what you are saying. I agree that moving the scoop forward would look good as well. Part of what I like about this scoop is that it is fairly long and places the openings about midway on the hood rather than the fairly common front location of most scoops or the rear of the hood openings that are less frequent. I think it looks some what unique or at least different than most. I appreciate your suggestion but I think that I will keep the length, again it's just a personal preference thing. Besides, I had already cut the hood openings but it could still have been made to work.
Thanks Nolan
[This message has been edited by Sourmug (edited 03-28-2006).]
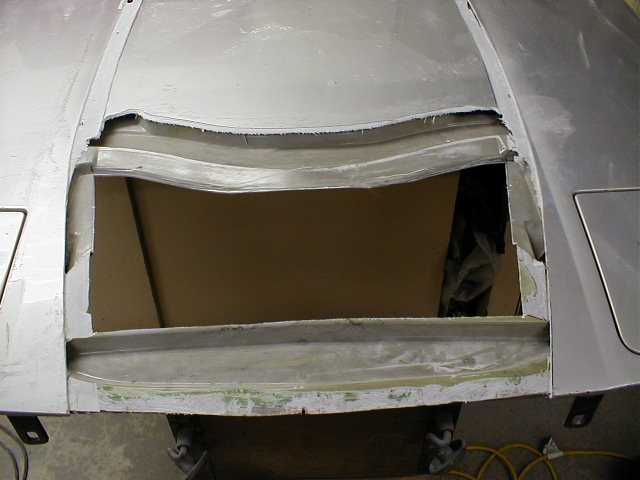
I did decide to cut 1 1/2" out between the two halves of the scoop and placing the cut pieces in the hood I traced the overall outline and then using the template I traced the hood openings as well: I then drilled two holes, one in each of the upper corners just to see how my marks on the top of the hood correspond with the underside. I figured that it's easier to patch two small drill holes than two large holes in case I screwed up. I checked the underside and sure enough the template had been placed too far forward. Darn rubber tape measures I then re-marked the openings using the correct distance: And drilled hole in all the corners so that the jigsaw blade could be positioned for cutting. I wasn't nearly as nervous cutting the hood as I was cutting the deck lid. It doesn't seem to be as big of a deal. Here are the two openings:
[This message has been edited by Sourmug (edited 05-08-2007).]
[booktext]I trhen taped the scoop onto the hood so that I could checkl the fit from underneath: Here's how if looks from the back looking forward: And this is from the front: And here is a close-up of the gap between the top of the hood and the underside of the scoop:
There is about a 3/4" high gap which gets taller as it moves towards the rear. I am going to cut the top further to create a flap that will be bent down to meet the bottom sheet of the hood. This will give the leading edge an airfoil shape which should assist in air flow. [/boolktext] Nolan
[This message has been edited by Sourmug (edited 05-08-2007).]
Tonight I sanded the top of the hood at the openings in preparation to bend the top layer down. Then I marked out the 4 cuts to be made which will make two 3" long flaps: I then cleared out all the dust and applied my trusty panel adhesive between the two layers: And then clamped it firmly in place. The top layer flaps bent downward fairly easy and the bottom layer does not appear to have distorted: I will let that sit overnight just to make sure it bonds and cures.
Also tonight I cut out the two scoop openings using a dremel c/w cut off wheels and a sanding drum to shape out the rounded corners. I then filled the air bubble with the glass fiber reinforced filler which will also sit overnight.
Nolan
[This message has been edited by Sourmug (edited 05-08-2007).]
Holy Cow, What detailed work. It just keepsgetting better and better doesn't it. I love the TA fender scoops. However I think that I may try to do a set like the second generation style on my 79'. I know I have seen someone on here do this before. Where did you learn about the fiberglass? I have one experiance with it and it was not good, I am very intimidated. Thanks david
Holy Cow, What detailed work. It just keepsgetting better and better doesn't it. I love the TA fender scoops. However I think that I may try to do a set like the second generation style on my 79'. I know I have seen someone on here do this before. Where did you learn about the fiberglass? I have one experiance with it and it was not good, I am very intimidated. Thanks david[/QUOTE]
David:
Thanks for the comments. I have learned, the little that I know about fiberglassing, from this forum and a number of other websites but mostly from just doing it. I started with the battery box because it wasn't something attached to the car and if it didn't work it would be no big deal. I would suggest that you do something similar just to get a feel for how glassing works. Here are some links that I have found to be helpful:
It's good to see someone else jumping in and trying their hand at bodywork. It took me 2 years to start & finish all the bodywork on my "GreenGT" - and it looks like you're getting a much more solid start on it than I did (I ended up having to re-do things a few times because I didn't listen to the instructions as clearly as I should've).
The one tool I can't endorse enough is a larger (6" diameter) DA Sander. I picked mine up at Home Depot for around $50 - and it was the best money I ever spent when it comes to doing bodywork (it's much easier to get a smooth plain when you're working with a larger sanding surface!
As to the quality of the 'glasswork you've received from vendors... as I understand, your first two pieces (from Tiawan & DV) are going to be two of your "most difficult" pieces. I have Stage2 Scoops (although from an earlier 'glassworker), and other than a couple of air pockets in the gel coat - they are great quality. And air pockets (at least in small numbers) are just a side of hand-made glasswork that is tough to avoid - I'm just glad you located the voids before you got further along in the process!
MinnGreenGT:
Thanks! I actually do have a 6" DA sander but forgot to mention it as it was really only useful for the top of the deck lid. I had done the majority of the top sanding some time back and didn't take a picture of it. But, here is a picture now:
You are right, it makes a big difference on the larger areas.
Speaking of air bubbles, I started to sand the two scoop pieces when I got home tonight, low and behold I found a number of additional bubbles that my "hunt and peck" method with the hammer didn't find. I guess my method wasn't very efficient. These all became evident when I was sanding so a word to the wise "sand your piece first thing and you'll find the holes"! Nolan
[This message has been edited by Sourmug (edited 05-08-2007).]
I removed the clamps from the hood and it popped back open! The Panel Adhesive didn't stick Well that's never happened before.
The adhesive chipped off the two surfaces quite easily. and is very smooth so I assume the the two surfaces are too smooth for the adhesive to bond to. I used the dremmel to rough up the surfaces, hopefully it will work now.
So I filled my new air bubles and may call it a night.
Arg! Nolan
[This message has been edited by Sourmug (edited 05-08-2007).]
What can I say? I couldn't stay out of the garage.
After we went and got some Chinese, played a game or two on the computer, I went back out. I pulled the clamps off and.....
Hey! It worked! It's a pretty subtle curve and I don't really know just how much it will help air flow (if any) but it's gotta be better than a flat vertical edge. Besides I like the idea and it just seems more finished.
Nolan
[This message has been edited by Sourmug (edited 05-08-2007).]
Tonight I added the filler pieces where I bent the top of the hood down. These fill the larger gaps between the two layers of the hood: Again I used the SMC panel adhesive. The filler pieces were cut from the sheet fiberglass that was once the top of the deck lid. I also made the cut lines on the flaps larger so that these pieces go all the way down and make contact with the bottom layer. Once set I roughly cut the pieces to shape with a dremmel cut-off wheel and sanded to match the top and bottom contour of the hood layers: The odd shape of the bottom matches the contour of the bottom layer.
Then I sanded and applied filler to the underside of the scoops. Since this will be visible through the hood openings when the hood is in the upright position I want these to look as close to OEM as possible. And I also began sanding the top of the hood to remove both the paint and the primer to make sure that the scoop will adhere well when bonded and so the fiberglass will stick when it's applied as well. This is tedious work and not very exciting. I will probably work on this over the weekend before I update this thread again.
Thanks for looking. Nolan
[This message has been edited by Sourmug (edited 05-08-2007).]
The underside of the two scoops have been smoothed: One side required much less filling and sanding than the other but they were not too bad. The finish is not down to 400 grit paper yet as the underside will require some glass work but it's much easier to work on these before they are attached.
I want to maintain the original hood lines as much as possible. I remember reading in Skitime's thread that he had created a recess in the hood surface to accept the mounting flange on the scoop. This would keep the top edge of the flange as close to the original hood surface as possible. I PM'ed Skitime to see what he used to make the recess. Skitime apparently used a circular saw while holding the blade to the right depth. I asked him about using a router but Skitime said that he had difficulty with the bit burning the hood. I didn't fell comfortable with the circular saw idea so in the end I did use a router with a new bit and didn't have any problems with burning. The router is a little difficult to control freehand but it worked quite well, my lines are not quite as strait a Skitime's but they will be covered anyways. Here is a picture from Skitime's thread: And this is how my hood turned out: The mounting flanges on my scoops also needed some work as they varied in thickness from about 3/16" to 5/15" in thickness with a few spots that may have been thicker. I ground the bottom side of the flanges down until they were more or less a uniform thickness.
After a test fit, I realized that I would also have to router a groove down the center of the hood:
[This message has been edited by Sourmug (edited 05-08-2007).]
By the way, the hood may not be completely uniform in thickness. I did penetrate in one spot: It's very easy to do. I also did not make the center groove as deep as the others. Down the center line there is mostly only one layer to the hood and I didn't want to penetrate it which would only make more work when it comes time to clean up the underside. Here is the bit that I used in the router, I don't think that I will keep it for wood use and fiberglass is extremely hard on cutting blades and edges: This process of routering the hood produces a TON of dust and airborne fibers, make sure you are wearing the appropriate mask and face shield when doing this.
After cleaning the grooves and the scoop flanges it was time to bond the scoops to the hood. I "buttered" the underside of the flanges as well as the edge of the scoop opening that touches the hood with the panel adhesive: The scoop was then placed in the grooves, checked for fit and screwed in place with drill point self-tapping screws. These little babies are great when you can't use a clamp: Here is one side bonded and screwed down: When the second scoop was buttered, the joint between the two halves was also buttered. Then it was placed and screwed: When using these screws there will be penetration of the tip through the bottom layer but these will be easily patched and sanded when the bottom is finished.
[This message has been edited by Sourmug (edited 05-08-2007).]
The following morning I removed the screws. I was a little nervous as the two front outside edges of the scoop did not sit down on the hood and had to be bent downwards when I was screwing the scoops on. I was concerned that they would pop at these corners. The scoops appear to be fully bonded with now gaps. After a quick sanding to get rid of the excess adhesive and a cleaning with acetone I applied the fiber reinforced bondo to fill in the remaining gaps between the flanges and the outside edge of the groove: This was also sanded afterwards to provide a relatively smooth surface for the layer of fiberglass that is going to be applied. There is one modification that I want to make to these scoops. The front edges sit too far back from the leading edge of the hood and seem to conflict a bit with the front edges of the lights. I want to extend the leading edge of the scoops forward. I cut two extension pieces from the scrap pieces that were cut out to form the hood openings below the scoops. These were shaped using a belt sander to match the needed contours:
[This message has been edited by Sourmug (edited 05-08-2007).]
Once I was satisfied with the fit, the pieces were then bonede and screwed in place: They were left over night as well. The screws were removed and the extensions and the filler were final sanded prior to fiberglassing: After cleaning the fiberglass has been applied:
And that's my prgress for the weekend.
Nolan
[This message has been edited by Sourmug (edited 05-08-2007).]
Question - actual fiberglass, or fiberglass bondo? And, why?
Ryan:
The fiberglass reinforced bondo was used to fill the gap because it has higher strength than regular bondo. I then used fiberglass over the joint as shown in the last pictures to prevent cracking. Does this answer your question or am I confused?
Nolan
[This message has been edited by Sourmug (edited 05-27-2007).]
Did you use fiberglass bondo, and just stuck some fiberglass mat into the mix, or did you fiberglass bondo it, wait, then apply fiberglass with resin over it? I'm just confused as to why you did it the way you did... Isn't the bondo enough?
Or... why didn't you use just fiberglass w/resin?
[This message has been edited by ryan.hess (edited 04-03-2006).]
Did you use fiberglass bondo, and just stuck some fiberglass mat into the mix, or did you fiberglass bondo it, wait, then apply fiberglass with resin over it? I'm just confused as to why you did it the way you did... Isn't the bondo enough?
Or... why didn't you use just fiberglass w/resin?
The picture that you posted is when I applied the fiberglass mat and resin. It is my understanding that there is a risk when using just bondo on a joint that, if there are any stresses involved, cracking at the joint may occur. The hood is subject to stress when it is being opened and when it is being closed, especially if allowed to slam shut. Also in this picture: you can see that under the duct tape the leading outside corners of the scoops are elevated off of the hood due to the scoops not completely matching the curve of the hood. These corners had to be pressed down when the scoops were attached and this also induces stress.
The reinforced bondo was used because when I removed material to make the groove for the flanges it would weaken the hood surface. My grooves did not perfectly match the outside edge of the flange and so I wanted to add some reinforcement back into the remaining gap. It also smoothed out the groove so that the fiberglass would go on relatively smooth.
Is it overkill? I don't know, but why take chances?
Nolan
Edit to add this picture which shows how the corners didn't sit down on the hood:
[This message has been edited by Sourmug (edited 05-27-2007).]
The hood and decklid are SMC. I believe they are fiberglass *reinforced*. The door panels and fenders are RRIM (something reinforced injection molded plastic)
The hood and decklid are SMC. I believe they are fiberglass *reinforced*. The door panels and fenders are RRIM (something reinforced injection molded plastic)
OK, I sit corrected! ( I always get it mixed up) I guess I should quit using the term "bondo" as the fillers that I am using are Evercoat. I checked their products page and the fillers I am using are all compatable with SMC. About the fiberglass resin, it is a Bondo product and is polyester but according to the can it too is SMC compatable. I have not noticed any separation issues with the fiberglass and the SMC but I guess time will tell.
Thanks (for the heart attack!) Nolan
[This message has been edited by Sourmug (edited 05-27-2007).]
Here's a few progress shots. The first few are after the first coat of "filler" (not bondo ) has been applied and sanded: You can see the overall shape starting to take on form. Here are a couple showing the low profile: And the second coat has been applied:
Thanks Nolan
[This message has been edited by Sourmug (edited 05-27-2007).]
Here is some more progress that I have made on the hood scoops. I have done most of the sanding on the top and have applied glazing putty in the more "obvious" defects and sanded it down as well. I didn't take any pictures of that as it's basically the same process as the deck lid. I did not want to finish the top off completely as working on the bottom will likely produce some marring and scratches on the top surface as it sit on the table. I will finish the top once the bottom is complete.
Here's how the hood openings look from the underside once the scoops were bonded: Thew black finish was removed to allow the fiberglass and filler to adhere. In this shot you can see where I have quickly sanded all the high spots at the holes that were made by the screws when the scoops were bonded on: And now after cleaning the surfaces with acetone I have applied two layers of fiberglass to the scoop/hood openings:
There is one tricky thing about fiberglass and that is getting it so sit down on tight curves and angles. Air pockets trend to form near these curves and having small pockets like this seems to be almost unavoidable. once the fiberglass set there were a few of these pockets. I will grind them out with the dremmel and fill them later.
So I guess I may have been a little harsh with my comments about the quality of the scoops and the deck lid vent from an air bubble point of view.
[This message has been edited by Sourmug (edited 05-27-2007).]
Another little issue that I have with my hood is that there is some damage to the holes that the pins go into to prevent the hood from decapitating you in an accident. This damage is minor and seems to be from the pins making contact with the hole edges when the hood is being closed. Here is a picture of what the damage: I applied some reinforced filler to the damage, let is set up and sanded it smooth. I then applied a layer of fiberglass: The holes will later be cut out with the dremmel to match the original shape. I have also applied filler and sanded it down a couple of times to the opening areas: And I have also started to fill all the screw holes:
That's it so far! I think it's starting to come along. But I don't think I'm going to get anything else done today, it's my birthday after all! and we are having a bunch of friends over for a barbecue and movies.
[This message has been edited by Sourmug (edited 05-27-2007).]


.JPG)
.JPG)
.JPG)
.JPG)


.JPG)
.JPG)
.JPG)
.JPG)
.JPG)
.JPG)
.JPG)


 but it could still have been made to work.
.JPG)

.JPG)
.JPG)
.JPG)
.JPG)
.JPG)
.JPG)
.JPG)
.JPG)
.JPG)
.JPG)


_1.JPG)

 I guess my method wasn't very efficient. These all became evident when I was sanding so a word to the wise "sand your piece first thing and you'll find the holes"!
.JPG)
.JPG)
.JPG)
 Well that's never happened before.
.JPG)
.JPG)
.JPG)
.JPG)

.JPG)
.JPG)
.JPG)
.JPG)
.JPG)
.JPG)
.JPG)
.JPG)
.JPG)
.JPG)
.JPG)
.JPG)
.JPG)
.JPG)
.JPG)
.JPG)
.JPG)
.JPG)
.JPG)
.JPG)
.JPG)
.JPG)
.JPG)
.JPG)
.JPG)
.JPG)
.JPG)


.JPG)


_1.JPG)
.JPG)
.JPG)
.JPG)
.JPG)
.JPG)
.JPG)
.JPG)
.JPG)
.JPG)
.JPG)
.JPG)
.JPG)
.JPG)
.JPG)
.JPG)
.JPG)


