Pennock's Fiero Forum
  The Construction Zone
  Sourmug's Decklid Vent Build ** 56K Warning!!** (Page 2)

Post New Topic  Post A Reply
Email This Page to Someone! | Printable Version | Print VBook

This topic is 18 pages long:  1   2   3   4   5   6   7   8   9   10   11   12   13   14   15   16   17   18 
Previous Page | Next Page
next newest topic | next oldest topic
Sourmug's Decklid Vent Build ** 56K Warning!!** by Sourmug
Started on: 03-12-2006 03:40 AM
Replies: 681 (59712 views)
Last post by: labbe001 on 02-22-2024 04:39 PM
Fiero1Fan
Member
Posts: 4364
From: Brachttal, Germany
Registered: Sep 2005


Feedback score:    (19)
Leave feedback


Total ratings: 100
Rate this member

Report this Post03-18-2006 06:59 PM Click Here to See the Profile for Fiero1FanClick Here to visit Fiero1Fan's HomePageSend a Private Message to Fiero1FanEdit/Delete MessageReply w/QuoteDirect Link to This Post
I will be doing BOTH mods!!

edit: Sorry I stole page 2!

[This message has been edited by Fiero1Fan (edited 03-18-2006).]

IP: Logged
Fiero1Fan
Member
Posts: 4364
From: Brachttal, Germany
Registered: Sep 2005


Feedback score:    (19)
Leave feedback


Total ratings: 100
Rate this member

Report this Post03-18-2006 07:05 PM Click Here to See the Profile for Fiero1FanClick Here to visit Fiero1Fan's HomePageSend a Private Message to Fiero1FanEdit/Delete MessageReply w/QuoteDirect Link to This Post

Fiero1Fan

4364 posts
Member since Sep 2005
Got the pdf. That was quick!!! Thanks.
IP: Logged
Sourmug
Member
Posts: 4538
From: Calgary, Alberta, Canada
Registered: Sep 2002


Feedback score:    (29)
Leave feedback


Total ratings: 144
Rate this member

Report this Post03-18-2006 07:15 PM Click Here to See the Profile for SourmugSend a Private Message to SourmugEdit/Delete MessageReply w/QuoteDirect Link to This Post
I guess that we're booth snooping around the forum at the same time. Yes, I see that you stole page two!

[This message has been edited by Sourmug (edited 03-18-2006).]

IP: Logged
Fiero1Fan
Member
Posts: 4364
From: Brachttal, Germany
Registered: Sep 2005


Feedback score:    (19)
Leave feedback


Total ratings: 100
Rate this member

Report this Post03-18-2006 07:33 PM Click Here to See the Profile for Fiero1FanClick Here to visit Fiero1Fan's HomePageSend a Private Message to Fiero1FanEdit/Delete MessageReply w/QuoteDirect Link to This Post
I'll sell page 2 to you cheap! Sent you an email.
IP: Logged
Sourmug
Member
Posts: 4538
From: Calgary, Alberta, Canada
Registered: Sep 2002


Feedback score:    (29)
Leave feedback


Total ratings: 144
Rate this member

Report this Post03-18-2006 09:34 PM Click Here to See the Profile for SourmugSend a Private Message to SourmugEdit/Delete MessageReply w/QuoteDirect Link to This Post
YAY! the underside if the deck lid is done!!!! Is it perfect? No. But I'm pretty darn happy with it. There's still a few imperfections and the odd "wave" but over all I think it looks good. Let me tell you it feels really good to have some progress on this. When I was in the middle of the glassing/filing/sanding phase it felt like nothing was ever going to be done.

Anyways what do you think:


Nolan

[This message has been edited by Sourmug (edited 05-08-2007).]

IP: Logged
doublec4
Member
Posts: 8289
From: Oakville, Ontario, Canada
Registered: Jun 2003


Feedback score:    (20)
Leave feedback


Total ratings: 150
Rate this member

Report this Post03-18-2006 10:50 PM Click Here to See the Profile for doublec4Send a Private Message to doublec4Edit/Delete MessageReply w/QuoteDirect Link to This Post
That looks REALLY good!

Now what does the other side look like

IP: Logged
crzyone
Member
Posts: 3571
From: Alberta, Canada
Registered: Dec 2000


Feedback score: N/A
Leave feedback


Total ratings: 176
Rate this member

Report this Post03-19-2006 02:22 AM Click Here to See the Profile for crzyoneSend a Private Message to crzyoneEdit/Delete MessageReply w/QuoteDirect Link to This Post
Awesome work Nolan. Don't see my old 3.4 dohc lying around the garage anywhere
IP: Logged
Sourmug
Member
Posts: 4538
From: Calgary, Alberta, Canada
Registered: Sep 2002


Feedback score:    (29)
Leave feedback


Total ratings: 144
Rate this member

Report this Post03-19-2006 06:15 PM Click Here to See the Profile for SourmugSend a Private Message to SourmugEdit/Delete MessageReply w/QuoteDirect Link to This Post
crzyone:

The 3.4 DOHC is hiding, it's still in bit and pieces patiently waiting for me to get to it.

doublec4:

I just flipped the deck lid over to get some shots and here they are:


[This message has been edited by Sourmug (edited 05-08-2007).]

IP: Logged
Sourmug
Member
Posts: 4538
From: Calgary, Alberta, Canada
Registered: Sep 2002


Feedback score:    (29)
Leave feedback


Total ratings: 144
Rate this member

Report this Post03-19-2006 06:27 PM Click Here to See the Profile for SourmugSend a Private Message to SourmugEdit/Delete MessageReply w/QuoteDirect Link to This Post

Sourmug

4538 posts
Member since Sep 2002
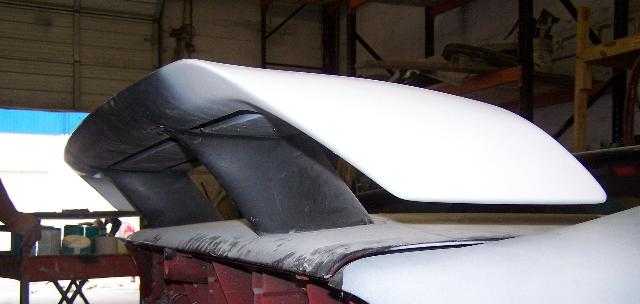
As you can see I had already done a lot of work to the top before the underside was completed.

What I did after the vent was bonded to the deck lid was take an angle grinder with an abrasive paper pad with a rubber backer and went around the lip of the fiberglass vent to remove a fair bit of material to make the transition between the vent and the deck lid less pronounced. I also sanded the cracks that were caused during transit and patched both the cracks and the other damaged areas with the fiberglass impregnated filler. This took a few applications to restore the damaged areas so they would match the original contours.

Additionally, the edge seams have been filled with the same filler and sanded smooth. One additional problem with this piece is that the mold that they used was not thoroughly clean and as a result there as little bits if some red substance caught in the gel-coat and has a rough texture. Needless to say the whole piece needs a thorough sanding. There are also some minor gouges that need to be filled.

There is still a bit of work to be done but I think it's coming along.

Nolan

[This message has been edited by Sourmug (edited 05-08-2007).]

IP: Logged
Fiero1Fan
Member
Posts: 4364
From: Brachttal, Germany
Registered: Sep 2005


Feedback score:    (19)
Leave feedback


Total ratings: 100
Rate this member

Report this Post03-19-2006 06:35 PM Click Here to See the Profile for Fiero1FanClick Here to visit Fiero1Fan's HomePageSend a Private Message to Fiero1FanEdit/Delete MessageReply w/QuoteDirect Link to This Post
May I ask what may be a silly question? Why did you only cut open 3 of the ribs? The 1st and 5th you left closed.
IP: Logged
Sourmug
Member
Posts: 4538
From: Calgary, Alberta, Canada
Registered: Sep 2002


Feedback score:    (29)
Leave feedback


Total ratings: 144
Rate this member

Report this Post03-19-2006 06:48 PM Click Here to See the Profile for SourmugSend a Private Message to SourmugEdit/Delete MessageReply w/QuoteDirect Link to This Post
 
quote
Originally posted by Fiero1Fan:

May I ask what may be a silly question? Why did you only cut open 3 of the ribs? The 1st and 5th you left closed.


The first rib (at the front edge) wasn't open in the pictures that Golden sent me and it sits at a different angle that the rest of the ribs. I suppose that it could be opened up. I may give some consideration to this but bacause of the construction of the vent I think it would not be able to be cut to match the other three.

The final rib (at the back) is only about 1/2" high so you would end up with a very narrow slot and I don't think that it would be practical to do.

Nolan

[This message has been edited by Sourmug (edited 05-08-2007).]

IP: Logged
PFF
System Bot
red84sematt
Member
Posts: 1413
From: black river falls wisconsin usa
Registered: Mar 2006


Feedback score: (2)
Leave feedback

Rate this member

Report this Post03-20-2006 12:58 AM Click Here to See the Profile for red84semattSend a Private Message to red84semattEdit/Delete MessageReply w/QuoteDirect Link to This Post
that is a great decklid there the underside is near oem factory looking. i like both ur mods would love to see both completed and car done. i might do the vent to my decklid but i think ill have someone else do it not that brave (well not yet anyway). so far so good keep it up man

------------------
hi hope you enjoyed what ive shared ttyl

IP: Logged
fieromadman
Member
Posts: 2217
From: Oconomowoc WI, USA
Registered: Jan 2003


Feedback score: (1)
Leave feedback


Total ratings: 63
Rate this member

Report this Post03-20-2006 01:26 AM Click Here to See the Profile for fieromadmanClick Here to visit fieromadman's HomePageSend a Private Message to fieromadmanEdit/Delete MessageReply w/QuoteDirect Link to This Post
Wow, that looks really good! I might have been insprired to add a decklid vent when I get my car re-painted next. I didnt realize how modified and well done that car will end up being. Now get to the 3.4 DOHC !!

-Jeff

------------------

--180* t-stat, (cam degrees) 1.5 degree intake advance and 5 degree exhaust retard, ported lower intake, FFP pulley, A/C Idler, flowmaster exhaust, EGR delete, K&N filter, chip-- --Check out the Fiero Kingdom!--

IP: Logged
Sourmug
Member
Posts: 4538
From: Calgary, Alberta, Canada
Registered: Sep 2002


Feedback score:    (29)
Leave feedback


Total ratings: 144
Rate this member

Report this Post03-20-2006 01:33 PM Click Here to See the Profile for SourmugSend a Private Message to SourmugEdit/Delete MessageReply w/QuoteDirect Link to This Post
Thanks for the comments. The 3.4 DOHC will be down the road abit as I am redoing the suspension, Lebaron brake upgrade, adding power mirrors and door locks etc, etc....

Nolan

IP: Logged
fieroman_5000
Member
Posts: 1407
From: Ann Arbor, MI, USA
Registered: Oct 2001


Feedback score: (1)
Leave feedback

Rate this member

Report this Post03-20-2006 03:17 PM Click Here to See the Profile for fieroman_5000Send a Private Message to fieroman_5000Edit/Delete MessageReply w/QuoteDirect Link to This Post
Sourmug, unfortunatly my landlord doesn't let me use the un-attached garage as he keeps some maintanance supplies in there...it's also in my lease that I can't use it Soon I will be house shopping so I will deffinately be on the lookout

BTW: Great work there! One of the better looking deck ven't I have seen. I'm sure she (he?) will be a real beauty when all finished up!

~Shane

IP: Logged
Sourmug
Member
Posts: 4538
From: Calgary, Alberta, Canada
Registered: Sep 2002


Feedback score:    (29)
Leave feedback


Total ratings: 144
Rate this member

Report this Post03-20-2006 09:21 PM Click Here to See the Profile for SourmugSend a Private Message to SourmugEdit/Delete MessageReply w/QuoteDirect Link to This Post
Woohoo! My next project has arrived from Driven Visions. I purchased a low profile hood scoop. While I think the larger scoops such as Skitime's are very well done, they are too "in your face" so to speak. (No pun intended ) I want to have some thing a little more subtle. I think it's just a matter of personal preference.

Here is a picture of the top of the scoop:

The bottom:

And a lousy profile shot, but you get the idea:


The top finish is much better than the deck lid vent but the bottom of course will require a fair bit of work to smooth it out so that the final product will look OEM. There is a bit of warpage but I think it will lay out fine once I start to attach it to the hood.

Here are some pictures from the Ebay add. first one with the dimensions:


And a finished look:


I hope to be able to achieve the smooth look of the one on the green car. I have seen one on which it appeared to be adhered to the surface of the hood so that there was a raised band around the scoop. It was not the look that I am hoping for.

So, opinions, condemnations, have I gone to the dark side of rice???
Nolan

[This message has been edited by Sourmug (edited 05-08-2007).]

IP: Logged
PaulJK
Member
Posts: 6638
From: Los Angeles
Registered: Oct 2001


Feedback score:    (25)
Leave feedback


Total ratings: 237
Rate this member

Report this Post03-21-2006 12:24 AM Click Here to See the Profile for PaulJKSend a Private Message to PaulJKEdit/Delete MessageReply w/QuoteDirect Link to This Post
I usually don't like hood scoops but THAT one looks GOOD . I'm wondering if the cutouts will actually allow hot air out though; they look pretty far back, maybe even over the spare tire trunk ....
IP: Logged
Sourmug
Member
Posts: 4538
From: Calgary, Alberta, Canada
Registered: Sep 2002


Feedback score:    (29)
Leave feedback


Total ratings: 144
Rate this member

Report this Post03-21-2006 01:01 AM Click Here to See the Profile for SourmugSend a Private Message to SourmugEdit/Delete MessageReply w/QuoteDirect Link to This Post
PaulJK:

Yes the scoop cut outs are pretty far back but I should be able to cut openings through the hood behind the radiator and use the space between the hood and the raised portions of the scoop to vent. That's my theory anyways and I think it will work.

Nolan

[This message has been edited by Sourmug (edited 03-21-2006).]

IP: Logged
Intel
Member
Posts: 752
From: Helsingborg, Sweden
Registered: May 2002


Feedback score: (1)
Leave feedback


Total ratings: 53
Rate this member

Report this Post03-21-2006 10:55 AM Click Here to See the Profile for IntelSend a Private Message to IntelEdit/Delete MessageReply w/QuoteDirect Link to This Post
Looks great!
Now I just have to install my fender vents!

PS. You have mail!

IP: Logged
Sourmug
Member
Posts: 4538
From: Calgary, Alberta, Canada
Registered: Sep 2002


Feedback score:    (29)
Leave feedback


Total ratings: 144
Rate this member

Report this Post03-21-2006 08:23 PM Click Here to See the Profile for SourmugSend a Private Message to SourmugEdit/Delete MessageReply w/QuoteDirect Link to This Post
Intel:

I have replied to your e-mail.

Nolan

[This message has been edited by Sourmug (edited 03-21-2006).]

IP: Logged
Sourmug
Member
Posts: 4538
From: Calgary, Alberta, Canada
Registered: Sep 2002


Feedback score:    (29)
Leave feedback


Total ratings: 144
Rate this member

Report this Post03-21-2006 08:55 PM Click Here to See the Profile for SourmugSend a Private Message to SourmugEdit/Delete MessageReply w/QuoteDirect Link to This Post

Sourmug

4538 posts
Member since Sep 2002
[boodtext]Yay! My next, next project also arrived in the mail:


I won these in the Hurricane Raffle last December, thank you Ausfiero!

There was some minor damage in transit, such as scratching and chipping:


And in a few other areas as well. Nothing major and it can all be repaired. There is a fair bit of finishing that will be required and the mounting holes all have to be drilled, so if you are thinking of purchasing these with the intent of just putting them on with minimal effort you will be surprised. Again nothing major and I am very happy to have them.

It also gives me the opportunity to try out the new 2" / 3" random orbit sander that I also received today:


I sure wish that I had this baby when I was doing the underside of the deck lid. Oh well, better late than never.
[/booktext]
Thanks again Jim!

Nolan

[This message has been edited by Sourmug (edited 05-08-2007).]

IP: Logged
PFF
System Bot
Sourmug
Member
Posts: 4538
From: Calgary, Alberta, Canada
Registered: Sep 2002


Feedback score:    (29)
Leave feedback


Total ratings: 144
Rate this member

Report this Post03-22-2006 10:08 PM Click Here to See the Profile for SourmugSend a Private Message to SourmugEdit/Delete MessageReply w/QuoteDirect Link to This Post
I did a little bit of work on the side scoops today. I wanted to patch some of the minor damage.

This corner had cracked in a couple of places but the bottom layer of mat is still intact. I applied some Corvette Panel Adhesive while holding the cracks open. Then I supported it from behind with a small piece of angle iron clamped to the backside. This will hold the piece strait while the adhesive cures:


Here is a repair of a crack that cuts diagonally through the layers of mat. Again the adhesive was applied similar to the repair above and clamped shut:


The skirts have a few dimples in them from the molding process and they are being filled:
.

I don't imagine that any fiberglass part comes out of the mold and is perfect not requiring any kind of touch-up. Again the amount of work that will be required shouldn't be too much for these parts. I also tried out the new sander smoothing some of the seams and rough edges, if you can afford one of these I would highly recommend that you get one, it is great! I purchased mine though Ebay from this vendor - "autobodydepot". It is the Chicago Pneumatic Random Orbital Air Sander CP-7200S Mini Sander w/2" & 3" Pads/Sandpaper and Case.

Nolan

[This message has been edited by Sourmug (edited 05-08-2007).]

IP: Logged
Sourmug
Member
Posts: 4538
From: Calgary, Alberta, Canada
Registered: Sep 2002


Feedback score:    (29)
Leave feedback


Total ratings: 144
Rate this member

Report this Post03-25-2006 07:35 PM Click Here to See the Profile for SourmugSend a Private Message to SourmugEdit/Delete MessageReply w/QuoteDirect Link to This Post
** UPDATE **

I hvave forgotten to show the primer that I am now using thanks to the advice of Custom2M4 and 355Fiero. What I did was go down to the local Autobody Supply store and asked for advice on materials and preparation and explained what I was doing, they were extremely helpful and recommended the following.

Final sanding with 400 grit paper.
Cleaming of the deck lid with soap and water.
And a final cleaning with a degreaser.
I also used acetone as one of the steps. Here is the acetone and the degreaser.

I am using a high build primer. This picture shows the reducer on the left, the primer in the middle and the activator on the right.

For a sealer coat the recommended mix for this product (yours may be different) is 4 parts primer, 1 part activator and 2 parts reducer.
For a medium caot with some filling the mix is 4/1/1
For a high build coat the mix is 4/1 with no reducer.

Here is a picture of the detail spray gun that I am using. You will also need a water/oil filter to prevent fisheye and of course a good quality mask:


I have now seen the light about spray can versus real primer. The automotive primer is 1000% better than the spray can junk. It just flows on much smoother and covers way better.

Thanks again guys!

Nolan


Edit to add: It's great working in an engineering firm, I get all the free paper that I need for masking off parts!

[This message has been edited by Sourmug (edited 05-08-2007).]

IP: Logged
Sourmug
Member
Posts: 4538
From: Calgary, Alberta, Canada
Registered: Sep 2002


Feedback score:    (29)
Leave feedback


Total ratings: 144
Rate this member

Report this Post03-25-2006 07:44 PM Click Here to See the Profile for SourmugSend a Private Message to SourmugEdit/Delete MessageReply w/QuoteDirect Link to This Post

Sourmug

4538 posts
Member since Sep 2002
So here are some pictures of the deck lid masked and cleaned, ready for priming:


And here is the deck lid after the sealer prime coat:


I think it's looking pretty darn good, if I do say so myself. There are a few pinholes and the odd bit of sanding that may be required but not nearly the amount of touch up that the underside required.

What do you think?

Oh, I need some suggestions for finishing off the vent openings ie. grilles etc. Any ideas would be greatly appreciated.

Nolan

[This message has been edited by Sourmug (edited 05-08-2007).]

IP: Logged
Sourmug
Member
Posts: 4538
From: Calgary, Alberta, Canada
Registered: Sep 2002


Feedback score:    (29)
Leave feedback


Total ratings: 144
Rate this member

Report this Post03-26-2006 01:25 AM Click Here to See the Profile for SourmugSend a Private Message to SourmugEdit/Delete MessageReply w/QuoteDirect Link to This Post
It's now about 8 hours after I sprayed the Deck lid. The automotive primer sure leaves a nice smooth finish. After looking it over there are a few tiny tiny pinholes and as a previously indicated just a little more sanding to do. I have applied the glazing putty and will be doing the final sanding and primer coat tomorrow.


I hope you guys are finding this thread to be informative, I've sure learned a lot doing this. If you had told me that I could do this a year ago I wouldn't have believed it!

Nolan

[This message has been edited by Sourmug (edited 05-08-2007).]

IP: Logged
crzyone
Member
Posts: 3571
From: Alberta, Canada
Registered: Dec 2000


Feedback score: N/A
Leave feedback


Total ratings: 176
Rate this member

Report this Post03-26-2006 04:41 AM Click Here to See the Profile for crzyoneSend a Private Message to crzyoneEdit/Delete MessageReply w/QuoteDirect Link to This Post
Awesome work man. I really want to see this in person
IP: Logged
HC
Member
Posts: 691
From: Phoenix, AZ
Registered: Feb 2006


Feedback score: N/A
Leave feedback

Rate this member

Report this Post03-26-2006 05:55 AM Click Here to See the Profile for HCClick Here to visit HC's HomePageSend a Private Message to HCEdit/Delete MessageReply w/QuoteDirect Link to This Post
Wow! I bet its next to impossible to get a better factory finish than the one you've got there!

Can't wait to see the deck in place!

IP: Logged
RCR
Member
Posts: 4397
From: Shelby Twp Mi
Registered: Sep 2002


Feedback score:    (7)
Leave feedback


Total ratings: 102
Rate this member

Report this Post03-26-2006 07:35 AM Click Here to See the Profile for RCRSend a Private Message to RCREdit/Delete MessageReply w/QuoteDirect Link to This Post
It's an awesome thread, Nolan. You're doing a great job. Thanx for the extra time to do the thread...

Bob

IP: Logged
Sourmug
Member
Posts: 4538
From: Calgary, Alberta, Canada
Registered: Sep 2002


Feedback score:    (29)
Leave feedback


Total ratings: 144
Rate this member

Report this Post03-26-2006 06:31 PM Click Here to See the Profile for SourmugSend a Private Message to SourmugEdit/Delete MessageReply w/QuoteDirect Link to This Post
Thanks for the compliments guys, I'm really quite happy with it. I'm also happy to contribute to the forum, I wouldn't have had the guts to try any of this without the information and support that you all provide.

Levi, next time you are coming this way send me an e-mail and you can drop by.

Nolan

IP: Logged
Comealongway
Member
Posts: 586
From: Calgary, Alberta, Canada
Registered: Dec 2002


Feedback score: N/A
Leave feedback

Rate this member

Report this Post03-26-2006 10:39 PM Click Here to See the Profile for ComealongwaySend a Private Message to ComealongwayEdit/Delete MessageReply w/QuoteDirect Link to This Post
Honestly Sour mug will you consider doing some glass work for me, i also have the stage 2 rocker panels and front stage 2 scoop aswell. You do amazing work.
IP: Logged
Sourmug
Member
Posts: 4538
From: Calgary, Alberta, Canada
Registered: Sep 2002


Feedback score:    (29)
Leave feedback


Total ratings: 144
Rate this member

Report this Post03-26-2006 10:48 PM Click Here to See the Profile for SourmugSend a Private Message to SourmugEdit/Delete MessageReply w/QuoteDirect Link to This Post
Comealongway:

I don't know what to say!!?? I am honored that you would ask but I am really just a beginner, perhaps I could help you out and show you what I did? would that work?

Nolan

IP: Logged
PFF
System Bot
Sourmug
Member
Posts: 4538
From: Calgary, Alberta, Canada
Registered: Sep 2002


Feedback score:    (29)
Leave feedback


Total ratings: 144
Rate this member

Report this Post03-26-2006 10:57 PM Click Here to See the Profile for SourmugSend a Private Message to SourmugEdit/Delete MessageReply w/QuoteDirect Link to This Post

Sourmug

4538 posts
Member since Sep 2002
Update:

The sanding of the glazing putty has been done and the prep work finished. I have now applied the final primer coat, the mix was thicker than the sealer coal that I put on previously. I have removed the tape and paper an here is how it looks:


And here are a few shots to give you an idea of how it will look on the car:


The wing stands are 6" high.

I am still hoping that some of you will have some suggestions for finishing the vent openings, I'm not sure that I want them to be completely open. Any Ideas?

So, for now I am calling this decklid finished until the car goes in for painting (several years from now at this rate ) There is a little clean up to do on the underside, just a wee bit of over-spray.

I will probably work on the front hood next. Should I start a separate thread or keep this one going?

Thanks everyone.

Nolan

[This message has been edited by Sourmug (edited 05-08-2007).]

IP: Logged
kmerkle01
Member
Posts: 232
From: Lake George, NY USA
Registered: Sep 2004


Feedback score: N/A
Leave feedback

Rate this member

Report this Post03-27-2006 01:03 AM Click Here to See the Profile for kmerkle01Send a Private Message to kmerkle01Edit/Delete MessageReply w/QuoteDirect Link to This Post
i say keep this one going
IP: Logged
FieroWannaBe
Member
Posts: 2289
From: USA
Registered: Oct 2004


Feedback score: N/A
Leave feedback

Rate this member

Report this Post03-27-2006 09:02 PM Click Here to See the Profile for FieroWannaBeSend a Private Message to FieroWannaBeEdit/Delete MessageReply w/QuoteDirect Link to This Post
wing tips, wing tips, WING TIPS!!!
IP: Logged
Sourmug
Member
Posts: 4538
From: Calgary, Alberta, Canada
Registered: Sep 2002


Feedback score:    (29)
Leave feedback


Total ratings: 144
Rate this member

Report this Post03-27-2006 09:33 PM Click Here to See the Profile for SourmugSend a Private Message to SourmugEdit/Delete MessageReply w/QuoteDirect Link to This Post
 
quote
Originally posted by FieroWannaBe:

wing tips, wing tips, WING TIPS!!!


What do you mean about wing tips?? Got a picture?

Thanks
Nolan

[This message has been edited by Sourmug (edited 05-08-2007).]

IP: Logged
FieroWannaBe
Member
Posts: 2289
From: USA
Registered: Oct 2004


Feedback score: N/A
Leave feedback

Rate this member

Report this Post03-27-2006 09:45 PM Click Here to See the Profile for FieroWannaBeSend a Private Message to FieroWannaBeEdit/Delete MessageReply w/QuoteDirect Link to This Post
IP: Logged
Sourmug
Member
Posts: 4538
From: Calgary, Alberta, Canada
Registered: Sep 2002


Feedback score:    (29)
Leave feedback


Total ratings: 144
Rate this member

Report this Post03-27-2006 09:51 PM Click Here to See the Profile for SourmugSend a Private Message to SourmugEdit/Delete MessageReply w/QuoteDirect Link to This Post
 
quote
Originally posted by FieroWannaBe:


Ahhh, I see. I think I remember seeing those in a recent thread, I'll have to dig it up. I'm not sure exactly how I feel about those yet.

Thanks for the picture.

Nolan

PS. A + for you.

[This message has been edited by Sourmug (edited 05-08-2007).]

IP: Logged
GonsaiPK
Member
Posts: 367
From: Elgin, IL
Registered: Sep 2003


Feedback score: N/A
Leave feedback

Rate this member

Report this Post03-27-2006 11:12 PM Click Here to See the Profile for GonsaiPKSend a Private Message to GonsaiPKEdit/Delete MessageReply w/QuoteDirect Link to This Post
I would urge you to 'glass on some tips on that wing. IMHO it's the one thing that makes it look like it belongs up there.

Oh, and keep it going in this thread. You do beautiful, detailed work. Gave you a + long time ago.

IP: Logged
Sourmug
Member
Posts: 4538
From: Calgary, Alberta, Canada
Registered: Sep 2002


Feedback score:    (29)
Leave feedback


Total ratings: 144
Rate this member

Report this Post03-28-2006 01:14 AM Click Here to See the Profile for SourmugSend a Private Message to SourmugEdit/Delete MessageReply w/QuoteDirect Link to This Post
 
quote
Originally posted by GonsaiPK:

I would urge you to 'glass on some tips on that wing. IMHO it's the one thing that makes it look like it belongs up there.

Oh, and keep it going in this thread. You do beautiful, detailed work. Gave you a + long time ago.


GonsaiPK and FieroWannaBe:

I see what you guys mean. I looked around a bit and Curly's chop top has the extension too. It looks different when they are finished. I guess I will have to look into doing something similar. Also thanks for the comments.

GonsaiPK: I returned your +! Thanks!

Nolan

[This message has been edited by Sourmug (edited 05-08-2007).]

IP: Logged
Sourmug
Member
Posts: 4538
From: Calgary, Alberta, Canada
Registered: Sep 2002


Feedback score:    (29)
Leave feedback


Total ratings: 144
Rate this member

Report this Post03-28-2006 01:18 AM Click Here to See the Profile for SourmugSend a Private Message to SourmugEdit/Delete MessageReply w/QuoteDirect Link to This Post

Sourmug

4538 posts
Member since Sep 2002
**** START OF HOOD VENT BUILD ****

Tonight I started on the hood vent install. I dug up the ole front hood and wanted to see how the Driven Vision's scoop would fit:


Hmm.... this thing is way more warped than I originally thought. It appears that it is mostly from the top left corner to the bottom right corner. Also the front to back curve doesn't match the curve of the hood. I also noticed that the closer I place the scoop to the front of the hood the more curve there is to the hood and the worse the gaps get.

Looking at the installed picture the front edge of the scoop seems to be at the leading edge of the hood BUT the scoop openings appear to be further back than what the openings are if the scoop is that far forward:


So I think that when they installed the scoop it sits back on the hood and the leading edge has been built up so that it extends to the front of the hood.

The mounting flange that goes around the perimeter of the scoop also overlaps the two lines that run from the front to the back of the hood on either side. Also the flange has been roughly cut and is not a uniform width around the scoop. Here I have marked the center line of the scoop and a uniform 3/4" line to cut the flange down to:


[This message has been edited by Sourmug (edited 05-08-2007).]

IP: Logged
Previous Page | Next Page

This topic is 18 pages long:  1   2   3   4   5   6   7   8   9   10   11   12   13   14   15   16   17   18 
next newest topic | next oldest topic

All times are ET (US)

Post New Topic  Post A Reply
Hop to:

Contact Us | Back To Main Page

Advertizing on PFF | Fiero Parts Vendors
PFF Merchandise | Fiero Gallery | Ogre's Cave
Real-Time Chat | Fiero Related Auctions on eBay


Copyright (c) 1999, C. Pennock