make sure u put some clear over that chrome paint. it will dull pretty quick if you dont.
I too am concerned about the durability of the chrome paint. I have been experimenting with some test pieces and so far all the clear coats that I have used turn the chrome into a grey color. I will have to do aome more investigating.
Thanks! Nolan
[This message has been edited by Sourmug (edited 05-29-2007).]
Your project is looking incredible. Well done on everythingyou have undertaken so far. I look forward to a project update at a Calgary Fiero meeting soon. Are you shooting for getting it on the road this summer?
I got out to my garage tonight to get mine out from "under 3' of crap" to start getting it finished for the summer. Warm enough here now to get my Wife's car out of the garage and take it over again for the summer. I just took my windscreen out and put in the extended screen for a fit. It really makes a huge difference in the look of the car. I did not think it would make that much of a difference but it really does. I am also finishing up the custom dash. It is all coming together.... finally.
As far as your chrome paint is concerned, I have found that you will not be able to get the chrome to stay chrome with clear coat. I tried everything on test pieces and they all turned grey with clear coat.
Let the layers dry for a very long time in between coats and you can get a few coats on that look pretty good for thickness and protection without the clearcoat.
We should talk about how I routed everything for the brakes since you are putting all that on as well.
I want a 3S dash so bad. I've been watching this thread since I realized it really isnt a Decklid Vent Build thread (seen enough of those ). I'll definatly have to steal some of your ideas if thats okay.
As far as your chrome paint is concerned, I have found that you will not be able to get the chrome to stay chrome with clear coat. I tried everything on test pieces and they all turned grey with clear coat.
Let the layers dry for a very long time in between coats and you can get a few coats on that look pretty good for thickness and protection without the clearcoat.
Hi Don:
I actually may have a solution for the Chrome paint. One of the forum members, Vindaloo, sent me a link to an Eastwood Product that looks promising. (Thanks Taylor!)
I won't have the car on the road this summer but I am shooting for the 25th Anniversary the following July! I would like to come over and see how you did your brakes. Do you have time next weekend?
Nolan
[This message has been edited by Sourmug (edited 05-29-2007).]
I want a 3S dash so bad. I've been watching this thread since I realized it really isnt a Decklid Vent Build thread (seen enough of those ). I'll definatly have to steal some of your ideas if thats okay.
Of course you can use any ideas that I post! That's why I'm posting all the pictures, I hope it does help someone out.
I won't have the car on the road this summer but I am shooting for the 25th Anniversary the following July! I would like to come over and see how you did your brakes. Do you have time next weekend?
I hope you can make it out. That's also my timeline to get it done. Look forward to meeting you there.
Here is a shot showing the spot where the stock manual HVAC control was and the cables are disconnected: In case you were wondering, I have no A/C, but who needs it in Canada. The manual controls work like this:
The non-A/C HVAC control uses two slider control levers to actuate three cables.
The top slider controls which vents get the air:
This is accomplished as follows: Moving from left to the center position moves the green cable and rotates the damper actuator (on the right side of the heater box) in a counterclockwise fashion. One the slider moves past the center position the green cable stops and the blue cable moves a second actuator (on the left front of the heater box) in a counterclockwise fashion to diver the air into the defroster vents.
The bottom slider control does the cooler-warmer function:
Moving the slider from left to right moves the red cable and rotates a damper actuator (located on top of the heater box) in a clockwise fashion.
Here is a shot showing the "red" cable connected to it's new actuator: Thsi is goning to mount to the underside of the air box so I fabricated a small bracket out of 1" square aluminum and pre-drilled for the mounting screws. And here it is mounted in place: I will be mounting the HVAC control module in the void space between the tunnel and the plastic protector that sits below the carpet on the passenger side. I believe that this is where the performance sound amp would be.
[This message has been edited by Sourmug (edited 05-29-2007).]
I then manufactured a new bracket for the two other actuators: I welded, painted and predrilled it - the usual. Here it is ready for the actuators: And with the actuators mounted inside it: And the whole assembly mounted in place with the cables attached All ready for the wiring... Nolan
[This message has been edited by Sourmug (edited 05-29-2007).]
I now am the proud owner of a new installed head liner!! Here's the pictures.
First thing I did was to trim the sound deadener that is above the dome light. Fierosound suggested it as the deadener is an asphalt base and the lights would cause it to melt: I then inserted the headliner and attached the various bits and pieces that hold it up such as the coat hooks, dome light etc. Here is how it looks through the sunroof opening: Then I began to do the trimming and the installation of the sunroof moulding. The vinyl is trimmed to rough size with enough to stuff into the recess around the opening. Some of the vinyl is then inserted into the recess and the moulding is tapped into place with a small hammer to hold the vinyl: Repeat as required until it is all in place. The trickiest area is the 4 corners. You have to be carefull to not trim too much and it is a little patience testing but I think it turned out great! Nolan
[This message has been edited by Sourmug (edited 05-29-2007).]
So I bought some 2 part urethane foam for my door panels: Here is what the panels look like now: Here is the sketch of what I want them to look like: The intent is to match the Stealth dash end contours and pick up on the major lines that the dash has. This is what I'm thinking and hoping anyways...
I also needed to add some speaker rings to the panels to make sure that I have ample room behind the speaker magnet. I don't have a router so I cut out two rings from 3/4" MDF using my jig saw. The outside was cut slightly over sized so that they could be smoothed on my disc sander. Here they are being glued on: And after the clamps are removed: I then marked out the outlines on the panels so that I could attach the forms to make a rough mold for the foam. The form material will be strips of sheet styrene plastic cut from some larger sheets I have laying around from my scratch model building days:
[This message has been edited by Sourmug (edited 05-29-2007).]
Here's a couple of pics showing the form strips attached and ready for the foam. It is all held in place using tape: I added a couple of cross strips between the two sides of the form for some extra support.
I have never used this two part foam before so I don't really know how much it expands or how much to mix together. For the first batch I used 14 oz. each of the two components. Basically you mix equal parts for 30 seconds and then it starts to expand: Then you pour it into the mold: Let me tell you it sure doesn't look like very much sitting in the mold. I was thinking "Hmmm, did I mix it right? Do I need to add more?" When "bam" it started to expand, and expand and expand... Needless to say I mixed up too much for the first mold :
[This message has been edited by Sourmug (edited 05-29-2007).]
At about this point I'm starting to wonder why I'm doing this
So for the next mold I mixed up 8 oz. each for the mix: Much better!!
The directions say to let it sit for an hour and during that time it gives of a bit of heat similar to when fiberglass cures. Then it's ready to start shaping: The Plastic forms pulled off quite easily and the drywall saw and a knife cut it fairly easily. The final shaping will be with a sander and hand sanding:
Lots more to do but you get the idea.
Nolan
[This message has been edited by Sourmug (edited 05-29-2007).]
Here are some progress pictures. The first few are just after I placed the panel back onto the door and have started to carve out the interface with the dash end: Basically all I'm doing is closing the door until something touches the dash then sanding that bit away and repeating the procedure. Here's another shot part way through: Then once the door would close and the dash end contour matched I pulled the panel off for some additional shaping and sanding: The foam is fairly brittle where is it this so some did chip off around the speaker ring but it will be easily repaired.
[This message has been edited by Sourmug (edited 05-29-2007).]
And after a little more shaping the panel was put back onto the door for a check and some small tweaking here and there. Here's how it looks: I have a little more sanding to do to make sure there is adequate clearance for the fiberglass and then it time to glass it!
All in all I'm quite pleased. What do you all think? I'd like some feedback.
Thanks Nolan
[This message has been edited by Sourmug (edited 05-29-2007).]
hey sourmug, it looks really good! you have been using good taste in your mods. i have an 84 and i increased the engine venting by putting on the 85-88 vent grills - so i have venting all the way across. i estimate that 1/2 the heat (or more) leaves by the original 84 vent, 1/3 leaves by the right side vent and only a little leaves by the left side vent. i moved my battery to the front so i have unobstructed venting on the right side. now the 85-88 stock vent system blocks the center, obstructs the right with a battery and we wonder why it has a hot engine compartment? hmmmmmm hello? i am planning a vent for the radiator that is 100% UNDER the hood - invisible when the hood is shut. we will see how well it works. may i ask a dumb question? what is the purpose of the vents on the side of your car? thanx jon
------------------ I'm the original owner of a white ' 84 2M4 purchased Dec 10, 1983 from Pontiac. Always garaged, no rust, 4-wheel drifts are fun!
What is the purpose of the vents on the side of your car? thanx jon
Hi:
The vents on the rear quarter panels will be used for the engine cold air intake on the driverside (similar to stock) and the passenger side will be used to introduce air into the engine compartment and possiblly for an intercooler if the engine gets boosted in the future.
The front fender scoops are purely cosmetic. I have read about people discussing using them to relieve air from the radiator compartment but I don't know if anyone has actually done that, I don't need to because of the hood scoop I installed. Basically I just like the looks of them.
Thanks Nolan
[This message has been edited by Sourmug (edited 05-22-2007).]
LOL, you crack me up. How's your car coming along?
Working on the engine...The 4.0 is hung, now I'm trying to figure out how to put the cradle in. I'm seriously concidering a 2" stretch and using the Aurora suspension. Won't know either way until I start cutting steel.
When I get stuck, I'll go back and work on the interior and seats.
Here's the driver-side door panel; This panel is a bit different in contour than the passenger side due to the different shape of the dash end on this side. I had to build up a few spots to get the correct shape. To do this I used a glue gun to adhere additional foam as I had just a little bit laying around from trimming my first pour. The only disadvantage to using the glue gun is that the glue is more resistant to sanding than the surrounding foam and so it creates a bit of a ridge that needs extra care. I think I'm going to have to put my mirrors on to see if the "horns" on the top part of the panels are blocking my view.
The next thing I'm going to do is build some supports for the underside of the armrests on the door panels.
Nolan
[This message has been edited by Sourmug (edited 05-29-2007).]
I did some work on the armrest supports this afternoon.
The first thing I wanted to do was to anchor the foam into place. So before I made the molds I attached some screw anchors to the door panel. These are the kind that expand for use in drywall applications: Then they were attached from behind the panel and tightened so that the metal expanded into the "flower" shape: Then I made the molds using the same polystyrene strips: And then mixed and pured the foam and let it do it's magic: After half an hour I trimmed the excess foam that rose above the mold and peeled the plastic off and began the shaping process:
[This message has been edited by Sourmug (edited 05-29-2007).]
The armrest was removed and the inside part of the mold with it: And I then used the armrest to mark out some trim lines and continued to shape the support: And presto! Heres the final shape:
This foam makes this really easy!
Thoughts?? Yay or Nay??
If you don't like it let me know why and what you think I should do. I know some of you are reading this thread but please don't just lurk let me know your opinions.
Thanks Nolan
[This message has been edited by Sourmug (edited 05-29-2007).]
I think it looks good. You did a nice job. I have used a similar kind of foam (Great Stuff) as gap filler and for shaping before glassing. I just might have to copy you.
I think you're doing an awesome job, it looks great! Only suggestion is maybe build up the top of the panel a little bit so the "horns" don't look so out of place.
I know what you mean about the "Horns". They are much more obvious when the door panels are off the car or the doors are open, but when the doors are closed they appear to blend in and not stick out so much. I will keep this in mind and I may add some curvature to the top of the panel in the future.
Nolan
[This message has been edited by Sourmug (edited 05-26-2007).]
I have now applied two layers of fiberglass to the panels: The two part urethane foam can have the fiberglass applied directly to it and it wont melt unlike some other foams. And here the panels have had a quick sanding and the edges have been cleaned up ready for a filler coat. Nolan
[This message has been edited by Sourmug (edited 05-29-2007).]
Ummm, Where can I find a bucket like that ? The door skins you are making are looking awsome. I didnt realize how bad the stock skins look with the new dash. Now when I am driving I keep stairing at the doors. I know you have a lot of work in them but how much for set ? $300.00 ,$400.00 , $500.00 Thanks , Chris
For the past 12 pages I�ve been saying to myself �Yeah, I could that. I could give the same attention to detail and build something that looks just as nice. When I make over my car I�m going to make it just as awesome as Nolan�s!� Then you built those doors�from scratch�and they look stock. Bravo! On the passenger side, did you even take that seam on the dash between the glove box and the top part and continue it across the door? In a couple pictures it looks like you extended it across the door to the top of the armrest where it picks up that line as it cascades down to the part where you would actually rest your arm. To my eyes, that is the styling cue that makes the doors a perfect fit.
I may have missed it before, but have you decided what you are going to do about covering them? Getting vinyl to stick to those contours might be an interesting chore to say the least.
Ummm, Where can I find a bucket like that ? The door skins you are making are looking awsome. I didnt realize how bad the stock skins look with the new dash. Now when I am driving I keep stairing at the doors. I know you have a lot of work in them but how much for set ? $300.00 ,$400.00 , $500.00 Thanks , Chris
About the door panels. My dash is probably sitting in my car at a slightly different position and angle than your dash is in your car. Because of this difference the panels likely would not match the dash ends in your car. I needed to slowly carve out the shape in the foam a little at a time to make sure that it finally matched the dash as close as possible. My intention is to provide the information so that anyone can do this to their own car. If I can do it so can anyone else and in fact they may find a better way. So I guess that as a long winded answer to your question I don't think I would be comfortable making panels for you based on my dash as they may need substantial remolding to fit yours.
Thanks for asking though, that's meant a lot to me as a compliment. I hope you understand my reasoning. Nolan
For the past 12 pages I�ve been saying to myself �Yeah, I could that. I could give the same attention to detail and build something that looks just as nice. When I make over my car I�m going to make it just as awesome as Nolan�s!� Then you built those doors�from scratch�and they look stock. Bravo! On the passenger side, did you even take that seam on the dash between the glove box and the top part and continue it across the door? In a couple pictures it looks like you extended it across the door to the top of the armrest where it picks up that line as it cascades down to the part where you would actually rest your arm. To my eyes, that is the styling cue that makes the doors a perfect fit.
I may have missed it before, but have you decided what you are going to do about covering them? Getting vinyl to stick to those contours might be an interesting chore to say the least.
Thanks for the compliments! As I mentioned above, if I can do it so can anyone else.
Yes I did extend the groove onto the door panel where the curve of the armrest supports off of the original Grand Am door panel continues the suggestion of the curve.
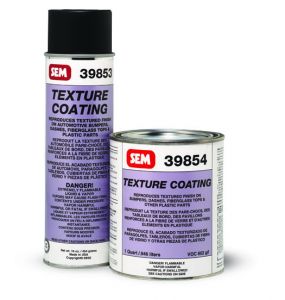
As for finishing the fiberglass contours, I don't think that I will be able to apply sheet vinyl in any way that would gibe me a nice finish. There are simply too many curves. I know that there is apparently a heat formable vinyl that is available but I still think that it will not be a good fit. SEM produces a spray on texture as described by their website as follows:
quote
SEM Texture Coating is a unique blend of flexible materials formulated to reproduce a BLACK TEXTURED FINISH on plastic bumpers, instrument panels, dashes, consoles, fiberglass tops, and other textured plastic and vinyl parts. After applying SEM Texture Coating, use SEM Plastic Prep to prep the surface to be sprayed with SEM COLOR COAT.
I think that I will give this a try. As I understand it there are different ways to apply it which creates some variation in texture. I don't know how close it will match the dash vinyl grain but some difference will be OK I think.
Nolan
[This message has been edited by Sourmug (edited 05-29-2007).]
Do the "horns" look wierd from outside of the car?
I don't have any pictures at the moment of the panels from the outside of the car. I will post some later. I don't think that the horns are quite so obvious with the door closed but I may extend the curve on the top edge of the panel so that it isn't quite so severe.
Nolan
[This message has been edited by Sourmug (edited 06-18-2007).]


 ). I'll definatly have to steal some of your ideas if thats okay.

.JPG)
.JPG)
.JPG)
.JPG)
.JPG)
.JPG)


.JPG)
.JPG)
.JPG)
.JPG)
.JPG)
.JPG)
.JPG)
.JPG)
.JPG)
.JPG)
.JPG)

.JPG)
.JPG)
.JPG)
.JPG)
.JPG)
.JPG)
.JPG)
.JPG)
.JPG)

.JPG)
.JPG)
.JPG)
.JPG)
.JPG)
.JPG)
.JPG)
.JPG)
.JPG)
.JPG)

.JPG)
.JPG)
.JPG)
.JPG)
.JPG)
.JPG)
.JPG)
.JPG)
.JPG)
.JPG)
.JPG)
.JPG)
.JPG)
.JPG)
.JPG)
.JPG)

 The only disadvantage to using the glue gun is that the glue is more resistant to sanding than the surrounding foam and so it creates a bit of a ridge that needs extra care.
.JPG)
.JPG)
.JPG)
.JPG)
.JPG)
.JPG)
.JPG)
.JPG)
.JPG)
.JPG)
_1.JPG)
.JPG)
.JPG)
.JPG)
.JPG)
.JPG)
.JPG)
.JPG)
.JPG)
.JPG)
.JPG)
.JPG)

.JPG)
.JPG)
.JPG)
.JPG)
 ?
?