I sure got awfully tired of the dust in the garage last winter. Hopefully this baby will help keep the dust down to manageable levels :
I also purchased a power door lock kit mostly to have key-less entry: Here is everything that comes with the kit: I plan on installing these in a similar fashion to the method LTLFRARI used on his web site: Here
As mentioned previously, I also purchased Rodney Dickman's short shifter c/w boot. Here is a picture of how the boot looks on the Stealth console: The boot is a great product and is if great quality but it just doesn't look right sitting there. So I purchased a chrome frame and leather boot for a BMW E3 which I think looks much better with this particular console:
[This message has been edited by Sourmug (edited 05-29-2007).]
I also replaced the dew wipes with the assistance of : jstricker's thread I also removed the outer door skins with the help of : Fierohoho's thread Here are some my pictures of the process for those who may not have done this: The first thing to remove is the molding which is held on by plastic clips. Here is a shot with the molding removed: The next step is to remove the clips which will break virtually every one. You can new ones through the Fiero Store. Once those are removed there are 4 plastic rivets on the bottom of the door which need to be drilled or center punched to remove them. Then the whole skin will lift up off of the door structure. A small rod connects to the lock mechanism. Here is the rod and to remove it you undo the small clip on the key lock: And the door skin is off! Here is a picture of the bottom edge of the skin, the 4 large holes were for the rivets that attach it to the structure: The stock ground effects need to be removed for the Aus stage 2 scoop trim. The stock piece is held on by a number of rivets as seen in the previous picture and by a metal bar that is also riveted in place. Here is the back side of the skin showing all the rivets: Once the bottom row of rivets are removed the stock piece slides off of the metal bar: And the skin ready for prepping for the Aus trim:
The dew wipes were much easier to replace using the info in the threads above but it's still a bit of work but at least they are done now. Sorry no pics.
I then started on the inside of the doors. First I removed the self tapping screws I used to hold the new door levers on and replaced them with pop rivets: Sorry for the out of focus picture.
[This message has been edited by Sourmug (edited 05-29-2007).]
I am also mounting some speakers in the doors. The one I purchased are Pioneer TS-A1671R 6 1/2" diameter and are only 1 3/4" deep.
I cut out the speaker opening into each of the new door panels and the temporarily mounted them and traced the opening onto the door structure using soapstone. The holes were them cut into the metal. This position cut our a tack weld between the two layers of metal so I ran a small bead along the cut edge: And then touched up all the cut edges with rust paint: I was initially concerned that the widow regulators would be in the way but there appears to be sufficient clearance between the end of the regulator and the speaker magnet: The window stop also just mises the speaker magnet as the window moved up and down. I think I will add a 1/4" ring to the front of the door panel just to provide some additional clearance though. And the speaker from the panel side:
That's it for now. Nolan
[This message has been edited by Sourmug (edited 05-29-2007).]
Say, while you're at it... How does the door panel look for adding an enclosure for those 6.5" drivers? I've got this nutso plan to install a pair of 6.5" subwoofers that way, pushing them into the cabin enough to clear the regulators. I haven't done much research into the job yet though as I don't even how power windows in my Formula. { : ]
Just figured I'd ask while you've got the doors in that state. = D
Red 5spd Formula Trot, the ever-planning, fox...
Well, there's not much room for an enclosure. What sort of measurements/pictures would you like?
Your build is looking incredible! I have been putting in my 3000gt dash and installing as best I can to your instructions,level and skills.(I'm not even close....lol) I was wondering if anyone has figured out how to use our wiring harnes to somehow plug into the back of the dash to use the different cluster?? Any thoughts on this problem. Thanks , Chris
Well, there's not much room for an enclosure. What sort of measurements/pictures would you like?
Nolan
Basically, how much depth is available and how much of the door's lower area is it available for. I was looking at using as much of the carpeted area as is needed to get the job done. The enclosure can be shaped around door beams and the regulators if need be to get more volume too. : ] Basically, I just need to pull the inner door skins on my car but haven't done so yet. I figured that if you have them off already you could give an impression as to the likelihood of success for such a project.
Red 5spd Formula (power nothing... yet.) Trot, the pondering, fox...
Thanks for your comments, I really hope that this thread helps you out!
TrotFox:
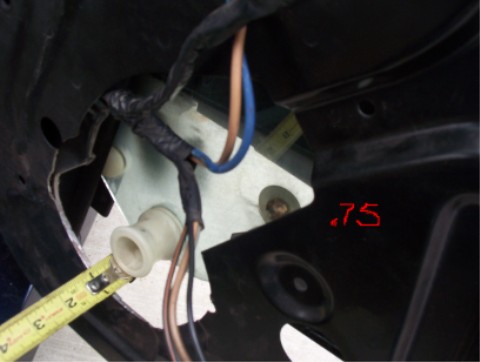
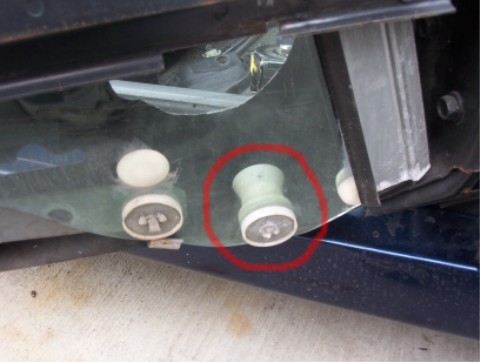
As I mentioned earlier, there is the window stop that comes down right behind the speaker location and this severely limits the depth of space available. Rickady88GT has a Thread about relocating the regulators. Here are a couple of pictures from that thread that show the issue: This picture shows his solution to the stop:
I hope to get out into the garage over the holidays and do a bunch of work.
TrotFox:
I was wondering if you had seen the info I had posted. There sure isn't much room for enclosures. Fierosound just sent me a LINK to some foam baffles that I'm going to look into.
Nolan
[This message has been edited by Sourmug (edited 12-19-2006).]
The guys on one of my train forums (G-scale model railroads) advocate using Styrofoam cups as baffles similar to what you linked to. They claim much better bass responce from the tiny speakers normally used in locomotive sound systems. Looks like a good compromise for a woofer but I'm looking at sub enclosures and so will require more volume. *shrug* Looks like I'll be learning to make fiberglass molds and attaching something to the door in place of some of the carpet. : ]
Thanks for the bump Bob, and happy new year to you.
Well I haven't really done any work on the car but I have made some purchases for it. Let's see...
I bought most of the brake parts, just need to get pads. I bought this all together from one of the guys nearby who decided not to do the brake upgrade: Now I have an extra set of brackets. The black ones below are a set that I had previously purchased and I believe they were from one of Archie's kits. As you can see, they are a different shape than the others although all the bolt holes line up. Anyone know which would be better?
I also received my fiberglass headliner. Bottom view: Top view: It arrived with some shipping damage in the form of a small crack: But overall it appears to be in good shape.
[This message has been edited by Sourmug (edited 05-29-2007).]
The small bubbles in the headliner shopuldn't affect anything once it is covered with vinyl. The reason I ordered the bare fiberglass unit is because I will need to modifiy it to suit the Stealth pod before I cover it, as you can see it is considerably smaller than the stock unit: Here is are some pictures of the stock headliner for comparison: I will also have to cut out the 3rd brakelight hole as it was missed prior to shipping.
[This message has been edited by Sourmug (edited 05-29-2007).]
And now for the item that I'm really excited about!
I ordered a set of HVAC controls from Riceburner. These are the units that he makes for the F355 dash kits and it is sure a quality piece of work. Bob (Riceburner) is a great guy to deal with and if you are looking for something like this he is the gent to see! My car does not have A/C so the HVAC unit is different than the usual one he makes in that the non-A/C cars will require 3 actuators instead of the usual 2.
Here's the kit: The solid-state controls: And this is where it's going to go:
OK, that's it, time to do some actual work on the car!
Nolan
[This message has been edited by Sourmug (edited 05-29-2007).]
Good to see you back at it. Man how do you "just happen" find someone locally that just happens to not want to do the brake upgrade and just happens to have everything needed??? He doesn't just happen to have a cousin with the same problem does he??
Good to see you back at it. Man how do you "just happen" find someone locally that just happens to not want to do the brake upgrade and just happens to have everything needed??? He doesn't just happen to have a cousin with the same problem does he??
Sure, things "just happen". No cousin that I know of though...
Originally posted by Sourmug: The only problem that I see is that our population is about 10% of the States and so we have about 10% of any given car. It may be costly to acquire another dash. But I may look around to see if a damaged one is available.
Nolan, while fairly new to the forum, I am no stranger to modding the Fiero, nor am I a stranger when it comes to perusing the aisles of cars at the local junkyard. I live in Radcliff, Kentucky and have access to a vast number of salvage yards, each with an equally vast amount of cars. Upon reciept of an e-mail from you, describing the kind of parts you need, I would be more than happy to hit the local wreckers and see what I can come up with. I could ship said parts to you and would be willing to do this for free. Free, of course meaning that I wouldn't want any compensation for my time or efforts, only that you'd pay the shipping and cost of the items. I don't know anything about crossing international lines or the possible tarriffs associated with do so, so if you do, please let me know. But it'd be a damn dirty shame to let the limited availability of parts be a roadblock to you during the course of this build.
I'd be honored to have you look over my engine/suspension modifications and tell me what you think. If you see an area of weakness or over-thought (as we all can be guilty of at times, hehe), speak freely and don't be afraid to be critical. I don't want to do this more than once, so accuracy and quality are paramount.
I've really enjoyed reading through your entire thread and look forward to seeing the finished product.
Good to see you back at it. Man how do you "just happen" find someone locally that just happens to not want to do the brake upgrade and just happens to have everything needed??? He doesn't just happen to have a cousin with the same problem does he??
To explain one case of how this can just "happen", I know a guy in Louisville that bought a big brake kit for his Miata, but later found that once installed, he would get bumped into a higher class in Autocross where he had NO chance of being competitive because he had done no horsepower or suspension mods. Faced with the decision to upgrade the power/drivetrain and suspension to be competitive, he sold the entire brake kit, for a bit of a loss, and it had never been installed.
Just goes to show, do your homework before you buy something for a car intended to be raced.
You will not be disappointed with the HVAC unit from Riceburner. Keep up the great work, it is really coming along nicely.
Wish I was able to get out to the garage more for my projects as well. Work is way too busy...
I have the RCC brake caliper mounts that are like the bottom picture you have there. I would recommend going with the top picture as I had to do a bit of trimming on the rear to get it all to fit.
Drop me a line or call me and I can show you the mods I did to get my brake upgrade on. I also used the front rotors from the Beretta as well and not the rears as most of the conversions go. I had an aluminum kidney built for the difference needed to put the front caliper mount out to the right positon. The front rotors give a significant increase in braking surface than the rear rotors do on the conversion.
I also set up the rear calipers differently as well to allow for the bleed screw to be on top where it should be. The hand brake cable goes under the axle and clears easily.
Originally posted by Brocephus: Nolan, while fairly new to the forum, I am no stranger to modding the Fiero, nor am I a stranger when it comes to perusing the aisles of cars at the local junkyard. I live in Radcliff, Kentucky and have access to a vast number of salvage yards, each with an equally vast amount of cars. Upon reciept of an e-mail from you, describing the kind of parts you need, I would be more than happy to hit the local wreckers and see what I can come up with. I could ship said parts to you and would be willing to do this for free. Free, of course meaning that I wouldn't want any compensation for my time or efforts, only that you'd pay the shipping and cost of the items. I don't know anything about crossing international lines or the possible tarriffs associated with do so, so if you do, please let me know. But it'd be a damn dirty shame to let the limited availability of parts be a roadblock to you during the course of this build.
I'd be honored to have you look over my engine/suspension modifications and tell me what you think. If you see an area of weakness or over-thought (as we all can be guilty of at times, hehe), speak freely and don't be afraid to be critical. I don't want to do this more than once, so accuracy and quality are paramount.
I've really enjoyed reading through your entire thread and look forward to seeing the finished product.
Brocephus (aka John, hehe)
John:
Thank-you for your generous offer to look for parts. I have sourced some vinyl that is awfully close to the Stealth pattern and I don't think that the difference will be very noticeable. So far I have been able to locate the parts that I require, e-bay is a wonderful thing: D
Bout your engine/suspension modifications, I would be happy to offer my opinion but I would recommend that you post a thread about them and you will likely get some replies from people who are far more knowledgeable about them.
You will not be disappointed with the HVAC unit from Riceburner. Keep up the great work, it is really coming along nicely.
Wish I was able to get out to the garage more for my projects as well. Work is way too busy...
I have the RCC brake caliper mounts that are like the bottom picture you have there. I would recommend going with the top picture as I had to do a bit of trimming on the rear to get it all to fit.
Drop me a line or call me and I can show you the mods I did to get my brake upgrade on. I also used the front rotors from the Beretta as well and not the rears as most of the conversions go. I had an aluminum kidney built for the difference needed to put the front caliper mount out to the right positon. The front rotors give a significant increase in braking surface than the rear rotors do on the conversion.
I also set up the rear calipers differently as well to allow for the bleed screw to be on top where it should be. The hand brake cable goes under the axle and clears easily.
Good luck and keep at it.
Cheers Don
Hi Don:
I would like to see what all you did for your brakes and how you routed the various components. I'll Mkae some arrangements in the next few weeks to drop by.
If I understand what your'e saying the second set of brackets that you refer to are not for the LeBaron brakes, is this correct?
OK! I hope no one reading this suffers a hear attack but... I actually managed to get some work done attaching the HVAC controls to the center console!
I know, I know, the world must be ending or something.
So, here is the measuring: And the hole cut. It's slightly larger than the controls and they pop though the hole. This is to allow for the vinyl etc. that is going to be added. I then cut out a backing plate from the left over original deck lid material from when I cut out my deck lid vent: And attached it with the SMC adhesive: And once set I cut a few small notches for the mounting screws:
[This message has been edited by Sourmug (edited 05-29-2007).]
The brackets were then attached to the back: And Voila! Now I just need Andrew to make up the custom Fiero badge and MR Mike to send my my samples so I can pick the leather. Once I have these I can recover the console and something will actually be finished on the car! I can hardly wait.
Nolan
[This message has been edited by Sourmug (edited 05-29-2007).]
Just to show that this was not some freak one time occurrence I also recovered my head liner today! By the way I have decided to not use the Stealth dome light as the modifications to the headliner would be fairly extensive and the resulting bulge would present fair amount of difficulty to have the vinyl smoothly adhere to it.
I'm using contact cement that is heat resistant as I know that warm interiors tend to make most adhesives let go and you end up with a droopy head liner. Here's the product:
Here are the head liner and the vinyl ready for preparation. The vinyl comes on rolls that are 55" wide. I cut a piece that is 36" long for the full width of the vinyl. Most instructions for doing this indicate that you are to use the old head liner fabric as a template but I decided to do the trimming with the vinyl attached to the fiberglass. I quickly traced out the rough outline of the fiberglass piece onto the back of the vinyl so that I would know where to apply the contact cement. I then applied the cement to the back of the vinyl and the face of the fiberglass and waited about 20 minutes for the cement to dry. Once ready I laid the fiberglass onto the table with the cement up. I then covered the liner with tow sheets of large format paper that entirely covered one half of the liner each with the seam down the narrow width of the liner. the vinyl was then placed cermet side down on top of the paper. The reason for doing this is so that the two pieces do not come in contact with each other, as the name implies contact cermet joins the two pieces together upon contact. Once I made sure all the glued bit lined up I began to slowly spread the two pieces of paper apart a couple of inches at a time making sure that the vinyl was bonding to the fiberglass at the correct location and without wrinkles. Some minor adjustment can be made but nothing major.
I then flipped the assembled liner over and began trimming as required and bonding the front and back edges similar to the original. And , now it's ready for installation:
But first, I have to add in the performance sound wiring and install this:
Nolan
[This message has been edited by Sourmug (edited 05-29-2007).]
Yay, I made a bit more progress! First off I have covered the dash corner infill pieces with vinyl. Here are some step by step shots of the procedure, which is essentially as I described previously for the head liner: Basically it's pretty easy to do, it just takes a bit of patience.
[This message has been edited by Sourmug (edited 05-29-2007).]
I have also started to color some of the different dash trim bits and pieces using Chrome paint: And the trim behind the inside door handle. First filling in the Grand Am logo and then painting them: It sure feels good to be working on the car again!
Nolan
[This message has been edited by Sourmug (edited 05-29-2007).]
nice work cousin Nolan...hyuck hyuck..ps nolan just didnt luck into a complete brake swap i posted it for sale in the mall a few times...he was just the one who bought it...and he needed to pick up pads...i didnt have any pads for the swap....lol..tim..again she is looking good...


 :
:.JPG)
_1.JPG)
.JPG)
.JPG)
.JPG)
.JPG)
.JPG)
.JPG)


.JPG)


.JPG)
.JPG)
.JPG)
.JPG)
.JPG)
_1.JPG)
.JPG)
.JPG)
.JPG)
.JPG)
.JPG)
.JPG)
.JPG)
.JPG)
.JPG)


 Waking up for a bump only....
  ...
... 
 I actually managed to get some work done attaching the HVAC controls to the center console!
_2.JPG)
_1.JPG)
_1.JPG)
_1.JPG)
_1.JPG)
.JPG)
.JPG)
.JPG)
.JPG)
.JPG)
.JPG)
.JPG)
.JPG)
.JPG)
.JPG)
.JPG)
.JPG)
.JPG)
.JPG)
.JPG)
.JPG)
.JPG)
.JPG)
.JPG)
.JPG)
.JPG)
.JPG)
.JPG)
.JPG)
.JPG)


