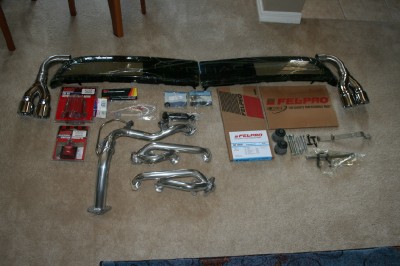
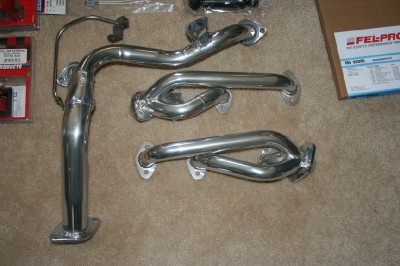
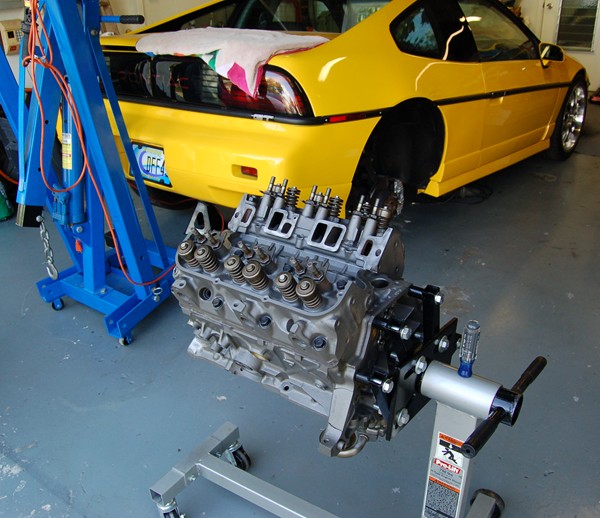
Well, an update on my 3.4L swap. I sent my injectors to cleaned and flow tested, sent Darrell Morse my throttle body and plenum to get worked on and just got my bags of goodies from the Fiero Store. I must say that I am quite impressed as always with the Fiero Store. The treatment is excellent and with the pennocks discount, I saved a bunch of money. BTW, this is just the begining of new parts for me. Here are some pics.
I finished this 3.4L swap with all kinds of misc stuff to do to the car. For a 17 year old kid, it was a gift from his dad. Lucky Kid, 88GT too. And I am half way through my next swap. I was only 4 degs off on stabing the distrib this time
As far as the cold start injector, it only sprays during cranking when the engine is not warmed up. You can leave it in with no worries.
Alex, Nice stack of parts, I put on new tail light covers on this Fiero too.
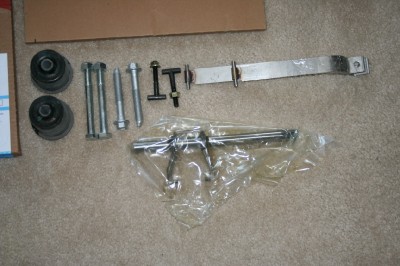
And for all doing this swap I recomend the poly dogbone, as it will help save your other mounts. A worn rubber dogbone in a 3.4 will shred the stock mounts. Just a heads up.
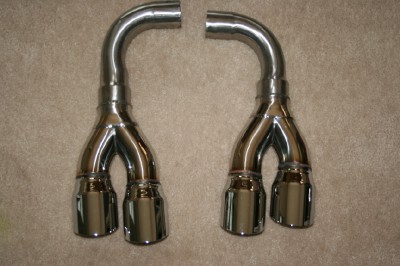
DAMN YOU! Tempting me to go spend more money ! Those headers, Y pipe and tips are things of beauty.
My swap might not the prettiest thing around, I'm just hoping to get it to run good and last a little while
I already have a "poly filled dogbone" sardonyx, plus I bought all new motor and trans mounts. Figured I'd do them while the cradle is out anyway. Need to order some poly cradle bushings tho.....
BTW, those Ocelot tips are a beauty. I could not believe how nice they are. The craftsmanship is awesome. They will go nicely with the Ocelot exhaust that I already have.
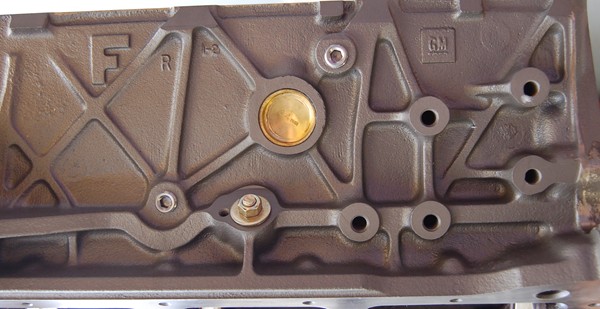
More progress today. I finally got the cylinders honed out and finished cleaning out all the particles, grime and dirt out from that, and from removing all the casting flash in the oil return holes. I bought a $7.00 shotgun cleaning set at Walmart and put the copper brushes and swabs in the kit to good use cleaning out the oil galleys in the block before blowing them out with the air gun and then installing all the freeze plugs and oil galley plugs: Note the expansion plug that I replaced the crank sensor with. I also filled the knock sensor hole just above the freeze plug, (even though it's a blind hole), with a pipe plug. Keeps things looking nice and neat
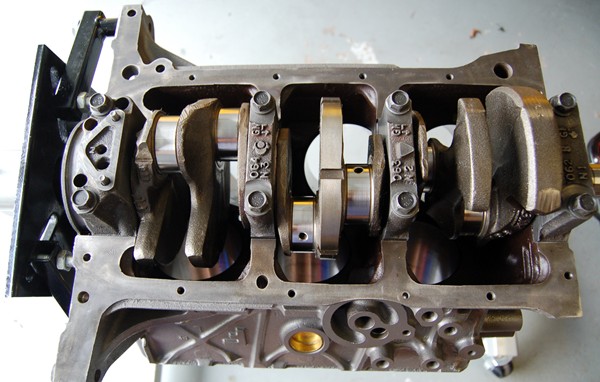
Next it was time to install the crankshaft.
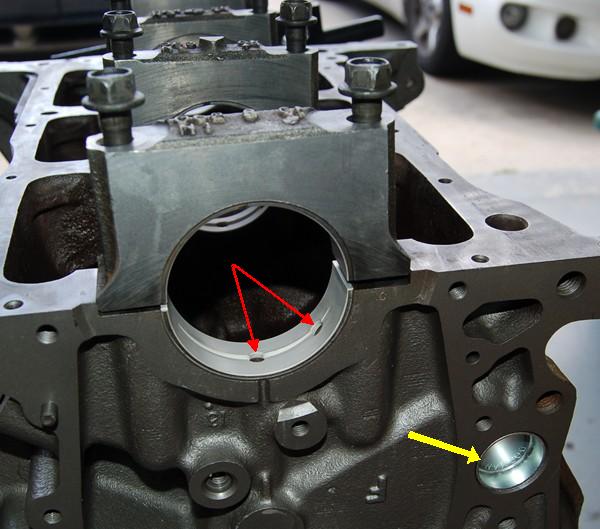
Here are the main bearings installed after cleaning the journals and caps with solvent. Your bearings should be installed DRY between their seats and the backside of the bearings. Note that the correct bearings have 2 oil holes in the upper bearing halves, (red arrows), and also have the lead-in groove. If you get any other kind, return thenm and get the correct ones. The main caps are just sitting on loose while I checked that everything matched up. These are Sealed Power Bearings The Pioneer freeze plug kit I bought was specifically labelled for the Chevy 207, (3.4L), V6 but it was 1 freeze plug short, so it was back to the store for another plug. All they had in the 34mm size was steel instead of brass, (yellow arrow), so that's what I got. All freeze plugs received a thin layer of RTV around their perimeter and were then driven in with a socket that fit inside them nicely and a ball peen hammer. Once the block is painted they will all look the same anyway..
[This message has been edited by randye (edited 04-21-2007).]
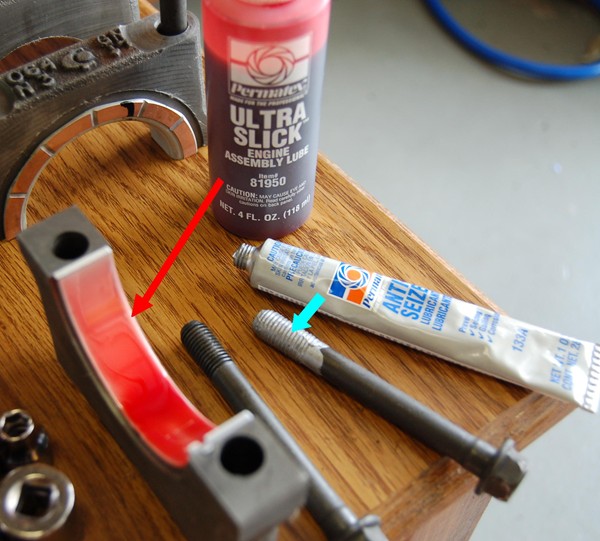
With the main bearings installed I lubed the upper bearings and the lower, (cap), bearings with Permatex Ultra Slick Assembly Lube and coated the threads of the main cap bolts with Permatex anti-seize compound. I like the Permatex Super Slick lube as it has good surface holding, (filming), ability and won't gum up oil passages at start-up like moly grease tends to do. Plus it looks like blood so it's very easy to see if you missed applying it anywhere
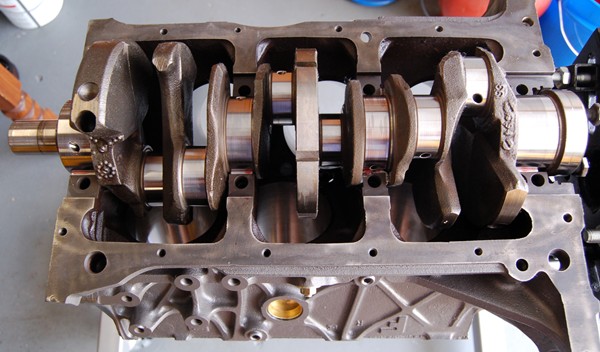
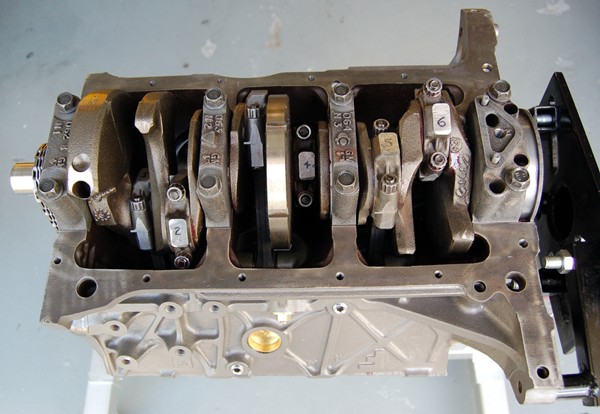
Once the bearings were all lubed up liberally I installed a couple of the flex plate bolts to the end of the crank to give me a "handle" and then carefully layed the crank into the bock.
The crankshaft in place I then installed the main bearing caps and bolts. Leave the bolts just slightly loose at first and use a wood block and hammer to tap the crank toward the rear of the engine fully and then tap the crank from the rear end toward the front of the engine. This aligns all the bearings and sets the thrust faces of the #3 bearing properly. Check the distance between the front side of the thrust bearing face and the crank thrust face with a feeler gage. It should measure between .002 and .0084 in. (Mine measured .003 ) Something about a freshly ground and polished crankshaft that just looks so pretty to me...don't know why, it just looks nice
[This message has been edited by randye (edited 04-21-2007).]
I missed a step earlier, and like most of these build threads, I got busy and forgot to take a photo Anyway, I installed the rear main crank seal before installing the #4 main bearing cap as it's MUCH easier and safer to do it now than to press or pound it in later... My rear main journal had a slight groove worn in it from the old seal, (red arrow in next photo), but it looked minimal, (less than .003 deep), plus I couldn't find a repair sleeve immediately available anywhere, so I figured it would be ok with a fresh seal in place.
Before placing the rear main bearing cap in place, you also need to put a 1/8 inch bead of "Permatex Gasket Maker Anerobic Sealer" in the areas shown in blue, otherwise oil will seep out between the bearing cap and block around the rear main seal. It can often be be mistaken for a leaking rear main seal. Some people insist that a thin film of sealer go on this entire area, but I've always had very good results from the pattern I use.
The main bearing caps all installed and torqued down to 70 ft. lbs. Do not pull the caps down with the bolts. Tap them in to seat with a small wood block and hammer! Make sure to torque the cap bolts progressively and work from the center cap out to both ends. Torque 30 then 50 then 70 ft. lbs. make sure that the crank rotates freely. If not, back off the bolts and find out what's binding. When you're done it should rotate freely and smoothly.
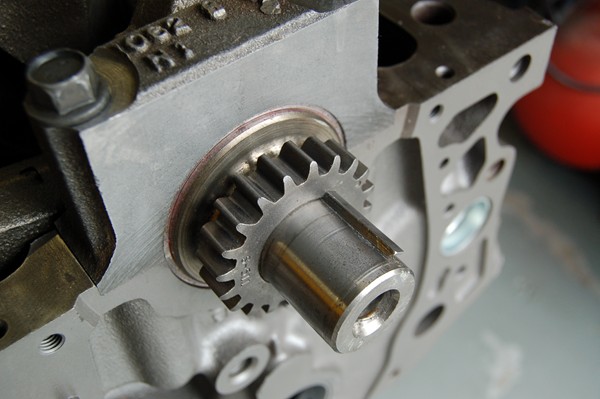
I prefer to install the crankshaft timing sprocket once the crank is in the block. Clean up the keyway and the key of any burrs or mushroomed edges and tap it into the slot, then using a short piece of pipe or a wood block tap the new sprocket onto the nose of the crank until it seats solidly onto the shoulder of the crank. If the sprocket isn't properly seated all the way, it won't align with the cam sprocket properly and you'll destroy the timing chain in a very short order!
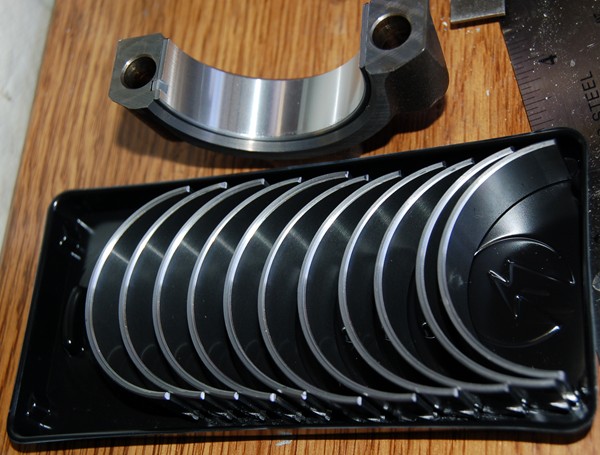
I had hoped to get the pistons installed today, but when I opened the package of Clevite 77 rod bearings I bought I found that they were the wrong parts! Seems that Auto Zone transposed a "3" and an "8" in the part number and it got past me too. Anyway the bearings were clearly NOT for a 3.4 rod , so off to the parts store AGAIN and new rod bearings are supposed to be here tomorrow morning. If so, I might be able to get the long block completed this weekend
The correct rod bearings arrived at the shop this morning, but instead of Clevite 77, I now have Sealed Power Bearings. Actually they look better than the Clevite bearings so I'm almost happy about the mix up.
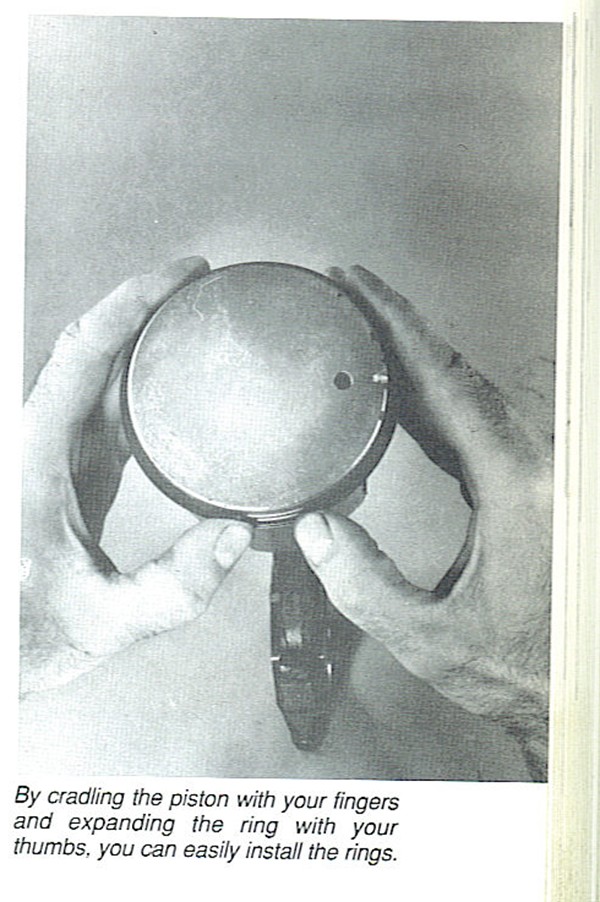
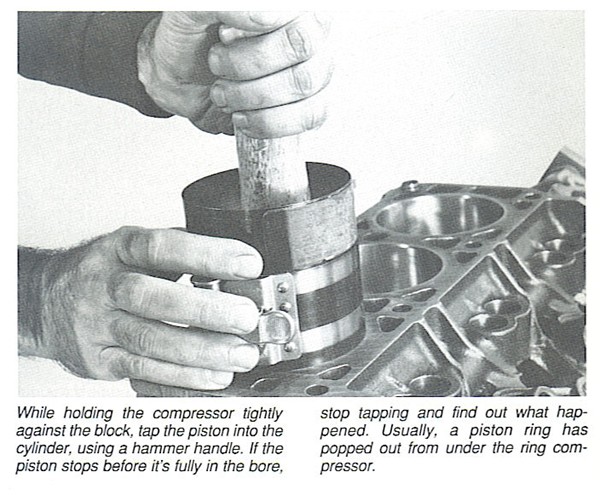
I forgot to take photos of installing the rings on the pistons so I'm borrowing a couple of pictures from "How to Rebuild Your GM V-6 90 Degree Engine" by Tom Currao Some folks like to use piston ring install pliers, but I've found that it's way too easy to spread the rings too far and break them using those, so I install my rings by hand:
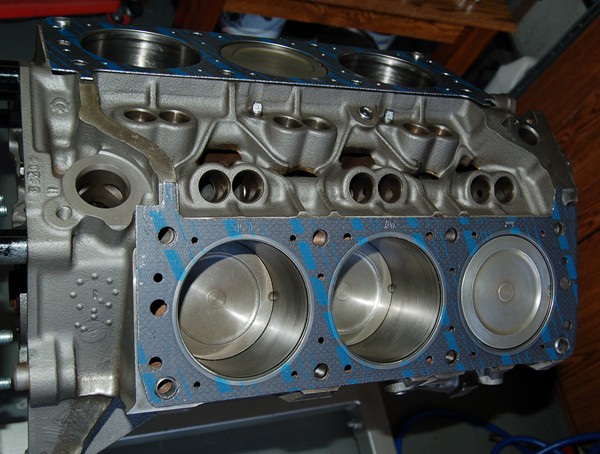
The method of installing the pistons in the block is also pretty straightforward.
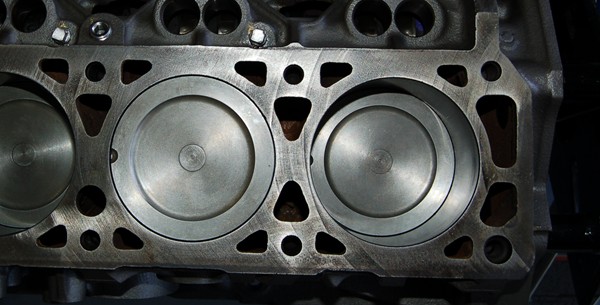
I had a lot of trouble with the cheap-o ring compressor I used, (my trusty old one went missing), but I finally managed to get all 6 holes filled and the rod journals and bearings lubed up with assembly goo. Rod cap nuts were torqued down per spec. (36-42 ft. lb.) You'll need a 13mm, 12 point, socket for this.
Note that I previously numbered all the rods on the caps with a black marker so that they went back in the bores where they came out of. I just numbered from the front of the engine to the rear sequentially when I took them out. I used some Permatex red thread locker on the rod cap nuts to make sure they stay put.
[This message has been edited by randye (edited 04-23-2007).]
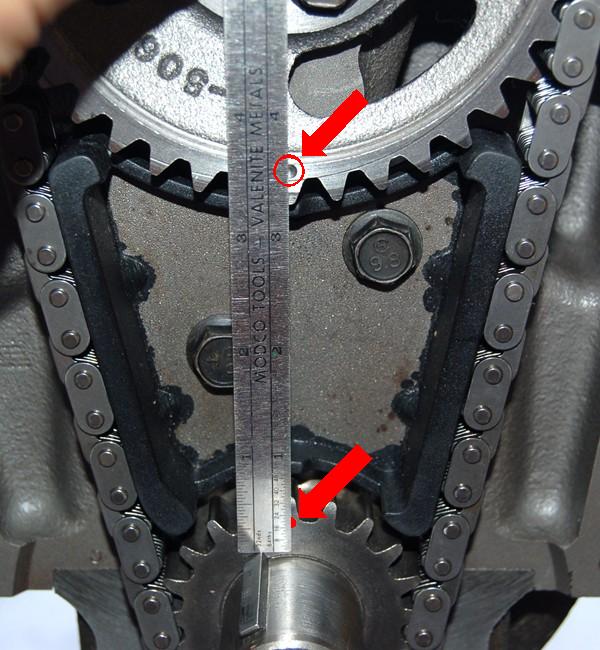
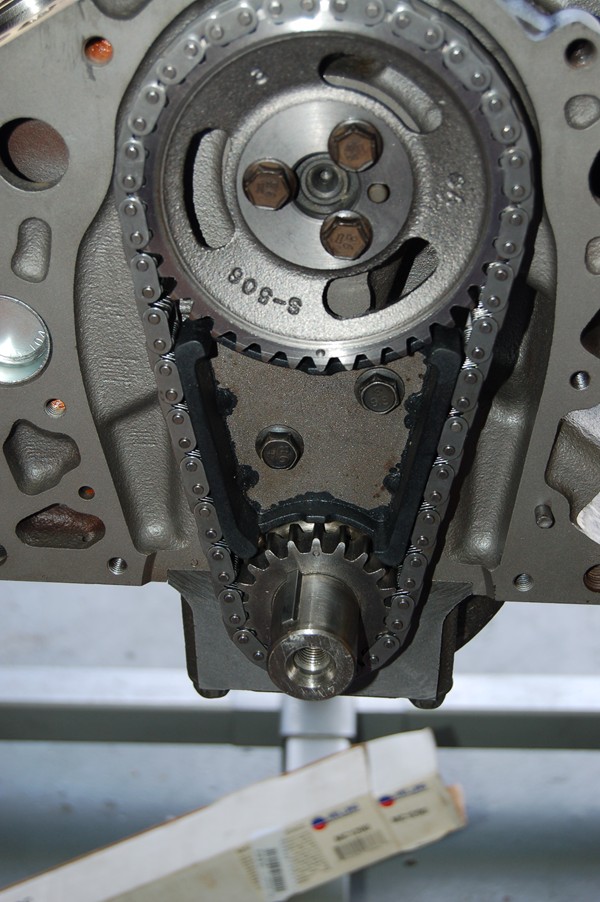
Next I temporarily bolted the cam sprocket onto my new Melling camshaft. This provides a "handle" to help install the cam into the block. Go a segment at a time and apply assembly lube to the cam bearing journals and moly grease to the cam lobes, (The moly grease stays put and works better than assembly "goo" between the lifters and the cam lobes. The cam slides straight into the block with no effort. Once it's seated, carefully remove the cam sprocket without pulling the cam out and install the timing chain. Be certain to align the two timing marks (highlighted in red). One tooth off either way and the engine won't run properly. Use a straightedge to check alignment if you aren't sure.
Once the chain is in and aligned, install the chain dampner and torque the bolts to 17 ft. lb.[
[This message has been edited by randye (edited 04-22-2007).]
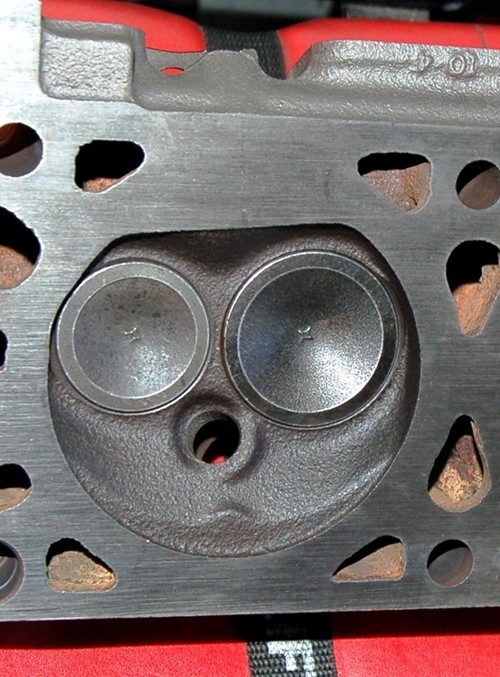
On to the Heads! The valve job and clean up looks much better than what I started with
The head locating dowels were put back in, (2 per side), and the new Felpro head gaskets put in place.
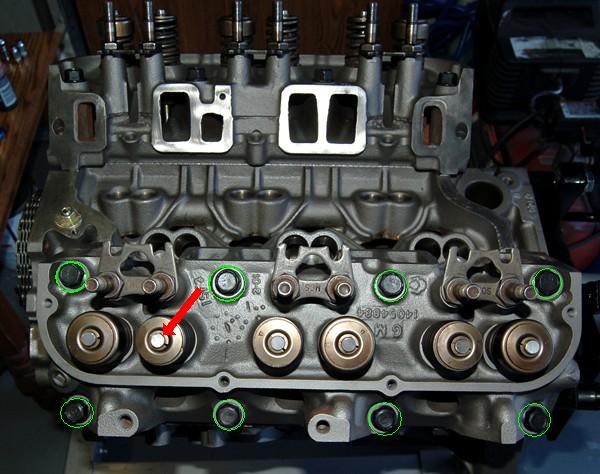
Since the heads had been reworked and I didn't want to mess with extracting that pesky plug with the square socket, I simply swapped the heads side to side, (they're identical) I purchased a set of Felpro head bolts, (shown in green circles), as you should always replace the head bolts, (they stretch and fatigue). Install the head bolts with a little Permatex non-hardening sealer on the threads to prevent coolant leaking. Then torque the bolts in proper sequence and specification.
The valve stems, (red arrow), were cleaned up nicely during the valve job and the stock rockers showed very minimal, if any, wear so I'll be re-using the old rockers. Even the rocker balls looked almost perfect. Astonishing really considering the shape the bearings were in from dirty oil.
[This message has been edited by randye (edited 04-22-2007).]
That's as far as I managed to get today. I have yet to prime and install the oil pump and set the oil pump pick-up heigth and fix it in place, (I just hung it in place for now). Then install the lifters, pushrods and set the valve lash Then it can probably "officially" be considered a "long block". Instead of denting in the 3.4 oil pan, I'll be following a tip I got from Shawnkfl, and altering the front motor mount slightly.
I'll have to pick out some engine paint colors soon. Not sure what to choose just yet, but I'm thinking I'd like it to look fairly stock "Fiero" with a little "twist" to it just to hint that it's something a little different than a stock 2.8
I did my 3.4 pushrod swap a couple of years ago and other than a rebuild plus porting the exhaust and intake, it's pretty much stock. The only problem I ran across was adjusting the valve train. Once the engine's in the car, it's a PITA making valve adjustements as the intake has to come off before you can get to the valve covers. It was my fault mainly because I'd never done that kind of work before and didn't do it right in the first place. Other than that, the swap was pretty trouble free. I learned more about Fieros during that one swap than I learned from the three other Fieros I owned over the years.
The difference in performance was well worth the work.
Randy, you are not really going to paint that engine Fiero "red" or whatever that color is, now are you?? Things are looking nice, shouldn't be to long now. Good Luck Gary
Randy, you are not really going to paint that engine Fiero "red" or whatever that color is, now are you?? Things are looking nice, shouldn't be to long now. Good Luck Gary
Nope..well maybe I'm open to suggestions right now.
don't forget to place the lower intake gaskets in their position before you drop in the pushrods. you can cut the gasket after, but it's not the best solution. just lay the gaskets where they should go and drop the pushrods through them. it will be clear as to why if you havn't checked that part out yet...
don't forget to place the lower intake gaskets in their position before you drop in the pushrods. you can cut the gasket after, but it's not the best solution. just lay the gaskets where they should go and drop the pushrods through them. it will be clear as to why if you havn't checked that part out yet...
Thanks Shawn!
You know, even though it's been YEARS since I've done an engine rebuild, one thing doing this has brought back to me is that it's easy to get over anxious when you get close to getting it done and forget something crucial. The key is to take your time, maybe even make "to do" check lists, and double check everything, ....like that mysterious o-ring I called you about
lol...i searched long and hard about the O-rings. i just KNEW i needed them because they were in my kit. come to find out....i didn't. my kit had three of different sizes that i don't need. on the plus side, i had four manifold gaskets ...so i gave a set to bobadoofunk! i also ended up with two of the crank seals.
Not a lot of progress this week Gary. Had a long "honey-do" list this weekend, but managed to get a little modification done that I've been wanting to mock up before finishing the swap: I put it in a new thread so as not to clutter up Sardonyx's thread with more mods, plus I figured some folks might miss it if I "buried" it in this thread. See my meager weekend progress here: https://www.fiero.nl/forum/Forum1/HTML/065095.html
Well, I am taking my time. Not doing a whole lot lately. I do have good news though. I was able to get that freaking plug out. Man that was a PITA. Also, Just got an e-mail today from Rich Jensen @ Cruzin Performance.com, he is the one that's cleaning and blue printing my injectors and he said they are to ship. I did download the flow worksheet of the injectors and it is pretty amazing where they were and now. He did find that one of the injectors was bad so I have to buy one. Total cost for the job, $80.50. Mine you that these are the injectors that came out of the engine that I bought. Overall, I am very pleased with the service rendered by Rich, so I do recommend him if you want to get you injectors worked on.
I got messy tonight and stripped the paint off a spare set of valve covers and an upper intake. Since you covered that well, I'll not post anything on it.
One note though, I used Mar-Hyde brand "Tal Strip". That stuff RIPS the paint off the parts! It will also burn the heck out of any skin it touches! It's like a gel that you brush on and it wrinkled up the old paint on the parts in approx. 10 minutes. It then just hoses off.
I also poured it into the upper manifold and nearly filled it up. I then let it sit for approx. 30 min. then flushed it out with the hose and VOILA, no more carbon...the inside of the manifold is as clean as the outside now Sure beats media blasting. A gallon jug at Advance Auto is approx. $26, but well worth it IMHO. Couldn't have been easier.
I pulled out the old 2.8 last night and striped both blocks today, along with other misc. Fiero work. What a vacation, come to Vegas and do 3 engine swaps, and my Fiero is improving by leaps and bounds while I am here too. Oh and Randye I have been told, in person, how great it is that my thread now has rebuild pics too.
Oh and Randye I have been told, in person, how great it is that my thread now has rebuild pics too.
That's really gratifying, and I'm happy to make a contribution. I do think it's rather nice to have more or less complete 3.4 thread with engine rebuild info, particularly since low mileage 3.4PR motors are getting harder to find and the "How to Rebuild You 60 Degree V6" book is out of print, also hard to find, and very expensive if you do. Personally, I would never rest easy with a 100k+ motor just dropped in without a rebuild.
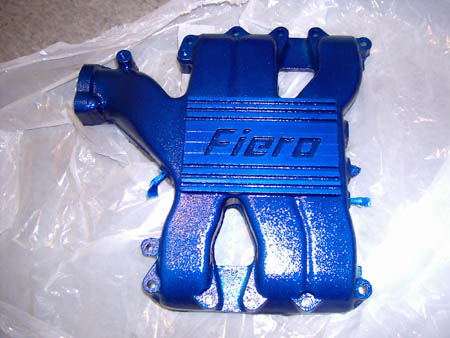
On another note, I am still undecided about the paint colors for my valve covers and upper manifold, but I'm actually leaning heavily toward the metallic, (candy), blue cast coat you used on your block. Perhaps is should be the "official" 3.4PR color
Well, just got my injectors today. They look nice and clean and in another bag I got all the parts that were replaced. I also stated to stip and paint the oil pan. As soon as I get my stuff from Darrell, they'll be sent to powder coating.
GO Alex! Sounds like things are starting to come together for you now
I managed to modify my thermostat housing. Removed the TB coolant line tubes, MIG welded the holes and ground them smooth and painted it. You can't tell they were ever there now! Block, 710 pan, lower and middle manifold are painted. Rodney Dickman exhaust studs are installed.
Removed the casting parting lines from the upper manifold and removed the cast on TB coolant lines mounting lug with a die grinder and a carbide rotary cutter.
Hope to start dropping the cradle this weekend and swapping parts over from the old 2.8
I'm seeing light at the end of the tunnel...hope it's not an oncoming train
I'm just blown away whenever I come across this thread. It always inspires me to clean up my engine bay, but I need some help with that. Does anyone know the color/code of this blue powder? It's very similar to my car's body color, and I'd love to have my intake, valve covers, and misc. parts done up in it.
Thanks in advance for any input. Feel free to shoot me a PM or email.
Looks like there are a few cars out there that use this M20 drain plug, so there IS an alternative to simply filling the dang thing with RTV and living with it I don't need 5 of them, so I'll check the parts stores for a single one....
(Yes, I already measured the threads on the old sensor, and they're *not* a pipe thread, but a straight M20 X 1.5 metric...)
Randy
[This message has been edited by randye (edited 05-10-2007).]
if you have to buy five, i'll buy one off you. or if you find a source, please let me know...i need one too! thanks for lunch randy. that place was pretty good if you ask me. i'm all clear for saturday too so pm me an address and i'll mapquest it. i'll take off around 10ish saturday morning.
you can used the 3.4 pan as long as you use the 3.4 oil pump. it's pretty simple to do that plus you can use the stock 3.4 oil level dip stick. no need to dent the oil pan either. a few minutes with a grinder and you can clear the engine mount easily.
Aren't you going to use your oil pan? I thought up to '86 you are supposed to use the 2.8 oil pan. Correct me if I am wrong.
Like Shawn said Alex. I'm using the 3.4 oil pan. It's actually a better pan and I already have the 3.4 oil pump installed. The pan will mate up fine to the 87-88 timing cover.
Also as Shawn said, DON"T dent your oil pan to clear the motor mount. It's very easy to remove just a little metal from the mount to clear it and it doesn't affect it structurally.
The 85-86 timing cover has an angle on it(with 2 extra bolts) and needs to use the 2.8 pan, 87-88 can use either pan.
I just finished up my 3rd swap last night(while I am in Vegas this month) So far I have done 3 swaps, 1 clutch, misc Fiero work, and pulled my engine out to do misc upgrades. I can't even count how many 3.4 swaps I have done so far.
You said you've done 3. ( "So far I have done 3 swaps" )
Hope you haven't lost some fingers from all that work
I want to get this straight, either way I have to dent the oil pan? Also, Since I am using the 2.8 oil pan, do I have to use the dipstick form the 2.8 or the 3.4?
I want to get this straight, either way I have to dent the oil pan? Also, Since I am using the 2.8 oil pan, do I have to use the dipstick form the 2.8 or the 3.4?
NO You do not have to dent the oil pan.
If you have an 87 or 88 timing cover, the 3.4 oil pan will mate up to it just fine.
If you have an 86 or earlier timing cover you will need to use the 2.8 oil pan and dipstick. The 2.8 oil pan is shallower than the 3.4 I believe. You'll get a false oil level reading from the 3.4 dipstick in the 2.8 pan.
You need to remove about 1.5 square inches of metal from the front motor mount on the short part of the "L" shape to clear the corner of the 3.4 original oil pan. This is not necessary on the 2.8 pan. The trimmed off metal allows the 3.4 pan to fit nicely and it's such a small trim it doesn't really affect the structural integrity of the motor mount.
I'll be trimming my motor mount tomorrow and I'll try to post some photos this weekend.
[This message has been edited by randye (edited 05-11-2007).]