Pennock's Fiero Forum
  The Construction Zone
  3.4L pushrod Swap (lots of pics) (Page 10)

Post New Topic  Post A Reply
Email This Page to Someone! | Printable Version

This topic is 16 pages long:  1   2   3   4   5   6   7   8   9   10   11   12   13   14   15   16 
Previous Page | Next Page
next newest topic | next oldest topic
3.4L pushrod Swap (lots of pics) by sardonyx247
Started on: 05-23-2004 02:00 PM
Replies: 618 (104760 views)
Last post by: Notorio on 02-14-2021 11:28 PM
randye
Member
Posts: 13819
From: Florida
Registered: Mar 2006


Feedback score: (1)
Leave feedback


Total ratings: 216
Rate this member

Report this Post05-11-2007 09:23 PM Click Here to See the Profile for randyeClick Here to visit randye's HomePageSend a Private Message to randyeEdit/Delete MessageReply w/QuoteDirect Link to This Post
 
quote
Originally posted by ThreeofClubs:


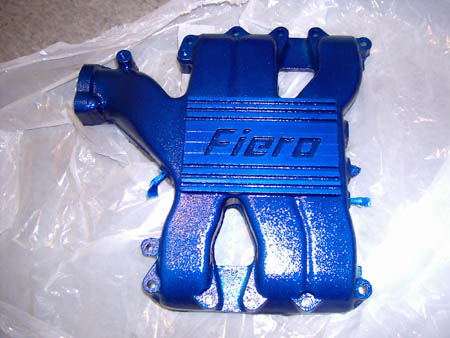
I'm just blown away whenever I come across this thread. It always inspires me to clean up my engine bay, but I need some help with that. Does anyone know the color/code of this blue powder? It's very similar to my car's body color, and I'd love to have my intake, valve covers, and misc. parts done up in it.

Thanks in advance for any input. Feel free to shoot me a PM or email.


You might want to check out the various colors on either Eastwood's or Caswell Plating's websites.
It looks a little like Caswell's "Lollipop Blue" metallic powder color to me....

IP: Logged
randye
Member
Posts: 13819
From: Florida
Registered: Mar 2006


Feedback score: (1)
Leave feedback


Total ratings: 216
Rate this member

Report this Post05-12-2007 03:52 PM Click Here to See the Profile for randyeClick Here to visit randye's HomePageSend a Private Message to randyeEdit/Delete MessageReply w/QuoteDirect Link to This Post
The problem of the clunky old oil pan sensor on the 3.4 is SOLVED!

Here is the part required. Available for the *huge* cost of $1.98 from Advance Auto Parts


Here is what it looks like installed on the pan...a very RED pan I might add...


No more filling the old sensor with RTV or messing around with other "make-do" methods.
Looks professional and clean and will not leak!

[This message has been edited by randye (edited 05-12-2007).]

IP: Logged
randye
Member
Posts: 13819
From: Florida
Registered: Mar 2006


Feedback score: (1)
Leave feedback


Total ratings: 216
Rate this member

Report this Post05-12-2007 04:11 PM Click Here to See the Profile for randyeClick Here to visit randye's HomePageSend a Private Message to randyeEdit/Delete MessageReply w/QuoteDirect Link to This Post

randye

13819 posts
Member since Mar 2006
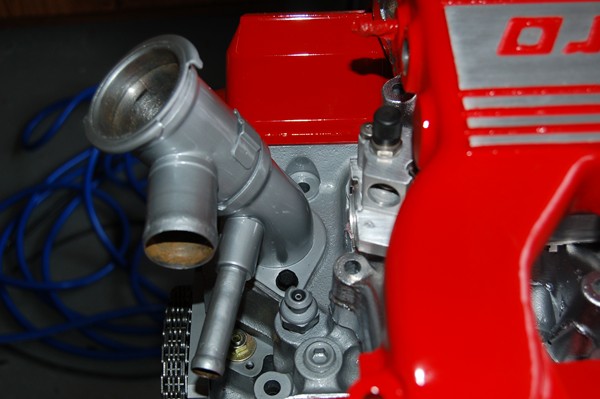
Heres the refurbished thermostat housing with the throttle body cooling lines removed, the holes MIG welded in and ground smooth and painted:


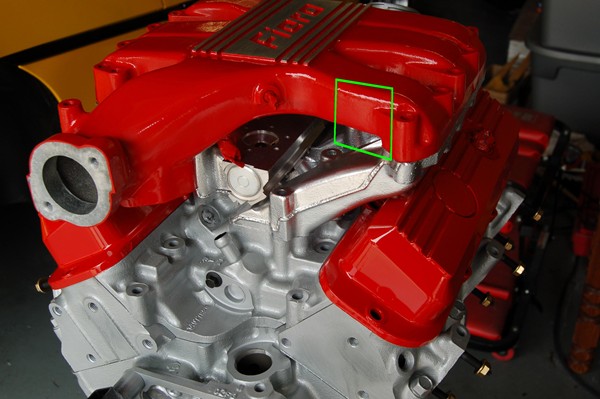
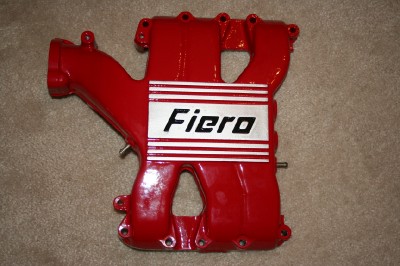
Since there were no more TB cooling lines to worry about, the cast on lug on the upper manifold for the tube mounting was also removed and while I was at it I removed all of the casting parting lines on the upper manifold and smoothed it out a bit before painting:


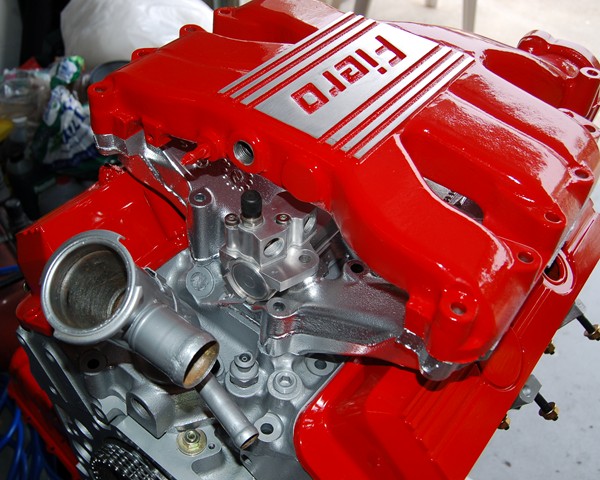
Heres the other end of the manifold nicely cleaned up and painted:

This images is larger than 102400 bytes. Click to view.

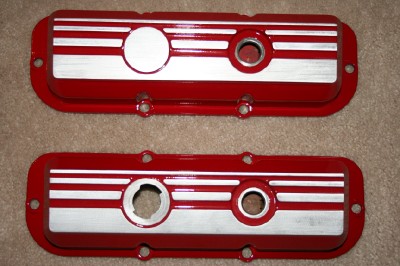
I still need to sand the paint off the raised portions of the valve covers, polish all the areas and hit them with some high temp clear to forestall oxidation.

Should be just about ready to swap the new 3.4 in by next weekend if all goes well.
Thinking about removing the casting parting lines on the middle manifold too, but they are hard to actually see once the motor is installed and the distributor, brackets and misc. plumbing are in place.

[This message has been edited by randye (edited 05-12-2007).]

IP: Logged
randye
Member
Posts: 13819
From: Florida
Registered: Mar 2006


Feedback score: (1)
Leave feedback


Total ratings: 216
Rate this member

Report this Post05-12-2007 04:28 PM Click Here to See the Profile for randyeClick Here to visit randye's HomePageSend a Private Message to randyeEdit/Delete MessageReply w/QuoteDirect Link to This Post

randye

13819 posts
Member since Mar 2006
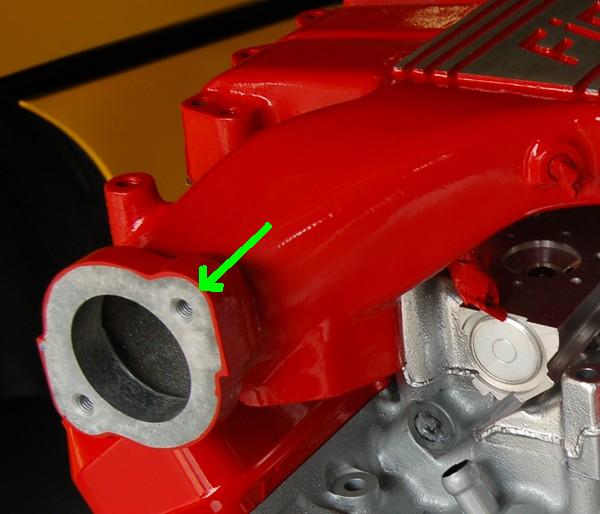
A small tip when painting manifolds or other parts..
I leave approx. 1/16th inch "overlap" on masked off areas wherever possible, (green arrow).
This helps prevent chipping of the paint on corners and edges and leaves plenty of gasket sealing surface.


You can also see how nice the upper manifold looks without the cast parting lines.
Not a perfect job but it looks much better to my eye

[This message has been edited by randye (edited 05-12-2007).]

IP: Logged
shawnkfl
Member
Posts: 2457
From: Largo, Florida
Registered: Oct 2004


Feedback score:    (7)
Leave feedback


Total ratings: 72
Rate this member

Report this Post05-12-2007 05:12 PM Click Here to See the Profile for shawnkflSend a Private Message to shawnkflEdit/Delete MessageReply w/QuoteDirect Link to This Post
randy, you're too humble! everything you've done to that car and engine is top notch. i was just staring in awe. next weekend, we'll hear it purr!

[This message has been edited by shawnkfl (edited 05-12-2007).]

IP: Logged
randye
Member
Posts: 13819
From: Florida
Registered: Mar 2006


Feedback score: (1)
Leave feedback


Total ratings: 216
Rate this member

Report this Post05-12-2007 08:15 PM Click Here to See the Profile for randyeClick Here to visit randye's HomePageSend a Private Message to randyeEdit/Delete MessageReply w/QuoteDirect Link to This Post
 
quote
Originally posted by shawnkfl:

randy, you're too humble! everything you've done to that car and engine is top notch. i was just staring in awe. next weekend, we'll hear it purr!


Coming from a fellow mechanical engineer and a guy who has built a VERY nice 3.4L engine himself, I am honored by your compliment.

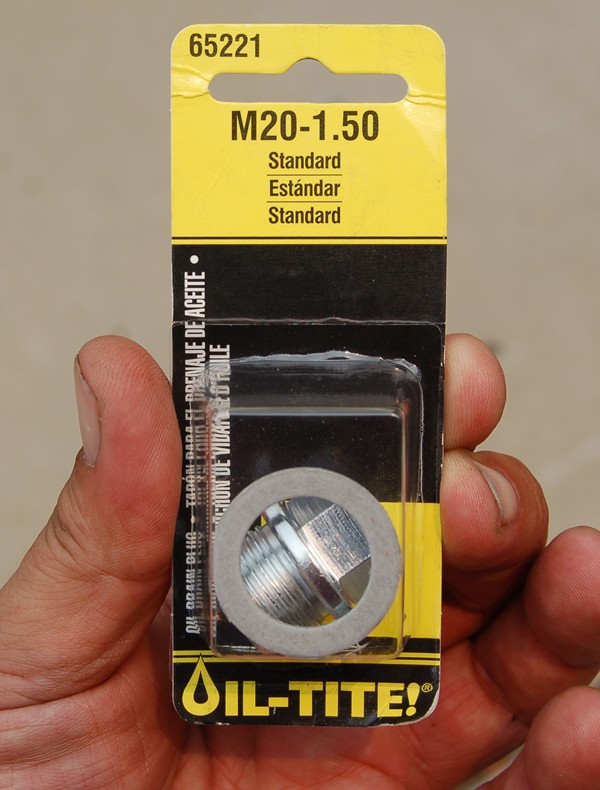
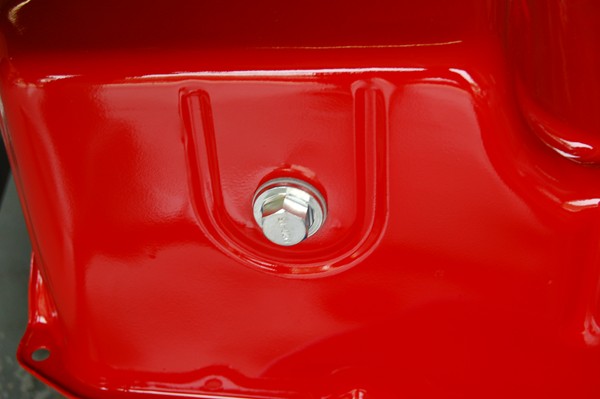
I'm happy we both were able to find the oil pan and block sensor plugs, and even happier that they were so "expensive"
You spent about what?, $6.00 for them?, and they turned out to be commonly stocked, off-the-shelf, items too!
Couldn't have been easier huh?

IP: Logged
shawnkfl
Member
Posts: 2457
From: Largo, Florida
Registered: Oct 2004


Feedback score:    (7)
Leave feedback


Total ratings: 72
Rate this member

Report this Post05-12-2007 09:30 PM Click Here to See the Profile for shawnkflSend a Private Message to shawnkflEdit/Delete MessageReply w/QuoteDirect Link to This Post
i think i have about $6.00 invested in the oil pan plug, crankshaft sensor plug and the cam sensor plug. why people leave the cut sensors in there instead of spending a few bucks is beyond me? i guess it goes along the same line as the bashing in the oil pan method though....it's all in the details.

we're all clear for saturday. i can't wait!

oh...tell kim that my A/C works much better with the vents open...lol. i like the windows down when i drive so i keep the vents closed. it took me a minute to figure out what the "whistling" sound was coming from the dash.
IP: Logged
JimmyS
Member
Posts: 4666
From: Lehigh Acres, Florida
Registered: Apr 2006


Feedback score:    (31)
Leave feedback


Total ratings: 124
Rate this member

Report this Post05-12-2007 10:05 PM Click Here to See the Profile for JimmySClick Here to visit JimmyS's HomePageSend a Private Message to JimmySEdit/Delete MessageReply w/QuoteDirect Link to This Post
Looks spectacular Randye! Can't wait to see it in person.

------------------

My best advice when it comes to your Fiero is to "NOT" do any dealings with www.kitcarman.com

VIAGRA - Strong enough for a man but made for a woman

IP: Logged
shawnkfl
Member
Posts: 2457
From: Largo, Florida
Registered: Oct 2004


Feedback score:    (7)
Leave feedback


Total ratings: 72
Rate this member

Report this Post05-13-2007 11:50 AM Click Here to See the Profile for shawnkflSend a Private Message to shawnkflEdit/Delete MessageReply w/QuoteDirect Link to This Post
randy, i was thinking. lets get a "to do" list going to get ready for the swap next weekend.

i know you need to do:

lifters
pushrods
rockers
gaskets
lock down the oil pump
vacuum lines (new or make them?)
injectors and fuel pressure regulator
manifolds (are you using the ones off the 2.8?)


anything else?
IP: Logged
alex de jorge
Member
Posts: 501
From: Kissimmee, FL
Registered: Nov 2005


Feedback score: (1)
Leave feedback

Rate this member

Report this Post05-13-2007 07:02 PM Click Here to See the Profile for alex de jorgeSend a Private Message to alex de jorgeEdit/Delete MessageReply w/QuoteDirect Link to This Post
Which plugs did you guys get for the crankshaft sensor and the cam sensor plug? I would love to get them out and not leave them there.
IP: Logged
randye
Member
Posts: 13819
From: Florida
Registered: Mar 2006


Feedback score: (1)
Leave feedback


Total ratings: 216
Rate this member

Report this Post05-13-2007 07:26 PM Click Here to See the Profile for randyeClick Here to visit randye's HomePageSend a Private Message to randyeEdit/Delete MessageReply w/QuoteDirect Link to This Post
 
quote
Originally posted by alex de jorge:

Which plugs did you guys get for the crankshaft sensor and the cam sensor plug? I would love to get them out and not leave them there.


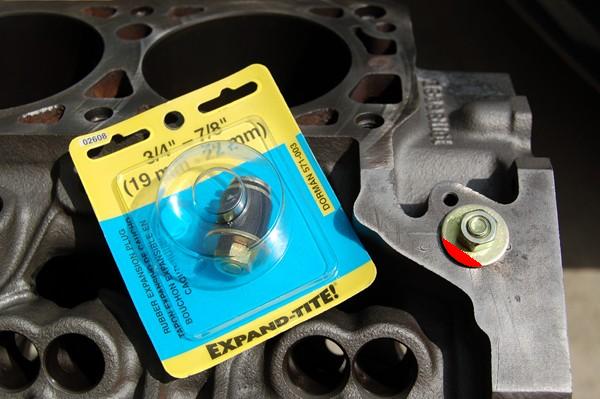
Advance Auto Parts
They are on the shelf:


Dorman 571-003

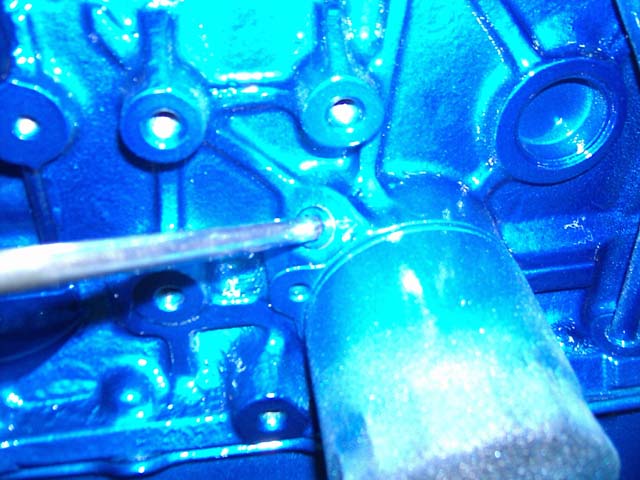
The same plug fits the cam and crank sensor holes.
Trim off the area in red in the photo above so that the cam sensor plug clears the lower intake manifold.
About 2-3 minutes work with a file or a bench grinder.

IP: Logged
PFF
System Bot
randye
Member
Posts: 13819
From: Florida
Registered: Mar 2006


Feedback score: (1)
Leave feedback


Total ratings: 216
Rate this member

Report this Post05-13-2007 07:53 PM Click Here to See the Profile for randyeClick Here to visit randye's HomePageSend a Private Message to randyeEdit/Delete MessageReply w/QuoteDirect Link to This Post

randye

13819 posts
Member since Mar 2006
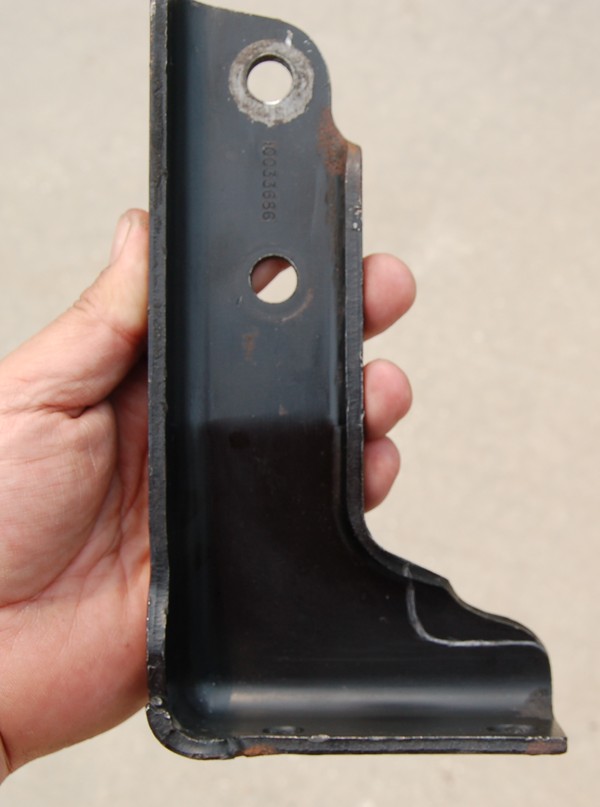
Sardonyx used the expedient method of simply denting in the 3.4 oil pan to clear the Fiero 2.8 motor mount, and I guess thats ok, but I opted for something a little different. (Actually Shawnkfl put me onto this mod)

Here the 2.8 mount is scribed approximately to where it needs to be trimmed to clear the 3.4 oil pan:


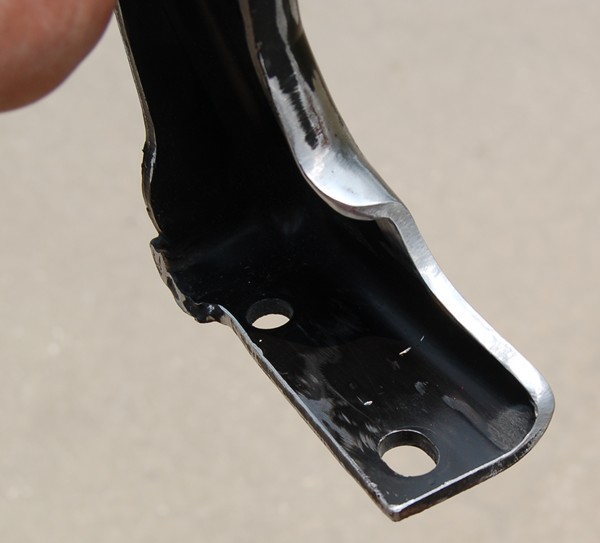
I used a die grinder and a carbide cutter to trim away the corner. Took about 20 - 30 minutes to clean it up:
You can probably do the same thing on a bench grinder as well.


Leave a generous radius and not a square inside corner to prevent creating a stress riser that might crack the mount later.
Just smoothly blend the cut as shown.

The mount bolted to the block and it now clears the oil pan nicely, and so little material is removed I don't think the mount is weakened structurally....should be fine.
I'll remove it and paint now

[This message has been edited by randye (edited 05-13-2007).]

IP: Logged
shawnkfl
Member
Posts: 2457
From: Largo, Florida
Registered: Oct 2004


Feedback score:    (7)
Leave feedback


Total ratings: 72
Rate this member

Report this Post05-13-2007 08:19 PM Click Here to See the Profile for shawnkflSend a Private Message to shawnkflEdit/Delete MessageReply w/QuoteDirect Link to This Post
with the pan installed, it's really easy to see exactly where to trim the engine mount bracket. took me maybe 10 min. with a 4" angle grinder. nice job randy. that red paint is making me second guess my yellow...
IP: Logged
randye
Member
Posts: 13819
From: Florida
Registered: Mar 2006


Feedback score: (1)
Leave feedback


Total ratings: 216
Rate this member

Report this Post05-13-2007 10:35 PM Click Here to See the Profile for randyeClick Here to visit randye's HomePageSend a Private Message to randyeEdit/Delete MessageReply w/QuoteDirect Link to This Post
 
quote
Originally posted by shawnkfl:

that red paint is making me second guess my yellow...


RED IS GOOD

This images is larger than 102400 bytes. Click to view.

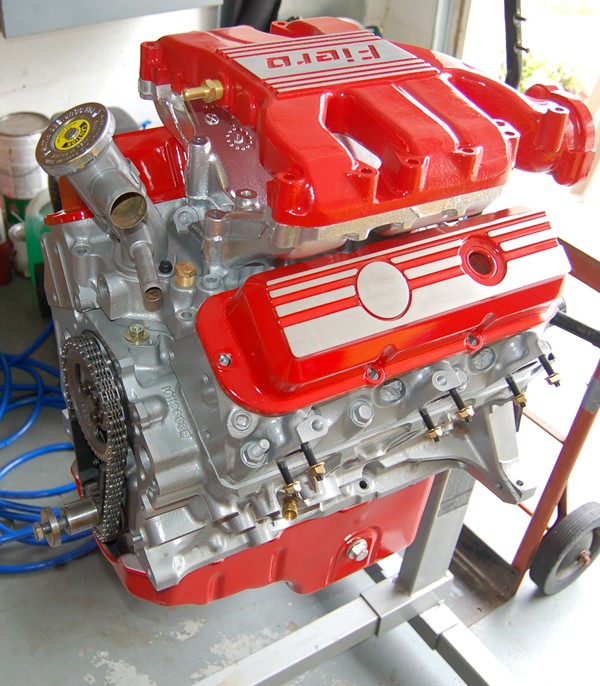
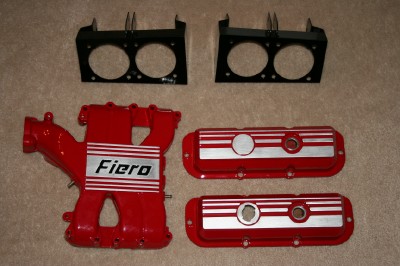
VHT "Universal Red" with VHT Clear to prevent oxidation on the brushed aluminum.
The block, heads, lower and middle manifold and the thermo housing are VHT "Aluminum" also with clear coat over it.

Leave your 3.4 yellow Shawn. It will look great in that black coupe
IP: Logged
David DeVoe
Member
Posts: 1358
From: Grand Blanc, MI US
Registered: Jul 2001


Feedback score: N/A
Leave feedback

Rate this member

Report this Post05-18-2007 11:12 AM Click Here to See the Profile for David DeVoeSend a Private Message to David DeVoeEdit/Delete MessageReply w/QuoteDirect Link to This Post
bump
IP: Logged
civicduty13
Member
Posts: 342
From: Sioux Falls, South Dakota USA
Registered: Jul 2004


Feedback score: N/A
Leave feedback

Rate this member

Report this Post05-18-2007 12:41 PM Click Here to See the Profile for civicduty13Click Here to visit civicduty13's HomePageSend a Private Message to civicduty13Edit/Delete MessageReply w/QuoteDirect Link to This Post
 
quote
Originally posted by randye:


NO You do not have to dent the oil pan.

If you have an 87 or 88 timing cover, the 3.4 oil pan will mate up to it just fine.

If you have an 86 or earlier timing cover you will need to use the 2.8 oil pan and dipstick. The 2.8 oil pan is shallower than the 3.4 I believe. You'll get a false oil level reading from the 3.4 dipstick in the 2.8 pan.

You need to remove about 1.5 square inches of metal from the front motor mount on the short part of the "L" shape to clear the corner of the 3.4 original oil pan. This is not necessary on the 2.8 pan. The trimmed off metal allows the 3.4 pan to fit nicely and it's such a small trim it doesn't really affect the structural integrity of the motor mount.

I'll be trimming my motor mount tomorrow and I'll try to post some photos this weekend.


so with this info, is there a difference in the 2.8 pump and the 3.4 pump?? or is it just the pickup tube??

IP: Logged
randye
Member
Posts: 13819
From: Florida
Registered: Mar 2006


Feedback score: (1)
Leave feedback


Total ratings: 216
Rate this member

Report this Post05-18-2007 09:21 PM Click Here to See the Profile for randyeClick Here to visit randye's HomePageSend a Private Message to randyeEdit/Delete MessageReply w/QuoteDirect Link to This Post
 
quote
Originally posted by civicduty13:


so with this info, is there a difference in the 2.8 pump and the 3.4 pump?? or is it just the pickup tube??


I believe that the 3.4 oil pump is a high volume pump (as well as the pick-up tube being slightly different.)
The 2.8 and 3.4 pump housings appear to be otherwise identical.
IP: Logged
sardonyx247
Member
Posts: 5032
From: Nevada, USA
Registered: Jun 2003


Feedback score:    (88)
Leave feedback


Total ratings: 218
Rate this member

Report this Post05-20-2007 10:54 PM Click Here to See the Profile for sardonyx247Click Here to visit sardonyx247's HomePageSend a Private Message to sardonyx247Edit/Delete MessageReply w/QuoteDirect Link to This Post
A high volume pump usually has longer gears. As far as the outside goes I have no idea.
IP: Logged
alex de jorge
Member
Posts: 501
From: Kissimmee, FL
Registered: Nov 2005


Feedback score: (1)
Leave feedback

Rate this member

Report this Post05-26-2007 08:01 PM Click Here to See the Profile for alex de jorgeSend a Private Message to alex de jorgeEdit/Delete MessageReply w/QuoteDirect Link to This Post
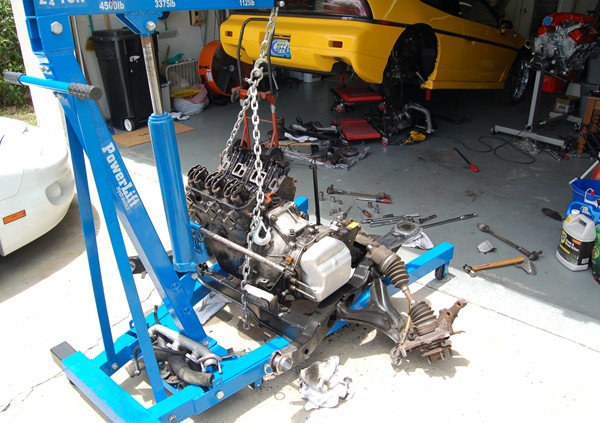
Well, it been a long time since I have done an update. Today, with the help of Eli, I got the timing chain done(the small sprocket was a PITA to get off), as well as the rod and main bearings. Also, got the flywheel off and the new installed, the same with the rear main seal and the timing cover seal. Things should start to pick up as far as putting everything together. I still have a few things that have to get painted.
IP: Logged
randye
Member
Posts: 13819
From: Florida
Registered: Mar 2006


Feedback score: (1)
Leave feedback


Total ratings: 216
Rate this member

Report this Post05-27-2007 12:12 AM Click Here to See the Profile for randyeClick Here to visit randye's HomePageSend a Private Message to randyeEdit/Delete MessageReply w/QuoteDirect Link to This Post
Great to hear you're making progress Alex !!

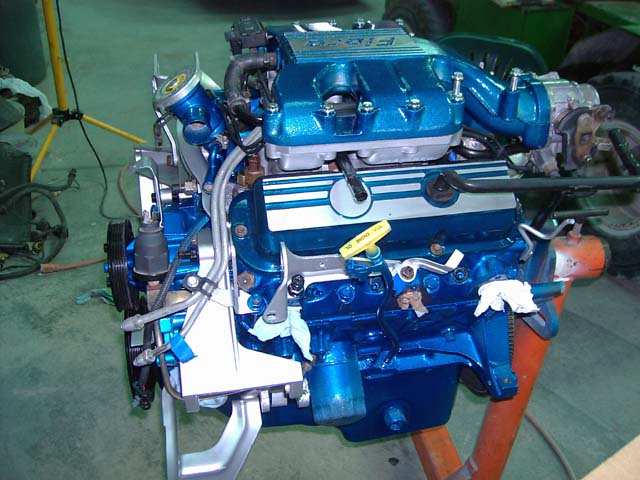
Since the following photo was taken I have the old engine and trans off the cradle and the cradle is completely stripped down.
I have new polyurethane cradle and A-arm bushings going in once the cradle is cleaned and painted and new tie rods and ball joints going in too.
New Pioneer motor mount and trans mounts are going on also. Found out that my front trans mount was broken and had been since I bought the car. Explains the *clunk* I sometimes had when putting the car in reverse!


The new 3.4 is on the stand in the garage waiting to go on the cradle.
I got the trans cleaned up more today as well as a lot of brackets and misc. parts. Tomorrow should be "paint" day for the cradle and trans and A-arms and then reassembly can start

Hope to have it all back in and running by next weekend.
I did say I work slow ....

Randy

[This message has been edited by randye (edited 05-27-2007).]

IP: Logged
alex de jorge
Member
Posts: 501
From: Kissimmee, FL
Registered: Nov 2005


Feedback score: (1)
Leave feedback

Rate this member

Report this Post05-27-2007 05:49 AM Click Here to See the Profile for alex de jorgeSend a Private Message to alex de jorgeEdit/Delete MessageReply w/QuoteDirect Link to This Post
Randy,

Your project is coming along nicely. You should be very proud.
IP: Logged
PFF
System Bot
yellowstone
Member
Posts: 9299
From: Düsseldorf/Germany
Registered: Jun 2003


Feedback score: N/A
Leave feedback


Total ratings: 250
Rate this member

Report this Post05-27-2007 06:35 AM Click Here to See the Profile for yellowstoneSend a Private Message to yellowstoneEdit/Delete MessageReply w/QuoteDirect Link to This Post
Looks beautiful - misfortune sparked a great project here!
IP: Logged
randye
Member
Posts: 13819
From: Florida
Registered: Mar 2006


Feedback score: (1)
Leave feedback


Total ratings: 216
Rate this member

Report this Post05-27-2007 09:37 AM Click Here to See the Profile for randyeClick Here to visit randye's HomePageSend a Private Message to randyeEdit/Delete MessageReply w/QuoteDirect Link to This Post
 
quote
Originally posted by yellowstone:

Looks beautiful - misfortune sparked a great project here!


You just like it because it's yellow

When are you going to show all those new parts on your engine?
IP: Logged
yellowstone
Member
Posts: 9299
From: Düsseldorf/Germany
Registered: Jun 2003


Feedback score: N/A
Leave feedback


Total ratings: 250
Rate this member

Report this Post05-27-2007 01:10 PM Click Here to See the Profile for yellowstoneSend a Private Message to yellowstoneEdit/Delete MessageReply w/QuoteDirect Link to This Post
I have to pass TUV (technical and emissions inspections) in June. I'll do this afterwards...

 
quote
Originally posted by randye:


You just like it because it's yellow

When are you going to show all those new parts on your engine?


IP: Logged
alex de jorge
Member
Posts: 501
From: Kissimmee, FL
Registered: Nov 2005


Feedback score: (1)
Leave feedback

Rate this member

Report this Post05-29-2007 10:51 PM Click Here to See the Profile for alex de jorgeSend a Private Message to alex de jorgeEdit/Delete MessageReply w/QuoteDirect Link to This Post
OK. The only thing done today was the installations of the timning chain dampner. The one that came with the engine was pretty worn. I am waiting for my new oil pump, flywheel bolts and oil pan gasket to come in. I also stripped the middle and lower intake and they'll be painted tomorrow.
IP: Logged
civicduty13
Member
Posts: 342
From: Sioux Falls, South Dakota USA
Registered: Jul 2004


Feedback score: N/A
Leave feedback

Rate this member

Report this Post05-30-2007 11:34 AM Click Here to See the Profile for civicduty13Click Here to visit civicduty13's HomePageSend a Private Message to civicduty13Edit/Delete MessageReply w/QuoteDirect Link to This Post
all i can say is that this thread has helped me out a lot. I will be doing my swap this weekend and have already used a lot of the info off here to purchase parts. I wont be doing a lot of the painting and all that stuff but I did do all new bearings, piston rings, oil pump, cam, timing chain and will be porting a set of exhaust manifolds today. I will post up my choice of color for the plenum and valve covers after I get it painted. Hehe

Do you have to get an adapter for the oil pressure sender if you arent using ac??
IP: Logged
randye
Member
Posts: 13819
From: Florida
Registered: Mar 2006


Feedback score: (1)
Leave feedback


Total ratings: 216
Rate this member

Report this Post05-30-2007 02:16 PM Click Here to See the Profile for randyeClick Here to visit randye's HomePageSend a Private Message to randyeEdit/Delete MessageReply w/QuoteDirect Link to This Post
 
quote
Originally posted by civicduty13:

all i can say is that this thread has helped me out a lot. I will be doing my swap this weekend and have already used a lot of the info off here to purchase parts. I wont be doing a lot of the painting and all that stuff but I did do all new bearings, piston rings, oil pump, cam, timing chain and will be porting a set of exhaust manifolds today. I will post up my choice of color for the plenum and valve covers after I get it painted. Hehe

Do you have to get an adapter for the oil pressure sender if you arent using ac??


I'm really happy that maybe some of the engine overhaul posts have been helpful for you. You never really know sometimes if what you post is helpful or just repeating already well known stuff.

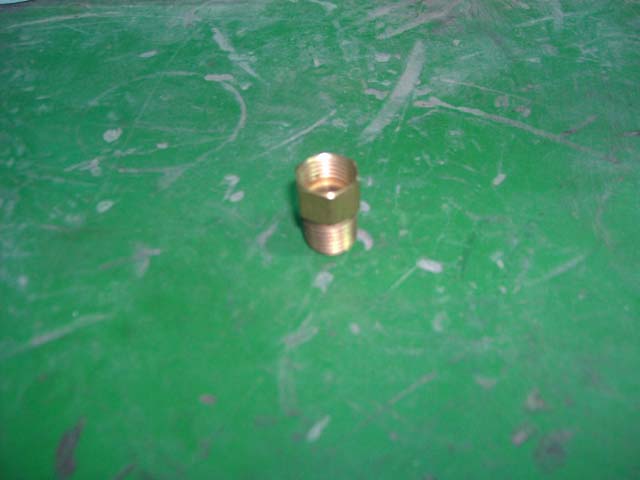
As far as the oil pressure sender adapter, it depends on what oil pressure sender you have. I know that the one from the 2.8 with A/C will not fit into the threads on the 3.4 block, (big size difference). If you have a sending unit from a non-A/C 2.8 it might fit, but I don't have one to verify that with. The threads in the 3.4 block for the pressure sender are 1/4 NPT.
If you end up needing an adapter, it's no sweat at all. Home Depot, Lowes, Ace Hardware or any good hardware place should have a whole range of brass fittings for you to find something.
For my adapter, (car with A/C), I used a 1/4 NPT male to 5/16 female flare fitting, cost approx. 90 cents

IP: Logged
sardonyx247
Member
Posts: 5032
From: Nevada, USA
Registered: Jun 2003


Feedback score:    (88)
Leave feedback


Total ratings: 218
Rate this member

Report this Post05-30-2007 03:08 PM Click Here to See the Profile for sardonyx247Click Here to visit sardonyx247's HomePageSend a Private Message to sardonyx247Edit/Delete MessageReply w/QuoteDirect Link to This Post
 
quote
Originally posted by civicduty13:

Do you have to get an adapter for the oil pressure sender if you arent using ac??


There is a adapter for the oil sender if you have A/C.
You can get one at Pep Boys, MotorMite# 43228, it is labeled 5/16" to 1/4".


This plug is where the above adapter goes, a 1/4in extention fits the hole perfect


------------------
"DRIVE IT LIKE A FIERO"
'84 Fiero, engine to be determined
'87Blue GT 3.4L Swap Completed!!!!!!!!
Las Vegas Fiero Club
Fiero Road Club Of Northern Nevada

IP: Logged
David DeVoe
Member
Posts: 1358
From: Grand Blanc, MI US
Registered: Jul 2001


Feedback score: N/A
Leave feedback

Rate this member

Report this Post05-30-2007 07:59 PM Click Here to See the Profile for David DeVoeSend a Private Message to David DeVoeEdit/Delete MessageReply w/QuoteDirect Link to This Post
Randy,
I have a similiar project going, but although I will be replacing the engine in my 86GT, the main goal is to replace a badly rusted cradle. I will be installing a low mile, completely regasketed and painted 2.8. After following this thread I'm wishing I had put all that time and effort into a 3.4. Oh well, next time maybe. Great job, great thread.
IP: Logged
civicduty13
Member
Posts: 342
From: Sioux Falls, South Dakota USA
Registered: Jul 2004


Feedback score: N/A
Leave feedback

Rate this member

Report this Post05-30-2007 08:42 PM Click Here to See the Profile for civicduty13Click Here to visit civicduty13's HomePageSend a Private Message to civicduty13Edit/Delete MessageReply w/QuoteDirect Link to This Post
 
quote
Originally posted by sardonyx247:


There is a adapter for the oil sender if you have A/C.
You can get one at Pep Boys, MotorMite# 43228, it is labeled 5/16" to 1/4".


This plug is where the above adapter goes, a 1/4in extention fits the hole perfect


do you have any pics of the sender put in place?? this is great.
IP: Logged
sardonyx247
Member
Posts: 5032
From: Nevada, USA
Registered: Jun 2003


Feedback score:    (88)
Leave feedback


Total ratings: 218
Rate this member

Report this Post05-30-2007 10:05 PM Click Here to See the Profile for sardonyx247Click Here to visit sardonyx247's HomePageSend a Private Message to sardonyx247Edit/Delete MessageReply w/QuoteDirect Link to This Post
 
quote
Originally posted by civicduty13:


do you have any pics of the sender put in place?? this is great.


You can kinda see the oil press. sensor in these pics.
 
quote
Originally posted by sardonyx247 ON PAGE 3:


quote
Originally posted by David DeVoe:

great thread.


Thanks

------------------
"DRIVE IT LIKE A FIERO"
'84 Fiero, engine to be determined
'87Blue GT 3.4L Swap Completed!!!!!!!!
Las Vegas Fiero Club
Fiero Road Club Of Northern Nevada

IP: Logged
PFF
System Bot
alex de jorge
Member
Posts: 501
From: Kissimmee, FL
Registered: Nov 2005


Feedback score: (1)
Leave feedback

Rate this member

Report this Post05-30-2007 10:06 PM Click Here to See the Profile for alex de jorgeSend a Private Message to alex de jorgeEdit/Delete MessageReply w/QuoteDirect Link to This Post
Today I painted the middle and lower intakes and timing cover. I also got a call form the powder coater, he's got my plenum, valver covers and headlight buckets ready to be picked up. As soon as I do and get a chance, I'll post pics.
IP: Logged
civicduty13
Member
Posts: 342
From: Sioux Falls, South Dakota USA
Registered: Jul 2004


Feedback score: N/A
Leave feedback

Rate this member

Report this Post05-31-2007 01:29 AM Click Here to See the Profile for civicduty13Click Here to visit civicduty13's HomePageSend a Private Message to civicduty13Edit/Delete MessageReply w/QuoteDirect Link to This Post
 
quote
Originally posted by sardonyx247:


Thanks


awesome. so it is just a tube that the sender goes into. I havent looked at my fiero in about 3 weeks and really had no idea how that worked. Thank you again.


IP: Logged
alex de jorge
Member
Posts: 501
From: Kissimmee, FL
Registered: Nov 2005


Feedback score: (1)
Leave feedback

Rate this member

Report this Post05-31-2007 05:29 PM Click Here to See the Profile for alex de jorgeSend a Private Message to alex de jorgeEdit/Delete MessageReply w/QuoteDirect Link to This Post
I just picked up the plenum and valve covers along with the headlight buckets and they look amazing. I'll post pics later.

OK. Here they are.


[This message has been edited by alex de jorge (edited 05-31-2007).]

IP: Logged
JimmyS
Member
Posts: 4666
From: Lehigh Acres, Florida
Registered: Apr 2006


Feedback score:    (31)
Leave feedback


Total ratings: 124
Rate this member

Report this Post06-01-2007 12:09 AM Click Here to See the Profile for JimmySClick Here to visit JimmyS's HomePageSend a Private Message to JimmySEdit/Delete MessageReply w/QuoteDirect Link to This Post
Looks great Alex!

------------------

My best advice when it comes to your Fiero is to "NOT" do any dealings with www.kitcarman.com

VIAGRA - Strong enough for a man but made for a woman

IP: Logged
alex de jorge
Member
Posts: 501
From: Kissimmee, FL
Registered: Nov 2005


Feedback score: (1)
Leave feedback

Rate this member

Report this Post06-01-2007 08:12 AM Click Here to See the Profile for alex de jorgeSend a Private Message to alex de jorgeEdit/Delete MessageReply w/QuoteDirect Link to This Post
Thanks JimmyS,

All of my parts are finally starting to come together. I hope to start putting the engine back together by next week. I so excited!
IP: Logged
randye
Member
Posts: 13819
From: Florida
Registered: Mar 2006


Feedback score: (1)
Leave feedback


Total ratings: 216
Rate this member

Report this Post06-01-2007 09:05 AM Click Here to See the Profile for randyeClick Here to visit randye's HomePageSend a Private Message to randyeEdit/Delete MessageReply w/QuoteDirect Link to This Post
Cleaning, repairing and prepping parts is the hard part.
The real fun begins when you get to start putting it all back together
Looks like you're doing a nice clean professional looking job Alex. Keep up the great work!
Wish I had powder coated my headlight buckets from Timo like you did. Looks like they came out great.
IP: Logged
alex de jorge
Member
Posts: 501
From: Kissimmee, FL
Registered: Nov 2005


Feedback score: (1)
Leave feedback

Rate this member

Report this Post06-01-2007 02:35 PM Click Here to See the Profile for alex de jorgeSend a Private Message to alex de jorgeEdit/Delete MessageReply w/QuoteDirect Link to This Post
 
quote
Originally posted by randye:

Cleaning, repairing and prepping parts is the hard part.
The real fun begins when you get to start putting it all back together
Looks like you're doing a nice clean professional looking job Alex. Keep up the great work!
Wish I had powder coated my headlight buckets from Timo like you did. Looks like they came out great.


They did. I am quite happy with them. They look so nice. I am waiting for the headlights to come. When I placed my order some of the items I ordered where on back order.
IP: Logged
alex de jorge
Member
Posts: 501
From: Kissimmee, FL
Registered: Nov 2005


Feedback score: (1)
Leave feedback

Rate this member

Report this Post06-04-2007 05:20 PM Click Here to See the Profile for alex de jorgeSend a Private Message to alex de jorgeEdit/Delete MessageReply w/QuoteDirect Link to This Post
OK, I need some help here. Trying to get my flywheel on, I noticed that the bolts that came with the engine and the new flywheel are not working out too well. The bolts are not long enough. Can anyone tell me exactly what size and length bolt I need and also where can I get them? I have been to every auto parts store with no avail.

thanks
IP: Logged
sardonyx247
Member
Posts: 5032
From: Nevada, USA
Registered: Jun 2003


Feedback score:    (88)
Leave feedback


Total ratings: 218
Rate this member

Report this Post06-04-2007 05:26 PM Click Here to See the Profile for sardonyx247Click Here to visit sardonyx247's HomePageSend a Private Message to sardonyx247Edit/Delete MessageReply w/QuoteDirect Link to This Post
 
quote
Originally posted by alex de jorge:

OK, I need some help here. Trying to get my flywheel on, I noticed that the bolts that came with the engine and the new flywheel are not working out too well. The bolts are not long enough. Can anyone tell me exactly what size and length bolt I need and also where can I get them? I have been to every auto parts store with no avail.

thanks


It sounds like you got 'flexplate bolts' instead of 'flywheel bolts' for the auto vs stick. I think I have seen them in the "help" section at autoparts stores.


edit:should be m10x1x23 but it has to be a HARD bolt like 11.?

------------------
"DRIVE IT LIKE A FIERO"
'84 Fiero, engine to be determined
'87Blue GT 3.4L Swap Completed!!!!!!!!
Las Vegas Fiero Club
Fiero Road Club Of Northern Nevada

[This message has been edited by sardonyx247 (edited 06-04-2007).]

IP: Logged
Previous Page | Next Page

This topic is 16 pages long:  1   2   3   4   5   6   7   8   9   10   11   12   13   14   15   16 
next newest topic | next oldest topic

All times are ET (US)

Post New Topic  Post A Reply
Hop to:

Contact Us | Back To Main Page

Advertizing on PFF | Fiero Parts Vendors
PFF Merchandise | Fiero Gallery | Ogre's Cave
Real-Time Chat | Fiero Related Auctions on eBay


Copyright (c) 1999, C. Pennock