Pennock's Fiero Forum
  The Construction Zone
  Project XTC - The Rehabilitation! (Page 3)

Post New Topic  Post A Reply
Email This Page to Someone! | Printable Version

This topic is 12 pages long:  1   2   3   4   5   6   7   8   9   10   11   12 
Previous Page | Next Page
next newest topic | next oldest topic
Project XTC - The Rehabilitation! by katatak
Started on: 03-14-2009 05:57 PM
Replies: 466 (20917 views)
Last post by: Marine1981 on 10-14-2011 11:47 PM
katatak
Member
Posts: 7136
From: Omaha, NE USA
Registered: Apr 2008


Feedback score:    (8)
Leave feedback


Total ratings: 82
Rate this member

Report this Post05-06-2009 08:47 PM Click Here to See the Profile for katatakSend a Private Message to katatakEdit/Delete MessageReply w/QuoteDirect Link to This Post
More fun with the XTC.

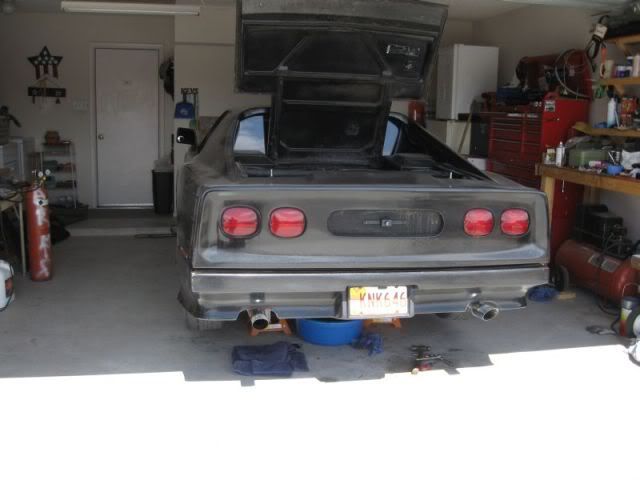
Had some code problems so I thought I'd try and clear it up today. I cleared the codes and installed a new MAP and TPS sensor. Was getting code 23 and 34. Fired it up and the SES light came on in ess than a minute. Code 33????? Then I found that I forgot to hook up the vac line to the MAP - DOH! Cleared the codes, fired it up and after 3 minutes I get code 23. So it is either the MAT or the Mixture Control Solenoid. I am guessing but based on the amount of fuel coming from the injector at idle, I am going with the Mixture Control Solenoid first. I do not have a clue where it's located but I will find it.

Check this out - I almost fell over when I found this. New TPS


Wow - Page 3 ownage too!

[This message has been edited by katatak (edited 05-06-2009).]

IP: Logged
Frizlefrak
Member
Posts: 2921
From: El Paso, Texas
Registered: Aug 2003


Feedback score: (5)
Leave feedback


Total ratings: 72
Rate this member

Report this Post05-07-2009 01:14 AM Click Here to See the Profile for FrizlefrakSend a Private Message to FrizlefrakEdit/Delete MessageReply w/QuoteDirect Link to This Post
Pat...you sure that isn't a NOS piece made in the 80's? I didn't know China had a province called USA ( prounounced OOO-sah)
IP: Logged
katatak
Member
Posts: 7136
From: Omaha, NE USA
Registered: Apr 2008


Feedback score:    (8)
Leave feedback


Total ratings: 82
Rate this member

Report this Post05-07-2009 02:23 AM Click Here to See the Profile for katatakSend a Private Message to katatakEdit/Delete MessageReply w/QuoteDirect Link to This Post
 
quote
Originally posted by Frizlefrak:

Pat...you sure that isn't a NOS piece made in the 80's? I didn't know China had a province called USA ( prounounced OOO-sah)


Now thats funny right there. "Made in U.S.A" or "Made in OOO-sah - province of China".

The box says "Wells" - and I have never heard of them. It's probably just the case that is made here - then shipped off to china for assembly. Seems to have sured my TPS error code though - at least for now.

IP: Logged
katatak
Member
Posts: 7136
From: Omaha, NE USA
Registered: Apr 2008


Feedback score:    (8)
Leave feedback


Total ratings: 82
Rate this member

Report this Post05-07-2009 11:45 PM Click Here to See the Profile for katatakSend a Private Message to katatakEdit/Delete MessageReply w/QuoteDirect Link to This Post

katatak

7136 posts
Member since Apr 2008
Thursday Night!

Was getting a code 23 so I replaced the MAT sensor - no more codes. Also installed a coolant temp switch and temp sensor. To recap, I replaced:

The TPS, MAP, MAT, Temp Sensor, Coolant Temp switch (fan). I was able to rebuild the dash and installed a tach and temp/fuel gauge and replaced the speedo with working trip ODO - transplanted the original Odometer, replaced the printed circuit sheet on the back and replaced / checked all the dash bulbs. We now have everything in the dash working, no codes, a wroking temp gauge, a working Tach and a working OP gauge. Only cost about 100.00 in parts and sensors. Made sure that the fan switch worked - I let the car heat up and at 220 the fan kicks on the car cools to 190, the fan shuts off.

We got the rest of the car buttoned up and took it for a little test (60 miles) drive and never got hot enough to kick the fan on. My home alignment works great - no tire squealing, no pulling, no darting, etc. I'm still going to take it to the alignment shop to get her as close to perfect as possible. She runs great and drives so much better with all new poly all the way around, new shocks up front and new struts in the back. I love it when all that hard work pays off.
IP: Logged
Frizlefrak
Member
Posts: 2921
From: El Paso, Texas
Registered: Aug 2003


Feedback score: (5)
Leave feedback


Total ratings: 72
Rate this member

Report this Post05-08-2009 01:13 AM Click Here to See the Profile for FrizlefrakSend a Private Message to FrizlefrakEdit/Delete MessageReply w/QuoteDirect Link to This Post
I love it when a plan comes together.
IP: Logged
katatak
Member
Posts: 7136
From: Omaha, NE USA
Registered: Apr 2008


Feedback score:    (8)
Leave feedback


Total ratings: 82
Rate this member

Report this Post05-08-2009 09:23 PM Click Here to See the Profile for katatakSend a Private Message to katatakEdit/Delete MessageReply w/QuoteDirect Link to This Post
Got it into the alignment shop today. All done and it drives great. Tomorrow - new skins......Almost done!
IP: Logged
katatak
Member
Posts: 7136
From: Omaha, NE USA
Registered: Apr 2008


Feedback score:    (8)
Leave feedback


Total ratings: 82
Rate this member

Report this Post05-29-2009 08:27 PM Click Here to See the Profile for katatakSend a Private Message to katatakEdit/Delete MessageReply w/QuoteDirect Link to This Post
Well I have been out of town for the last 3 weeks - no time to work on the XTC till this evening. Last weekend, I took it to the gas station to fill it up (only filled it twice). This time, I heard a splashing noise under the car when the pump shut off. I looked underneath and there was gas dripping off the tank. I got it home, jacked it up but I could not tell exactly where it was leaking. I tightened all the hose clamps but then ran out of time. It looked like it was coming from the top of the tank.

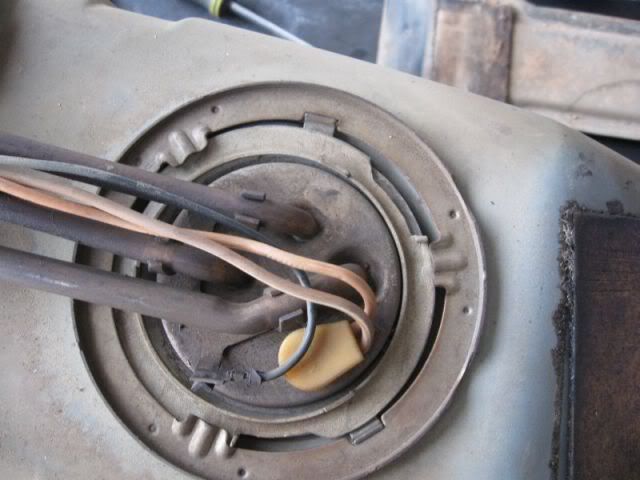
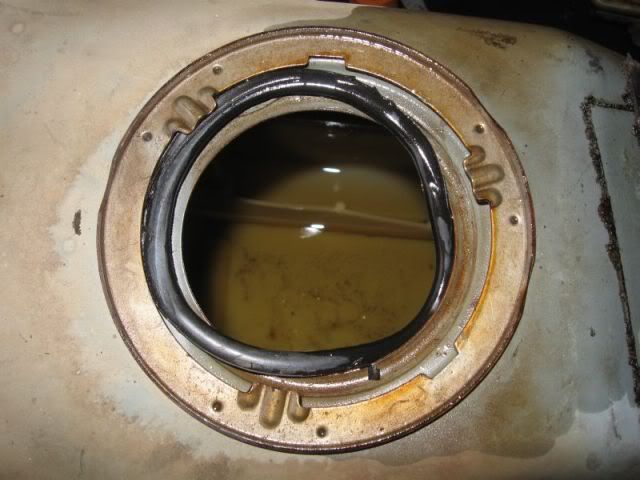
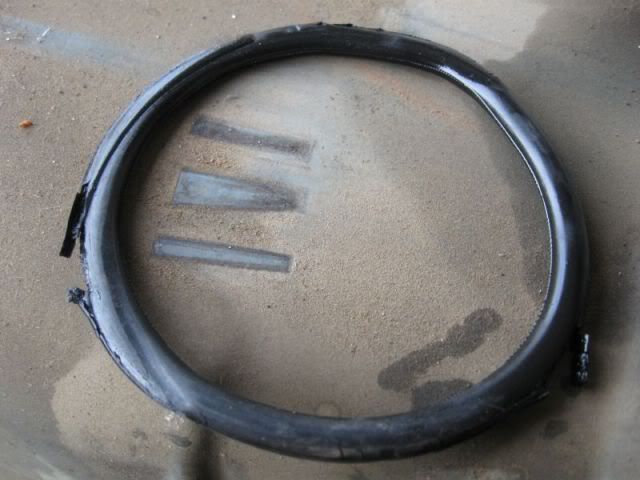
This evening, I had my boy pour some gas out of a can in the car while I watched under the car. Sure enough, gas was leaking from the top of the tank. I pulled the tank out and found that the locking ring for the pump was offset. When I pulled the pump out, I found that the O Ring seal was goofed up. Not sure if the PO replaced the pump or not but the tank had been out of the car sometime in it's past.

So now I just have to decide if it is worth getting a new pump while it is apart. Anyone have any suggestions on brand? I'll be searching the web tonight! More later.


IP: Logged
FieroMaster88
Member
Posts: 7680
From: Mattawan, MI
Registered: Nov 2000


Feedback score:    (43)
Leave feedback


Total ratings: 168
Rate this member

Report this Post05-29-2009 10:36 PM Click Here to See the Profile for FieroMaster88Send a Private Message to FieroMaster88Edit/Delete MessageReply w/QuoteDirect Link to This Post
I would throw a new pump in there if it was me. Get a factory replacement/AC Delco pump.

------------------

88 Coupe: Modded 4.9L V8 5 speed
www.geocities.com/fast88fiero

IP: Logged
katatak
Member
Posts: 7136
From: Omaha, NE USA
Registered: Apr 2008


Feedback score:    (8)
Leave feedback


Total ratings: 82
Rate this member

Report this Post05-30-2009 04:24 PM Click Here to See the Profile for katatakSend a Private Message to katatakEdit/Delete MessageReply w/QuoteDirect Link to This Post
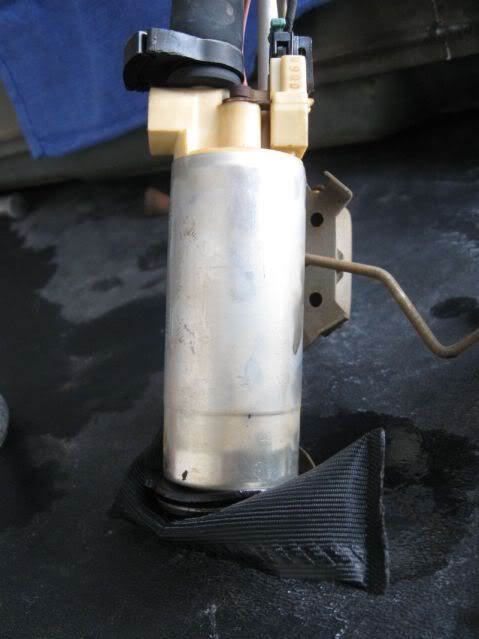
Installed a new pump, screen and fuel filter today. Back up and running now. Found something interesting. The fuel filter was installed backwards. Maybe it's me but with the new pump and filter, it seems to run a lot better. Of course it would not be a Fiero if I did not run into "other" issues.

As I had the car up in the air, I noticed a coolant leak up front. Found the overflow tank to be - well "overflowing". I removed the rad cap and found the gasket to be messed up. Most likely allowing coolant to leak by and drain into the overflow tank while the back end was up in the air. I picked up a new cap and am hoping the car will run a little cooler now.

When I drove it to the parts store to get the new cap, I could hear a "squealing" coming from the engine compartment. My first thought was alternator. Some checking with a stethascope shows that it is the belt slipping. Back to the parts store for a new belt now. It never ends.

Edit to add: Forgot to add, before I reinstalled the tank, I put a half a gallon of gas in it and turned it upside down to check the seal. New seal works fine but I found that the "return" line leaks where it goes through the monuting plate - not much but it did get "wet" with gas. I'll be hunting for another unit to replace it with.

[This message has been edited by katatak (edited 05-30-2009).]

IP: Logged
Carver1
Member
Posts: 2843
From: Edgewood, New Mexico
Registered: Nov 2000


Feedback score:    (11)
Leave feedback


Total ratings: 62
Rate this member

Report this Post05-30-2009 05:07 PM Click Here to See the Profile for Carver1Send a Private Message to Carver1Edit/Delete MessageReply w/QuoteDirect Link to This Post
Hey Pat. If you find any parts you need at AutoZone, let me know. I got a connection here at home. You are still more than welcome to my 88 for research or spares. Looks like I may end up keeping/building it. It will be down the road though. I will be replacing the pump with a higher capacity one, so the stock one here is available, as well as any duke parts. You know my number...
IP: Logged
katatak
Member
Posts: 7136
From: Omaha, NE USA
Registered: Apr 2008


Feedback score:    (8)
Leave feedback


Total ratings: 82
Rate this member

Report this Post05-30-2009 09:26 PM Click Here to See the Profile for katatakSend a Private Message to katatakEdit/Delete MessageReply w/QuoteDirect Link to This Post
 
quote
Originally posted by Carver1:

Hey Pat. If you find any parts you need at AutoZone, let me know. I got a connection here at home. You are still more than welcome to my 88 for research or spares. Looks like I may end up keeping/building it. It will be down the road though. I will be replacing the pump with a higher capacity one, so the stock one here is available, as well as any duke parts. You know my number...


I really need to load up some parts and come your way. Next weekend, I am going to clean out my "Fiero" shed. Anything in there is yours. I'll send you a list of what I got. I have those GT seats set aside for you too. All I really need for the XTC is a auto shift surround.

Going out to change an idler pulley on the XTC now - yipee.......

Later

IP: Logged
PFF
System Bot
katatak
Member
Posts: 7136
From: Omaha, NE USA
Registered: Apr 2008


Feedback score:    (8)
Leave feedback


Total ratings: 82
Rate this member

Report this Post05-30-2009 11:56 PM Click Here to See the Profile for katatakSend a Private Message to katatakEdit/Delete MessageReply w/QuoteDirect Link to This Post

katatak

7136 posts
Member since Apr 2008
Satruday evening update!

As I was installing the new idler (the old one definitely had a bad bearing), I found that the Alt. was very loose (mounts). As I messed with it, it fell off it's mount! The bottom bolt was broke in the middle, the front upper was actually "worn" in two and the rear bracket that bolts to the manifold was missing. I found it laying on top the exhaust heat shield (source of an annoying rattle). I decided that since it was "out" anyway, I'd install a new one. Went ahead ond got a lifetime warranty one. Got it all back together and running again. Only spent about 250.00 this weekend on it.
IP: Logged
katatak
Member
Posts: 7136
From: Omaha, NE USA
Registered: Apr 2008


Feedback score:    (8)
Leave feedback


Total ratings: 82
Rate this member

Report this Post05-31-2009 01:56 PM Click Here to See the Profile for katatakSend a Private Message to katatakEdit/Delete MessageReply w/QuoteDirect Link to This Post
I found a place that does State Inspections on Sunday and i am happy to report that the XTC passed and is now ready for daily driving. Just a few more projects to finish up and I can move on the the next project. Here's the short list:

1. AC repair - needs a compressor, accumulator and new orifice tube - flush the system out and recharge.

2. Install new door glass, power windows, power locks with remote entry, rebuild the door hinges and new dew wipes in and out.

3. Paint job.

I can see the light at the end of the tunnel.

Pat
IP: Logged
N3M3S1S
Member
Posts: 3865
From: Dover, DE
Registered: Dec 2007


Feedback score:    (6)
Leave feedback


Total ratings: 51
Rate this member

Report this Post05-31-2009 02:19 PM Click Here to See the Profile for N3M3S1SSend a Private Message to N3M3S1SEdit/Delete MessageReply w/QuoteDirect Link to This Post
Don't ya hate it when that light comes with a price tag? haha.
IP: Logged
Carver1
Member
Posts: 2843
From: Edgewood, New Mexico
Registered: Nov 2000


Feedback score:    (11)
Leave feedback


Total ratings: 62
Rate this member

Report this Post05-31-2009 02:47 PM Click Here to See the Profile for Carver1Send a Private Message to Carver1Edit/Delete MessageReply w/QuoteDirect Link to This Post
 
quote
Originally posted by katatak:

I can see the light at the end of the tunnel.

Pat


Make sure that light isn't attached to the front of a train.

IP: Logged
katatak
Member
Posts: 7136
From: Omaha, NE USA
Registered: Apr 2008


Feedback score:    (8)
Leave feedback


Total ratings: 82
Rate this member

Report this Post06-26-2009 05:20 PM Click Here to See the Profile for katatakSend a Private Message to katatakEdit/Delete MessageReply w/QuoteDirect Link to This Post
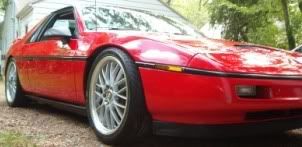
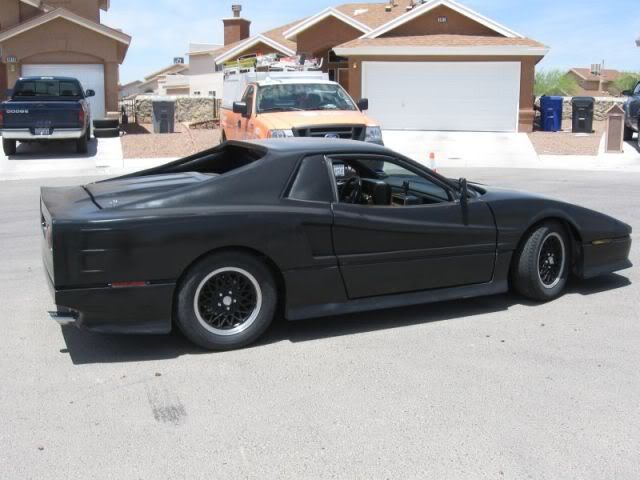
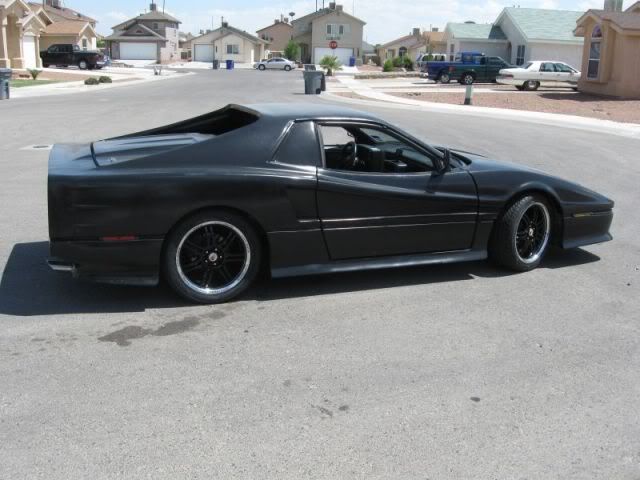
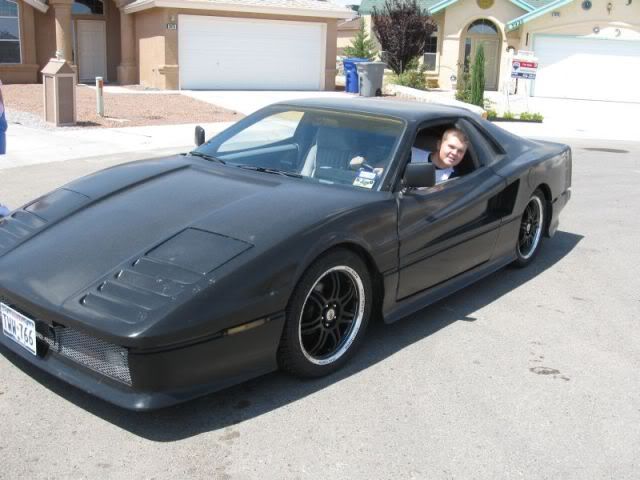
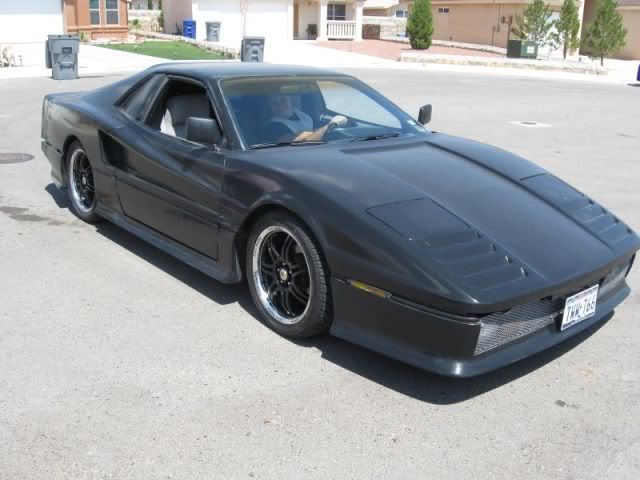
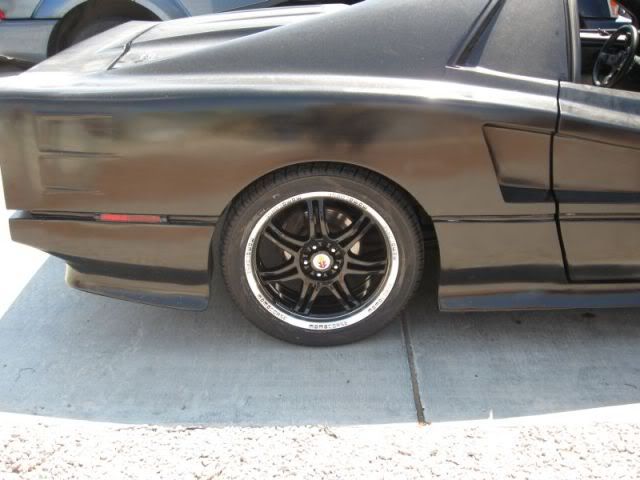
Forgive me for it's been a long time since my last confession - oh wait - that's for somewhere else....... Anyway, Here's a little upadte on the XTC. I ran into a great deal on a set of wheels and tires so here's some before and after pics. Let me know what you think!

Before:

V
V
V
V
V
V
And after:

A happy boy!


IP: Logged
Frizlefrak
Member
Posts: 2921
From: El Paso, Texas
Registered: Aug 2003


Feedback score: (5)
Leave feedback


Total ratings: 72
Rate this member

Report this Post06-26-2009 06:59 PM Click Here to See the Profile for FrizlefrakSend a Private Message to FrizlefrakEdit/Delete MessageReply w/QuoteDirect Link to This Post
Pat....we still on for tomorrow? I'll give you a call in a few.
IP: Logged
ALLTRBO
Member
Posts: 2023
From: College Park, MD
Registered: Mar 2006


Feedback score: (4)
Leave feedback

Rate this member

Report this Post06-27-2009 06:32 AM Click Here to See the Profile for ALLTRBOSend a Private Message to ALLTRBOEdit/Delete MessageReply w/QuoteDirect Link to This Post
 
quote
Originally posted by katatak:
Let me know what you think!

It looks the same.
The wheels need to be spaced out more (more the rear than the front) to look right in my eyes.
IP: Logged
Swedish Fiero
Member
Posts: 187
From: Mark, Sweden
Registered: Oct 2008


Feedback score: N/A
Leave feedback

Rate this member

Report this Post06-27-2009 08:29 AM Click Here to See the Profile for Swedish FieroClick Here to visit Swedish Fiero's HomePageSend a Private Message to Swedish FieroEdit/Delete MessageReply w/QuoteDirect Link to This Post
It looks great.. however, to be perfect the rear axle needs to be stretched about 4-5 inches backwards and another tail laight assembely would do it good..

Keep up the good work !!

------------------
Swedish Fiero


Dedicated owner of an 88 Fiero GT

IP: Logged
katatak
Member
Posts: 7136
From: Omaha, NE USA
Registered: Apr 2008


Feedback score:    (8)
Leave feedback


Total ratings: 82
Rate this member

Report this Post06-27-2009 08:08 PM Click Here to See the Profile for katatakSend a Private Message to katatakEdit/Delete MessageReply w/QuoteDirect Link to This Post
 
quote
Originally posted by Swedish Fiero:

It looks great.. however, to be perfect the rear axle needs to be stretched about 4-5 inches backwards and another tail laight assembely would do it good..

Keep up the good work !!


Thanks for the reply's.

Lots of alterations in the planning stages - Headlight, extractor hood scoop, wheel wells, marker lights, smooth out the body some, and maybe shortening the backend a little? I too think it hangs out there a little too far. Just gotta learn some glass skills and then we'll see what we can do.
IP: Logged
katatak
Member
Posts: 7136
From: Omaha, NE USA
Registered: Apr 2008


Feedback score:    (8)
Leave feedback


Total ratings: 82
Rate this member

Report this Post06-27-2009 08:13 PM Click Here to See the Profile for katatakSend a Private Message to katatakEdit/Delete MessageReply w/QuoteDirect Link to This Post

katatak

7136 posts
Member since Apr 2008
 
quote
Originally posted by ALLTRBO:

It looks the same.
The wheels need to be spaced out more (more the rear than the front) to look right in my eyes.


Looks the same?????? Are you saying rear tires out to the side more? I agree the back wheels need to come out some more. We did go from stock 15" wheels and tires to 17" wheels. I wanted a "wider" tire in the back but the 225 was all my sone couls afford at the time - maybe later he can go with a wider tire - maybe a 245 would help. I will say that we took it for a 100 mile trip today and it drives wo much better. Onward and upward - Thanks for the reply.

Pat

IP: Logged
PFF
System Bot
katatak
Member
Posts: 7136
From: Omaha, NE USA
Registered: Apr 2008


Feedback score:    (8)
Leave feedback


Total ratings: 82
Rate this member

Report this Post06-29-2009 10:55 PM Click Here to See the Profile for katatakSend a Private Message to katatakEdit/Delete MessageReply w/QuoteDirect Link to This Post
Alright..... Here we go again!

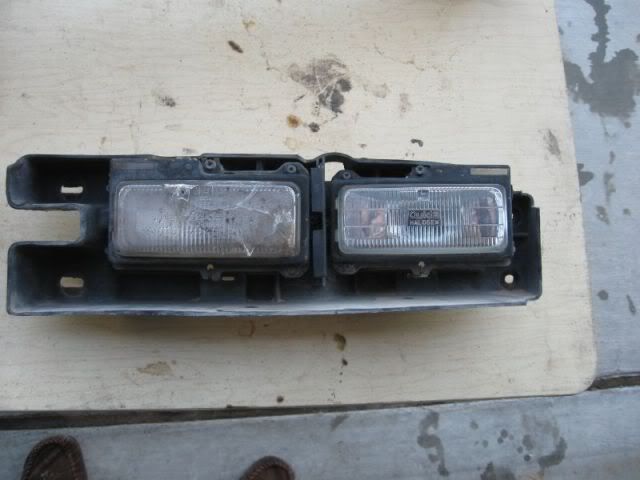
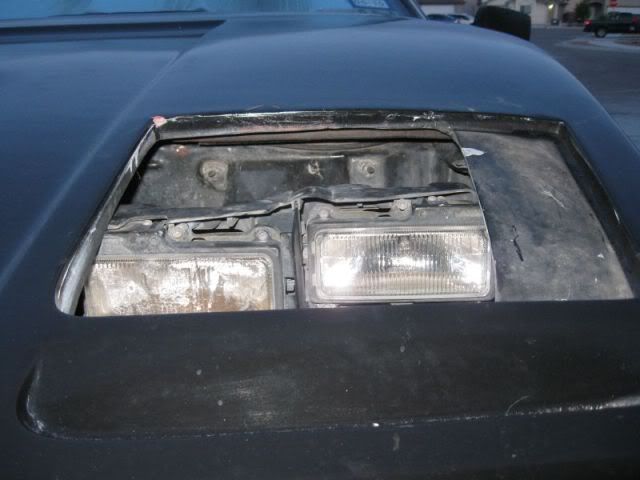
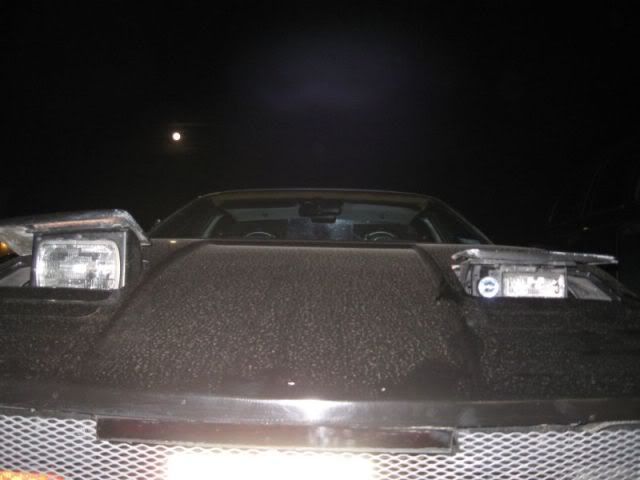
A couple of friends came over to the house on Saturday afternoon and we were talking about headlight mods for the XTC. Jeff made the suggestion that I try some headlights out of a 93 Camaro. So today, I went to the junk yard and picked up some headlight bucket assemblies from a 93 Camaro. Here's the idea - now you have to use a little imagination here but never the less, here's the idea. It's basically a "flush" mount into the hood without the plexi cover. My plan is to fab a wedged shaped pan out of sheet metal to use as a mold for the glass. Once I have the mold made, the glass laid up and the trimmed down buckets monuted to the glass, I will trim the hole in the hood to fit the pan/headlight assembly. I will also eliminate the "louvers" in front of the headlight. I envision a flat bottomed -wedge shaped "trough" with the top of the headlights just below the edge of the hood. Looking at the pics below, imagine the headlights sitting higher and a few inches further back. After I trimmed the bucket down, and placing it in the hole, it looks like I will have to cut some of the metal sidewall out so I can "center" the assembly in the hole. Also, there will be a small "ledge" coming out over the top of the headlight to give them a slight recessed look.

Here's the bucket:

And a few shots of the concept:


Comments?

Pat
IP: Logged
katatak
Member
Posts: 7136
From: Omaha, NE USA
Registered: Apr 2008


Feedback score:    (8)
Leave feedback


Total ratings: 82
Rate this member

Report this Post07-01-2009 07:51 PM Click Here to See the Profile for katatakSend a Private Message to katatakEdit/Delete MessageReply w/QuoteDirect Link to This Post
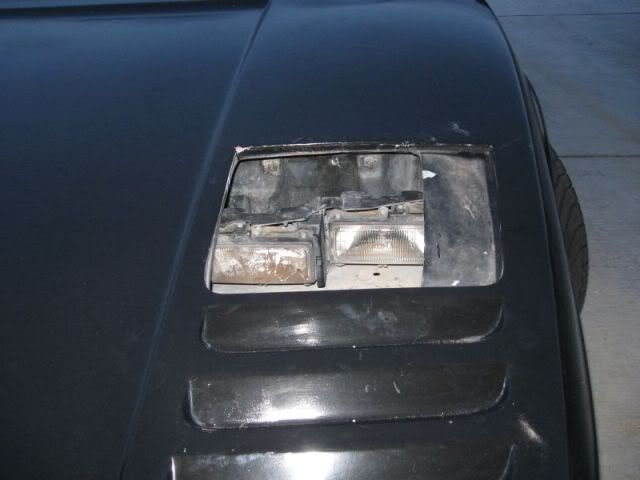
Well after some trimming of the Camaro buckets and opening & closing the hood 1000 times, I have come to the disapointing conclusion that my mod idea will not work - there is just not enough room under the hood to recess the lights. I wanted to move the lights forward ahead of the stock headlight location - it just will not fit. I think that they are too far from the front to mount them at the back of the stock location - just does not look right. I will be in search of something different now. Any ideas, let me know.

Pat

IP: Logged
doublec4
Member
Posts: 8289
From: Oakville, Ontario, Canada
Registered: Jun 2003


Feedback score:    (20)
Leave feedback


Total ratings: 150
Rate this member

Report this Post07-01-2009 08:18 PM Click Here to See the Profile for doublec4Send a Private Message to doublec4Edit/Delete MessageReply w/QuoteDirect Link to This Post
Slim pop ups

//www.fiero.nl/forum/Forum1/HTML/076247.html

------------------

IP: Logged
katatak
Member
Posts: 7136
From: Omaha, NE USA
Registered: Apr 2008


Feedback score:    (8)
Leave feedback


Total ratings: 82
Rate this member

Report this Post07-02-2009 01:06 AM Click Here to See the Profile for katatakSend a Private Message to katatakEdit/Delete MessageReply w/QuoteDirect Link to This Post
 
quote
Originally posted by doublec4:

Slim pop ups

//www.fiero.nl/forum/Forum1/HTML/076247.html


I was following your thread a while back and completely forgot about it. That is exactly what I am looking for now. Do you mind if I do a copycat on your design? I actually went and purchased 2 of the smaller headlights back when I had my 86 and was going to do something similar then. I looked at doing the 90mm or 60mm Hella's but the cost is too high and I do not think the round lights look right on the XTC. Thanks for the suggestion and link.

Pat
IP: Logged
doublec4
Member
Posts: 8289
From: Oakville, Ontario, Canada
Registered: Jun 2003


Feedback score:    (20)
Leave feedback


Total ratings: 150
Rate this member

Report this Post07-02-2009 01:18 AM Click Here to See the Profile for doublec4Send a Private Message to doublec4Edit/Delete MessageReply w/QuoteDirect Link to This Post
Feel free to copy me, I don't mind at all

Post some pictures when you're done, I'd be interested to see how yours turns out

------------------

IP: Logged
jmbishop
Member
Posts: 4484
From: Probably Texas
Registered: Jul 2006


Feedback score: N/A
Leave feedback


Total ratings: 169
Rate this member

Report this Post07-02-2009 01:42 AM Click Here to See the Profile for jmbishopSend a Private Message to jmbishopEdit/Delete MessageReply w/QuoteDirect Link to This Post
here are my pop ups from a few years ago.
IP: Logged
katatak
Member
Posts: 7136
From: Omaha, NE USA
Registered: Apr 2008


Feedback score:    (8)
Leave feedback


Total ratings: 82
Rate this member

Report this Post07-02-2009 01:55 AM Click Here to See the Profile for katatakSend a Private Message to katatakEdit/Delete MessageReply w/QuoteDirect Link to This Post
Hey Jim,

I like those too! Do you have any details on the build?

Thanks

Pat
IP: Logged
jmbishop
Member
Posts: 4484
From: Probably Texas
Registered: Jul 2006


Feedback score: N/A
Leave feedback


Total ratings: 169
Rate this member

Report this Post07-02-2009 04:44 AM Click Here to See the Profile for jmbishopSend a Private Message to jmbishopEdit/Delete MessageReply w/QuoteDirect Link to This Post
I did mine allot like doublec4's but instead of just trimming the headlight buckets down, I retained the part of the stock bucket that makes contact with the headlight lid by sectioning the bucket and using a good epoxy with glass fibers to put it back together. I never really finished them so the adjusting them is a little crude, the bracket that holds the lights is slotted. To adjust the headlights position just loosen the nuts a little, aim the light then tighten them up again.
IP: Logged
katatak
Member
Posts: 7136
From: Omaha, NE USA
Registered: Apr 2008


Feedback score:    (8)
Leave feedback


Total ratings: 82
Rate this member

Report this Post07-04-2009 12:43 AM Click Here to See the Profile for katatakSend a Private Message to katatakEdit/Delete MessageReply w/QuoteDirect Link to This Post
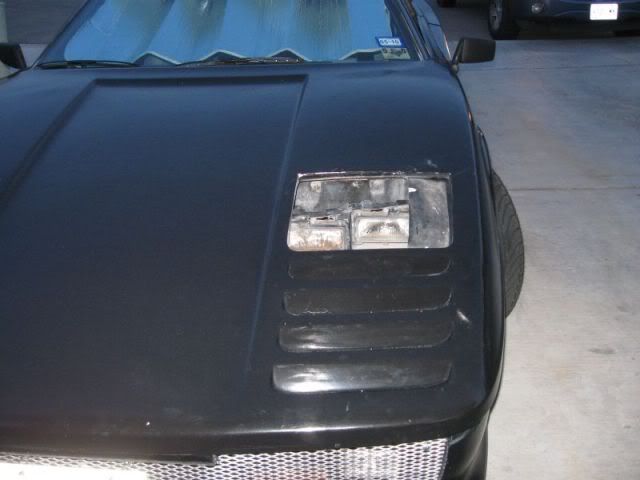
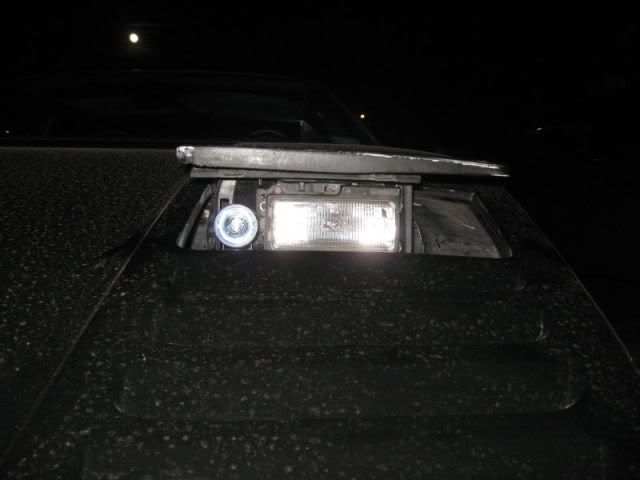
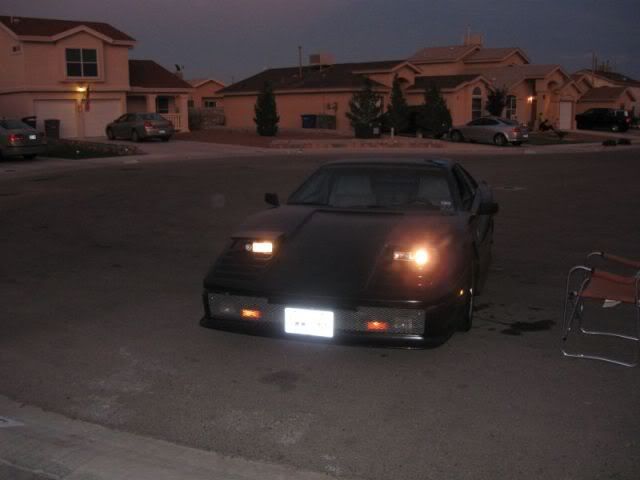
Here's the latest version - still needs some work. The light sts too low due to the way the hood is designed. This is the Camaro lamp. It is smaller than the 4556 lamp. I am not sure I like it - it looks too small for the "hole". The XTC lid is about 3" wider than the stock Fiero lid. I was able to get the lamp "centered" on the lid by using a right side bucket on the left side. I used the original Camaor bucket trimmed down to fit inside the Fiero bucket mount. I had to do some trimming on the inside of the Ferio bucket mount too. I will play with it all weekend. Probably will end up with all the stock stuff......lol. It's a project.


On a nother note, I seem to be having a starter problem now. Turn the key and nothing. I have power, lights, etc. just no crank. I'll dig into that tomorrow....
IP: Logged
Amida
Member
Posts: 2354
From: Seattle, WA. USA
Registered: Jul 2003


Feedback score: (4)
Leave feedback


Total ratings: 63
Rate this member

Report this Post07-04-2009 01:52 AM Click Here to See the Profile for AmidaSend a Private Message to AmidaEdit/Delete MessageReply w/QuoteDirect Link to This Post
 
quote
Originally posted by katatak:


Cool project. As an added detail to the tail light section, a black honey comb grill or maybe even a carbon fiber filler panel would be a cool little feature.
IP: Logged
PFF
System Bot
katatak
Member
Posts: 7136
From: Omaha, NE USA
Registered: Apr 2008


Feedback score:    (8)
Leave feedback


Total ratings: 82
Rate this member

Report this Post07-04-2009 04:16 PM Click Here to See the Profile for katatakSend a Private Message to katatakEdit/Delete MessageReply w/QuoteDirect Link to This Post
 
quote
Originally posted by Amida:


Cool project. As an added detail to the tail light section, a black honey comb grill or maybe even a carbon fiber filler panel would be a cool little feature.


I agree, the rear end needs an update too...... Once I get the headlights done, I have a few more details to take care of up front and then I'll move to the back.

List of future mods:

Extractor hood scoop
Smooth ot the tops of the front fenders - eliminate the louvers in front of the headlights
Mold in the front radiator scoop - eliminate the mesh grill and mold in the driving lights & turn signals.

I still have to get the AC going. Parts are on the way but the last few days I have been having a starter problem. I replaced the starter today. Had to cut the cat out to get to it but I'll just stright pipe it for now. I found some "heat" issues. The main cable from the battery to the starter was slightly melted due to heat form the exhaust manifiold. I used some of those "Simmons" spark plug heat shield socks on the wires to protect them. I alos found that the wires coming out of the AC switch plugs were damaged. All cracked and the insulation is coming off. One was completely severed (wonder why the AC compressor won't kick on?). I'' have to order some new connectors now cuase there is not enough good wire left to spilce them. I am thinking about rigging them up to see if the compressor works though. I will install the new compressor and new sitchs along with the connectors. It never ends......
IP: Logged
katatak
Member
Posts: 7136
From: Omaha, NE USA
Registered: Apr 2008


Feedback score:    (8)
Leave feedback


Total ratings: 82
Rate this member

Report this Post07-06-2009 11:34 PM Click Here to See the Profile for katatakSend a Private Message to katatakEdit/Delete MessageReply w/QuoteDirect Link to This Post
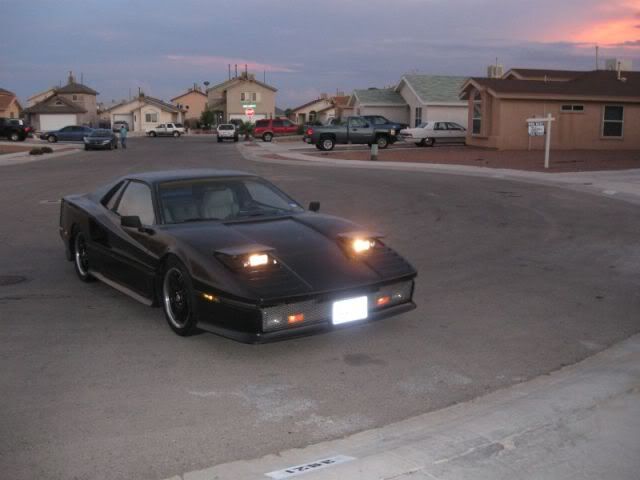
After the sun went down and it cooled off a little, I went back to work on the low profile headlights. The previous version had the light a little too low in the mount and about 1/2" of the bottom of the headligh was cut off by the bump in the hood just ahead of the headlight opening. So I moved the Camaro bucket up 1/2" in the mount and then added a small diameter driving light. It was getting late so I did not get the lights hooked up to see what it looks like "on". If it loks ok, I will use some aluminum sheet to fab a "cover" plate to trim out the lights. Here's where I am so far.

Before moving the light up in the mount:

Version 2:


IP: Logged
Gokart Mozart
Member
Posts: 12143
From: Metro Detroit
Registered: Mar 2003


Feedback score: (1)
Leave feedback


Total ratings: 159
Rate this member

Report this Post07-07-2009 09:00 AM Click Here to See the Profile for Gokart MozartClick Here to visit Gokart Mozart's HomePageSend a Private Message to Gokart MozartEdit/Delete MessageReply w/QuoteDirect Link to This Post
IP: Logged
Tony Kania
Member
Posts: 20794
From: The Inland Northwest
Registered: Dec 2008


Feedback score:    (7)
Leave feedback


Total ratings: 305
User Banned

Report this Post07-07-2009 12:15 PM Click Here to See the Profile for Tony KaniaSend a Private Message to Tony KaniaEdit/Delete MessageReply w/QuoteDirect Link to This Post
I am going to have to keep an eye on this mod. I like the low profile look. i also have a pair of driving lights mounted in my "grill" area. I like the extra light output that I get from them, but am not impressed with the look. Makes the front of my car look to cluttered. But, with a slim light, and a driving light in the stock location.....Hmmmmm?

------------------

IP: Logged
katatak
Member
Posts: 7136
From: Omaha, NE USA
Registered: Apr 2008


Feedback score:    (8)
Leave feedback


Total ratings: 82
Rate this member

Report this Post07-08-2009 12:11 AM Click Here to See the Profile for katatakSend a Private Message to katatakEdit/Delete MessageReply w/QuoteDirect Link to This Post
Gokart,

Thanks for those links.....
IP: Logged
katatak
Member
Posts: 7136
From: Omaha, NE USA
Registered: Apr 2008


Feedback score:    (8)
Leave feedback


Total ratings: 82
Rate this member

Report this Post07-08-2009 12:22 AM Click Here to See the Profile for katatakSend a Private Message to katatakEdit/Delete MessageReply w/QuoteDirect Link to This Post

katatak

7136 posts
Member since Apr 2008
Ok,

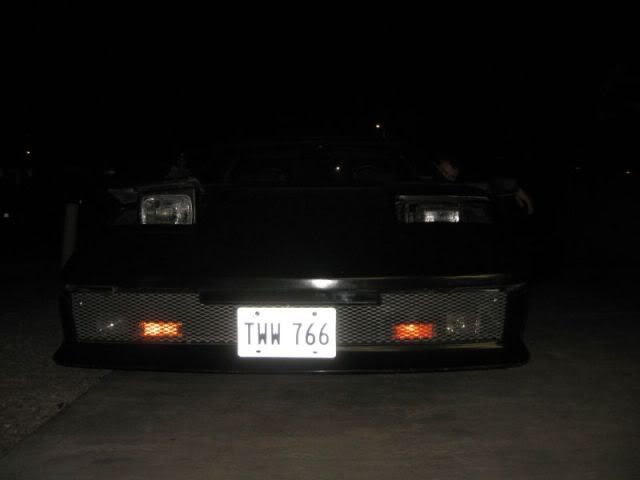
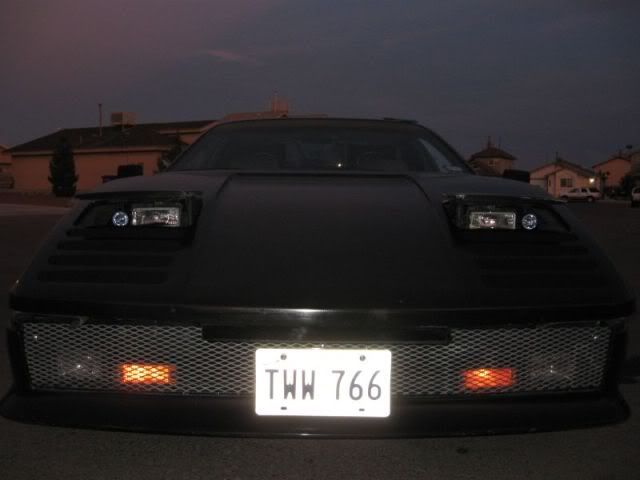
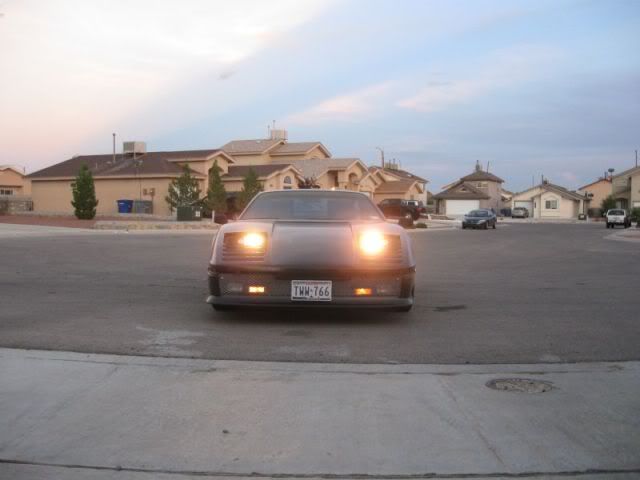
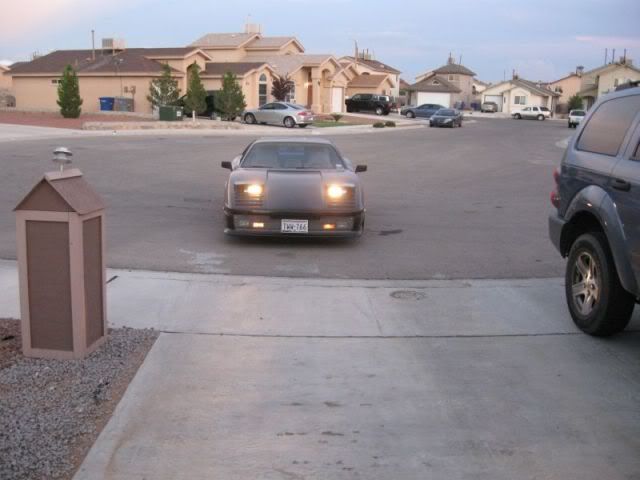
Made some progress today. I did some "swapping" around and I like this look a little better. I got the headlights working and adjusted. Just have to finish the wiring for the driving lights and fab the face plates. I think they turned out pretty good. I can even swap them from side to side to move the driving lights inboard or out board. I like em out board. After dark, I gave them some more adjustement and went for a drive in the country. Lights work great. I can't wait to get the driving lights working and finish this project.


One driving light on:


I want to give a big "THANKS" to doublec4 - and others that contributed, commented, etc. It was the inspiration I needed to get it done. I also need to thank my buddy Jeff for the driving light idea....it was exactly what I was looking for.

[This message has been edited by katatak (edited 07-08-2009).]

IP: Logged
doublec4
Member
Posts: 8289
From: Oakville, Ontario, Canada
Registered: Jun 2003


Feedback score:    (20)
Leave feedback


Total ratings: 150
Rate this member

Report this Post07-08-2009 12:27 AM Click Here to See the Profile for doublec4Send a Private Message to doublec4Edit/Delete MessageReply w/QuoteDirect Link to This Post
 
quote
Originally posted by katatak:
I want to give a big "THANKS" to doublec4 - and others that contributed, commented, etc. It was the inspiration I needed to get it done. I also need to thank my buddy Jeff for the driving light idea....it was exactly what I was looking for.


Looks pretty good! Don't have to thank me, you did all the work lol
IP: Logged
BlackThunderGT
Member
Posts: 2048
From: The Rock
Registered: Apr 2009


Feedback score: (5)
Leave feedback

Rate this member

Report this Post07-08-2009 01:07 AM Click Here to See the Profile for BlackThunderGTSend a Private Message to BlackThunderGTEdit/Delete MessageReply w/QuoteDirect Link to This Post
Pat,

Great job!!! I really like what you done with the driving lights...might have given a lot of us some new Ideas for our light mods

So did I read right and the XTC is now your baby? so we will see it at the Ruckus?

Paul
IP: Logged
jgrotzin
Member
Posts: 349
From: Rocheport, MO
Registered: Nov 2005


Feedback score: (5)
Leave feedback

Rate this member

Report this Post07-08-2009 09:37 AM Click Here to See the Profile for jgrotzinSend a Private Message to jgrotzinEdit/Delete MessageReply w/QuoteDirect Link to This Post
Those look great! They really fit the look of the XTC! Good job!
IP: Logged
Previous Page | Next Page

This topic is 12 pages long:  1   2   3   4   5   6   7   8   9   10   11   12 
next newest topic | next oldest topic

All times are ET (US)

Post New Topic  Post A Reply
Hop to:

Contact Us | Back To Main Page

Advertizing on PFF | Fiero Parts Vendors
PFF Merchandise | Fiero Gallery | Ogre's Cave
Real-Time Chat | Fiero Related Auctions on eBay


Copyright (c) 1999, C. Pennock