Could you post some pictures of updates to your LSJ car? It would be nice to see both the engine, and the car itself, including the inside - simply - how it looks like today.
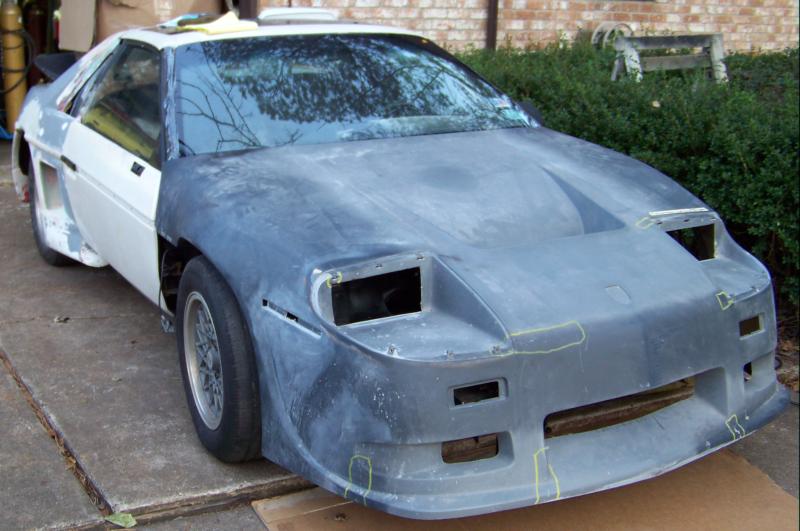
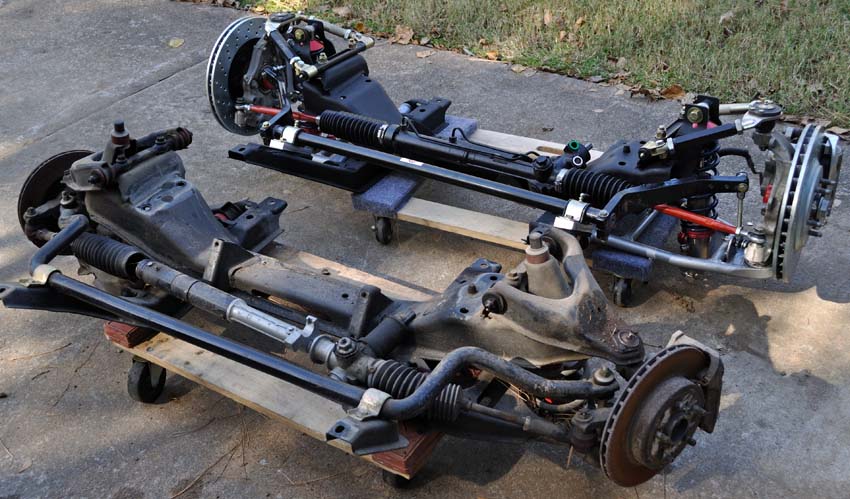
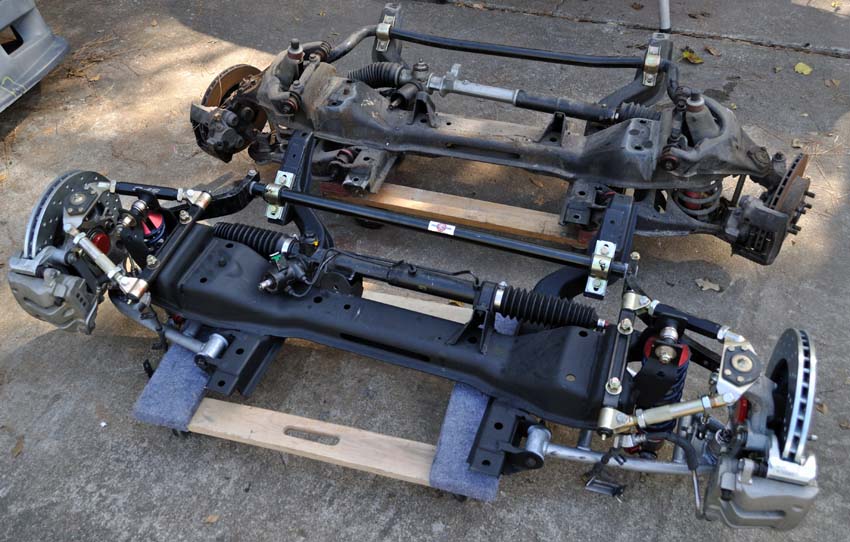
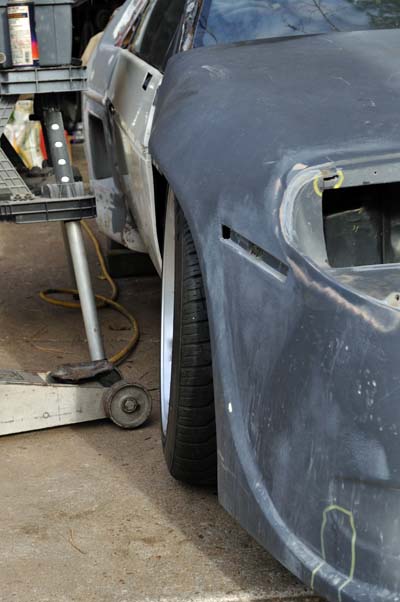
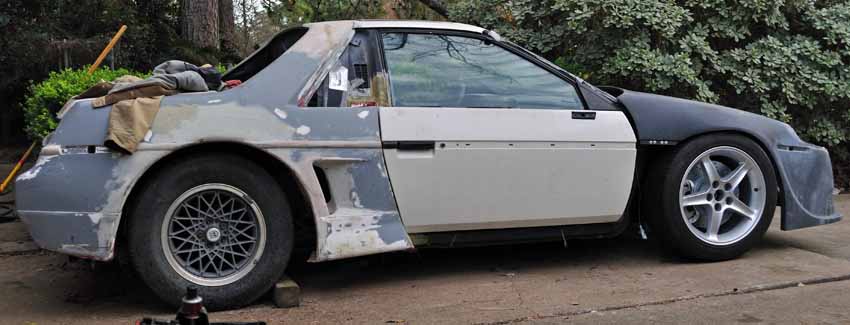
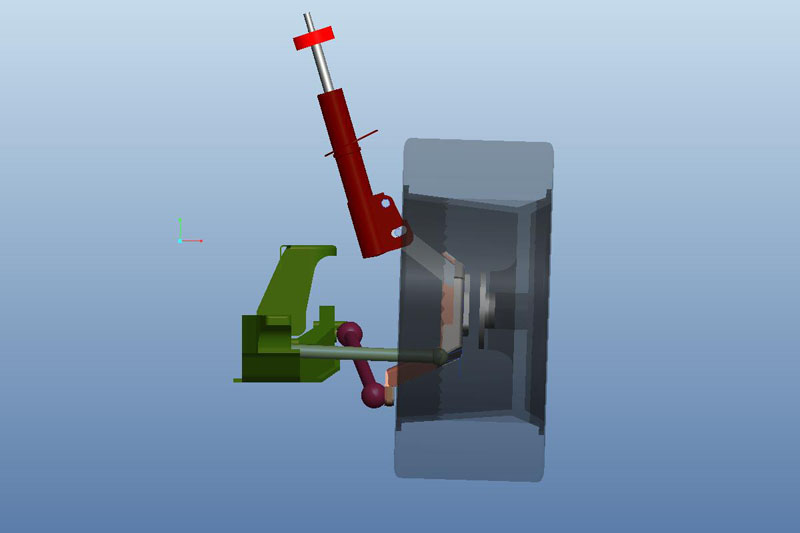
I decided to take the day off and work on installing the new front end in the notchie today because the weather is supposed to turn crappy this weekend.
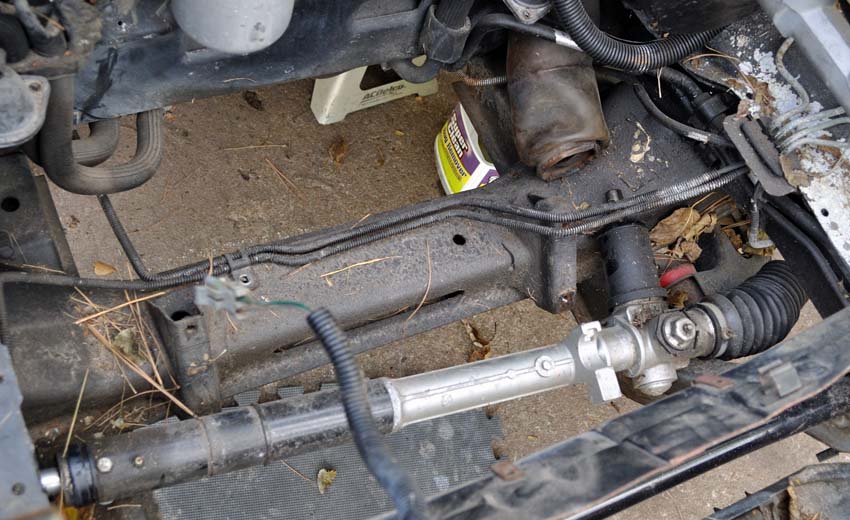
First thing I did was un-bolt the rack from the sub-frame to disconnect it from the steering column. After that I undid the break lines from the calipers and removed the tie downs to the sub-frame. Later on when I was putting it all back together I had to remove the steering shaft and column altogether to adjust it to fit.
I put my jack under the center of the sub-frame and removed the 8 bolts that hold it to the chassis and lowered it to the ground.
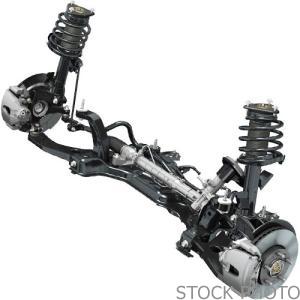
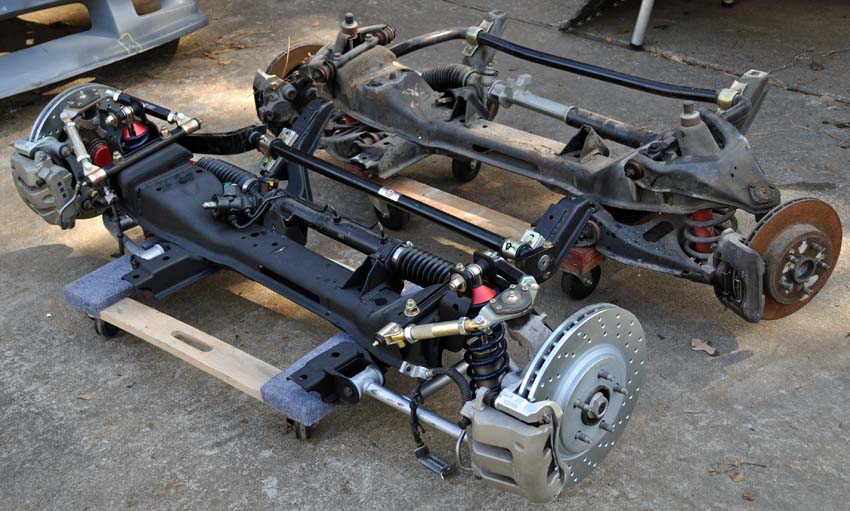
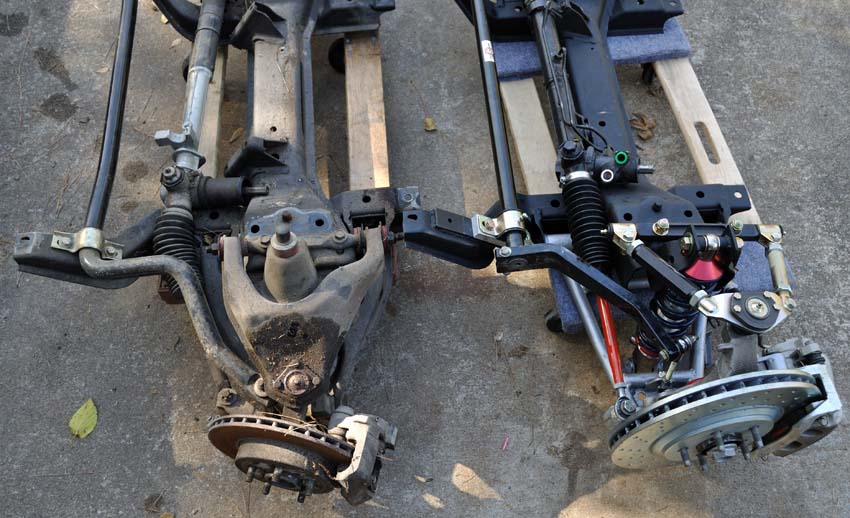
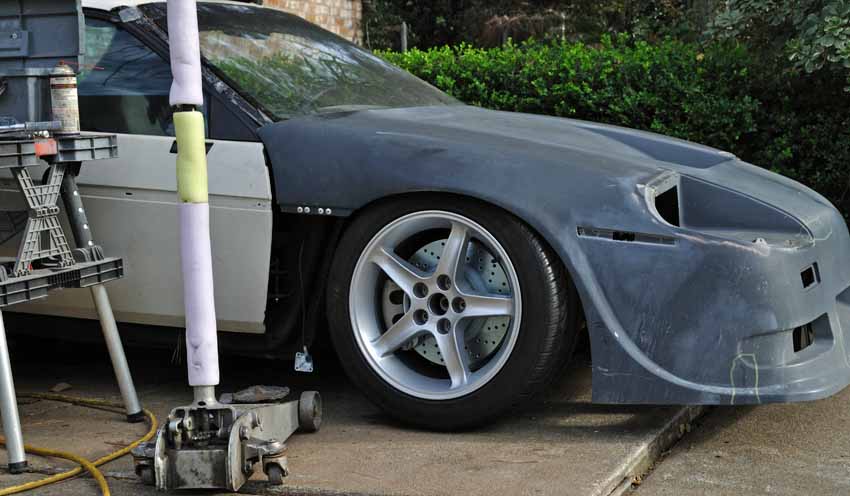
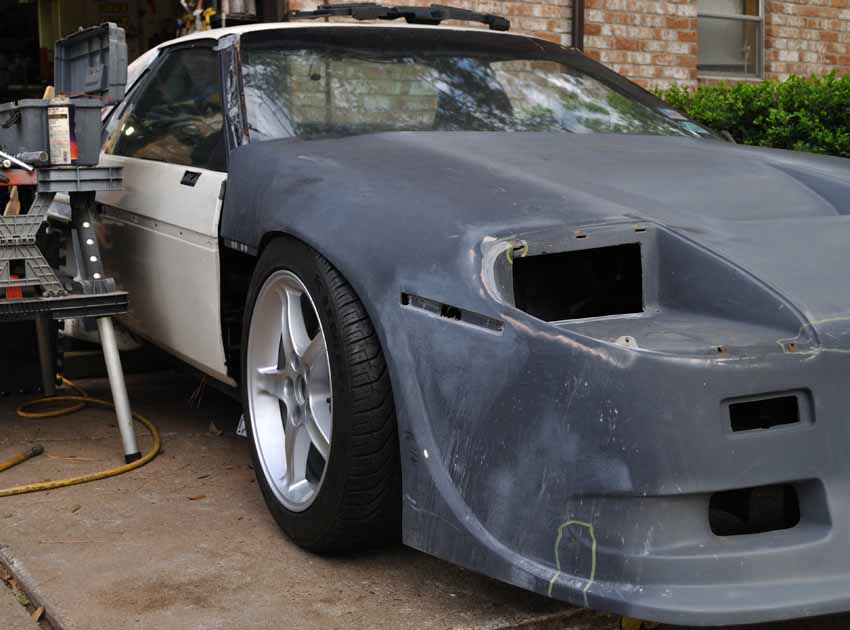
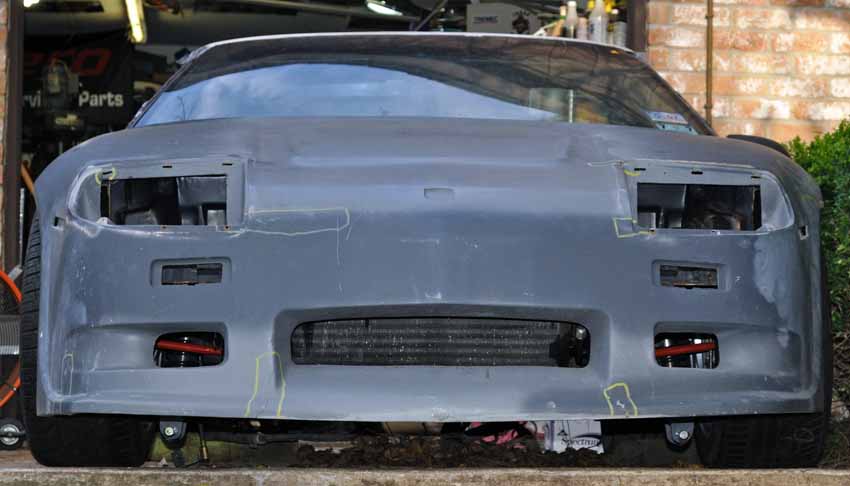
Here are some side by side images. The new front end is about 30lbs heavier then the original one.
Most of it is in the new brakes.
They are just frigging big.
I can't wait to see how HHP's adjustable bars work out on the track. The front sway bar on the old front end is an Addco bar that's 1.25" thick.
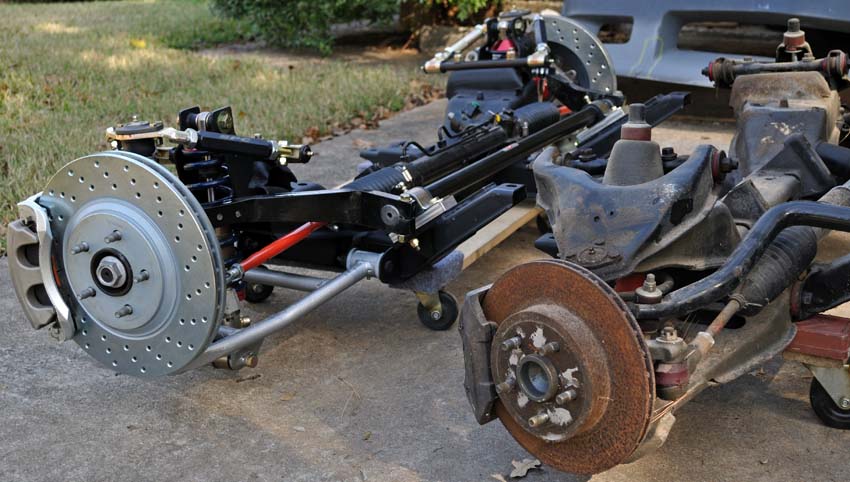
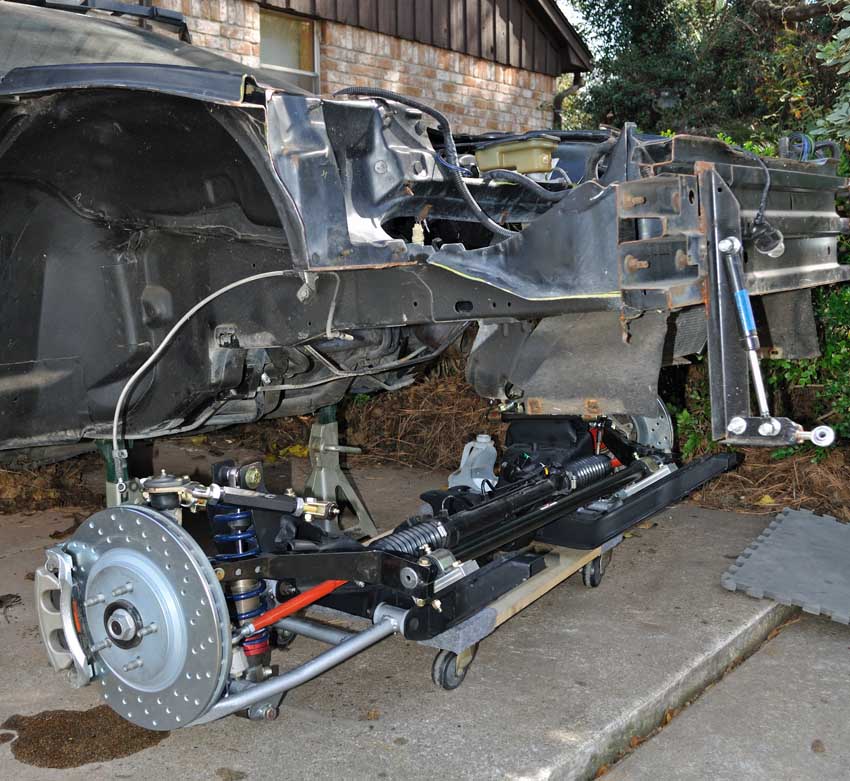
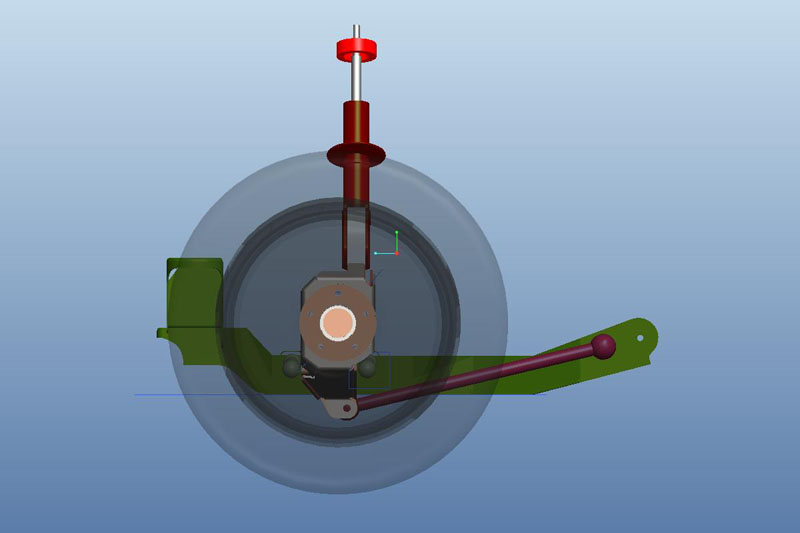
I have to admit with the mods done to the front sheet metal for the flip front end it made working on it much easier.
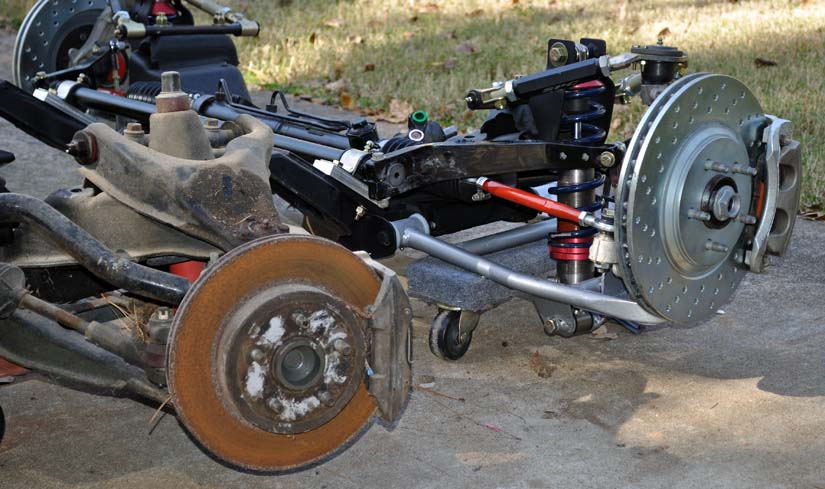
I balanced it on the floor jack and just lifted up in place in one piece.
1st trick is get the rear tab under the chassis mount pad. 2nd trick is get the alignment pin on the drivers side in it's hole.
Once you get the pin in, the rest of the bolts pull it pretty much into alignment.
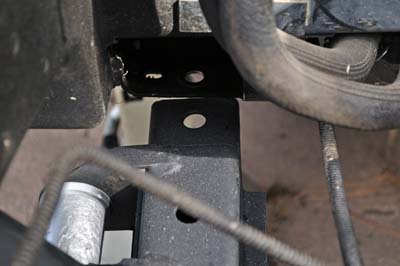
The right angle grease fitting has plenty of access room. The steering column D-shaft needed about 1/4" more reach for the corvette rack.
The corvette rack moves the the steering shaft just a bit to the drivers side. I was disappointed to find my rack is 2.5 total turns rather then the 2 turn ZL1 rack that I though I bought. I'll be on the look out for a real one.
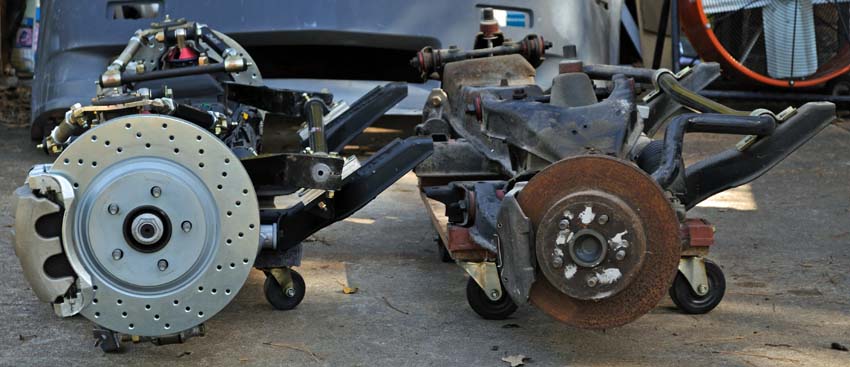
Here it is at full droop with the wheels on, And after setting it down for the the first time.
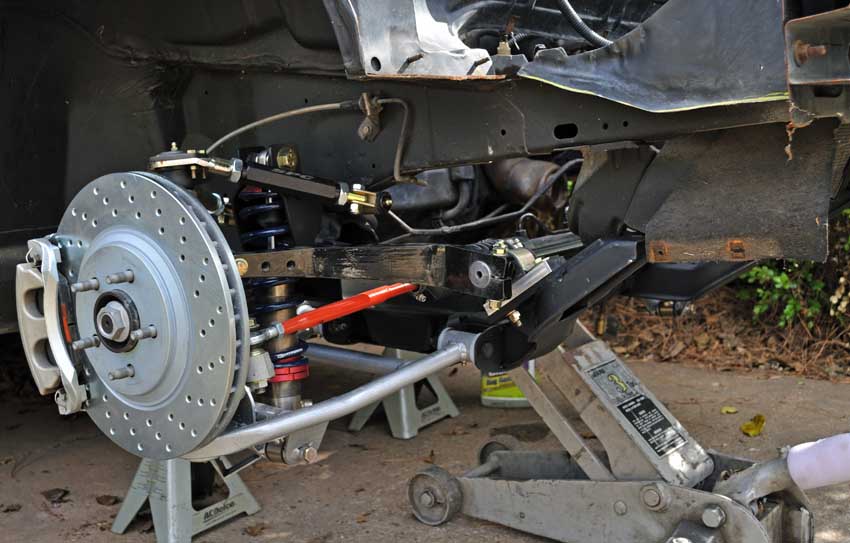
I had just hand tighten the springs on the coil overs and need some more pre-load, and less camber.
I cranked in about an inch of pre-load and reeled in the camber to something a little more appropriate.
The front end is about at the right ride height now.
I like the way the Mustang wheel looks on the car, but I may need more spring rate to keep the front wheels out of the monster camber gain that's dialed in under braking.
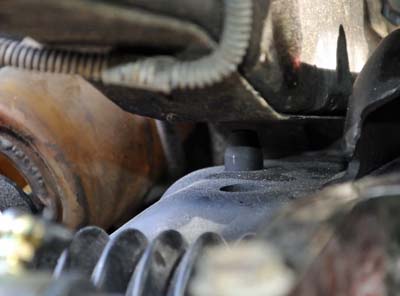
Need to get longer brake lines to reach the new calipers and make up some hydraulic hoses for the power steering.
------------------ yellow 88 GT, not stock white 88 notchie, 4 banger
[This message has been edited by ccfiero350 (edited 01-08-2011).]
It been a while since I have posted here but work has been on going. I have been working with coppertop_01 designing some new suspension pieces.
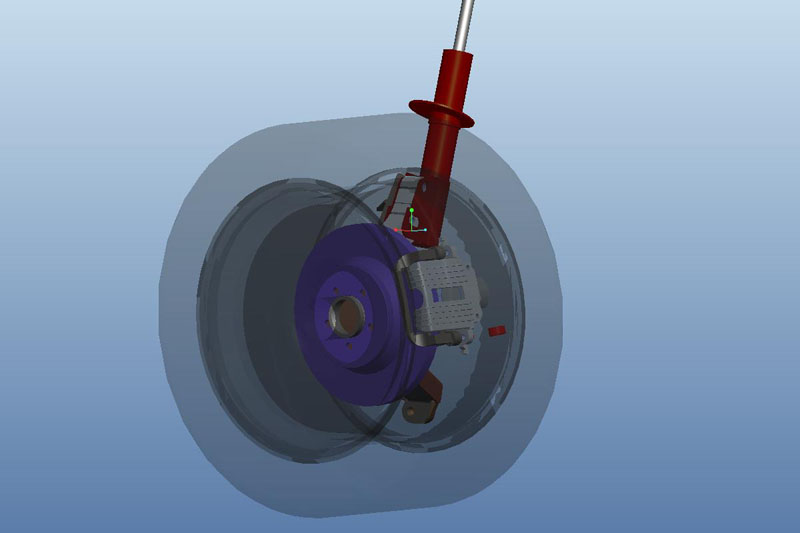
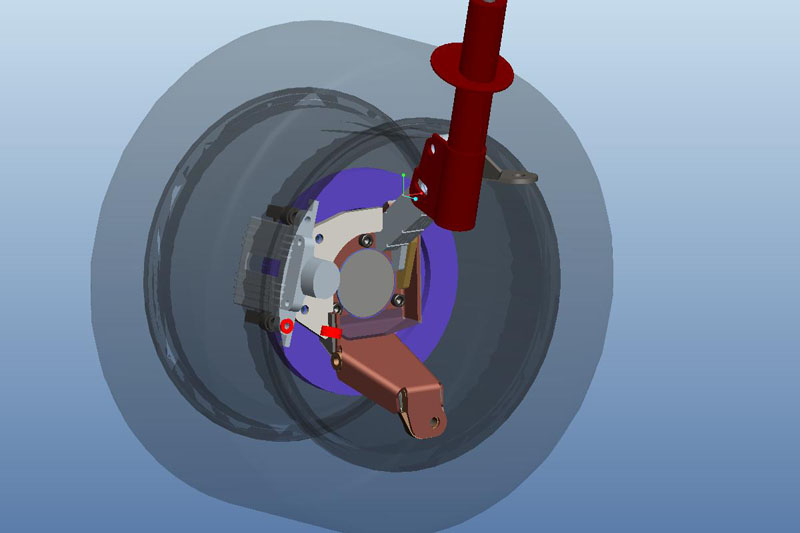
There rear knuckle for an 88 is a unique piece, and limits the use of larger unitized bearing hubs. So I designed a new one that uses a Saturn Vue hubs and axle.
To fit my IMSA wide body, I need a least a 10 1/2" wheel, and cheap wide wheels come on mustangs. I also incorporated C4 disc with calipers mit parking brakes.
So my special thanks to bloozeberry for his subframe prints, I made a full math model of the 88 rear suspension.
This version features some changes in geometry to help with roll center, camber gain and anti squat with the 2" lowering.
I can do motion analysis with the software with animations, make changes and run it again. Really fun stuff.
I've got some mods to the sub frame that will re-locate the links a tad to fine tune the roll center.
Can't wait to get the pieces to weld up.
------------------ yellow 88 GT, not stock white 88 notchie, 4 banger
It been a while since I have posted here but work has been on going. I have been working with coppertop_01 designing some new suspension pieces.
There rear knuckle for an 88 is a unique piece, and limits the use of larger unitized bearing hubs. So I designed a new one that uses a Saturn Vue hubs and axle.
To fit my IMSA wide body, I need a least a 10 1/2" wheel, and cheap wide wheels come on mustangs. I also incorporated C4 disc with calipers mit parking brakes.
So my special thanks to bloozeberry for his subframe prints, I made a full math model of the 88 rear suspension.
This version features some changes in geometry to help with roll center, camber gain and anti squat with the 2" lowering.
I can do motion analysis with the software with animations, make changes and run it again. Really fun stuff.
I've got some mods to the sub frame that will re-locate the links a tad to fine tune the roll center.
Can't wait to get the pieces to weld up.
What software are you using?
[This message has been edited by FieroWannaBe (edited 02-26-2011).]
gotcha, Ive never used the peripheral software in ProE, but have in SolidWorks.Its great that your doing some investigation work for the improving the Fiero geometry, always good. What criteria are you using for the roll center location, and do you know where it was at factory spec? Ive read different ideas about locating the roll center relative to the CG height.
I have been kicking around the idea of making a new rear upright for the 88's to accomodate a larger bearing and as part of the design I was going to see if a 2" or 3" drop could be built in while still fitting within a 17" wheel rim. This would lower the chassis while retaining near stock 88 rear suspension geometry.
The knuckle does lower the toe links which will raise the roll center. In this type of strut suspension there's not much of a camber gain, I'm just trying to keep it positive after it's been lowered.
It would be possible to create one with the axle location dropped a few inches, but it would increase the bending stresses on the strut, which would could add friction in the strut.
------------------ yellow 88 GT, not stock white 88 notchie, 4 banger
Seen it before (CC did a video with my knuckle, not trying to be egotistical in what I was saying), but still impresses never the less.....Like I've said before top notch work there CC
Jer
[This message has been edited by coppertop_01 (edited 03-22-2011).]
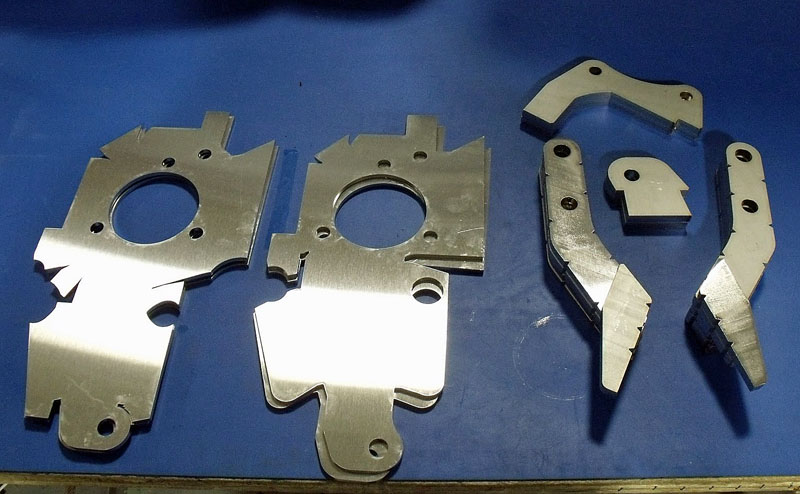
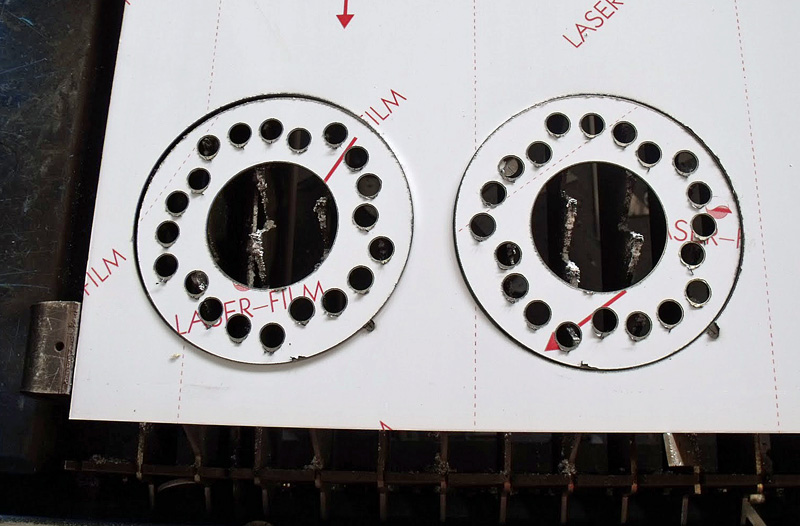
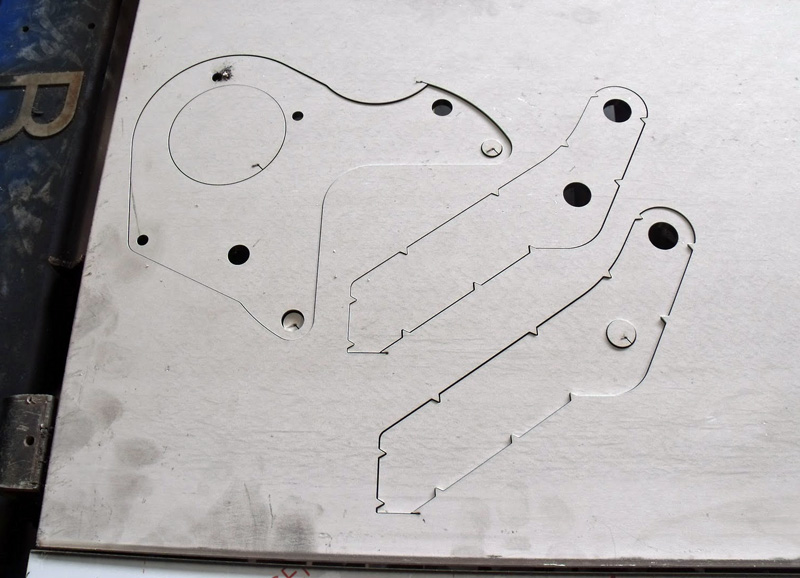
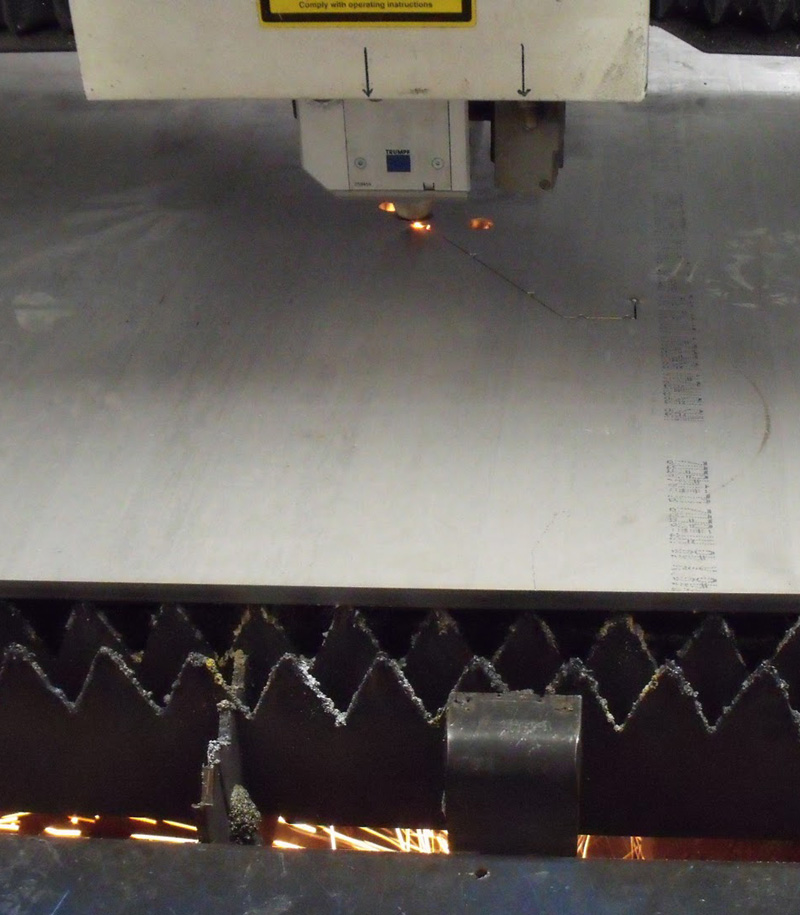
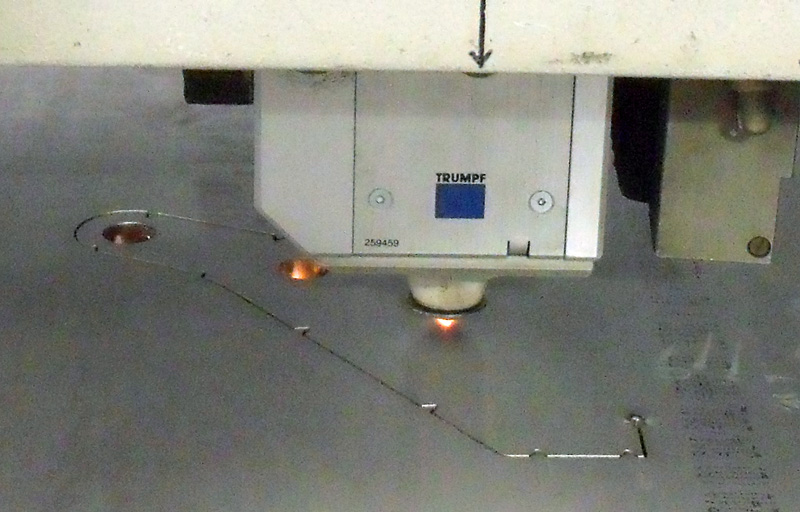
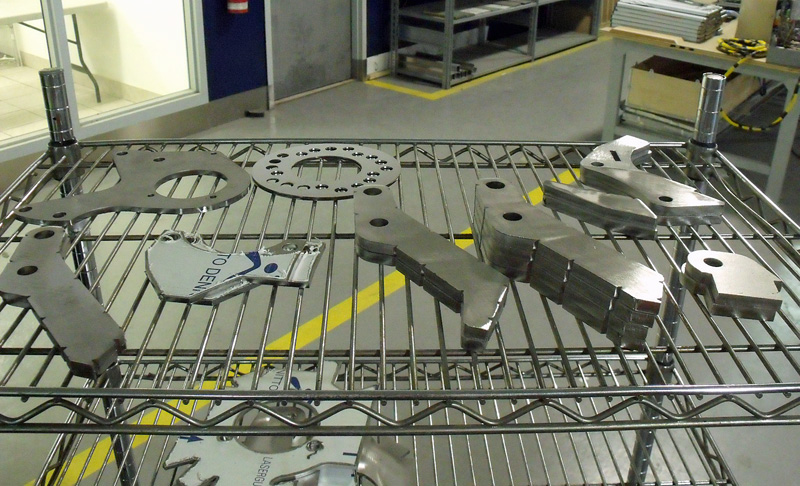
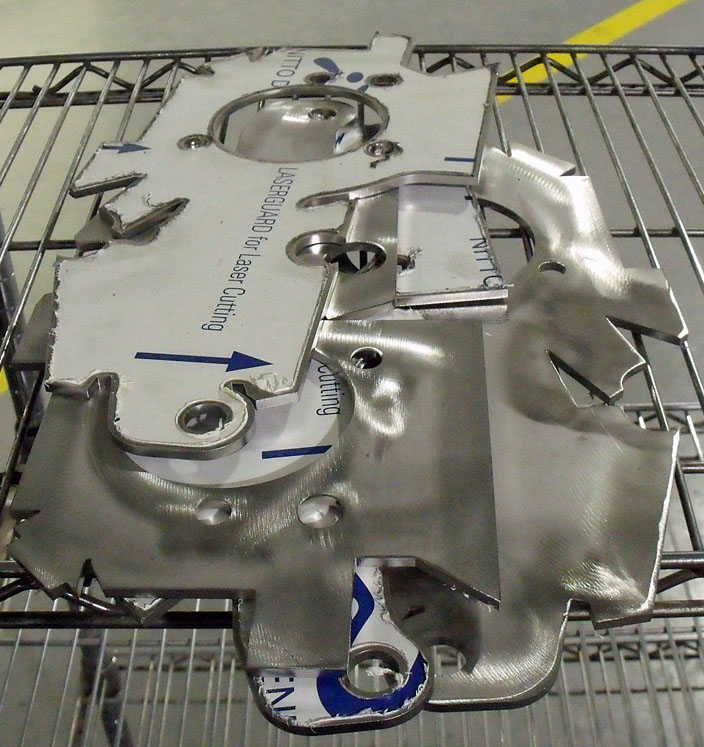
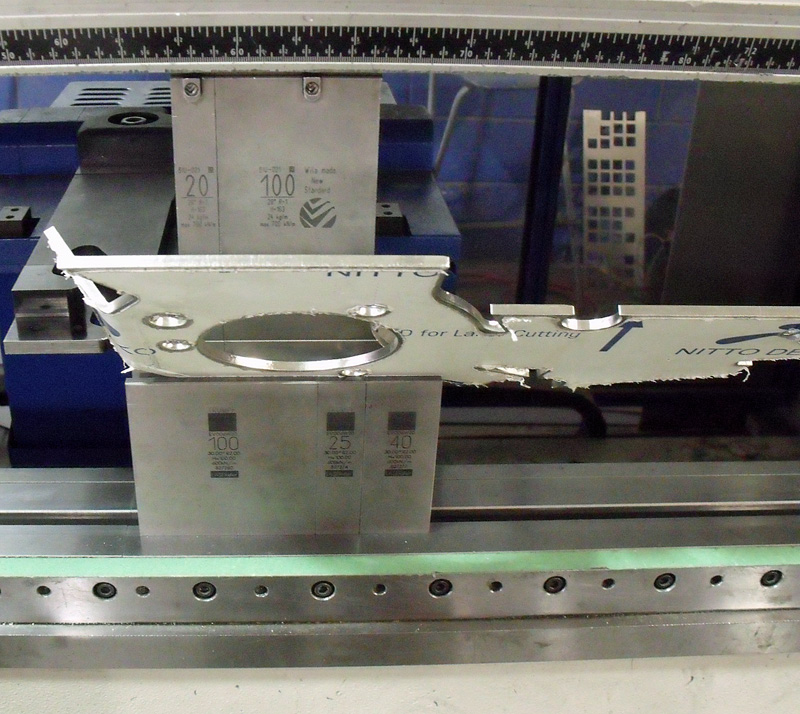
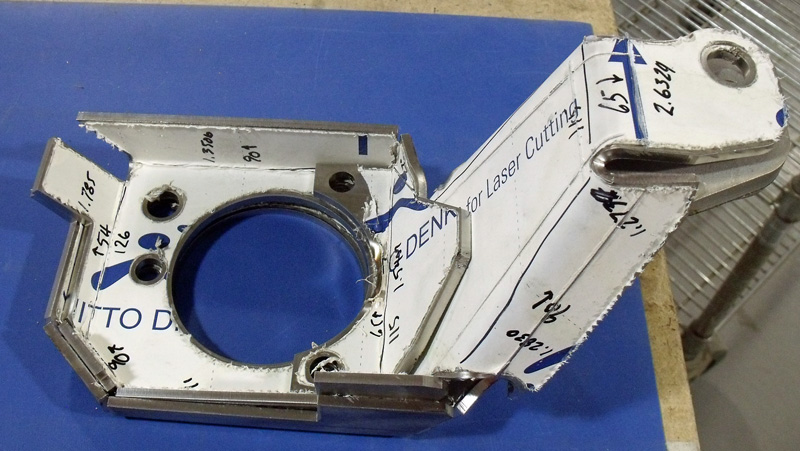
Received word from Coppertop01 that parts are cut, formed and heading to Houston for me to weld. He was very gracious to take some pictures as they were made.
These are shims to space the rotor from the hub.
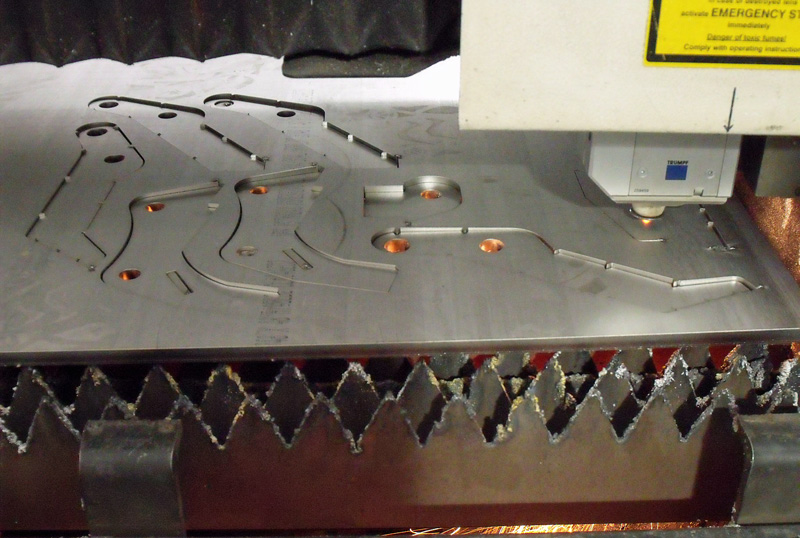
It may not be apparent from the photo, but that is 3/8" thick stainless plate these parts are cut from.
The laser cutter uses a 3,200 Watt CO2 laser that operates in the IR spectrum.
Depending on what your cutting, the cut can be as small as .030"
There are two tables that the cutter works over, so you can load/unload one table while it cutting over the other. Each table is 5ft wide and 10ft long. A jib crane is used to load the 500 lb plates on the table.
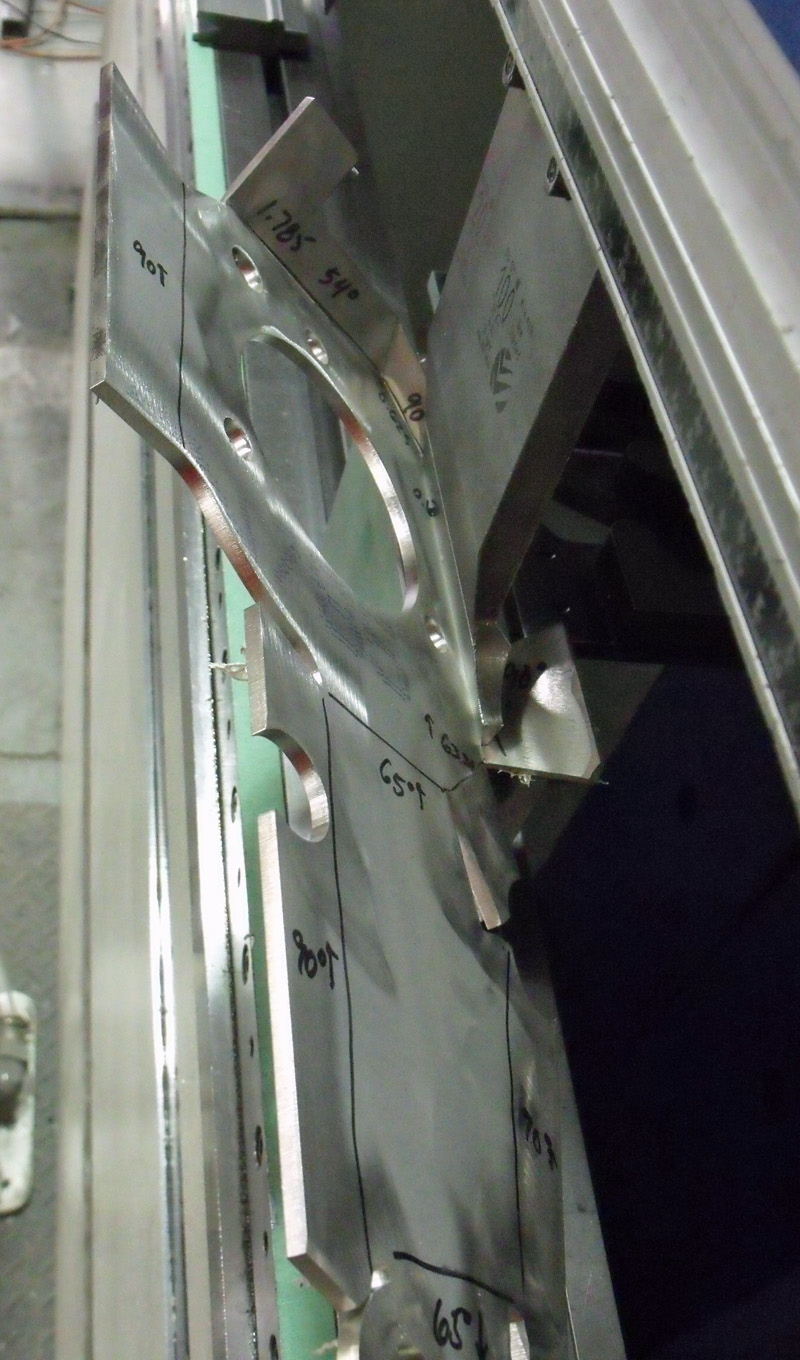
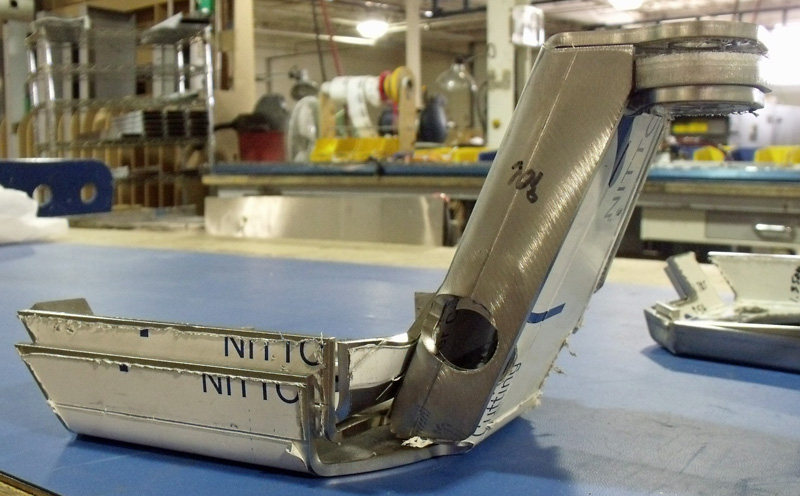
Flat parts waiting to be formed
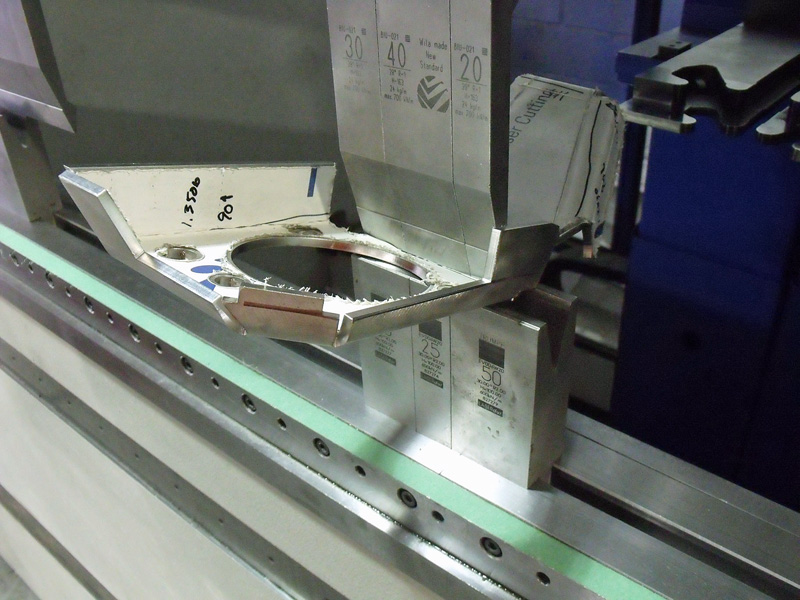
The parts are formed on a press brake, this allows you to put a perfect bend with a known radius to any degree to you can fit on the die.
Even though these are made from 3/16" ss, it"s still sheet metal.
The press brake can bend a sheet up to 10 ft wide with up to 140 metric tons of pressure, this unit has dual 3 axis guides.
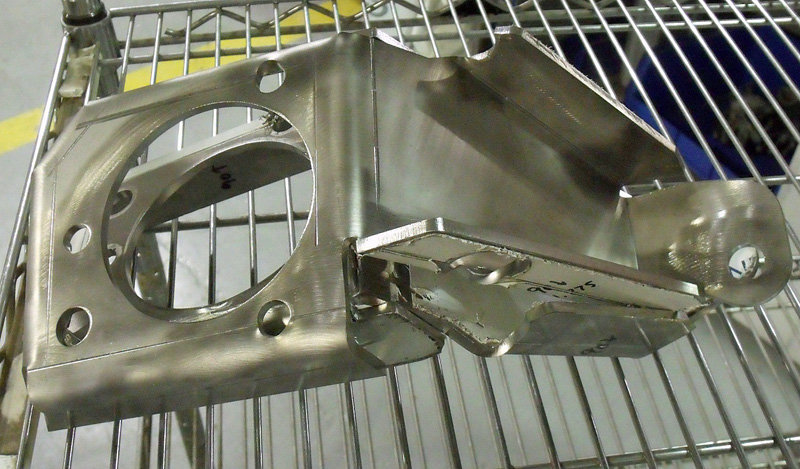
Next step is welding all the parts together to make a lowered, big bearing knuckle for an 88 fiero.
My thanks to coppertop01 for all his top notch work.
------------------ yellow 88 GT, not stock white 88 notchie, 4 banger
Received word from Coppertop01 that parts are cut, formed and heading to Houston for me to weld. He was very gracious to take some pictures as they were made.
*snip*
My thanks to coppertop01 for all his top notch work.
Wow, I've never read through this thread before. Amazing what your're doing here! I really like the notchie with with the flipper front end.
I wish someone would design a suspension that would leave the '88 suspension in the dust. So instead of upgrading an '84-'87 rear suspension to '88, it could be upgraded to a setup with better geometry than even an '88. Solidworks and other developments in CAD/CAM, CNC, etc. have enabled us to continue on where Fiero designers left off nearly 30 years ago.
Maybe something like a 4-link setup, or a double wishbone rear suspension.
Either way, please keep the pictures and this build thread coming.
It's just no fair that we don't all have free access to multi-million dollar machining and metal forming shops! All the productive things that could be done... (not to mention all the expensive metal that would end up in the scrap bin after folding it the wrong way!) So tell us the truth... how many knuckle pieces did we not see? Where's the reject pile?
Seriously, this looks amazing. Can't wait to see more.
So tell us the truth... how many knuckle pieces did we not see? Where's the reject pile?
Actually this kind of work is my stock and trade. Giving the advancements of 3D cad, and a good sheet metal shop, and years of experience, I can find the major design issues before it ever leaves my work station. Coppertop_1 can spot production issues before it's made. Together we make a good team.
There were two different sets made, His, custom designed for cobalt/ion hubs and stock geometry, and mine, custom designed for bigger vue hubs, wide rims, and is lowered. Both sets came out pretty well and fitted up with out too much work. No scrap parts, no extra pieces.
Now that I have the parts in my hands, I have a few ideas for improvements though.
I'll be taking pictures of the weld up and post soon.
Thanks,
------------------ yellow 88 GT, not stock white 88 notchie, 4 banger
CC is right, the pieces that I cut mine and CC's out of are the original pieces, no scrap pieces, thats not saying there wasn't a couple small problems, a couple bends fell into the die during bending, but nothing that can't be repaired with some brute strength and a little more welding. I can't believe how well everything came out, 3D cad is amazing when its done right and the proper tolerances are used in the design stage.
3D cad is amazing when its done right and the proper tolerances are used in the design stage.
Jer
I second that statement. It really helps you to foresee any design flaws before a part is even made / money is wasted. As long as you understand manufacturing processes available, as well as tolerances, you're gold!
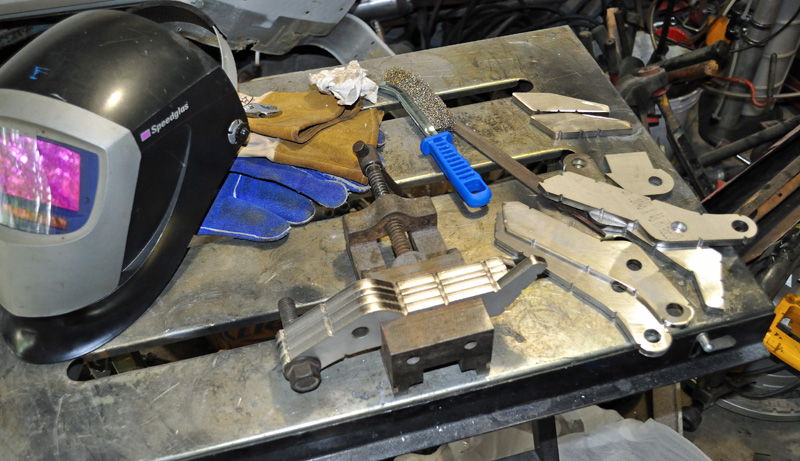
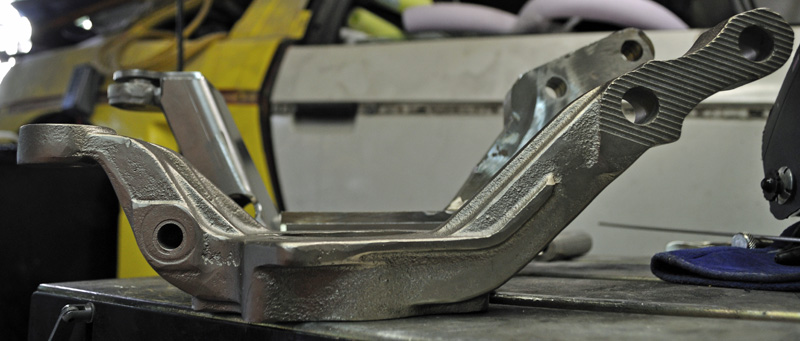
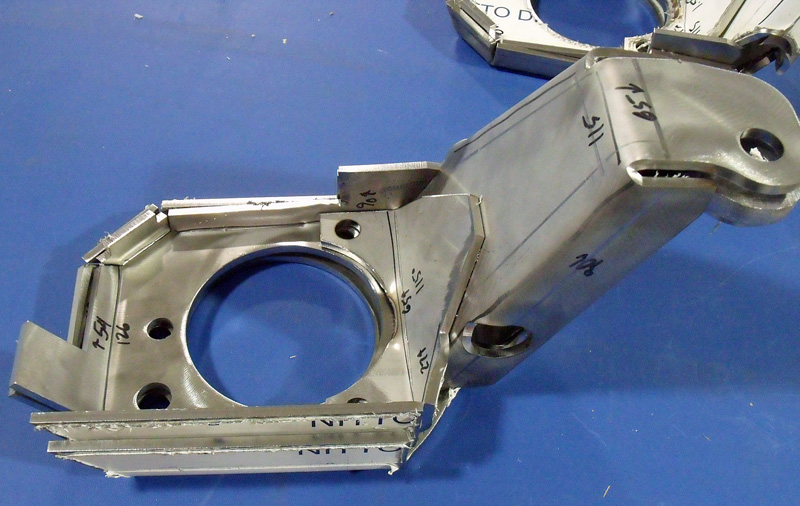
Received my parts from Coppertop01 last week and started in on the welding.
The strut mount portion is laminated, typically this would be a solid waterjetted part, but we improvised with the materials and machines we had out our disposal.
I added weld reliefs for ease of alignment of the laminates and to change the bending characteristics from a leaf spring to more like a solid bar.
Certain faces of the strut mount need to ground back to flat to fit flush on the next part of the assembly.
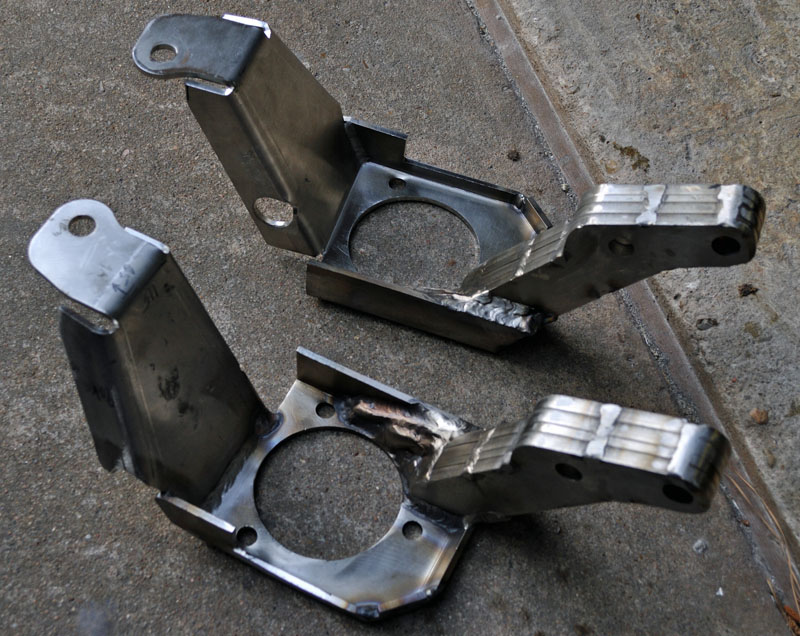
Both sets done, just need a little more prep for the next stage, more to come.
------------------ yellow 88 GT, not stock white 88 notchie, 4 banger
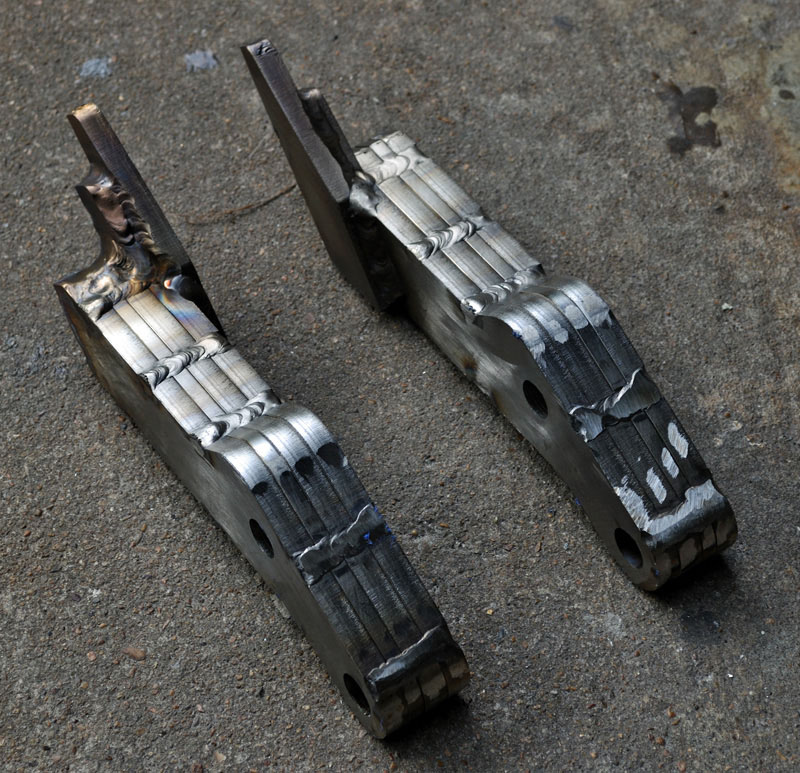
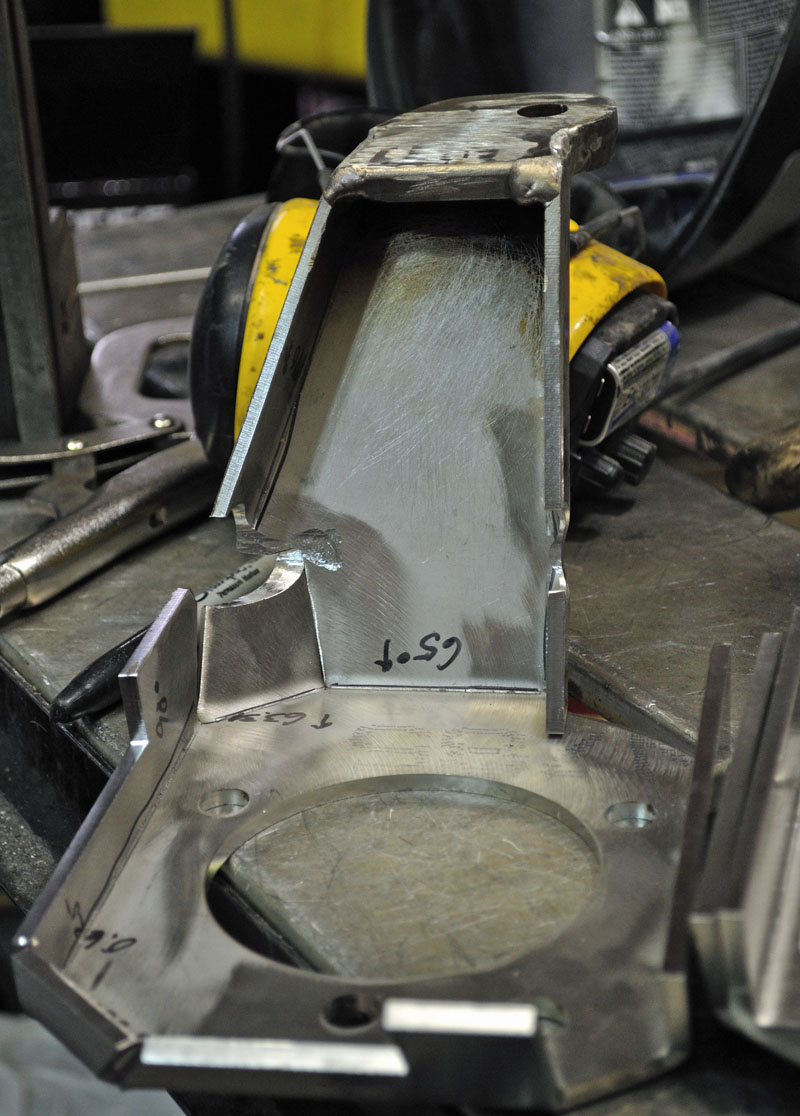
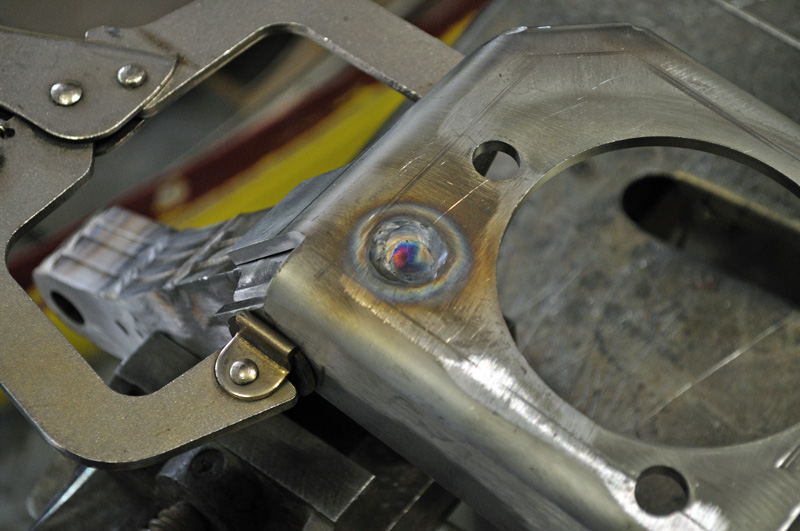
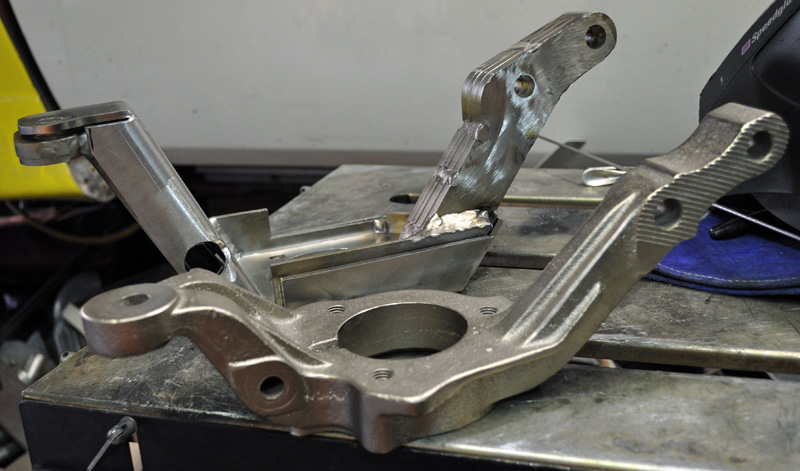
Continuing on with the welding, the two sheet metal halves of the knuckle need to be boxed before assembly.
The horizontal linkage fill piece is welded to the outer shell.
The two shells are bolt clamped together in prep to weld the inside seams of the inner shell. This sets the angle for the nested parts.
This side was a special case. I cut the inside piece in half and welded it back together because it was inadvertently bent and unbent in one place and stretched the metal.
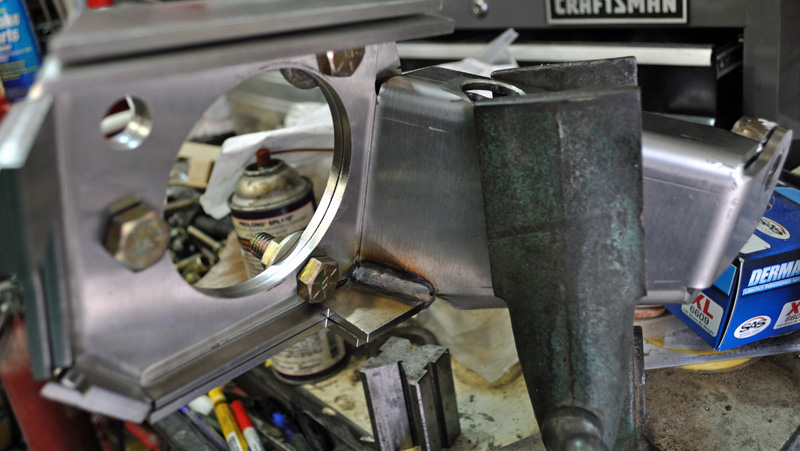
The knuckle really starts taking shape when you weld the strut mount onto the sheet metal parts. The weld bung hole on the face of the knuckle half anchors the strut mount to the inside knuckle half. Later it will be welded to the outside half bung hole.
The strut mounts are fully perimeter welded to the inside sheet metal part.
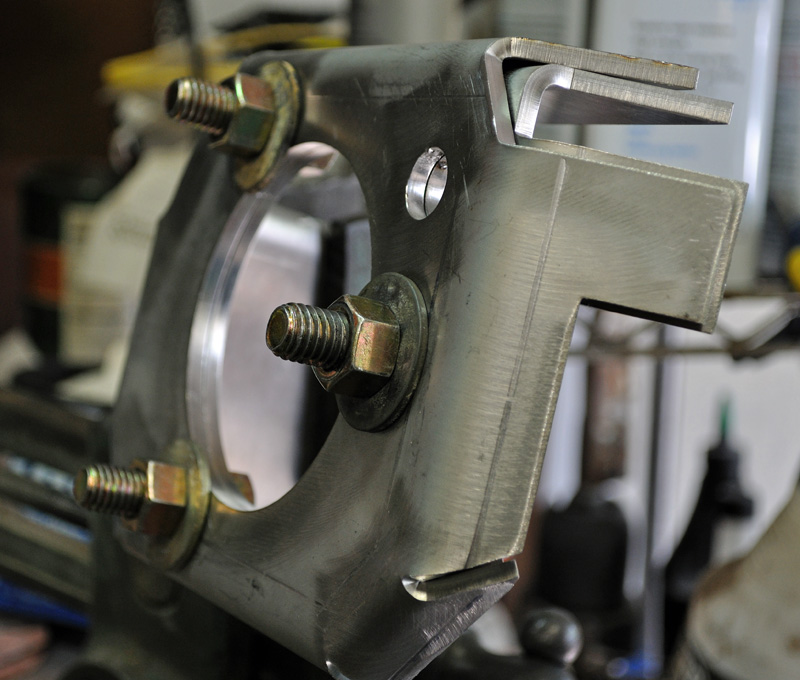
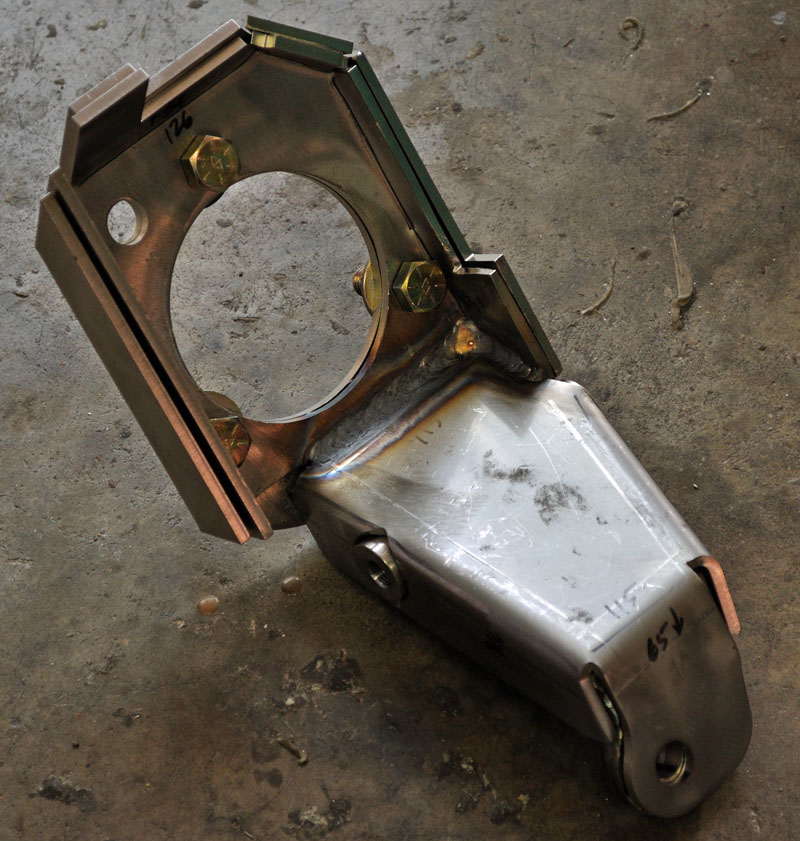
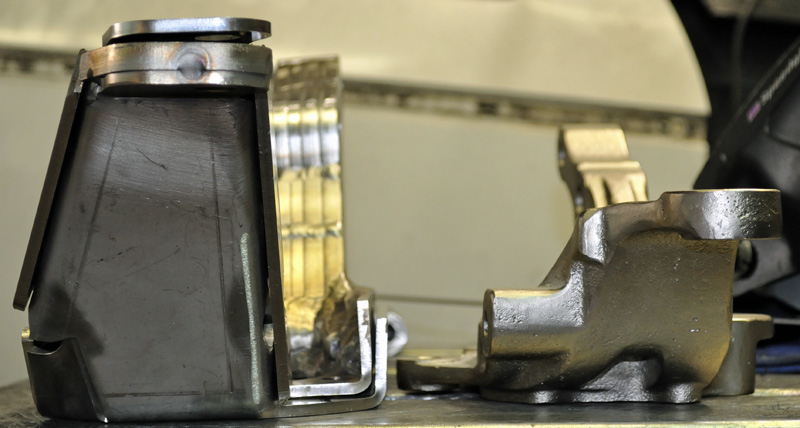
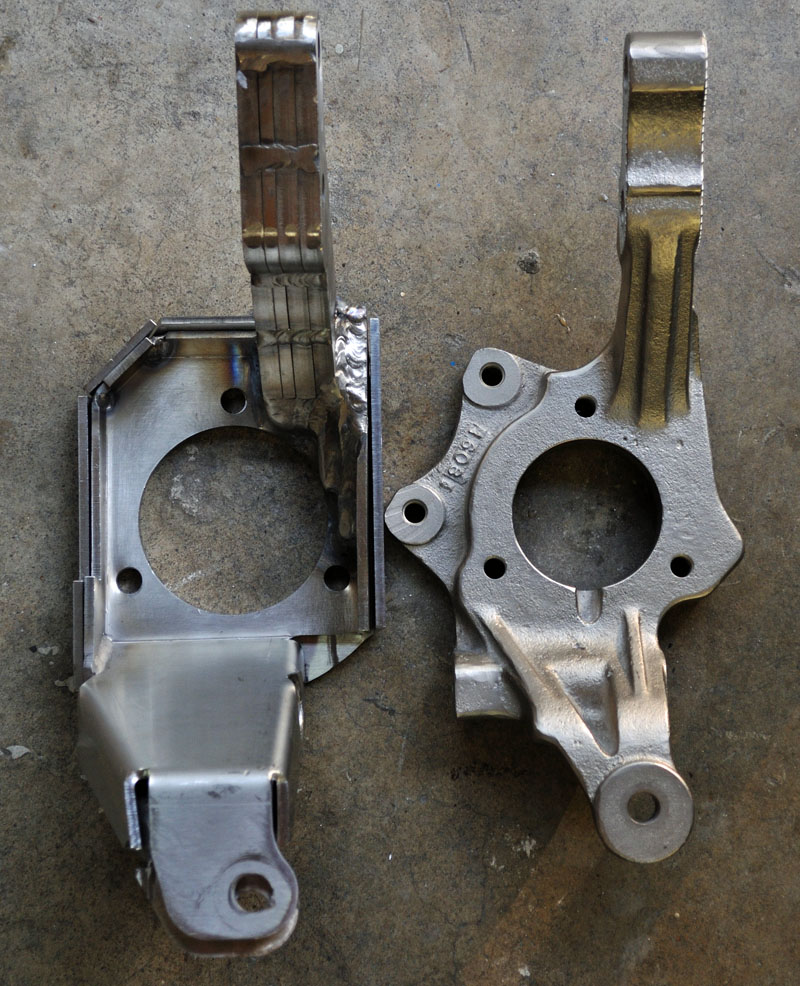
You can start to see the difference in the new piece and the stock 88 knuckle
The offset difference is shown.
These guys are made to fit a lot deeper wheel.
It may not be apparent from this angle but the axle location is lowered too.
Ran out of argon, more to come.
------------------ yellow 88 GT, not stock white 88 notchie, 4 banger
I'm curious, why did you decide on using the existing 3-link setup with improved geometry, instead a 4-link, or other more modern setup? It looks like you really know suspension geometry, and the Fiero could use a more modern setup.
Wellll, originally I was just going to do an engine swap and get the car back on the road, that was 2007, then I came across some cool parts, and you know the rest of the story.
The 3-link is a pretty good design for a strut based suspension, it only lacks a good camber gain. To do better in a fiero, I would drop the strut and do full on SLA type, but they would mean a whole new sub frame and mods to the chassis space frame to boot.
To get the camber gain in a good usable zone with these new knuckles, I just need to raise the inboard toe mounts about an inch. That's a whole lot easier then adding another whole set of tie in points a foot above the lower mounts.
My main goal was to get away from the weeny fiero hub bearing and use cheap wide wheels along with off the shelf axles that fit the MU3 transmission and Vue hubs.
------------------ yellow 88 GT, not stock white 88 notchie, 4 banger
Couldn't you achieve the same result by lowering the lateral link attachment points on the knuckle an inch? Or would this change the roll center compared to raising the inboard attachment points? Is there even room to lower the knuckle attachment points without interfering with the trailing arm?
You can, and I did, to a point. You need to lower both the laterals and trailing link together. Increasing the angle of the trailing will increase anti-squat.
There is a pretty good twist that goes on when brake is applied between these points. As you move away from the axle centerline and at the same time move away from the wheel centerline, it multiplies the torque applied so you have to add more metal to keep it from bending.
Moving the inboard lateral pickups does not change that twist in the knuckle, so it's cool.
Moving either pickup point will effect the roll center, and in the case of my rear end, I'm trying to raise it up. The front is a whole other animal.
------------------ yellow 88 GT, not stock white 88 notchie, 4 banger
Originally posted by ccfiero350: Wellll, originally I was just going to do an engine swap and get the car back on the road, that was 2007, then I came across some cool parts, and you know the rest of the story. The 3-link is a pretty good design for a strut based suspension, it only lacks a good camber gain. To do better in a fiero, I would drop the strut and do full on SLA type, but they would mean a whole new sub frame and mods to the chassis space frame to boot. To get the camber gain in a good usable zone with these new knuckles, I just need to raise the inboard toe mounts about an inch. That's a whole lot easier then adding another whole set of tie in points a foot above the lower mounts. My main goal was to get away from the weeny fiero hub bearing and use cheap wide wheels along with off the shelf axles that fit the MU3 transmission and Vue hubs.
I know how that is. I'm guessing by the time you'll finish the build you'll probably replace the now aged LSJ with an LNF motor. - I guess that's the nature of long-term builds.
You have a point with the 3-link suspension. I'm not that lucky. I have a pre '88 so I don't even have a trailing link. I know I could put in an '88 rear end, but that's a lot of effort. (finding an '88, separating the motor from the cradle, separating my motor from cradle, etc. )
At that point it may be fun to do an even better version than just the '88 suspension, hence my idea of a double wishbone.
I had to look up the term "SLA", as I just know it as an unequal A-arm double wishbone suspension. Then again "SLA" is much faster to say, and also yielded this cool video:
I see how making a mount for the UCL (upper control arm) would be difficult, but I think there may be a way of mounting one by just modifying the cradle and leaving the rest of the Fiero Space-frame stock. (maybe tying it into the stock upper strut mount) Kind of like the people who made the above video. Agent 47 Granted, this is for a front end, but a similar approach of triangulation may still work. What do you think?
[This message has been edited by Austrian Import (edited 04-13-2011).]
I know how that is. I'm guessing by the time you'll finish the build you'll probably replace the now aged LSJ with an LNF motor. - I guess that's the nature of long-term builds.
Actually, while the LNF motor is newer and delivers more power stock, There isnt enough aftermarket demand for power modifications as compared to the LSJ. The biggest reason is that the LNF is direct injected and there is no supplier that offers a direct injector of higher capacity than the stock. The LSJ thought has alot more room to add and for much less $.
Originally posted by ccfiero350: That Boxster subframe is a great example of what a SLA rear should look like. The Agent 47 video demonstrates exactly what happens to the 88 tri-link rear set up. What I'm trying to do is to get it behave a little better.
So do you think a setup like this is feasible on a Fiero? The way I envision it by modifying (or redesigning, while keeping the stock attachment points) a Fiero cradle, while keeping the Fiero spaceframe intact? Or do you see it as more involved?
Could you elaborate on your take of the Agent 47 video? I'm confused if you meant the 88 tri-link setup is like the "before" part of using McPhaerson struts with very aggressive camber angle, or the "after' part where one would use the Agent 47 SLA "drop in" adapter?
aussie, might have you covered with the 88 cradle, guess you haven't seen my build? CC dropped me some plans for a 88 cradle and from there I was able to autocad, laser, form and weld a new 88 style cradle custom built to take a LSJ and F35 transmission.
The previous guy was right about the LNF's, they are a great motor, but there is some large problems with using it as a bolt in motor, the LSJ is much easier with a greater array of aftermarket support and removing the blower and putting on a turbo is fairly easy.
CC.......that boxter rear end gives me idea's, although I ain't doing that to my car, maybe the next one.


 The corvette rack moves the the steering shaft just a bit to the drivers side. I was disappointed to find my rack is
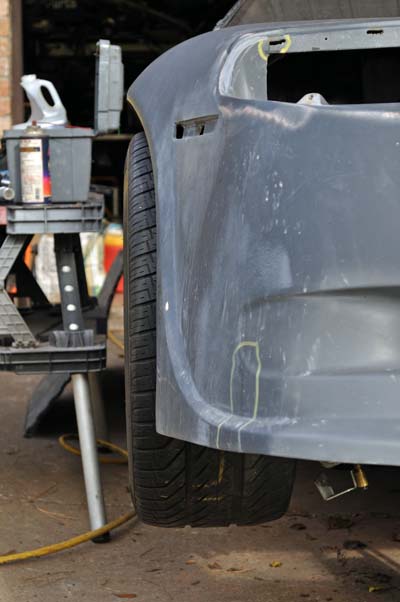


 It's just no fair that we don't all have free access to multi-million dollar machining and metal forming shops!
  All the productive things that could be done... (not to mention all the expensive metal that would end up in the scrap bin after folding it the wrong way!) So tell us the truth... how many knuckle pieces did we not see? Where's the reject pile?