Pennock's Fiero Forum
  The Construction Zone
  "VERT" build thread (Page 2)

Post New Topic  Post A Reply
Email This Page to Someone! | Printable Version

This topic is 6 pages long:  1   2   3   4   5   6 
Previous Page | Next Page
next newest topic | next oldest topic
"VERT" build thread by YELLOWFIERO88
Started on: 07-14-2005 10:39 PM
Replies: 209 (22707 views)
Last post by: FIERO JOHN-WI on 02-19-2021 10:41 AM
bubbajoexxx
Member
Posts: 1630
From: Ontario Canada
Registered: Aug 2003


Feedback score: N/A
Leave feedback


Total ratings: 112
Rate this member

Report this Post11-21-2005 05:43 PM Click Here to See the Profile for bubbajoexxxClick Here to visit bubbajoexxx's HomePageSend a Private Message to bubbajoexxxEdit/Delete MessageReply w/QuoteDirect Link to This Post
updates please
IP: Logged
YELLOWFIERO88
Member
Posts: 1329
From: Cincinnati, Ohio
Registered: Nov 2004


Feedback score: (1)
Leave feedback

Rate this member

Report this Post11-22-2005 12:32 AM Click Here to See the Profile for YELLOWFIERO88Click Here to visit YELLOWFIERO88's HomePageSend a Private Message to YELLOWFIERO88Edit/Delete MessageReply w/QuoteDirect Link to This Post
Sorry bubba i have been doing other things. I went through all my fiero parts and put them in bins with labels on them.it was just getting to be a mess upstairs. I got a ranger that I am puting air ride on that I will be finishing over the weekend. When I get done with that I will be back on the VERT again I also bought my 2 post lift the other day so I will be working on putting a footer in for that and getting it up and running to drop the craddle out
IP: Logged
Fie Ro
Member
Posts: 3735
From: Soest, The Netherlands
Registered: Sep 2001


Feedback score: N/A
Leave feedback


Total ratings: 132
Rate this member

Report this Post11-22-2005 04:48 PM Click Here to See the Profile for Fie RoSend a Private Message to Fie RoEdit/Delete MessageReply w/QuoteDirect Link to This Post
I got some associations seeing the pics of the speedboat and your window shapes
 
quote
Originally posted by YELLOWFIERO88:


..ah finally found it:

IP: Logged
YELLOWFIERO88
Member
Posts: 1329
From: Cincinnati, Ohio
Registered: Nov 2004


Feedback score: (1)
Leave feedback

Rate this member

Report this Post11-27-2005 10:23 PM Click Here to See the Profile for YELLOWFIERO88Click Here to visit YELLOWFIERO88's HomePageSend a Private Message to YELLOWFIERO88Edit/Delete MessageReply w/QuoteDirect Link to This Post
well I worked on it today, concentrating on the C-Piller area. I got both sides boxed in and primered. Then worked on geting the rest of the interior out of the way.

I cut off the post to the height I wanted it at

Next I took and welded in a piece of 1/8" flat stock
IP: Logged
YELLOWFIERO88
Member
Posts: 1329
From: Cincinnati, Ohio
Registered: Nov 2004


Feedback score: (1)
Leave feedback

Rate this member

Report this Post11-27-2005 10:26 PM Click Here to See the Profile for YELLOWFIERO88Click Here to visit YELLOWFIERO88's HomePageSend a Private Message to YELLOWFIERO88Edit/Delete MessageReply w/QuoteDirect Link to This Post

YELLOWFIERO88

1329 posts
Member since Nov 2004
Then I ground down the edge to follow the contour of the pillar.

Then put a coat of primer to protect the bare metal.

I also got more of the interior out of it to be cleaned

IP: Logged
YELLOWFIERO88
Member
Posts: 1329
From: Cincinnati, Ohio
Registered: Nov 2004


Feedback score: (1)
Leave feedback

Rate this member

Report this Post11-28-2005 10:42 PM Click Here to See the Profile for YELLOWFIERO88Click Here to visit YELLOWFIERO88's HomePageSend a Private Message to YELLOWFIERO88Edit/Delete MessageReply w/QuoteDirect Link to This Post
RHD anyone?????? I got the column mounted tonight.


I hope to be done with the conversion by this weekend. I do have several questions as to some of the electrial componants. Like there is a black box that mounts in the center console opposite of where the performance sound would go. There is a couple other thingy's that I do not know what they are. So if anyone is really good at knowing what all the components are, get ahold of me please!!!! I want the wiring as clean as can be and in order for me to do that I need to know what everything is.

Tell me what you guys think so far.

IP: Logged
greengoblin0129
Member
Posts: 2670
From: Indy
Registered: Mar 2005


Feedback score: (5)
Leave feedback


Total ratings: 102
Rate this member

Report this Post11-28-2005 10:50 PM Click Here to See the Profile for greengoblin0129Click Here to visit greengoblin0129's HomePageSend a Private Message to greengoblin0129Edit/Delete MessageReply w/QuoteDirect Link to This Post
WOW, looks good so far. Can't wait to see it when it's done. POST MORE PICS

***My 700th Post ***

[This message has been edited by greengoblin0129 (edited 11-28-2005).]

IP: Logged
Helo-mech
Member
Posts: 161
From: Sauk Rapids, Minnesota, USA
Registered: Feb 2002


Feedback score: N/A
Leave feedback

Rate this member

Report this Post11-29-2005 12:33 AM Click Here to See the Profile for Helo-mechClick Here to visit Helo-mech's HomePageSend a Private Message to Helo-mechEdit/Delete MessageReply w/QuoteDirect Link to This Post
 
quote
Originally posted by YELLOWFIERO88:


Tell me what you guys think so far.

Let me guess, the gas pedal is going away, and a throttle lever is going on the door?

Man, I can't wait untill next spring when I can finally put time in MY car...

------------------

My house is almost done, and my 85 GT wants more power! Soon to be - 3800SC!

Check out my Fiero project page!

IP: Logged
YELLOWFIERO88
Member
Posts: 1329
From: Cincinnati, Ohio
Registered: Nov 2004


Feedback score: (1)
Leave feedback

Rate this member

Report this Post11-29-2005 01:03 PM Click Here to See the Profile for YELLOWFIERO88Click Here to visit YELLOWFIERO88's HomePageSend a Private Message to YELLOWFIERO88Edit/Delete MessageReply w/QuoteDirect Link to This Post
 
quote
Originally posted by Fie Ro:

I got some associations seeing the pics of the speedboat and your window shapes
..ah finally found it:

Do you think I could use that windshield?

 
quote
Originally posted by Helo-mech:

Man, I can't wait untill next spring when I can finally put time in MY car...

What you going to let a little cold stop you? Why wait till spring??

IP: Logged
FIEROPHREK
Member
Posts: 4424
From: a dig
Registered: Mar 2004


Feedback score: (5)
Leave feedback


Total ratings: 137
Rate this member

Report this Post11-29-2005 01:39 PM Click Here to See the Profile for FIEROPHREKSend a Private Message to FIEROPHREKEdit/Delete MessageReply w/QuoteDirect Link to This Post
 
quote
Originally posted by YELLOWFIERO88:
RHD anyone?????? I got the column mounted tonight.

Thats cool ! I am really intereted in a RHD fiero. I would love to be able to get one. Might just have to mod one, one day

------------------
HARDCORE SBC CRONIE AND PROUD OF IT ! GOT TQ ?

IP: Logged
Helo-mech
Member
Posts: 161
From: Sauk Rapids, Minnesota, USA
Registered: Feb 2002


Feedback score: N/A
Leave feedback

Rate this member

Report this Post11-29-2005 01:53 PM Click Here to See the Profile for Helo-mechClick Here to visit Helo-mech's HomePageSend a Private Message to Helo-mechEdit/Delete MessageReply w/QuoteDirect Link to This Post
 
quote
Originally posted by YELLOWFIERO88:


What you going to let a little cold stop you? Why wait till spring??


My sig says it all...

------------------

My house is almost done, and my 85 GT wants more power! Soon to be - 3800SC!

Check out my Fiero project page!

IP: Logged
PFF
System Bot
YELLOWFIERO88
Member
Posts: 1329
From: Cincinnati, Ohio
Registered: Nov 2004


Feedback score: (1)
Leave feedback

Rate this member

Report this Post11-29-2005 11:26 PM Click Here to See the Profile for YELLOWFIERO88Click Here to visit YELLOWFIERO88's HomePageSend a Private Message to YELLOWFIERO88Edit/Delete MessageReply w/QuoteDirect Link to This Post
Well I did not get much done tonight. I battled with the lug nuts on the front wheels for about an hour and a half . A high amount of torque, a sledge hammer and a tourch finnaly got them off.

I got the front suspension setup out tonight. I figure it will be alot easier to mount the rack with it out of the car. I will also go ahead and mount the air bags, paint, and install the poly bushings while it is out. That way when it goes back in it is done. Tomorrow I will be mocking up the rack and getting it all welded together. so there will be an update hopefully tomorrow

IP: Logged
YELLOWFIERO88
Member
Posts: 1329
From: Cincinnati, Ohio
Registered: Nov 2004


Feedback score: (1)
Leave feedback

Rate this member

Report this Post12-01-2005 01:10 AM Click Here to See the Profile for YELLOWFIERO88Click Here to visit YELLOWFIERO88's HomePageSend a Private Message to YELLOWFIERO88Edit/Delete MessageReply w/QuoteDirect Link to This Post
Well I realized that I forgot to get measurements for the front bag mounts So being pissed off about having to put the front end back in just to take 1 measurement, I decided to clean the garage out. Tomorrow is another day and I will get the measurement taken and be back to where I was. Oh well part of the nature of the beast

IP: Logged
Joe Torma
Member
Posts: 3485
From: Hillsborough, NJ USA
Registered: Jul 2001


Feedback score: N/A
Leave feedback


Total ratings: 129
Rate this member

Report this Post12-01-2005 10:22 AM Click Here to See the Profile for Joe TormaClick Here to visit Joe Torma's HomePageSend a Private Message to Joe TormaEdit/Delete MessageReply w/QuoteDirect Link to This Post
You make quick progress! Looks good.
Looks like you're going to beat me to an air bag install....I'm too busy building my car's new home.
Any details as to what you're using?

[This message has been edited by Joe Torma (edited 12-01-2005).]

IP: Logged
YELLOWFIERO88
Member
Posts: 1329
From: Cincinnati, Ohio
Registered: Nov 2004


Feedback score: (1)
Leave feedback

Rate this member

Report this Post12-01-2005 12:05 PM Click Here to See the Profile for YELLOWFIERO88Click Here to visit YELLOWFIERO88's HomePageSend a Private Message to YELLOWFIERO88Edit/Delete MessageReply w/QuoteDirect Link to This Post
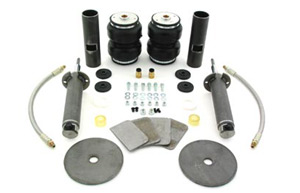
I will be using a 2500 easy street front bag and the easy street rear strut setup. Not sure what valves I will be using but they will be electric and 3/8". I dont want it too fast but I dont want it too slow. I will restrict the dump to 1/4" or smaller so that it don't slam on the ground. And yea I hope to lay it on the ground
http://www.easystreetair.com/index.asp?PageAction=VIEWPROD&ProdID=404
http://www.easystreetair.com/index.asp?PageAction=VIEWPROD&ProdID=690
Knock on wood I hope to have the air ride mounted before X-Mas. This will only happen if I can get everything sandblasted and painted by the 12/20/05. That will give me 4 more days that I can put things back together. It will also help that I have 8 more vacation day left to use up before the end of the year

[This message has been edited by YELLOWFIERO88 (edited 12-28-2005).]

IP: Logged
BERKELUSA
Member
Posts: 262
From: Manchester, New Hampshire USA
Registered: Apr 2005


Feedback score: N/A
Leave feedback

Rate this member

Report this Post12-01-2005 06:20 PM Click Here to See the Profile for BERKELUSAClick Here to visit BERKELUSA's HomePageSend a Private Message to BERKELUSAEdit/Delete MessageReply w/QuoteDirect Link to This Post
 
quote
Originally posted by YELLOWFIERO88:
Then I ground down the edge to follow the contour of the pillar.

Looks good, I followed the edge crease at the corner of the door where it just starts to bend IN then made hinges close to the corner as possible and got this: (no pics just a link to that page for ya) https://www.ammoman.com/Fiero/Rotted96.htm

Welcome to the FCC (Fiero Convertible Club) lol

------------------

Rob's (BERKELUSA) 1986'se - 6" inch stretched - Ferarri Vented - Convertible Project (95+ pages)

[This message has been edited by BERKELUSA (edited 12-01-2005).]

IP: Logged
YELLOWFIERO88
Member
Posts: 1329
From: Cincinnati, Ohio
Registered: Nov 2004


Feedback score: (1)
Leave feedback

Rate this member

Report this Post12-02-2005 01:30 AM Click Here to See the Profile for YELLOWFIERO88Click Here to visit YELLOWFIERO88's HomePageSend a Private Message to YELLOWFIERO88Edit/Delete MessageReply w/QuoteDirect Link to This Post
Wow I looked through some of your site and damn you got one heck of a build going there

Well I got my 2-post lift bolted in tight now all I need to do is mount the arms and wire it up. I should be able to finish that tomorrow after work

On the car, I got the rear springs taken out. Got the front springs, and bumpstops removed and the x-member bolted back in. Put the wheels back on and set it on the ground to get the measurements I need. I am not real happy with the height it is sitting. My goal is to have it lay floors on the ground. I am now about 2" from that goal. the problem is the pesty frame rail is in the way. I am going to have to reconsider my wheel/tire combo or deal with it not laying out. Right now it has a great raked stance to her that I like. Humm, humm, decisions, decisions. I called it quits early tonight so I could get a little sleep tonight. Here it is at 1:30 and I am still not in bed. LOL. Hopefully I decide on what I am going to do so I can start with the bag mounts on saturday morning. If that is the case then I will have all the suspension done by sunday night ready for paint. Then paint monday night, assemble on tuesday night.

When I get done with the suspension and the steering, I am going to get the fenders, hood and doors in primer and ready for paint. I have a love/hate relationship with bodywork. I love to hate doing it. This will allow me to break up some of the body work instead of waiting till the car is done mechanically then doing all the body at once. I love to paint, just hate doing the body part.

[This message has been edited by YELLOWFIERO88 (edited 12-02-2005).]

IP: Logged
ToonTownfiero
Member
Posts: 993
From: Saskatoon Saskatchewan
Registered: Apr 2004


Feedback score: N/A
Leave feedback

Rate this member

Report this Post12-02-2005 03:24 AM Click Here to See the Profile for ToonTownfieroClick Here to visit ToonTownfiero's HomePageSend a Private Message to ToonTownfieroEdit/Delete MessageReply w/QuoteDirect Link to This Post
If I even tried doing what you are doing I would end up with something that an autowrecker woudn't touch
keep up the hard work.

------------------

1985 2m4
Saskatoon, Sask Canada
Visit the Saskatoon Fiero Club Website at
http://www.freewebs.com/saskatoonfieros/
Come chat with us at our Forum
http://saskfiero.suddenlaunch.com/

IP: Logged
YELLOWFIERO88
Member
Posts: 1329
From: Cincinnati, Ohio
Registered: Nov 2004


Feedback score: (1)
Leave feedback

Rate this member

Report this Post12-04-2005 10:14 PM Click Here to See the Profile for YELLOWFIERO88Click Here to visit YELLOWFIERO88's HomePageSend a Private Message to YELLOWFIERO88Edit/Delete MessageReply w/QuoteDirect Link to This Post

Well I got the struts made today. I started by cutting off the mounts from the factory struts. They give you brackets in the kit but there is no holes drilled in them. I did not feal like drilling all the holes in them and then trying to slot the bottom for adjustment so that is why i cut them off.

I them took my measurement of where I wanted the car to lay at and transfomed it to the pipe. I then cut it to length.

Next I took and bolted the beackets to the spindle and welded the pipe to the brackets. Then slid the strut into the pipe and welded it to it. I added a tong for the brake line . I also took the upper mount and welded the bolts to it so that I would not have to use 2 wrenches to get it installed. I then shot it all in primer. I still have to clean up the strut shaft, but I wanted to make sure that it did not rust with the moisture in the air system.

[This message has been edited by YELLOWFIERO88 (edited 12-04-2005).]

IP: Logged
YELLOWFIERO88
Member
Posts: 1329
From: Cincinnati, Ohio
Registered: Nov 2004


Feedback score: (1)
Leave feedback

Rate this member

Report this Post12-07-2005 12:05 AM Click Here to See the Profile for YELLOWFIERO88Click Here to visit YELLOWFIERO88's HomePageSend a Private Message to YELLOWFIERO88Edit/Delete MessageReply w/QuoteDirect Link to This Post
[QUOTE]Originally posted by FIEROPHREK:

If you use the notchie rear clip then you'll have to go with the rear tailight style. Was that your original plan ? From your concept it looks like you have the fastback style rear on the car.

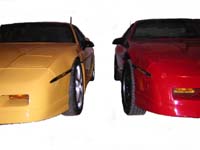
Well here is the answer:
Well I have no bags to work on the front so I screwed with the rear clip. It will be the hardest body part on the car. I am taking a fastback and molding the notchie front to it. I started by taking the parts car and getting the clip part off it I needed. Thanks loyde (fastfieros)

I then put it on the vert and did my measurements.

I measured from the front of the clip back 22" and that is where I cut the clip. I then took the notchie piece and measured the same, and cut her up. Masking tape and a permanate marker works great for marking it.

I then took the piece and test fit it. It fit perfect so I went ahead and ground it down. Using a paint stir, 2 vise grips, and some more masking tape I held it in position for the glassing. I went ahead and mixed resign, applied it, and waited for it to dry. Next will be some more triming and some foam work with a curry comb, then more glass work. This will be the hardest panel on the car so I will mess with it on and off till it is done as I have down time.

IP: Logged
YELLOWFIERO88
Member
Posts: 1329
From: Cincinnati, Ohio
Registered: Nov 2004


Feedback score: (1)
Leave feedback

Rate this member

Report this Post12-07-2005 11:50 PM Click Here to See the Profile for YELLOWFIERO88Click Here to visit YELLOWFIERO88's HomePageSend a Private Message to YELLOWFIERO88Edit/Delete MessageReply w/QuoteDirect Link to This Post

YELLOWFIERO88

1329 posts
Member since Nov 2004
Well I worked on it tonight. I am back on the front end again. I got the front suspension out again.

I cut the factory brackets off and ground it smooth.

I then made new brackets out of 1" box tube. I drilled the holes and mounted the brackets to the rack. I then positioned it on the x-member and welded it in position.

slapped a little paint on it so that dont rust till I get it to the powdercoater

IP: Logged
PFF
System Bot
BobadooFunk
Member
Posts: 5436
From: Pittsburgh PA
Registered: Jun 2003


Feedback score: N/A
Leave feedback


Total ratings: 128
Rate this member

Report this Post12-08-2005 03:47 AM Click Here to See the Profile for BobadooFunkClick Here to visit BobadooFunk's HomePageSend a Private Message to BobadooFunkEdit/Delete MessageReply w/QuoteDirect Link to This Post
wow , awesome job.. i cant wait to see a Fiero with completed air bag setup!! Joe i WAS waitin for YOU!!

keep up with the pix!!

------------------

https://www.fiero.nl/forum/Forum1/HTML/050262.html "Ritalin"
See all of my movies!

IP: Logged
Joe Torma
Member
Posts: 3485
From: Hillsborough, NJ USA
Registered: Jul 2001


Feedback score: N/A
Leave feedback


Total ratings: 129
Rate this member

Report this Post12-08-2005 10:30 AM Click Here to See the Profile for Joe TormaClick Here to visit Joe Torma's HomePageSend a Private Message to Joe TormaEdit/Delete MessageReply w/QuoteDirect Link to This Post
I know, I know...this guy works really fast! My glass beads got damp and my shop vac failed so I couldn't finish 'blasting my crossmember(the most recent holdup). He's being sponsored too(lucky!)

Yellow...just curious...why are you converting to RHD?

[This message has been edited by Joe Torma (edited 12-08-2005).]

IP: Logged
YELLOWFIERO88
Member
Posts: 1329
From: Cincinnati, Ohio
Registered: Nov 2004


Feedback score: (1)
Leave feedback

Rate this member

Report this Post12-08-2005 12:25 PM Click Here to See the Profile for YELLOWFIERO88Click Here to visit YELLOWFIERO88's HomePageSend a Private Message to YELLOWFIERO88Edit/Delete MessageReply w/QuoteDirect Link to This Post
Thanks BobadooFunk

Not sponsered yet but hopefully I will be. So far alll out of my empty wallet. I am waiting till I get a little farther on it to send in all my stuff for the sponsorship.

As for the RHD????........Why not? It has really not been done(one other I have seen and it is not in the states). I want to show off my fab skills because I am getting everything ready for my own shop. This is going to be kinda a "show off car" that shows what I can do.

Joe, these rear struts are really nice if you have not done your rear yet. If interested then let me know and I will get you wholesale $$$ on them
Brian

IP: Logged
Joe Torma
Member
Posts: 3485
From: Hillsborough, NJ USA
Registered: Jul 2001


Feedback score: N/A
Leave feedback


Total ratings: 129
Rate this member

Report this Post12-08-2005 01:39 PM Click Here to See the Profile for Joe TormaClick Here to visit Joe Torma's HomePageSend a Private Message to Joe TormaEdit/Delete MessageReply w/QuoteDirect Link to This Post
May take you up on that, if this doesn't work out...

Still have to finish welding the other side.

Question about that setup...how does the top of the strut seal, and pivot?

Empty wallet...I hear that.

[This message has been edited by Joe Torma (edited 12-08-2005).]

IP: Logged
Morkidan
Member
Posts: 386
From: Cincinnati, OH
Registered: Oct 2003


Feedback score: N/A
Leave feedback

Rate this member

Report this Post12-08-2005 02:18 PM Click Here to See the Profile for MorkidanSend a Private Message to MorkidanEdit/Delete MessageReply w/QuoteDirect Link to This Post
Looking good man! I know who Im calling when I need help with something on my car lol

------------------
86 2.8 V6 fastback GT 65k original miles
2004 SRT-4 stage1

IP: Logged
exoticse
Member
Posts: 8650
From: Orlando, Fl
Registered: Jun 2003


Feedback score: N/A
Leave feedback


Total ratings: 108
Rate this member

Report this Post12-09-2005 07:15 AM Click Here to See the Profile for exoticseSend a Private Message to exoticseEdit/Delete MessageReply w/QuoteDirect Link to This Post
 
quote
Originally posted by Morkidan:

Looking good man! I know who Im calling when I need help with something on my car lol

I know what you mean ! I still got my 86 coupe up the road at my folks house in Middletown,..watching him work has got the ideas going in my mind for sure !

I have always wanted a roadster hehehehe.

IP: Logged
YELLOWFIERO88
Member
Posts: 1329
From: Cincinnati, Ohio
Registered: Nov 2004


Feedback score: (1)
Leave feedback

Rate this member

Report this Post12-14-2005 12:03 AM Click Here to See the Profile for YELLOWFIERO88Click Here to visit YELLOWFIERO88's HomePageSend a Private Message to YELLOWFIERO88Edit/Delete MessageReply w/QuoteDirect Link to This Post
UGGGHHHHH!!!!!!!!!!!!!!! flood control
IP: Logged
YELLOWFIERO88
Member
Posts: 1329
From: Cincinnati, Ohio
Registered: Nov 2004


Feedback score: (1)
Leave feedback

Rate this member

Report this Post12-14-2005 12:19 AM Click Here to See the Profile for YELLOWFIERO88Click Here to visit YELLOWFIERO88's HomePageSend a Private Message to YELLOWFIERO88Edit/Delete MessageReply w/QuoteDirect Link to This Post

YELLOWFIERO88

1329 posts
Member since Nov 2004
Well the computer has been down here I got the rear suspension completley torn apart, bushings burnt out, and sent off to the powdercoater. I am having a silver metalic powder then topcoated with a clear powder. It will look really good when it is done


I started on the front suspension today. I started by notching the x-member so I have plenty of room for the bag. I used a piece of 8"o.d. pipe with a thickness of 3/8". I really notched it back so I want it plenty strong. Plus I had it laying here.

I removed the factory spring perch and I am making a new bolt in one. I got it started but not finished. Tomorrow is another day. I need all the front tore apart with bushing burnt out before friday night so it can be done before my powder coater goes on vacation. No rush or anything. LOL

------------------

88GT 3.4SC
88GT T-TOP
87GT VERT (build in progress)
www.fiero.nl/forum/Forum1/HTML/053203.html

IP: Logged
YELLOWFIERO88
Member
Posts: 1329
From: Cincinnati, Ohio
Registered: Nov 2004


Feedback score: (1)
Leave feedback

Rate this member

Report this Post12-18-2005 05:22 PM Click Here to See the Profile for YELLOWFIERO88Click Here to visit YELLOWFIERO88's HomePageSend a Private Message to YELLOWFIERO88Edit/Delete MessageReply w/QuoteDirect Link to This Post
Well everything is at the powder coater getting a metalic silver coating
http://eastwood.com/shopping/product/detailmain.jsp?itemID=10342&itemType=PRODUCT&iMainCat=844&iSubCat=847&iProductID=10342
I finished up the x-member friday night and got it down to get the powder applied over the weekend. I have to pick it up tuesday night and will get the bushings put back in and the whole thing assembled. I am not sure if it will be reinstalled in the car yet or not. The company wants to display the whole front setup at this years Cavalcade of customs (better known as autorama, or world of wheels) show . Here is what it looks like.


more updates tuesday.
IP: Logged
YELLOWFIERO88
Member
Posts: 1329
From: Cincinnati, Ohio
Registered: Nov 2004


Feedback score: (1)
Leave feedback

Rate this member

Report this Post12-19-2005 11:48 PM Click Here to See the Profile for YELLOWFIERO88Click Here to visit YELLOWFIERO88's HomePageSend a Private Message to YELLOWFIERO88Edit/Delete MessageReply w/QuoteDirect Link to This Post
Got the engine ready to drop out tonight. I got one stubbron bolt on the cradle that wont come out and the oxygen tank is empty. I am getting it filled tomorrow and will finish droping it out. I picked up a qt of my paint. It is going to be the sunburst orange metalic off the newer gm cars. cost $110 for one qt of chromabase, that does not include the reducer or the clear/activator Hopefully it has a good coverage rate.
IP: Logged
PFF
System Bot
YELLOWFIERO88
Member
Posts: 1329
From: Cincinnati, Ohio
Registered: Nov 2004


Feedback score: (1)
Leave feedback

Rate this member

Report this Post12-21-2005 01:44 AM Click Here to See the Profile for YELLOWFIERO88Click Here to visit YELLOWFIERO88's HomePageSend a Private Message to YELLOWFIERO88Edit/Delete MessageReply w/QuoteDirect Link to This Post
Well I got the oxygen picked up today but just no motivation to work in the garage. But I do get to pick up the parts tomorrow from getting powdered Maybe that will get me back into the mood.
IP: Logged
LZeitgeist
Member
Posts: 5662
From: Raleigh, NC, U.S.A.
Registered: Dec 2000


Feedback score:    (8)
Leave feedback


Total ratings: 126
Rate this member

Report this Post12-21-2005 06:15 AM Click Here to See the Profile for LZeitgeistSend a Private Message to LZeitgeistEdit/Delete MessageReply w/QuoteDirect Link to This Post
 
quote
Originally posted by YELLOWFIERO88:
there is a black box that mounts in the center console opposite of where the performance sound would go. There is a couple other thingy's that I do not know what they are. So if anyone is really good at knowing what all the components are, get ahold of me please!!!!

I believe the black box under the carpet on the driver's side of the center tunnel is the cruise control computer module.

------------------
Patrick W. Heinske -- LZeitgeist@aol.com
1988 Red Fiero Formula Convertible
*Desktop Photo Here*

IP: Logged
Joe Torma
Member
Posts: 3485
From: Hillsborough, NJ USA
Registered: Jul 2001


Feedback score: N/A
Leave feedback


Total ratings: 129
Rate this member

Report this Post12-21-2005 10:35 AM Click Here to See the Profile for Joe TormaClick Here to visit Joe Torma's HomePageSend a Private Message to Joe TormaEdit/Delete MessageReply w/QuoteDirect Link to This Post
What's the installed height of the bag at driving height?
IP: Logged
YELLOWFIERO88
Member
Posts: 1329
From: Cincinnati, Ohio
Registered: Nov 2004


Feedback score: (1)
Leave feedback

Rate this member

Report this Post12-21-2005 11:02 AM Click Here to See the Profile for YELLOWFIERO88Click Here to visit YELLOWFIERO88's HomePageSend a Private Message to YELLOWFIERO88Edit/Delete MessageReply w/QuoteDirect Link to This Post
 
quote
Originally posted by LZeitgeist:
I believe the black box under the carpet on the driver's side of the center tunnel is the cruise control computer module.

Thanks.
I am going to need help from some of you "wiring guys" figuring out some of the rewiring

 
quote
Originally posted by Joe Torma:
What's the installed height of the bag at driving height?

I got it at about 6". Max height is around 8"+. There is almost perfect alignment throughout the bag travel. However, when it is all the way up, the upper c-arm will hit the bag bracket. There will be a bumpstop there, and there is plenty of clearance between the bag and the upper c-arm so I am not 2 worried about it. Sides Nothing beats the look of a car going down the road with less than 2" of clearance "why bag it if you aint gona drag it? "

IP: Logged
Joe Torma
Member
Posts: 3485
From: Hillsborough, NJ USA
Registered: Jul 2001


Feedback score: N/A
Leave feedback


Total ratings: 129
Rate this member

Report this Post12-21-2005 12:26 PM Click Here to See the Profile for Joe TormaClick Here to visit Joe Torma's HomePageSend a Private Message to Joe TormaEdit/Delete MessageReply w/QuoteDirect Link to This Post
 
quote
Originally posted by YELLOWFIERO88:
"why bag it if you aint gona drag it? "

That's right!
Looks like I'll have 1.5" more "UP" than you. Are you going to weld in gussets to that upper bag plate?

IP: Logged
YELLOWFIERO88
Member
Posts: 1329
From: Cincinnati, Ohio
Registered: Nov 2004


Feedback score: (1)
Leave feedback

Rate this member

Report this Post12-24-2005 10:44 PM Click Here to See the Profile for YELLOWFIERO88Click Here to visit YELLOWFIERO88's HomePageSend a Private Message to YELLOWFIERO88Edit/Delete MessageReply w/QuoteDirect Link to This Post
 
quote
Originally posted by Joe Torma:
Are you going to weld in gussets to that upper bag plate?

Well...........I have them laying on the sawhorses the only problem is that the parts are laying on my garage floor...........

already powdercoated. I knew when I took them down there I was forgetting something. I put a big pipe wrench on the end of the bracket and tried to bend it. It did not budge at all, so hopefully it won't when it is in the car. The plates are made of 1/4" heat treated plate. If it does then I can weld them in and repowdercoat it.

more parts.

Finally here is the engine/trans I bought off Rick. I will be stripping it down and checking everything before final paint, and install

IP: Logged
Joe Torma
Member
Posts: 3485
From: Hillsborough, NJ USA
Registered: Jul 2001


Feedback score: N/A
Leave feedback


Total ratings: 129
Rate this member

Report this Post12-25-2005 01:40 AM Click Here to See the Profile for Joe TormaClick Here to visit Joe Torma's HomePageSend a Private Message to Joe TormaEdit/Delete MessageReply w/QuoteDirect Link to This Post
Looks great! I was wondering if I should paint my crossmember silver...you pretty much decided that for me.

I figured those plates were thick, but I would watch them. Once again, everything looks really nice.

IP: Logged
yons
Member
Posts: 914
From: colliers,wv
Registered: Sep 2003


Feedback score: N/A
Leave feedback

Rate this member

Report this Post12-30-2005 07:27 AM Click Here to See the Profile for yonsSend a Private Message to yonsEdit/Delete MessageReply w/QuoteDirect Link to This Post
Hey Brian any updates on your machine

------------------
www.yonsracing.com

IP: Logged
YELLOWFIERO88
Member
Posts: 1329
From: Cincinnati, Ohio
Registered: Nov 2004


Feedback score: (1)
Leave feedback

Rate this member

Report this Post12-30-2005 09:42 AM Click Here to See the Profile for YELLOWFIERO88Click Here to visit YELLOWFIERO88's HomePageSend a Private Message to YELLOWFIERO88Edit/Delete MessageReply w/QuoteDirect Link to This Post
Joe, thanks for the good words

Steve, I have been working on the house. I have had the master bathroom gutted for 2 months now, so its time to get that back together. I should be done with the house this weekend and back on the car next week.

I got some more parts at the powder coaters getting done like coolant lines and the gas tank. They are being done in "almost chrome" . I want to get those back and see what the color looks like. Before I put the lines and gas tank back in I am going to seam seal and paint the bottom of the car, engine bay and front area (gloss black). I will follow that by installing the front suspension setup, then the rear suspension and engine. hopefully by the end of jan. I will have it rolling around and start on the "rats nest of wiring"

IP: Logged
Previous Page | Next Page

This topic is 6 pages long:  1   2   3   4   5   6 
next newest topic | next oldest topic

All times are ET (US)

Post New Topic  Post A Reply
Hop to:

Contact Us | Back To Main Page

Advertizing on PFF | Fiero Parts Vendors
PFF Merchandise | Fiero Gallery | Ogre's Cave
Real-Time Chat | Fiero Related Auctions on eBay


Copyright (c) 1999, C. Pennock