Dennis, Thanks for the compliment. I'm really a retired controls engineer for elevators with responsibility for hardware & software design with a side of mechanical engineering as needed. I'm pretty good at design and still a crap-to-fair welder. I've never done enough of it to be come competent. But I'm improving.
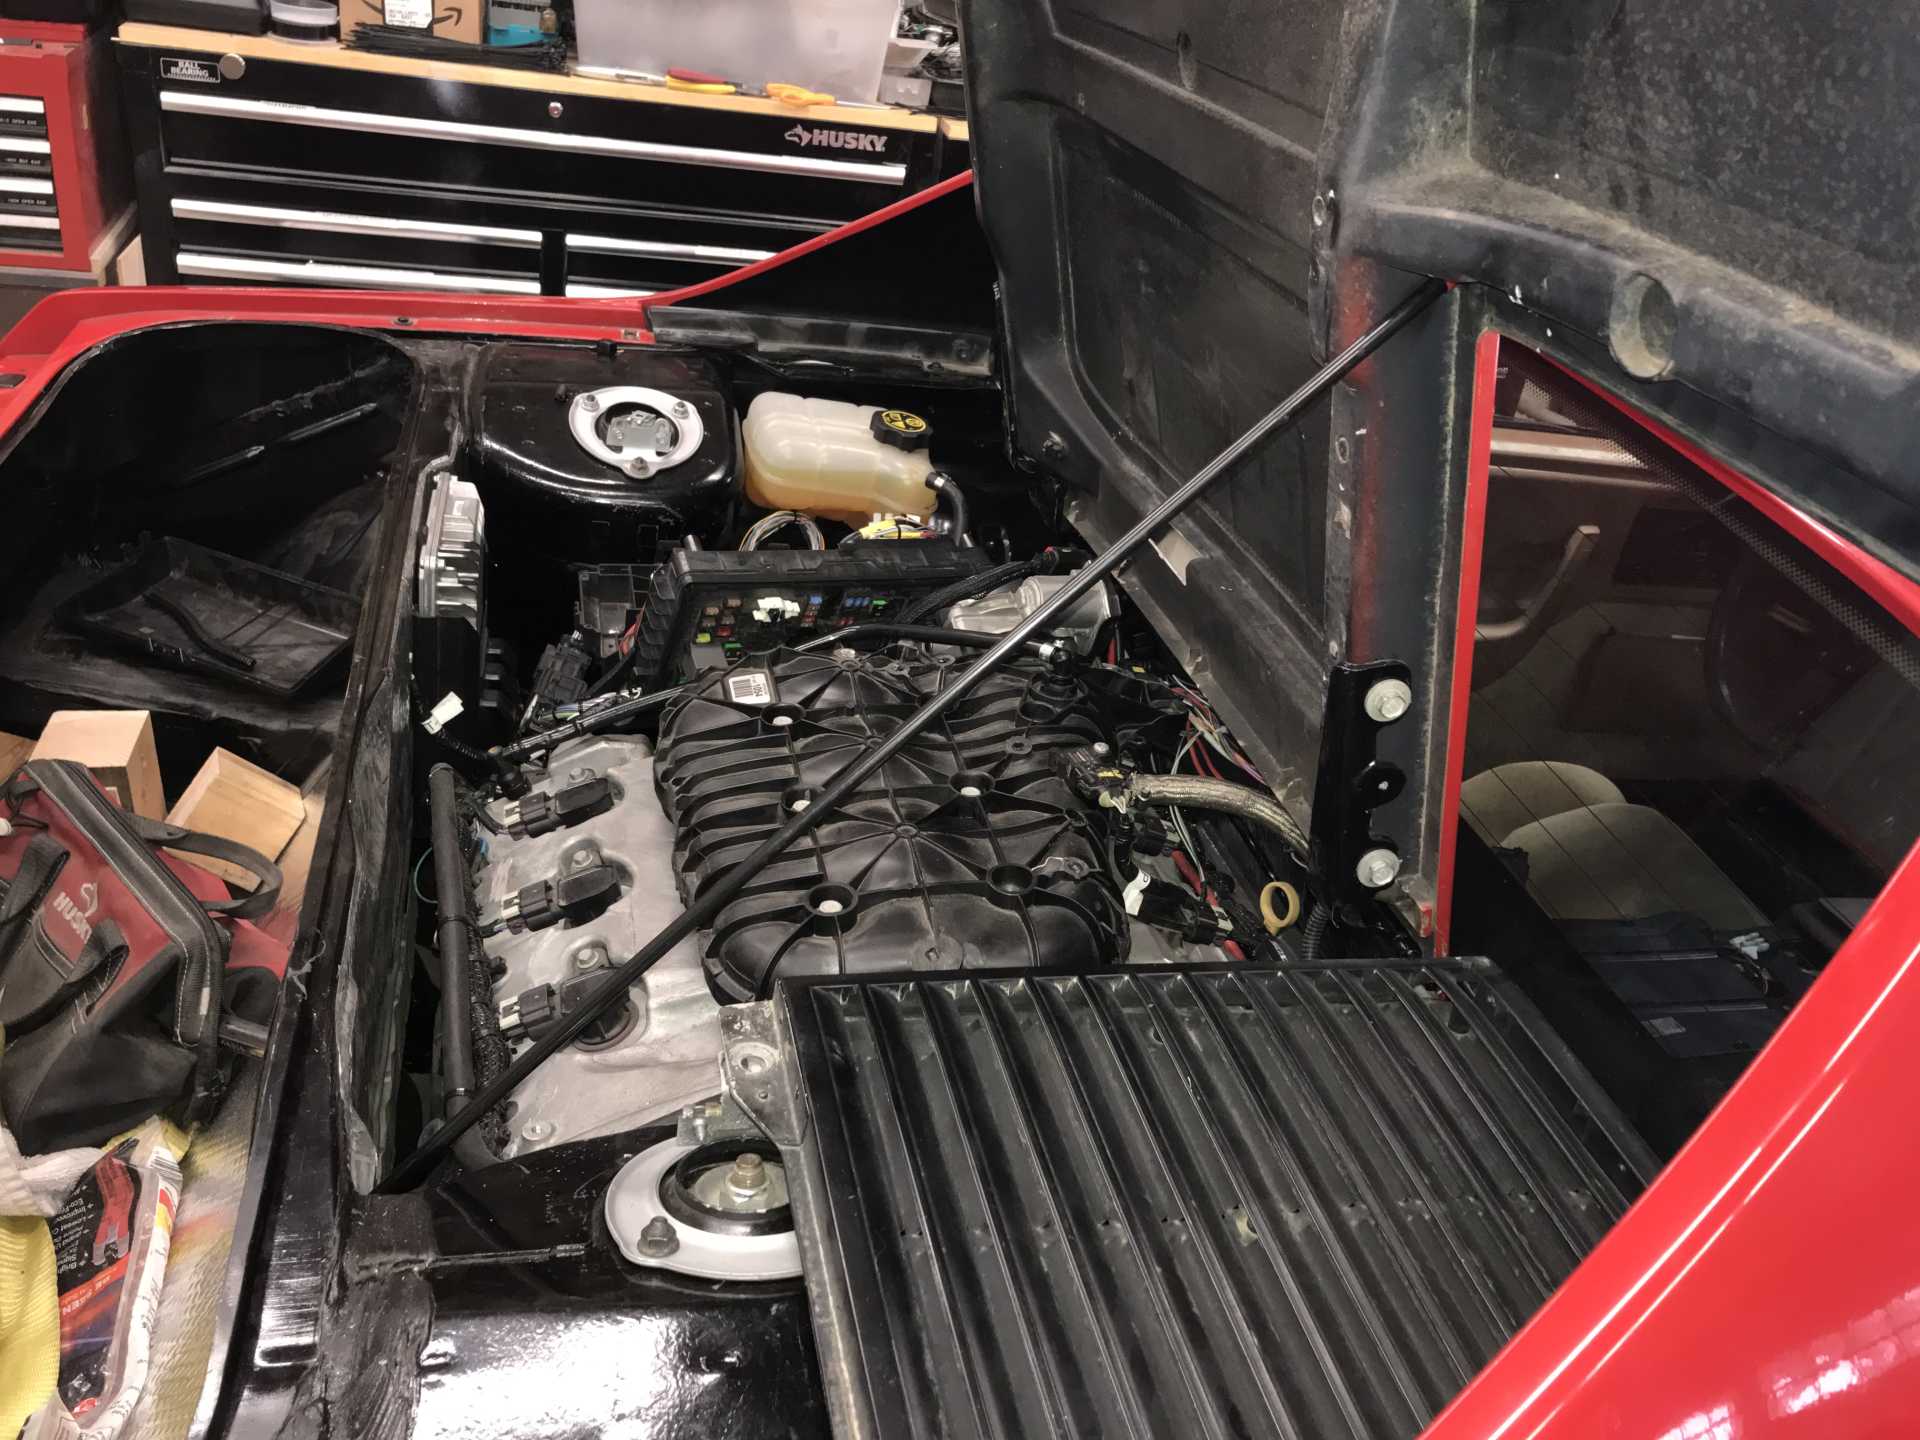
The trick to this swap was to buy the whole car and rip out everything electric/electronic. I bought the Mitchell1DIY service for the car so I could figure out where things go. Right now by process of elimination I have the ECU, BCU(talks to everything), SDGW (Serial Data Gateway), CCM (Chassis Controller, runs fuel pump & Evap), Keyless Entry Module, Push to Start, Brake Switch (needed to start), Shift Knob(for manual shifting), Gas Pedal and Instrument Cluster. As long as these are connected the car will start and run. As far as the power train goes it doesn't know it is in a Fiero. 2018 & later GM cars have vehicle-specific encoding in some modules, the shop manual doesn't say which. So if one of your modules fails you must take the replacement to someone who can code it for your car (Your local friendly Chevy dealer!). And who knows if they would touch a swapped engine.
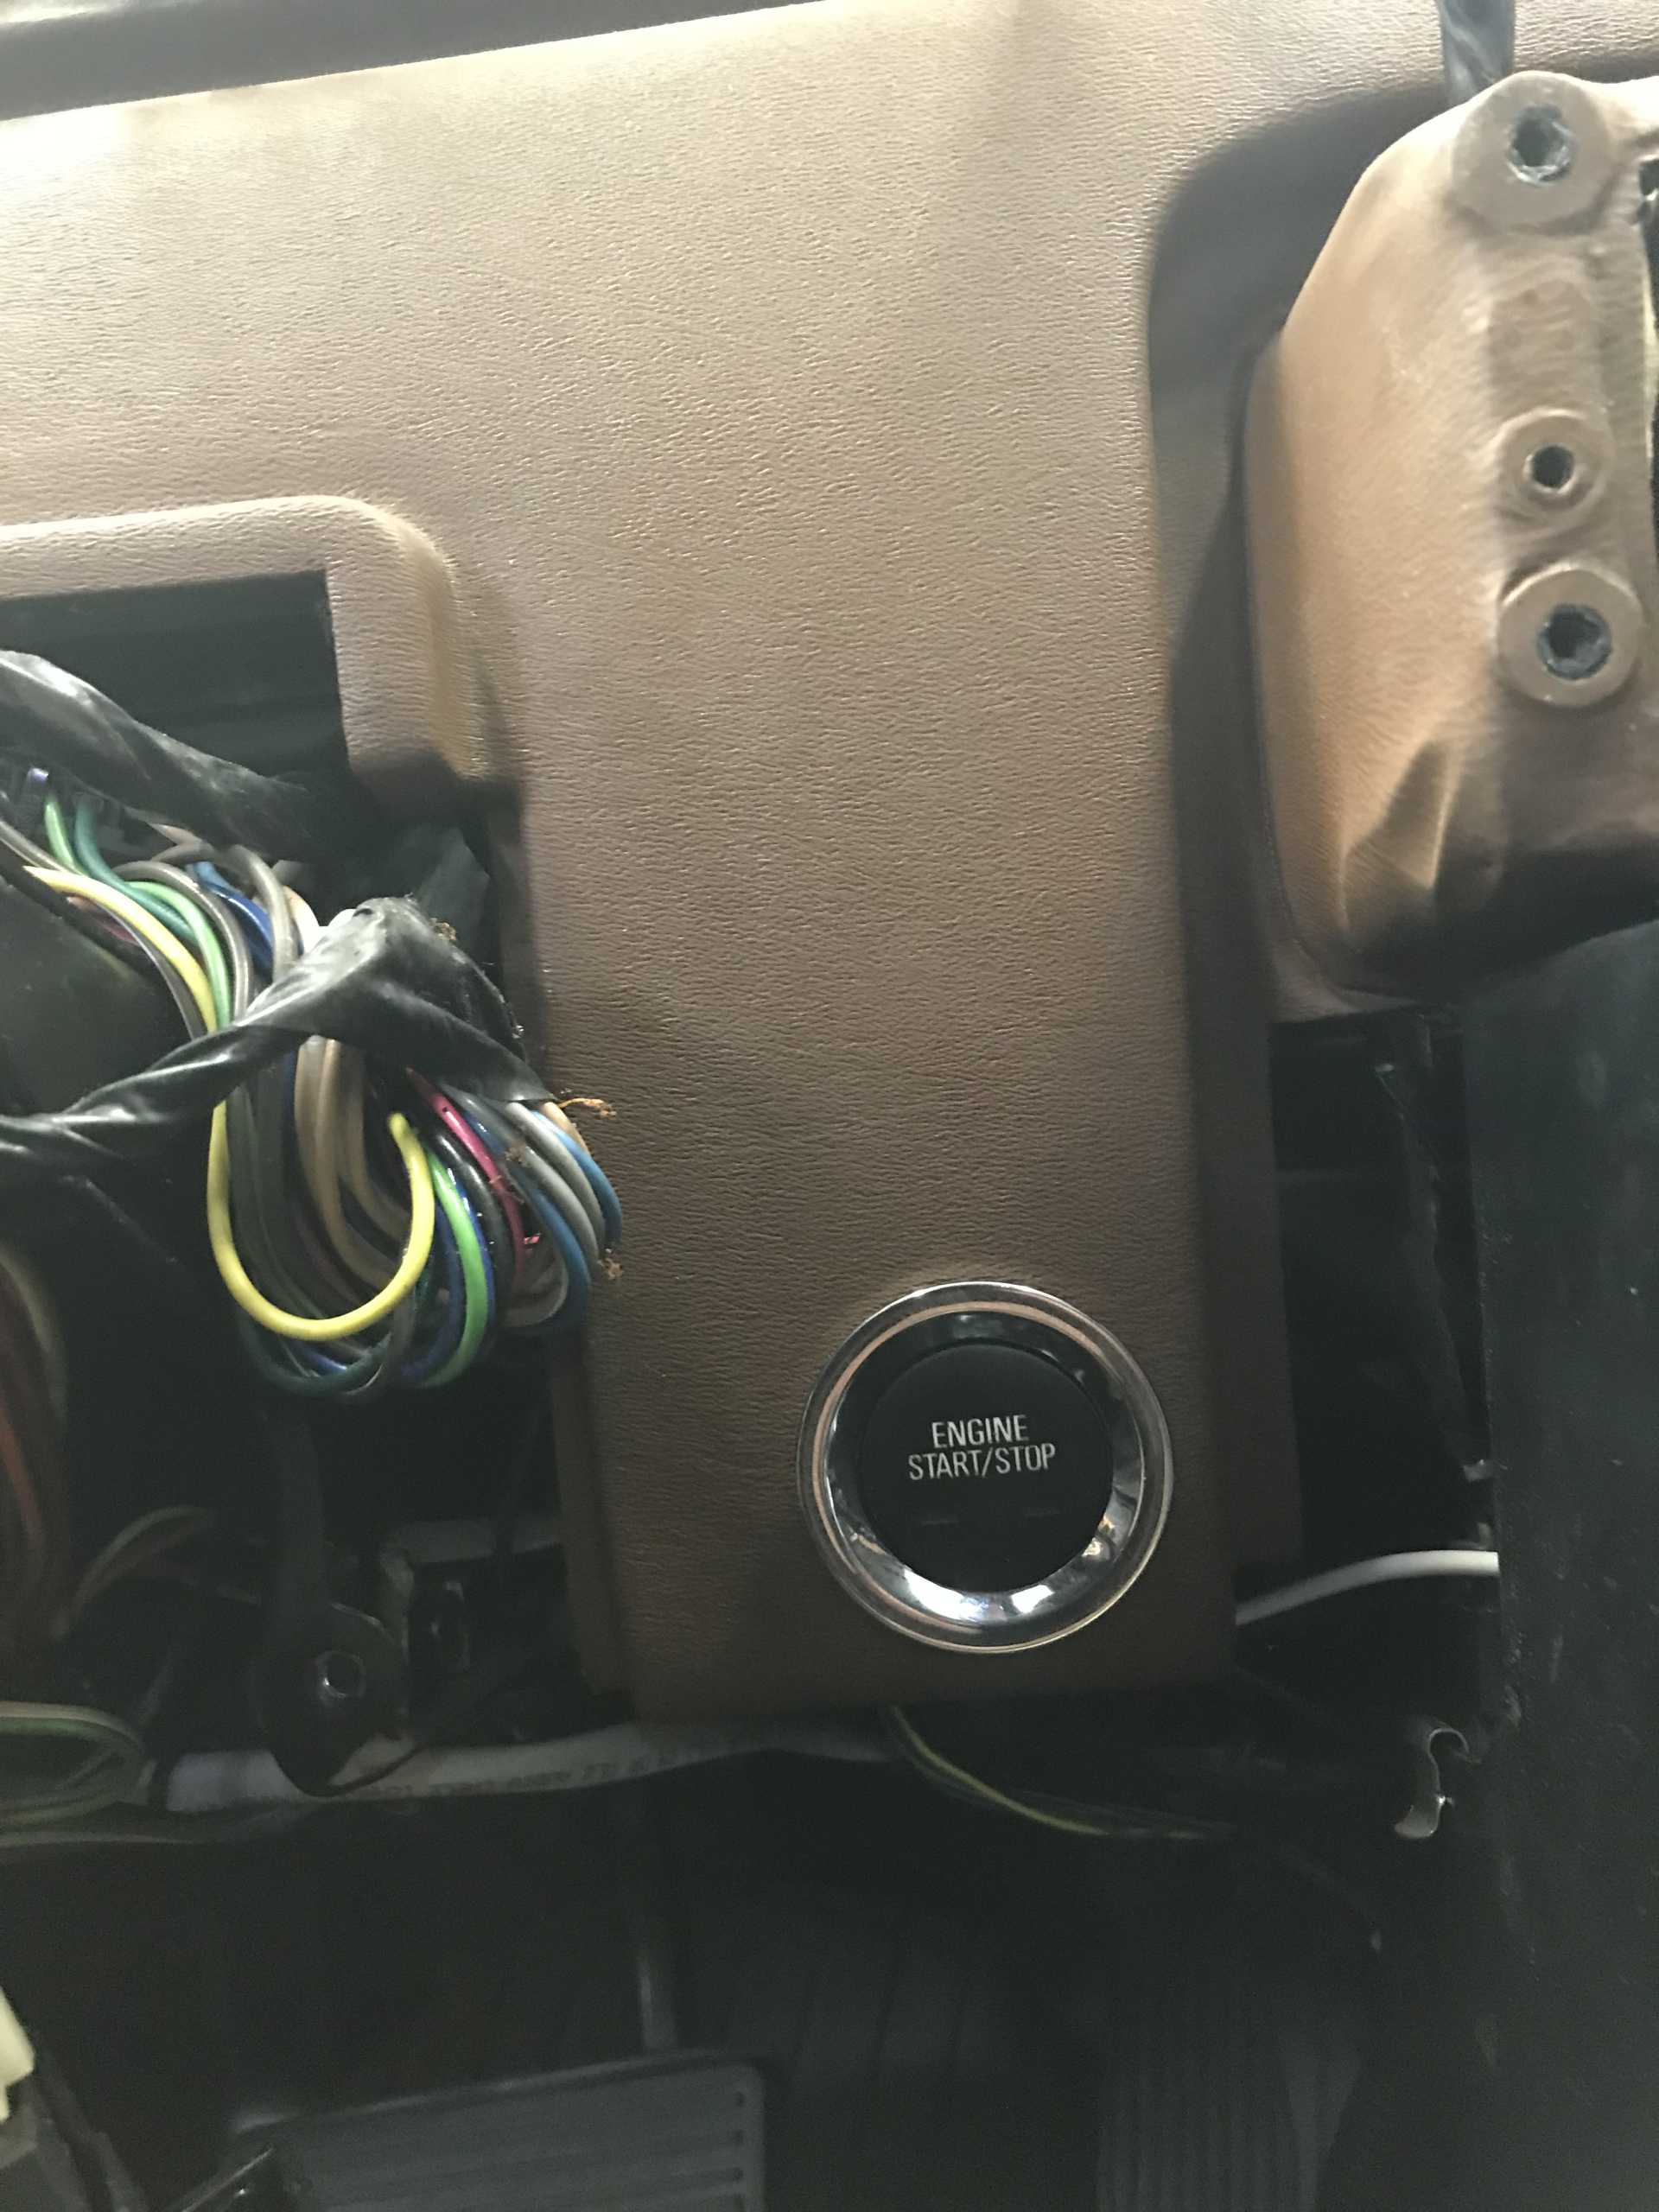
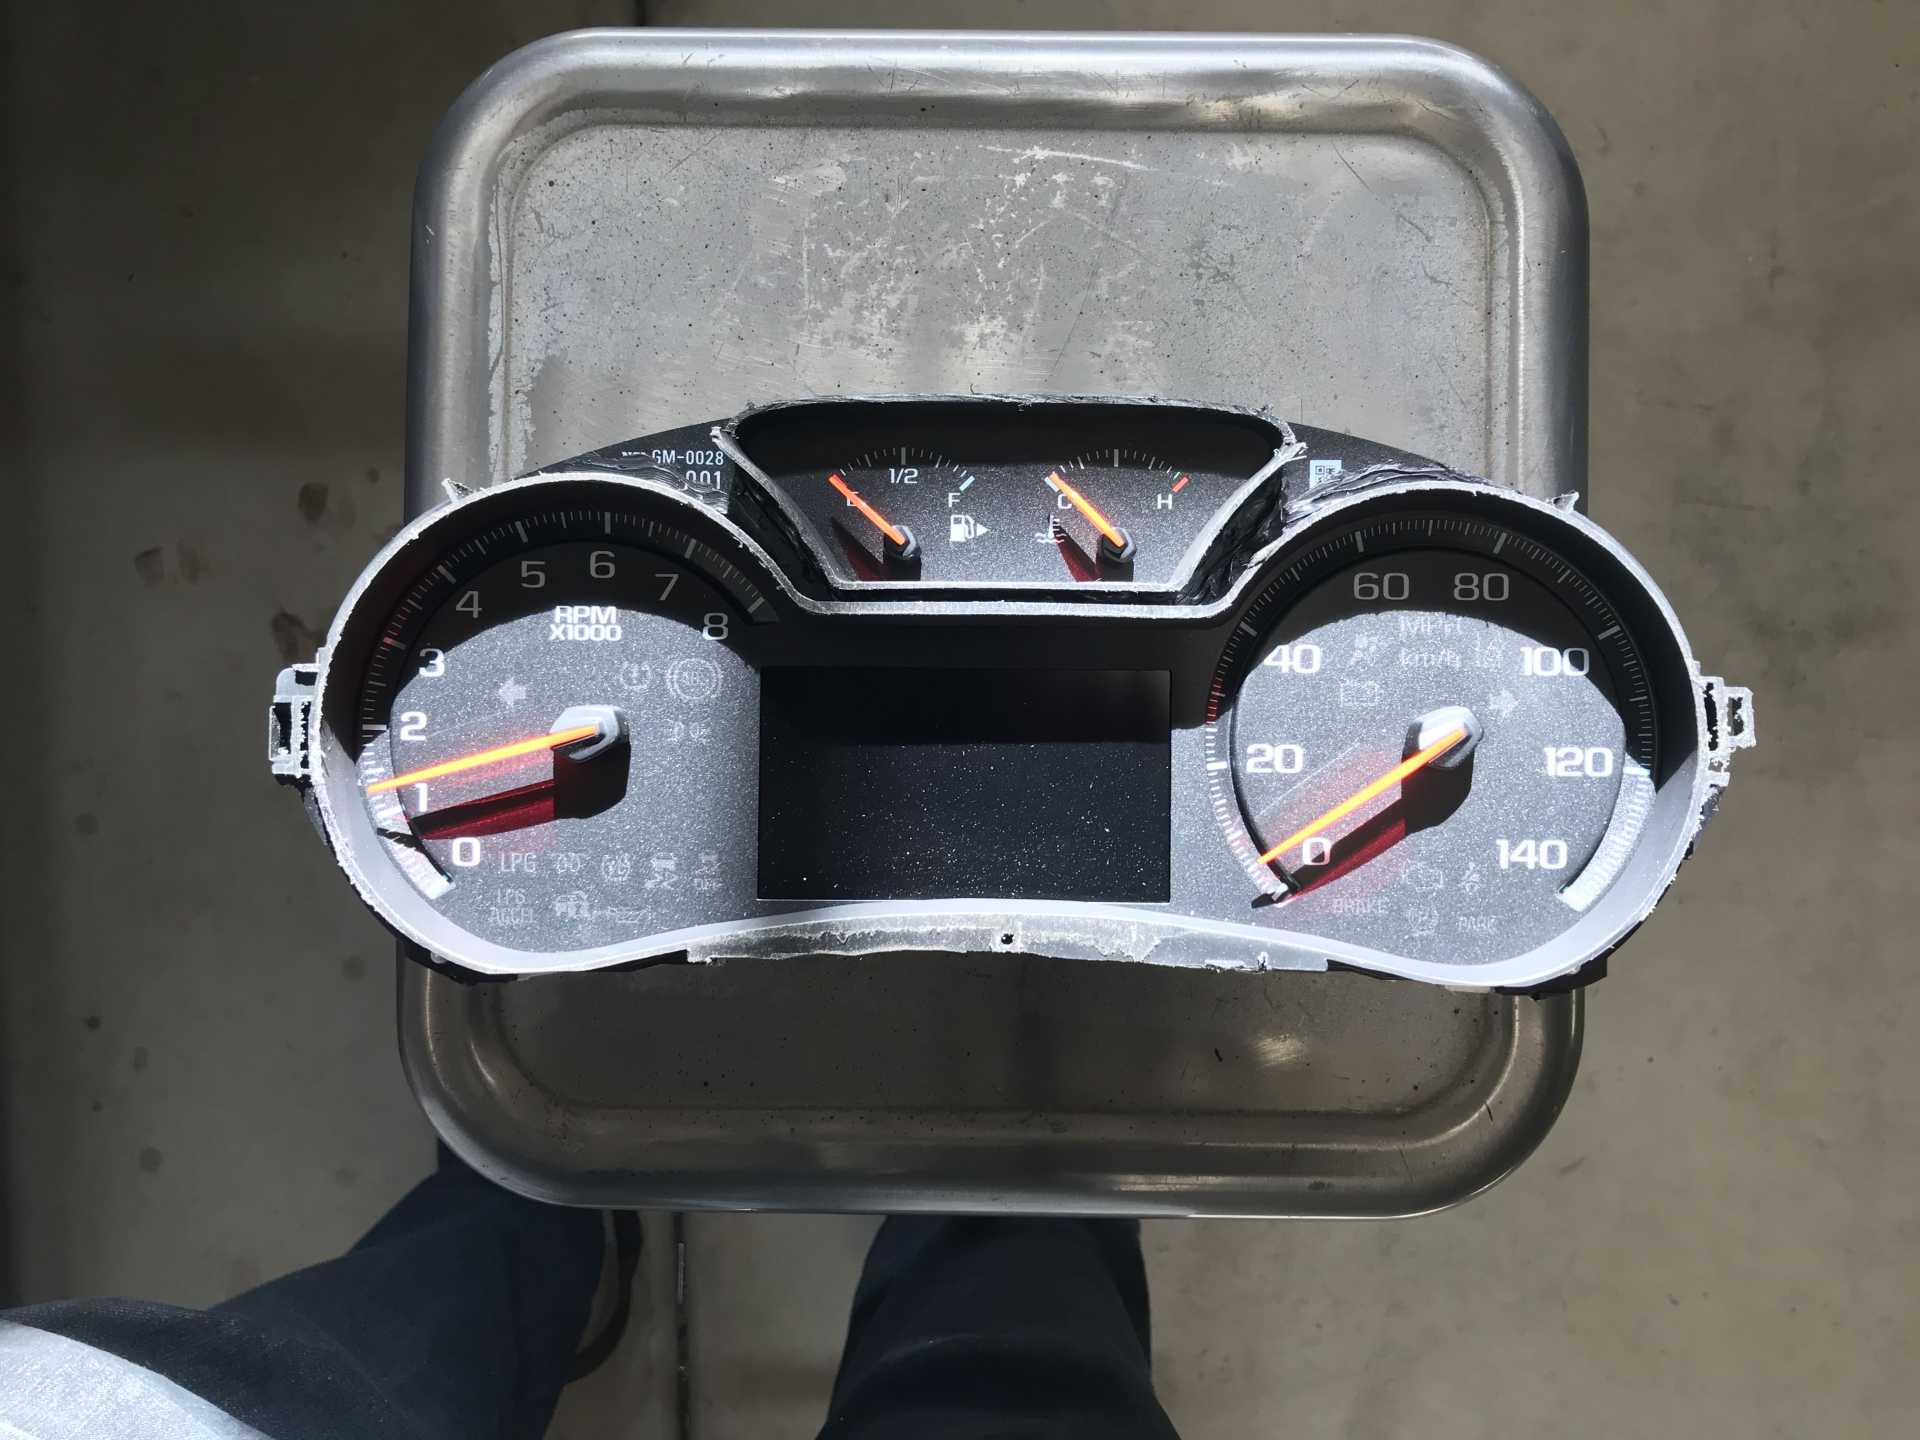
Right now I've got all kinds of warnings but it still runs to the redline making power. I guess most of the DTCs don't matter other than being an inconvenience. Once I'm further along I'll figure out how to get rid of them. Today I'm trimming the instrument cluster along with the steering wheel switches for cruise control and display management to fit in the Fiero panel bezel. Tight fit but it should work. I just follow the wiring diagrams and eliminate the unwanted (and Big) connectors. So far most things work OK. My only real unknown is when I push to stop the engine does but goes into accessory operation. I flip my battery master off and it resets.
[This message has been edited by MikesFirstFiero (edited 11-29-2021).]
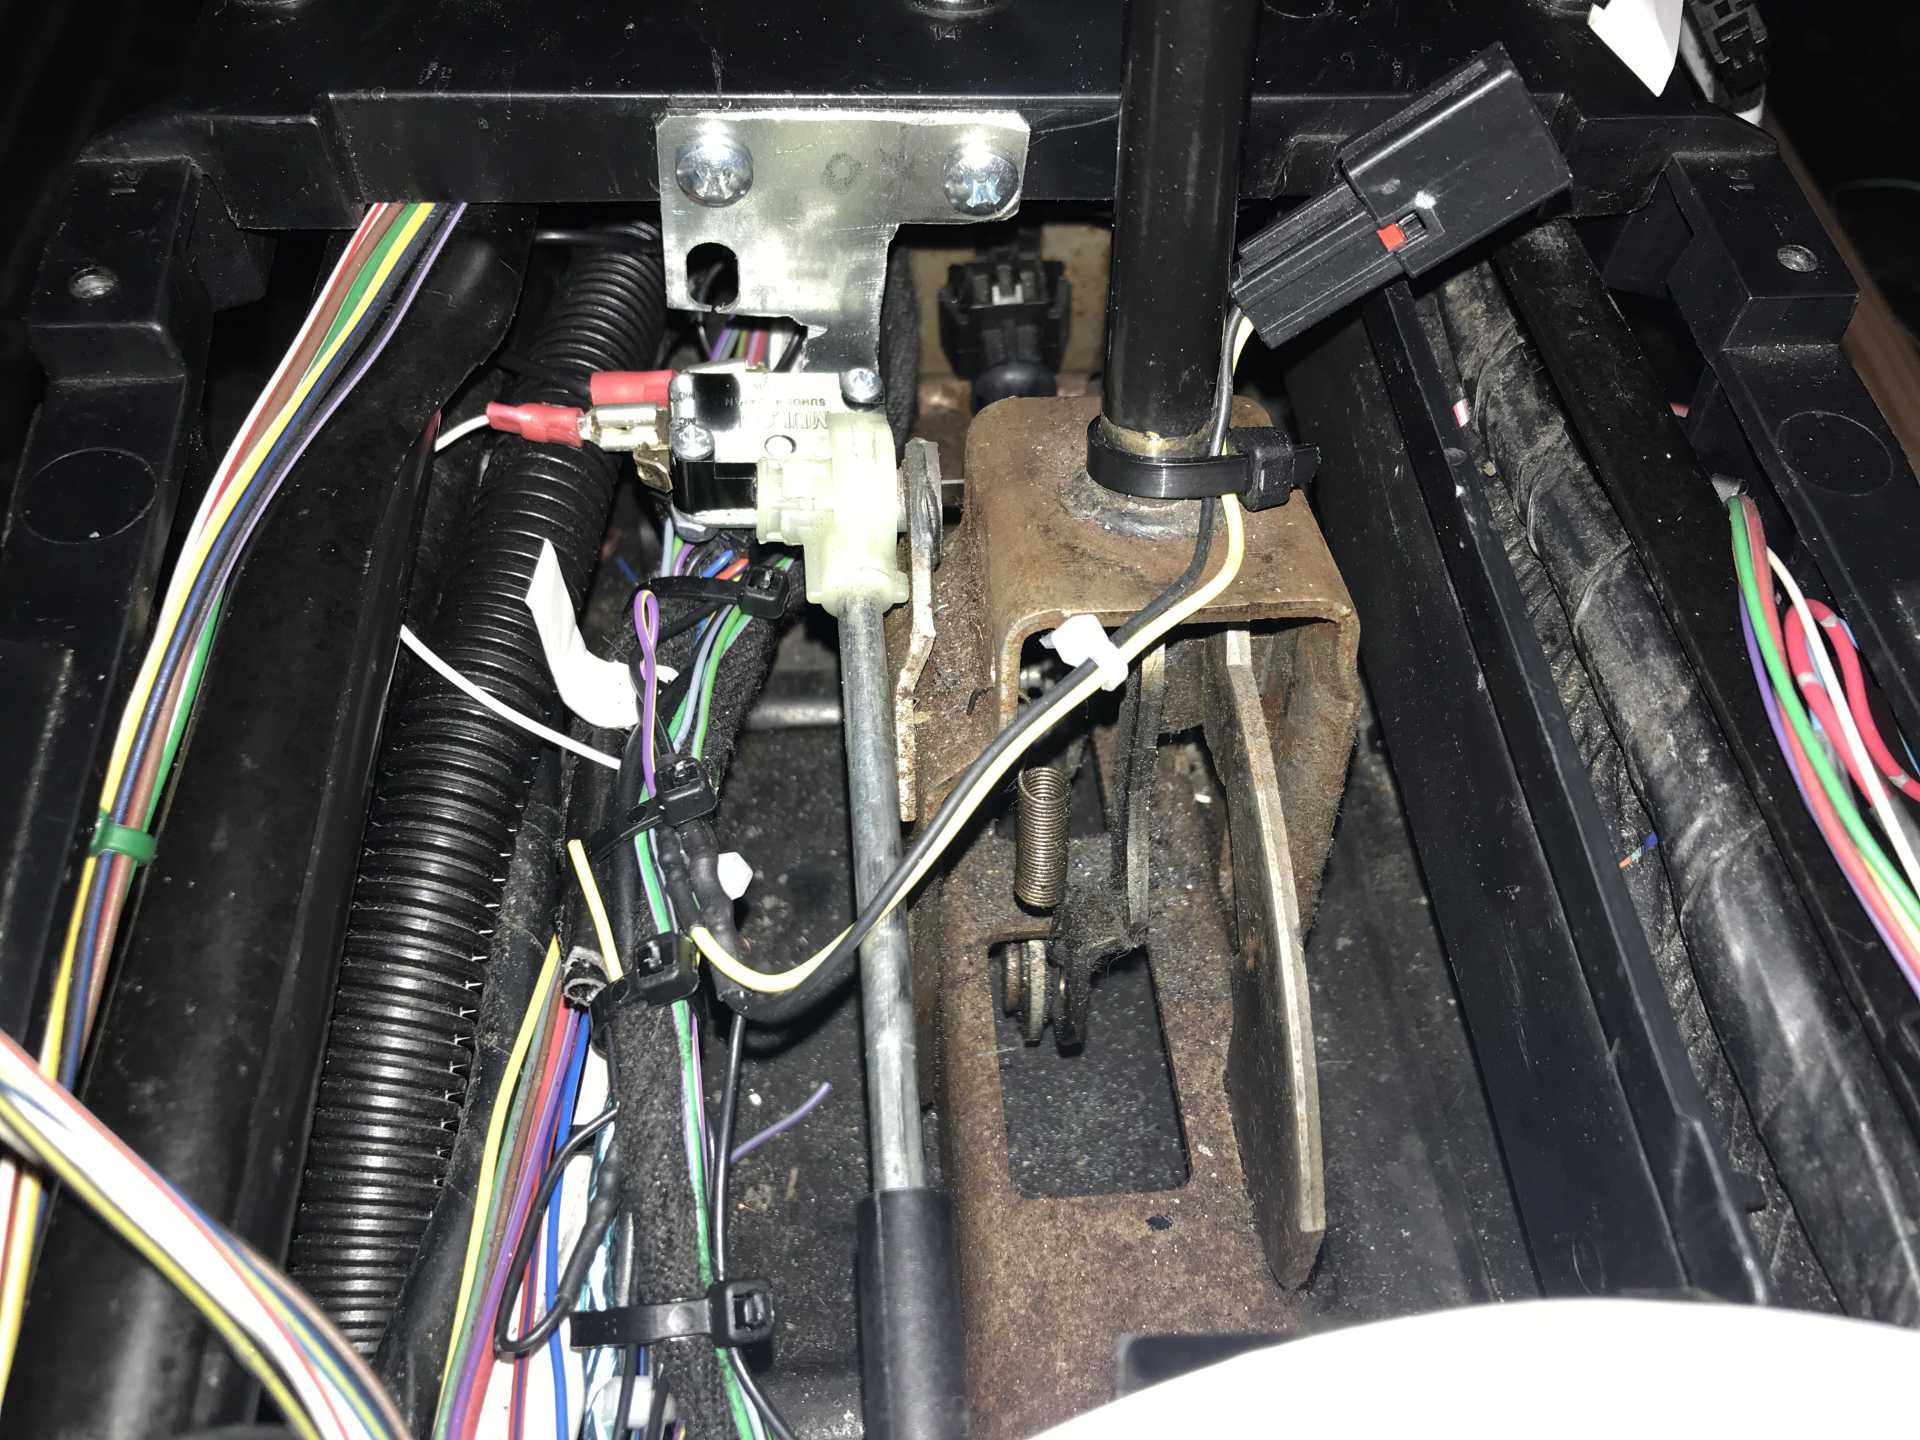
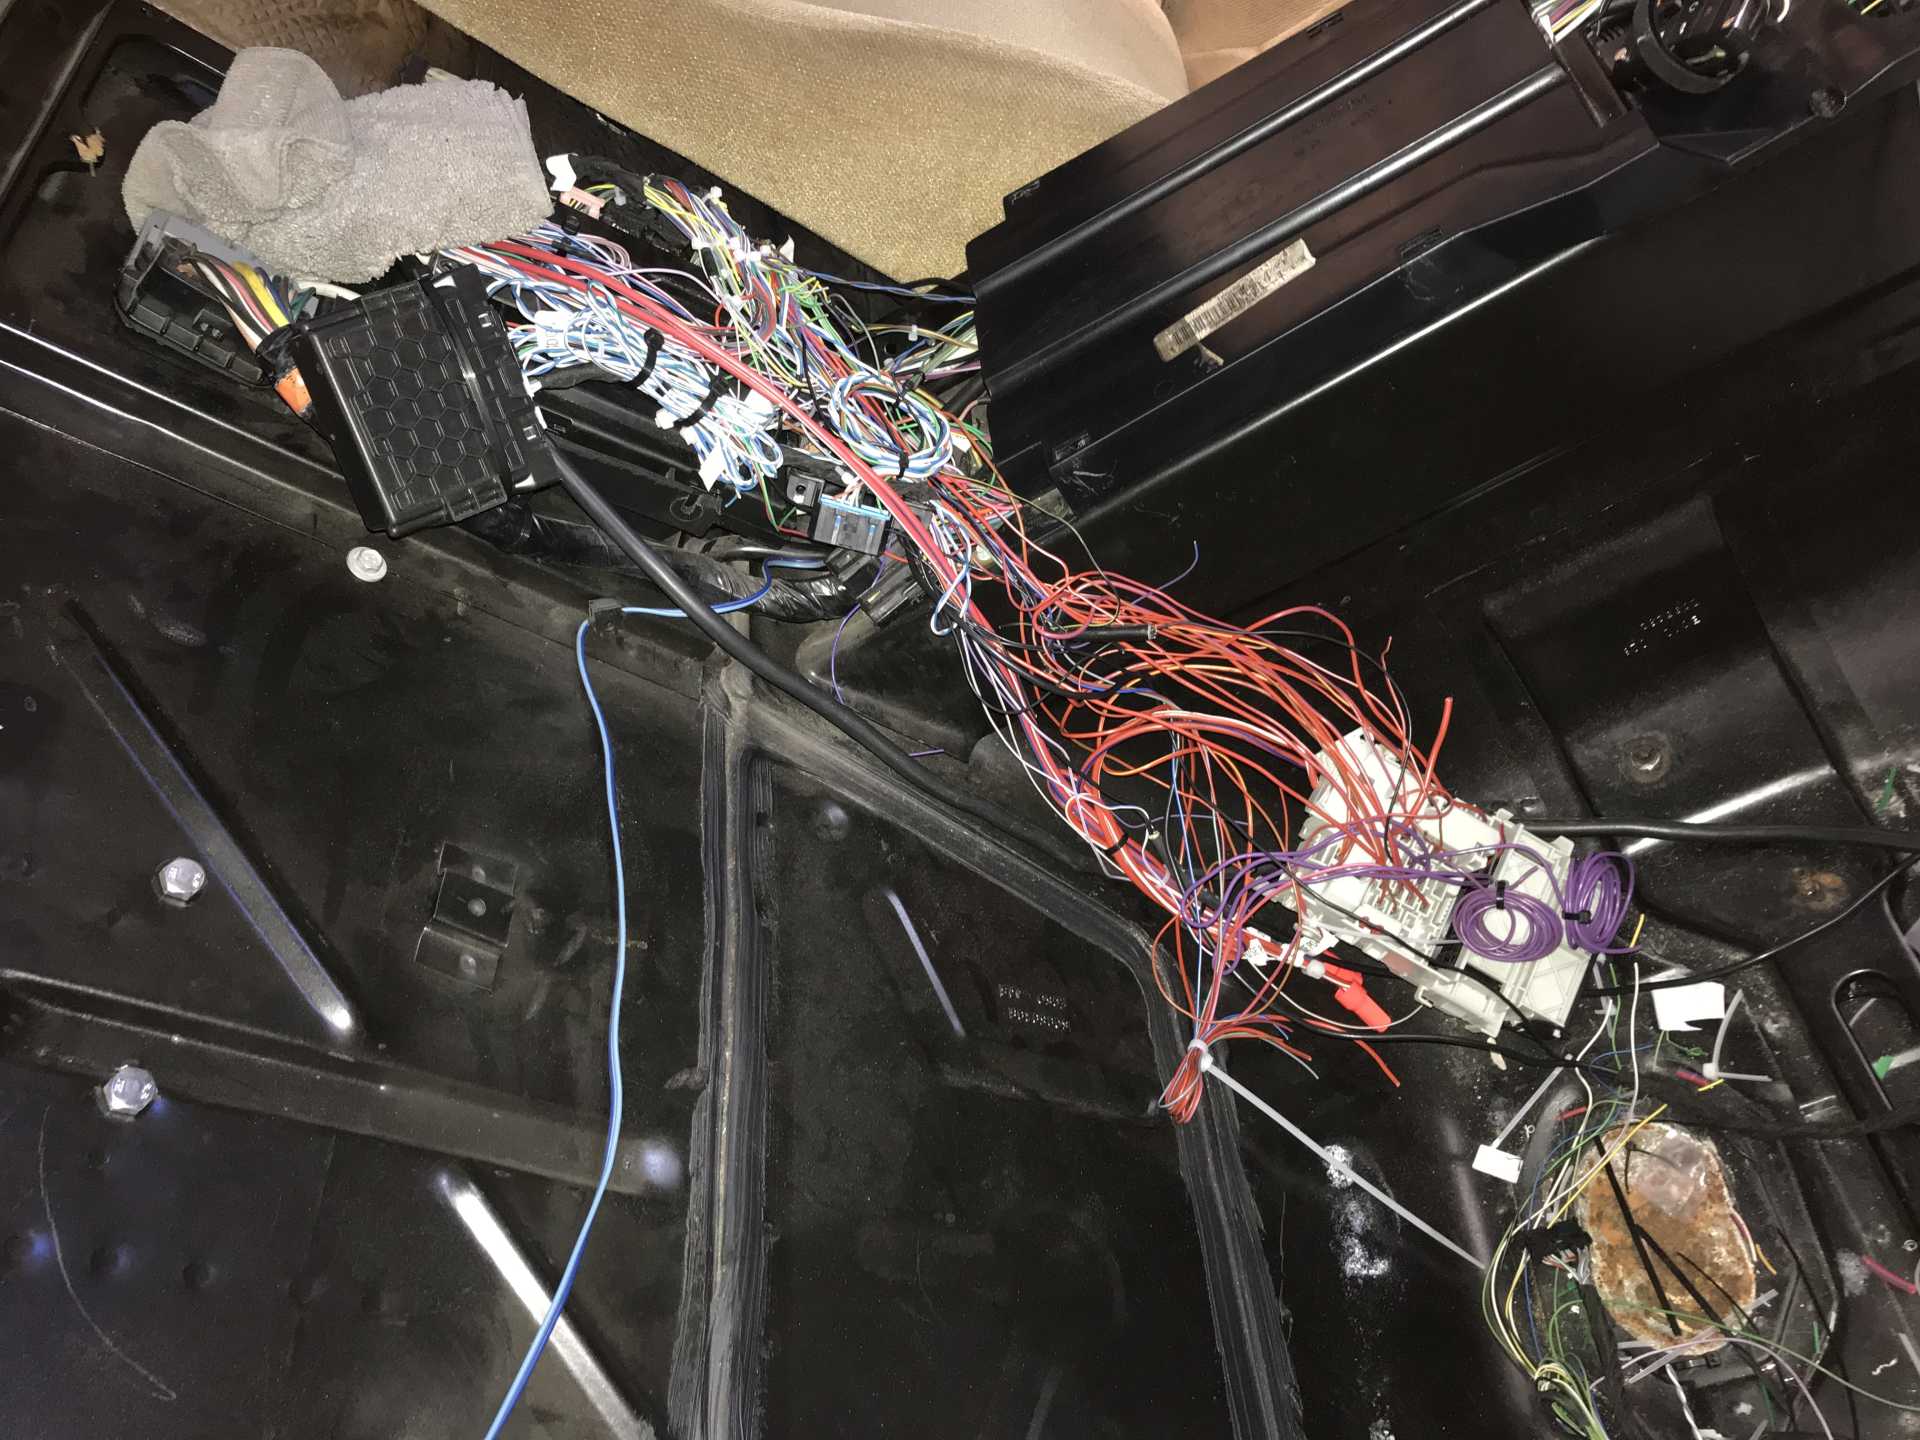
I did bleed the brakes again since the pedal was low, found some air in the system both front and rear so now the pedal feels much better. I've been putting the hours in but the progress for this work seems glacial, wiring takes forever and I have done lots of that kind of work. Messing with a complete harness means everything should work but there are lots of wires & connectors you don't need that must be figured out and eliminated. The goal is to get all the operating controls where they belong so it is safe to take on the road with other traffic. Pulled out the gas pedal to lower the pedal position closer to the firewall by an inch and to add a stiffener rib on the back to make it less flexy. Rerouted the gas pedal cable to where it needed to be since it temporary. Extended the push-to-start cable and put the switch in the dash. Moved the gear indicator and shft knob wiring to be in the center console. Put the brake switch in the center console for now. Will eventually add it to the brake pedal; don't need it for the brake lights yet. Eventually will need it so the brake, tail and turn signals are driven from the Impala controls. For now only reason for it is to start the engine since the lights are all Fiero. The key FOB is cable tied to the keyless sensor now so you push the PTS button and it starts. The transmission must be in park too but that's done with software and a internal transmission switch in the TCU.
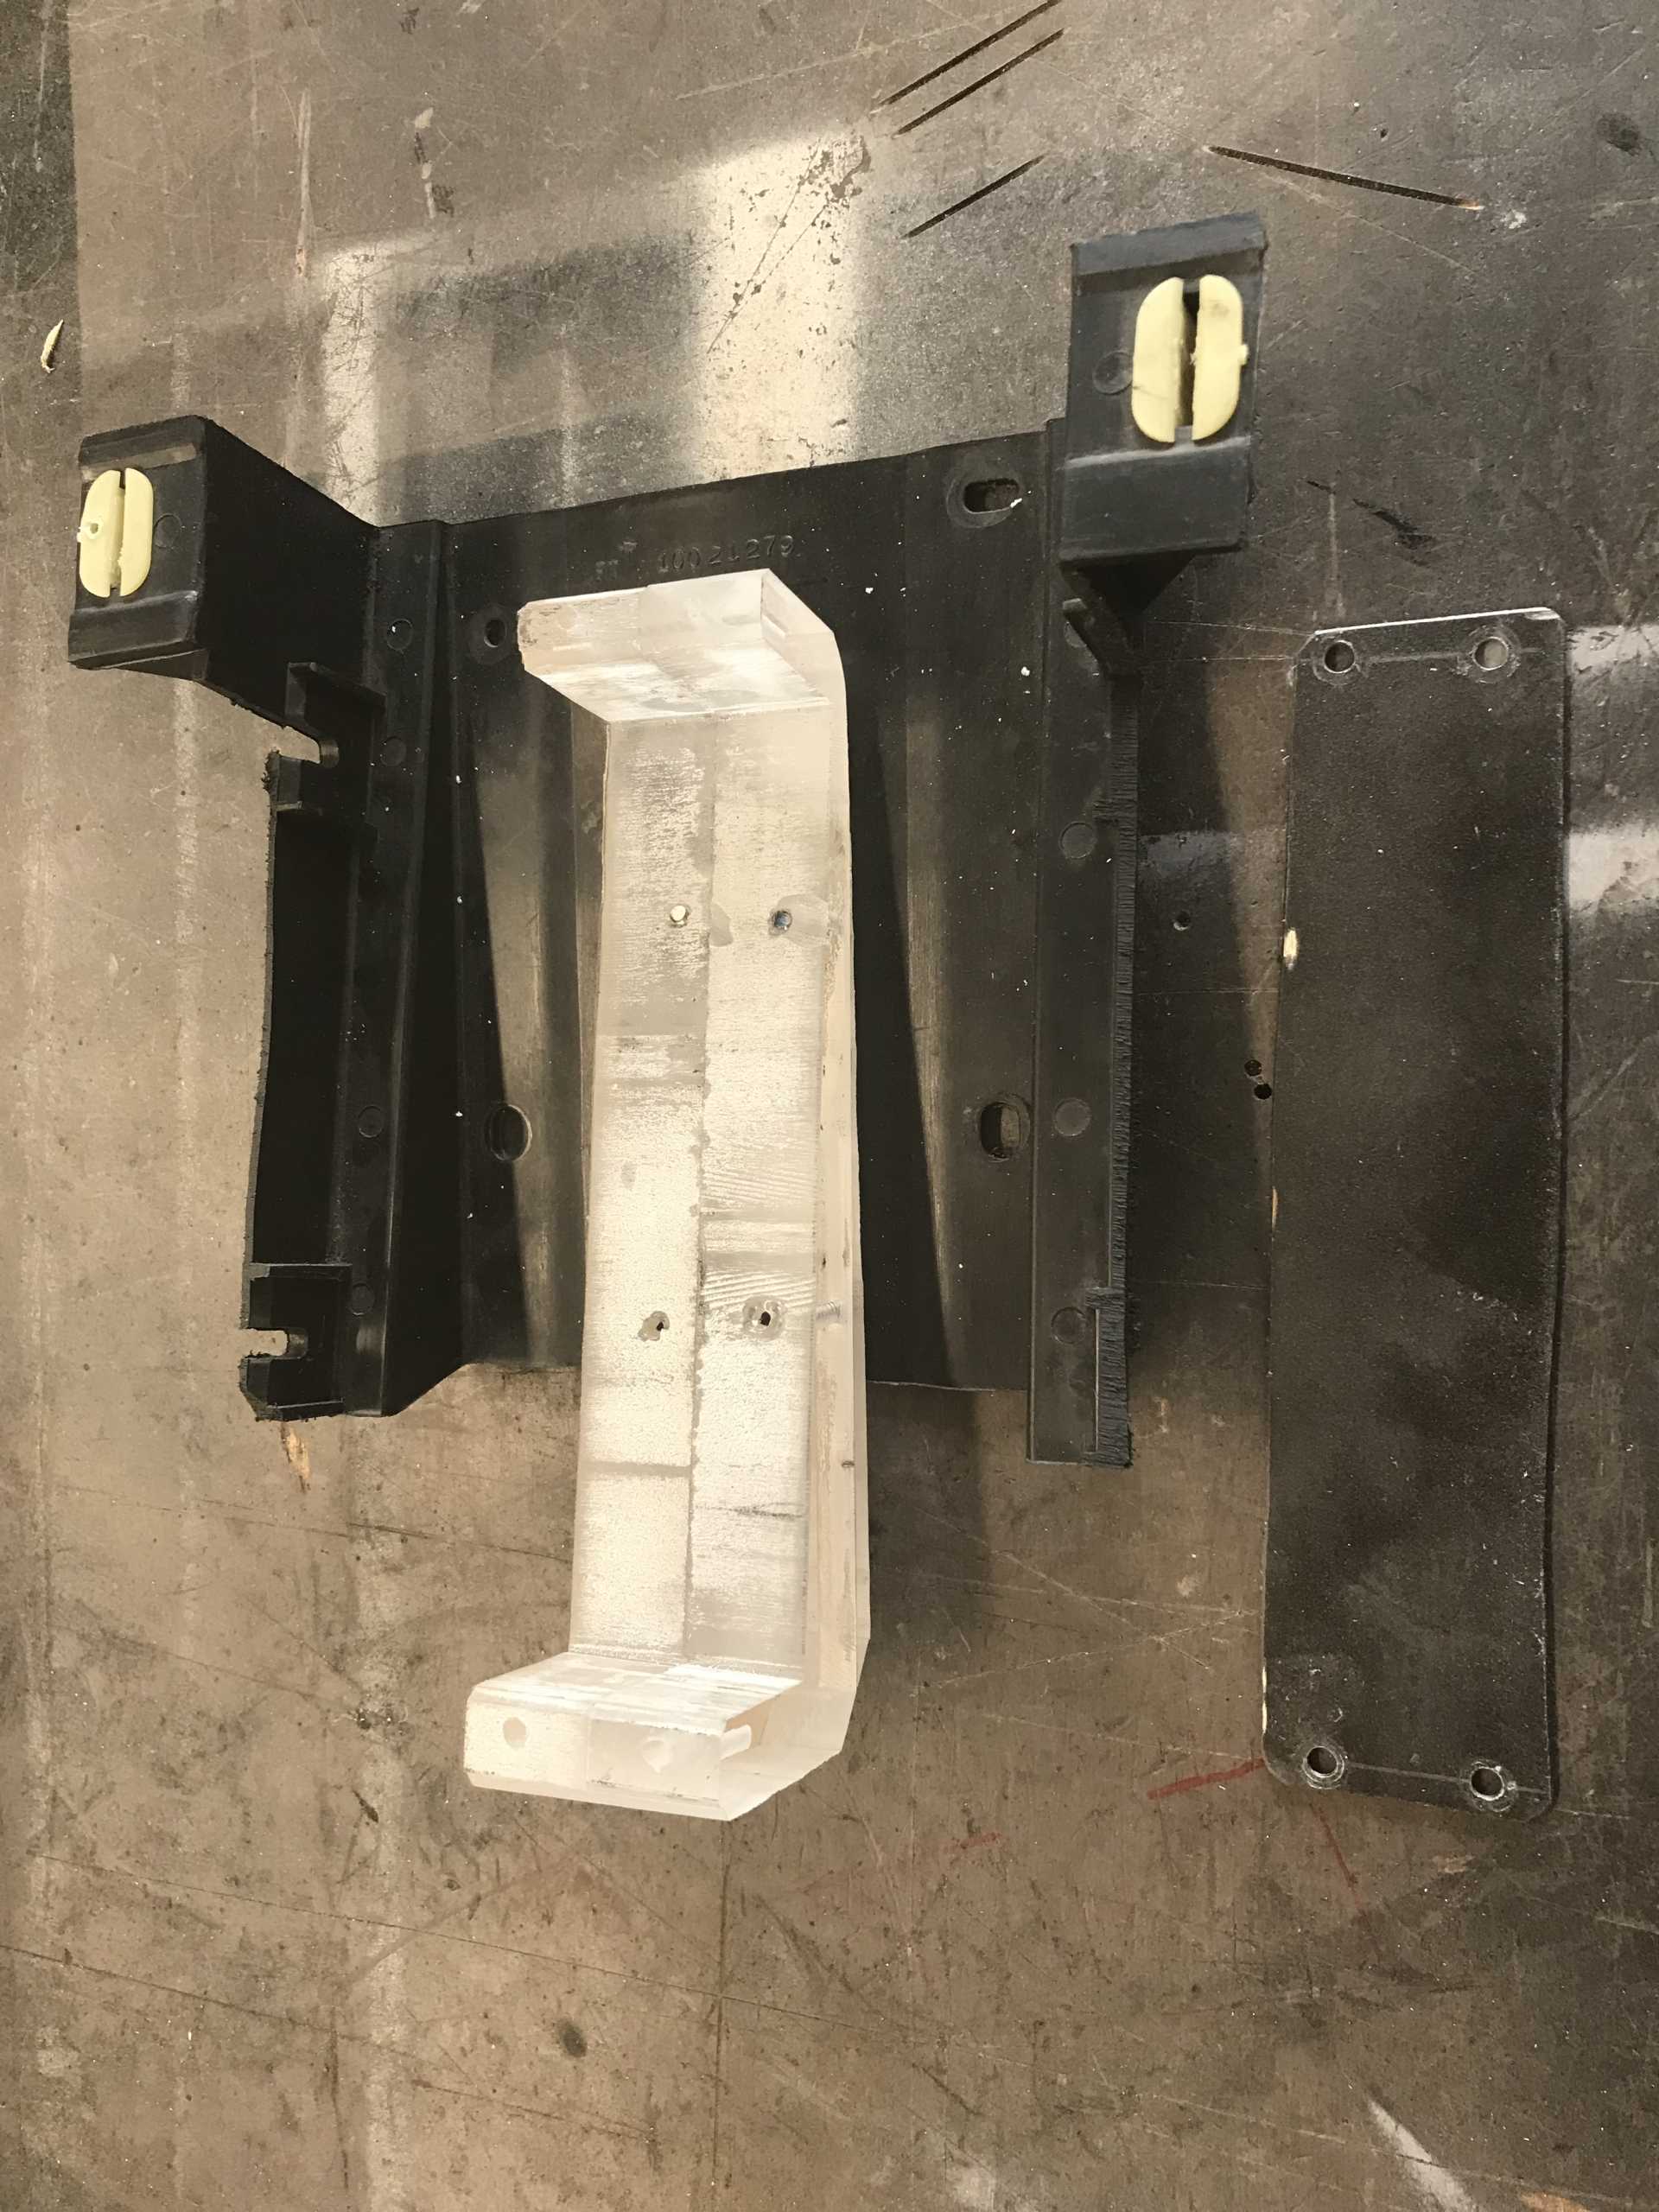
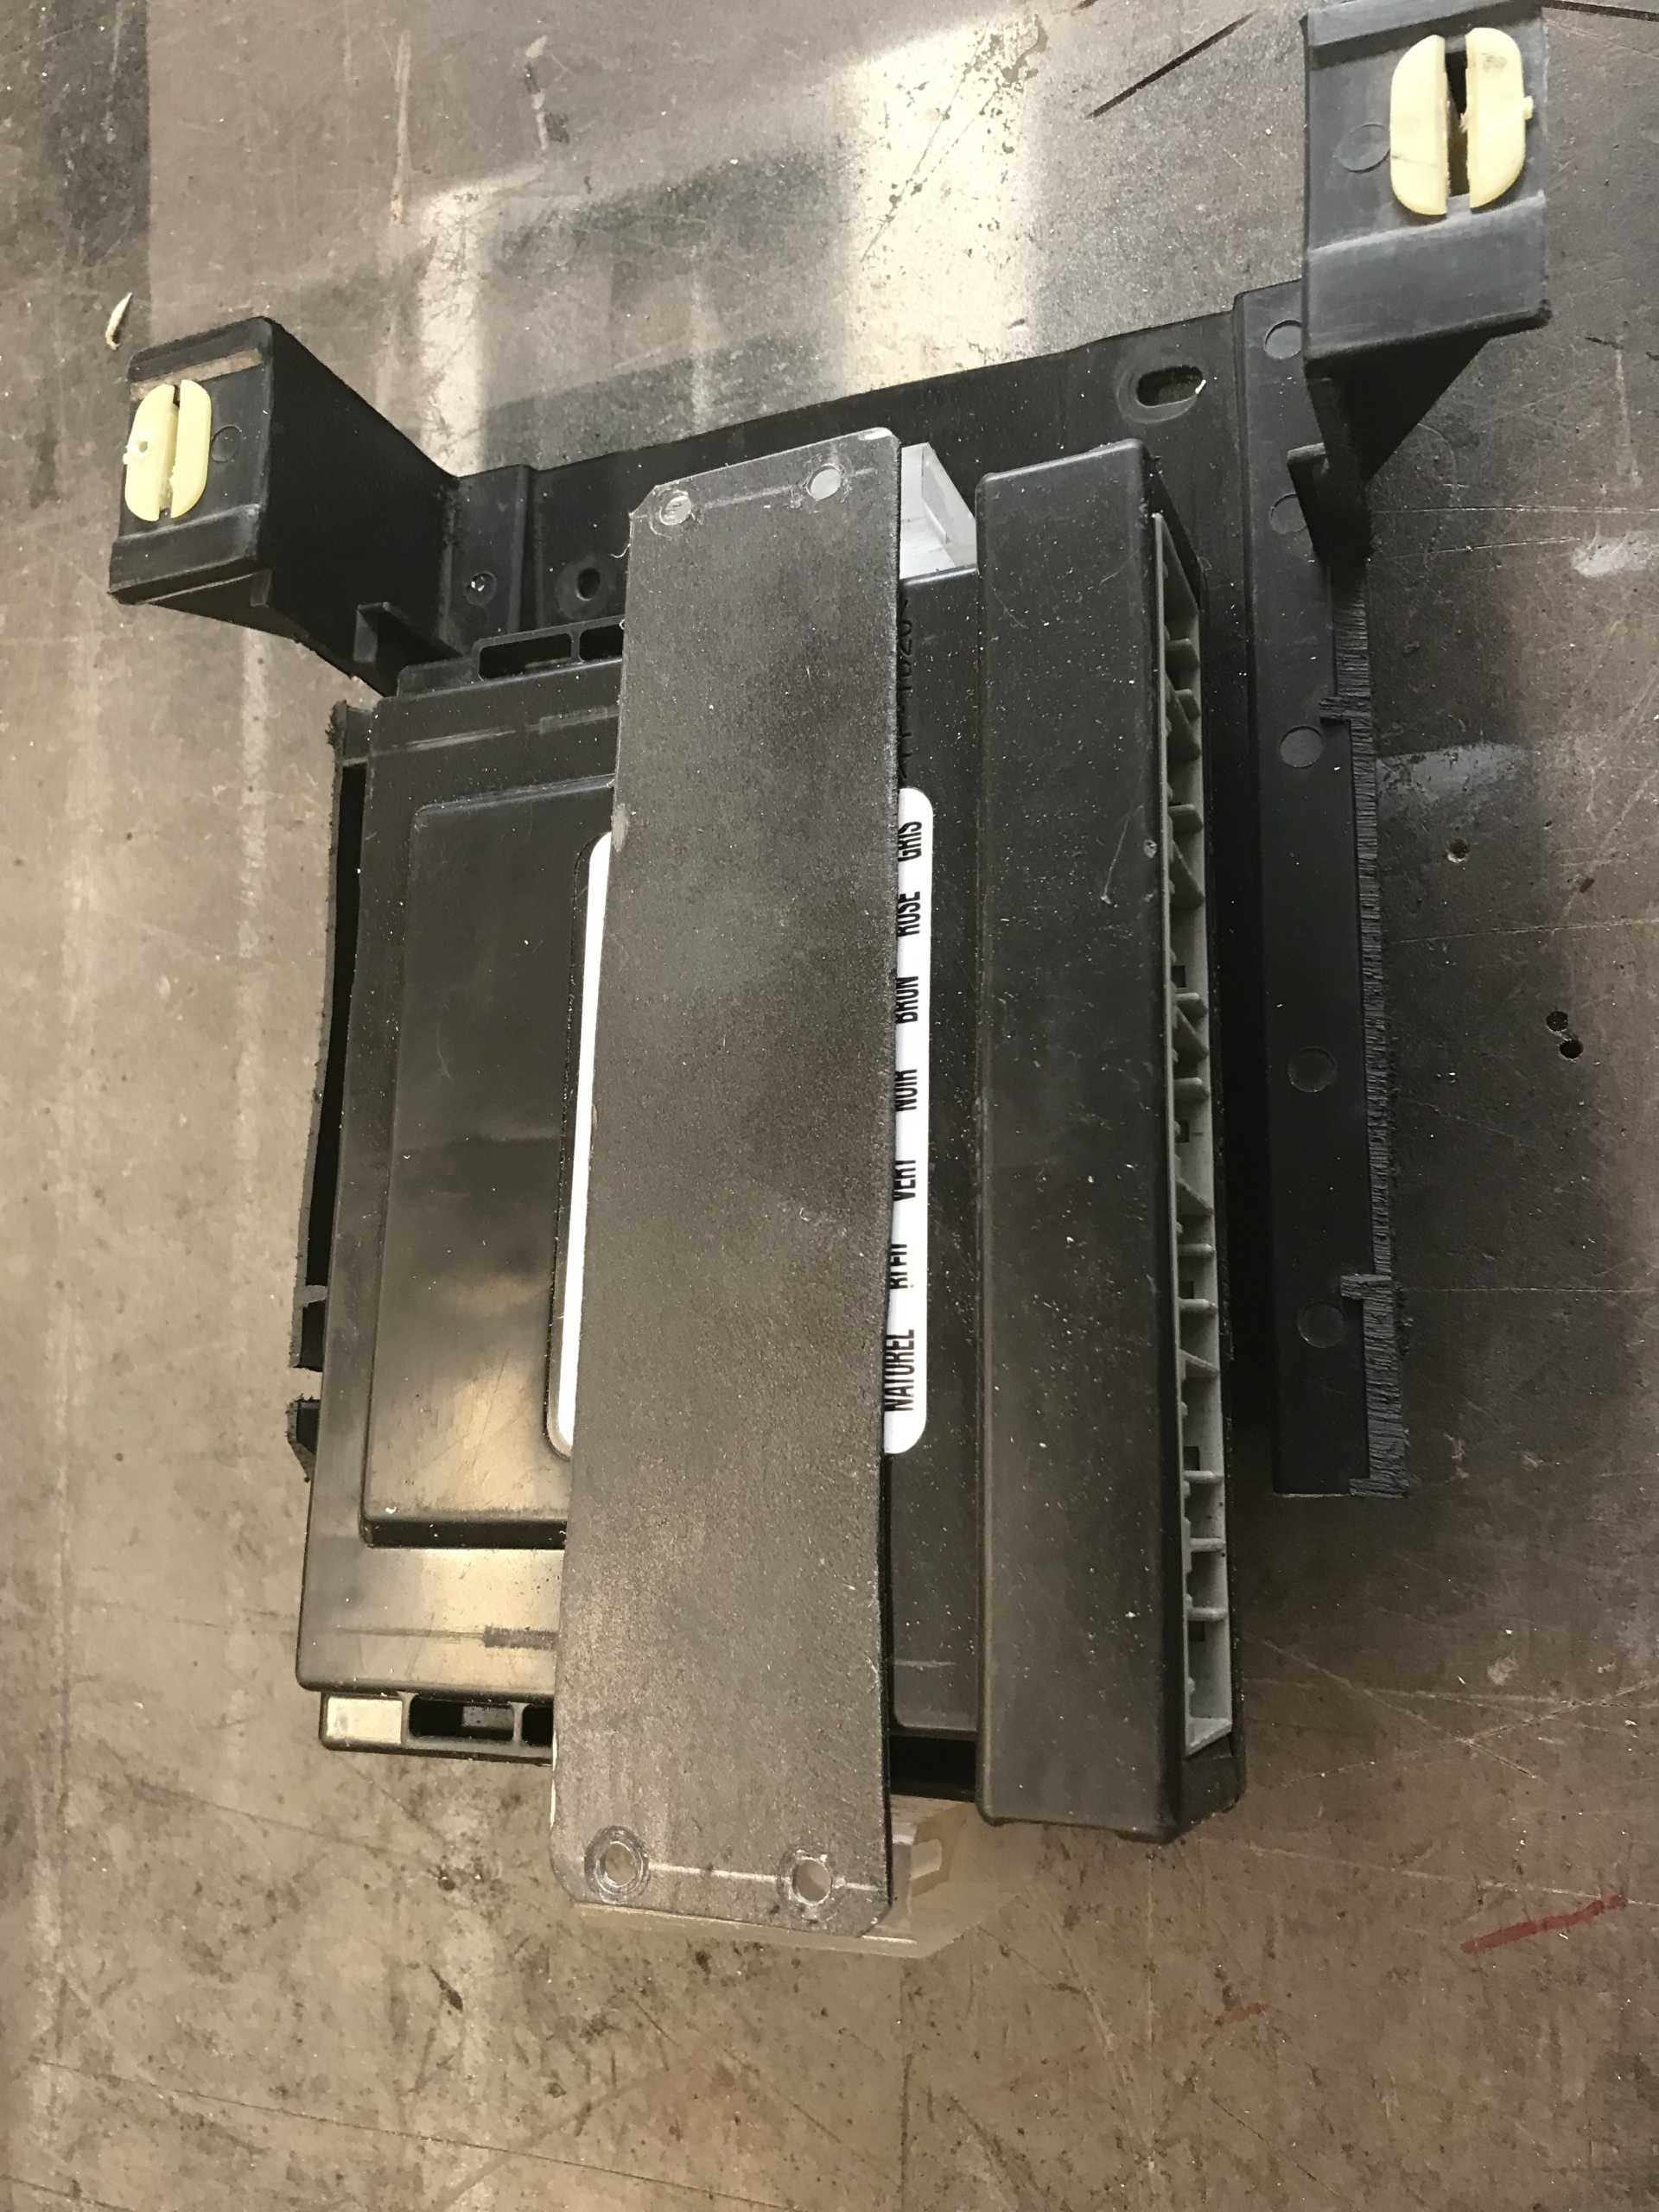
The old ECU mount was adapted to hold the Body Control Module
Push to start hidden behind the Instrument Bezel
Wires to shift knob for manual shift up/down
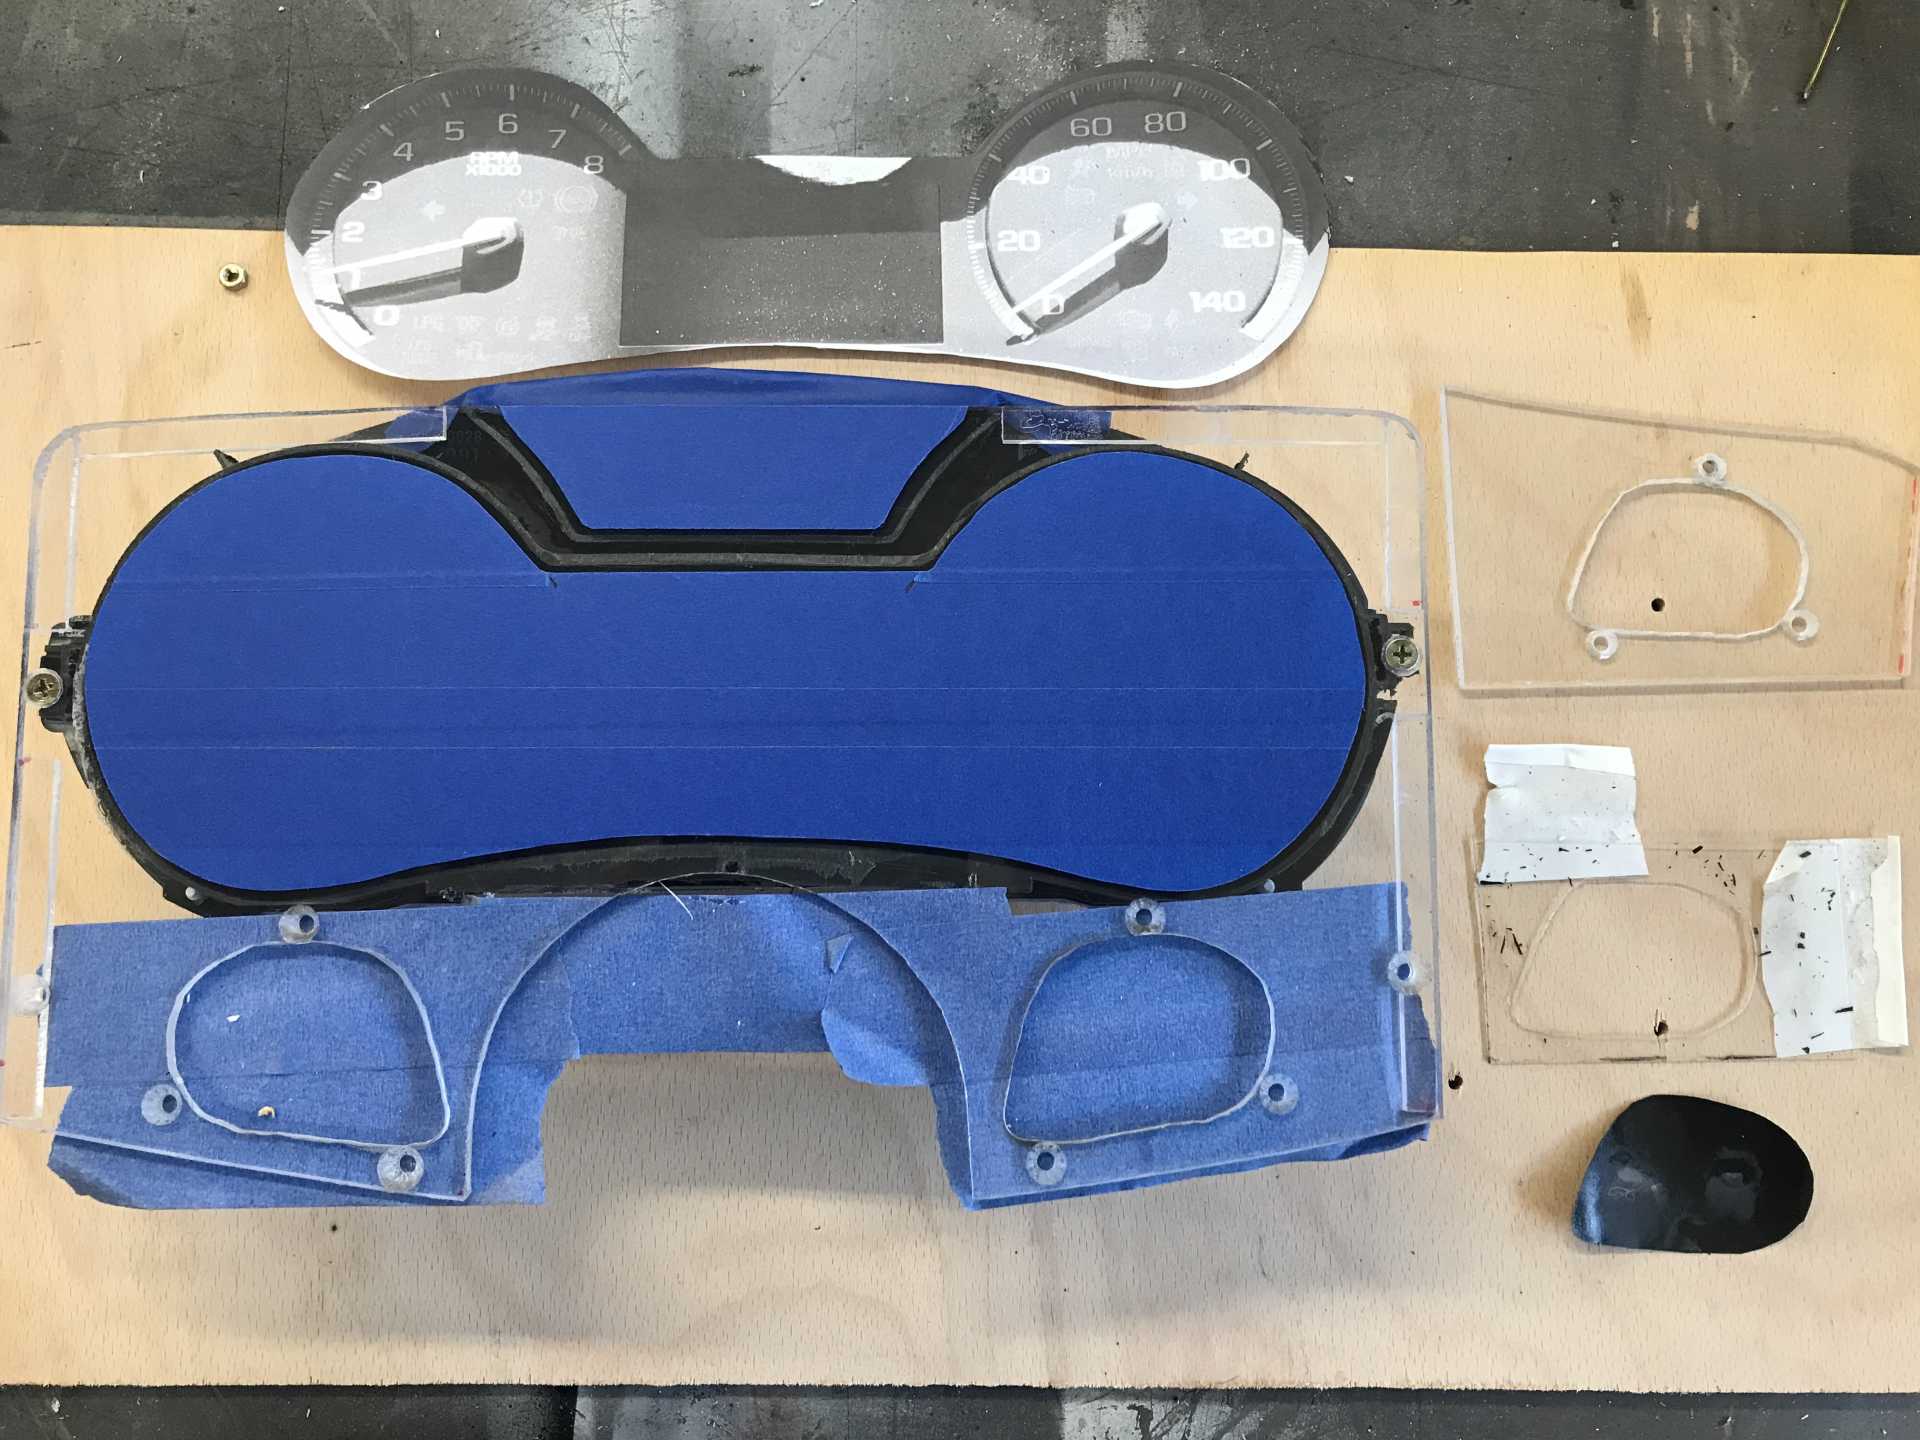
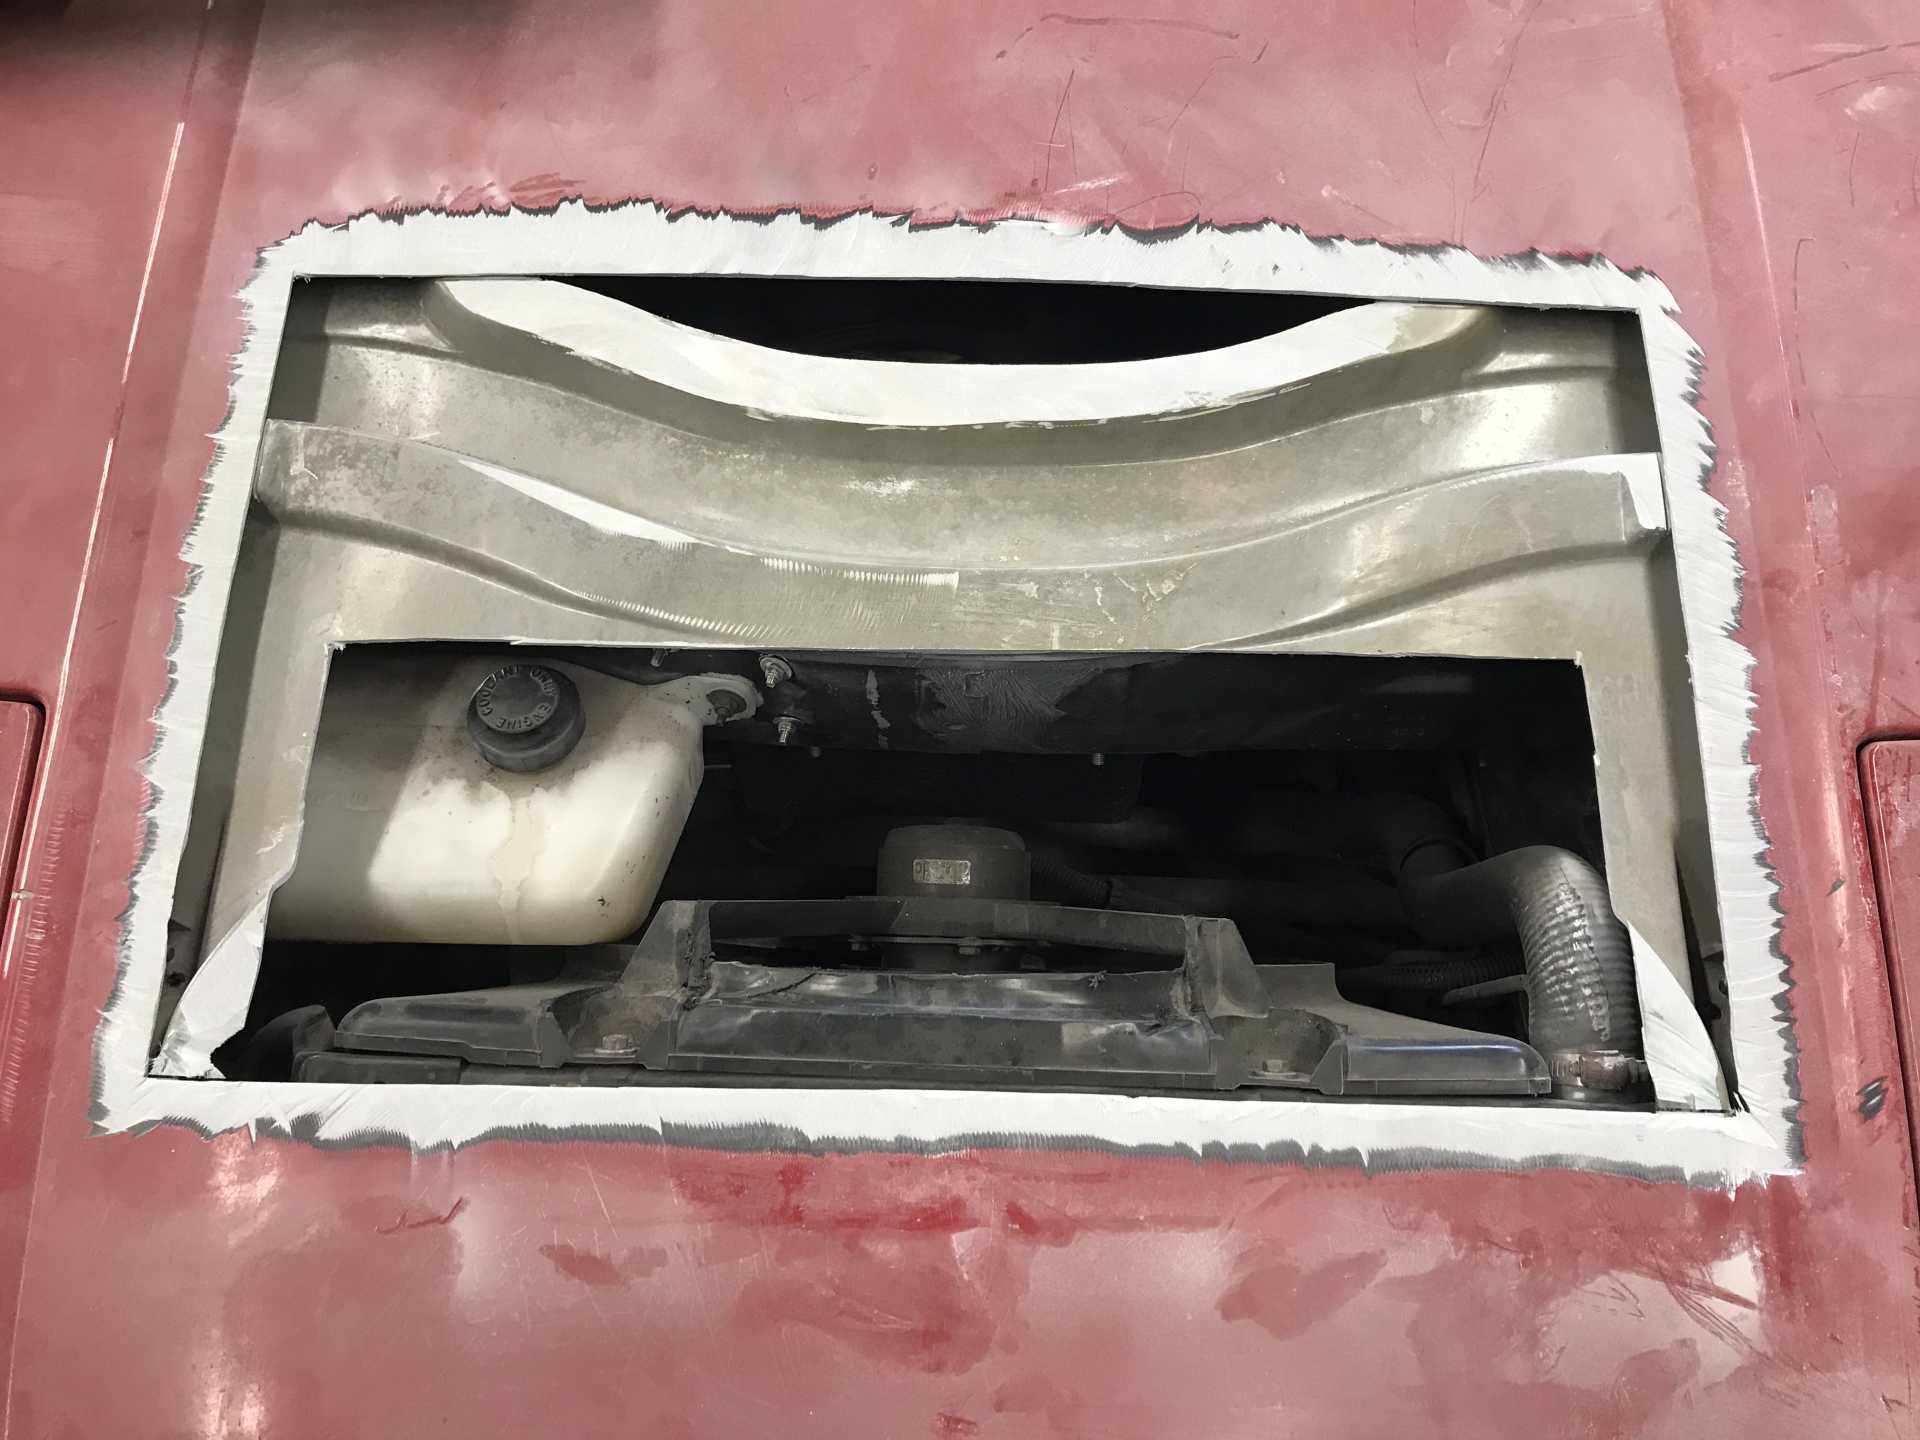
Started working on the instrument cluster. The idea is to retain the original cluster bezel, remove the Fiero parts and add in the Impala cluster and the left and right Impala steering wheel switches for cruise control and display selection. I'm not going to add them to the Fiero wheel since would be very un-original and look ugly, it wouldn't fit well and requires several wires to be run in the steering column. The switches will go below the instrument cluster. First step was to cut the Impala cluster so it is thin front to back. The original has glare shields and is much wider at the top (7"). It needs to be like the Fiero, just a vertical thin flat box. Then cut off almost everything sticking out to reduce the top to bottom and side to side size. Luckily I have a bandsaw and the trimming took an hour with no mistakes. If you are into wood working and don't have a bandsaw, get one you will love it. I see them at estate sales all the time for cheap. I decided to make the IP front cover from a 1/4" thick piece of transparent acrylic which was cut to the shape of the original trim plate. The cluster and new switches will mount to the back and the whole thing will be held in place by two screws on the sides and the top of the cluster which extends up above the bezel to lock it in place. It sounds simple but there was a lot of head scratching to make it fit securely and look good. The switch outlines are mirror images of each other and are oddly shaped. How to cut this funny shape in a piece of plastic? This is a long process, you might want to look at the photos to make sense of it. I remembered a trick I used for panel layout in the past. First I took photos of the switches and instrument cluster frim directly above them so there is no distortion. Then the photos were printed on my computer until the image size was the same as the actual part by changing the printer scaling factor. This photo was cut out and the outine of the switch was marked on a thin sheet of acrylic as a marking aid. This marking aid was then cut out with my portable router and filed & sanded until the switch fit correctly. Next step was to transfer the outline to a small piece of 1/4 acrylic as a template which was also routed and carefully trimmed until the switch would fit (only needed to do this once). Note that the switches do not mount flat, but are tilted up and outwards which changed the shape somewhat. Then the mounting holes for the switches were added to the template. Now I have a replica of what each cutout and mounting holes will look like. Almost there now.
Taking the photo used for masking the acrylic panel
The painting& cutout prep items talked about, left is the photo&masked panel. Right is the cutout photo & templates
The switch template was cut to fit along the edge and bottom of the face plate and was placed where the switches go. Then the switch mounting holes were drilled on the real panel and countersunk. The template was mounted to the real panel with the mounting screws to hold it in position; now I've got a really good pattern to make two identical holes. Time to get out the router again with a laminate trimmer bit. After cutting a small hole in the center of the real panel cutout, the trimmer bit was used to widened it until it was an exact duplicate of the template. Only the template needed to be precisely trimmed, the real cutouts were just copies of the that and needed only light sanding to eliminate rough edges. Cutting acrylic with a router is a messy and fiddly process; you must go slowly and look like a snowman when done. If your router speed is too high the plastic will melt. If you are to agressive the bit will dig in and destroy your work. Always cut into the bit rotation since going the other way usually leads to disaster as the bit tries to race ahead.
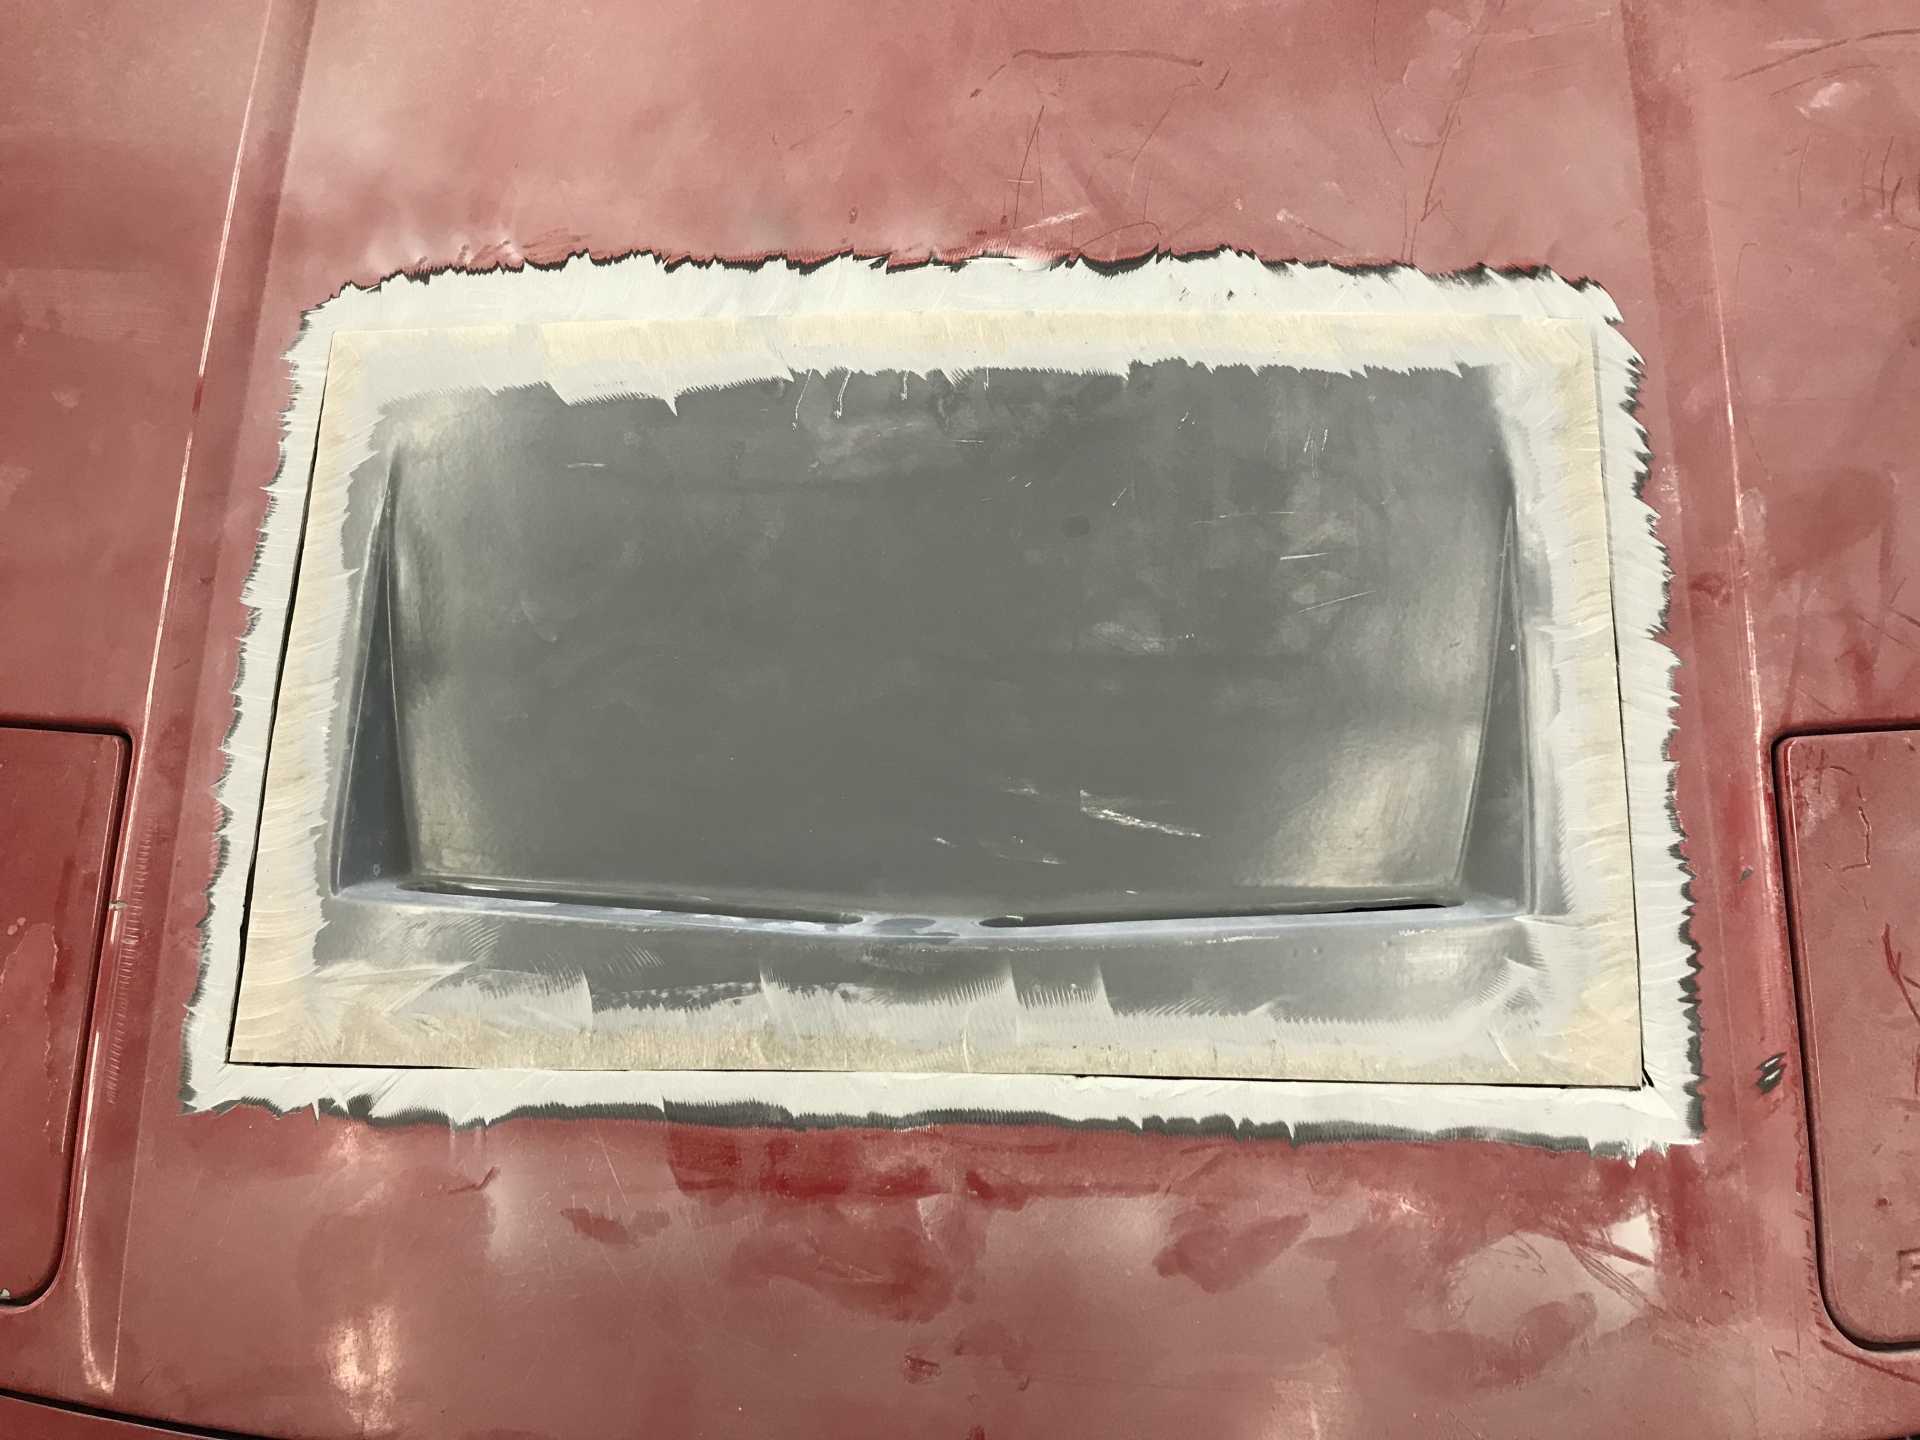
Disaster didn't happen (this time, other projects haven't been so lucky) and the panel was almost ready for painting. The panel was cleaned and some scratches from routing buffed out. Then cluster and switches were mounted to the panel to check the fit; the switches were removed (while trying not to touch panel surfaces). The photo of the instrument cluster was laid on top and trimmed until it was slightly smaller (1/16") than the actual cluster openings This means the edges cut on the bandsaw were hidden. Luckily there was a straight edge on the cluster cutout that could be used as a guide. I removed the photo and placed a piece of painter's tape on the panel along that straight edge inset by the 1/16". The photo was placed on top of the tape and marked for left-right position. Then the photo was removed and more tape was placed over the entire instrument area. Tne photo was replaced and lined up to the marks and held with bits of tape. The tape on the panel was cut to the outline of the photo very carefully with a sharp X-acto knife and the excess tape removed.
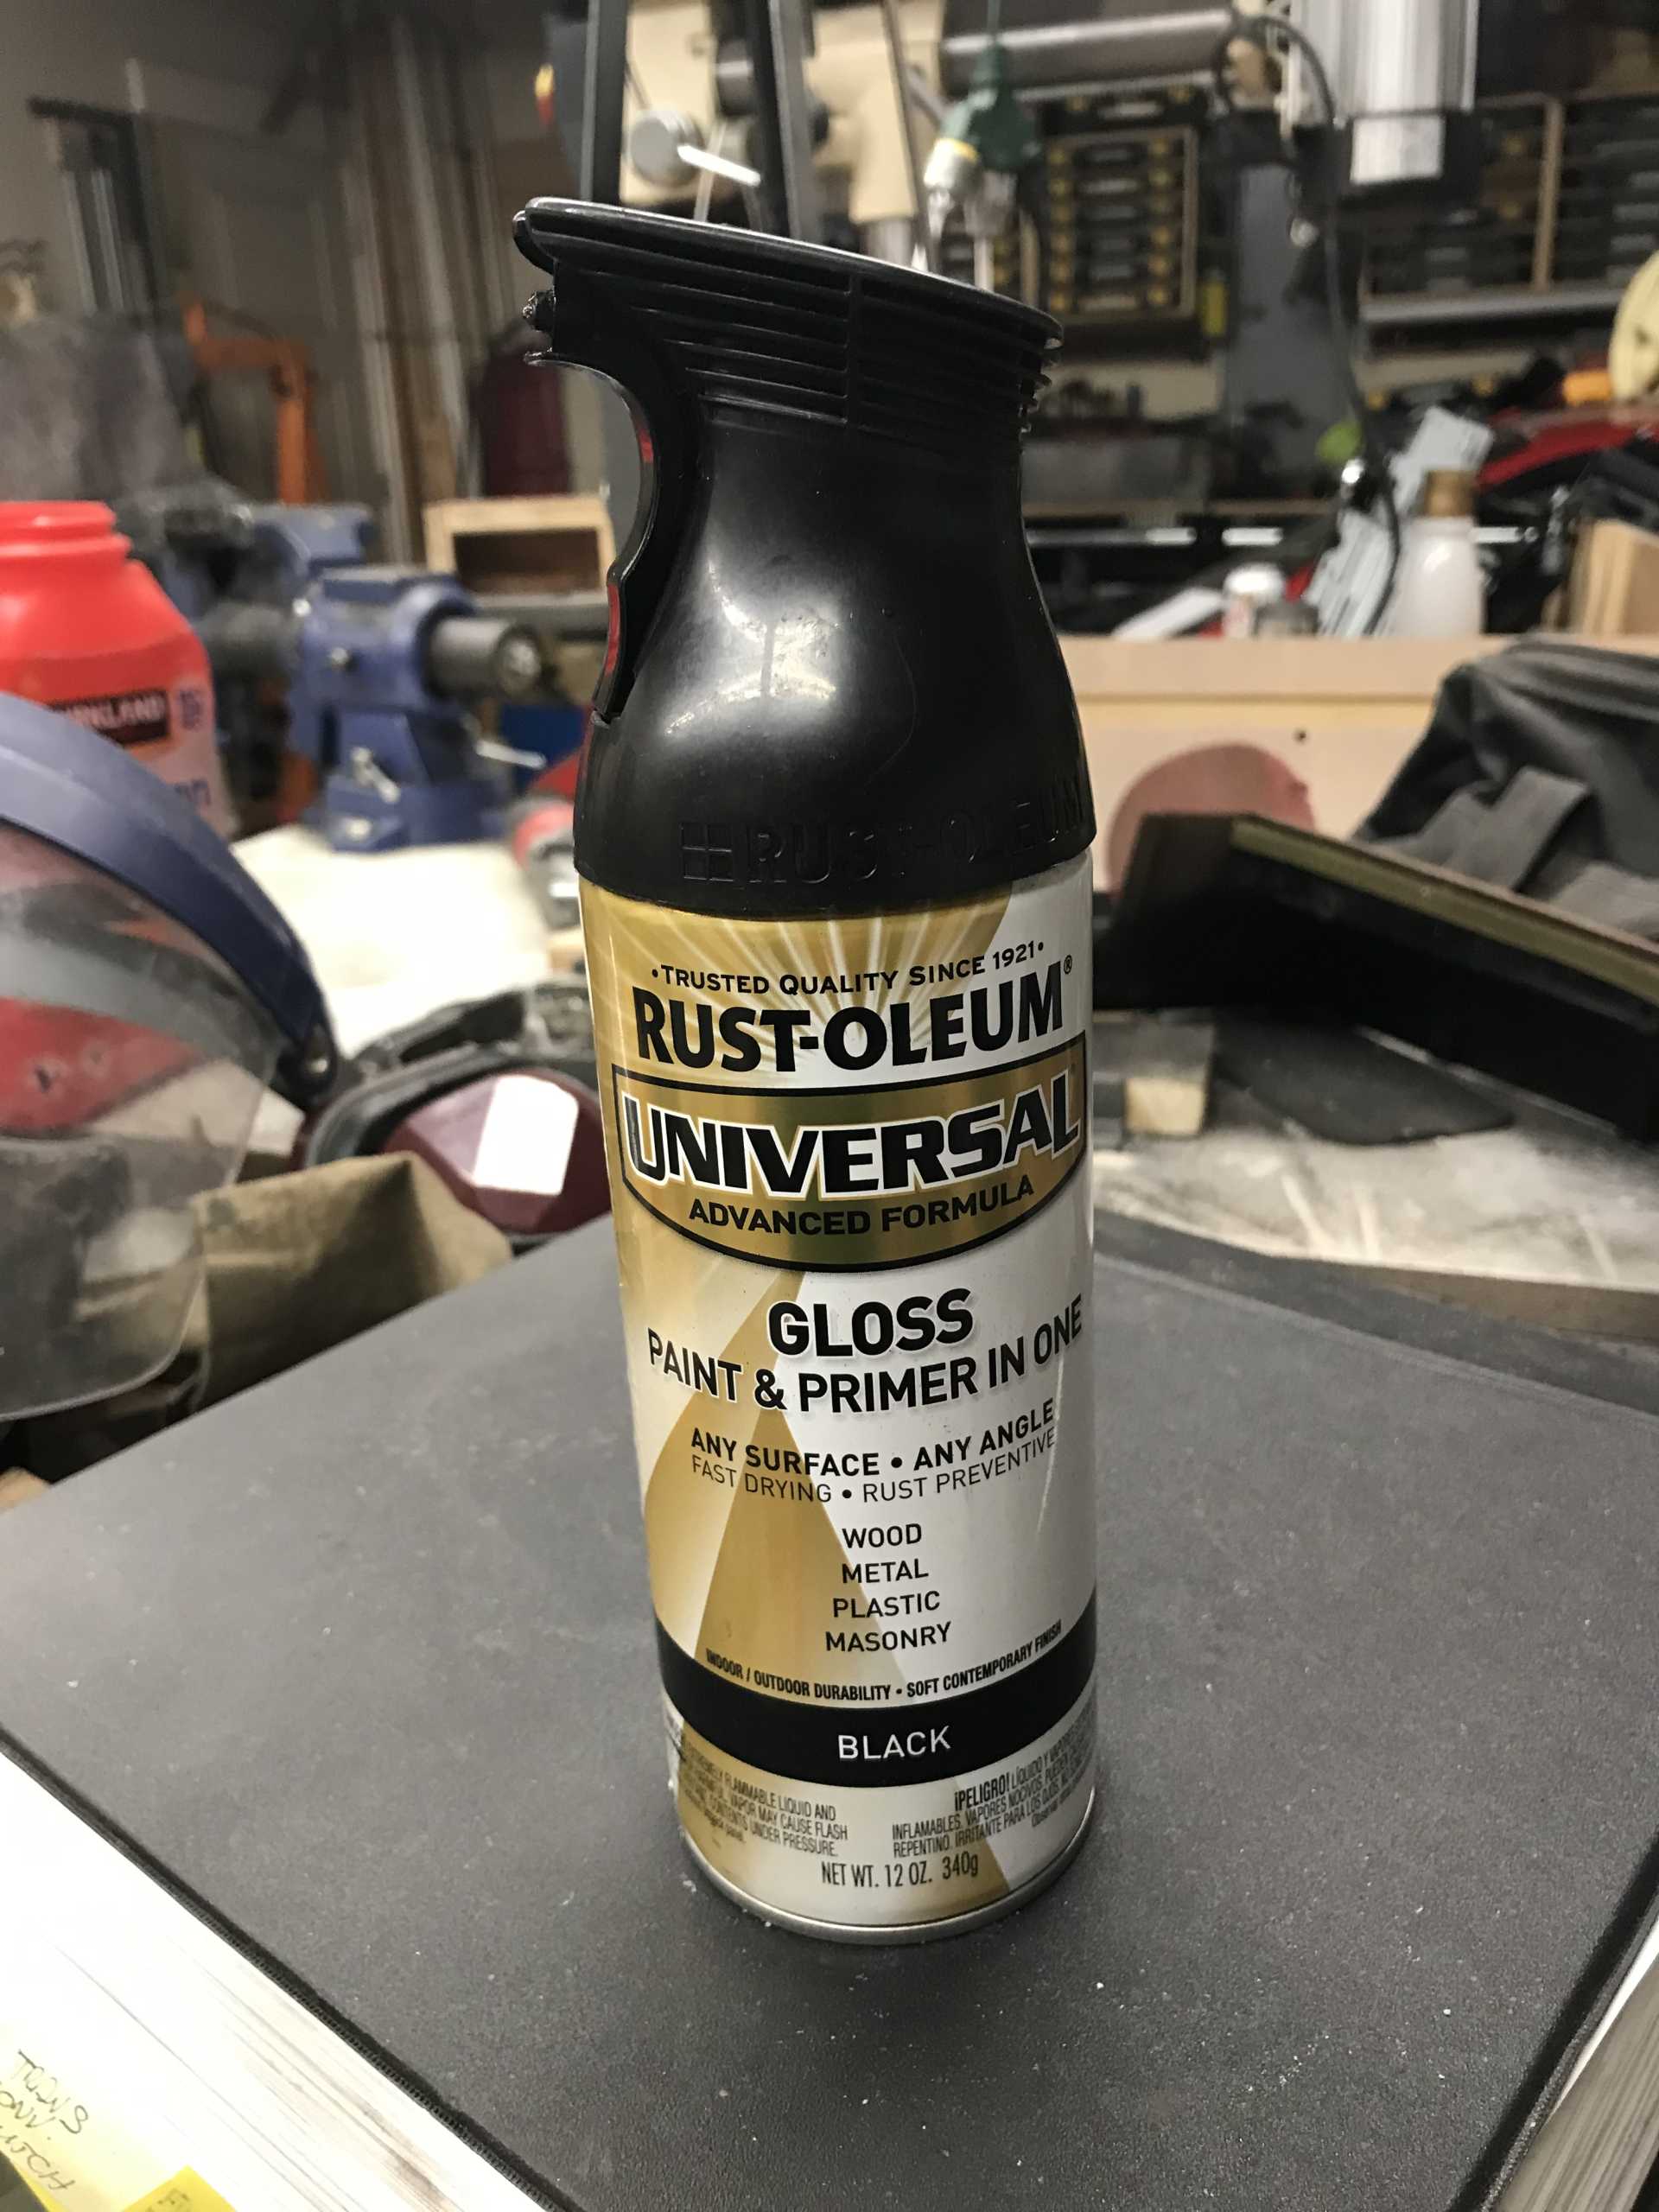
Finally after 12 hours of making templates, cutting, fitting, trimming, cleaning, taping and cutting the tape outline, the panel was sprayed with Rustoleum Universal. It is a really good rattle can. It needs to be used exactly as the manufacturer specifies. It is the only spray can I've found that gives a true 6-8" fan pattern like a real gun, almost like HVLP in a can. Clean work is essential, double coat within 5 minutes or wait a day or two before applying the next coat (or it will craze). And it is very slow to dry. Figure 24-72 hours. But the results are very good for a $7 can of paint.
This is the stuff I used
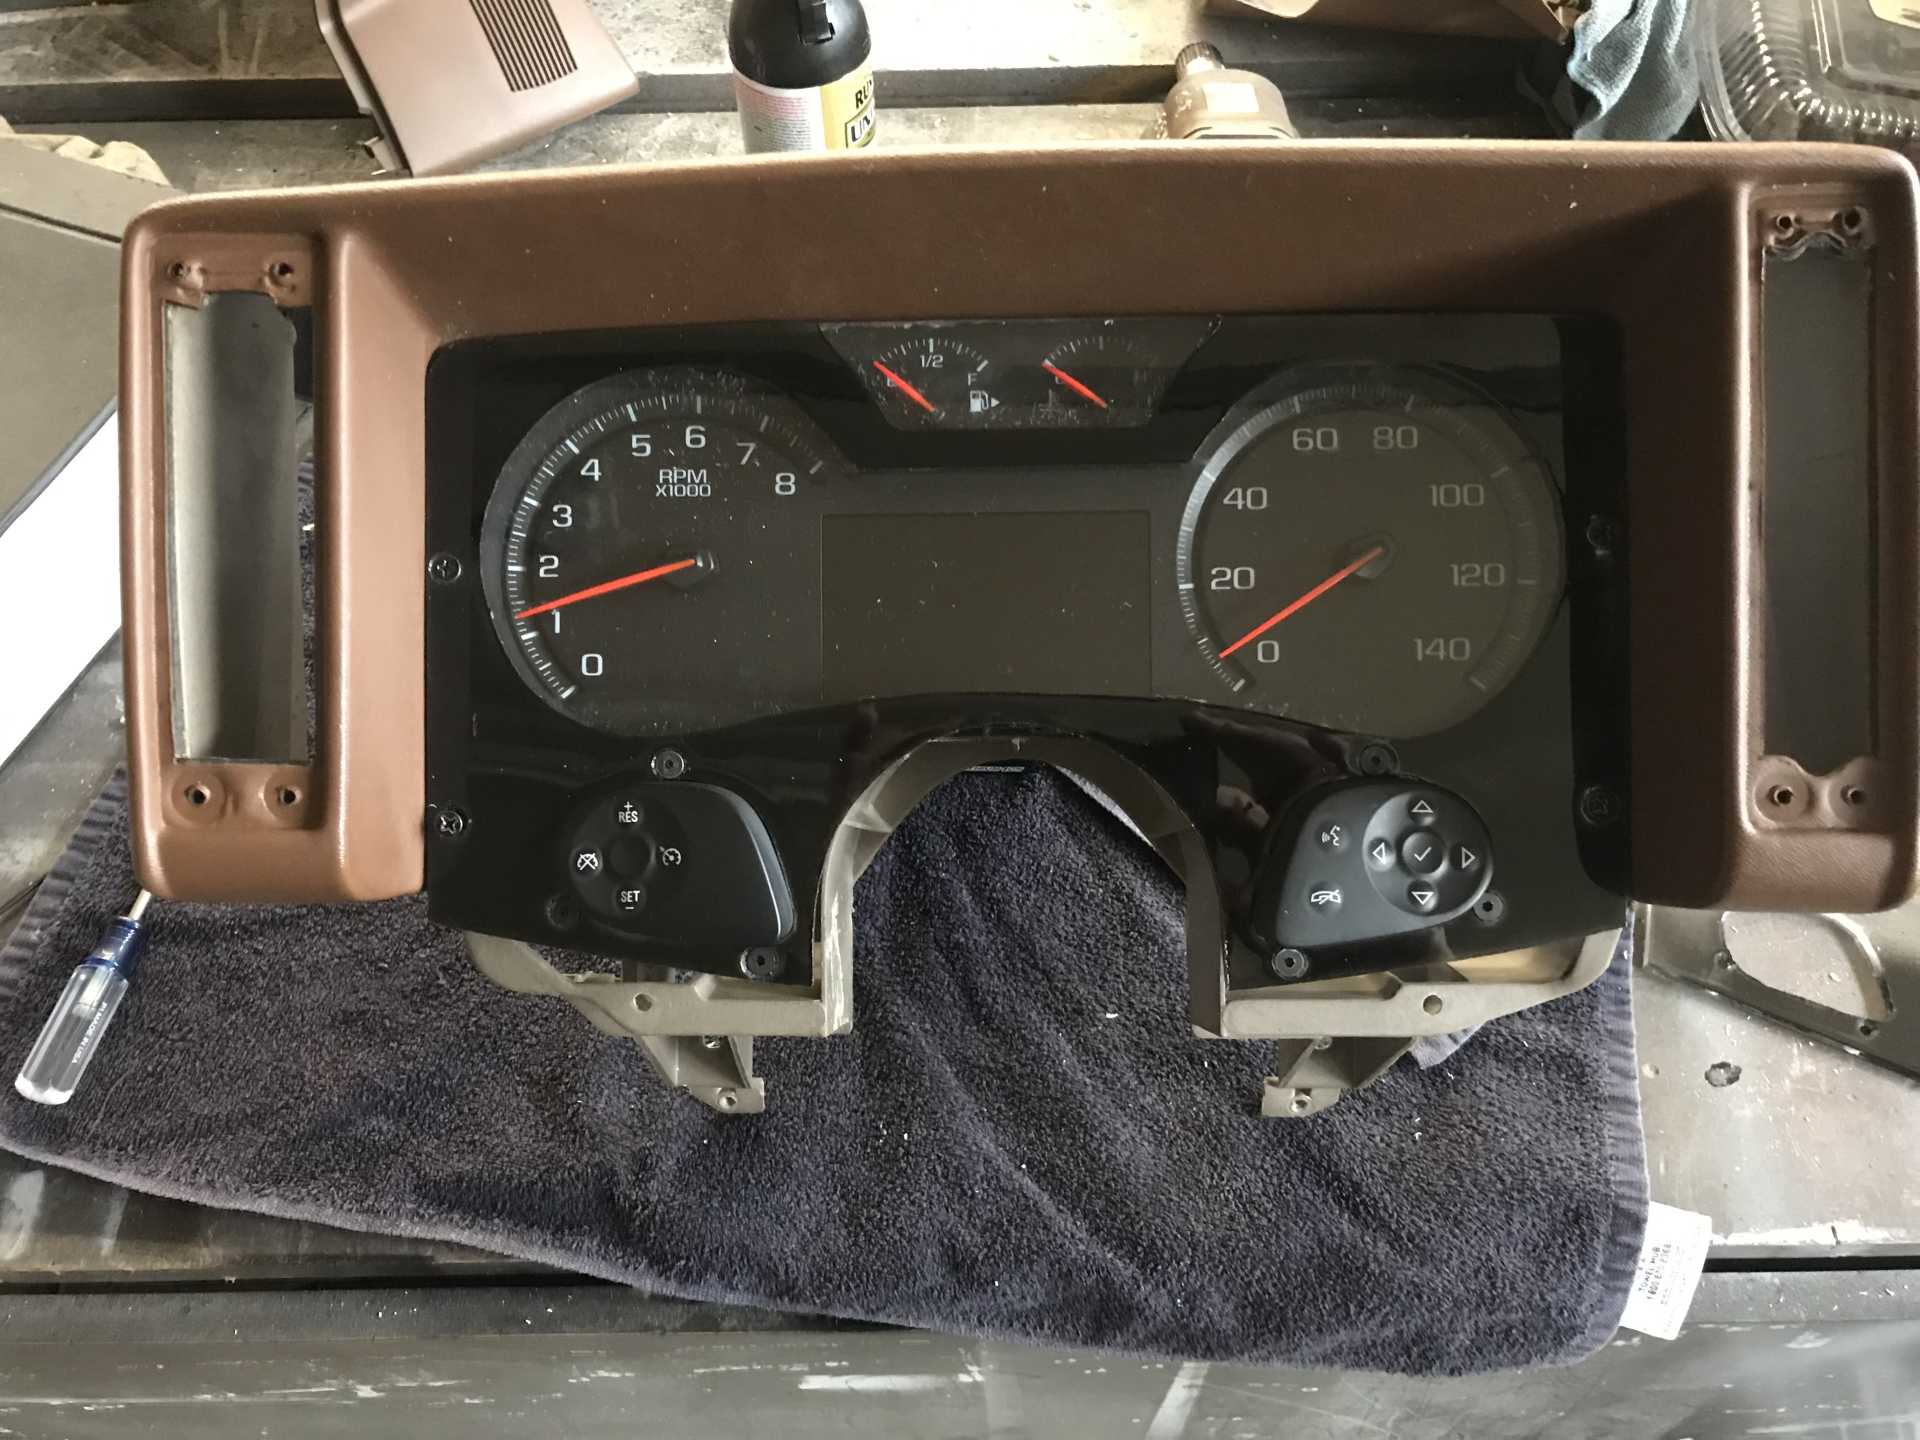
And the result. Not perfect but good for a first try.
Mounted in the car
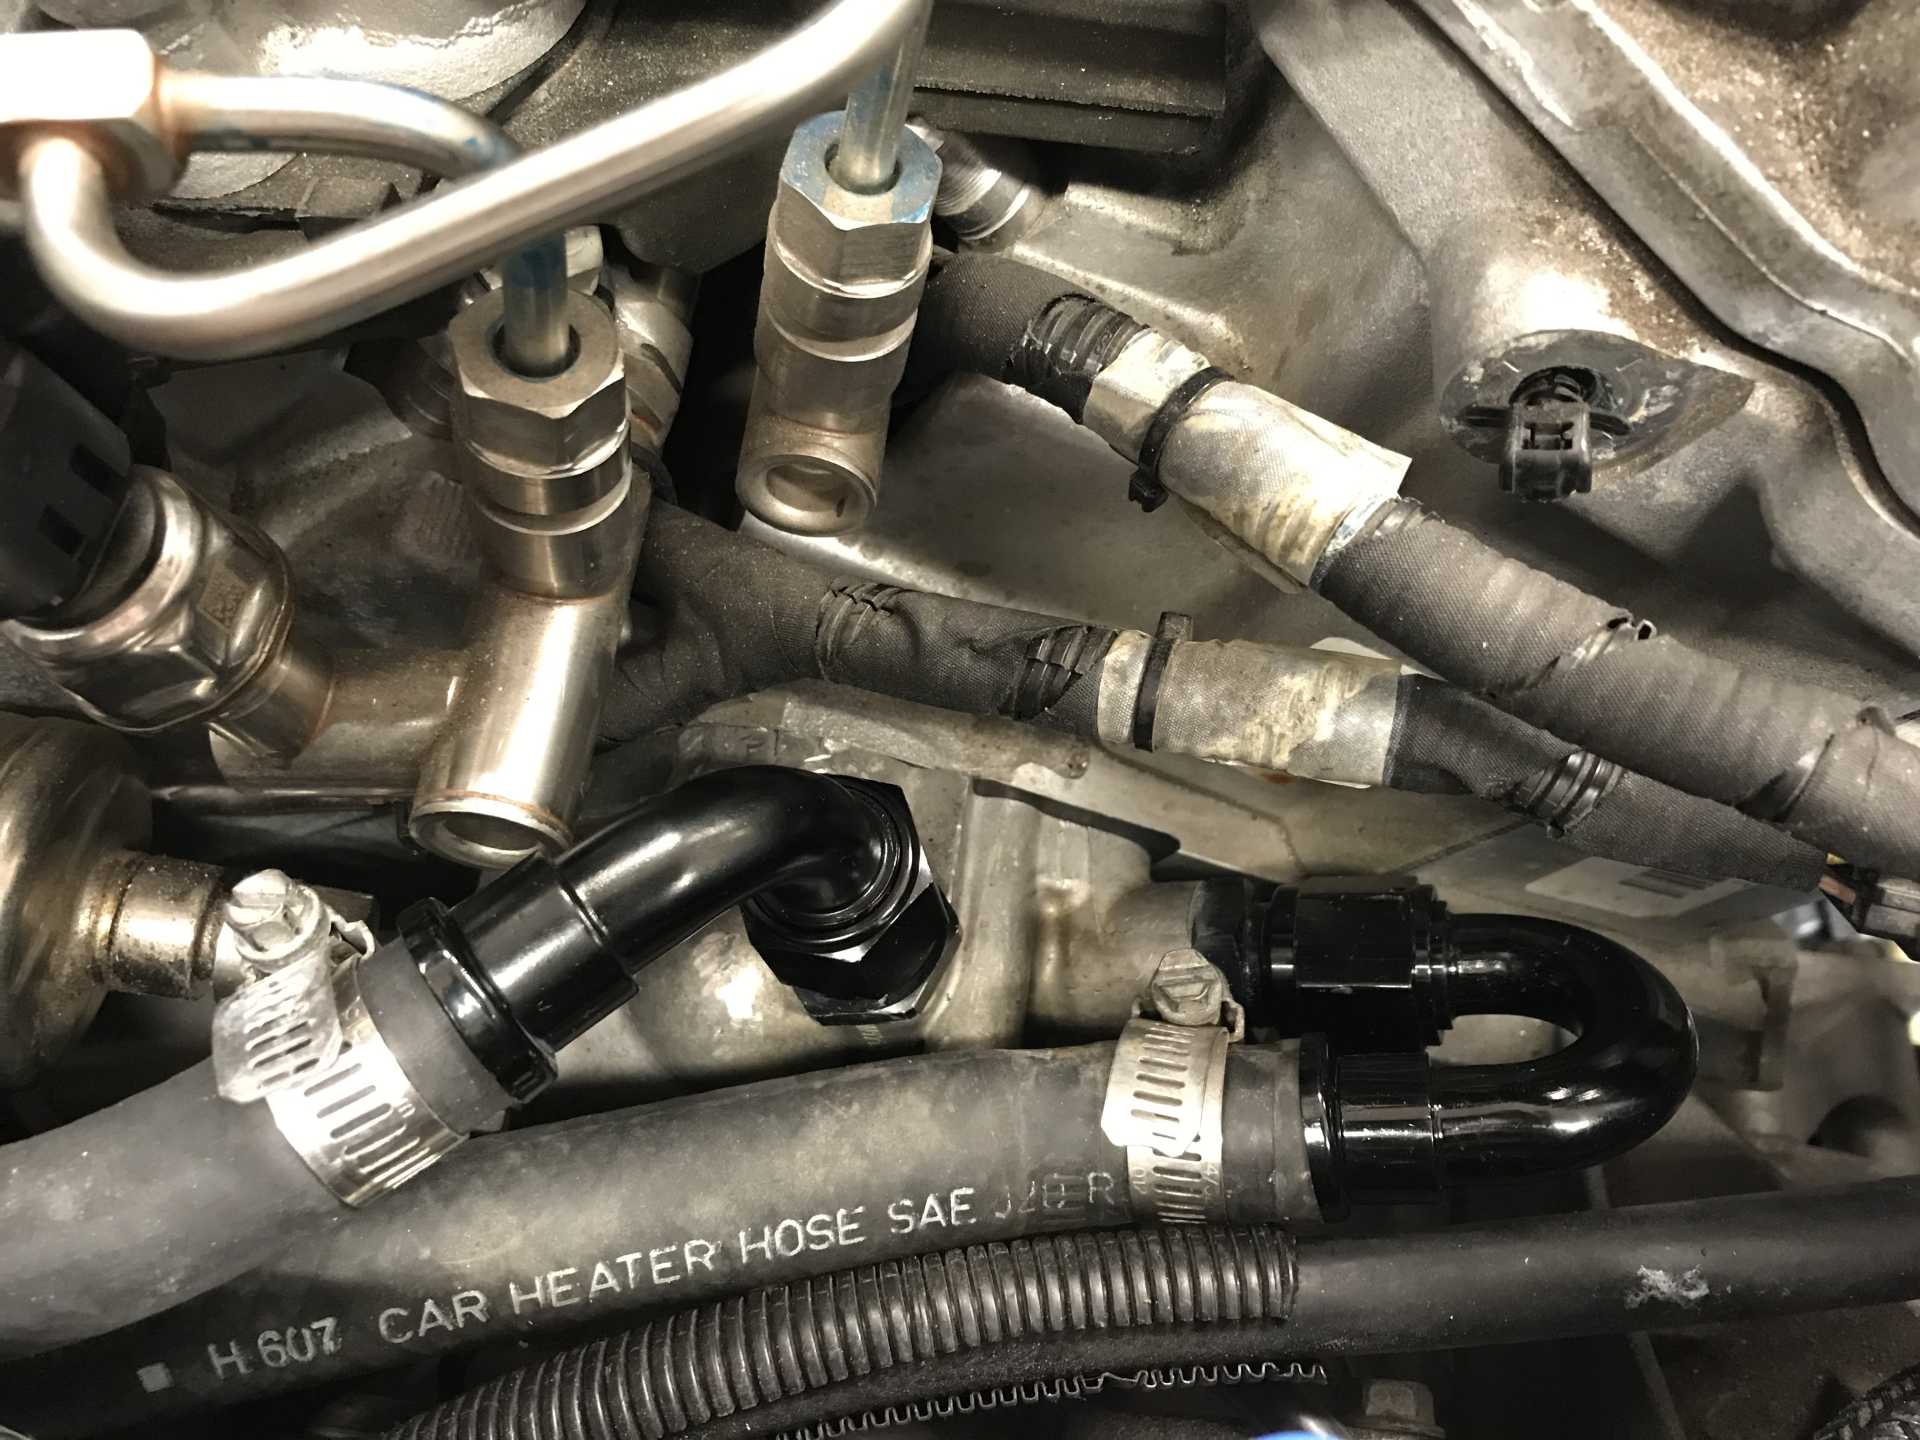
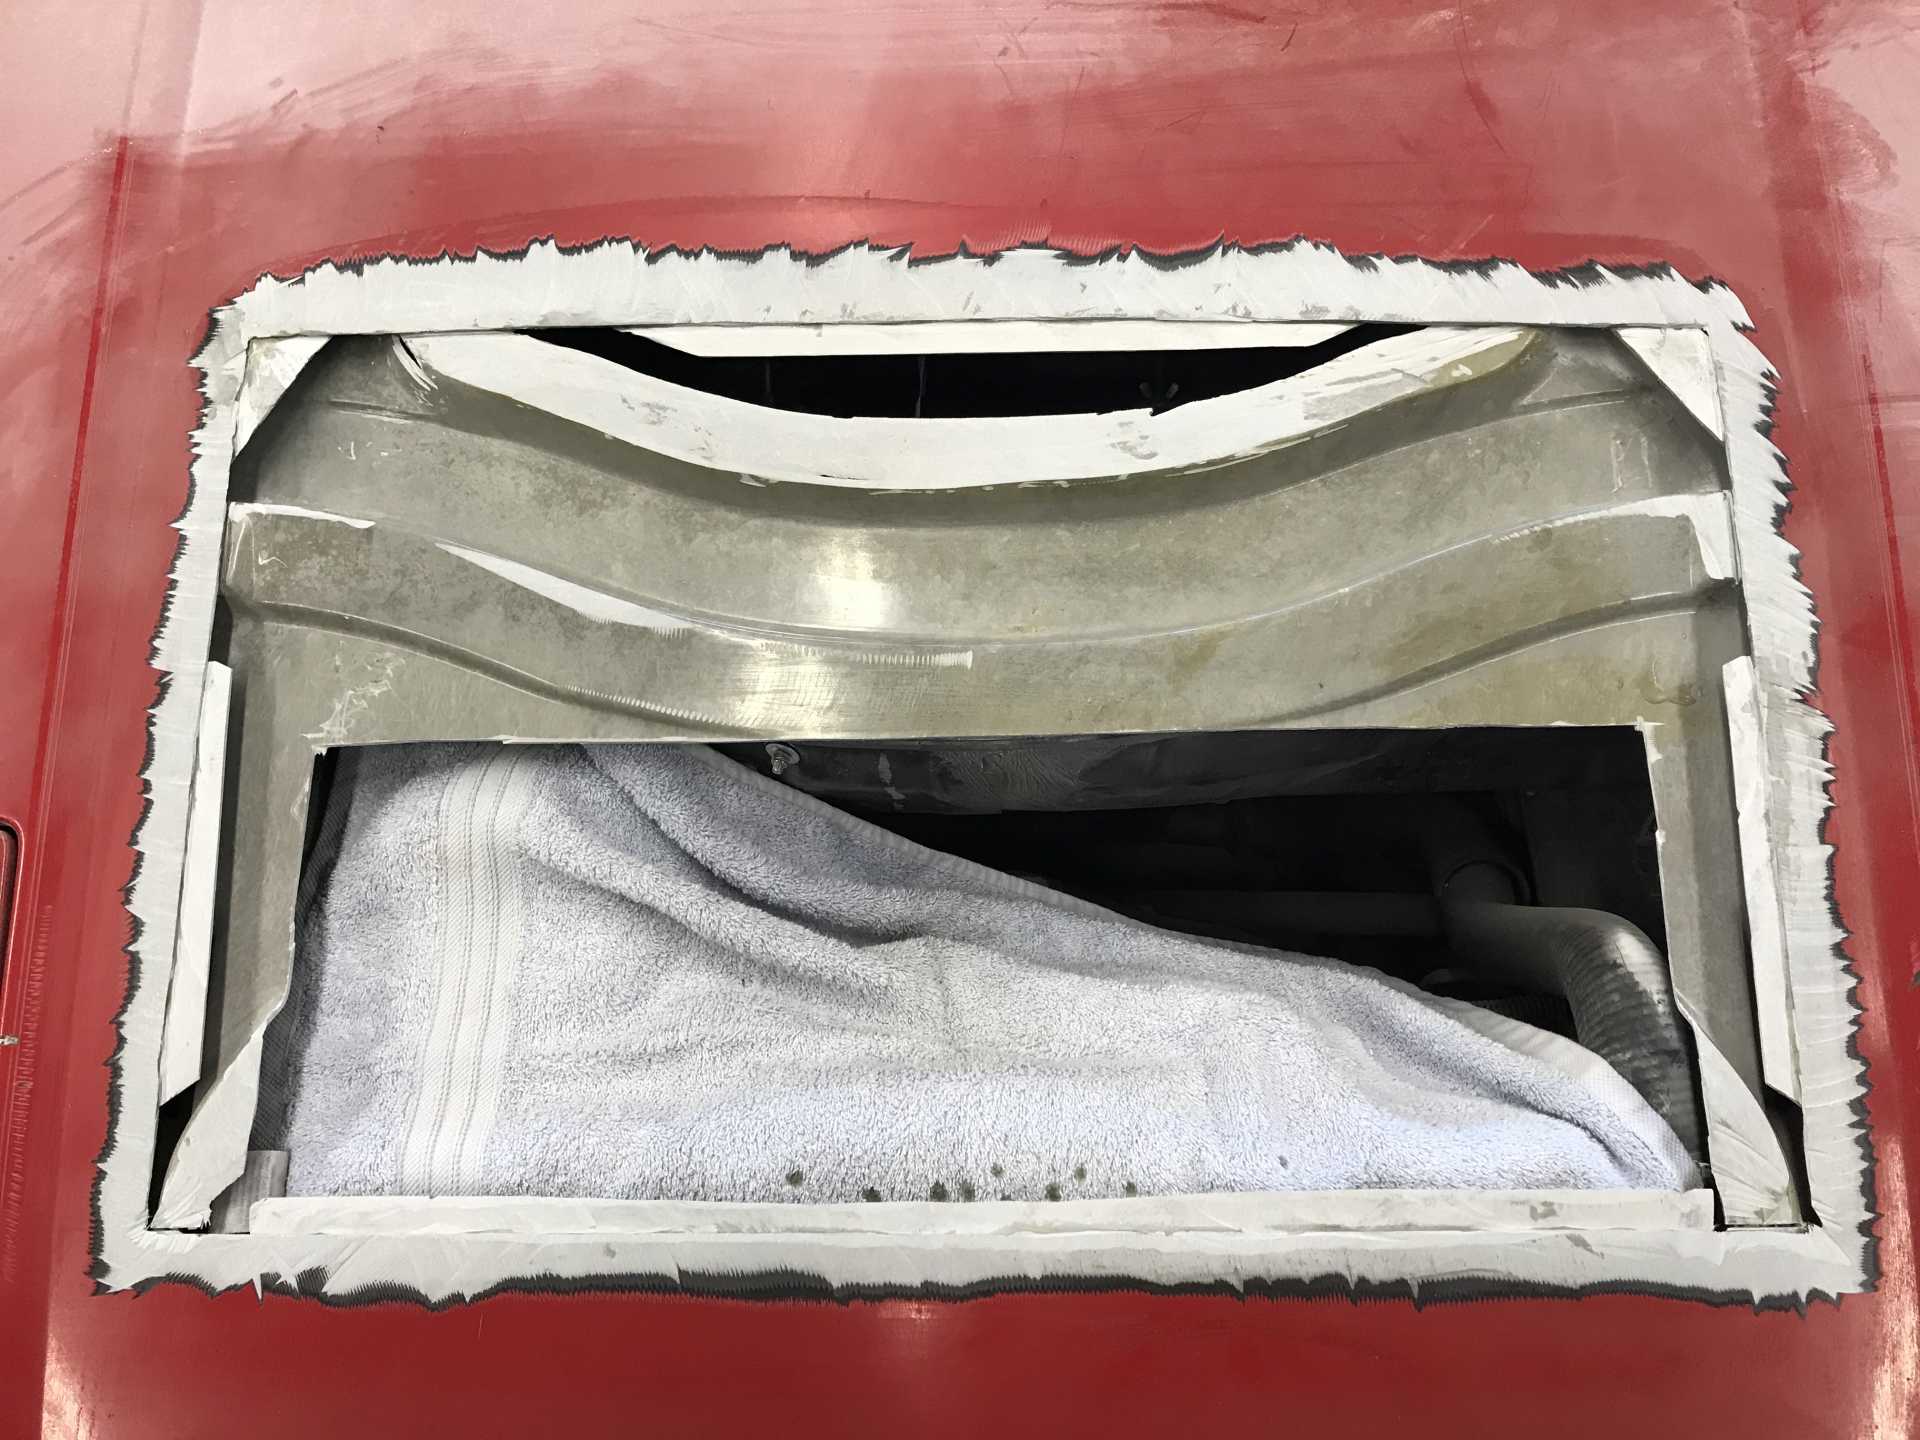
Now that this is complete I'm working on getting rid of unwanted wiring and connectors. Most of the connectors are huge and won't be needed. The goal is to verify everything working in place and then dispose of the connectors, checking that something needed hasn't been removed. Then the interior can go back in. Also the heater AN fittings showed up so with winter coming they will be hooked up and the coolant (water) replaced with the real stuff. Then I tackle the air filter & hose to the MAF & TB.
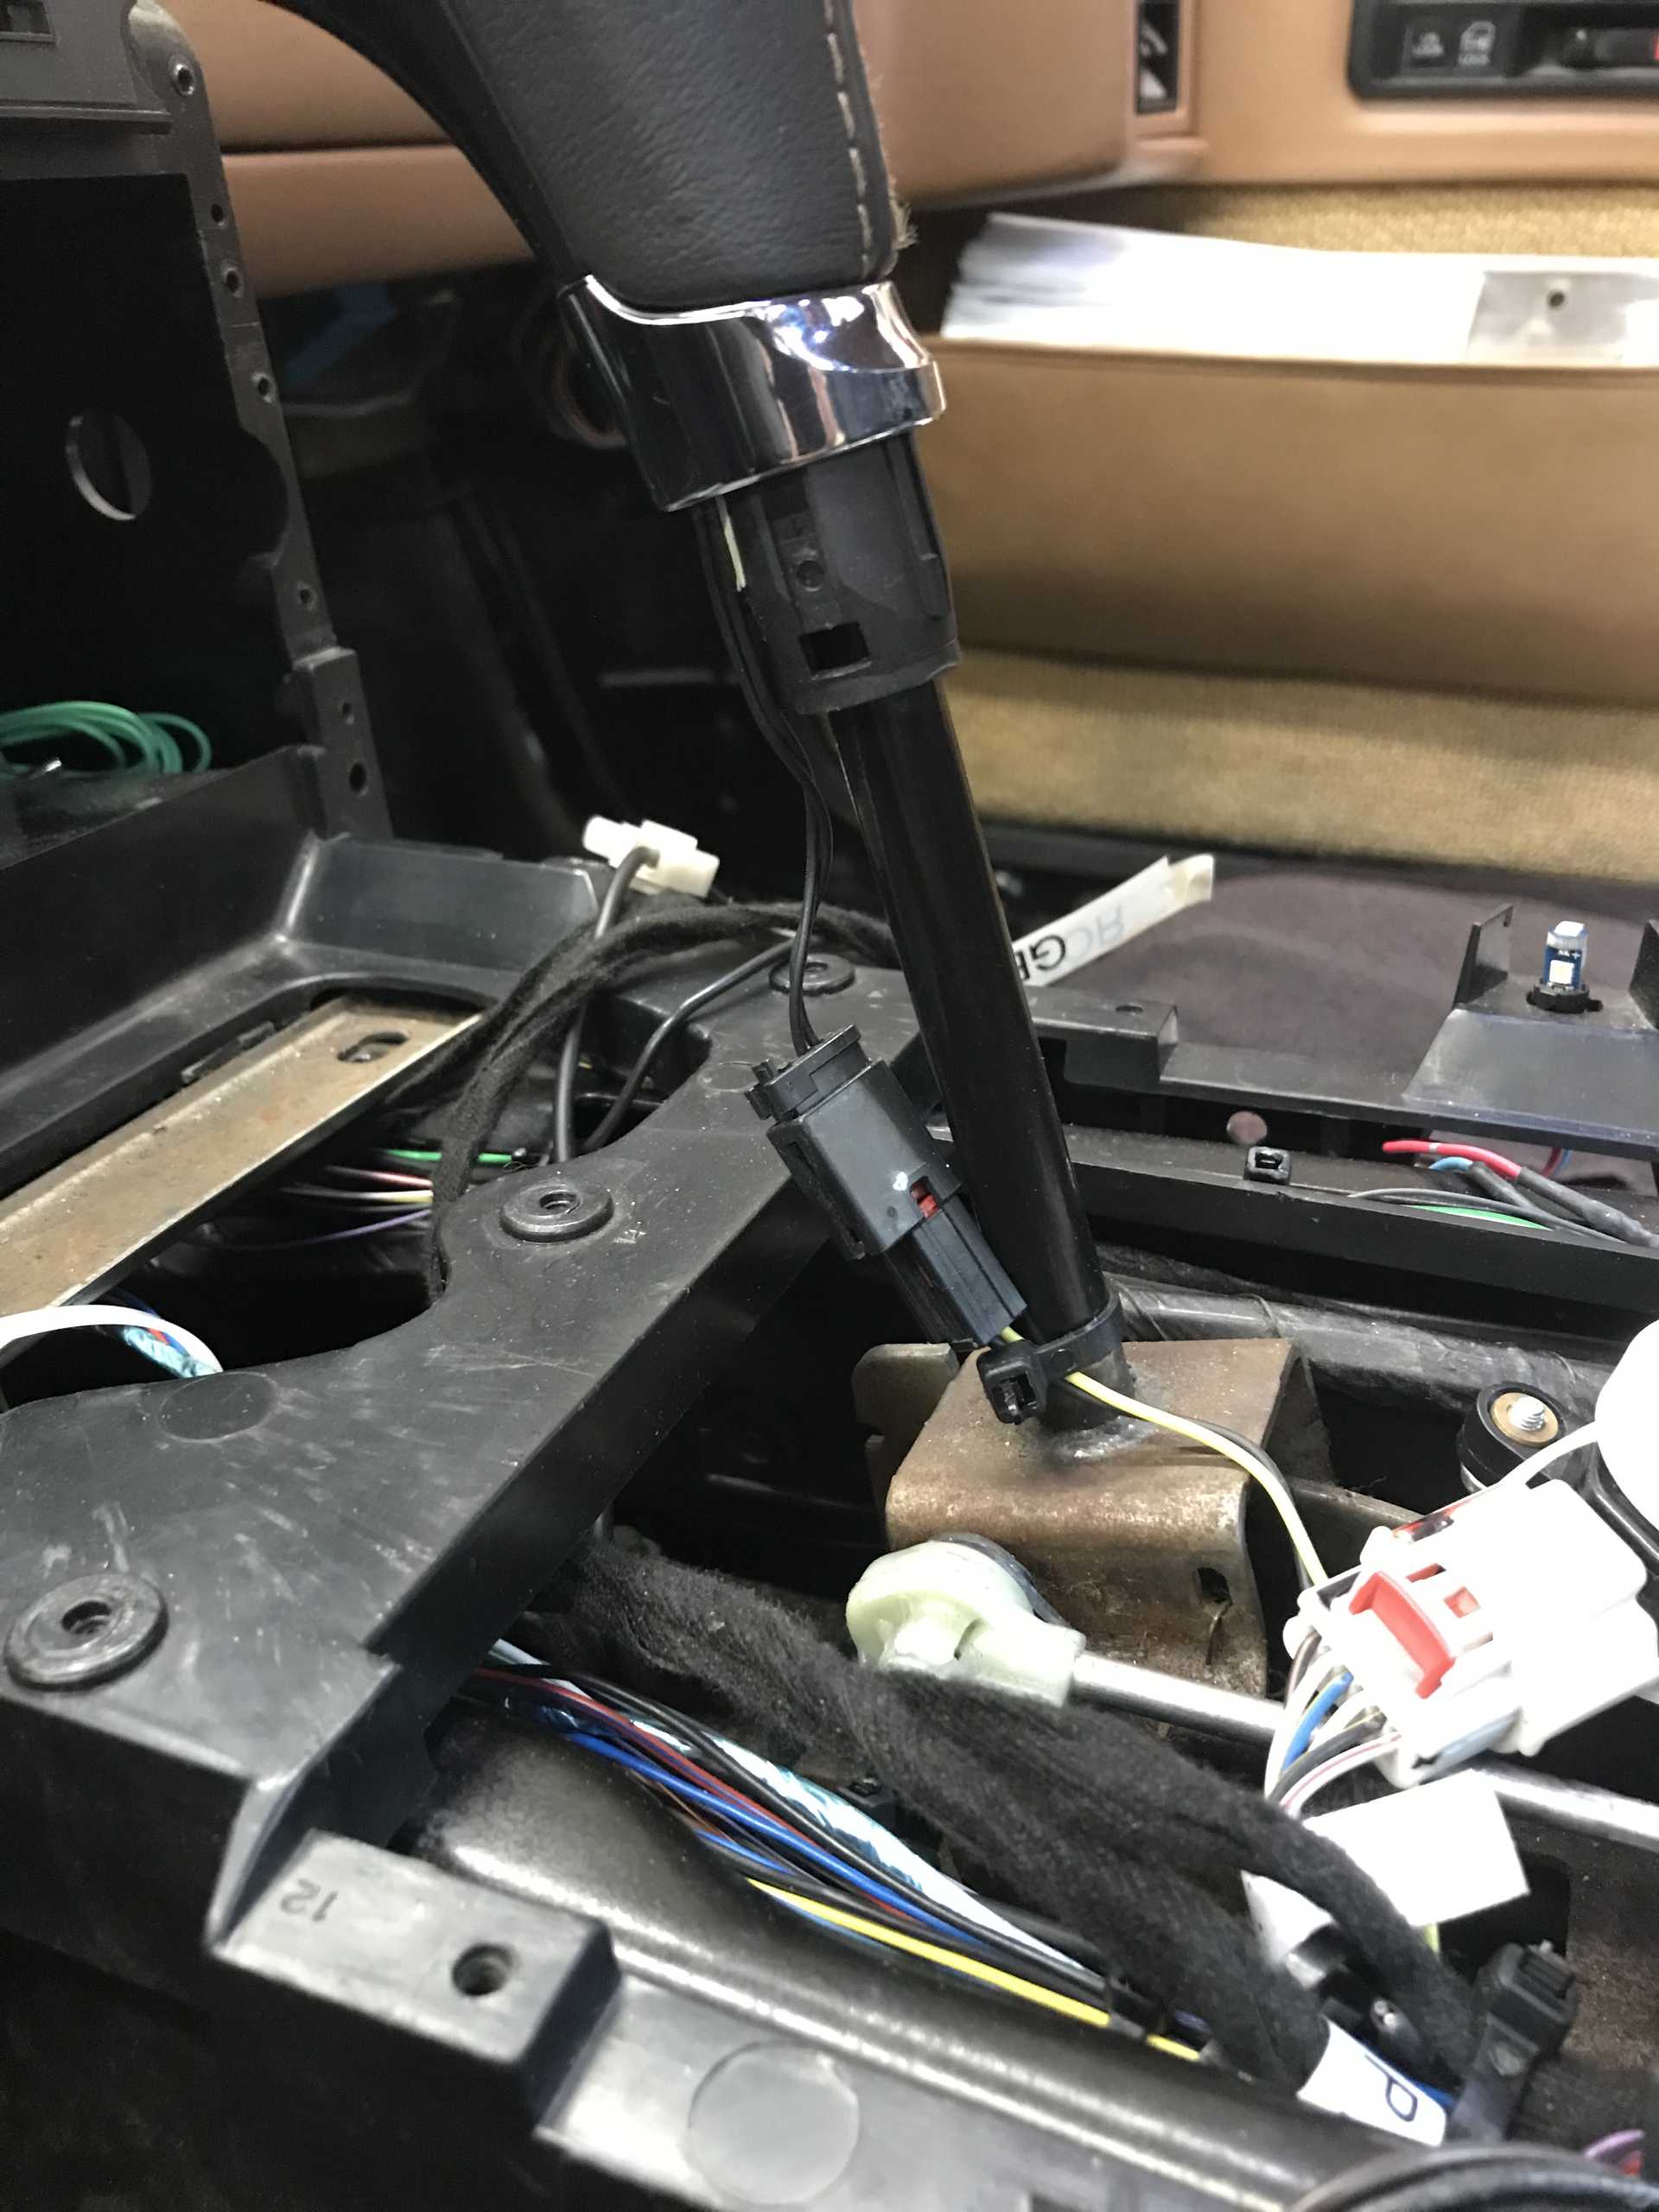
Spent a day messing with the wiring for the Instrument cluster and mounting the cluster. It fit nicely and the wiring seemed to work out right. Then I went to start it; turning on the battery master caused the PS pump to kick in??? That's not supposed to happen. So I pushed the PTS to see if it was totally dead and it did start and idle. But the display was black and the gas pedal did nothing. Sigh, time to dig in and figure it out tomorrow. A few hours later I remembered the ground for the display was left off. Maybe that will solve the black display. The PS pump running indicates the Hot-in-Run signal is always active. No idea what is up with the gas pedal. Sure enough putting the errant wire ot ground solved the IP problems and stopped the PS pump from starting while not running. But the gas pedal is still dead. I've been meaning to start cutting out the unneeded Impala connectors and decided the gas pedal was a good place to start. What a mass of wires, almost 100 in this cable. Rewiring them without the connector solved the problem. Vroom. And another obscure problem cropped up, shut off the engine and the display shows "Shift to Park" but the shifter is in Park! The electrical power does not turn off - it goes into accessory. Turns out there is a almost undocumented switch on the shifter that tells to BCU the lever is in Park. Leave the lever in neutral or anything other than Park and the system never shuts off. This switch is not required for starting the engine, only for turning off power when you stop the engine. So I added a "shifter park" switch and one more problem solved.
The Shifter in Park switch is a micro switch with an arm that the shifter yoke closes to turn off the electricity
And the final result <How to upload a video?>
While waiting for the paint to dry on the panel I hooked up the heater hoses, the AN swivel fittings made it simple to point them where they needed to go. I did fab a pair of hose retainers from 3/4" acrylic (another band saw job). Those were hose clamped to the front cradle cross bar and run to the pipes next to the gas tank.
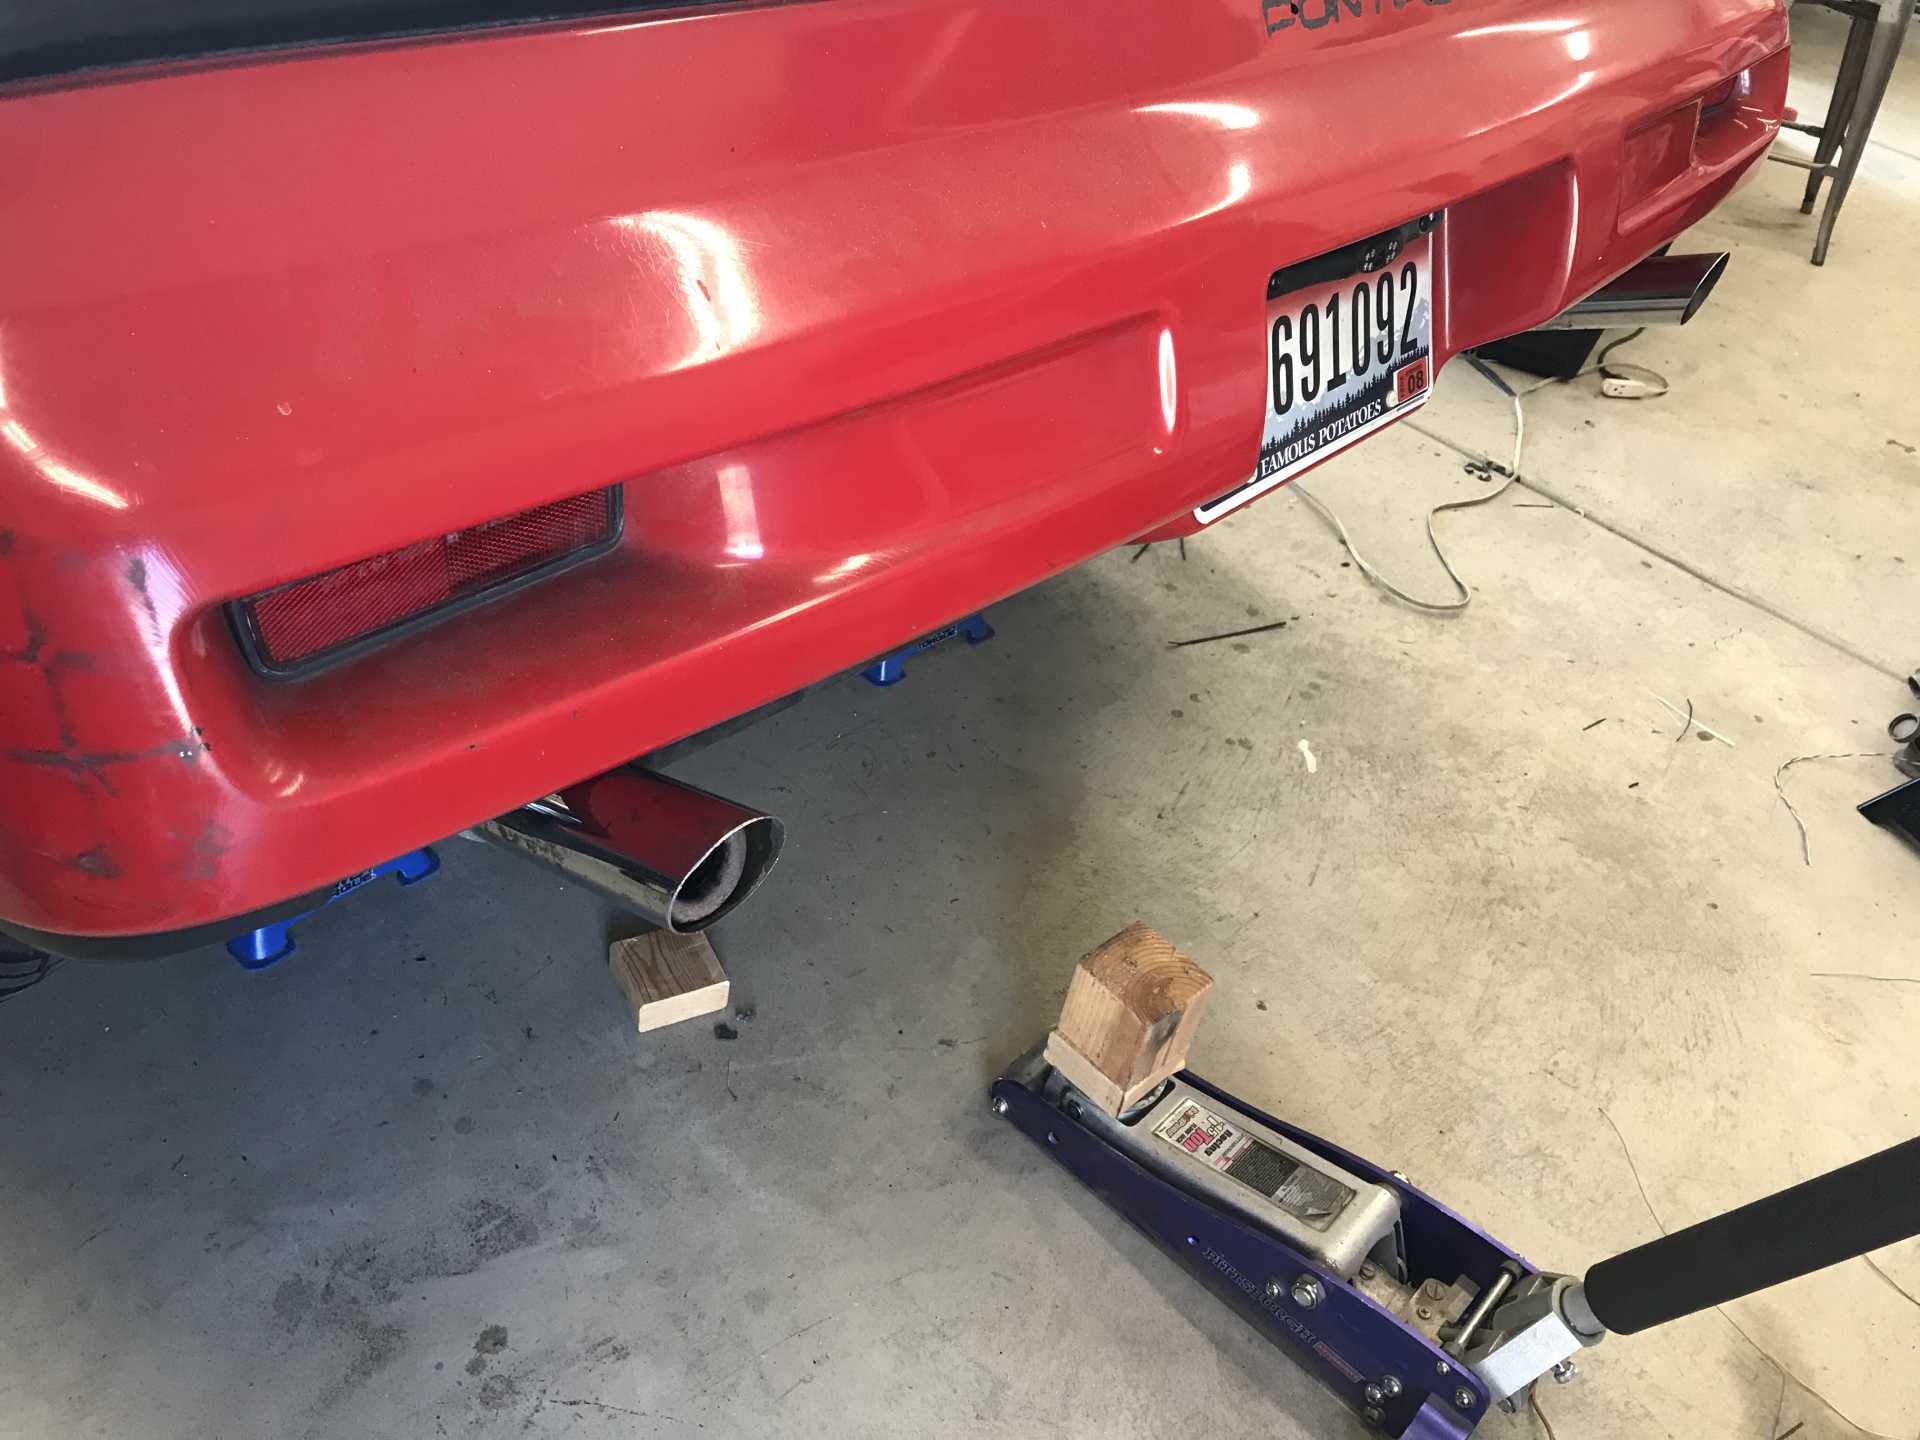
The next day I took it for a short run about 16 miles round trip. It ran well but then seemed to start running on 5 cylinders. No other problems. Since it was getting late I decided to look at it the next day. Next day's project was to add in the heater hoses since it's starting to get into the 50s around here. While walking around the car I noticed a plug wire that didn't look right. Sure enough it was not latched in place. Let's hope this solves the running on 5. My AN swivel fittings came in so adding the hoses meant removing the fuse box and MAF and working under the car. No big surprises and I started filling the coolant. Tomorrow we try driving again after I burp the system. While the ass end was up I decided to finish the exhaust pipes. The camaro muffler has two outlets, one per end. I went to my local Mr.Muffler shop (a really helpful guy) who bent two 90 degree bends out of 2.25" pipe. Took them home and added the old tips I used on the 2.8 which needed some adapting and a few hours later they were done. Those tips were a disappointment since they lost part of the plating and started to rust, hence the sloppy VHT. They do act as small resonators and make things quieter at idle and low power. I'll probably replace then with something from Vibrant which is stainless steel. Added more coolant and went driving.
This is the first time I've had everything installed and working so I cranked it up and it ran on all six; the loose connector was the cause of the poor running the other day. No leaks from adding the heater hoses. The car is quiet while cruising and gets loud only when you push it. Acceleration in all gears is nice. When in fifth gear at 50 MPH I was seeing a reported 42mpg. An untimed seat-of-the-pants pull from 0 to 60 went by pretty fast. Next time I'll take my radar detector with GPS speedo and see how far off the car's speedo is. I'll video the IP so I can calculate the speed vs time and thus the wheel horsepower.
[This message has been edited by MikesFirstFiero (edited 10-23-2021).]
Yes I do know quite a lot, but this is my first swap project; I made a career of updating existing elevators with new control systems so I'm used to working on old stuff and figuring out how to mount a sensor or encoder where there wasn't one before. Without the efforts of all the other swappers who posted to Pennocks I would not have near the success I've had. They have given me inspiration for the corvette brakes, battery relocation, power steering and now the LFX swap. As for going quickly, I've been able to work on it mostly full time being retired and now I'm up to almost 700 hours. Most guys work and only get to do 20 hours per week which means a long calendar time. Besides my Wife said "Get it out of the Garage by 1 November" so she can park inside when it's cold. When Momma's not happy, Nobody's happy.
The chime has been driving me crazy, dings any time the motor is running. So I figured out where it is located and removed it. Then I decided to mount the Impala brake switch in addition to the Fiero brake switch; eventually the Impala BCU will run the stop, turn and backup lights. But while the seats are out I thought it would save time to have the brake switch working in the right place. Plus it makes starting "normal" for a modern car, press the brake & push the button. The bracket for the switch turned out to be simple but the location is miserable to get to so the shape was guesswork. A really thankless job being upside down. And yes, I made a plywood template of the bracket first before cutting metal. Turned out to be a good thing since the mounting holes were in the wrong location. Next the Impala brake switch cable has been be extended by about 4 feet and connected to the new switch. The switch is connected to the pedal arm by a pin mounted to the arm.
Original mounting holes were too close to the sensor/switch so moved them out 1/2" Multiple holes for the pin since not sure what rotation would be needed to connect to the lever. It's actually a dual-channel volume control (potentiometer) similar to the accelerator.
Actuator pin is a 5mm bolt with threads ground off. Lucky the brake lever is aluminum so easy to drill & tap.
By accident I left the MAF connector off and started the engine to check that I did no harm. When it started it "burped/sneezed" and continued to run. When shut off the IP did go blank but the PS pump and cooling fan continued to run?? This says that the Hot-In-Run is still active with no MAF signal present. Plugging the MAF back in made everything work normally.
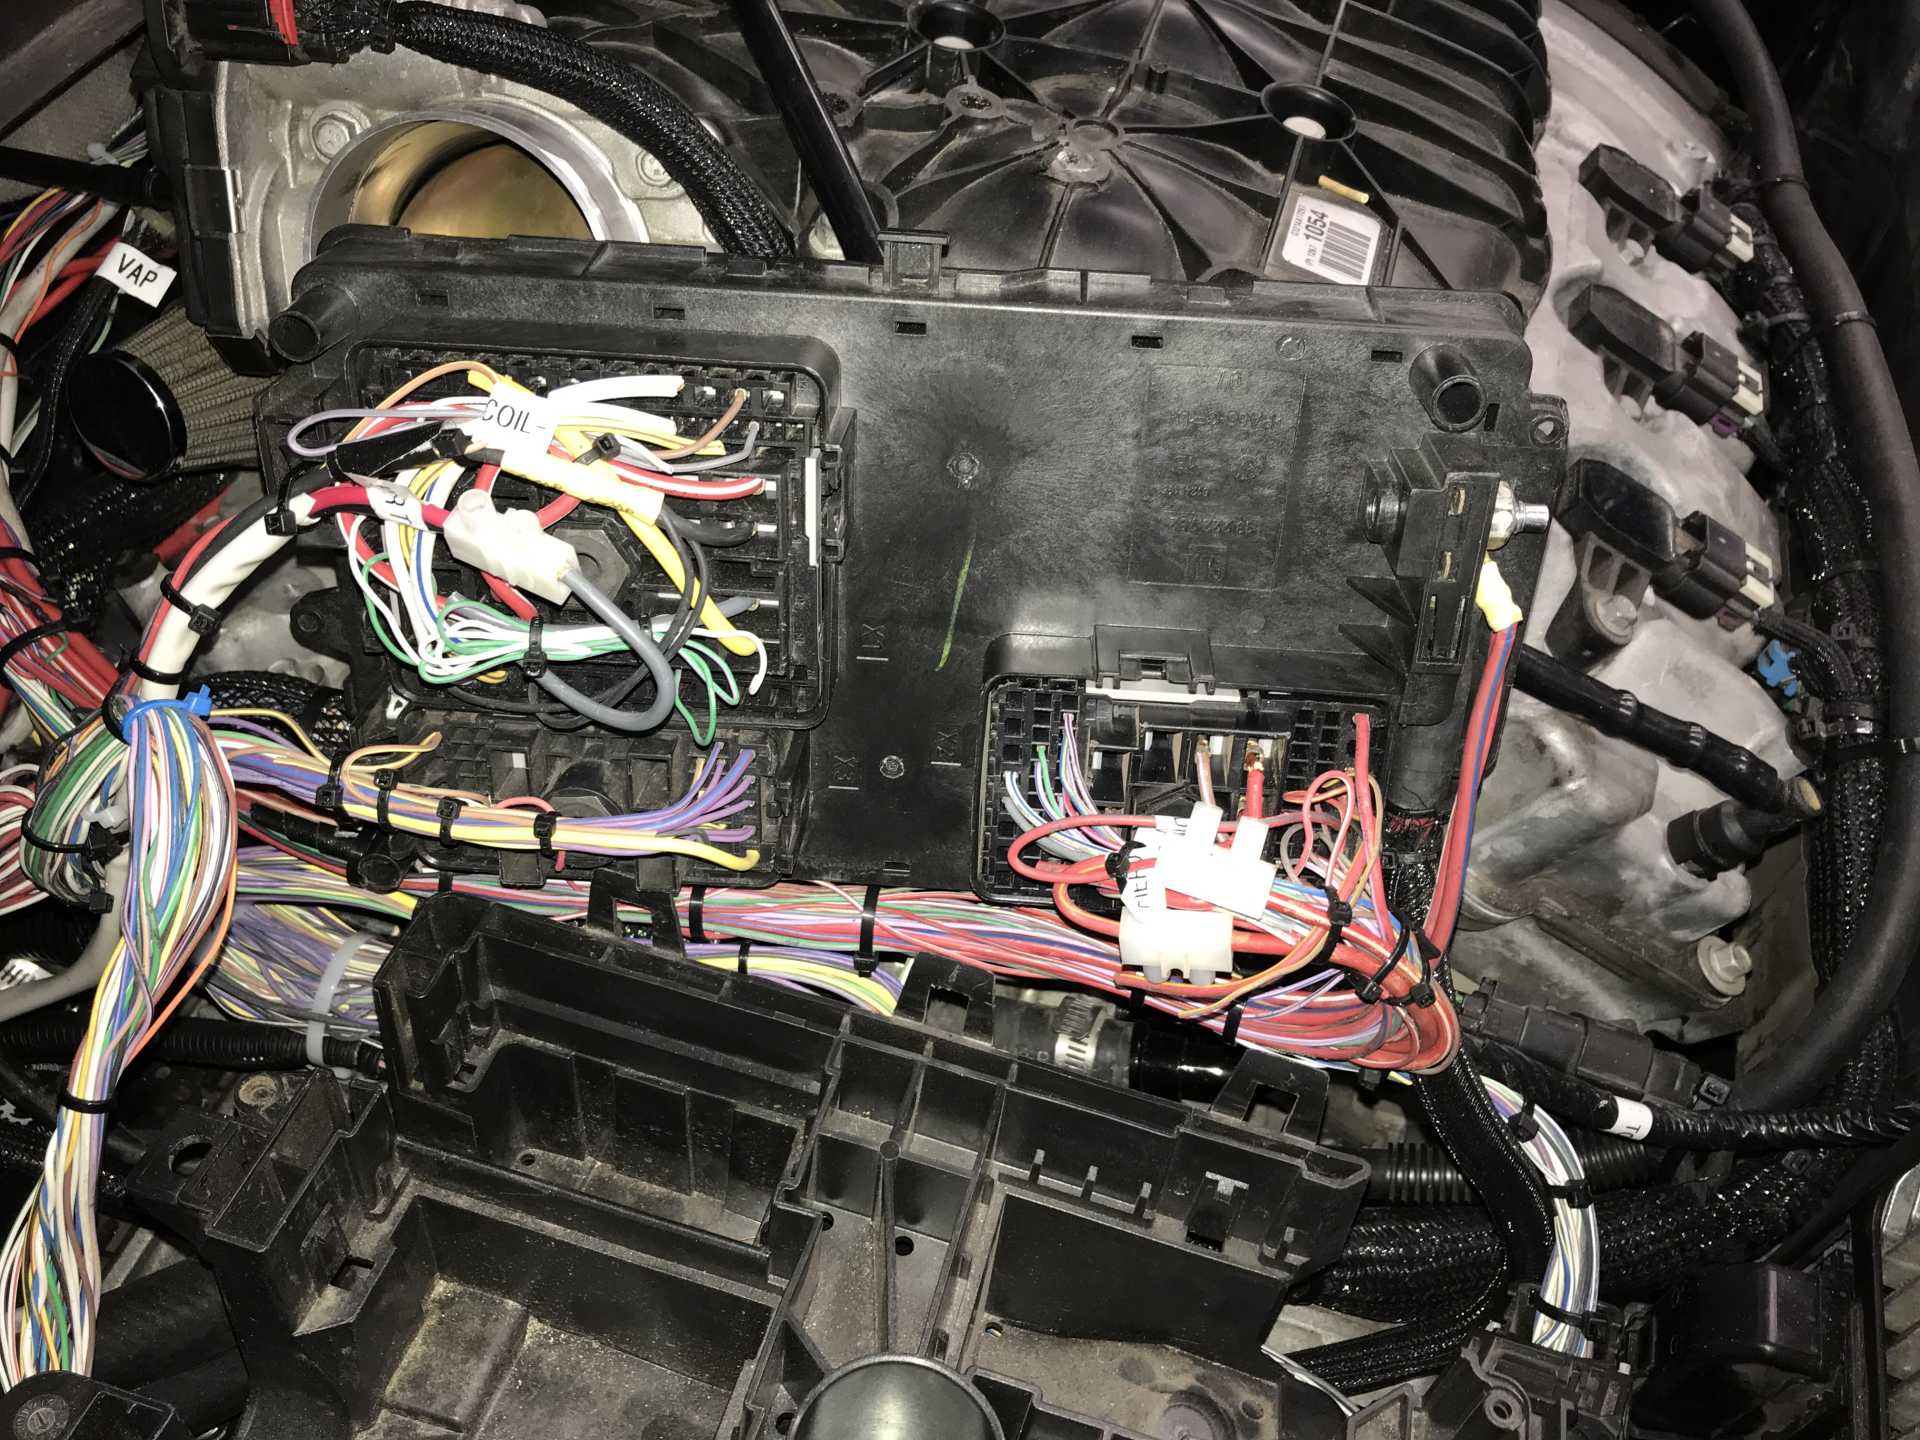
Reached a milestone today, the last Impala harness connector has been cut out so now the only thing left to resolve is the internal Impala fuse block. The big one is in the engine bay, the smaller one is inside the passenger compartment. I think I will be able to eliminate the internal one since there are lots of fuses no longer used in the engine bay block. Besides there is no good place to put it in the cabin. Just need to match where the power comes from (Always On or Hot-in-Run) and the fuse current rating. Looks like I'll be able to button up the interior next week.
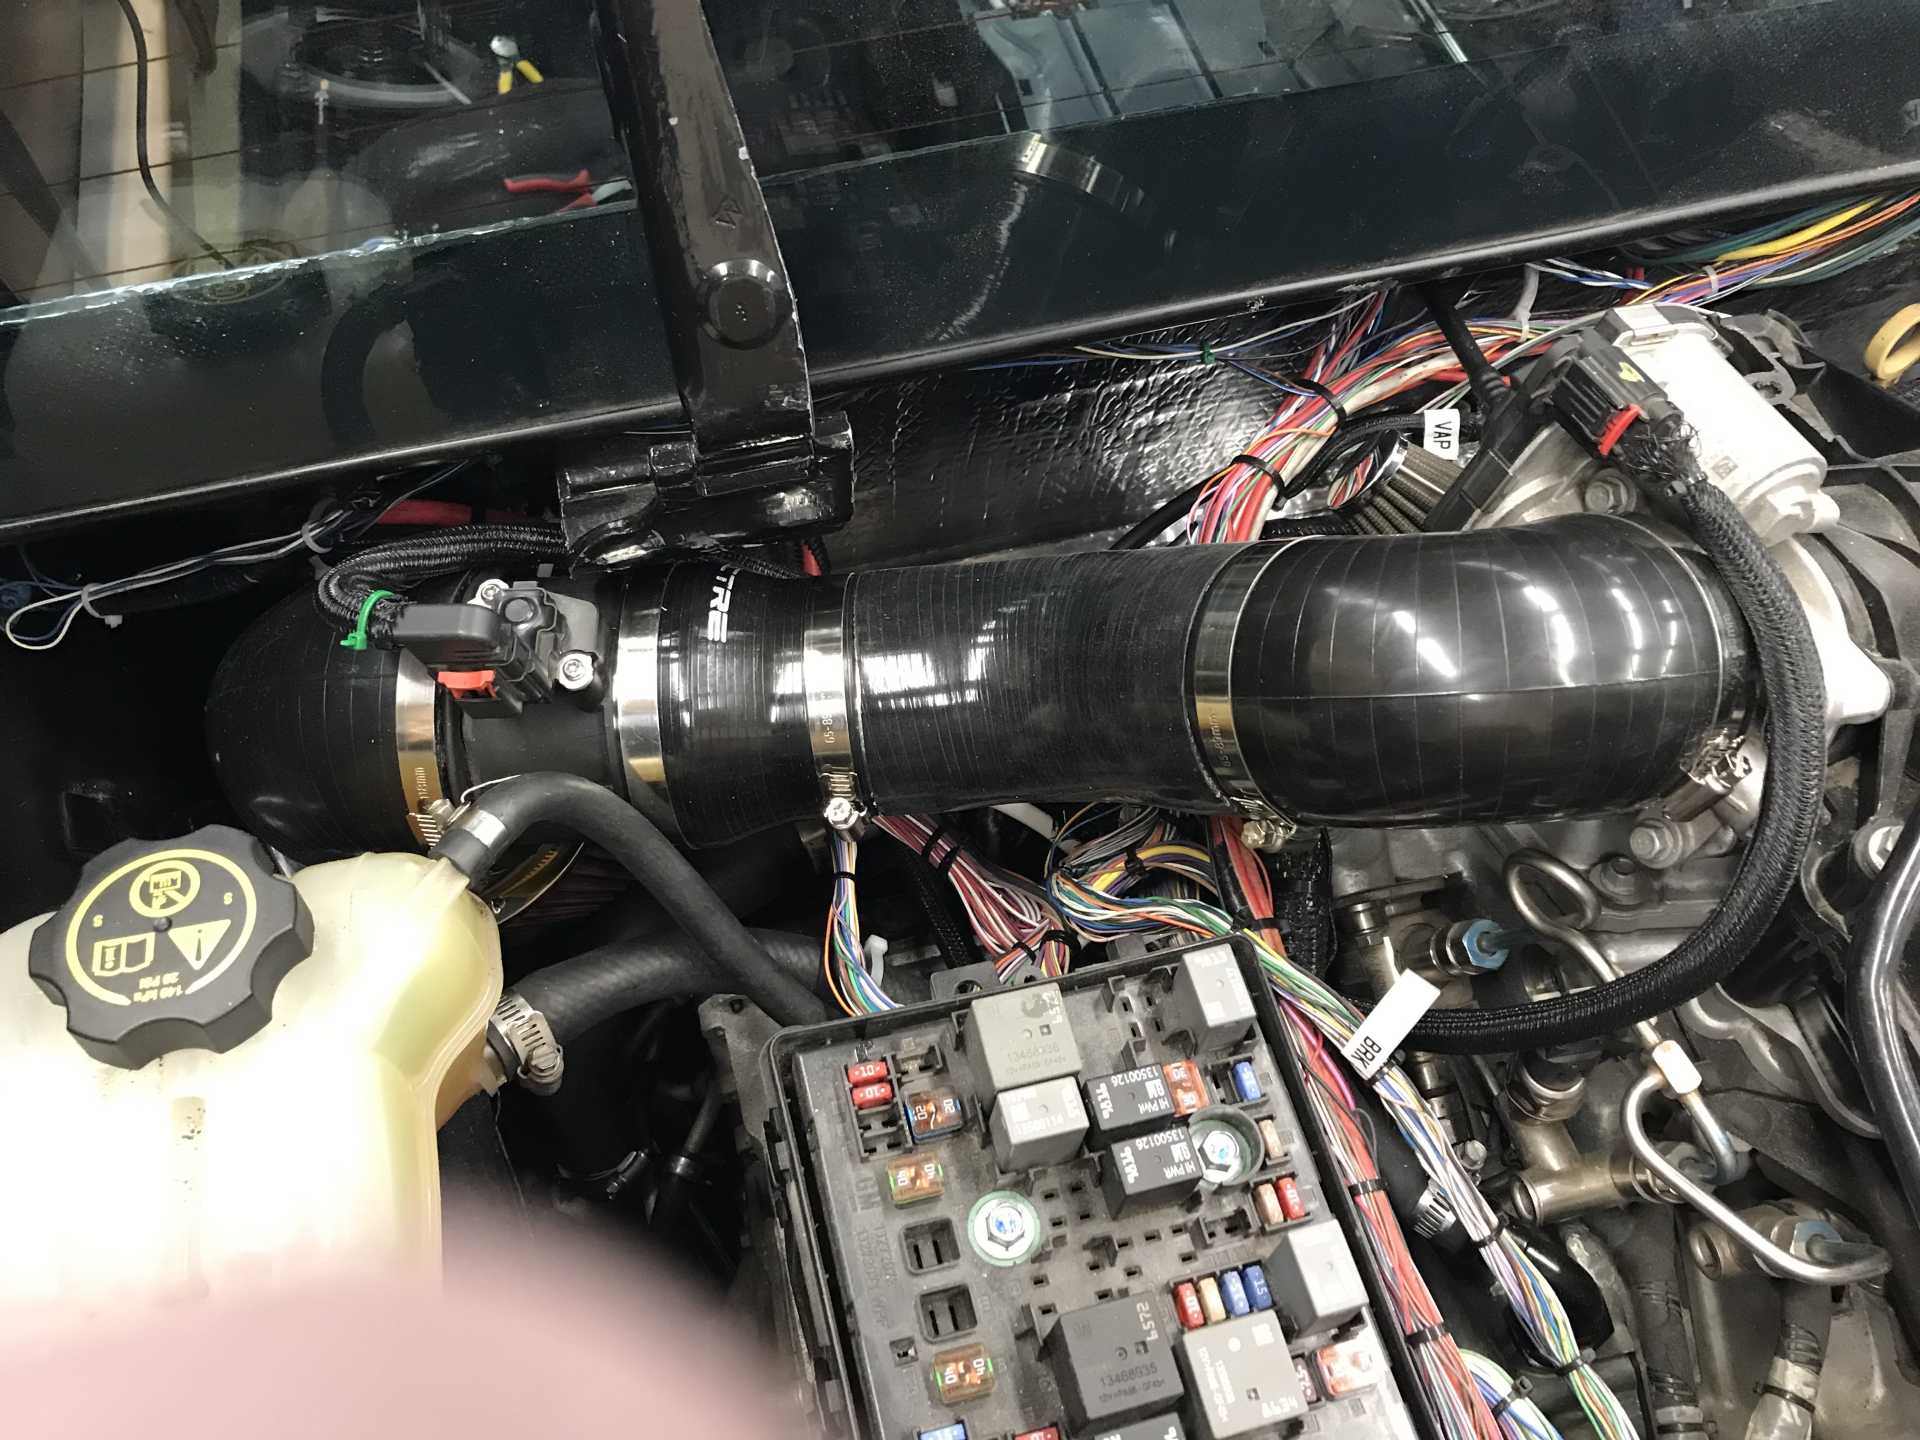
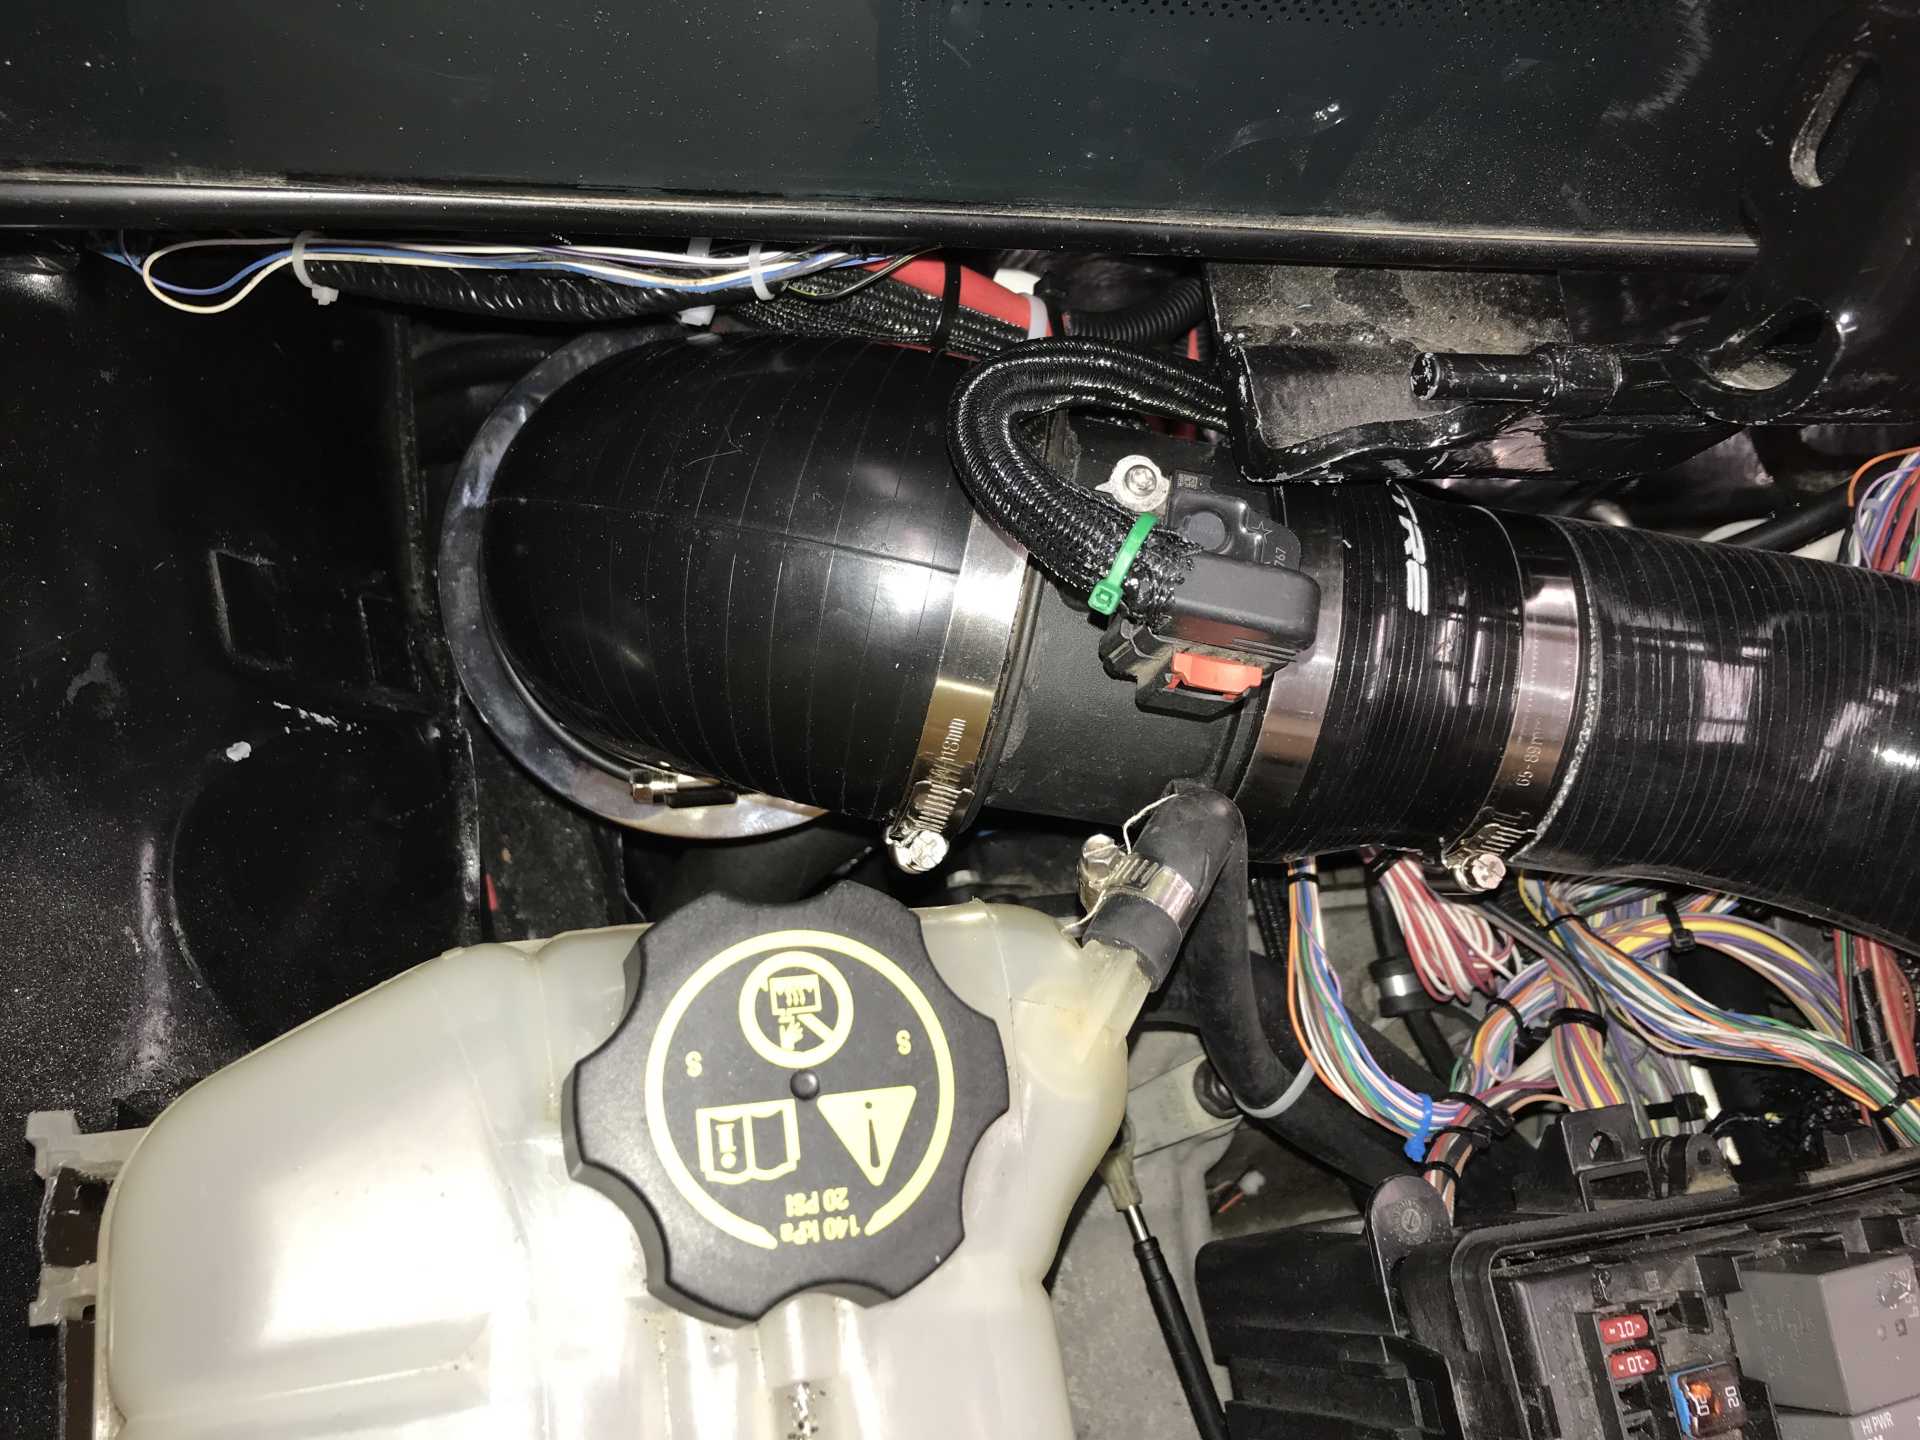
The throttle body on the Impala sticks up and is a concern that it might not clear the trunk lid. An imprecise measurement shows it may fit. Next week I'll put the lid in place with a lump of play dough on top of the TB and close it. If it does close this will tell me how much room there really is (the play dough is between two layers of plastic wrap to prevent a mess). Bought some ABS plastic fittings in 2" size (since I already have 2" pipe) and prototyped the routing and clearances of the air inlet pipe. I'm ordering a 6" long cone filter and elbows to match up to the MAF (3.7" dia) and the TB (3.0"). I'll probably use a little 3" exhaust metal pipe to make joints between the different parts since I'll paint it if needed; real air inlet pipe is stupid expensive. Like everything else the fitting will be tight. The Fiero motto should be "No space unfilled".
I'll figure out what I did to the cruise control switch too, since it stopped working. Probably hooked it up to the wrong wire.
Found that only the center brake light was working. Traced it to the original Fiero wiring. The brake feed goes to C500 and loops back out through C500 to C210. I missed that earlier, now working. Hooked up the cruise control which does turn on but does not engage. Finished the intake filter. Used a 6" cone, 90 elbow 4" to the MAF at 3.7". Reduced to 3.0" to a 45 and then a 90. Had to do some trimming of the elbows to shorten mostly everything for minimum length. Biggest problem was shortening it to fit under the deck lid hinge.
But it does fit barely.
Nothing bolts it down for now
Since it has no place to go. Yes, I'm missing two hose clamps.
There is a cone down there somewhere.
First timed results. I let the car shift by itself, brake on and 2000 RPM launch. Looks like 0-60 is 5.5 seconds. I'll have more results in a few days, it's going to be raining here so no playing. It seems to be torque limiting off the line with no wheel spin. My speedo is off by 10% due to tire size difference from the Impala so true 60 MPH is indicated 66.
[This message has been edited by MikesFirstFiero (edited 10-24-2021).]
Time to catch up with the last couple of weeks. With it running I decided to mount the trunk lid and check for interference. The throttle body looks very high. With the hinges on there was some when I lowered the lid to about 1" from closed. Hmmm, Seems there is a hard stop and the front of the lid pushes up too. The hard stop turned out to be the attachments for the vents on the strut mounting rings are directional. Who would'da thought. That problem was solved by swapping them. The other problem of the lid lifting at the front was some interference for sure. I mounted some cardboard where I thought it was coming from and lowered the lid again. But the cardboard was not dented. Then I noticed there were scratches on the front cross bar of the lid, it was hitting the very top of the TB actuator. A quick set of cuts with the angle grinder and problem solved. I was amazed that that was the only interference since the engine looks very tall.
I'll make it look better when I do the body work next spring
With the lid in place it was time to figure out how to hold the lid open. I didn't like the prior gas strut since it didn't open the lid open very far. So I cut down a lid torsion bar and uses it as a prop rod. A small hole cut in the frame gave a place for the bottom to go.
It's time to turn to putting the interior back together but first the wiring needs to be finished inside the car. Some if the wiring was temporary and needed to be re-routed or lengthened. The interior Impala fuse block needed to go away, the answer was to use fuses in the engine bay that were no longer needed (power windows, door locks, and so on). Remapping the fuses and wiring everything took 3 days. By being methodical it all swapped over with no errors. There was lots of room in the bottom of the fuse block to connect the fuses to the new wiring.
The power wiring rat's nest to be deleted
This fuse box is big but has worked out very well.
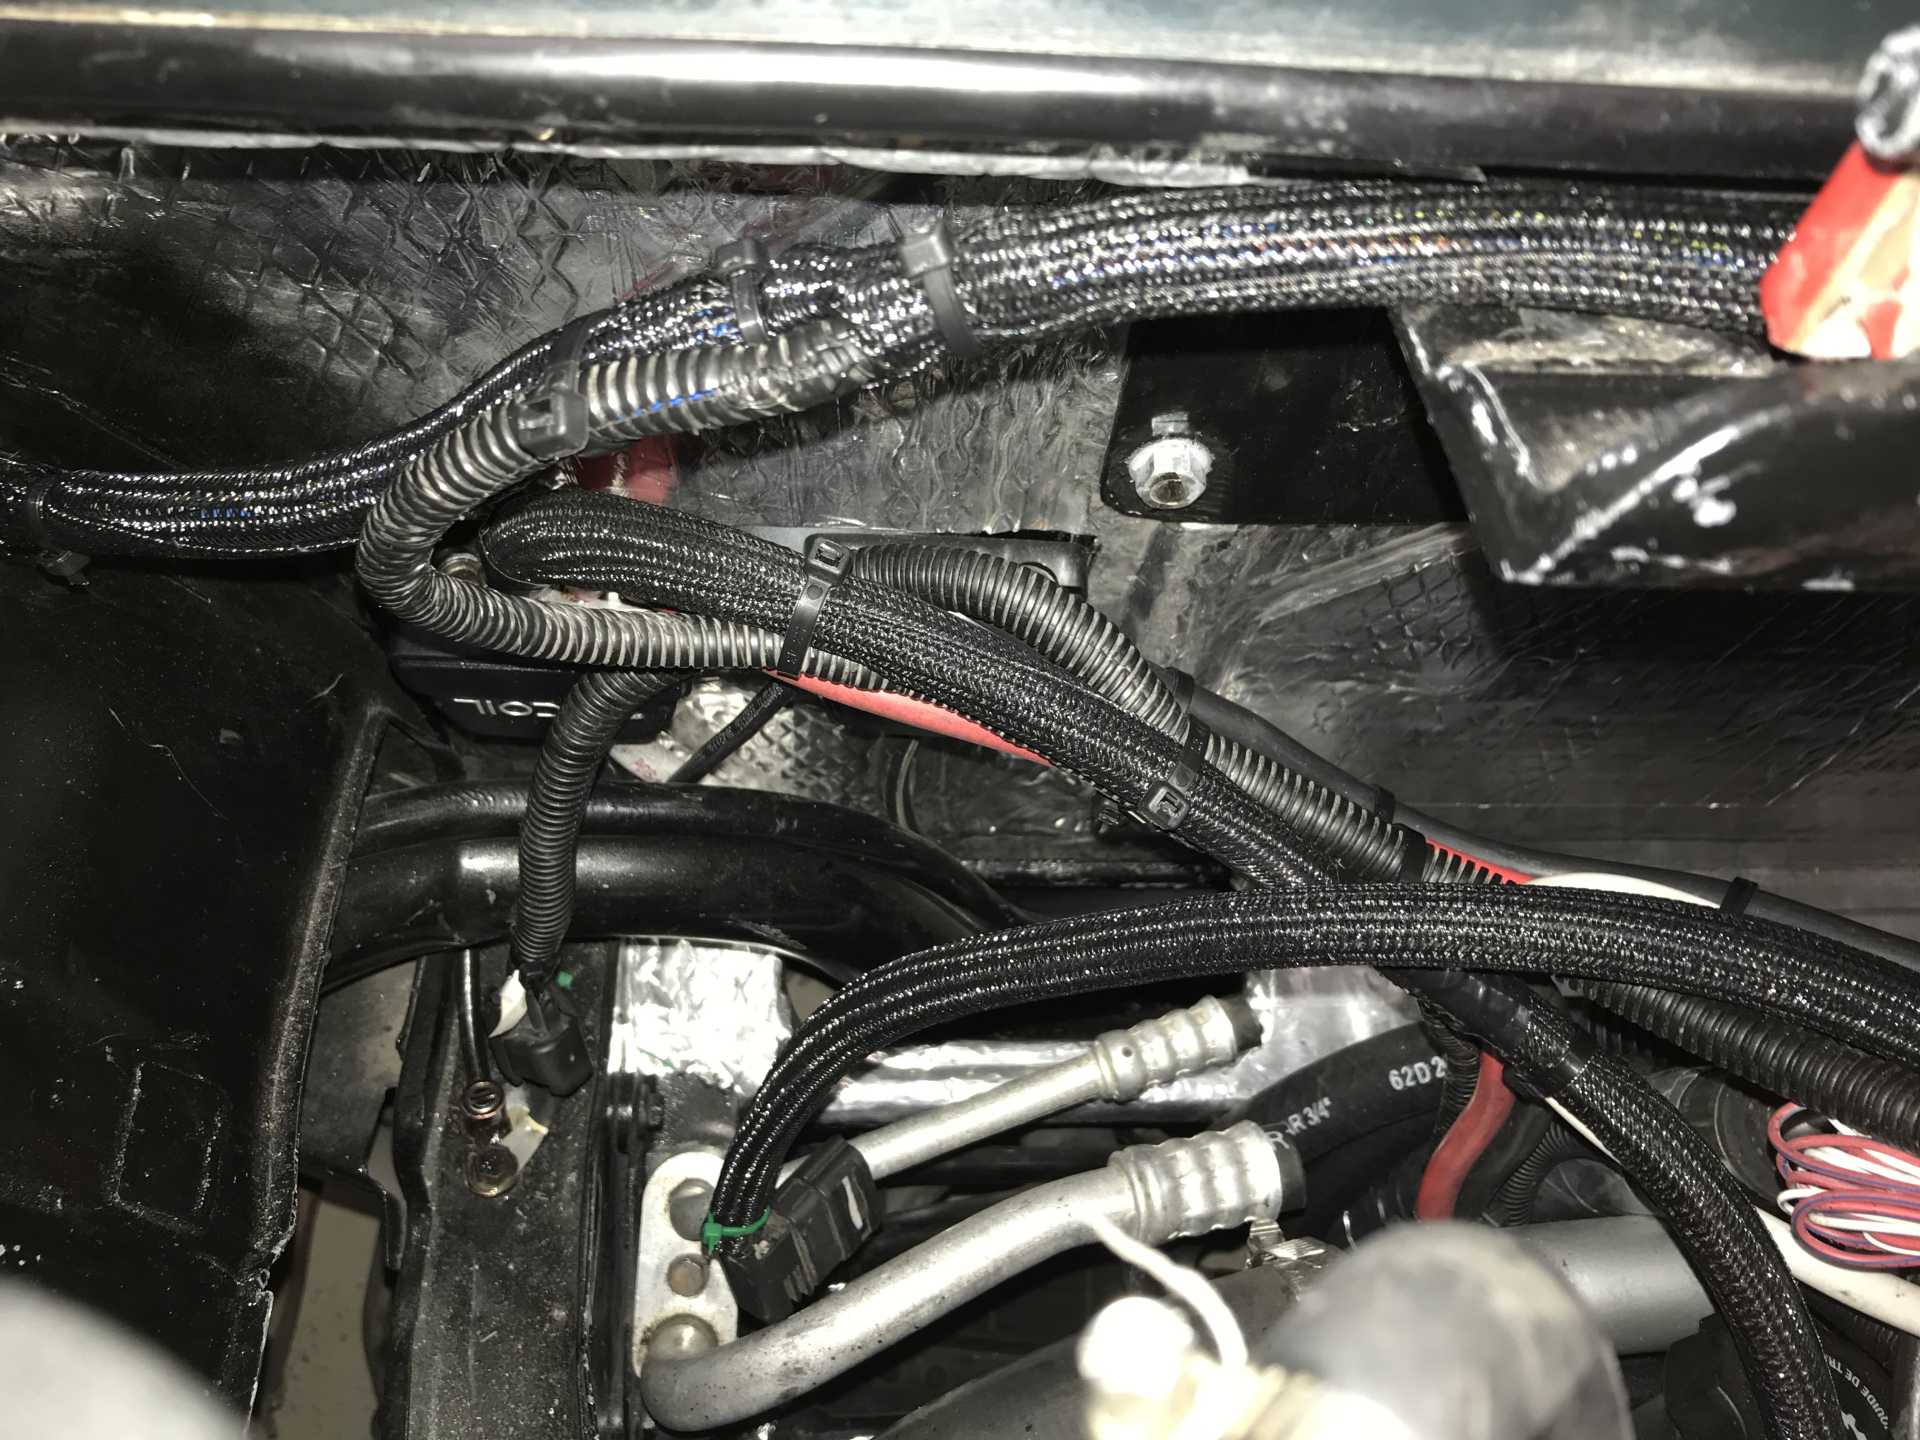
Also time to clean up some if the engine bay wiring too. Much more to come.
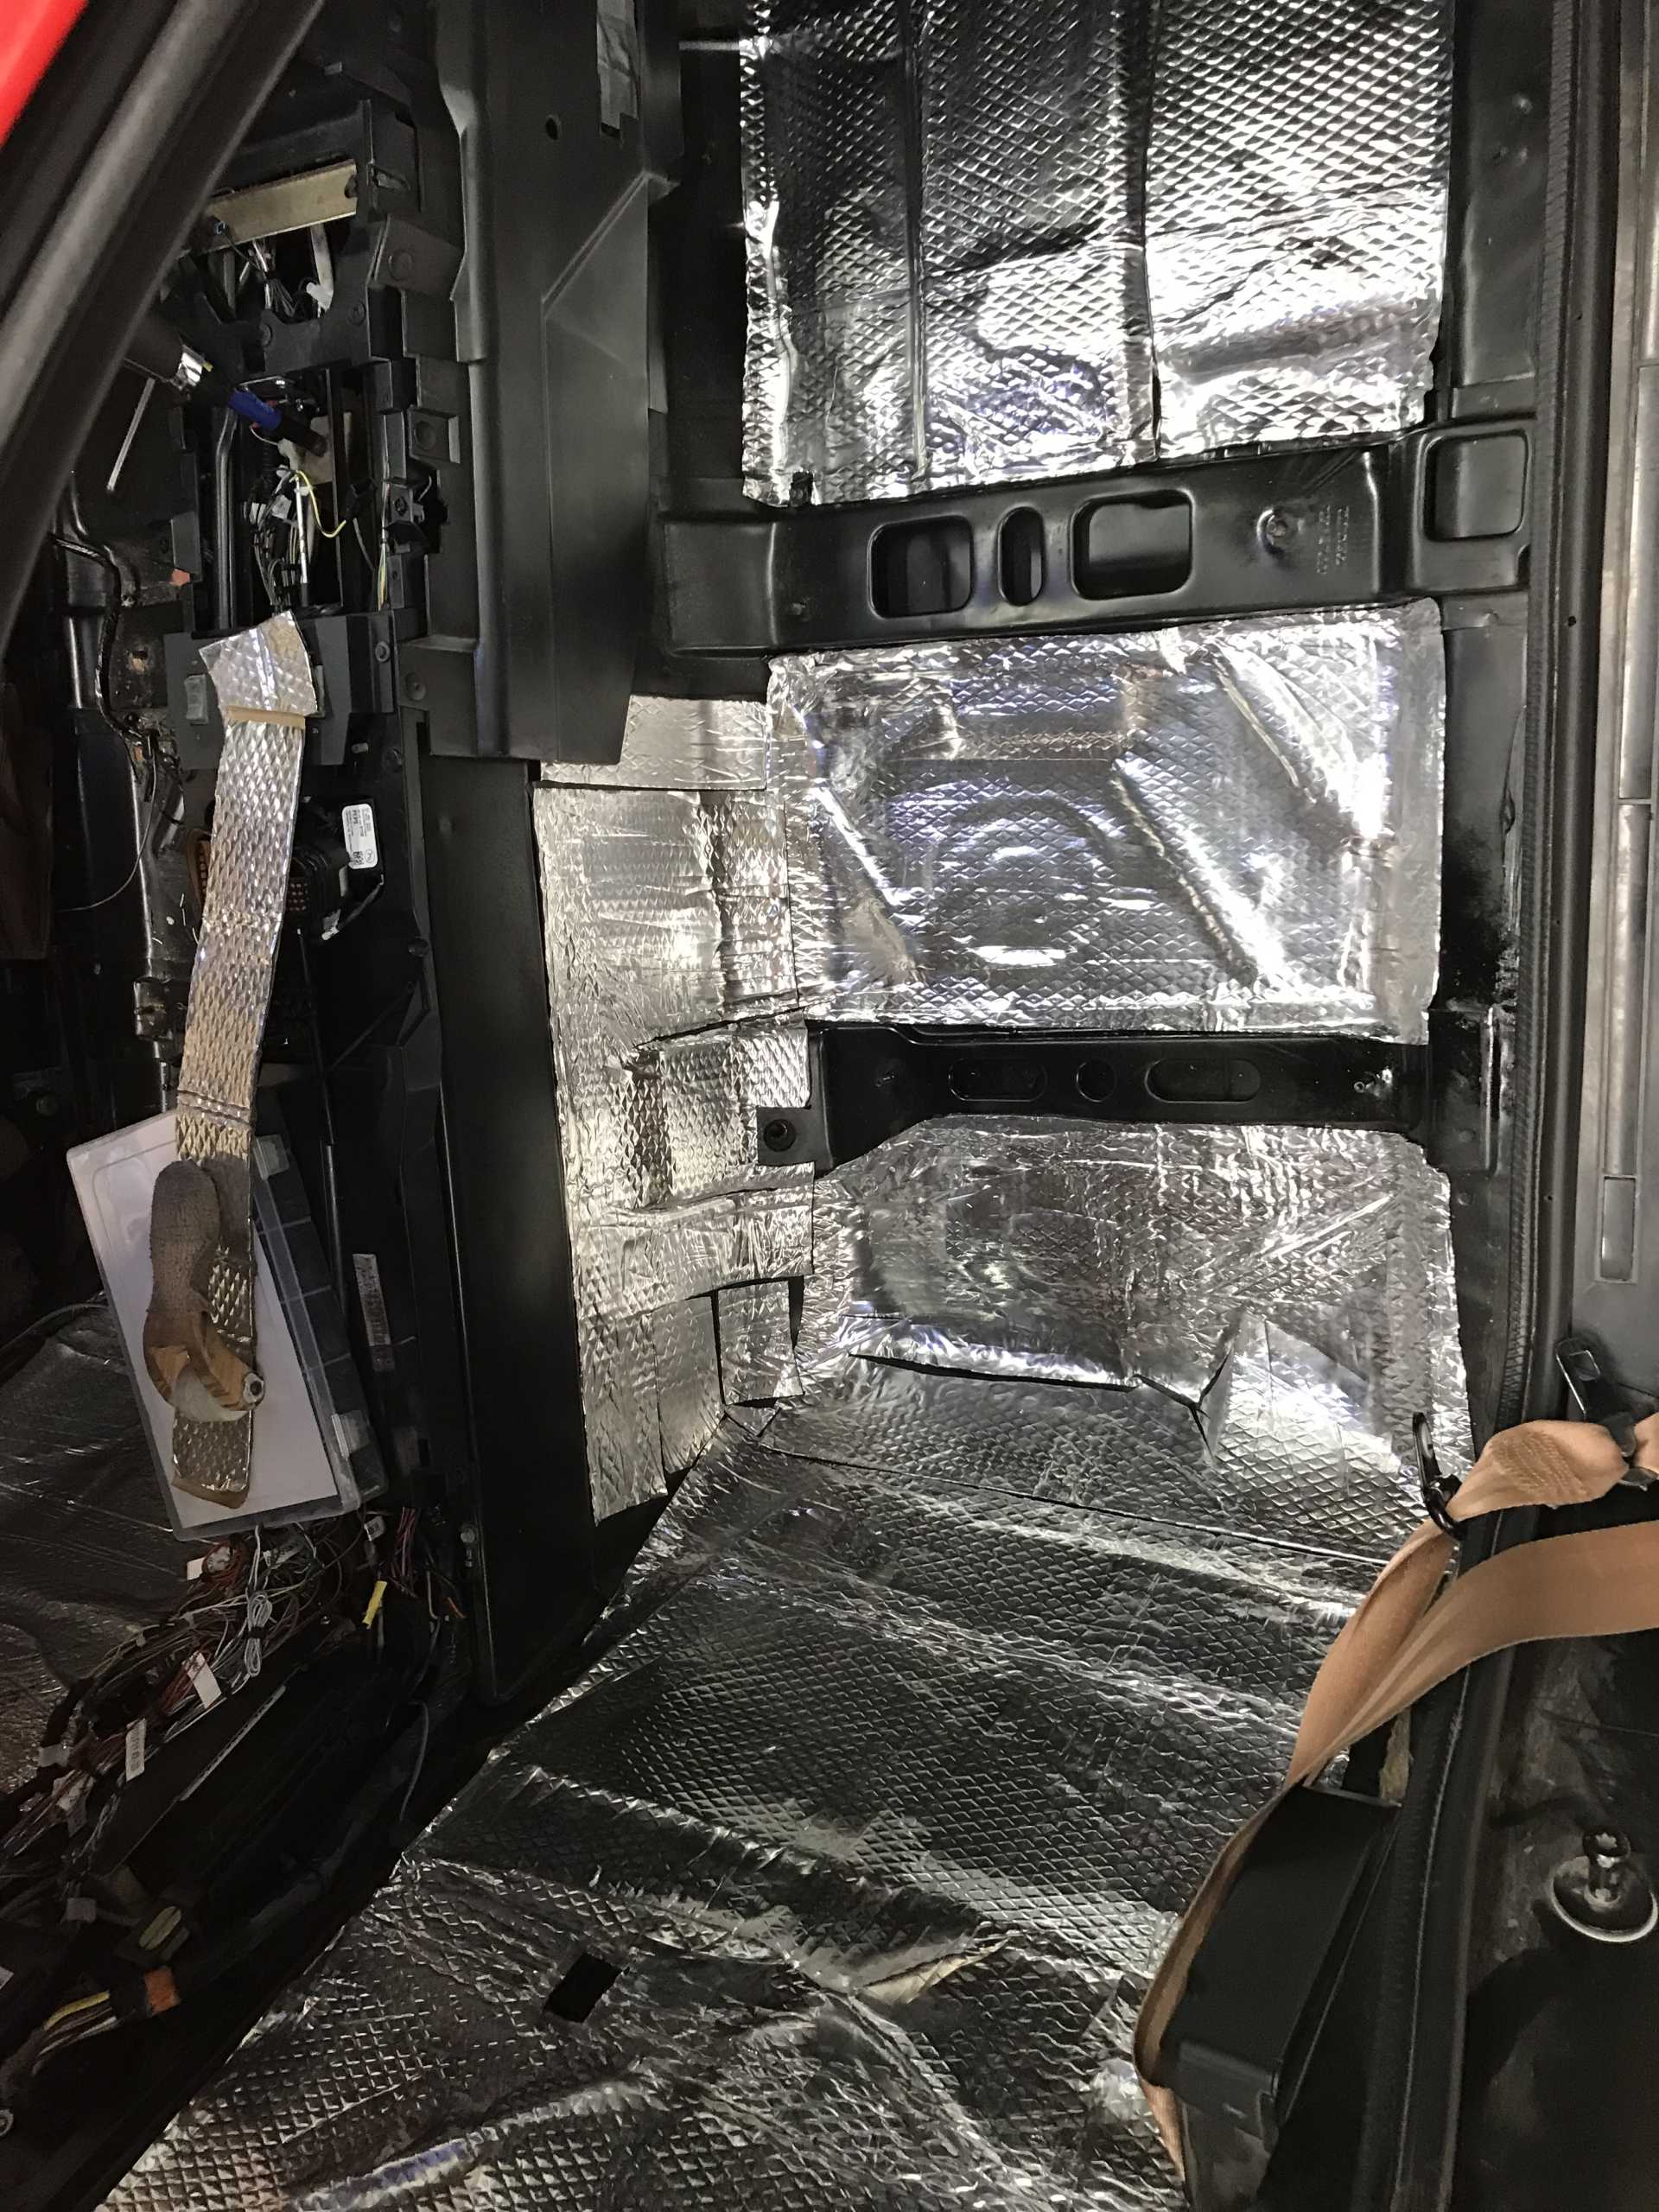
I added some sound deadening to the front of the firewall, on the sides of the tunnel and inder the seats, same stuff as in the engine bay & trunk. Then the original carpets went back in.
The under the seat cushion material was very bad so my wife hand stiched some nomex cloth to the seat bottom carpeting. I then stretched it and wired it to the seat frame with a piece of piano wire to distribute the load on the fabric.
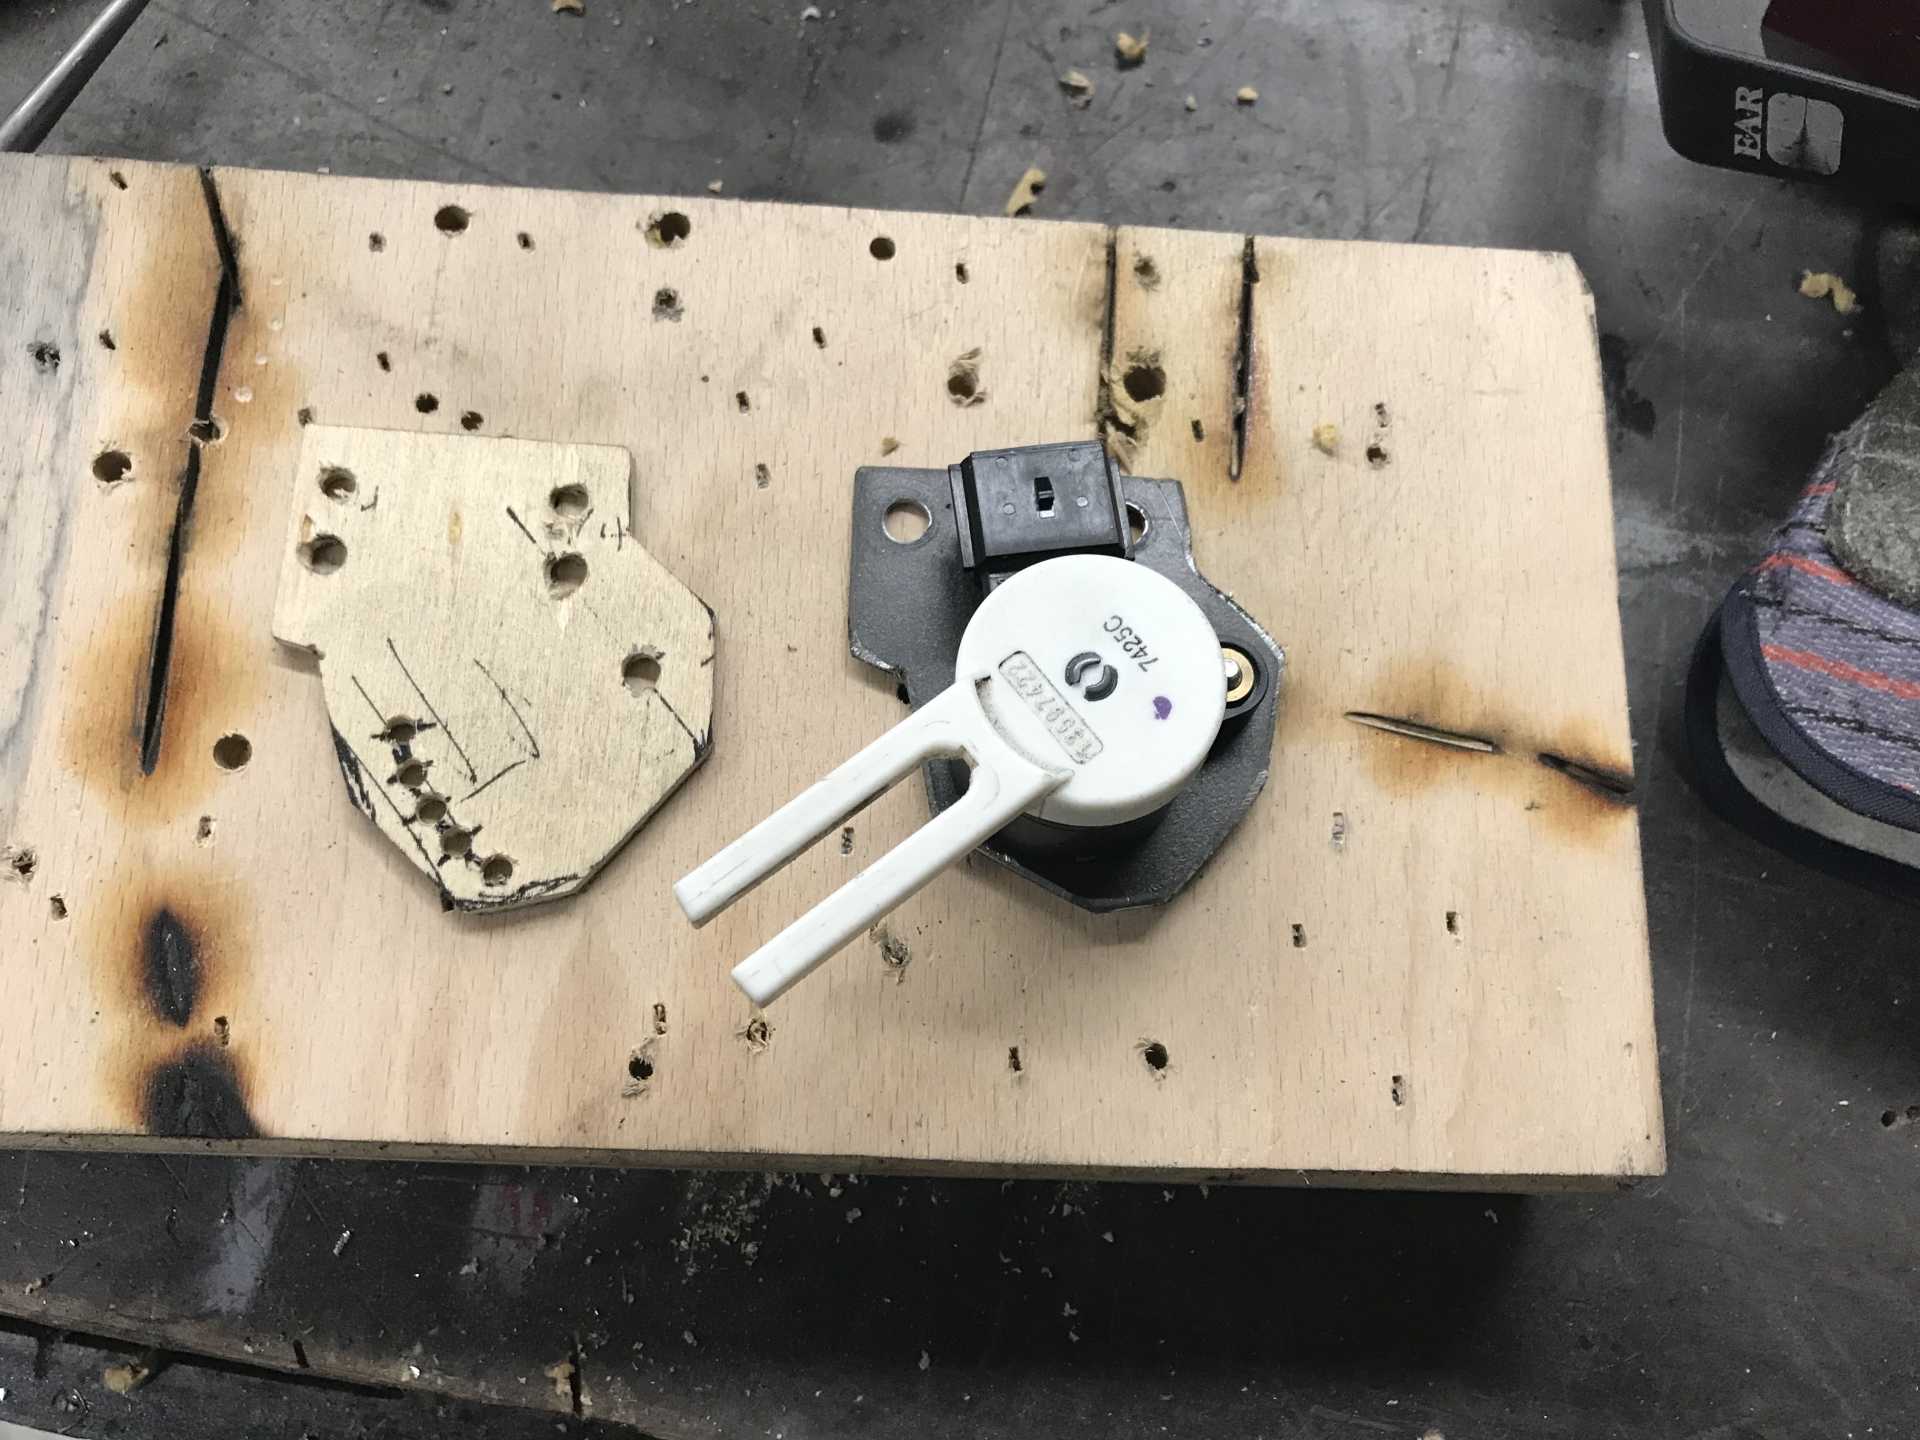
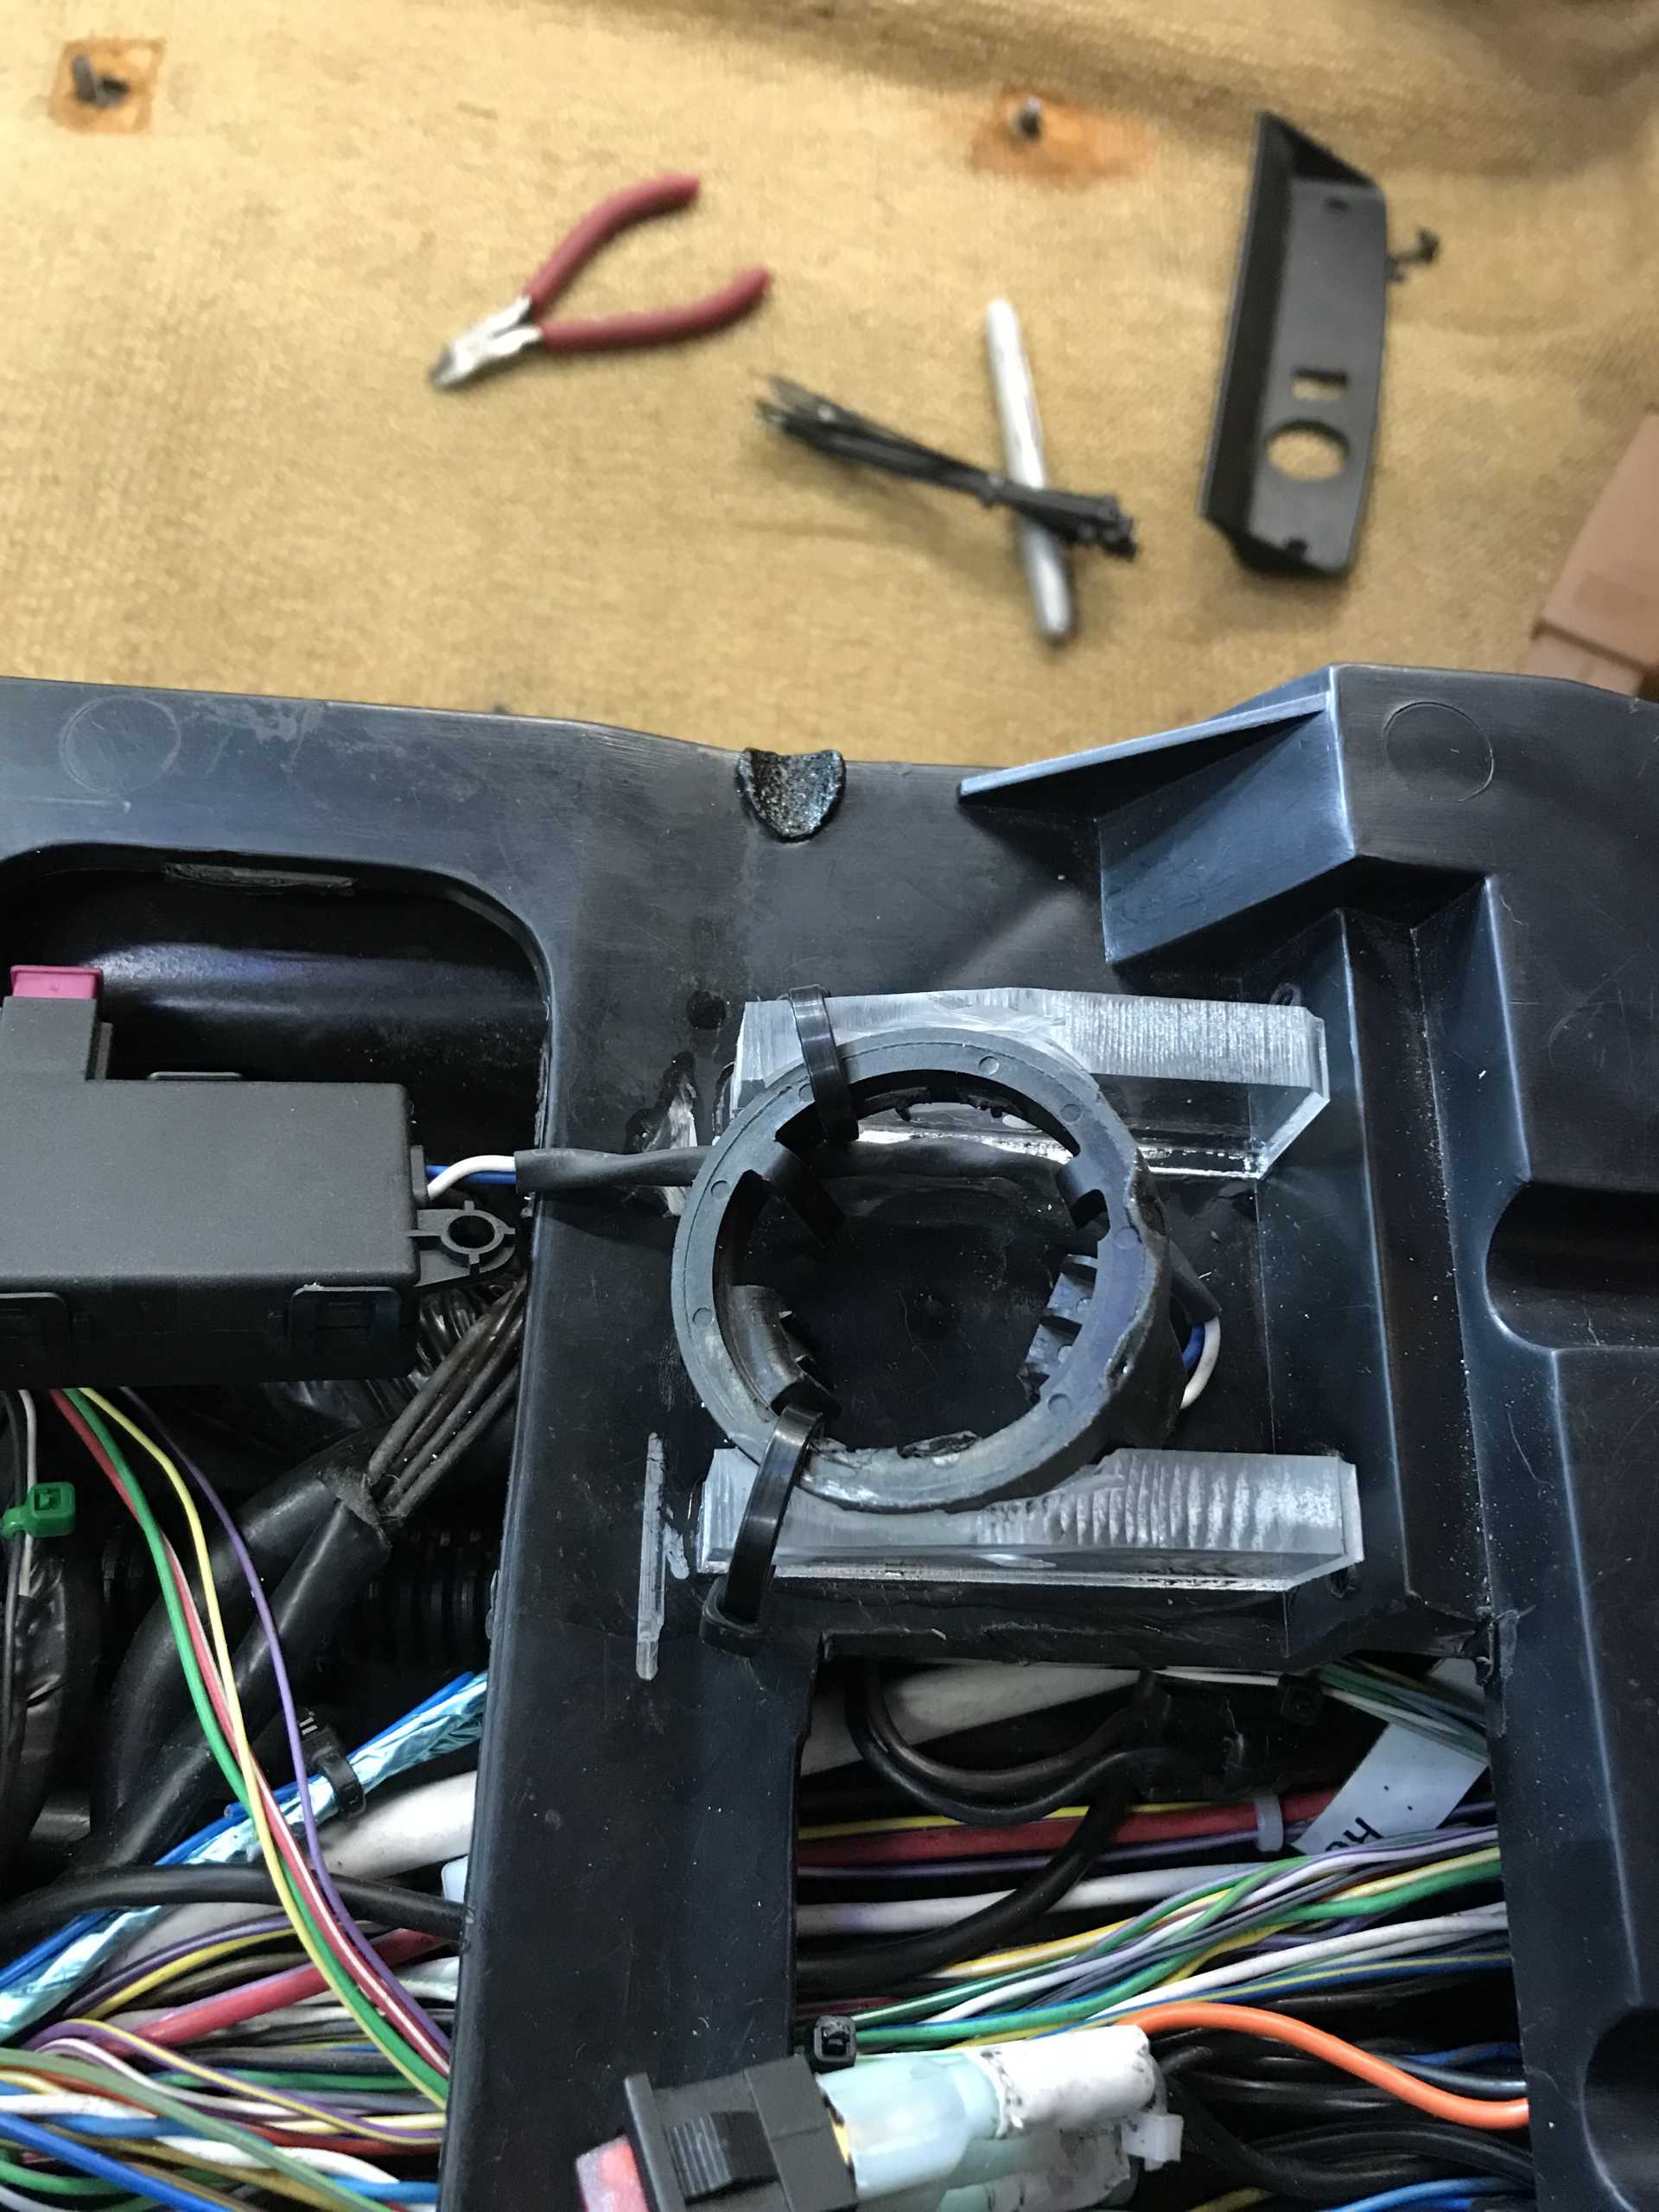
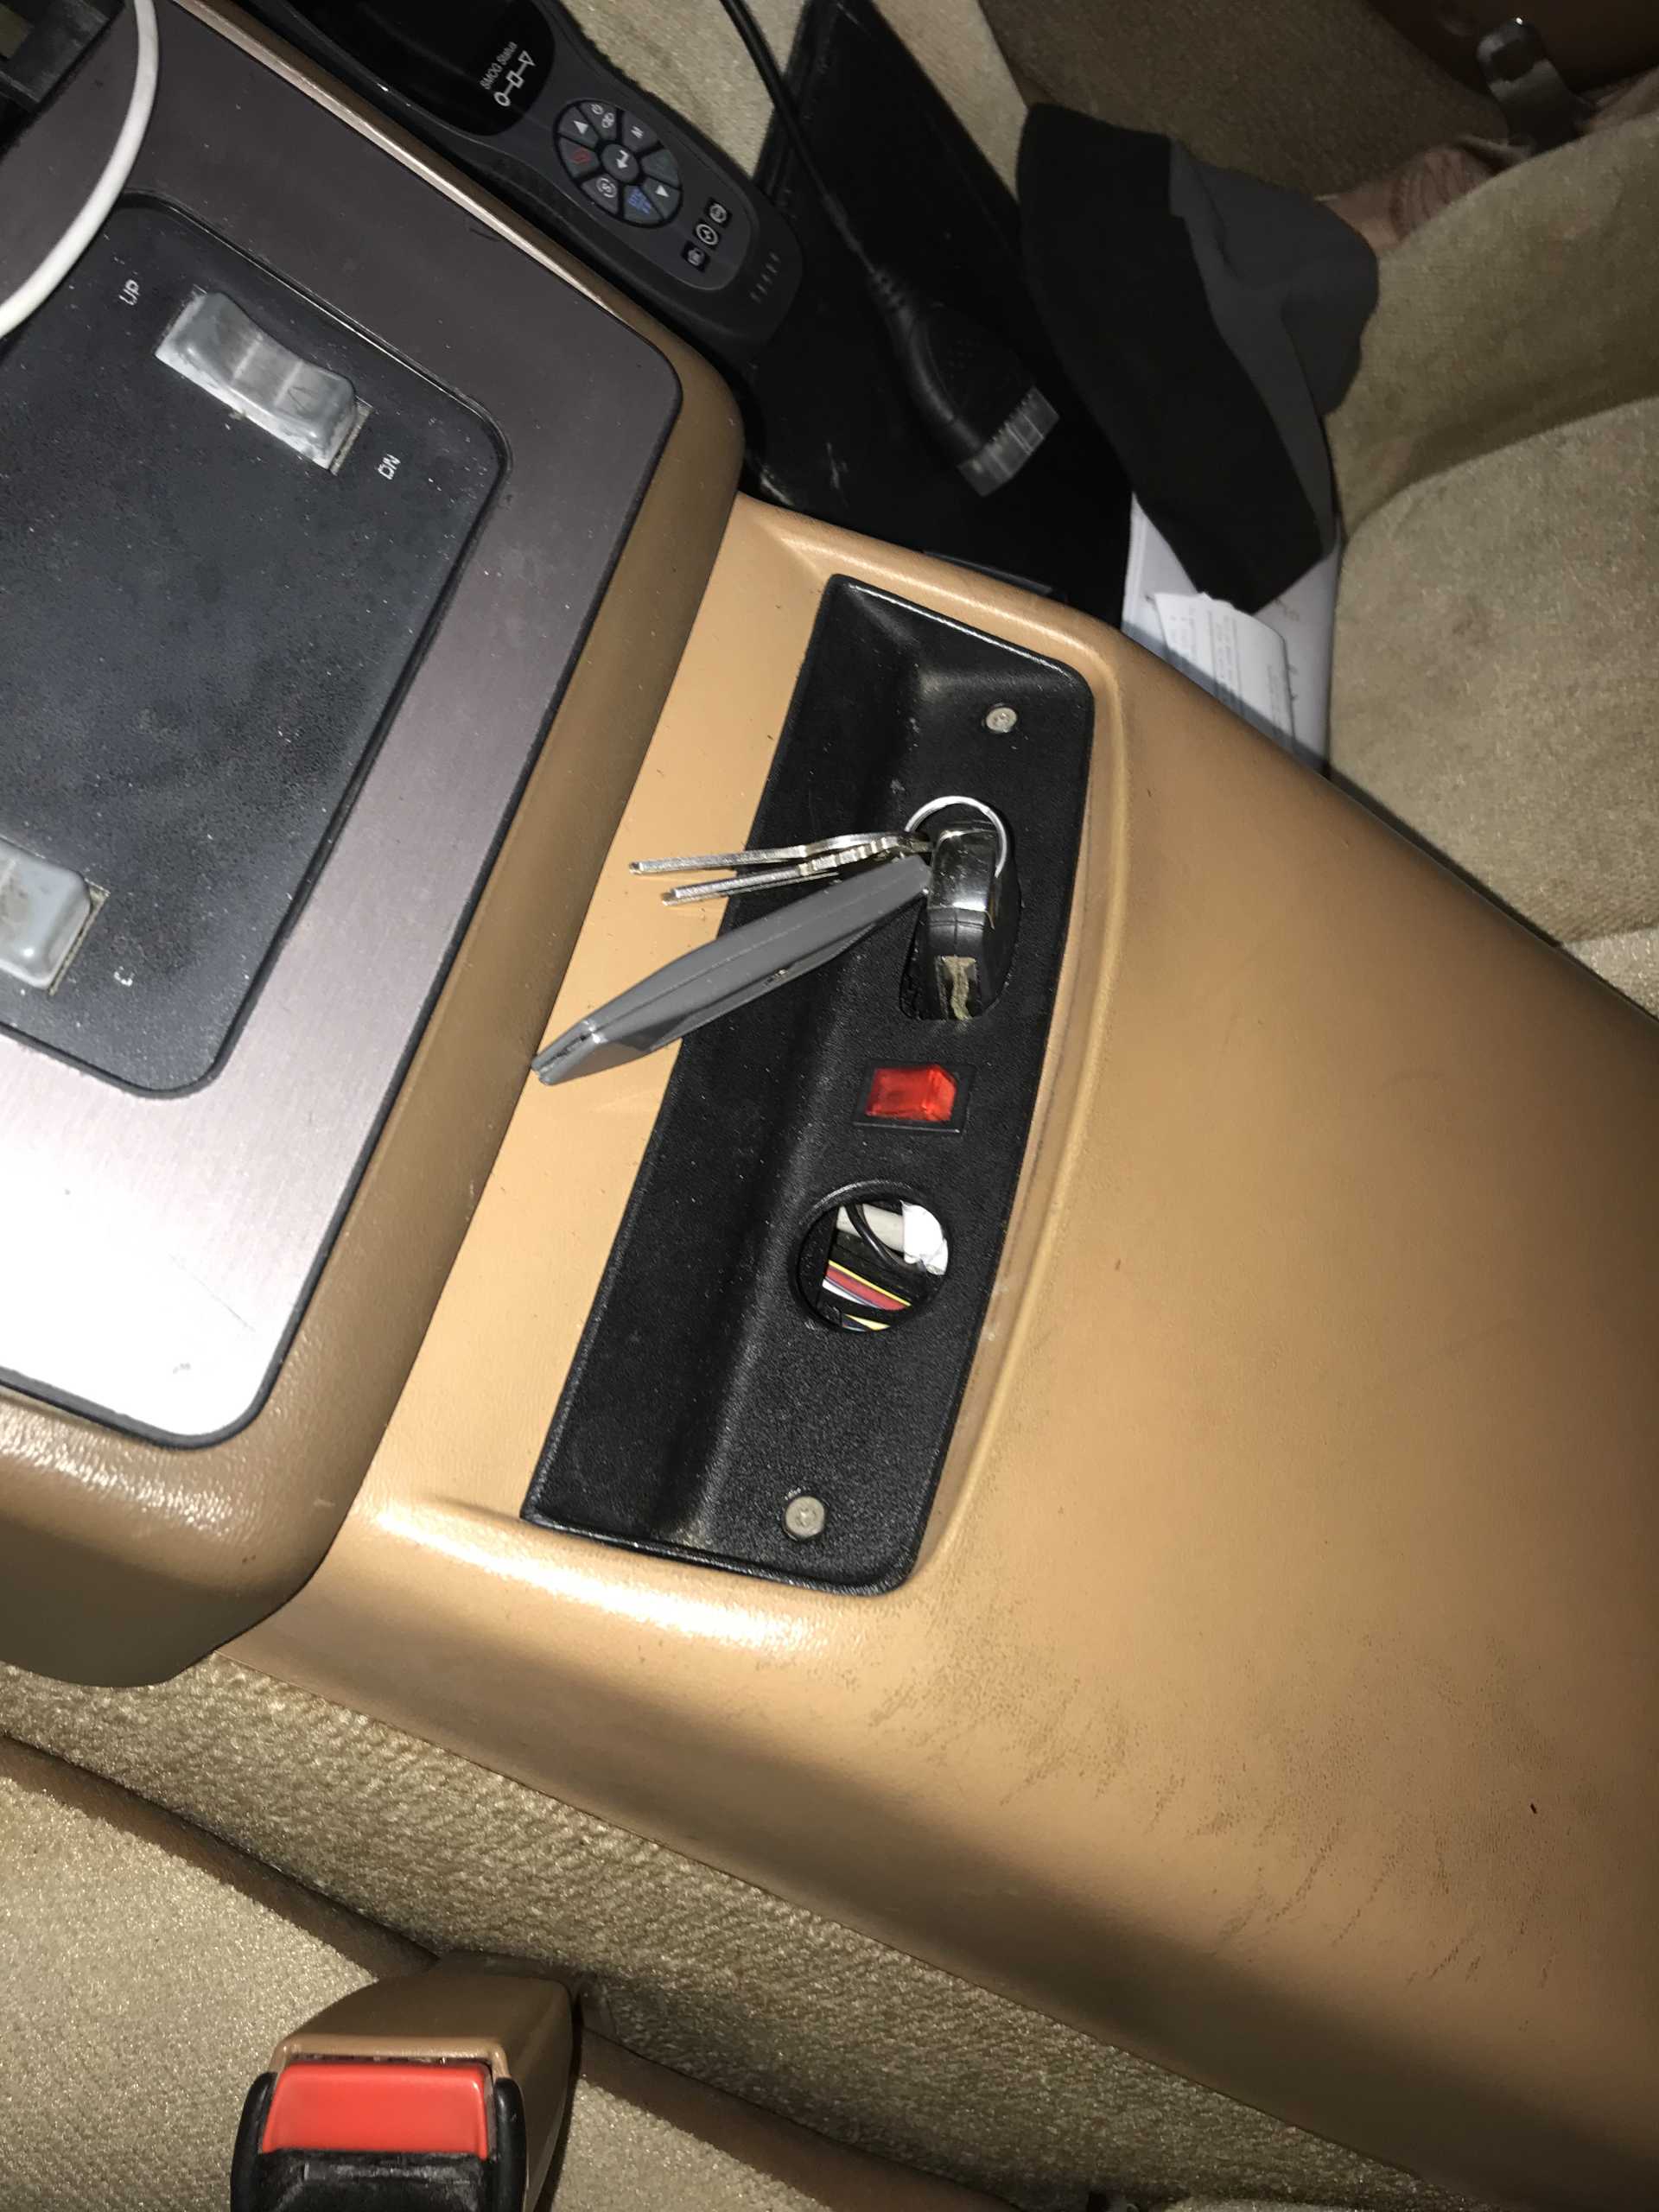
With the console positioned I tried to figure out where to mount the Impala immobilizer coil making it look good and not interfere with anything else. This coil must be very close to the key or the engine will not start. You press the key and the immobilizer talks to the key Which then talks to the BCU that talks to the ECU that talks to the ECU and finally powers the ignition power and starter selenoid. Putting it in place of the instrument panel dimmer would work, but that also controls the interior lights; putting it below the radio in the console would also work but be ugly. Finally decided to mount it where the old OBD plug was located next to the cigar lighter. The mount is made from acrylic that is glued to the skeleton. The immobolizer ring is cable-tied into place with the key inserted in a slot cut into the plastic cover plate. Insert the key, step on the brake and push the button and it starts.
The console is now taking shape with the Fiero gear shift indicator replace by the Impala one. It's LED that are white except for the gear you are in, which is orange. Getting it to fit was another day and a half project that required lots of modifiiction to the Fiero trim. Notice it reads PRNDM. The top of the shift knob has the + / - switch.
The radio was replaced with a double-DIN radio/display that talks to my backup camera and to my iPhone. Now I have moving maps, can play audio files and the other AirPlay functions via a USB cable. the radio was about $300 and fit without too much difficulty since it is Fiero-sized (small)
Crappy photo but you get the idea.
It's been driven a few times since the last photos were taken. I think I've got a fuel pressure issue that prevents going to full throttle. I suspect the fuel pump fitting that fed the Impala siphon has come loose and is causing the pressure to drop. For running around town and moderate acceleration it's just fine but it simply won't run at full throttle over about 5000 RPM. It was doing well and the next time I drove it this cropped up. I'll put my OBD-2 scanner on it and get some real-time data. We have had really wet weather here and with all the rain I drive pretty carefully so I don't put it in a ditch, which we have lots of.
Now that it is running and can live outside I've met my deadline and spent a week cleaning and rearranging the garage. I've even figured out how to have a shop and keep both cars in the insulated garage for the winter. Next things to do are to check the fuel pump, install the inner fender liners, continue cleaning up the engine bay wiring and get the key cover plate cut.
[This message has been edited by MikesFirstFiero (edited 11-07-2021).]
Now that the car is running I've had to turn my attention to other work around the house that was ignored since about April. The auto workshop has been reverted to a woodworking shop, but smaller. This allows both cars to park in the garage and have room to still have a useful shop area. When I need to work on either car one can be parked outside and there is plenty of room. The Venza needs it's ATF replaced. Toyota says for "life" but I don't believe it. So with 80K miles it is getting replaced next week.
The Fiero has accumulated about 250 miles in the last 3 weeks. I've driven it over to North Spokane, an 80 mile round trip. Have not solved the fuel issue yet but I hooked up my OBD2 unit and can see a FP that ranges from 43 to 56 PSI. The chassis controller module uses PWM (Pulse Width Modulation) to control the FP output pressure. With it going up to 56 PSI I'm thinking the pump is not the cause. I'll run it more and see what DTCs show up. Driven moderately it runs well. My first fuel top-up shows the fuel economy to be about 25 MPG overall. Not too bad since I enjoy quick acceleration too much and have been giving rides to my gear-head friends (one has a hot rod F350, another a 427 Vette and another has a Factory 5 Cobra project going). The manual shift on the shift knob works very well. Shifting gears is quick so it feels responsive. If you down shift it even blips the throttle.
Another thing that is a surprise is with it being winter I don't need the cooling fan to operate. Even around town it does not overheat at the traffic lights. Only a slight increase over what it is with the fan running. I'm thinking this engine in normal driving burns less fuel and thus creates less heat to be rejected by the radiator. Even though the radiator is Fiero sized (It's a 3-row aftermarket one put in by the prior owner) it seems to be just fine even though it's half the area of the Impala one. And the heater now works, taking only about 3-4 minutes to get hot. On full hot it is overwhelming and needs only to be set about in the middle of the temp range. But it's only about 32F right now in the mornings.
I've got a laundry list of things to do to prep it for winter driving: oil change & filter, install winter wheels & snow tires (and go back to stock rotors). install inner wheel wells, add a retainer so the shift cable does not come loose (only happened once), Hook the cooling fan to the Impala ECU, put the trunk liner back in after cutting it to fit the new depth, get the reverse lights to work so my backup camera work too, finish the interior plastic bits that need to be painted and/or modified. But first comes finishing a present for grand daughter. Have a nice Thanksgiving guys.
Originally posted by MikesFirstFiero: Another thing that is a surprise is with it being winter I don't need the cooling fan to operate. Even around town it does not overheat at the traffic lights. Only a slight increase over what it is with the fan running. I'm thinking this engine in normal driving burns less fuel and thus creates less heat to be rejected by the radiator. Even though the radiator is Fiero sized (It's a 3-row aftermarket one put in by the prior owner) it seems to be just fine even though it's half the area of the Impala one. And the heater now works, taking only about 3-4 minutes to get hot. On full hot it is overwhelming and needs only to be set about in the middle of the temp range. But it's only about 32F right now in the mornings. .
A few things the Fiero has going for it that the Impala doesn't.The Fiero radiator is on the opposite side of the car as the engine so it doesn't get heated up by the hot air coming off the engine. The coolant capacity is probably 2.5 times greater. The heat not only radiates from the radiator but to some small extent also radiates through the plumbing along the car.The metal pipes by the rocker panels for instance add 20 feet of plumbing with the heat from the pipes being transferred to the surrounding air as well as the clamps and metal frame attachmrnts, thus dissipating some of the heat.
Have not solved the fuel issue yet but I hooked up my OBD2 unit and can see a FP that ranges from 43 to 56 PSI. The chassis controller module uses PWM (Pulse Width Modulation) to control the FP output pressure. With it going up to 56 PSI I'm thinking the pump is not the cause. I'll run it more and see what DTCs show up.
You're running the body control module with its PWM output? Or do you have a Fiero-style regulated fuel pressure, referenced to manifold pressure?
Thats s good point that the plumbing system has lots of losses getting from the engine to the radiator and back. I'll have the fan hooked up by spring and I'll see how often it turns on. I'm putting in Archies hood vent too.
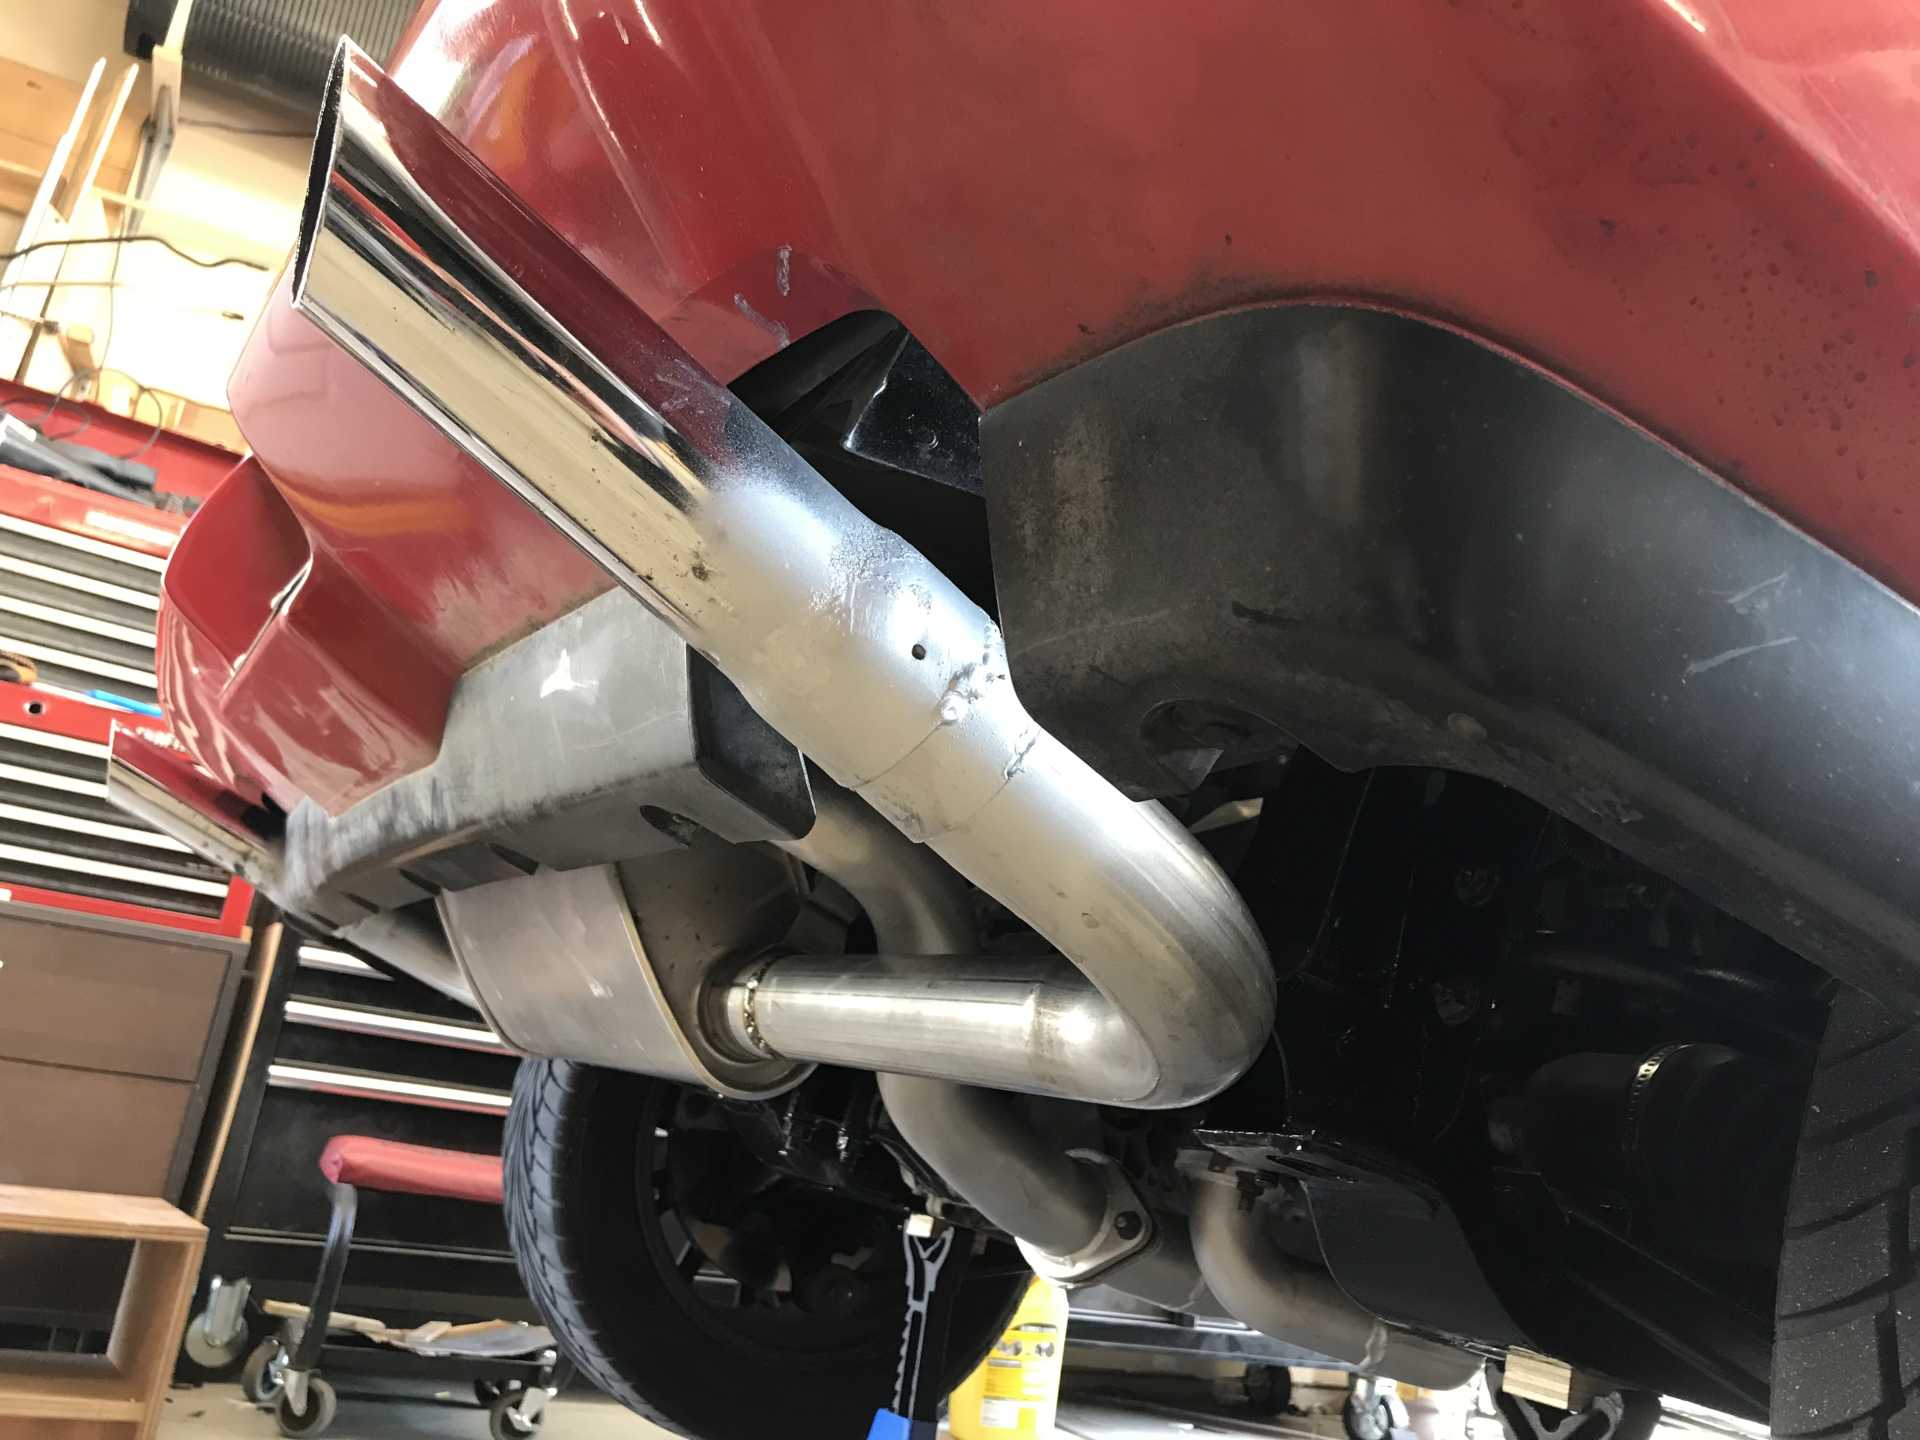
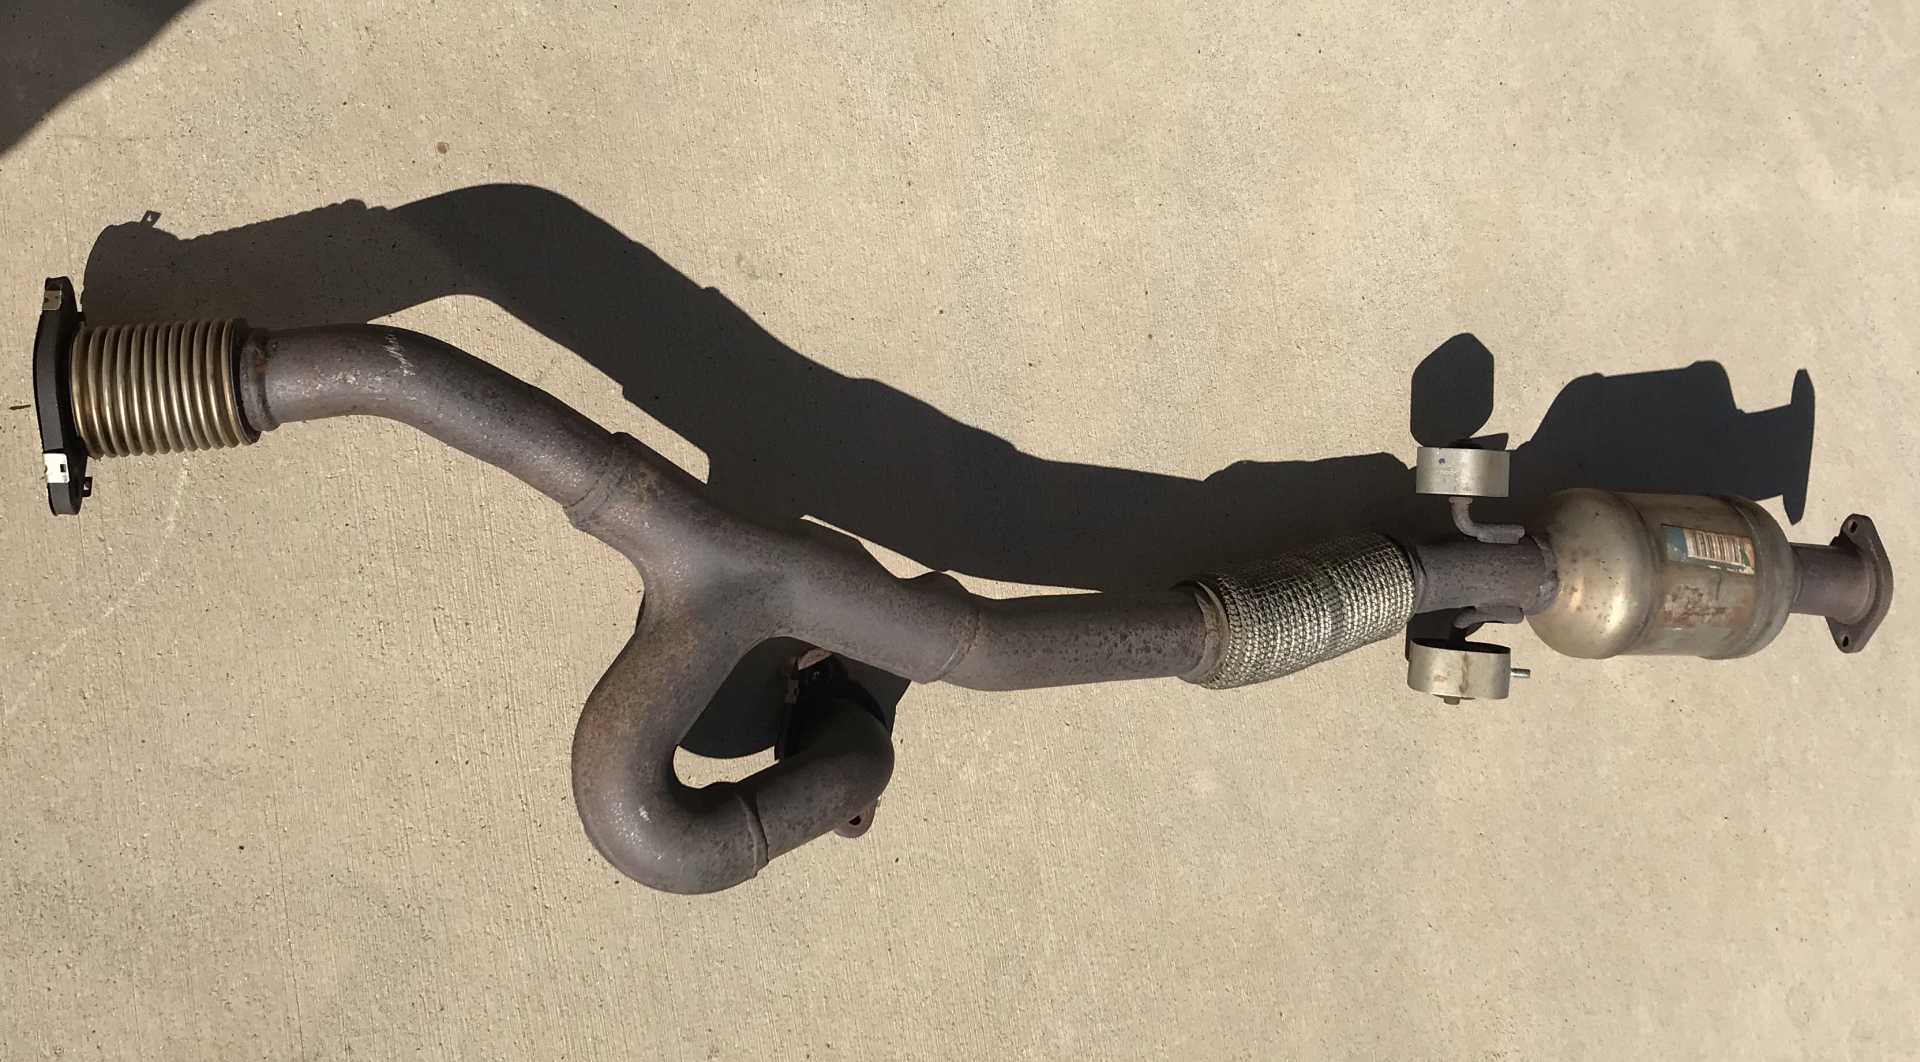
The fuel system is complete Impala with the ECM, BCM and CCM all talking over a CanBus. The only real change is the pressure regulator and fuel return is now external in a Corvette fuel filter rather than in the tank as part of the pump assembly. Another thing I'll look at is the exhaust tips. The muffler exhaust pipes are 2.25 which reduces to about 1.5" at the resonator tips. Maybe increased back pressure? The Impala mufflers were a 26" long glasspack and two big chambered cans with not much restriction.
Notice the restriction where the front & rear bank pipes join. Thats the only real restriction in the entire Impala exhaust. I cut it out when I used parts of this pipe to join up with the Camaro muffler.
The Impala rear mufflers are big and heavy lumps.
I weighed the car the other day this conversion increased the weight from 2750 to 2860. I find the steering to be more neutral but haven't really wrung it out yet, just some larger roundabouts (the new WA-290 one going to ID-53 has all tires howling). Even though the differential is open, with the stock Fiero rear anti-roll bar added, the car no longer lifts the inside rear wheel when hard cornering. I'm sure adding the bar has also helped reduce the understeer too.
For a BMW I'd look at the Camaro version of this engine. There has been a lot of work done in stuffing that into Miatas.
[This message has been edited by MikesFirstFiero (edited 11-23-2021).]
I'm willing to bet most of your car's weigh gain was the transmission. That 6T70 is a hefty unit... about twice as heavy as a stock Fiero gearbox. But aside from that, it's better in every way.
For the Bimmer, I'd definitely get the RWD variant. I may end up getting the LY7 instead of the LFX, to make things a little easier.
Anyway, I don't want to derail your thread. So let's talk about this cool project.
[This message has been edited by Blacktree (edited 11-23-2021).]
For the Bimmer, I'd definitely get the RWD variant. I may end up getting the LY7 instead of the LFX, to make things a little easier.
The port injected engine gives up a bunch of power to the direct injected engine.
I'm thinking that an LLT with long tube headers could out perform an LFX which can never have headers... Beyond that, newer and higher tech is better. ...Until it comes to the unhackable C8 Corvette network architecture.
[This message has been edited by Will (edited 11-24-2021).]
Originally posted by Will: The port injected engine gives up a bunch of power to the direct injected engine.
That's true. But I have no experience with DI. Part of the plan is to add a turbo, and run it on E85. I'm not sure how much of a hassle that will be with a DI fuel system.
Some versions of the LFX are E85 capable and have a fuel composition sensor to adjust the fuel flow, so that is possible for the DI engine. The use of a turbo may take some serious modification of the ECU parameters too. One good thing about the LFX is the single exhaust per bank makes adding a small turbo on each bank simpler to plumb. Or try to find a Caddy LF3 (420HP). Don't know if it is E85 capable. For my purposes 300 HP is a good number for combined performance and economy. Driving anything with 10 pounds per HP is going to maked you smile.
And yes the 6T70 is large and heavy. But the second generation seems to have worked out the bugs of the earlier ones. It does a credible job of shifting up and down crisply and quickly when you push the shift button. So that worked for me. I'm not so sure the extra 100 pounds in the middle of the car is such a bad thing since the handling does not seem to be adversly affected. Having driven an Alfa with a Selespeed for years was fun and made city traffic much more pleasant than having a clutch.
[This message has been edited by MikesFirstFiero (edited 11-24-2021).]
Since my last post I've driven the car moderately since the misfire problem under higher power has not been solved. Until Today. Thinking it was a fuel pressure problem I hooked up my OBD2 reader and set it for live data. The fuel pressure most of the time was about 44 PSI and occasionally it hit 56PSI. This told me that the fuel pump was not the problem. With other things to do I mostly ignored it. I've mostly ignored my honey-do list for six months and have quite a backlog. I needed to drive over to Spokane a couple of weeks ago and took the freeway. At highway speeds the same problem came up only at a much lower throttle position. Passing other cars was just not possible without misfire. Could it be exhaust flow restriction? I thought that was the only thing that had changed since I cleaned up the wiring and finished the exhaust in October (unless I made a wiring error).
This week it began to snow and stick so I decided this would be a good time to change the oil & filter, swap wheels, tires, brake rotors and install the inner wheel tubs. So while I was under there I chopped off the resonator tips and finished the other work. One thing I needed to fabricate were the splash guards covering the sides of the engine compartment below the wheel tubs. Last time I made them from a thick gasket-type material. It really didn't hold up very well. Debbie & I drive (her Venza) over to Spokane to get some tonneau cover snaps from Tandy Leather. And the light went on. Why not make them from leather? So $50 later I had some 8 ounce per square foot leather about 1/8" thick, some leather dye and some mink oil. I used the old shield as a pattern, cut the leather to shape, applied the dye and then the mink oil as waterproofing to both sides. Some new plastic push-in fasteners and they fit nicely. Since they are exposed I'll re-treat them with mink oil in the spring.
Using the old shield as a pattern. Then cut out with a sharp utility knife.
And the resulting leather part
Why did I swap brake rotors? My snow tires are on original 14" rims and those won't work with Corvette rotors. So back to the originals. Today has been mostly clear and warmer so the snow melted and the roads were dry - and full throttle acceleration was back to normal with the exhaust tips removed. Those exhaust tips had a tail pipe diameter of 2.25" but the resonator reduced that to about 1.5", cutting the cross section by 50% and giving more back pressure.
The inside diameter of the tips is much smaller than the outside causing the misfire.
So if you are considering an LFX swap then keep the exhaust free flowing. Now I'm going to need to find a replacement that fits and keeps the same inner diameter. Both Vibrant and Borla look like they have resonator parts that could fit. Solving this has made me much happier since with an unsolved misfire issue I was concerned about driving in the winter. Also with the smaller diameter snow tires the motor hits the redline quicker and then sits at 7,100 RPM making very little power. Need to upshift when it hits 6700-6800. The ECU does not want you to kill your engine.
[This message has been edited by MikesFirstFiero (edited 12-09-2021).]
I was surprised that back pressure was the cause but since they optimize the valve timing I'm guessing it caused some of the high temperature gas to not exit the cylinder so the next intake charge ignited prematurely. From what I read there are lots of tuning items that could be done to bump the power up significntly.
But for now I need to figure out how it behaves in stock configuration. And that will wait until Spring with ice on the roads. And the stock power bump is sooo much better than I imagined, I'm happy. The old 2.8 was a troublesome slug and the 3-speed auto was awful; they made the car unpleasant to drive, now I smile a lot. I used to think my 1990 T-Bird SC was quick until I dropped the LFX in this Fiero.
[This message has been edited by MikesFirstFiero (edited 01-10-2022).]
Just a quick update. I was planning on making the Impala Cruise Control work but after investigation that may prove difficult. According to the Mitchell 1 online manuals the CC needs the parking brake controller and the ABS controller to function which I don't plan to install. I don't know if there is a work-around for the Body Control Unit which talks to them and decides it is okay to engage the cruise function. Since it is CAN bus I might try to figure out what data those two modules send and program a small computer to respond with the correct signals.
The Borla exhaust tips with resonators are in and reduce the idling & low power sounds quite a bit (maybe 6-8db). I'm happy with that. They are big with a 4" outer diameter but they were the only thing I could find that fit and reduced the noise at cruise. They have little muffling effect above 1/4 throttle which is cool so it snarls nicely. Still looking at the DTCs to eliminate high rpm misfire. Got a deal on AC Delco OEM iridium plugs for $3.50 each and swapped them, made no difference, old plugs worth keeping. I think the rebate is good until end of Jan on all AC Delco plugs, check RockAuto.com. I may buy a new coil pack and try it one cylinder at a time. I'm also going to bypass the fuel pump controller and tie the pump to the Hot-in-Run power feed to eliminate that as a cause too. In the end I may need to take the car to someone who understands the LFX and can provide a solution.
Those tips are 4" OD and 13" long and just fit
It's been snowing and the car is covered with dirt. But at least I can keep it in the heated garage and not worry about removing the snow.
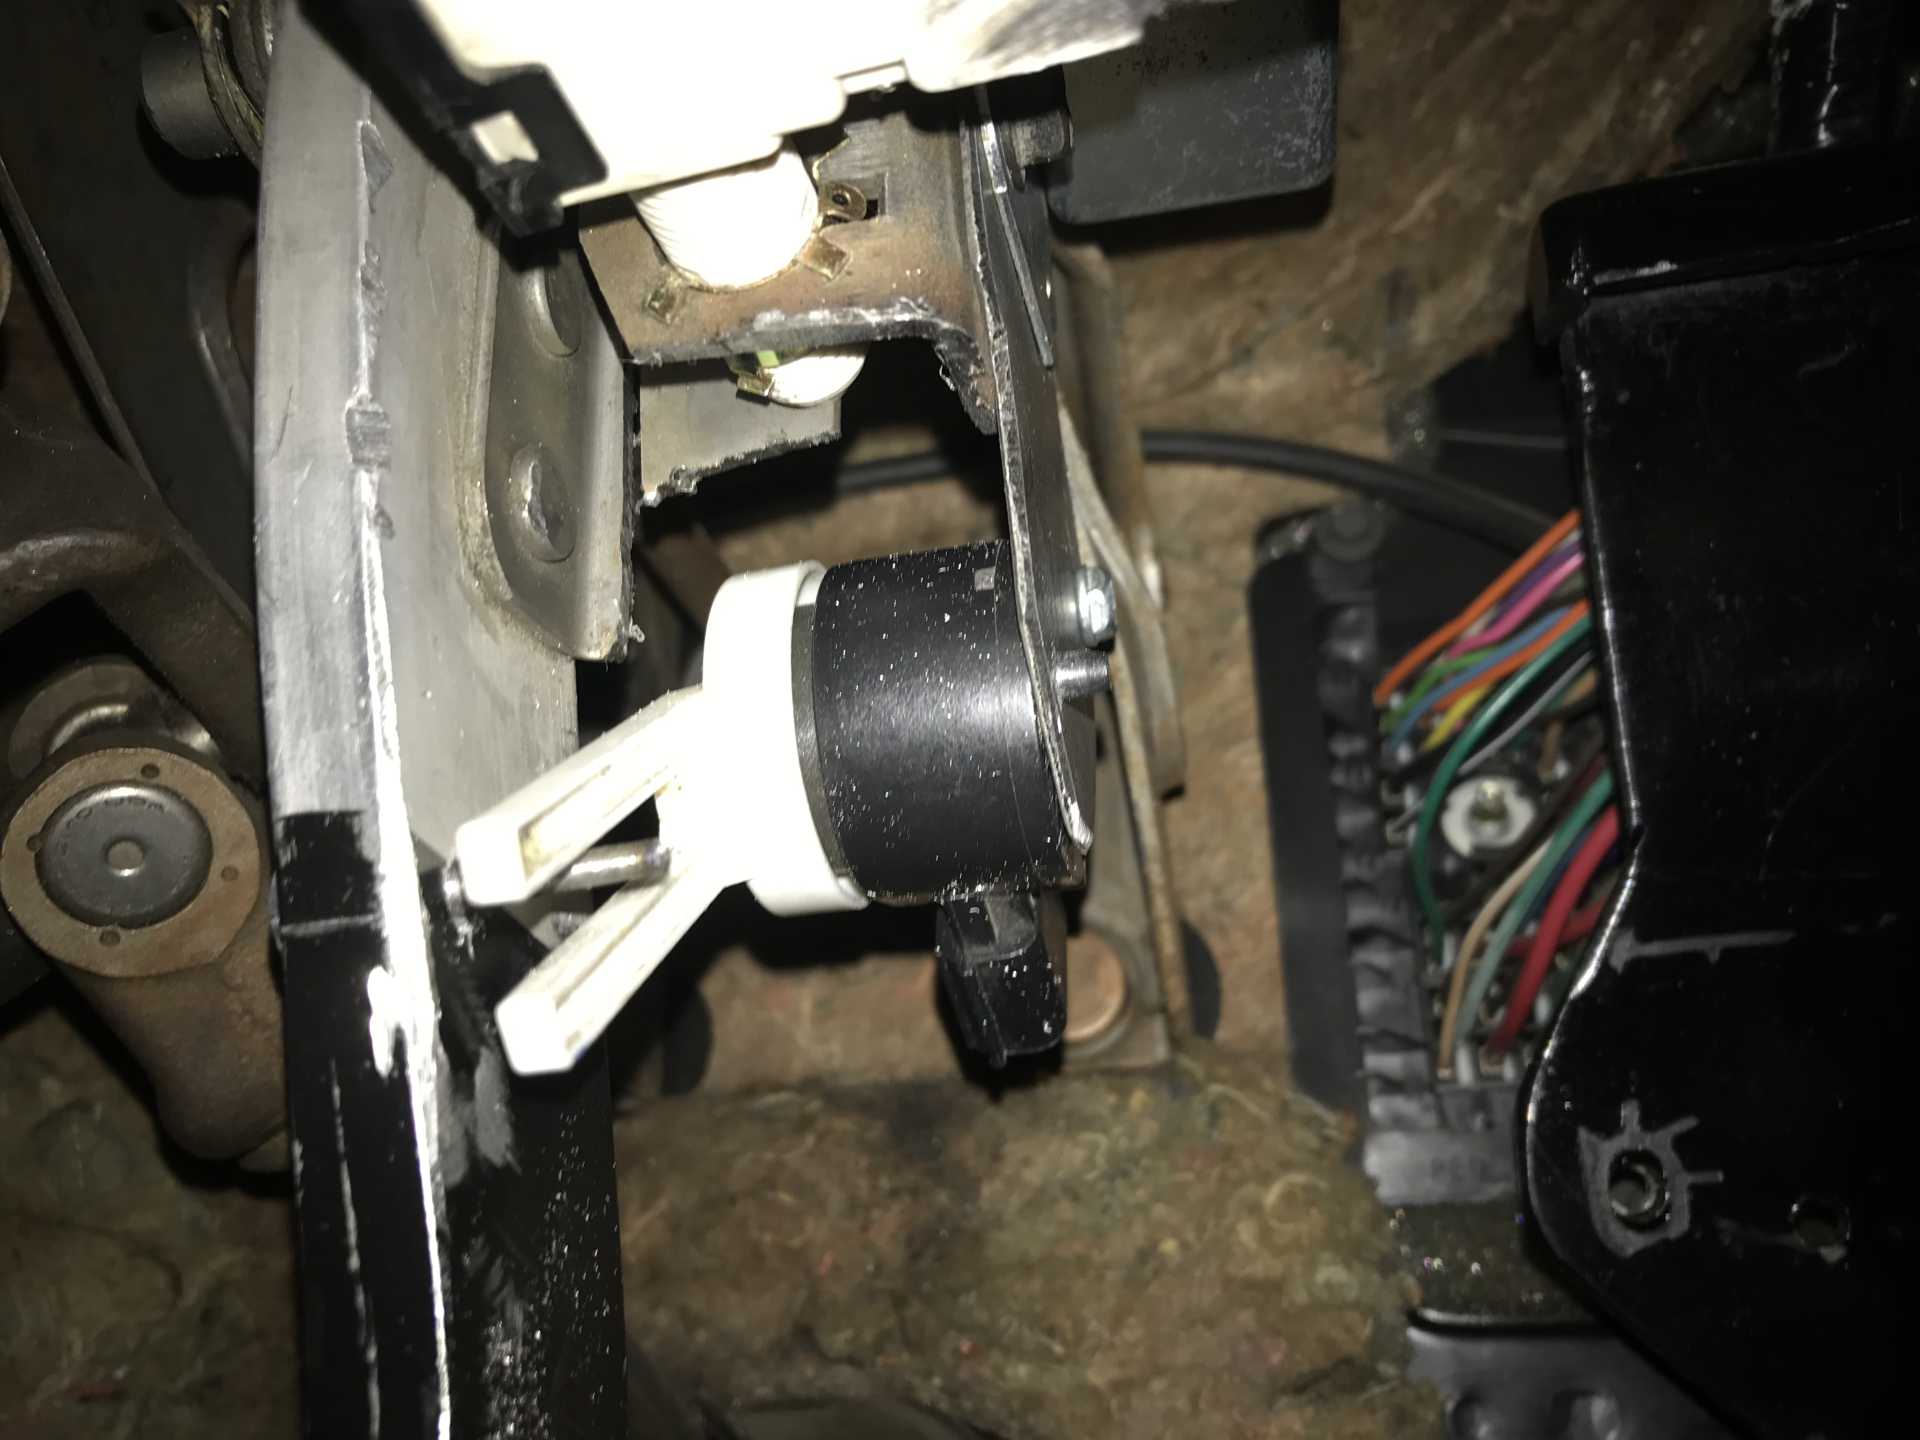
Also mounted the key fob detector ring where the old OBD plug was. Looks good and works to hold the fob securely in position. If the correct fob is installed it will start otherwise it won't. The steering column key now does nothing and does not need to be used.
The open hole where the lighter went will be used for a USB connector to the Sony receiver. The red switch is to turn my Escort 360 radar detector on and off.
[This message has been edited by MikesFirstFiero (edited 01-11-2022).]
This is one of the most amazing swaps that we have ever seen. There are steps that could be taken to make this engine run stand alone with an aftermarket ECU and a trans controller but got to give you credit for swapping the entire system into your Fiero. I'd be interested in what the 1/4 mile E.T. would be.
------------------ " THE BLACK PARALYZER" -87GT 3800SC Series III engine, custom ZZP /Frozen Boost Intercooler setup, 3.4" Pulley, Northstar TB, LS1 MAF, 3" Spintech/Hedman Exhaust, P-log Manifold, Autolite 104's, MSD wires, Custom CAI, 4T65eHD w. custom axles, Champion Radiator, S10 Brake Booster, HP Tuners VCM Suite. "THE COLUSSUS" 87GT - ALL OUT 3.4L Turbocharged engine, Garrett Hybrid Turbo, MSD ign., modified TH125H " ON THE LOOSE WITHOUT THE JUICE "
Thanks Dennis, I had high hopes of getting most of the new tech features to work but that will require quite a bit more work. I'd like ABS but finding front hubs that would fit and has sensors would require research. I will probably get the keyless entry to work later. I agree that the standalone method would be simpler to do, cost more $$, be more adjustable and probably take a fair amount of time to sort out (or pay someone to figure it all out).
I can't wait to give some real numbers for 0-60 and the quarter mile. I've ordered three new coil packs to try to solve the misfire, going try each side and narrow down from there. At $22 each it's a cheap gamble that is easy to do. Plus up here the roads are still icy and wet. Drove our Venza from CDA to Missoula Mt yesterday and the mountain passes were like skating rinks. No performance data until March at the earliest. I'm going to get the hood vent installed for now since my garage is warm. Archie said over 90 MPH the headlight covers would start to rise without it. That didn't sound good to me plus it should help the cooling in the summer too.
I've ordered three new coil packs to try to solve the misfire, going try each side and narrow down from there. At $22 each it's a cheap gamble that is easy to do.
I just fixed a bad miss on my 3800SC and fixed the exact same problem on another car. The mounting plate for the ignition module developed some corrosion where the module mounted. Took the coil pack apart, cleaned the mounting plate w a fine wire brush, wiped with solvent, applied a surface coating of conductive thermal grease, put everything back together and ran a new ground wire to the plate. Problem fixed on both cars without replacing any parts. It was apparently a bad ground to the module. Also watch out for those budget coil packs on ebay. Check both the primary and secondary resistances to find if they are equal to OEM and weigh them. We've seen coil packs that weigh 25% less than OEM that run like crap. Lower weight = less copper windings.
------------------ " THE BLACK PARALYZER" -87GT 3800SC Series III engine, custom ZZP /Frozen Boost Intercooler setup, 3.4" Pulley, Northstar TB, LS1 MAF, 3" Spintech/Hedman Exhaust, P-log Manifold, Autolite 104's, MSD wires, Custom CAI, 4T65eHD w. custom axles, Champion Radiator, S10 Brake Booster, HP Tuners VCM Suite. "THE COLUSSUS" 87GT - ALL OUT 3.4L Turbocharged engine, Garrett Hybrid Turbo, MSD ign., modified TH125H " ON THE LOOSE WITHOUT THE JUICE "
[This message has been edited by Dennis LaGrua (edited 01-11-2022).]
This engine has a coil per plug and I buy most parts from Rock Auto. I don't trust most eBay stuff unless it is a known brand. If you engine has a distributor mounted module then moving it to an external heat sink could make it last longer. The one on the 2.8 fails often since the disty shaft conducts heat from the block and gets up to 150F plus the module itself generates heat. When I remote mounted mine the module temp on a good heat sink dropped to about 115-120F. If you were to buy an off brand there is no guarantee that the semiconductors are really rated for use under high temperatures.
The one on the 2.8 fails often since the disty shaft conducts heat from the block and gets up to 150F plus the module itself generates heat. When I remote mounted mine the module temp on a good heat sink dropped to about 115-120F. If you were to buy an off brand there is no guarantee that the semiconductors are really rated for use under high temperatures.
Most original configuration distributor mounted ignition module failures on Fiero are due to...
1. Replacing module and not replacing the pickup coil 2. Replacing module and not using the proper thick white heat sink paste 3. Replacing module and not applying the proper thick white heat sink paste correctly 4. Replacing module and not properly cleaning/prepping the distributor contact surface and vents 5. Replacing module with a substandard aftermarket unit that cannot withstand the heat like the original
...and all 3 of my original 2.8 modules are still good 35 years after the assembly line, the secret to long life is in the details.
I agree with both Will & Skybax the proper module grounding is essential to correct operation. I still maintain that the design more susceptable to failure due to the critical importance of heat management. One thing I've also found is if you buy a new distributor (probably imported) check that the module is properly seated and the grease applied evenly. One I bought from Taiwan had uneven application of the silicone thermal paste that caused it's module to fry after about a year. Glad I don't have that problem anymore, now I've got new ones.
I have very much enjoyed watching your swap progress.
I have been planning to LFX/6T70 swap mine for a few years now, and it looks like I will be able to start on it this summer.
Getting the LFX cruise control to work is something I have been trying to figure out ahead of time, as with a few other things I anticipate being a challenge.
A few things I learned by doing this swap into an 88 It will fit but make it as low as possible in the cradle. The engine & trans. will need to be shifted to the driver side a bit, but that's ok. And the cradle wiill need notching on both sides and maybe new cross rails depending on your engine mounts. Cut down the Impala axles to fit your hubs. Tilt the engine back a bit so you have good room up front for the Alternator & AC compressor to fit. The Impala LFX works out well since the exhaust goes under the oil pan keeping the heat low and you can keep the cats too. To make cruise control with stock electronics it needs ECM, Body Control Module, Serial Data Gateway, ABS controller, Parking brake controller, Gas pedal, Brake pedal switch, Instrument Cluster, Switches for CC & display and the key FOB sensor ring in the center console. Also need the shift knob for manual shifting, push-to-start, Chassis Control Unit for fuel pump and maybe some other stuff I haven't discovered yet. I don't know if you could make it work stand-alone or not. And a subscription to Mitchell-1 online shop manual for the donor car. For $30/year it's worth it. The best year models to look for are 2015 to 2017. That will have the newer engine and second gen 6T70. 2018 & later needs serial number matched electronic modules for your donor car. When you decide to dig into it let me know if I can help. If you are in the Spokane-CDA area look me up. Just send me a PM.
Awesome work, and I can't believe how clean the underside is, what a great foundation to start with, and for only a $1000. When the swap is complete and all the bugs worked out, have you considered swapping some body panels (like fastback roof section, side scoops, etc) and having it painted?
[This message has been edited by Skybax (edited 01-21-2022).]
The car sat in a garage for most of the time before I bought it. The last two or so years it was parked on a concrete driveway in a Seattle neighborhood. I did spend a few hours picking pine needles out of cracks and joints of the body work. Luckily the underside was painted and has no significant rust that I can find. Yes, paint is next but it will always stay a notchie. I did put the GT nose on it and the wing on the back. I don't plan on adding a GT skin to the car. The previous owner was going to put the GT rear on it but I decided to have it look similar to the Indy pace car. I will paint it this spring, probably in the same red color.
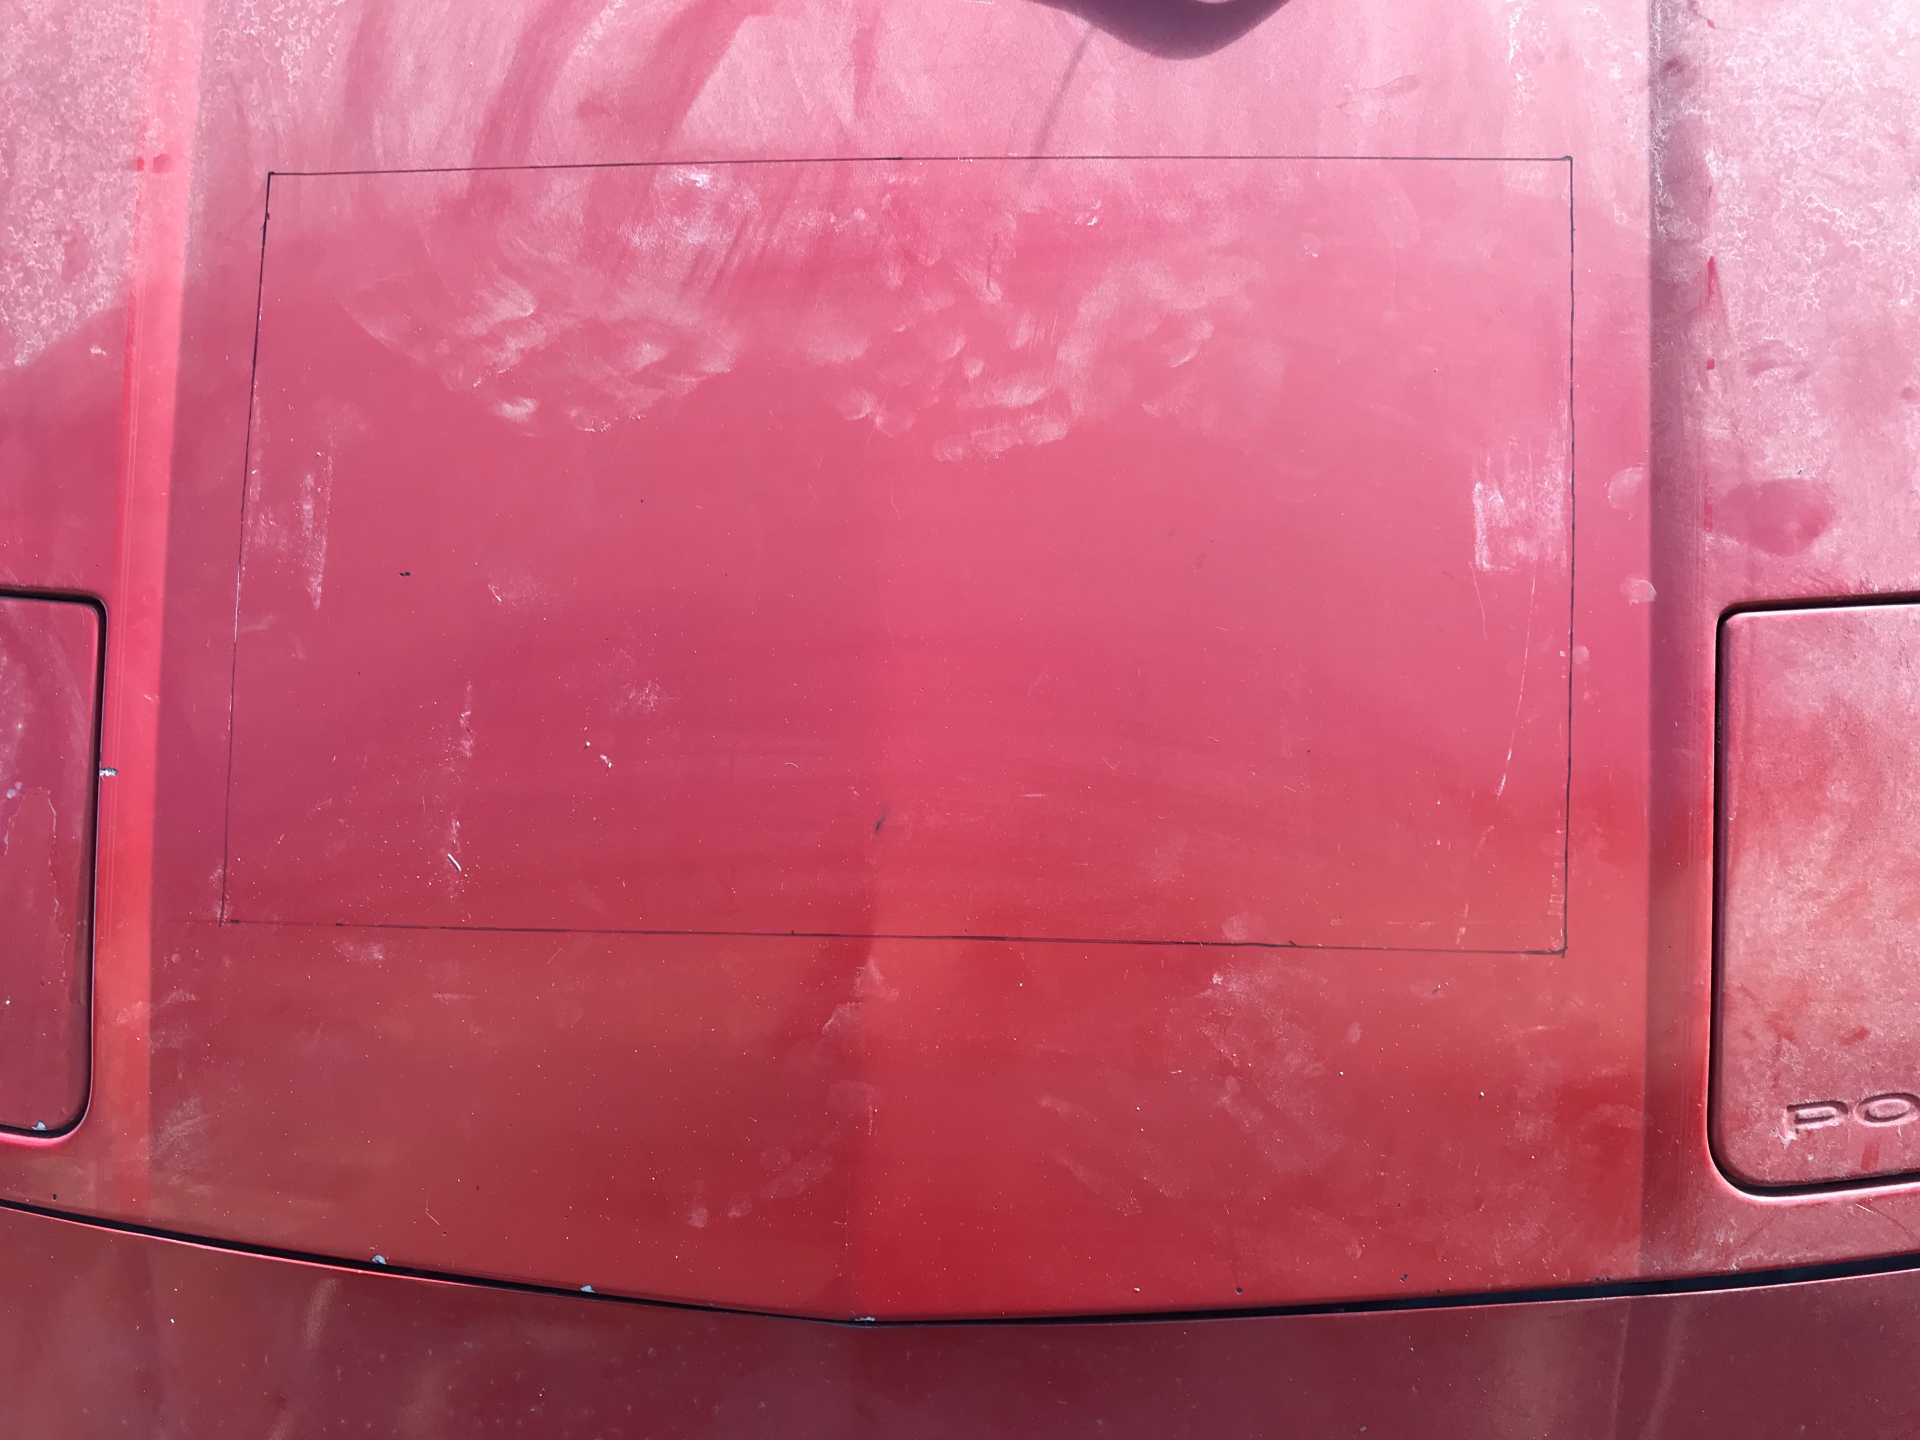
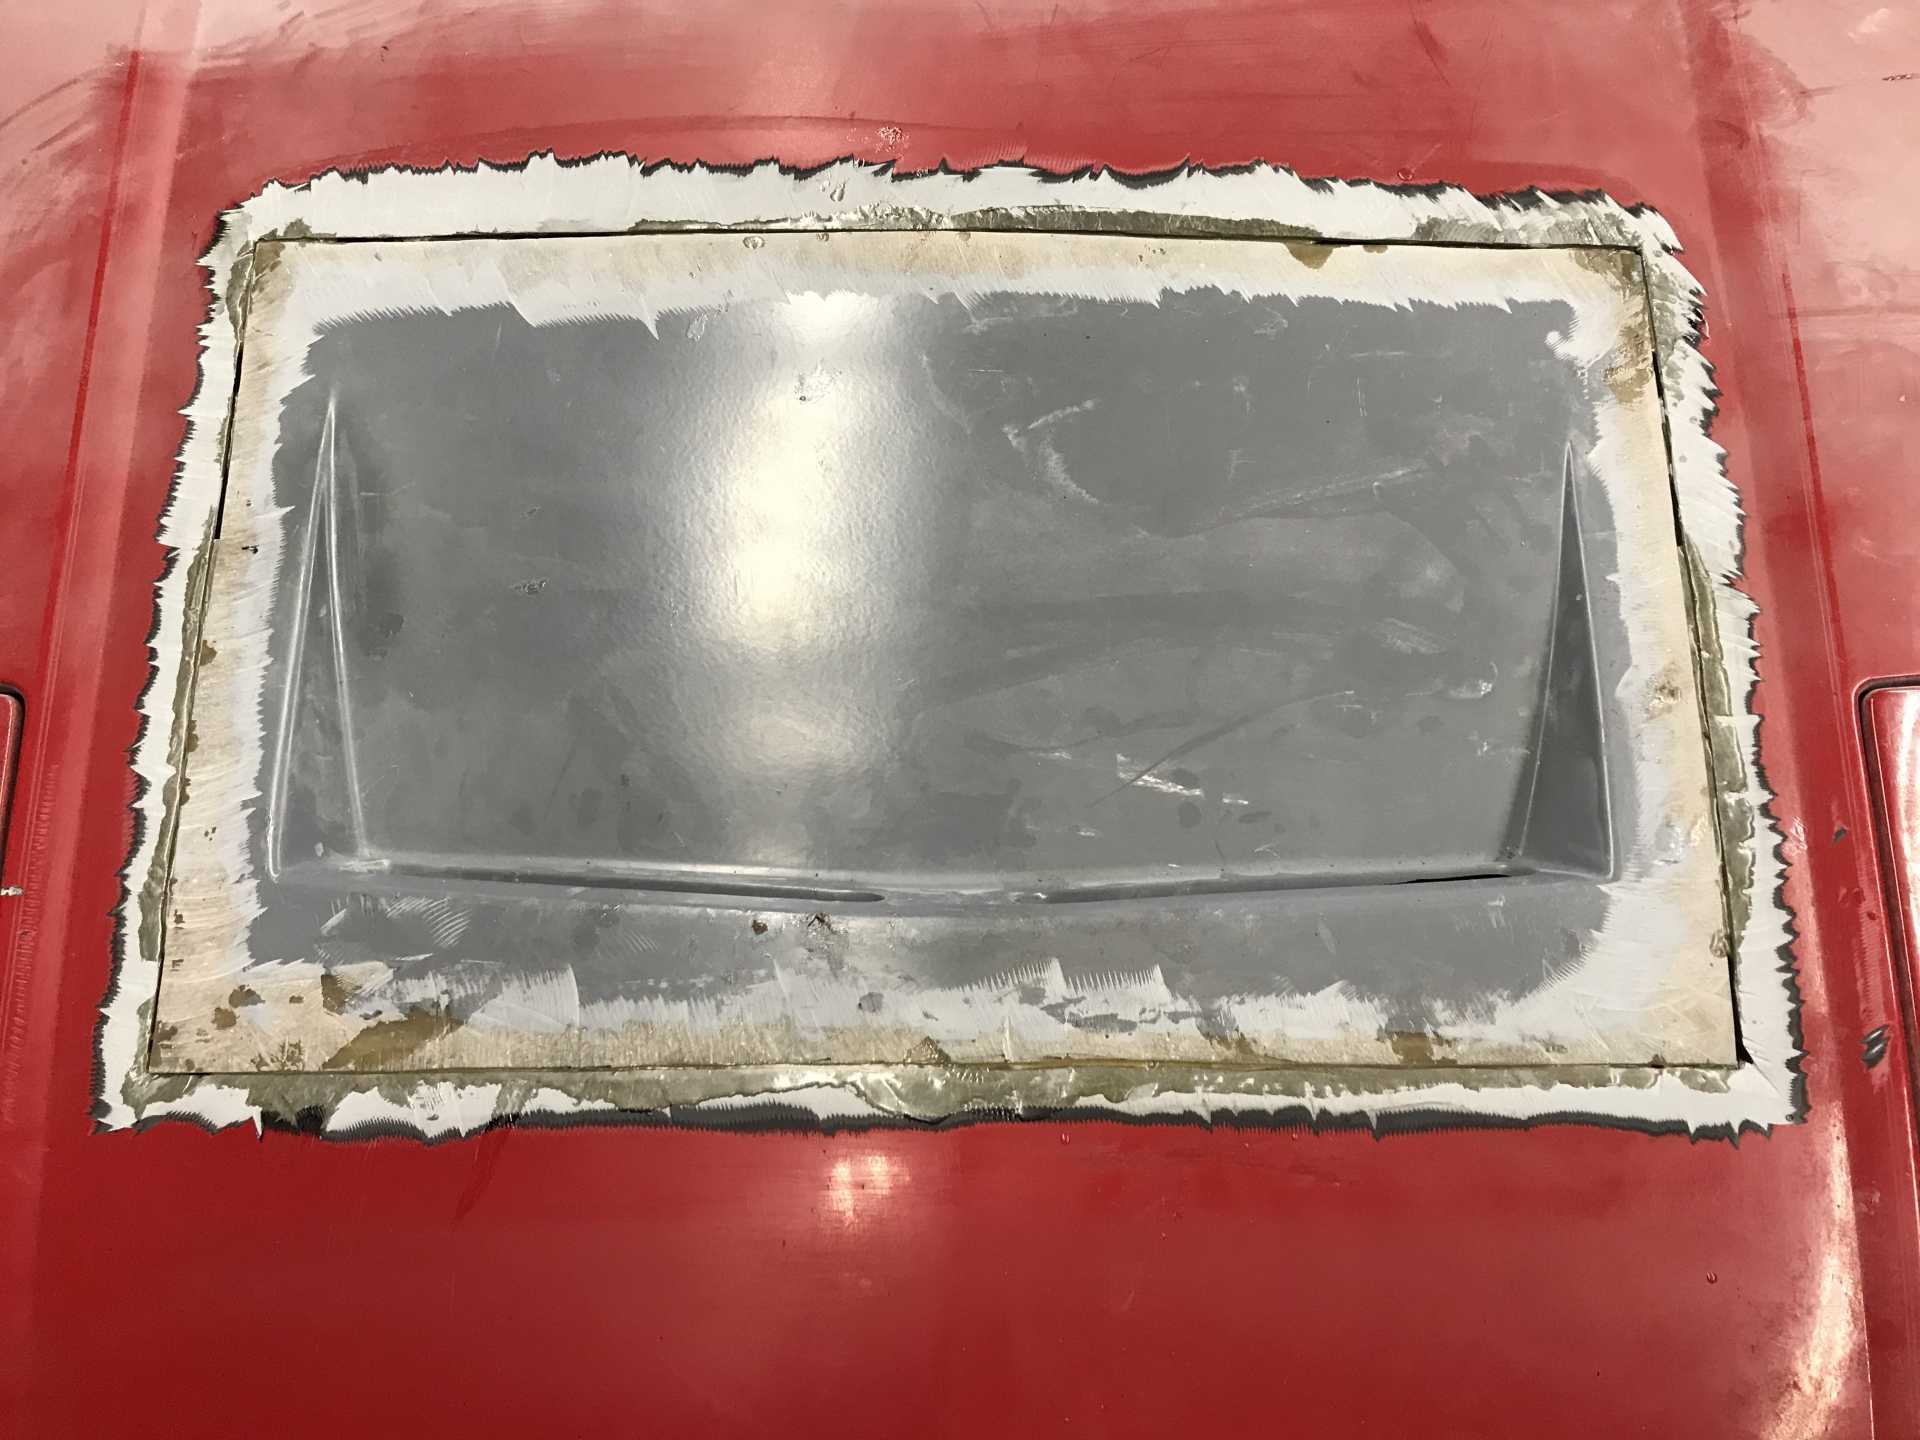
What I have been doing the last couple of weeks is putting V8-Archie's Warber hood vent in the hood. I've just about finished the body work but it will stay in primer until I prep the complete hood and the rest of the car. Here are some photos of the vent installation. It wasn't difficult but I only worked on it about 3 hours per day so it took about a week to get to this point. Only thing with body work is the dust. So with fiberglass I don a 3M P100 mask, goggles and ear muffs when using my angle grinder. I've got a Milwaukee and it is very loud. For finish sanding I use a Makita 5" Orbital with 120/220 grit. The body filler is Evercoat Vette Panel Adhesive/Filler. The real trick to body work is plan on many hours of prep time so it will look good.
I did have a second scrap hood that I experimented with first to determine the location of the cutout. I found the inner frame to be different from the hood on the car. It made a little difference for the mounting of the vent flanges, but nothing difficult.
I followed Archie's instructions for locating the vent. It needs to be 9.5" to 10.0" from the hood lip to the notch or you will have interference problems.
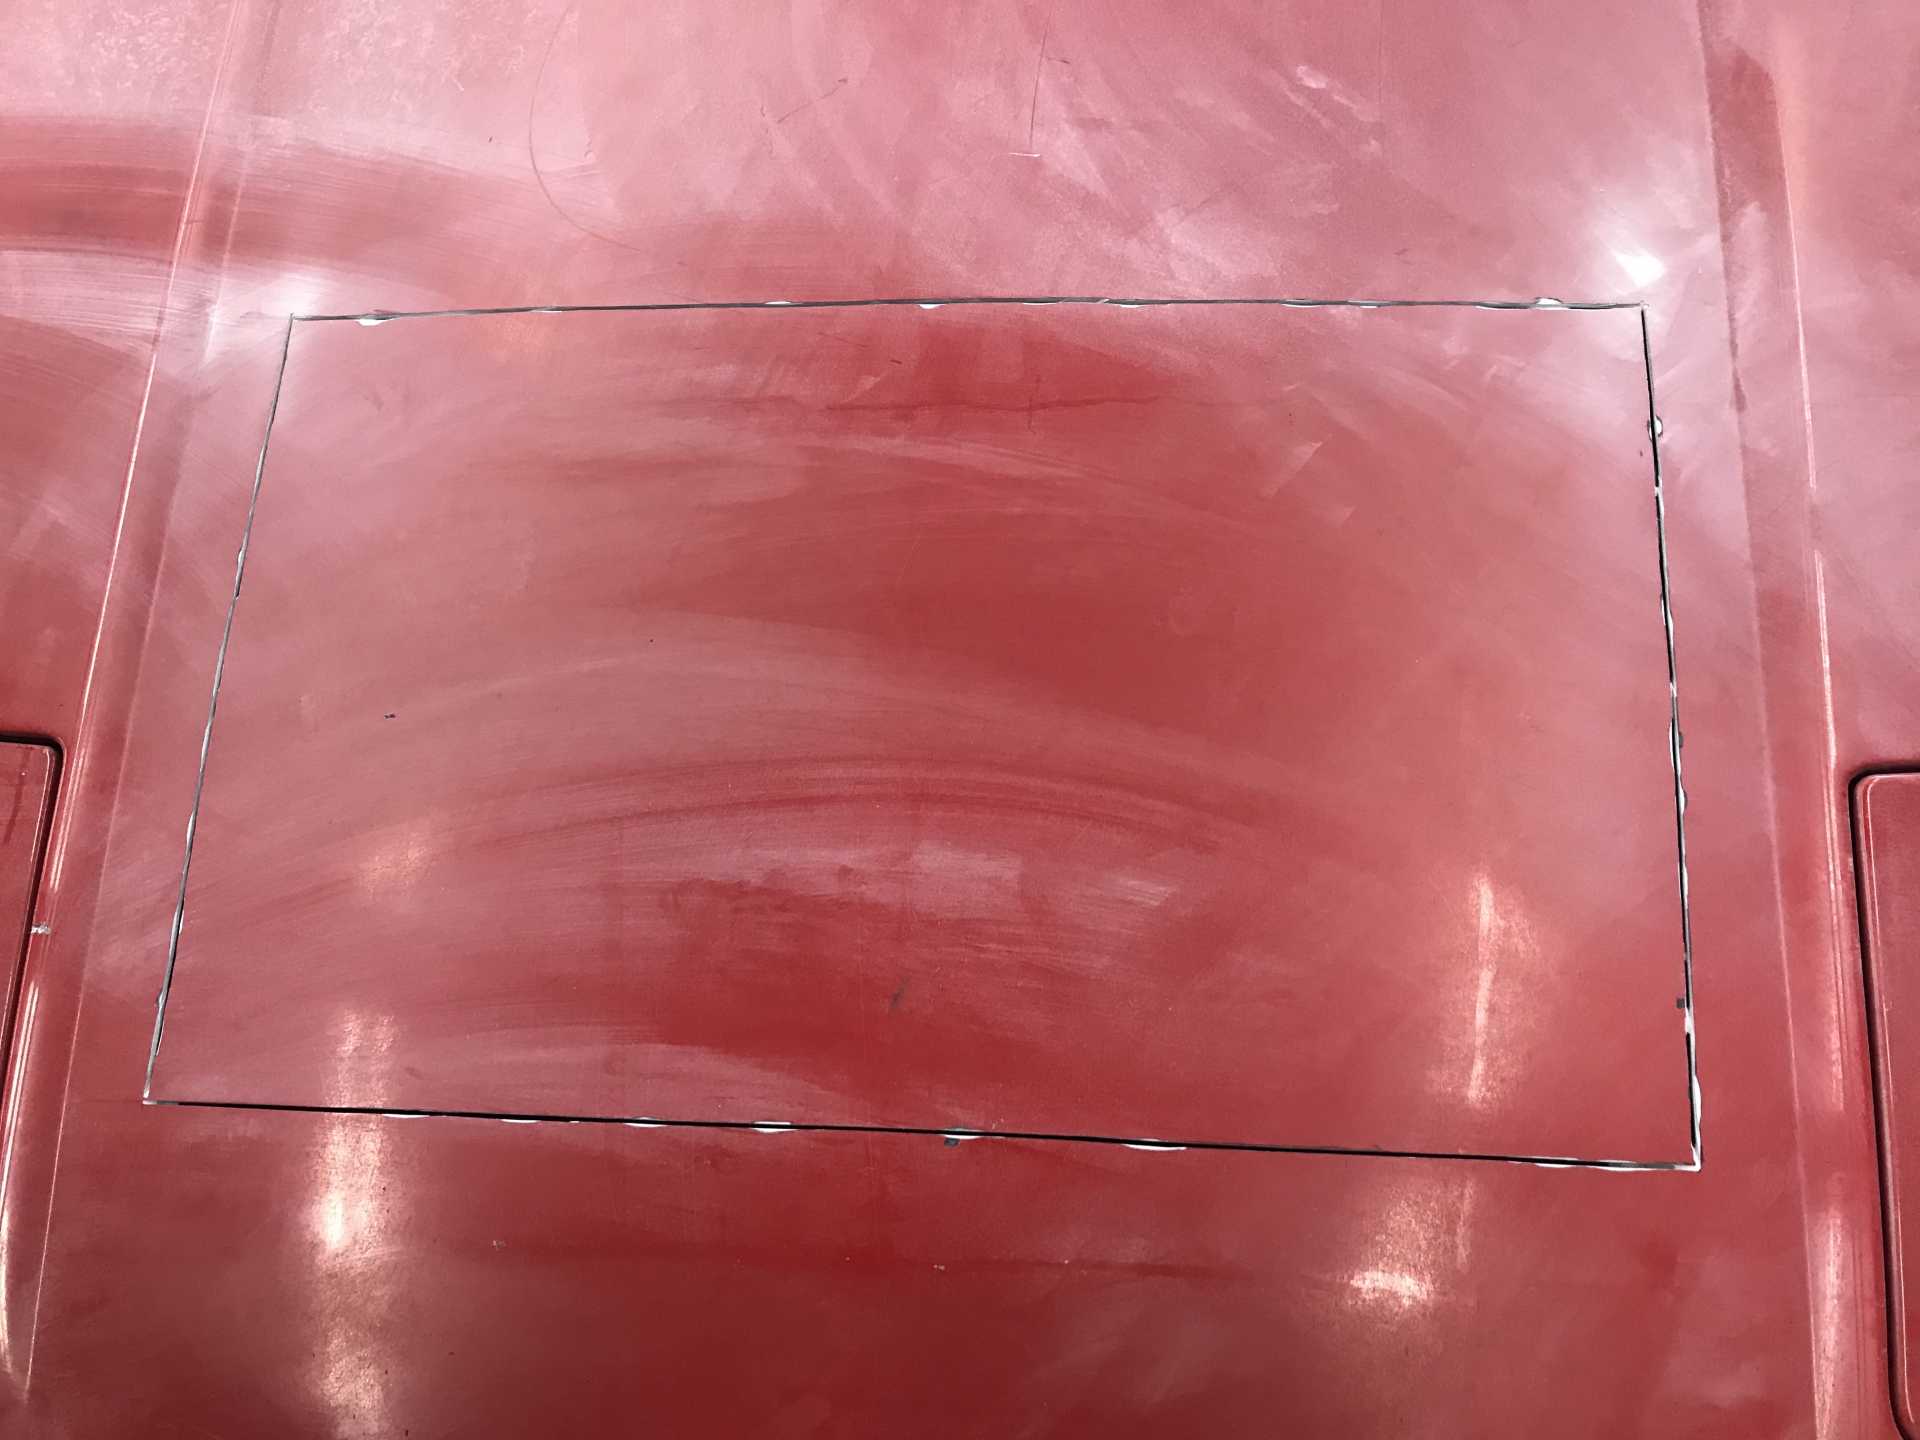
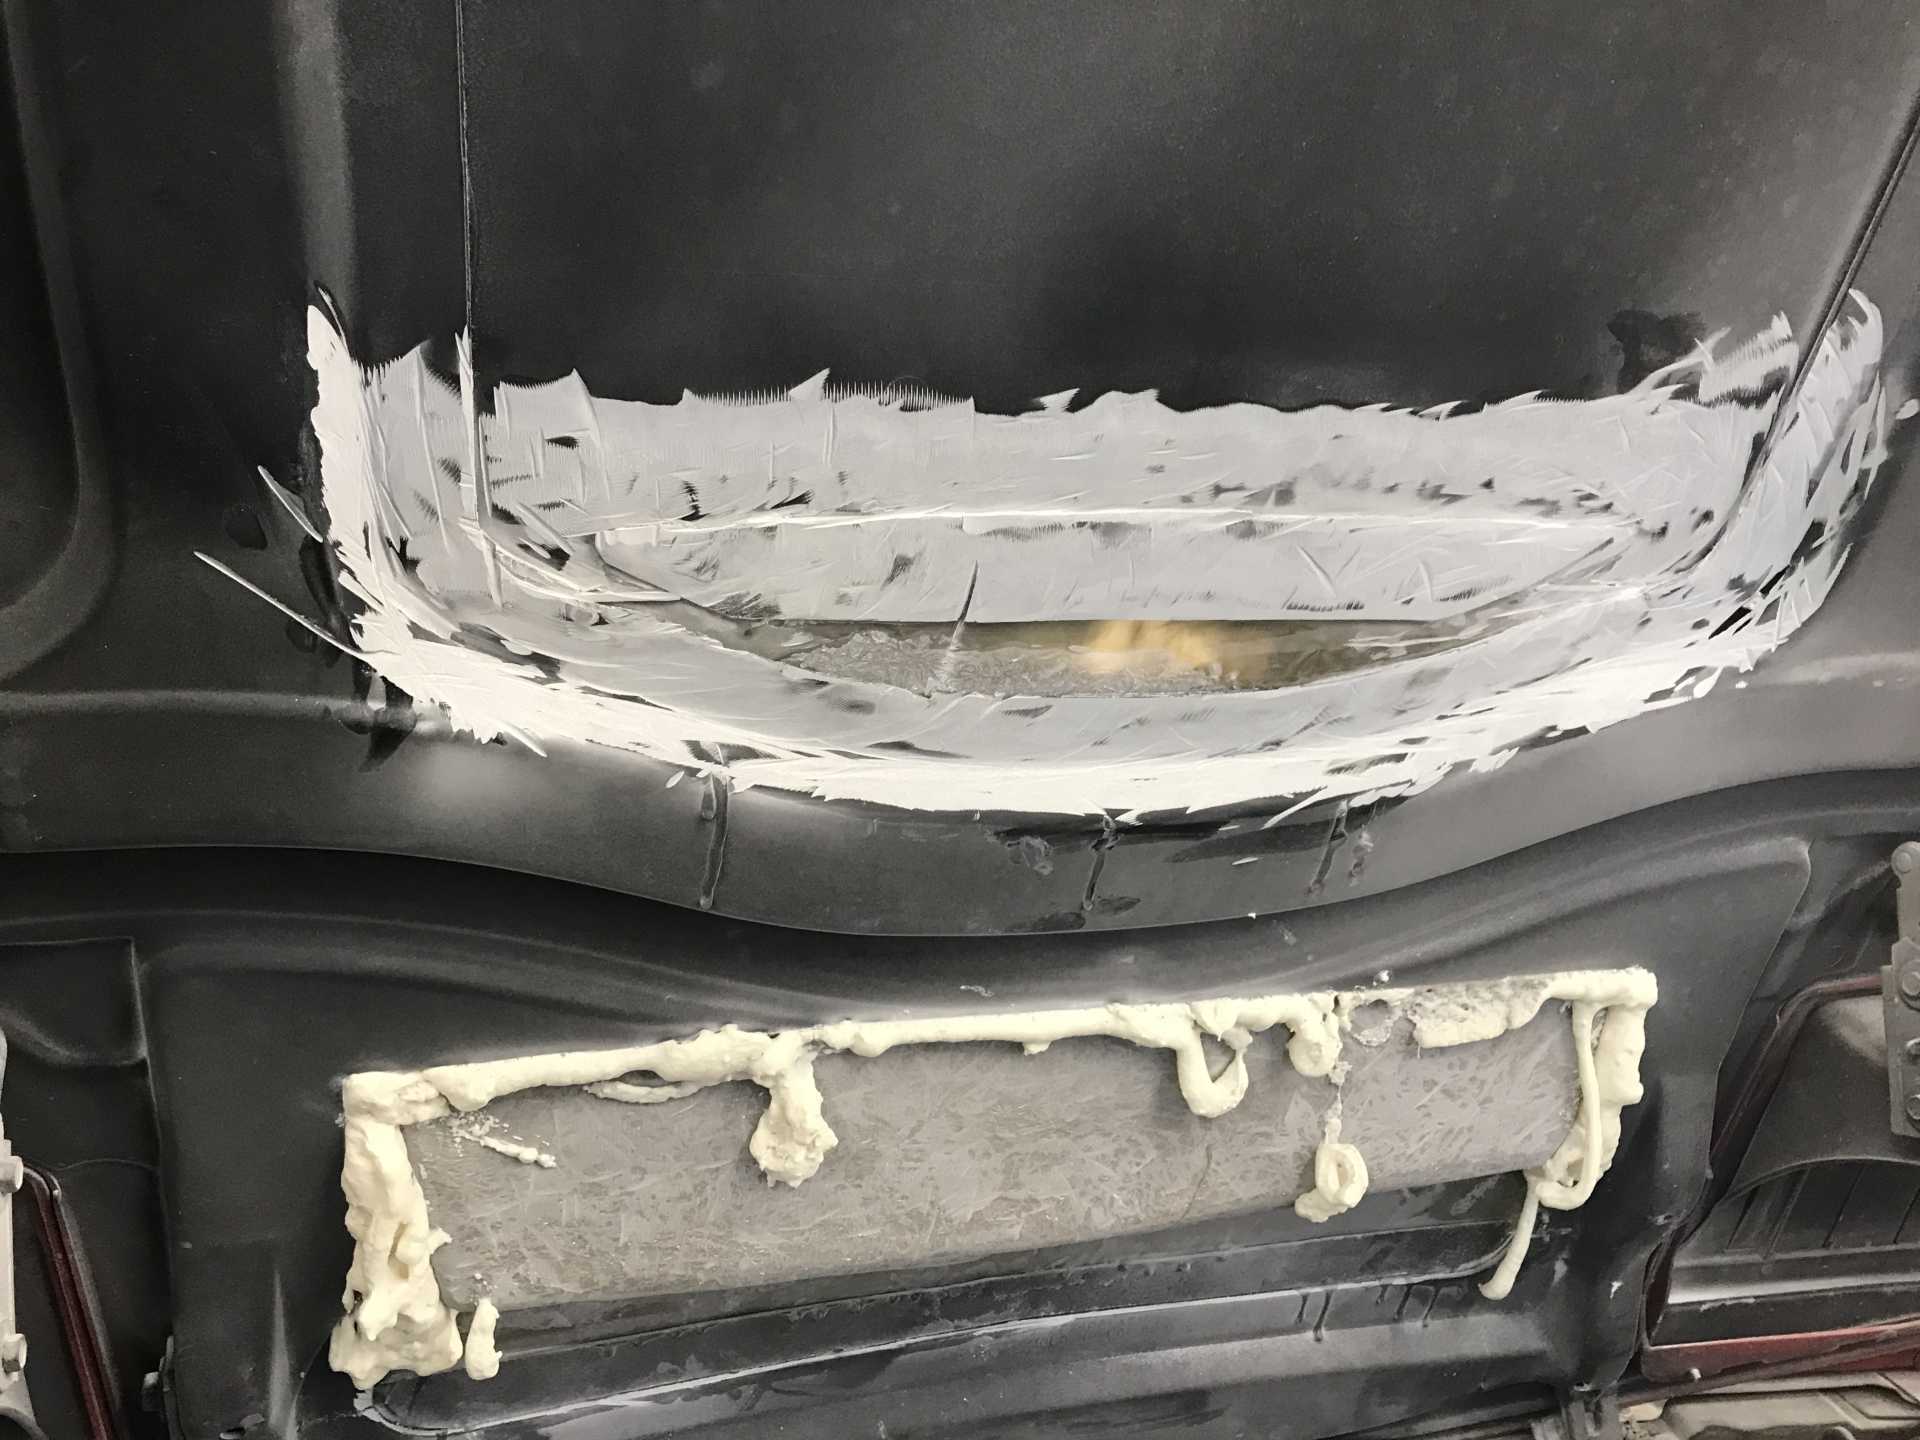
Next using an angle grinder cut through the hood skin only (about 3/16") no deeper or the frame will be weakened.
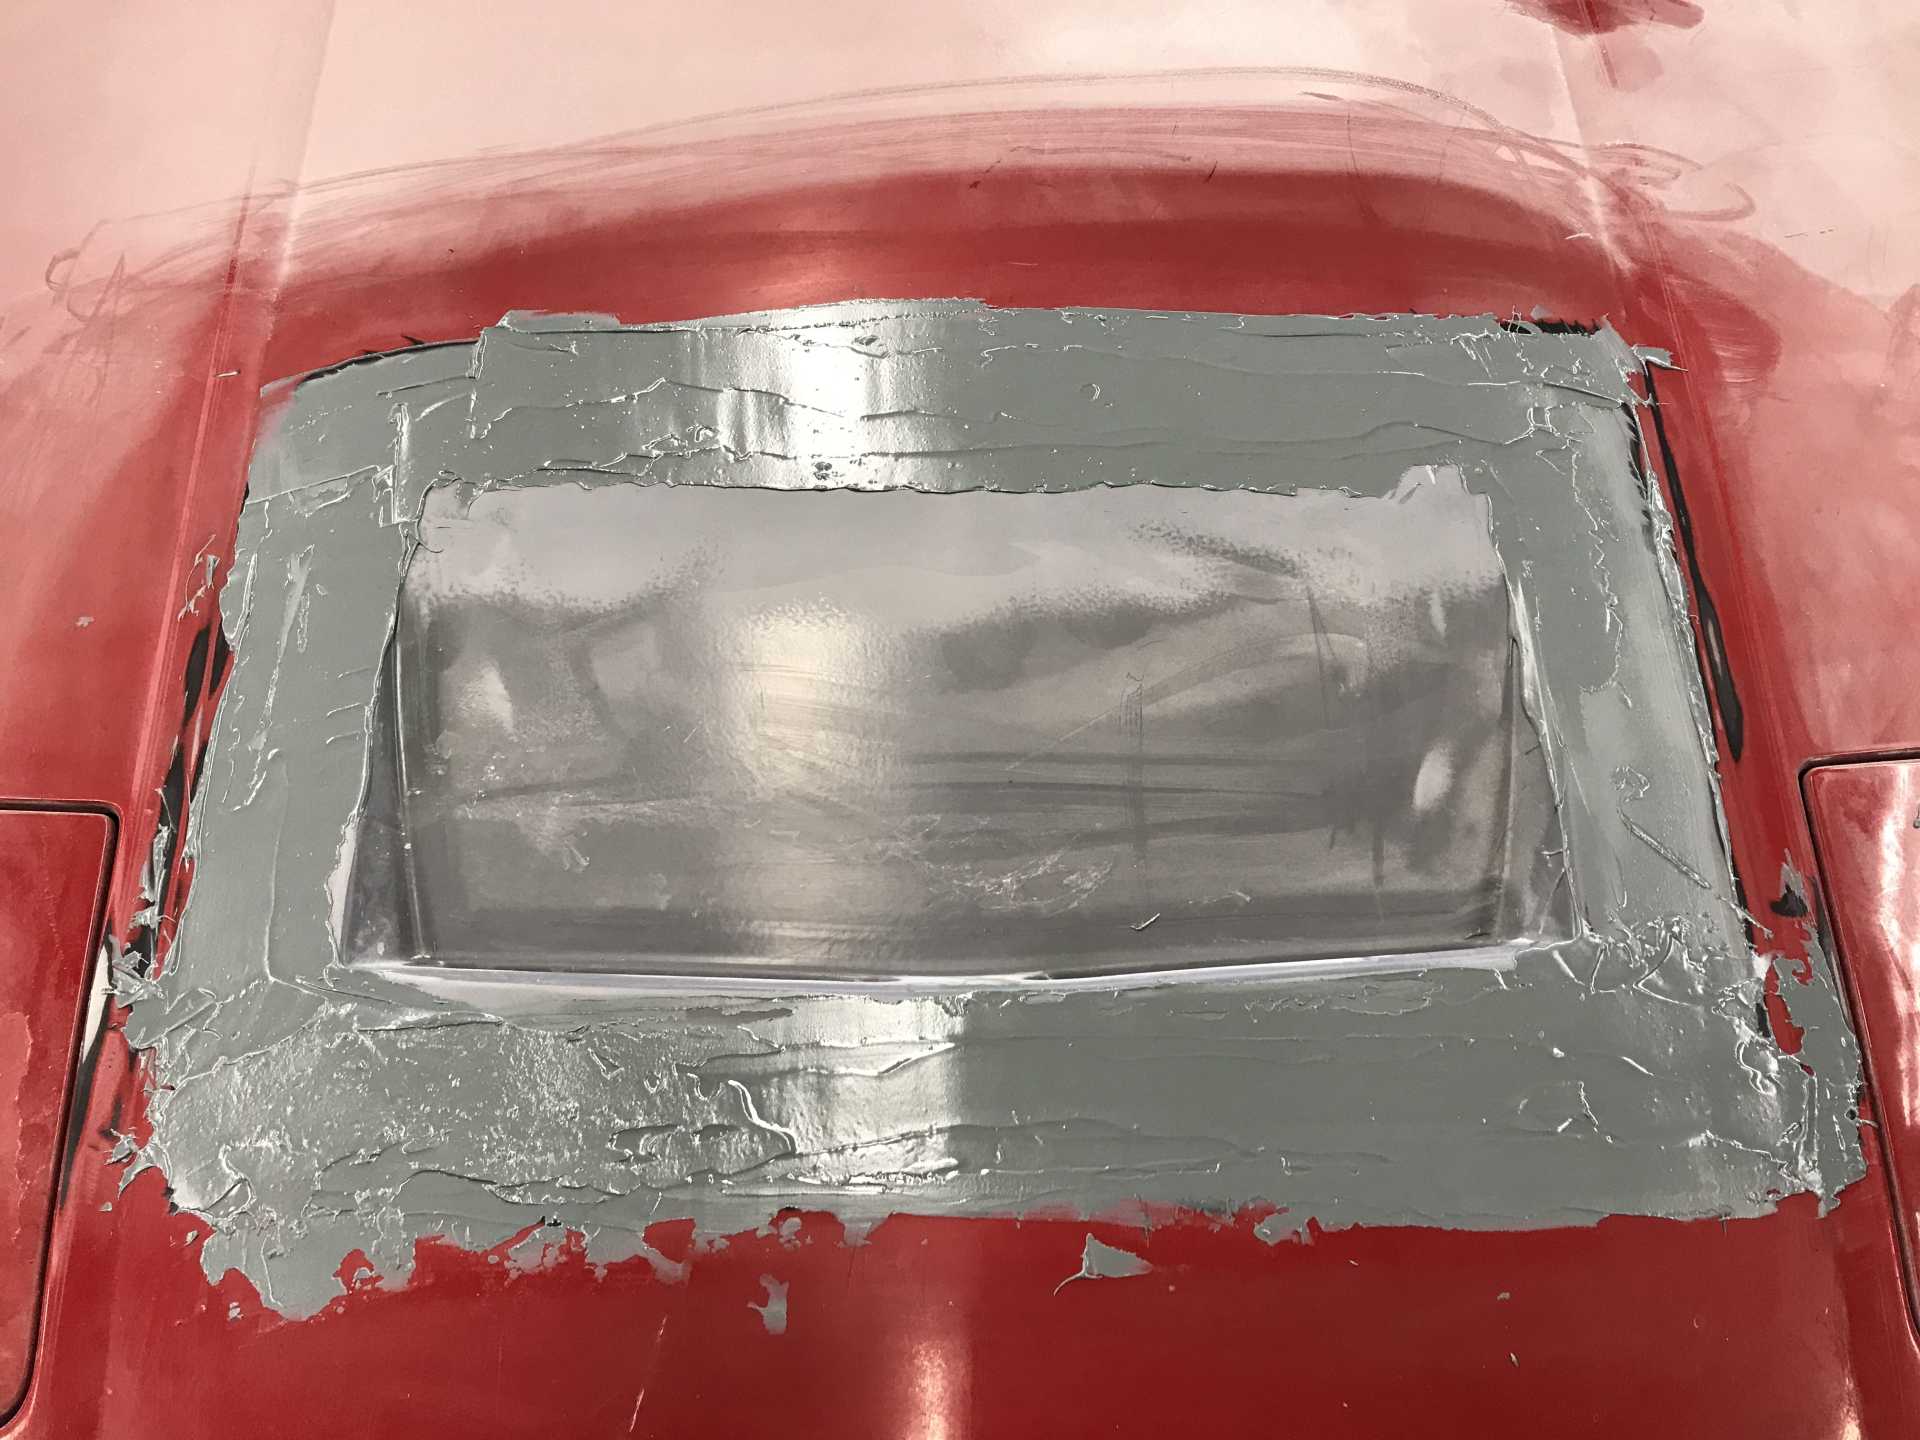
The skin is simply pried off. It is a little bit stubborn, but just keep prying.
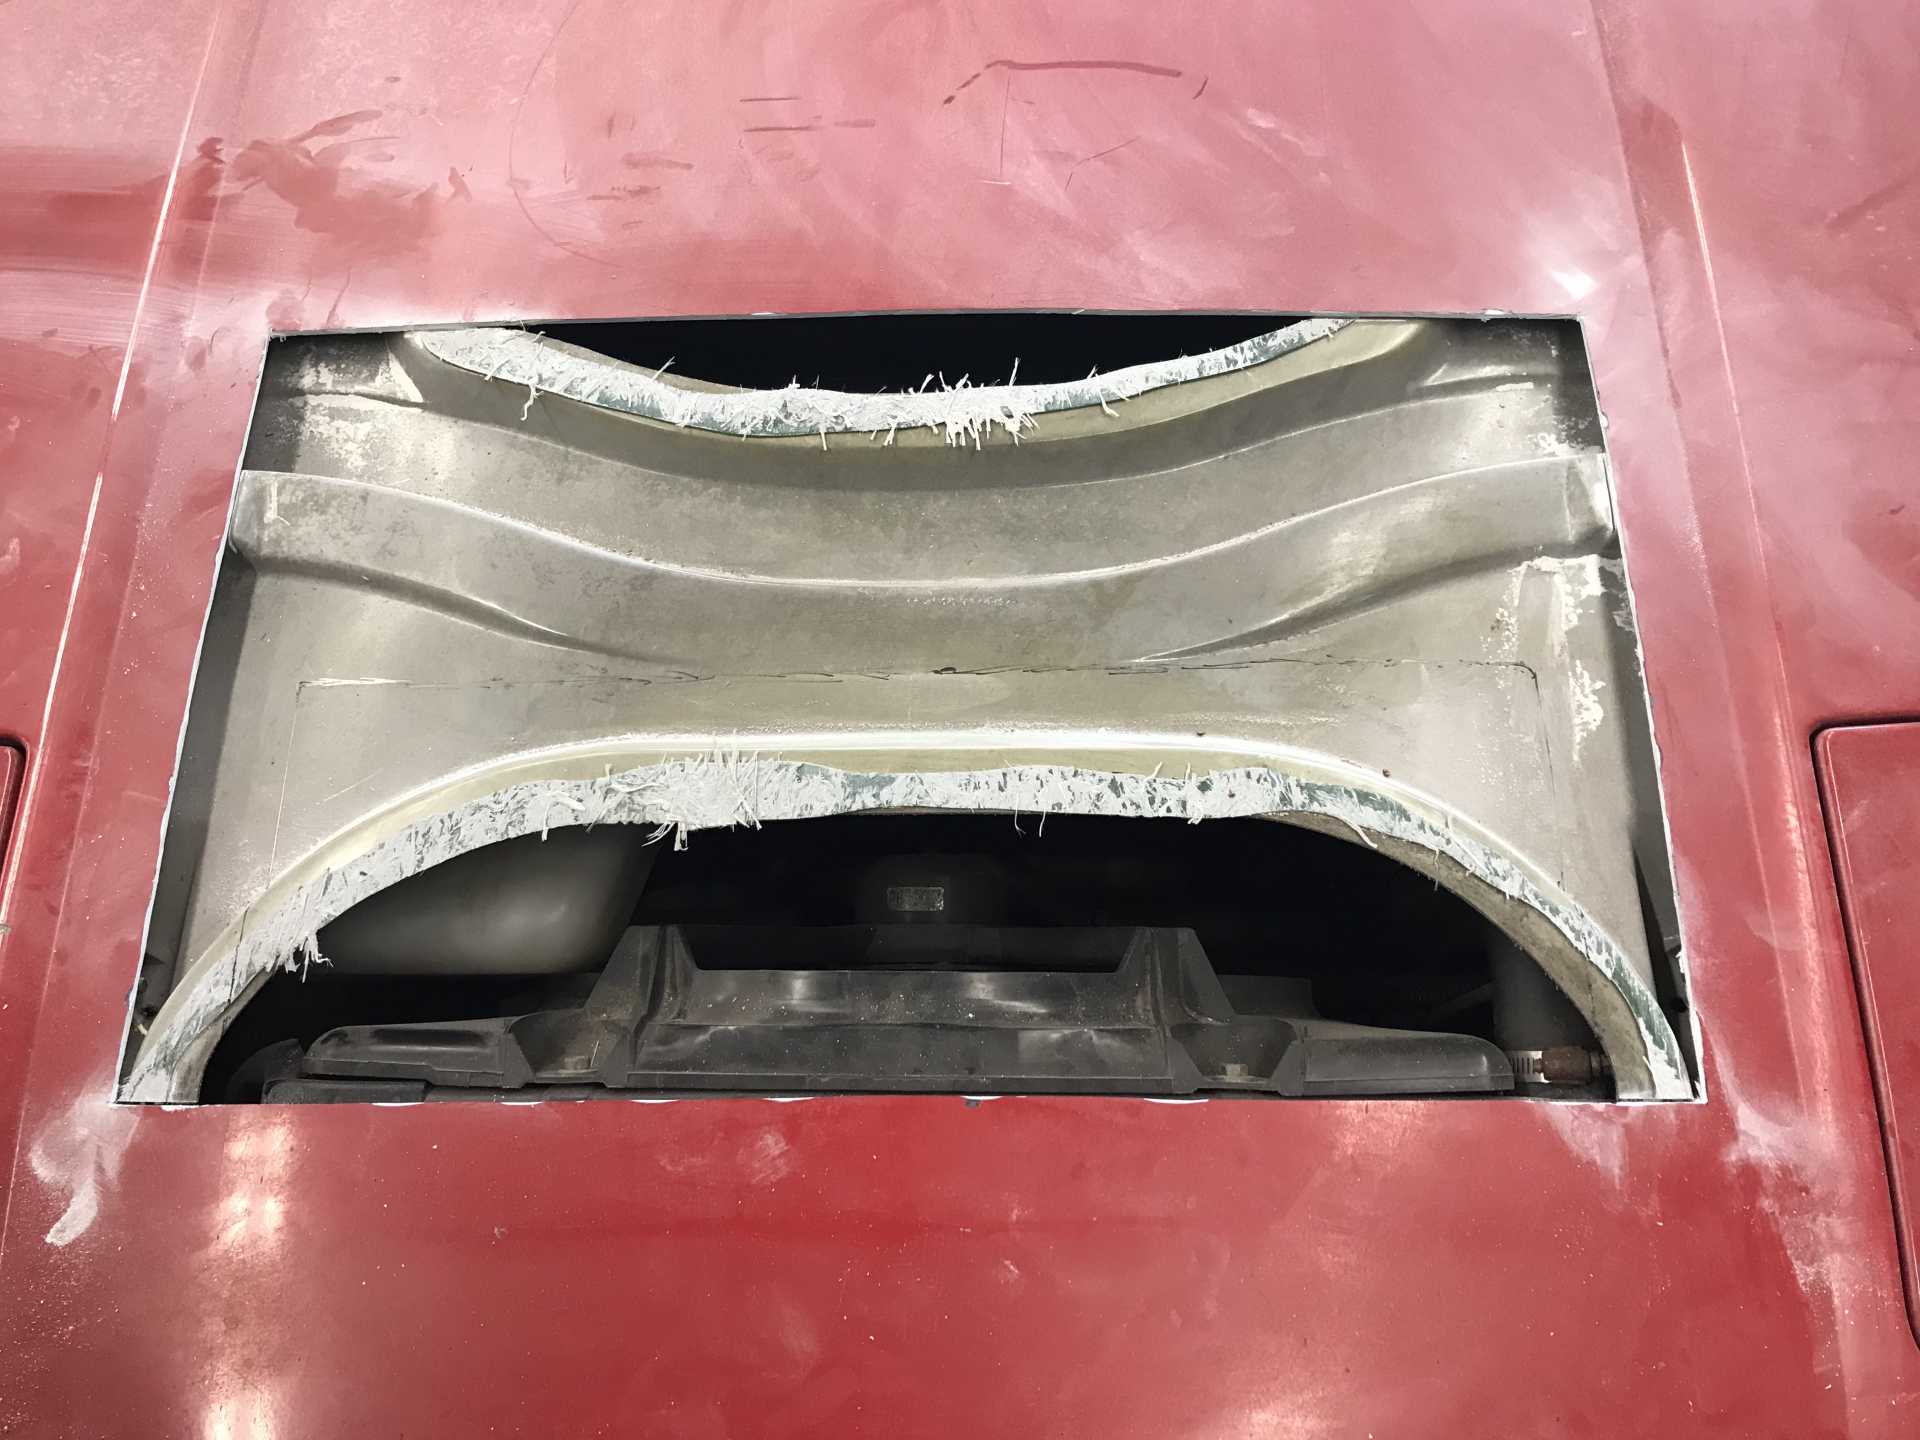
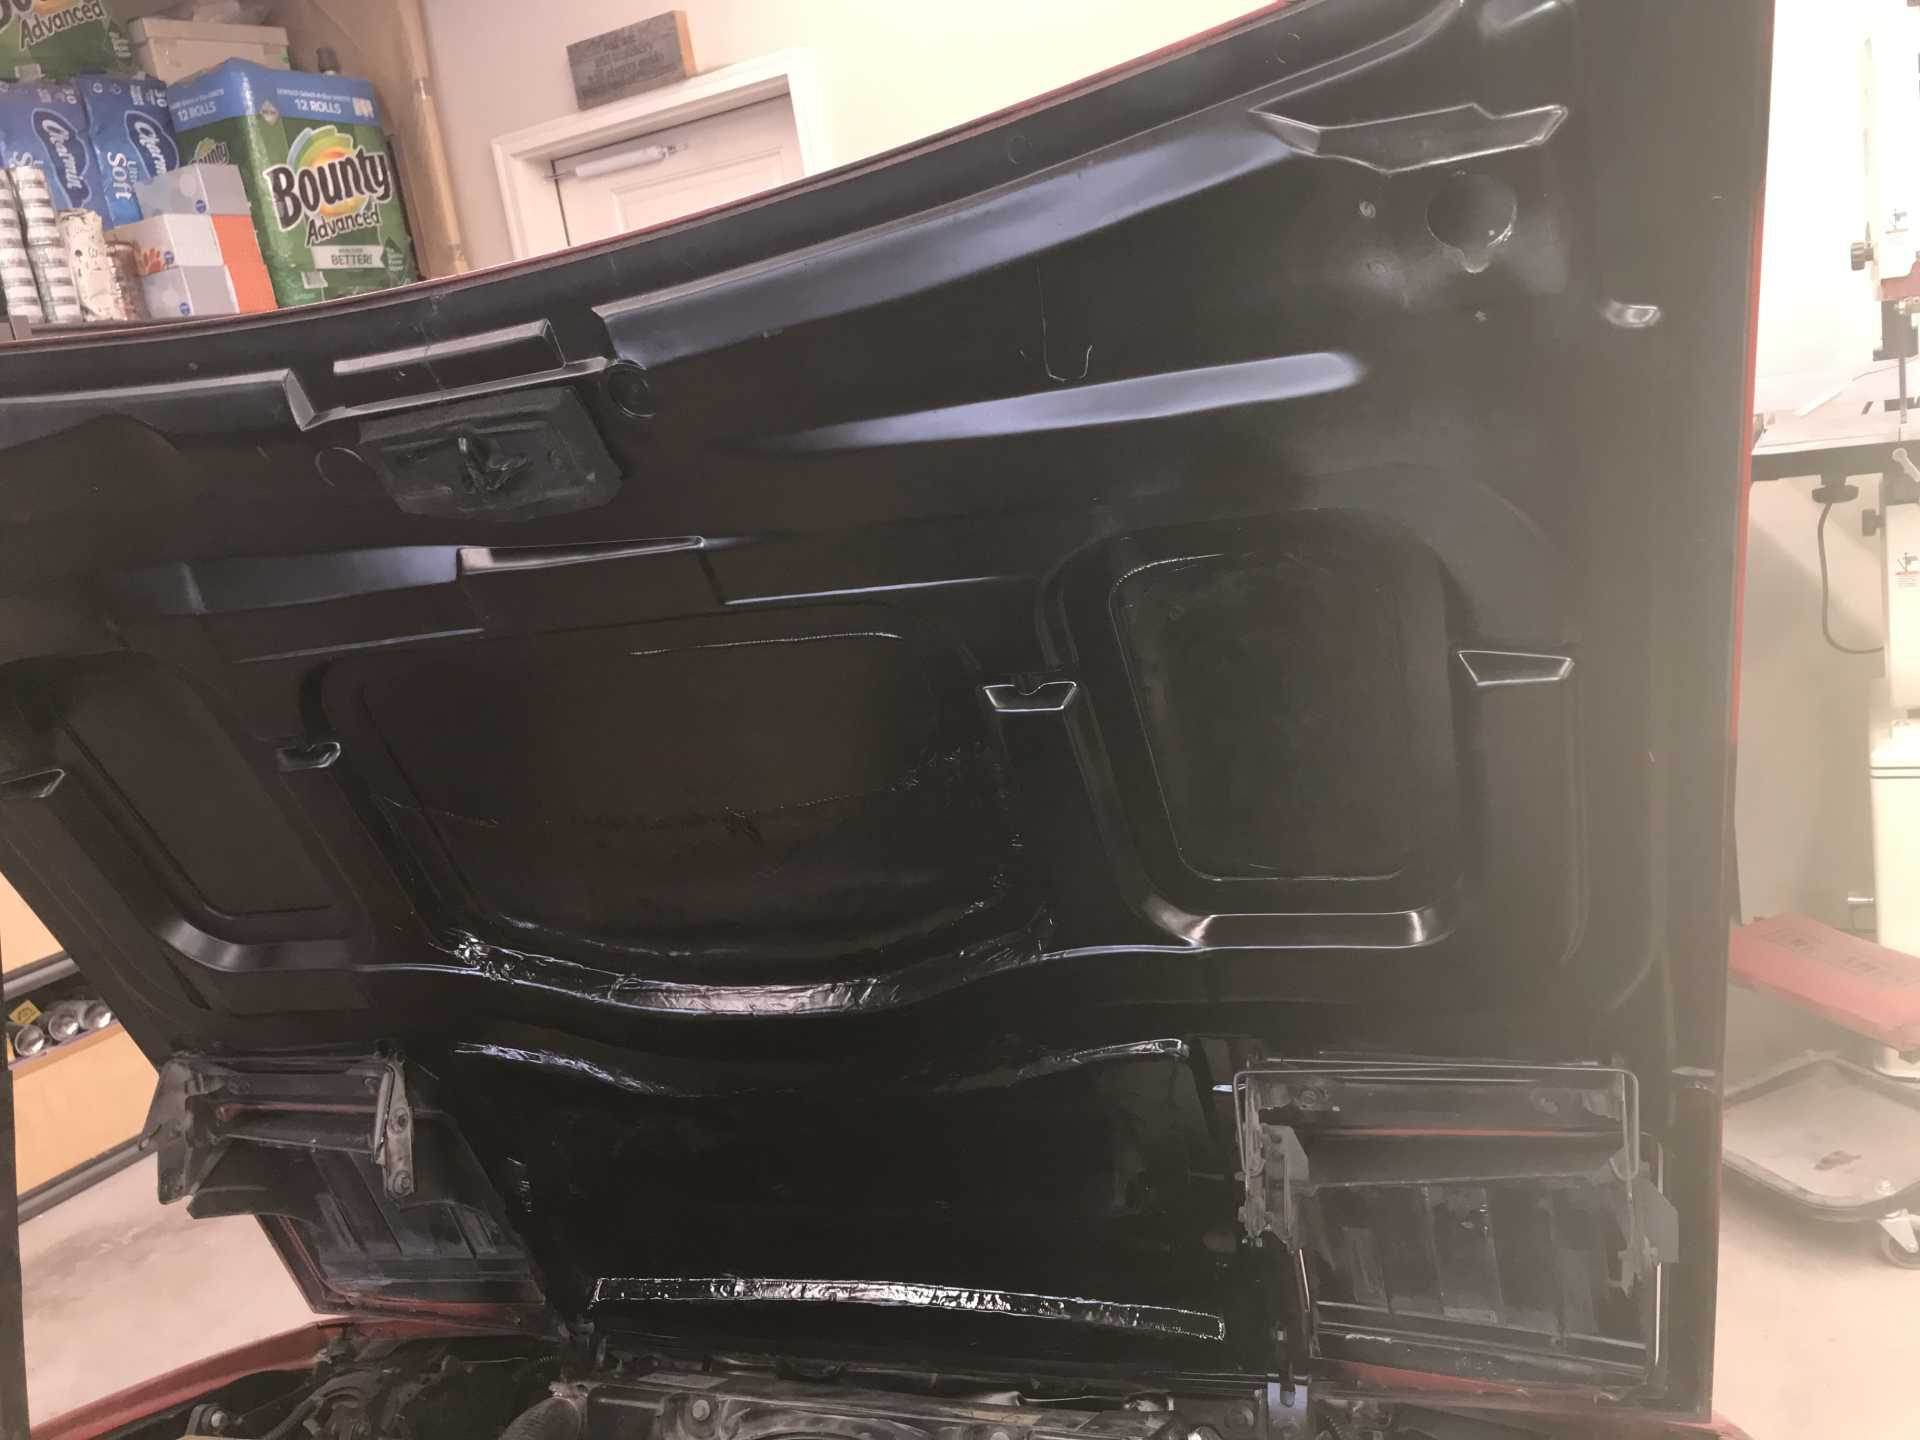
Next the frame is cleaned up and trimmed of the old adhesive and the frame cut to clear the vent.
Now the hood just drops in and the fit is checked. The edges of the joint are beveled to provide room for the filler.
I added flanges to the bottom of the remaining hood skin so there is a positive vertical location for the vent to fit on all four sides.
With the flanges in place I was able to trim the bottom of the vent to have the surface be flush with the hood.
Time to get serious, The vent was resined in place to all the frame and flange contact points. I used weights to make certain all the edges were firmly in place on the frame and flanges. Otherwise there would be more grinding and cutting and dust. This was allowed to sit overnight.
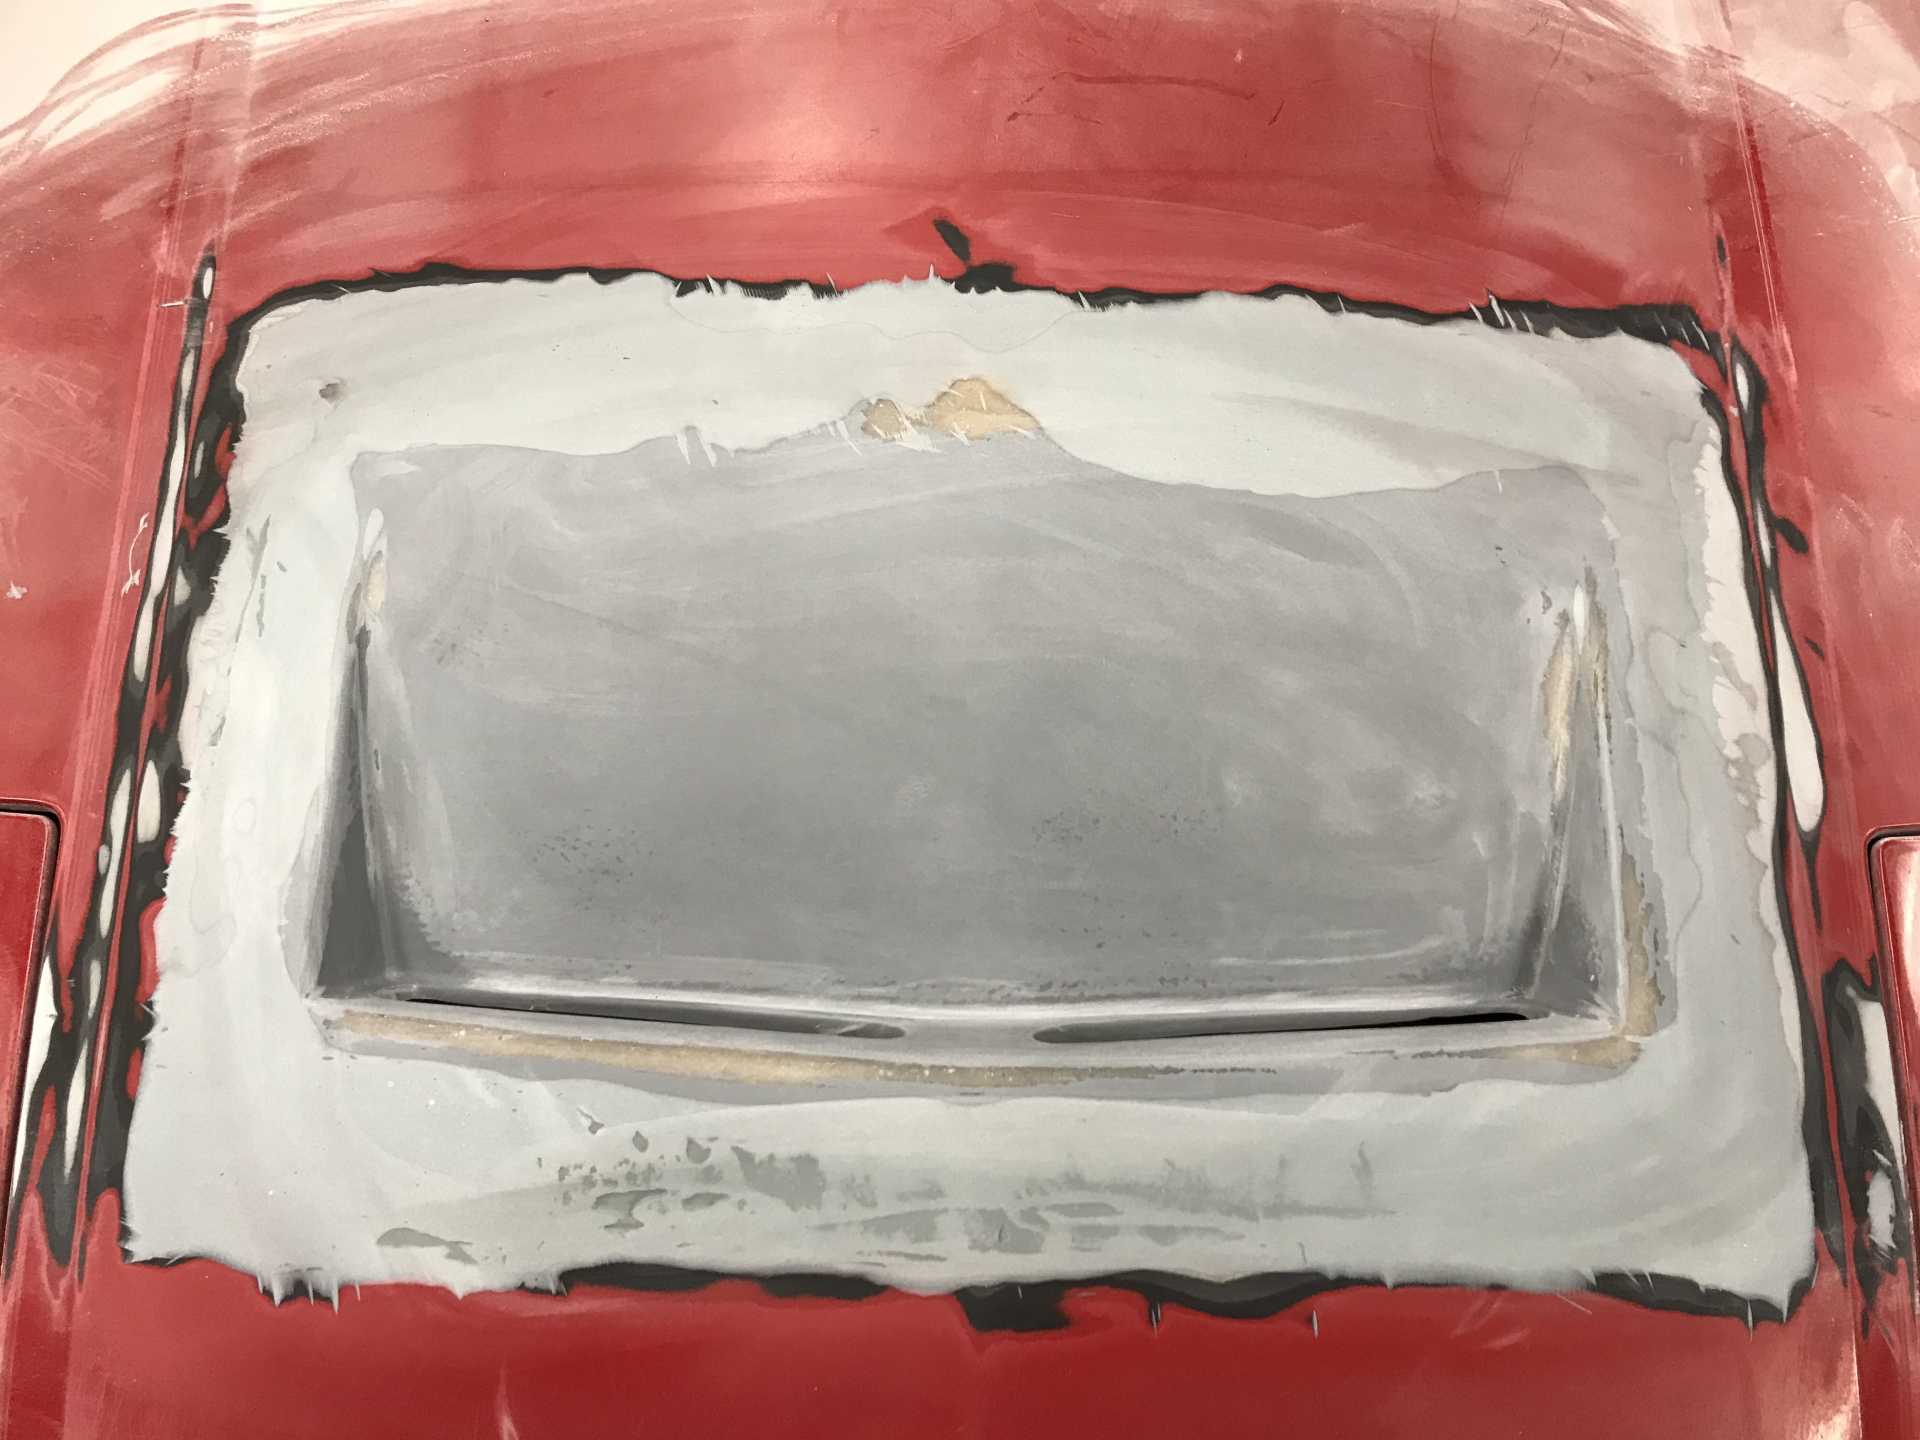
On goes the first coat of filler. It hardens in 5-10 minutes depending on the amount of hardener used.
I waited overnight and then sanded the primer using 120 grit on the orbital.
Then a coating of good primer (from an auto body supply, NOT Rustoleum) was applied to show the problems.
Next was to prep the inside for a layer of glass cloth. This was applied in three strips. In this photo the rearmost section was sanded and the voids around the vent were filled using expanding foam. This foam was then cut off and profiled to make a transition from the vent to the frame.
The first strip of cloth is on place and allowed to harden before trimming the foam and applying the remaining two strips.
After sanding and cleanup the interior was shot with a satin black (same as used on the cradle). It will need more cleanup when I remove the hood for overall painting.
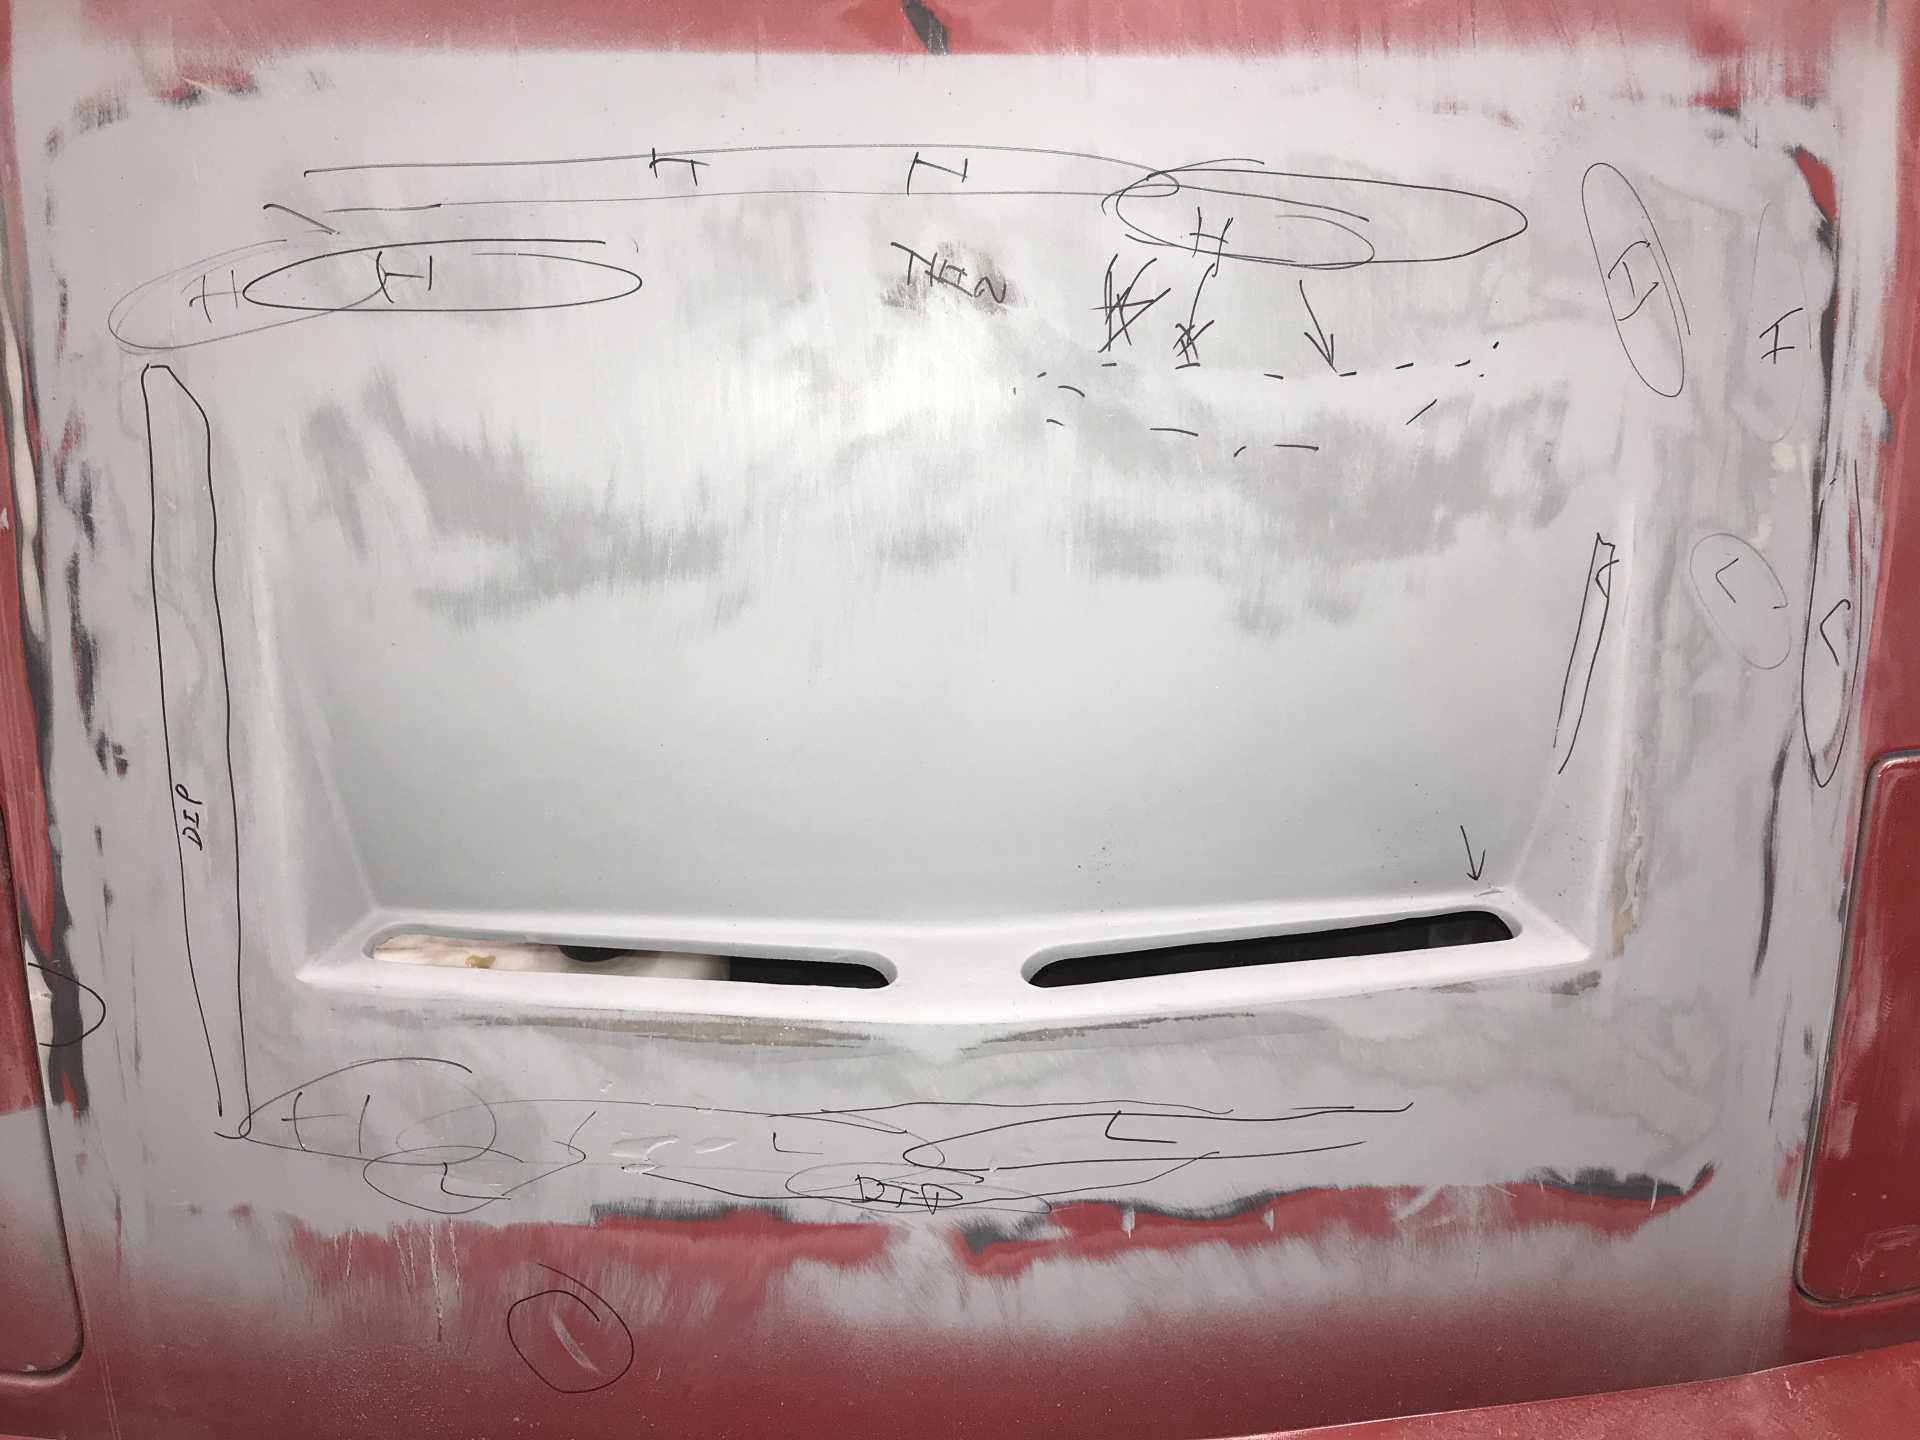
The surface of the hood was marked up for filling in the low spots and sanding the high spots. Actually this was done in two steps with the last one to contour the front of the hood and vent for better appearance. The place marked "dip" needed more than I used to look & feel right. To do this sanding a "flat" sander is used. Just a hard rubber tool or piece of wood to back the paper will sand only the high points. And your fingers will elp you in feeling the highs & lows too.
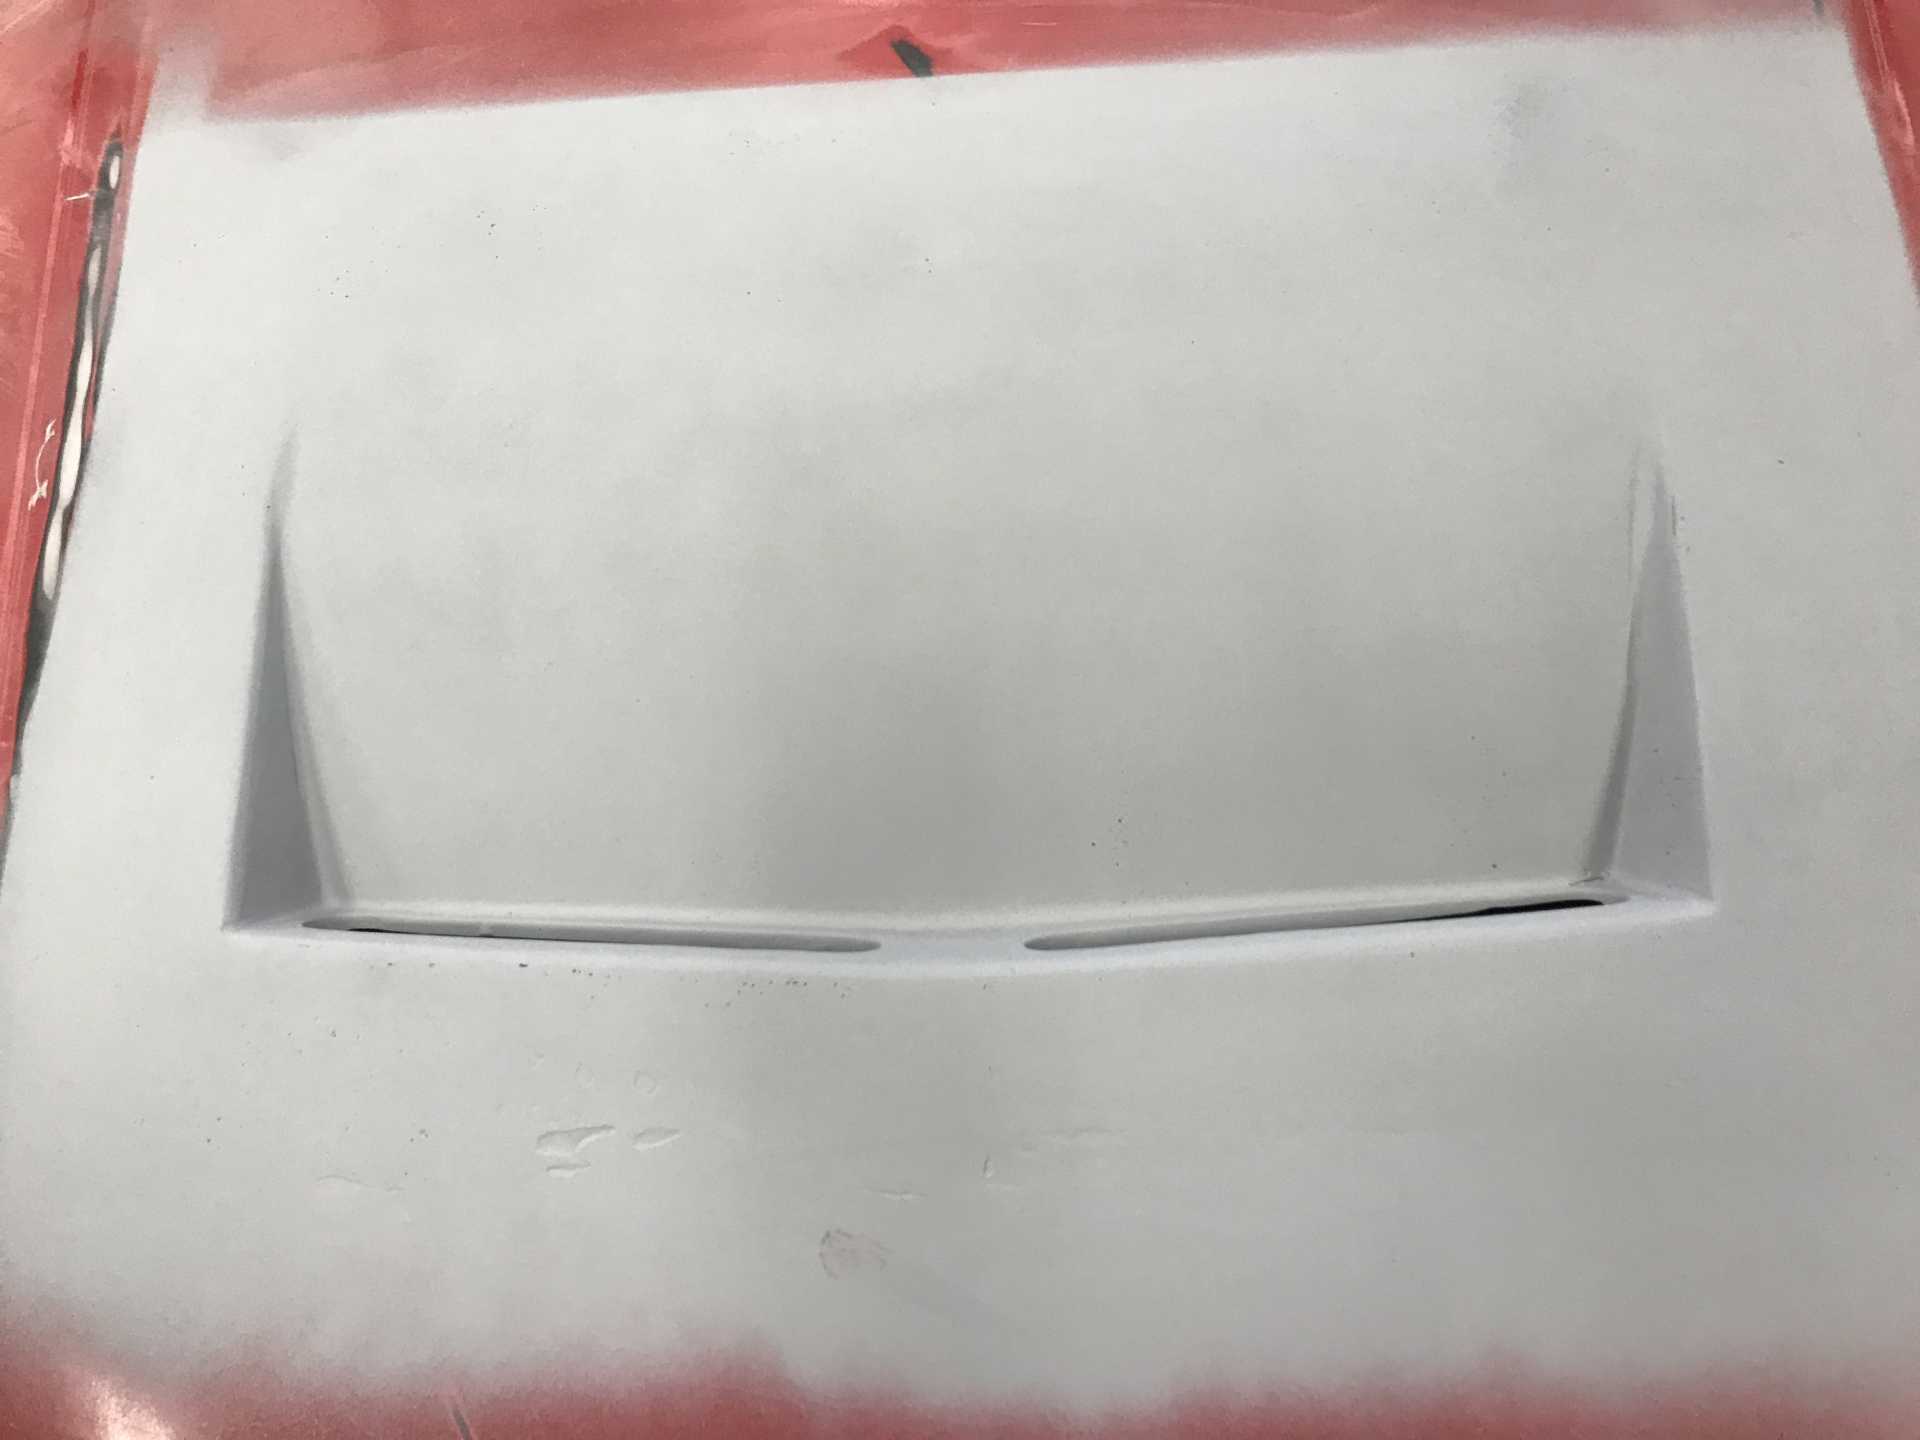
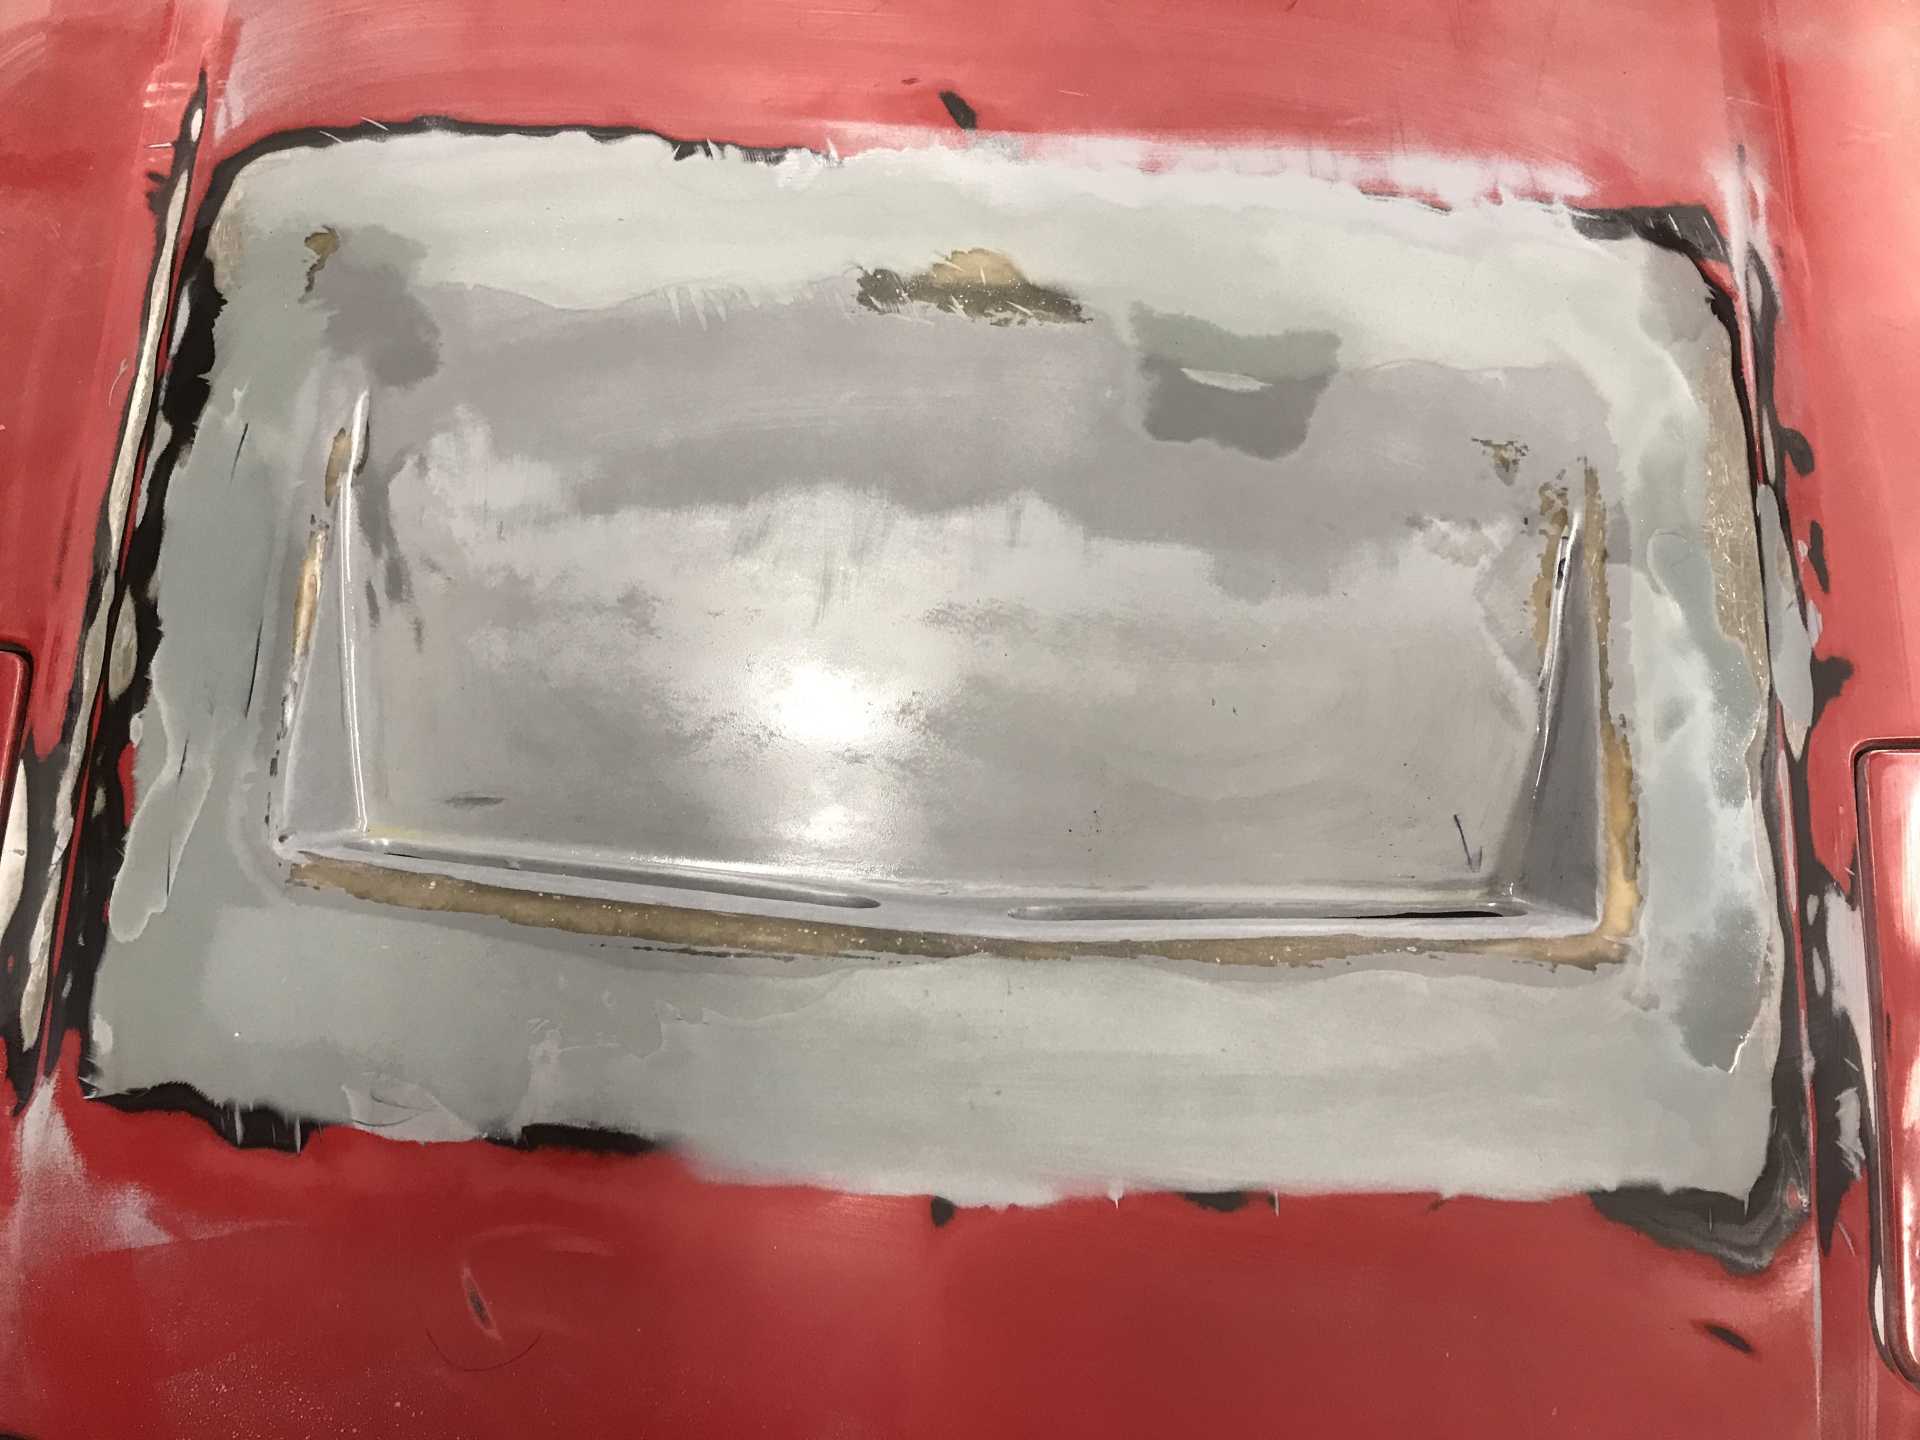
A few hours of sanding later the second coat begins to look & feel better. This has had a coating of adhesion enhancer that gives it the glossy look.
Another coat of primer brings out all the imperfections that will be dealt with later, but it is beginning to look like it should.
Still have more cleanup to do, but this will wait for the final body prep.
This is the filler I used it is a bit more flexible than others and is similar hardness as the panel materinal so it sands evenly and feathers very well.
I've also trimmed and installed the trunk carpet to fit the shallower rear trunk and it looks ok.
Finally I am making progress on the misfire. I bought three new plug coils and installed them a few days ago. That made a big difference in the performance. I decided to buy another three which should show up next week. They are Spectra Premium C-761 exact replacements. Bought 3 from Amazon and they were $22 each, total with tax was $72 (I'm a Prime member so no shipping charge). Went back to buy the remainder and the price had jumped to $92! All I can say is beware of greedy Amazon sellers. I found the same exact parts on RockAuto for $61 including shipping.
[This message has been edited by MikesFirstFiero (edited 01-21-2022).]
Installing the last three spark coils did help but didn't solve the issue. It is more driveable than before but... Today i made a change to the fuel pump power feed as an experiment. On the impala the fuel pump is used to operate the Evap, Gas gauge and Fuel pump. The pump is driven by a Pulse Width Modulation scheme in the Chassis Control Module. It switches the pump on and many times per second. The amount of time On-vs-Off determines the output pressure. Measuring pump voltage it shows 3.6VAC and 4.8V DC. This means the pump is powered less than 50% of the time. With PWM control you can achieve extremely fine control of the motor. It is similar the method I used to operate 75HP elevator motors.
The pump pressure typically runs about 45PSI no matter what. this car has a pressure sensor after the Corvete fuel filter that includes a pressure regulator (I used a Wix). The first step was to cut the wire feeding the pump from the CCM and connect the pump to the +12V Hot-in-Run power temporarily. That made an immediate improvement. The pressure to the fuel injection pump on the engin under all conditions ranges between 57 an 59 PSI.
It now idles and runs much better but it's still not completely right at high RPM and full throttle. Next step will be to have the injectors cleaned or replaced. Depends on the cost. Bill at Mr.Injector in Coeur D'Alene has the equipment to test and clean the Direct Injection parts. I'll stop by and see what he can do. In the mean time I'll find an unused fuse in the block and run a power wire to the fuel pump directly. For my test i used an inline 15A 3AG fuse that worked fine.
One thing seems to be true about these new electronic controlled engines is that they produce lutstanding good power for their size but they require much closer control of the operating parameters of air, spark, fuel and timing. From what I read the latest engine and transmission controls are even more locked down and it is not easy for anyone to work on them other than putting in a factory exact replacement part (which needs the car VIN in it or no go). In a few years tuning an engine will be a lot more difficult and costly.
[This message has been edited by MikesFirstFiero (edited 01-27-2022).]
It does not have the manual shift option as far as I can tell. It also does not have push button start or a FOB. I am hoping that it will be easier to work with than the later years.