I and my wife moved back to the US after spending 12 years in Malaysia, I was an elevator controls designer over there. I finally decided to retire and do nothing too serious. Well that lasted for about a year and then we bought a house and I had three car garage and one car. So I setup a garage wood shop and built drawers for cabinets, a headboard, a kids rocking horse, chairs and cutting boards. Life was OK but not too complicated. Then a good friend called me and said he knew of a 1988 Fiero that was originally a 2M4, now swapped to a 2.8 with an A/T, but it did not run. And it's been sitting for ten years mostly in a garage. It's only $1K and the car is "complete" meaning all the parts are there, good or not, has 20 year old tires and flaking paint. On the good side it has a factory shop manual and it's red.
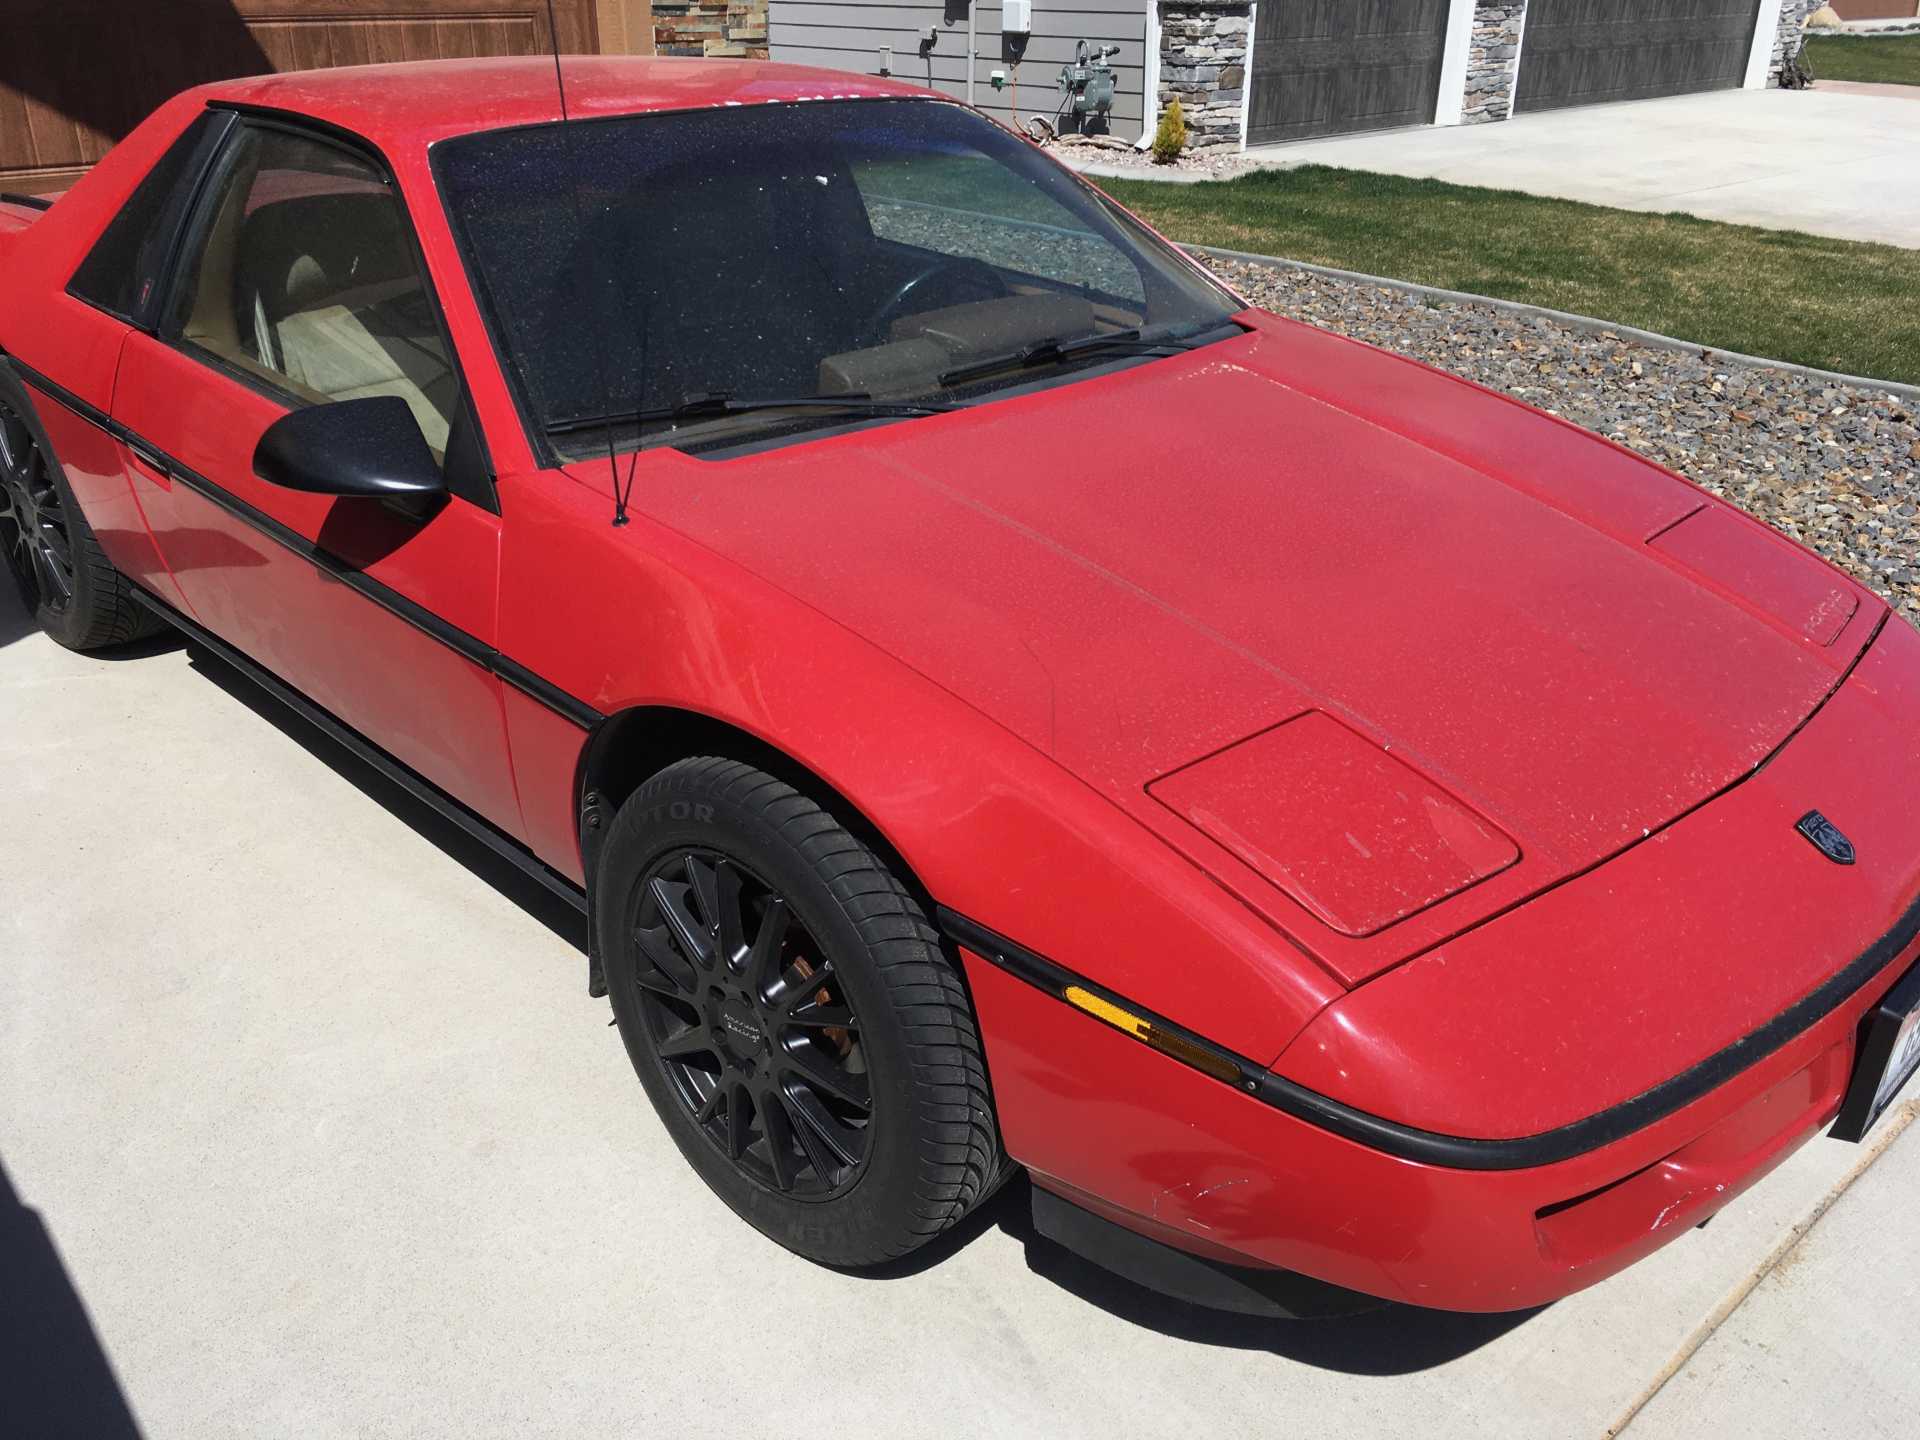
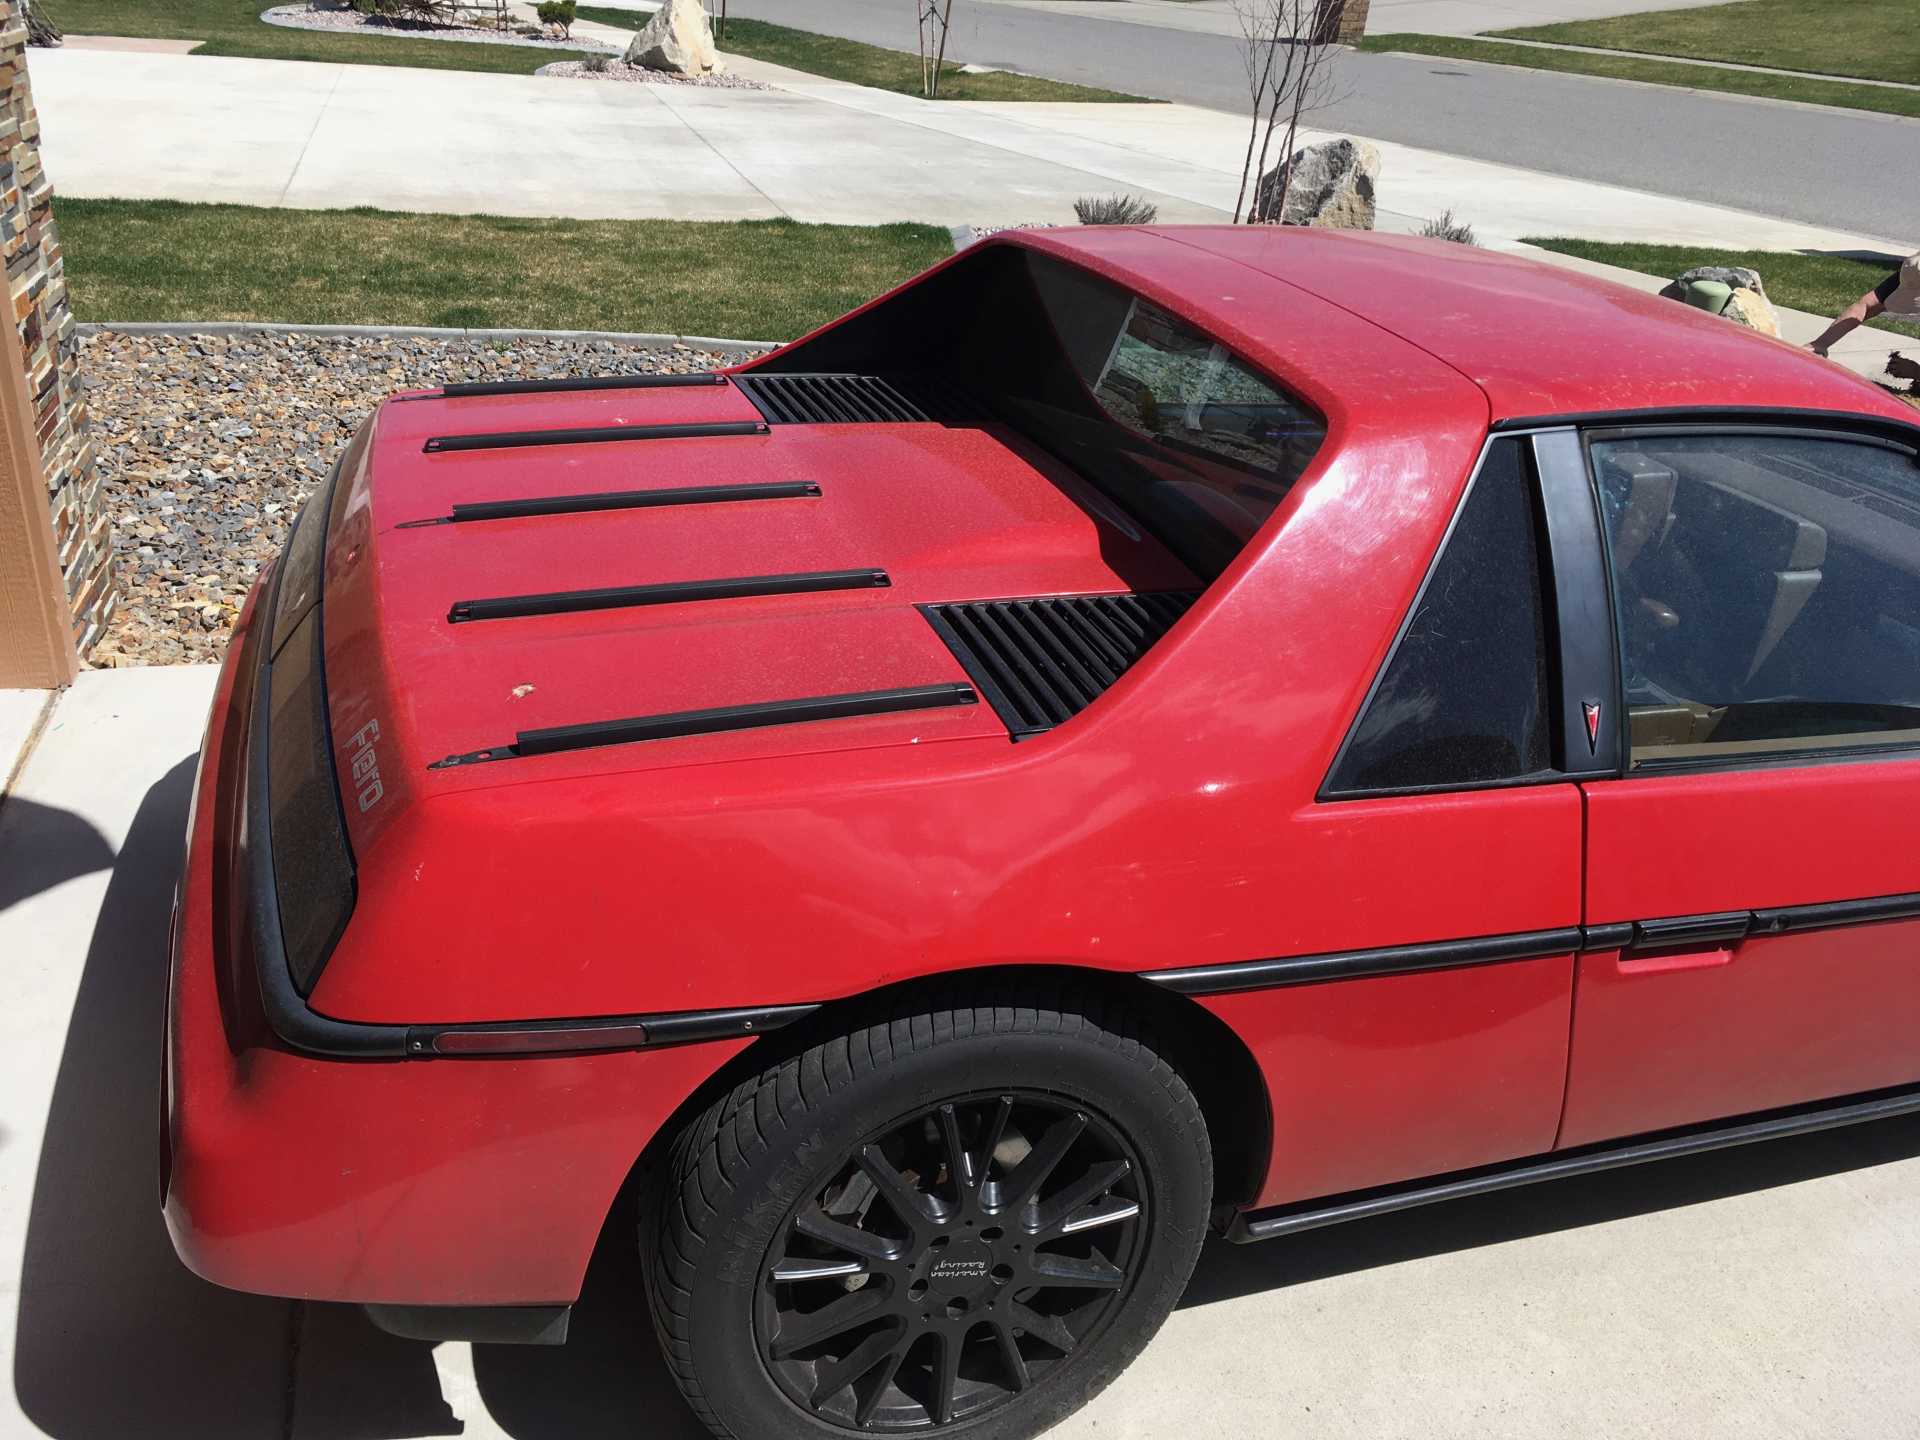
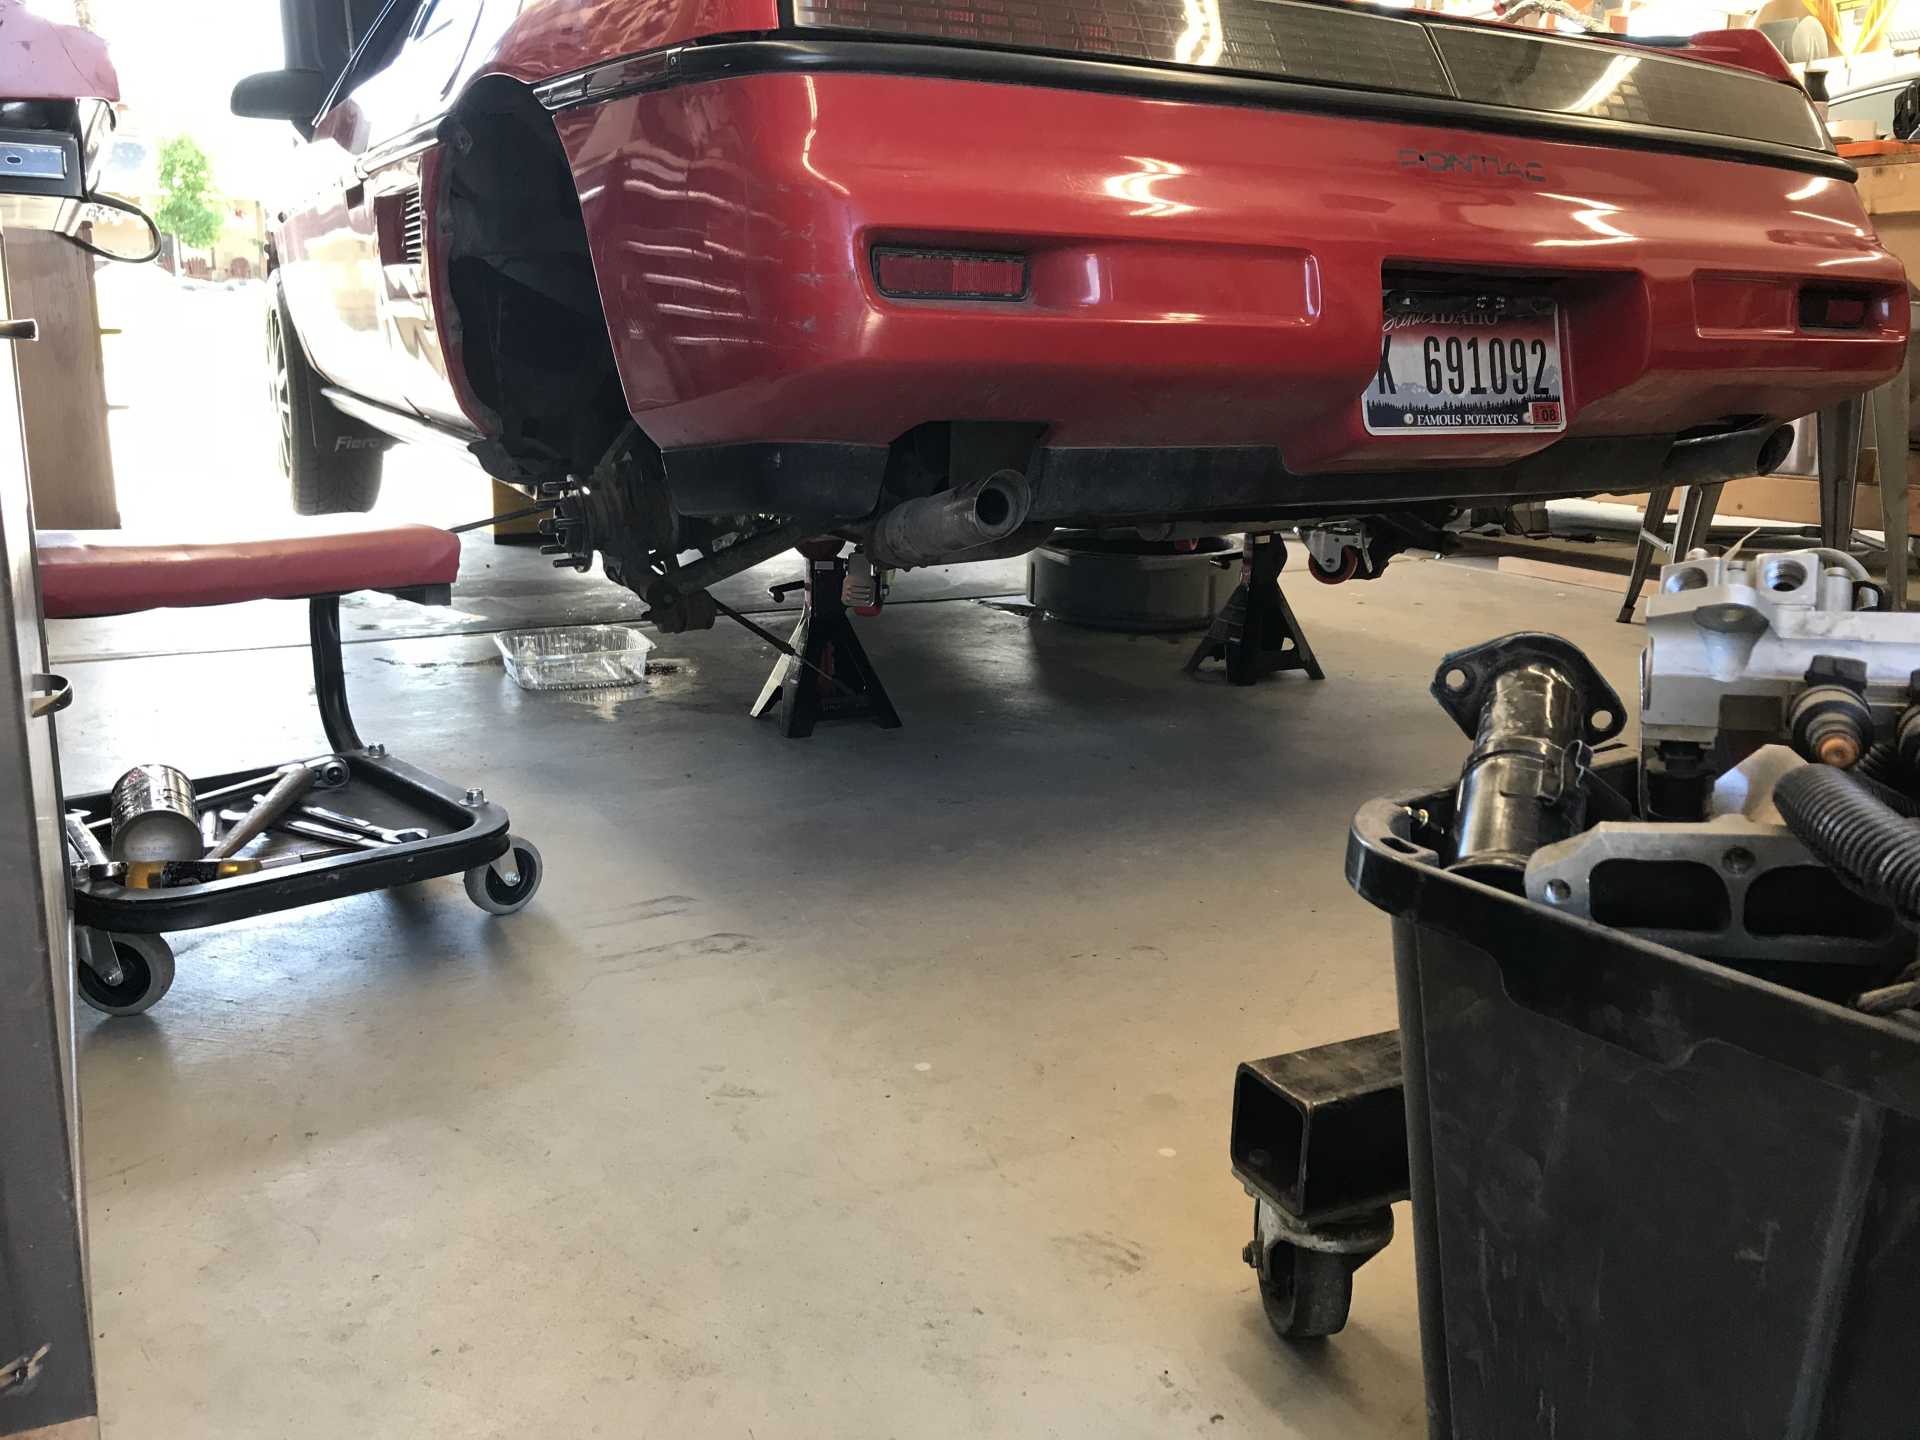
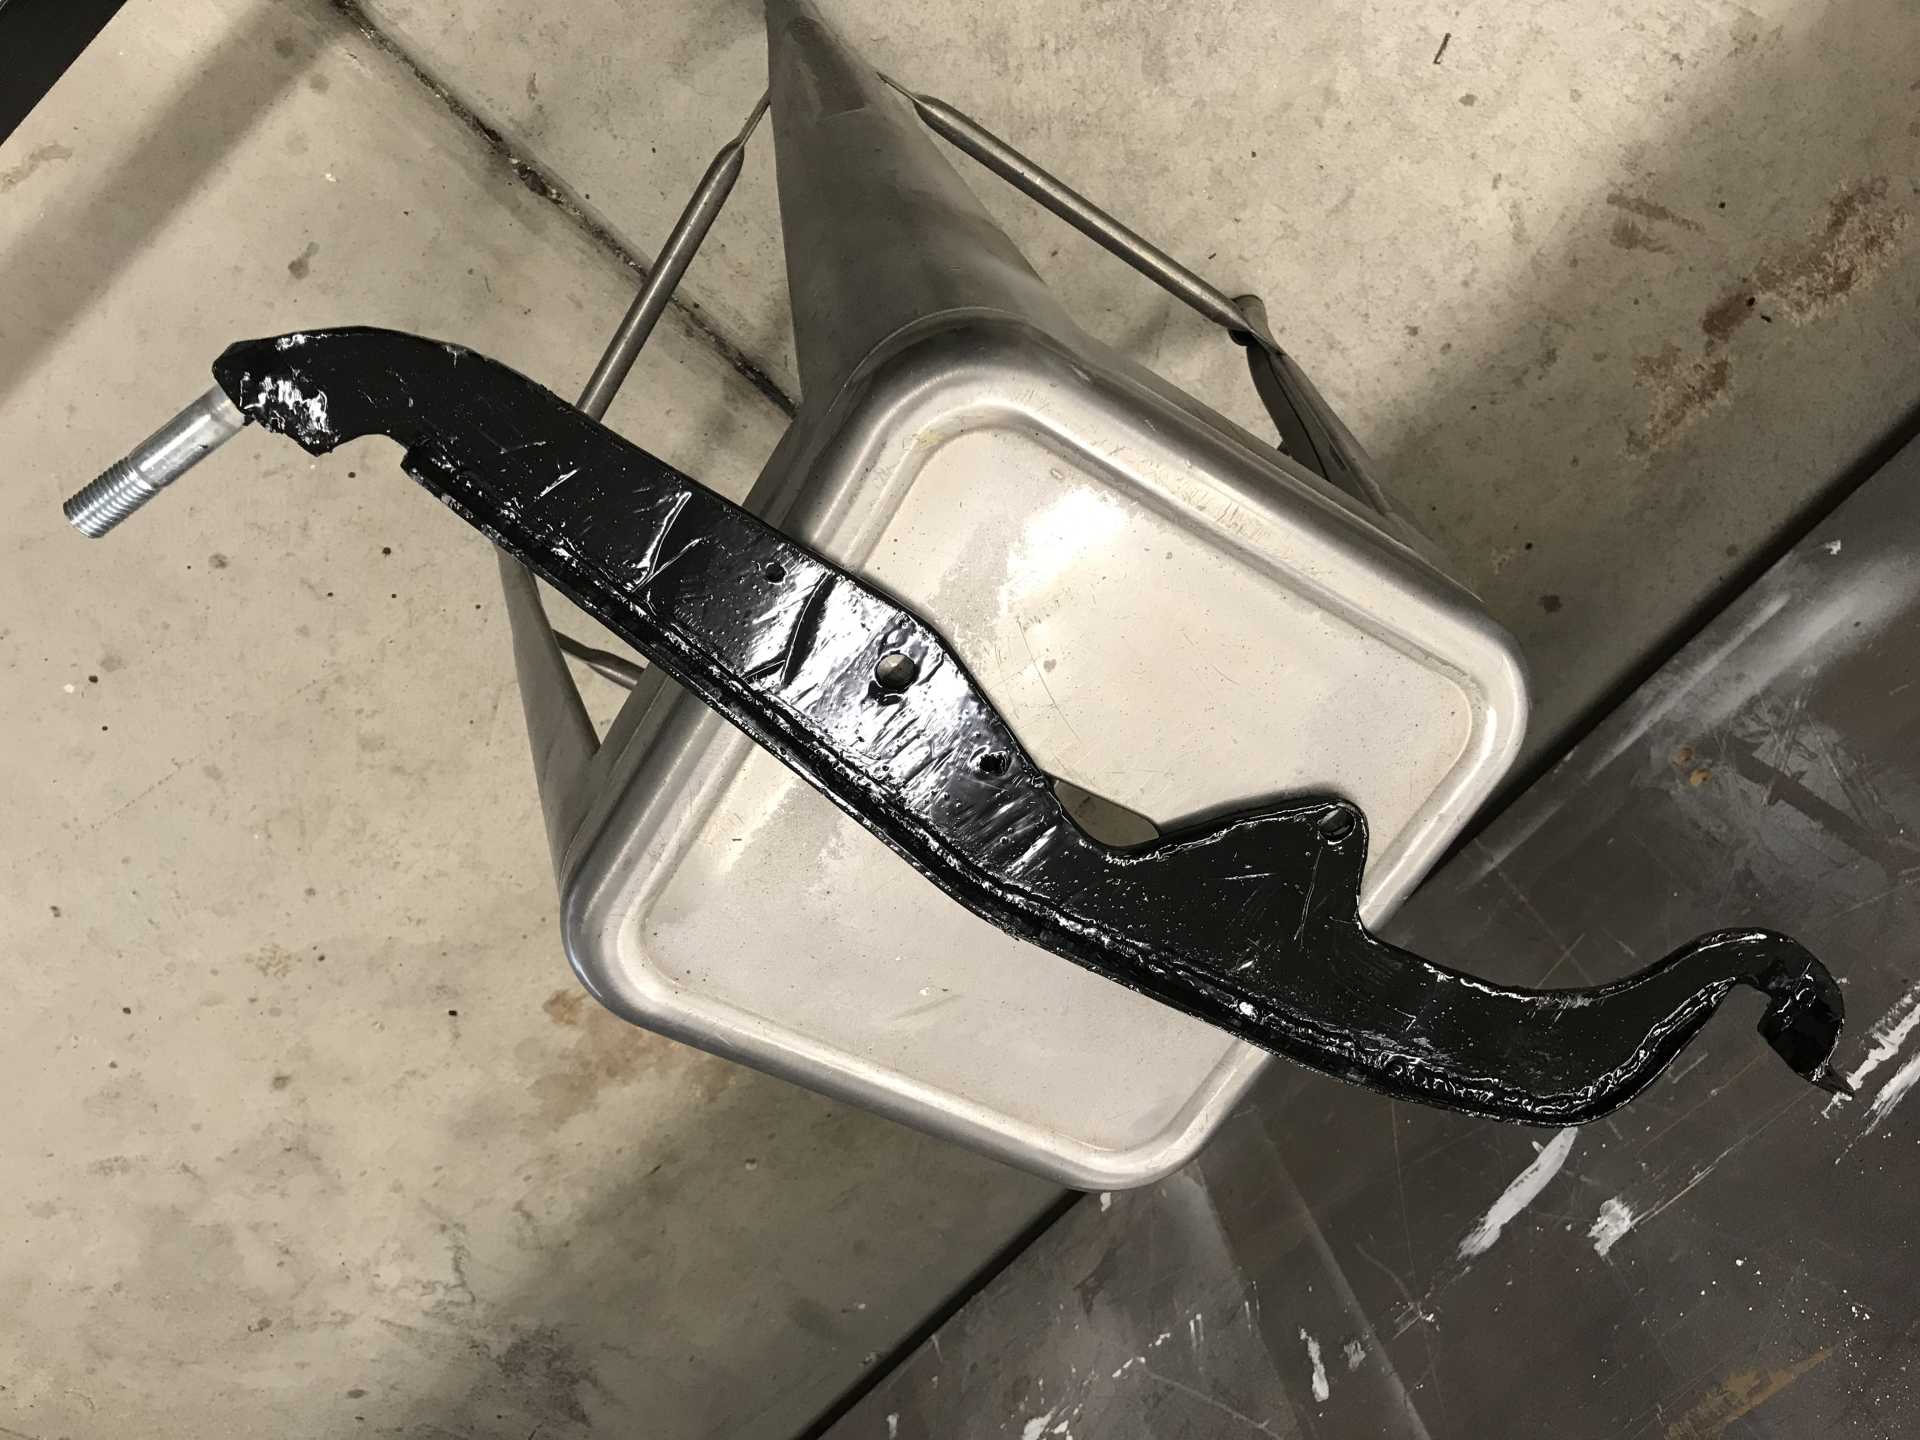
Photos taken after I swapped out the original 14" for 16"
Having always admired the Fiero, I bit on the deal. My friend even trailered it over from Seattle to North Idaho where I live. Getting it running was slow and frustrating since I knew squat about GM cars in general and Fireos in particular. But it's a car, so how bad can it be?
Lets see, I replaced Battery, which was located in the rear trunk Fuel Pump, all the rubber parts were melted Rebuilt all 4 calipers New 16" wheels and tires Plugs, Wires, Oil pressure switch/sender Idle Air Throttle Position Sensor Coolant Temp Sensor Heater Hoses Front Shocks Rear Struts Poly bushings all around New Front Hubs from Dickman New Cat converter, one of the main things wrong with the engine Added a resonator since the Ocelot exhaust was too loud for myears New distributor - More on that to come New radio with display & ApplePlay Reversing camera (on license plate) Alternator, twice. Thanks for AutoZone's lifetime guarantee.
Finally it wants to run. Set the timing and it idles well. Goose the throttle and it dies and won't start. Timing has gone to hell. Reset it and next start it dies. Turns out the reluctor wheel on the old distributor was loose, the press-fitting had failed. One new Taiwan-made distributor and it began to come to life and ran pretty well once I chased down some vacuum leaks. If ever there was a system doomed to fail it is the 2.8 vacuum hose system. Particularly when it is 30 years old.
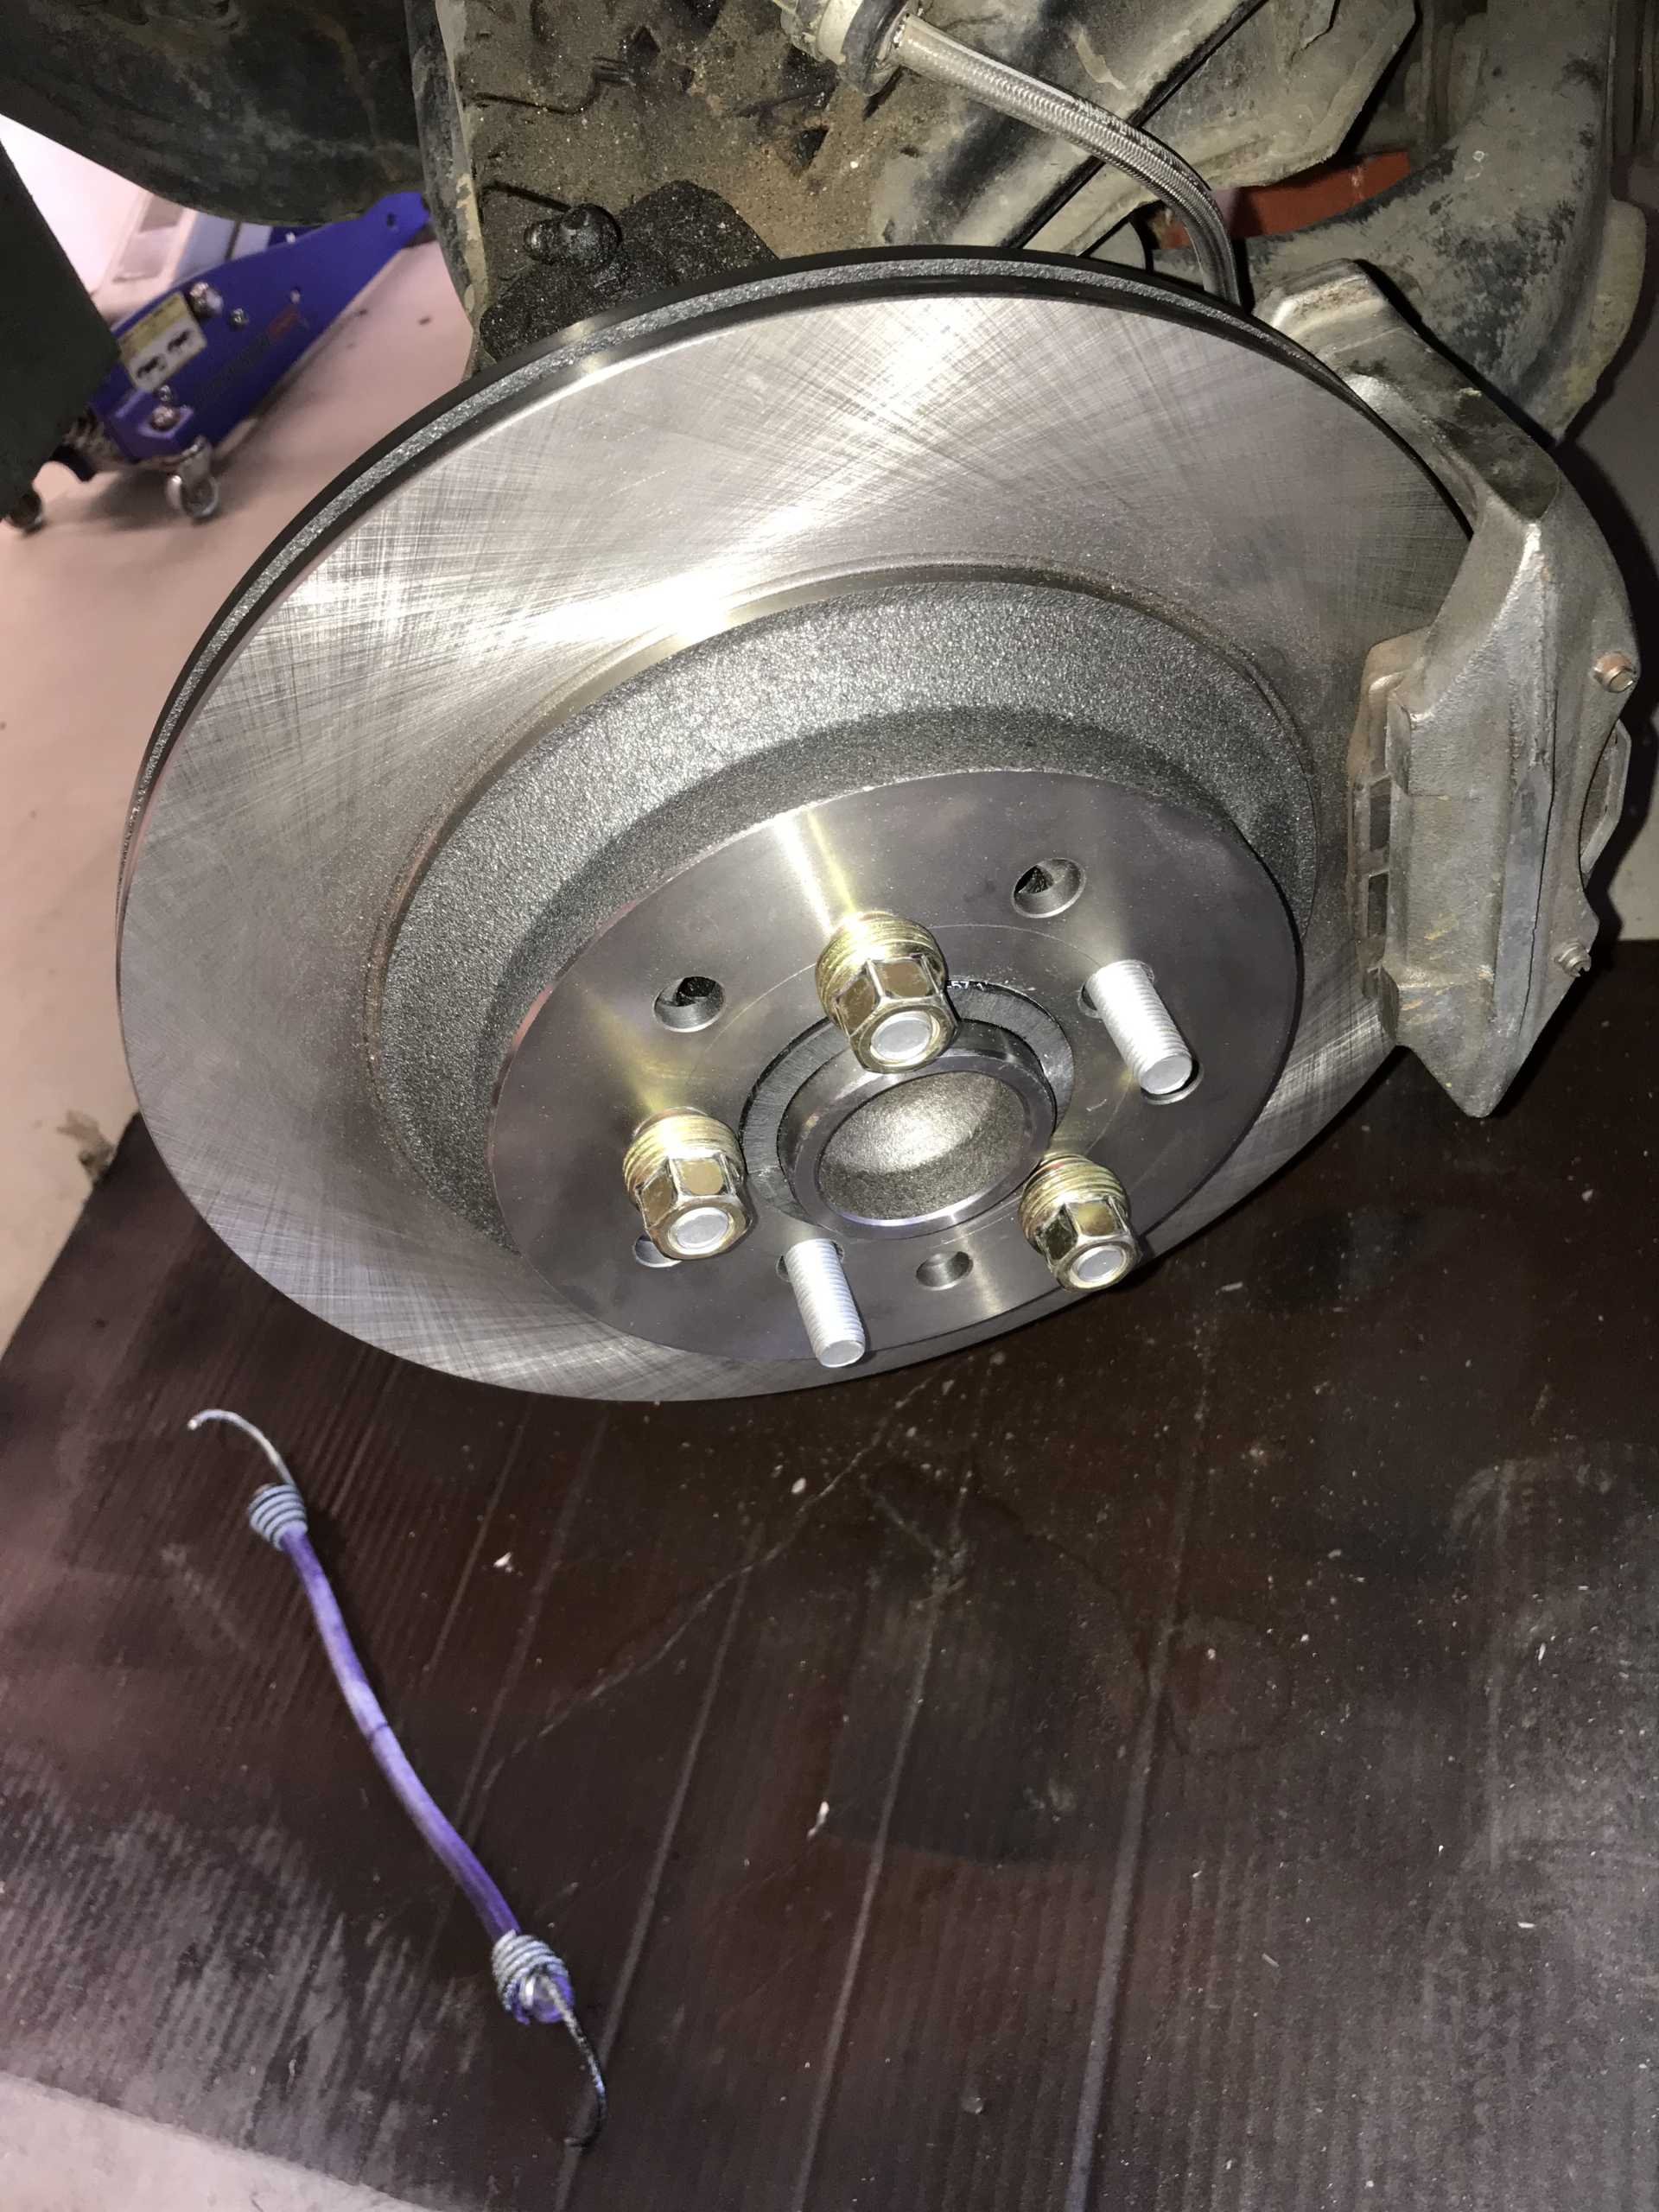
It ran well enough to take to Seattle and didn't fail me but it was irritating with 65 MPH being 3900 RPM. And not very economical getting 20 MPG. My wife's 3.5L Venza gets 25 MPG on the same trip but going 75 MPH. So I decided to begina restoration and improvement project. First was the change to Corvette C4 rear discs all around using the stock calipers. That worked out quite well after reading Pennock's looking for answers. I made brackets from 3/8" steel and it gave much more stopping power with the same pedal pressure.
Emboldened by that success I decided to do two things. First I hated the manual steering effort and the rack was so worn it was like tilling a sailboat. More Pennocks reading I decided to go with a 90's Camaro rack and a power steering pump from a MR2 Spyder. The rack took some trimming on the tie rods, as did the tie rod ends. I had to make a new driver side bracket to hold the new rack. The biggest issue was the new hydraulic hoses on the rack were too high and interfered with the spare tub. Who needs a spare? trimming the bottom off gave the clearance to alllow the hoses to fit for the pump too. While I was digging around the front I decided to relocate the battery from the rear trunk to the front using V8 Archie's battery holder. The power steering pump was difficult to find and I ended up getting a rebuilt one from SoCal for $600. Wiring it in was simple. Did not hookup the VSS output but it works well none the less. It detects when you load the pump by turning the wheel and increases the pressure all by itself. This is a neat setup with tank, pump and controller in one compact unit.
I never liked the stance of the car and decided to lower the front end using Dickman's 1" lowering ball joints. They clear the 16" wheels after trimming the lower A-Arm since it hits the Vette rotors. It would hit the stock rotors too for that matter. Does it handle better? Don't know but I like the look now.
Now the troubles started. The engine had a chronic ever-so-often misfire. Then it would simply die when running and also misfire at high RPM. Probably the ignition module (one year old now). Replaced it and found the mounting of the old module to the distributor had uneven heat sink compound causing it to overheat. Problem solved so I thought. Not really, I got out my temperature meter and found the module runs about 120F when on the heat sink. Then when the engine was good and hot I measured the temp of the heatsink (which is mounted to the cast iron intake manifold) it runs about 150-160F. Not a very good heat sink, more like a heat source. So I remote located the module on a good heat sink and the temperatures dropped to 110-115F. Problem solved ? No it died again after all my attempts. Then the real problem was discovered. The connector to the reluctor coil was worn on one pin and it would actually lose contact with the pin on the module. Instant stoppage. When it cooled down it might make contact and run normally - or not. Fifteen minutes with a pair of needle nose pliers and the contact was good again.
That stupid white connector looked good but I found the problem by accident. I plugged in the connector to the module and caught only one pin. I noticed there was no contact friction and that was the problem. The advice to change the coil every now and then is good. Not because the coil goes bad but because the connector can become loose. If you have patience it can be bent back into proper shape. But eventually it will relax again and fail.
A note on remote module. Do Not ground the heatsink directly to the chassis. Put the heat sink on insulating washers and ground it ONLY to the distributor as follows. The wires on the coil will need to be extended and must be 2 conductor stranded shielded wire #24 - #22. The shield must connect to the distributor and to your new heat sink. The signals on this cable are very low and the shield isolates the internal low voltage from all the other electrical noise in the engine bay. The shield also provides the only ground path between the remote module and the distributor.
By this time I was fed up with the old engine, old transmission (which locked up it's clutch when hot) and started to hunt for a modern engine & transmission to do a swap. Fixing the problems on the old engine would still give me a slow car with poor fuel economy. Having a car with a 200 mile range sucks. The hunt led to two solutions, either a 3.2L VW VR-6 with a auto-shift manual transmission or a GM LFX with a 6T70 would do the job. The VR6 is physically smaller and produces 270 or so HP and having a paddle shifted manual is lots of fun, my Alfa 147 in Malaysia had one and it was great. The LFX is larger as is the 6T70, but much more available and less costly. The engine is lively and the transmission can be manually shifted.
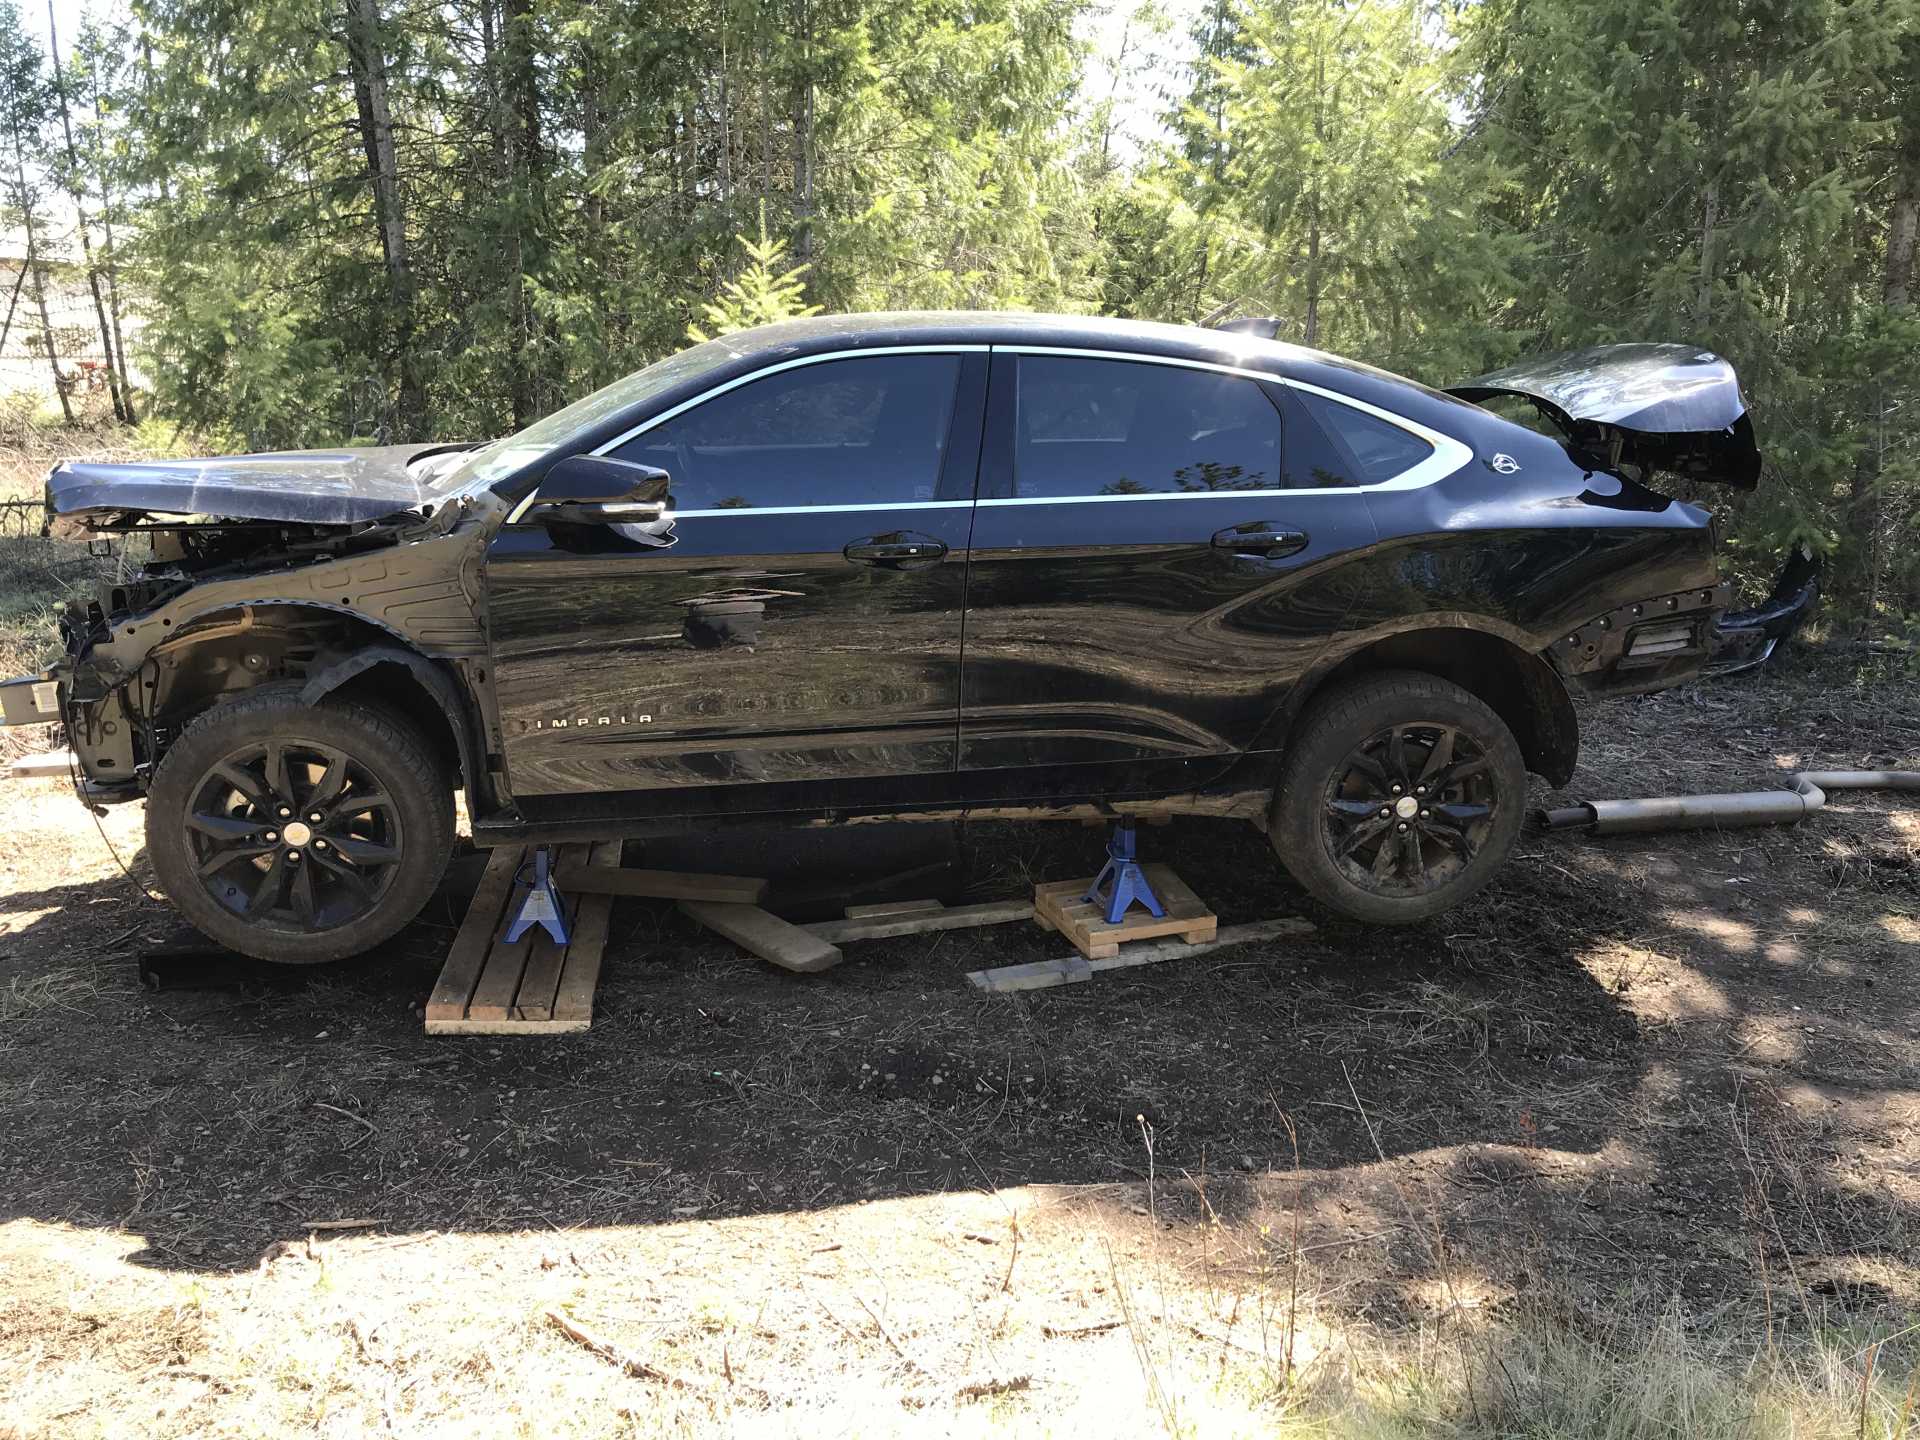
That decided it, I'd go with the LFX. Digging into the details I found that you need a lot more than the engine & transmission. So I eventually found a totaled 2018 Impala at an IAA auction. It took three weeks to win it since the insurance company did not want to sell it at the price people were willing to pay. The third time it went up for sale the same thing started to happen and the seller finally dropped his reserve. I snapped it up with a bid of $1525. Then you add the auction fees. The final cost was $2250. Plus the $200 to become a bidder. But I literally had a complete running car. For some reason the auction listed it as not running. Strange since it simply needed a good battery charge to run. While IAA isn't inexpensive they do treat customers well and try to accurately describe the cars they sell. Not all IAA sites allow ondinary folks to place bids, but in Washington state they do.
Next: You bought an Impala, Now What?
[This message has been edited by MikesFirstFiero (edited 02-04-2024).]
I and my wife moved back to the US after spending 12 years in Malaysia, I was an elevator controls designer over there. I finally decided to retire and do nothing too serious. Well that lasted for about a year and then we bought a house and I had three car garage and one car. So I setup a garage wood shop and built drawers for cabinets, a headboard, a kids rocking horse, chairs and cutting boards. Life was OK but not too complicated. Then a good friend called me and said he knew of a 1988 Fiero that was originally a 2M4, now swapped to a 2.8 with an A/T, but it did not run. And it's been sitting for ten years mostly in a garage. It's only $1K and the car is "complete" meaning all the parts are there, good or not, has 20 year old tires and flaking paint. On the good side it has a factory shop manual and it's red.
Having always admired the Fiero I bit on the deal. My friend even trailered it over from Seattle the North Idaho where I live. Getting it running was slow and frustrating since I knew squat about GM cars in general and Fireos in particular. But it's a car, so how bad can it be?
Lets see, I replaced Battery, which was located in the rear trunk Fuel Pump, all the rubber parts were melted Rebuilt all 4 calipers New 16" wheels and tires Plugs, Wires, Oil pressure switch/sender Idle Air Throttle Position Sensor Coolant Temp Sensor Heater Hoses Front Shocks Rear Struts Poly bushings all around New Front Hubs from Dickman New Cat converter, one of the main things wrong with the engine Added a resonator since the Ocelot exhaust was too loud for myears New distributor - More on that to come New radio with display & ApplePlay Reversing camera (on license plate) Alternator, twice. Thanks for AutoZone's lifetime guarantee.
Finally it wants to run. Set the timing and it idles well. Goose the throttle and it dies and won't start. Timing has gone to hell. Reset it and next start it dies. Turns out the reluctor wheel on the old distributor was loose, the press-fitting had failed. One new Taiwan-made distributor and it began to come to life and ran pretty well once I chased down some vacuum leaks. If ever there was a system doomed to fail it is the 2.8 vacuum hose system. Particularly when it is 30 years old.
It ran well enough to take to Seattle and didn't fail me but it was irritating with 65 MPH being 3900 RPM. And not very economical getting 20 MPG. My wife's 3.5L Venza gets 25 MPG on the same trip but going 75 MPH. So I decided to begin restoration and improvement project. First was the change to Corvette C4 rear discs using the stock calipers. That worked out quite well after reading Pennock's looking for answers. I made brackets from 3/8" steel and it gave much more stopping power with the same pedal pressure.
Emboldened by that success I decided to do two things. First I hated the manual steering effort and the rack was so worn it was like tilling a sailboat. More Pennocks reading I decided to go with a 90's Camaro rack and a pwer steering pump from a MR2 Spyder. The rack took some trimming on the tie rods, as did the tie rod ends. I had to make a new driver side bracket to hold the new rack. The biggest issue was the new hydraulic hoses on the rack were too high and interfered with the spare tub. Who needs a spare? trimming the bottom off gave the clearance to alllow the hoses to fit for the pump too. While I was digging around the front I decided to relocate the battery from the rear trunk to the front using V8 Archies battery holder. The power steering pump was difficult to find and I ended up getting a rebuilt one from SoCal for $600. Wiring it in was simple. did not hookup the VSS output but it works well none the less. It ddetects when you load the pump by turning and increases the pressure all by itself. This is a neat setup with tank, pump and controller in one compact unit.
I never liked the stance of the car and decided to lower the front end using Dickman's 1" lowering ball joints. They clear the 16" wheels after trimming the lower A-Arm since it hits the Vette rotors. It would hit the stock rotors too for that matter. Does it handle better? Don't know but I like the look now.
Now the troubles started. The engine had a chronic ever-so-often misfire. Then it would simply die when running and also misfire at high RPM. Probably the ignition module (one year old now). Replaced it and found the mounting of the old module to the distributor had uneven heat sink compound causing it to overheat. Problem solved so I thought. Not really, I got out my temperature meter and found the module runs about 120F when on the heat sink. Then when the engine was good and hot I measured the temp of the heatsink (which is mounted to the cast iron intake manifold) it runs about 150-160F. Not a very good heat sink, more like a heat source. So I remote located the module on a good heat sink and the temperatures dropped to 110-115F. Problem solved ? No it died again after all my attemtpts. Then the real problem was discovered. The connector to the reluctor coil was worn on one pin and it would actually lose contact with the pin on the module. Instant stoppage. When it cooled down it might make contact and run normally - or not. Fifteen minutes with a pair of needle nose pliers and the contact was good again.
That stupid white connector looked good but I found the problem by accident. I plugged in the connector to the module and caught only one pin. I noticed there was no contact friction and that was the problem. The advice to change the coil every now and then is good. Not because the coil goes bad but because the connector can become loose. If you have patience it can be bent back into proper shape. But eventually it will relax again and fail.
A note on remote module. Do Not ground the heatsink directly to the chassis. Put the heat sink on insulating washers and ground it ONLY to the distributor as follows. The wires on the coil will need to be extended and must be 2 conductor stranded shielded wire #24 - #22. The shield must connect to the distributor and to your new heat sink. The signals on this cable are very low and the shield isolates the internal low voltage from all the other electrical noise in the engine bay. The shield also provides the only ground path between the remote module and the distributor.
By this time I was fed up with the old engine, old transmission (which locked up it's clutch when hot) and started to hunt for a modern engine & transmission to do a swap. Fixing the problems on the old engine would still give me a slow car with poor fuel economy. Having a car with a 200 mile range sucks. The hunt led to two solutions, either a 3.2L VW VR-6 with a auto-shift manual transmission or a GM LFX with a 6T70 would do the job. The VR6 is physically smaller and produces 270 or so HP and having a paddle shifted manual is lots of fun, my Alfa 147 in Malaysia had one and it was great. The LFX is larger as is the 6T70 too but much more available and less costly. The engine is lively and the transmission can be manually shifted.
That decided it, I'd go with the LFX. Digging into the details I found that you need a lot more than the engine & transmission. So I eventually found a totaled 2018 Impala at an IAA auction. It took three weeks to win it since the insurance company did not want to sell it at the price people were willing to pay. The third time it went up for sale the same thing started to happen and the seller finally dropped his reserve. I snapped it up with a bid of $1525. Then you add the auction fees. The final cost was $2250. Plus the $200 to become a bidder. But I literally had a complete running car. For some reason the auction listed it as not running. Strange since it simply needed a good battery charge to run. While IAA isn't inexpensive they do treat customers well and try to accurately describe the cars they sell. Not all IAA sites allow ondinary folks to place bids, but in Washington they do.
Next: You bought an Impala, Now What?
Your story sounds familiar, but my Impala was a 2013. I considered using the automatic, but decided that the cradle mods were more than I wanted to tackle. I went with the Saab F40. Good luck on your project.
Having completed several 3800SC swaps and one 4.9L ; the LFX Fiero engine swap would be a harder swap to do but IMO one of the best. While other swaps have a history to them and you can find swap parts, its not so with the LFX. But being all aluminum, having a very light weight, using more modern technology and offering 300 HP in stock trim is very attractive. I wish my GT had this engine. Good luck on the swap. With your level of skill, I am sure that you will complete it, and hopefully provide some info on how it was done.
------------------ " THE BLACK PARALYZER" -87GT 3800SC Series III engine, custom ZZP /Frozen Boost Intercooler setup, 3.4" Pulley, Northstar TB, LS1 MAF, 3" Spintech/Hedman Exhaust, P-log Manifold, Autolite 104's, MSD wires, Custom CAI, 4T65eHD w. custom axles, Champion Radiator, S10 Brake Booster, HP Tuners VCM Suite. "THE COLUSSUS" 87GT - ALL OUT 3.4L Turbocharged engine, Garrett Hybrid Turbo, MSD ign., modified TH125H " ON THE LOOSE WITHOUT THE JUICE "
I wish you luck with your project. Several of these in the works, now. I'm curious as to how the 6T75 will fit. One of the other builders described a bunch of work that was going to be required, in order to make it fit, and went with an F40, instead. Some of the newer GM automatics (and even some of the older ones, but using updated electronic controls) are quite good.
I thought of the 6T75 since it is significantly stronger internally. But finding a LFX with 6T75 was a problem. From what I read it is the same external size as the 6T70
I thought of the 6T75 since it is significantly stronger internally. But finding a LFX with 6T75 was a problem. From what I read it is the same external size as the 6T70
My school of thought is to use the transmission that was designed for the powertrain. In this case its the 6T45 designed for 300 ft lbs of torque. That is pretty strong. I see swaps where just about any engine including the SBC is bolted to the Getrag. You know that's not going to last. Being a former drag racer years back we always used modified autos but today's automatics are very strong. I know little about the LFX swap except that they have been done in Miatas and trucks but it appears that using the autos on a Fiero application may require cradle modification depending on what unit is used. . While there appear to be a number of LFX Fiero swaps in the works, I don't believe that any are on the road as yet. Word to the wise though, GM had a recall on this engine due to timing chain and bearing failures. A 2019 GM Recall document can be found online ------------------ " THE BLACK PARALYZER" -87GT 3800SC Series III engine, custom ZZP /Frozen Boost Intercooler setup, 3.4" Pulley, Northstar TB, LS1 MAF, 3" Spintech/Hedman Exhaust, P-log Manifold, Autolite 104's, MSD wires, Custom CAI, 4T65eHD w. custom axles, Champion Radiator, S10 Brake Booster, HP Tuners VCM Suite. "THE COLUSSUS" 87GT - ALL OUT 3.4L Turbocharged engine, Garrett Hybrid Turbo, MSD ign., modified TH125H " ON THE LOOSE WITHOUT THE JUICE "
[This message has been edited by Dennis LaGrua (edited 07-27-2021).]
I thought of the 6T75 since it is significantly stronger internally. But finding a LFX with 6T75 was a problem. From what I read it is the same external size as the 6T70
The Cadillac XTS-V even had a 6T80 It was AWD and would have to be converted for Fiero use... I think that's just a matter of unbolting the T-case and possibly swapping the diff carrier.
Originally posted by MikesFirstFiero: I thought of the 6T75 since it is significantly stronger internally. But finding a LFX with 6T75 was a problem. From what I read it is the same external size as the 6T70
quote
Originally posted by Will: Not sure where you got that info, but GM used the 6T70 with LFX.
I know that Will's comment wasn't addressed specifically to me, but I posted "6T75" above. So I had it wrong, first.
================= While we're here... this all makes me wonder why GM never attached a 6T70 or 6T75 to the LS4, instead of letting it tear up 4T65Es. I'm sure it's probably about the money, but a new case half shouldn't have been that ugly to do. [/hijack]
[This message has been edited by Raydar (edited 07-27-2021).]
Correction on this end. The LFX engines came with the 6T70 transmissions. The spec on torque is 280 ft lbs and 300 Horsepower. That is stated here: 6T70/6T75 specs
[This message has been edited by Dennis LaGrua (edited 07-27-2021).]
I know that Will's comment wasn't addressed specifically to me, but I posted "6T75" above. So I had it wrong, first.
================= While we're here... this all makes me wonder why GM never attached a 6T70 or 6T75 to the LS4, instead of letting it tear up 4T65Es. I'm sure it's probably about the money, but a new case half shouldn't have been that ugly to do. [/hijack]
The '08-'10 Saturn Vue had a LZ4 with MH4 6T70 transmission... so I think the case already existed.
Edit: I've wondered the same thing about the Northstar... it was in production through 2011 in the Caddy DTS and Buick Lucerne, but had the 4T80E transmission the entire time. GM wasn't interested in dropping the 6 speed into those cars, I guess.
[This message has been edited by Will (edited 07-28-2021).]
The 6T70 in this swap came with the engine from the same Impala. This transmission & engine combination has been used in the prior Impala generation too. About 2013 the 6T70 was redesigned to solve it's first generation problems. Some cars were updated in 2013, others in 2014. You really want the second generation for fewer problems.
The LFX engine was introduced in 2012 in a Buick. It also underwent a revision in 2014 to fix bad timing chains and excessive oil burning causing the PCV to clog and the intake valves to coke up. So getting a later model engine seemed to be a better solution. And the mileage would be lower. Mine was crunched with 58K on the Odo.
Now to make things more complicated in 2018 GM made many of the electronic modules in cars VIN dependent when manufactured. Swap an ECU or BCU or ? with another car and it stops working. All modules (and I wish I had a list) need to have the same VIN programmed into them. For "Theft Protection". More like for "Profit Protection". One more reason I bought a complete car rather than bits and pieces.
[This message has been edited by MikesFirstFiero (edited 07-27-2021).]
AFAIK, the CAN bus looks for serialized components to interface with so it is quite a complex job figuring out a work around. Buying a complete vehicle solves many of these issues but extensive reprogramming may still be needed to eliminate the DTC's for missing elements. In some cases the newer PCM's may not even function without them. I guess that any problem can be solved with enough work but GM sure isn't making engine swaps easy these days. If you are going stick then the aftermarket ECU's may be the answer.
------------------ " THE BLACK PARALYZER" -87GT 3800SC Series III engine, custom ZZP /Frozen Boost Intercooler setup, 3.4" Pulley, Northstar TB, LS1 MAF, 3" Spintech/Hedman Exhaust, P-log Manifold, Autolite 104's, MSD wires, Custom CAI, 4T65eHD w. custom axles, Champion Radiator, S10 Brake Booster, HP Tuners VCM Suite. "THE COLUSSUS" 87GT - ALL OUT 3.4L Turbocharged engine, Garrett Hybrid Turbo, MSD ign., modified TH125H " ON THE LOOSE WITHOUT THE JUICE "
I think you are correct Dennis. I expect some problems but I have the complete set of harness wires and every module in the Impala. How much I will need to make it play remains to be seen.
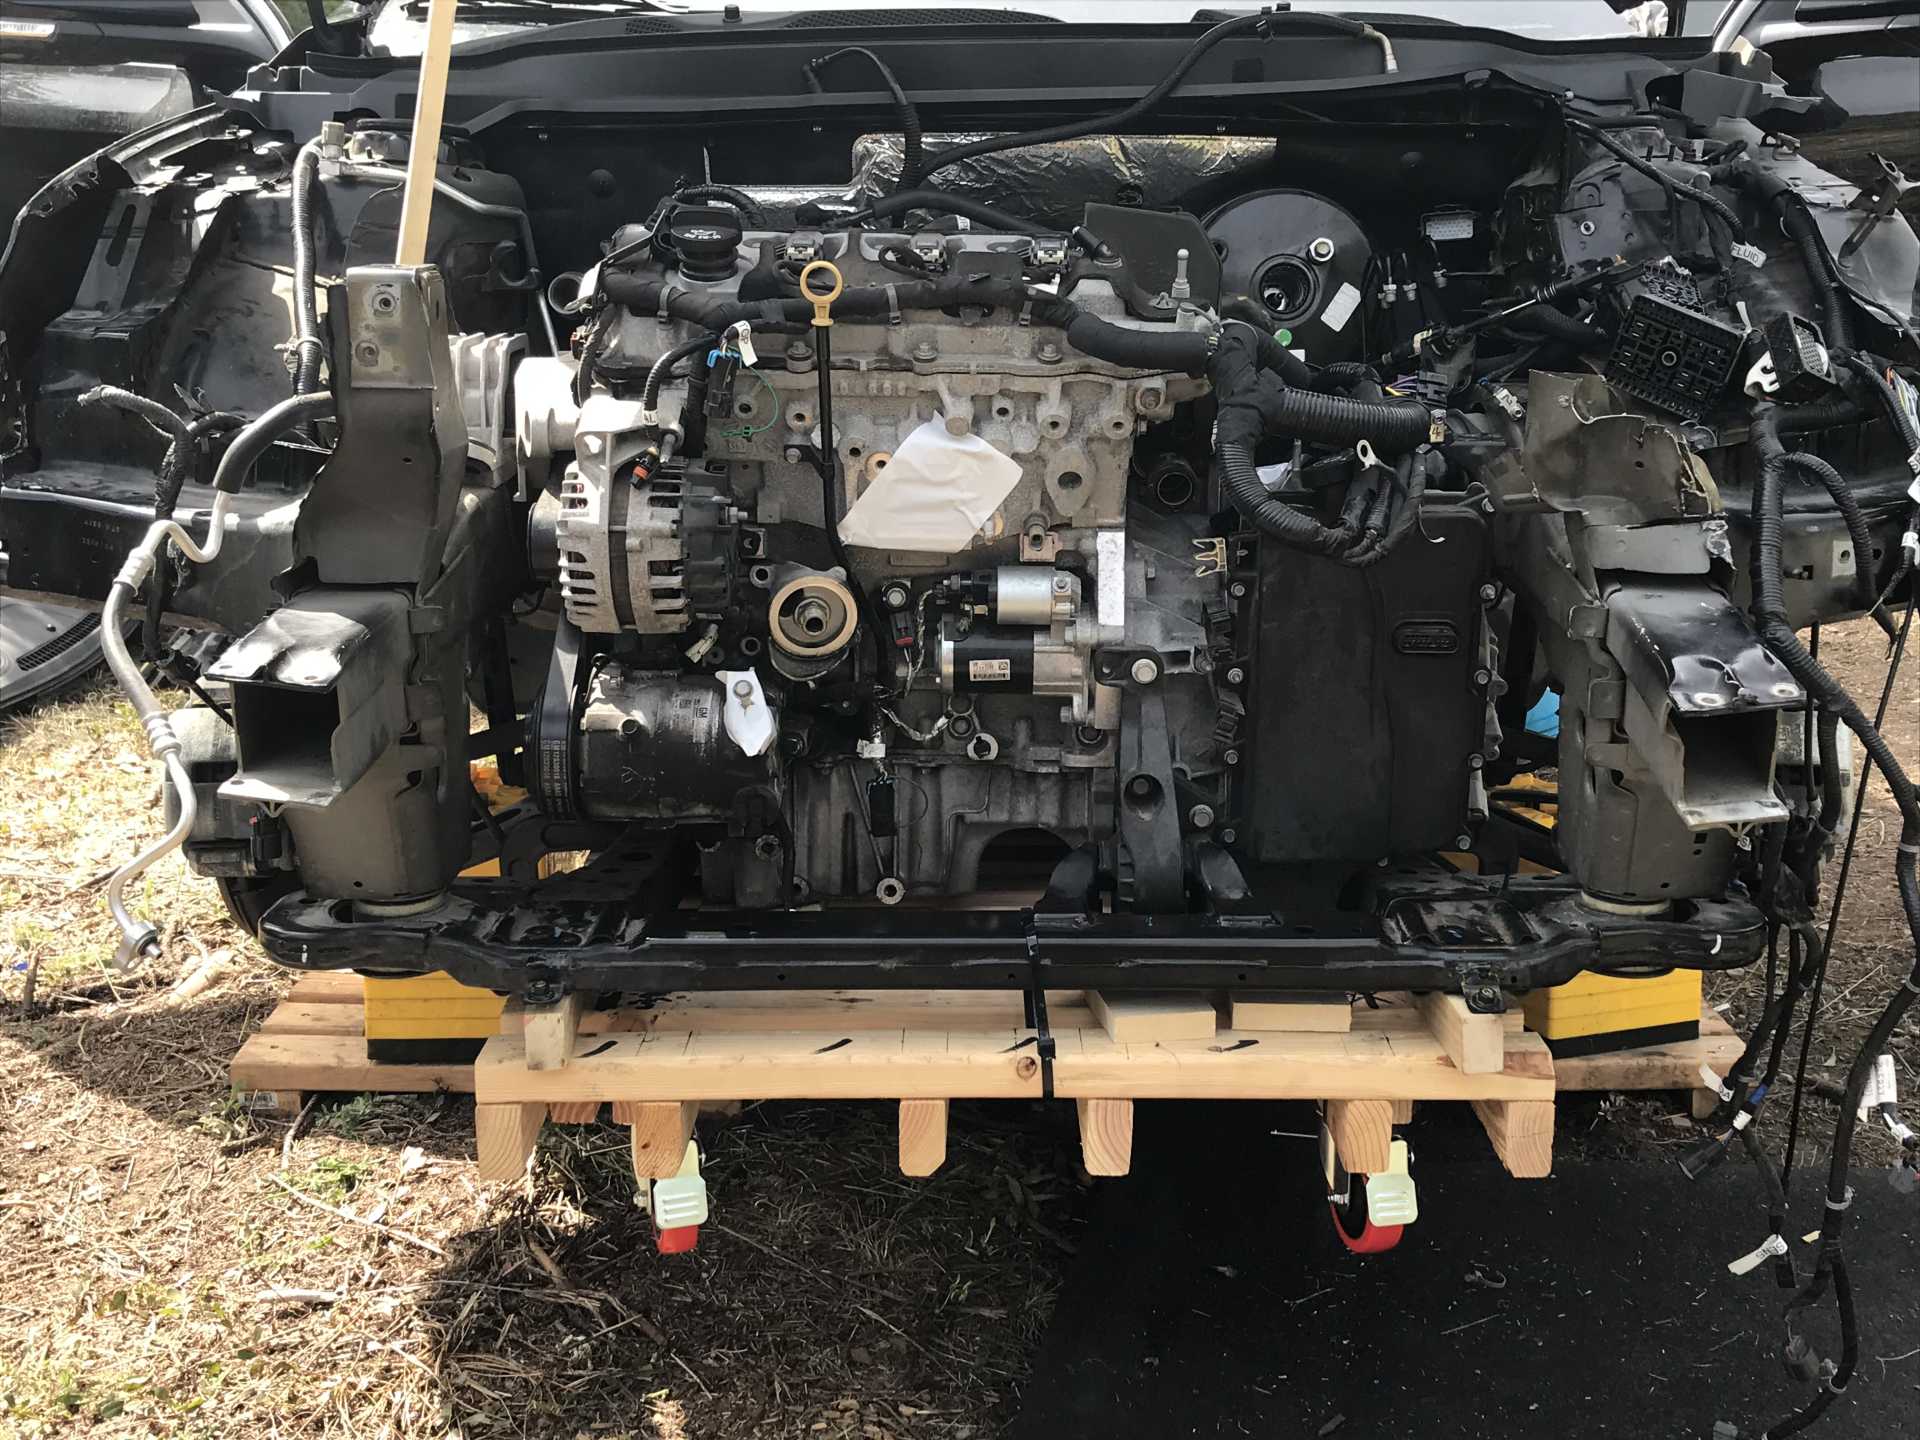
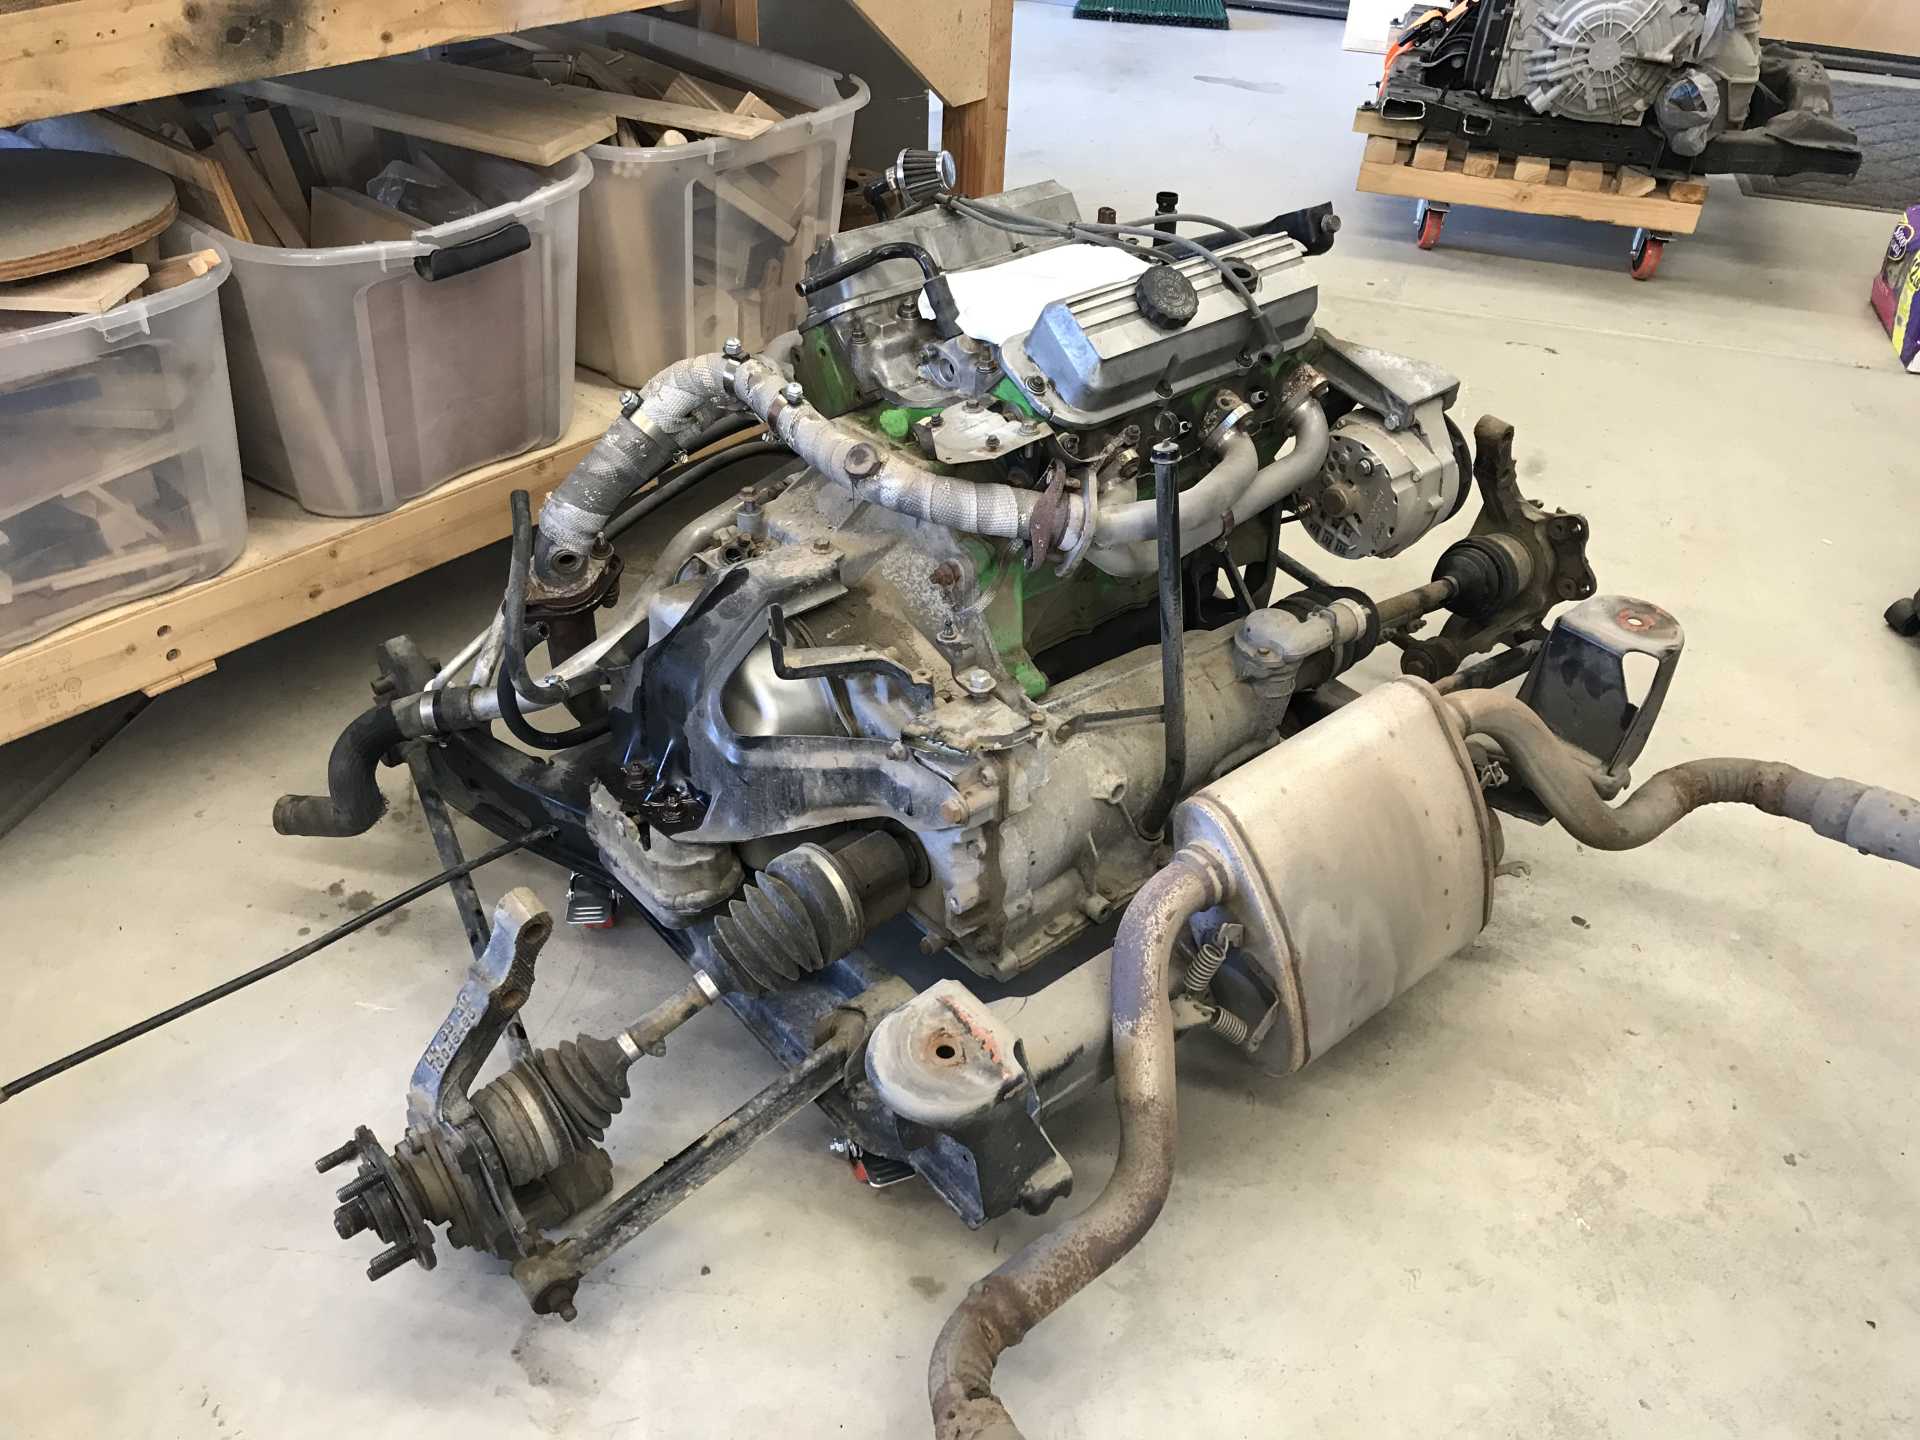
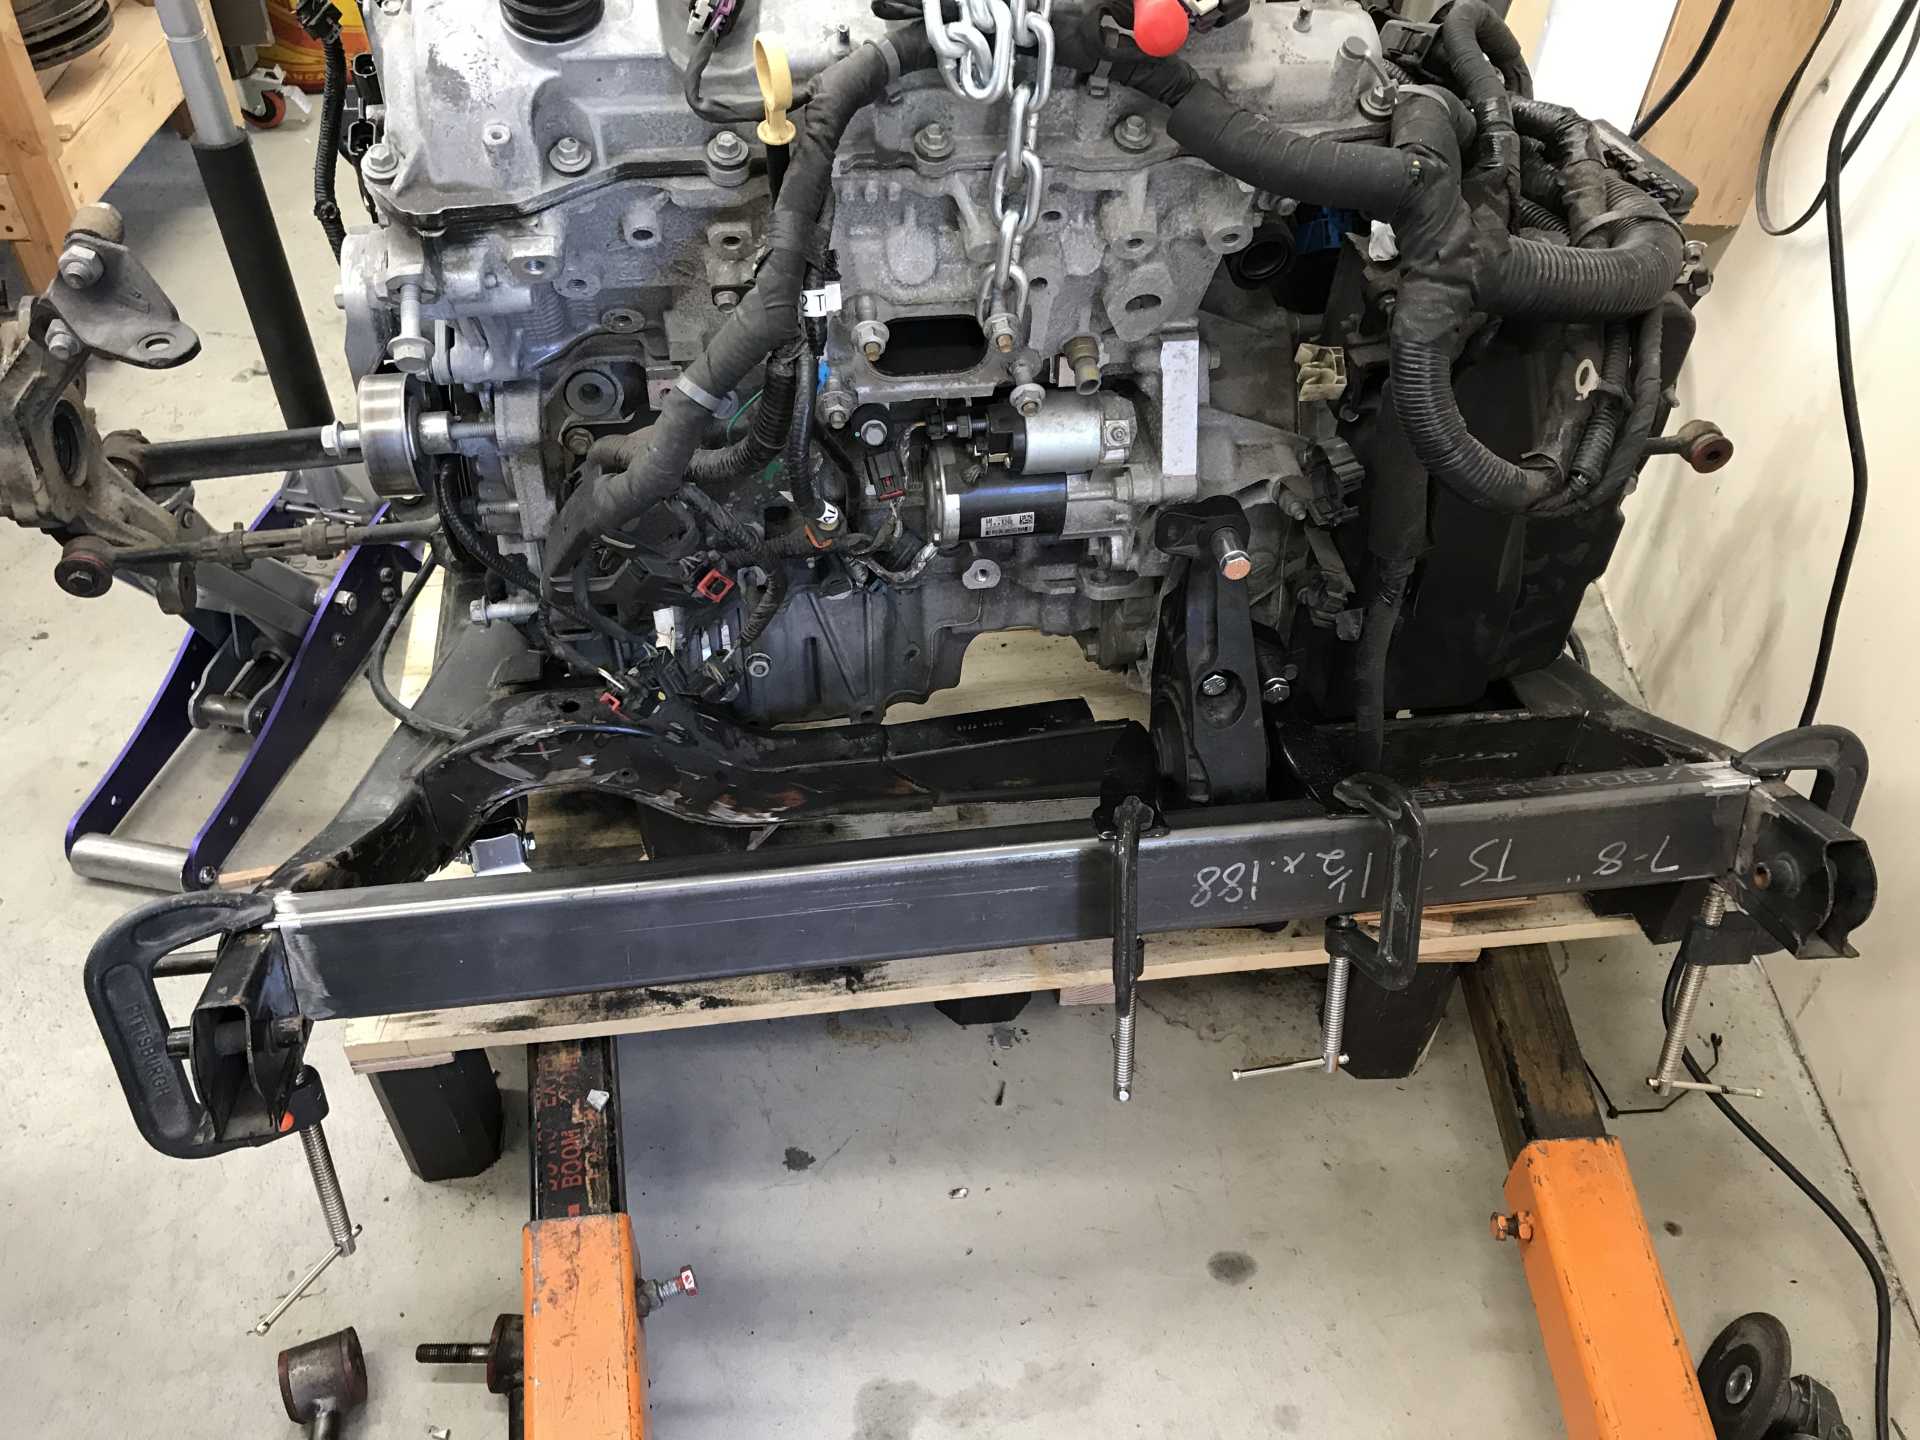
So I bought this wrecked Impala and had a friend trailer it over to North Idaho so I could dismantle it. First step was to put it up on jack stands and figure out where to start. I figured I would need the engine & transmission and other things like the ECU, BCU, Accelerator, instrument cluster, shifter, keyless entry, push to start, maybe the fuel pump, and maybe the ABS controller & pump. And of course the wiring harness that ties everything together. Lots of harness it turn out.
Engine Top Mount on Left
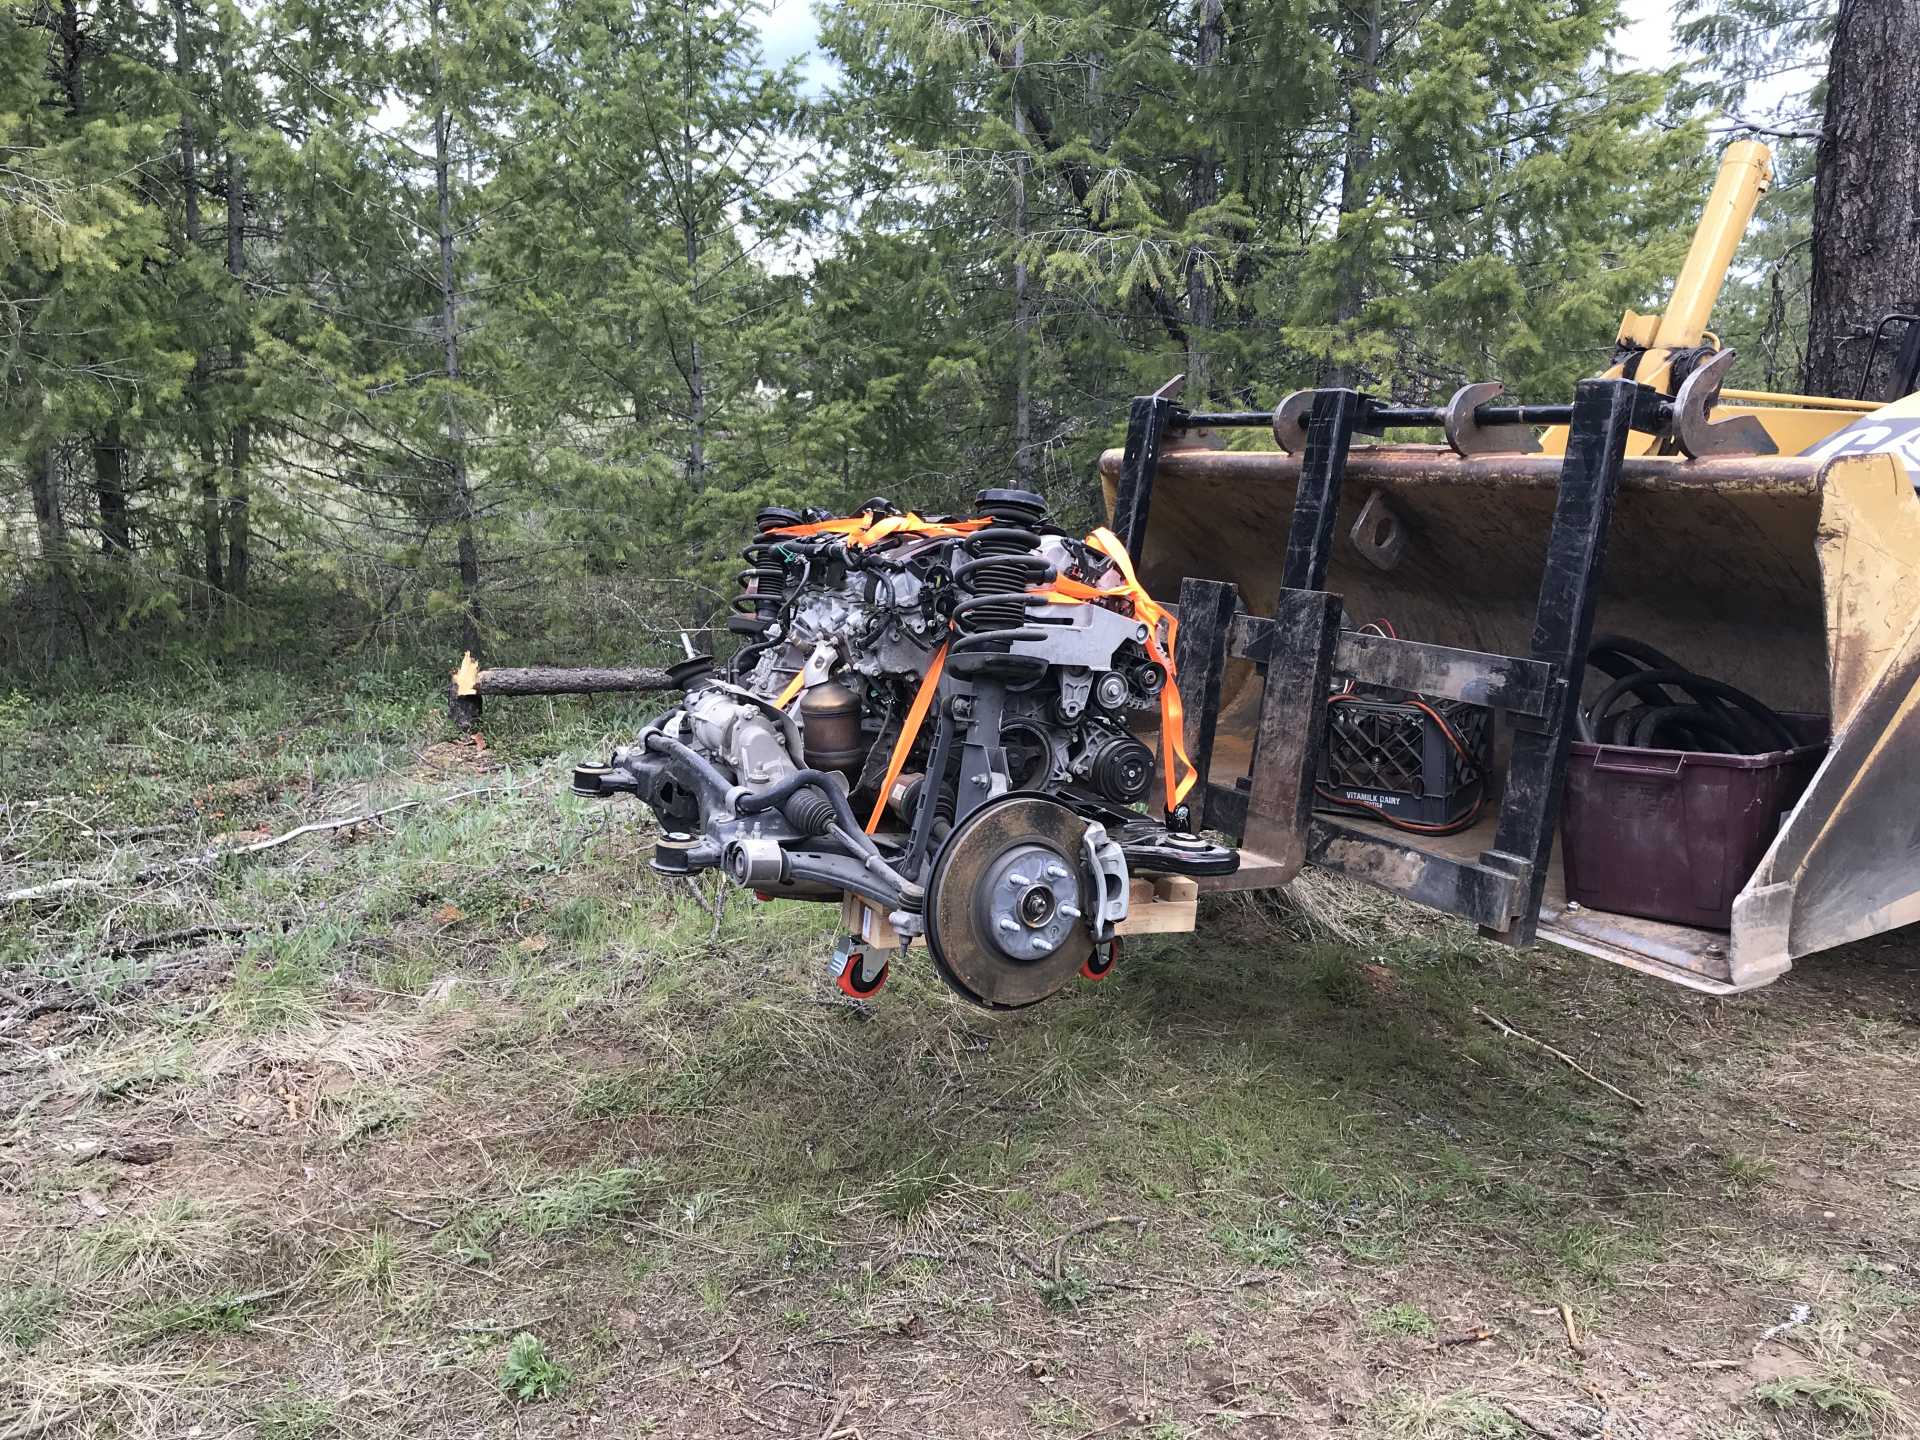
Removing the Impala engine cradle turned out to be pretty simple. Remove the bumper, brakes and suspension parts, upper motor mounts, hoses for fuel, vacuum, cooling, heating and A/C. Removing the steering shaft, exhaust pipe and opening several connectors and the cradle is held in place by only 4 bolts. This took about 8-10 days of working about 4 hours per day. And I labeled everything that was disconnected since I knew nothing about the Impala and have a bad case of CRS (Can't Remember Stuff). Then we unbolted the cradle it dropped with a wooden dolly that had I attached to the cradle by big cable ties. We had a backhoe with forks that slid under the dolly and dropped the whole thing out in 30 minutes onto a trailer. Dropped is actually true, when the last bolt was removed the whole cradle dropped the forks about 6-8" and took us all by surprise. A short trip to home and the cradle was safely in the garage where an engine hoist was used to separate the cradle from the engine so I could spot the engine and get a rough idea of how it would fit on the Fiero cradle. Badly as it turned out. So major work was needed to make it fit.
Tranny Top Mount
Engine on Dolly before removal
On the Forks
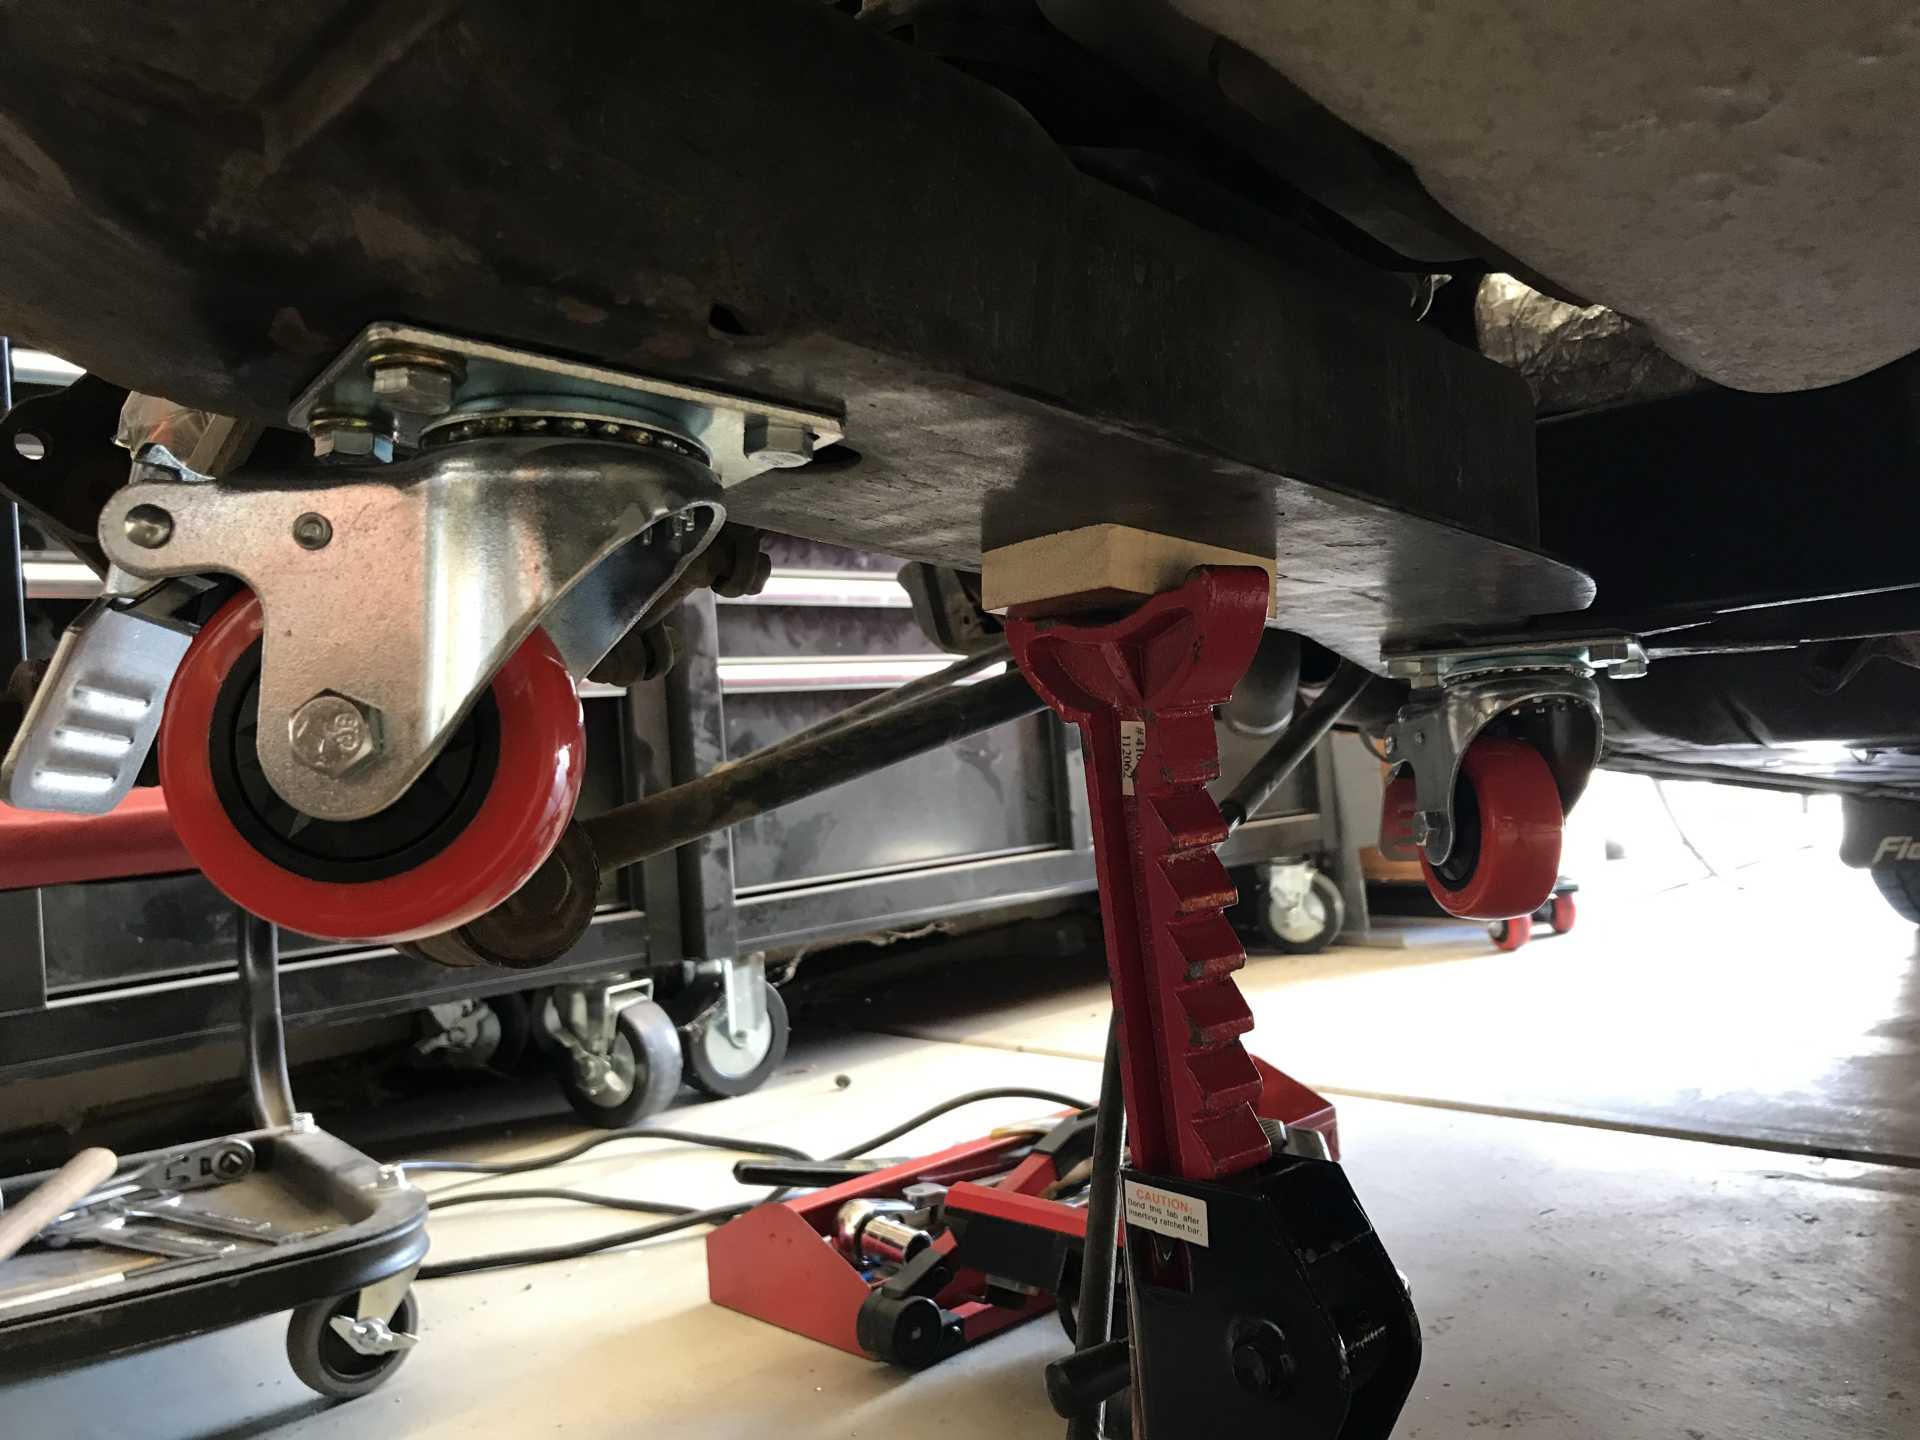
While ripping the Impala apart I removed the Fiero V6 on it's cradle. To make life easy lifted the Fiero onto jack stands in the rear and RV leveling blocks in the front. The hoist was disconnected from the LFX which sat on a wooden support until needed. I attached 4 casters to the bottom of the Fiero cradle with bolts and lifted the Fiero off of the rear stands and lowered it to the ground until the rear casters on the cradle touched the ground and then removed the rear cradle bolts. Next a floor jack was used to raise the front of the cradle just enough to take the weight off of the front cradle bolts which were slipped out easily to my surprise. Lowering the floor jack had the cradle on the ground and mobile on it's casters. Raising the hoist lifted the car so the cradle was slipped out from under the car. Finally the front cradle bolts were replaced and the jack stands once again supported the rear of the car so the hoist could be used for engine work.
Casters Bolted.to Cradle
Ready to Lower
Lowered to Ground
Easy to Roll Around
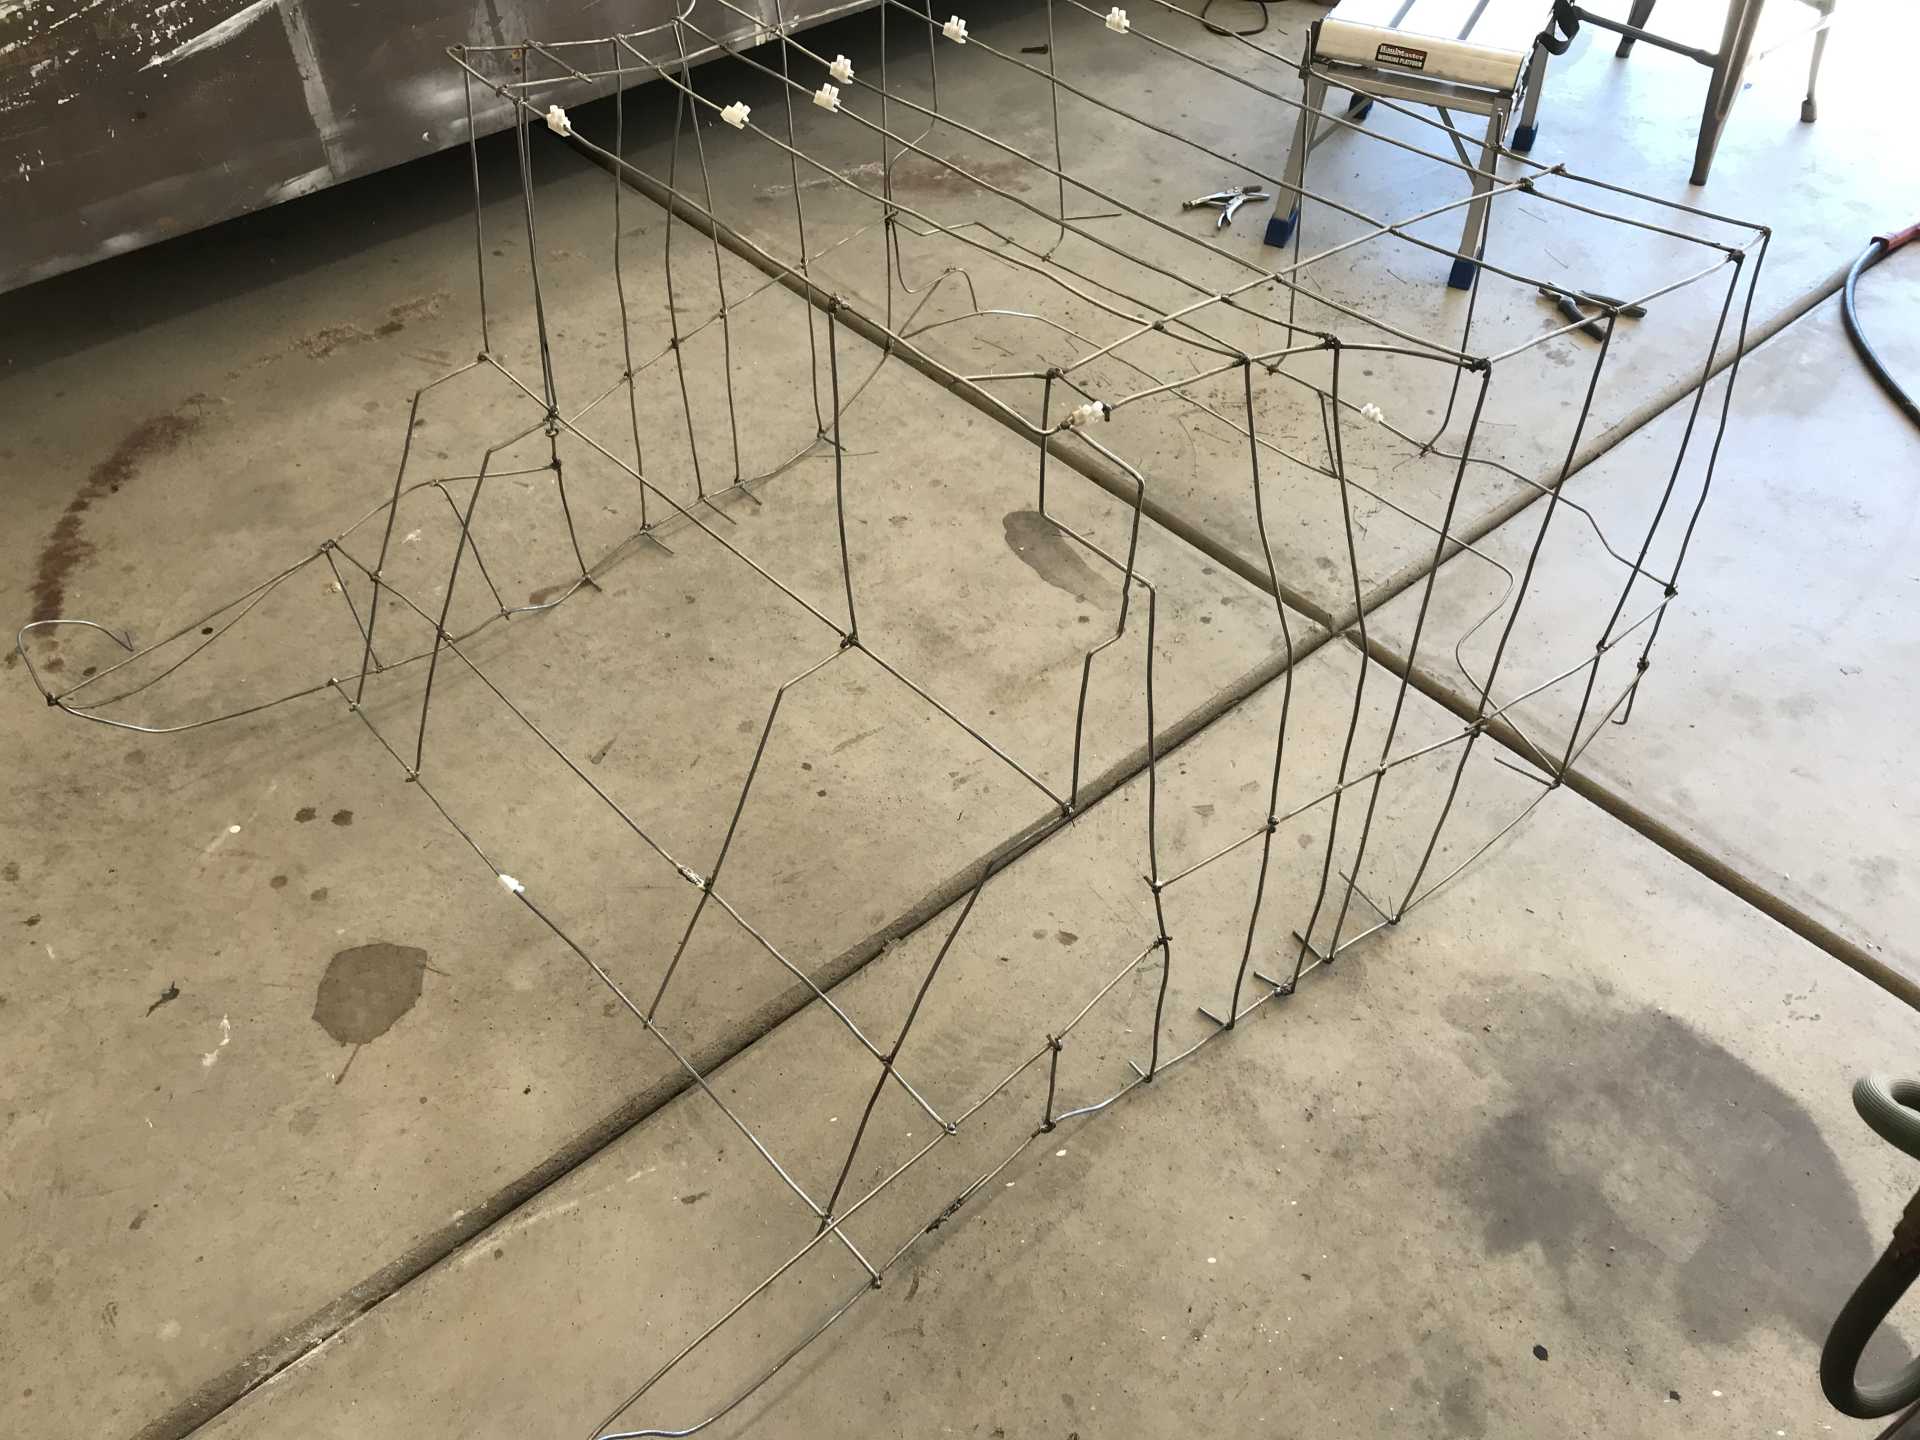
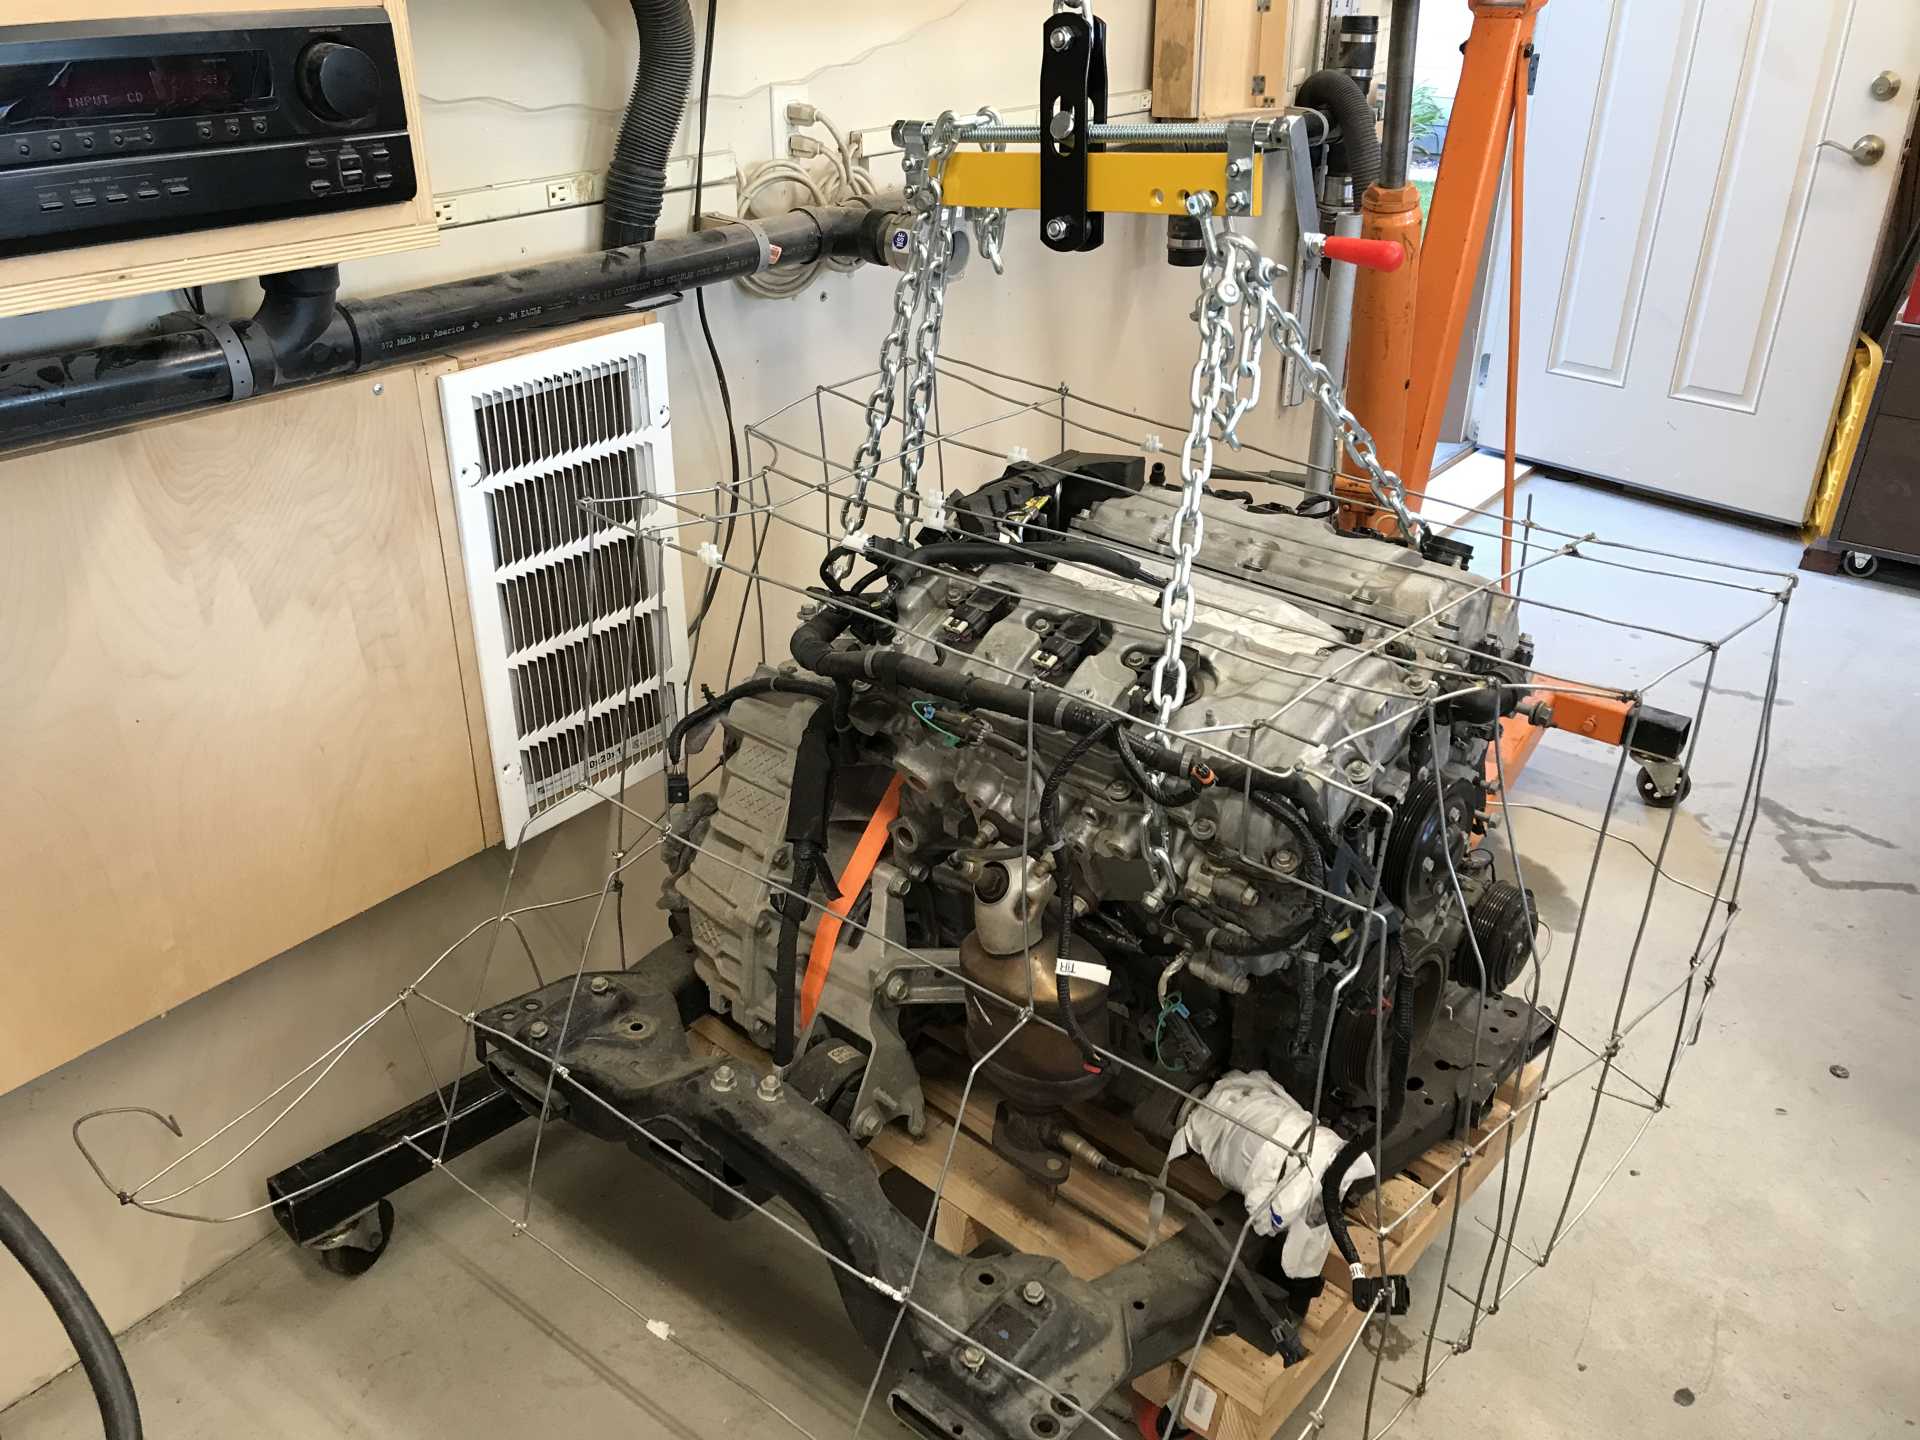
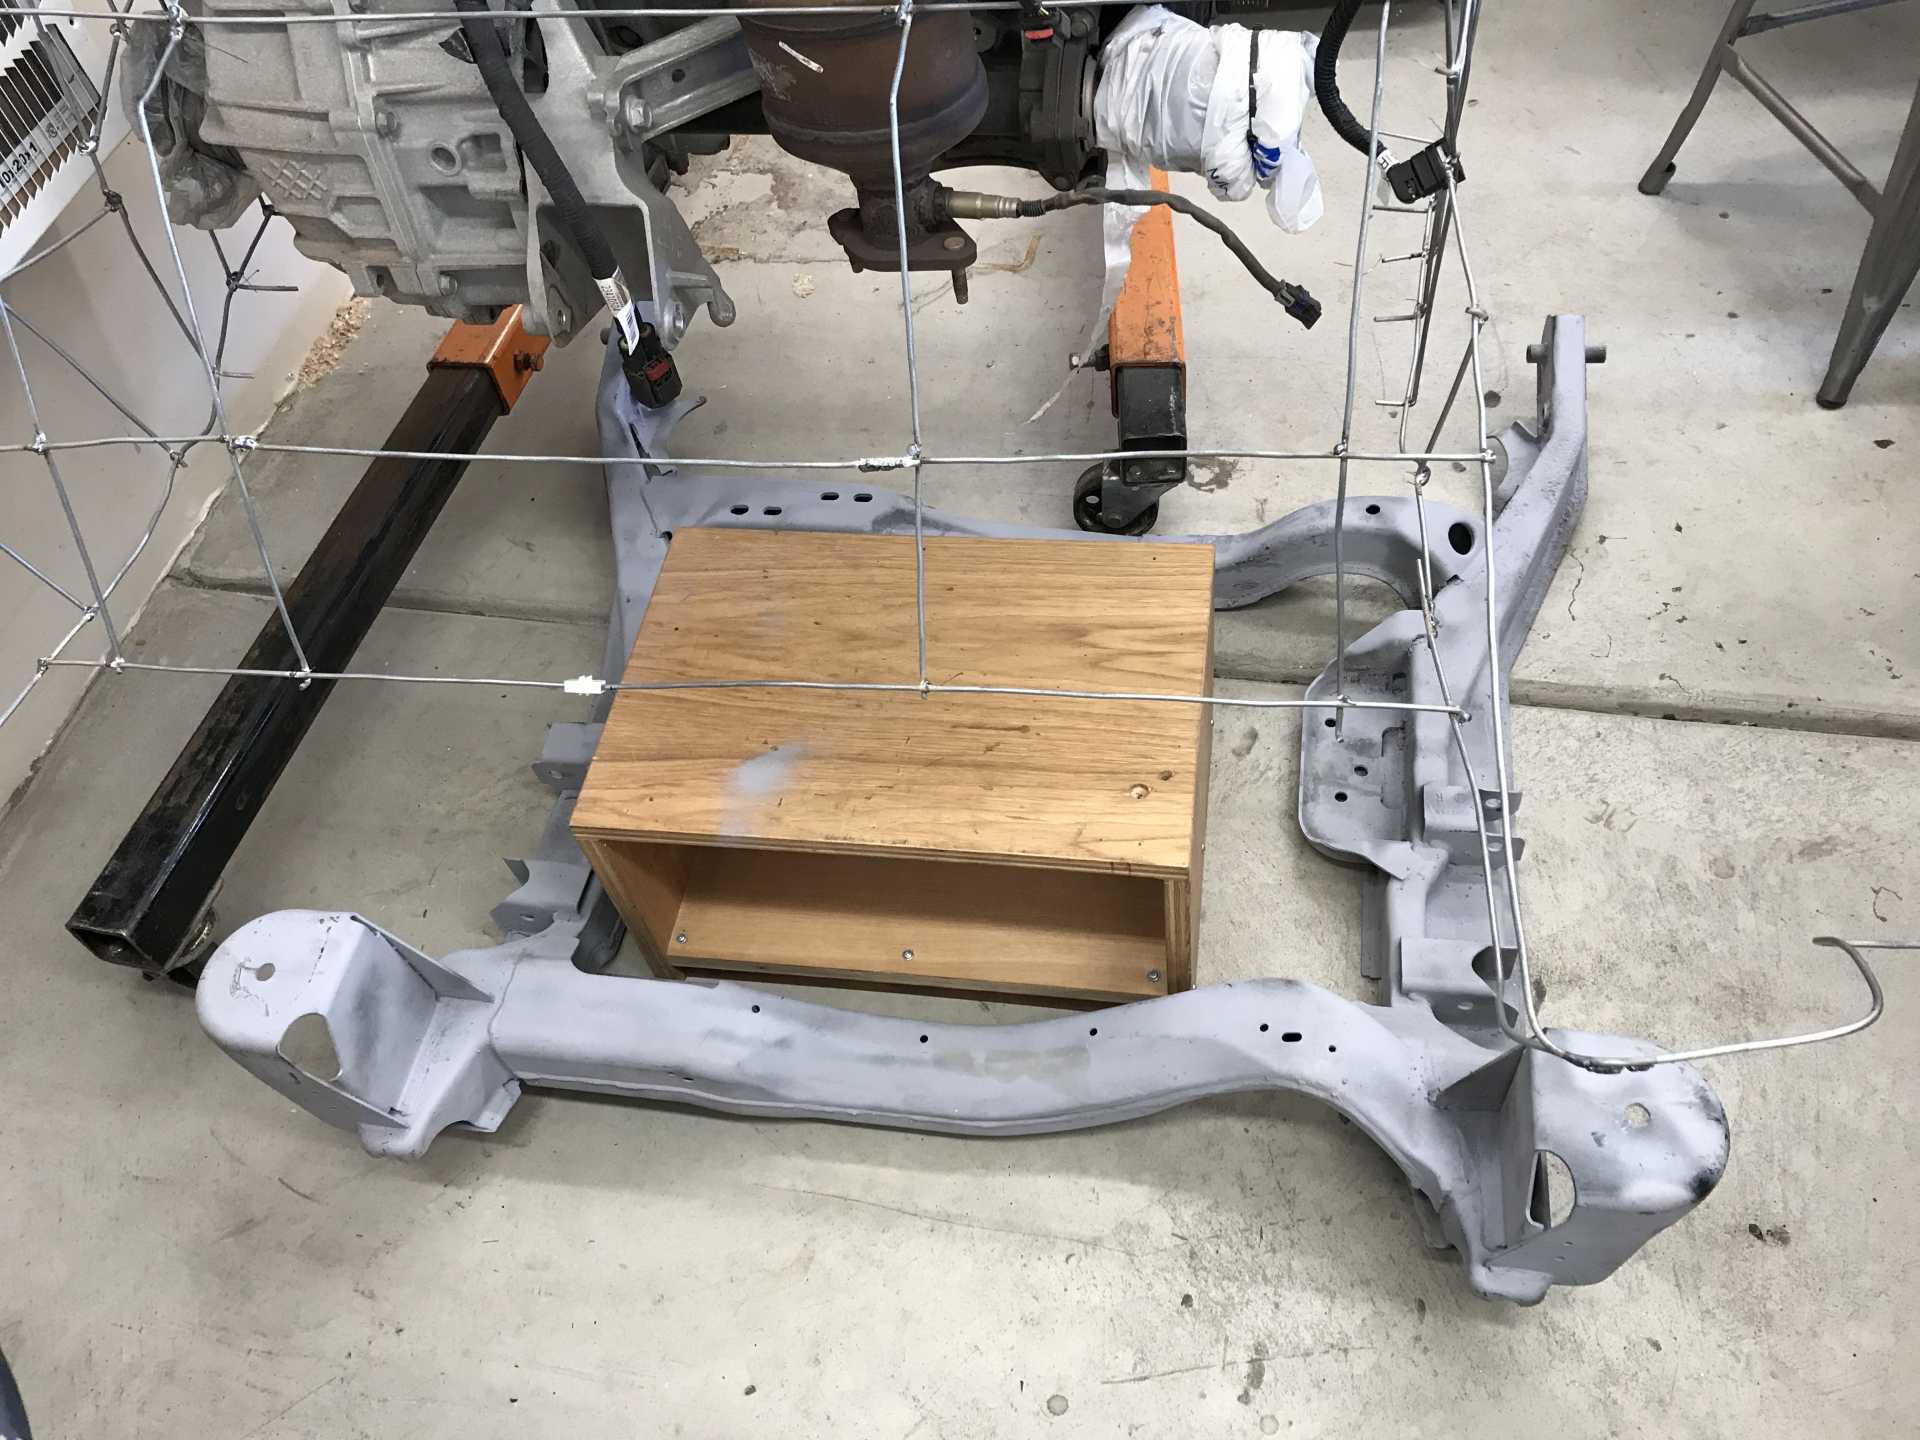
My first thought when comparing the two engines was "How will this ever fit?" and how do I figure out how to locate it? The answer was to build a birdcage. Running over to our local Tractor Supply (North Idaho has both Farms and Tractors so farming supplies are readily available) I bought a 170' coil of #9 steel wire. I then put a second cradle for the FIero in place and spent about 3 days making a model of the engine space out of the wire, piece by piece, welding the joints of the different pieces together. The birdcage had four locating wires on the cradle exterior. Up front there were two holes on the side rails and in the rear I followed the bottom of the cradle where it steps up to the rear cradle mounts. The cradle gave me the dimensions and the locating pins related it's position to the cradle.
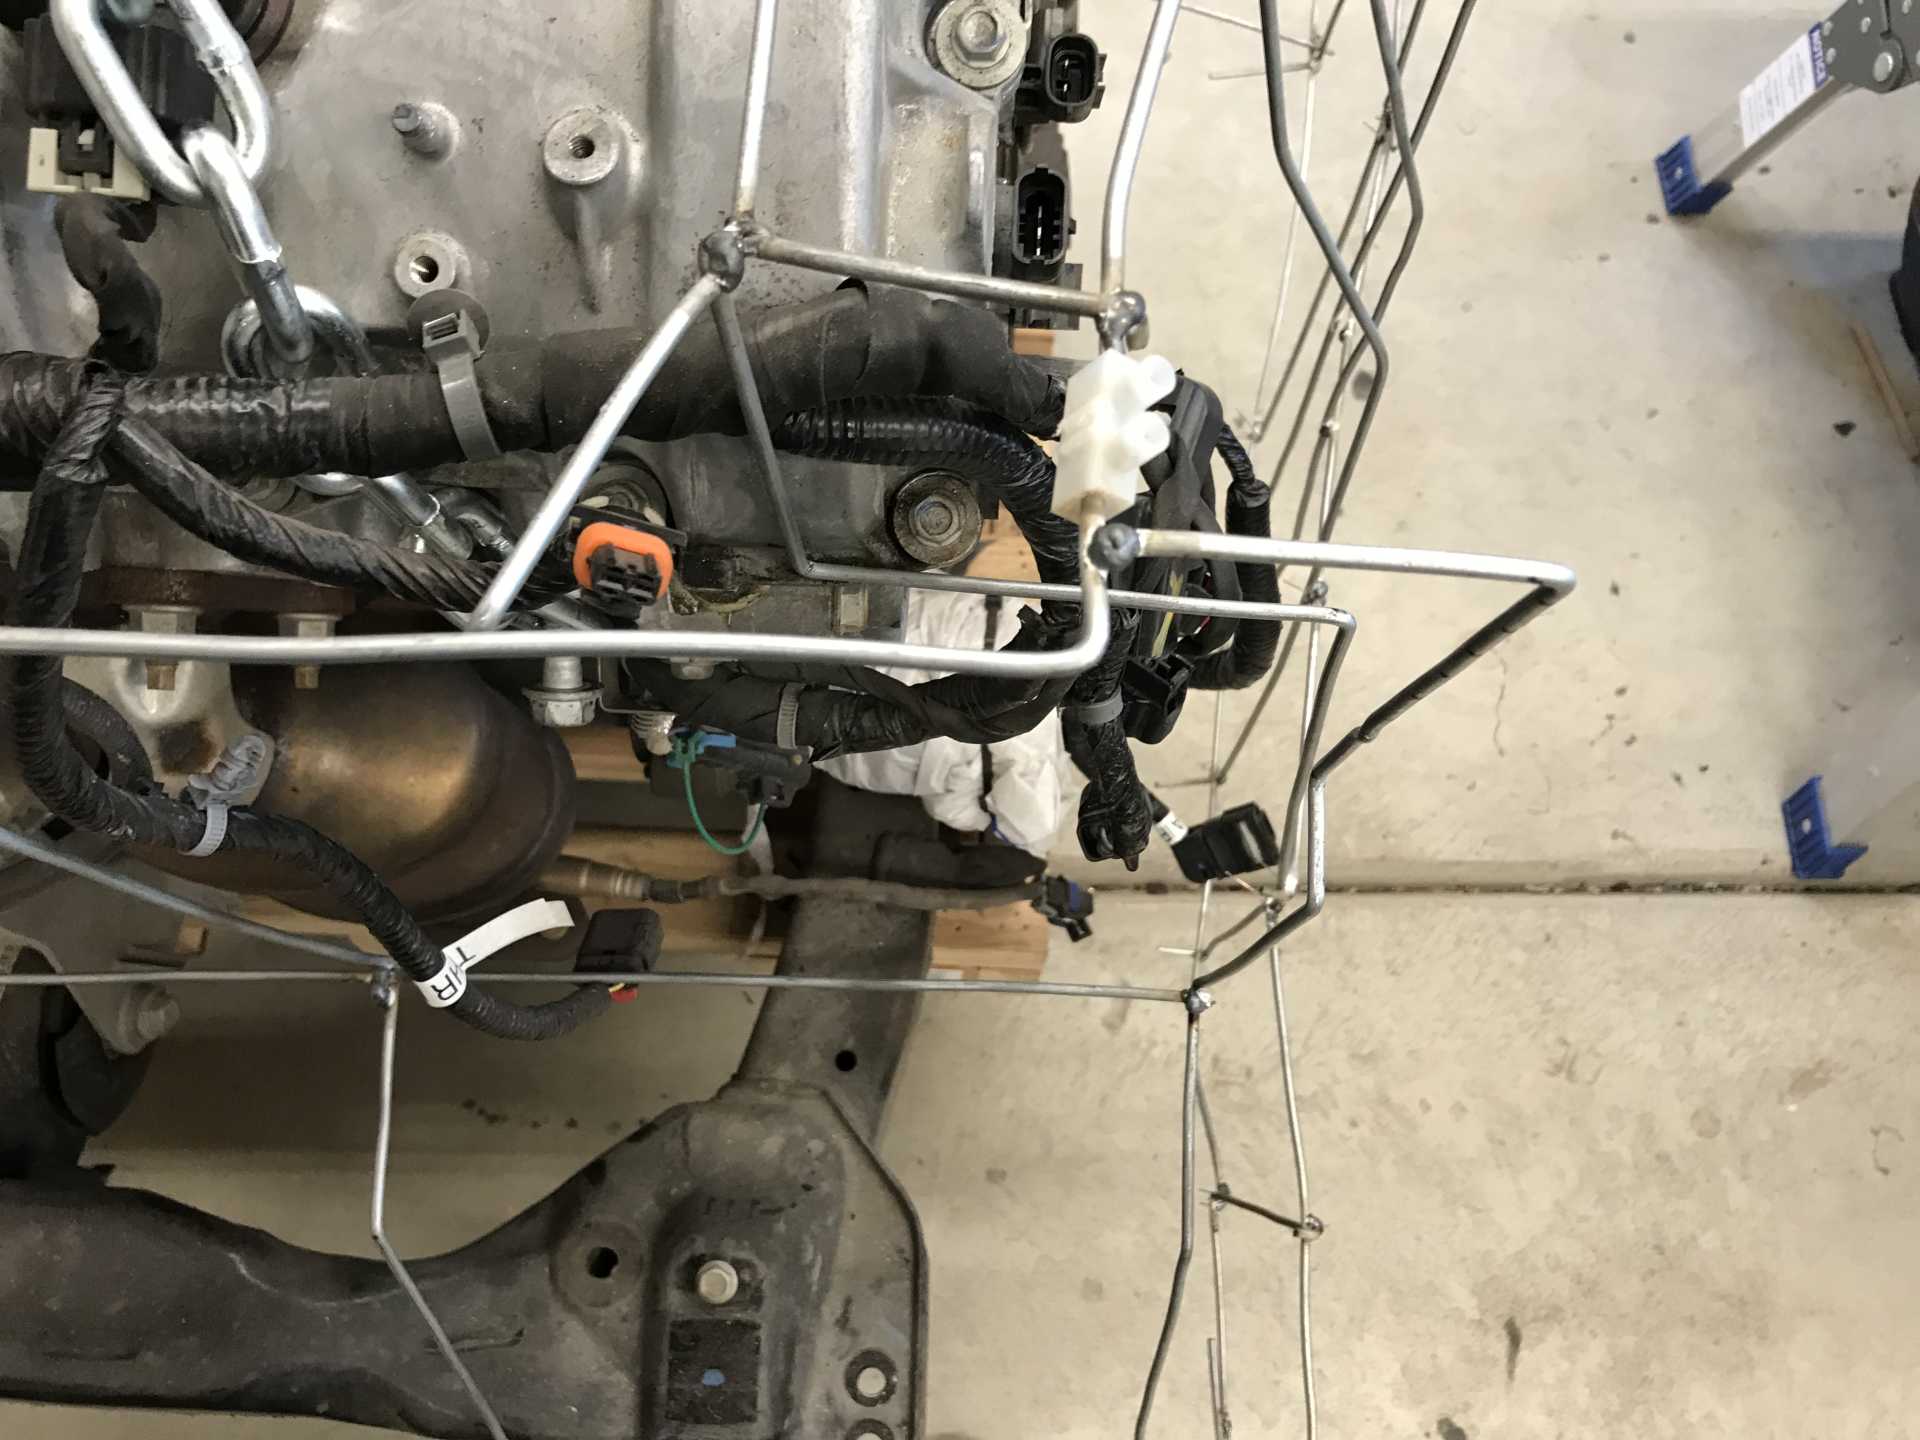
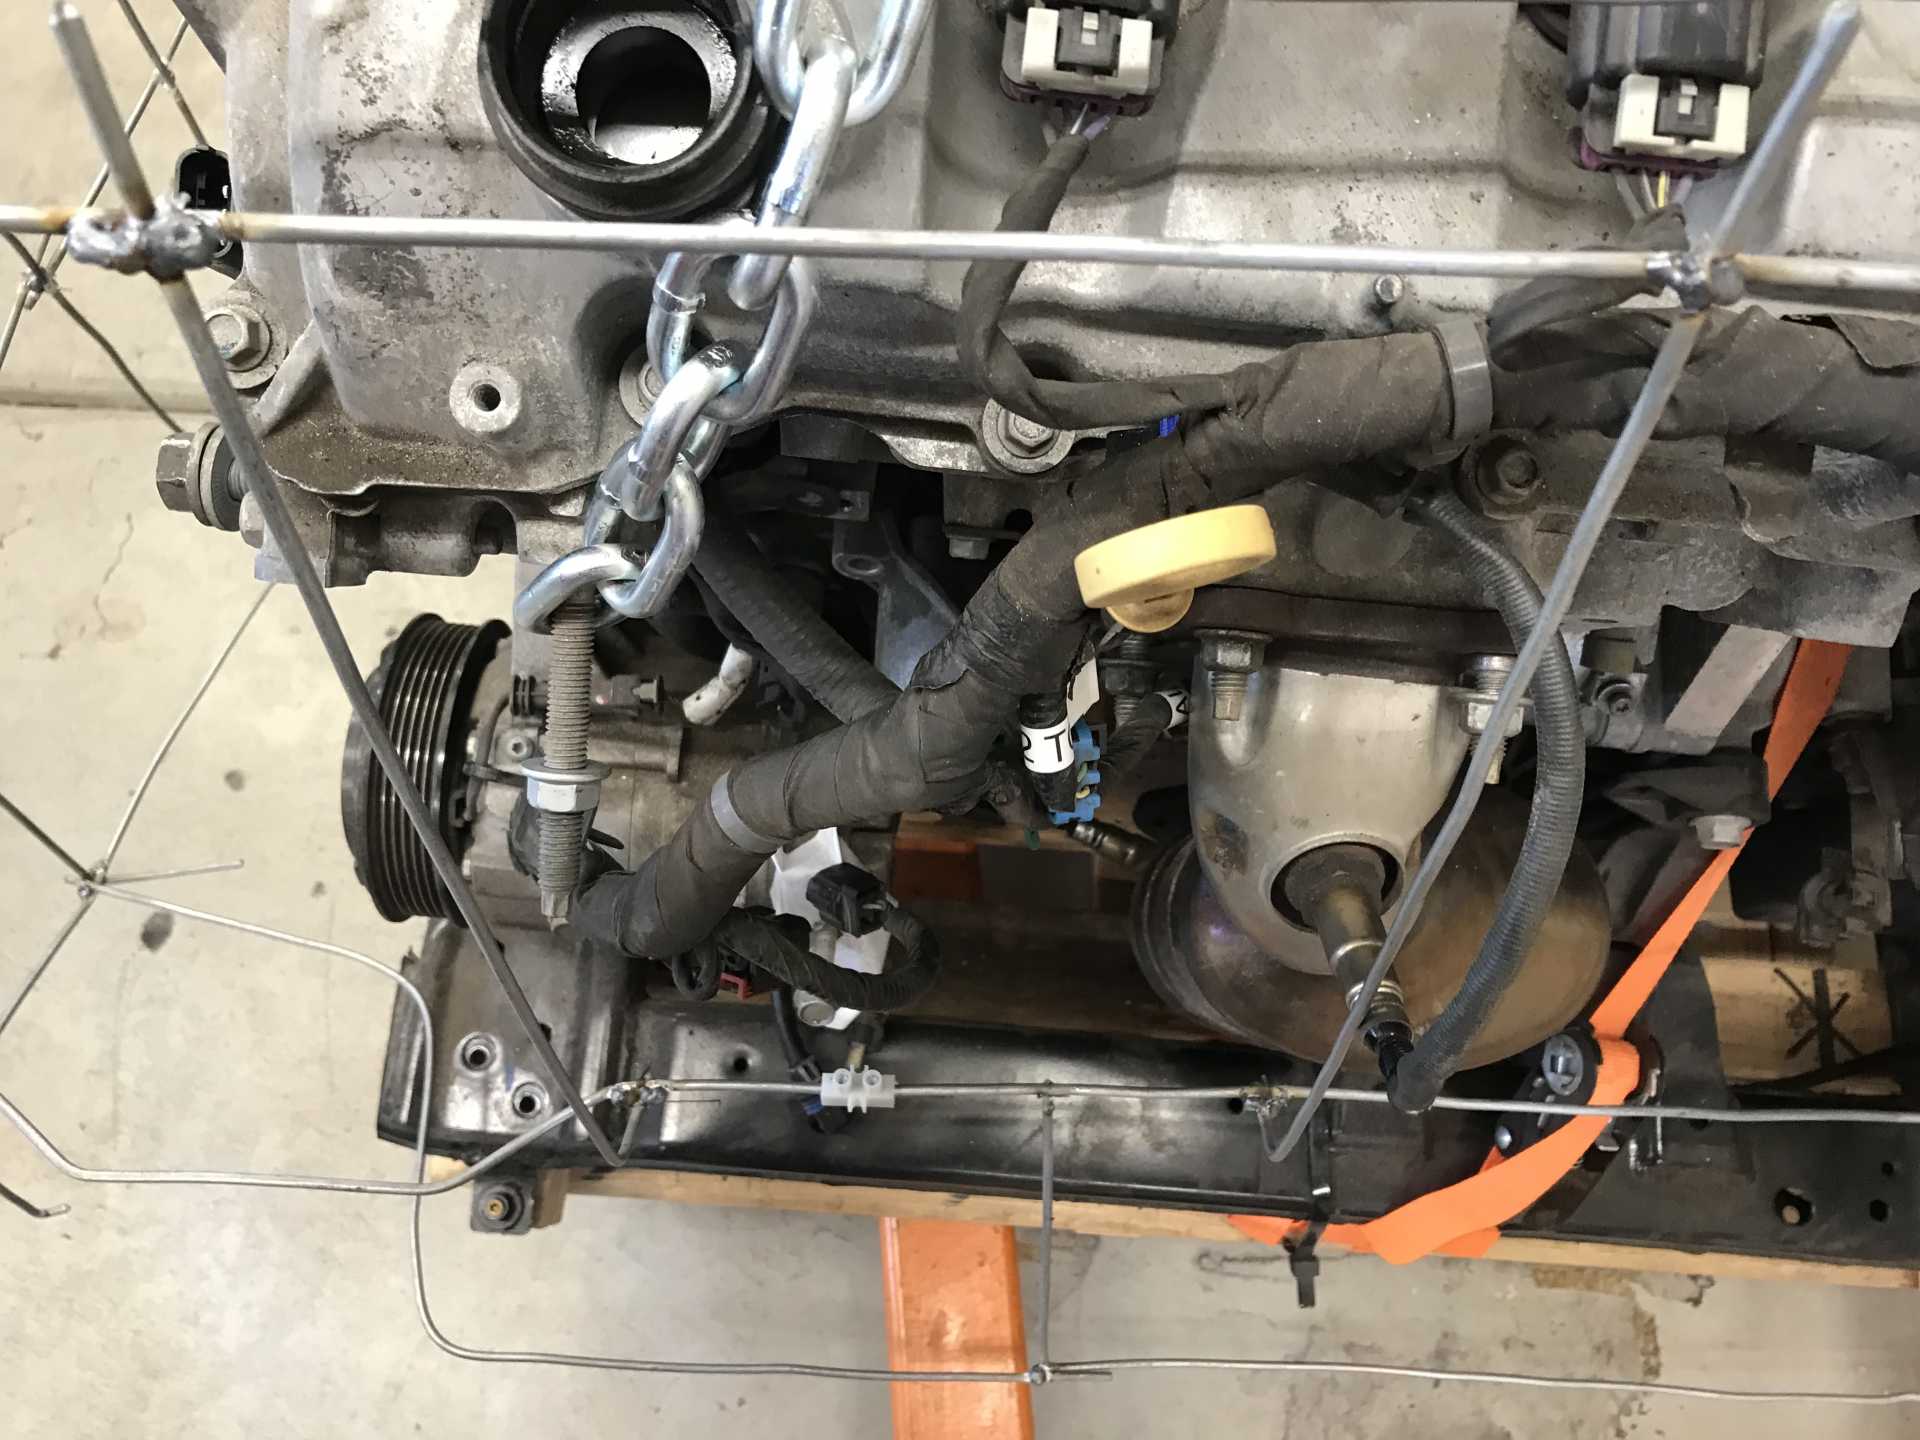
Once the birdcage was finished I dropped the second cradle from the Fiero and cut the birdcage in half left to right so it could be easily removed. The halves were fastened together with some screw-type electrical butt connectors. Then I dropped the birdcage over the LFX while it was still on the Impala cradle. First fitting showed that it would fit in the bay but there were some real concerns. The engine would need to be as low as possible to allow the aft head to clear the right shock tower, the cat converters had two O2 sensors that would need to be moved, The engine would need to be shifted to the left an inch or so, also for the aft head to clear the shock tower, The dog bone would need to go, the transmission would need to be notched to clear the left rear suspension arm attachment to the cradle, the cradle would need some cutting to clear the transmission and engine parts and the engine mounts would be a big problem.
Birdcage on LFX on Impala Cradle
The Aft Head too Close to Tower
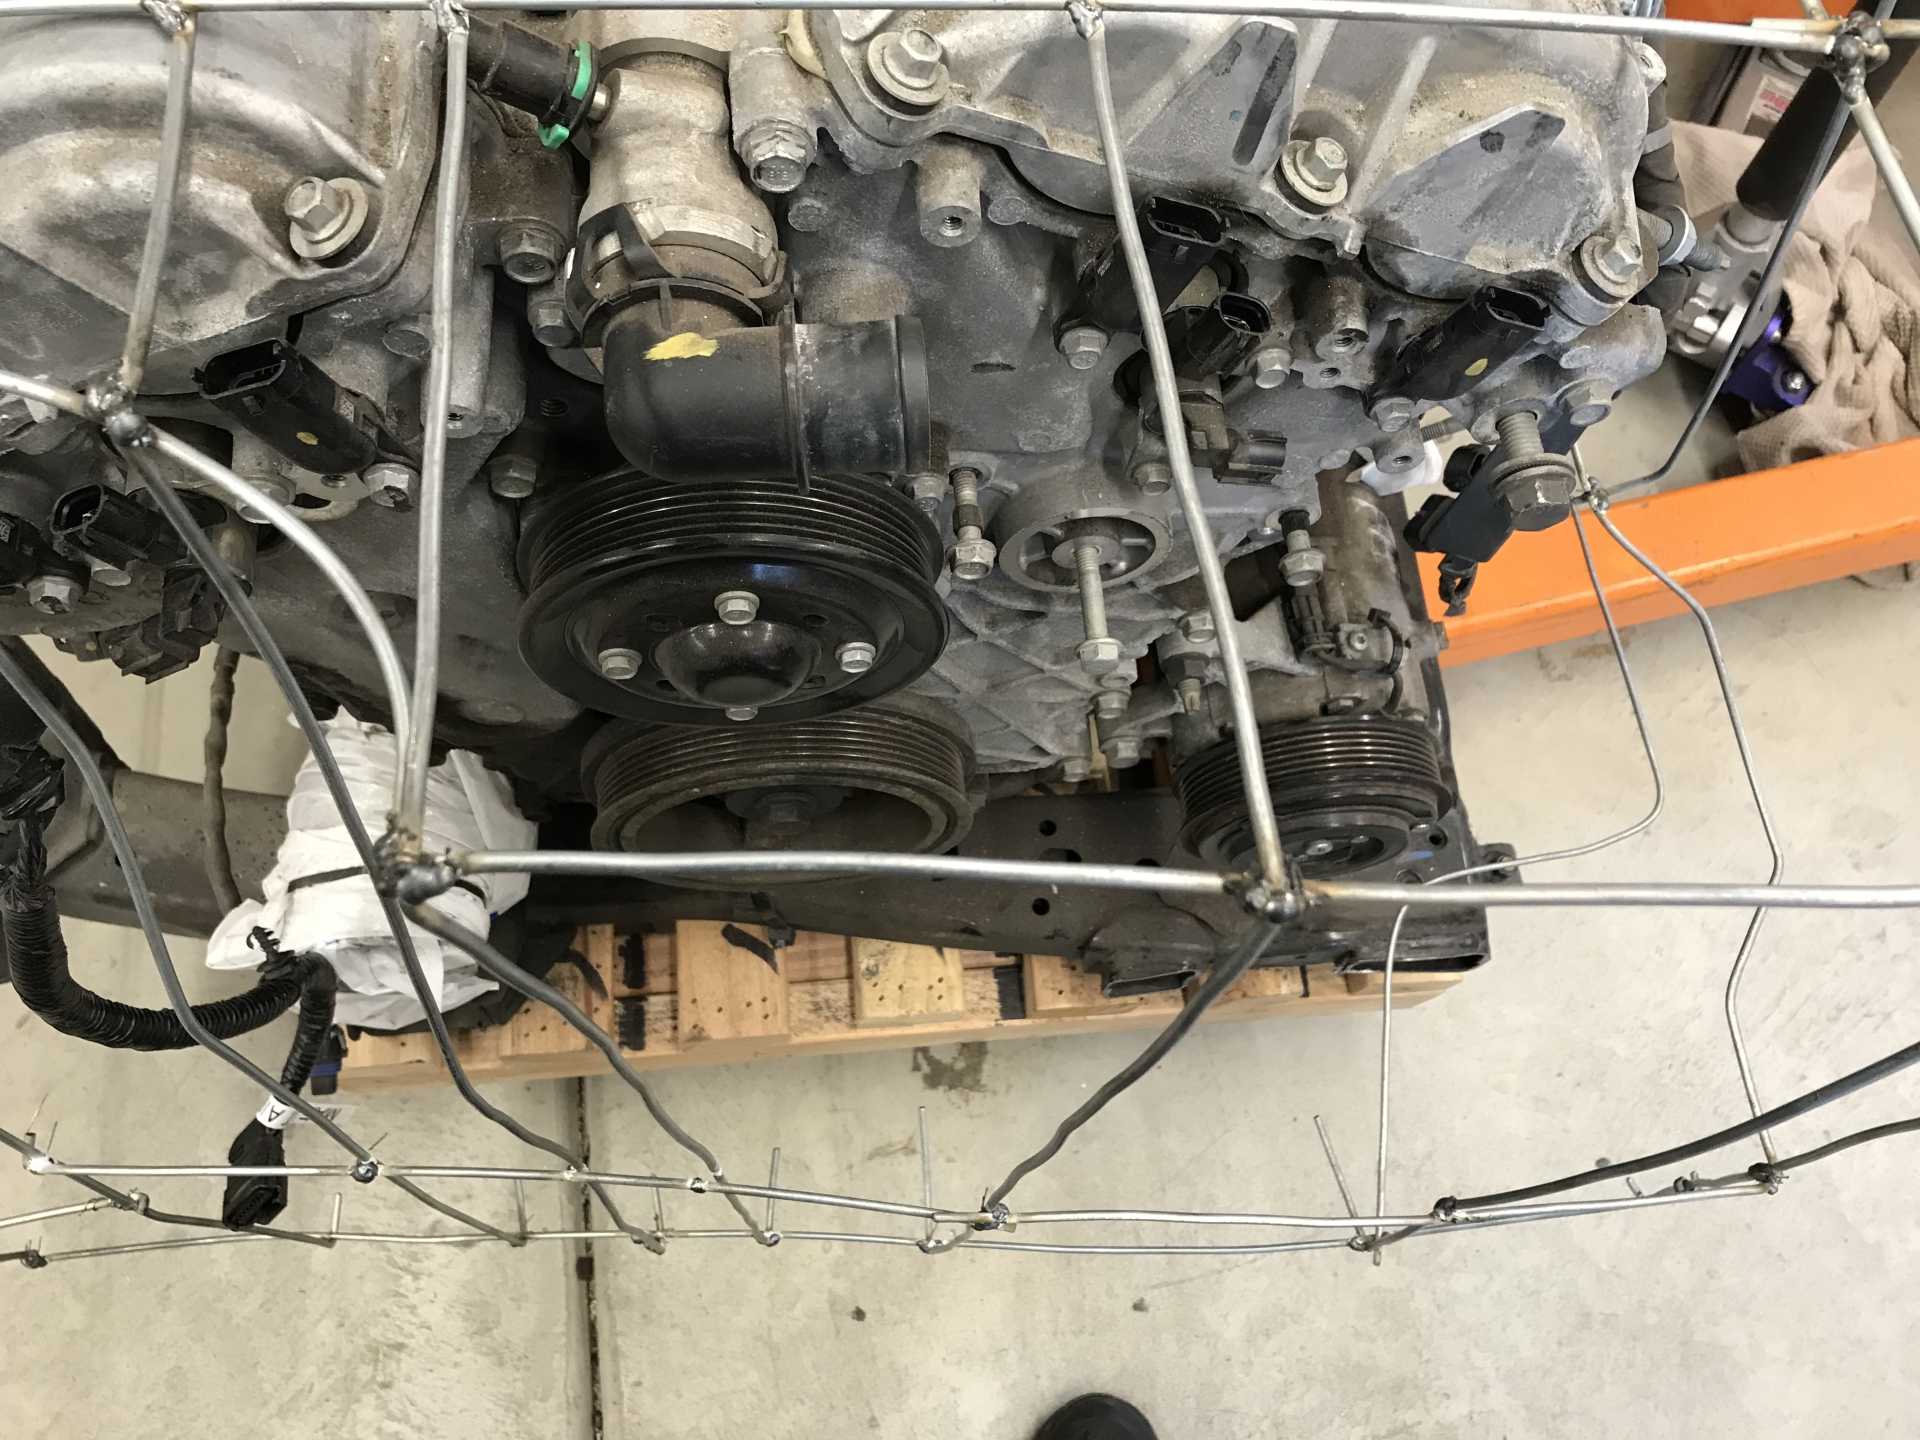
Good Room on Accessory side of engine, Alternator will fit above A/C Compressor
O2 Sensor Needs Moving
Birdcage on LFX, Lowering to Cradle
On the good side the exhaust would be not too difficult since there is a notch in the oil pan for the front pipe to cross under the engine to the rear where it links up to the rear cat converter. The transmission is a boxy lump that has no parts beside the engine like the 4T65. All of it is behind the engine on the left of the car. The only access needed is on the front of the transmission where there is an electrical connector and on top where the gear selector is located.
Next, The Cradle & Motor Mounts
[This message has been edited by MikesFirstFiero (edited 07-30-2021).]
I was concerned about the engine location and preventing interference. I really don't want to need to install it and find I missed something that could have been avoided. I've used it several times to check the position when building the motor mounts and cradle mods. I'll post that in a few days.
[This message has been edited by MikesFirstFiero (edited 07-30-2021).]
I do like the bird cage. I was fortunate enough have a Fireo parts car that was a front end total. I cut off the rear end and used it as a mobile Fireo engine bay that had hinges. It was a little difficult to move around, but I could move it by my self without any help. I will be watching closely
Just a suggestion, can the Impala cradle be modified to fit in the Fiero rather than modifying the Fiero cradle? It all depends of the extent of modifications. Don't be afraid of cutting and modifying the strut towers. You can gain several inches of room with this mod. But this modification requires a coil over strut. You may already consider coil over struts anyway because of the versatility of spring rates and weight jacking.
It sounds like you are figuring it all out. I would venture to say that your measurements confirming a tight fit are exactly why the LFX auto swap is not popular. I'm sure that you will get this installed and running but only after some real fabrication work is done. It may be inspirational to know that some Fiero owners have fit the LS4 V8/auto swap in their cars
------------------ " THE BLACK PARALYZER" -87GT 3800SC Series III engine, custom ZZP /Frozen Boost Intercooler setup, 3.4" Pulley, Northstar TB, LS1 MAF, 3" Spintech/Hedman Exhaust, P-log Manifold, Autolite 104's, MSD wires, Custom CAI, 4T65eHD w. custom axles, Champion Radiator, S10 Brake Booster, HP Tuners VCM Suite. "THE COLUSSUS" 87GT - ALL OUT 3.4L Turbocharged engine, Garrett Hybrid Turbo, MSD ign., modified TH125H " ON THE LOOSE WITHOUT THE JUICE "
A Northstar fits an early Fiero chassis with the bellhousing in the stock location and cutting on the trunk wall dogbone mount and the right hinge box. For an '88, there's some carving on the right strut tower required.
The LFX is smaller than the Northstar and probably won't require cutting the strut tower unless you need to move the bellhousing flange to the right for transmission fitment reasons. It most likely will require cutting the trunk wall dogbone mount.
Although... does the 3.4 TDC require cutting the trunk wall dogbone mount?
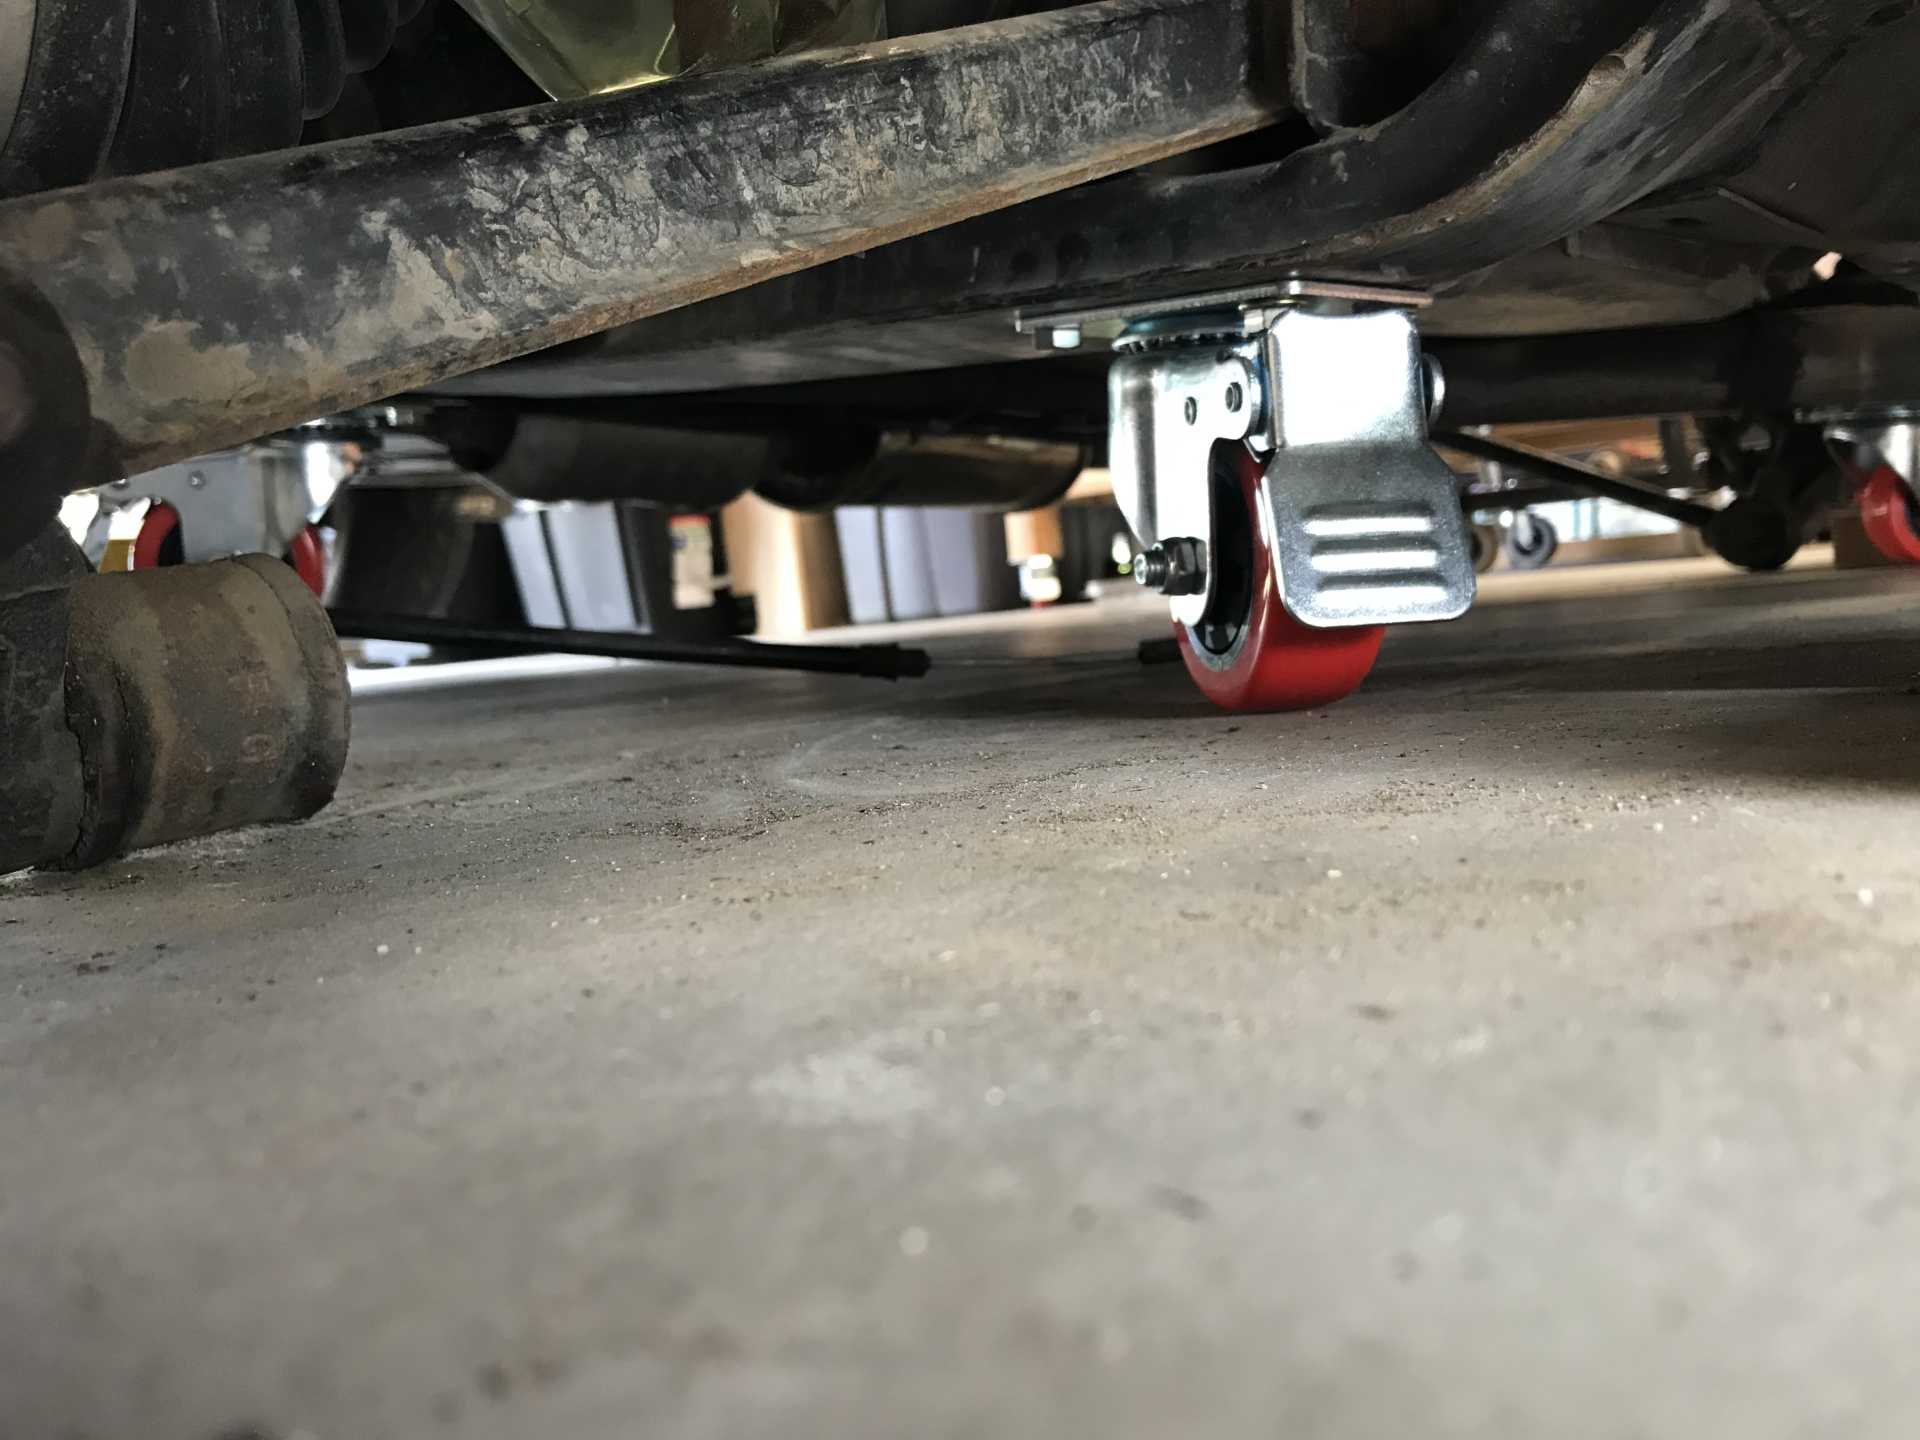
The casters are from Home Depot. I've used them on very heavy shop tables and they seem to hold up well. There were no holes in the cradle so I jacked up the car and placed them on the flat bottom part of the cradle. Three of them were simple, the fourth was more of a problem and required a shim. The front ones are fairly close to the center of mass but I've had no problems with it tipping. I drilled & tapped 16 holes in the cradle and mounted the casters carefully since the bottom plate isn't very thick. I figure that 16 screws holding 900 pounds was an acceptable load since half of the screws are normally in compresson and the other half in tension with a longer arm distance. So far it has worked well, even with the LFX, sway bar, trunnions, & hubs on it. Besides being easy to move it also provides a low ground clearance so the car does not need to be raised too high since my hoist is not that tall.
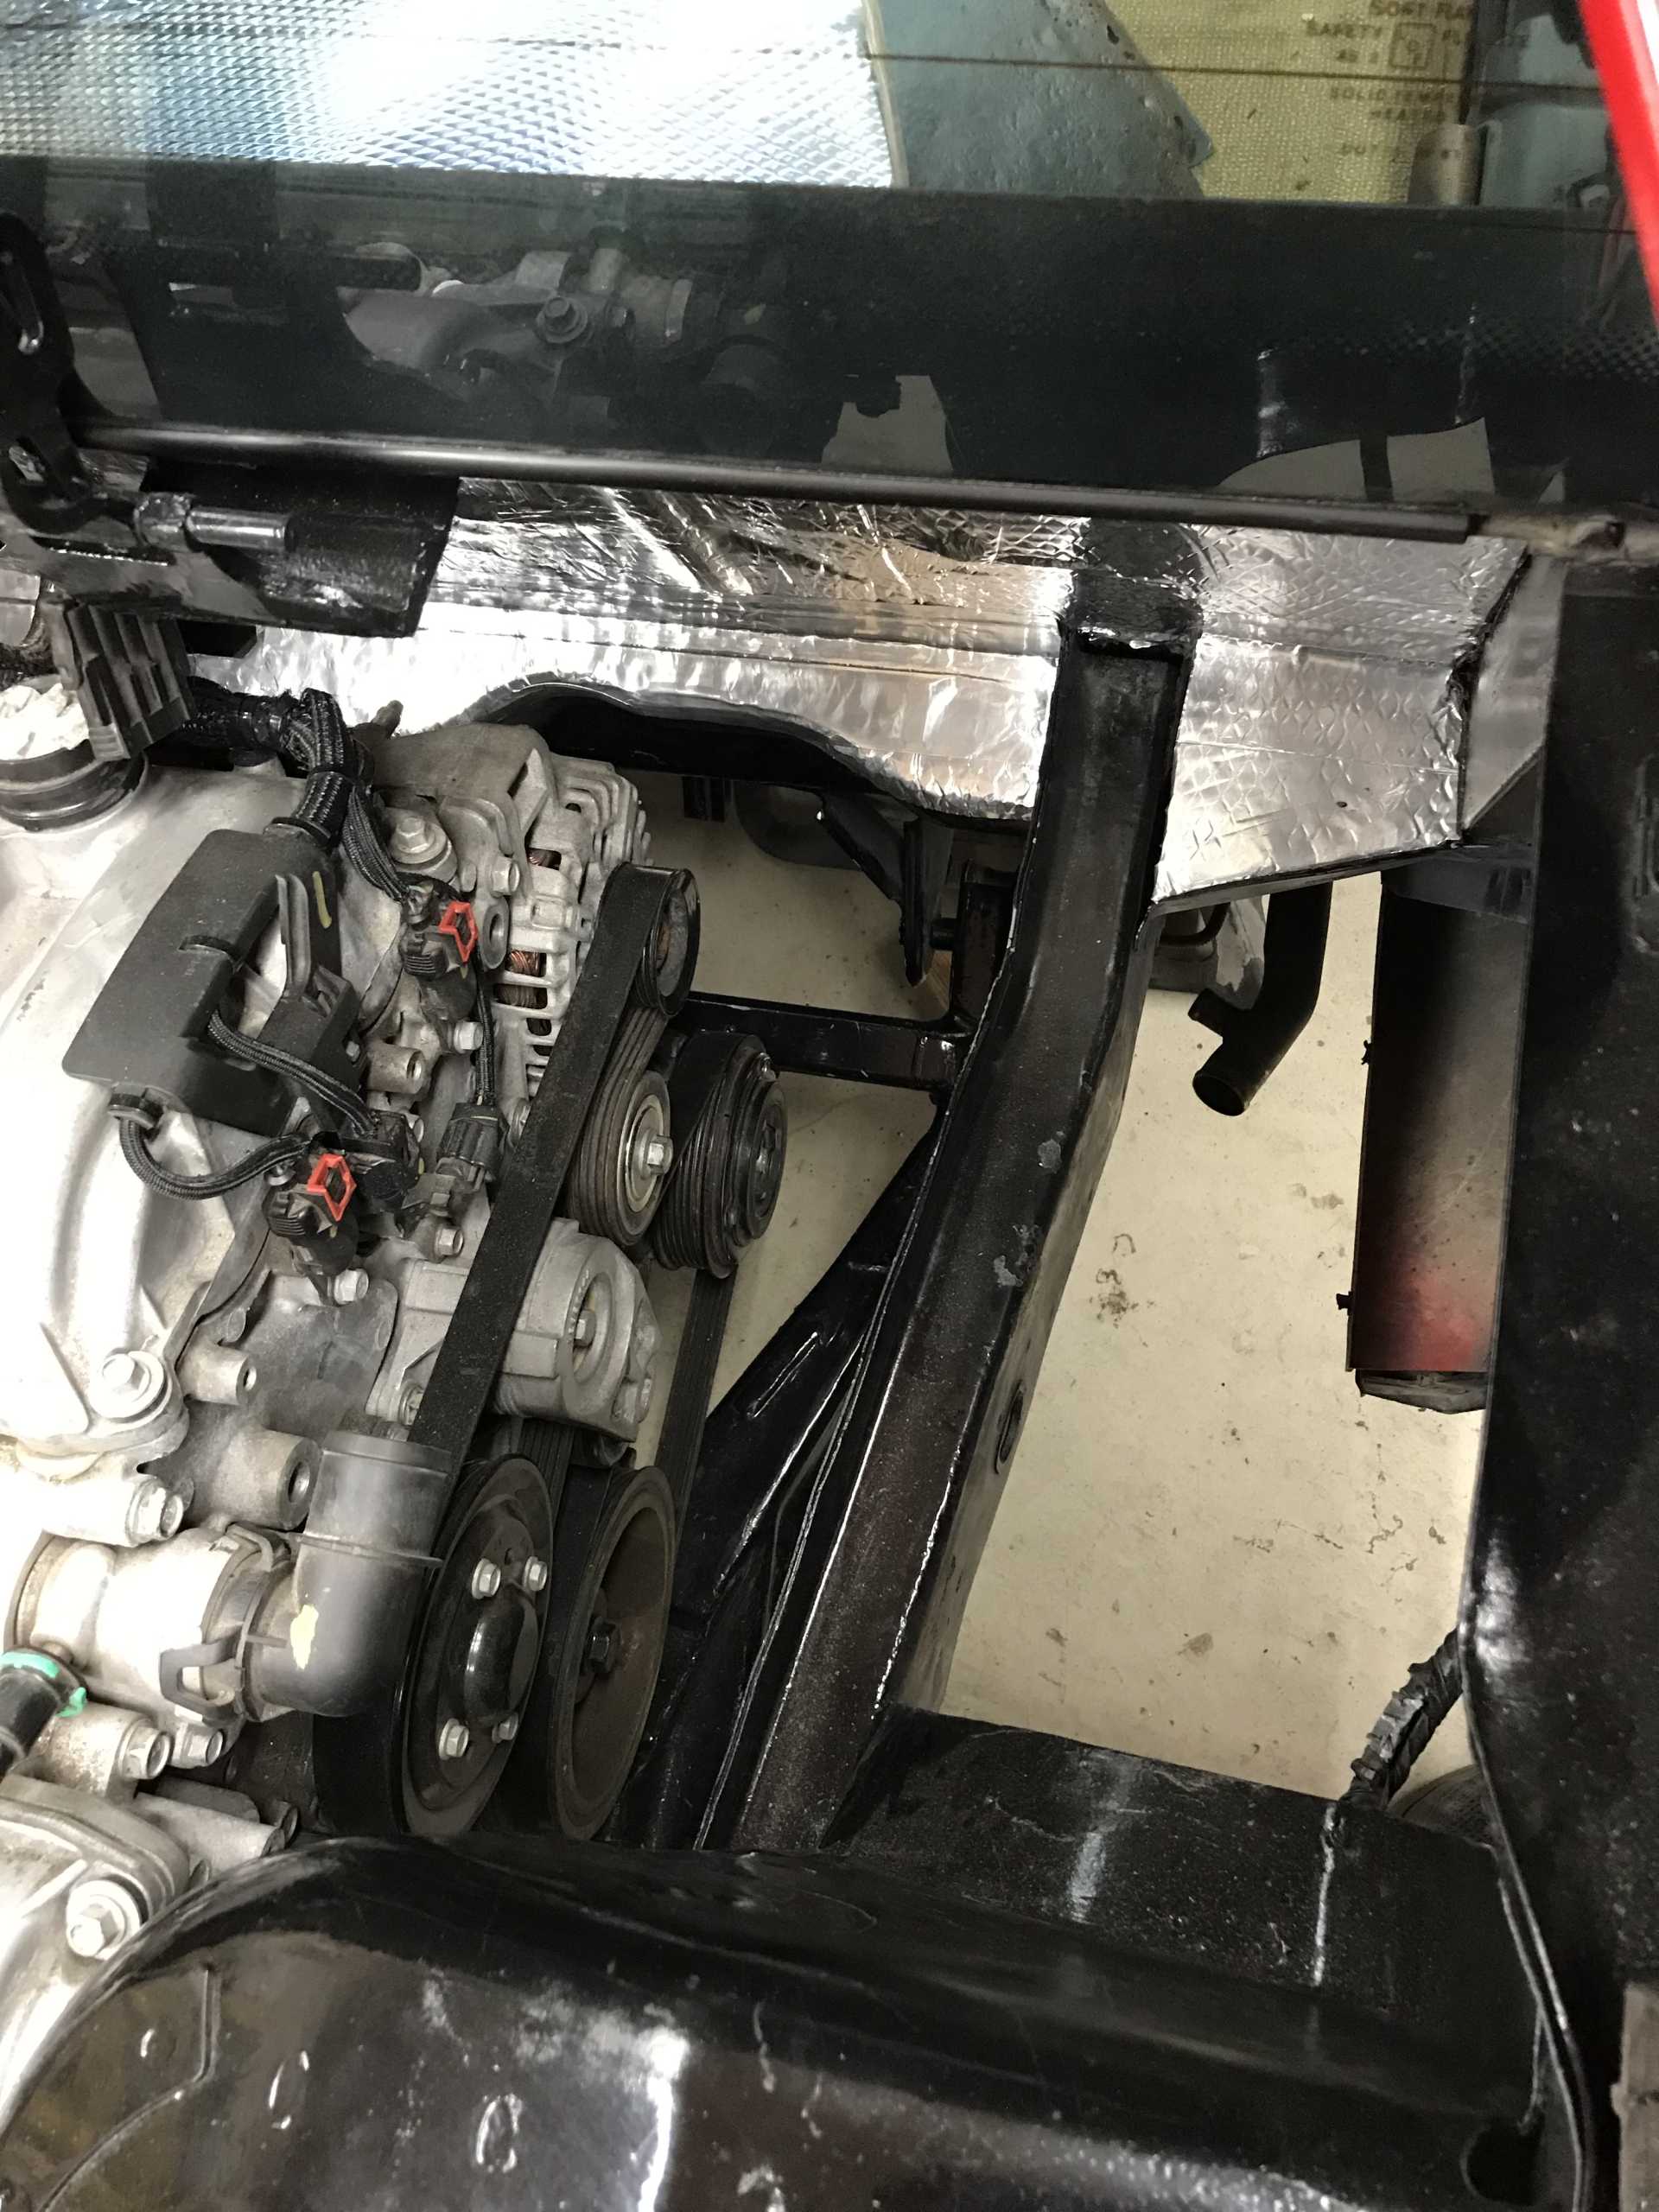
Having some kind of engine bay template is a great help in sorting out the location I've lowered the engine as much as possible so the bottom of the oil pan is flush with the bottom of the cradle side rails. if the engine with the Intake Manifold is too high then adding a bigger hump in the deck lid is not so difficult to do. The fore-aft and side to side locations are really the problem. I've thought of trimming the right side shock tower but I think it will fit on without doing so. At least the birdcage says it will fit. Front to back was important so the alternator would fit in front of the engine (stock LFX location) above the A/C compressor. Nice thing about this engine is other than some sensors, the starter & oil filter there is nothing needing servicing on the engine flanks. Plugs are on top and there are only 4 bolts per downpipe and all of them are easily accessible.
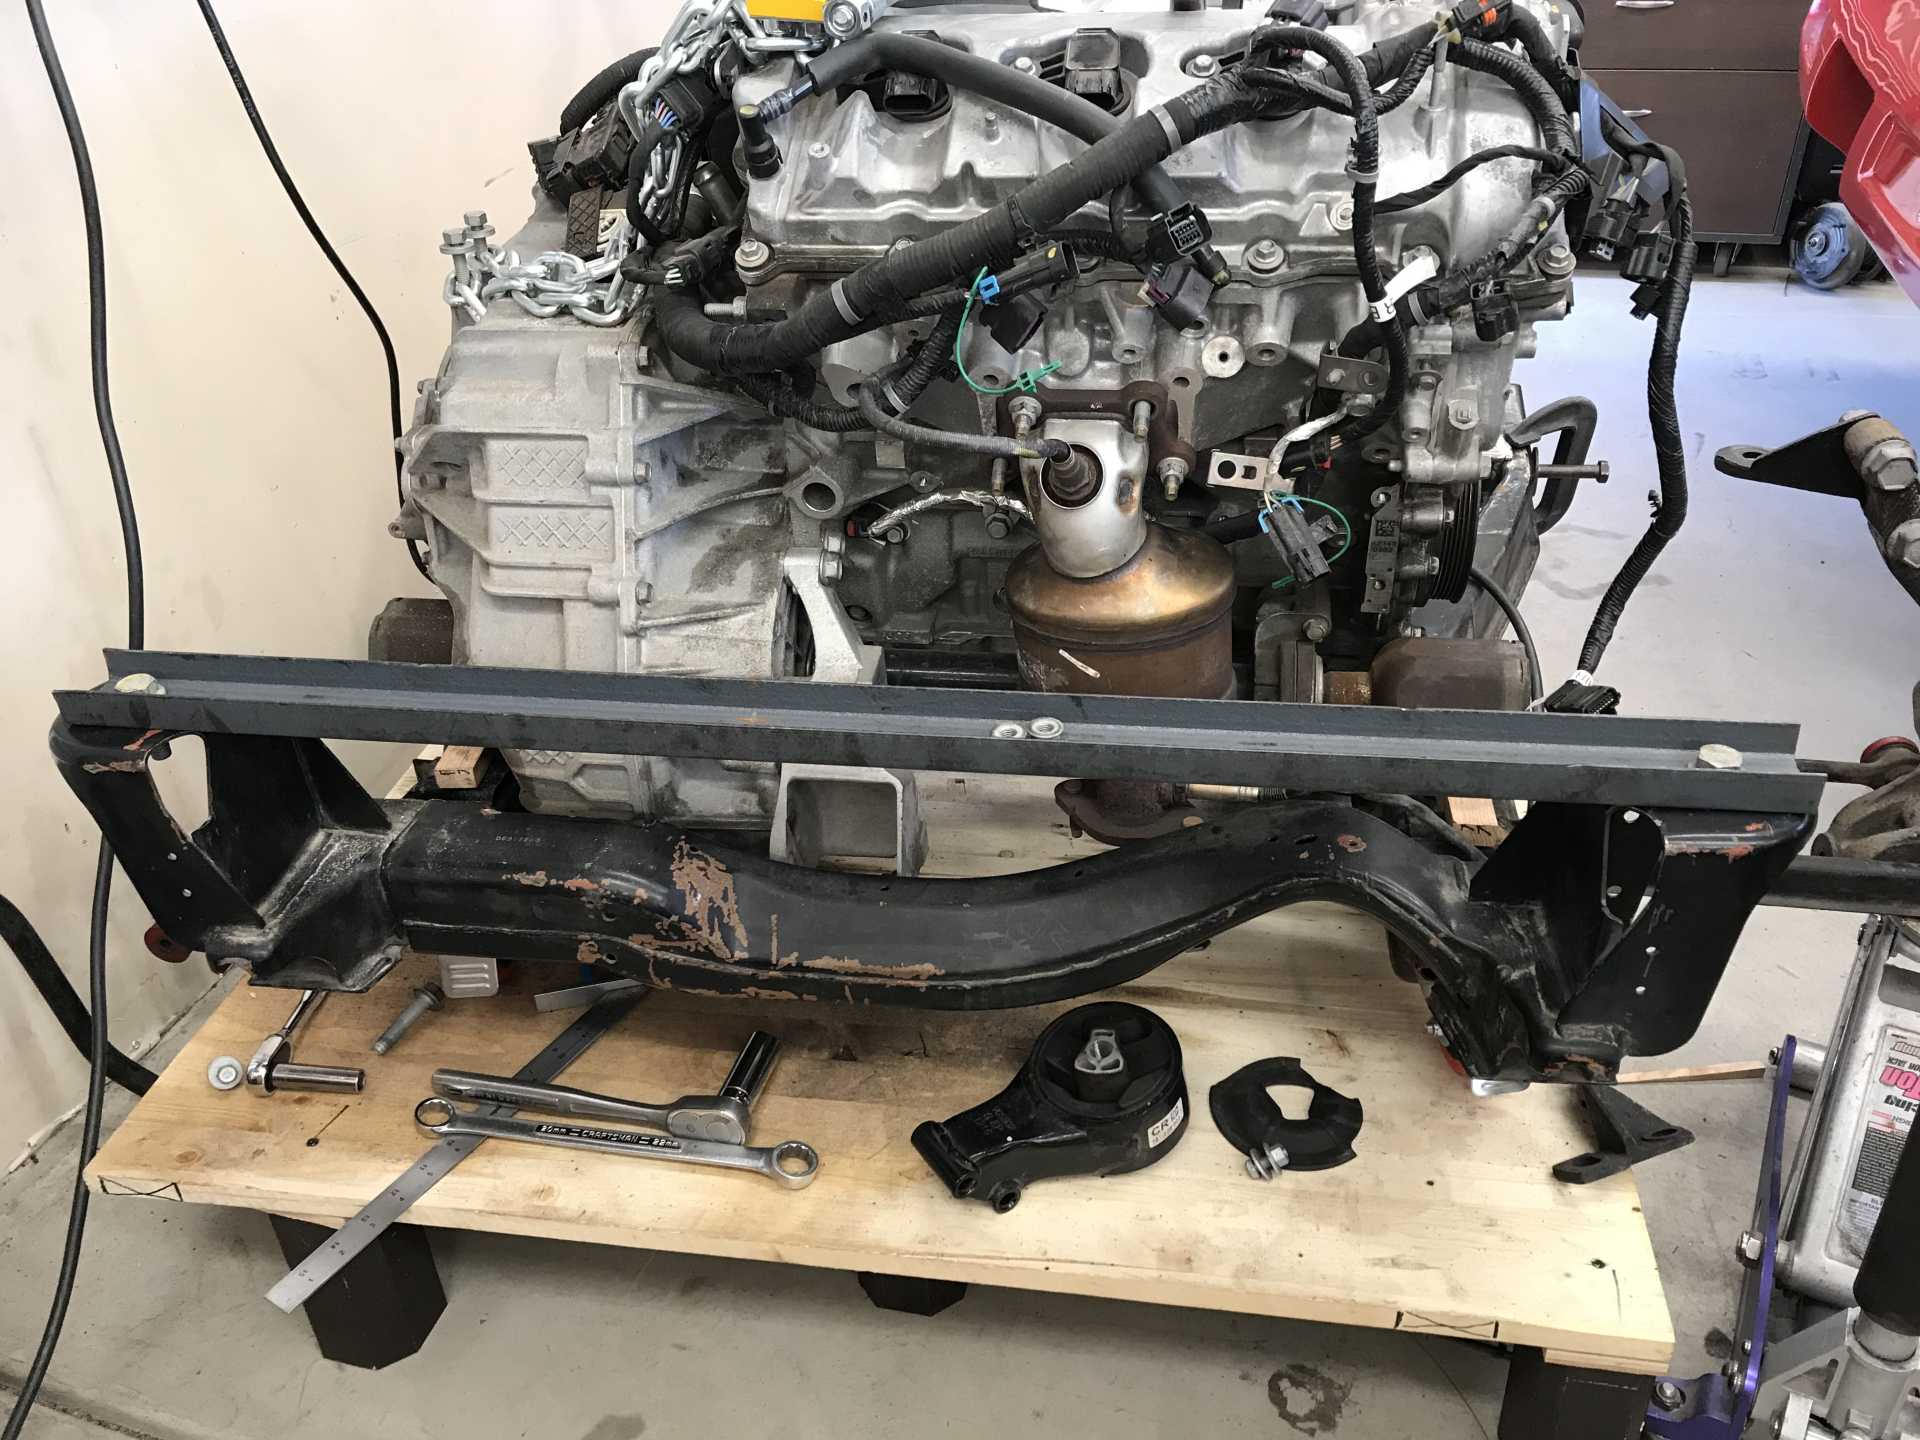
The Impala cradle is very long and flat and seemed to be a lot of work to convert it to fit the Fiero mounting points. In my next update you will see that i did re-use two of the Impala motor mounts and two of the cradle isolators.
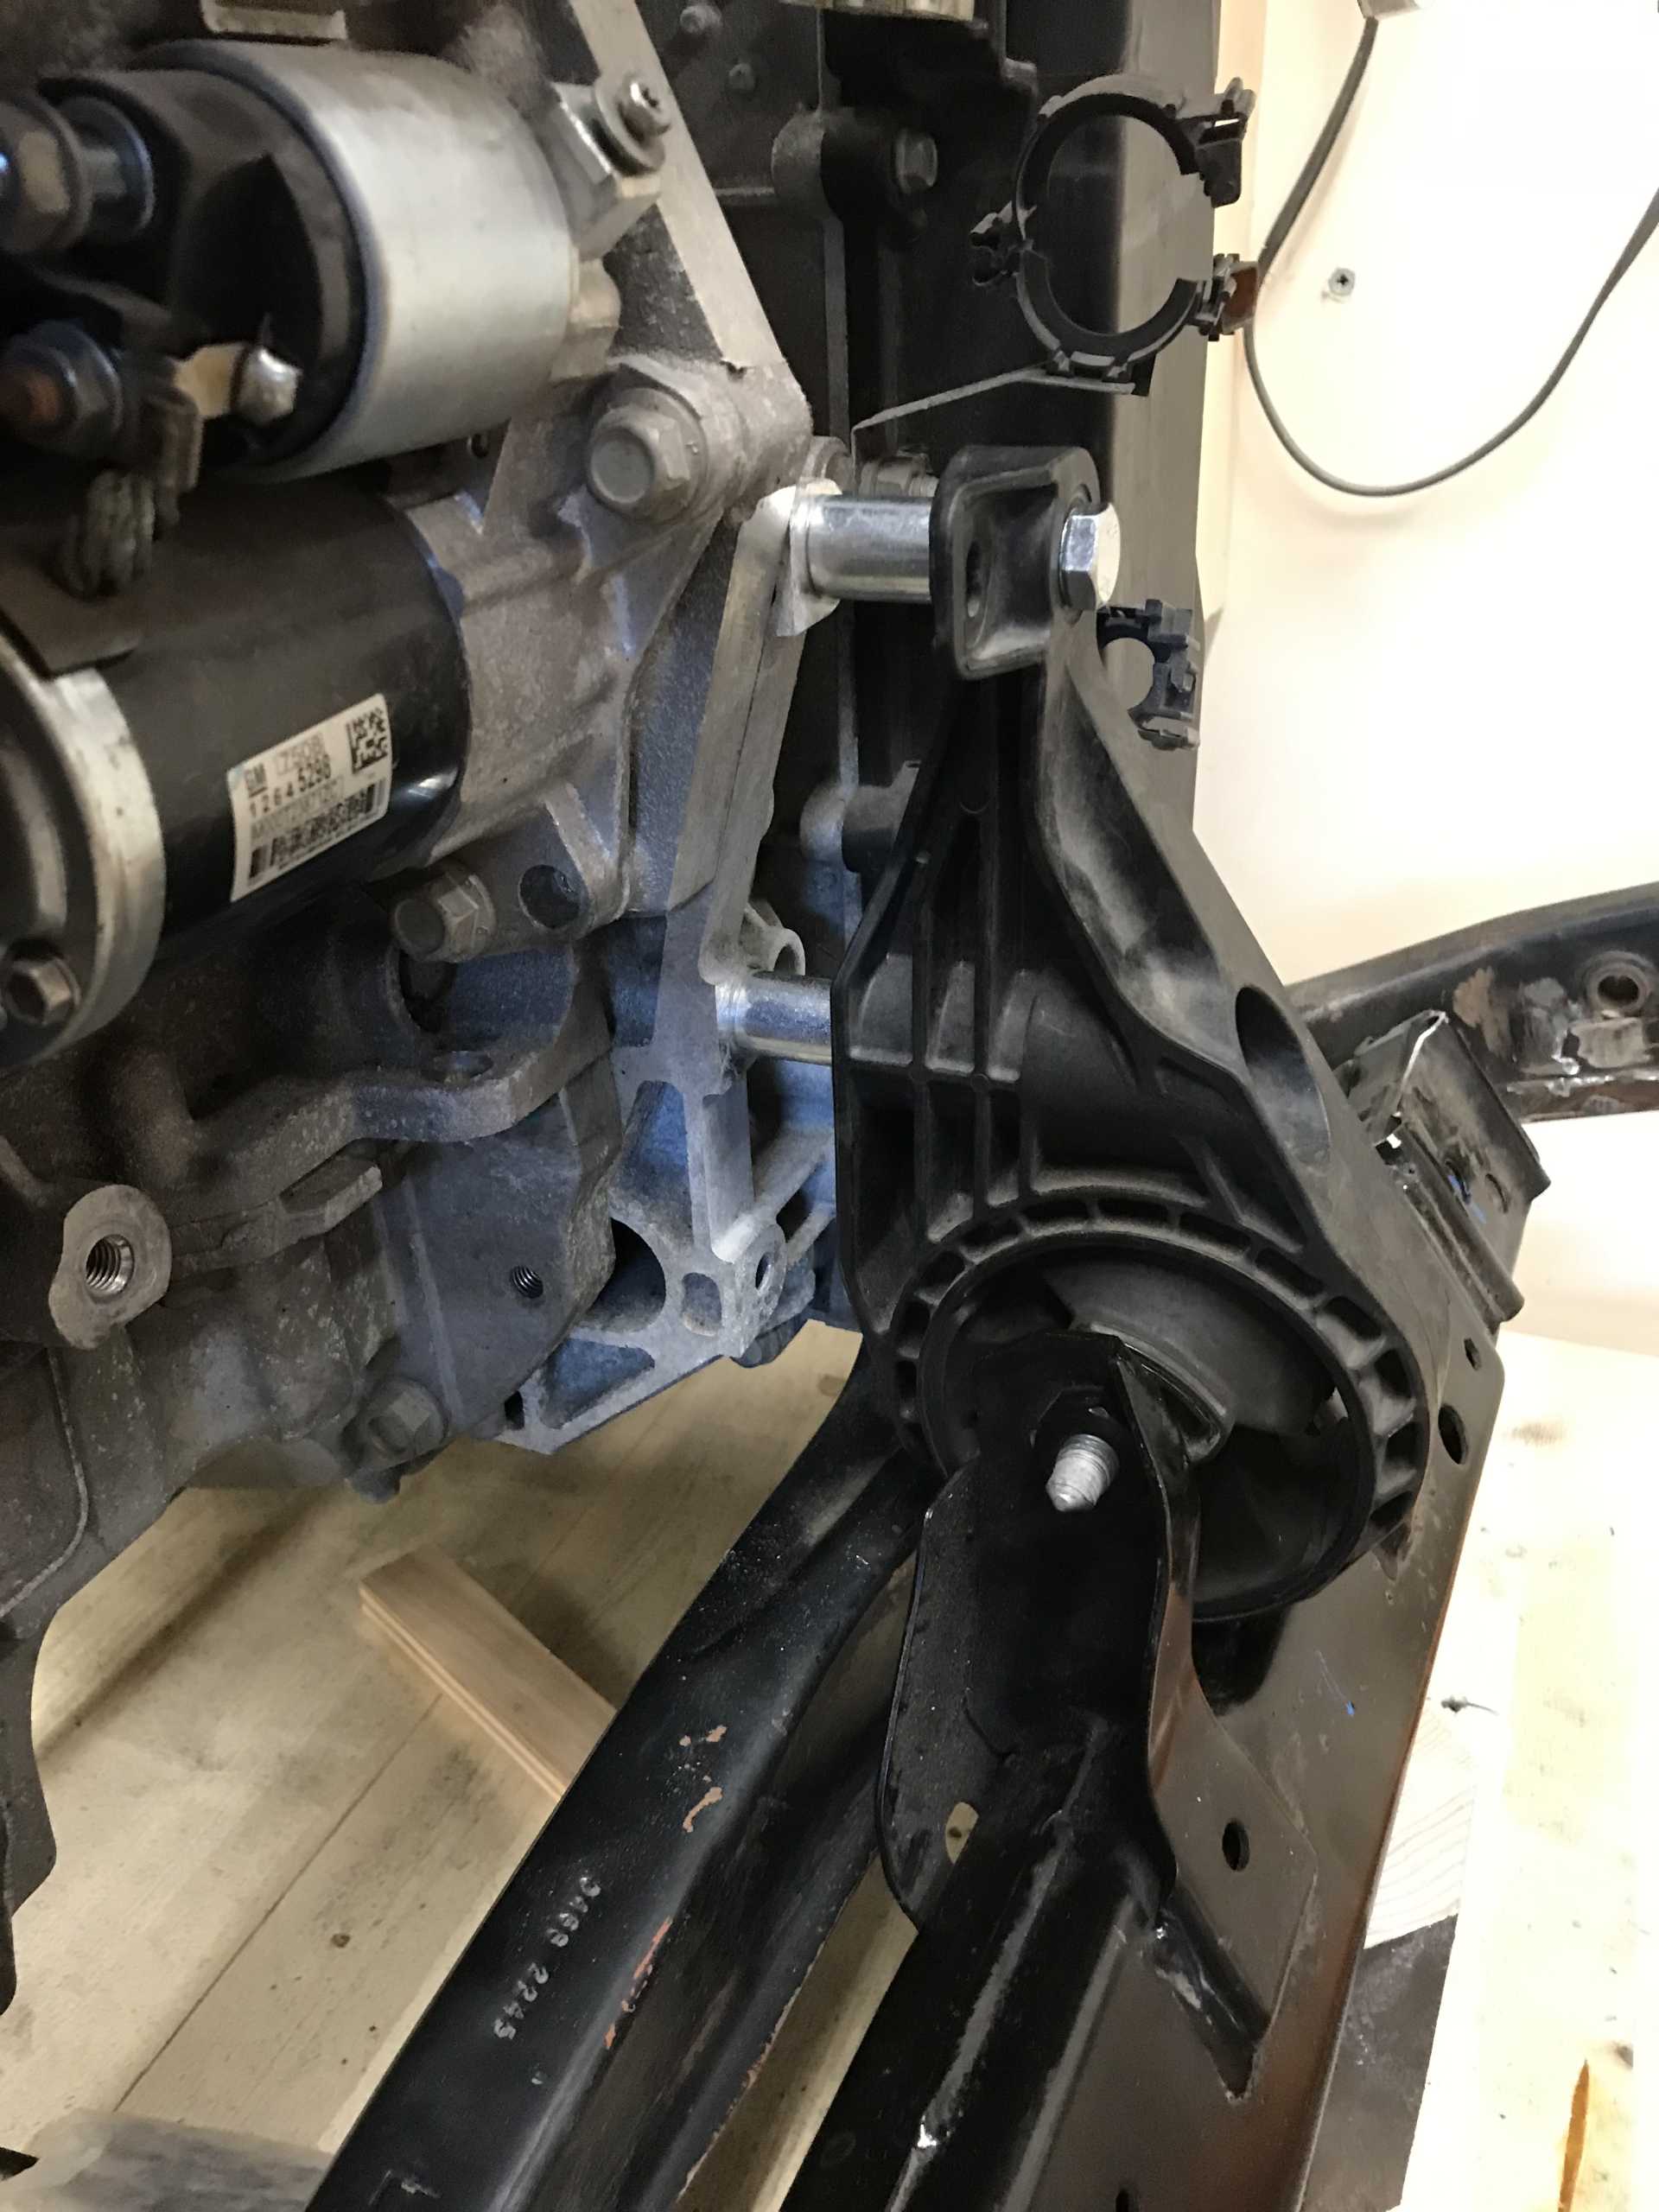
Mounting the engine required moving it to the left about 3/4" so the aft head cam sensors are clear of the right shock tower. It could be moved even more since the 6T70 is only about 12" wide. The real hassle was getting the engine as low as possible in the cradle. And yes the dogbone mount is gone.
Finally the work of others fitting this same transmission and the LS4 / NorthStar engines was a good sign that there is really a lot of space in the bay for making this swap work. Right now I'm fixing a leaking front crank seal on the LFX and about to have the Impala axles cut down fit the Fiero outer CV joints. I've got a shop in Boise, ID that does axle work. With luck the cradle goes in the car this coming week and I'll have axles in 2 weeks.
[This message has been edited by MikesFirstFiero (edited 08-01-2021).]
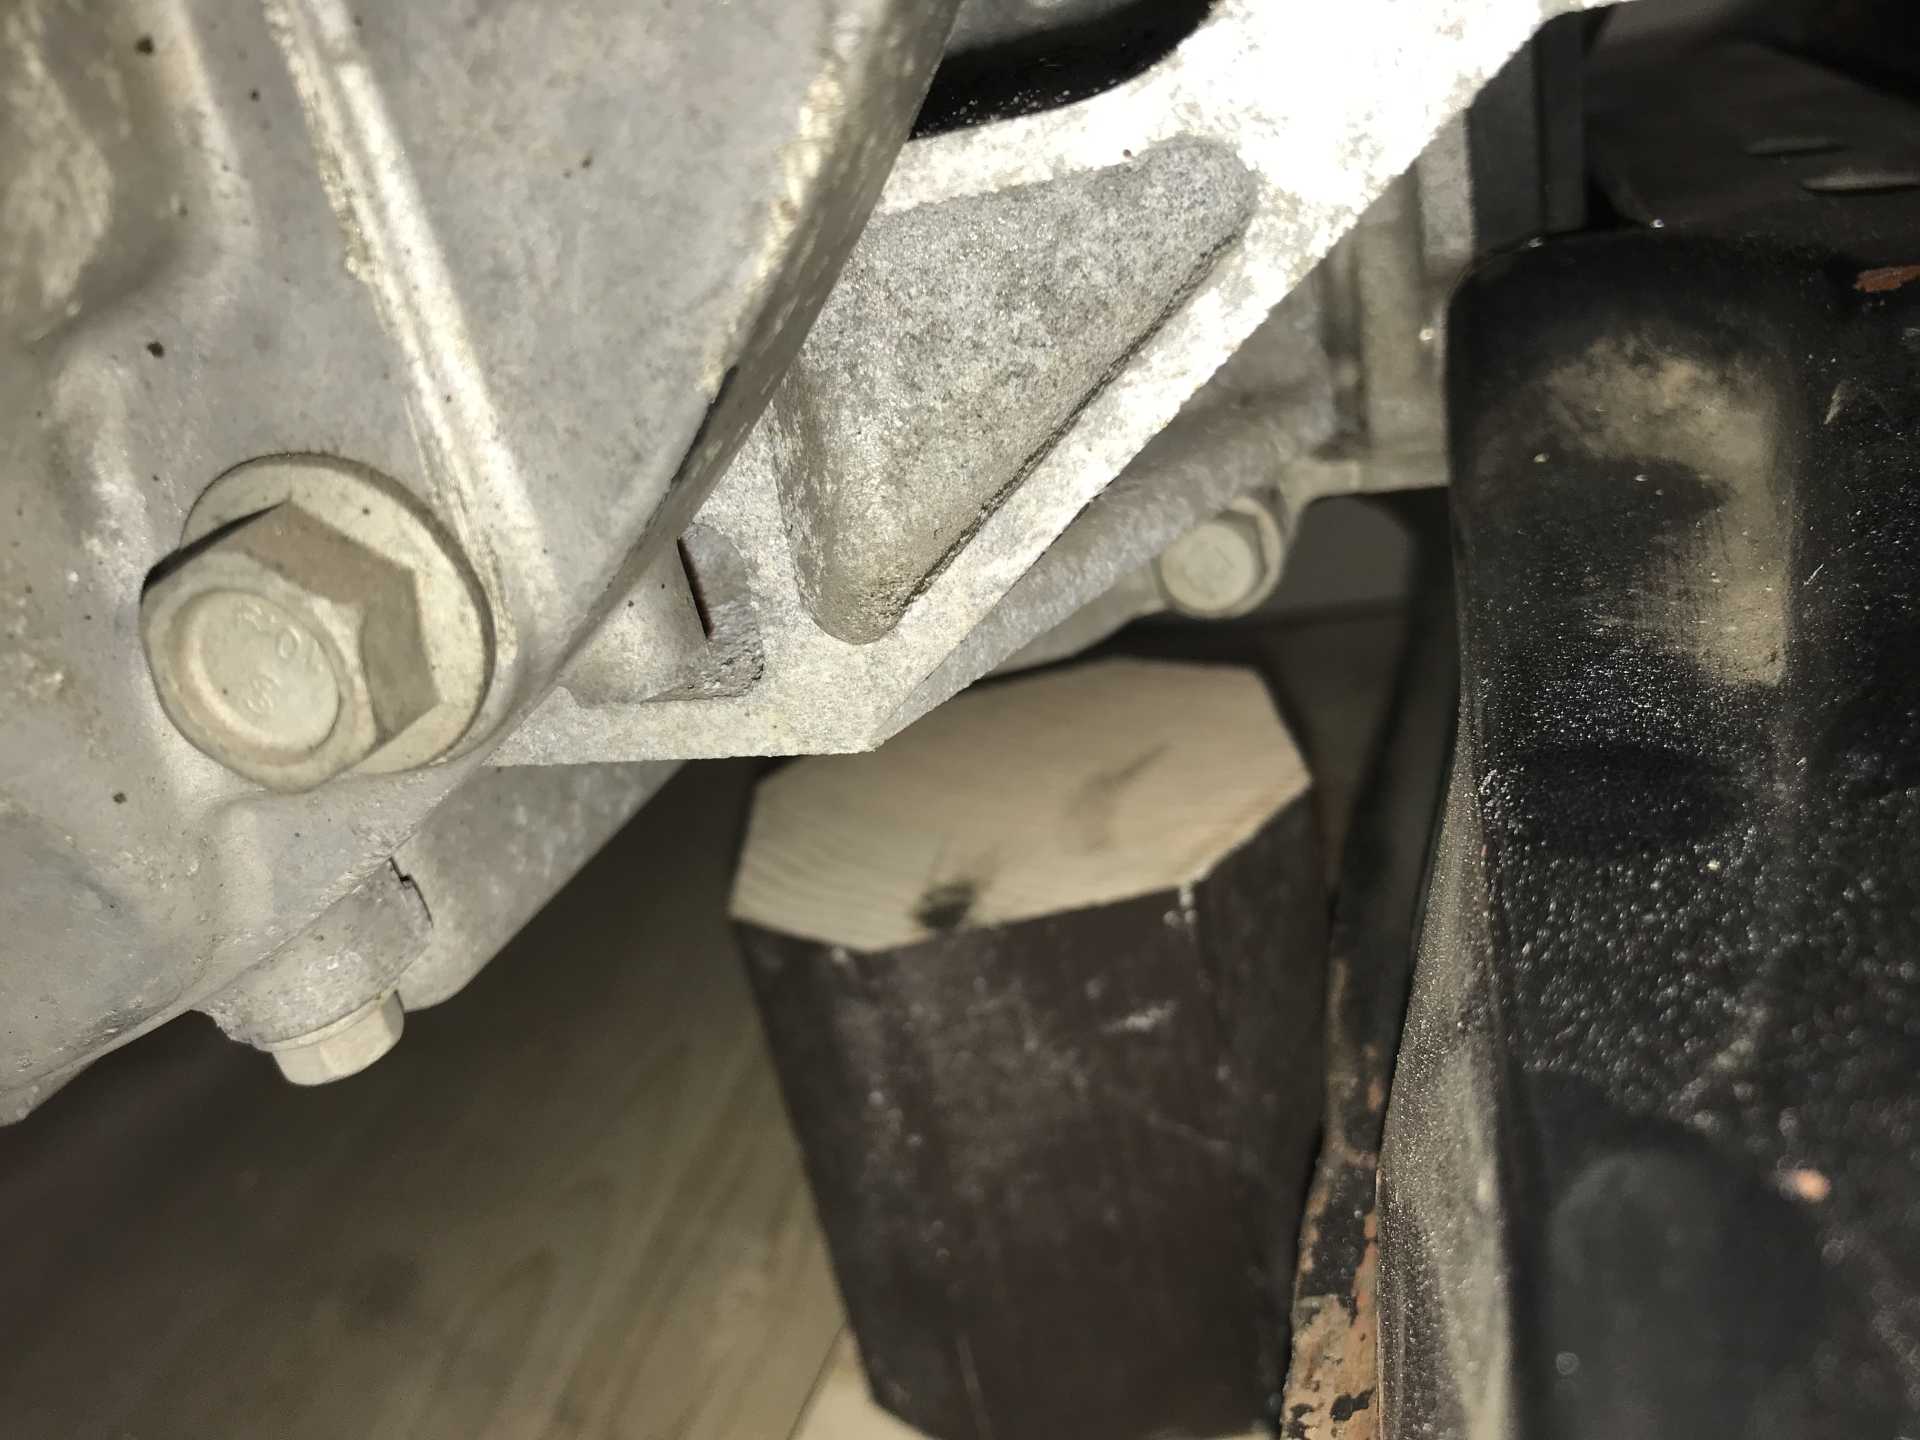
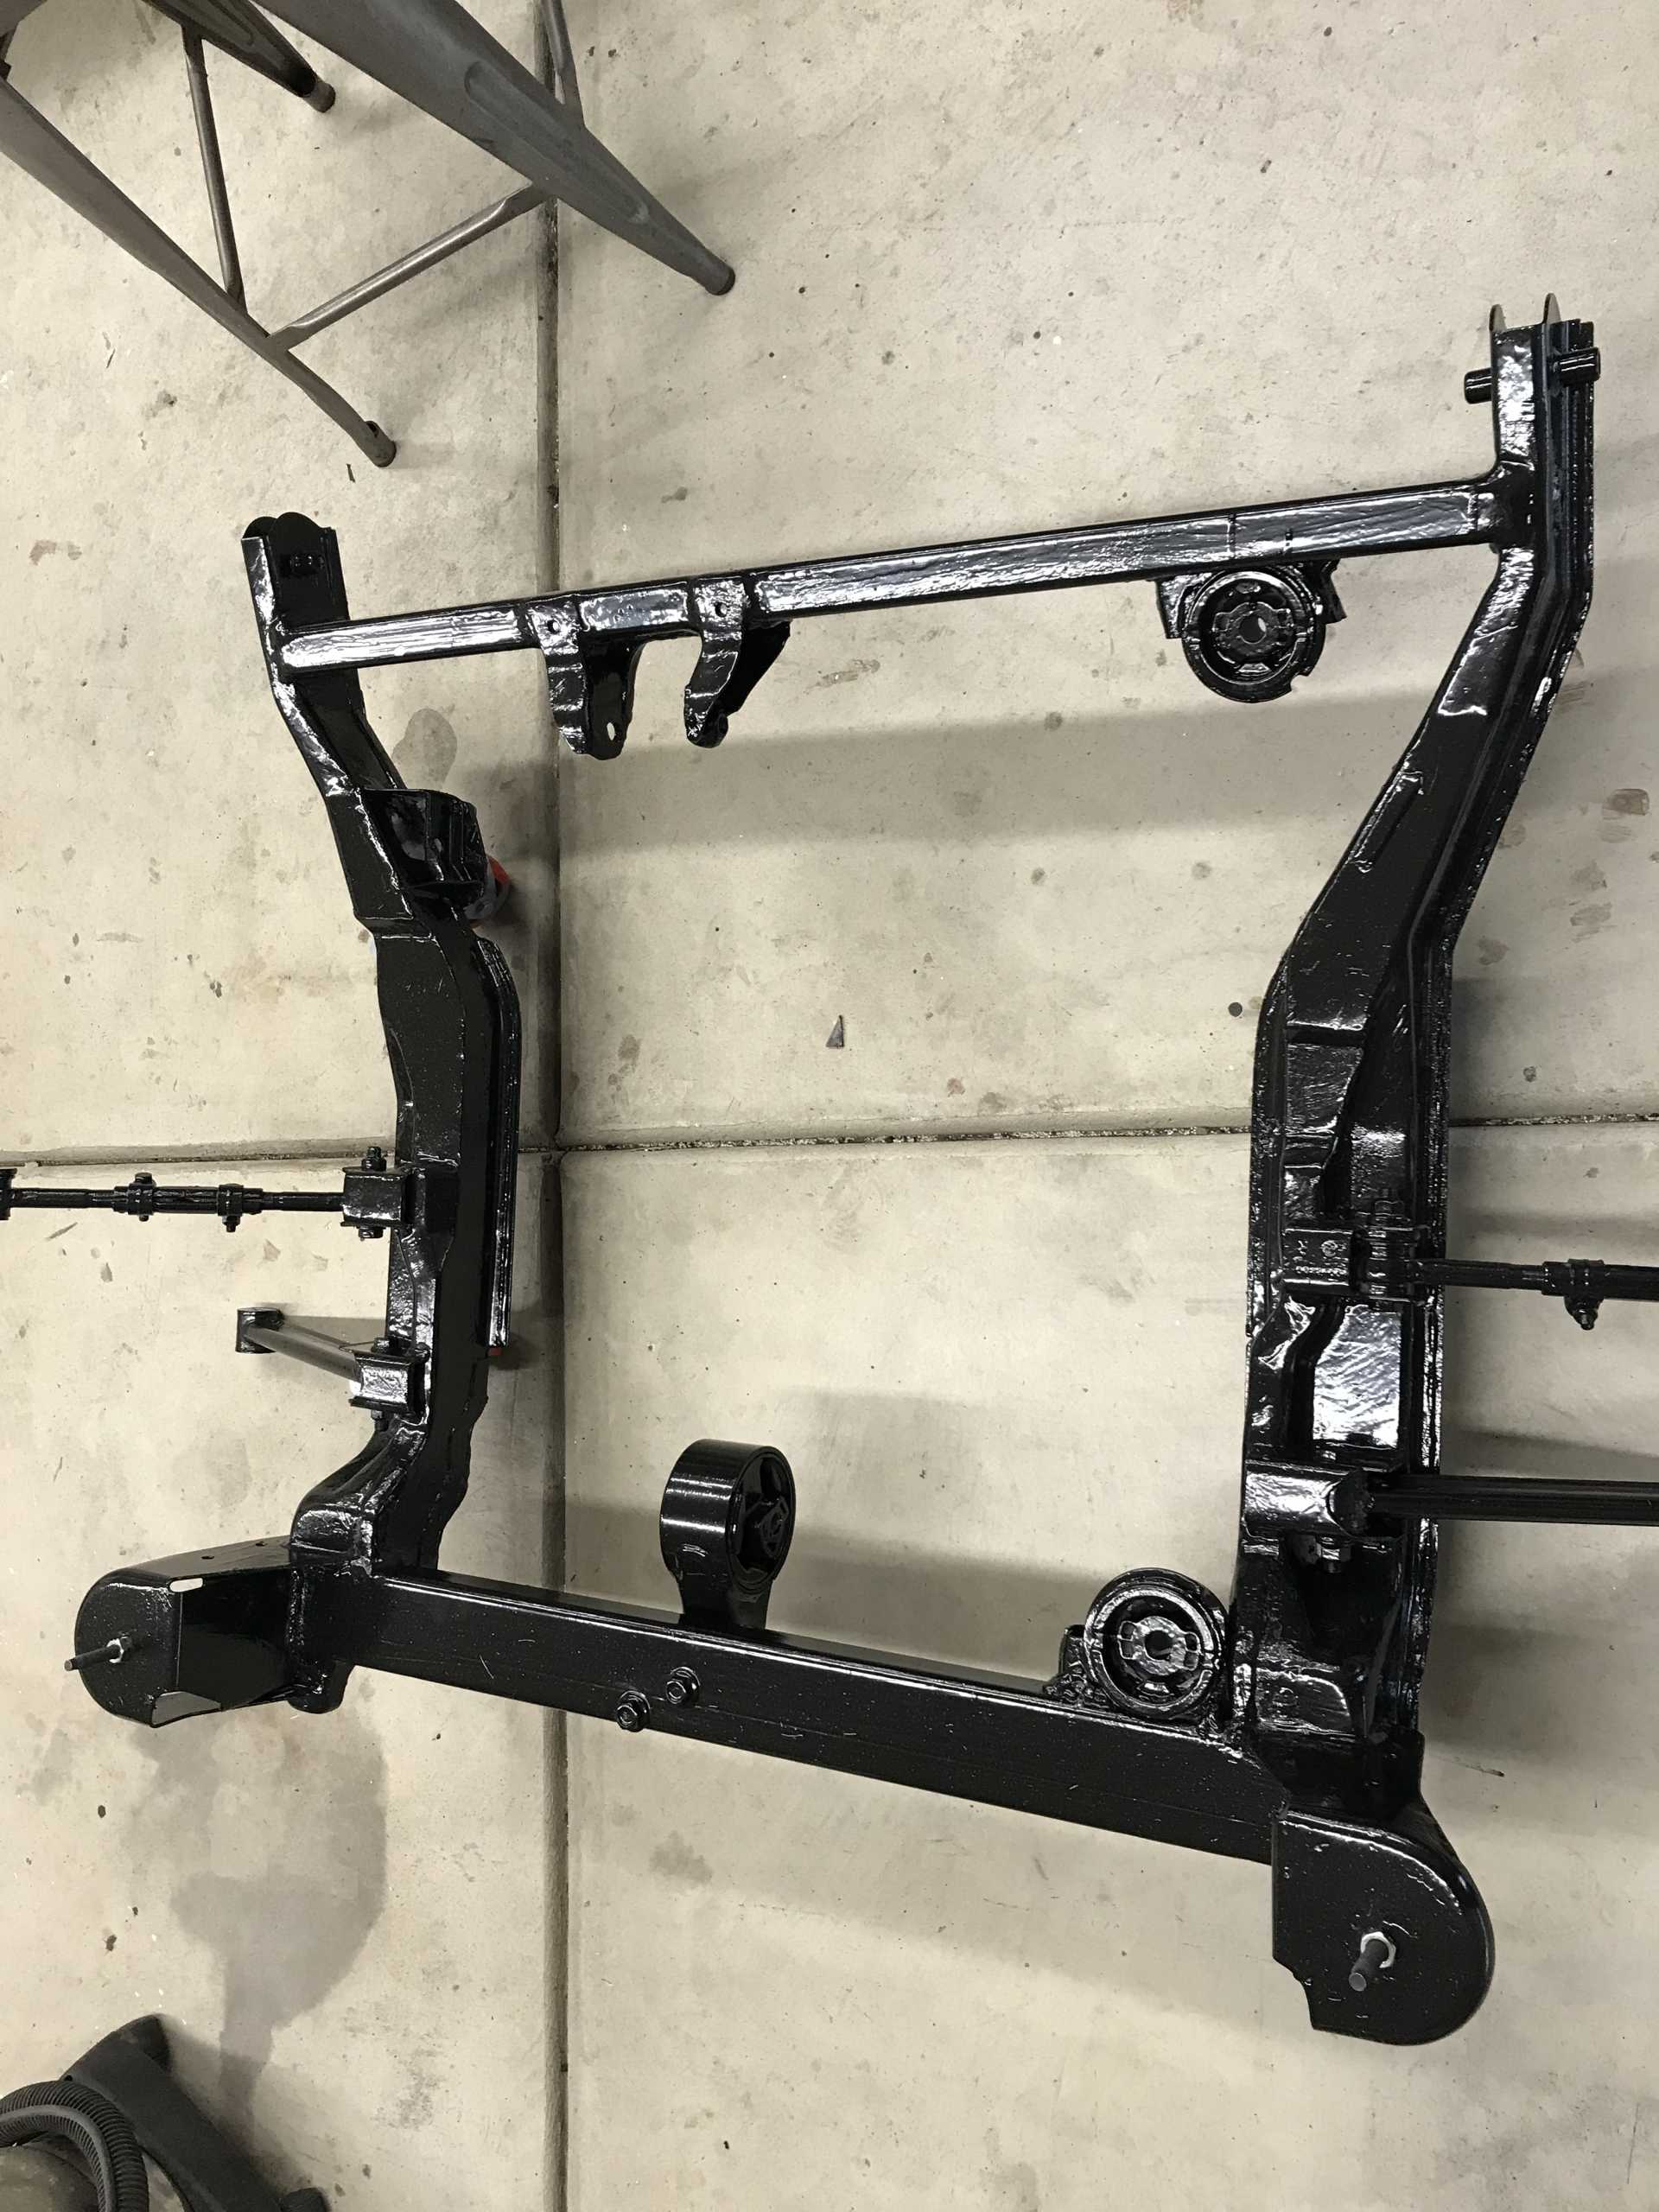
The cradle has been the first part that needed significant changes. To marry the engine and the cradle I lifted the engine with a hoist and placed the cradle on the ground with a wooden platform inside it, still mounted on casters). Then the engine was lowered onto the platform and shimmed to be level to the floor. On the LFX the oil pan is a structural part and the engine-transmission rests on the transmission at the torque converter and the front of the oil pan behind the harmonic dampener. Just looking at the fit a few problems became obvious. -The cross members of the old cradle were intended for an engine that was much narrower, one or both would need modification. -The new motor mounts would be a problem since there are only the mounts at the transmission on both sides but nothing on the front of the engine. It was suspended from above. -The engine would need to be as low as practical to clear the right shock tower and to give a lower CG. -Both side rails would need some cutouts to clear the transmission and a sensor on the front of the engine. -There would need to be something to provide a torque reaction force to the cradle with as long of an arm as possible since there is no dogbone.
Interference on the left side with the transmission, one of many
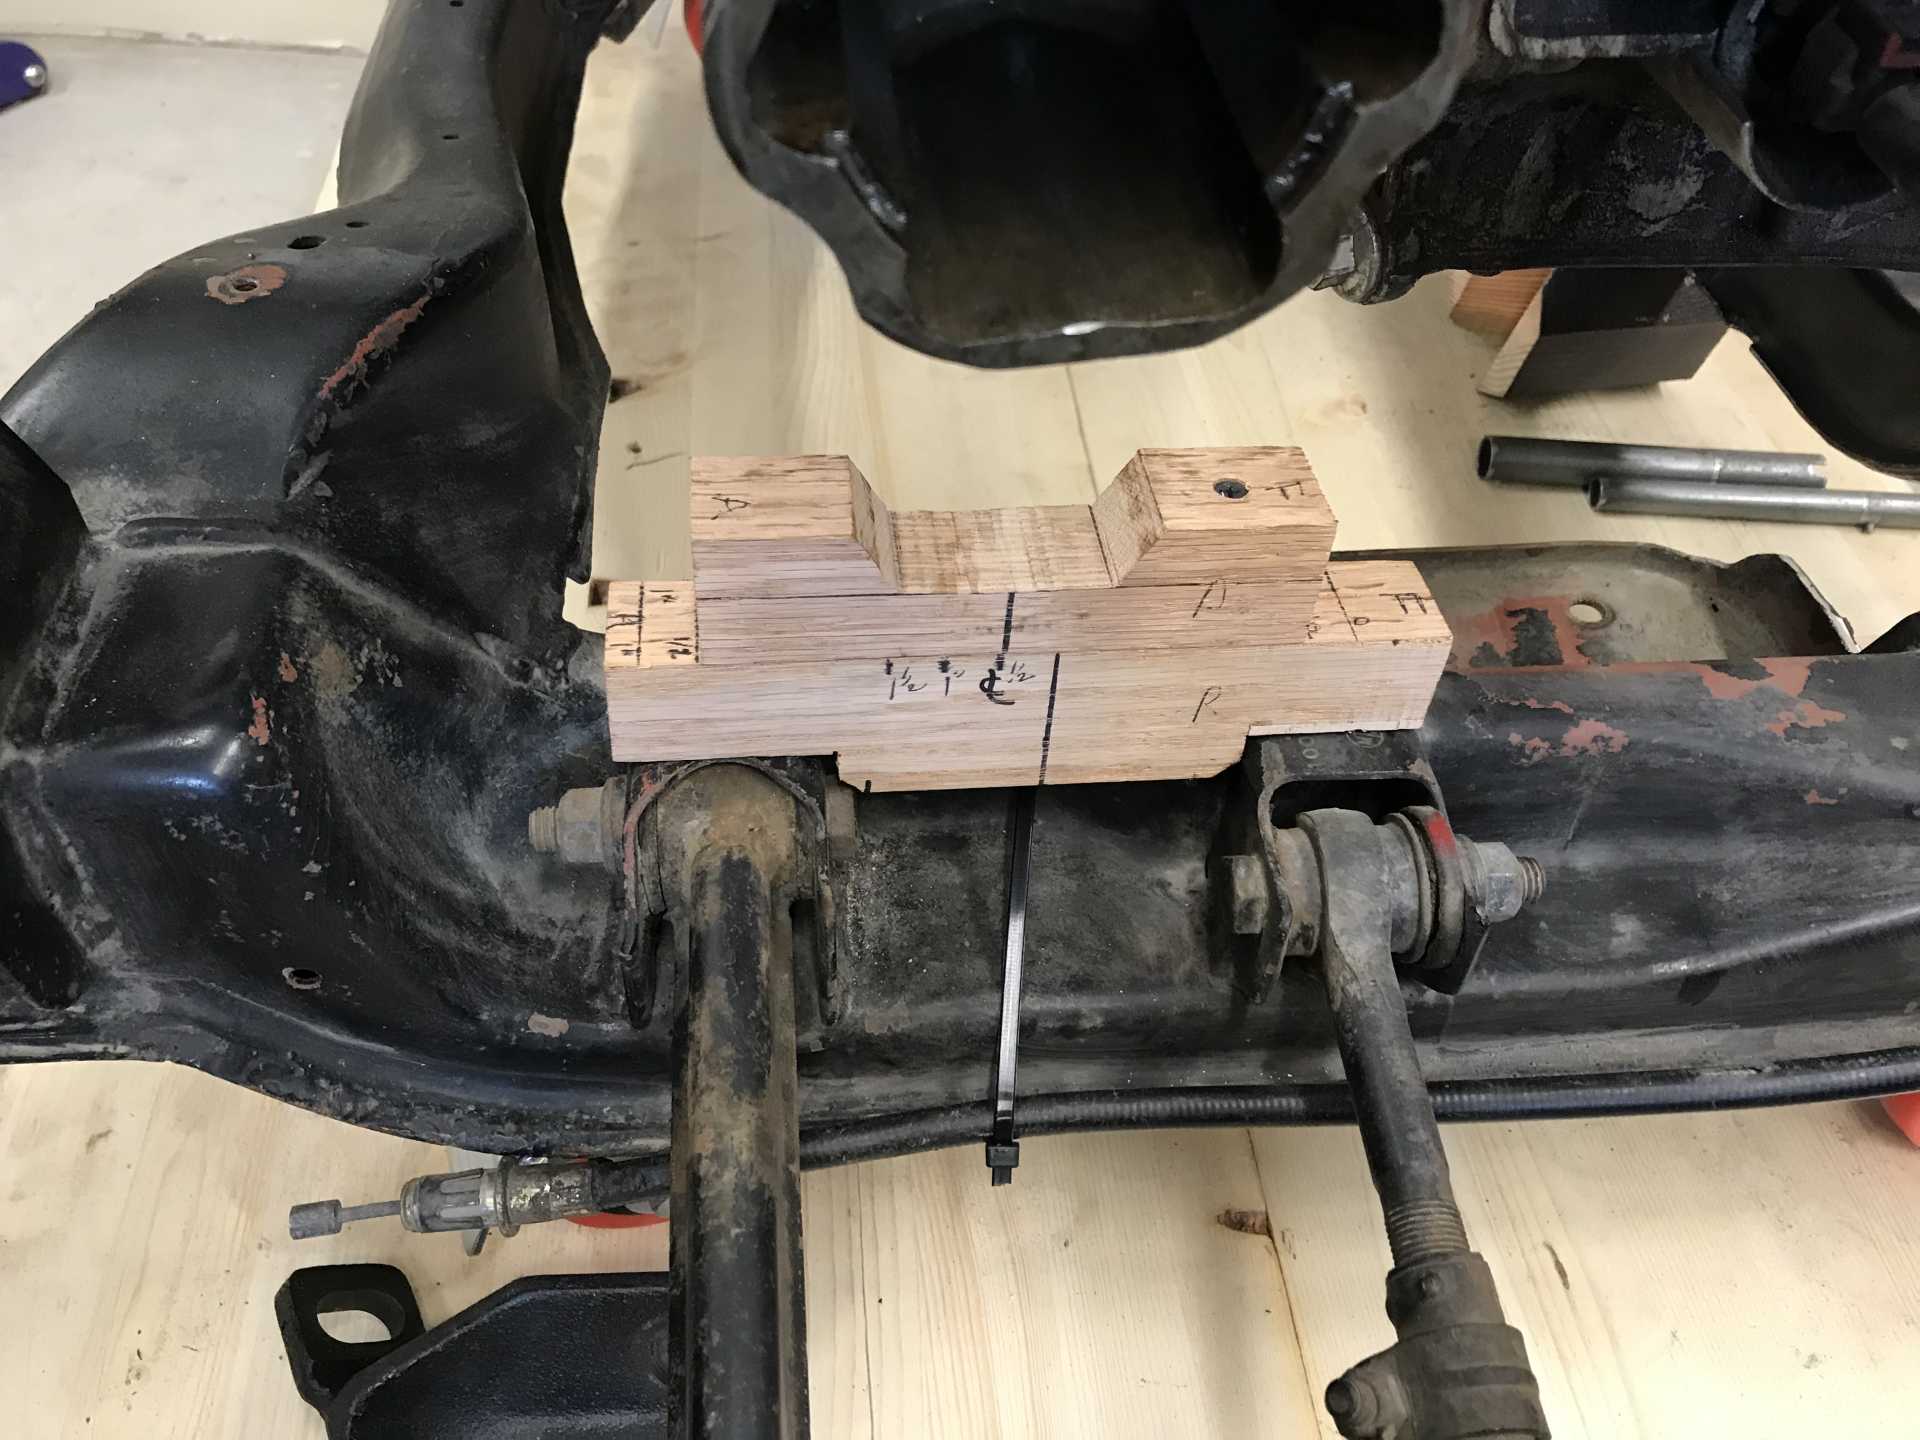
The first thing I did was to make a pair of jigs from some scrap Oak, they were placed on top of the suspension arms mounts. These were cut to mate to the Impala tripod outer housings. The axle/engine location front to back (relative to the car) and the height of the axle were determined by the jigs. the Forward side of the engine was held up by a piece of a 4 x 4 with shims for height adjustment. Left-right positioning was by eyeball using the cradle rail as a reference. Lowering the engine showed that all the old 2.8 motor mounts would need to go. As I lowered the engine& transmission the jigs I made were sliced thinner on a bandsaw so they were always a good reference. The birdcage was used many times to check the engine-tranny location, without it the mount would be guesswork. I'm planning on mating the engine assembly to the car one time only.
These jigs saved loads of time making sure the position was repeatable. I must have lifted and set the engine 5 times.
At this time I decided to look at the motor mounts before I went any further, I knew the tranny would require a cut on the left cradle rail but that could wait for now. This is a low-budget swap so re-using anything from the Impala was free. I checked many engine mounts and the cost, size and location pretty much ruled them out and I did have a set of Impala mounts already. To use the Impala mounts I would need to move the cross bars out and weld the impala brackets to them. So one at a time I located the new cross bars and tack welded them in place and then cut out the old cross bars. Since the front crossbar mounts the handbrake I left the driver side stub in place. But for now there is no handbrake. To keep the rear cradle mounts aligned I used a U-channel of steel bolted to the cradle-to-car mounts to keep the original geometry accurate. I then welded in the new one and cut the old bar out. I really didn't want to have to fight bad cradle mounting points when it goes back in. Both cross bars were made from 2 x 3 rectangular tubing. The fore transmission mount was welded to the crossbar at an angle after fiddling with the engine placement. The aft cross bar was mounted flat so the Impala bolt-on mount could be reused. This solution solved several problems. -It was cheap, $60 for steel. -It moved the attachments to the cradle closer to the ends of the cradle. This reduces the bending stress on the cradle rails and gives the same arm distance as the Impala to reduce the torque reaction force. -It allowed the stock exhaust Impala to be easily routed to the rear of the car. The muffler would be located under a reduced-depth trunk. I got this idea from the LS/LFX conversion by Dan86GT (https://www.fiero.nl/forum/Forum3/HTML/000136-2.html) and it makes really good sense. The original Fiero muffler was tiny and putting a bigger one between the engine & trunk was not going to work. Now I'll have room for a Camaro transverse muffler (and maybe a resonator if it is too loud when crusing).
View of forward of engine with Impala mount in place. The existing cross bar just does not work.
Trying the Impala cradle cross bar as an experiment. It's too short to use.
Front new 2"x3" crossbar ready for welding, old bar is partly still in place. The bar covers the trailing arm nuts that were welded in place.
Positioned to weld the Impala mount bracket to the front cross bar
Keeping the rear cradle mounts aligned so I can cut off the rear crossbar. The aft mount is the black drumstick laying on the platform.
The tranny still bottomed on the cradle rail and on the aft left side suspension mount. The only way to solve the suspension interference was to cut off a rib on the tranny that was exactly in the wrong place. That made the mount lower but not enough. The cradle needed to be notched on the left side by about 3/4" to eliminate the interference. The tranny was now lower fore and aft and solved the clearance issues with the cradle.
Notch to transmission web to clear left rear arm mount.
Cradle with both cross bars replaced, forward mount bracket in place. Notch in both rails.
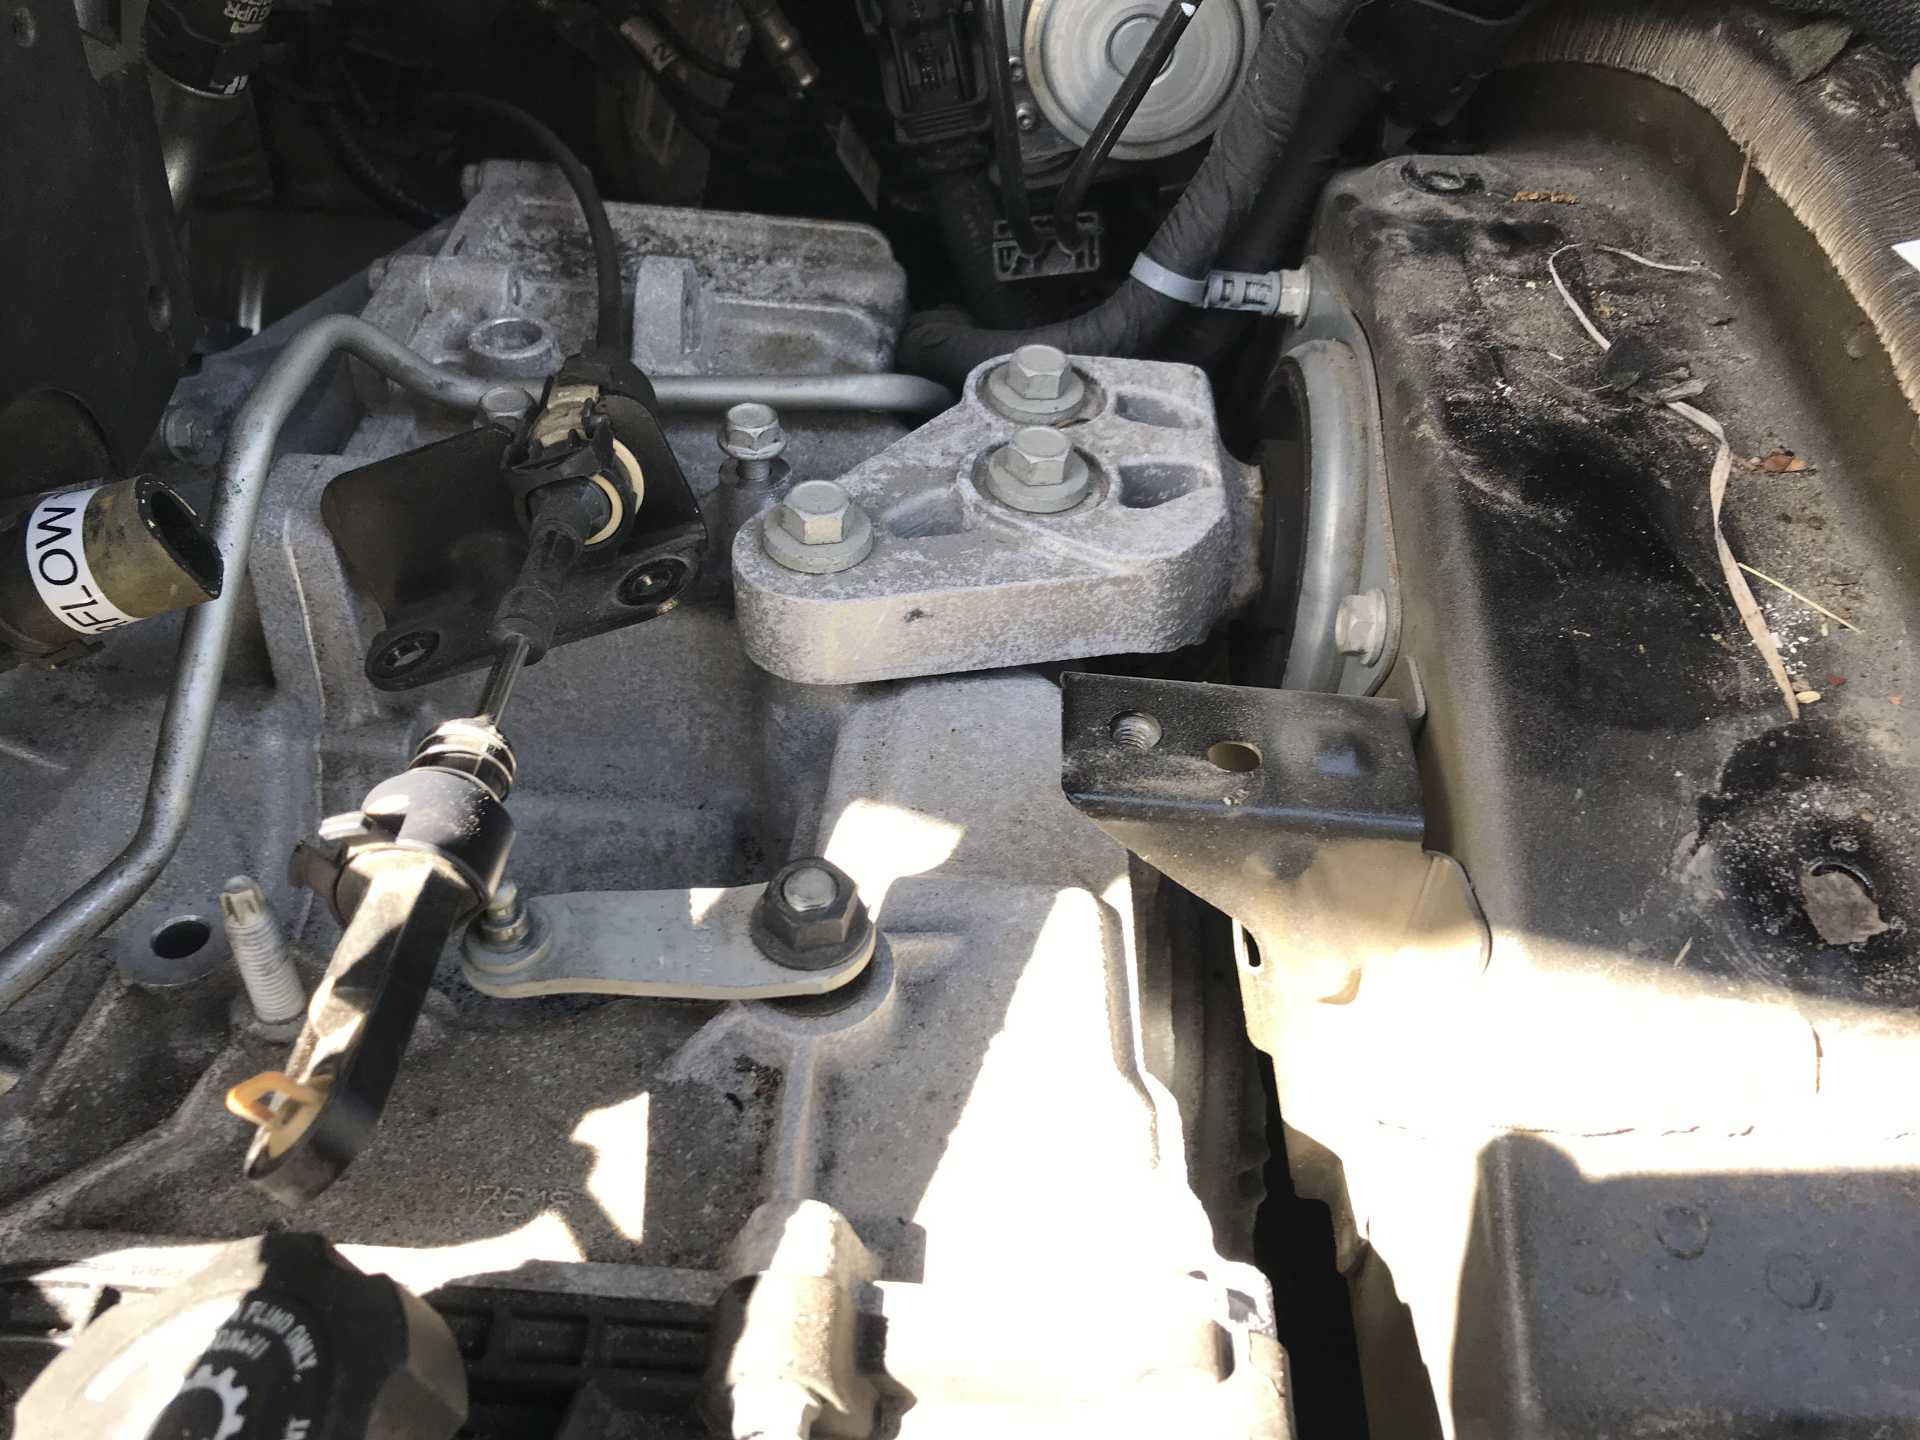
The aft rear transmission mount bolted up to the cross bar from below with spacers to determine the rear height. The fore transmission mount height needed to be lowered too; this was done be slotting the mounting bracket and welding heavy washers at the new height. What about the front of the engine? Well I mulled this over and eventually figured out a solution that was cheap, gave a long lever arm and provided some vibration isolation. On the side of the engine there are some possible mounts on the aft flank by using the transmission shaft mounting points. But what about the forward side? That has the alternator, oil filter & sender and A/C compressor taking up most of that space. And there isn't much lateral space between the engine and the cradle rail.
Then I discovered there are two unused 14mm tapped holes on either ends of the oil pan front near the top. I took some measurements and made a cardboard template of what a mounting bracket could look like except fpr the ends. I had no idea what the ends of this bracket would connect to, I wanted vibration isolation but had no idea how to get it. Then I remembered I still had the Impala cradle isolators in their steel collars. The collars I welded to the cross bars, one to each bar. The isolators look like plastic & rubber donuts with an aluminum hub in the center. A little bit of thinking gave me the strange snake-like ends to the mounting bracket. One end of the bracket has the mounting bolt welded to it and the other has a mounting pad. This was needed since the isolators are canted and both mounting bolts can't be welded to the bracket. Next came a wood template and a test fitting. It worked well enough to make the real thing from 1/4" steel plate with a bottom flange to stiffen it laterally. The result is two engine mounts that are widely spaced from the transmission centerline and fit in the limited space and should provide adequate torque reaction since there is no dog bone.
Template and rough-cut engine mount bracket.
Forward mount on cross bar
Aft mount on cross bar
Preparing to drill the holes for bolts to the oil pan. The V shaped jig was drilled and checked for correct fit.
Finally I needed to make a notch on the right side rail to clear the sensor on the oil pan below the crankshaft. The photo below shows the engine on the mounts with the cats and accessories installed.
Completed front mount bracket with stiffening flange on bottom.
Completed cradle ready for the engine.
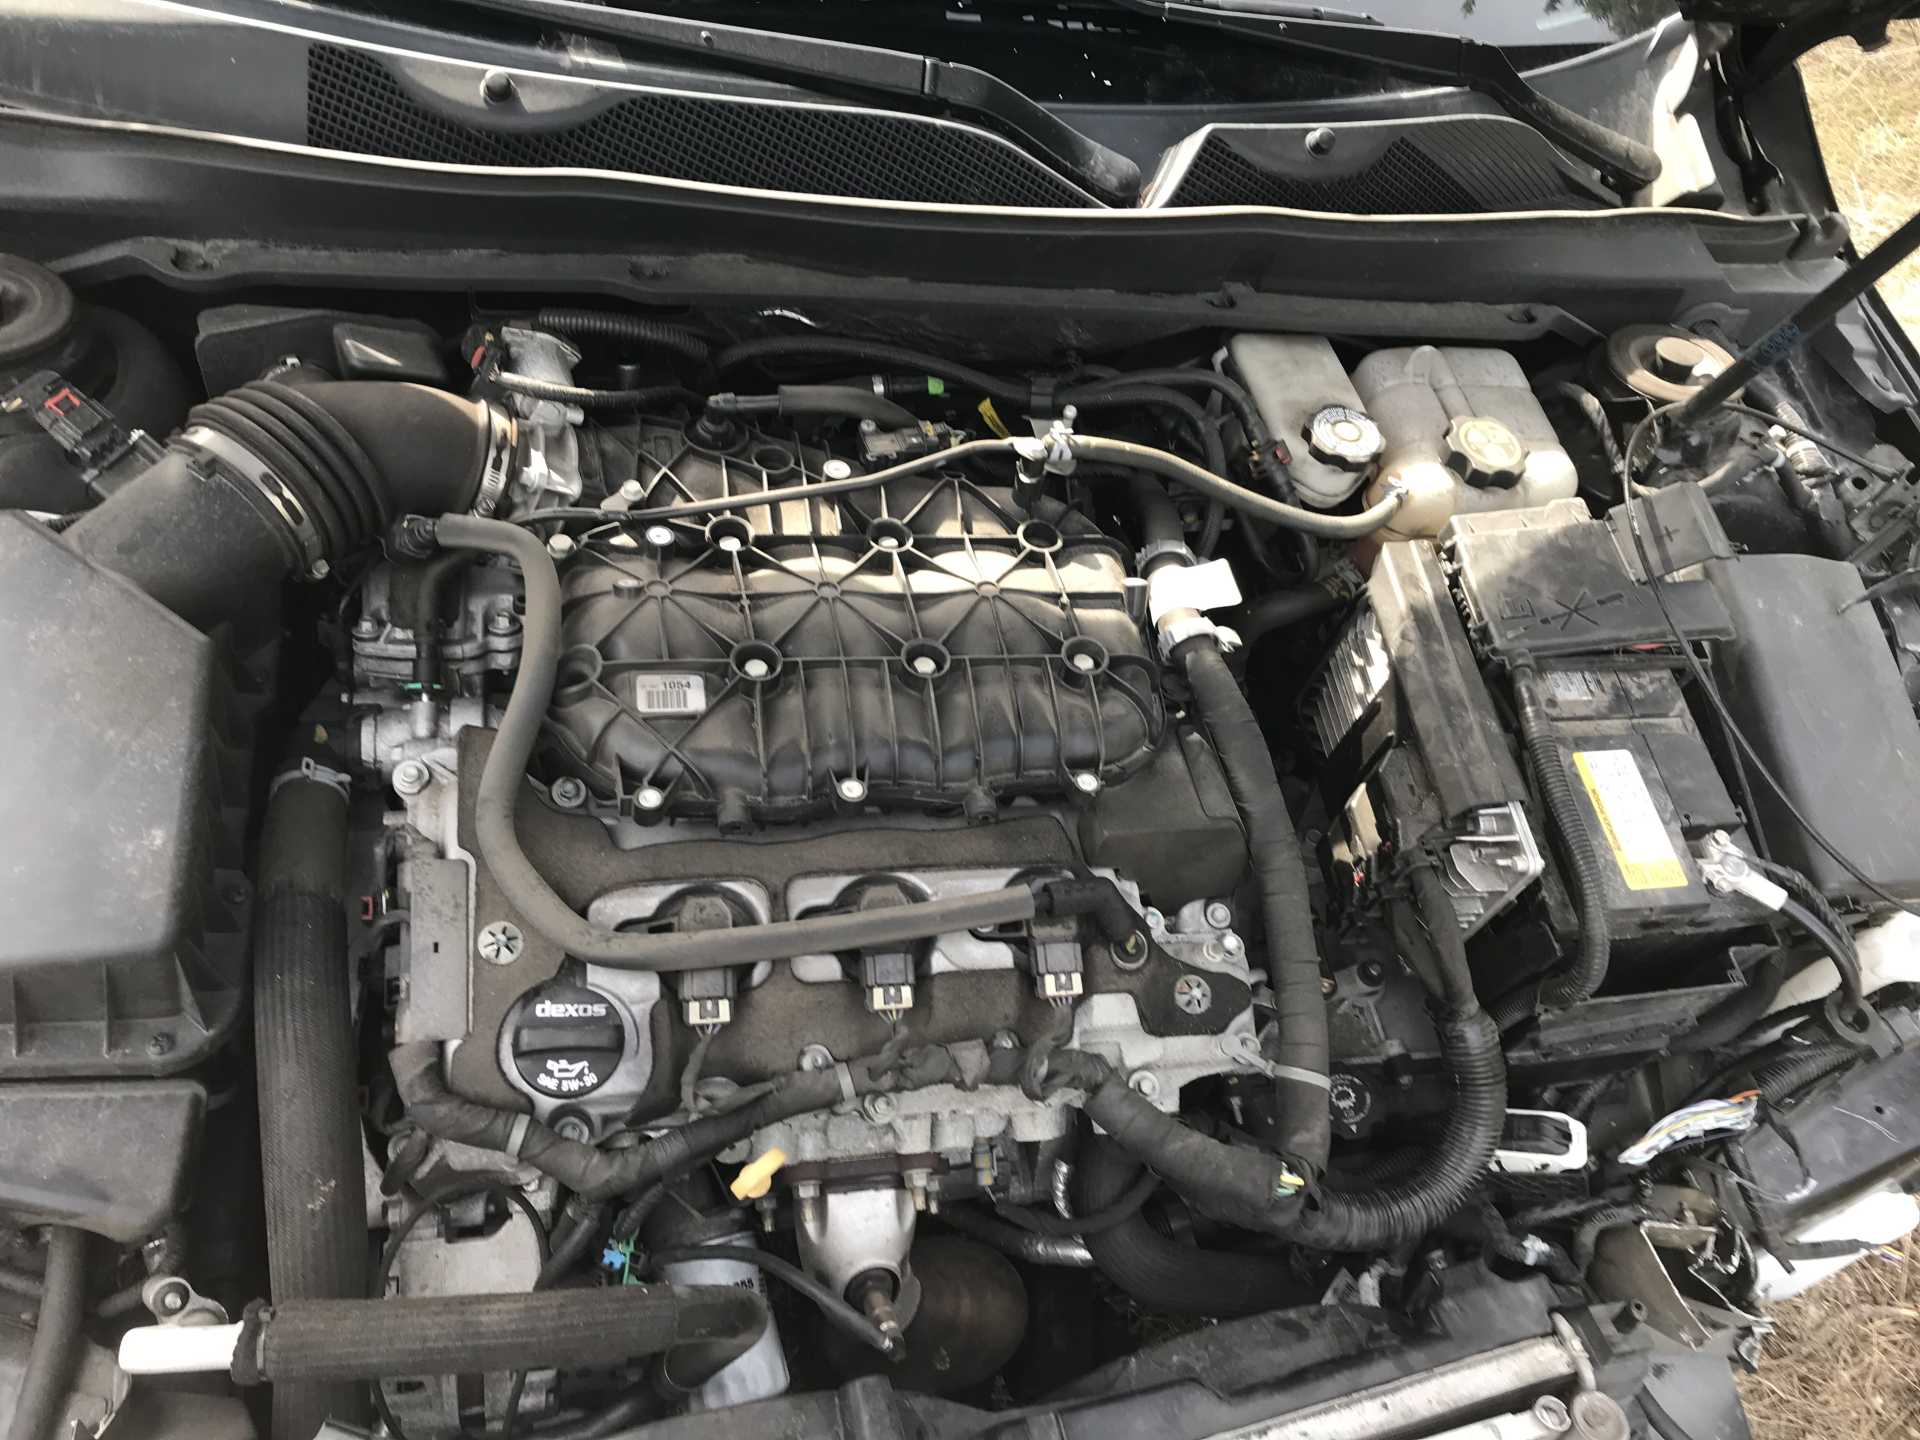
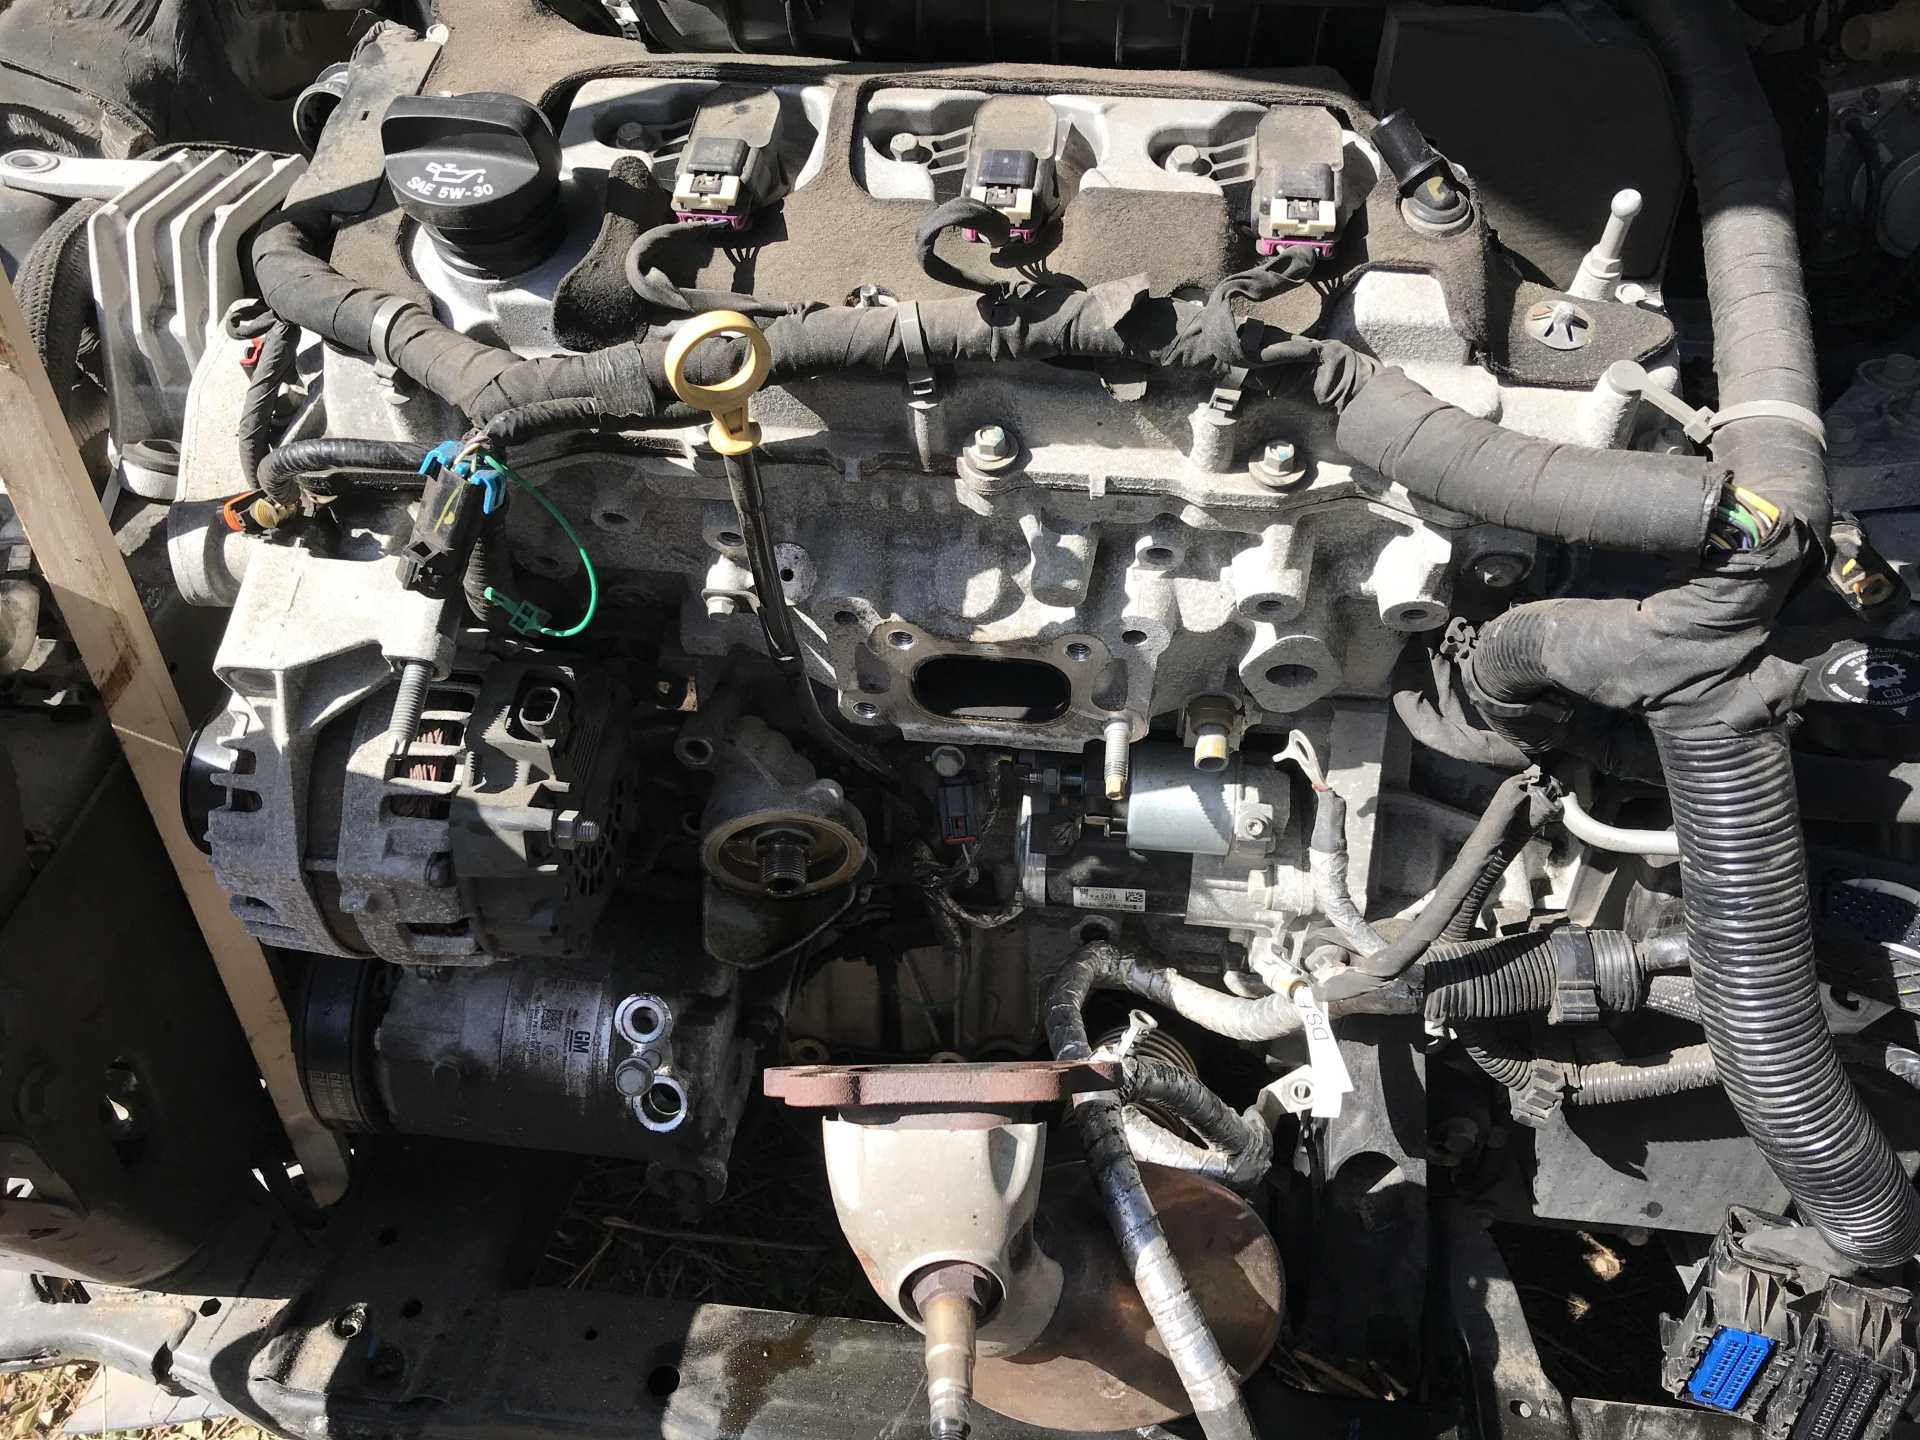
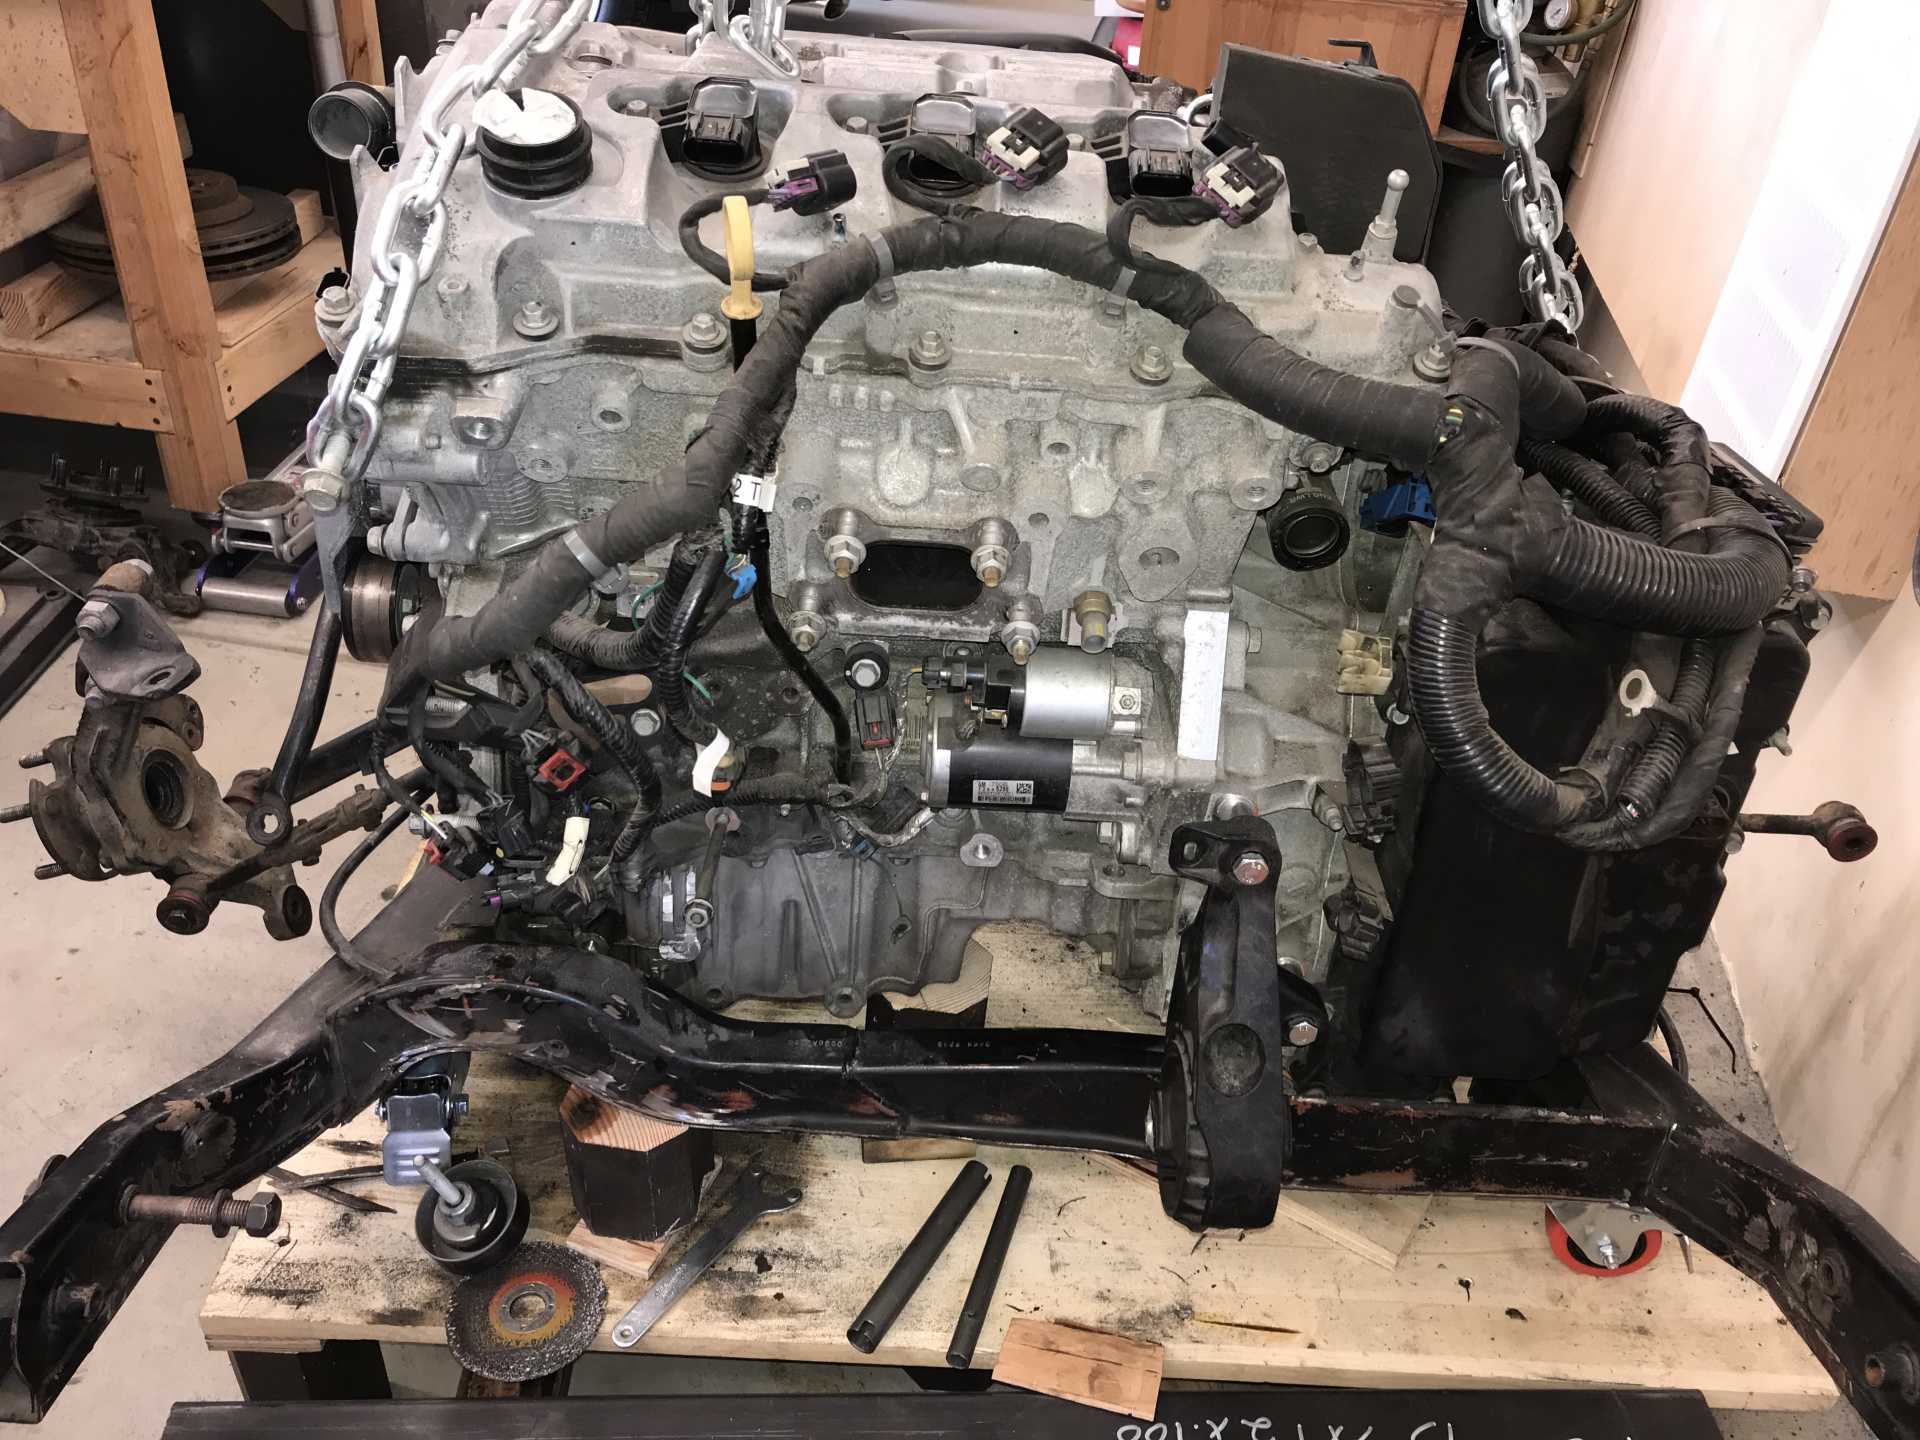
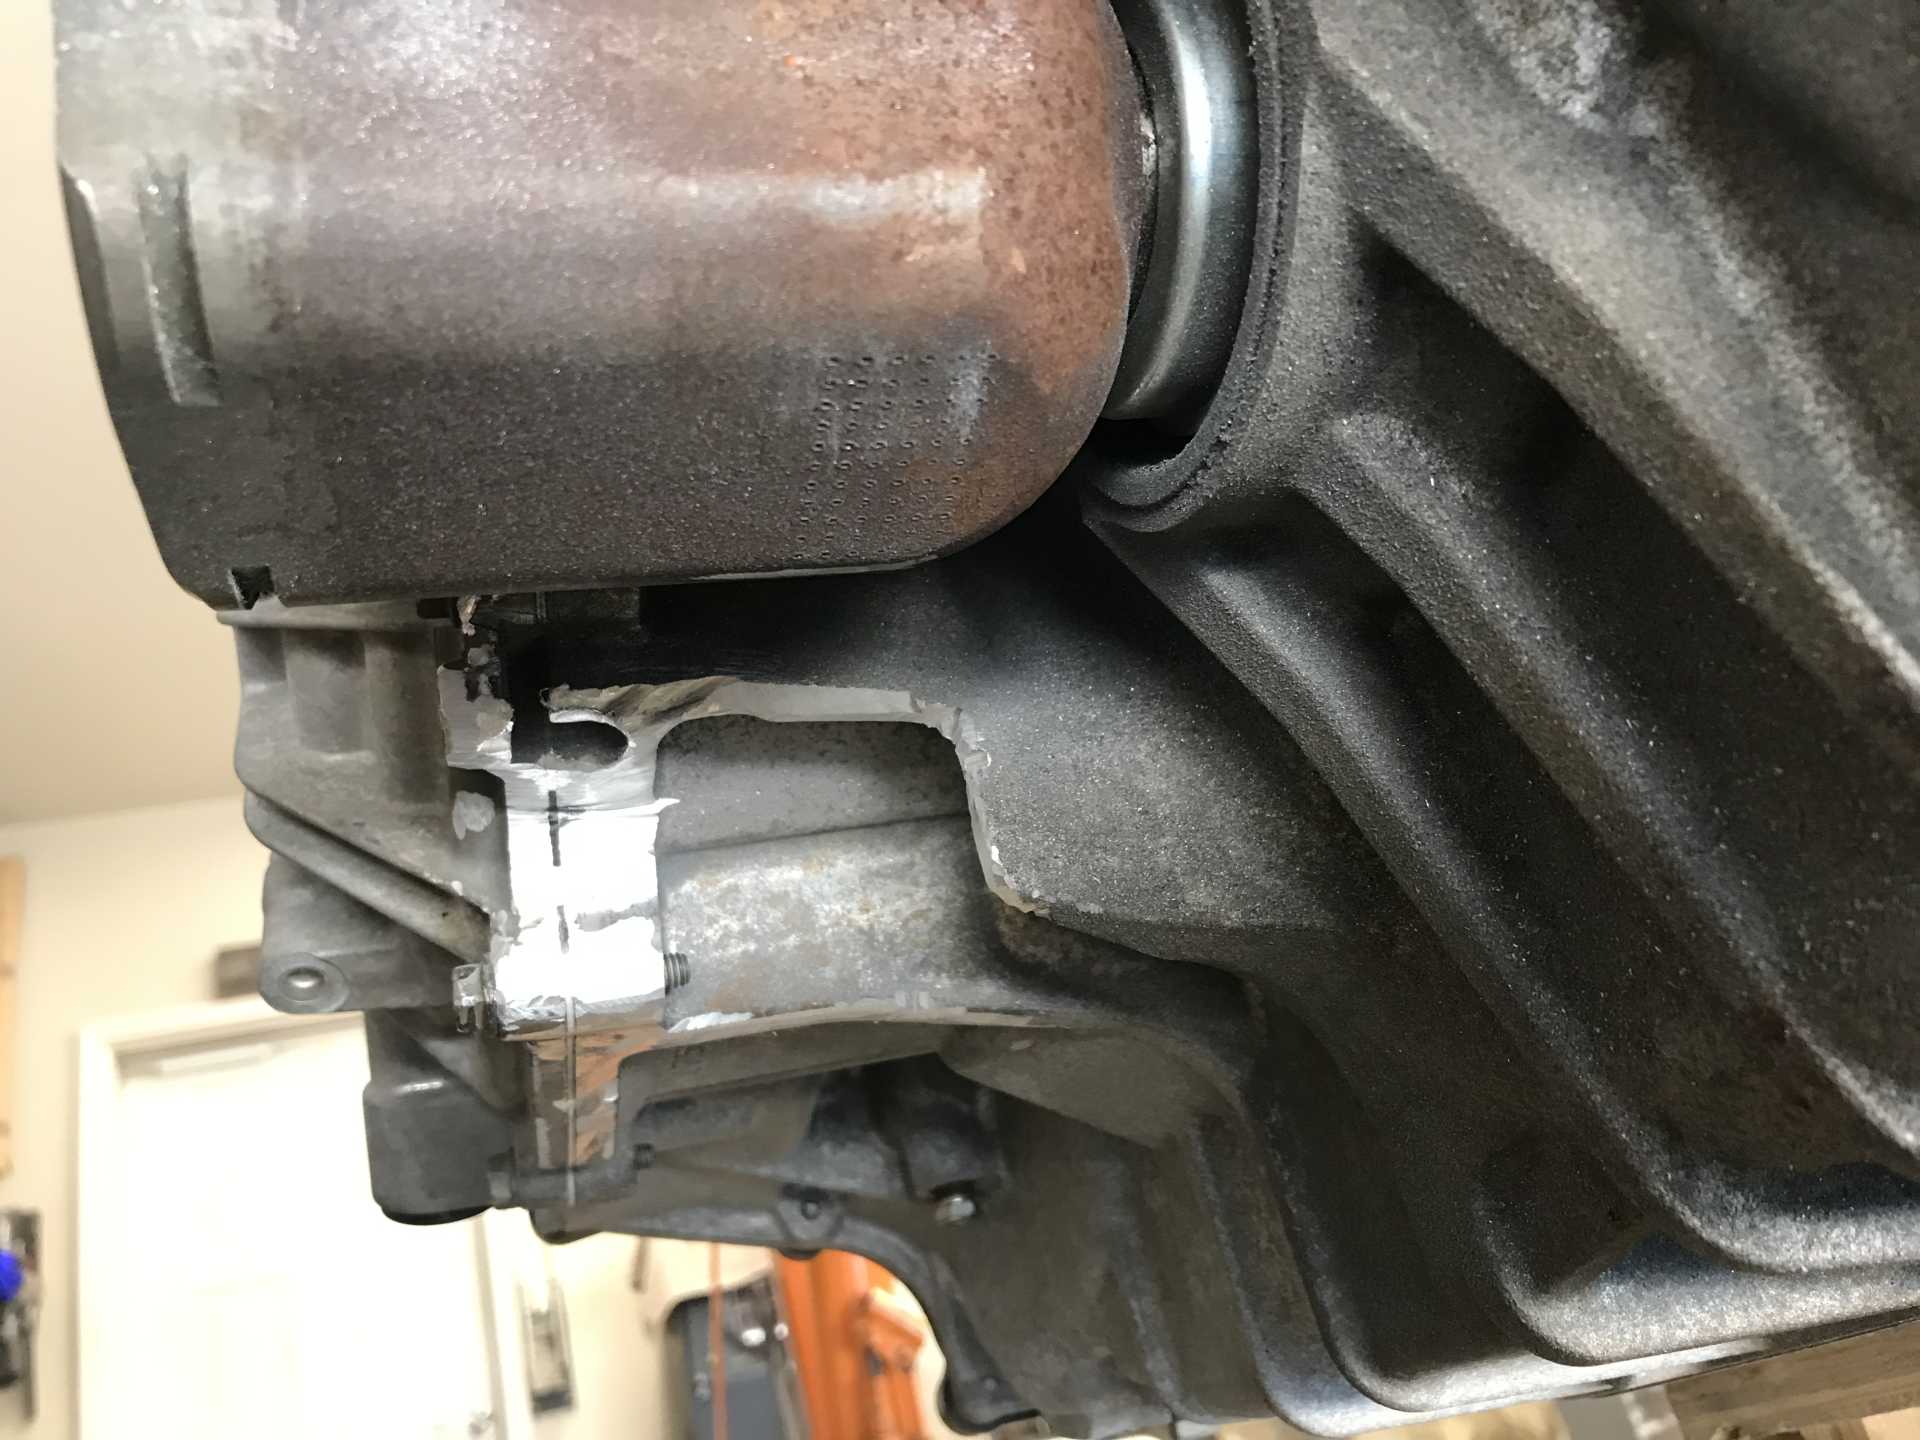
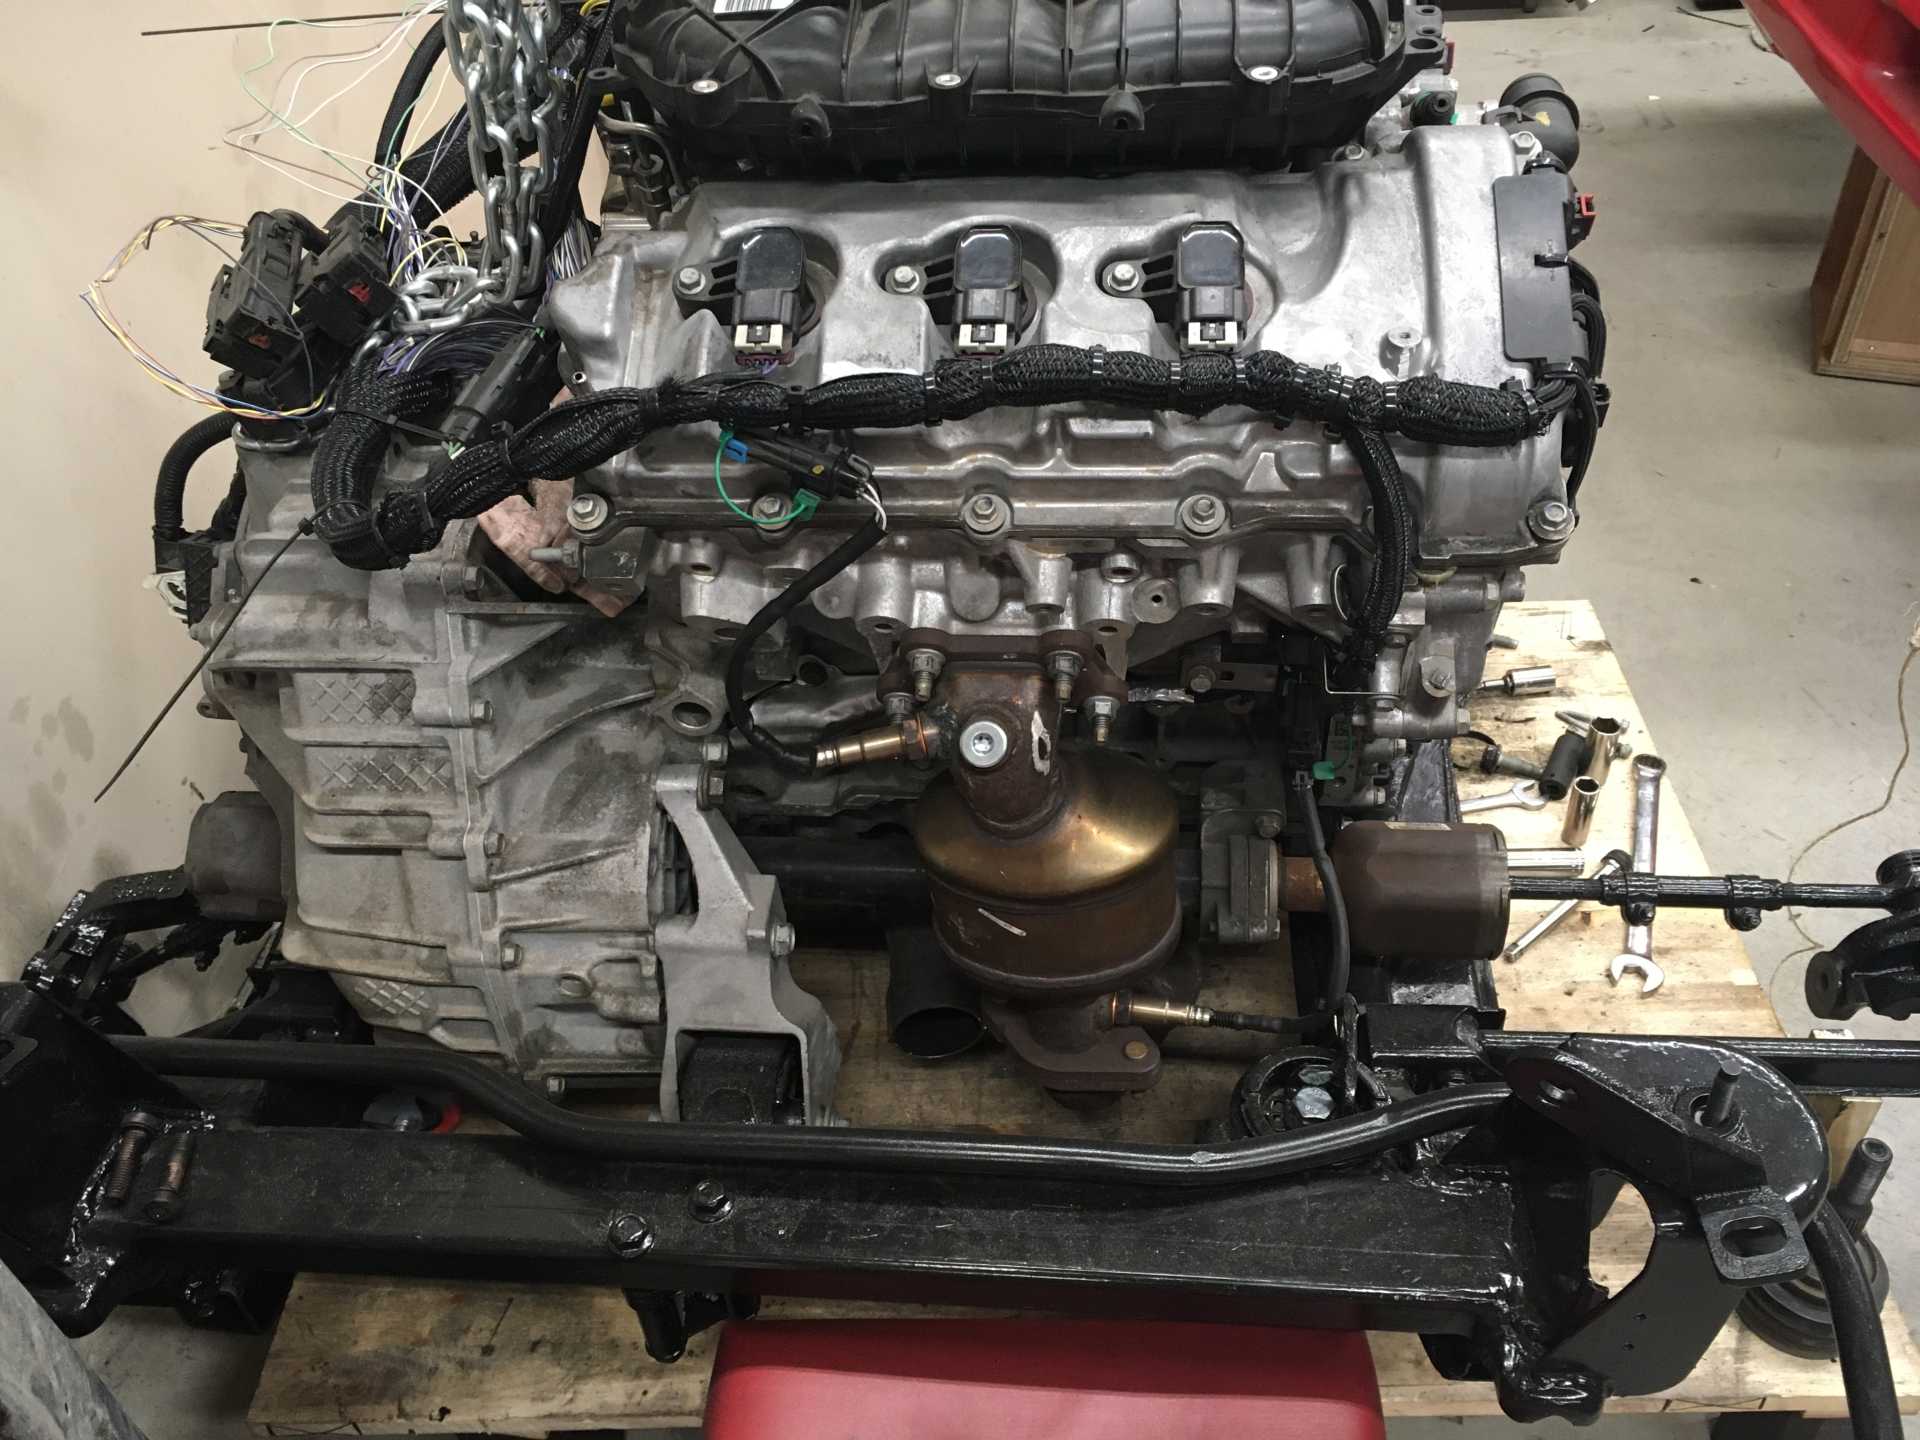
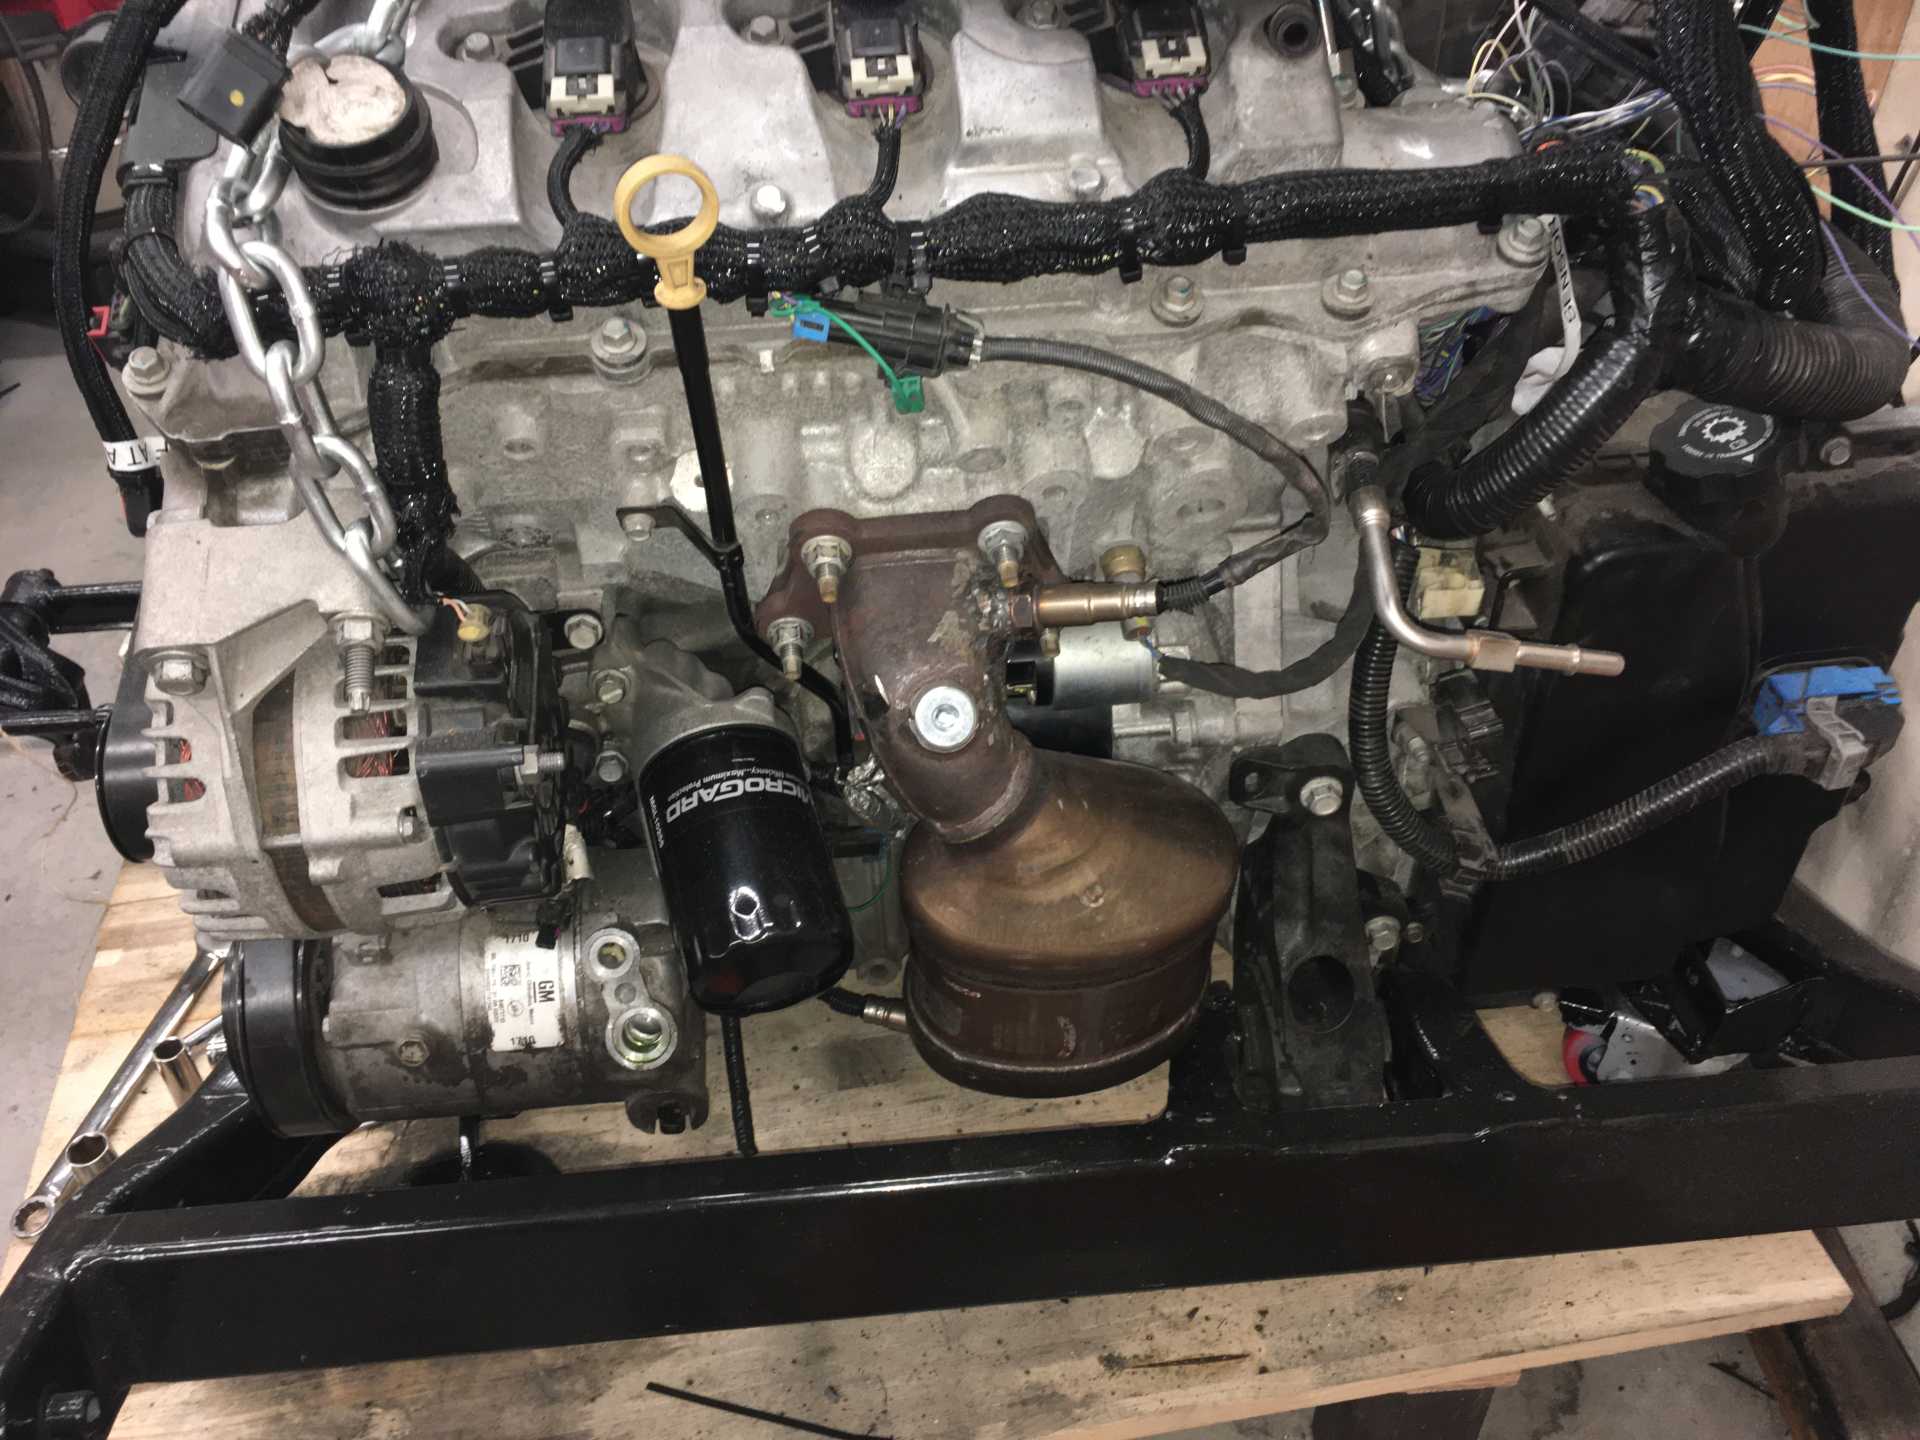
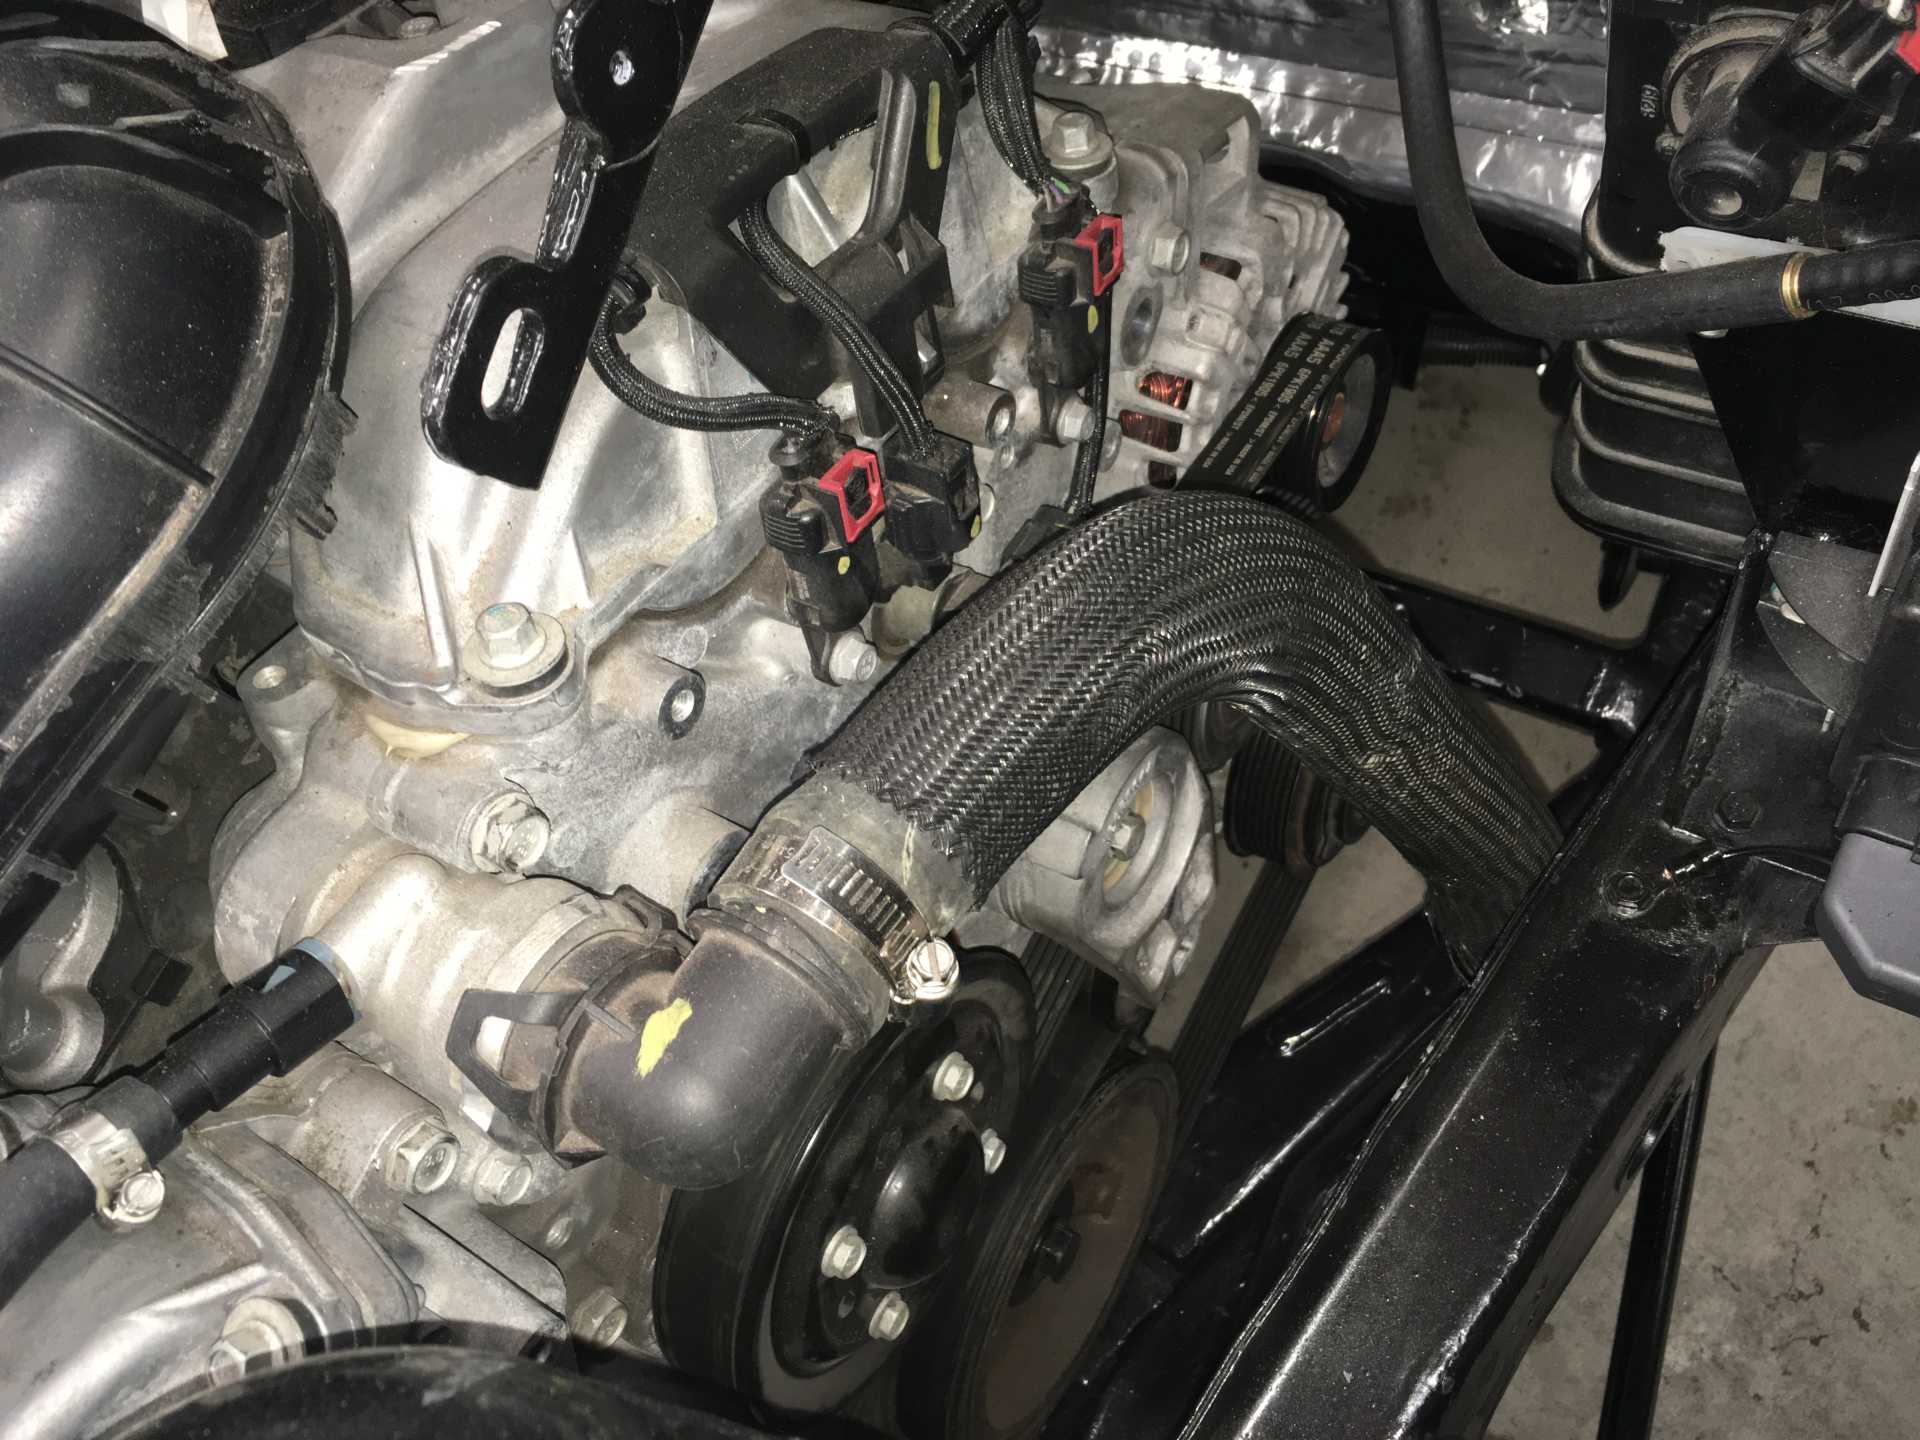
The O2 sensors have been moved to the sides of the cats with the original O2 holes plugged for now. Later maybe a patch will replace the bungs since they do stick into the exhaust flow. The engine wiring has been re-loomed with the connections to the Throttle Body and Mass Air Flow moved since the Intake Manifold is now reversed (I might consider a Camaro IM later). Two other issues were the fuel inlet hose needed to be rebent to feed from the other side of the engine. Finally the thermostat and housing has heater hoses pointing in the wrong direction. I removed the hose pipes and drilled & tapped the housing for AN-10 and AN-12 connectors that point them in the right direction. The thermostat and housing are a single non-repairable part, dealer cost is $190, I'd better not break it. A leaking front crank seal has been replaced while it's out in the open. The Fiero oil pressure sender has been added to the filter oil mount (so my rally gauges work), the Alternator & AC are mounted and the belt is on. Now "all" we need is to put it in the car, make the wheels turn and hook it up.
Aft end, aft motor mount is bottom left-center of photo, bolted below cross bar. Engine mount at opposite end of crossbar. Wiring is re-loomed to move it and make it look better. Cross-under front exhaust is just below left end of cat flange. Front & rear are joined up to the single pipe hidden behind the cat. It's all stock Impala parts.
View of aft end of engine mount. Bolt drops in with nut below to hold it to isolator.
Forward side of motor. All accessories in place. Engine mount hidden below AC compressor.
Next: Axles on the cheap.
[This message has been edited by MikesFirstFiero (edited 08-07-2021).]
The cradle has been the first part that needed significant changes. To marry the engine and the cradle I lifted the engine with a hoist and placed the cradle on the ground with a wooden platform inside it, still mounted on casters). Then the engine was lowered onto the platform and shimmed to be level to the floor. On the LFX the oil pan is a structural part and the engine-transmission rests on the transmission at the torque converter and the front of the oil pan behind the harmonic dampener. Just looking at the fit a few problems became obvious. -The cross members of the old cradle were intended for an engine that was much narrower, one or both would need modification. -The new motor mounts would be a problem since there are only the mounts at the transmission on both sides but nothing on the front of the engine. It was suspended from above. -The engine would need to be as low as practical to clear the right shock tower and to give a lower CG. -Both side rails would need some cutouts to clear the transmission and a sensor on the front of the engine. -There would need to be something to provide a torque reaction force to the cradle with as long of an arm as possible since there is no dogbone.
Interference on the left side with the transmission, one of many
The first thing I did was to make a pair of jigs from some scrap Oak, they were placed on top of the suspension arms mounts. These were cut to mate to the Impala tripod outer housings. The axle/engine location front to back (relative to the car) and the height of the axle were determined by the jigs. the Forward side of the engine was held up by a piece of a 4 x 4 with shims for height adjustment. Left-right positioning was by eyeball using the cradle rail as a reference. Lowering the engine showed that all the old 2.8 motor mounts would need to go. As I lowered the engine& transmission the jigs I made were sliced thinner on a bandsaw so they were always a good reference. The birdcage was used many times to check the engine-tranny location, without it the mount would be guesswork. I'm planning on mating the engine assembly to the car one time only.
These jigs saved loads of time making sure the position was repeatable. I must have lifted and set the engine 5 times.
At this time I decided to look at the motor mounts before I went any further, I knew the tranny would require a cut on the left cradle rail but that could wait for now. This is a low-budget swap so re-using anything from the Impala was free. I checked many engine mounts and the cost, size and location pretty much ruled them out and I did have a set of Impala mounts already. To use the Impala mounts I would need to move the cross bars out and weld the impala brackets to them. So one at a time I located the new cross bars and tack welded them in place and then cut out the old cross bars. Since the front crossbar mounts the handbrake I left the driver side stub in place. But for now there is no handbrake. To keep the rear cradle mounts aligned I used a U-channel of steel bolted to the cradle-to-car mounts to keep the original geometry accurate. I then welded in the new one and cut the old bar out. I really didn't want to have to fight bad cradle mounting points when it goes back in. Both cross bars were made from 2 x 3 rectangular tubing. The fore transmission mount was welded to the crossbar at an angle after fiddling with the engine placement. The aft cross bar was mounted flat so the Impala bolt-on mount could be reused. This solution solved several problems. -It was cheap, $60 for steel. -It moved the attachments to the cradle closer to the ends of the cradle. This reduces the bending stress on the cradle rails and gives the same arm distance as the Impala to reduce the torque reaction force. -It allowed the stock exhaust Impala to be easily routed to the rear of the car. The muffler would be located under a reduced-depth trunk. I got this idea from the LS/LFX conversion by Dan86GT (https://www.fiero.nl/forum/Forum3/HTML/000136-2.html) and it makes really good sense. The original Fiero muffler was tiny and putting a bigger one between the engine & trunk was not going to work. Now I'll have room for a Camaro transverse muffler (and maybe a resonator if it is too loud when crusing).
View of forward of engine with Impala mount in place. The existing cross bar just does not work.
Trying the Impala cradle cross bar as an experiment. It's too short to use.
Front new 2"x3" crossbar ready for welding, old bar is partly still in place. The bar covers the trailing arm nuts that were welded in place.
Positioned to weld the Impala mount bracket to the front cross bar
Keeping the rear cradle mounts aligned so I can cut off the rear crossbar. The aft mount is the black drumstick laying on the platform.
The tranny still bottomed on the cradle rail and on the aft left side suspension mount. The only way to solve the suspension interference was to cut off a rib on the tranny that was exactly in the wrong place. That made the mount lower but not enough. The cradle needed to be notched on the left side by about 3/4" to eliminate the interference. The tranny was now lower fore and aft and solved the clearance issues with the cradle.
Notch to transmission web to clear left rear arm mount.
Cradle with both cross bars replaced, forward mount bracket in place. Notch in both rails.
The aft rear transmission mount bolted up to the cross bar from below with spacers to determine the rear height. The fore transmission mount height needed to be lowered too; this was done be slotting the mounting bracket and welding heavy washers at the new height. What about the front of the engine? Well I mulled this over and eventually figured out a solution that was cheap, gave a long lever arm and provided some vibration isolation. On the side of the engine there are some possible mounts on the aft flank by using the transmission shaft mounting points. But what about the forward side? That has the alternator, oil filter & sender and A/C compressor taking up most of that space. And there isn't much lateral space between the engine and the cradle rail.
Then I discovered there are two unused 14mm tapped holes on either ends of the oil pan front near the top. I took some measurements and made a cardboard template of what a mounting bracket could look like except fpr the ends. I had no idea what the ends of this bracket would connect to, I wanted vibration isolation but had no idea how to get it. Then I remembered I still had the Impala cradle isolators in their steel collars. The collars I welded to the cross bars, one to each bar. The isolators look like plastic & rubber donuts with an aluminum hub in the center. A little bit of thinking gave me the strange snake-like ends to the mounting bracket. One end of the bracket has the mounting bolt welded to it and the other has a mounting pad. This was needed since the isolators are canted and both mounting bolts can't be welded to the bracket. Next came a wood template and a test fitting. It worked well enough to make the real thing from 1/4" steel plate with a bottom flange to stiffen it laterally. The result is two engine mounts that are widely spaced from the transmission centerline and fit in the limited space and should provide adequate torque reaction since there is no dog bone.
Template and rough-cut engine mount bracket.
Forward mount on cross bar
Aft mount on cross bar
Preparing to drill the holes for bolts to the oil pan. The V shaped jig was drilled and checked for correct fit.
Finally I needed to make a notch on the right side rail to clear the sensor on the oil pan below the crankshaft. The photo below shows the engine on the mounts with the cats and accessories installed.
Completed front mount bracket with stiffening flange on bottom.
Completed cradle ready for the engine.
The O2 sensors have been moved to the sides of the cats with the original O2 holes plugged for now. Later maybe a patch will replace the bungs since they do stick into the exhaust flow. The engine wiring has been re-loomed with the connections to the Throttle Body and Mass Air Flow moved since the Intake Manifold is now reversed (I might consider a Camaro IM later). Two other issues were the fuel inlet hose needed to be rebent to feed from the other side of the engine. Finally the thermostat and housing has heater hoses pointing in the wrong direction. I removed the hose pipes and drilled & tapped the housing for AN-10 and AN-12 connectors that point them in the right direction. The thermostat and housing are a single non-repairable part, dealer cost is $190, I'd better not break it. A leaking front crank seal has been replaced while it's out in the open. The Fiero oil pressure sender has been added to the filter oil mount (so my rally gauges work), the Alternator & AC are mounted and the belt is on. Now "all" we need is to put it in the car, make the wheels turn and hook it up.
Aft end, aft motor mount is bottom left-center of photo, bolted below cross bar. Engine mount at opposite end of crossbar. Wiring is re-loomed to move it and make it look better.
View of aft end of engine mount. Bolt drops in with nut below to hold it to isolator.
Forward side of motor. All accessories in place. Engine mount hidden below AC compressor. Cross-under front exhaust is just below left end of cat flange. They are joined up to a single pipe behind the cat.
Next: Axles on the cheap.
Do yourself a favor now, while you have the cradle out of the car. Your engine oil dipstick will not be accessible unless you put a bend about 2 inches from the end and fabricate a flexible cable dipstick. Looking great so far.
Not having the 6T70 makes it a lot simpler. Good to see another LFX completed. Any problems with aft bank cam sensors hitting the shock tower? And is that a dogbone mount?
[This message has been edited by MikesFirstFiero (edited 08-07-2021).]
Sorry for the long delay in posting progress. I've been at it most days and have lots to talk about.
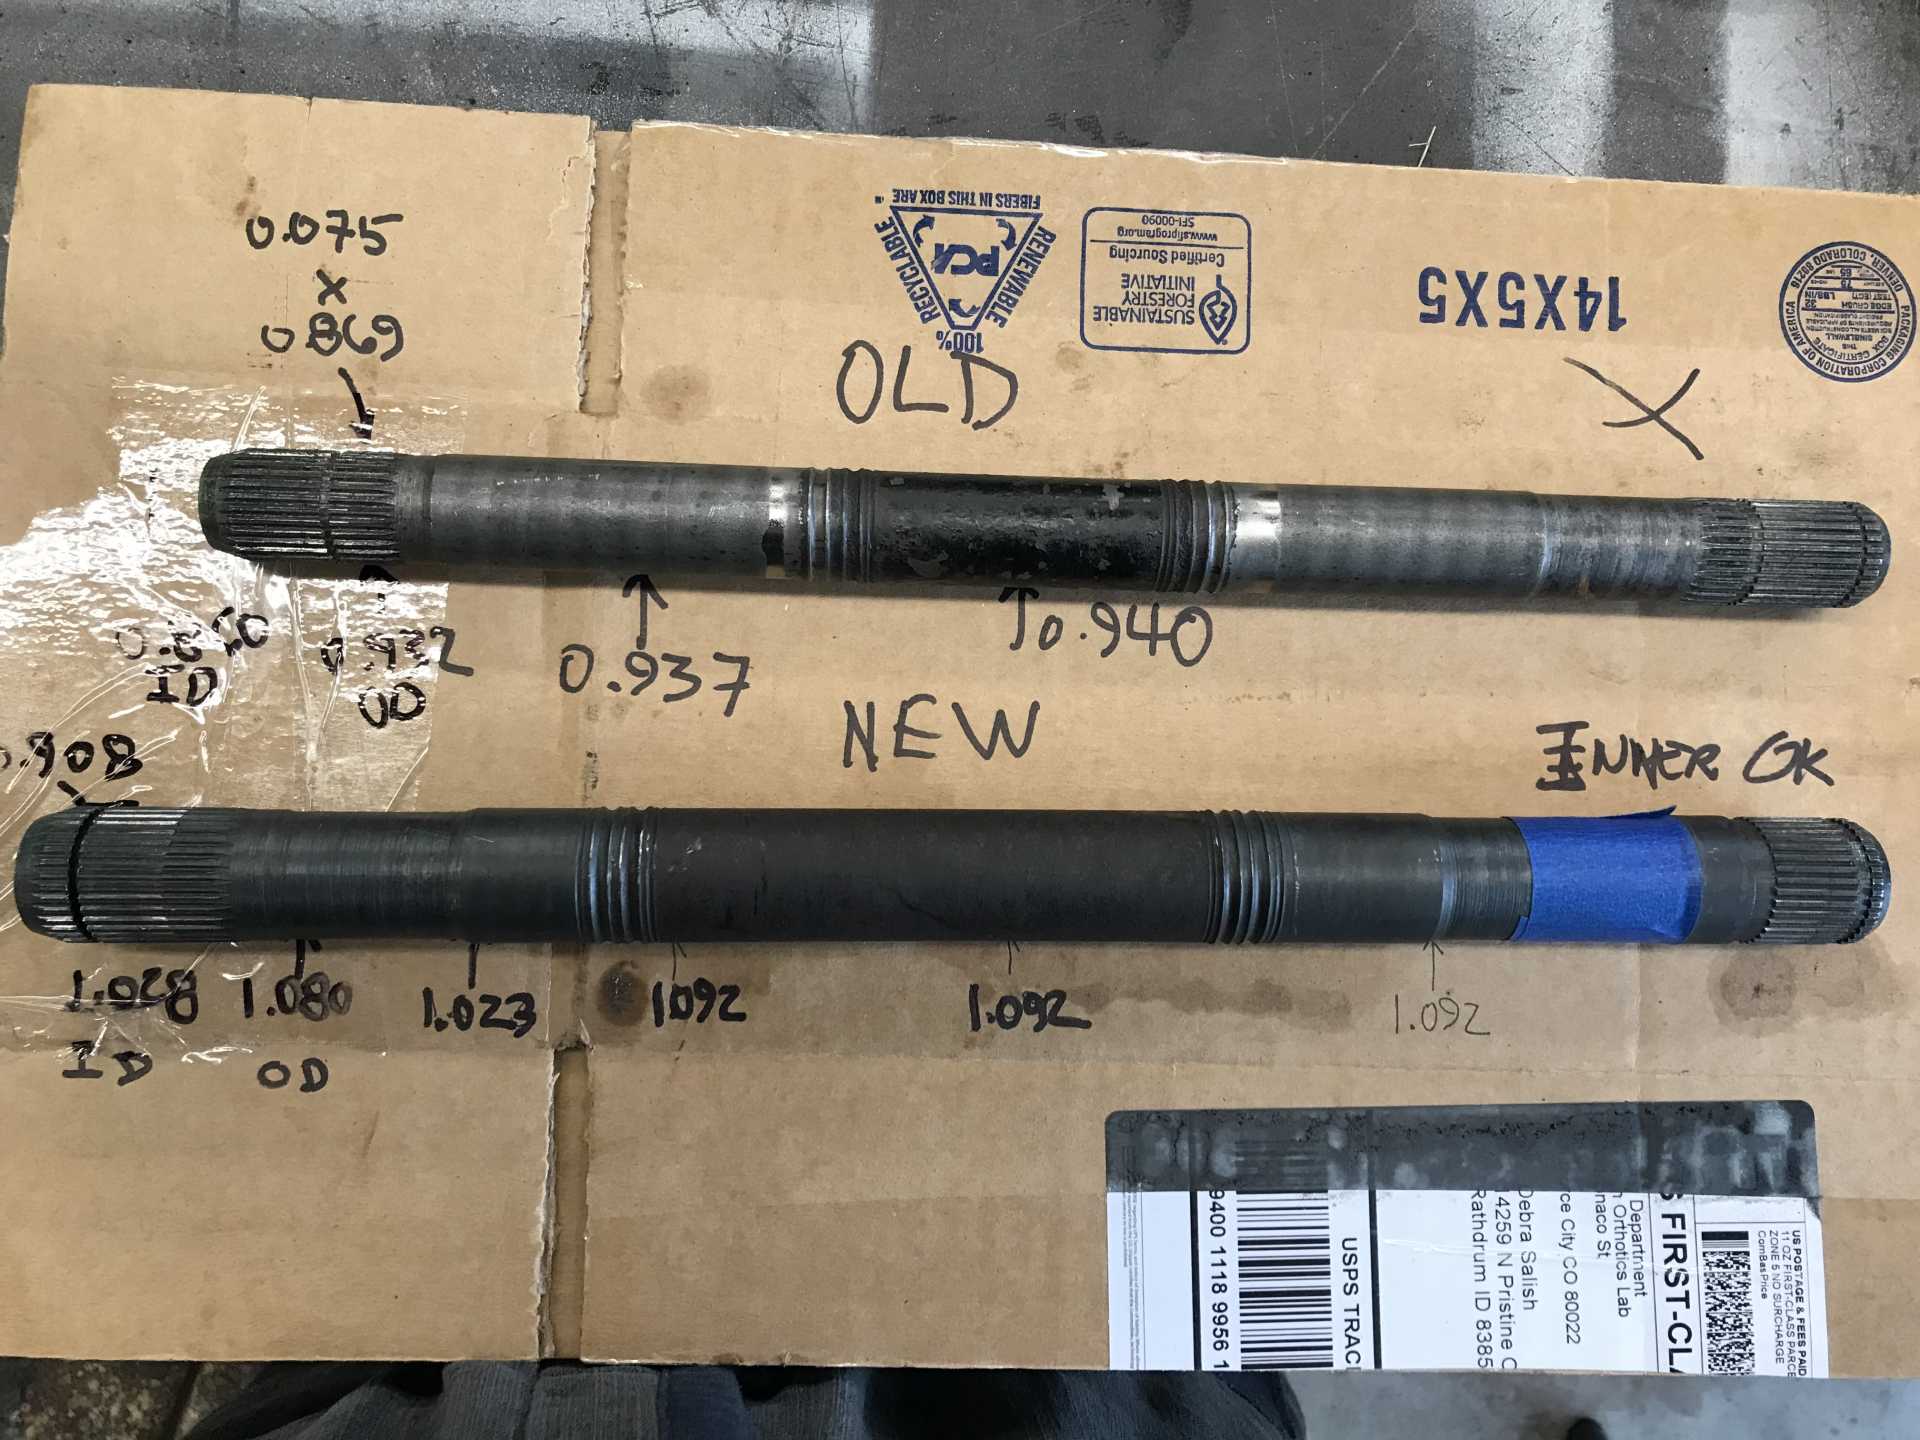
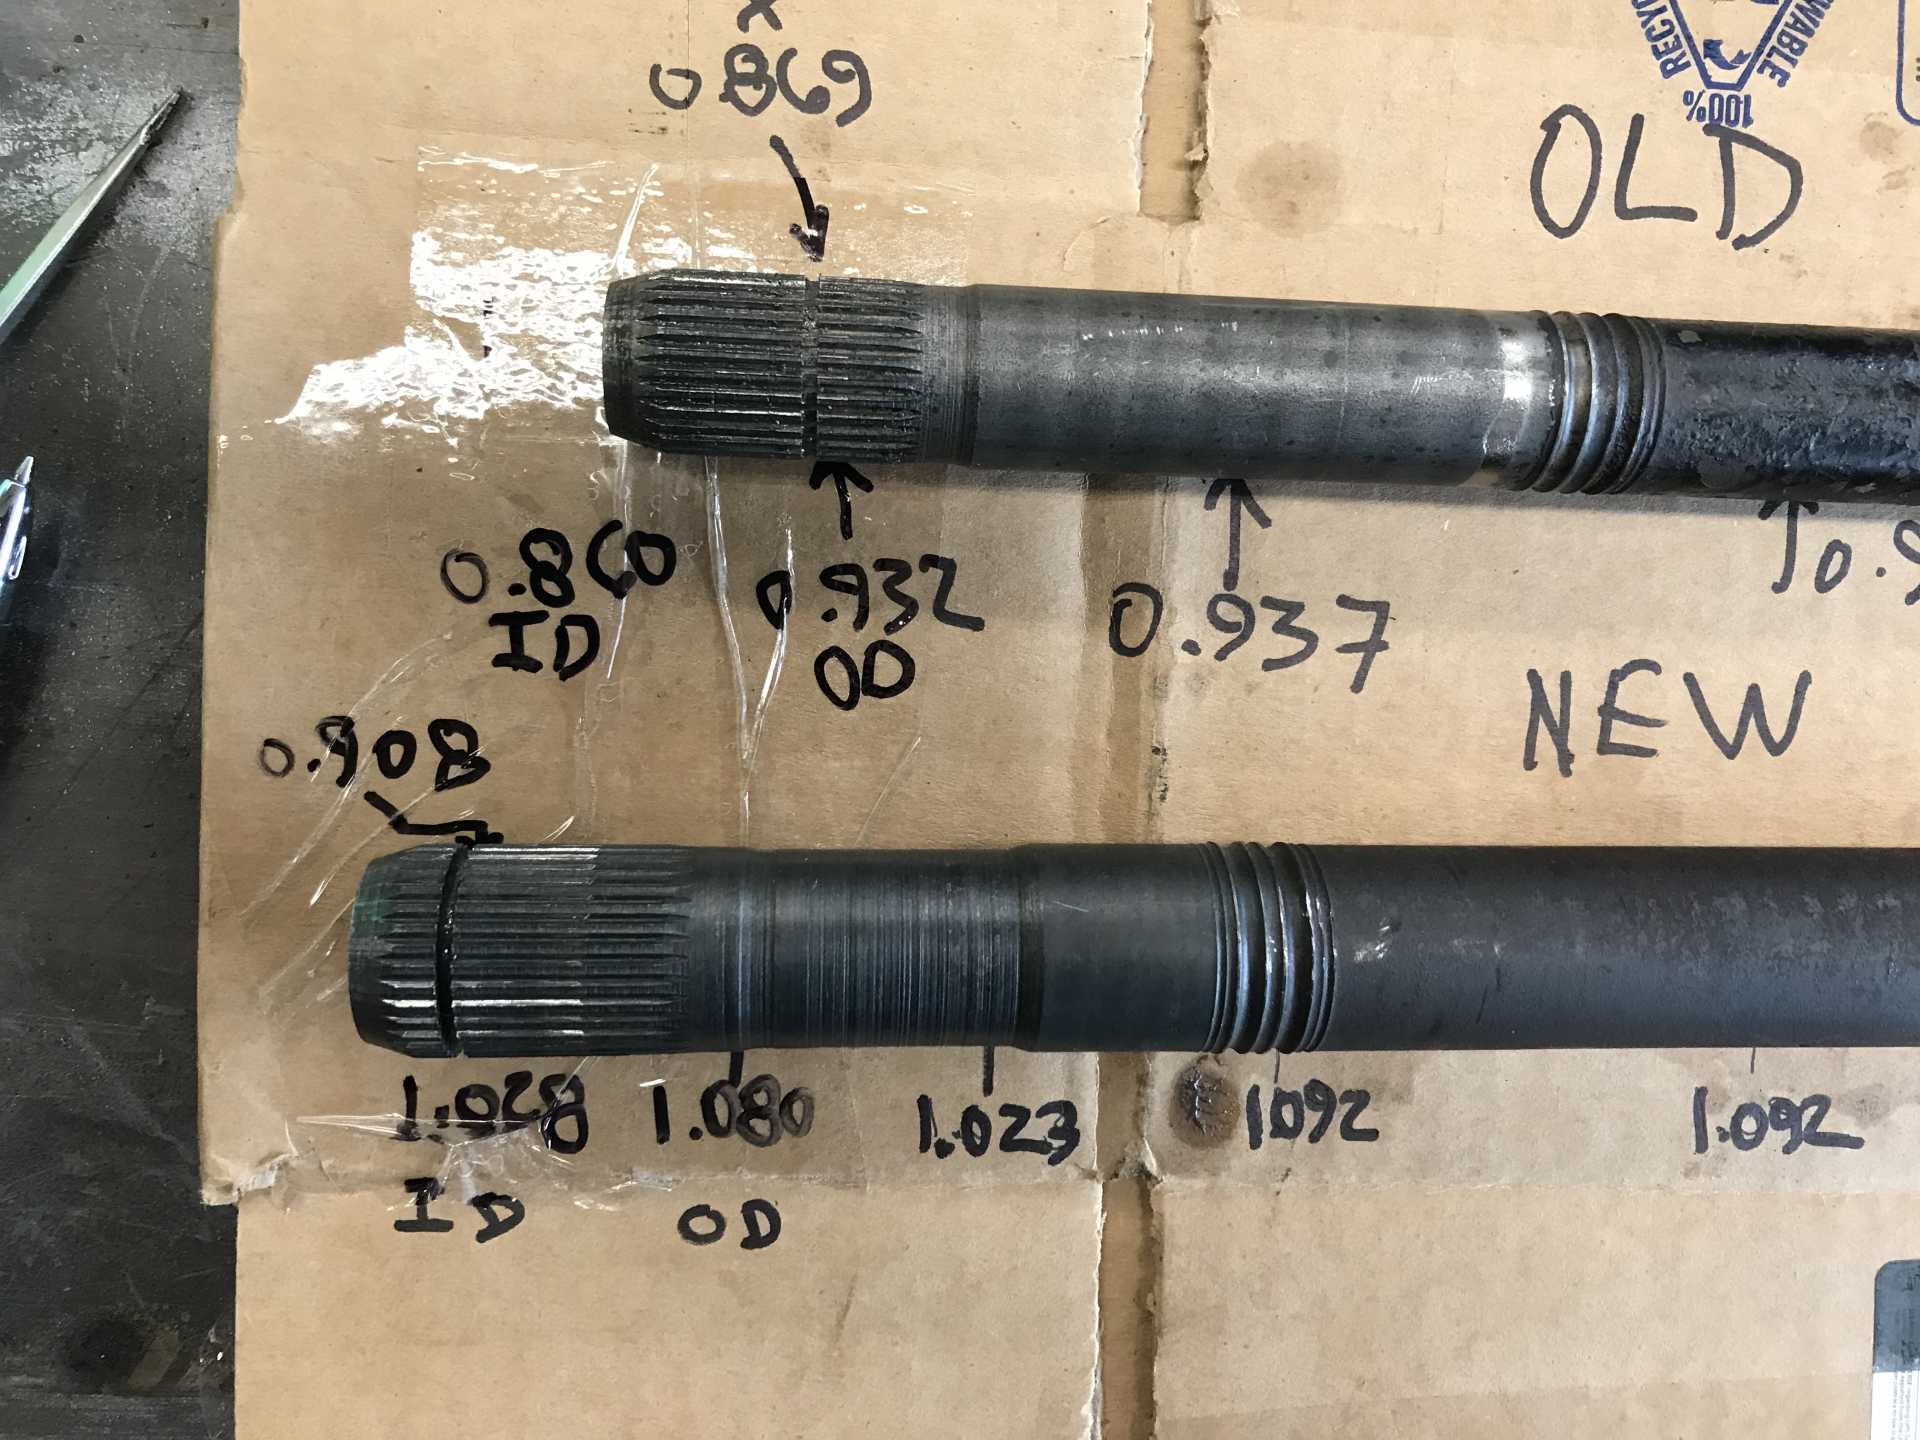
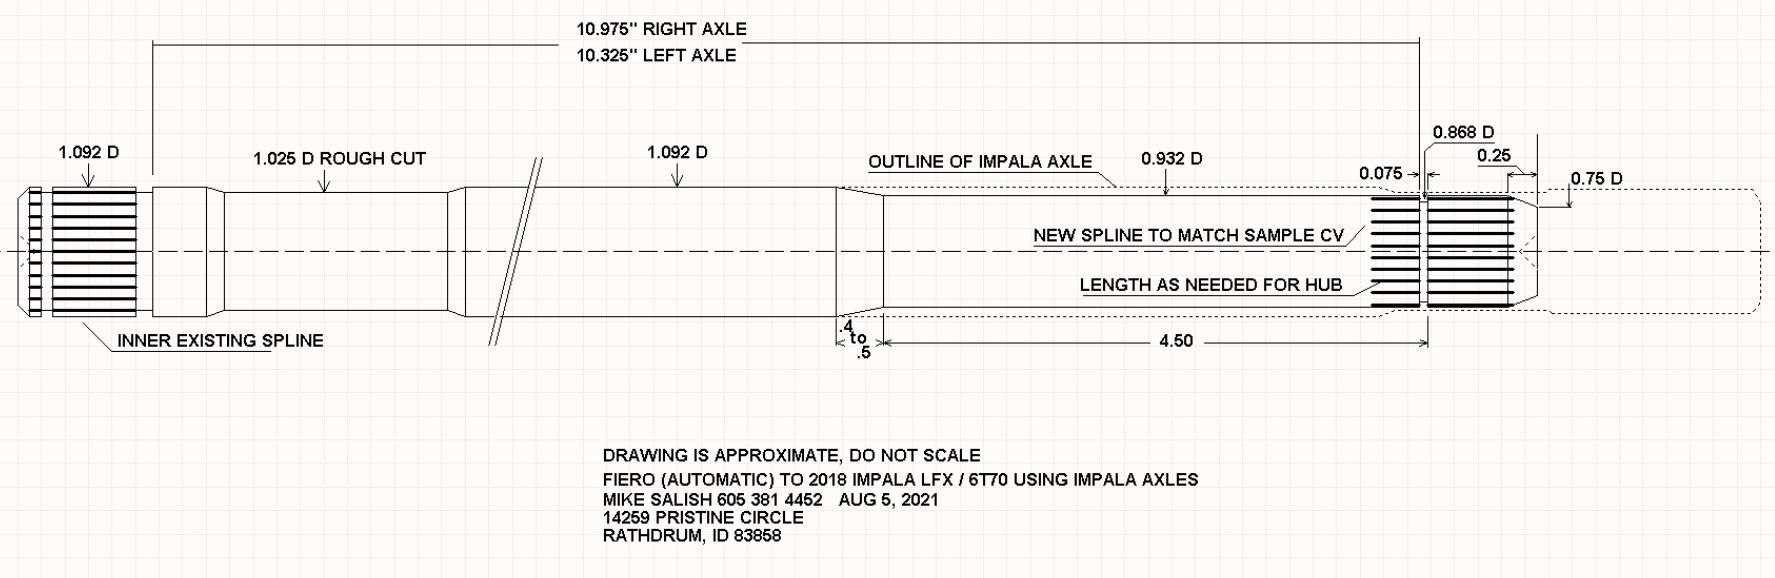
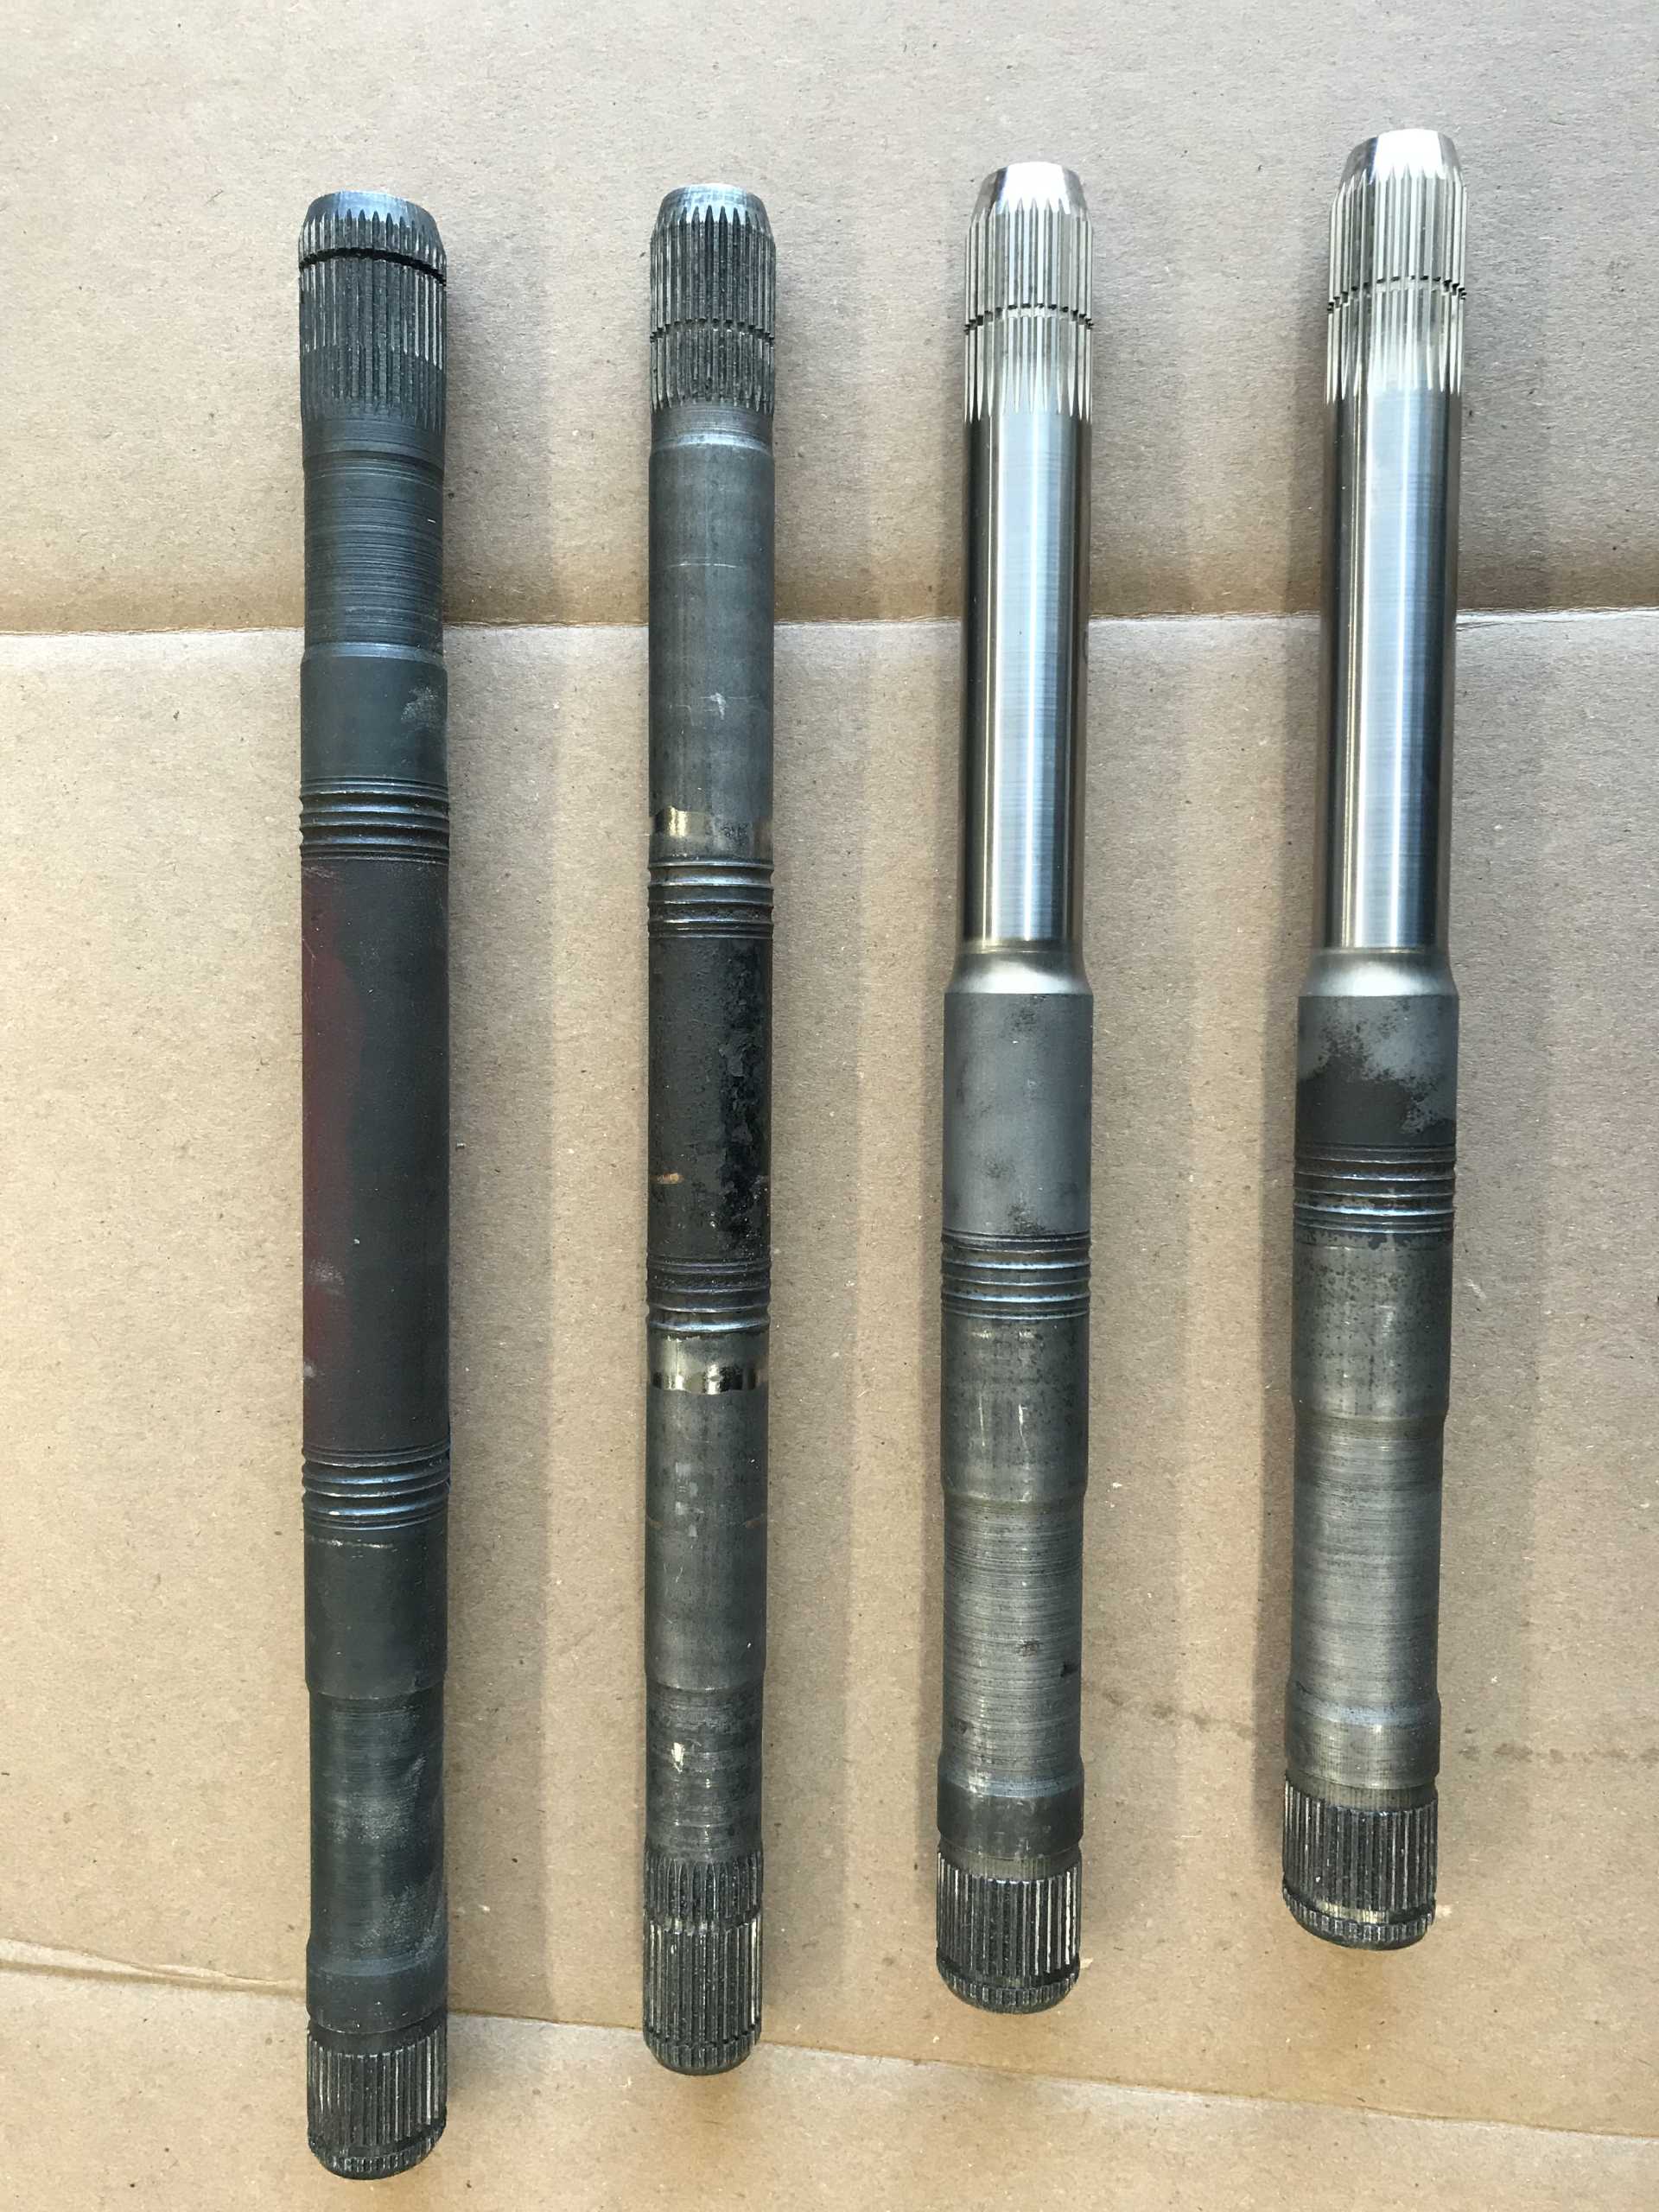
The axles were looking like a significant problem since the Fiero axles tripod ends won't work with the Impala parts. I looked at the Impala axles and found that they were long enough to work and the diameter was larger than the Fiero diameter. I spent a time over several days taking measurements of the axle positions in different points of suspension travel. I used a Fiero axle with the tripod fitting removed and replaced with the Impala part. The length position was determined by a plastic sleeve on the axle to position the tripod roller assembly. I made several independent measurements to insure that I was not making them too long or too short.
I found Dutchman Motorsports on the web in Boise, ID (https://dutchmanaxles.com) who said they could shorten, resize and respline the Impala axles for $75 each. Their big concern was that they would need to remove too much from the axles and get into the softer axle core. I sent them a drawing and they confirmed that the diameter reduction was good so I shipped the impala axles off along with a fiero axle and splined spider from a (new) Fiero outer CV as reference parts. Three weeks later they showed up and look great. For boots I went to (I'll find the name later) who specialize in CV joint parts. they had boots of the correct diameters in their catalog made fom a composite material, part rubber and plastic, for about $10 each with shipping. Since I was well into getting the engine in the car and connecting the liquid lines I set the axles aside for now.
Comparing the Impala and Fiero axles before modification
The shop drawing I sent to Dutchman
Impala, Fiero, New Axles
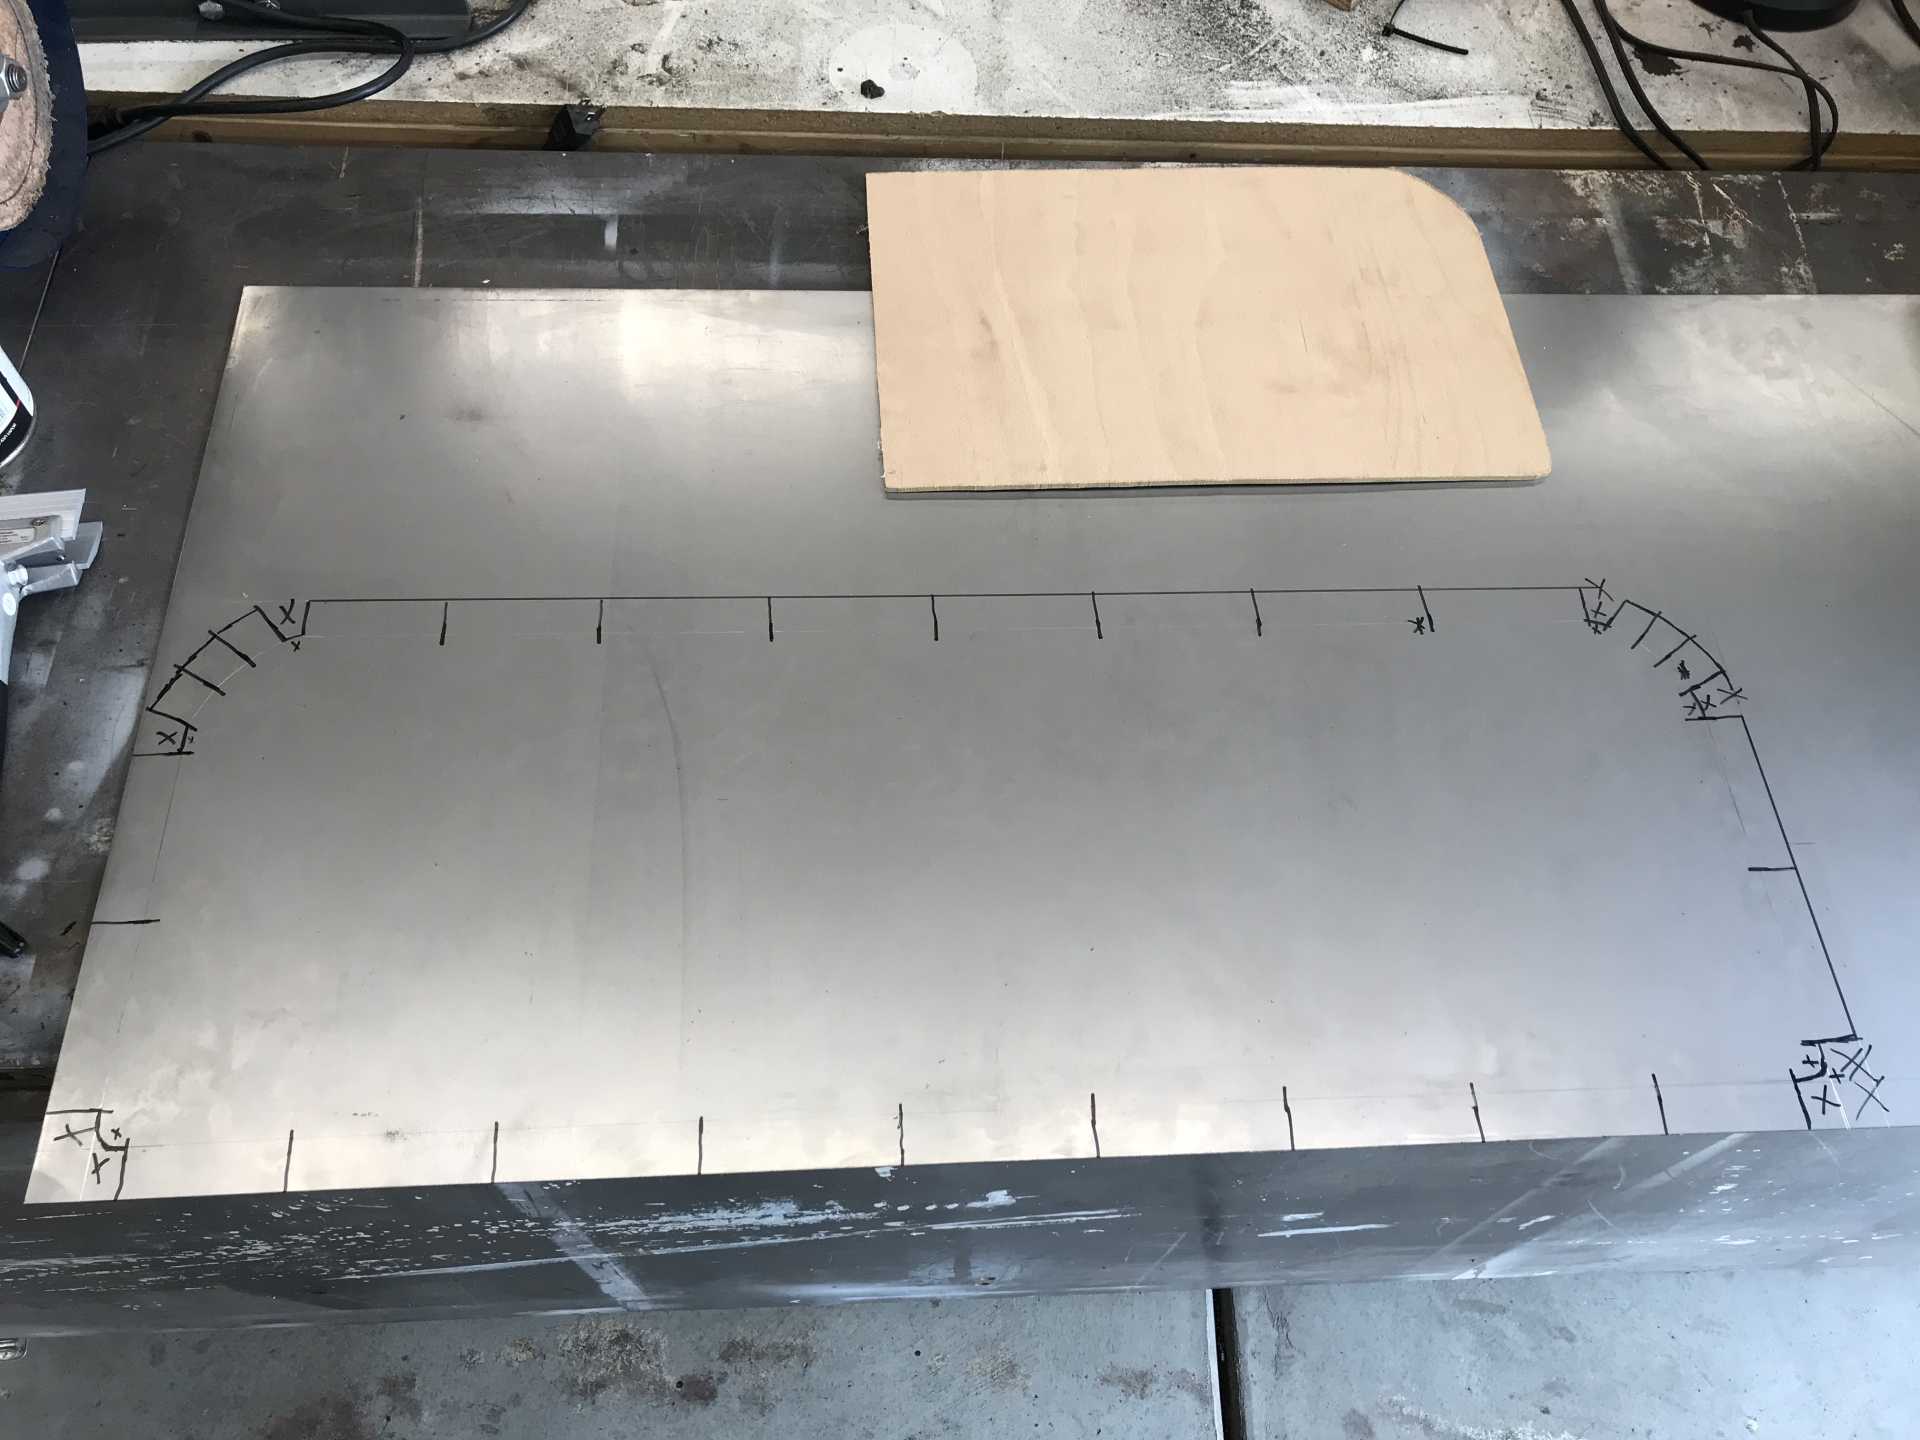
I spent a few days doing things cleaning up the engine bay, getting rid of unneeded old attachment points and fittings for the cruise control. Then I took a serious look at the new muffler installation. Cramming it between the engine and trunk meant that it would be impossible to work on that side of the engine and the trunk would always be hot. So I decided to copy the idea of chopping off the bottom of the trunk and putting the muffler below it. I found a muffler from a Camaro that was crossflow and acceptable dimensions. So off went the bottom of the trunk replaced by a new trunk bottom from 14 ga steel. I added a heat shield between the trunk and engine compartment where the cat converter is near. just cut up and relocated the original heat shield and I now have a big open space for the muffler. I'll worry about final placment of the muffler and exhaust later once the engine is in place.
Hinges
Cleaned up the bay
Hinges in the bay
Trunk Bottom marked on steel
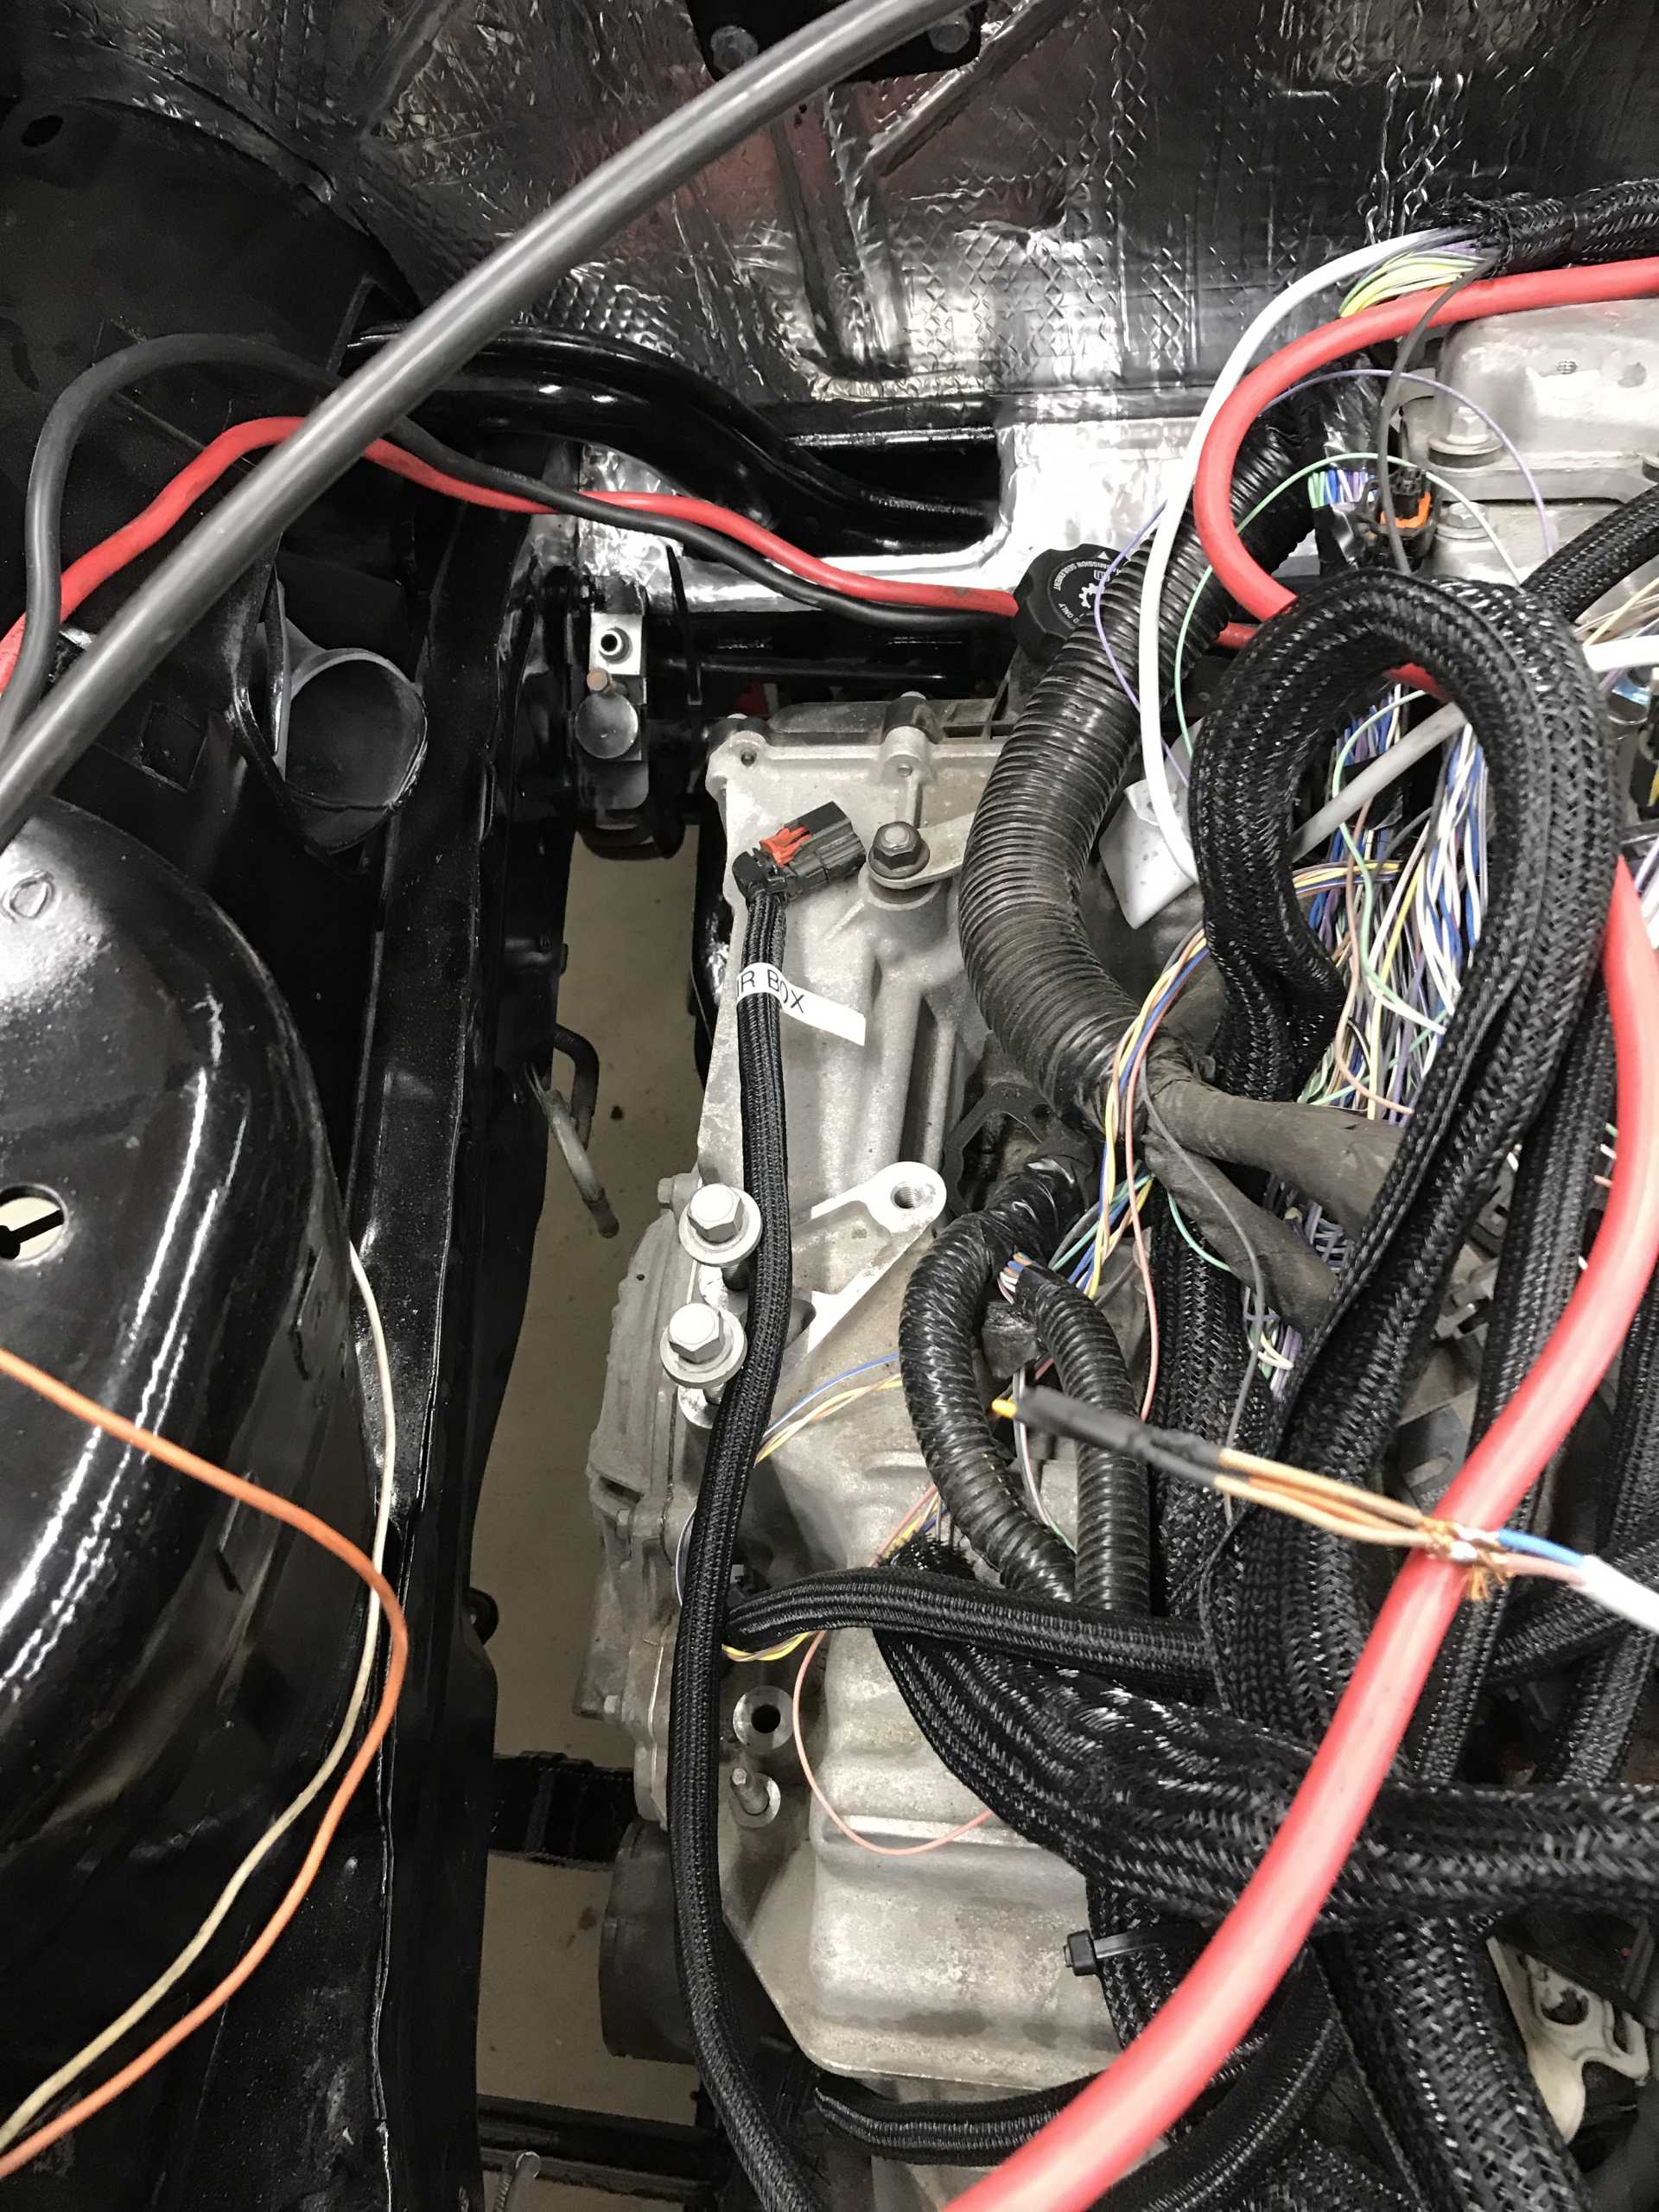
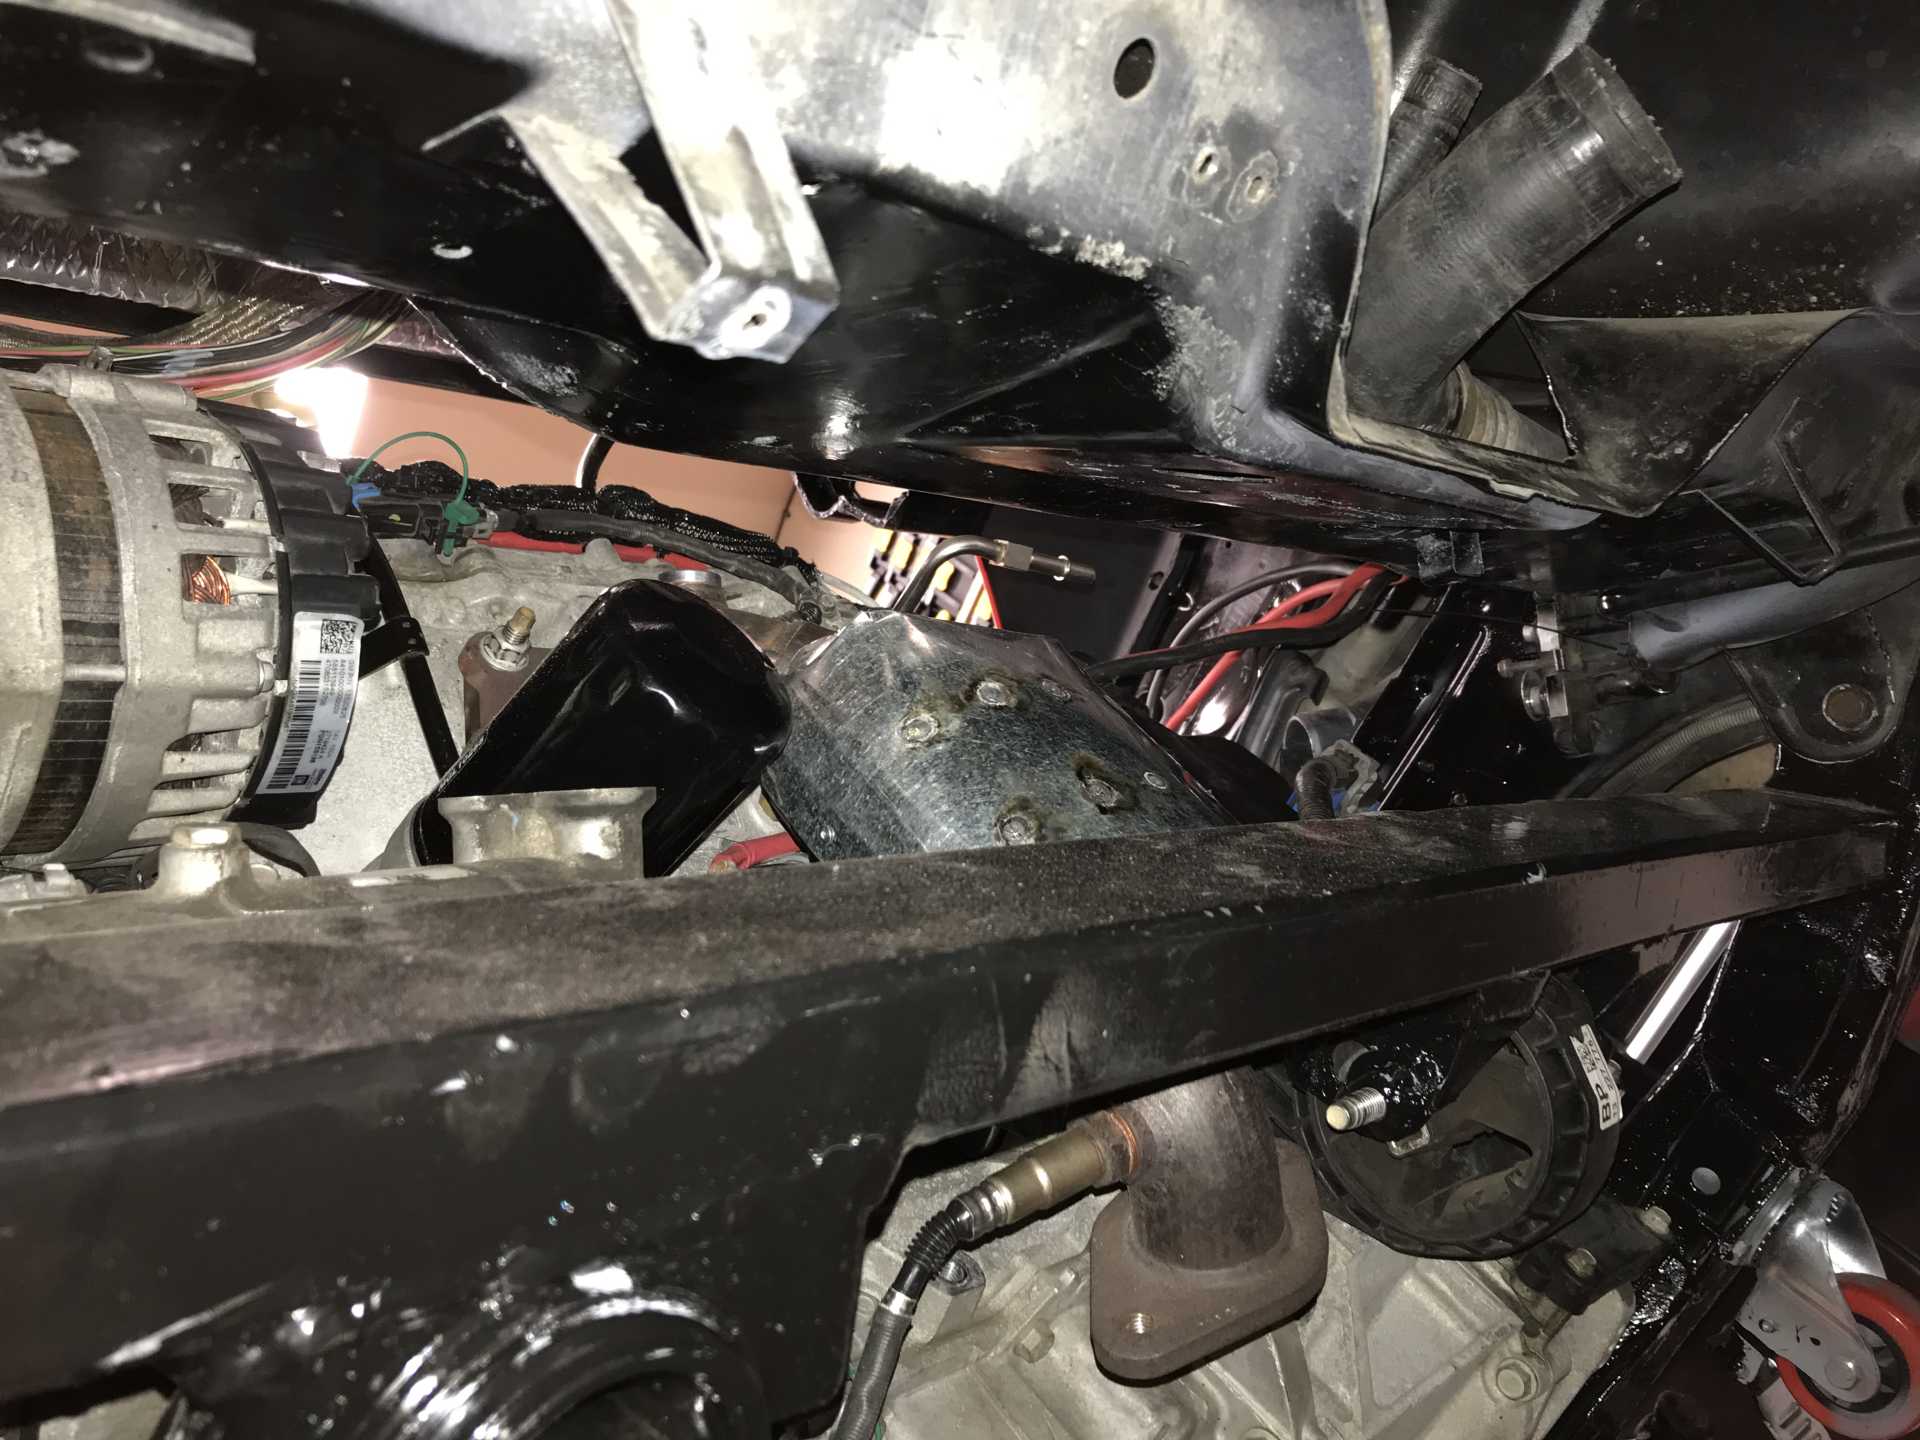
Then I spent a day or two doing things to the engine that would be more difficult after it was in place. I noticed what Daryl M did on his LFX swap and decided to provide some type of insulation for the outside of the cats. He used muffler tape but the cost of that stuff was more than I liked so I fabricated two heat shields out of 18ga steel and mounted them with modified hose clamps. I also cleaned up the engine harness and ran heavy duty cables for power and ground to the remote battery terminals. then it was time to install the engine and see if my planning paid off.
I lifted the body up and slid the cradle underneath.
Then lowered the car onto jack stands
Then raised the engine to meet the mounting locations on the car. About to hook up the hoist & lift it into place. Note my plumb bob to align the front bolt to the cradle sleeve, cradle is about 3” too far forward at this time. So My wife jacked it up until I got one bolt in, then some jiggling did the other front bolt.
And except for one cam sensor it fits. I cut out a part of the right shock tower to clear this. Should have moved the engine left another 3/4”. Engine is 3” low and will hit the tower. Angle grinder to the rescue.
And checkout the clearances for working on it. Rear is about 1.5”. Nothing much down there, a couple of sensors only. Bottom access
Front access is great to Alt, A/C, oil filter, starter
Right Side is empty. Big hole is part of wheel well and will be covered.
Left side even more. ECU & electrics will go over transmission. Should have moved the whole thing left 3/4" to avoid shock tower problem.
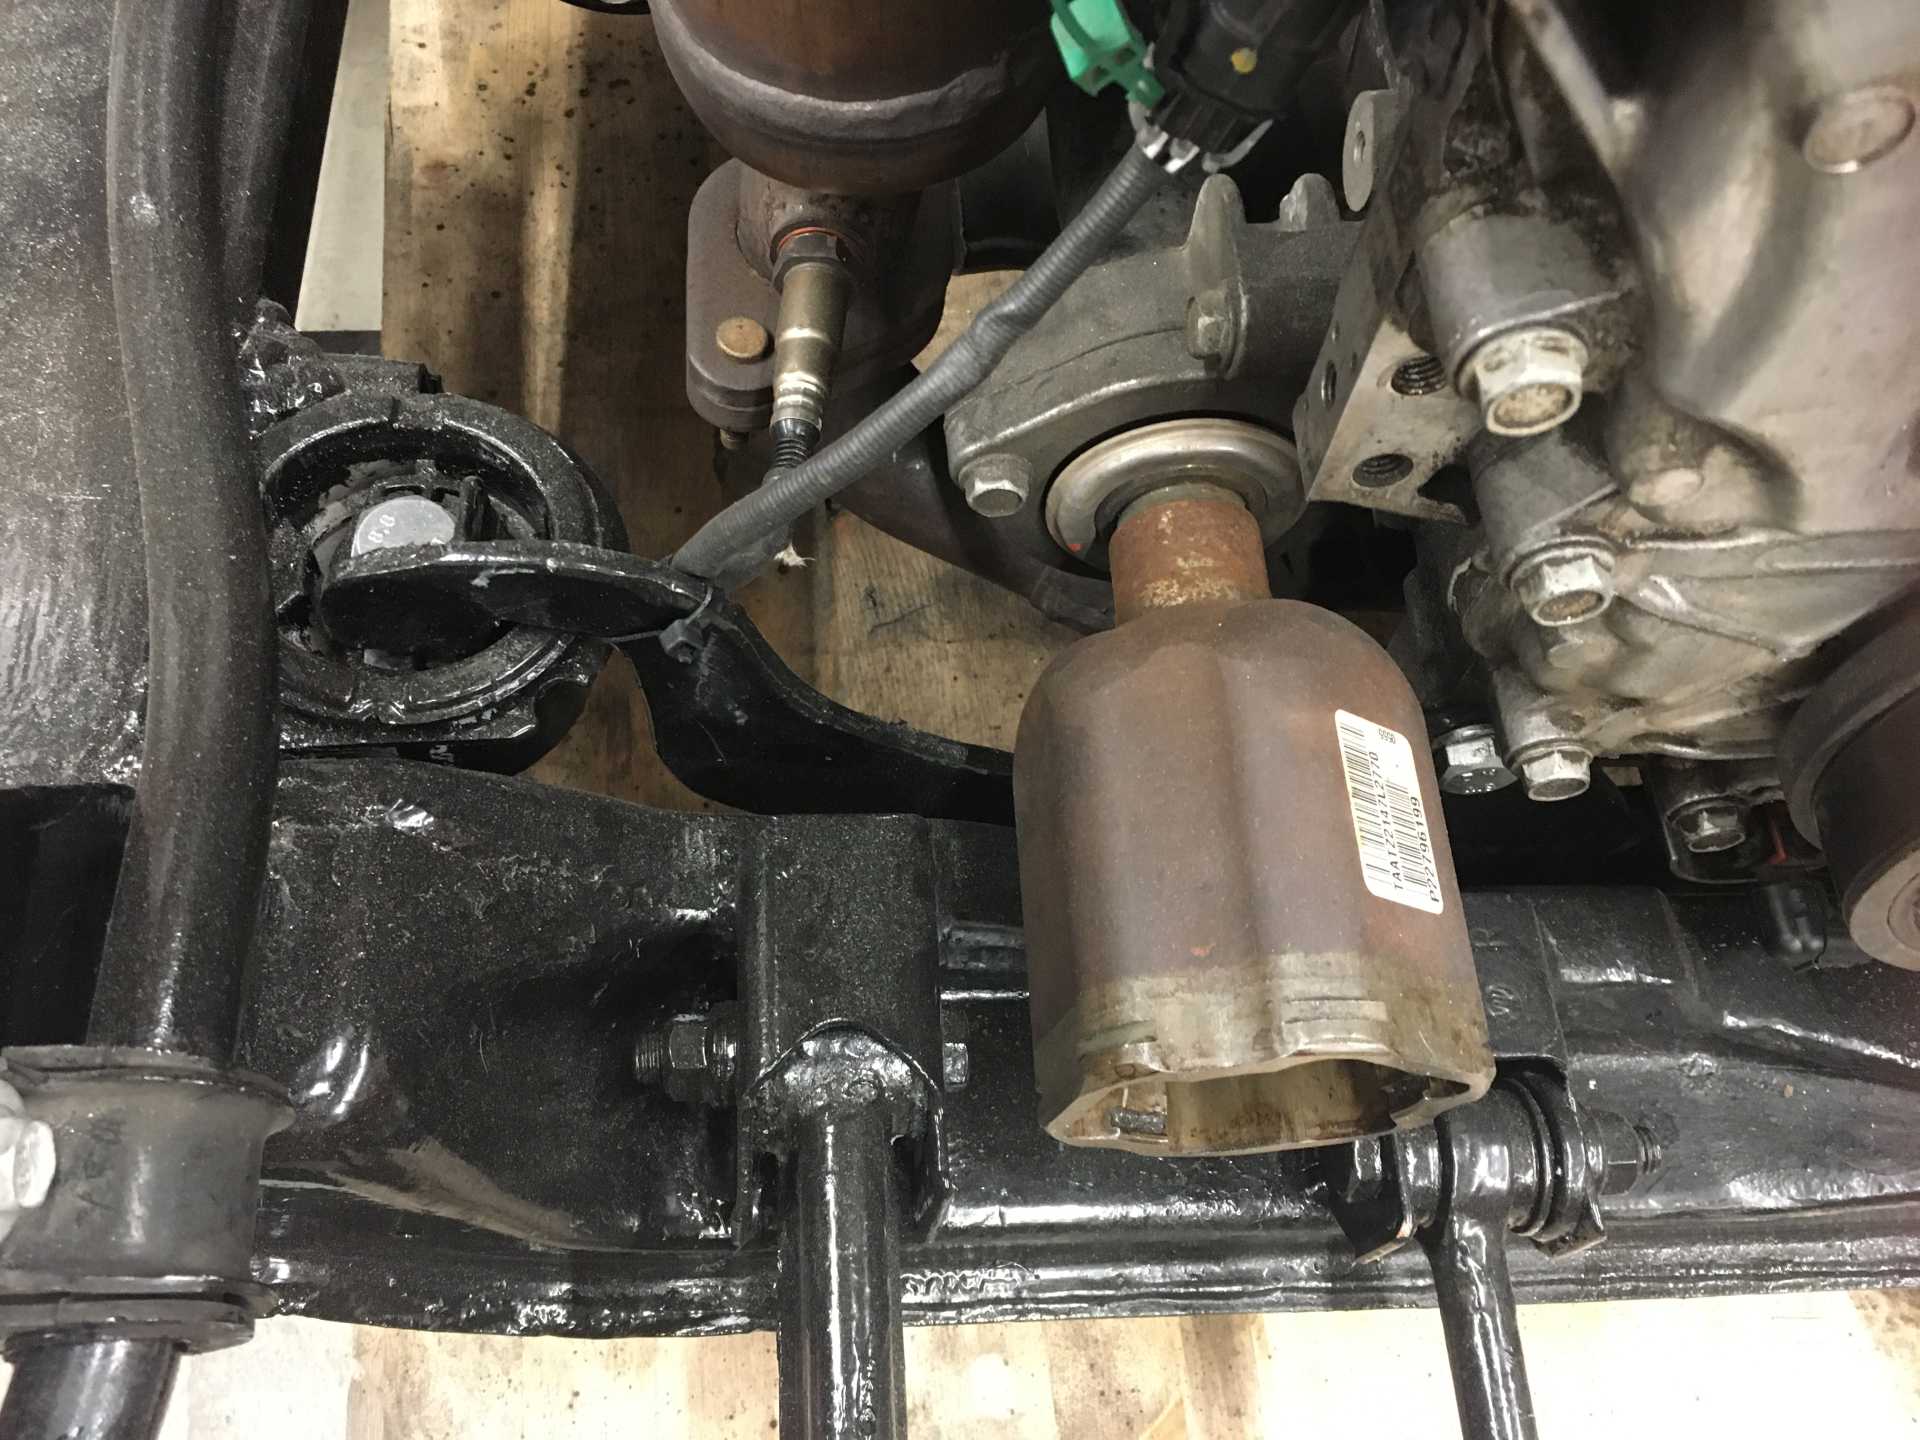
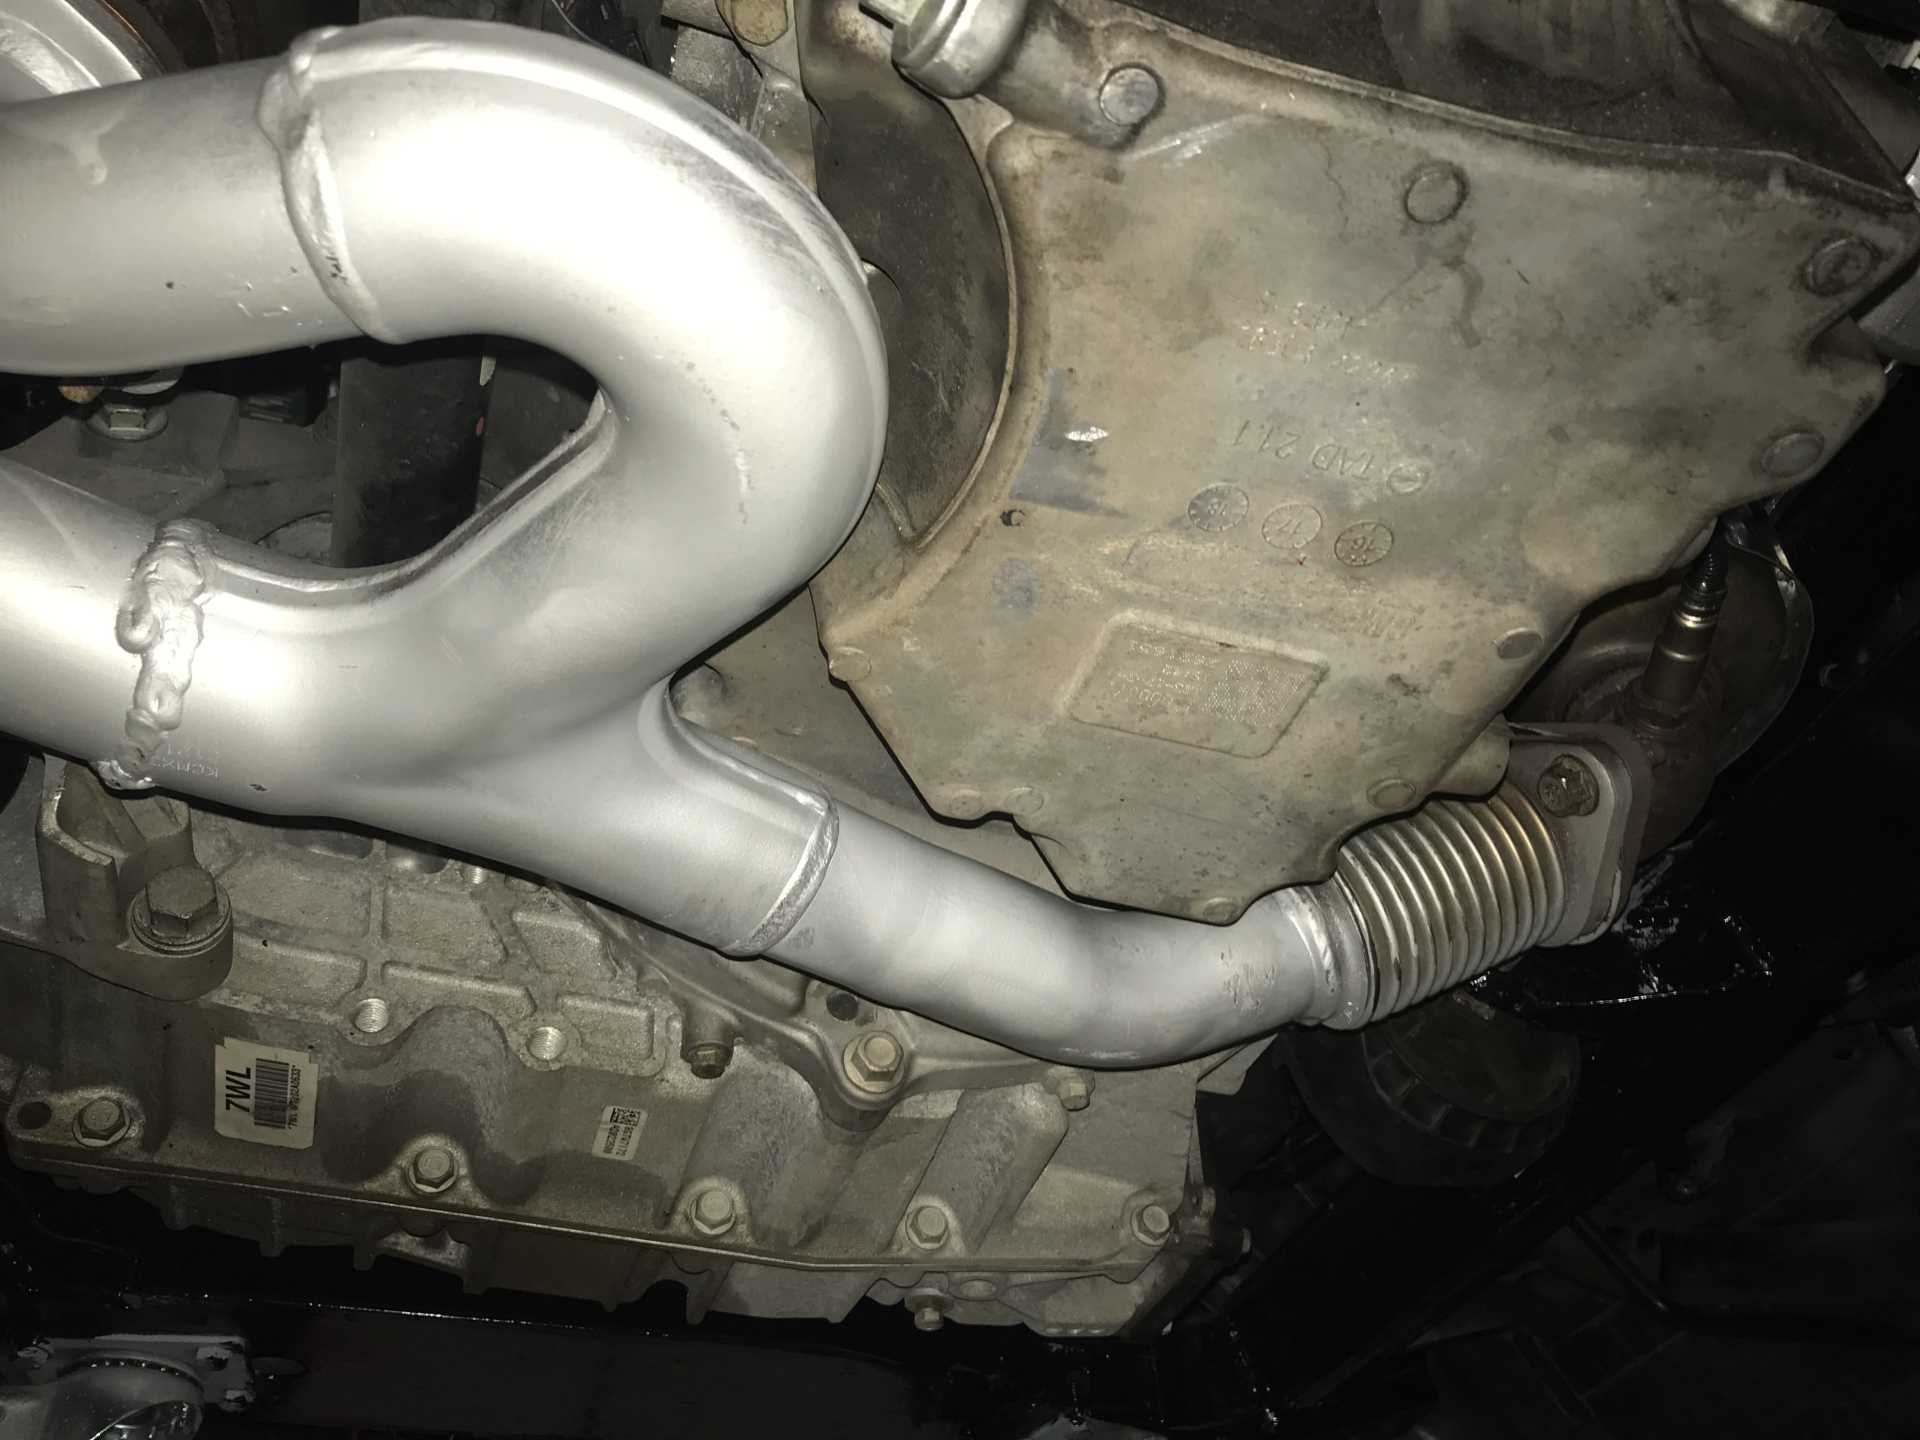
View of front of engine from the bottom, A/C is under Alt, I built heat shields for both cats. may not need the front one. Exhaust goes under the engine, has a notch in the oil pan. Those mounts are out of the Impala. There was a heat shield along all of the firewall since there were exhaust pipes, a crossover pipe and a Cat Converter. Now all gone. Cats and pipes are near nothing sensitive to heat.
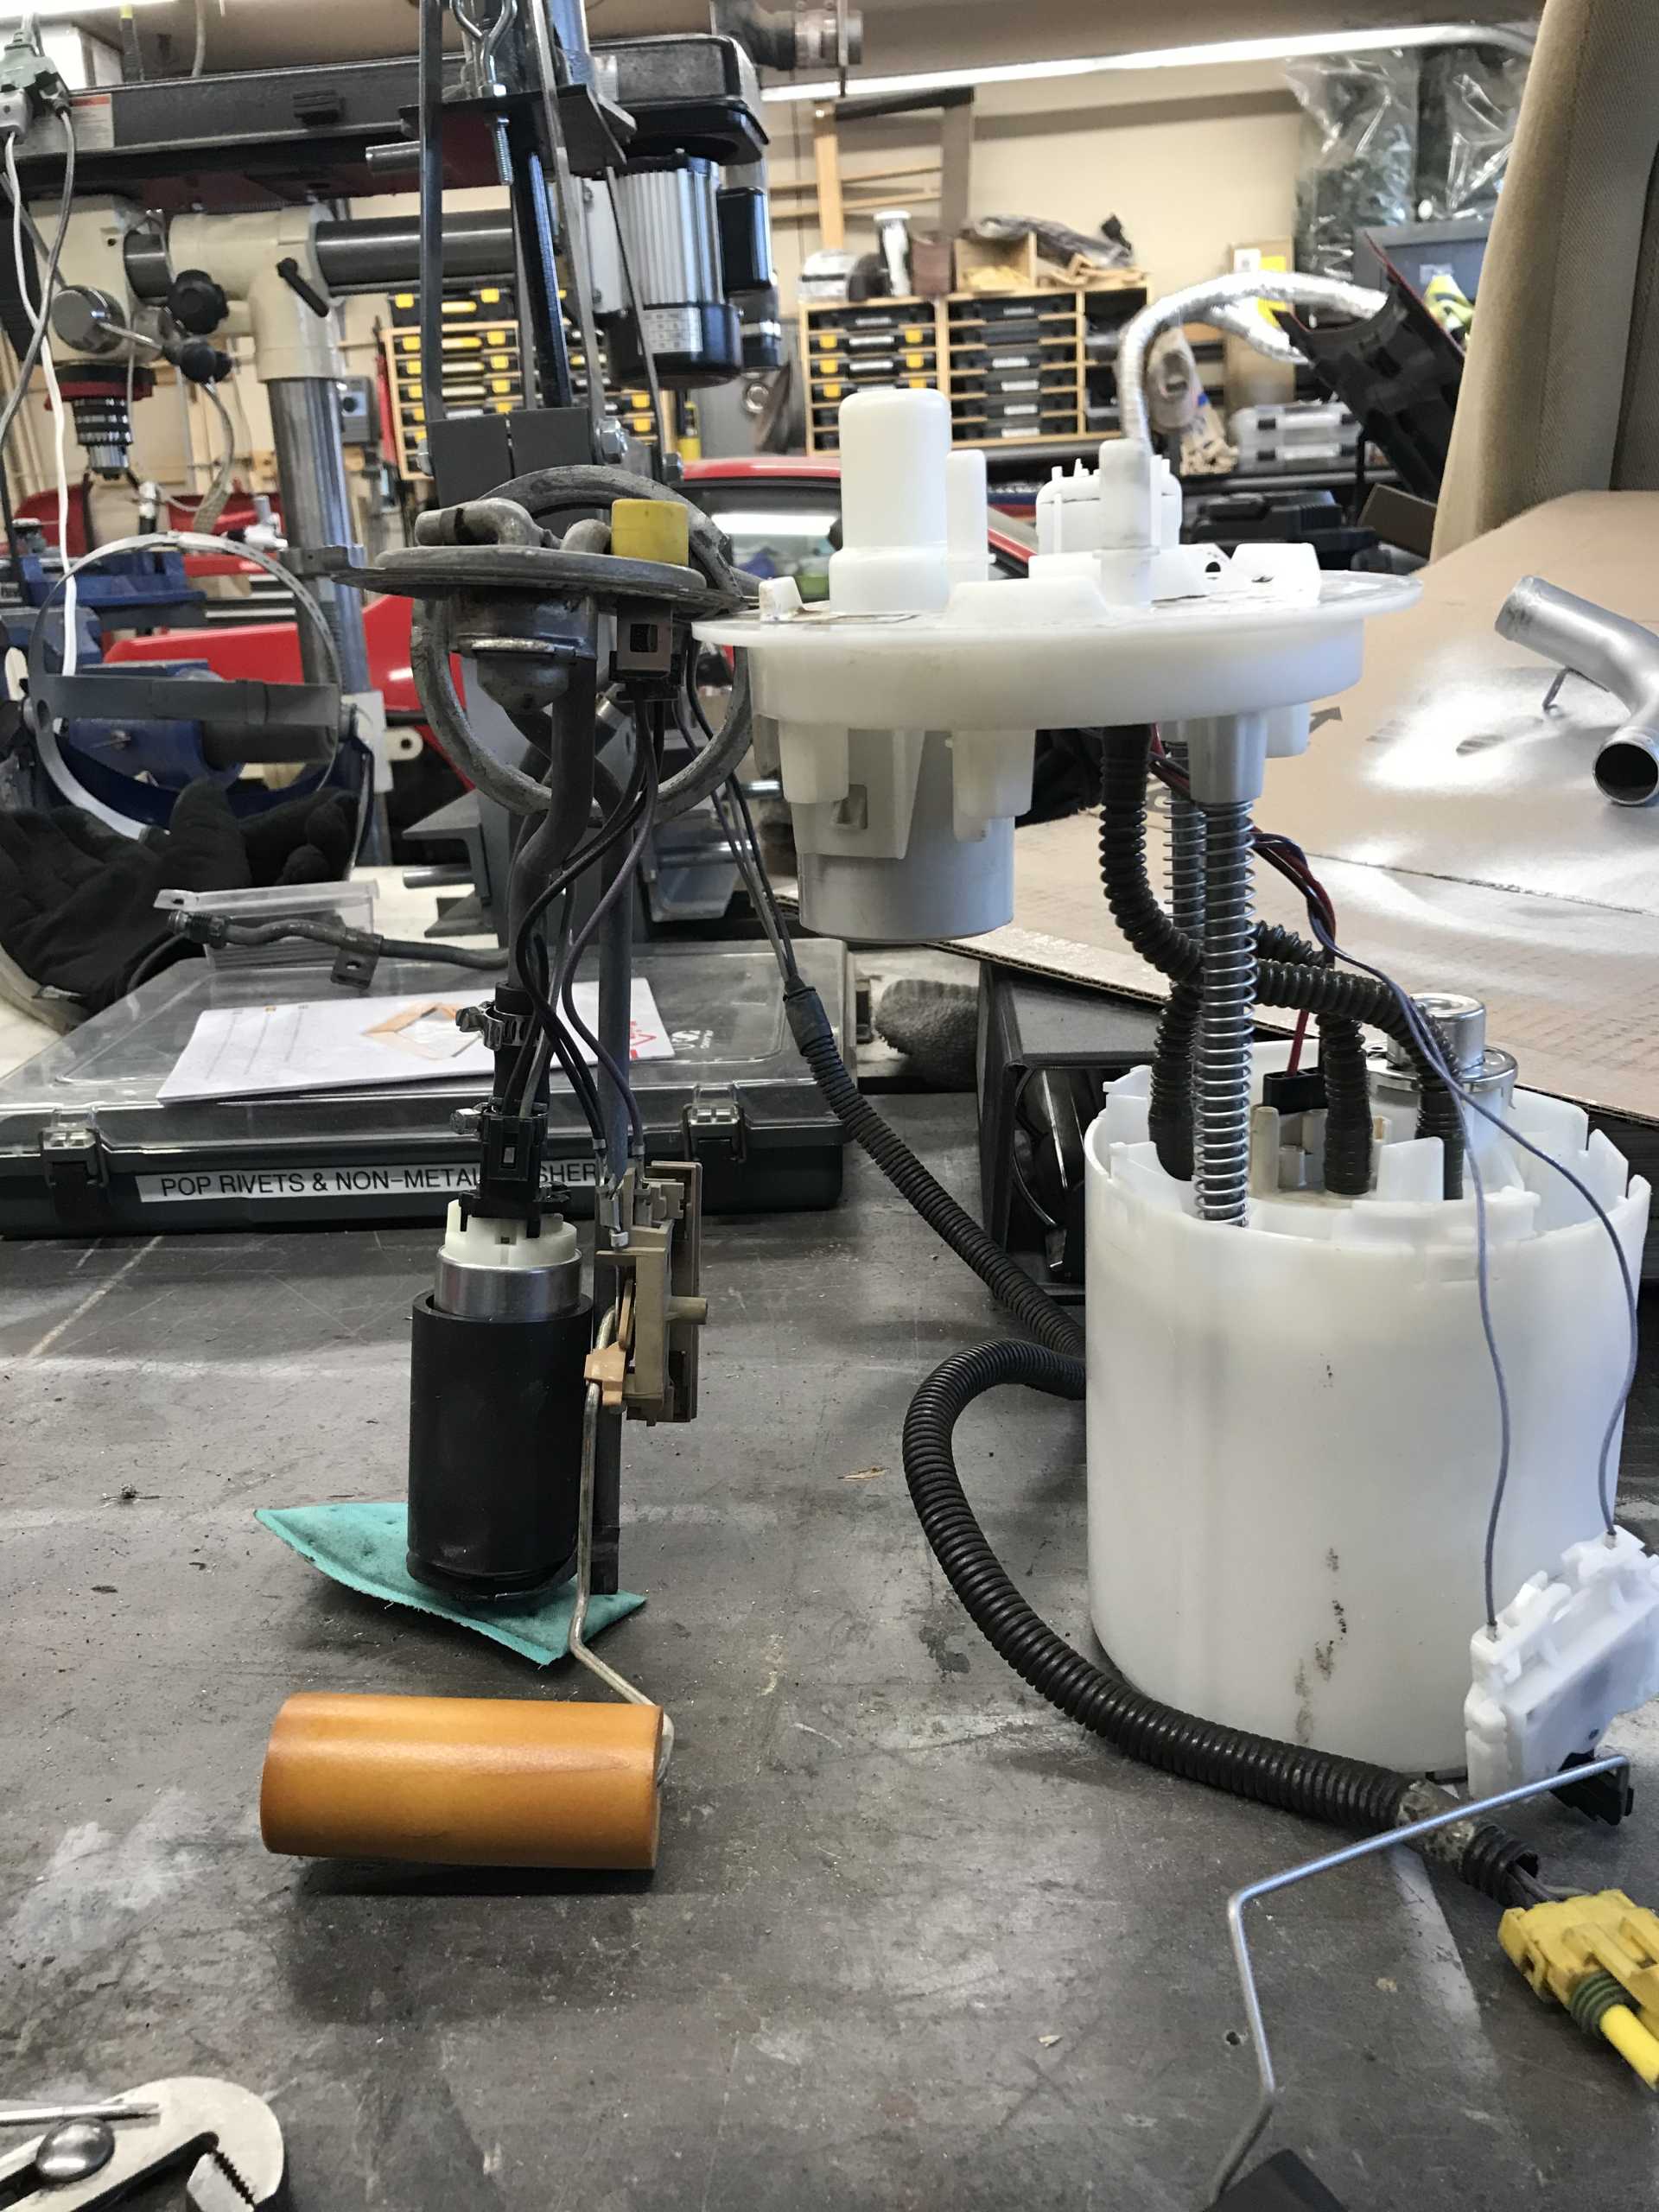
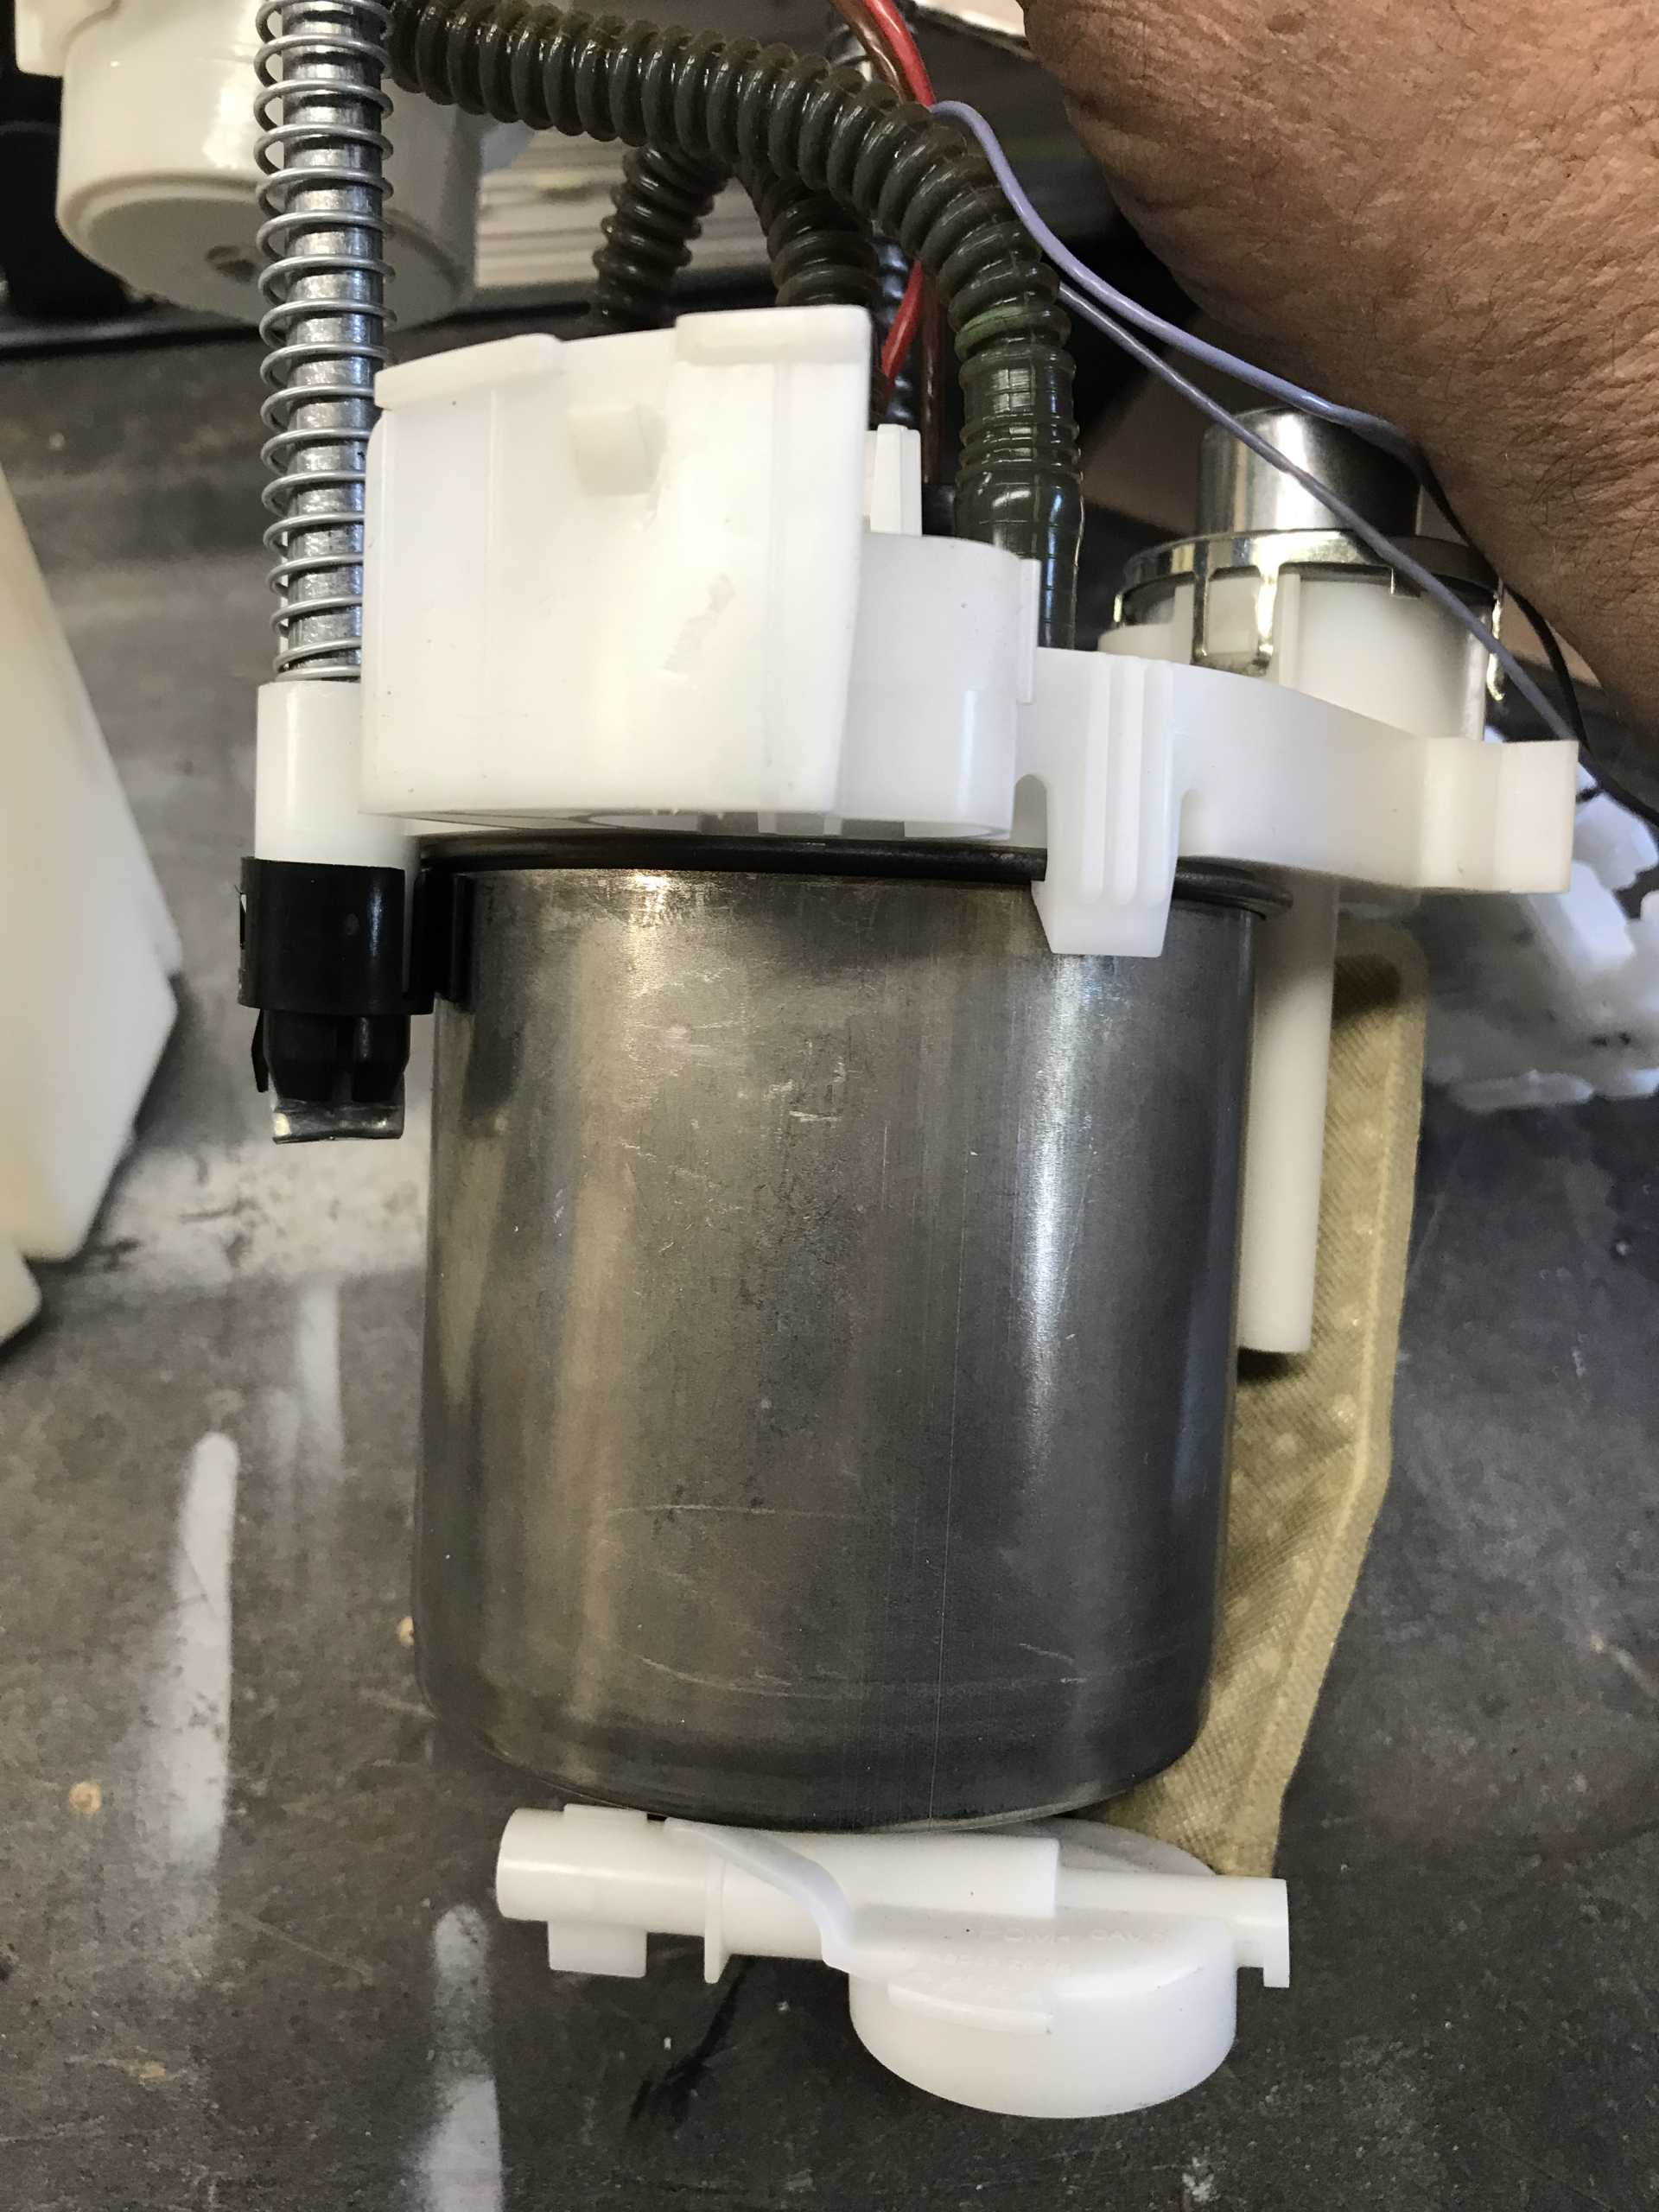
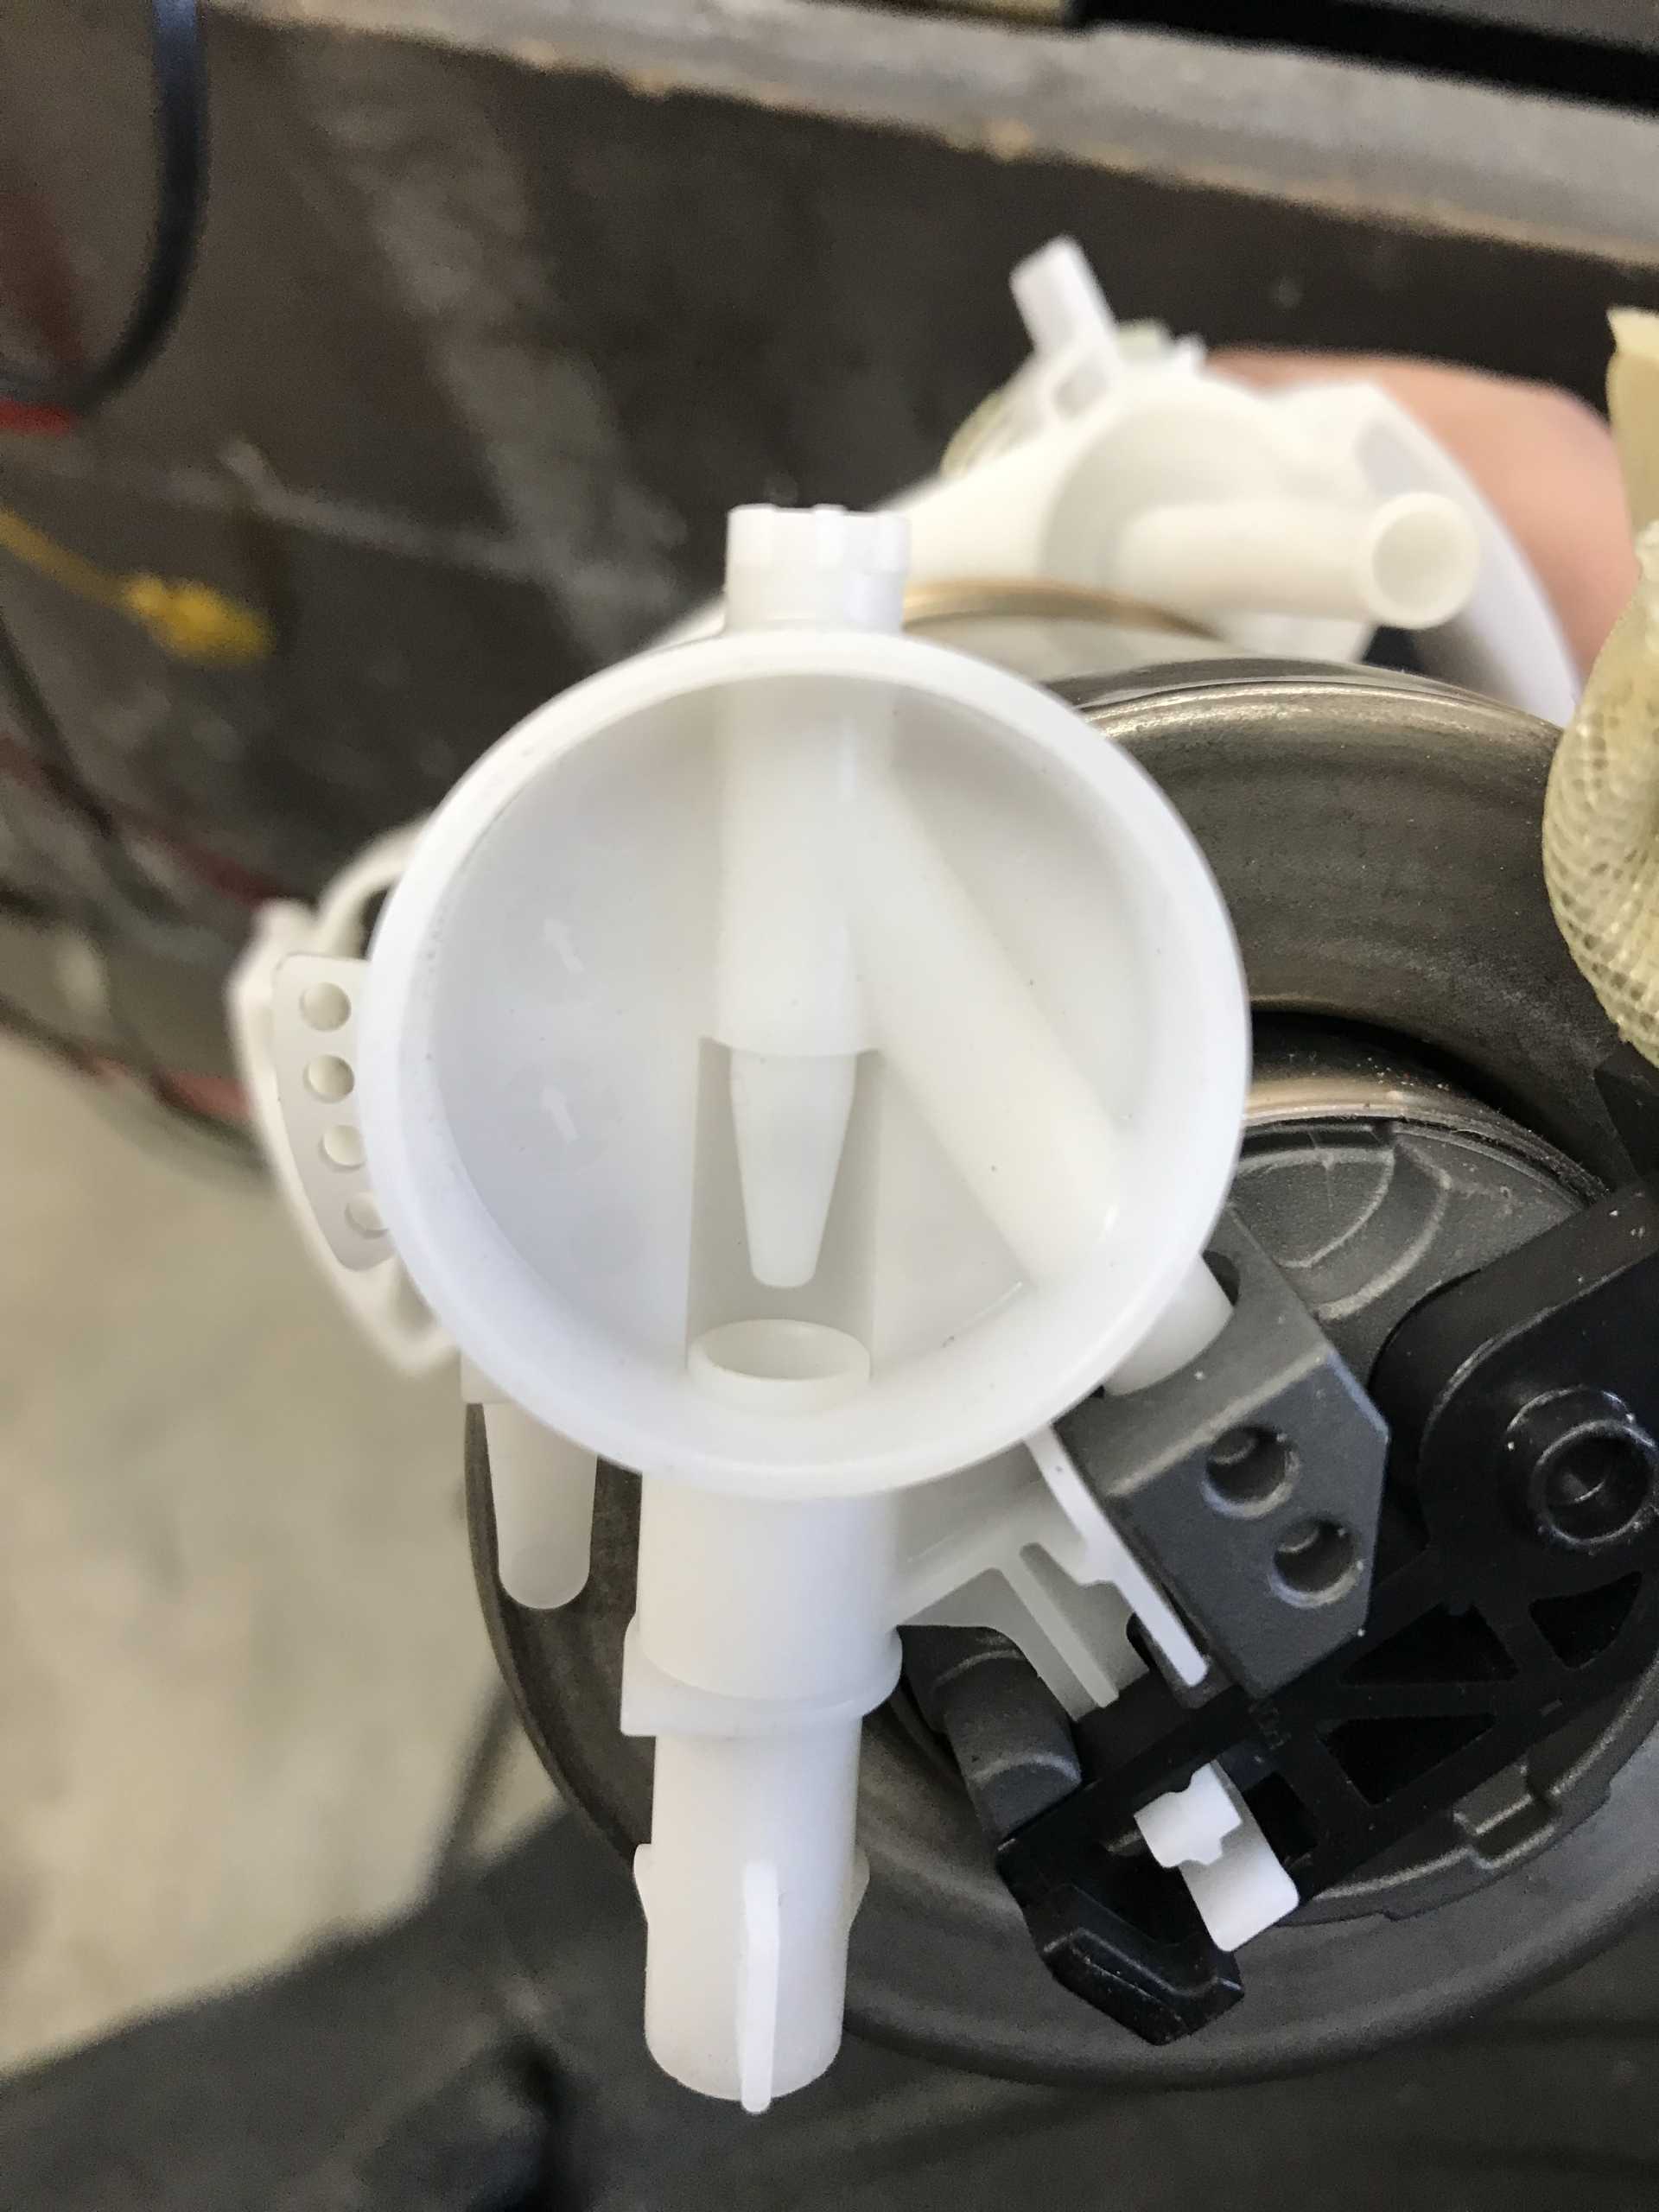
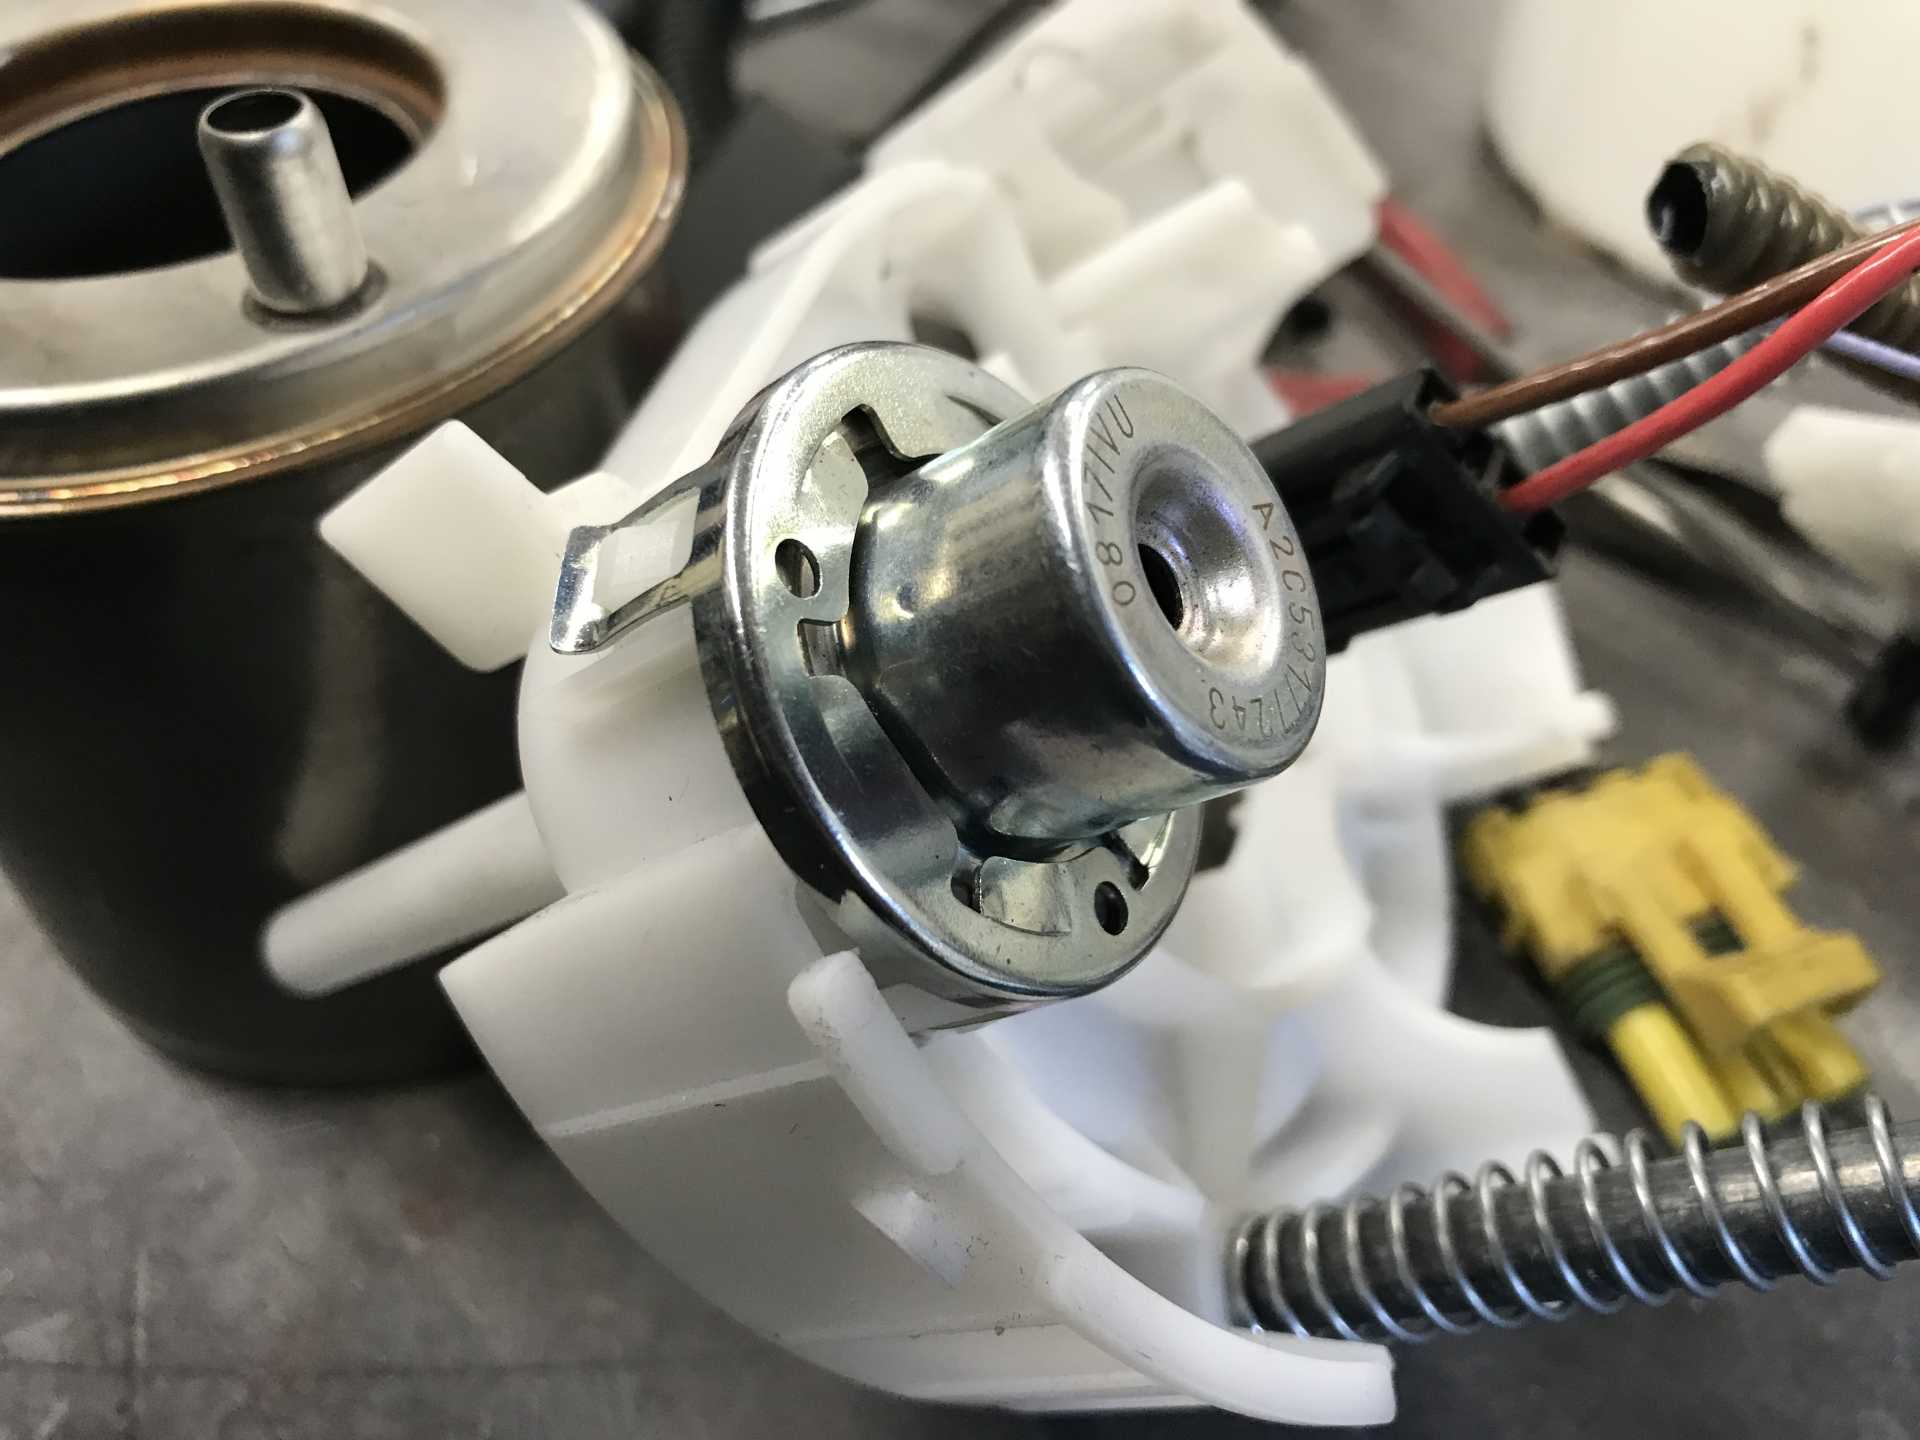
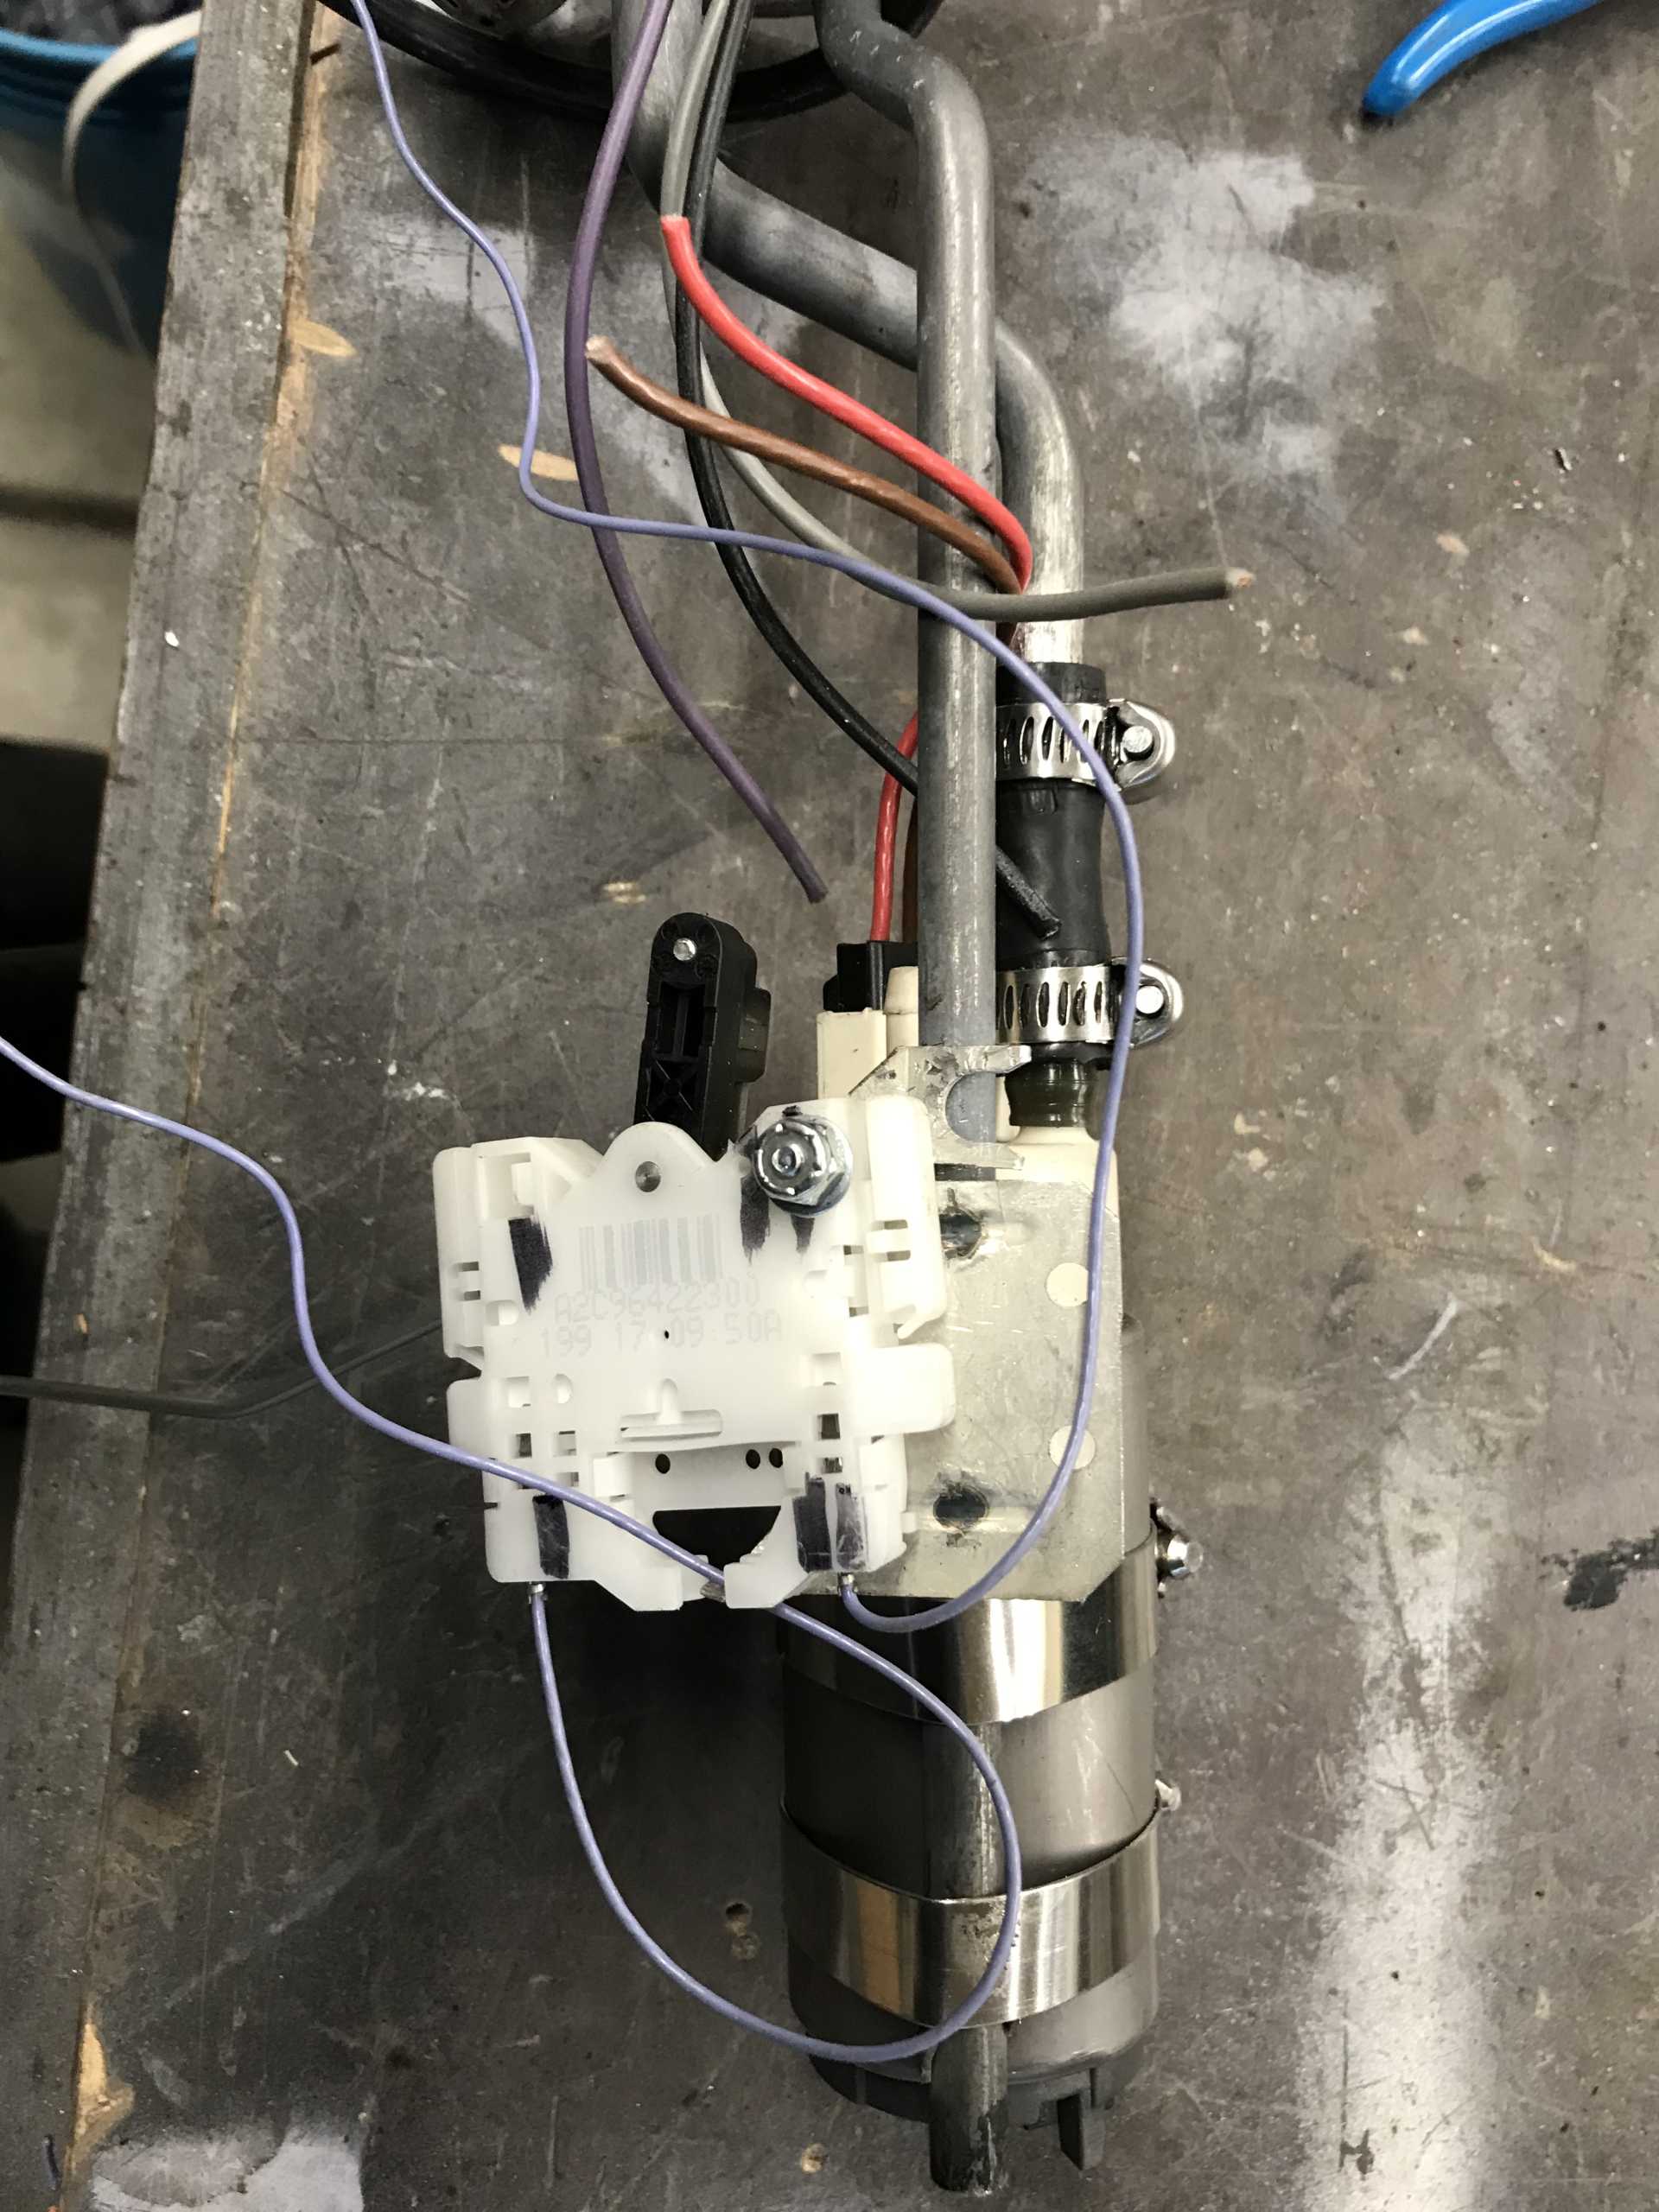
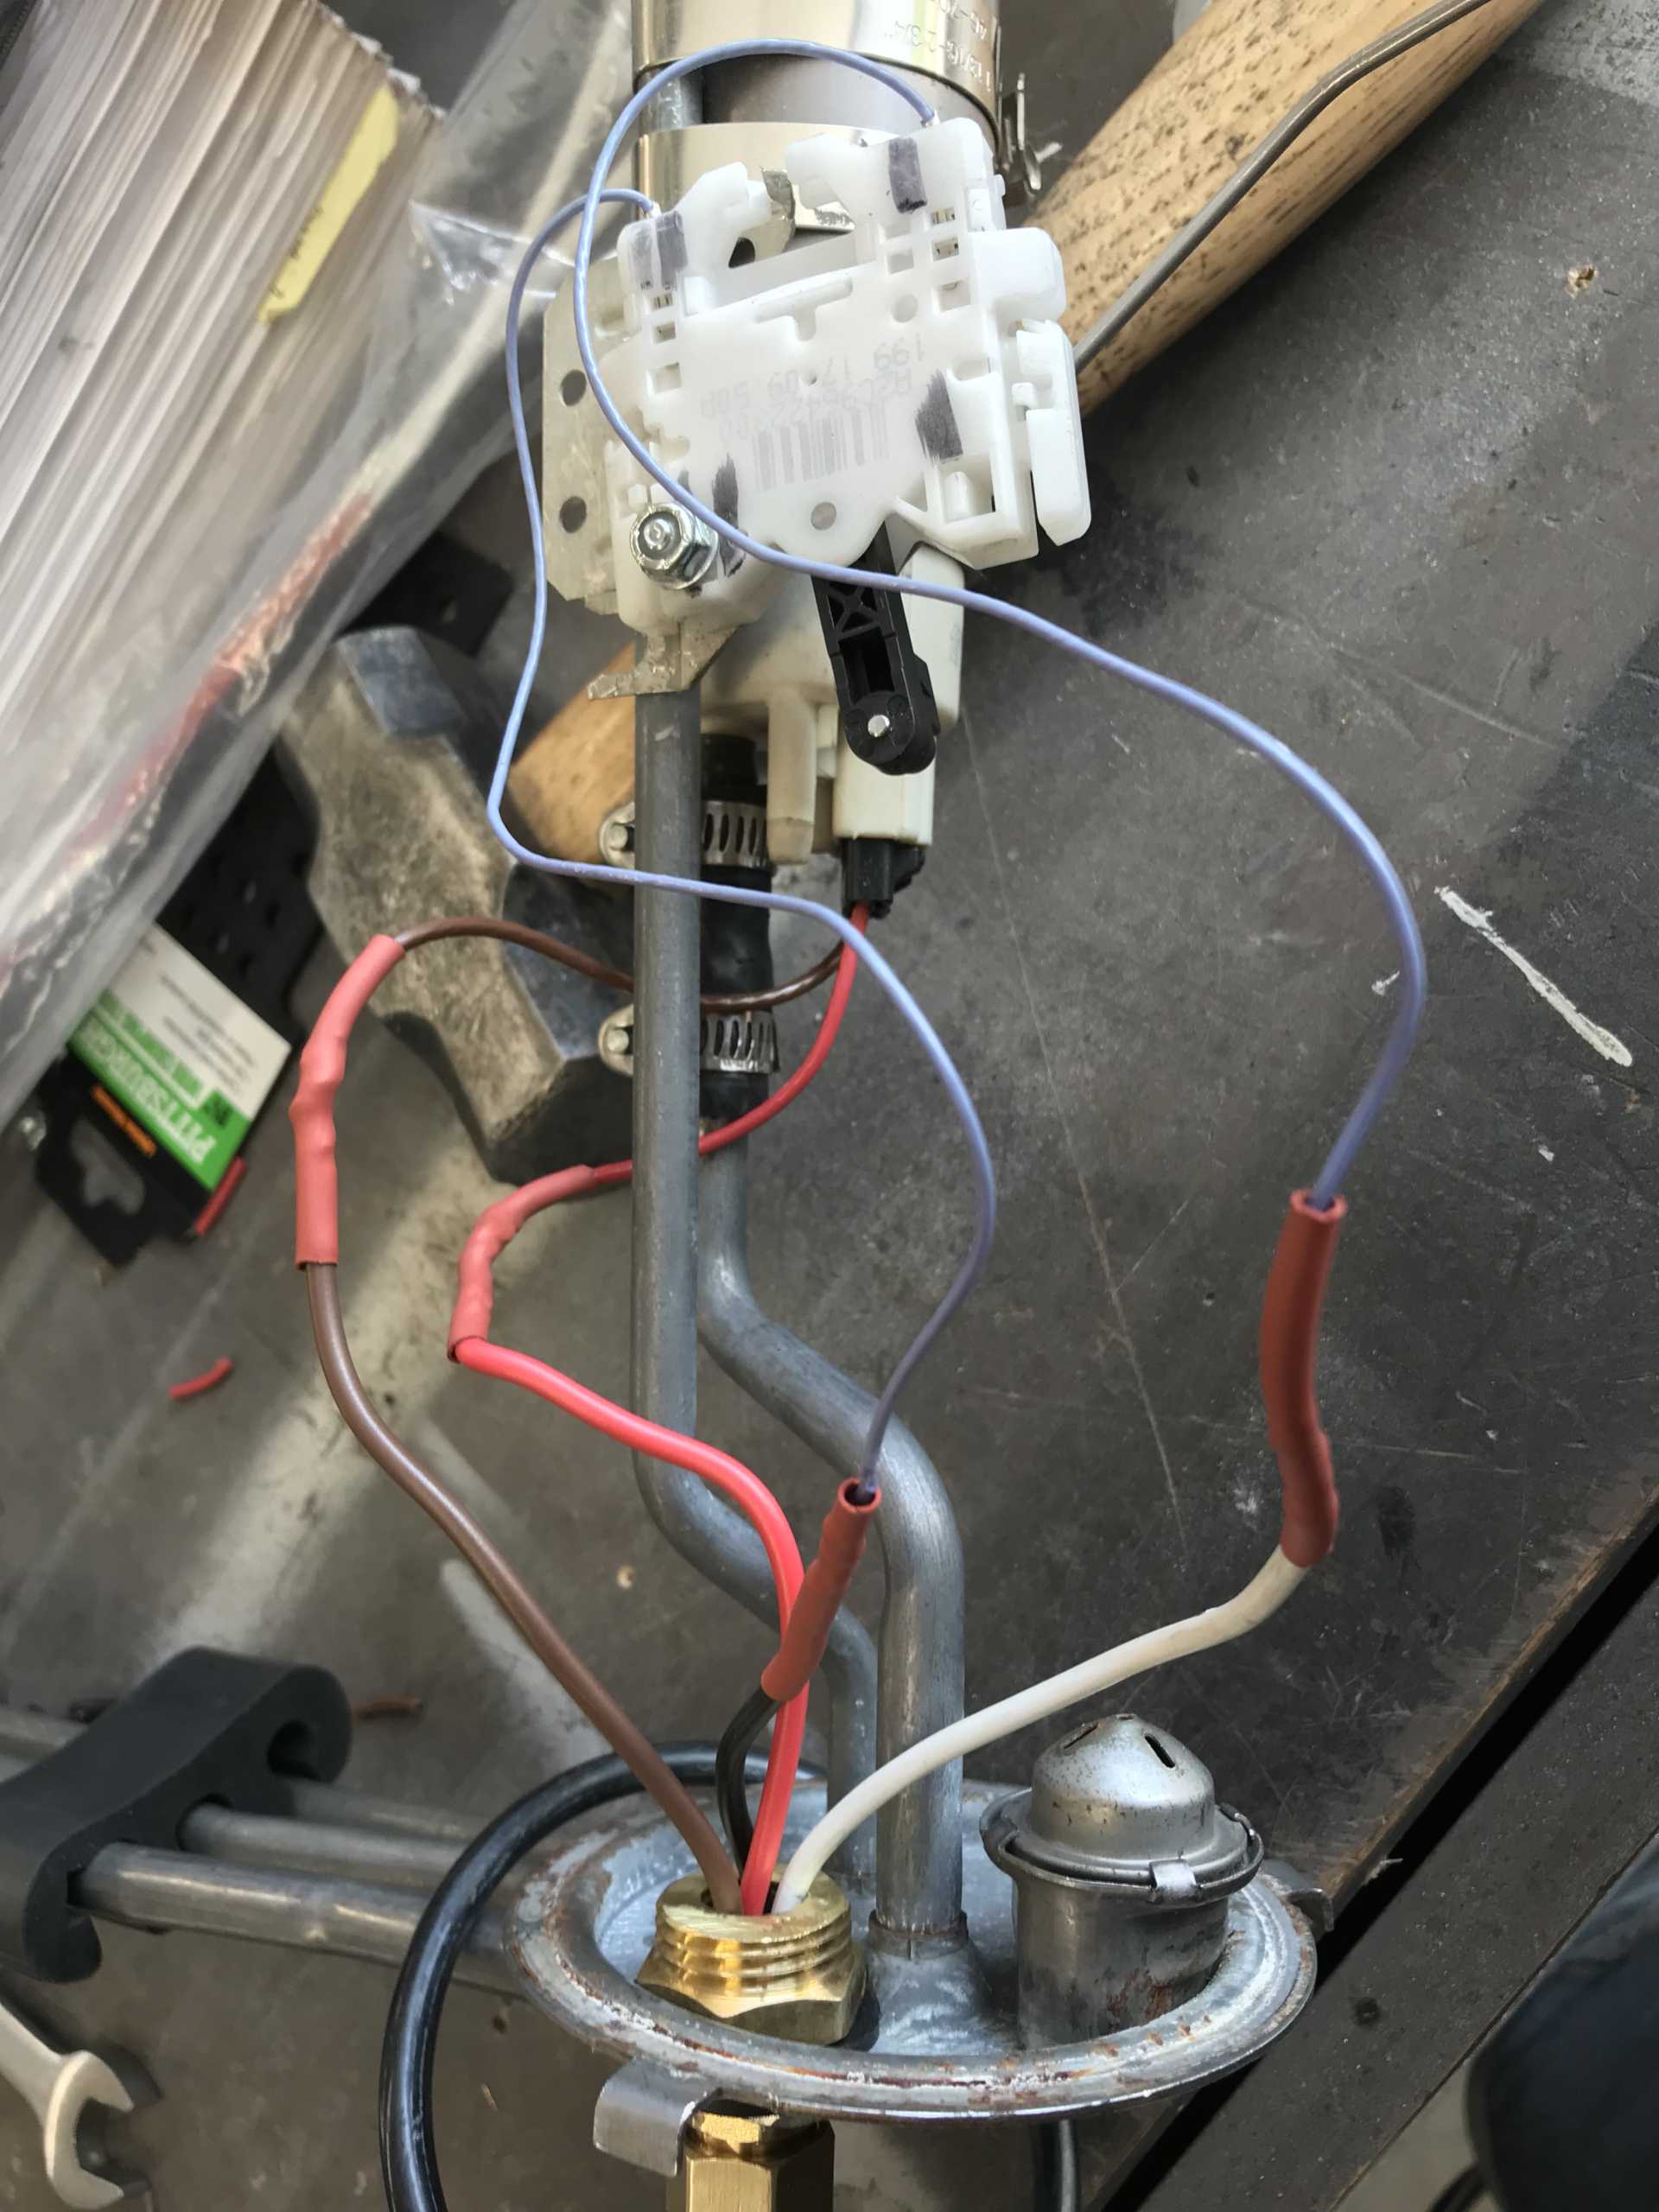
I had intended to use the Impala fuel pump with filter, pressure valve and level sender but it's huge and simply won't fit. Taking it apart was able to salvage the pump and the sender. The 55PSI pressure limiter will need to be external from a Corvette. Getting the pump to fit was simple except that it has a bottom opening to provide a siphon to suck fuel from the tank into the sump. That needed to stay and was cut down to fit. The senser was more of a problem. Different resistance from the fiero and needed to be fiddled with to arrive at a suitable position. Getting the float to work properly was difficult due to the internal baffling in the Fiero tank. But eventually it fit. The Impala uses 4 wires so the wiring fixture needed to be altered too.
The Impala it too big to be used as one part
The fuel filter is internal around the pump
This is the jet pump to siphon fuel into the sump. The sump has an inlet valve below this from the tank. Clever idea.
The internal pressure releif valve which can't be easily used. So now an external filter/relief valve
The sender is held in place by a bolt and a bent tab to prevent rotation. Note the lock nut.
The altered wiring just barely fit.
Next comes fitting the muffler in place using as much of the Impala exhaust as possible.
[This message has been edited by MikesFirstFiero (edited 09-24-2021).]
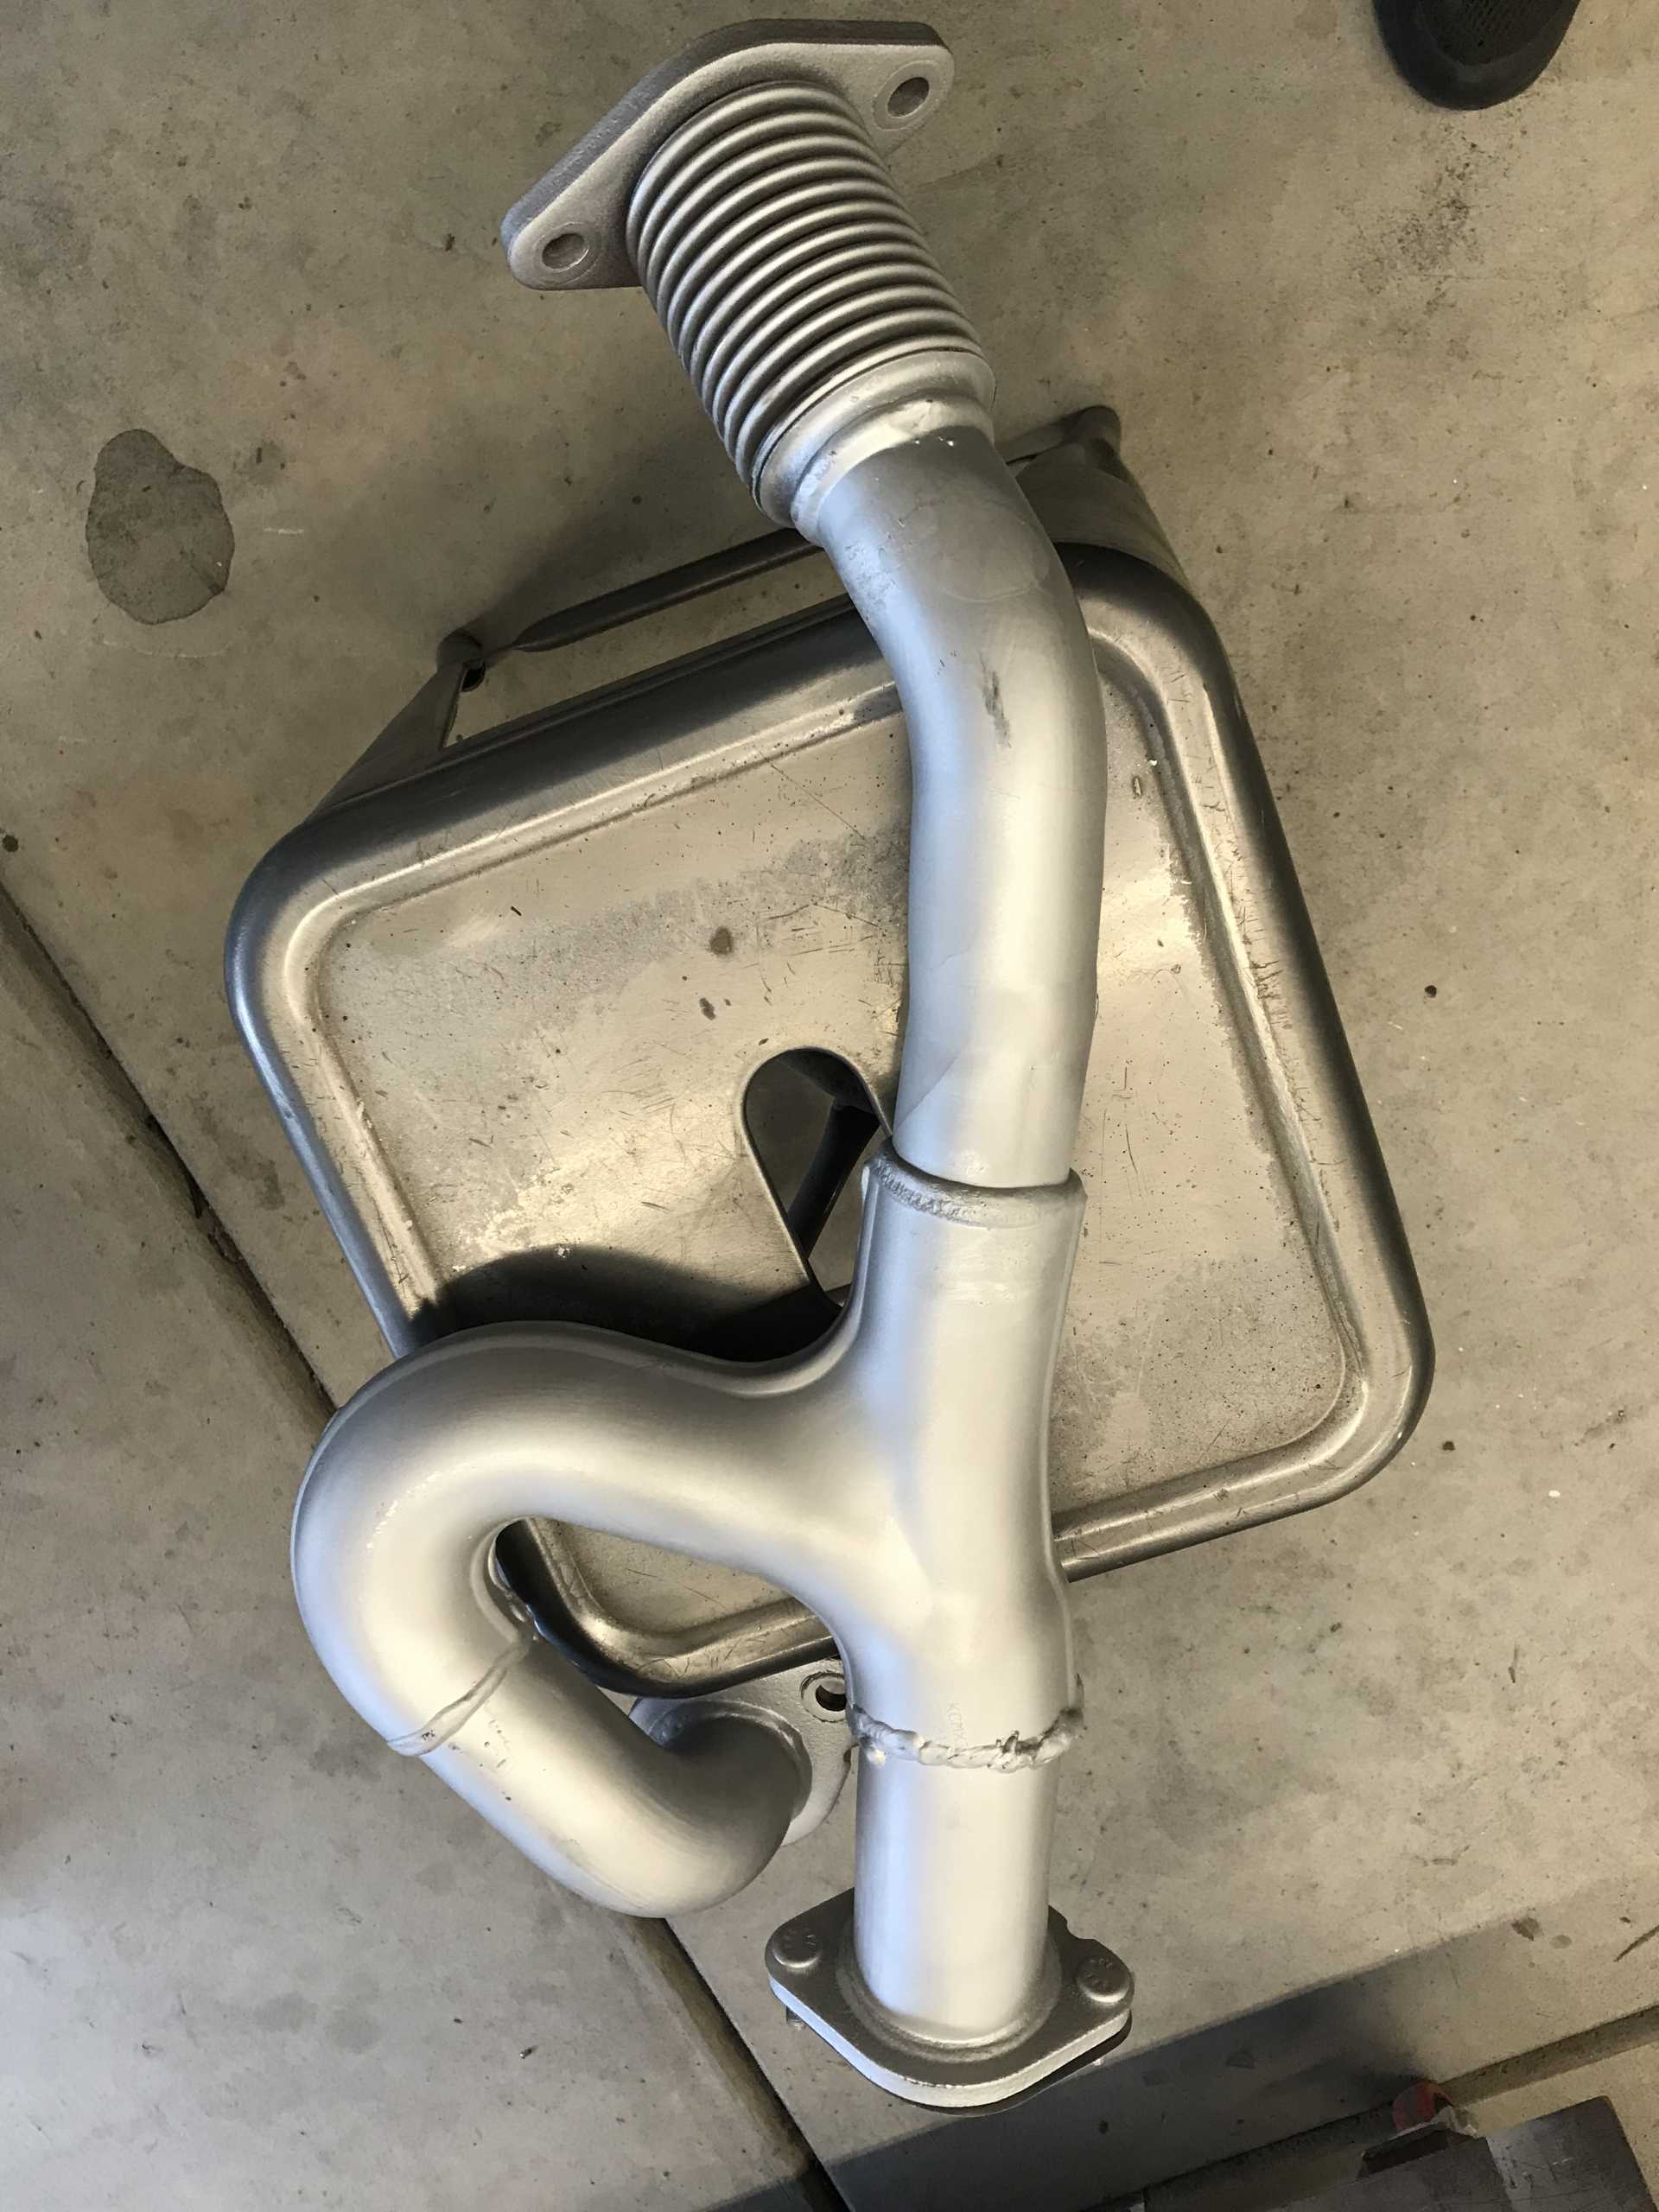
This swap is done on a budget so reusing parts from the donor car helps keep to costs down. Time to deal with the muffler. Some research showed that the Camaro muffler would fit quite well under the trunk So I build a jig to hold it and tried to figure out how to position It. My concerns were to have it tucked up so it is not visible, to reuse the impala after-cat front pipe, to use a common transverse muffler with one inlet & two outlets and to allow for the possible addition of resonators if the Camaro muffler was too loud.
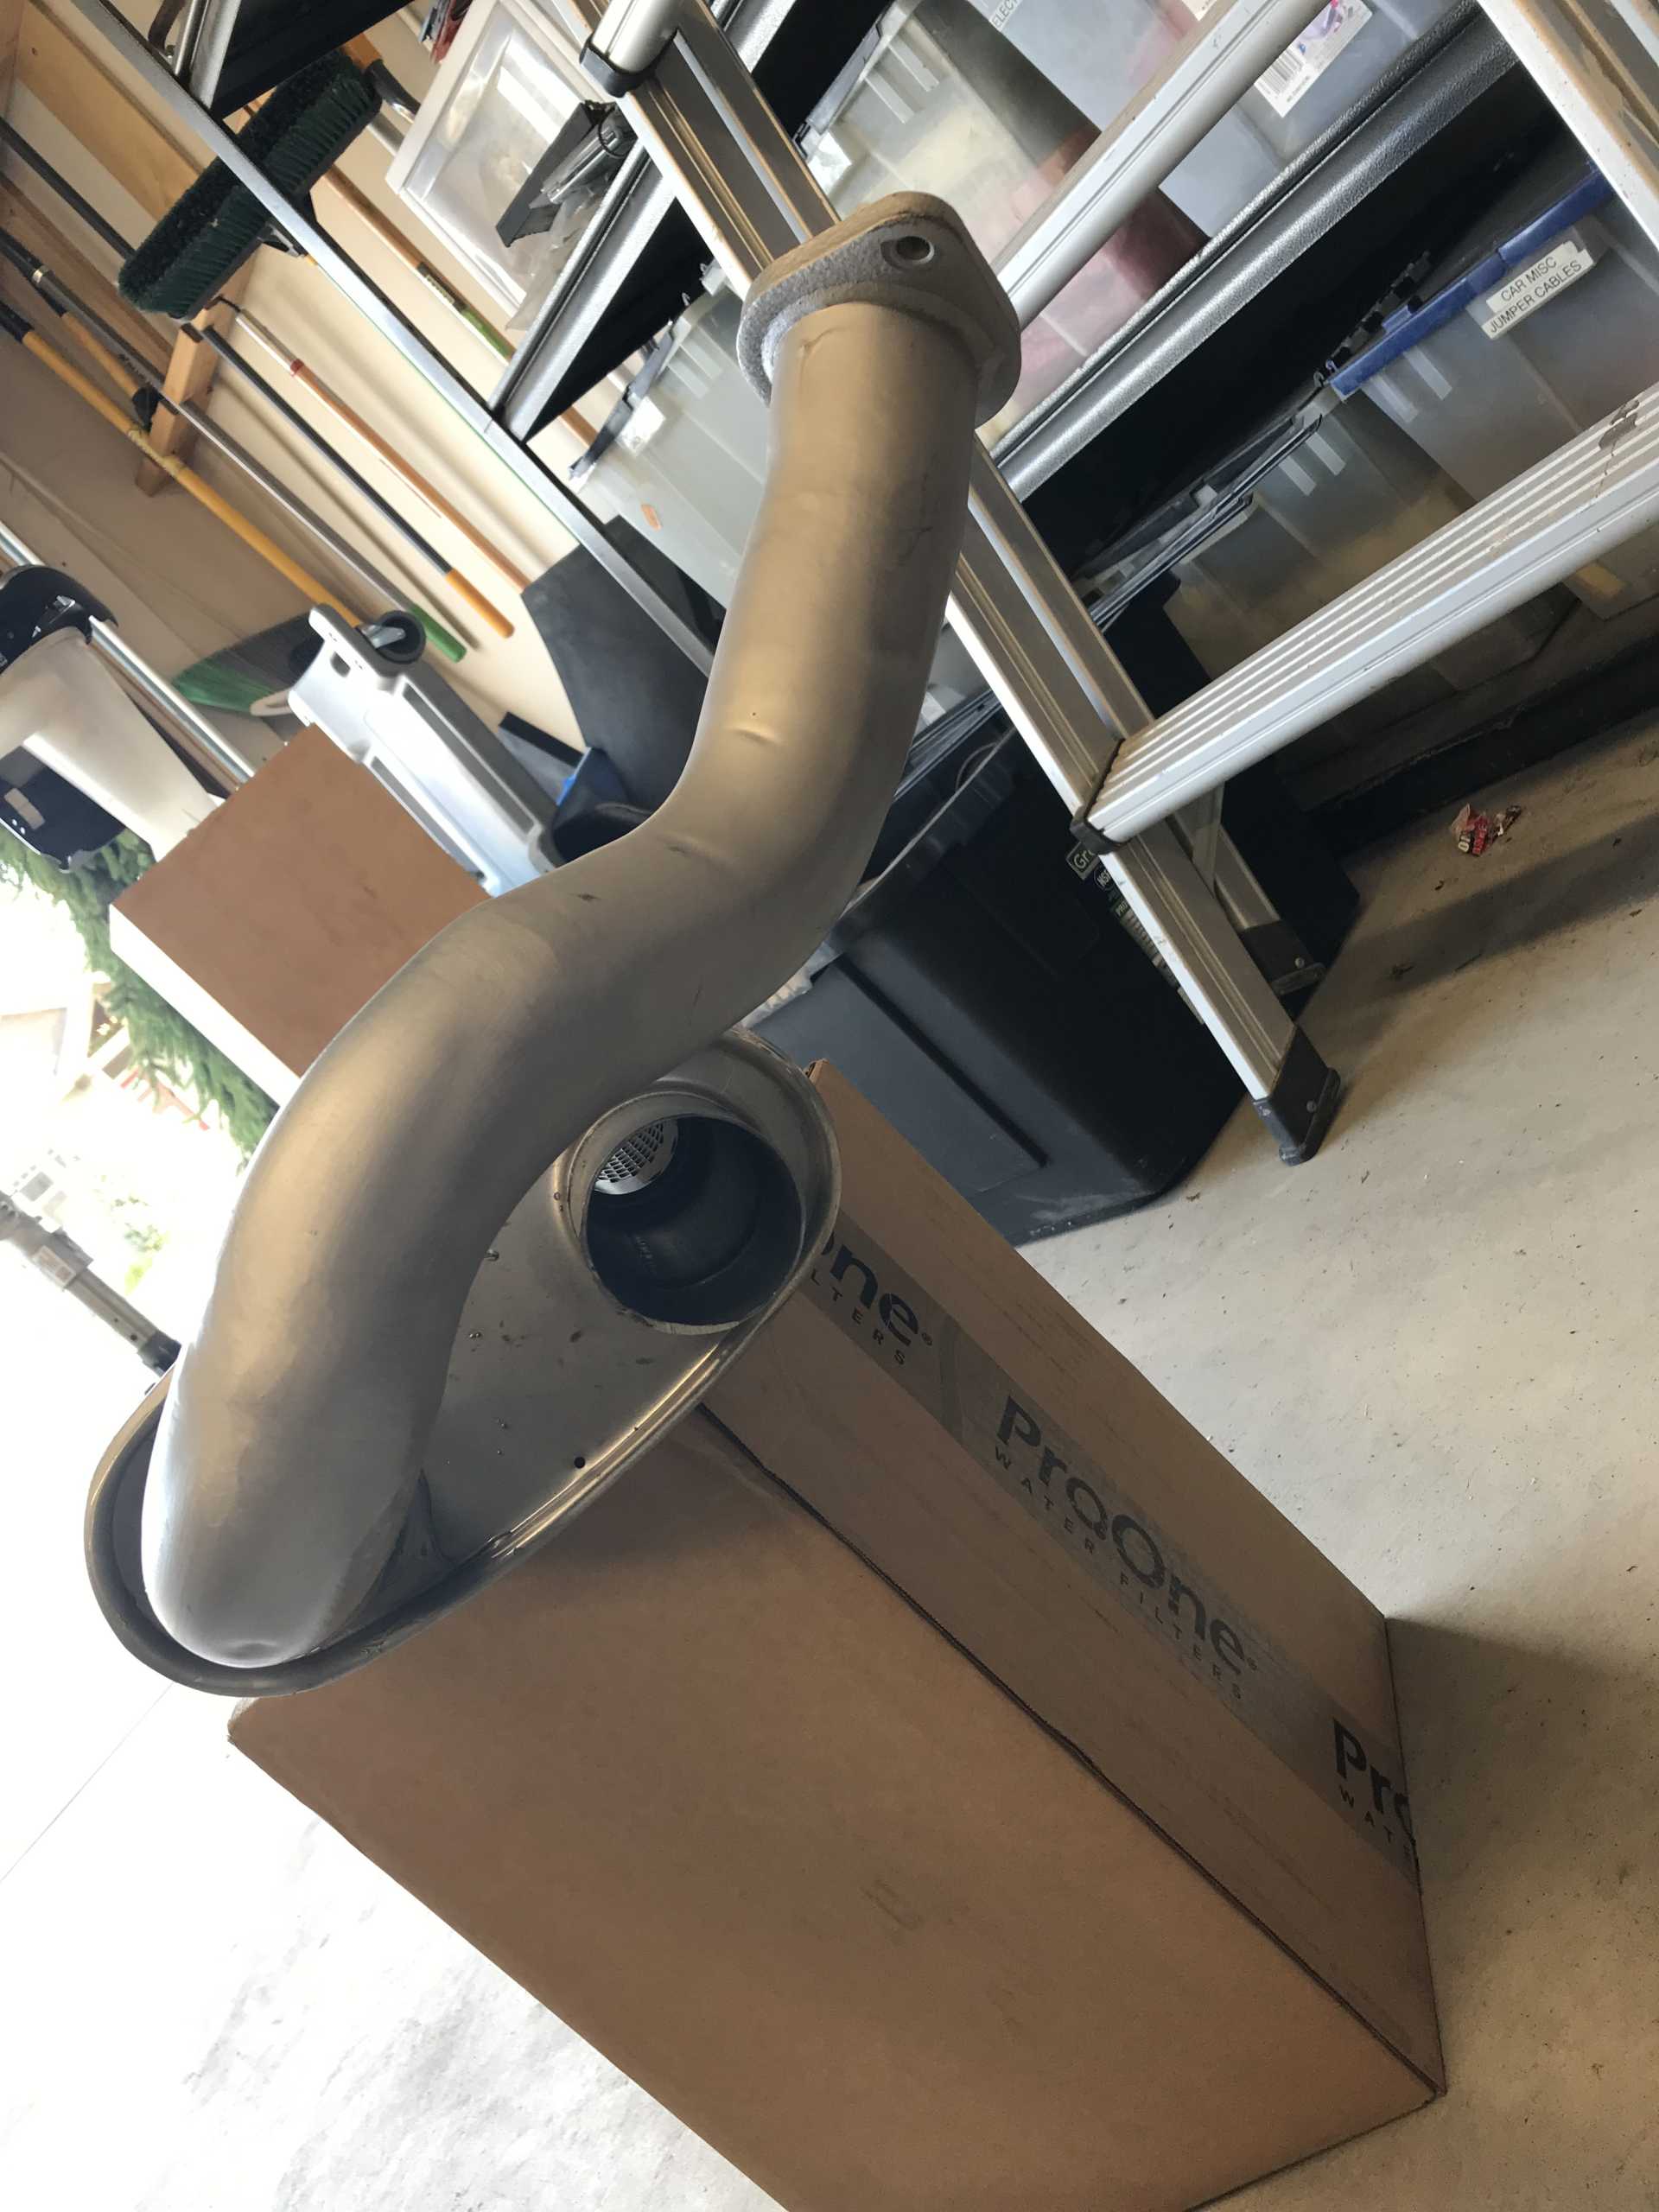
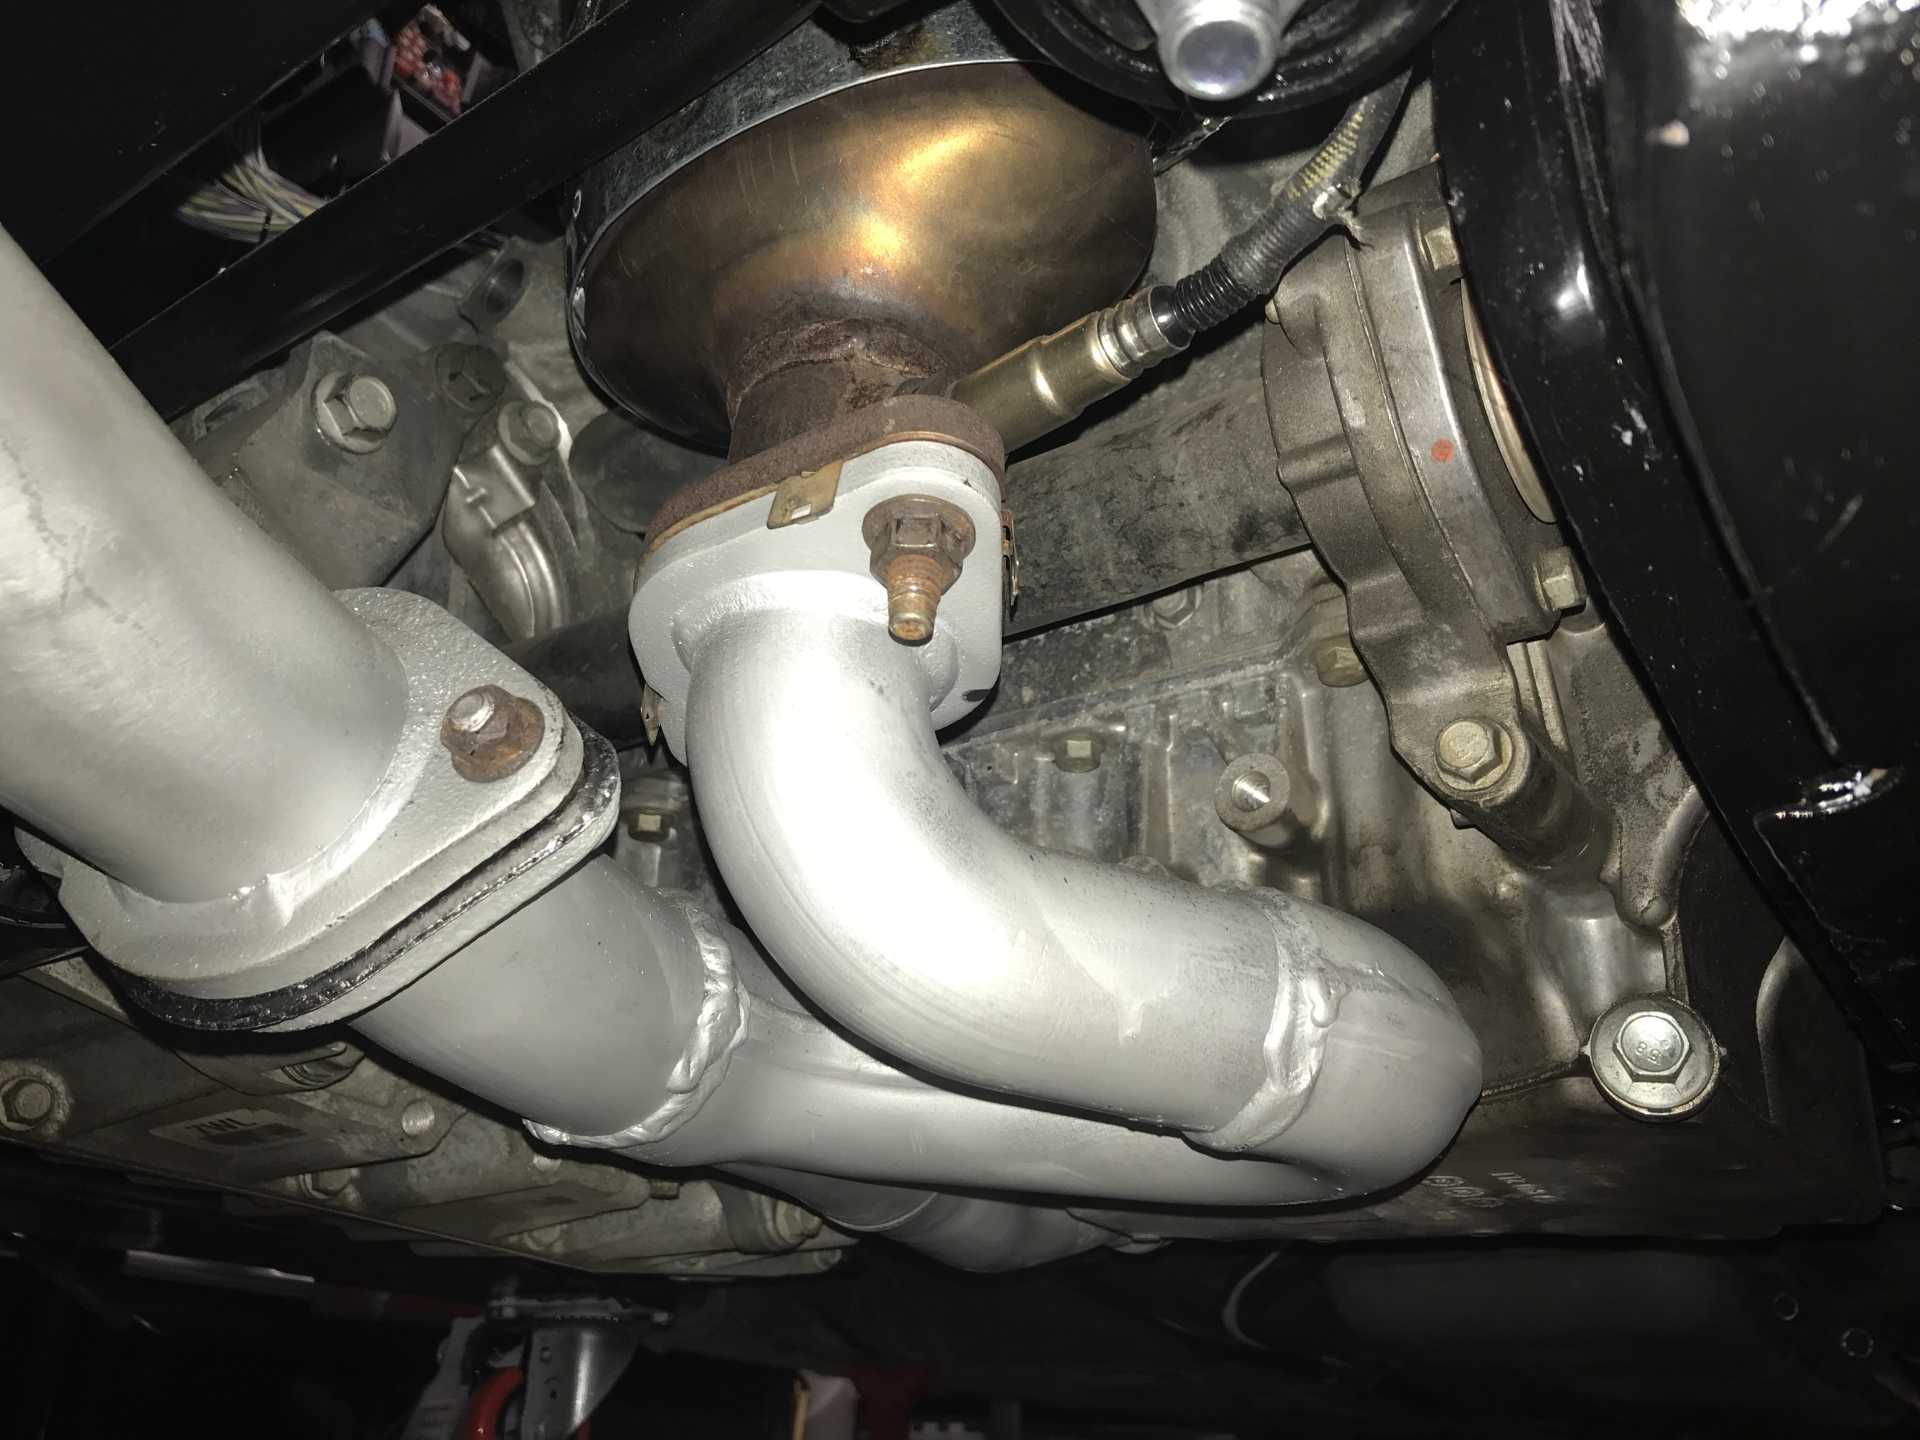
Looking at the front pipe it had a couple of problems. First it was too long and it had two areas of restriction. One was an intentional kink where the pipes came together that reduced the flow just made no sense, the other was a reduced diameter section of pipe after that. So I chopped off that part and replaced it with the end of a pipe that had a flange connecting to the second cat. The secondary cat was not used. I was able to reposition the pipe upwards a bit so it would not snag anything too.
The pipe after the pipes joined was very restricted with a big kink. Possibly intentional to lower the power. Can't haven't have the Impala outrun the Camaro can we?
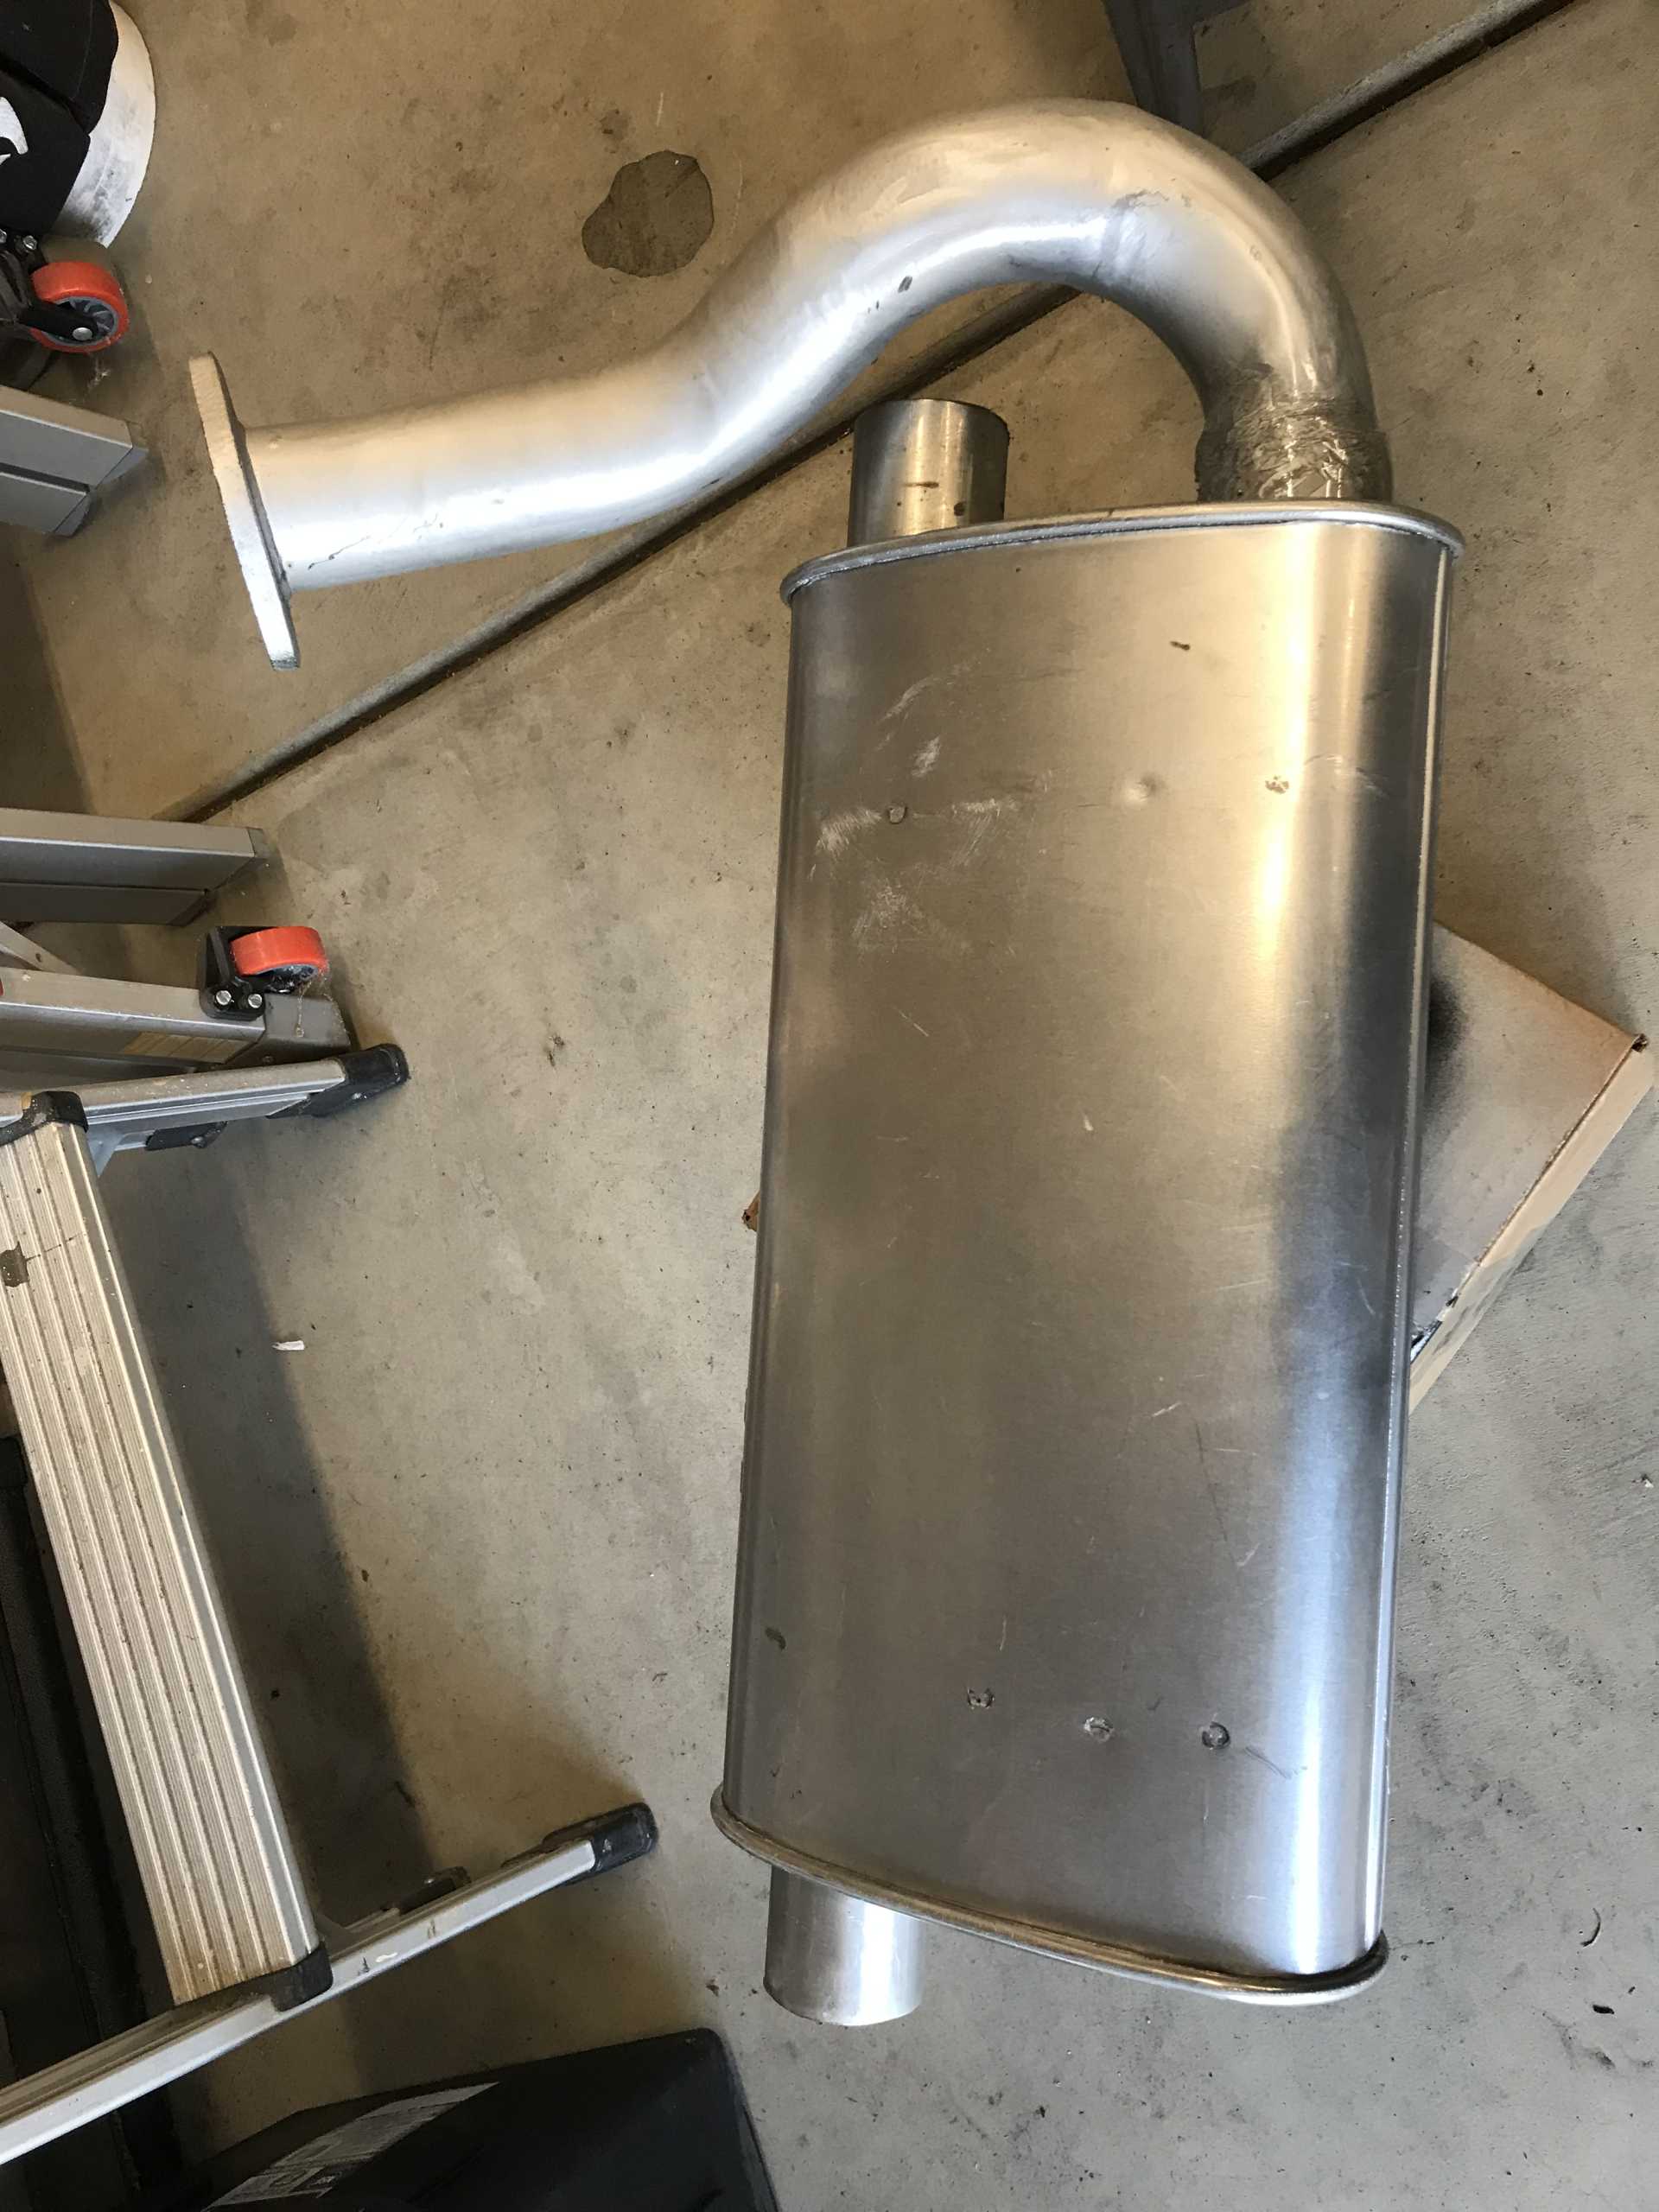
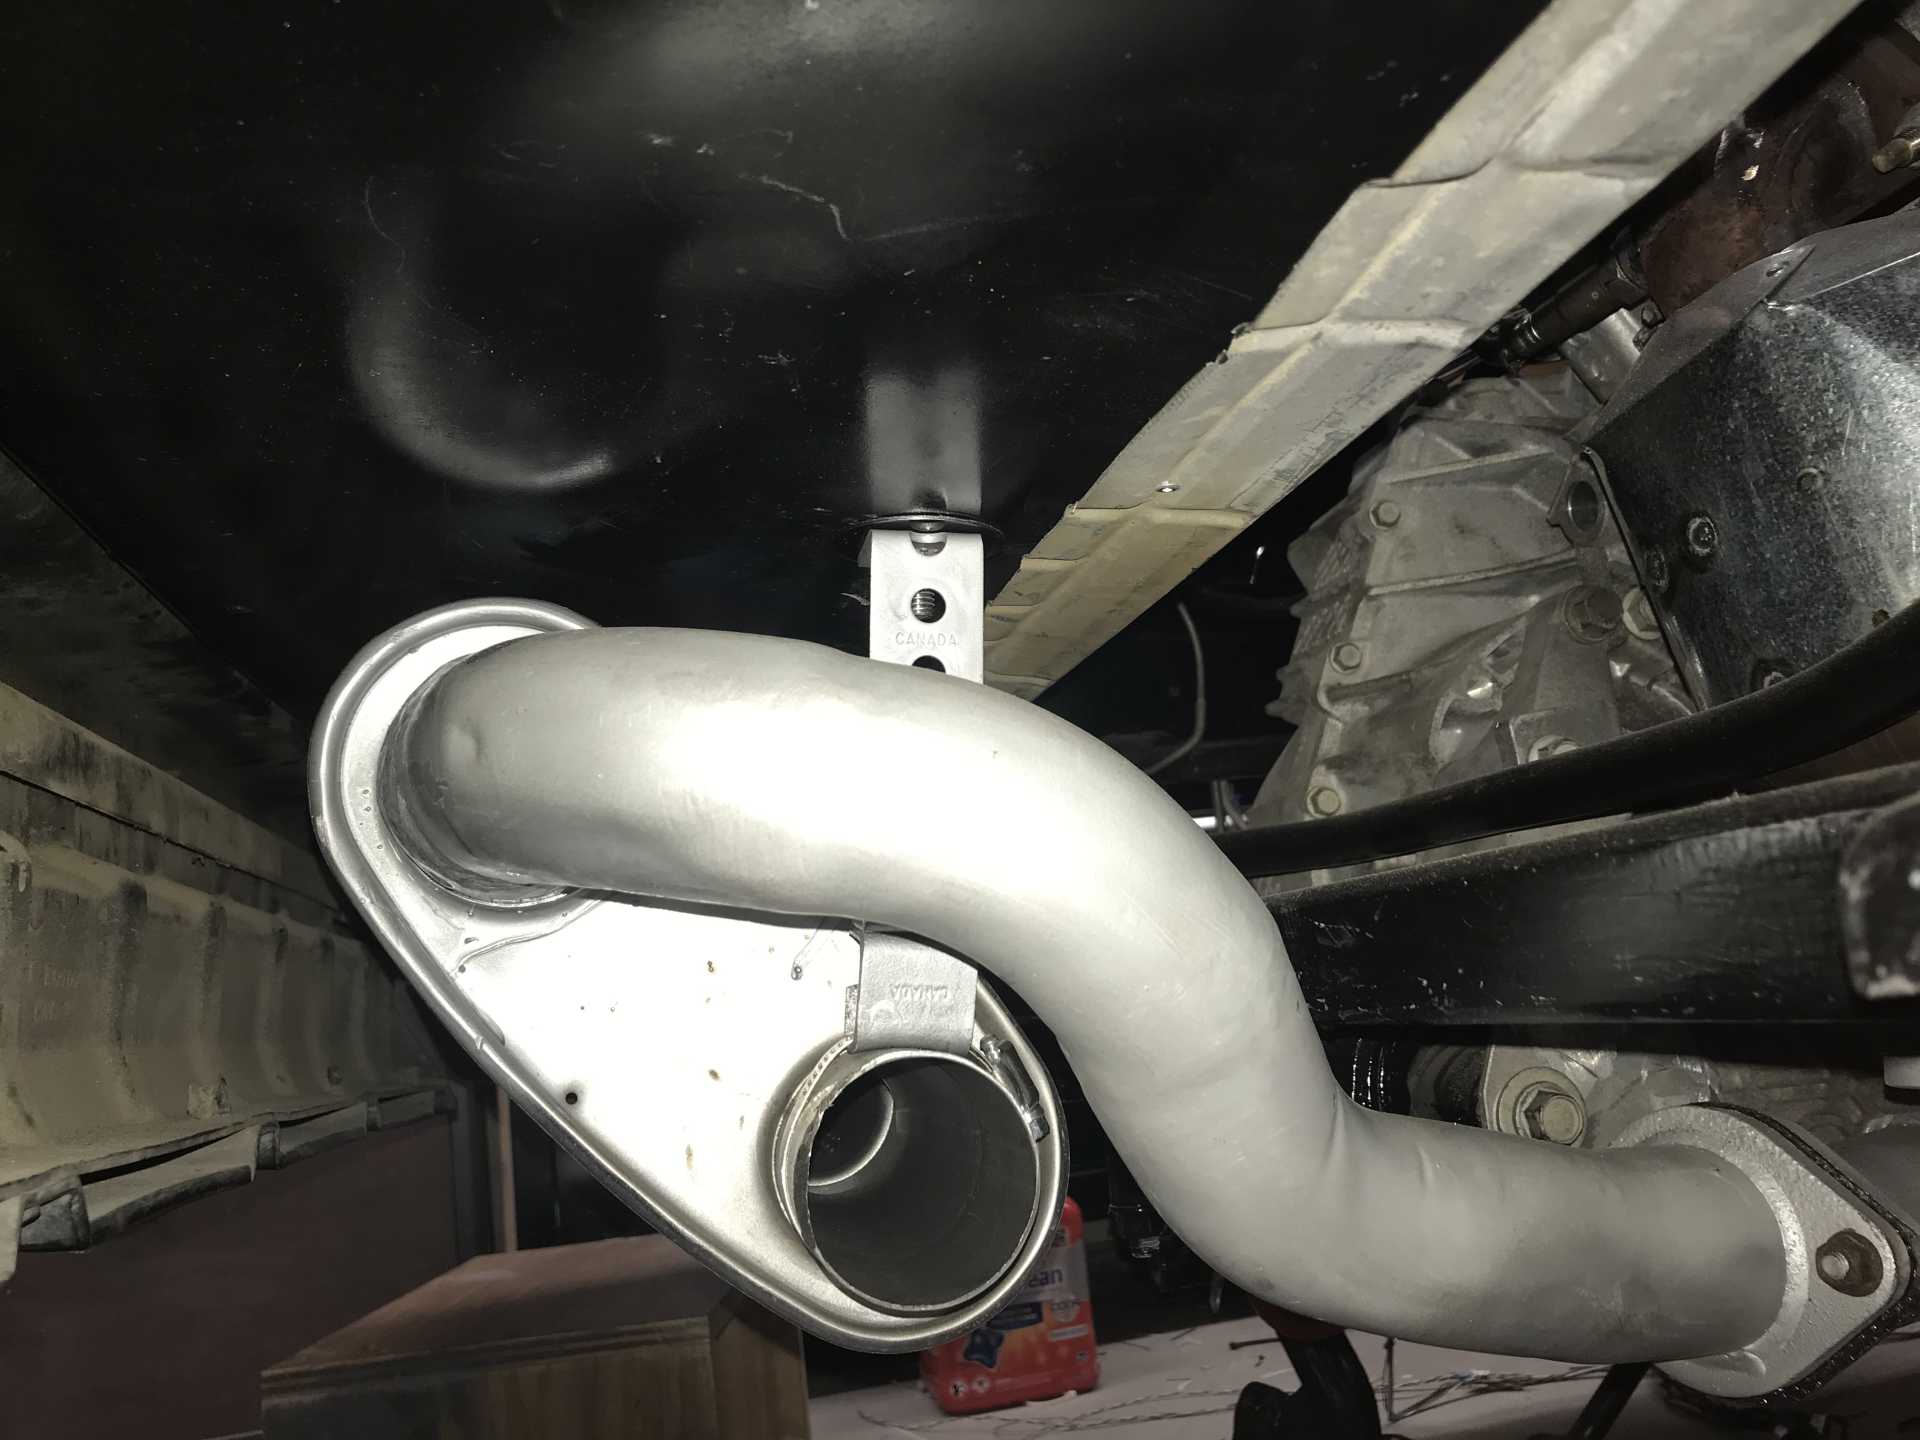
The muffler has one inlet and two outlets and the simplest thing to do would be to put the inlet to the front of the car, nearest to the engine. But then there would be no room to add small resonators if needed. So I decided to place the inlet to the rear of the car and cant the muffler upwards so the outlet pipes could go under it. The position of the exhaust dictated that the muffler would be shifted to the driver's side too. The twisty pipe was constructed piece by piece from four sections of the remaining Impala exhaust pipes. With the flange between the front pipe and the muffler it's easy to remove either for service or replacement. The muffler hangers are suspended from the floor of the trunk and are easy to access too. For now there are no tail pipes, I want to find out how loud this is with only one muffler. If it's quiet enough I'll add only tips, If not I'll add tips plus resonators. I don't need to car to be loud at cruise since it's irritating for longer trips.
It looks strange but it fits nicely
Wasn't too difficult to build. Rough cut the pieces and assembled them from the front to the back, trimming as needed. Ground down the welds to make it presentable.
The installed exhaust system worked out well using many of the Impala parts. Would be nicer if the muffler was more centered but the outlet of the front pipe dictated the location. Here are photos showing the whole assembly
Starting at the front. This pipe is all Impala. It's not too crowded under there and easy to remove the A/C or alternator - unlike removing a 2.8 alternator which was a pain.
Clever job for routing this pipe under the pan by Chevy
Picking up the rear exhaust and merging into one pipe. This was a major restriction in the original pipe.
The exhaust tube clears the inlet tube nicely
The whole thing, tail pipes will be added later.
[This message has been edited by MikesFirstFiero (edited 09-28-2021).]
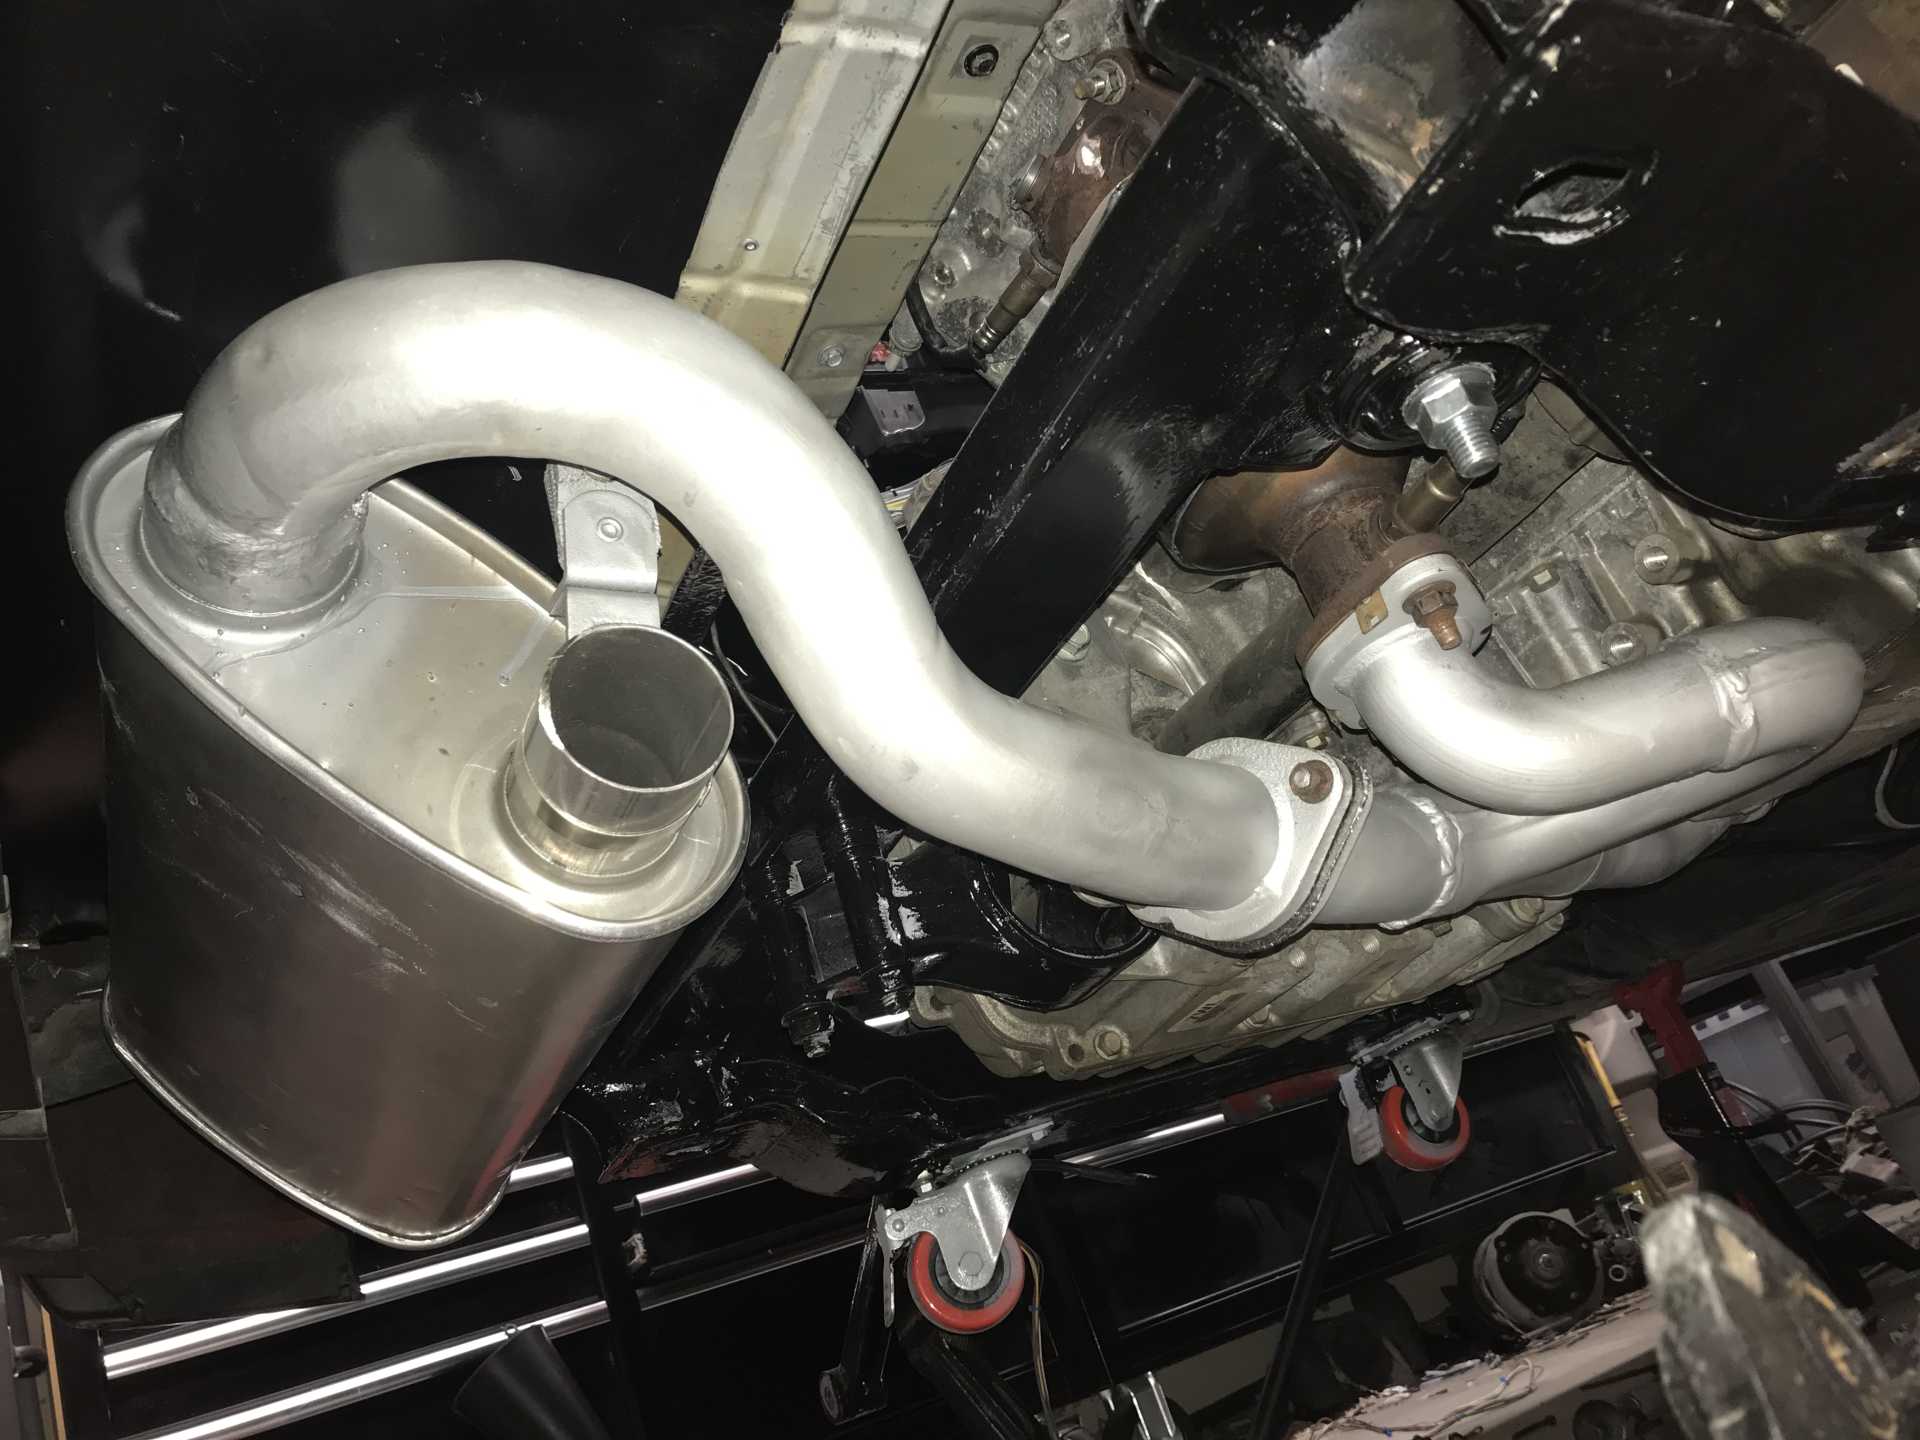
Progress is being made but the last few weeks were all about details. Everything seemed to need some time spent figuring out how to accomplish the task without breaking the bank. Buying the complete Impala did give me lots of parts to work with so things have worked out well so far. With the engine in the car and the muffler in place the next job was hooking up hoses & mechanical stuff.
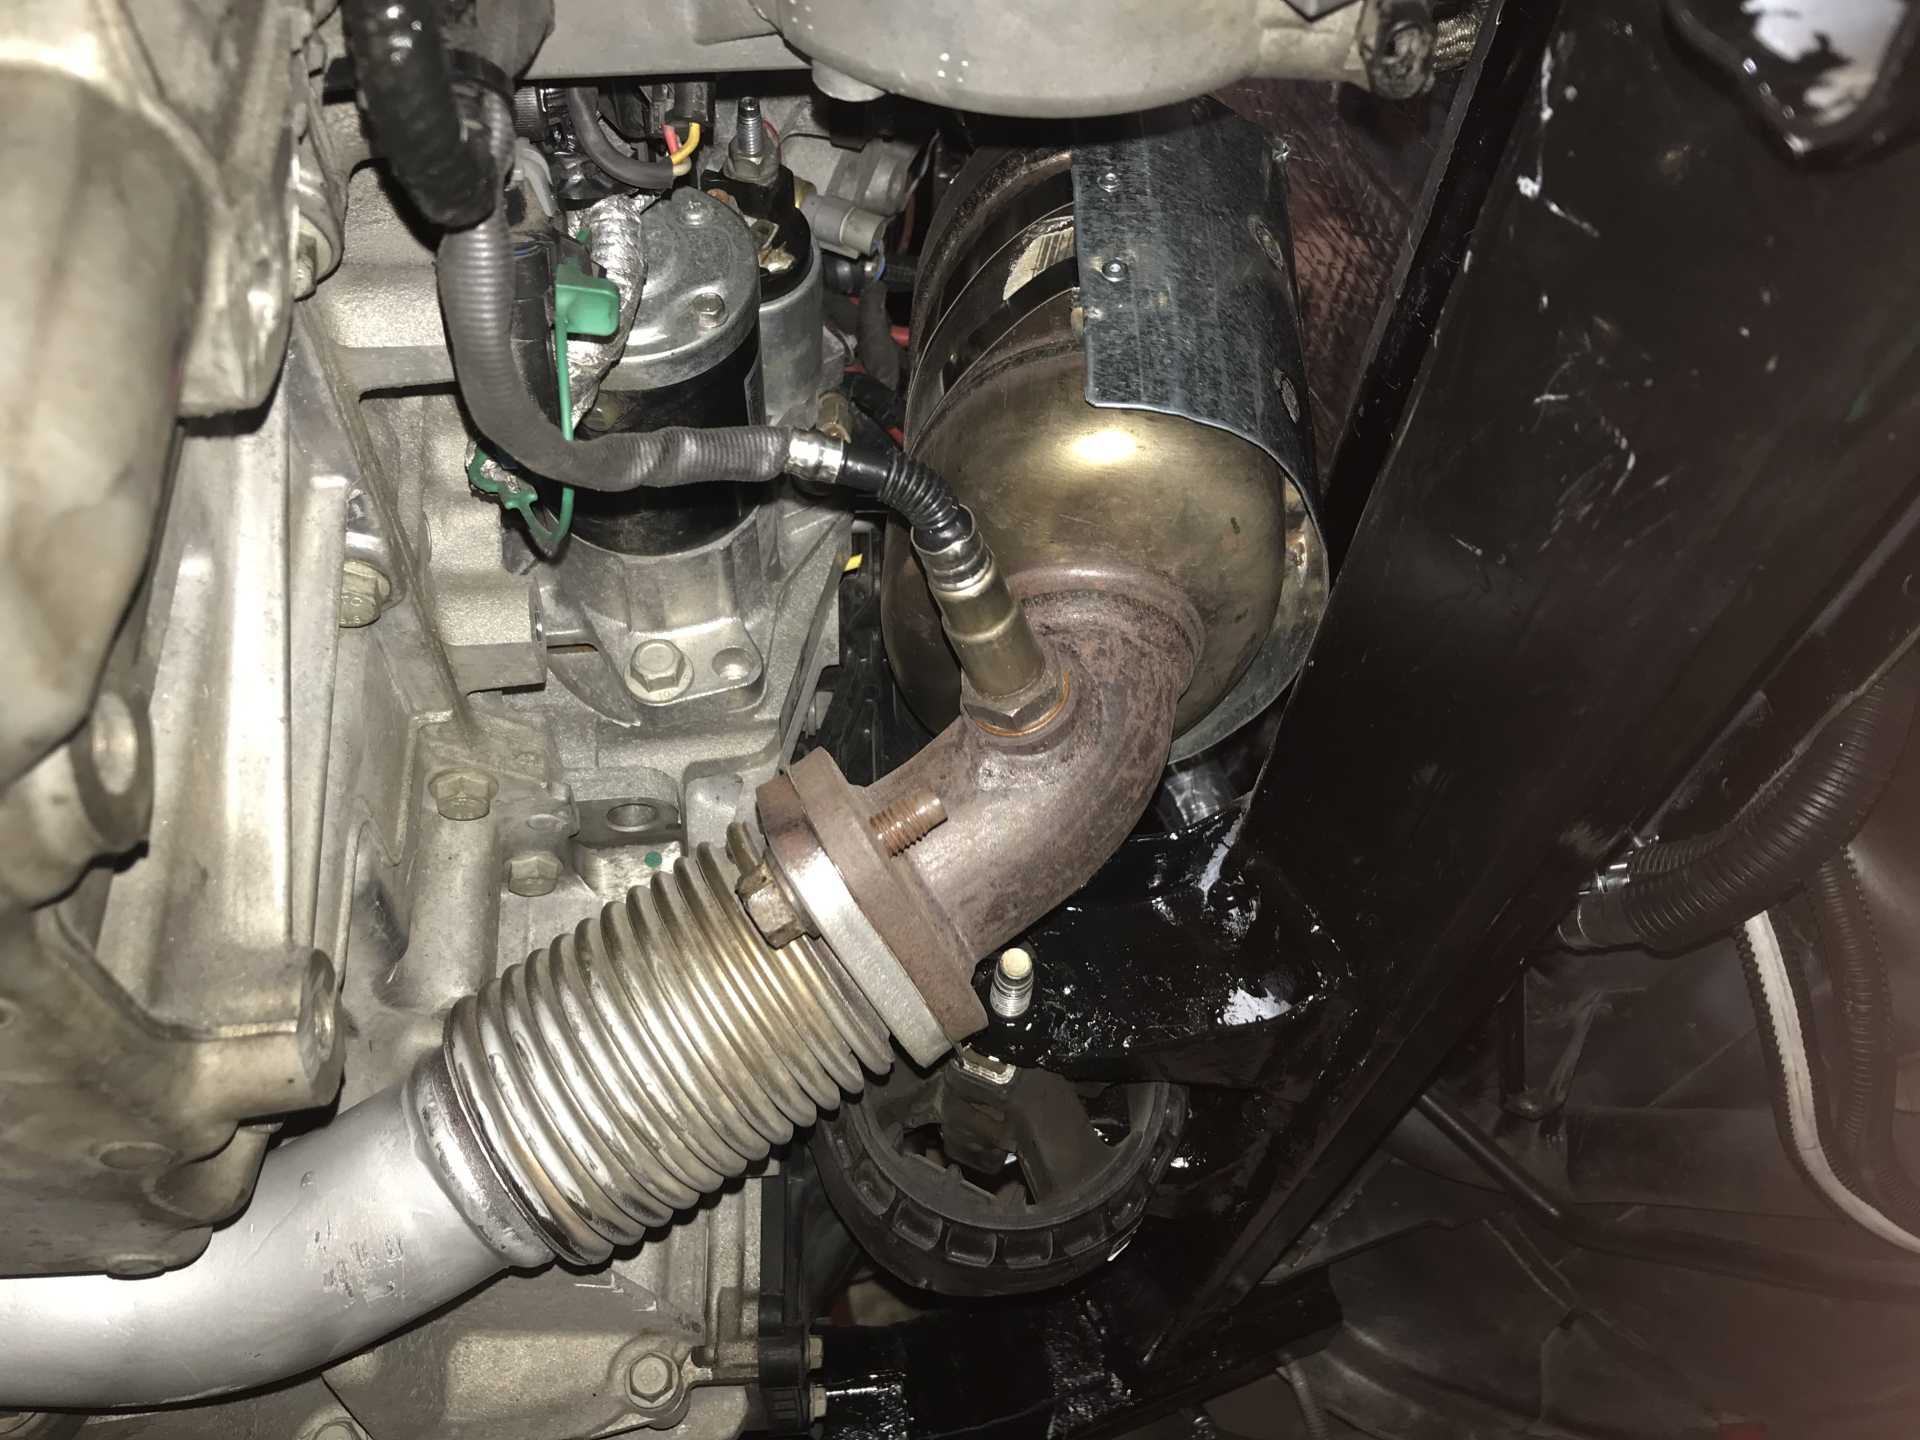
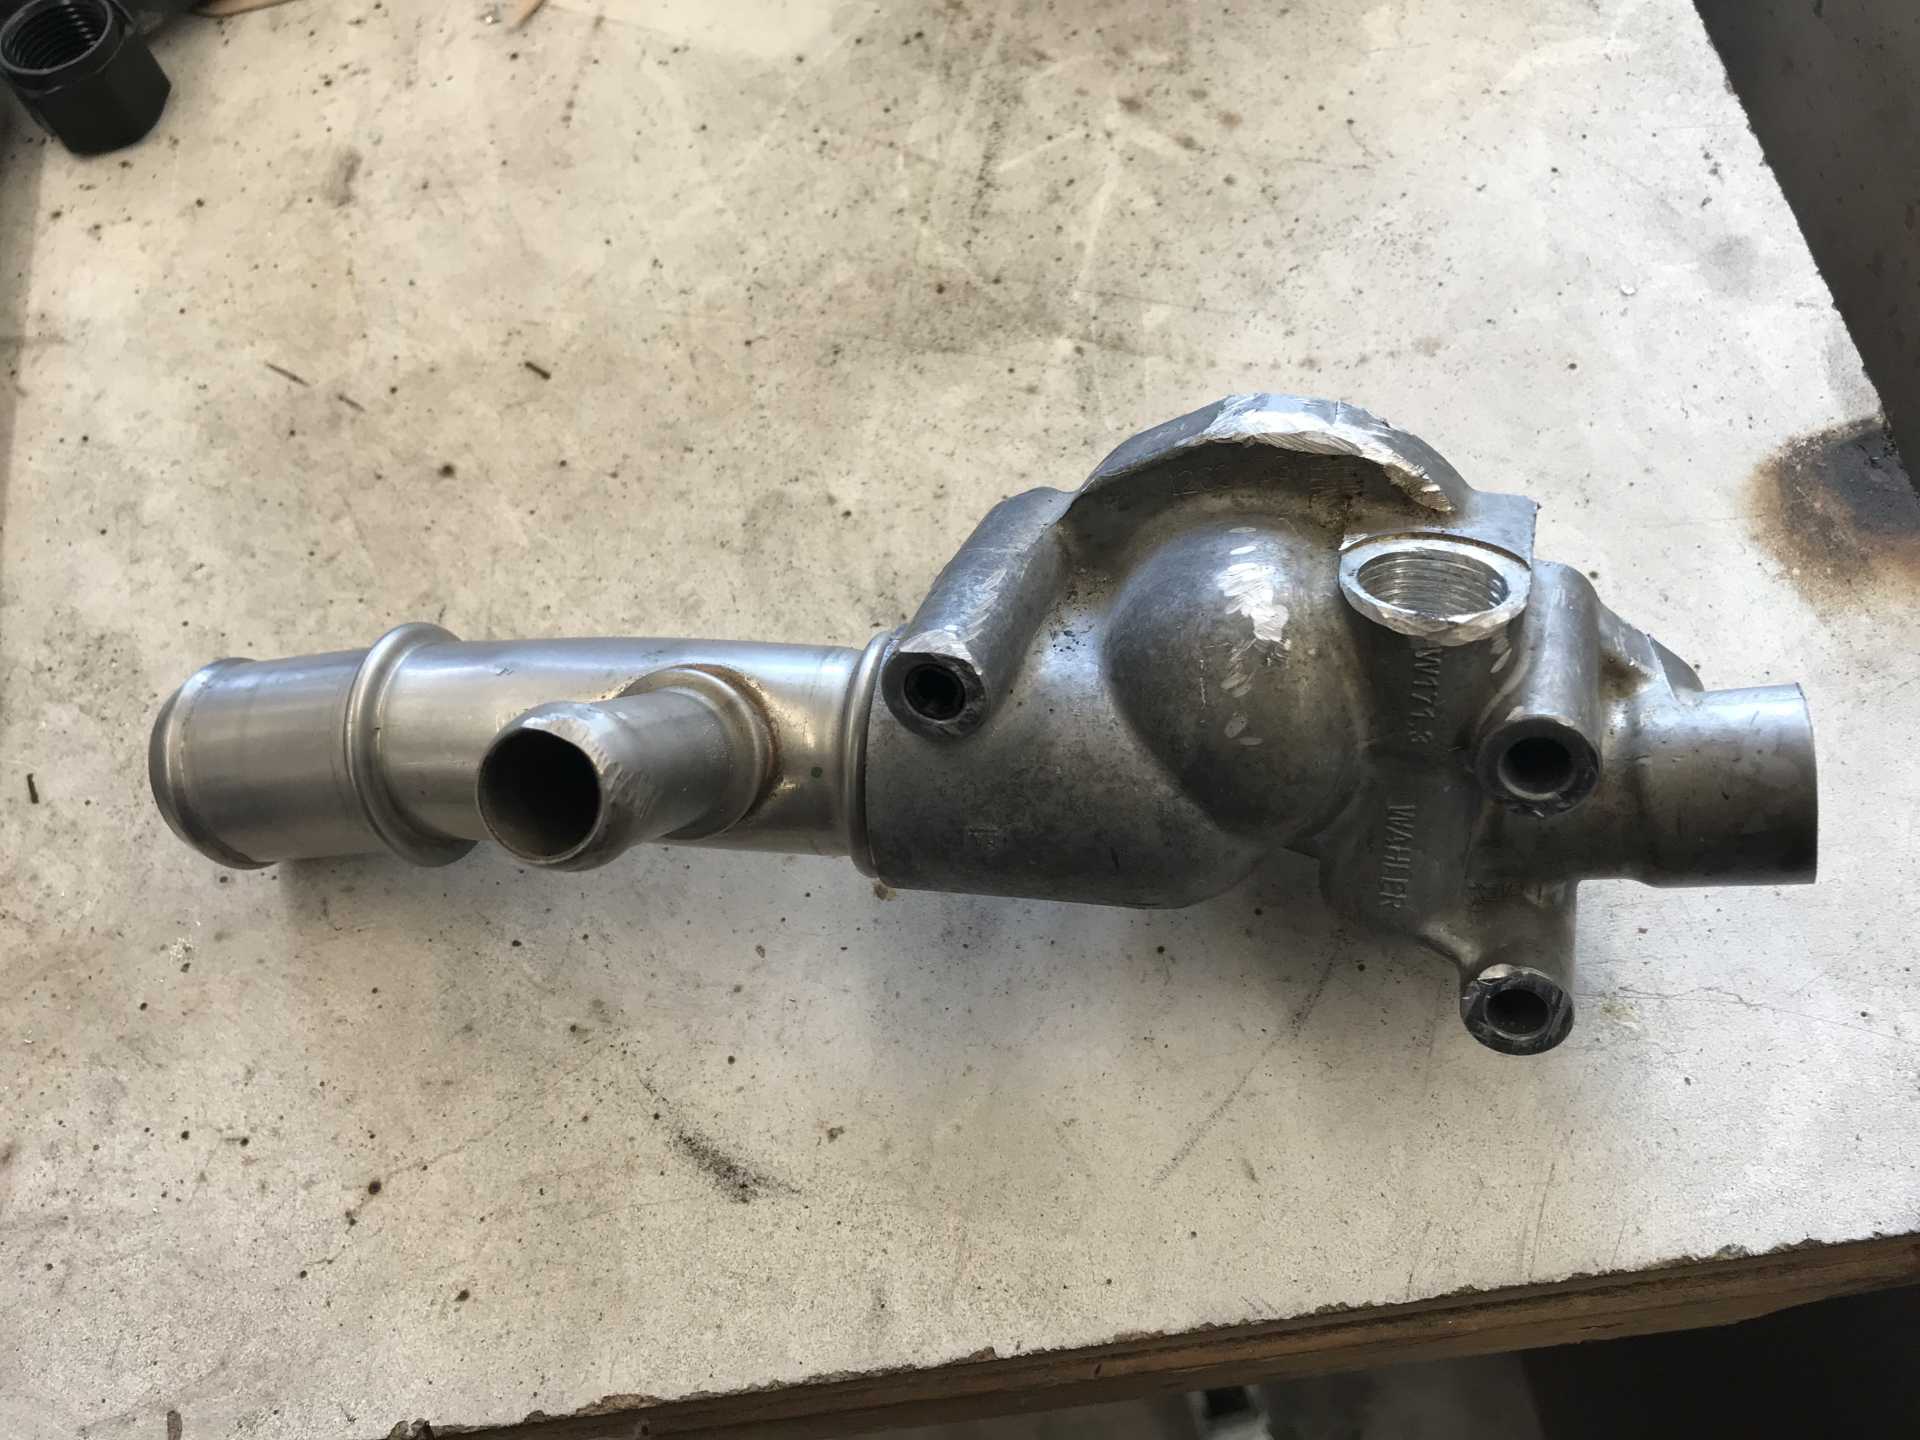
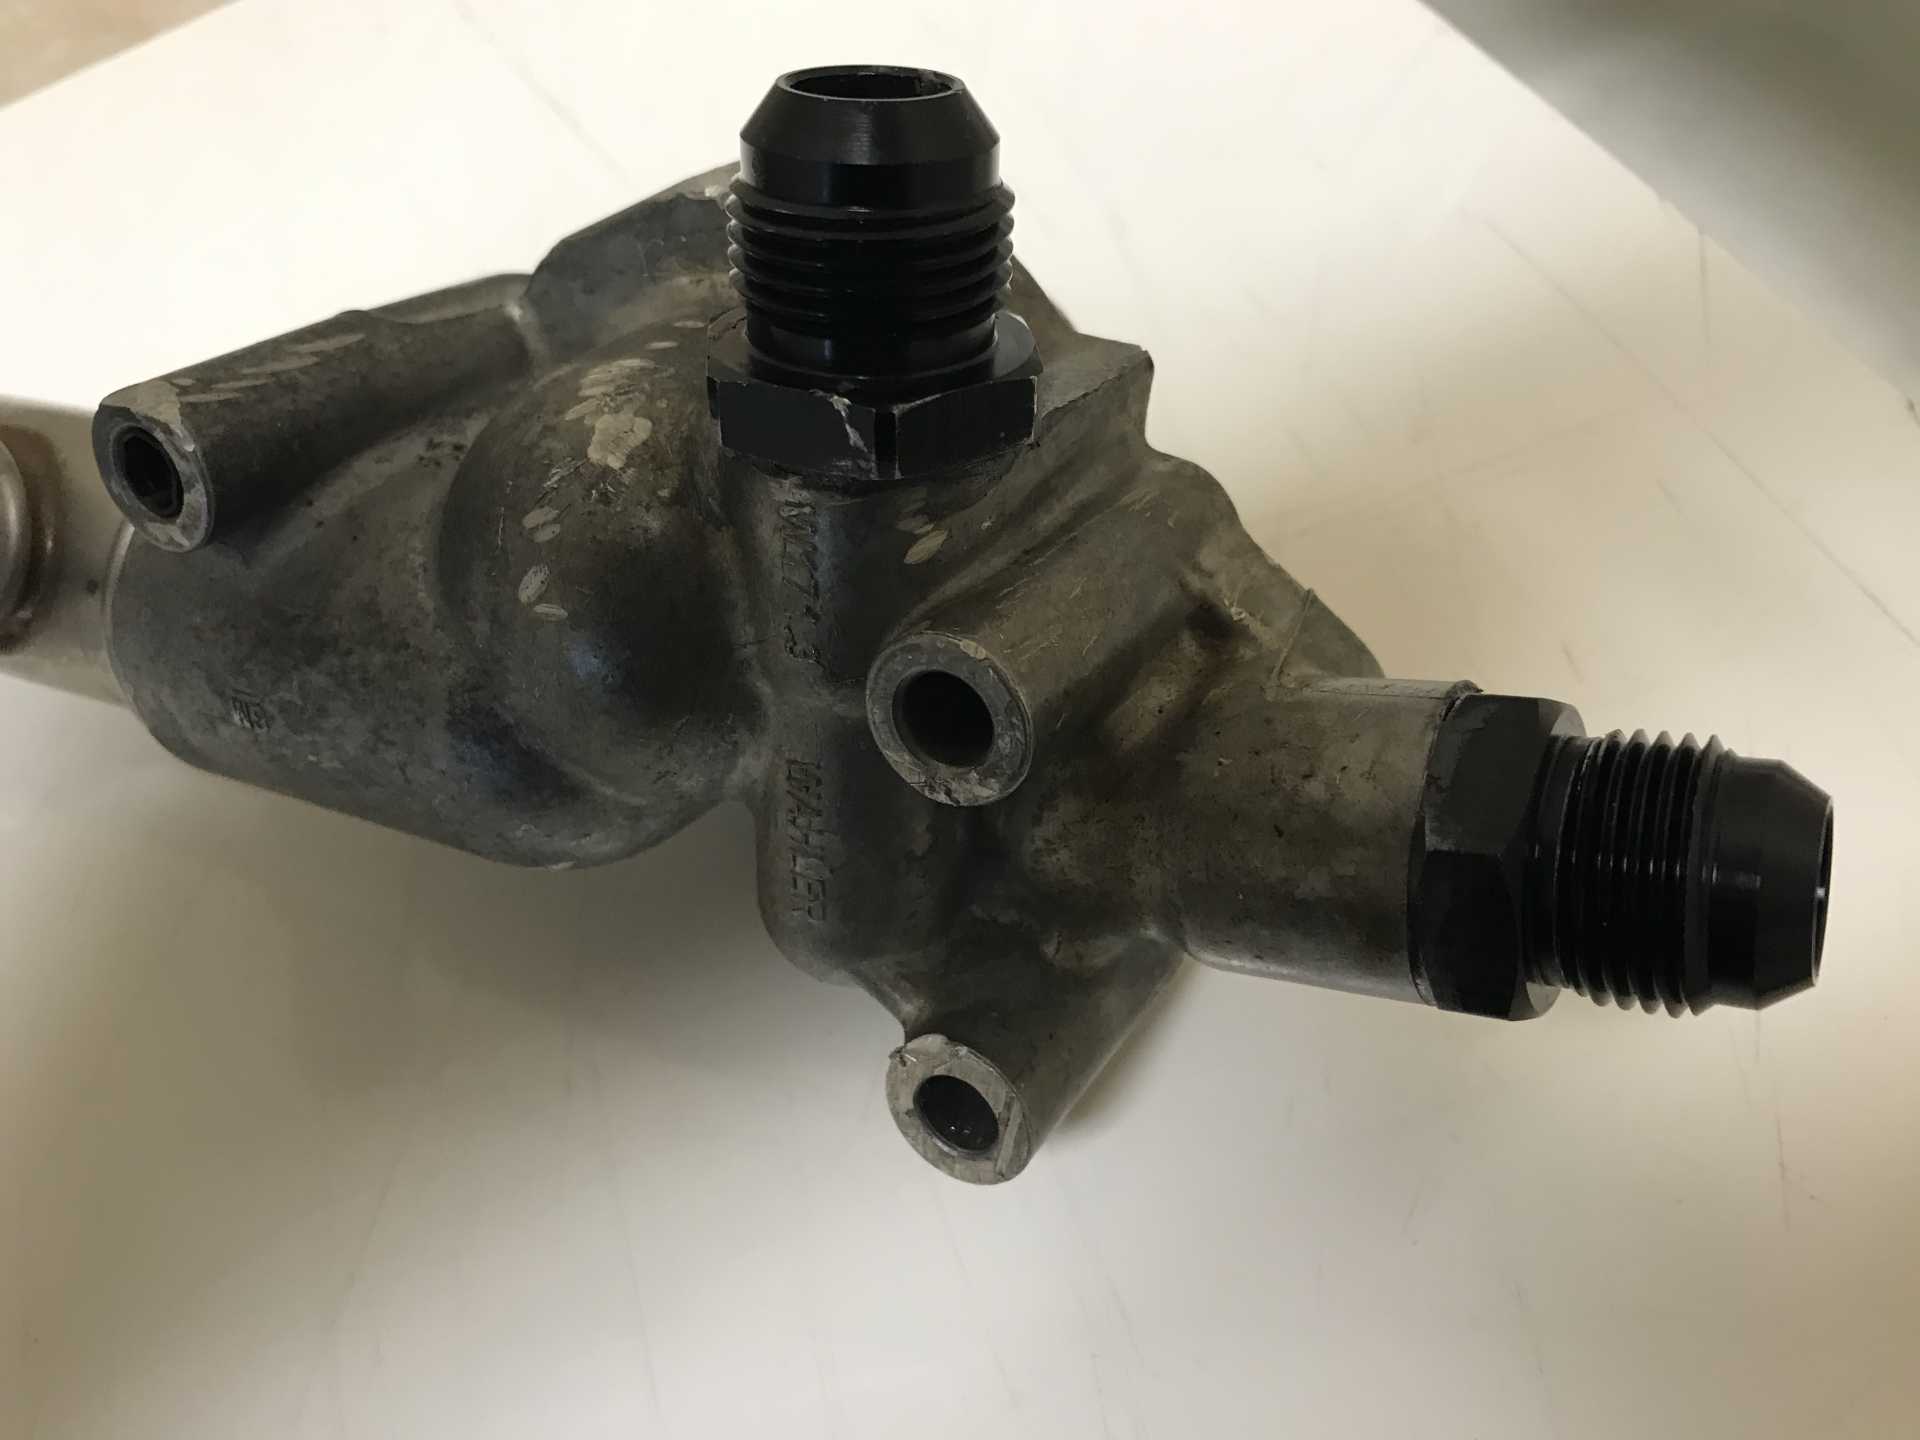
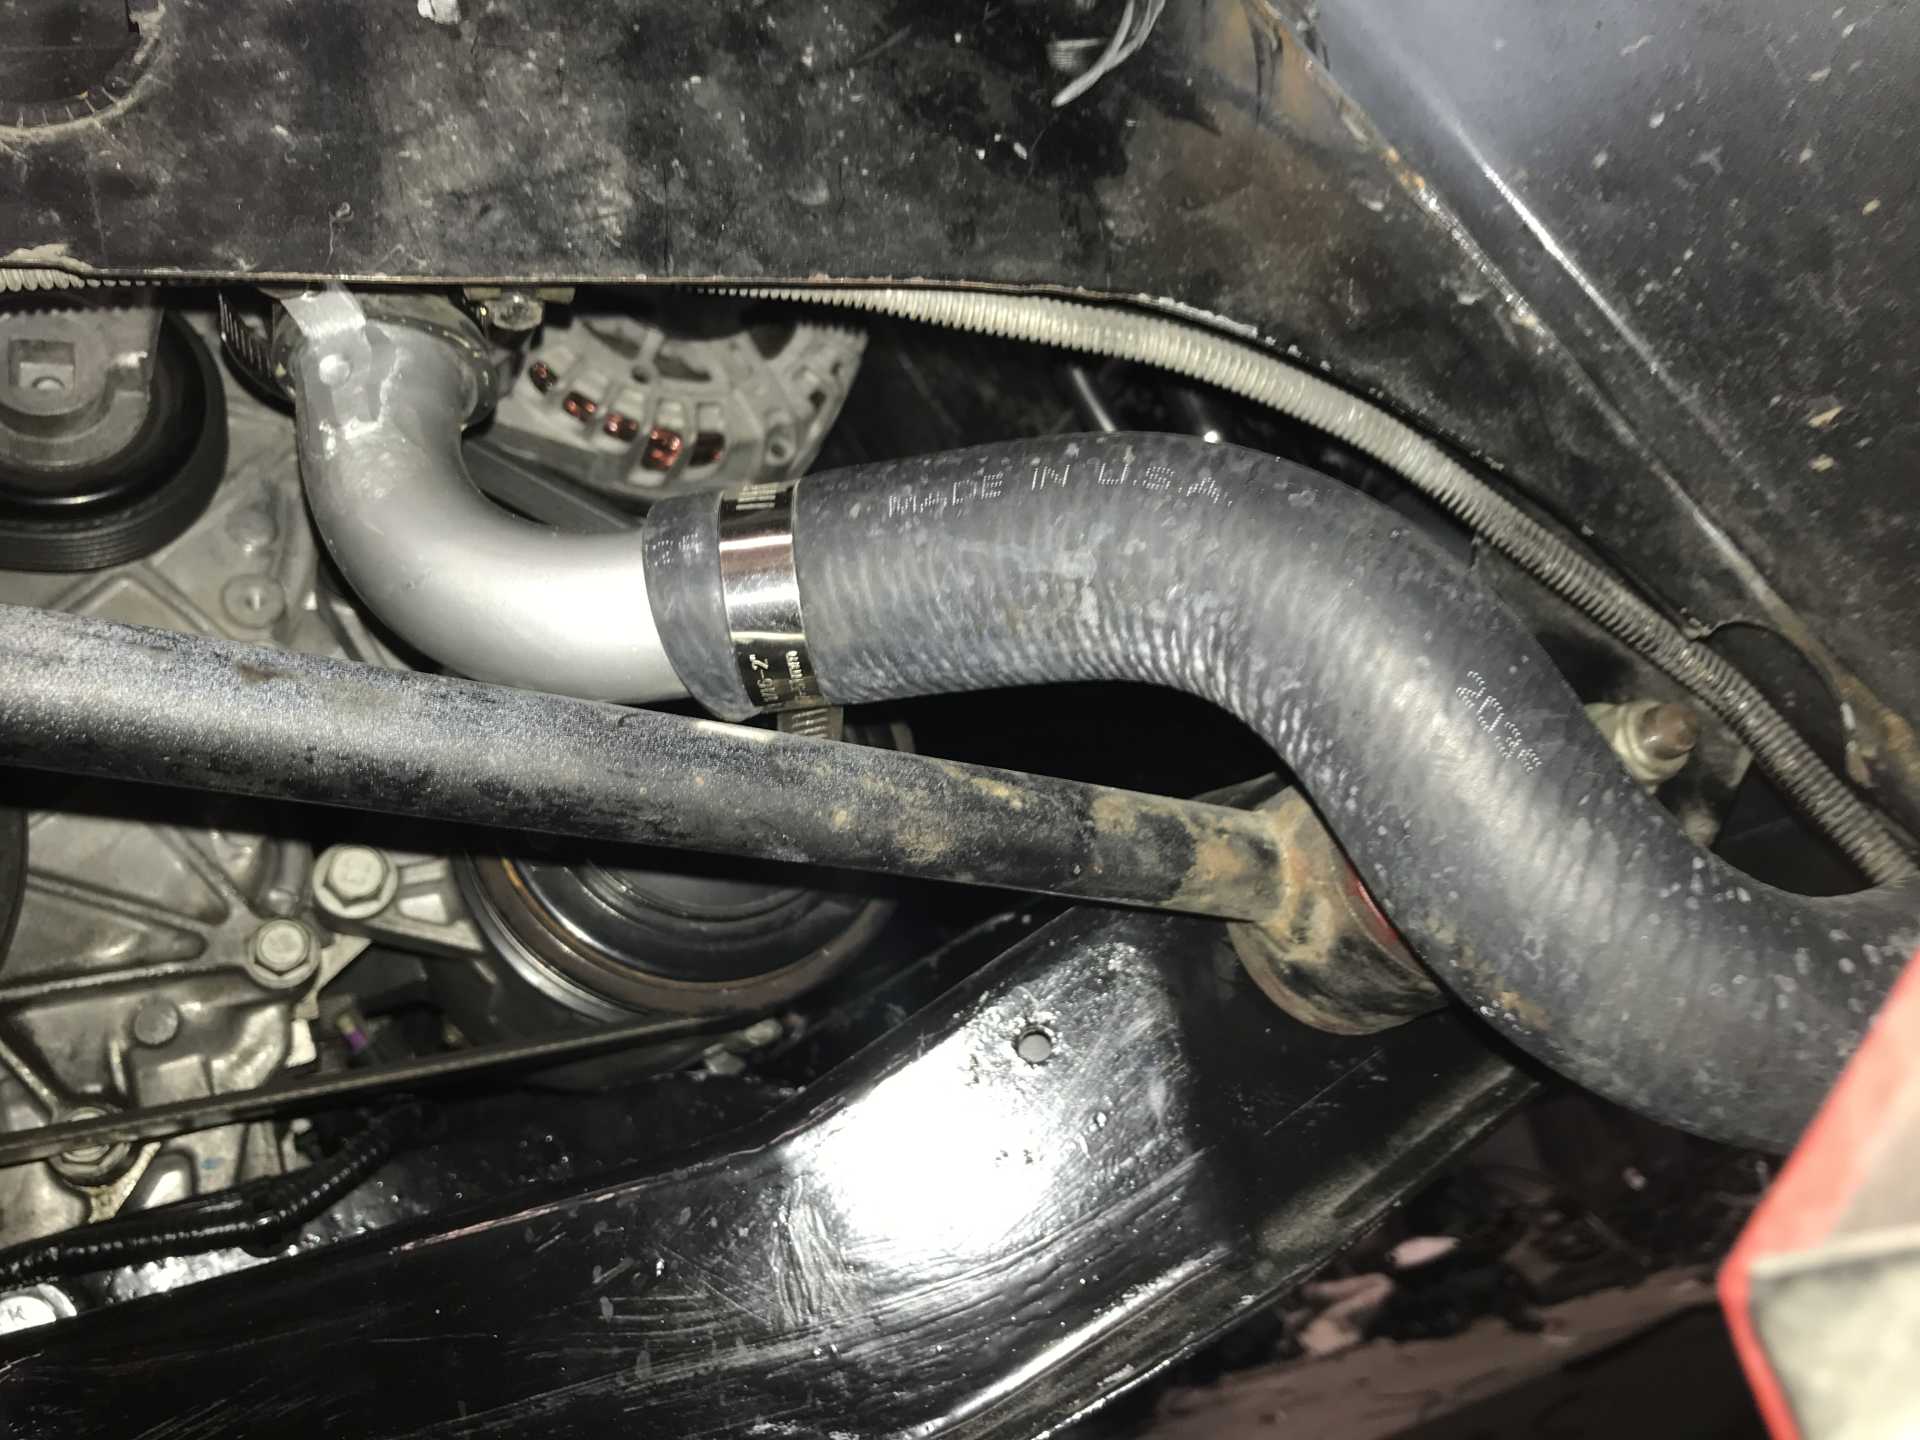
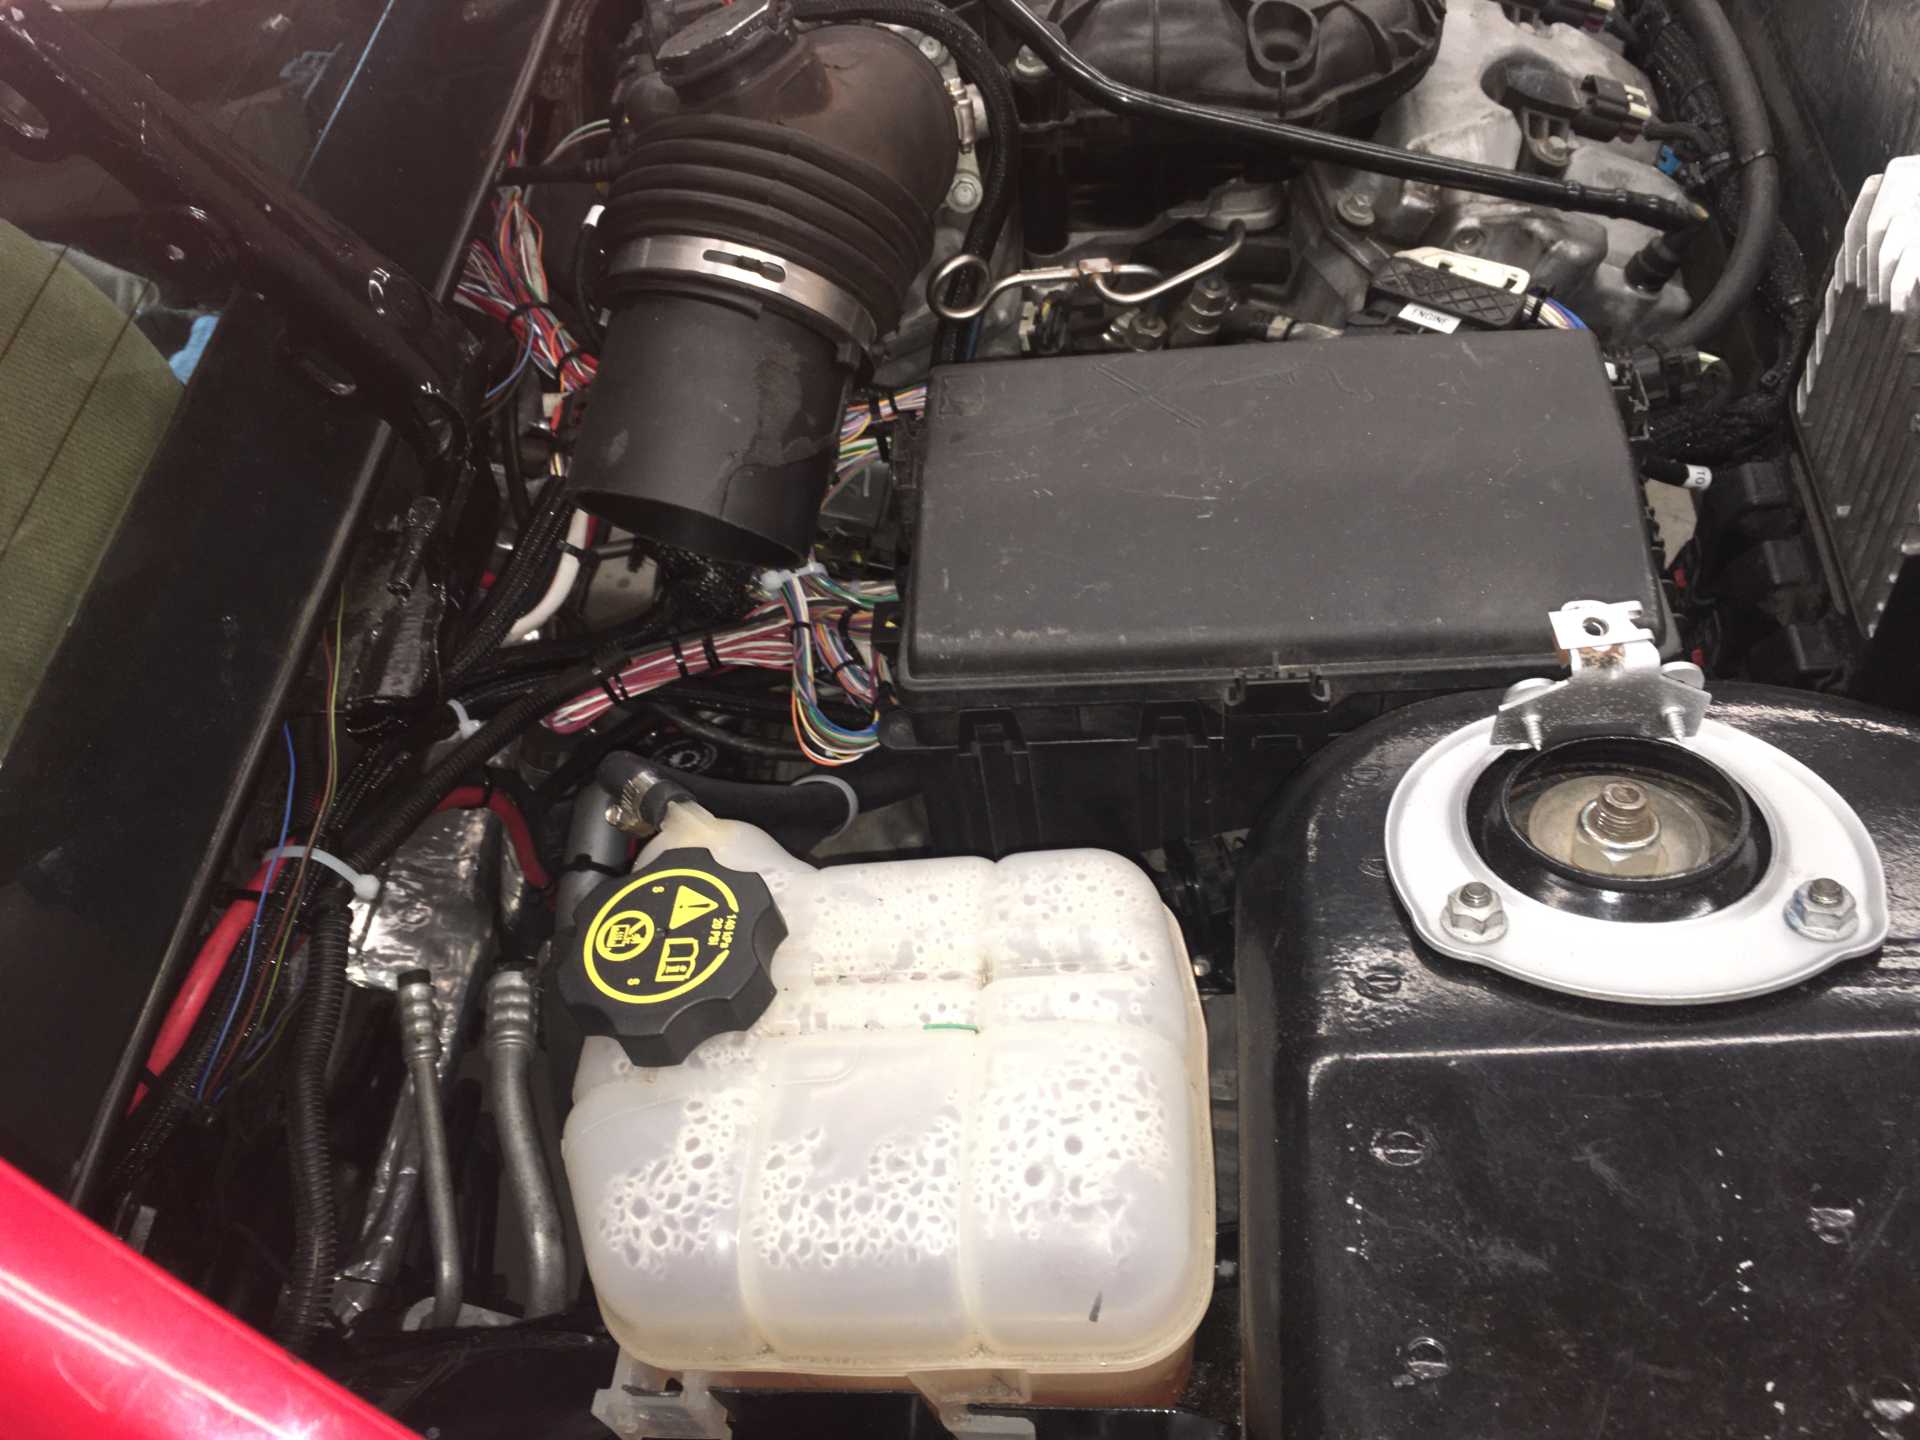
The transmission cooler piping from the radiator worked out well and I was able to modify and re-use the Impala pipes connecting to the Fiero hoses. The thermostat housing though was to be a problem. The inlet pipe (it's reverse flow) pointed in the right direction and there was a clear path to the side pipe. I cut up the Fiero coolant pipe from the front of the 2.8 and was able to use a combination of Fiero & Impala hoses to get the hoses between the two to fit. The heater connections on the thermostat housing were a problem though. One pointed to the rear of the Fiero and the other straight up and they were press-fit into the thermostat housing. I decided to solve this by removing and replacing them with AN fittings so I could use 180 and 90 degree swivel fittings to the hoses. I also allows me to cap them off easily until I get around to hooking up the Fiero heater pipes which also pointed in the wrong direction. I solved that by chopping them off before the bend and re-beading the pipes before the engine was in place. The thermostat housing was drilled and tapped for the AN-10 & AN-12 fittings but the threads were not too deep for me to feel comfortable. I ended up also JB Welding them in place along with the threads. Just in case. Turned out good in the end, no leaks.
The heater hose fittings are at the top and right of the photo. The large pipe goes to the radiator, the smaller branch goes to the expansion tank.
Added the AN fittings so swivel fittings can be used to point the hoses in the right direction
This is the right side hose to the engine inlet. the left is simliar.
Top View of right side hose
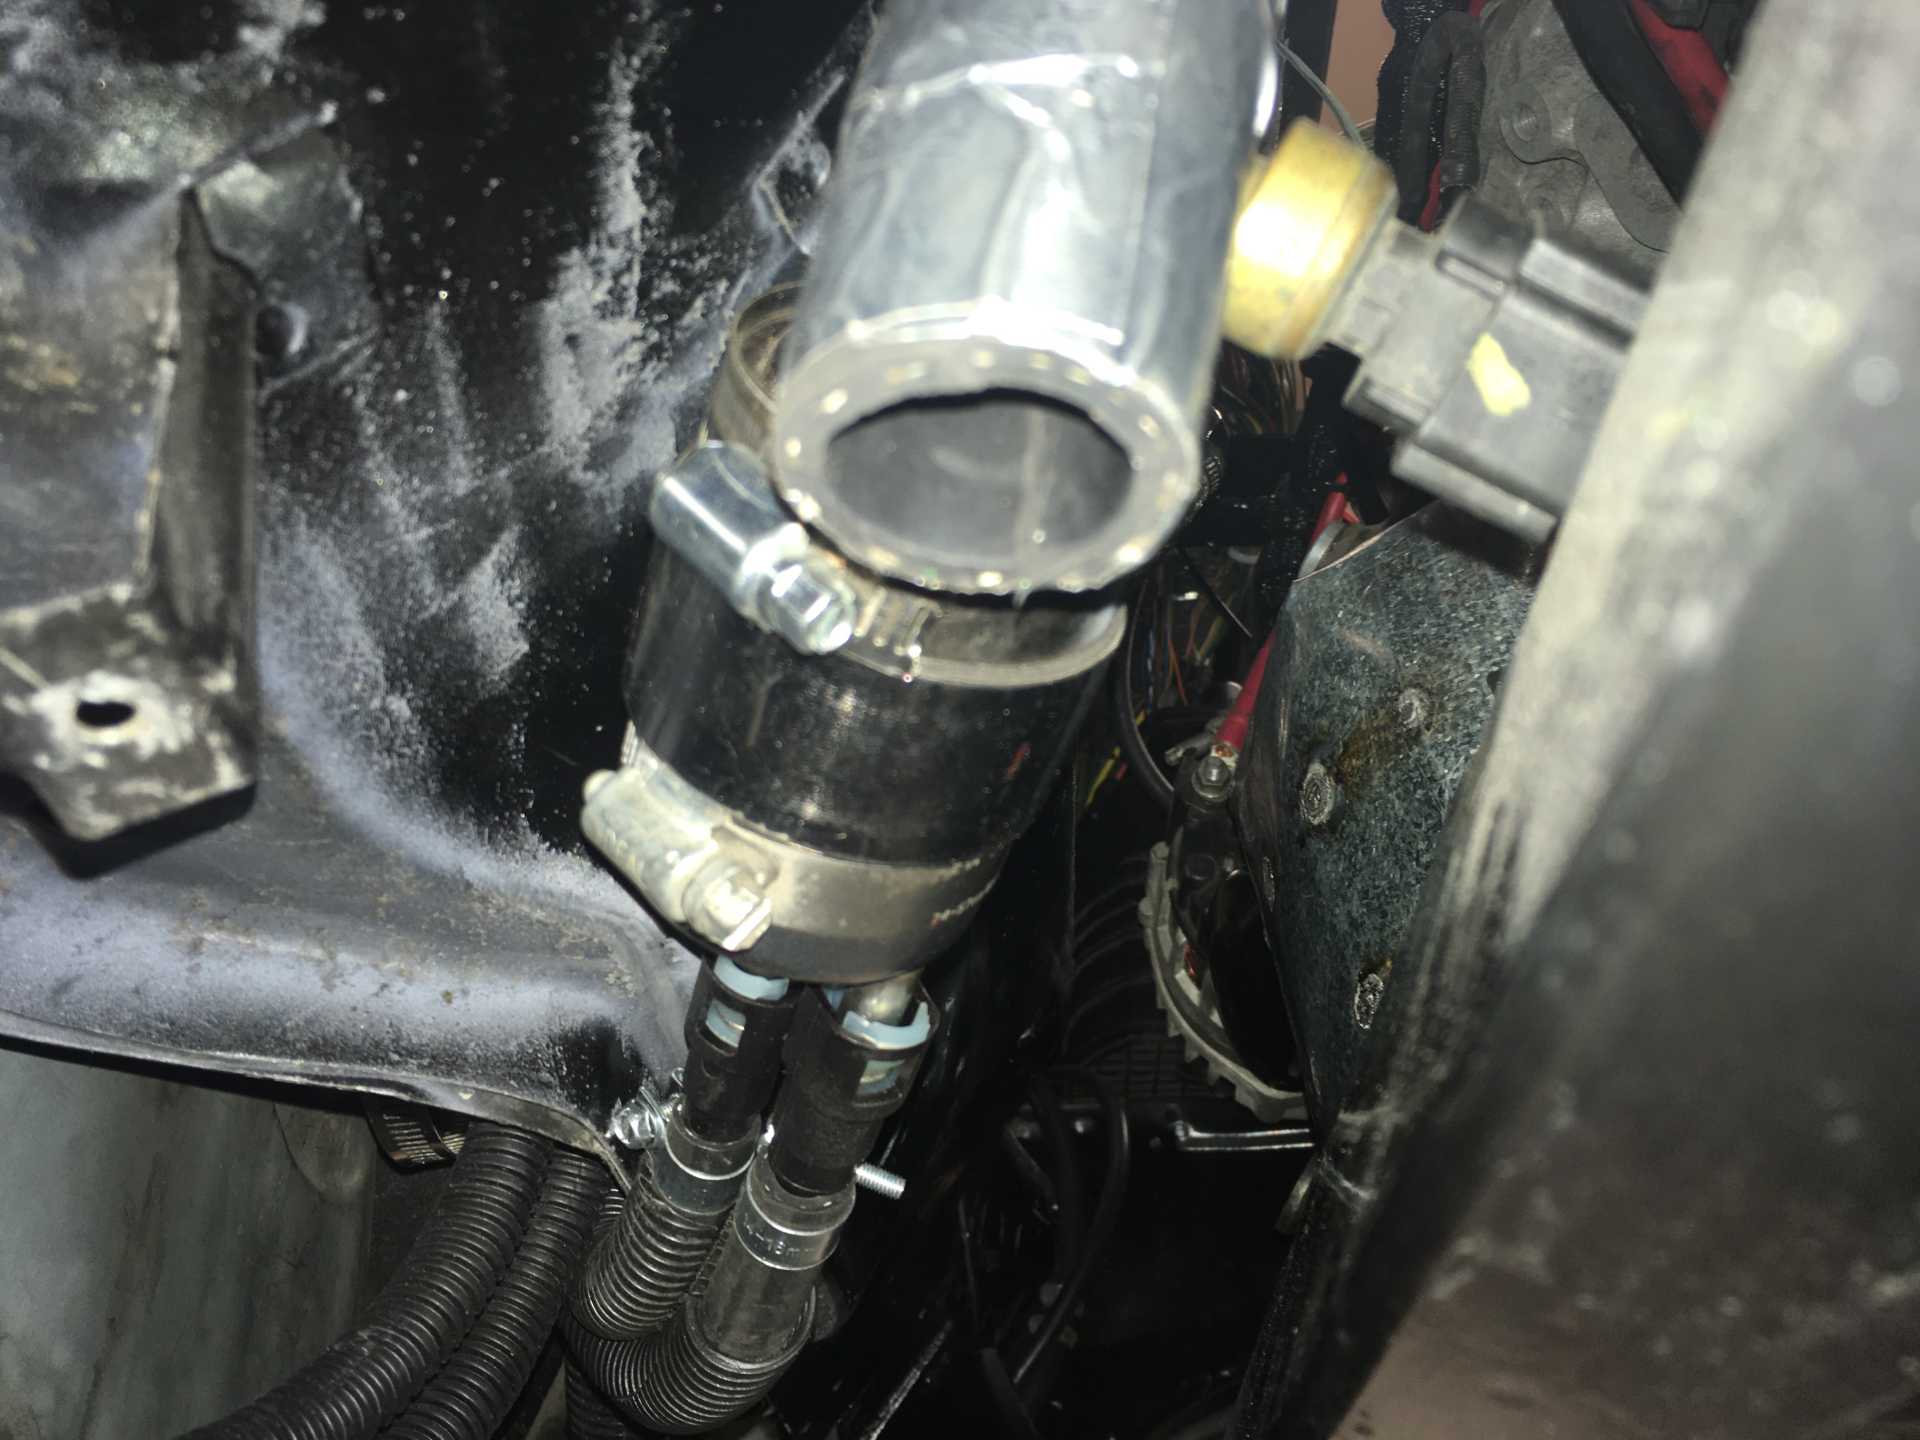
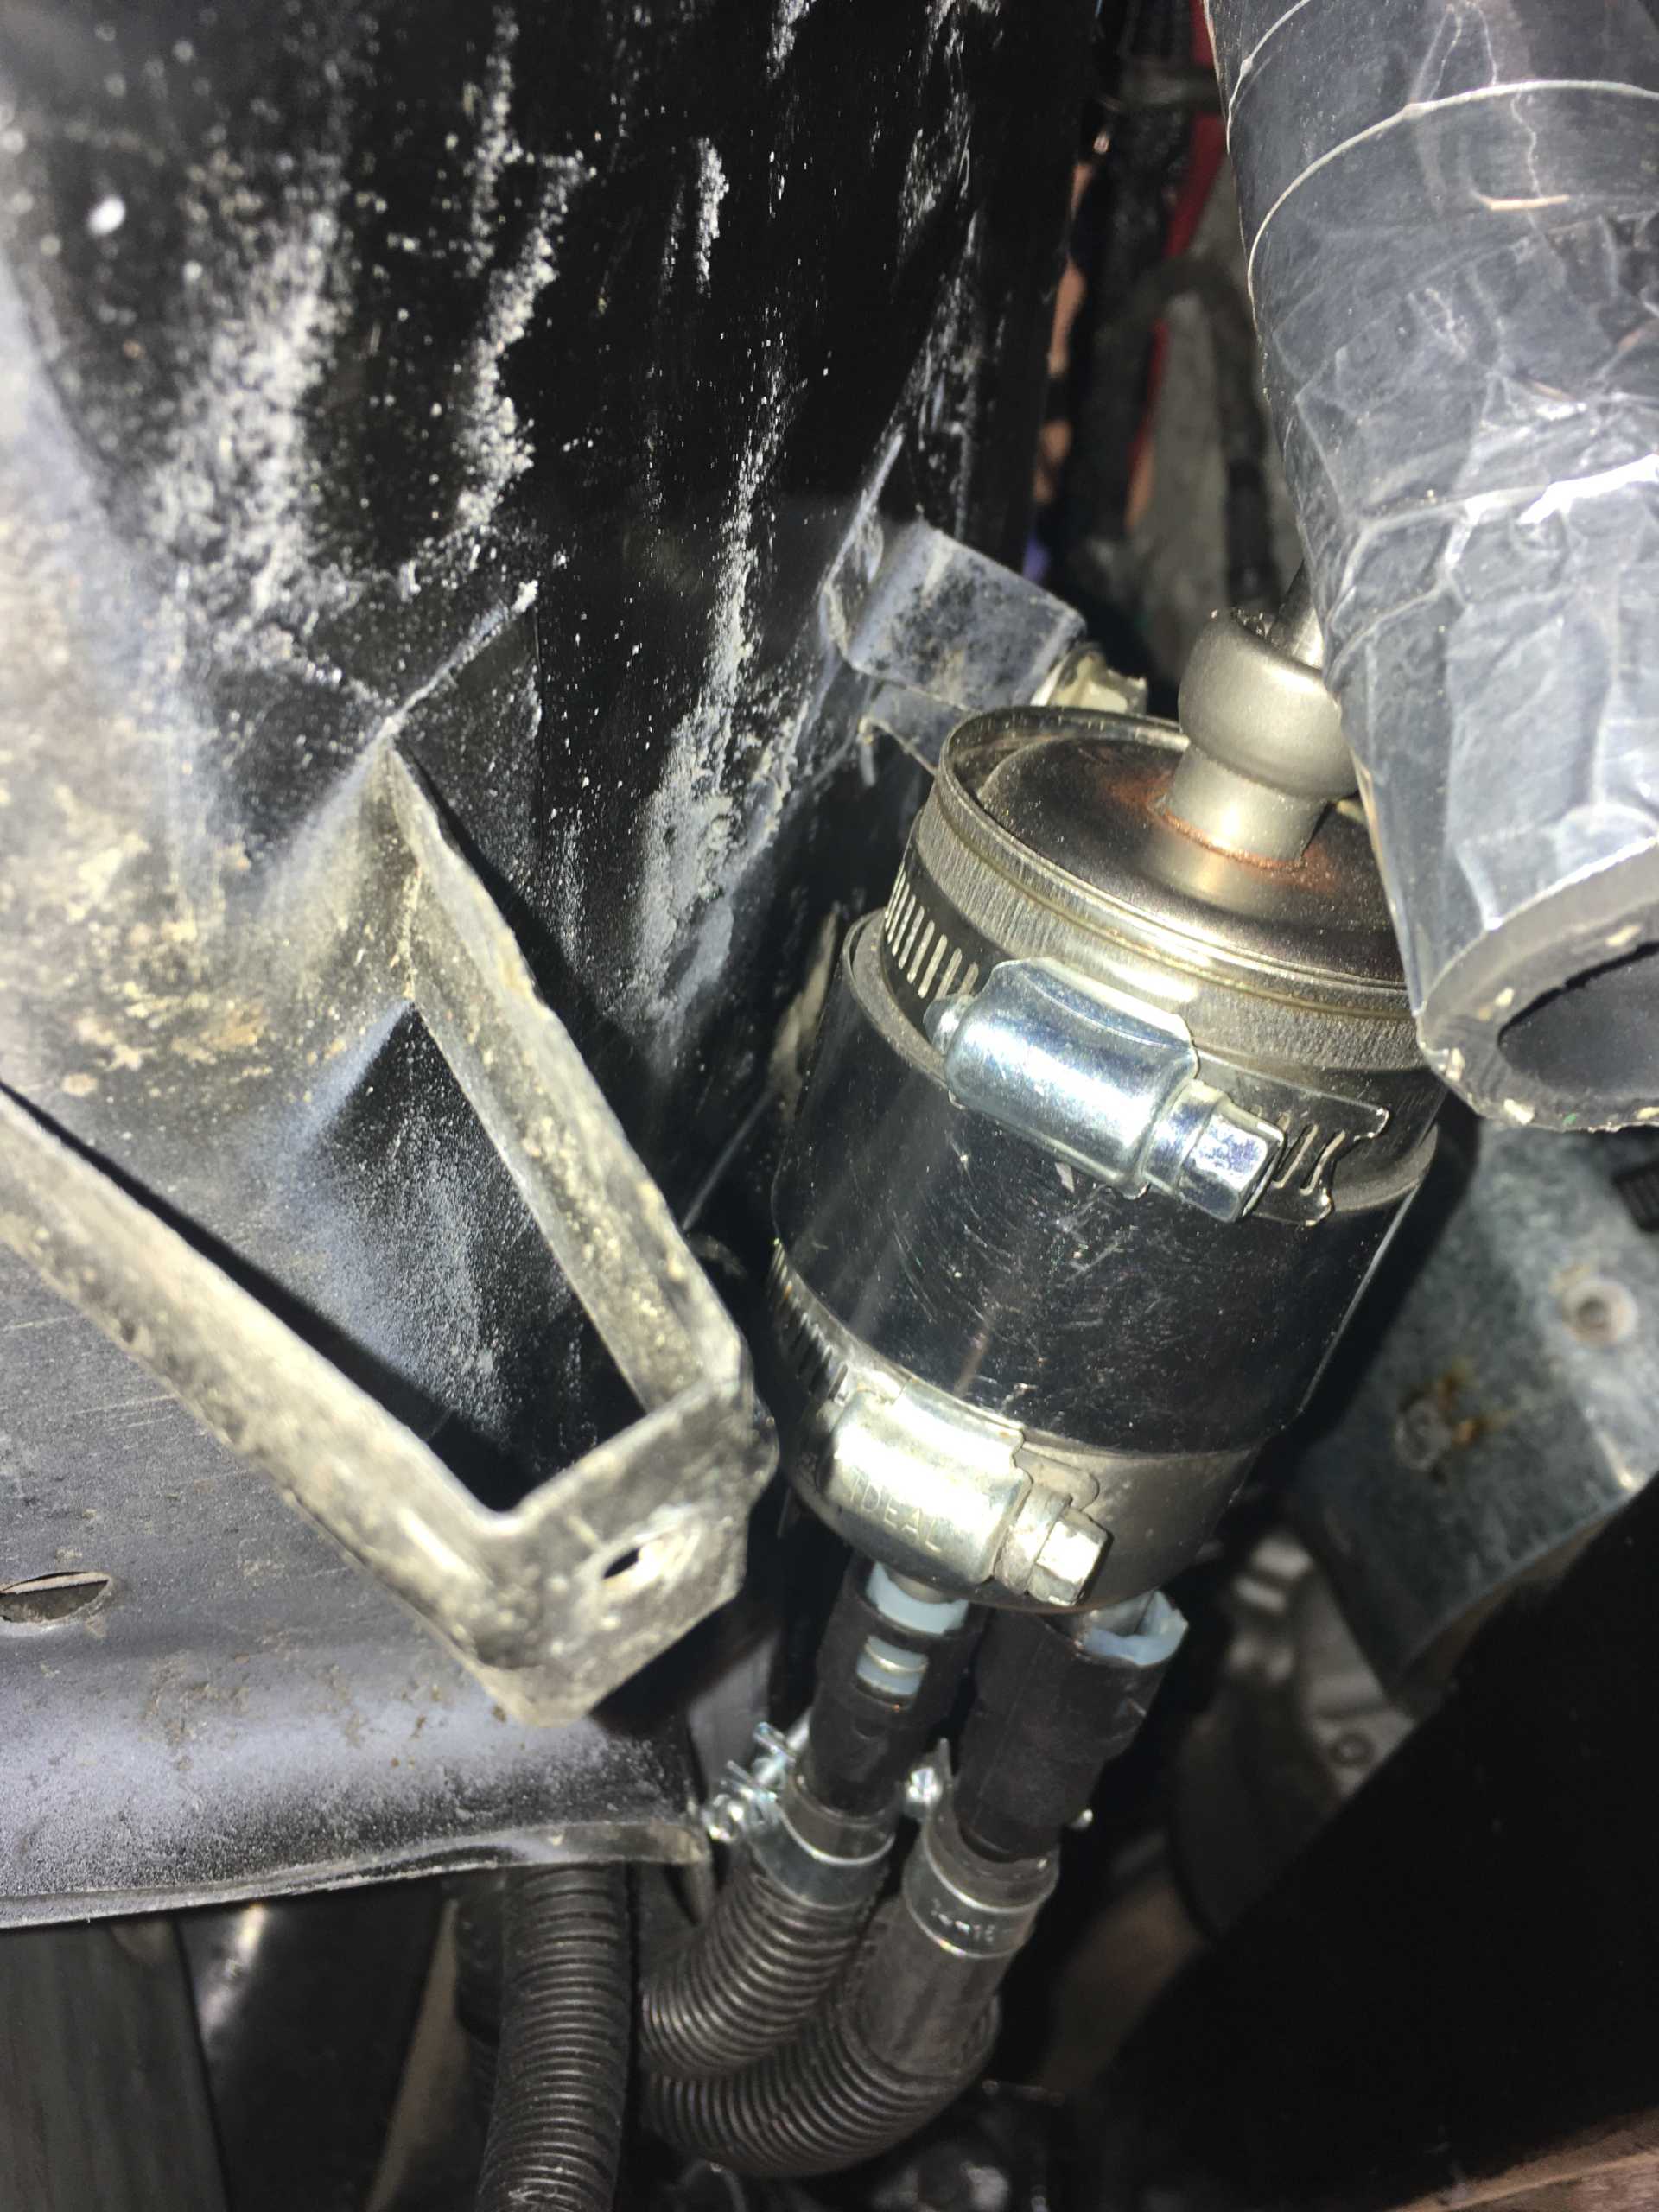
The fuel tank pipes also needed attention since the pipes for supply & return also pointed in the wrong direction. So those were also chopped off and re-beaded. The new hoses were routed well away from the cat converter and up to a Corvette fuel filter with internal regulator. The outlet then included the Impala fuel pressure sensor and ran up to the inlet of the high-pressure injector pump. That worried me since there were two hose clamps and a rubber hose in that section. If they leak or burst it could spray fuel on the cat. I ended up enclosing them all in a piece of 1" hose open on the bottom that lead down below the frame. I'll replace these with a custom metal pipe in the future.
Fuel filter outlet. Connector is fuel pressure sensor.
This view shows inlet from tank & return. Silver coated hose is protection against leaks due to the Cat being nearby
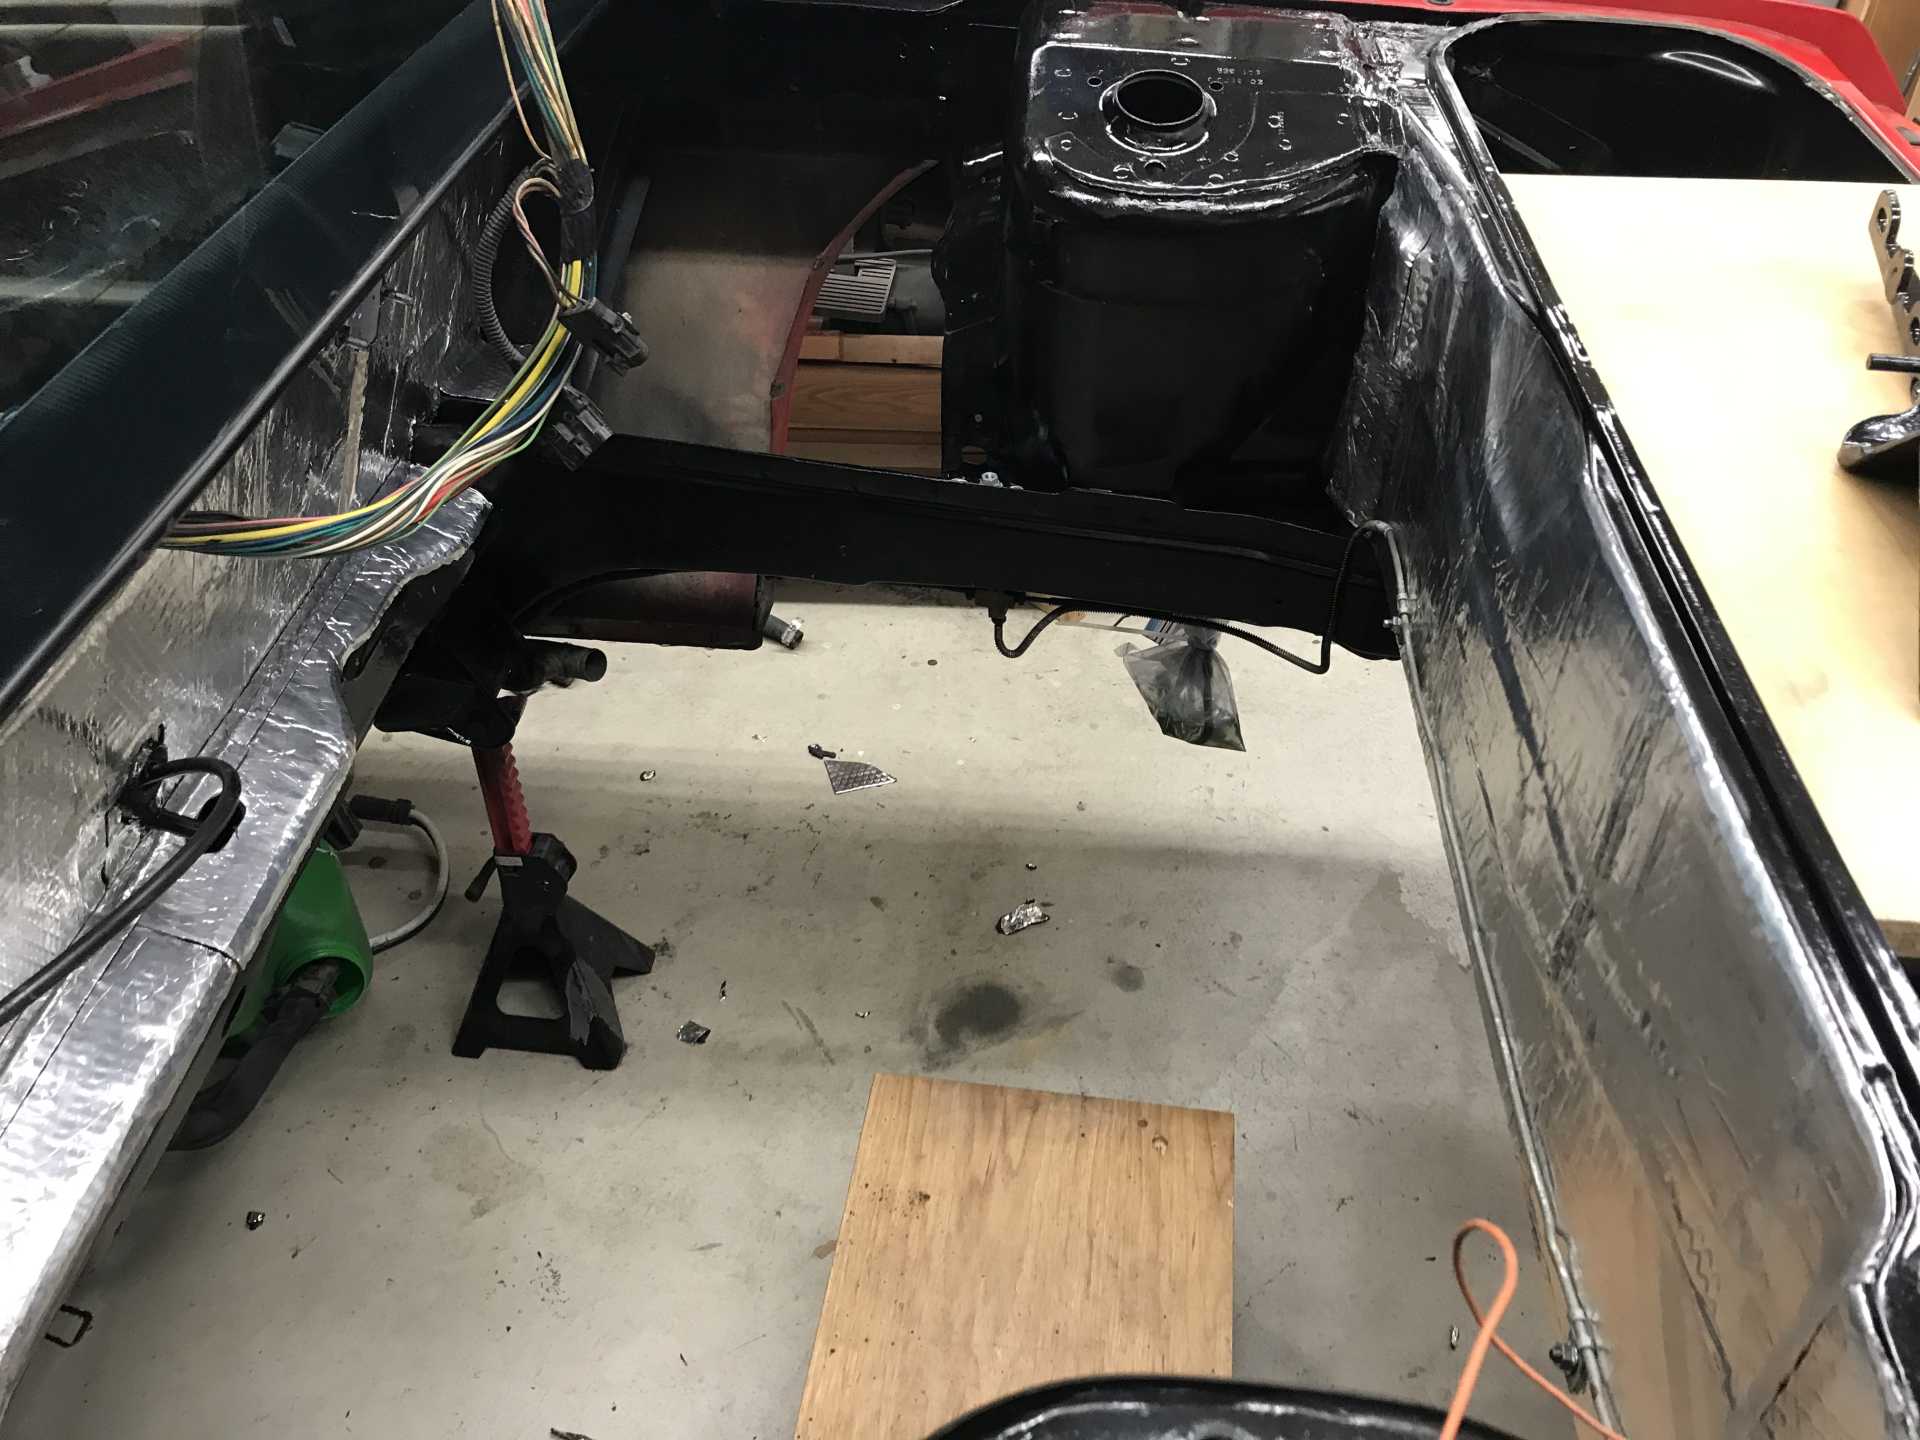
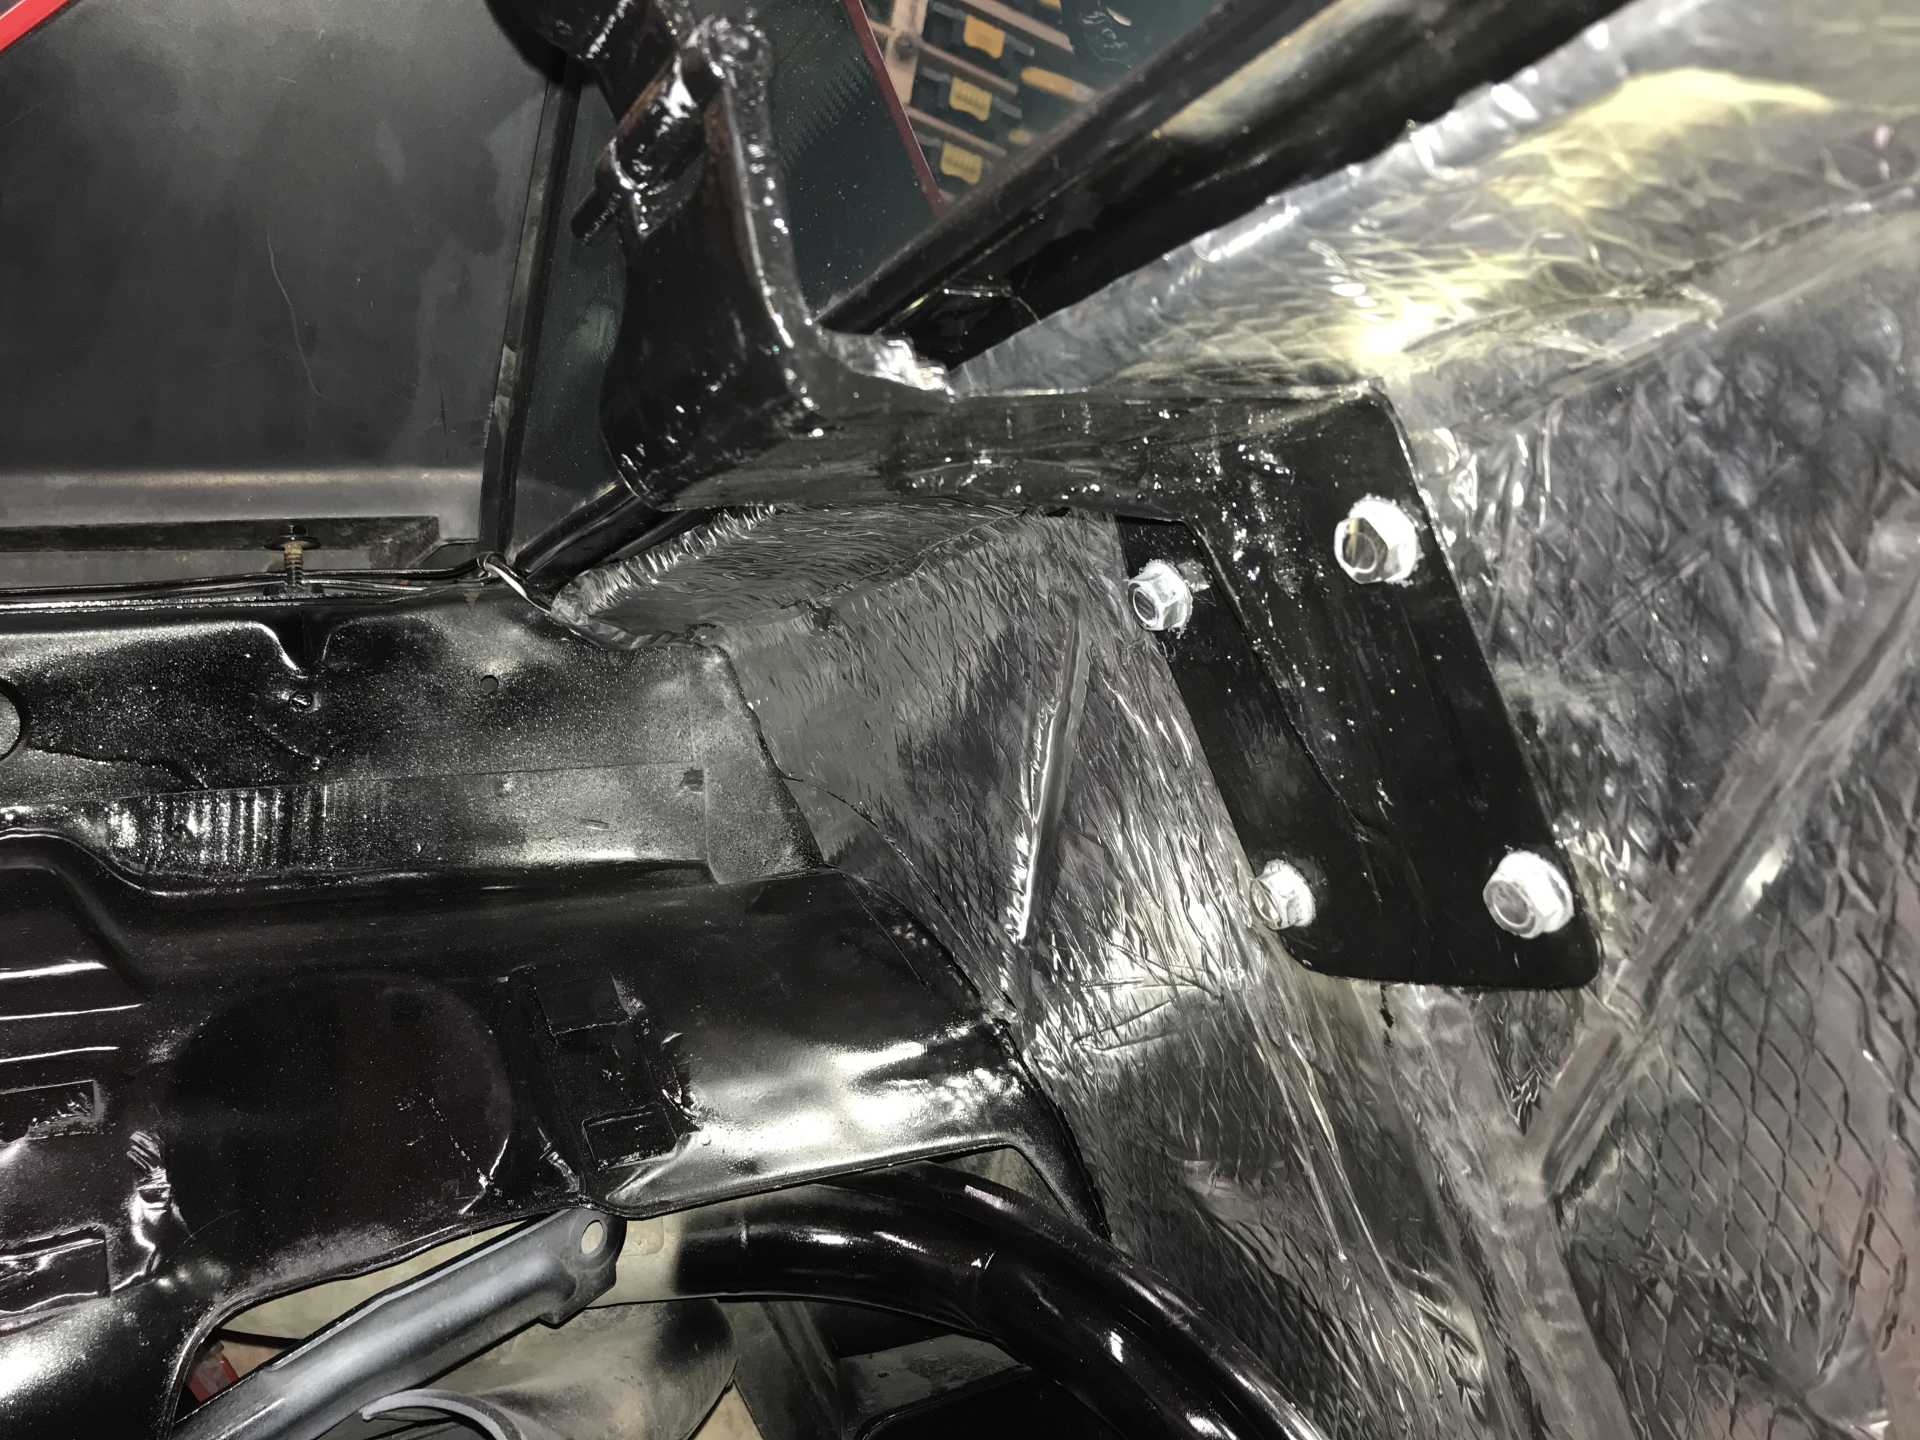
I kept the Impala evap assembly and Chassis Control Module (which controls the fuel pump too) by mounting them to a custom bracket where the battery used to live. The prior owner ripped out the sheet metal in that area so that needed to rebuilt also. But they did fit with no problems and the hoses worked out well to the fuel tank and engine.
Evap with CCM on the front Old C500 tucked away for now.
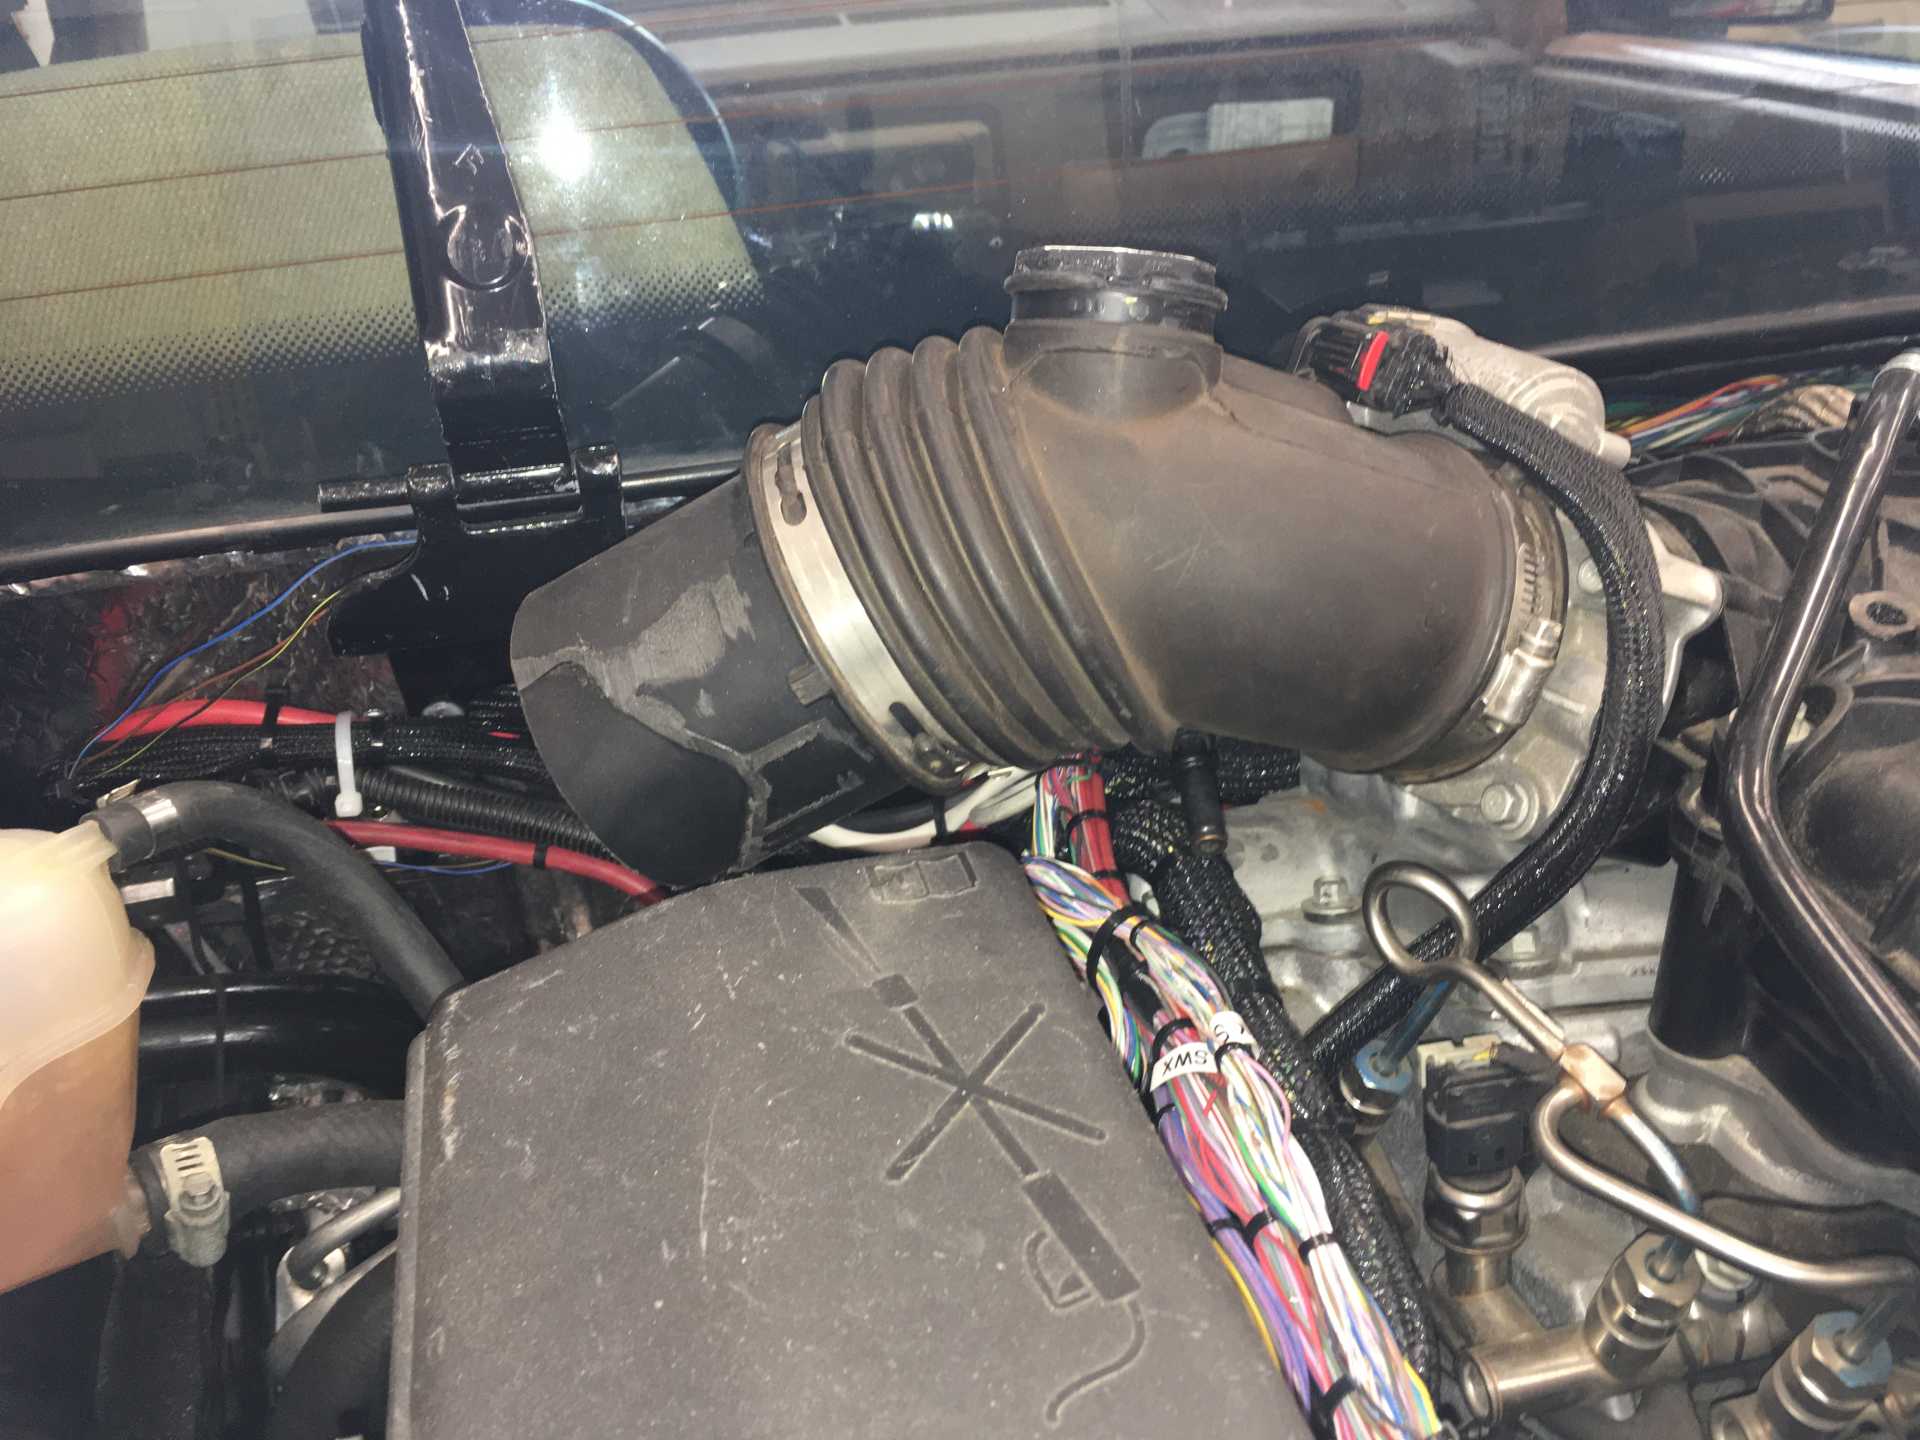
Then there is the intake manifold, throttle body, mass air flow and air filter. to deal with. This is mess that I'm not completely finished with. First the manifold needed to be swapped 180 to point to the left side. That's easy but some hoses will need to be shortened or lengthened. The real issue is the manifold outlet points up about 30 degrees and will interfere with the trunk lid. The MAF is a big pipe (3.5") and the Impala air filter box simply won't fit. So it's going to be a cone filter and some creative piping to make it sorta fit. I've considered cutting the intake manifold inlet off and extending it, not pointing up to avoid cutting the lid. Otherwise it will be adding a higher bump to the lid. On the good side the wiring will work out OK.
The intake tube. The cap on the side went to a resonance chamber to reduce noise. Needs to be lowered somehow.
Before tacking the electrical stuff I removed the throttle cable and pedal since these are now electric. I fabbed a bracket for the pedal and in it went. The transmission cable worked out well. I re-used the Fiero cable and only needed to reverse the 6T70 gear selector arm and fab a simple bracket to hold the cable. The Impala shift knob will fit with a little work and that's good since it has the up/down shift switches for manual shifting. The shifter column will need to be shortened about 1.5" otherwise it sticks up in the air too high, but that's easy.
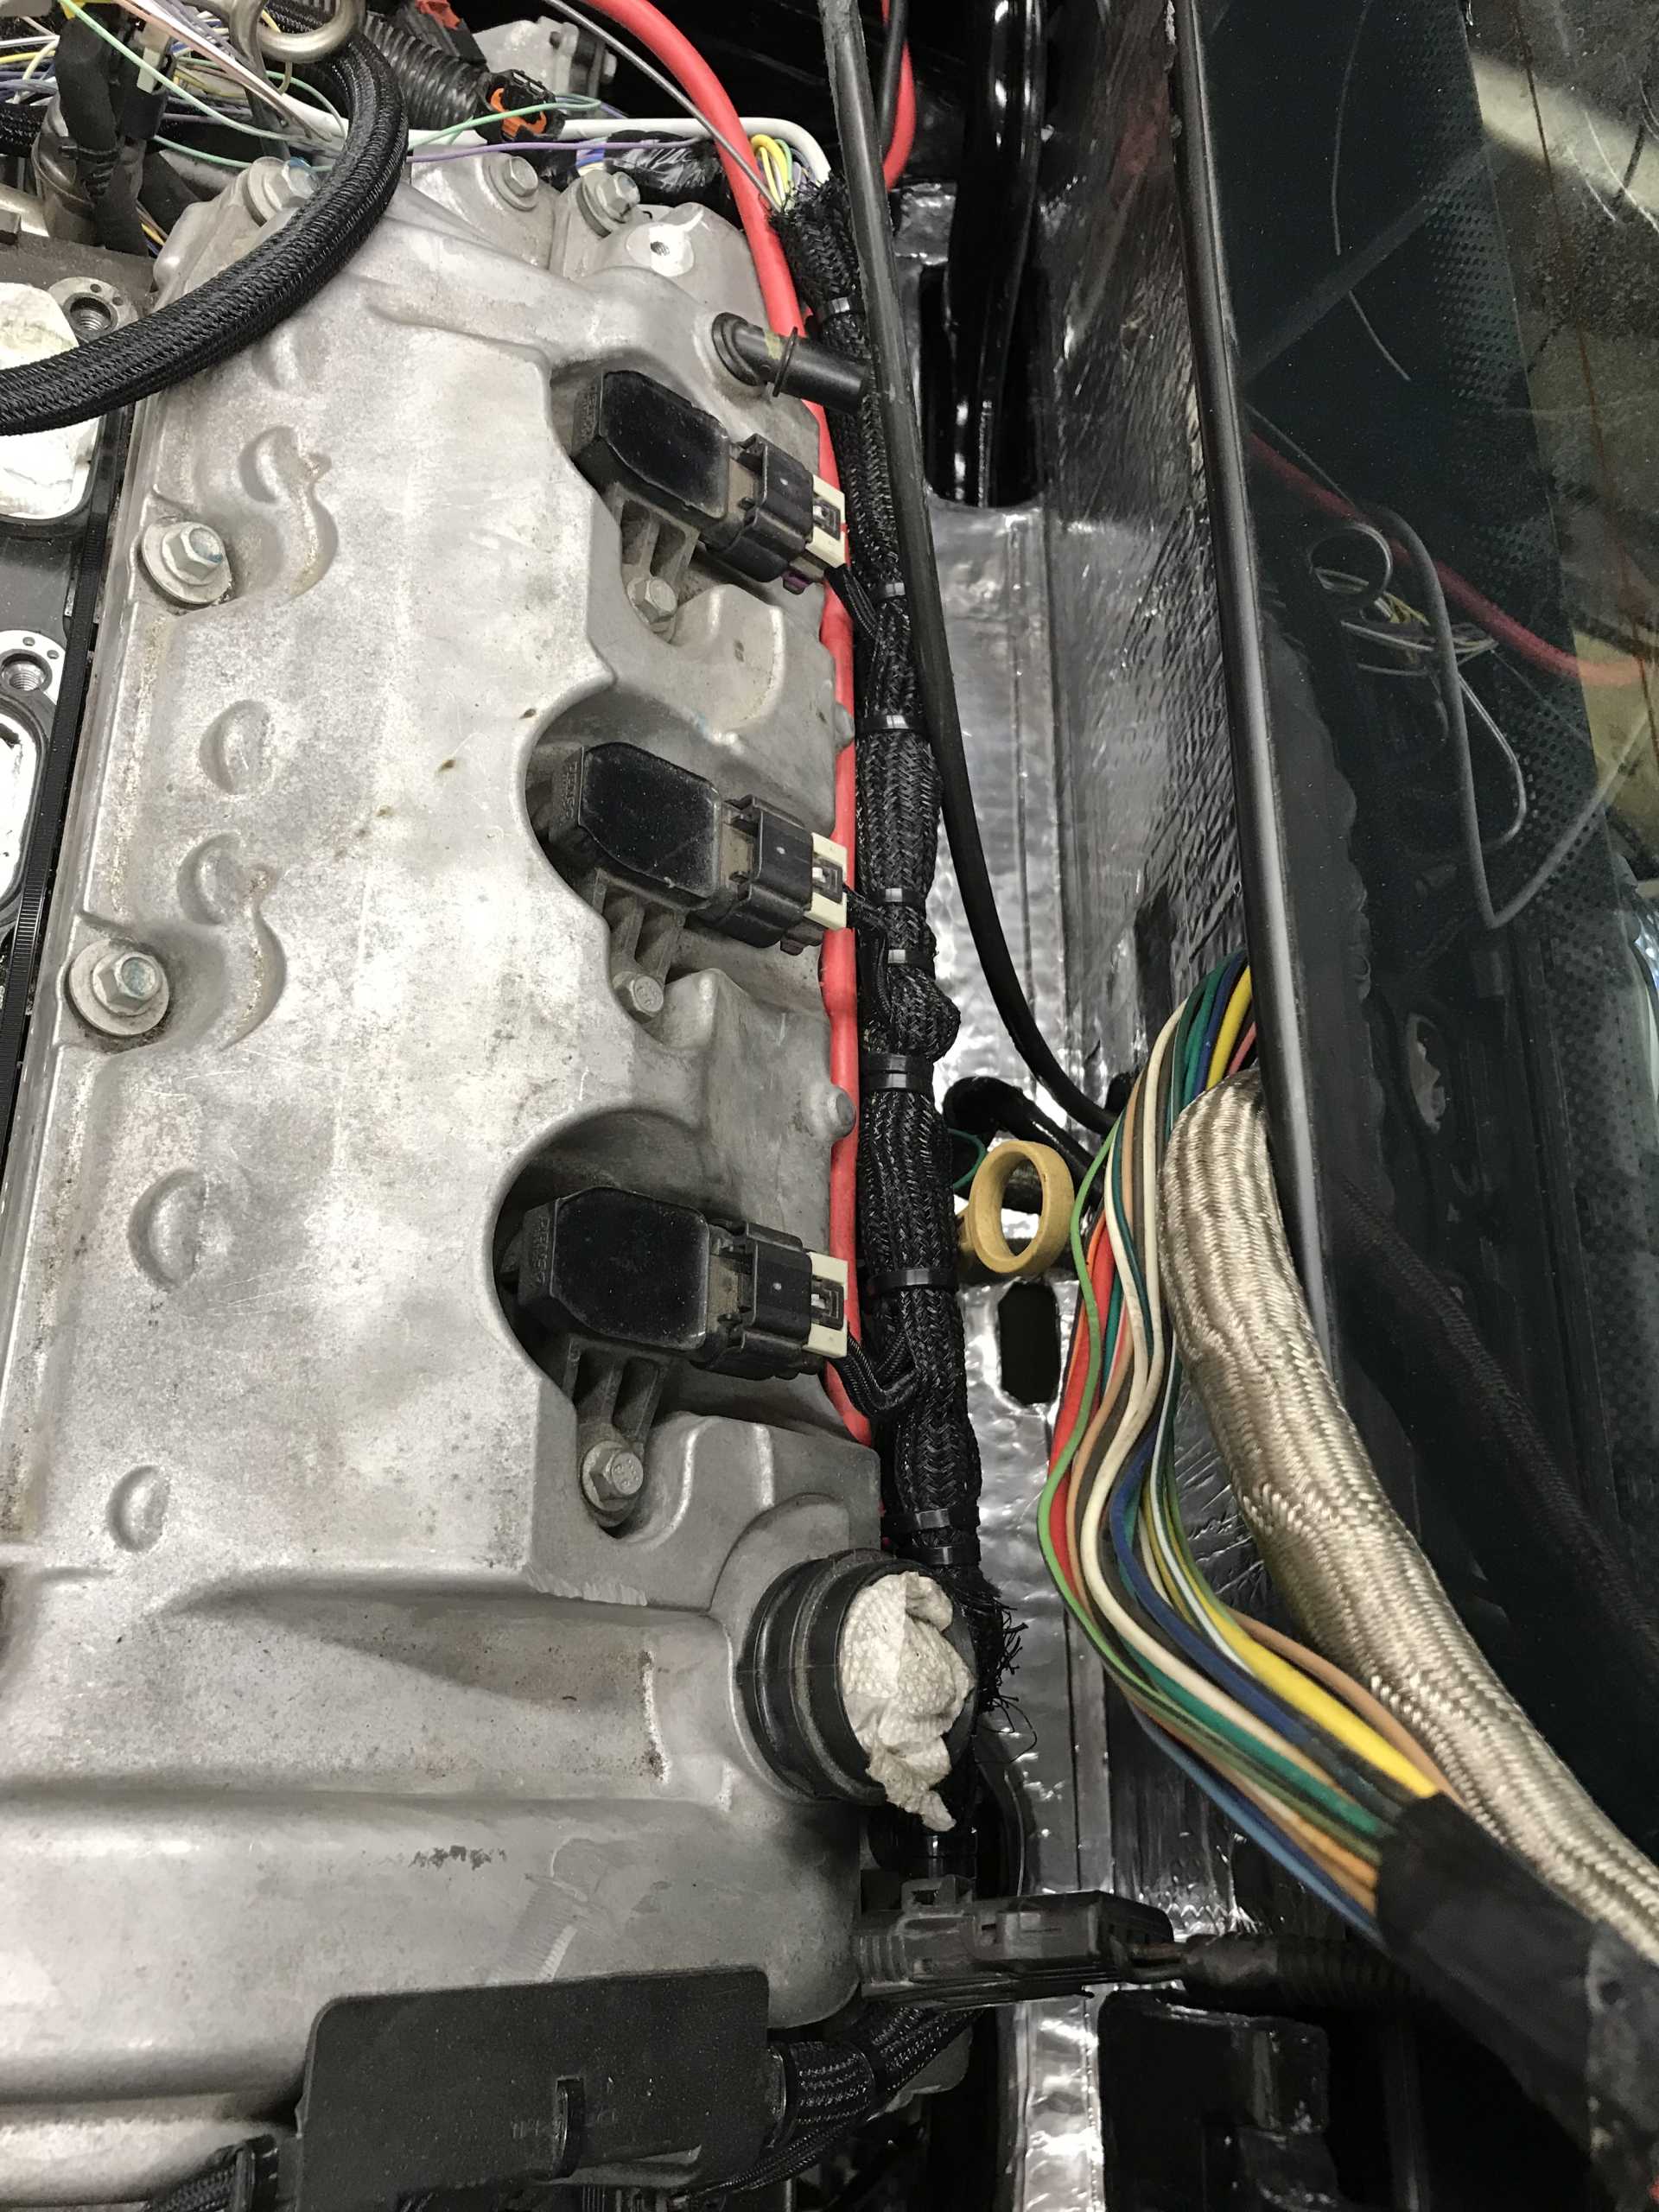
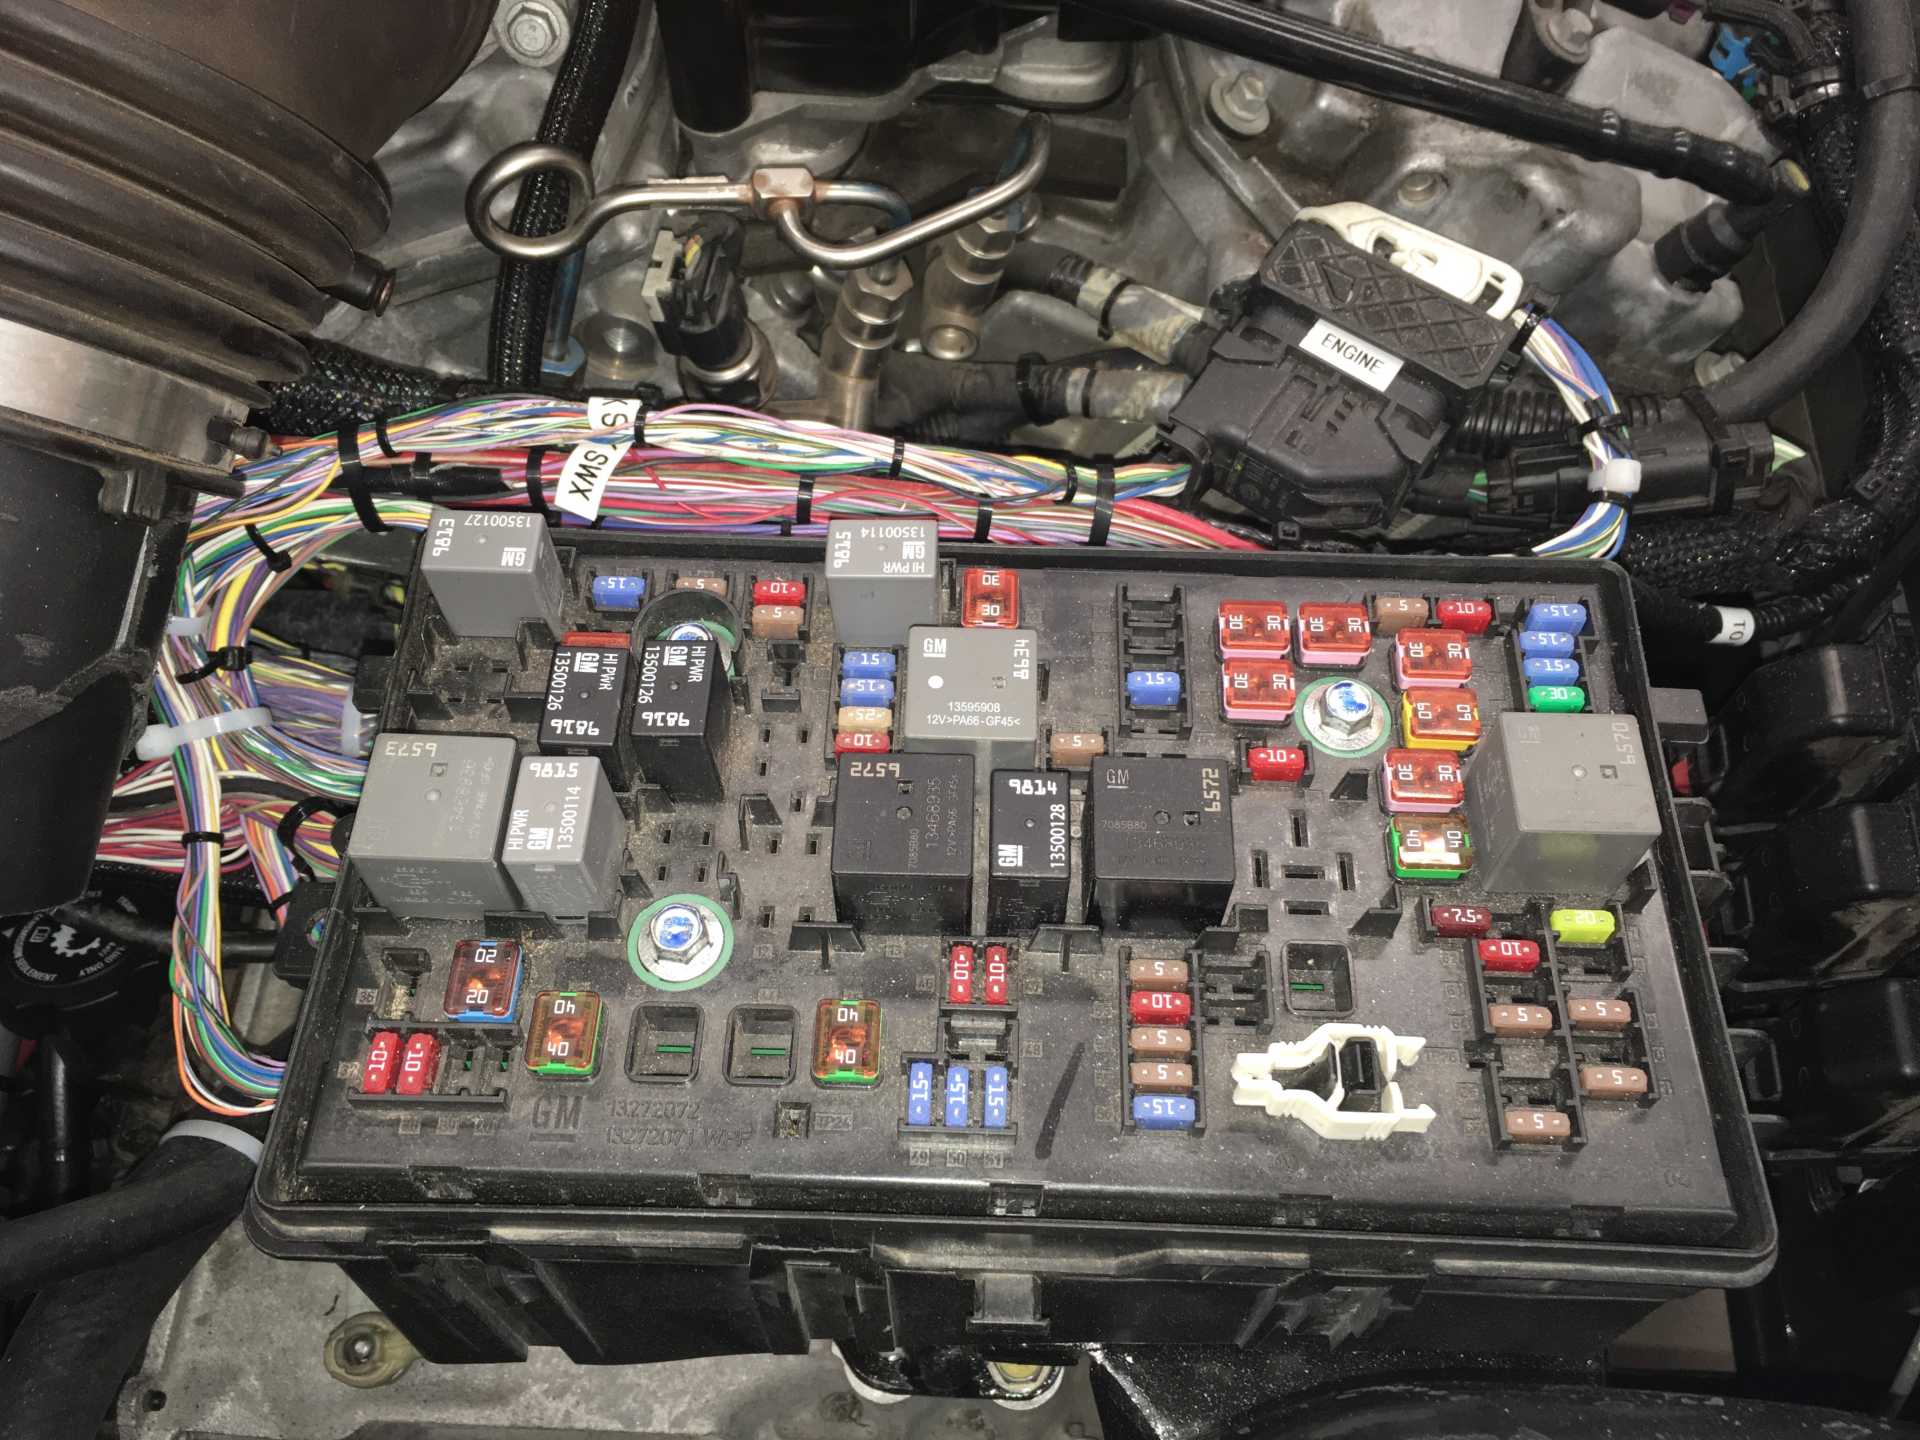
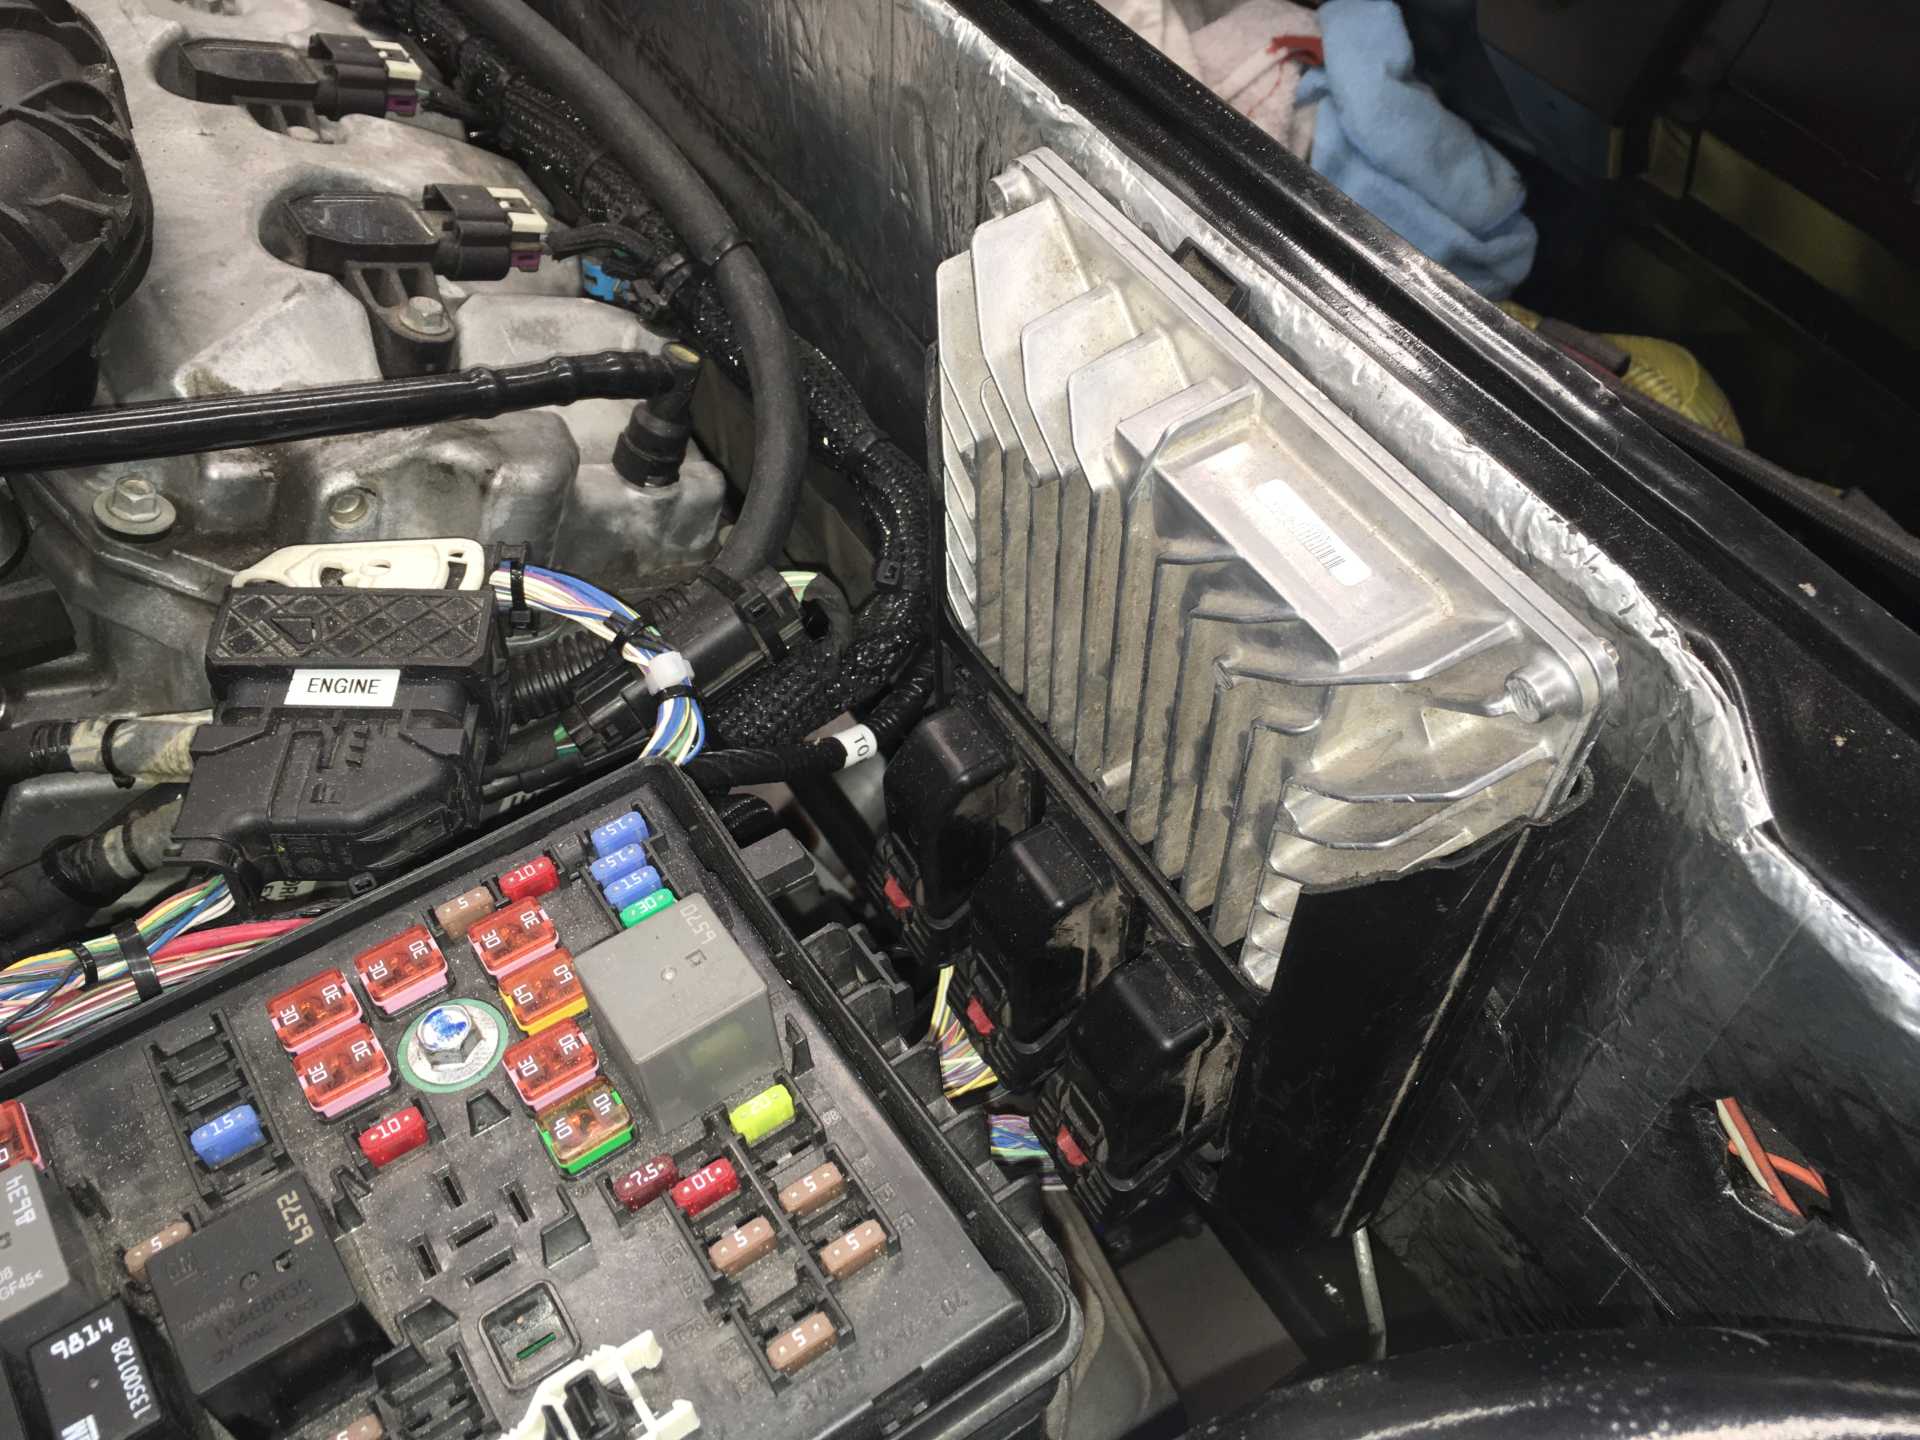
And then there is the wiring.So much wiring. I decided to toss the Impala harness in the trunk and figure out what to connect up to make it work and chop off stuff I didn't need. That turned out to be a long and difficult process that still isn't complete, I ended up unwrapping most of the harness to trace wires. The bottom line is to get the Mitchell1DIY access for your donor car for $30 for one year. You get complete schematic drawings, connector locations, pinouts and mechanical procedures that will save you weeks. Beats spending hundreds on the Helm books. Since my car is a 2018 I need certain modules that are VIN coded to make it work. I wanted the instruments and keyless entry to work so you need the following ECU (E39A), Body Control Module, Chassis Control Module, Serial Data Gateway, Keyless Entry Module, Brake switch, Press to start button and gas pedal; otherwise it won't work. I also wanted the instruments to work so include the IP. There is also battery current sensor and the fuse box (underhood) and keyless entry modules. There is also a special keyless entry coil in the center console. This talks to your "key" and lets the car start if the battery in the key is bad or the sensors are dead or disconnected. The fuse box also contains lots of relays for things you no longer have. I've re-purposed some of these to tie into the Fiero electrical system. This fuse box went over the top of the transmission. Also other minor but important stuff like the shift knob. The power to the fiero system now comes from the fuse box "Always Hot" through a fuse and ties into the wire from C500 (which is no longer in use) and the high speed fan relay (50 Amp) now is repurposed to provide the "Hot in Run" wire, also from C500. Under the dash the wires to the fuse box from the key are tied into the wires from the engine bay. The old transmission and steering interlocks are mo longer used. the key now does nothing.
So here is the semi-finished engine bay wiring. Cleaned up, not yet bundled and not fastened in place
The fuse box has lots of goodies that can be re-purposed. Big relay on left now provides Hot-in-Run power to Fiero Fuses
Hid the ECU on the trunk wall
After all that I turned on the new battery switch and tried to start it. The instrument panel lit up and said "Theft Deterrent"?? Turned out to be a loose connector to the Body Control Module. Next it wanted the brake to be pressed. So I cable tied the brake switch on. Pushed the start button and damned if it didn't start and run. Guess I'd better put in some coolant (water until I find all the leaks). After filling it and tightrning two loose hose clamps I started it again and let it idle for about 15 minutes; blipped the electronic gas pedal and that works too. Even shifted gears into forward and reverse. It's Alive!
Now that that is done the next job was to assemble the axles and mount the suspension The axles fit together easily. I dry fitted one to the suspension to check the position of t he tripod rollers. No problems, my measurements were good. Putting the suspension together is nothing special. Then the calipers went on and the brakes were bled. I'd mounted the accelerator on a bracket ready for wiring
I spent almost 2 days sorting the wires that stay in the engine bay and those that were to be routed thru the firewall cable openings. Then a day cleaning up the engine bay wiring. The passenger side now looks like a wiring scrap yard. But everything is there. Now some wires needed to be extended for the accelerator, Brake switch and push to start. There may be more but that's all I'm doing for now.
Once all that was done I installed a seat and pushed the button. It started, so I didn't break anything moving wires from the trunk to the passenger side. The shifter worked so it was time to take a preliminary drive. Nothing bad happened. It runs and idles, the throttle is very sensitive and there is LOTS of torque. After driving around the neighborhood I went to a nearby road closed at one end for construction and drove up and down it several times checking the shifting, both auto and manual. Worked like a champ. I did only a couple 3/4 throttle runs and will take some numbers after I check over everything.
Today's checks revealed no leaks or broken stuff. Found one loose bolt that is not used anymore. So we are good for now. I'll add a video of my next outing after I've dealt with some irritations. The gas pedal position needs to be lowered, The brakes need to be re-bled and the instruments need to be in front of me, not laying on the passenger floor. To date I've got about 600 hours time in this project.
[This message has been edited by MikesFirstFiero (edited 10-08-2021).]
Wow, thanks for all the information. You mentioned shifting the drive train to the left 3/4? The driver side is already ( if I remember correctly) the shorter of the two. Making it even shorter would concern me. Is it possible to just modify the strut tower and use a little longer shaft?
The shafts could probably be the same length if you cut the right shock tower. But that means coil-overs for sure. That's not in my budget for now. The axle difference from left to right came out to be 0.65". Shifting the engine over 0.325" would be easy. Remember I'm starting with Impala axles so those are longer and needed to be cut down. The Impala distance from tripod to tripod is longer than the Fiero distance so you need to work out whatever fits. You could take my numbers as a starting point and measure from there. I also replaced the hubs with Cavalier ones, that caused the axles to be shorter by .25" than if I had used the Fiero hubs. And all this is for the '88, It looks like the earlier cars would be a different game. You might want to look at the post again I just added more info and photos.
I've looked at this and it would possibly work. It looks like it would hit the shock tower though and need some type of pipe to bend it forward. I'll work on making the Impala part work for now since it's paid for but if that fails then one of the other IMs might work better. Thanks.
Mike I doubt if anyone here could have done a better LFX swap. Your fab work is incredible. How did you handle the powertrain management? I see that you used the stock PCM but the programming must have been a chore. Also doesn't that PCM need to interface with the instruments?
------------------ " THE BLACK PARALYZER" -87GT 3800SC Series III engine, custom ZZP /Frozen Boost Intercooler setup, 3.4" Pulley, Northstar TB, LS1 MAF, 3" Spintech/Hedman Exhaust, P-log Manifold, Autolite 104's, MSD wires, Custom CAI, 4T65eHD w. custom axles, Champion Radiator, S10 Brake Booster, HP Tuners VCM Suite. "THE COLUSSUS" 87GT - ALL OUT 3.4L Turbocharged engine, Garrett Hybrid Turbo, MSD ign., modified TH125H " ON THE LOOSE WITHOUT THE JUICE "