Pennock's Fiero Forum
  Technical Discussion & Questions
  Getrag transmission problem on low mileage Fiero GT (Page 3)

Post New Topic  Post A Reply
Email This Page to Someone! | Printable Version

This topic is 5 pages long:  1   2   3   4   5 
Previous Page | Next Page
next newest topic | next oldest topic
Getrag transmission problem on low mileage Fiero GT by Moar
Started on: 10-16-2015 05:54 AM
Replies: 162 (4828 views)
Last post by: Patrick on 04-09-2021 04:23 PM
hobbywrench
Member
Posts: 350
From: WA usa
Registered: Feb 2013


Feedback score: N/A
Leave feedback

Rate this member

Report this Post01-18-2016 11:39 AM Click Here to See the Profile for hobbywrenchSend a Private Message to hobbywrenchEdit/Delete MessageReply w/QuoteDirect Link to This Post
Re removal of blind bearing race above. The well heeled among us may seek a special bearing removal tool that (apparently) bites the ID of the race and includes removal screw. I removed mine with a 30 minute heat soak in the kitchen oven. Do not exceed 275F. The race will drop out
IP: Logged
hobbywrench
Member
Posts: 350
From: WA usa
Registered: Feb 2013


Feedback score: N/A
Leave feedback

Rate this member

Report this Post01-18-2016 11:47 AM Click Here to See the Profile for hobbywrenchSend a Private Message to hobbywrenchEdit/Delete MessageReply w/QuoteDirect Link to This Post

hobbywrench

350 posts
Member since Feb 2013
Moar. Although you have smoothed the shaft journal the pitted area is a hazard to the seal. I would try to make some careful measurements of that (abrasive) journal area vis a vis the seal lip seating area and avoid that area when positioning the seal. Seems like that is doable, no?
IP: Logged
Moar
Member
Posts: 150
From: Linz, Austria
Registered: Dec 2014


Feedback score: N/A
Leave feedback

Rate this member

Report this Post01-18-2016 02:47 PM Click Here to See the Profile for MoarSend a Private Message to MoarEdit/Delete MessageReply w/QuoteDirect Link to This Post
Hi,

thanks for all your replies!

Sent by Rodney:
 
quote
One popular way is to weld around the ID of the race and when it cools it shrinks slightly allowing it to be pried out.

I´ve also thought about the welding method but unfortunately too late (after I have removed the race).
However, I think with the welding method you also need a special tool (like a dent puller hammer) for pulling the race out of it´s seat.


Sent by hobbywrench:

 
quote
Moar. Although you have smoothed the shaft journal the pitted area is a hazard to the seal. I would try to make some careful measurements of that (abrasive) journal area vis a vis the seal lip seating area and avoid that area when positioning the seal. Seems like that is doable, no?


I guess due to wrong storage of the transmission (high humidity) a recurring
water film between shaft and seal caused the corrosion on the input shaft.

I don´t think that the input shaft seal rides EXACTLY on the same surface as before, because I have
mixed the bellhousings which results in slightly different tolerances (hopefully sufficient axial seal offset).
What you mean with seal positioning?
I thought this seal lies in a groove and so you cannot change it´s position?
It might be possible to shift the whole input bearing/seal assembly slightly in it´s seat.

In the meantime I have already put together my trans.
Now I´m hoping that the input shaft will not leak to much!
(I will use high viscosity oil for “improved sealing” )


BTW, IIRC is an internet / SMS abbreviation for “If I Recall Correctly”.
There is an abbreviation for almost everything out there!
I also don´t like too many and complicated abbreviations.

[This message has been edited by Moar (edited 01-18-2016).]

IP: Logged
Moar
Member
Posts: 150
From: Linz, Austria
Registered: Dec 2014


Feedback score: N/A
Leave feedback

Rate this member

Report this Post01-18-2016 03:11 PM Click Here to See the Profile for MoarSend a Private Message to MoarEdit/Delete MessageReply w/QuoteDirect Link to This Post

Moar

150 posts
Member since Dec 2014
Tom, you wanna know a NOS source of original Getrag 282 diff shims?
I have spent weeks of research for finding NOS shims.
There are quite a few online stores which are caliming that they have these shims stocked (like Gmpartsgiant, etc.).
However, when you place an order there then they cannot ship them!


Now the valuable tip for Fiero drivers:

Get these shims at FinditParts.com for a reasonable price ($26.-)!
(some GM 8672904 and 8672905 shim kits are still in stock)

Another source is WhiteRacingProducts:
http://www.whiteracingprodu...&products_id=1221219
http://www.whiteracingprodu...&products_id=1221220
(still 4 shim kits in stock)

Shim kit #1 ( # 8672903) is already out of stock everywhere!
I have ordered kit # 8672904. (you can grind some shims in case they are too thick for you)

[This message has been edited by Moar (edited 01-18-2016).]

IP: Logged
Rodney
Member
Posts: 4715
From: Caledonia, WI USA
Registered: Feb 2000


Feedback score: (4)
Leave feedback


Total ratings: 267
Rate this member

Report this Post01-18-2016 04:34 PM Click Here to See the Profile for RodneyClick Here to visit Rodney's HomePageSend a Private Message to RodneyEdit/Delete MessageReply w/QuoteDirect Link to This Post
 
quote
Originally posted by Moar:

Hi,

thanks for all your replies!

Sent by Rodney:

However, I think with the welding method you also need a special tool (like a dent puller hammer) for pulling the race out of it´s seat.


I can't seem to make it quote the welding thing. I don't think you still need a puller. When you weld something it heats it up and expands and when cool shrinks. Since it can not expand it only shrinks as it cools. I've never done it, someone told me this trick. Certainly use a TIG weld. It may not fall out or maybe it will but it should not be a problem to get it out.

------------------
Rodney Dickman

Fiero Parts And Acc's Web Page:
All new web page!:www.rodneydickman.com
Rodney Dickman's Fiero accessories
7604 Treeview Drive
Caledonia, WI 53108
Phone/Fax (262) 835-9575

IP: Logged
Rodney
Member
Posts: 4715
From: Caledonia, WI USA
Registered: Feb 2000


Feedback score: (4)
Leave feedback


Total ratings: 267
Rate this member

Report this Post01-18-2016 04:41 PM Click Here to See the Profile for RodneyClick Here to visit Rodney's HomePageSend a Private Message to RodneyEdit/Delete MessageReply w/QuoteDirect Link to This Post

Rodney

4715 posts
Member since Feb 2000
 
quote
Originally posted by Moar:

Tom, you wanna know a NOS source of original Getrag 282 diff shims?


What you generally would want is a selection of shims. Thin to thick. You add (stack up) as many as needed to get the correct crush (turning resistance). I have a selection of these shims here I bought when I used to offer a Getrag rebuilding service from a local trans rebuilder in Milwaukee. I used to know what year and trans the Dodge shim kit was. I can't find that in my saved notes on the Getrags. I have wondered if I could put a Getrag shim kit together. A multitude of thicknesses. Precision shims are somewhat expensive. If I sold a shim kit I would probably need to make each kit very generous and then let the customer return what they did not use.

------------------
Rodney Dickman

Fiero Parts And Acc's Web Page:
All new web page!:www.rodneydickman.com
Rodney Dickman's Fiero accessories
7604 Treeview Drive
Caledonia, WI 53108
Phone/Fax (262) 835-9575

IP: Logged
Moar
Member
Posts: 150
From: Linz, Austria
Registered: Dec 2014


Feedback score: N/A
Leave feedback

Rate this member

Report this Post01-18-2016 05:00 PM Click Here to See the Profile for MoarSend a Private Message to MoarEdit/Delete MessageReply w/QuoteDirect Link to This Post
You and your trans rebuilder have used diff shims from a Dodge?
It´s a pity that you can´t remember about any details.

Was it a Dodge Stratus?
Maybe sardonyx247 knows more about these Stratus shims...
IP: Logged
Rodney
Member
Posts: 4715
From: Caledonia, WI USA
Registered: Feb 2000


Feedback score: (4)
Leave feedback


Total ratings: 267
Rate this member

Report this Post01-18-2016 07:56 PM Click Here to See the Profile for RodneyClick Here to visit Rodney's HomePageSend a Private Message to RodneyEdit/Delete MessageReply w/QuoteDirect Link to This Post
I used to work for a large German company and we assembled many gear boxes and stuff. We stocked large amounts of different size and thickness shims. We bought in such bulk they we cheap and they sold them to me at their cost. Was many, many years ago.

------------------
Rodney Dickman

Fiero Parts And Acc's Web Page:
All new web page!:www.rodneydickman.com
Rodney Dickman's Fiero accessories
7604 Treeview Drive
Caledonia, WI 53108
Phone/Fax (262) 835-9575

IP: Logged
sardonyx247
Member
Posts: 5032
From: Nevada, USA
Registered: Jun 2003


Feedback score:    (88)
Leave feedback


Total ratings: 218
Rate this member

Report this Post01-18-2016 11:17 PM Click Here to See the Profile for sardonyx247Click Here to visit sardonyx247's HomePageSend a Private Message to sardonyx247Edit/Delete MessageReply w/QuoteDirect Link to This Post
It was either an 92 or 94 or a 02 or 04
I know vauge, but it did show up in the parts break down.
There is also alot on ebay under "getrag shims" If you can get a diameter, I can compare to the ones I have.
IP: Logged
sardonyx247
Member
Posts: 5032
From: Nevada, USA
Registered: Jun 2003


Feedback score:    (88)
Leave feedback


Total ratings: 218
Rate this member

Report this Post01-18-2016 11:20 PM Click Here to See the Profile for sardonyx247Click Here to visit sardonyx247's HomePageSend a Private Message to sardonyx247Edit/Delete MessageReply w/QuoteDirect Link to This Post

sardonyx247

5032 posts
Member since Jun 2003
 
quote
Originally posted by Rodney:


I have wondered if I could put a Getrag shim kit together. A multitude of thicknesses. Precision shims are somewhat expensive. If I sold a shim kit I would probably need to make each kit very generous and then let the customer return what they did not use.


Just sell one at a time, have them measure the thickness first, then just order one. It will keep more shims selection in stock for you/fiero owners, and people really don't need a whole kit but just one.
IP: Logged
hobbywrench
Member
Posts: 350
From: WA usa
Registered: Feb 2013


Feedback score: N/A
Leave feedback

Rate this member

Report this Post01-18-2016 11:42 PM Click Here to See the Profile for hobbywrenchSend a Private Message to hobbywrenchEdit/Delete MessageReply w/QuoteDirect Link to This Post
The bearing seating area measured: OD 2.360", ID 2.063" , calipers. Very little comes up on Dodge transaxle all live axles. There are several shim kits available at reduced prices , but they are larger than these dimensions and fit solid (3rd member) axles. This thread is getting better and better. I am waiting for MOAR to do his synchro rings.

[This message has been edited by hobbywrench (edited 01-19-2016).]

IP: Logged
PFF
System Bot
Moar
Member
Posts: 150
From: Linz, Austria
Registered: Dec 2014


Feedback score: N/A
Leave feedback

Rate this member

Report this Post01-19-2016 02:36 PM Click Here to See the Profile for MoarSend a Private Message to MoarEdit/Delete MessageReply w/QuoteDirect Link to This Post
Hopefully, I never need to replace these synchro rings.
The whole gear cluster needs to be removed for this and almost everything needs to be disassembled.

Hobbywrench has already done this and I think it was not funny...
IP: Logged
Moar
Member
Posts: 150
From: Linz, Austria
Registered: Dec 2014


Feedback score: N/A
Leave feedback

Rate this member

Report this Post01-19-2016 03:35 PM Click Here to See the Profile for MoarSend a Private Message to MoarEdit/Delete MessageReply w/QuoteDirect Link to This Post

Moar

150 posts
Member since Dec 2014
Preparing the ´88 bellhousing (which I will use for the ´86 unit) for final assembling

Installation of the missing oil splash shield:


As you may have already recognized the casting quality of the ´88 bellhousing is quite bad:


At the first glance you may think that there are hundreds of cracks in the casting, but fortunately there are no cracks!

Do you see any cracks now?
(casting errors removed with grinding tools)


Finally my ´88 bellhousing does not look like **** anymore!
(I think the grinding work should be also advantageous for stress distribution)

Shift shaft seal replacement:

It was a pain to remove this collar form the shift shaft with this fu*king cheap China puller which I bought in Germany*:


*) Quite a lot of Germany tools are just rebranded China tools (KRAFT, Mauk, etc.)

[This message has been edited by Moar (edited 03-22-2016).]

IP: Logged
Moar
Member
Posts: 150
From: Linz, Austria
Registered: Dec 2014


Feedback score: N/A
Leave feedback

Rate this member

Report this Post01-19-2016 03:52 PM Click Here to See the Profile for MoarSend a Private Message to MoarEdit/Delete MessageReply w/QuoteDirect Link to This Post

Moar

150 posts
Member since Dec 2014
Assembling of the ´86 trans with the ´88 bellhousing:

After applying transmission RTV (Alpha Gray from Cobratrans for about $3.-):


IP: Logged
Moar
Member
Posts: 150
From: Linz, Austria
Registered: Dec 2014


Feedback score: N/A
Leave feedback

Rate this member

Report this Post01-19-2016 04:14 PM Click Here to See the Profile for MoarSend a Private Message to MoarEdit/Delete MessageReply w/QuoteDirect Link to This Post

Moar

150 posts
Member since Dec 2014
As the ´86 unit is already finished (besides the paint) I have continued the work on the ´88 unit.

Differential bearing cone replacement with another weak China puller:

Bearing cage removal...


Grooving cone for facilitated removal...


Heating...


And pulling...
(China puller supported in a vice)


A China puller can remove at maximum two cones then you can throw it away!

Pressing on new cones with a strong vice...


FYI:
For reducing press-fit interference I stored the differential in a freezer and the two cones I putted in the kitchen oven together with a Pizza.

[This message has been edited by Moar (edited 03-22-2016).]

IP: Logged
Gall757
Member
Posts: 10938
From: Holland, MI
Registered: Jun 2010


Feedback score: N/A
Leave feedback


Total ratings: 90
Rate this member

Report this Post01-19-2016 04:28 PM Click Here to See the Profile for Gall757Send a Private Message to Gall757Edit/Delete MessageReply w/QuoteDirect Link to This Post
These are really good photos....a great addition to PFF, Thank you. I hope we don't loose them over time.
IP: Logged
hobbywrench
Member
Posts: 350
From: WA usa
Registered: Feb 2013


Feedback score: N/A
Leave feedback

Rate this member

Report this Post01-19-2016 07:19 PM Click Here to See the Profile for hobbywrenchSend a Private Message to hobbywrenchEdit/Delete MessageReply w/QuoteDirect Link to This Post
Moar, Great work and pictures. That "crazing" or whatever it can be called is widespread in aluminum castings I think. I took my riding lawnmower engine apart and found the same condition on the inside of the oil pan. It's hard not to see it as a defect, but the pan casting has been good for years now. Nevertheless, I wish we all had easy access to metal services such as magnaflux and dye penetrant (for aluminum). It would not hurt at all to routinely batch the used parts and have them inspected (for cracks). The magnaflux service is cheap. The penetrant (Zyglo) not so cheap and yet you can get home hobbyist kits for ? $50. Most of latter use a "black lite" which can also be obtained fairly cheaply, I think. I have a suitable black light flashlite which is used to inspect the rug for cat pee. I am awarding you a special prize in form of my 10 year old writeup on the synchro ring installation. With that in hand you will never need to replace them (superstitious). Coming in mail
IP: Logged
sardonyx247
Member
Posts: 5032
From: Nevada, USA
Registered: Jun 2003


Feedback score:    (88)
Leave feedback


Total ratings: 218
Rate this member

Report this Post01-24-2016 01:24 AM Click Here to See the Profile for sardonyx247Click Here to visit sardonyx247's HomePageSend a Private Message to sardonyx247Edit/Delete MessageReply w/QuoteDirect Link to This Post
OK it is a 1998 Dodge Stratus, for the diff shims.
IP: Logged
Moar
Member
Posts: 150
From: Linz, Austria
Registered: Dec 2014


Feedback score: N/A
Leave feedback

Rate this member

Report this Post01-24-2016 03:23 AM Click Here to See the Profile for MoarSend a Private Message to MoarEdit/Delete MessageReply w/QuoteDirect Link to This Post
sardonyx247, thank you very much for this valuable information.

But do you also know the transmission type?
I would assume the New Venture (Getrag) NV-T350 / F5MC1, right?

NV-T350 manual:
ftp://oskin.ru/pub/chrysler-dodge/manuals/Service Manuals/Transaxle_NV_T350/Трансмиссия_NV_T350.pdf

Obviously the NV-T350 is very similar to the Getrag MG-282!

[This message has been edited by Moar (edited 01-24-2016).]

IP: Logged
hobbywrench
Member
Posts: 350
From: WA usa
Registered: Feb 2013


Feedback score: N/A
Leave feedback

Rate this member

Report this Post02-04-2016 02:44 PM Click Here to See the Profile for hobbywrenchSend a Private Message to hobbywrenchEdit/Delete MessageReply w/QuoteDirect Link to This Post
Taking sardonyx clue and some searching I found a site with Stratus diff shims. factorychryslerparts.com shows a series of pn 05222345 and up , 24 sizes starting .5 mm out to 1.46 mm, with pricing from $2 up. Located at a GA dealer. Moar may have already found this source. Hope this is accurate for the Getrag 282. Someone let us know if good.
IP: Logged
Moar
Member
Posts: 150
From: Linz, Austria
Registered: Dec 2014


Feedback score: N/A
Leave feedback

Rate this member

Report this Post02-05-2016 12:57 AM Click Here to See the Profile for MoarSend a Private Message to MoarEdit/Delete MessageReply w/QuoteDirect Link to This Post
These Stratus differential shims PN # 05222345 should fit: ID: 55.0 mm / OD: 61.5 mm
However, I can´t find them for only $2. (did you mean $20.-)

Furthermore, the same differential bearing races are used for 95-97 Dodge Stratus differentials.

[This message has been edited by Moar (edited 02-05-2016).]

IP: Logged
PFF
System Bot
hobbywrench
Member
Posts: 350
From: WA usa
Registered: Feb 2013


Feedback score: N/A
Leave feedback

Rate this member

Report this Post02-05-2016 11:29 AM Click Here to See the Profile for hobbywrenchSend a Private Message to hobbywrenchEdit/Delete MessageReply w/QuoteDirect Link to This Post
Go to the site and see what I see. The prices jump all around from $1.81 to $24 each. Priced to encourage shim "paks" of cheaper thicknesses rather than one thick shim, or perhaps market demand for making up shim paks ? I guess what we really need is to test the availability . Last time Moar found a source GM could not ship the product which is discontinued. This source does have an 8xx tel number. Maybe Rodney can explain the crazy pricing.

Edit, Yes Moar, the Stratus tip is how I found the Chrysler site.

[This message has been edited by hobbywrench (edited 02-05-2016).]

IP: Logged
sardonyx247
Member
Posts: 5032
From: Nevada, USA
Registered: Jun 2003


Feedback score:    (88)
Leave feedback


Total ratings: 218
Rate this member

Report this Post02-06-2016 03:54 AM Click Here to See the Profile for sardonyx247Click Here to visit sardonyx247's HomePageSend a Private Message to sardonyx247Edit/Delete MessageReply w/QuoteDirect Link to This Post
I just went to a dodge dealer, I think it was around $20, but you only need one.

Edit to add: measure your size and buy just the one you need, a whole kit is a huge waste of money.
I have a few myself form all the getrags I have taken apart, but I didn't have the one I needed when I upgraded my diff.

[This message has been edited by sardonyx247 (edited 02-06-2016).]

IP: Logged
Moar
Member
Posts: 150
From: Linz, Austria
Registered: Dec 2014


Feedback score: N/A
Leave feedback

Rate this member

Report this Post02-06-2016 04:23 AM Click Here to See the Profile for MoarSend a Private Message to MoarEdit/Delete MessageReply w/QuoteDirect Link to This Post
Stratus shims (# 05222345): ID: 55.0 mm / OD: 61.5 mm
MG-282 shims (GM # 8672903/4/5): ID: 52.5 mm / OD: 62.1 mm

The Stratus shims are slightly different in diameter, but I think we can use them without any problems.
(shim thickness can be adapted by using a small belt grinder tool)
IP: Logged
sardonyx247
Member
Posts: 5032
From: Nevada, USA
Registered: Jun 2003


Feedback score:    (88)
Leave feedback


Total ratings: 218
Rate this member

Report this Post02-06-2016 05:00 AM Click Here to See the Profile for sardonyx247Click Here to visit sardonyx247's HomePageSend a Private Message to sardonyx247Edit/Delete MessageReply w/QuoteDirect Link to This Post
I am pretty sure I used the model/year I provided above with no mod.
As that is what I remember finding IIRC and it is in my GT now.

[This message has been edited by sardonyx247 (edited 02-06-2016).]

IP: Logged
Moar
Member
Posts: 150
From: Linz, Austria
Registered: Dec 2014


Feedback score: N/A
Leave feedback

Rate this member

Report this Post02-06-2016 05:26 AM Click Here to See the Profile for MoarSend a Private Message to MoarEdit/Delete MessageReply w/QuoteDirect Link to This Post
Thanks for this valuable information sardonyx247.

I´m sure this will help others with their transmission rebuilds in future when
all original Getrag MG-282 shims are completely out of stock everywhere.
IP: Logged
Moar
Member
Posts: 150
From: Linz, Austria
Registered: Dec 2014


Feedback score: N/A
Leave feedback

Rate this member

Report this Post02-07-2016 02:15 PM Click Here to See the Profile for MoarSend a Private Message to MoarEdit/Delete MessageReply w/QuoteDirect Link to This Post
Axle stabilizer bearings

This weekend I have installed axle stabilizer bearings.

One of these stabilizer bearing came with a wrong axle shaft seal (with brass bearing shell).
I prefer OEM axle seals and removed the smaller seal from the stabilizer bearing:


My dad turned the stabilizer bearing (left one on the picture) in a lathe in order to increase the seal OD to 55.00 mm:


The stabilizer bearing on the left-hand side is the cheap one without oil groove and with excessive bearing clearance.
I have measured a relative clearance of 3.5 per mil which is 3.5 times more as the other bearing clearance of the other one!

Next I test fitted the higher quality stabilizer bearing (with oil groove) and have recognized that the position of
oil grooves was very unfavorable when the oil supply hole (marked in black) was aligned with the bearings oil bore.
Oil grooves were exactly placed on the high loaded zone (marked in green)!


In order to fix this I have drilled another oil supply hole between the two oil grooves which will improve oil flow trough the bearing and will place the grooves in a moderate stressed area:


After all this I started with the installation of the stabilizer bearings.

I decided to place the higher quality bearing on the bellhousing side, because on this side the longer driveshaft will be placed (which may generate higher radial forces):


On the other side I installed the brass stabilizer bearing:


You need extreme force to press these stabilizer bearing into the transmission case.
For me it was almost impossible with a small 1 kg hammer (biggest one I have found).
I´m recommending a hammer which weighs at least 1.5 kg or a hydraulic press.

However, after 1 hour hammering the job was done with a small 1 kg hammer.
(disadvantage: Your neighbors will get very angry )

[This message has been edited by Moar (edited 02-07-2016).]

IP: Logged
hobbywrench
Member
Posts: 350
From: WA usa
Registered: Feb 2013


Feedback score: N/A
Leave feedback

Rate this member

Report this Post02-07-2016 03:33 PM Click Here to See the Profile for hobbywrenchSend a Private Message to hobbywrenchEdit/Delete MessageReply w/QuoteDirect Link to This Post
Moar, Very trick, slick.....I found another site archive with extensive discussion on the Getrag 282 assembly by two racers... It also referred to an archived Getrag thread in this forum. In that thread members were very happy with the pictures which apparently went through the shaft disassembly and assembly. But the pictures cannot be viewed. Ogre says the site has probably not been maintained. I emailed the site, West Coast Fiero , using the author's name, asking if we could obtain the pictures in any format. So far no response.

[This message has been edited by hobbywrench (edited 02-07-2016).]

IP: Logged
Moar
Member
Posts: 150
From: Linz, Austria
Registered: Dec 2014


Feedback score: N/A
Leave feedback

Rate this member

Report this Post02-08-2016 03:10 PM Click Here to See the Profile for MoarSend a Private Message to MoarEdit/Delete MessageReply w/QuoteDirect Link to This Post
You´re referring to the following thread, right?
DOHC: 1, Isuzu: 0 -- Getrag swap!

Sounds interesting. I´ll check it out soon.

IP: Logged
Moar
Member
Posts: 150
From: Linz, Austria
Registered: Dec 2014


Feedback score: N/A
Leave feedback

Rate this member

Report this Post02-08-2016 04:00 PM Click Here to See the Profile for MoarSend a Private Message to MoarEdit/Delete MessageReply w/QuoteDirect Link to This Post

Moar

150 posts
Member since Dec 2014
New problem - LSD and Fiero axle shafts

In the meantime I´ve figured out that I have a problem with the driveshafts.
They don´t fit into the new LSD!

The OEM differential has deeper spline bores (about 6.7 mm deeper).
The spline bores in the LSD cannot be as deep as on a non-LSD, because in
the center of the differential are two tick steel plates with springs between (LS-unit).
If I insert an original Fiero driveshaft it stops at the white tape, but it should stop at the stepped diameter:


I gotta fix this!
It is important that the drive shaft is placed deep enough in the diff, otherwise stabilizer bearings cannot fulfill their purpose.
(the bigger OD of the driveshaft cannot reach the stabilizer bearing)

I must cut off the front section of the spline where the original C-clip is placed (this will shorten the shaft 7.0 mm).
Then the stabilizer bearings can do their job.

But cutting the C-clip section off will cause another problem.
Without C-clips my driveshafts cannot be hold in position anymore (they will move inside the diff while driving), which is not good!

Maybe I can turn my own C-clip groove into the shaft somewhere on the other side of the spline (angle grinder?).
Between the side gear (bevel gear) and the differential carrier there is already a groove which I could use for axial fastening the driveshaft.

[This message has been edited by Moar (edited 02-08-2016).]

IP: Logged
Gall757
Member
Posts: 10938
From: Holland, MI
Registered: Jun 2010


Feedback score: N/A
Leave feedback


Total ratings: 90
Rate this member

Report this Post02-08-2016 05:49 PM Click Here to See the Profile for Gall757Send a Private Message to Gall757Edit/Delete MessageReply w/QuoteDirect Link to This Post
I have never read about someone needing to cut axles to make a LSD work. Where did yours come from?
IP: Logged
PFF
System Bot
hobbywrench
Member
Posts: 350
From: WA usa
Registered: Feb 2013


Feedback score: N/A
Leave feedback

Rate this member

Report this Post02-08-2016 07:31 PM Click Here to See the Profile for hobbywrenchSend a Private Message to hobbywrenchEdit/Delete MessageReply w/QuoteDirect Link to This Post
Moar, yes , that thread, 6pp

If you decide to put in a new circlip groove, please have your father do it on a lathe with an auxiliary grinder attachment using a "formed" wheel. I know you are skilled, but no room here for hand guided. lol
IP: Logged
Raydar
Member
Posts: 40685
From: Carrollton GA. Out in the... country.
Registered: Oct 1999


Feedback score:    (13)
Leave feedback


Total ratings: 460
Rate this member

Report this Post02-08-2016 08:00 PM Click Here to See the Profile for RaydarSend a Private Message to RaydarEdit/Delete MessageReply w/QuoteDirect Link to This Post
 
quote
Originally posted by Gall757:

I have never read about someone needing to cut axles to make a LSD work.
...


I haven't either.

I have the Engineered Performance LSD in my Getrag. Stock axles work just fine, with no modifications.
IP: Logged
Moar
Member
Posts: 150
From: Linz, Austria
Registered: Dec 2014


Feedback score: N/A
Leave feedback

Rate this member

Report this Post02-09-2016 01:02 AM Click Here to See the Profile for MoarSend a Private Message to MoarEdit/Delete MessageReply w/QuoteDirect Link to This Post
Check out my post on page 2 (01-01-2016 05:36 PM).

There you can see detailed pictures of my LSD.
I have absolutely no clue which LSD this!

Maybe someone can find it out with my pictures.

IP: Logged
sardonyx247
Member
Posts: 5032
From: Nevada, USA
Registered: Jun 2003


Feedback score:    (88)
Leave feedback


Total ratings: 218
Rate this member

Report this Post02-09-2016 03:16 AM Click Here to See the Profile for sardonyx247Click Here to visit sardonyx247's HomePageSend a Private Message to sardonyx247Edit/Delete MessageReply w/QuoteDirect Link to This Post
I have some pics of stock Getrag 282 shims

The outer part where the shim sits inside, not much use for the shims but could be.


I.D.


O.D.


Where it sits.
IP: Logged
Moar
Member
Posts: 150
From: Linz, Austria
Registered: Dec 2014


Feedback score: N/A
Leave feedback

Rate this member

Report this Post02-09-2016 05:24 AM Click Here to See the Profile for MoarSend a Private Message to MoarEdit/Delete MessageReply w/QuoteDirect Link to This Post
Yes, these dimension are right and are identical with the shims which I have ordered:
GM # 8672903/4/5: ID: 52.5 mm / OD: 62.1 mm
IP: Logged
Moar
Member
Posts: 150
From: Linz, Austria
Registered: Dec 2014


Feedback score: N/A
Leave feedback

Rate this member

Report this Post02-22-2016 06:18 AM Click Here to See the Profile for MoarSend a Private Message to MoarEdit/Delete MessageReply w/QuoteDirect Link to This Post
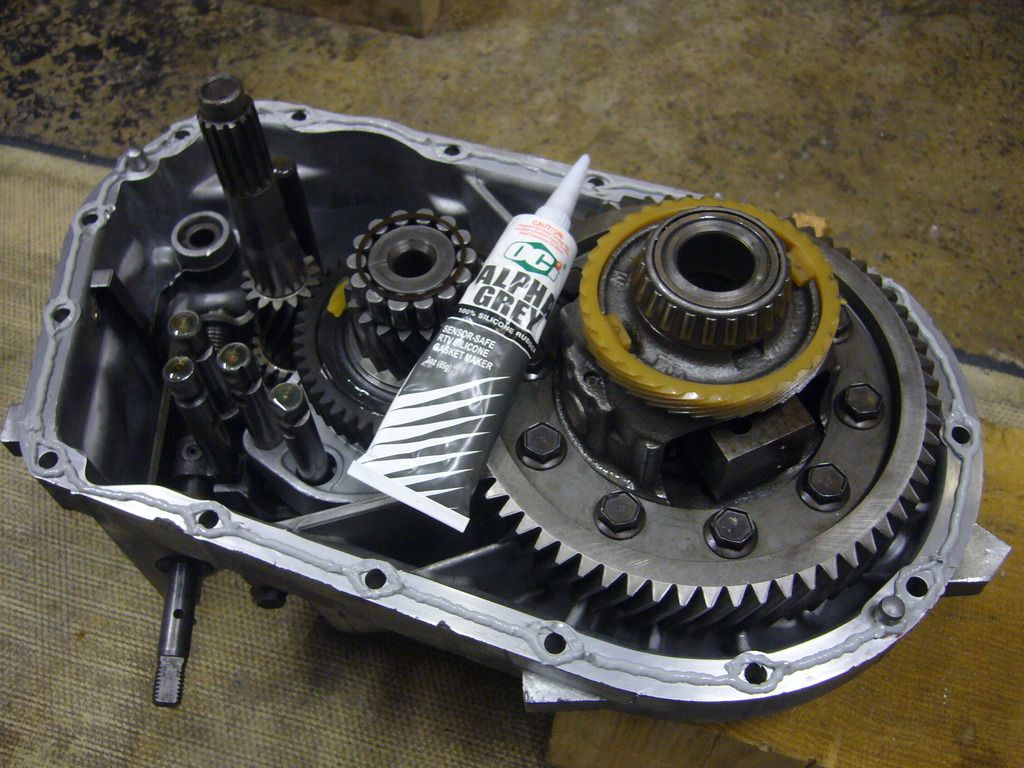
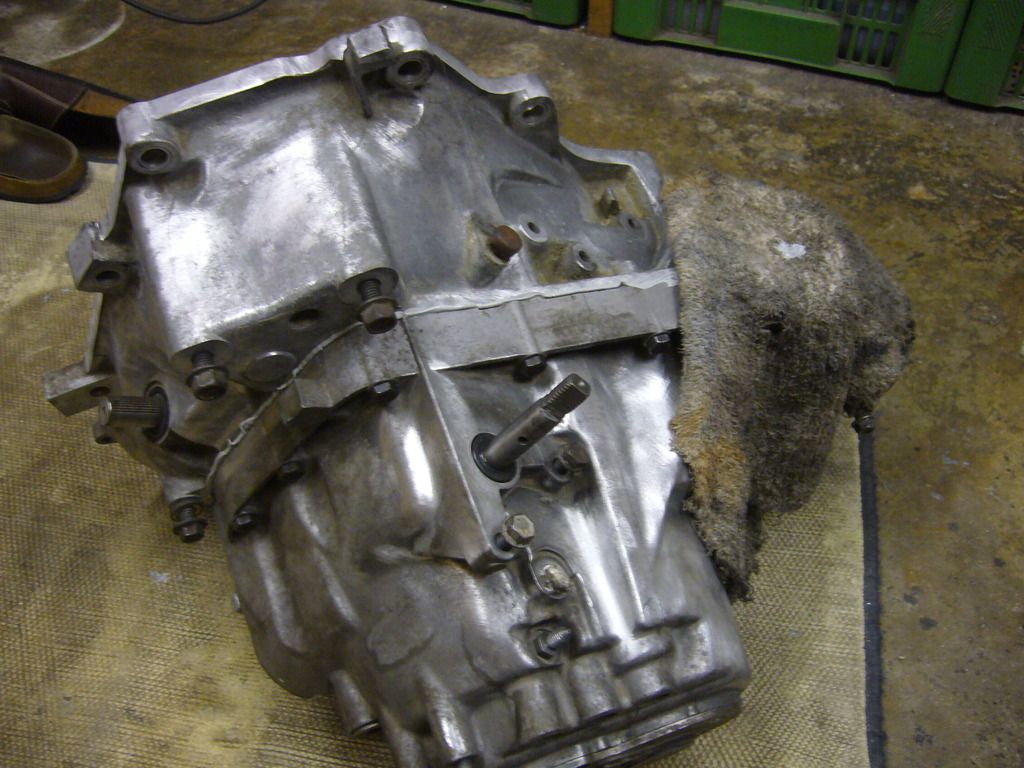
Final step - Painting:

After rebuilding my Getrag trans I decided to paint it in nice and shiny chrome.
A lot of hard work was involved, including several test paintings, which have cost me a lot of time and money.
You must work extreme accurately and absolutely no mistakes are forgiven.
I needed several weeks to find out how to paint chrome and I have written
my own write-up with step-by-step instruction for future paint jobs.
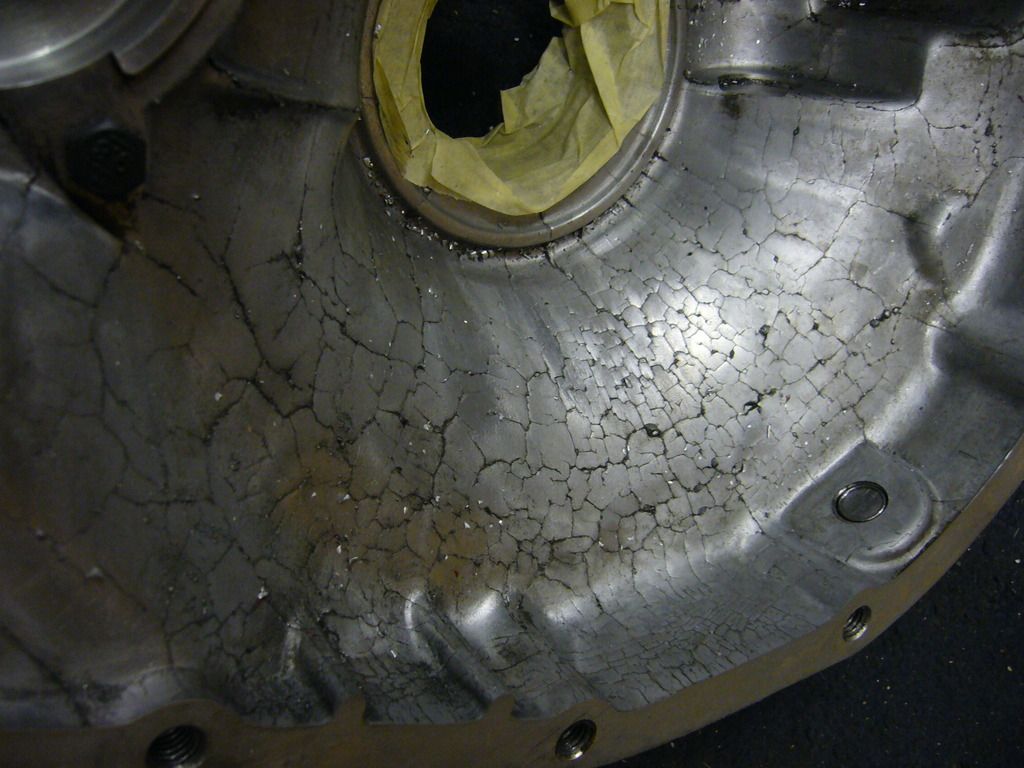
Chrome painting is almost a whole science of its own!

Step 1 / Prep. Work:
Before my transmission rebuild I have pre-cleaned the trans with a heavy-duty industrial degreaser.
However, this cleaner was an “oil” based product, which is not good for painting!
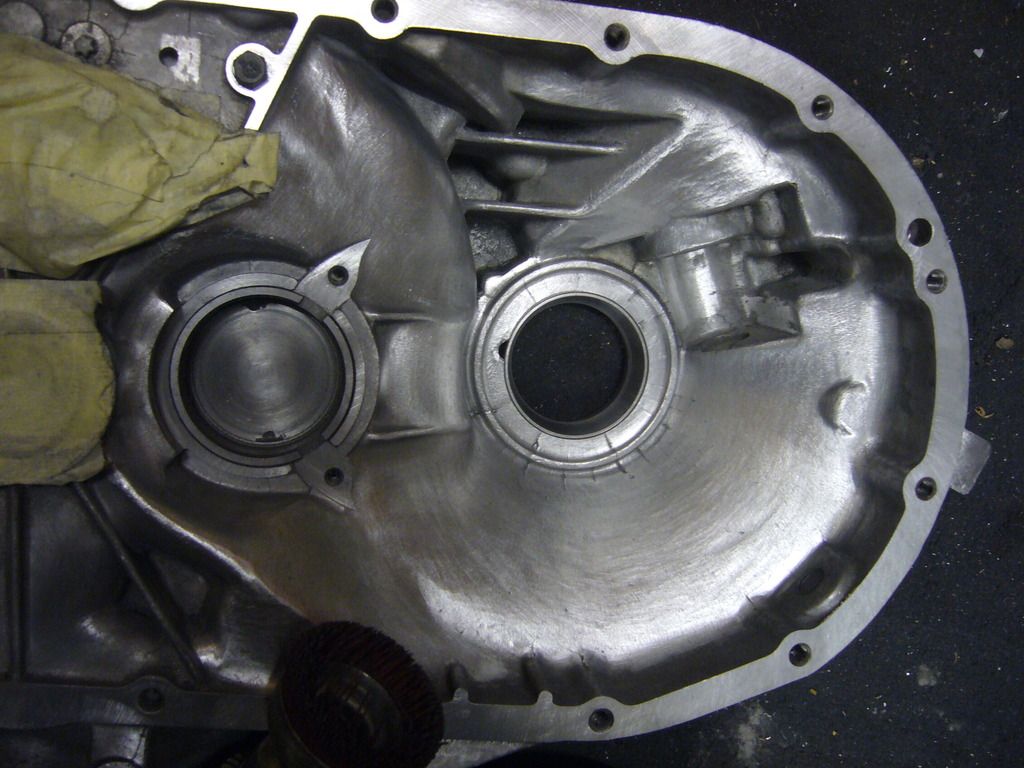
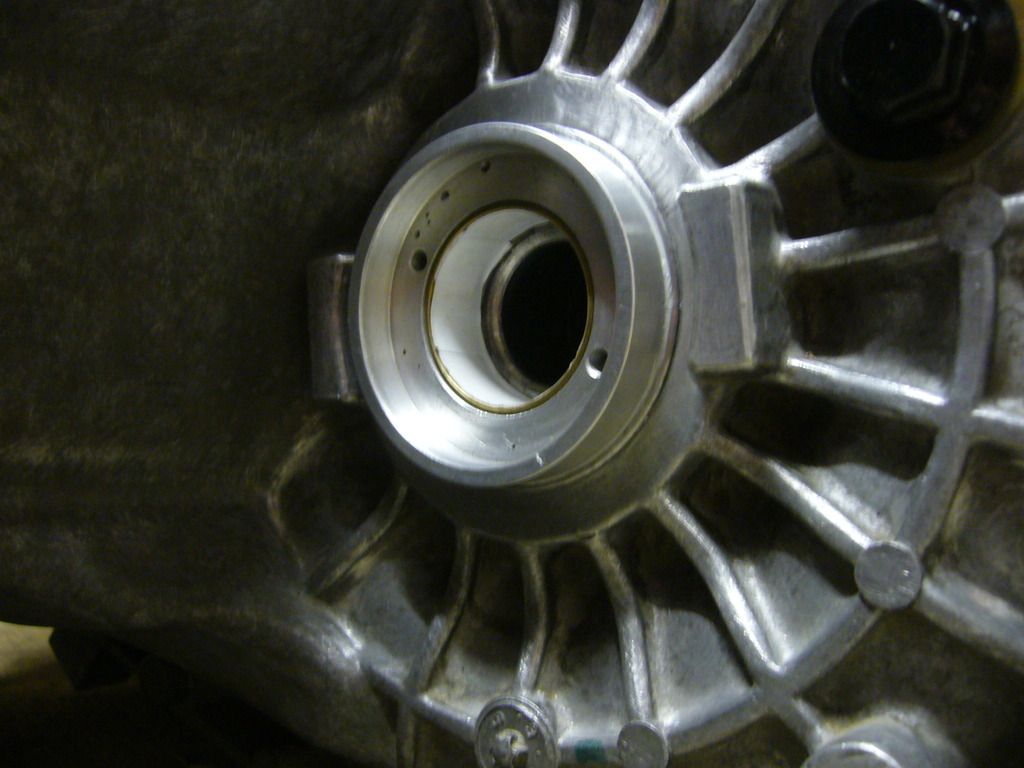
After bolting together my trans I have grinded away all the oxidation and then I have cleaned it with TSP (Trisodium phosphate).
If you use TSP for cleaning aluminum, you must swill the aluminum parts with a lot of clean water instantly
after applying the TSP (aluminum doesn´t like TSP). I recommend using another degreaser instead (tenside-based).
After thorough cleaning, you have to use AP-120 or METAL-READY for etching the
aluminum surface for ensuring proper adhesion of the black undercoat!

Applying AP-120 after cleaning:


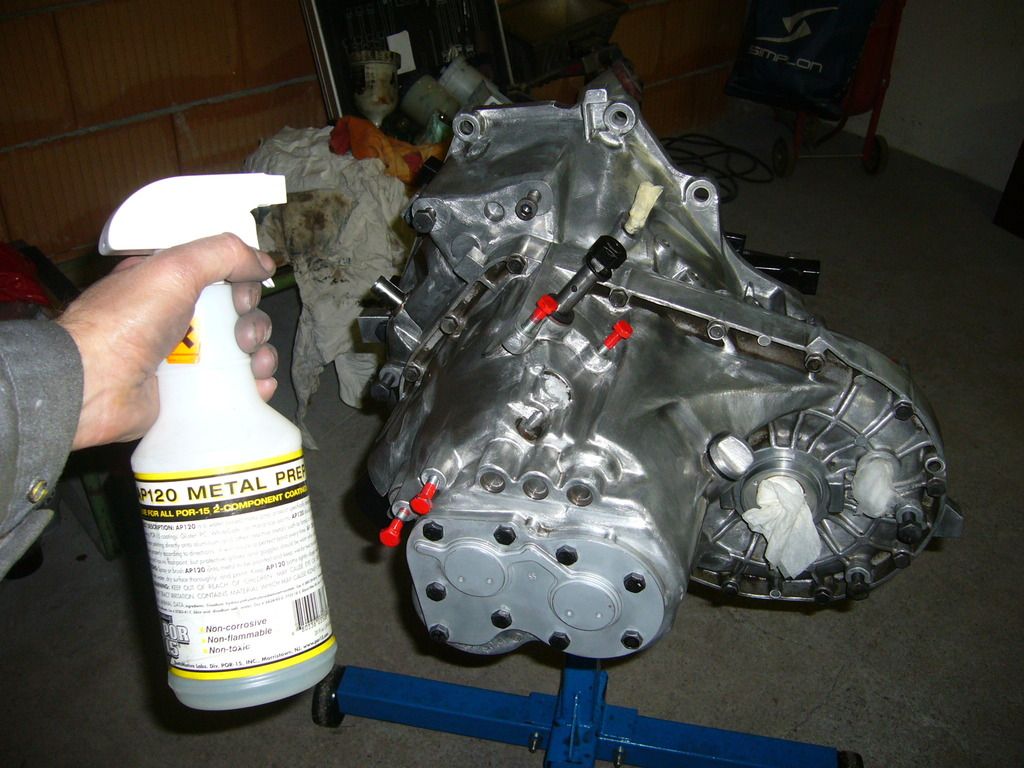
After 2-3 minutes, you need to swill the trans with a lot of clean water!
(otherwise the chemicals may harm the metal)

Then use compressed air to dry the transmission.
After “pre-drying” use a heat-gun until the metal gets bone dry.

Next you need to spray on acetone or brake cleaner.
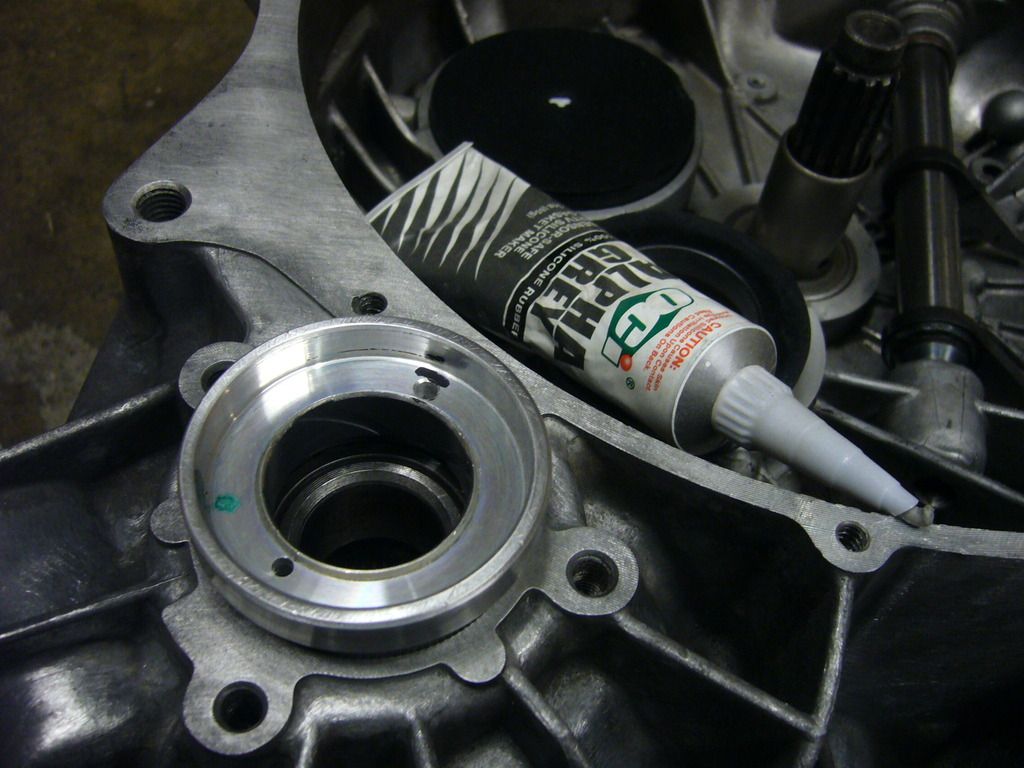
Wipe off this stuff off and the use silicone remover in order to get a 100% oil-free surface for painting!
(POR-15 is very sensitive against grease and oil residue)

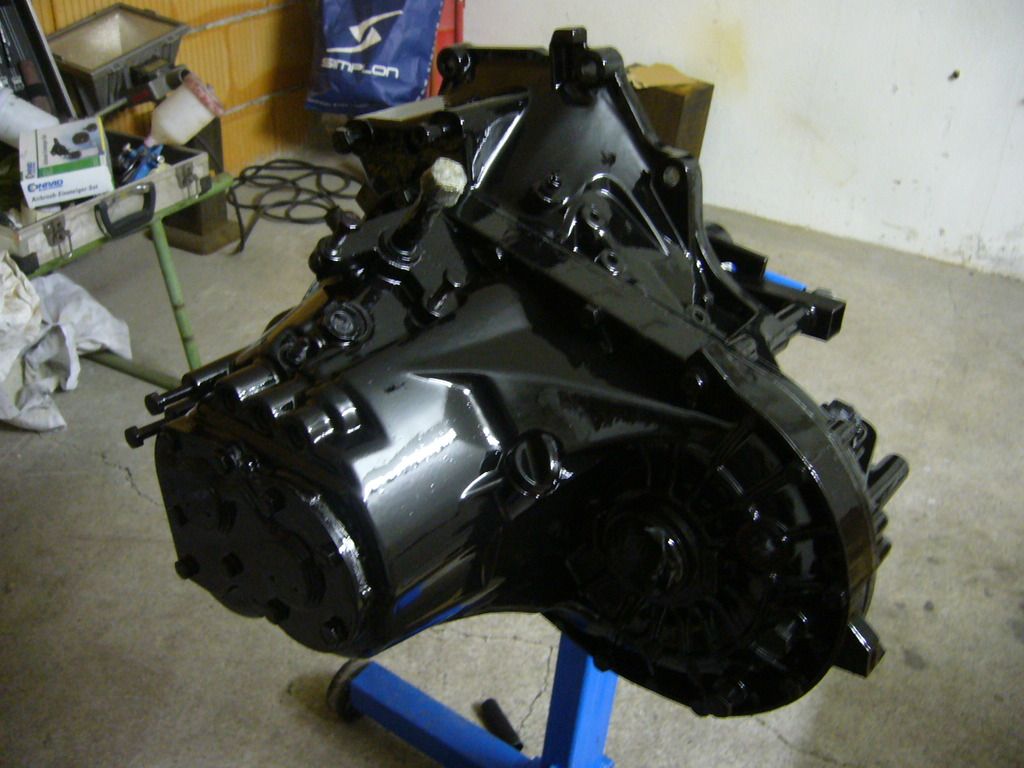
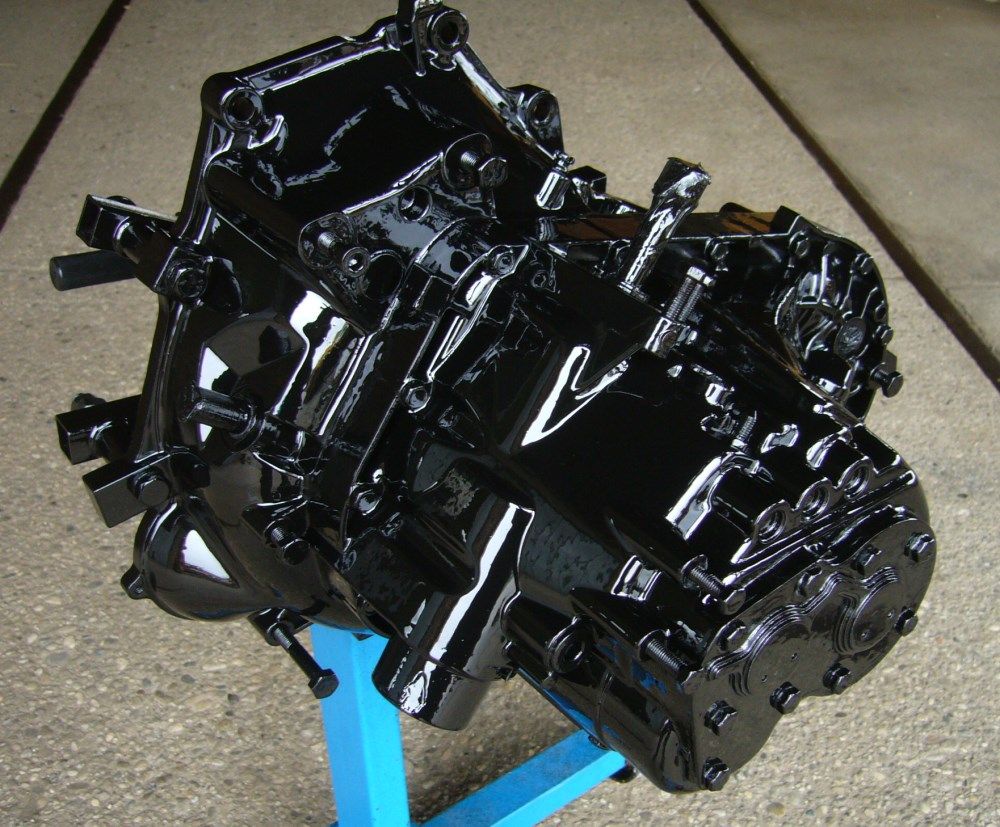
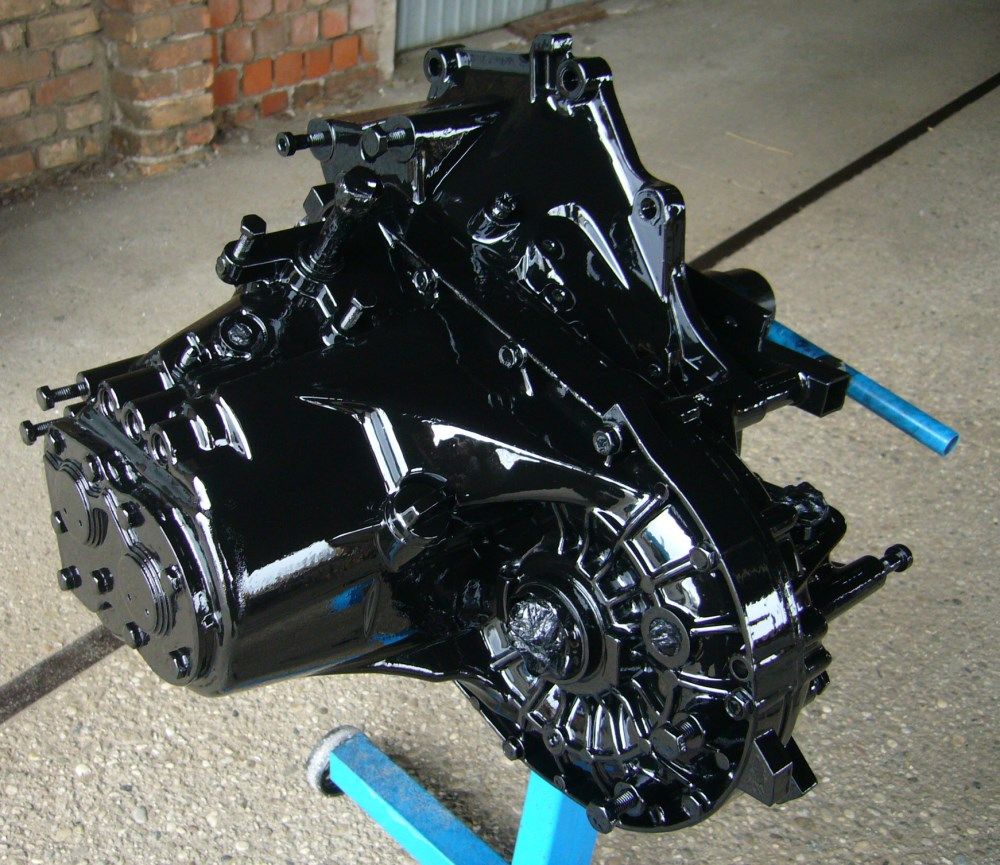
Step 2 / Black High-Gloss Urethane Undercoat:
Mix POR-15 with a stick (DO NOT shake the can!)
Use a 190-micron filter and fill POR-15 into your spray gun (2.0 mm nozzle) without thinner.
Apply the first coat POR-15 with a pressure of 5.0 bar.

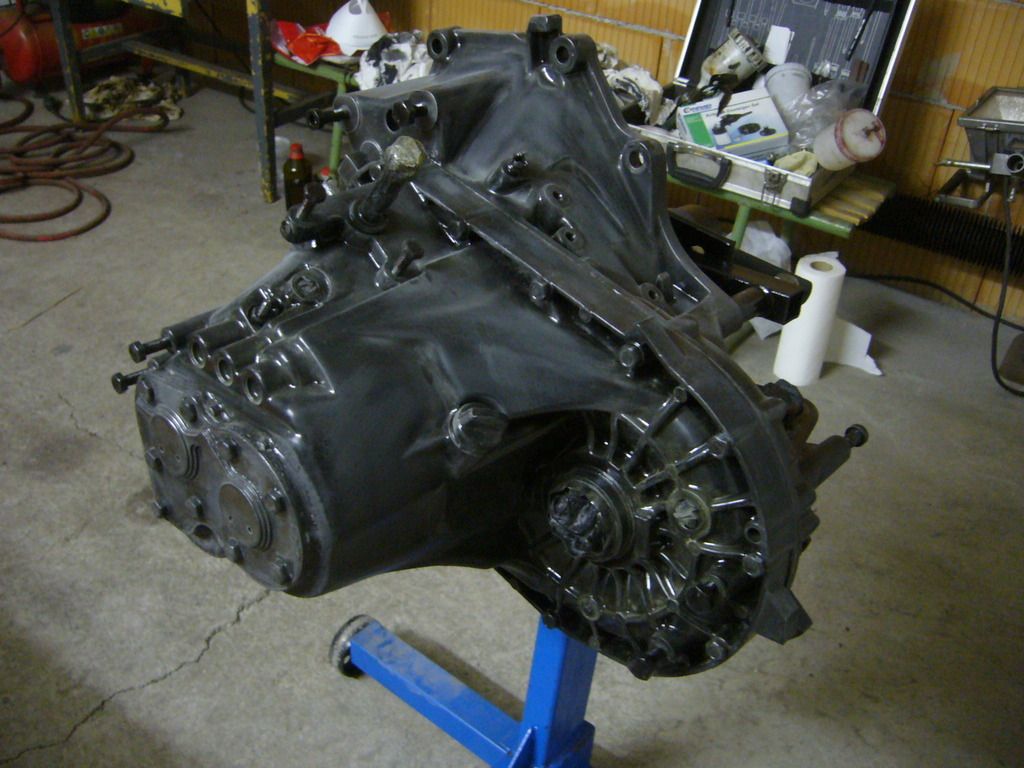
Next day grind the surface with a silicium carbid grinding fleece and apply the second coat POR-15 diluted with 10% Xylol at a pressure of about 4.8 bar:


Step 3 / Polishing:
Next day polish the POR-15 undercoat with Alu Magic and clean the surface thoroughly with silicon remover and compressed air.
(DO NOT do this in your painting room)


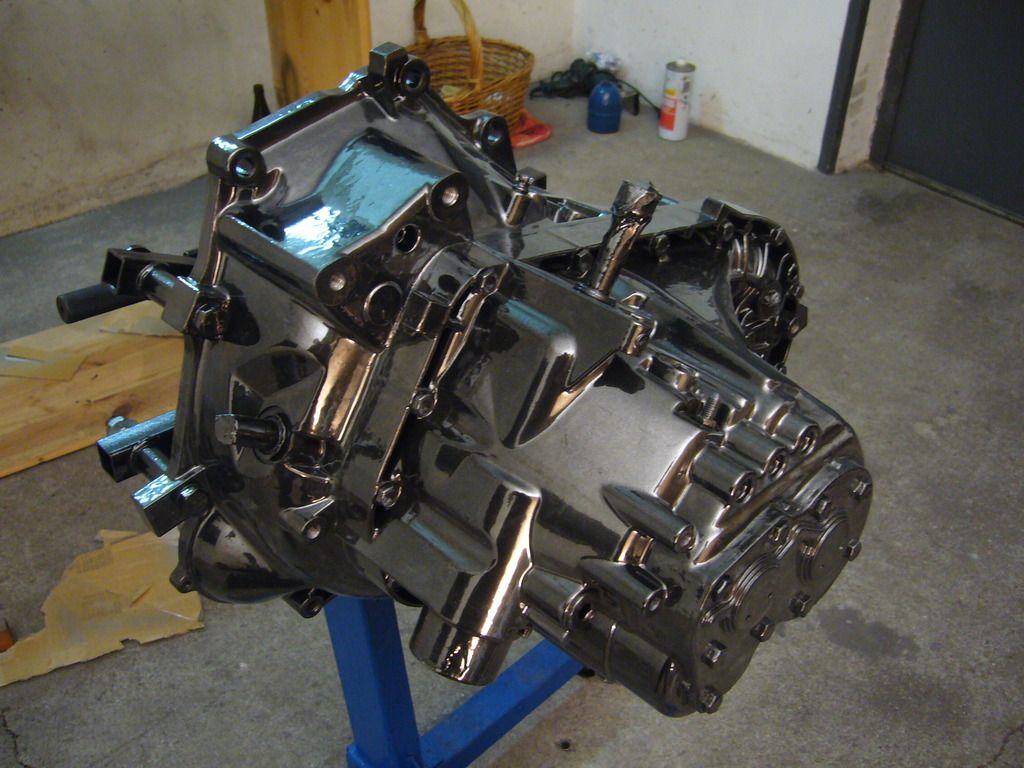
Step 4 / Chrome Paint (Sparkling Chrome):
Finally, you can apply the chrome paint.
Here you need to shake the can as much as possible in order to get an uniform distribution of chrome pigments.
I have used an airbrush (0.5 nozzle) @ 4.0 bar air pressure for finest atomization of chrome pigments.
Apply at least 3 – 4 coats of chrome paint (wait about 5 minutes between each coat).
Spray distance should be about 20 – 30 cm (3/4” – 1 ¼”).

Tips for airbrushing:
Move the airbrush in a smooth motion and always check the paint level in the airbrush.
BEFORE the chrome paint gets empty refill it immediately, otherwise the airbrush will suck in air bubbles.
ALWAYS shake the chrome paint can before refilling the airbrush.
When you need to paint the top and bottom surfaces, you need to turn the tranny on your engine/trans stand.
NEVER tilt the airbrush too much, always keep it horizontally!
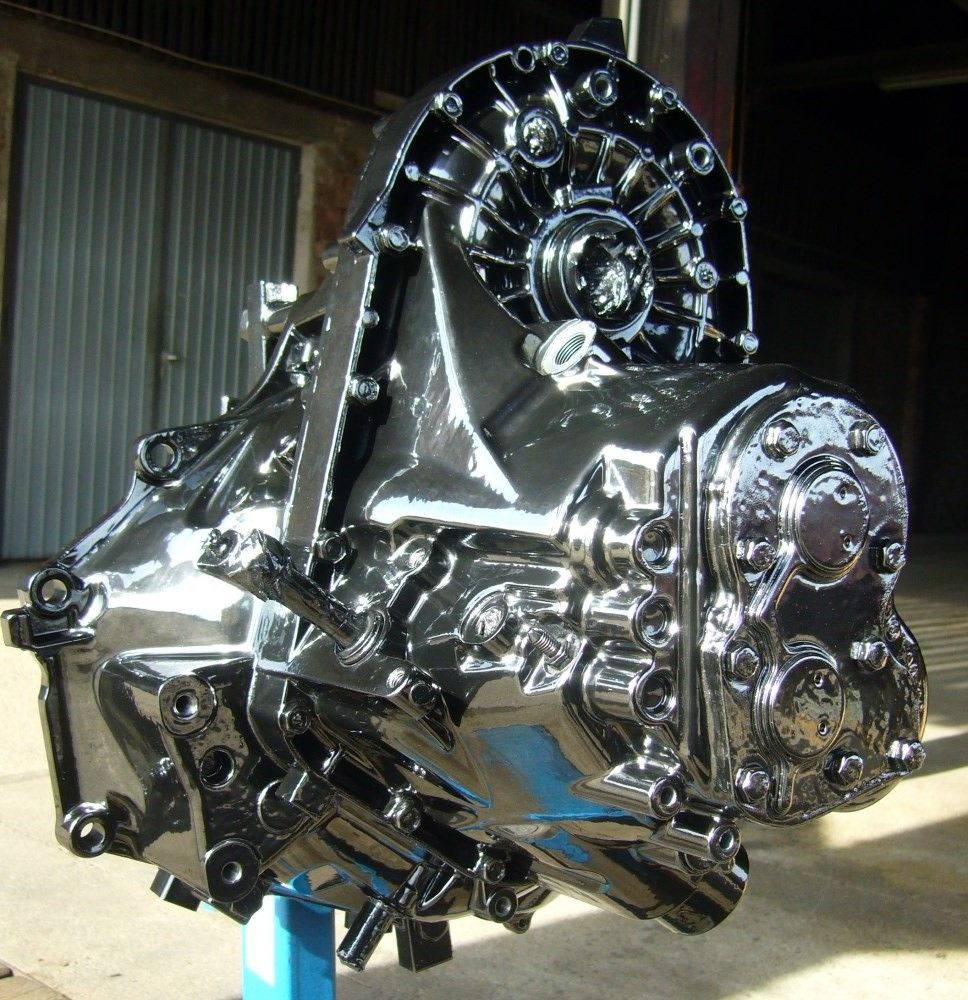
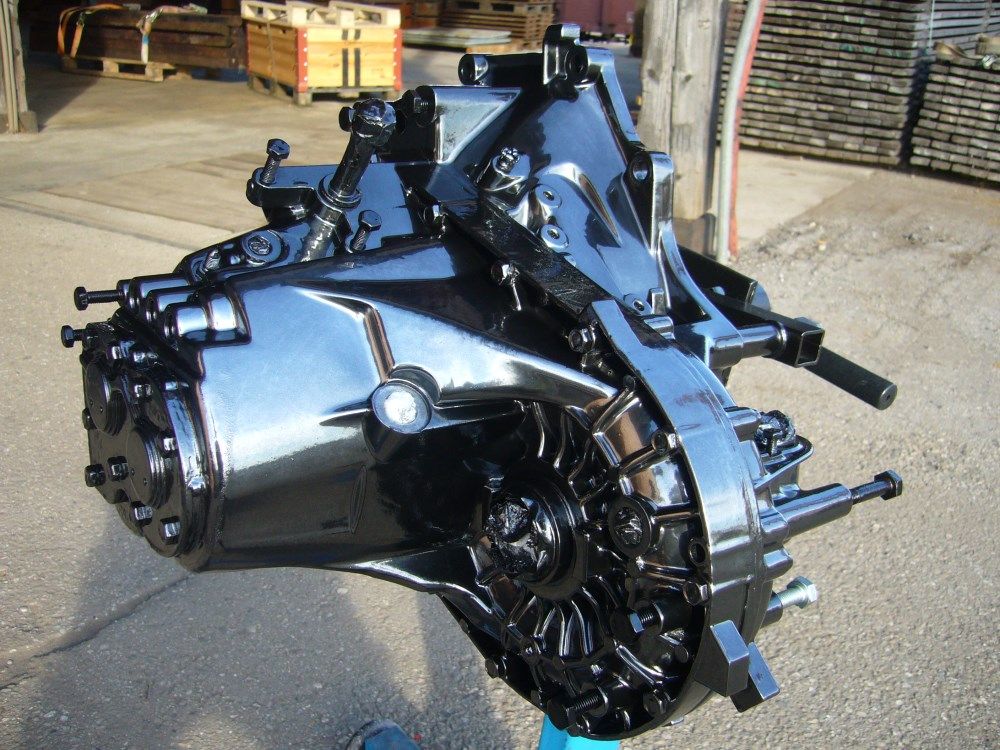
My results:


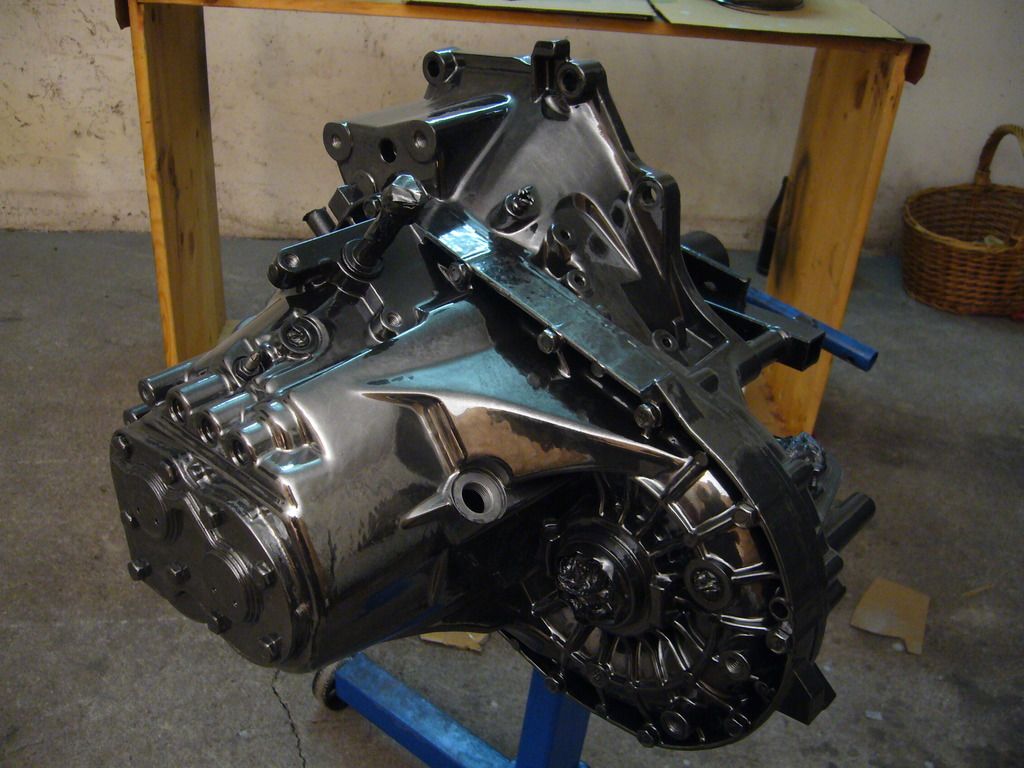
Step 5 / Urethane Clear Coat (Glisten PC):

First, you need to polish the chrome coat with a soft cotton wool or soft microfiber cloth.
Carry the tranny into another room for preventing contamination of the painting room.
Do not apply to much pressure when you polish the chrome paint, otherwise you may rub
off the chrome paint on sharp edges!


Then clean it with compressed air and carry it back into your painting room.

Awesome! Isn´t it?

Mix Glisten PC urethane clear 3:1 with PU-activator.
(in case you have already used your Glisten PC can in the past, I recommend using a 190-mircron filter in this case).
DO NOT shake the can!!! Use a small stick instead and SLOWLY mix the two components together.
DO NOT dilute the clear coat with paint thinner!!!

Fill the urethane clear into a HVLP spray gun (1.7 mm nozzle) and use a stick
for piercing air bubbles while paint flows into the gun´s paint canister.

Set the air pressure at about 4.0 bar and begin to apply a first light coat.
Wait about 3 - 5 minutes and then apply a final heavy coat.
Initially you may get an orange peel clear coat.
Just wait some minutes and the orange peel will disappear and you should get a glossy finish in the end!

Picture of final chrome paint job with urethane clear coat:


Now let the clear coat cure at least 4 days...

Optimal conditions for spraying Glisten PC:
Temperature: 18 – 24°C
Humidity: < 60%

Properties of Glisten PC clear coat:
- Extremely UV resistant (UV index up to 17)
- Rock hard and very scratch resistant (similar to POR-15)
- Chemical resistant against oil, gasoline, diesel, cellulose thinner, etc.
- Temperature resistant up to 200°C!

Required Equipment:
- Air compressor with oil/water separator
- Two HVLP spray guns (2.0 and 1.7 mm nozzles)
- Air brush or MiniJet for chrome painting
- Gas mask, rubber gloves and head covering


BTW, with this detailed and proven “spray on chrome” instruction nearly everybody should be able to make his/her own chrome paint job.
These are the ONLY working instruction for chrome painting out there!


I have invested quite a lot of time for research and I have found many products and instructions that are just bullshit.
Do not buy any chrome paint kits, because 99% of them are junk!
You just need to buy the chrome paint itself (e.g. Sparkling Chrome or Mirror Chrome).
The other used products are American polyurethane paints from POR-15.
It was not easy to find out this special combination of paints in order to get a chrome like finish...

[This message has been edited by Moar (edited 03-22-2016).]

IP: Logged
hobbywrench
Member
Posts: 350
From: WA usa
Registered: Feb 2013


Feedback score: N/A
Leave feedback

Rate this member

Report this Post02-22-2016 11:38 AM Click Here to See the Profile for hobbywrenchSend a Private Message to hobbywrenchEdit/Delete MessageReply w/QuoteDirect Link to This Post
Moar, Wow, that is beautiful! You are a real hot rodder at heart. Now , of course , the engine must be something special also. I don't think you will keep your car as a "garage queen," So will it clean up after use? How many hours on the costmetics?
IP: Logged
Moar
Member
Posts: 150
From: Linz, Austria
Registered: Dec 2014


Feedback score: N/A
Leave feedback

Rate this member

Report this Post02-23-2016 06:16 AM Click Here to See the Profile for MoarSend a Private Message to MoarEdit/Delete MessageReply w/QuoteDirect Link to This Post
My engine doesn't look bad at all, but it could look much better.
However, I will not waste too much time for cosmetics on the engine block, because I still have the stock 2.8L block in my Fiero.
My summer project will be rebuilding the 3.4L Firebird engine with aggressive cams and maybe hypereutectic high compression pistons and some other goodies.
In 1 or 2 years I´ll swap the engine, which will be freshly painted with some chrome applications.
So far I have already spend several 100 hours for cosmetic stuff!
(for polishing valve covers, for repainting LIM, intermediate intake, air filter box, brackets, wheel wells, cradle, suspension parts, brake rotors, etc.)

When the weather is bad, I´ll drive with my Jag in order to keep my Fiero clean!

[This message has been edited by Moar (edited 02-23-2016).]

IP: Logged
hobbywrench
Member
Posts: 350
From: WA usa
Registered: Feb 2013


Feedback score: N/A
Leave feedback

Rate this member

Report this Post02-23-2016 10:45 AM Click Here to See the Profile for hobbywrenchSend a Private Message to hobbywrenchEdit/Delete MessageReply w/QuoteDirect Link to This Post
Just out of curiosity have you considered the 3.4 DOHC? They are probably scarce in Europe. Here there are used ones but the crate motors seem to have disappeared and only 2 manual transmissions on car-parts.com. There is quite a lot of information available here on the conversion and it is involved. I see 3 or 4 running cars at $3K and up to $24K for low mileage, but only one in FLA with a 5 speed. One clean-sounding Lumina with auto is only 30 miles from me . Tempted, but as a donor car with auto I go hot and cold.
IP: Logged
Previous Page | Next Page

This topic is 5 pages long:  1   2   3   4   5 
next newest topic | next oldest topic

All times are ET (US)

Post New Topic  Post A Reply
Hop to:

Contact Us | Back To Main Page

Advertizing on PFF | Fiero Parts Vendors
PFF Merchandise | Fiero Gallery | Ogre's Cave
Real-Time Chat | Fiero Related Auctions on eBay


Copyright (c) 1999, C. Pennock