if you can get your hands on a Buick Lucerne water manifold, it mounts the alternator above the waterpump. when I get a 3900, it will be from a Lucerne for that reason. it may require some trimming of the decklid hinge box though.
I used an astro van alternator on my LX9, it only requires the charge wire, and a wire to the charge lamp on the cluster, and will probably be easier to find replacements for in the future.
are you planning on using the alternator to apply static tension to the belt, or are you going to mount a tensioner somewhere?
------------------ "I am not what you so glibly call to be a civilized man. I have broken with society for reasons which I alone am able to appreciate. I am therefore not subject to it's stupid laws, and I ask you to never allude to them in my presence again."
Why is the Lucerne LZ9 rated at a lower HP? Looks like it comes with the LZ4 intake too which is convenient. Planning to go with the starter motor from this vs the 07 Uplander.
This is the starter in the Uplander in 09 (and Lucerne). I expect this will work for my application. It is the starter that the later model LZ9s use.
Which year Chevy Astro for the alternator? It seems to get a new alternator every couple years. In my searching only 85 came up as having an alternator that only needed the 2 inputs (at least all the rest have a four pin connector and some may only require 2 inputs), and it seems to be the same part as the Fiero 2.5 alternator.
Also Interestingly enough the stock Uplander alternator only has two pins.
Why is the Lucerne LZ9 rated at a lower HP? Looks like it comes with the LZ4 intake too which is convenient.
Which year Chevy Astro? It seems to get a new alternator every couple years. In my searching only 85 came up as having an alternator that only needed the 2 inputs (at least all the rest have a four pin connector and some may only require 2 inputs), and it seems to be the same part as the Fiero 2.5 alternator.
Not sure on the HP output, I hate myself and was going to fix that the hard way.
I think the one I used was from a 2003 astro with the 4.3, it uses a 4 pin connector, but you only need to connect to the "L" terminal, and the power feed back to the starter/battery.
------------------ "I am not what you so glibly call to be a civilized man. I have broken with society for reasons which I alone am able to appreciate. I am therefore not subject to it's stupid laws, and I ask you to never allude to them in my presence again."
------------------ Astronomy says we will find a coded signal from outer space. Then we'll KNOW that life exists there, for coded signals aren't by chance.
Biology says there are coded genetic signals in every cell, but we KNOW that no intelligence created life.
I'm the original owner of a white ' 84 2M4 purchased Dec 10, 1983 from Pontiac. Always garaged, no rust, 4-wheel drifts are fun!
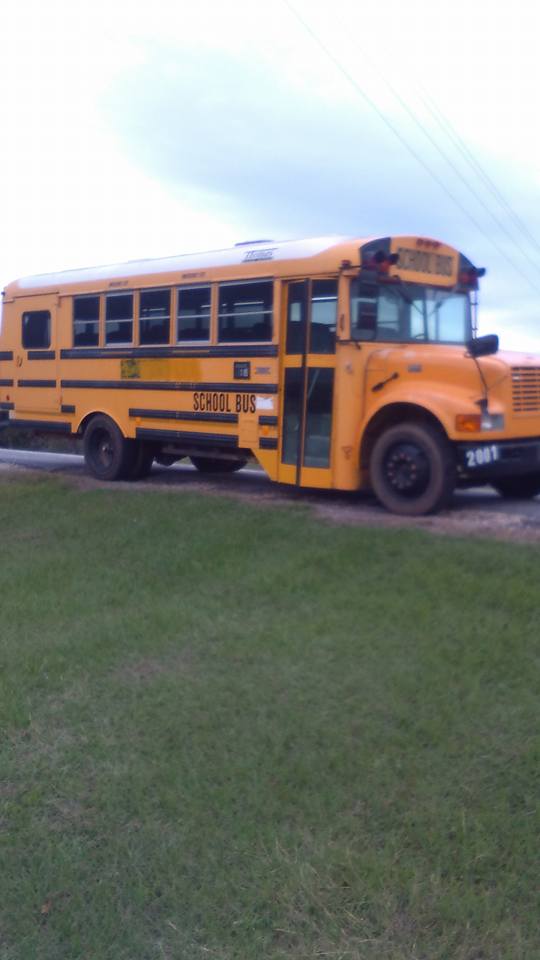
No real updates on the bus, it is slightly more stripped than in the picture.
But I did locate a bunch of Fiero parts I am going to play around with including a timing cover. I do want to see if I can modify it to work with the recirculating system. I have a mill at work with a rotary table so I am going to machine a flange for the 3900 thermostat and attempt to weld it to the Fiero timing cover, along with weld two barbs to the water inlet area for the recirculating lines and heater core. I just want to see what both setups look like and weigh pros and cons and feasibility of both.
[This message has been edited by zkhennings (edited 02-28-2021).]
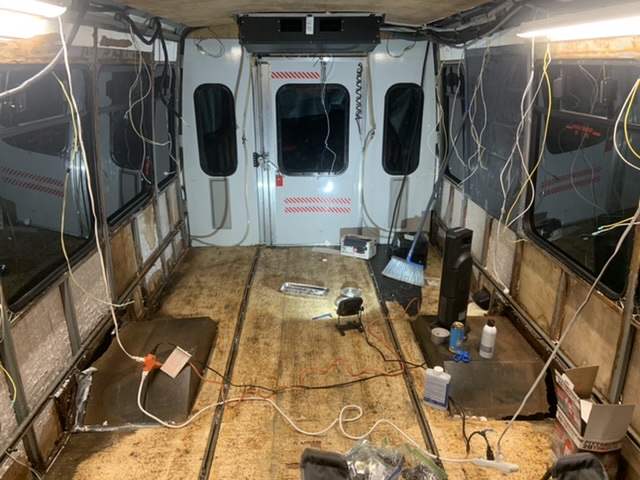
Very nice bus! A good size too, I think similar to mine length wise. A full size bus seems like such a hassle.
I have been doing more research on what to do for a timing chain solution. There is a double roller available, but I am not sure if it is required as I have seen that most people with a cam and valve springs use a first gen 3400 timing chain. WOT Tech pairs this with what looks like a 3900 timing guide.
Opinions on this would be great, I would like to shift at 7000rpms ideally and will select a cam to suit this, and valve springs that can handle the cam/rpms. If I need a double roller so be it, but it seems like most get away with the 99 and older timing setup.
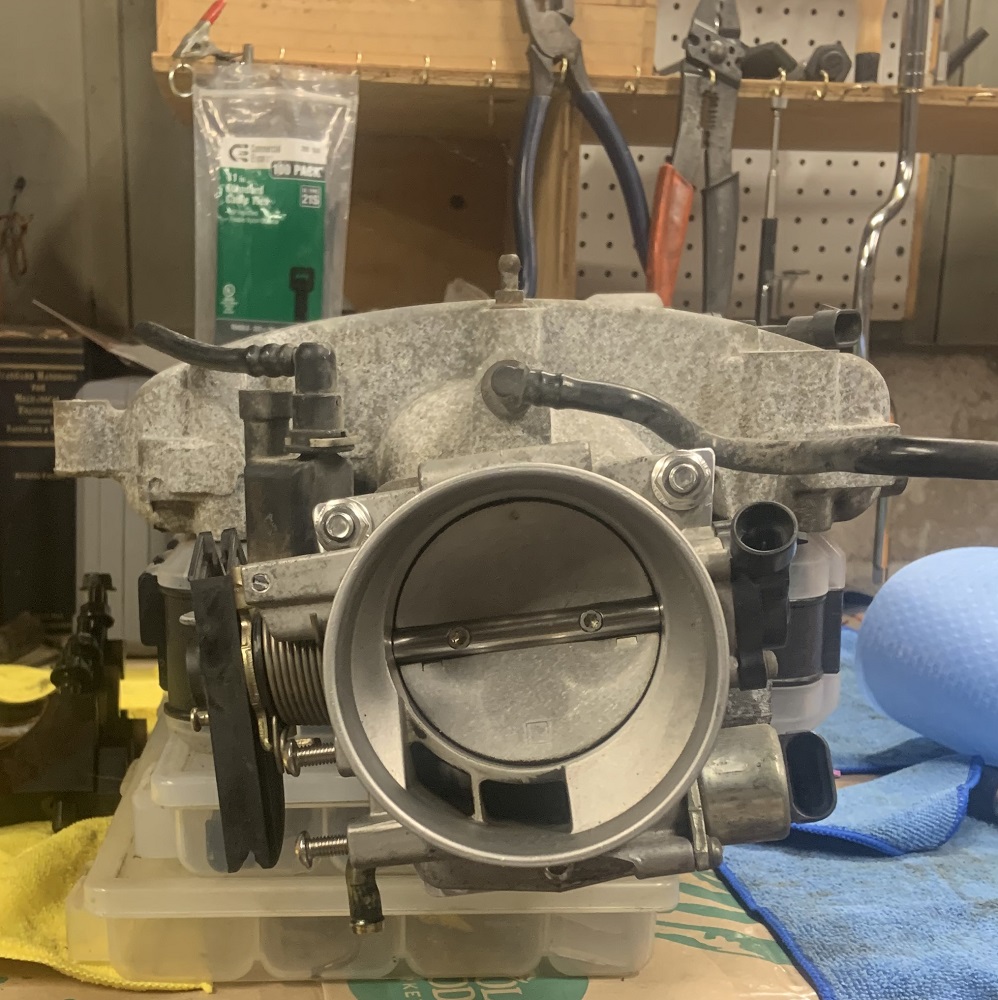
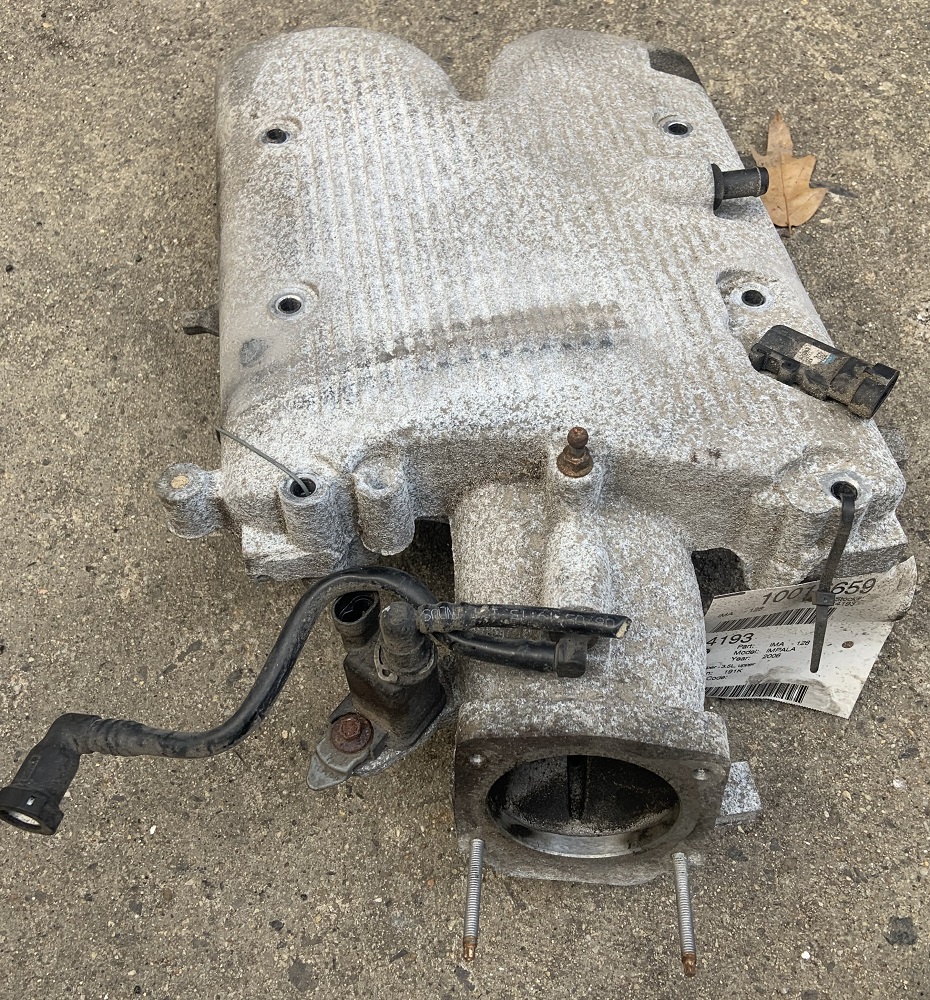
I also bought a N* throttle body off of Ebay, it was surprisingly the most plentiful and cheapest I came across in the correct size, and all the additional junk is below the throttle body instead of above which is good for hood clearance, and the throttle cable will end up on the correct side too. I went with a 2000-2005 Deville TB. No MAF on this 3900.
Going to go get an LZ4 intake at a yard soon, hopefully this week, maybe they will straight up trade me for my LZ9 intake, it is definitely more expensive with the actuator.
[This message has been edited by zkhennings (edited 03-02-2021).]
where do you see double rollers available? I organized the group buy for what I thought was the last production run.
I'm running a cryo treated, micro polished unit from WOT-Tech, it's a nice piece.
Do you have an adapter for the N* throttle yet? you might be able to run a DBW throttle if you feel like throwing down on a DBWx2, I'm running one and it seems pretty awesome, that being said I haven't been driving the car a whole lot either, nor have I actually hit WOT yet. I'm not 100% sure it's compatible with a microsquirt though.
modifying a stock fiero cover to work with the recirculating cooling system would be a new way to do it, personally, I would probably just use a stock LZ9 timing cover, but that's me.
------------------ "I am not what you so glibly call to be a civilized man. I have broken with society for reasons which I alone am able to appreciate. I am therefore not subject to it's stupid laws, and I ask you to never allude to them in my presence again."
I may go with the WOT Tech one as well because it works out to the same price as buying all the GM components.
I am going to machine a throttle body adapter for the TB, the MicroSquirt does not support the DBW, and I want to keep it simple anyways. If I wanted traction control the DBW would be cool.
The MicroSquirt also does not support the N* idle control valve as it cannot run a stepper motor. I need to get a PWM operated valve or an on off style solenoid idle valve from another car. I am thinking a PWM one from a VW per their recommendation. I will make my throttle body adapter have a spot for the new valve and a mill a pathway for the air. I could always get a solenoid valve off McMaster if it will be hard to machine a nice seat for an actual idle control valve, I need to look into it more and find some options.
Edit to the Edit, I was looking at 2 wire IAC valves for a mid 90s Nissan 240, Early 90s VW Golf, and Foxbody Mustangs. They are all way more expensive than the stepper motor IAC on the N* Throttle body so it seems to make sense to try and drive that. I really don't need to worry about this right now though, I can get everything working without an IAC, and I don't have to use one at all if I don't mind giving it some gas during cranking and warmup. I can always add in the IAC if I get sick of that. I also could use a 12V normally closed 2 port solenoid valve as long as it flows enough air, it seems as though I would feed it 12V and the Microsquirt can control a PWM ground wire that would go to it. They are cheaper than any car specific valve.
I do want to try the Fiero timing cover modifications, if for no other reason than to get some aluminum TIG welding practice in. I will be able to mock things up and decide what works best as nothing is set in stone. Nothing about the new water pump design seems superior to the Fiero water pump other than it is a simpler casting for the consumable portion of it, but I will investigate that further as things come apart as it may influence my decision.
I have also come across some well priced 304 SS tubing for the ex haust and for the headers , seems like this motor is extremely similar to an LS in terms of cylinders and heads, and they have good luck with 1-3/4 primaries, so I will probably go that route myself... Now I just need some header flanges
Injectors I am looking at. The Bosch EV14s for an S4 Audi 2.7. Part number is 0280158117. Come in sets of 6 for a good price. I think these are the smallest ones at 550cc which is 52lbs which is a big step up from the stock injectors, but as long as they are fast enough it should still idle fine. These are very highly rated injectors. They are slightly longer, but appear to be fine, I can always add small spacers under the rail and maybe clearance the upper intake manifold if necessary. But I think it will be fine.
Part numbers for 630cc ones are 0280158298. Here is a link to an Audi Wiki that has some other options for injectors with part numbers and lengths.
And from the 60*V6 forum I found the LZ9 stock injectors are 47mm Oring to Oring (54mm end to end). These EV14s are called 52mm, but from a picture I have seen are slightly longer. The 52, may be referring O-ring to Oring length because they are definitely spaced a little farther apart than LZ9 injectors.
[This message has been edited by zkhennings (edited 03-03-2021).]
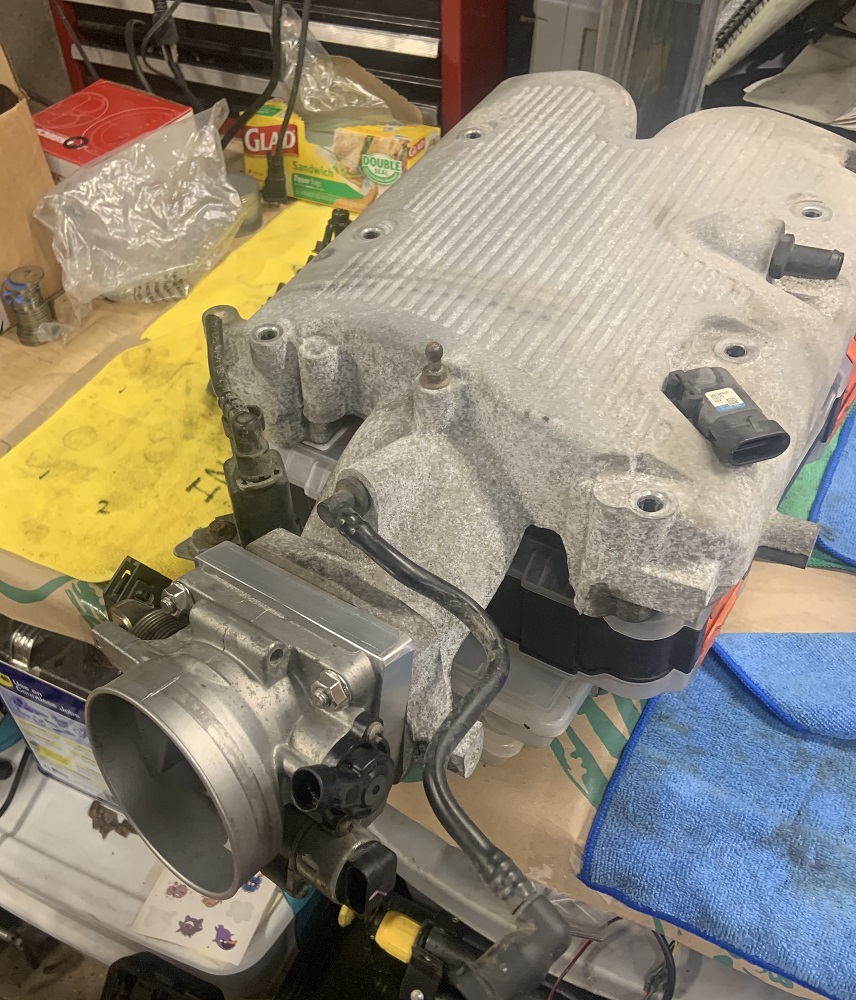
Picked up an LZ4 Intake from a junkyard today, N* throttle body comes in soon and I ordered some 3/4" aluminum to mill an adapter plate between the two.
My sample header flange is on the way, I need to do a little more engineering once I get it in hand, but it shouldn't be long before I'm ready for production. I take it you want to do 304SS?
------------------ "I am not what you so glibly call to be a civilized man. I have broken with society for reasons which I alone am able to appreciate. I am therefore not subject to it's stupid laws, and I ask you to never allude to them in my presence again."
My sample header flange is on the way, I need to do a little more engineering once I get it in hand, but it shouldn't be long before I'm ready for production. I take it you want to do 304SS?
304 would be ideal, but 18-8 would be ok. But a definite preference for 304. Sign me up for two header flanges
I am trying to figure out what size exhaust tubing would be good for the crossover pipe, the primaries will be 1.75" going into a collector of maybe 2.25" or 2.5" that will then go into the crossover at whatever the collector size is, and then the crossover will merge into a 3" exhaust. I am trying to size it in a way that will keep up exhaust velocities and gradually slow down. The exhaust will cool and shrink the farther away it gets from the heads, and with the increase in volume at the crossover it will cool even more, so the crossover diameter can probably be closer to the same size as the 3" exhaust. I am not going to make the headers quite as long as they should be due to space restrictions, I am more going to focus on making them as long as I can without taking up the entire engine bay and making sure the primaries are all almost exactly the same length and equally as convoluted. I will try and get them around 28" to 30" each but we will see what happens.
Got a bunch done to the engine today, took off all the extra bits, labelled everything and organized all the fasteners. Spun the motor over by hand and the compression is great. I do want to get a starter and hook up a battery and compression test each cylinder before I possibly pull the heads.
MicroSquirt came in
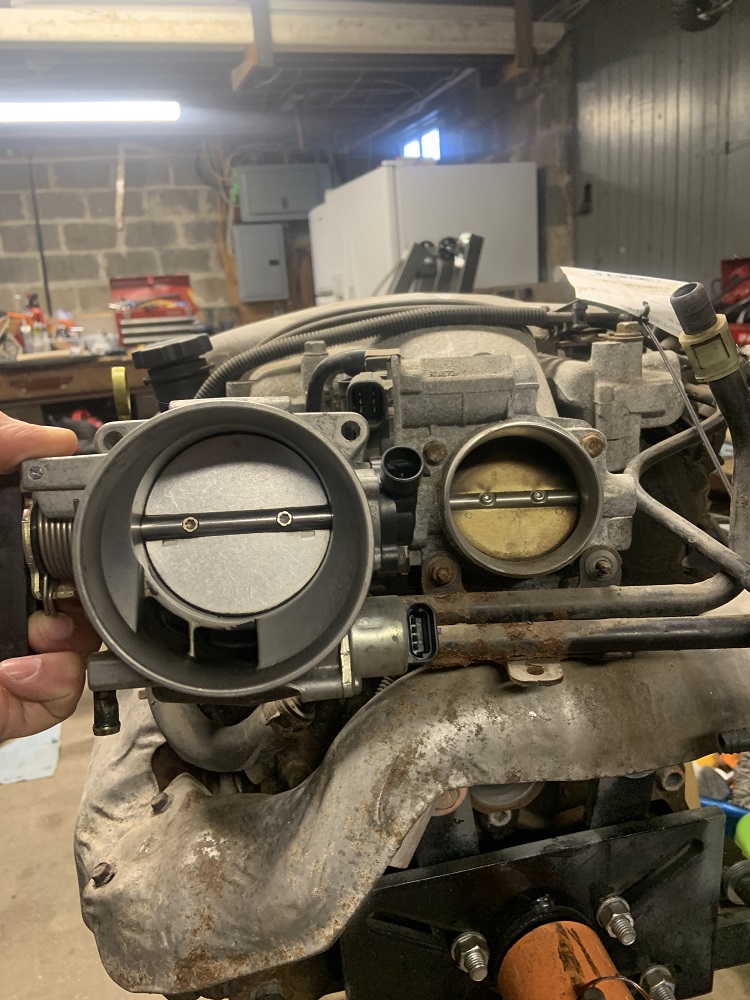
Throttle body comparison, not exactly a good comparison as the N* throttle body is closer to the camera
Motor stripped of bits and LZ4 intake in place. Nothing broke except 1 exhaust bolt, it spun with 0 resistance and the head came right off. The rest I took it slow and went in and out a little bit until they came out nice and easy. Plenty of stud is sticking out, I will screw a nut onto it and weld the nut to the broken bolt and it should come right out.
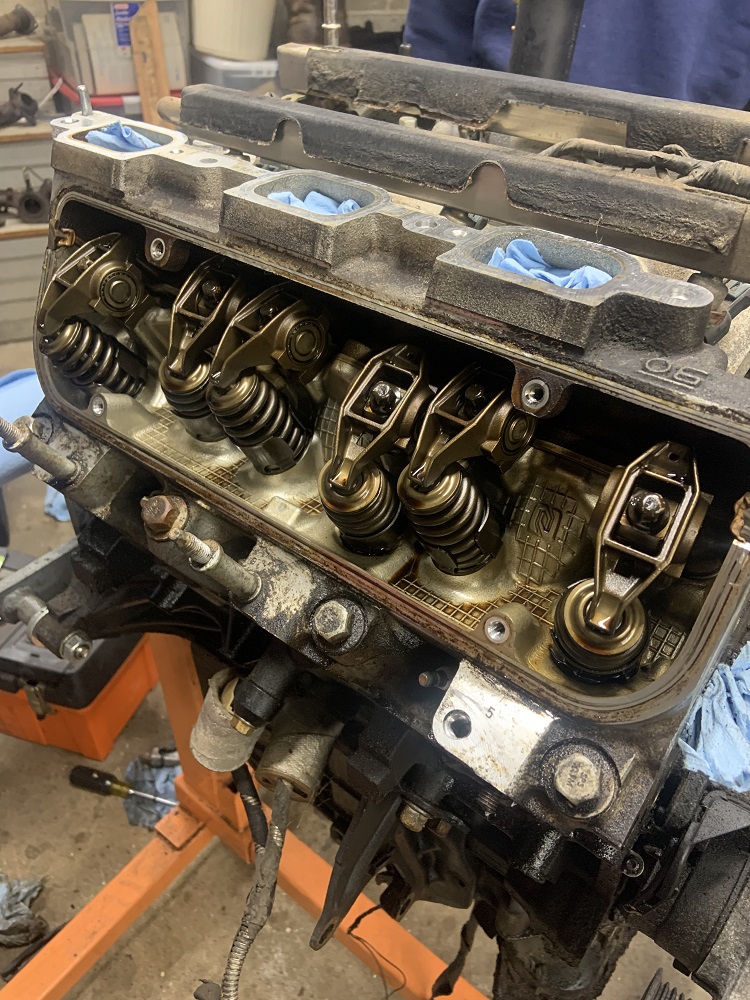
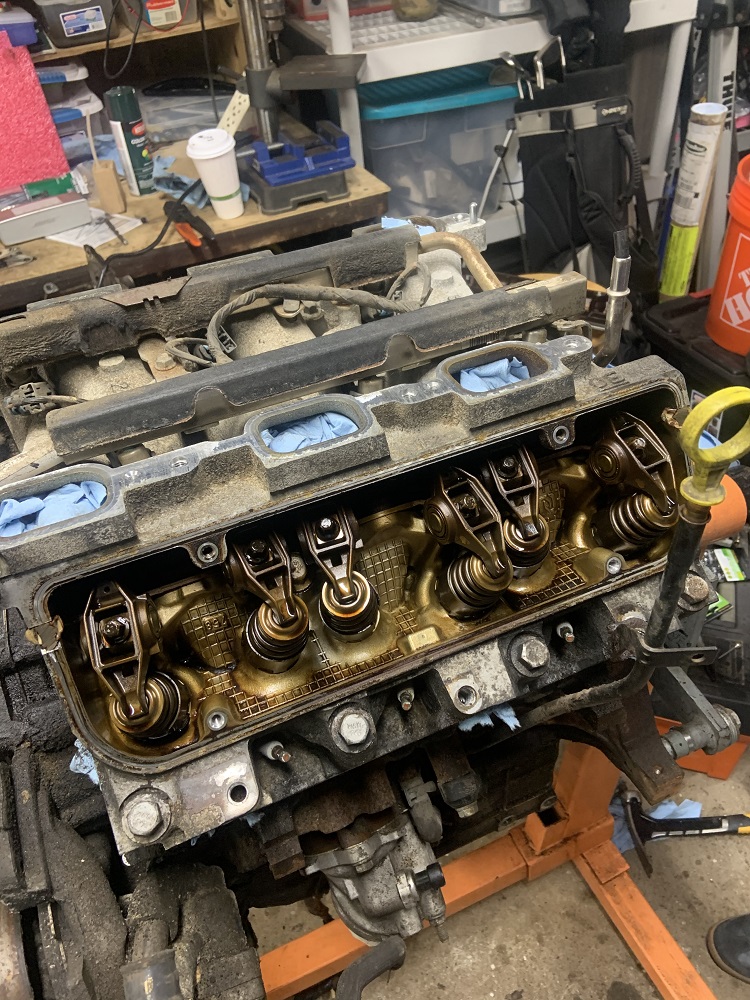
The valvetrain looks very clean
And the lifter galley area looks great too
So I planned to pull the heads off to do the headgaskets, but are these the Cometic gaskets? They have the gold rivets at the corners. I may keep them together for now if the compression test checks out good. Let me know if these look like the Cometic gaskets or if this is not an indication that they are anything special. Edit to say that looking at pics of the head gaskets on RockAuto, multiple of them have these gold rivets, so I doubt they are anything special. I will most likely pull the heads but still check the compression before hand to make sure the cylinders are all ok.
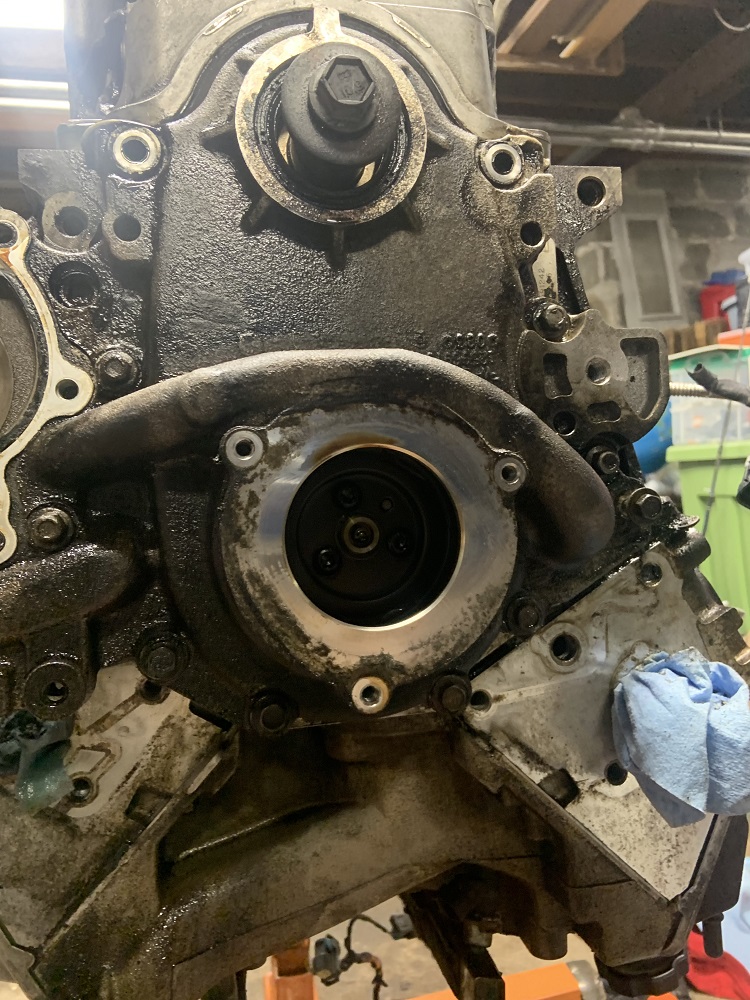
Going to get a new crank puller tomorrow as I guess I threw mine out, the threads were a little messed up and I must have gotten sick of it. Then I can pull the timing cover and oil pan off and check out the bottom end.
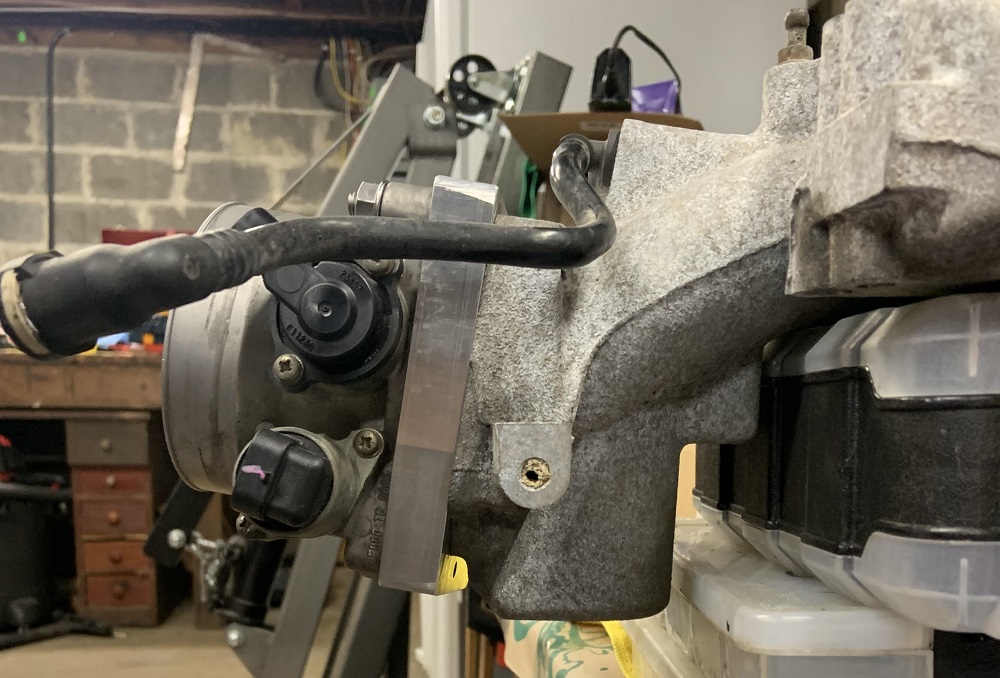
I may stick with this timing cover as I realized that I could create a nice access panel where the VVT actuator is, and I could inspect the timing chain periodically since I will not be running a double roller. It also takes up less space that I originally thought. Time will tell.
[This message has been edited by zkhennings (edited 03-06-2021).]
I doubt they're cometics, the factory gaskets are MLS on the 3900. I also don't think cometic makes a gasket for the 3900 yet.
------------------ "I am not what you so glibly call to be a civilized man. I have broken with society for reasons which I alone am able to appreciate. I am therefore not subject to it's stupid laws, and I ask you to never allude to them in my presence again."
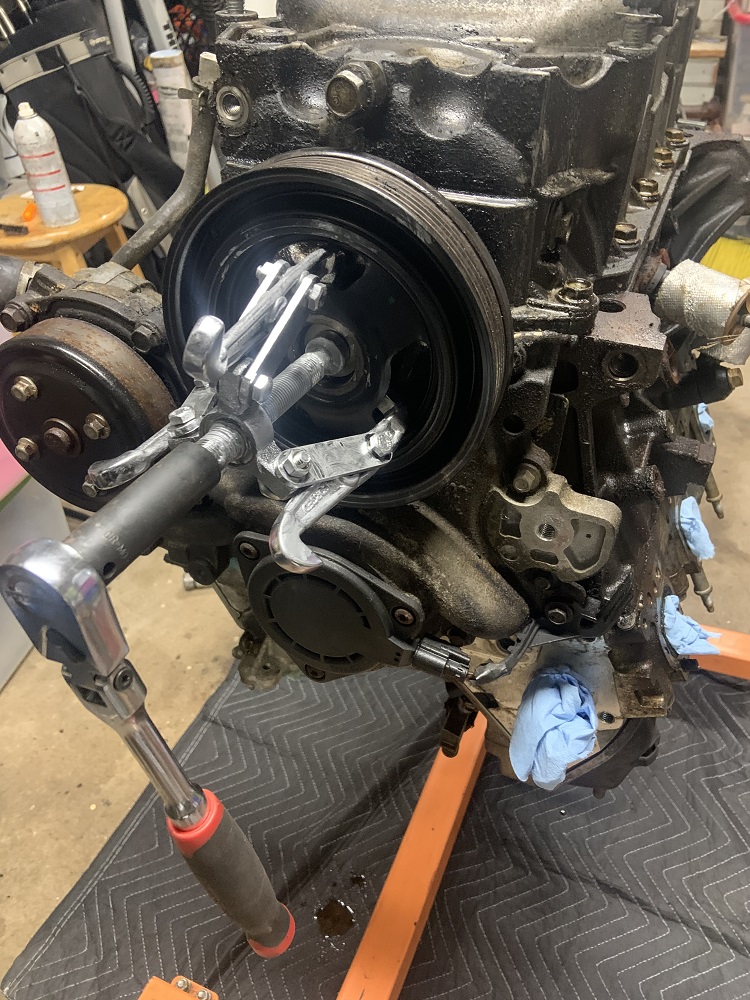
Got some 3 jaw pullers and one worked for the crank pulley
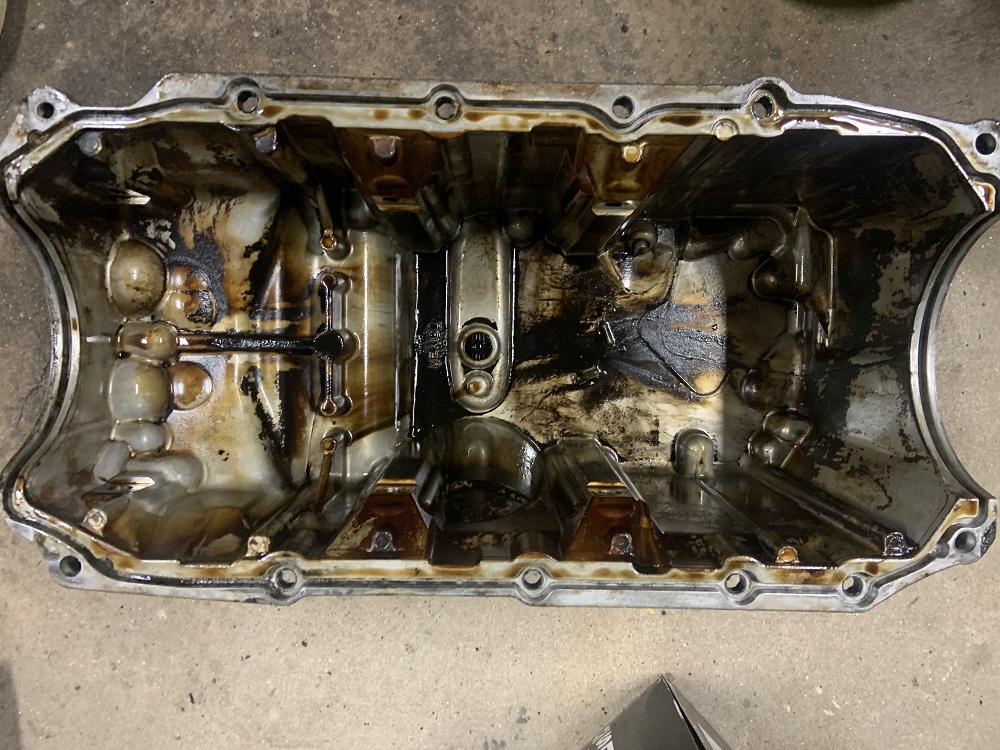
The oil pan was very dirty so I cleaned it before removing it
The oil pump on this thing is a beast
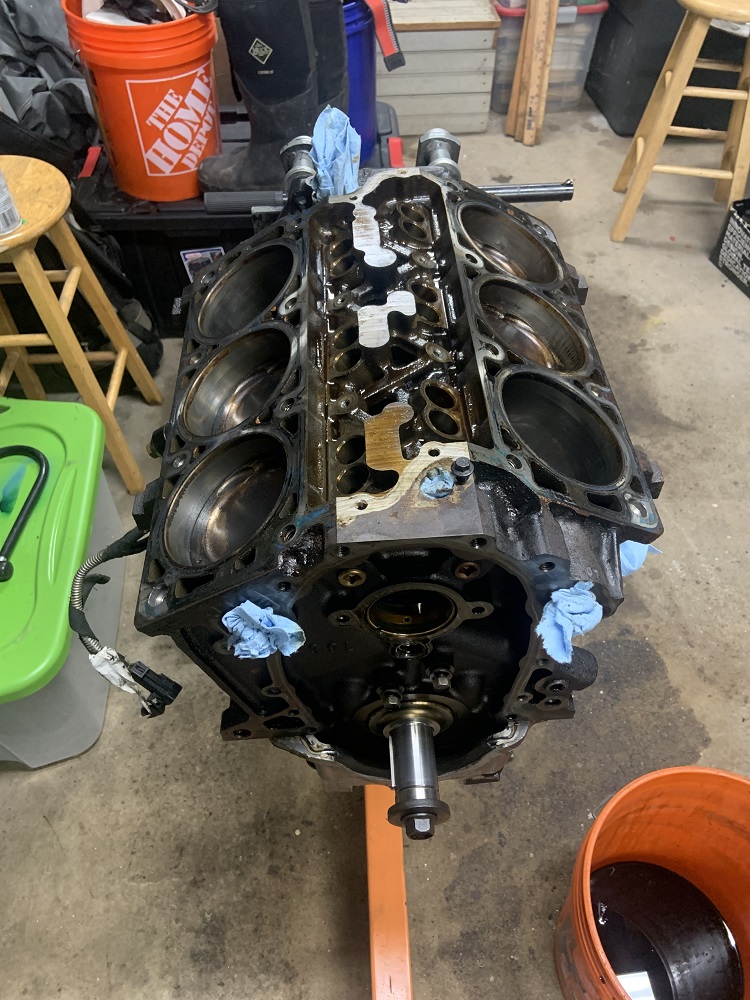
Bottom end looks good
Oil pan looks acceptable, it cleaned up really easily
Could possibly use this opening to inspect the 3400 timing chain
Timing cover removed
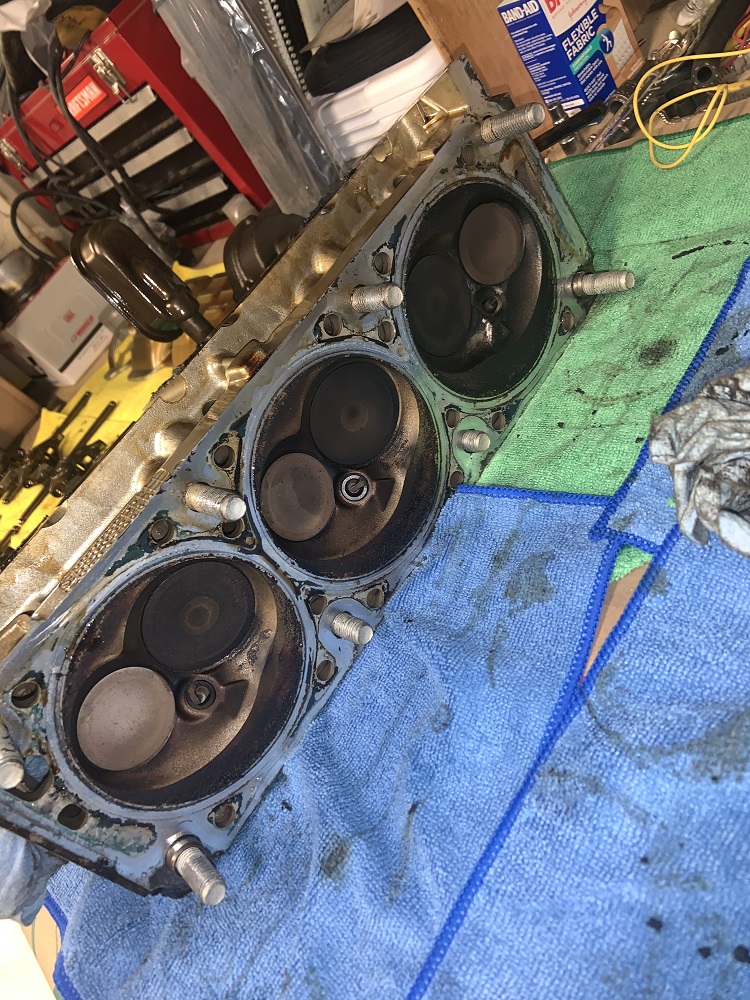
So then I decided to just take everything apart, I couldn't tell how good the crosshatching looked from the bottom so time for the heads to come off.
Head looks good
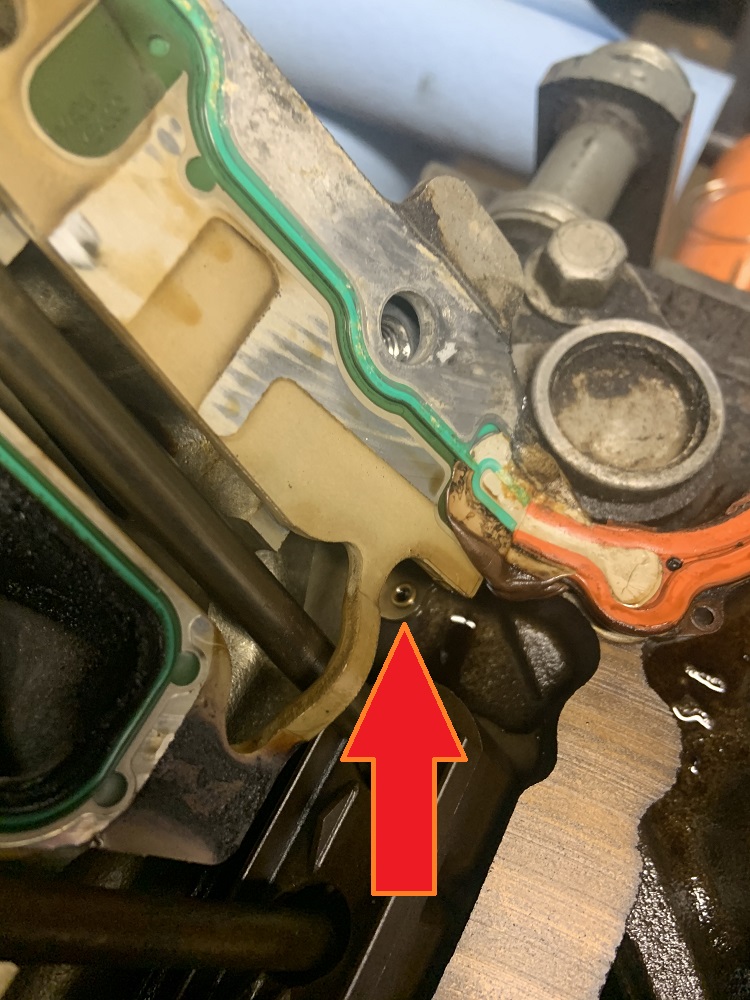
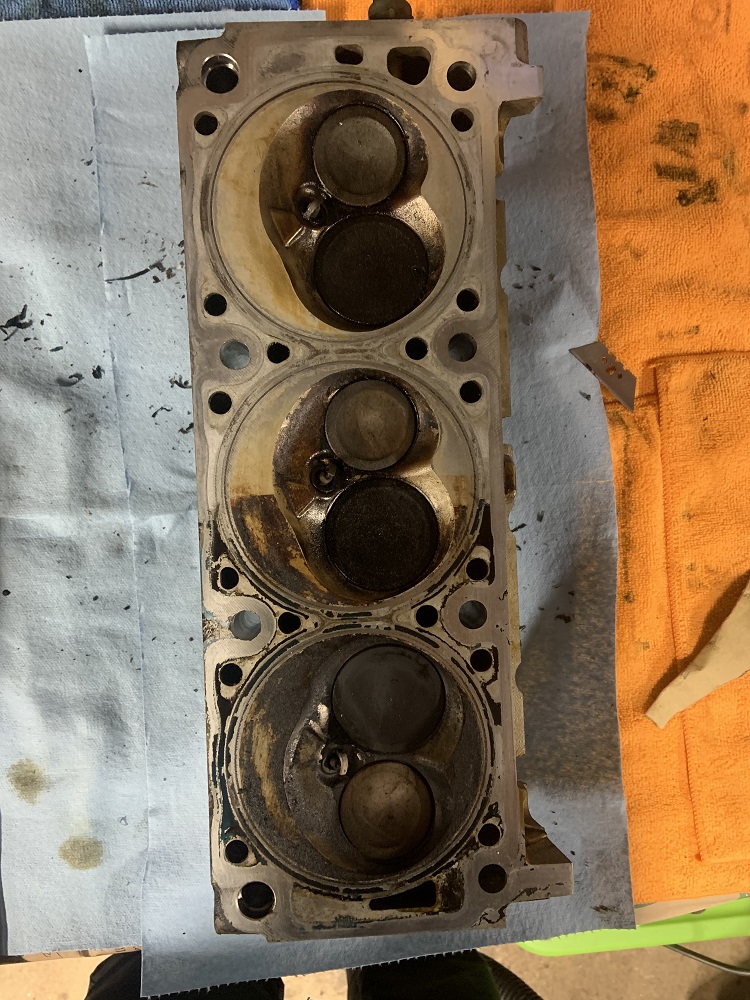
Half cleaned with a razor blade
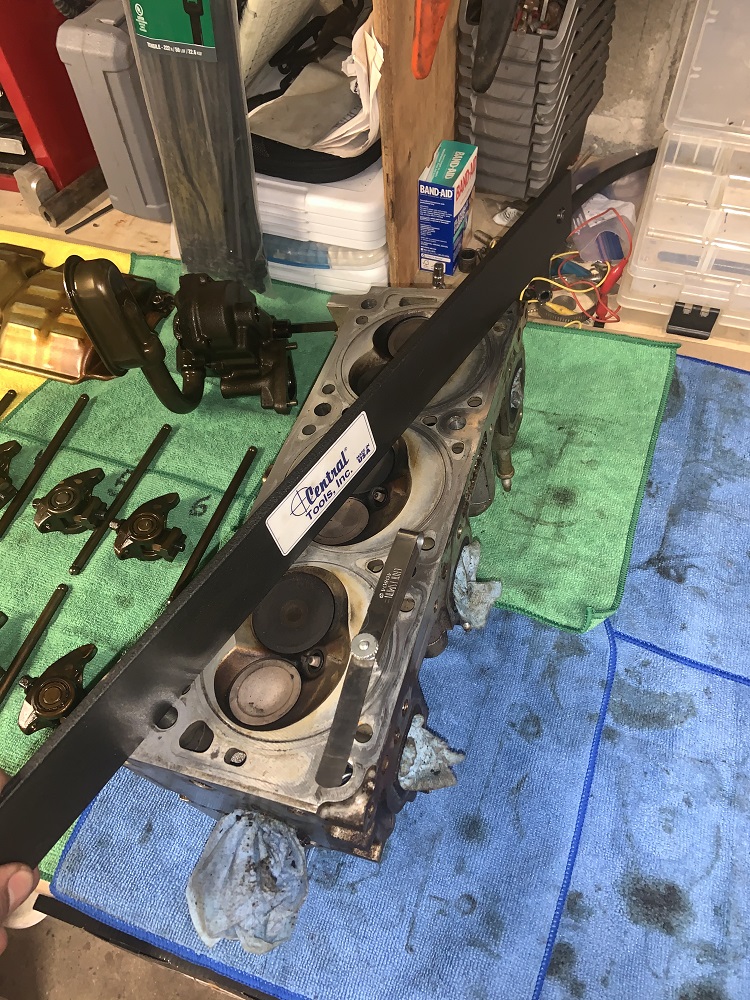
Checking flatness with this nice tool I have and a .0015" feeler gauge
They were flat almost everywhere but I found a couple spots it could slip through so I will bring the heads to get skimmed.
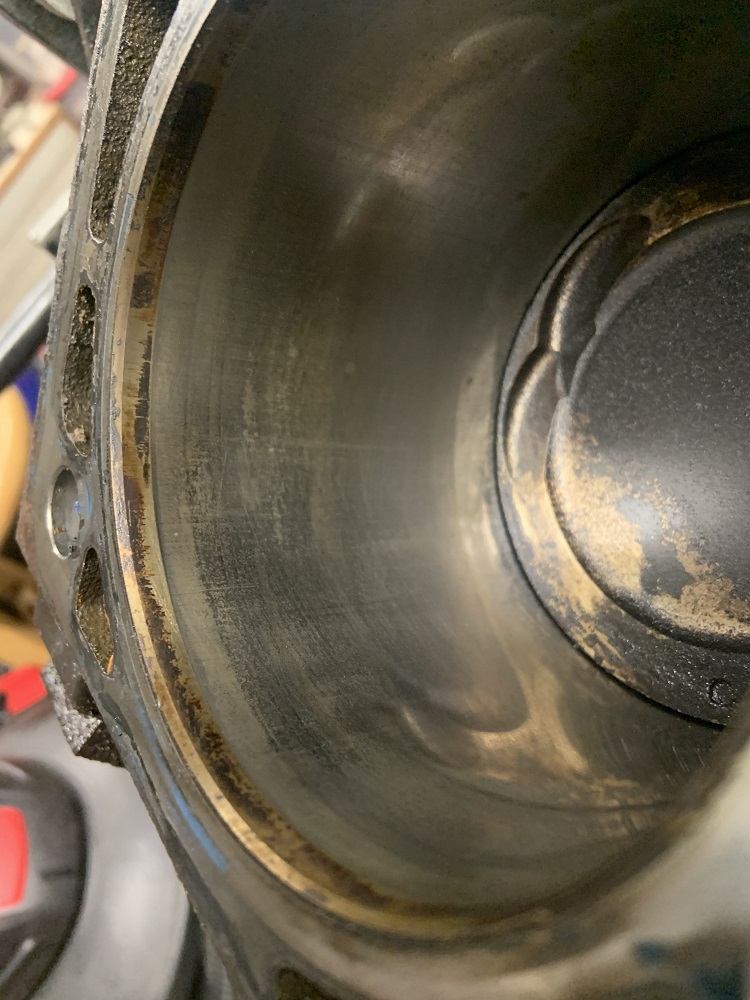
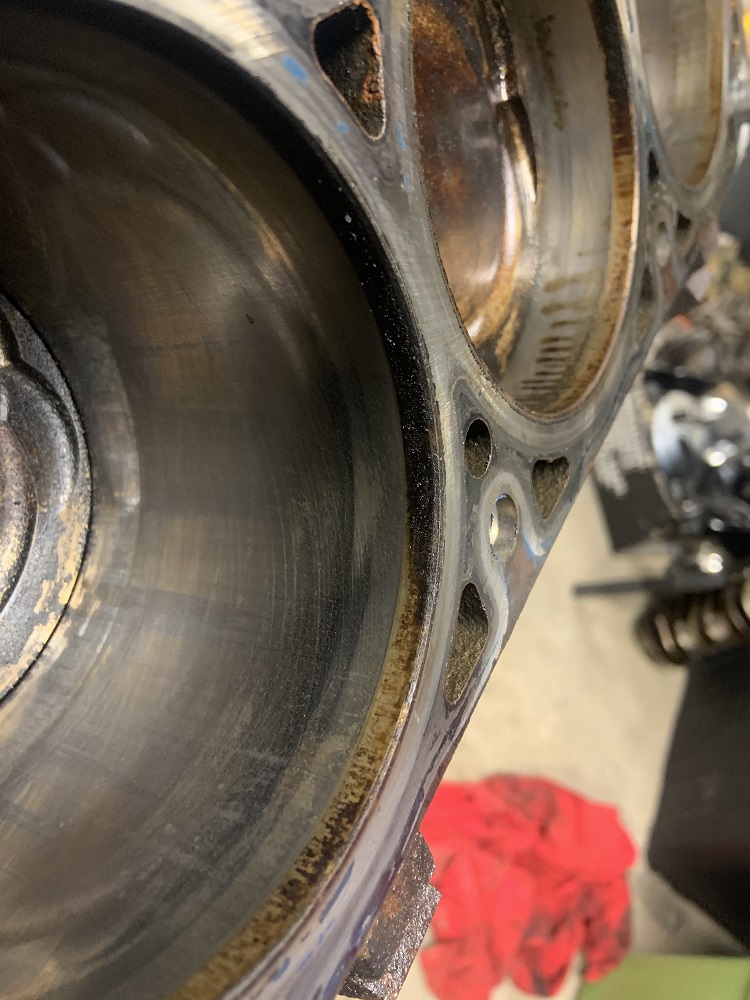
Crosshatching exists but is not great, bores are decently shiny. I guess I will hone the cylinders.
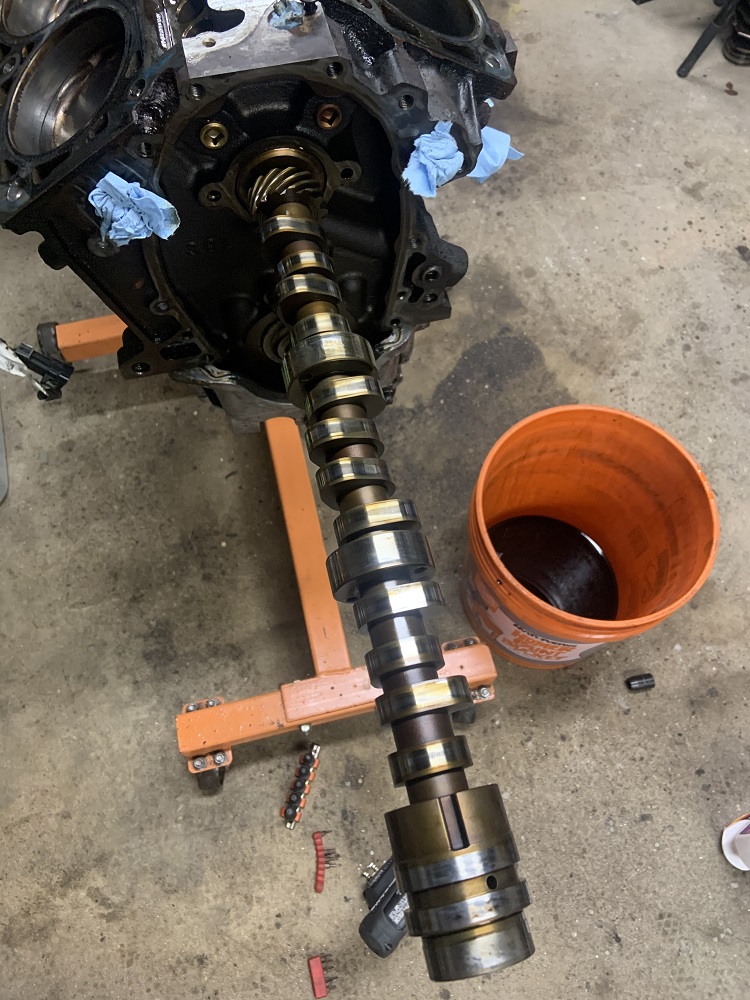
All the lifters and the cam look perfect
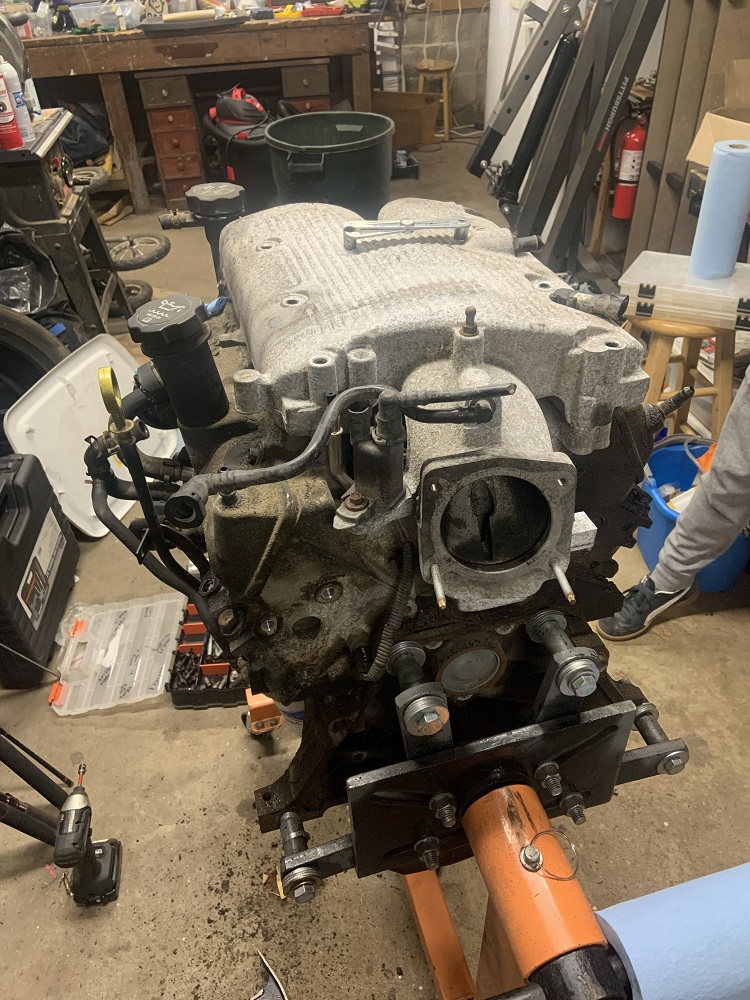
How the motor currently sits
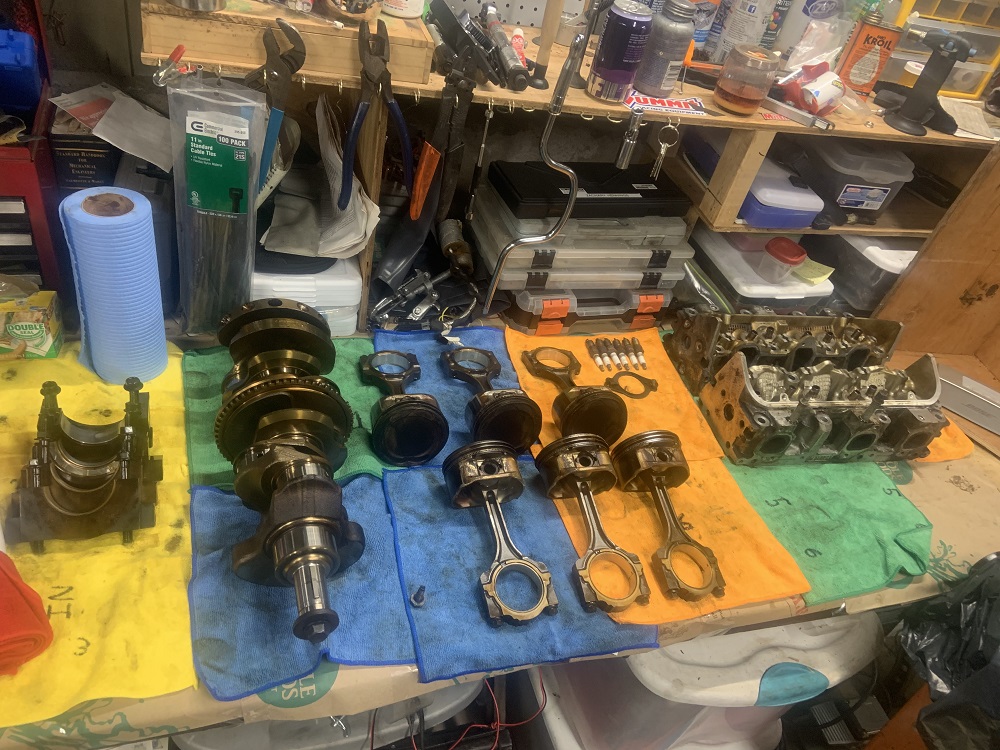
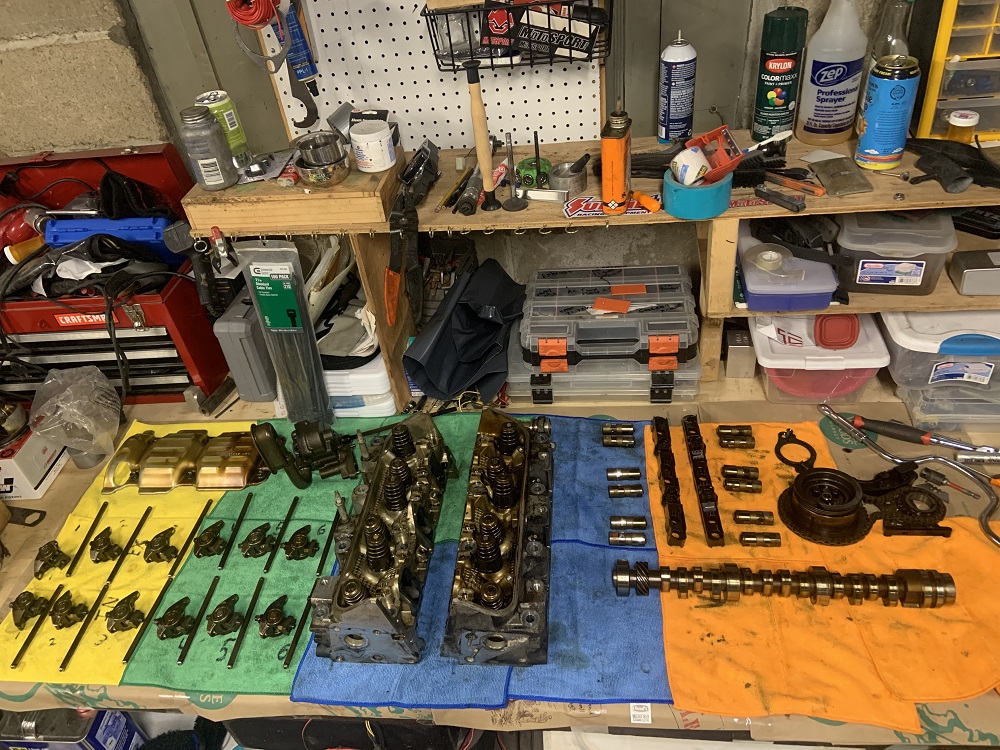
Parts laid out
Till next time
Next steps are to pull the pistons and rods out, I will pull the crank too and hone the cylinders. I am not going to replace the crank or rod bearings, just do ARP rod bolts for now, as I intend to get some stronger and lighter rods and pistons down the line, and I will do all the machine work and whatnot then.
I also want to get going on the cam as they take some time to make, I think I am going to order the Strip Cam from WOT Tech. Need to figure out what valve springs I am ordering too.
I brought both LZ9 and LZ4 intakes and N* TB with me to work, and I will begin machining the throttle adapter soon.
[This message has been edited by zkhennings (edited 03-29-2021).]
Strip Performance Cam with cam bearing spacers for the 3900, it is only $99 to get them included instead of $150 separately
"The WOT-Tech NA Stage 2 cam, also known as the Strip cam. It has a mild lope to it and suffers a slight torque loss in exchange for more RPM and HP. Shift points anywhere from 6500-7000 should consider this one, racing or street use. Tuning won't be too difficult for this one either.
Performance SBC Cam bearings, and I opted for the teflon coating for added protection, for $30 extra it can't hurt!
ARP Connecting Rod Bolts for Powdered Metal Rods - These I have questions about, I have to do more research because I want to make sure I am not going to oval the journal if the ARP bolts get torqued higher than stock.
Adjustable Pushrod to figure out what length pushrods I need - Another area I need to do more research, I tried to see how many turns it took to seat the stock rockers from the point that the lash was taken out of the pushrod, and it seemed like 1.25 turns, which is what the Fiero called for as well. Need to double check that
I did not order new lifters, mine seem pretty mint, I will take them apart and throw them in the ultrasonic parts cleaner and inspect them to make sure all the needles are nice and round. If I need new lifters I will order them when I order pushrods.
I also ordered a bottle brush hone from Summit, it seems like a really nice one, and it should fit mine and my brother's Subarus as well as the LZ9, and some of the LS motors.
Next on the list is figuring out what connectors I need to order from Ballenger, and figure out and buy the crimping tool that I will need. I will order a depinning kit as well to save myself the headache.
I need connectors for:
LZ9 Crank position sensor
Fiero Coolant Temp sensor, I need to get the 3 pin one so I can run the gauge too
Fiero or LZ9? Oil pressure sensor
LZ9 MAP sensor
LZ9 IAT sensor
N* TPS
Bosch EV14 Injector Connectors
LZ9 Coil Pack Connector
Fiero Alternator Connector
Fiero VSS Connector
At some point I may get the connector for the N* IAC, I have not decided whether I will be using it or not yet.
I already have an Innovate LC-2 Wideband sensor and gauge so I don't think I need a connector for it.
Also I called around to some machine shops and it seems like the going rate for resurfacing heads is $125 each, it includes a cleaning in the bath. So I am going to pay more than half the cost of the motor to get the heads resurfaced but it is what it is. If anyone knows a shop in the Boston area that has better prices let me know, because I called like 5 machine shops and they all quoted me the same price. I doubt I would need the heads resurfaced again though until I put some serious miles on this thing, so it is acceptable.
Excited to be making progress
[This message has been edited by zkhennings (edited 03-12-2021).]
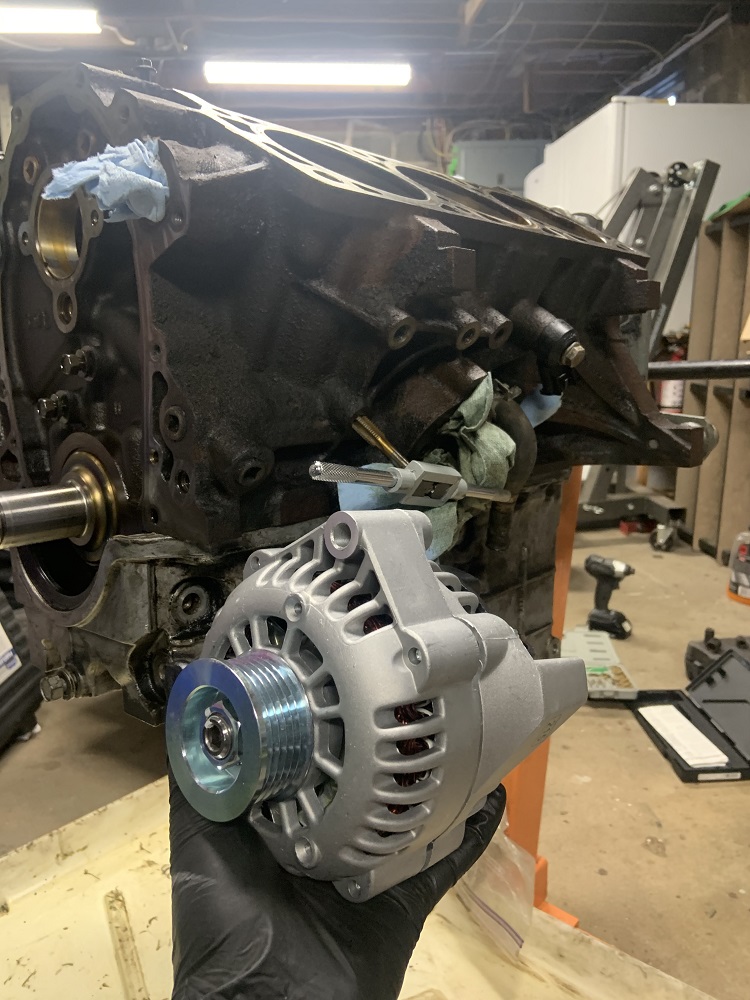
Ordered a lot of remaining things, all the gaskets and seals and whatnot, piston rings, a new Uplander engine mount (which is the same as a 3800 mount), 88 Fiero flywheel, all the parking brake cables, the newer model starter motor, and an alternator from a 99 Chevy Astro 4.3.
I was looking at the 2009-2011 Lucerne alternator which physically looks like the Astro alternator (it will be very easy to make a bracket for), and the Lucerne alternator (and Uplander) only have a 2 pin connector, and I was only planning to use a 2 pin setup so I was thinking this was perfect. Turns out at least one of the pins needs to see a PWM signal and it adjusts the output based upon that. A neat feature but a complexity that I would rather not deal with right now. I was happy to see that the 99 Astro alternator has the same mounting scheme. It is also quite a bit cheaper which was nice.
My current thoughts are that I will make the tensioner that originally bolted to the timing cover be between the crank pulley and the alternator in the original AC spot. I should have space because I need to put the alternator a little far away from the motor to get the belt routing to work, leaving space in between the alternator and crank pulley. Instead of tensioning the belt with the alternator, I can tension it with the tensioner and it will also be doing double duty to improve alternator belt wrap. It should be very easy to attach to the alternator bracket/front motor mount combo with the help of a mill to carve the necessary slots for the tensioning features. Since this bracket is so long I may take it all the way to the front crossmember and have it tie in there to either replace or just aid the dogbone. Edit to say that if I wanted to reuse the stock tensioner I would need to put a smooth pulley on it, but there are models from plenty of other cars with a smooth pulley if the stock one isn't going to work for me.
Since I want to keep the oil cooler/heater but don't necessarily want to notch the frame, I will probably use an oil filter relocation setup which I could always use for an external oil cooler if I ever needed it, but I would probably mount the oil filter under/ behind the alternator to the same big bracket that I am trying to have serve for many functions. It would be in a great spot for access, it would be nice and cool, and it wouldn't spill oil on anything
[This message has been edited by zkhennings (edited 03-09-2021).]
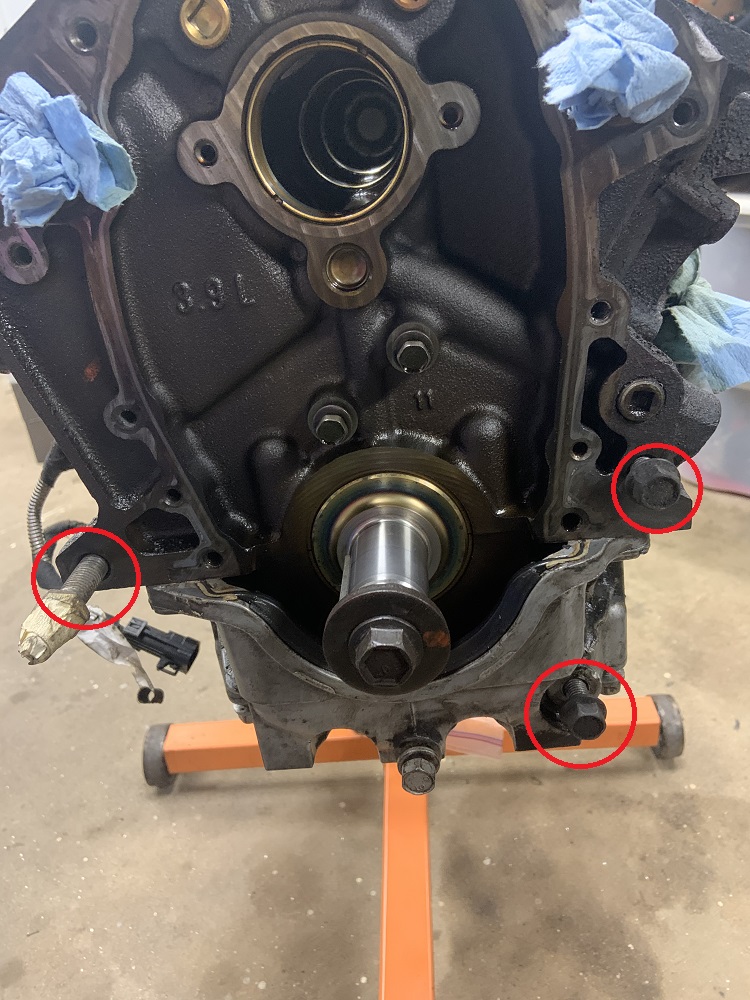
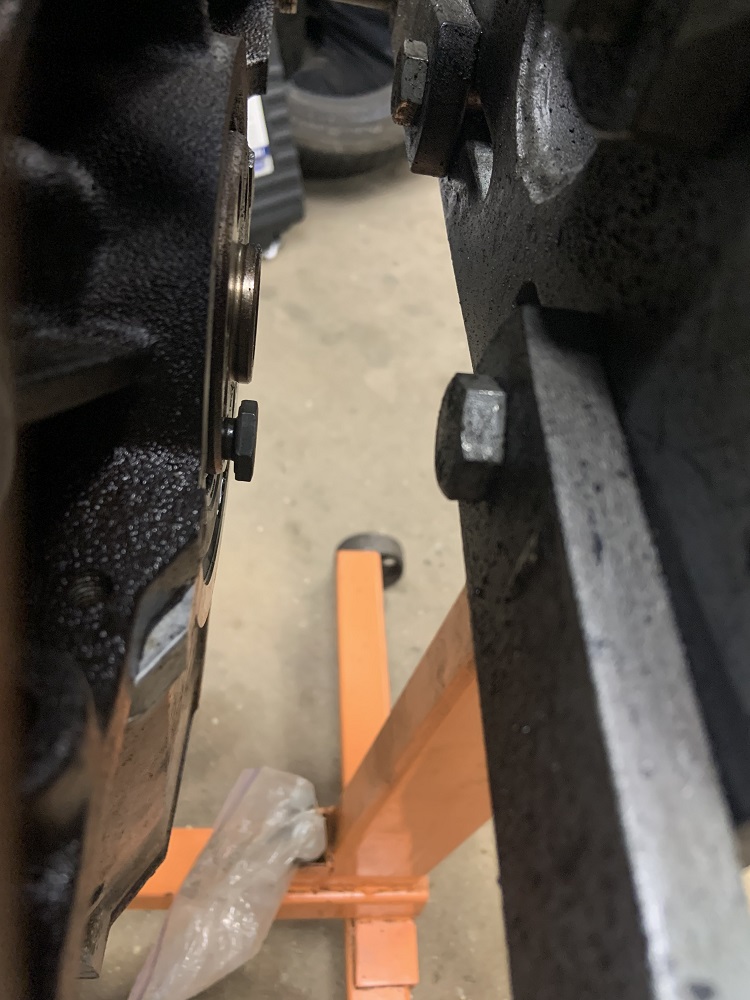
I wanted to confirm the bolt sizes that I will need for my motor mount/alternator bracket. Here are the bolts in place, and on the side I may or may not need to reinforce with that one. On the even side bank of the motor there are two holes in the same plane where the AC compressor normally bolts, I think that if I make the steel in this area thick enough I may not need to support the alternator from the backside (it will be in single shear)
Side bolt hole I may need
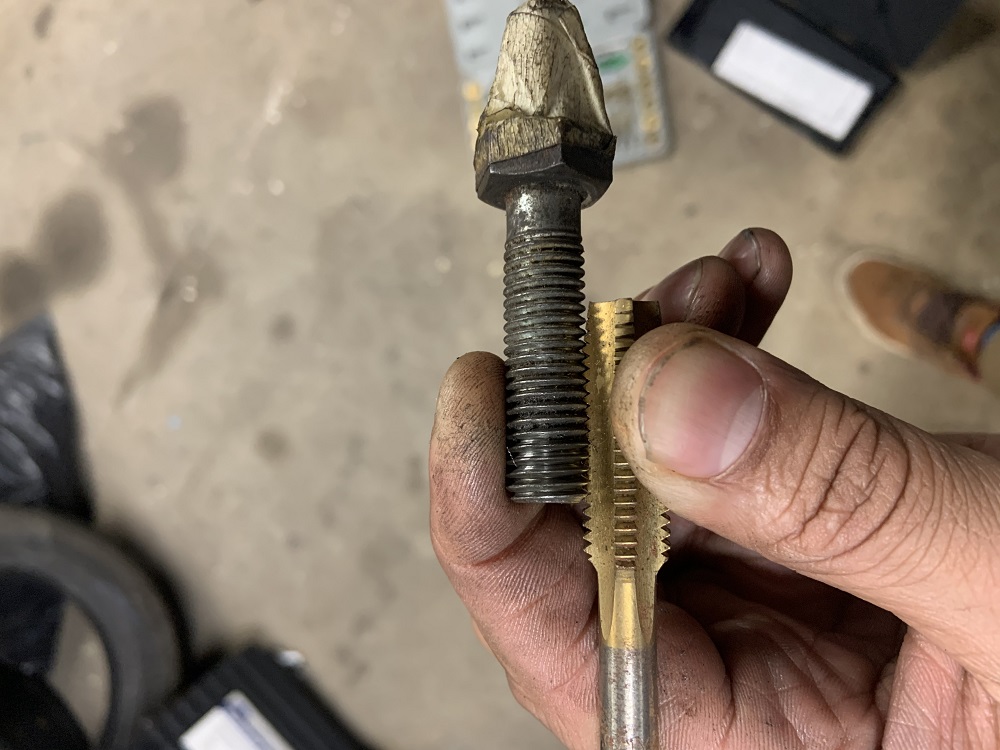
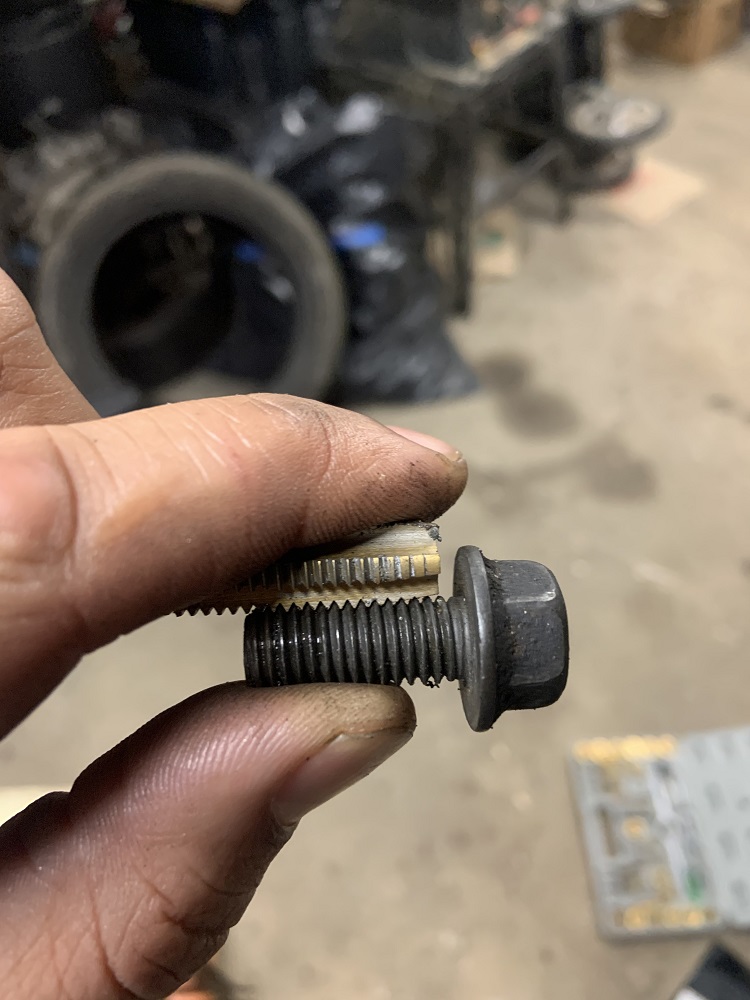
The sizes are M10x1.5 and M12x1.75, I double checked with some taps
I may order some fresh bolts for these. Here is what the G6 engine mount looks like, and the two oil pan bolt holes I plan to attach to
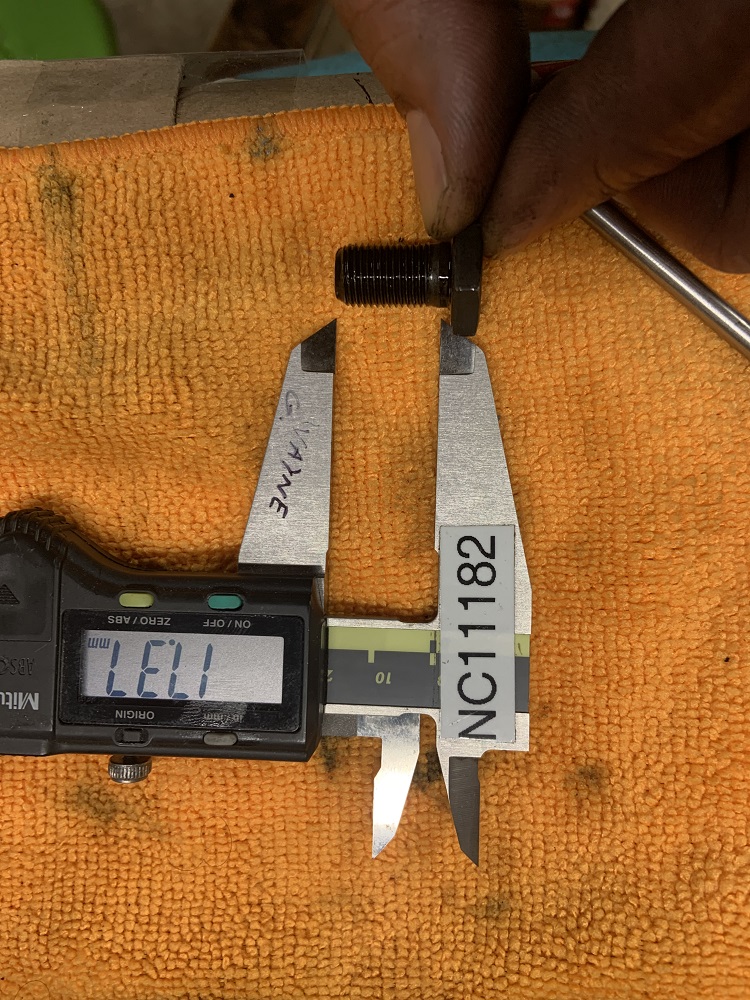
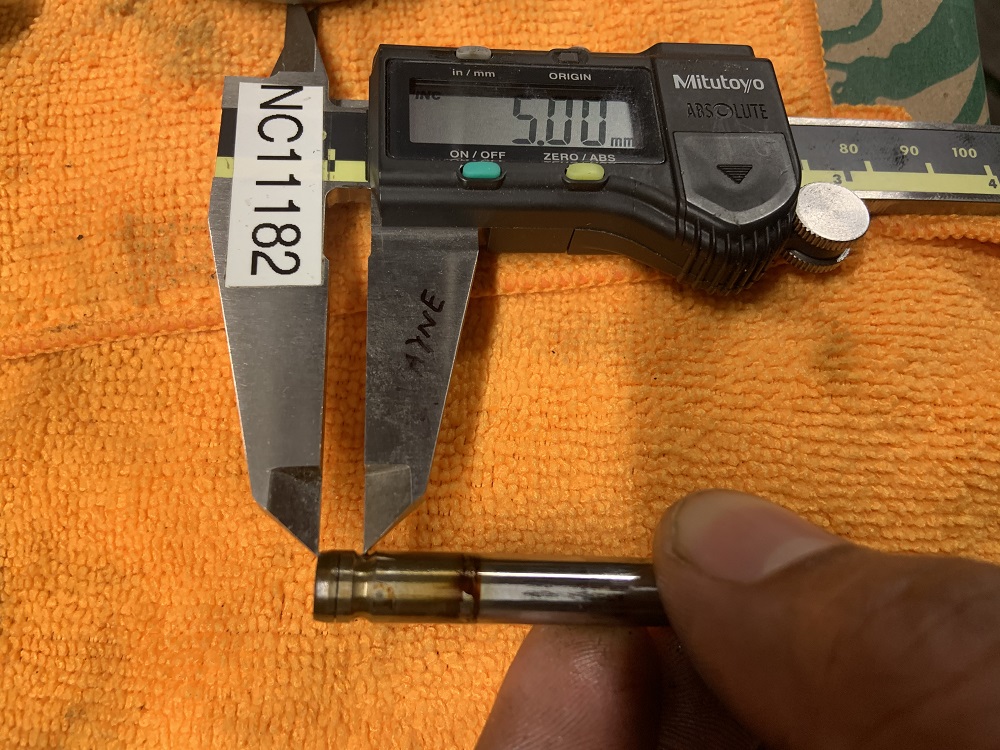
Next I needed to figure out what flywheel bolts to get, I planned to get 23mm ones like stock Fiero, but could only find 23.5mm ones, and I wanted to make sure they would fit.
Here is around how deep it threaded in, so I will be fine it has a lot of leeway. I ordered these ARP bolts for the flywheel and these ones for the pressure plate.
Pressure Plate - ARP 108-2201 for Honda D series engines - M8x1.25 - 25mm (stock is 22mm but these were closest they had and I think they will be fine, if not I'll shorten them)
I also talked to PAC today about retainers and locks for the 1218 springs and my application. They suggested these 311 retainers and these -.050" locks to increase my seat and open pressure. I ordered one set of both just to make sure they will fit before ordering the rest.
Part numbers:
PAC-R311
PAC-L8116
LS valves are 8mm in diameter, LZ9 are 7.95, close enough
The locks use a rounded cutout 5mm from the valve tip, I will compare the height to stock to make sure they are at the correct install height.
And finally, parts came in, nice.
[This message has been edited by zkhennings (edited 03-12-2021).]
I'm 90% on the header flanges, just a little more work to do. I'm looking into production options, ATM, but will probably be setting up a run later this next week.
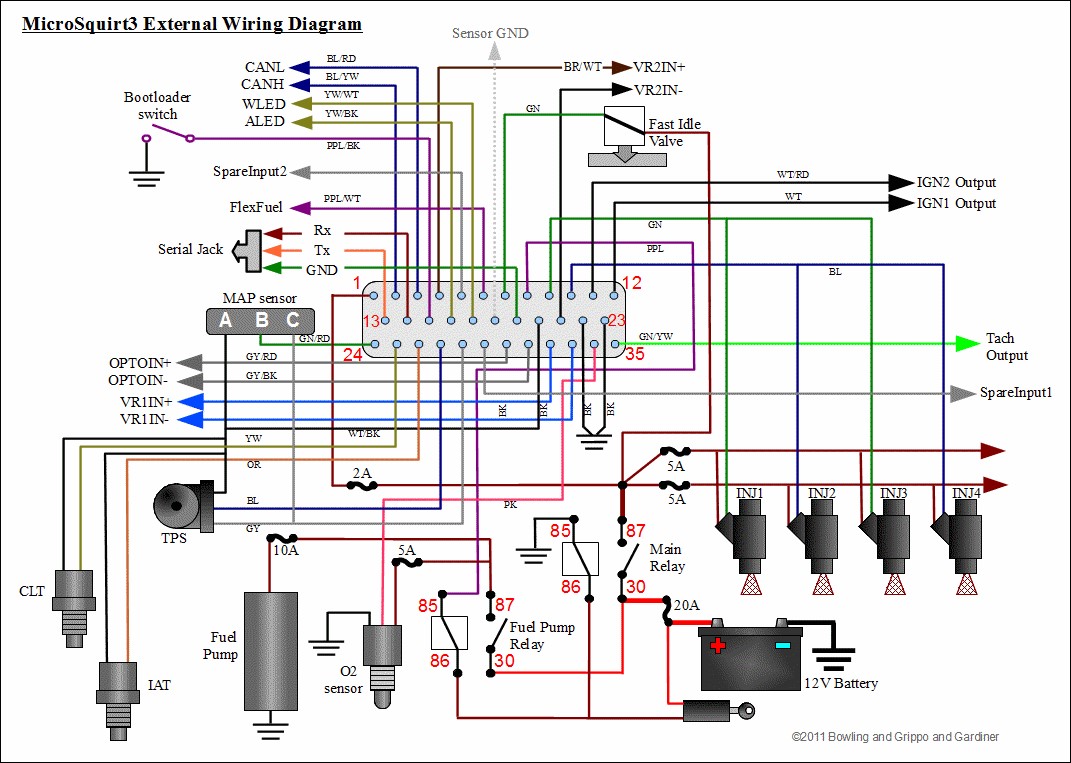
For the oil pressure gauge, you have 2 options, you can use the stock fiero sender and wire it up like stock fiero, or you can input the LZ9 OPSU into the microsquirt, and use a spare PWM output to drive the gauge (assuming you have a spare) I used the 2nd option in a more round about route with my LX9.
For the temp gauge, you can machine a 3 wire sending unit to fit where the LZ9 sender fits, or you can do as described above for the oil pressure gauge, again, if you have an unused PWM output. there's also the third option, of drilling and tapping a coolant passage for the stock fiero style sending unit.
Here's the thread I started about using the PWM outputs, I see that I never made the video like I said I would though... I'll have to fix that.
------------------ "I am not what you so glibly call to be a civilized man. I have broken with society for reasons which I alone am able to appreciate. I am therefore not subject to it's stupid laws, and I ask you to never allude to them in my presence again."
Interesting stuff and good to consider, here is a diagram for the MicroSquirt, I have to do more research to figure out which of the remaining outputs could be used to drive the coolant temp and oil pressure gauges.
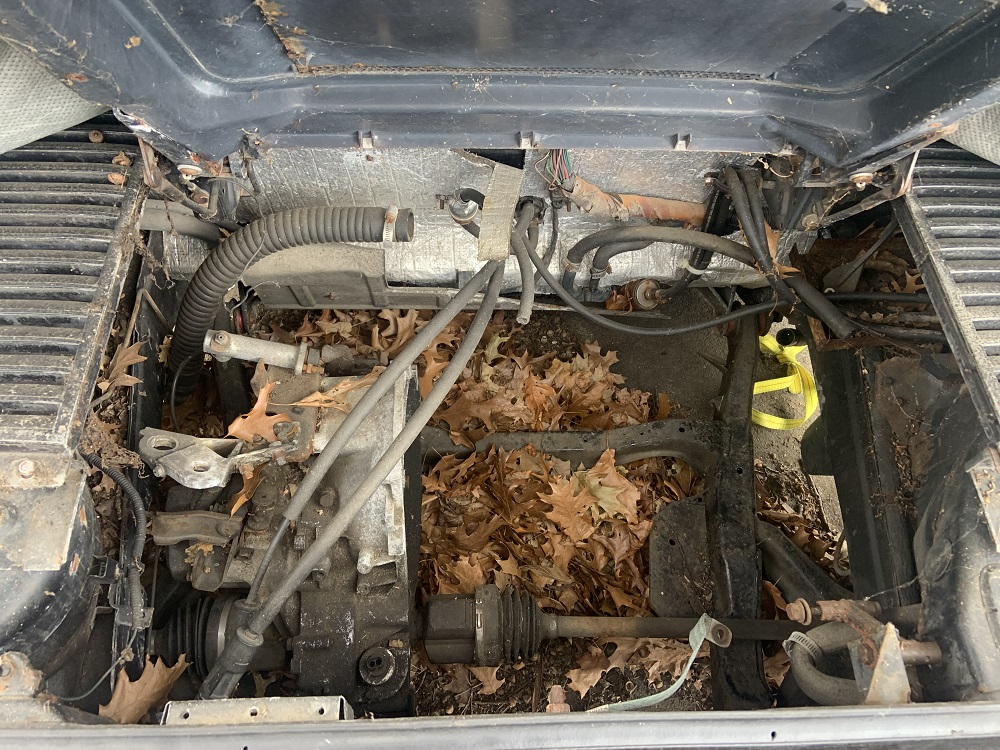
Weekend updates. I found my Fiero's keys which was a relief, and checked it out. It was dirty and the engine bay had accumulated some leaves, but nothing too bad for sitting for 6 years.
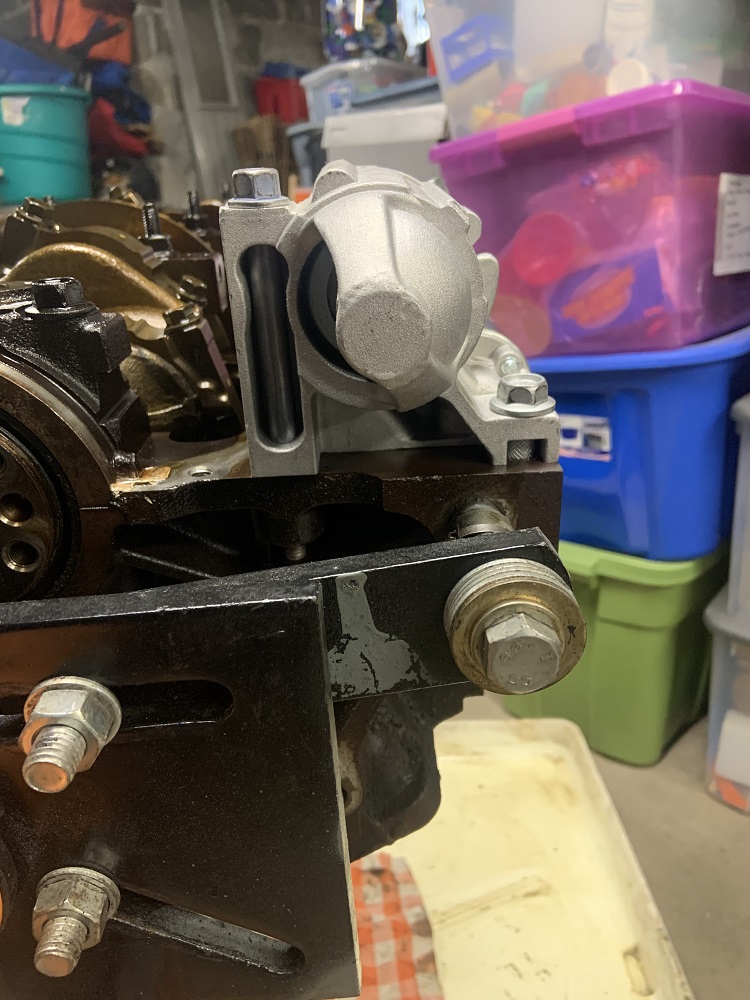
Mounted the starter with the new starter bolts I bought to make sure everything was good, it is a slightly newer starter than what was on the 2007 Uplander, it was for a 2011 Lucerne. It is incredibly light, multiple times lighter than the original Fiero starter.
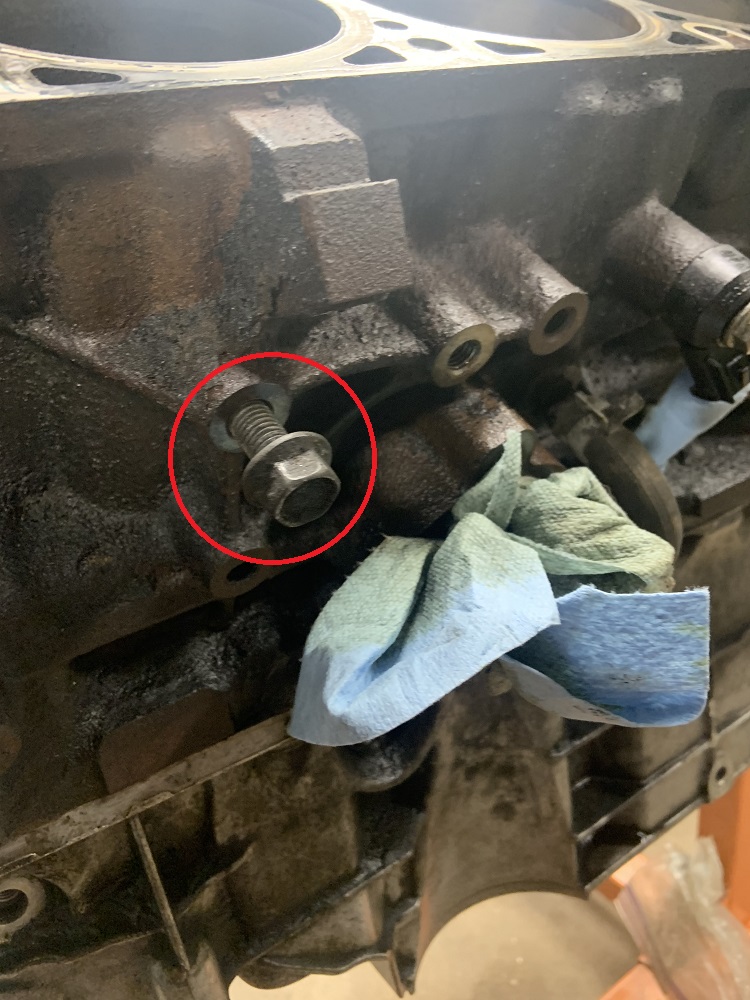
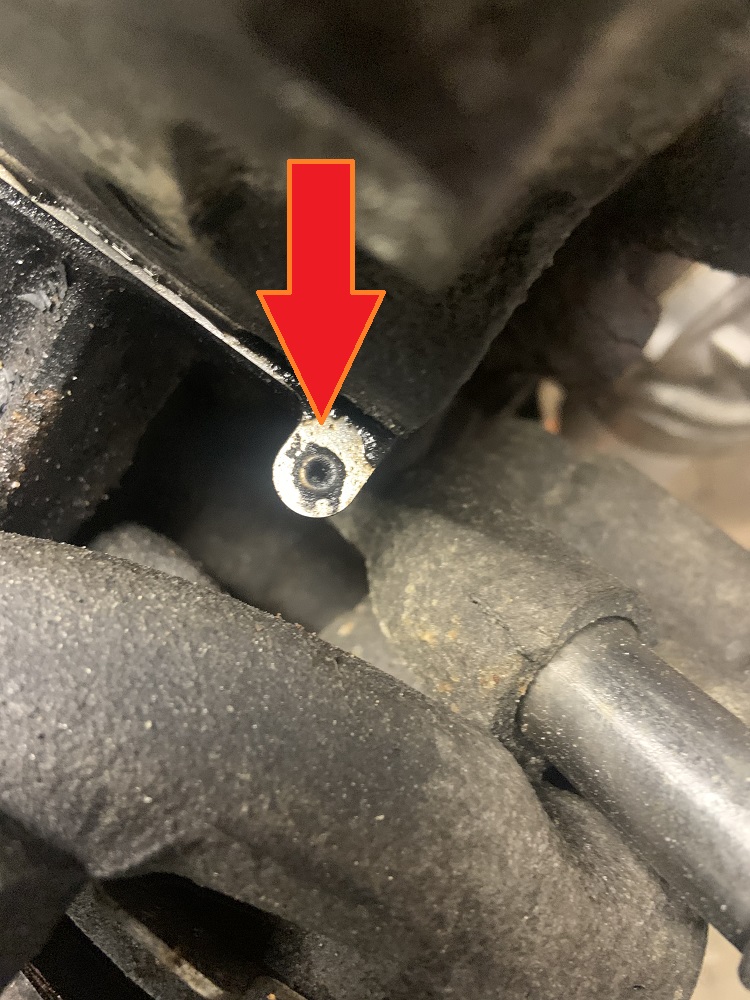
Also checked alternator placement, and I have a tap cleaning out an unused hole on the block. That hole plus the one above it could mount a small bracket to support the rear of the alternator, and it would turn the alternator into a semi load bearing member for the motor mount which would be cool, it is done all the time in motorcycles where their engines complete the frame.
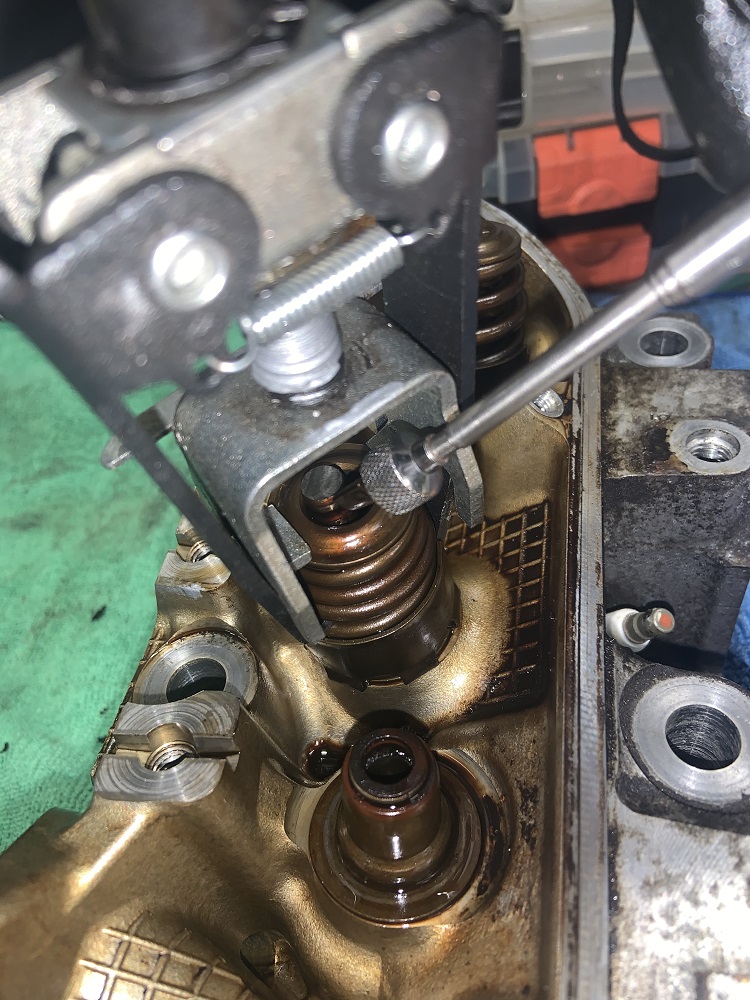
I stripped the heads fully and removed all the valves.
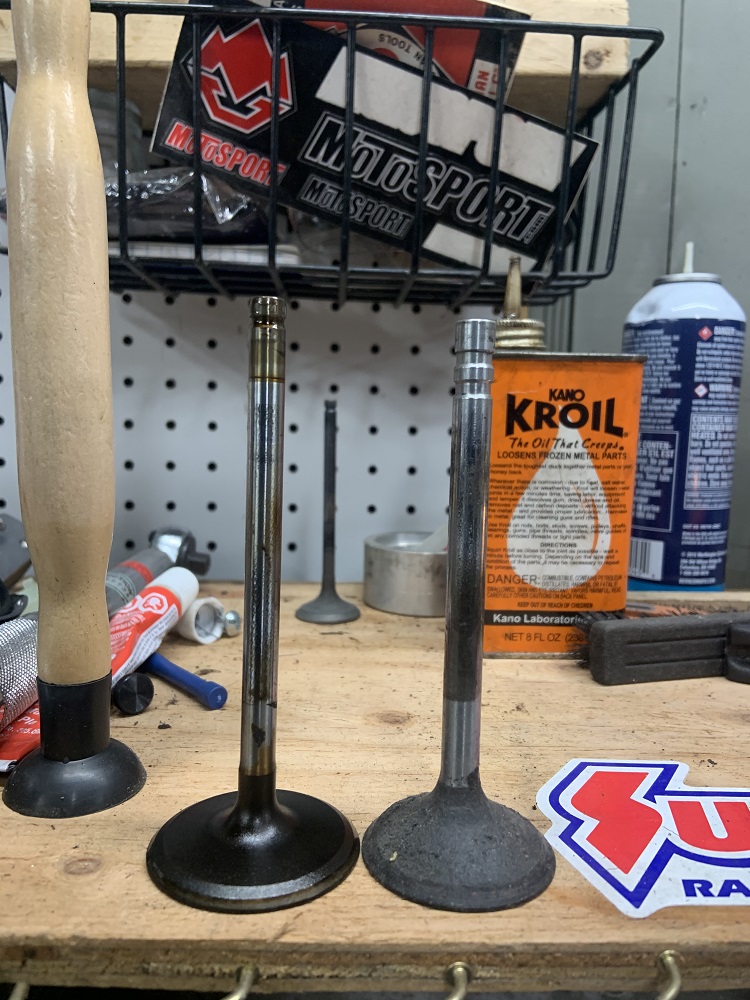
Here is a comparison to the 2.8 valves, note the 2.8 stem diameter is much larger, and the valve head is much thicker. Interesting how some parts evolve to be beefier and some get slimmer.
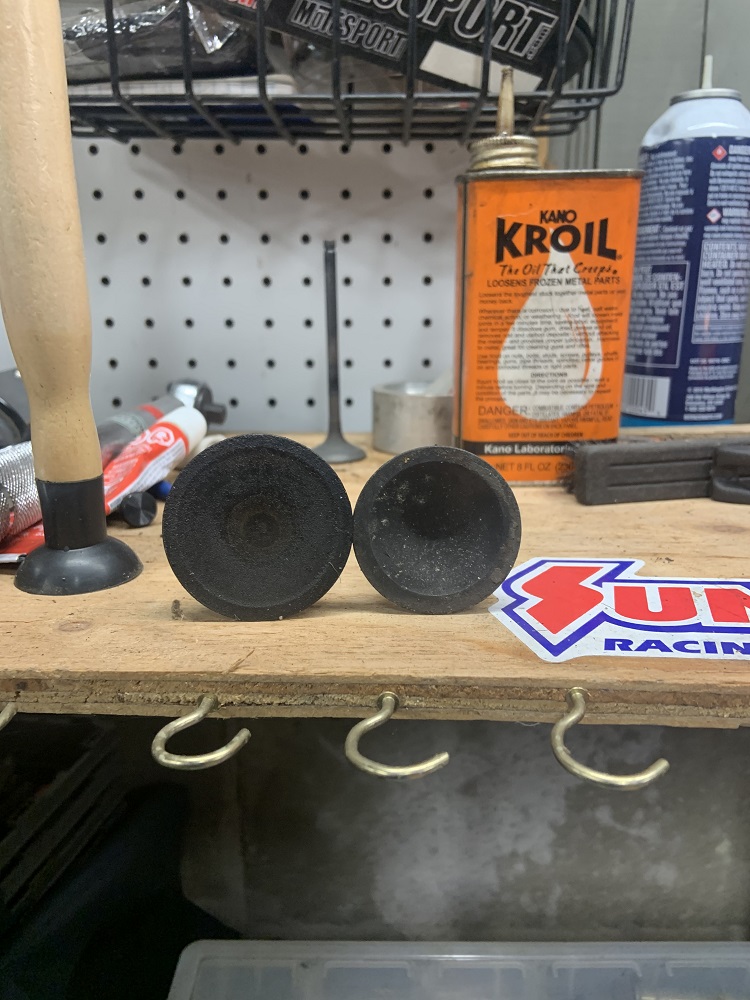
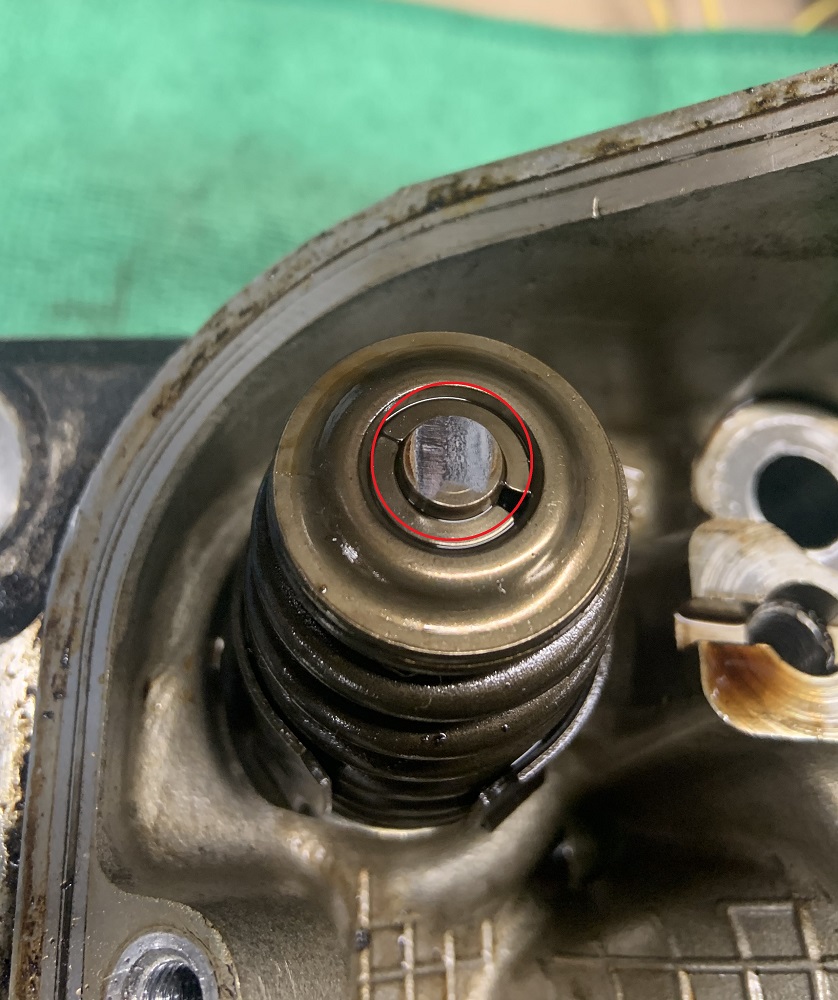
Here is a pic of the wear on the valve tips, should I get these and the rocker tips resurfaced or as long as a I reinstall in the original position will they be fine? I will get new valves and rockers eventually but I have already spent much more than I want to and they are 20-25$ per valve for the stock stuff and 25$ per rocker arm. I COULD BE CONVINCED THOUGH. Maybe.
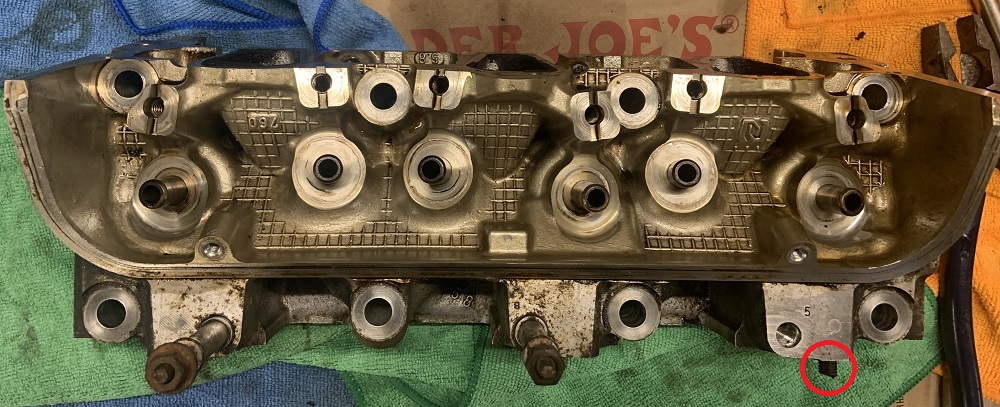
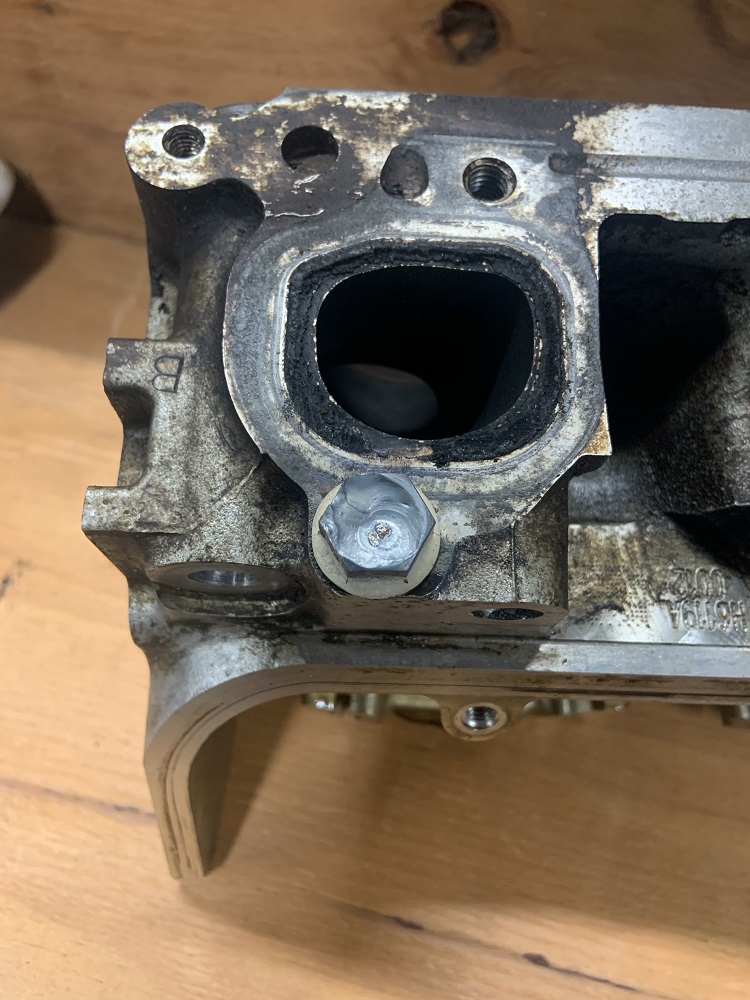
Cylinder heads were totally stripped, but I still had a broken exhaust stud on one. The castings on these 3900 heads are amazing, very impressive.
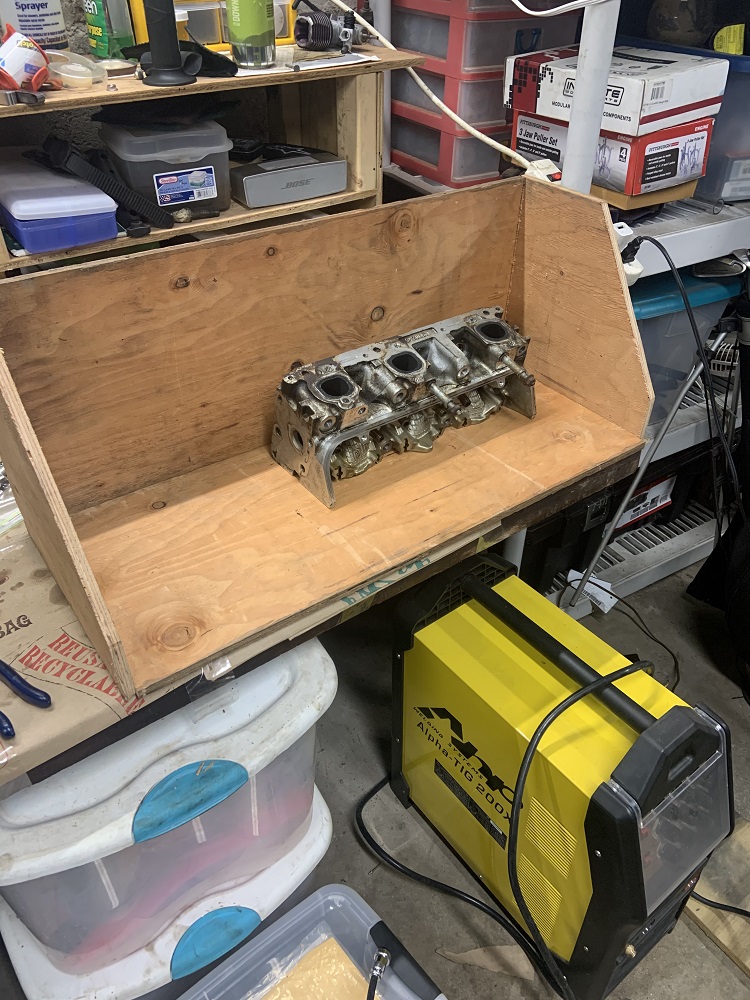
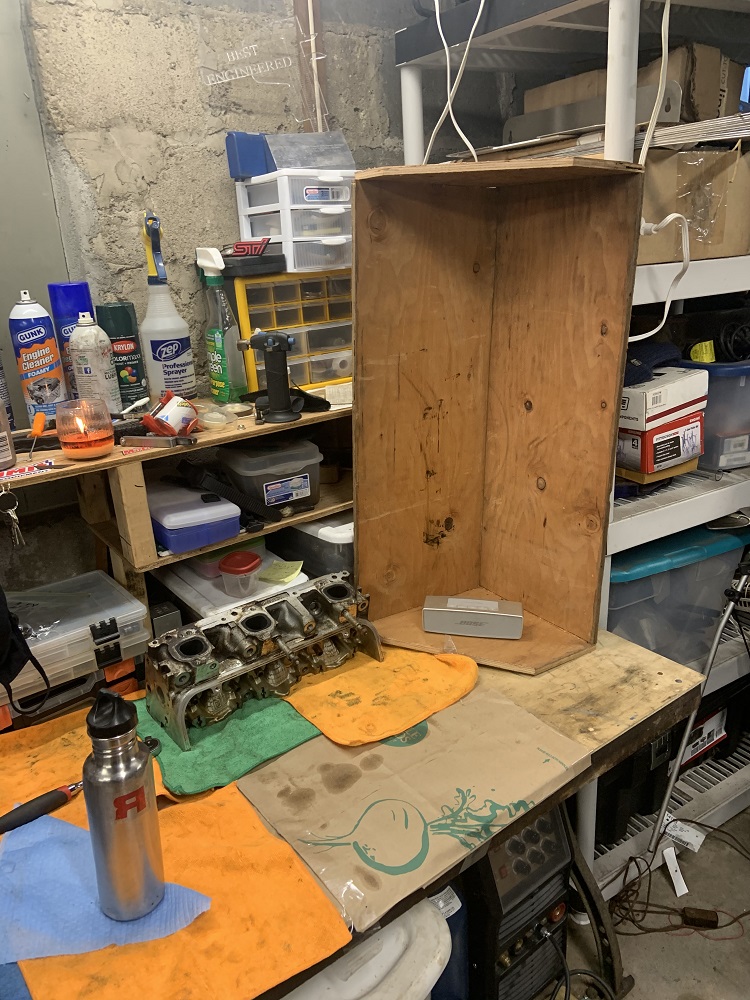
I needed to weld a nut to the stud to take it out and I could have broken out the Mig, but since I have a bunch of stuff to Tig and my Tig was not set up, I dedicated some time to getting it set up and I built this portable wooden Tig welding zone that I can also bring to my apartment.
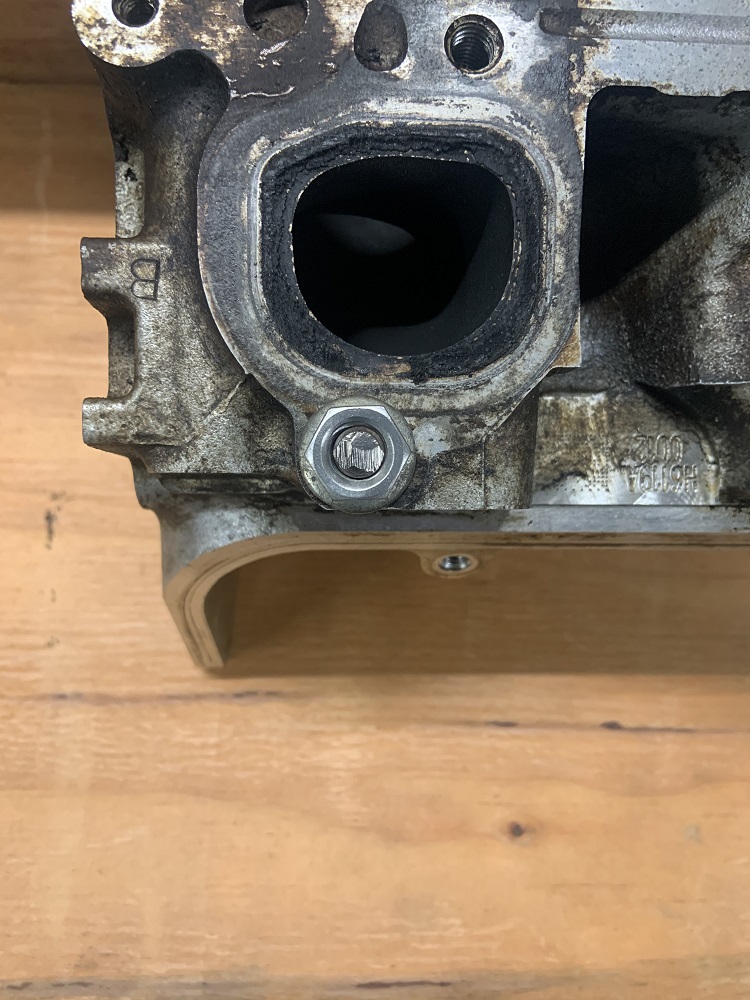
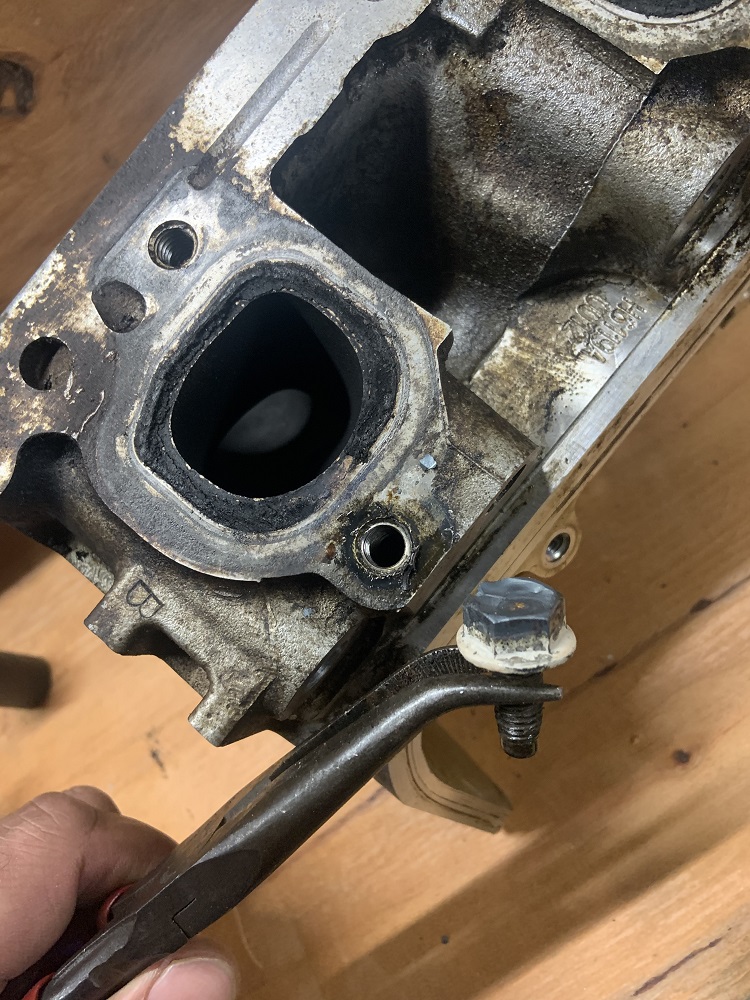
I used a Subaru turbo flange nut which slipped over the broken stud. I hit them both with the wire wheel to get them clean.
Welded.
Removed. Easy.
Heads are now ready for porting and going to the machine shop. And the Tig welding zone turns into a speaker enhancer lol.
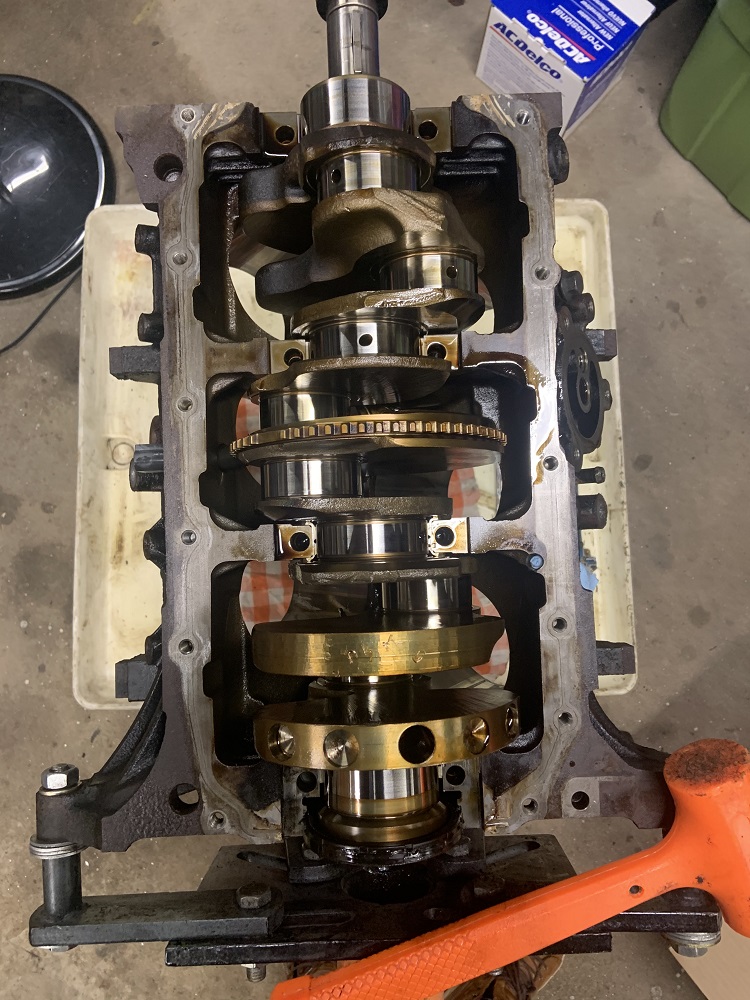
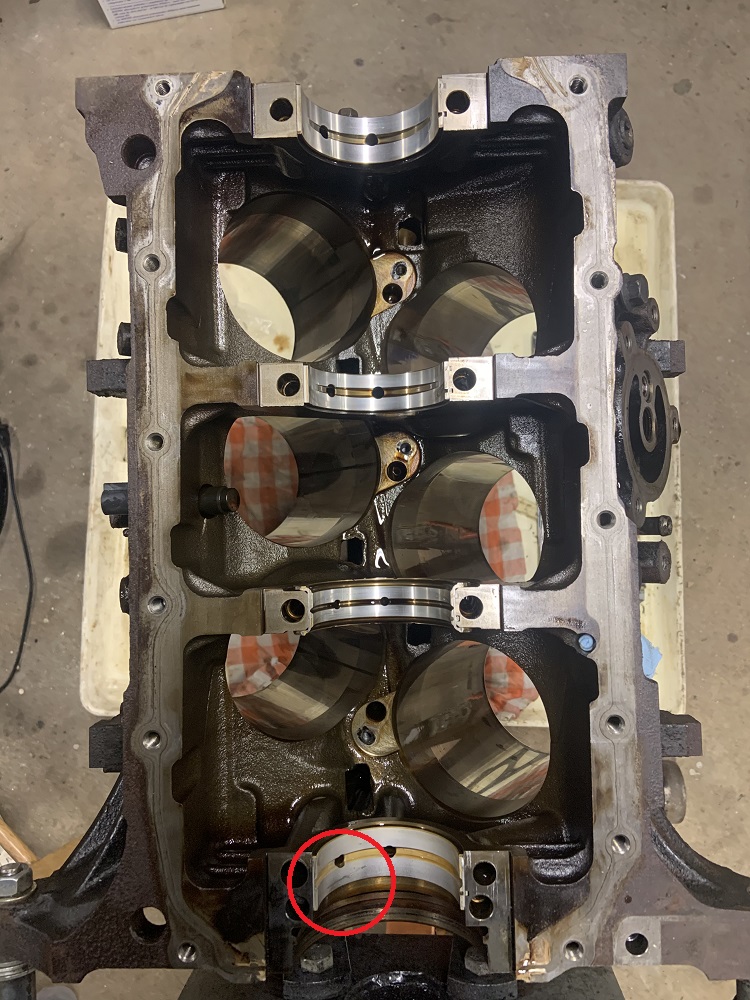
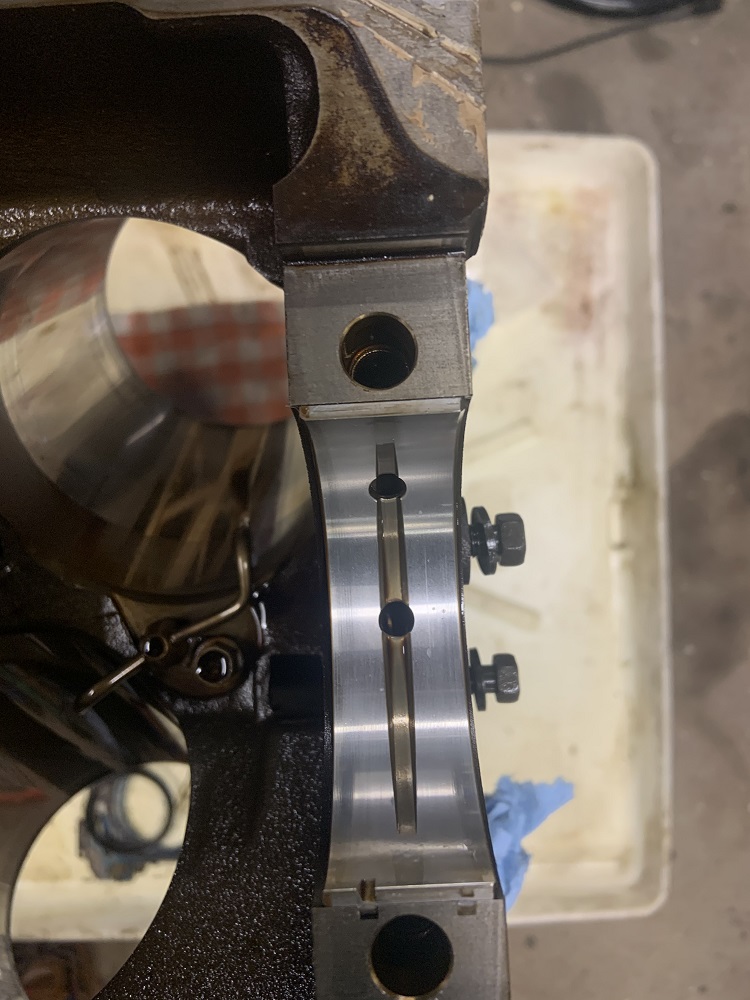
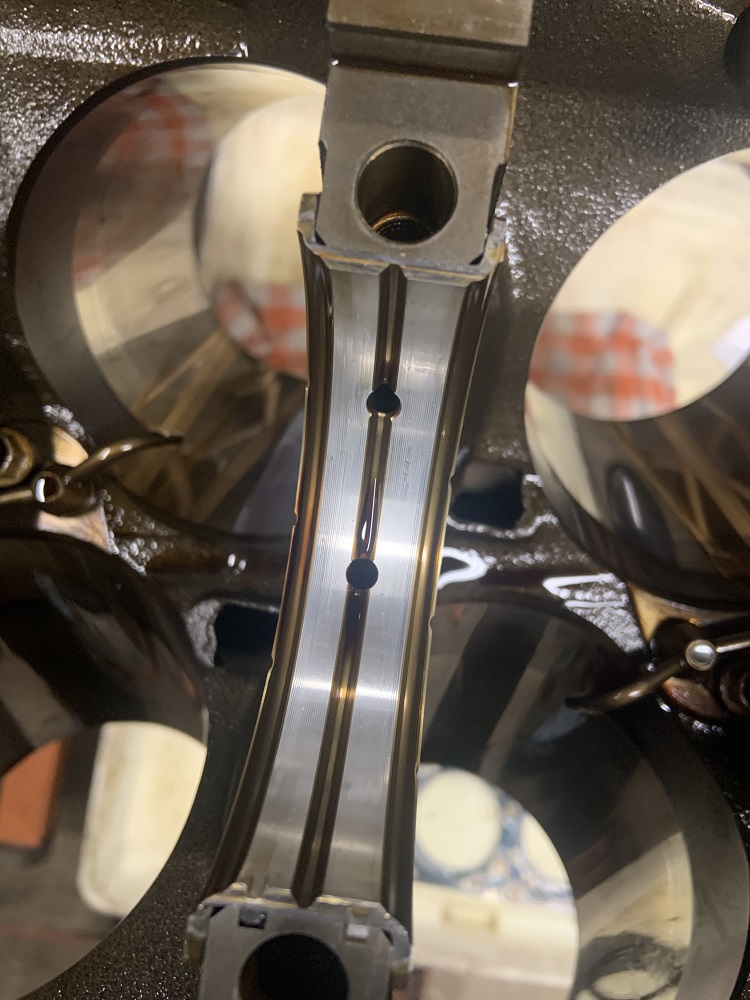
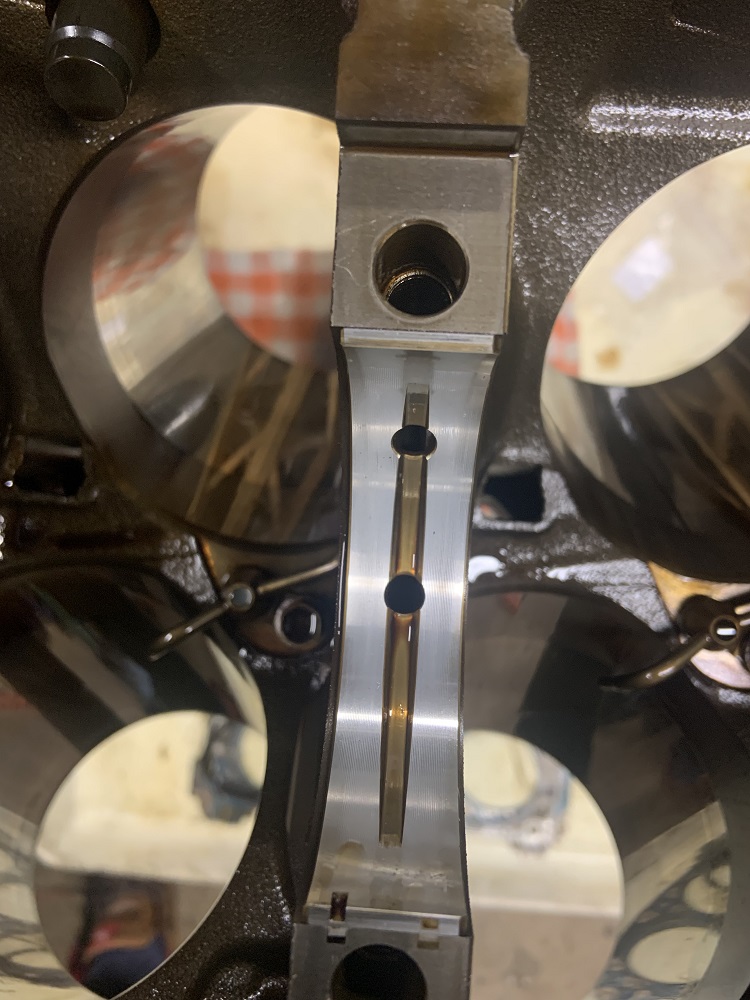
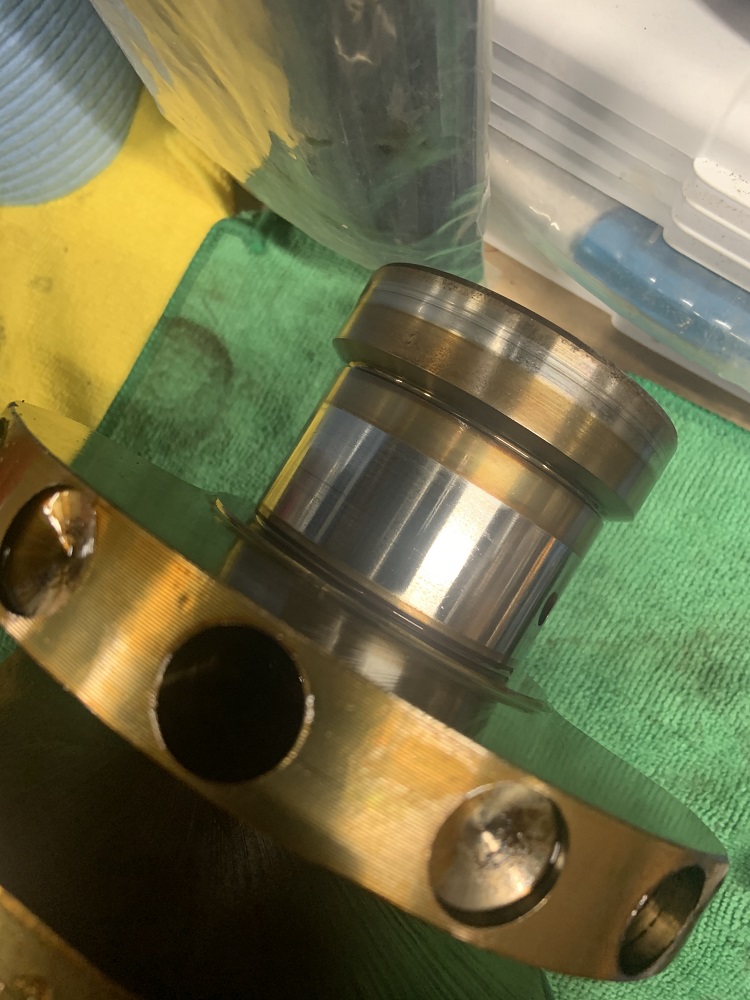
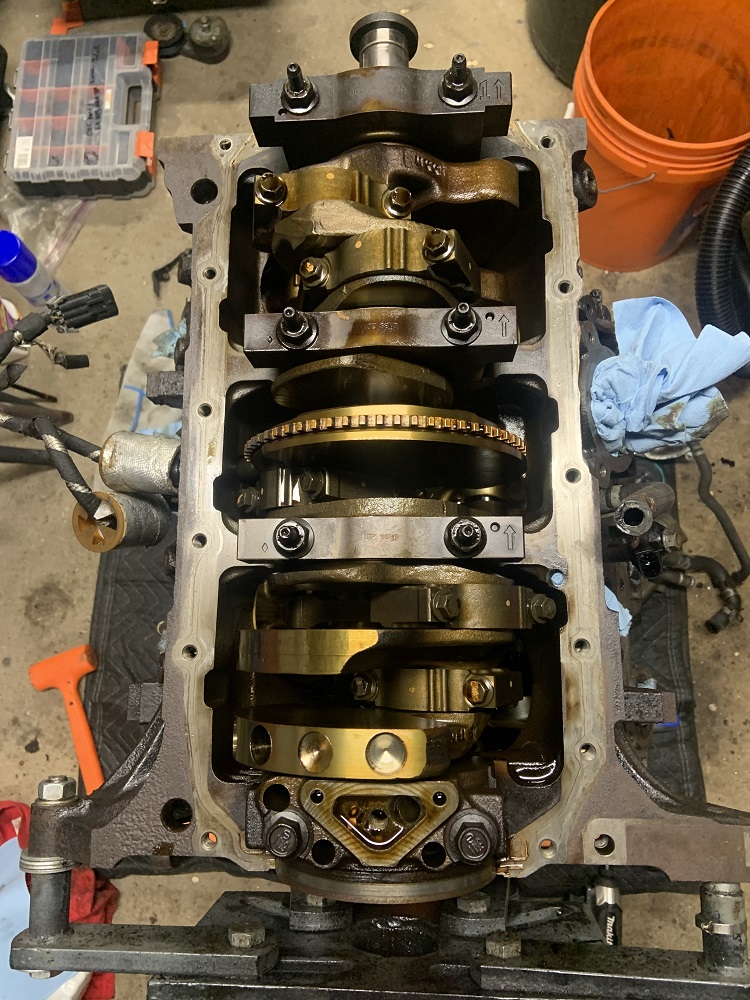
I turned my focus to the block and removed all of the pistons and rods and then all the main caps.
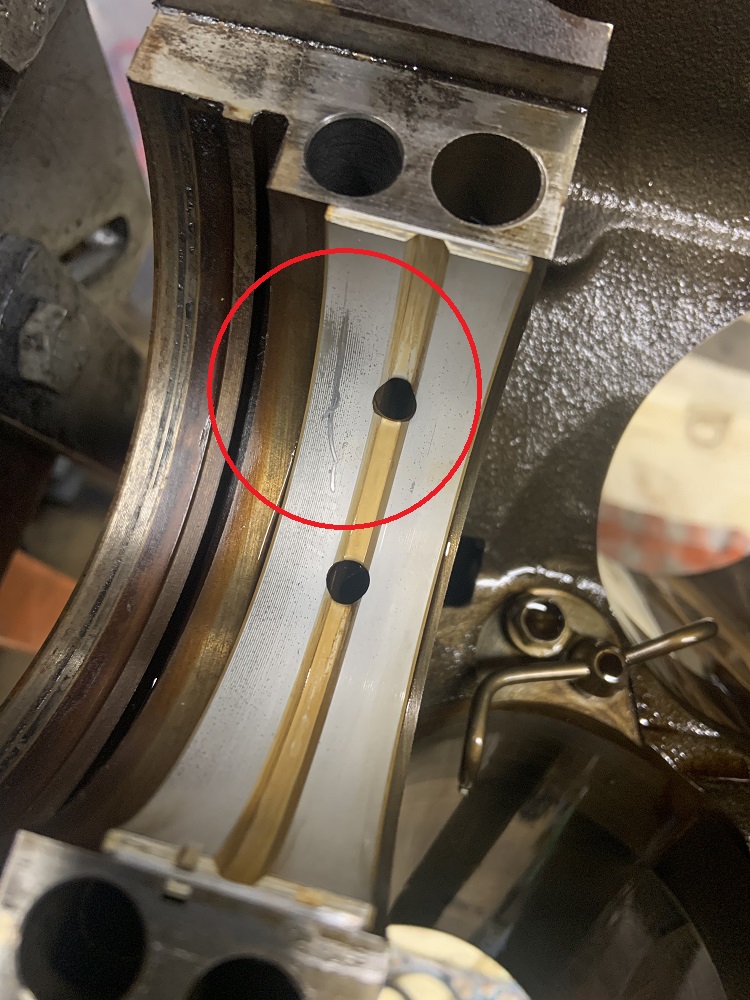
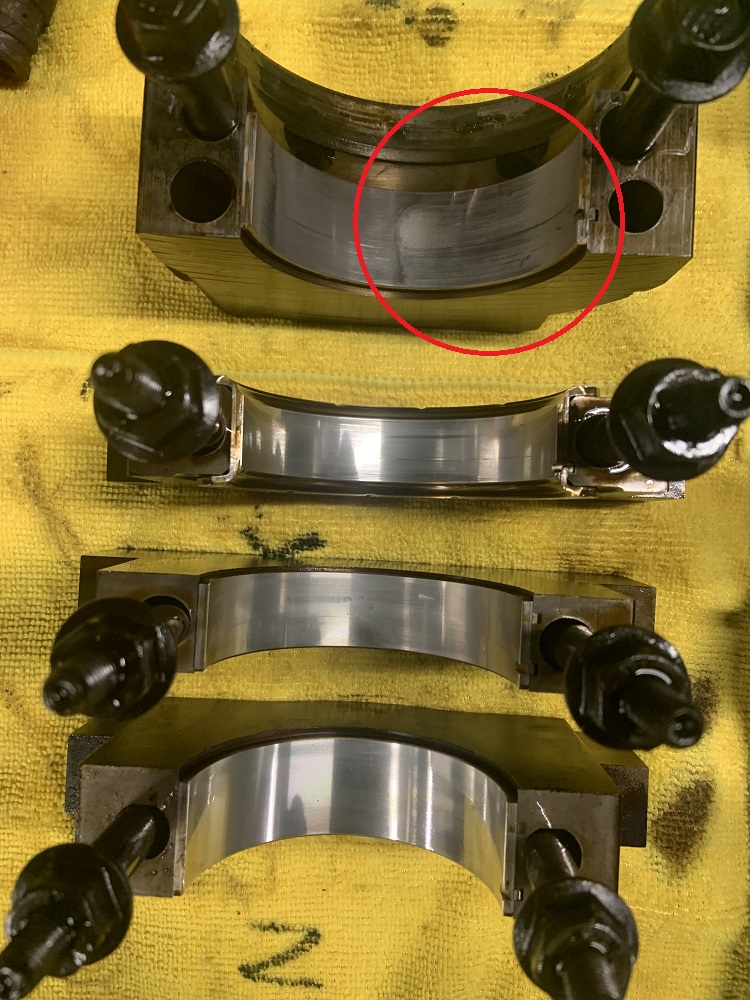
The main and rod journals on the crank look perfect. The rod bearings look perfect. The bearings in the block look decent, but the rear bearing looks not amazing.
Front.
Middle.
And the suspect rear bearing.
The rear journal of the crank looks great.
Here are the main caps. I circled some damage in the rear bearing.
In light of this I will get new main bearings and probably rod bearings too. Since I will be using ARP rods I may need to get the rods honed if the ARP bolts oval them out. I will bring them to the machine shop to check.
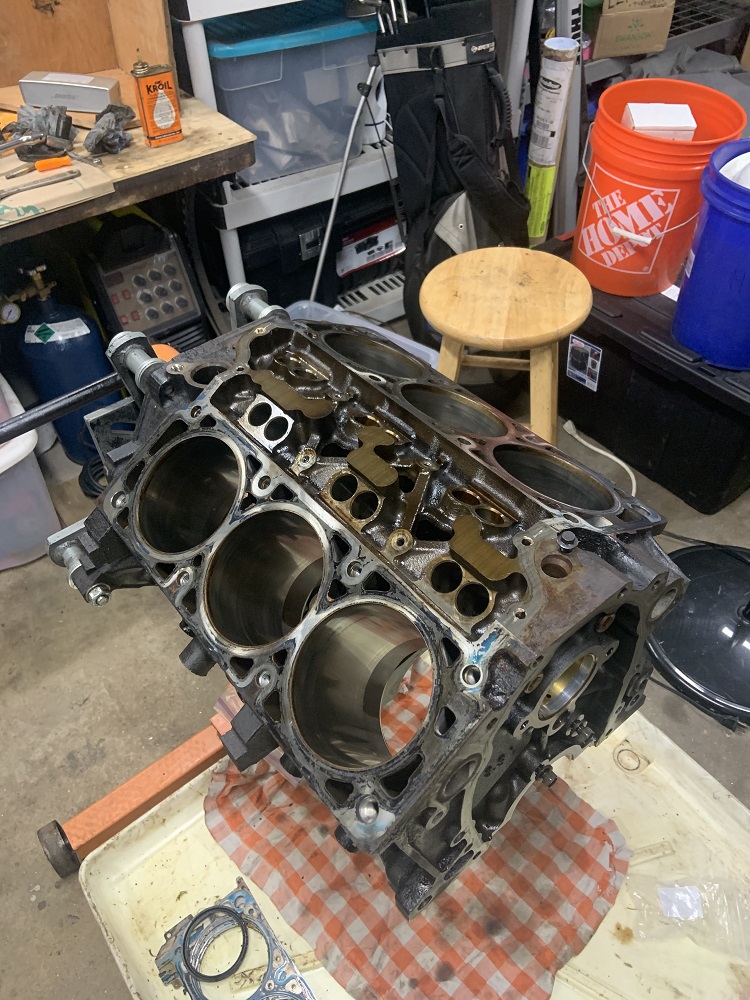
Here is the bare block. I am going to put it in a big tub full of degreaser from the dollar store to clean it up. I may bring it to the machine shop for a hot tanking depending on the cost.
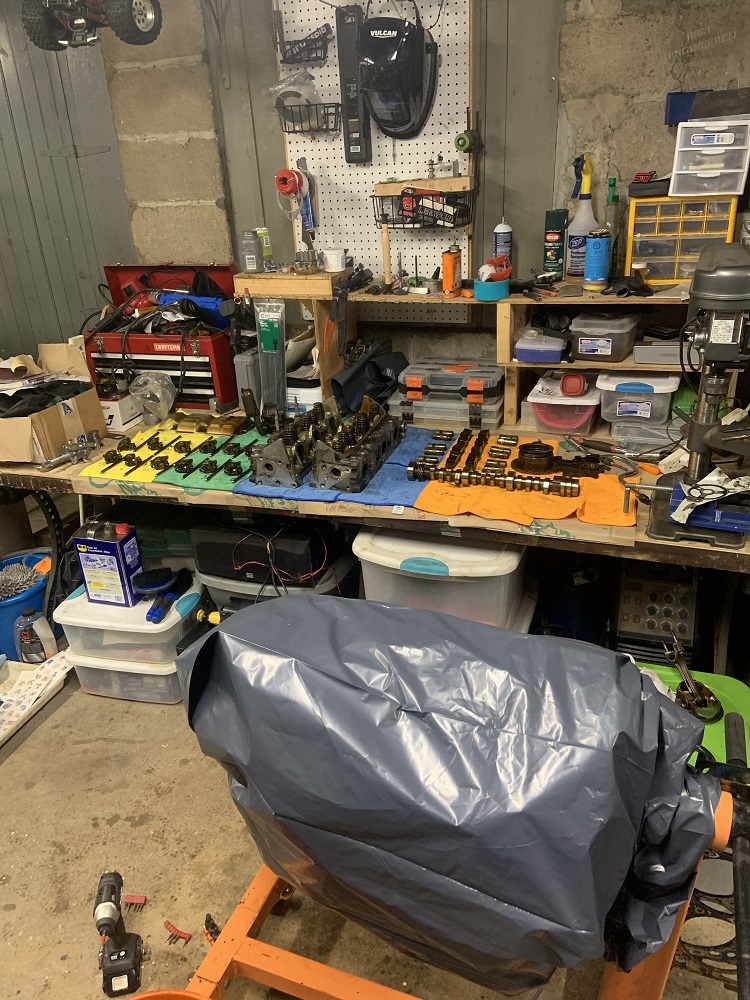
And I stored and organized all the stuff that was on the bench to make room for how it currently sits.
Now it is time to clean things and wait for more parts and tools to come in, as well as port the heads and get the heads resurfaced. I will start painting some components, and I am going to do some major trimming on the coolant crossover.
[This message has been edited by zkhennings (edited 03-15-2021).]
"The WOT-Tech NA Stage 2 cam, also known as the Strip cam. It has a mild lope to it and suffers a slight torque loss in exchange for more RPM and HP. Shift points anywhere from 6500-7000 should consider this one, racing or street use. Tuning won't be too difficult for this one either.
Looking at the cam specs the power delivety of that cam will be very linear and laggy. It'll be a good overall street cam with attitude. If it is a "reverse pattern" cam (by the way you posted the specs) it will benefit the engine if you are retaining the stock intake manifold. Keep pounding!! Looking forward to see it running!
Looking at the cam specs the power delivety of that cam will be very linear and laggy. It'll be a good overall street cam with attitude. If it is a "reverse pattern" cam (by the way you posted the specs) it will benefit the engine if you are retaining the stock intake manifold. Keep pounding!! Looking forward to see it running!
Thanks! That is how the cam specs are posted on WOT Tech, I think though that the exhaust has the greater lift than the intake so maybe the specs were posted backwards on the site. I looked at a turbo cam to compare and it does seem the specs are backwards (Ex/Int). I am maintaining the stock intake but it will be ported and gasket matched, and I have a larger throttle body for it.
davylong86 - No problem, it is useful for me to document everything to keep track of the build, and it is always nice to look back on your build once it is "done"
Also I have my fuel system components in the mail, a 340LPH pump that is rated for E85 (just in case), a section of submersible fuel hose, 6 injector connectors for the Bosch EV14s, and 6 550cc (52Lbs) Bosch EV14 Injectors for an Audi S4 2.7 turbo motor. They are rated for 300 - 550 crank HP. I ordered some stock injector O-rings in case I need them but I think the ones that come with the injectors should suffice.
I think asides from some sensors, connectors, and crimping/depinning tools, I have everything I need asides from rod bearings and main bearings. I will also buy a new oil pump if I take this one apart and it doesn't look perfect. I guess I also need some sheet metal for bracket fabrication, I was thinking 3/16" for the motor and alternator mounts. And I guess I need some vacuum hose, fuel line, fuel filter, coolant hoses, etc. Odds and ends, but stuff I can find locally and do not need to order.
I have called around a little more and I think I am going to get my machine work done down in CT, the shop my friend uses has much better pricing than the shops by me, and they are legit. In addition to the resurfacing of the heads I am going to have them hot tank the block and replace all the freeze plugs, replace the cam bearings (cheaper than buying a tool), and have them recondition the big ends of the rods with the ARP bolts.
Hopefully they can machine the rods back to the stock size and not machine them oversized, seems like the .002 oversized bearings are out of stock. Maybe the machine shop will have their own source.
Edit to remind myself to order the cam to timing gear bolt for a 3500
Edit x 2 to say it has been ordered along with a new cam journal rear plug and 4 dowel pins for the heads.
[This message has been edited by zkhennings (edited 03-16-2021).]
I would always expect the rear main bearing to have the most wear, because the load is applied on that end of the crankshaft. Modern, serpentine drive assemblies keep the load on the front bearings lower than older static tension V-belt drives, as the belt has a higher surface area, and therefor requires less tension to not slip, therefor applies less side load to the crank snout.
I wouldn't port the heads on the 3900 unless you, or the guy who is doing the port work is beyond pro level, the ports on these heads are really, really good out of the box, and I feel like they would be very easy to make worse. The quality of the casting I have here is miles better than anything I have ever seen stock. Hell, the seats are already cleanly blended into the bowls! I'm working on a custom intake manifold for an LZ9, but I'm nowhere near having a production part yet.
Check your PM's in a bit.
------------------ "I am not what you so glibly call to be a civilized man. I have broken with society for reasons which I alone am able to appreciate. I am therefore not subject to it's stupid laws, and I ask you to never allude to them in my presence again."
The castings are very good but not perfect, I have a lip on the intake ports, and theres definitely some area in the bowl I can take out. It’s minor compared to when I ported the iron heads, but there’s opportunity to clean it up and smooth out flow. I will not be doing anything drastic, just a simple smoothing, gasket matching, opening up the bowls, and polishing the exhaust side. I do plan to hog the lower intake manifold out as best as I can to the cross section of the gasket, and the upper LZ4 intake is very easy to increase port size to match. If I find I never hit 0 vacuum at WOT, I may end up modifying my upper intake manifold similarly to yourself, I have 3 feet of 3” aluminum tube sitting on a shelf staring at me. Some of that tubing will become a catch can, but the rest should be more than enough if it appears to be beneficial. Bonus is that the upper intake is so simple to remove when the motor is installed in the car. I will make sure to bolt the intake to some heavy steel square tubing during welding to keep everything flat if I do modify it.
I talked to the machine shop, he is confident that if the .002" oversized bearings exist (which they do) then he can find them. I also ordered main bearings since I will have him acquire the rod bearings.
I have been doing a lot of research into the components that could be used for forged internals, and there are many variations of these parts and a lot of conflicting information online, so I just decided to buy a few used components.
I order an LS1 piston and rod that has bearings in it already, and I ordered a 5.7" small block Chevy rod and I ordered bearings for it. I want to be able to compare the rod widths especially relative to the rod bearings if I need to get the rods narrowed, and I wanted to be able to see what the piston looks like in the bore and how it compares to the stock stuff. Now if I am looking at aftermarket variations of these parts I can check them against the stock parts. I want to be able to fit the longest rod I can without sacrificing stoke, I need to do some calculations and compare compression heights, and I need to calculate what the compression ratio would end up being. It seems like the LS1 pistons have much less dish than the LZ9 ones, which is good because it is easier to add dish than fill it in. I think I would prefer to use LS rods because they have a slightly larger big end than the SBC rods, but it probably does not matter.
I wanted to get these parts now while everything is apart so I can take pictures, measurements, and compare components to the stock components as well as check for clearances. Then I have a good knowledge base for figuring out what aftermarket parts I need to order before stage 2 of the build. I will post all the pictures and information here to make it easier for anyone who wants to build one of these. Machine work to make it all work would be relieving the valves in the piston tops, probably narrowing of the rods, and regrinding the crank journals to the correct diameter and offset to accommodate for any variations in rod length or compression height, but I will try and have the journal center remain where it currently is. Aftermarket pistons and rods all seem to use the .927" floating piston pins, regardless of LS or SBC, so no machine work needed to make that work.
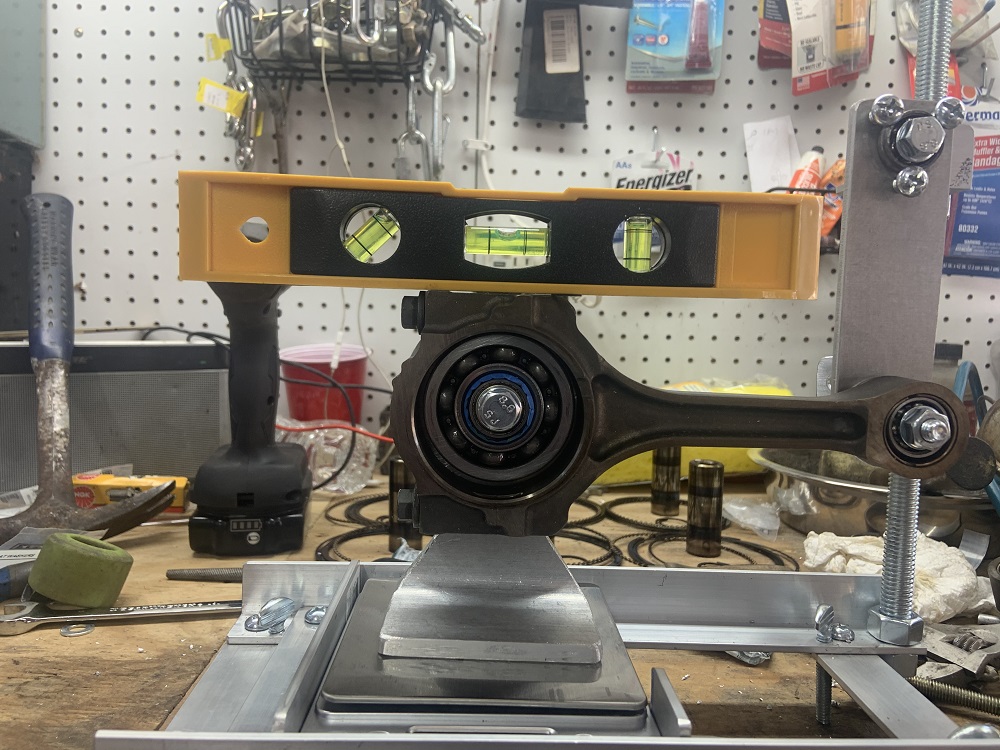
Edit to say further research into things and further discussion with the machine shop has made me decide to balance the stock rotating assembly. I will be taking weight off pistons and rods to get them as close as possible to each other, and I will bring them with my crank to the machine shop to have the rotating assembly balanced to race spec. My younger brother made a pretty sweet DIY rod balancing setup when he rebuilt his Subaru's motor that I will use to balance the stock rods. I think the extra time and $250 is worth not throwing a rod through the block and trashing the whole motor possibly.
[This message has been edited by zkhennings (edited 03-18-2021).]
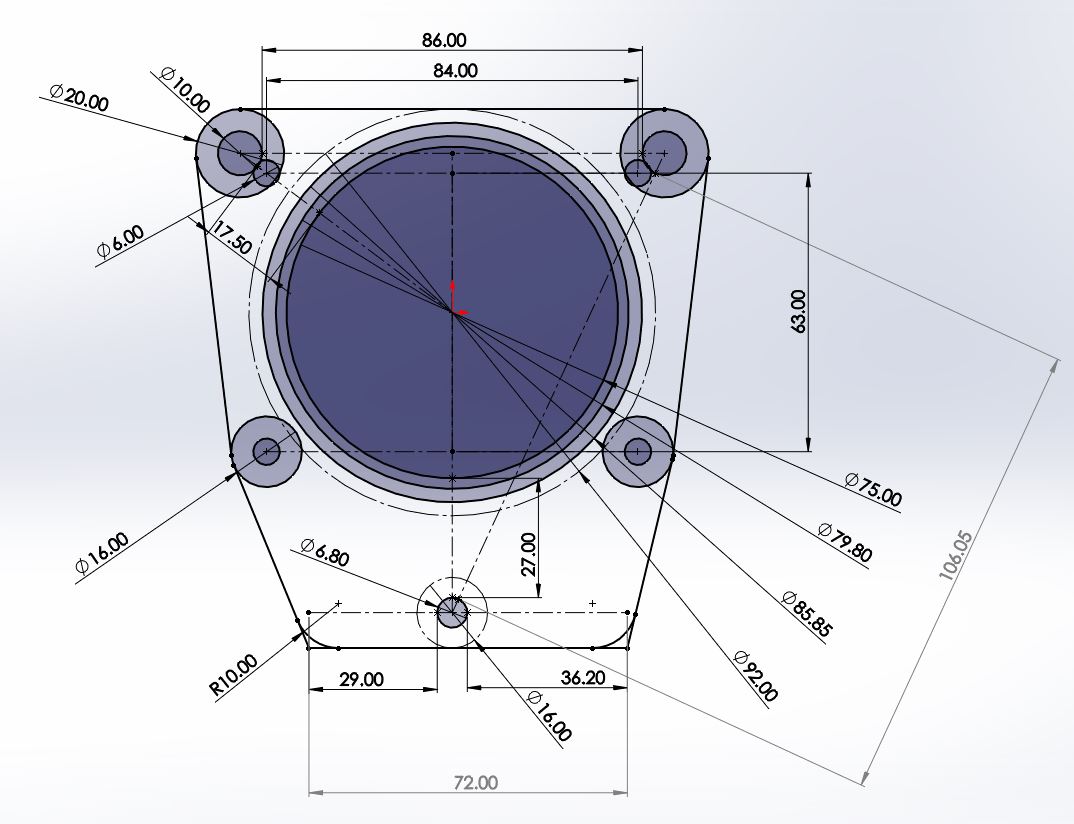
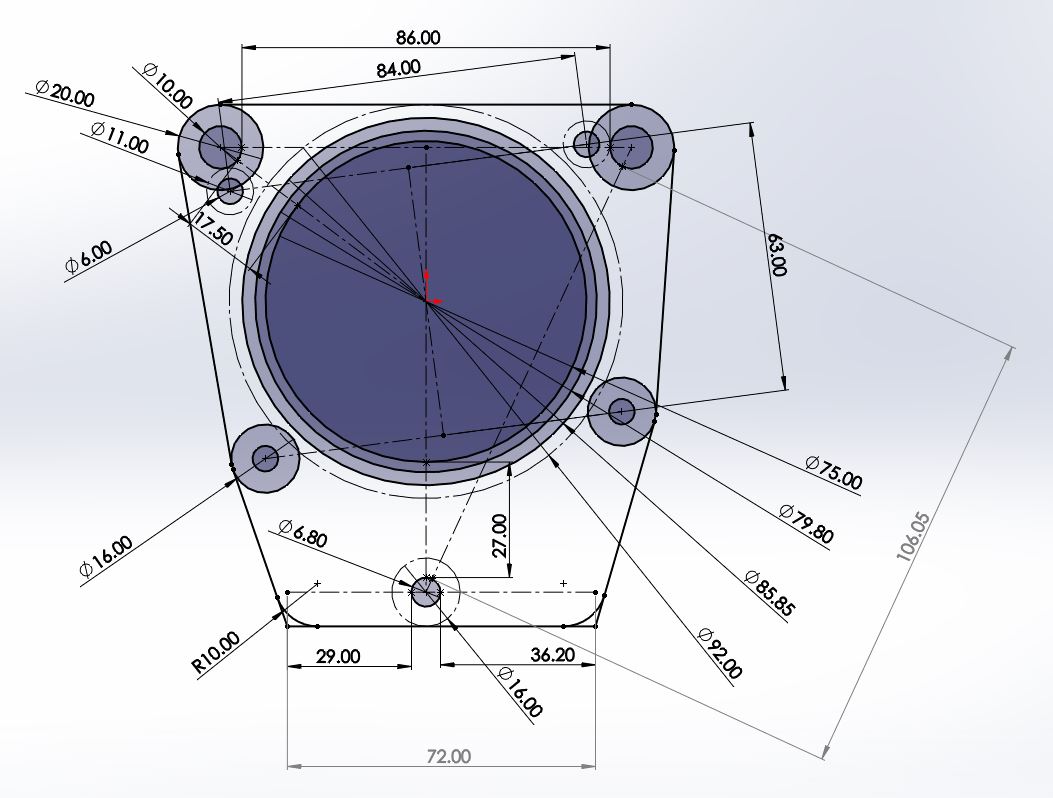
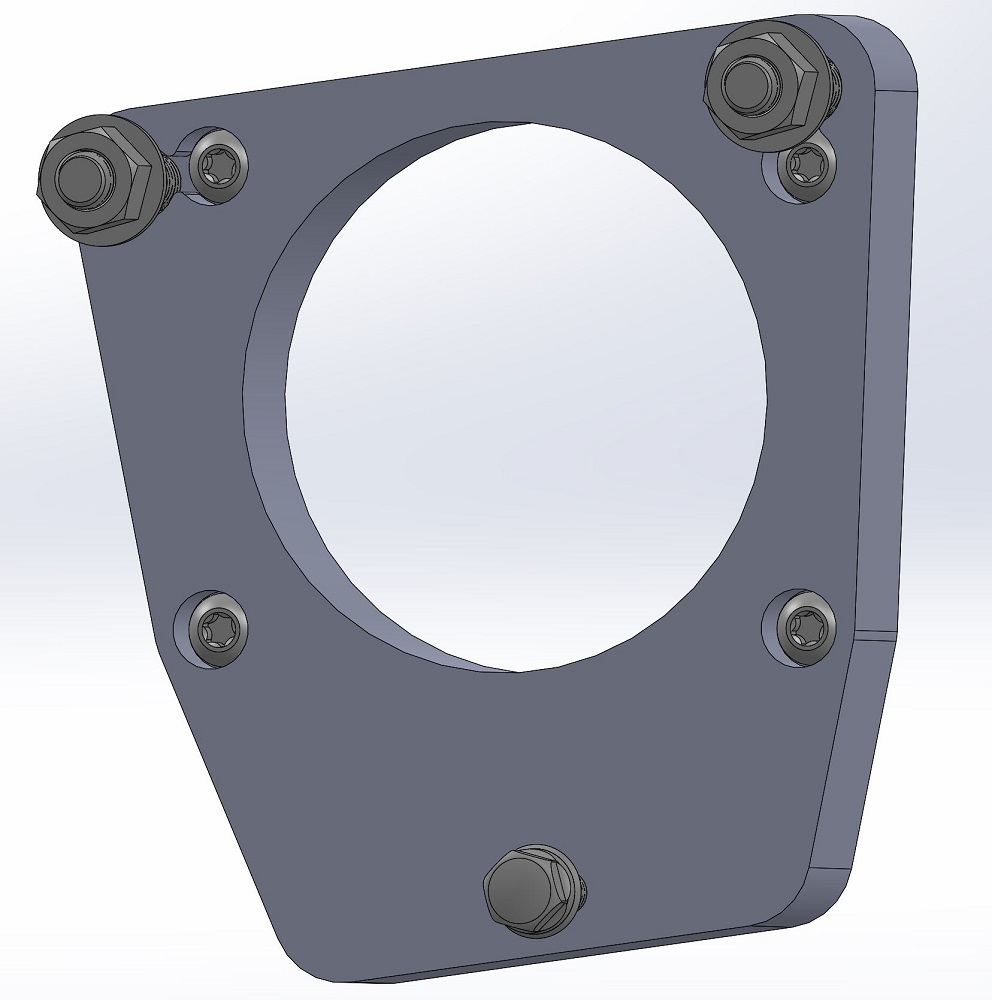
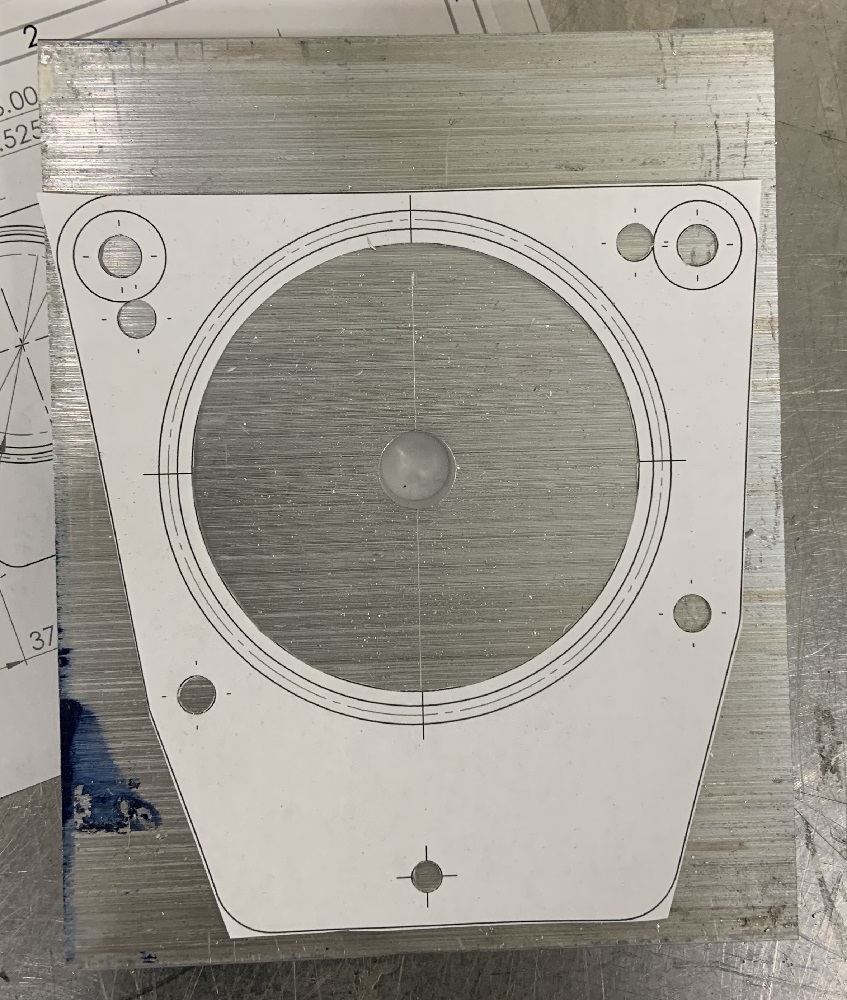
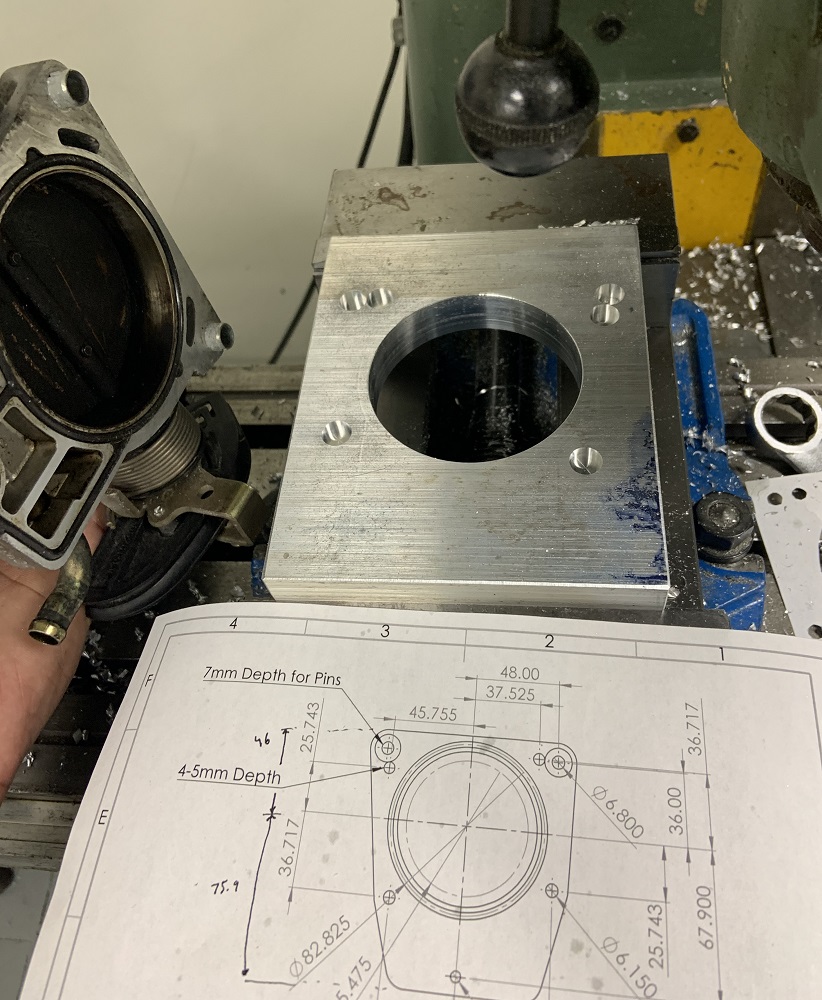
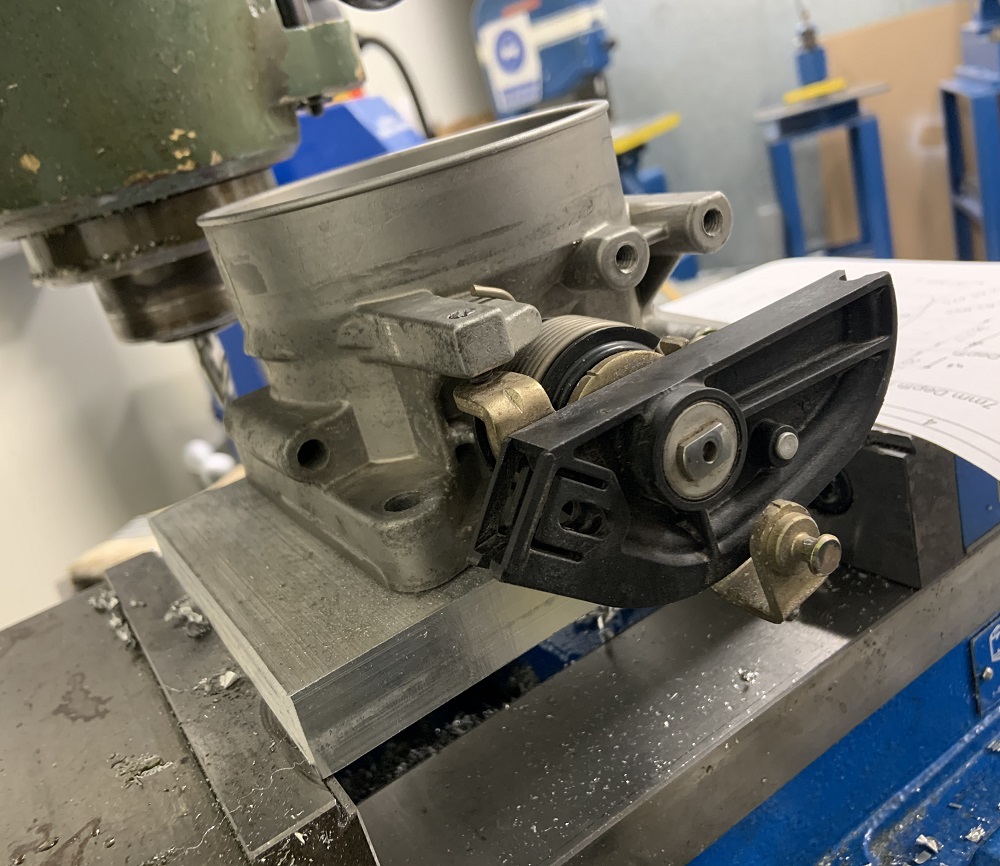
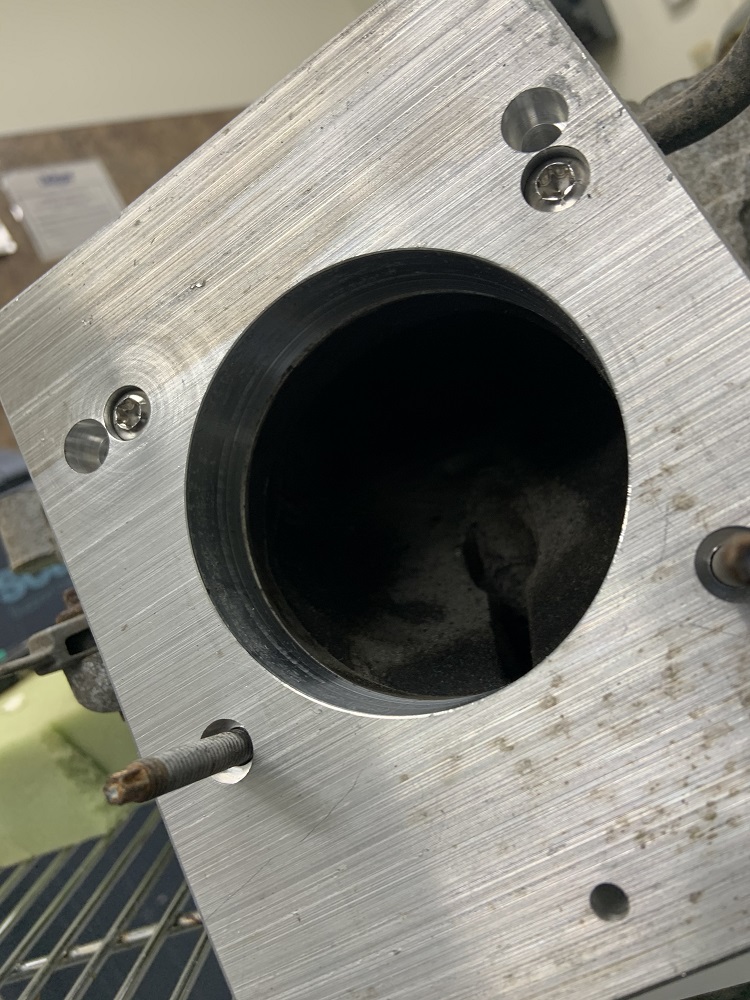
Spent some time after work today measuring and drawing this throttle body adapter up. The N* throttle body will have to be cocked in order to fit properly or the bolt holes will overlap. I will be using some M6 socket cap screws to attach the adapter to the manifold, they have a 10mm head, I gave them a 11mm diameter clearance to where the locating sleeves from the N* throttle body will slide in so that when I drill the holes the bit does not wander.
Here is how the bolt holes will be on top of each other if it is not cocked (the head of the bolt will be the real issue).
And here it is cocked with the 11mm clearance for the bolt heads.
I have some 3/4" aluminum to make this with on the Bridgeport. I may add some threaded mounting holes for the throttle cable bracket I will fabricate off of this adapter.
Also, this is a rear view, from the front the N* TB will be cocked CCW.
For comparison.
[This message has been edited by zkhennings (edited 03-18-2021).]
The castings are very good but not perfect, I have a lip on the intake ports, and theres definitely some area in the bowl I can take out. It’s minor compared to when I ported the iron heads, but there’s opportunity to clean it up and smooth out flow. I will not be doing anything drastic, just a simple smoothing, gasket matching, opening up the bowls, and polishing the exhaust side. I do plan to hog the lower intake manifold out as best as I can to the cross section of the gasket, and the upper LZ4 intake is very easy to increase port size to match. If I find I never hit 0 vacuum at WOT, I may end up modifying my upper intake manifold similarly to yourself, I have 3 feet of 3” aluminum tube sitting on a shelf staring at me. Some of that tubing will become a catch can, but the rest should be more than enough if it appears to be beneficial. Bonus is that the upper intake is so simple to remove when the motor is installed in the car. I will make sure to bolt the intake to some heavy steel square tubing during welding to keep everything flat if I do modify it.
it's worth mentioning that anything in the plenum will be a lower pressure than ambient, physics demands it.
if you end up using the N* IAC, or even just the IAC port, you'll need to make sure to either put a hole in the inner wall of the TB, or mill a path for the valve to actually work. I ran into this problem with I used an LS1 TB on my LX9 years ago.
------------------ "I am not what you so glibly call to be a civilized man. I have broken with society for reasons which I alone am able to appreciate. I am therefore not subject to it's stupid laws, and I ask you to never allude to them in my presence again."
Yes I was planning to leave it blocked for now and get idle tuned with the MicroSquirt before deciding if I want to hook up that stepper motor. I need a special module to run the stepper motor.
I will give a full post later but I made this today. It is nearly complete here.
Brought my engine block, crank, rods, pistons, valves, crank pulley, cam bearings pressed into spacers, piston rings, and heads to CT to my friend's this weekend to get my internals balanced and bring the parts to the machine shop yesterday when they were open.
I brought with me my brother's rod balancing setup, but I wasn't getting consistent results so I made a version that would be more precise. I didn't plan to do this and it took a lot longer than I thought it would. But before I could balance anything I had to take everything apart and clean it all really well. Everything was decently dirty.
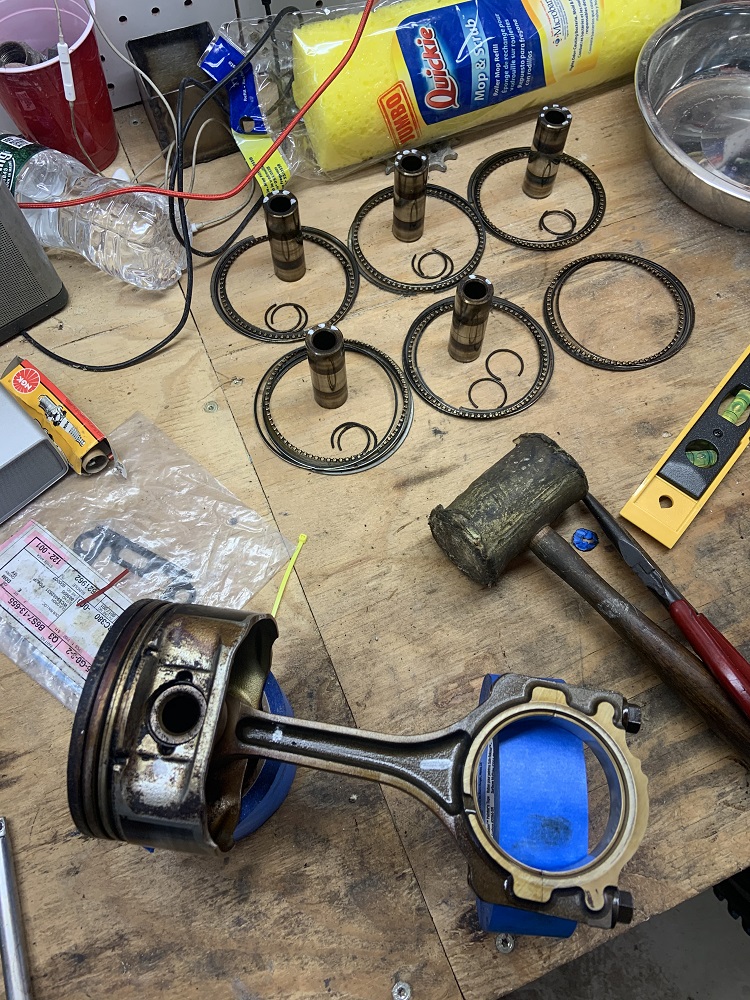
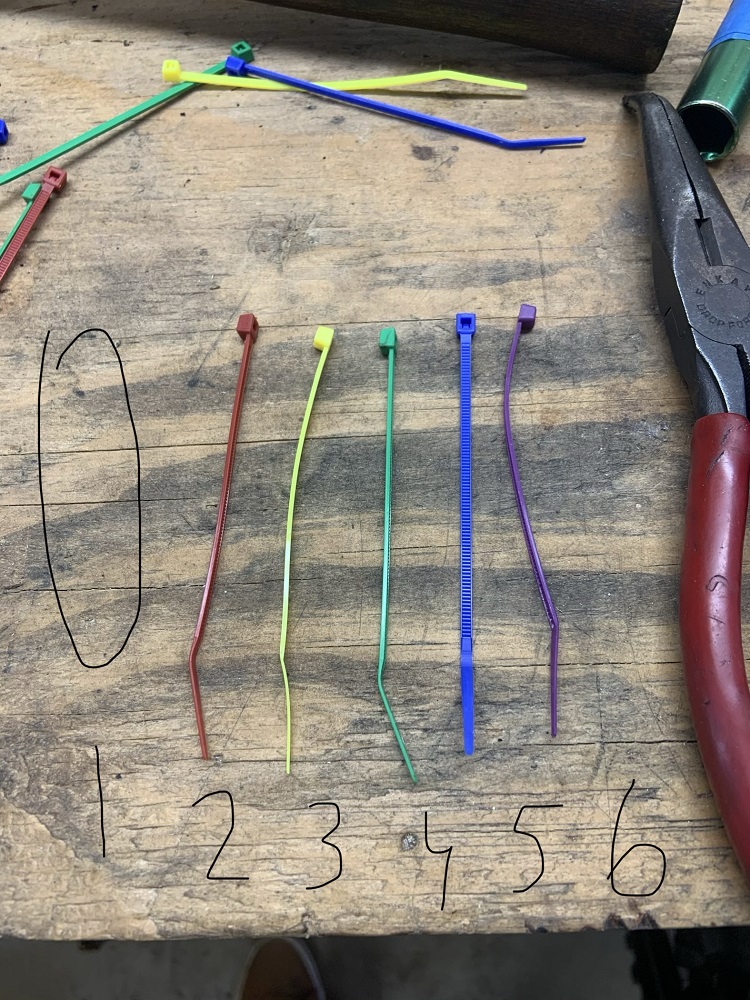
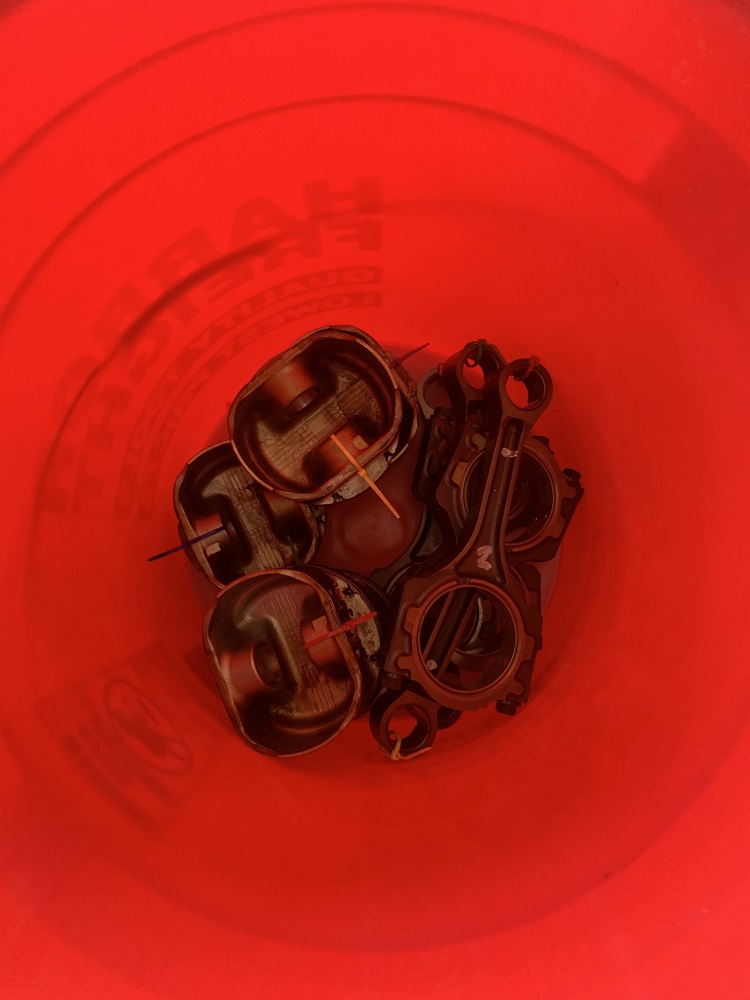
I also needed to keep track of what rod and piston were what and I was worried any markings I made would come off in the degreaser bath. I used various colored zip ties for this purpose.
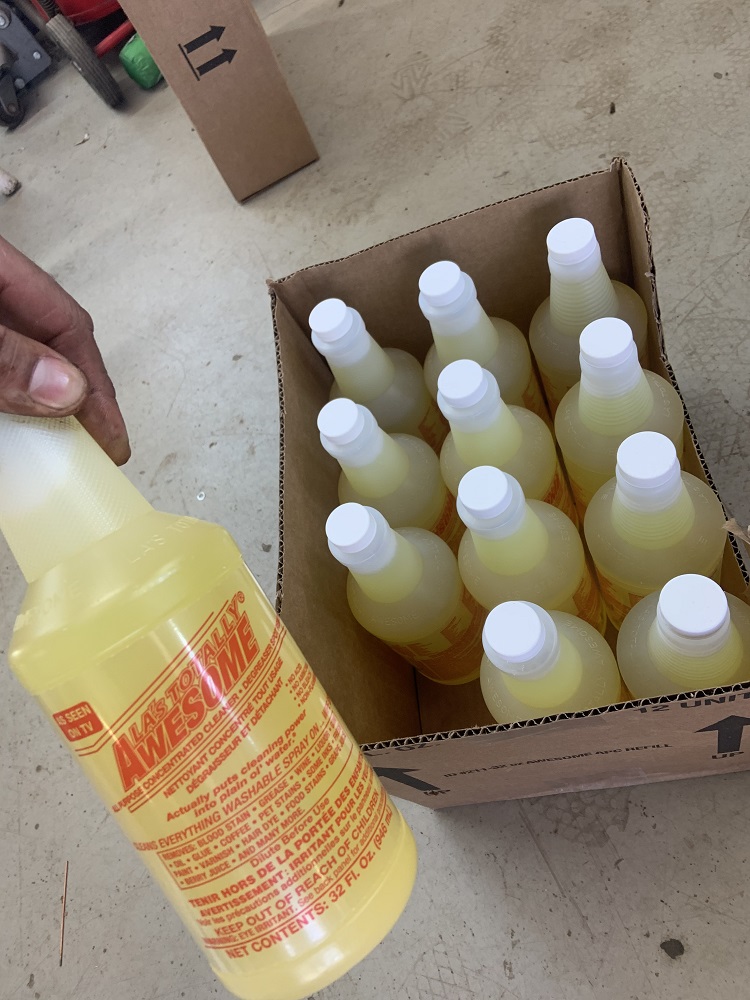
My brother used this stuff for his build, he found some guy on a forum had used it. LAs Totally Awesome, it is dollar store degreaser concentrate, and if not diluted it does serious work, I was impressed.
Ready to be covered.
Here they are at the halfway point where I scrubbed them with some plastic bristled brushes and really cleaned out the ring lands.
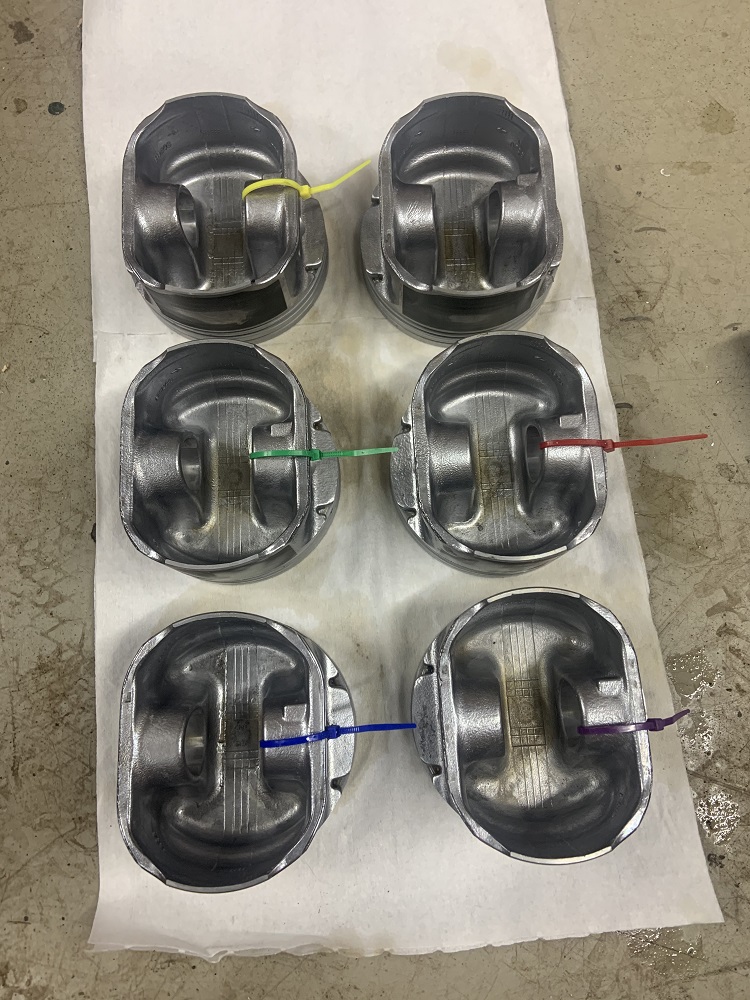
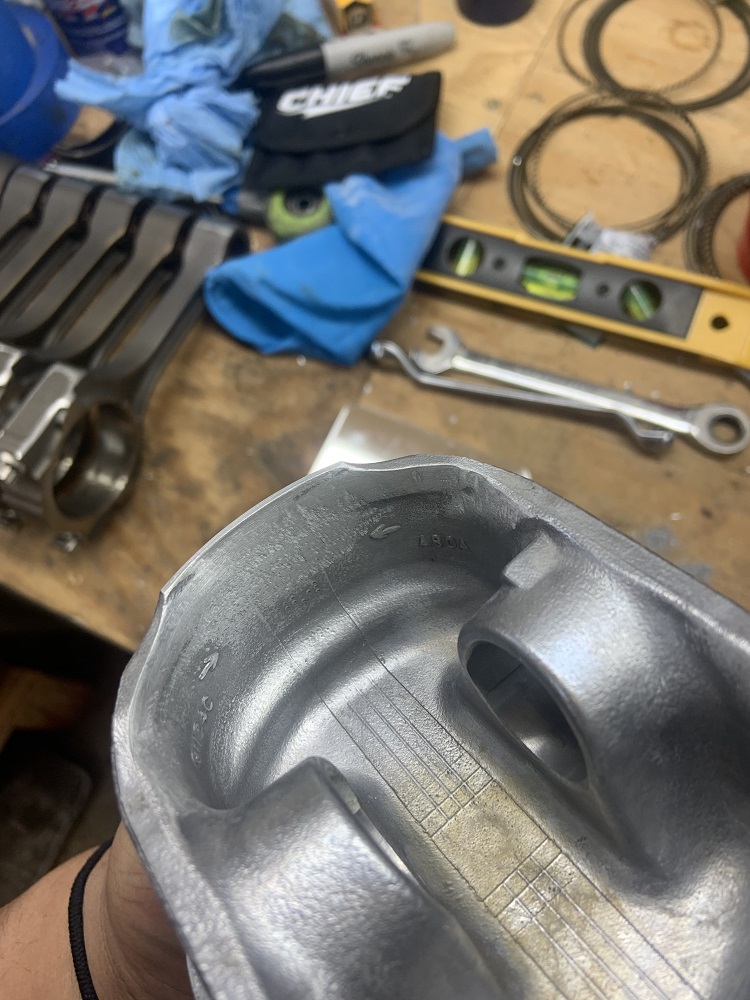
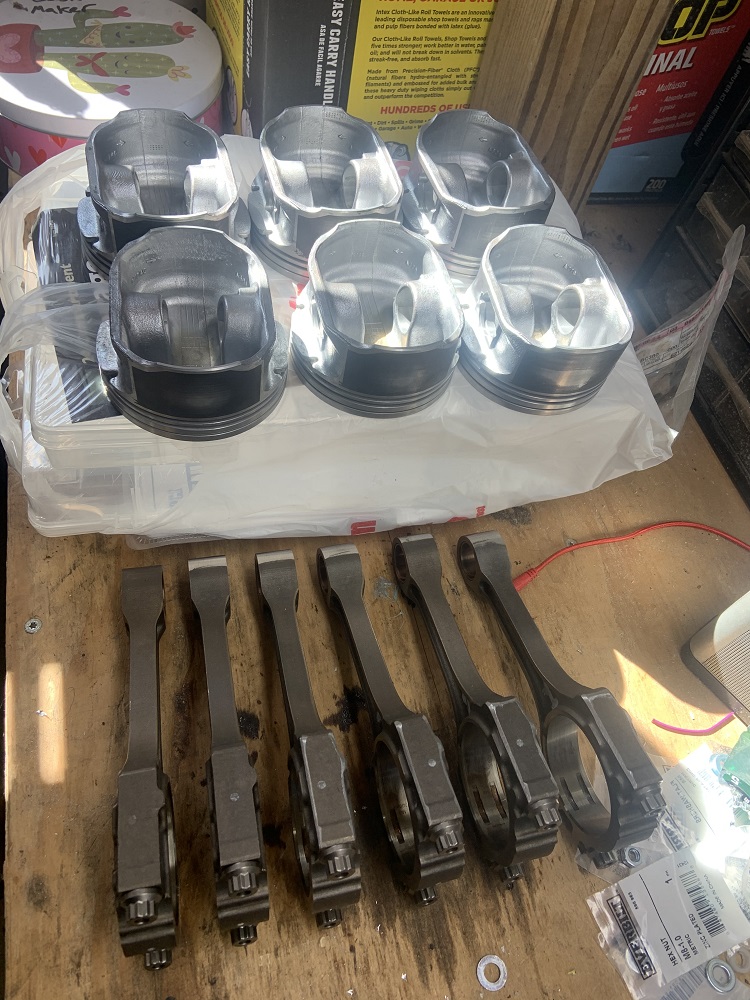
And here the pistons are nice and clean.
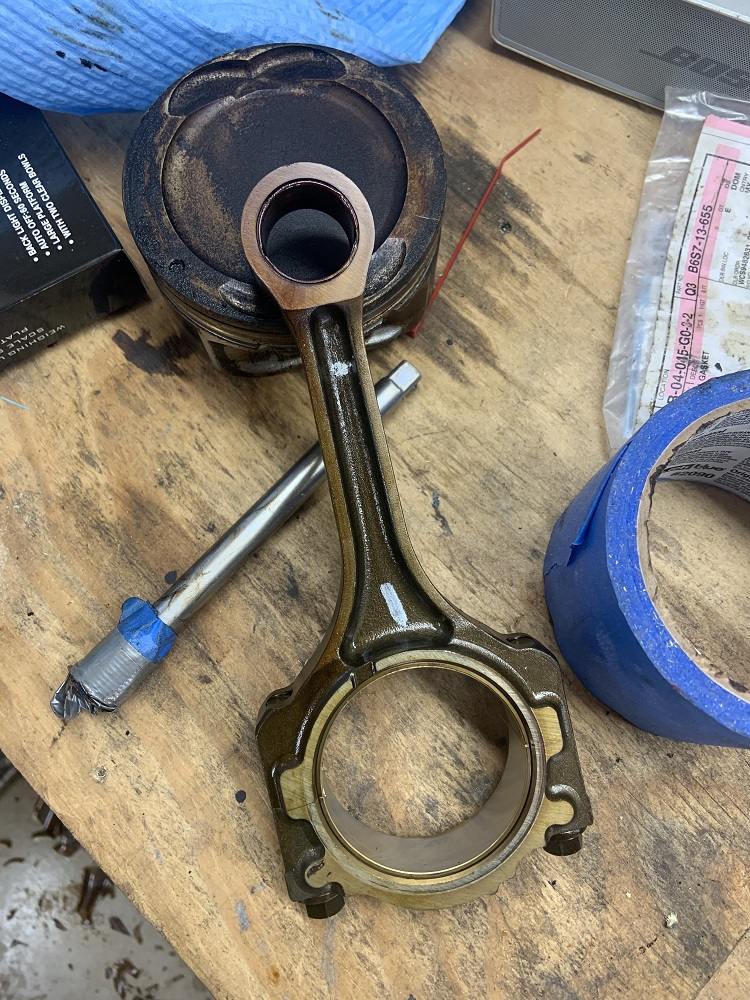
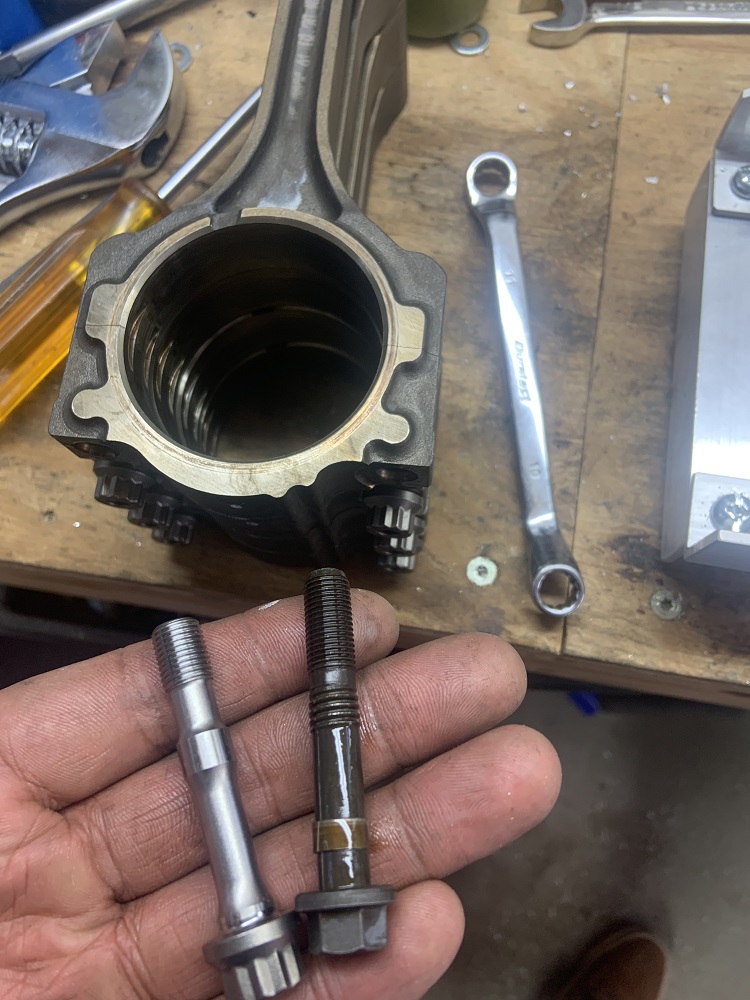
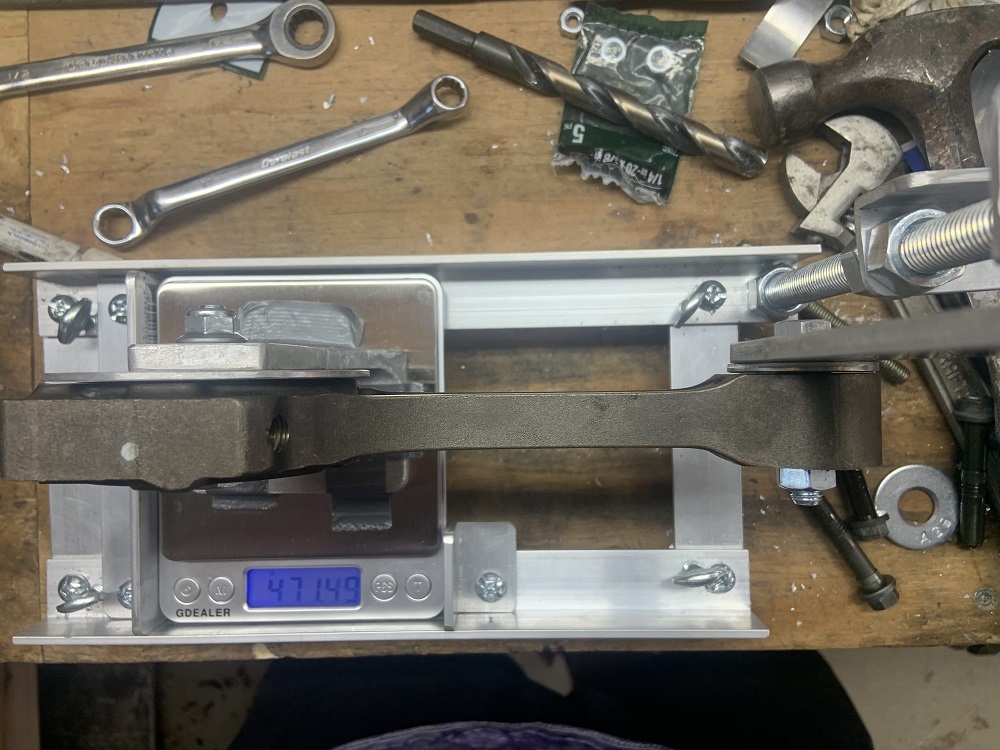
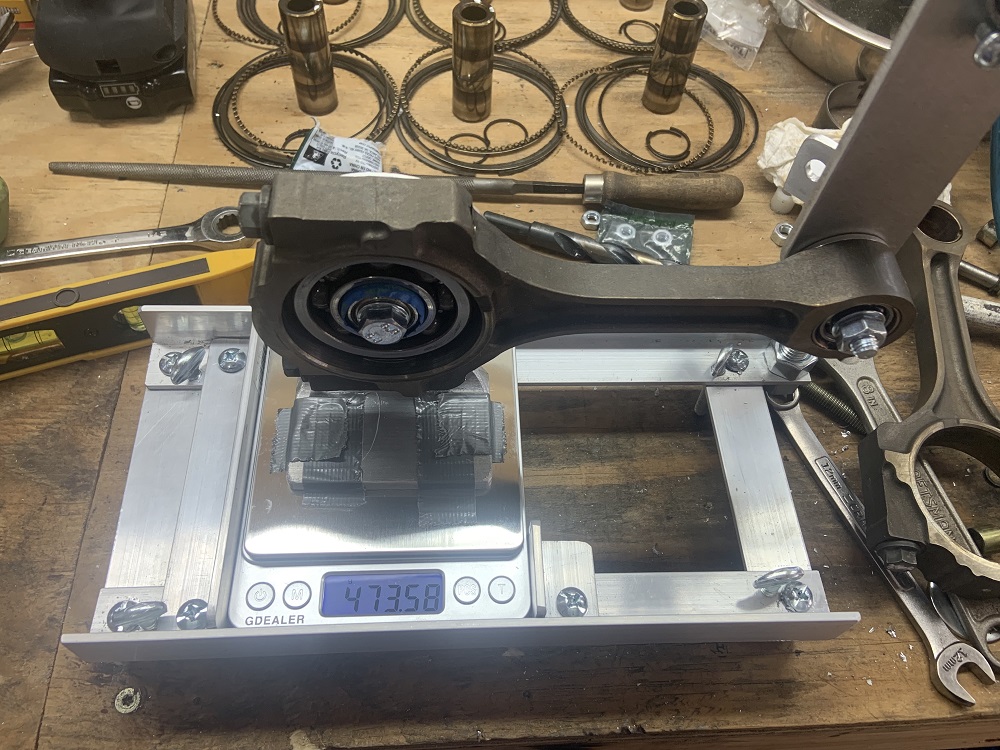
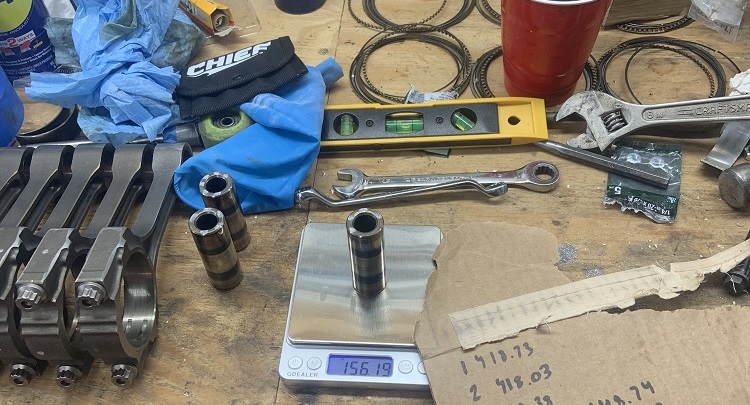
Then I put in the ARP rod bolts before starting to weigh the rods.
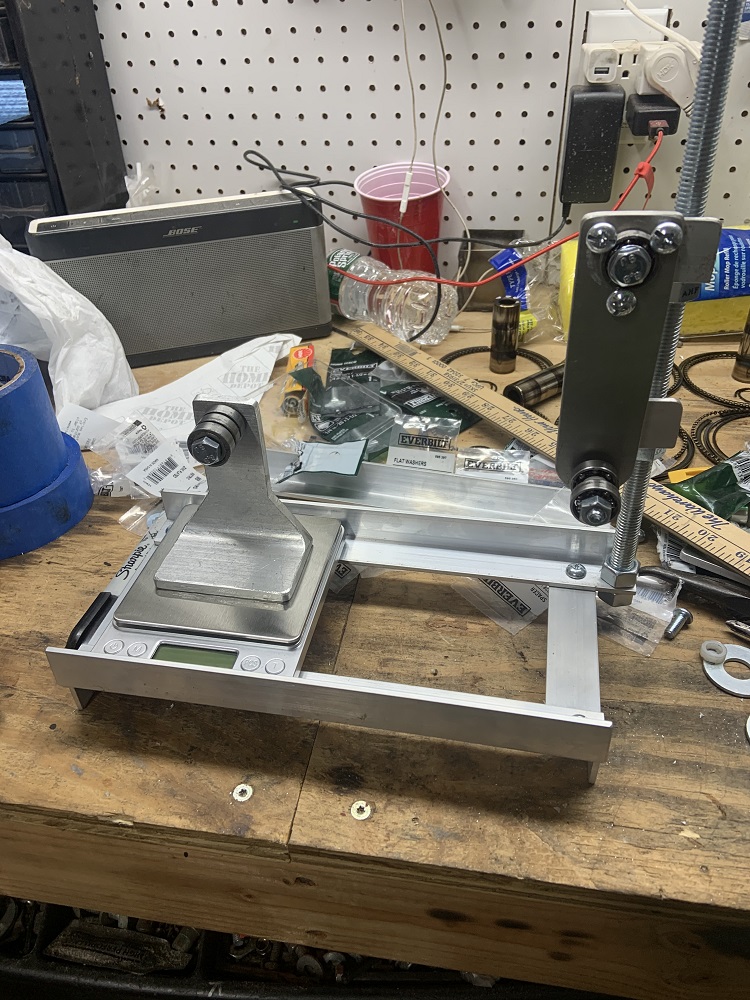
Here is the rod getting leveled, and I had two washers that were riding on bushings that allowed them to spin as the stops for the rod to make sure it was in the same place every time. But the rod could not be in contact with them and get an accurate measurement so I went for the smallest gap I could create.
Measuring the rods went well, I asked the machine shop to tell me how close I got, because it takes some work to get the rods to measure consistently, but you get a feel for it. I was within 0.05 grams by my measurements.
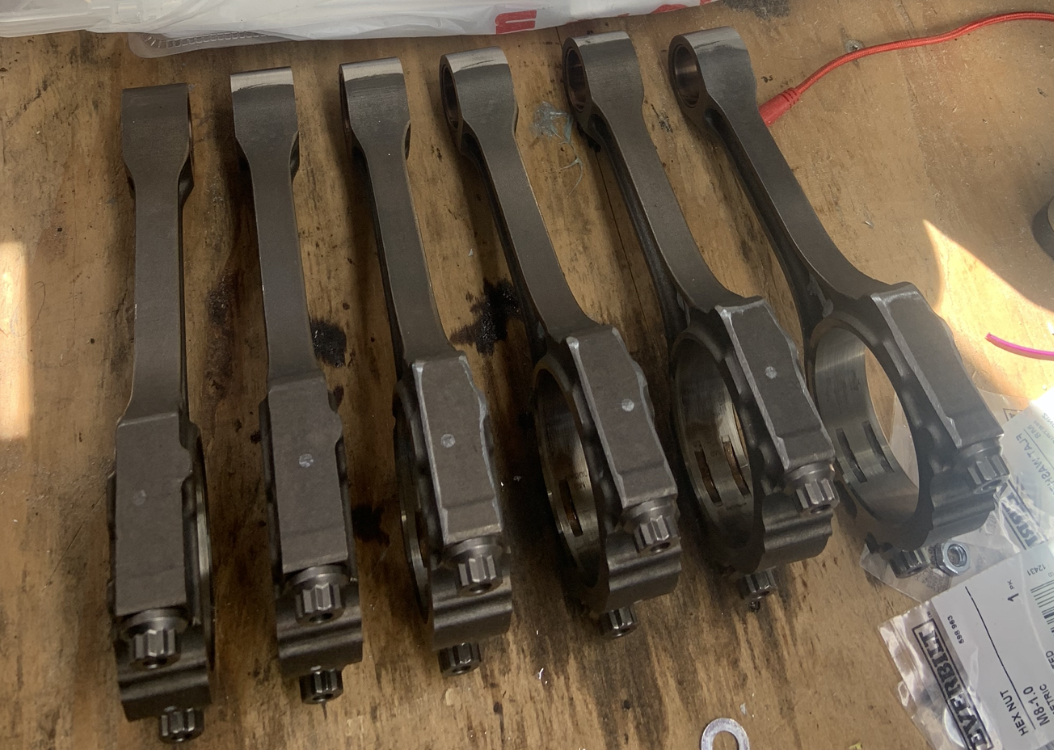
Here is how the rods looked after making the small ends weigh the same and big ends weigh the same. I went and bought a belt sander to do this work.
Then I weighed the pistons and piston pins, and everything was pretty close except one piston that was a gram heavy. And then I weighed the last piston and it was 5 grams light! I couldn't take 5 grams out of every piston so I took the gram out of the one heavy piston and I am going with it. The machine shop said that it is ok, and that I would have a hard time finding a replacement piston that would be close, I would really need aftermarket pistons. They also said that because it is not the rotating mass that it has much less effect. Oh well.
The heavy piston with a gram of weight removed.
And here it is all done and ready to go to the shop.
The shop thought my project was pretty cool, I took everything to Eastwoods Machine, they had a large variety of builds. I wish I took some pics of all the different motors to post here, I will get one when I go back to pick it all up. It will probably run me close to $1000 in machine work but I think it is all worthwhile.
[This message has been edited by zkhennings (edited 03-23-2021).]
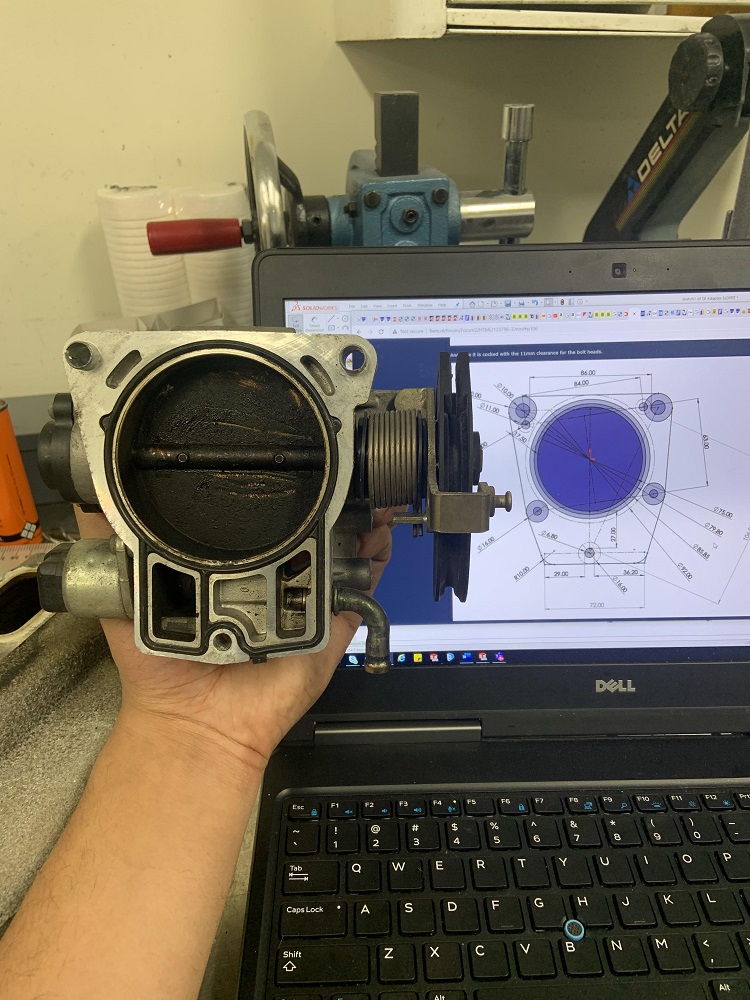
Finished up the throttle body adapter CAD after work, put together an assembly with hardware for kicks. The N* TB has two 10mm locating dowels that there are recesses for at the top two M8 studs, the TB is 15.5mm thick up top and 13.5mm thick where the bottom M6 bolt will secure it, the hardware is spaced accordingly in the CAD. The ring cut into the rear is to use the stock LZ9 TB gasket between the adapter and the intake.
Once I make it and confirm that it works well, I can send the solid body file out if anyone wants to have one made. Just PM me.
[This message has been edited by zkhennings (edited 03-23-2021).]
Got the hardware in for the TB adapter, might try my hand at machining it today or tomorrow.
Also received an LS1 piston, rod, and a forged 5.7" SBC rod and the bearings for it. I will see how everything will work out when I get the 3900 parts back from the machine shop. I am thinking I will 3D print some thin rod bearings to allow the SBC rod and the LS rod to fit on the rod journals of the 3900, and I can take some measurements of where things end up in the block. My plan is to get as much data recorded as I can using these stock dimensioned components so that it will be simple to see how aftermarket parts with their various lengths and heights will work out to give me the clearances I need, and the correct compression ratio. I hope I can get some 6.0" rods in there at the stock stroke with all the LS piston options that exist.
When I do stage 2 of the build I don't want it to be down for long, I have been there done that lol. That is the main reason for getting this data now.
I bought a 2nd cradle recently, and plan to build a 3900 with another FY1 F23 on it, and then have it ready to swap into my car once it's "done" that way I can take my time with the 3900, and still enjoy the car for the most part.
I look forward to seeing the TB adapter finished!
------------------ "I am not what you so glibly call to be a civilized man. I have broken with society for reasons which I alone am able to appreciate. I am therefore not subject to it's stupid laws, and I ask you to never allude to them in my presence again."
That is a good idea, I have been thinking about getting a second cradle (88 this time, or making a custom cradle), F23, and second motor to build the bottom end while the Fiero is running and driving around. It would be nice to have a second set of everything anyways, there aren't a ton of loose LZ9 parts available for purchase.
Got the LS1 piston and rod in as well as the forged 5.7" SBC rod and some bearings for it too see how far I could narrow it to get it to fit the LZ9 crank.
SBC rod has ARP bolts.
SBC rod bearings.
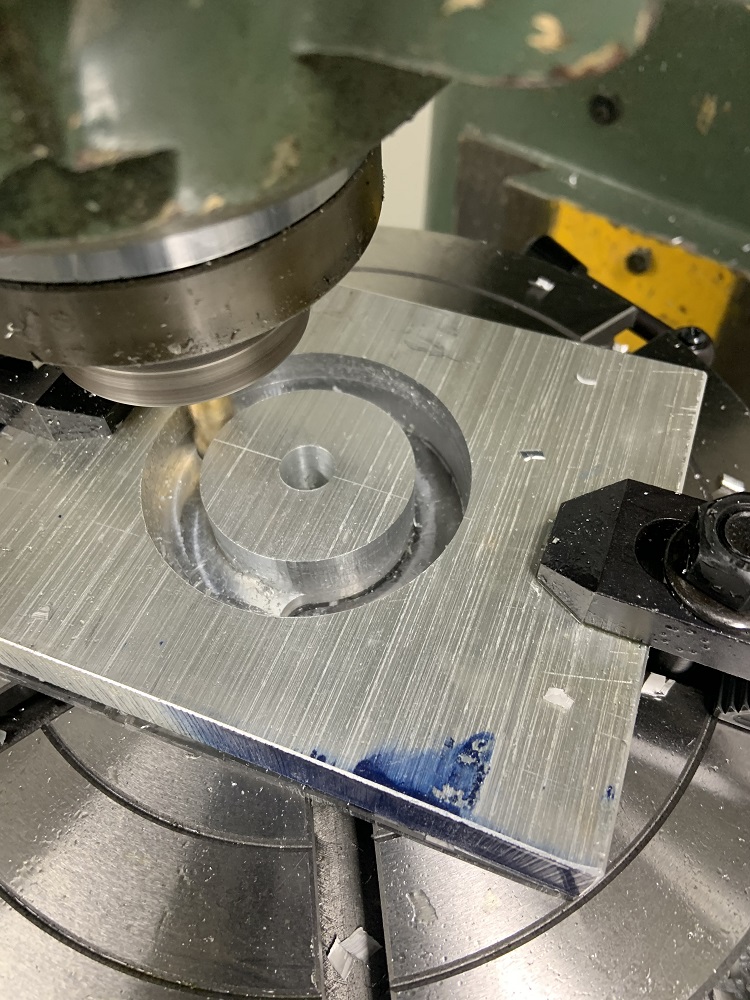
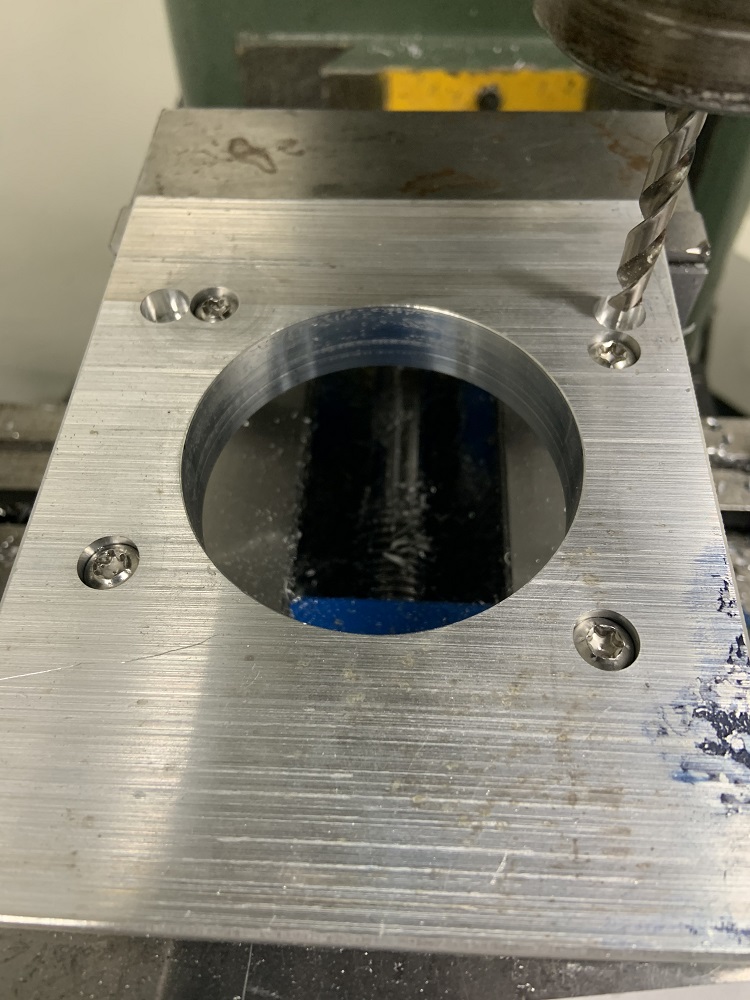
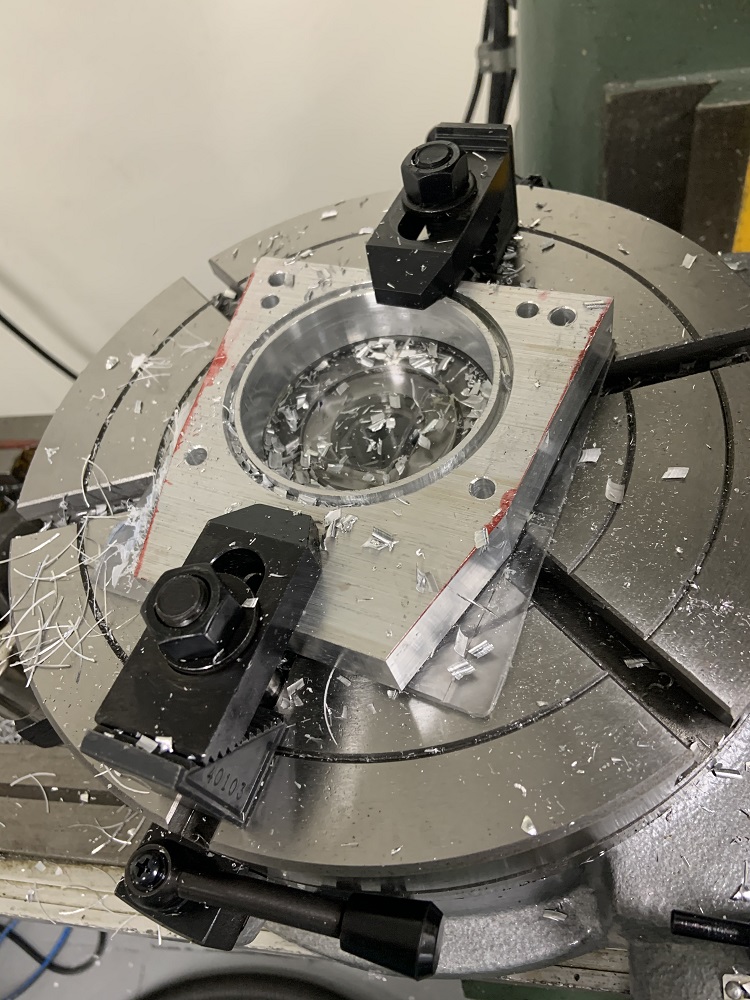
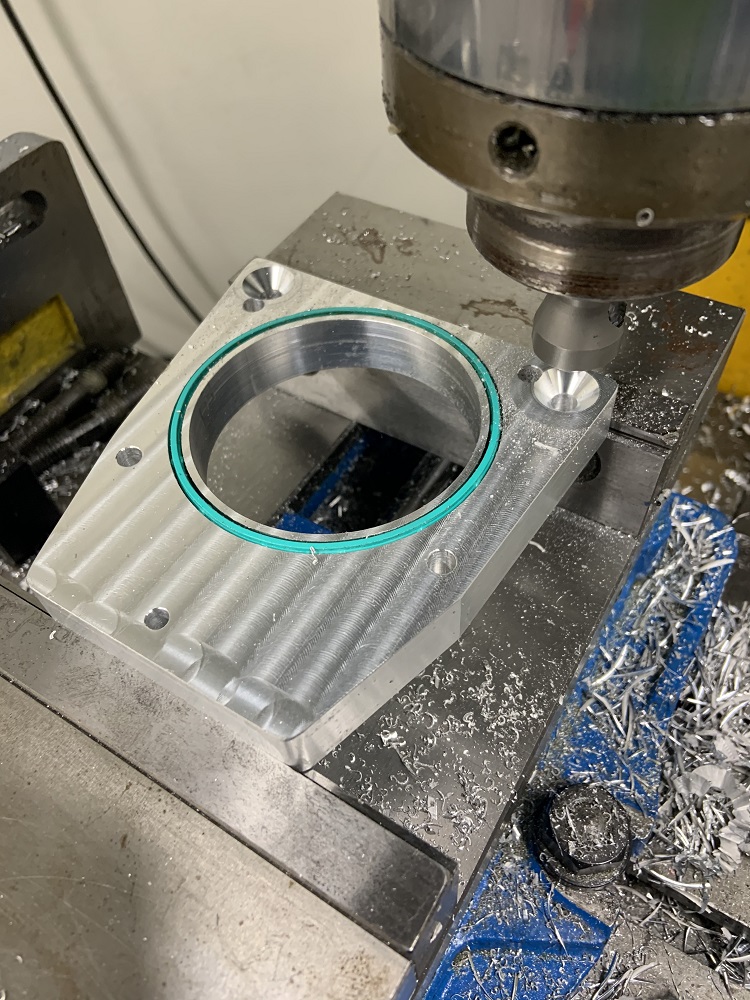
I also got a chance to get the throttle body adapter machined. First I cut a rough rectangle out, cleaned it up on the mill, and drilled a hole through the center where it lined up on the template so I could center it regardless of which side I was machining.
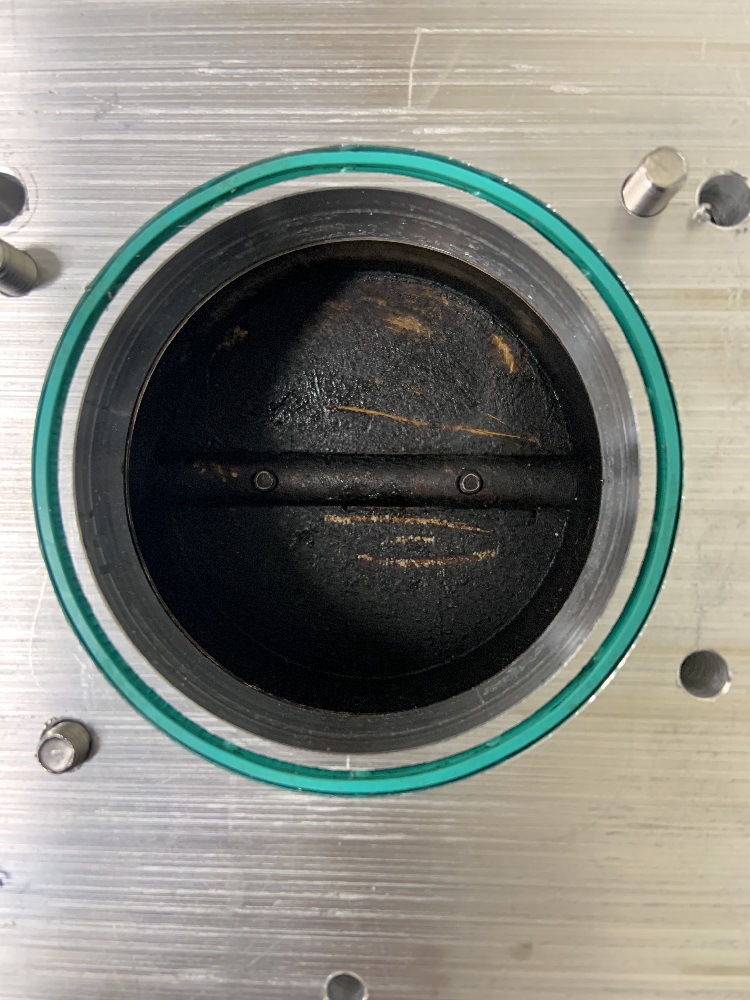
Cut out the 75mm hole.
And cut out the groove for the LZ9 TB gasket. I had a flat bottomed bit break on me halfway. I did not have another flat bottom endmill so I used the same diameter in a ball end, I had to machine it a little deeper to compensate. The gasket stick-out is not as much as I would like, but it was "a happy little accident" as I had to face it eventually anyways and the stick-out ended up correct.
This stick-out ended up back near stock after facing (shown here before facing).
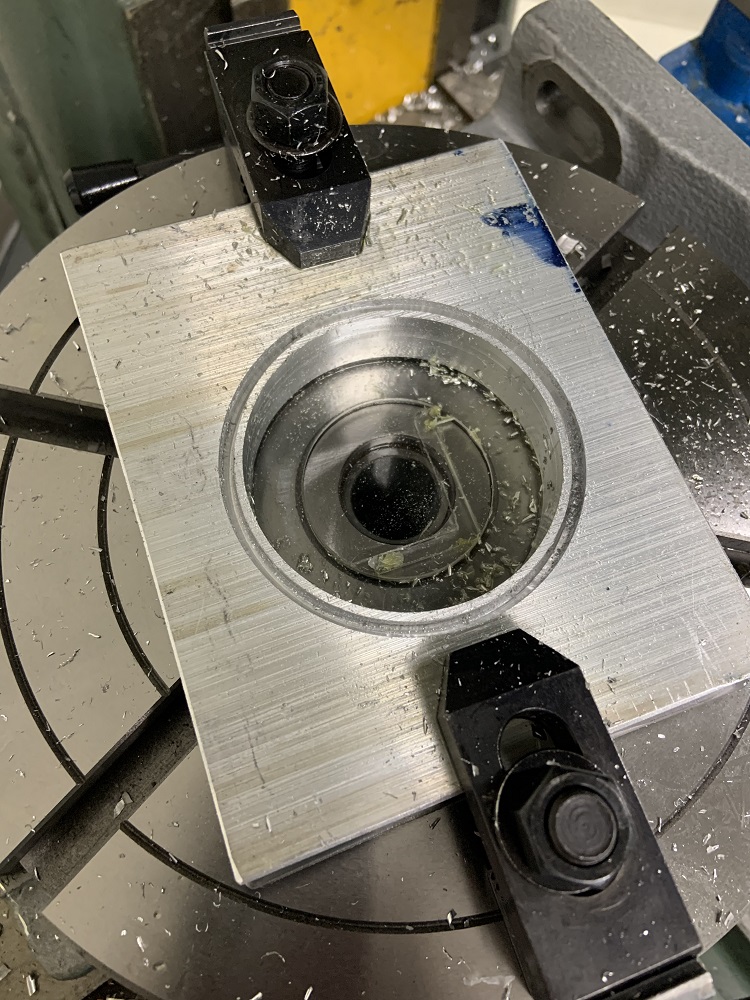
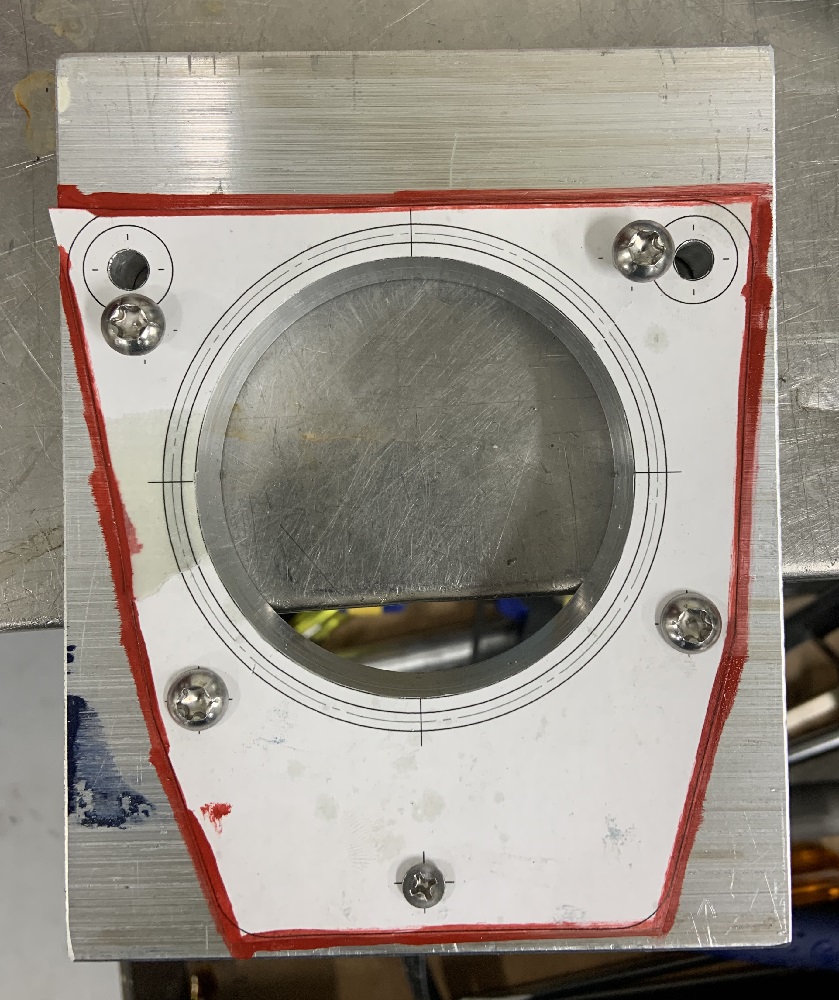
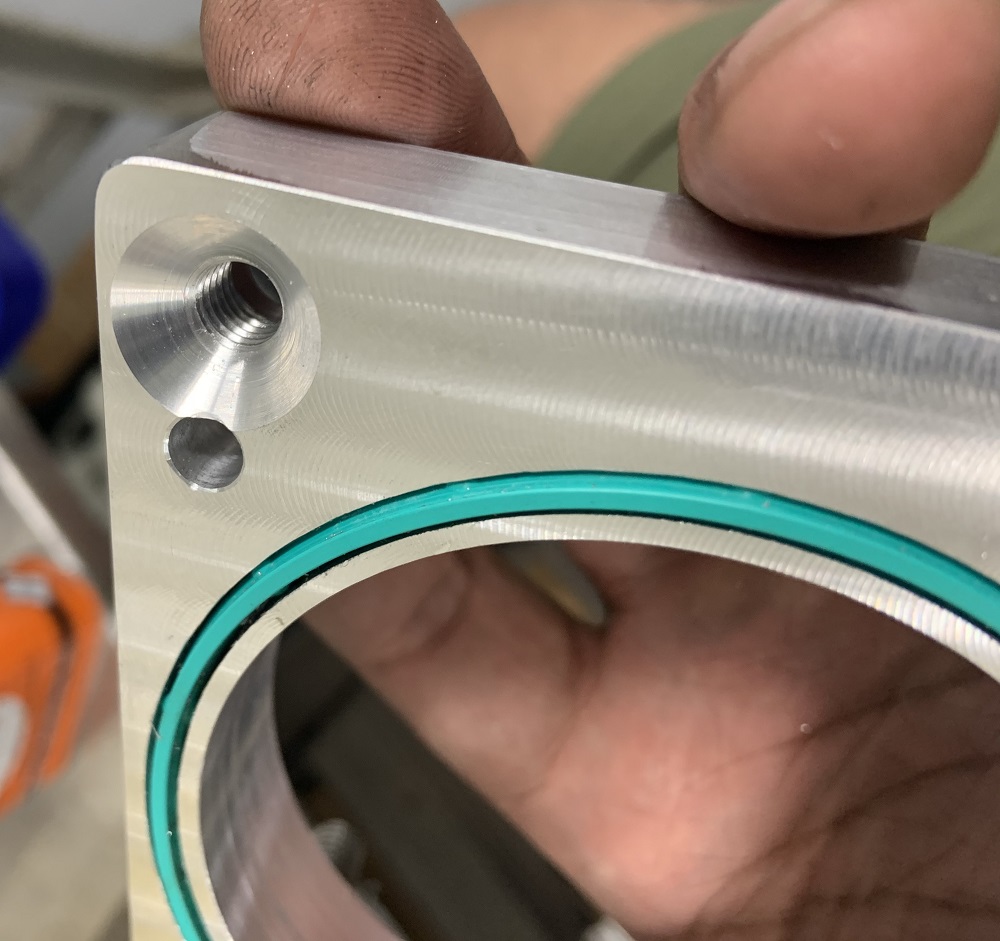
Next I flipped it back over to machine the pockets for the bolt heads, and the pockets for the N* TB locating dowels.
Checked the clearances for the pockets.
Drilled the through holes for the LZ9 intake bolts, and drilled the holes to be tapped for the N* TB.
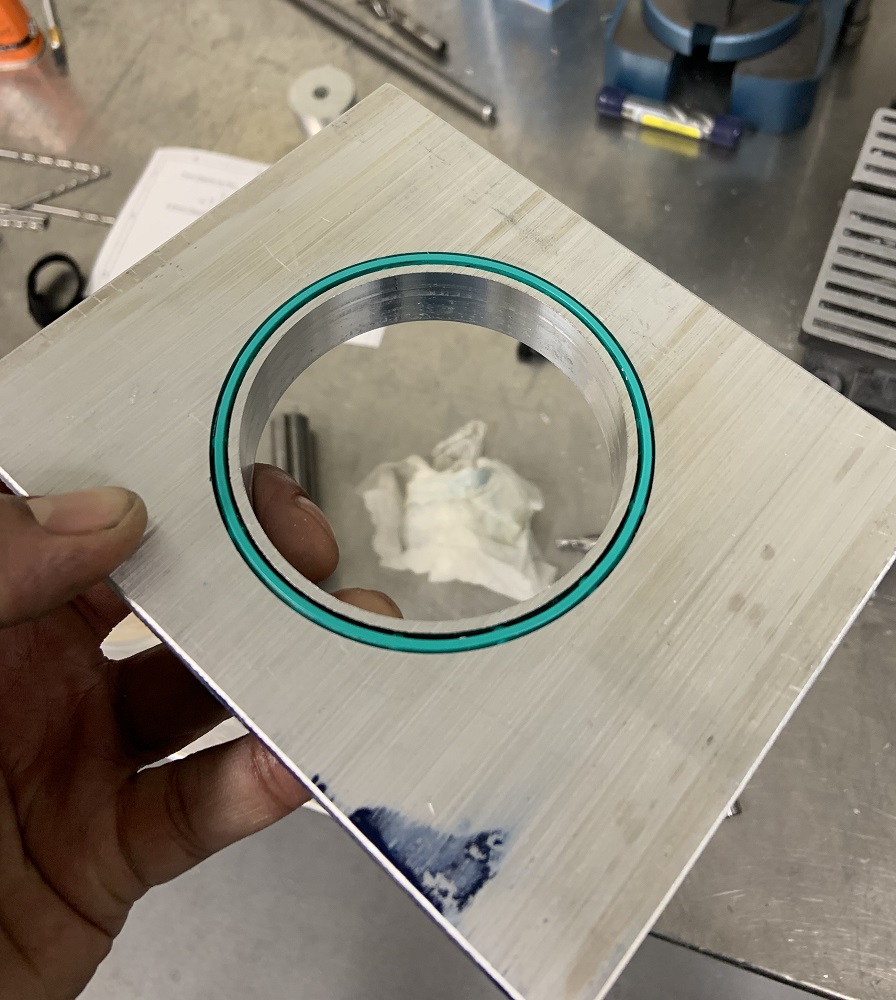
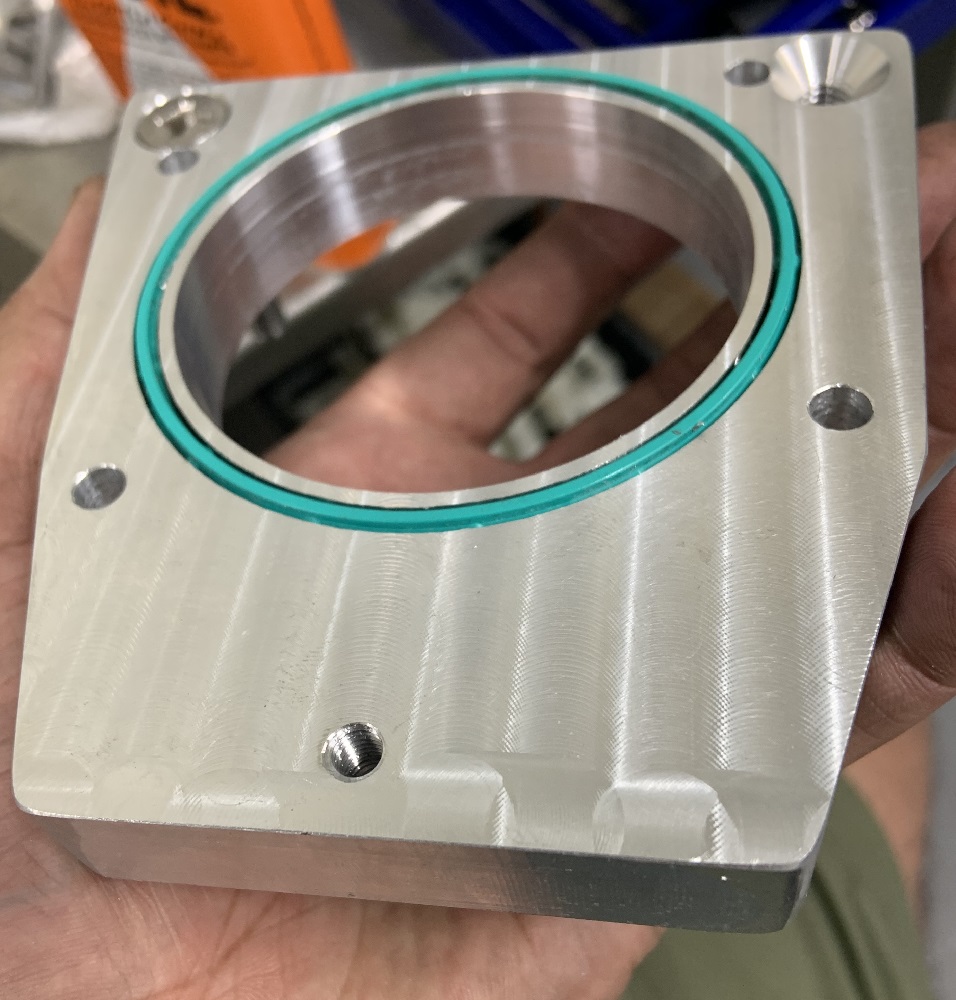
Checked the fit of the adapter to the intake.
And the fitment to the TB.
Got the final shape outlined.
And cut it out.
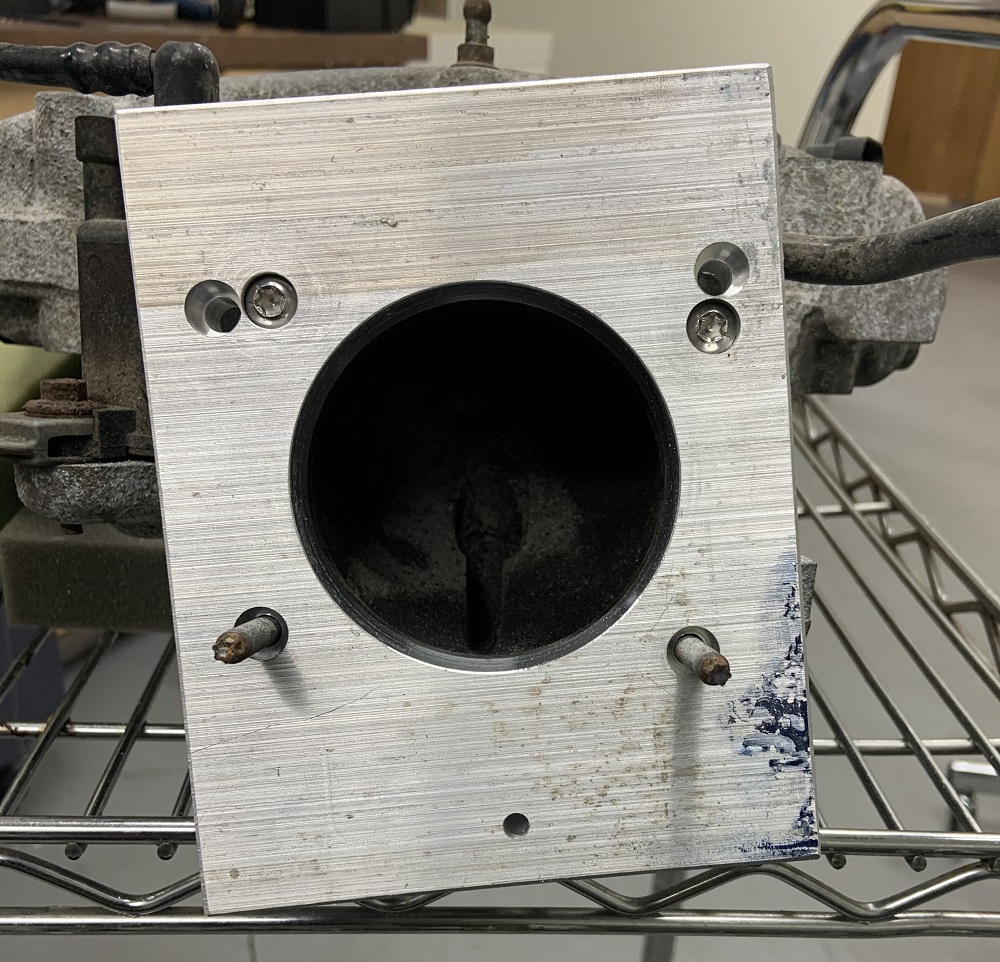
Faced both sides, and countersunk the holes for the studs for the N* TB.
Tapped the holes for the N* TB.
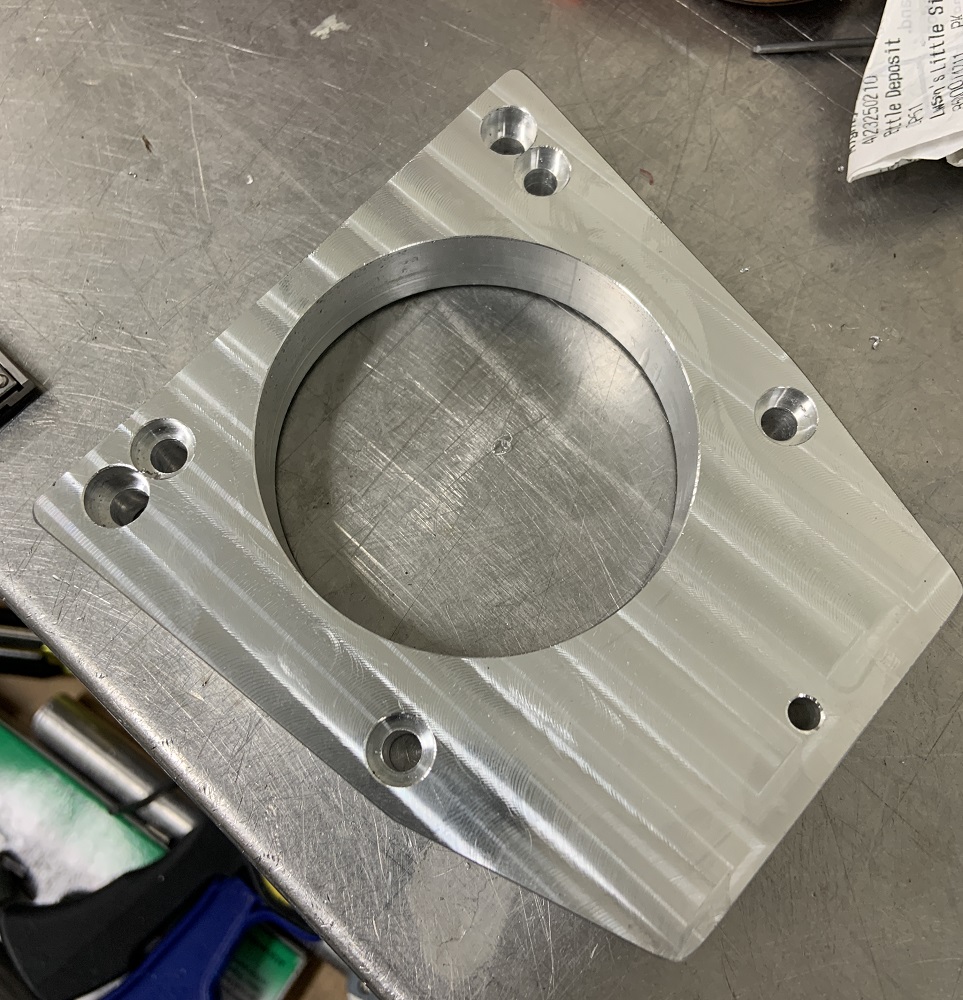
Finished adapter.
Did a final check of the fit to the TB with the studs. Everything lines up perfectly.
And then assembled the whole thing.
I am pretty pleased with how it came out. I am at a standstill asides from cleaning parts until the machine shop finishes up. I have started the process of acquiring some odds and ends for the Fiero, a front fender, non sagging bumper, and a driver's side mirror. The weather is looking nicer, I can put it in the garage in April to pull out the cradle to start getting ready for fitting everything.
[This message has been edited by zkhennings (edited 03-28-2021).]
I would make sure to test fit the plenum on a LIM to make sure the adapter doesn't hit anything on the LIM. Otherwise, nice work!
------------------ "I am not what you so glibly call to be a civilized man. I have broken with society for reasons which I alone am able to appreciate. I am therefore not subject to it's stupid laws, and I ask you to never allude to them in my presence again."
I would make sure to test fit the plenum on a LIM to make sure the adapter doesn't hit anything on the LIM. Otherwise, nice work!
Thanks, I haven’t test fit it, but if you look at this picture of where it should end up I don’t think it will cause any issues.
If someone were going to keep the stock heater core lines from the LZ9 that attach to the lower studs that mount the TB, they would have some issues using this adapter.
[This message has been edited by zkhennings (edited 03-29-2021).]
Some minor updates, checked out the -0.050” PAC LS locks I got as well as the PAC LS retainers. The stock 3900 retainers do not fit the PAC 1218 springs well, I am sure they could be forced onto the LS valve springs but I would be worried about that failing at some point.
I measured the ID of the locks when they are in the retainer and it is around 7.4ish mm at their deepest point, so they should work fine with the LZ9 valves which are 0.05mm smaller diameter than the 8mm LS valves.
Also the locating rib on the locks seems to be right at 0.050” higher than on the stock retainers, so this is good, I will check install height when I get my parts back.
I also need to weigh the valves when I get my parts back to see how much lighter they are than the LS valves and decide if I want to use the -0.050” locks or get standard height ones. If they are significantly lighter then I don’t necessarily need the extra seat and open pressure that PAC recommended to me.
I will take some comparison pics tomorrow.
I am in contact with a cryogenic treatment place in Worcester and planning to take my valves, rocker arms, pushrods, lifters, and timing components to get cryo treated. It shouldn’t cost much more than $100 and should help prevent wear of these components that are taking greater forces than stock. Going to take my lifters apart tomorrow one by one and inspect and clean them in the ultrasonic parts cleaner to make sure I can reuse them.
Other topics I have been investigating are rebuilding the headlight motors, mine need new bumpers I will make from 80A polyurethane. I am going to get brass gears from Rodney and new brushes as well, and hopefully they work consistently from now on.
I am also trying to locate a WS6 steering rack, I found one at a nearby yard but it is $200 so I may wait on that for a better deal.
Priced out the exhaust tubing and bits I will need to fabricate the headers and exhaust, not cheap but I am going with 304 USA made stainless tubing.
And finally I have finished stripping the bus interior of foam and can start the floor removal to replace all the rusted support beams. The foam removal has taken many hours every week for months, it has been brutal and I am glad it is finished. Need to make a jig to support the frame when I remove the supports.
[This message has been edited by zkhennings (edited 04-02-2021).]


 r !
r !


 but it is what it is. If anyone knows a shop in the Boston area that has better prices let me know, because I called like 5 machine shops and they all quoted me the same price. I doubt I would need the heads resurfaced again though until I put some serious miles on this thing, so it is acceptable.