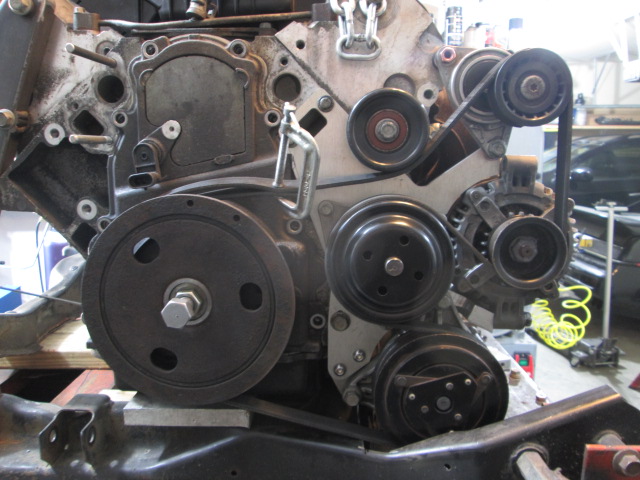
The pulley showed up (and the ID matches the shaft OD of the water pump which is nice!) and I made the needed clearance cuts to the cradle to get the engine at the same elevation as my first LS4/F40 swap an to have it pushed forward another 3/16".
Right now as the engine sits. The engine center-line is 8 11/16" from the bottom of the cradle and 15 1/16" from the center of the front cradle bolts. The oil pan is resting against the front cross-member, so the only way to go further forward is to move/replace the front cross-member, which is certainly under consideration.
The next step is to mock up some temporary (and adjustable) mounts and find a chassis to do a test fit with and verify clearances and final engine placement. If there is room in the chassis to move the engine further forward, it will be worth reworking the front cross-member to do so.
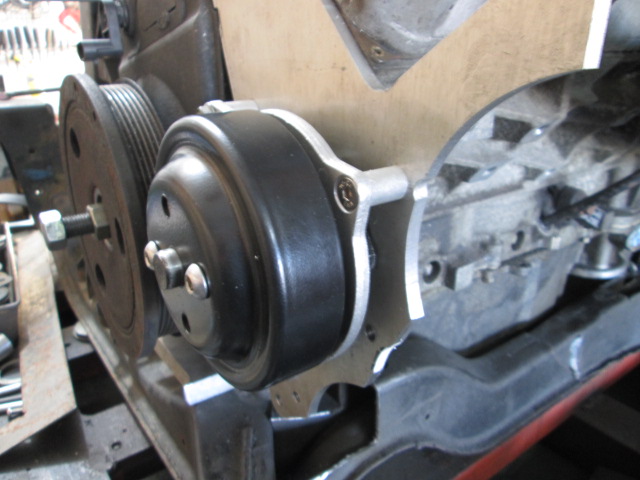
The one shown in the pictures is the one I will likely use as it fits the best.
Is that an out of the box application and if so what application is it for? Or are you planning to sell a kit that include the thermostat housing, pulley, mounts and pump all together?
Originally posted by Bob2112: Is that an out of the box application and if so what application is it for? Or are you planning to sell a kit that include the thermostat housing, pulley, mounts and pump all together?
Yes, it is an OEM application. I am not prepared to share the application at this point.
Yes, eventually there will be a complete accessory drive kits for electric as well as mechanical water pumps and A/C and non-AC versions as well.
I am also planning to offer the service of doing all the modifications to the cradle including welding on all the mounts, so the buyers can avoid multiple test fits and other hassles.
Right now the AC compressor is about 3/8" below the top of the exhaust passage. Three things to keep in mind.
1. Engine is currently at its lowest point, it might be raised as part of the test fit. . 2. The stock LS4 exhaust (or aftermarket w-body headers) will likely be used by most, so that passage might not be used at all for exhaust (and might even be filled for to reinforce the area). 3. For everyone of my swaps, I always included stainless steel heat shields to separate the exhaust from the parts that need to be protected.
[This message has been edited by fieroguru (edited 11-28-2017).]
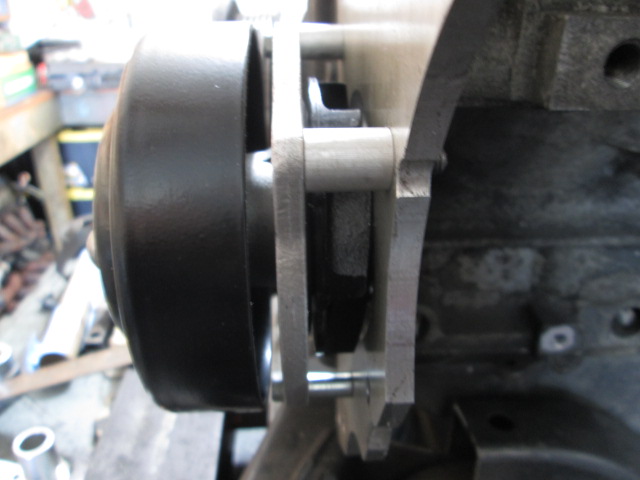
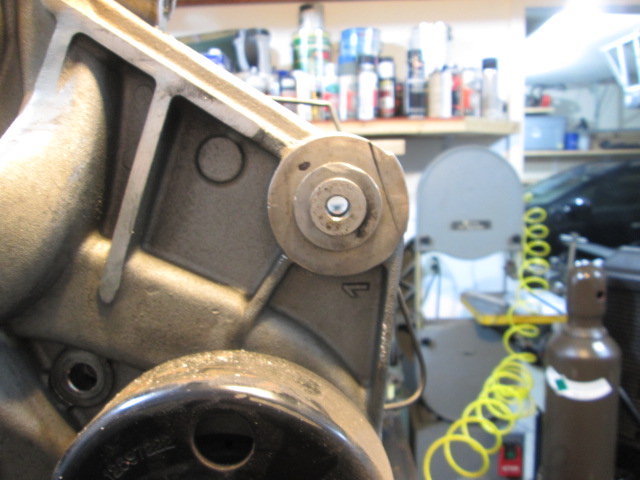
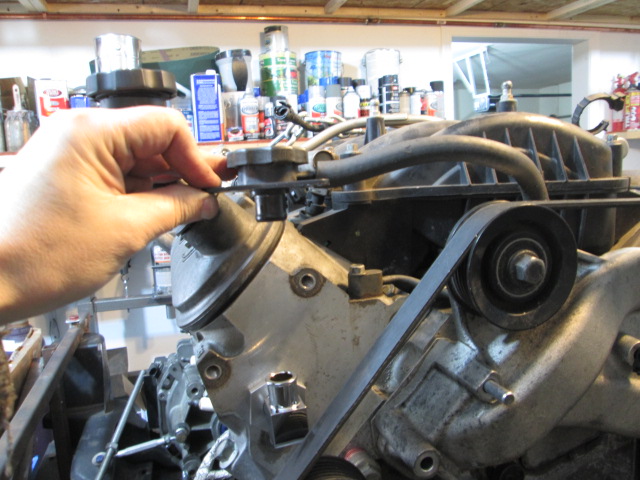
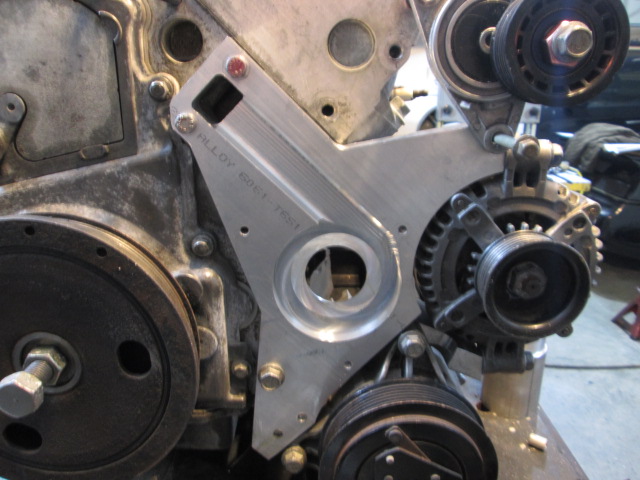
I milled the taper around the impeller so I could pull the pump into the proper position, countersunk 1 hole, and installed the pulley. I like the OD of this pulley, but still looking for other options - preferably one that is deeper so I can run the pulley within 1/16" of the housing.
A couple of weeks ago I was able to accomplish the test fit with the help of olejoedad, his son Brian, and a mutual customer. With the engine oil pan resting up against the front cross-member, the alternator was tight to the stock insulation around the double firewall tube. With some slight adjustments, we were able to get about 1/4" minimum clearance around the alternator and between the transmission and the driver side frame rail. With this test fit I was able to lock down the final drivetrain position, which will allow finalizing the engine and transmission mounts. I can also proceed with making the first mechanical water pump prototype now that I know it will fit.
I also heard back from the machine shop on the quote for the coolant housings and it was within the expected and needed range to be competitive. So the first CNC prototype has been ordered to validate their program vs. my prints, which will likely take 3-4 weeks. Once that is done, I will order the first batch of 5-10 - depending on how much interest there is for it.
Originally posted by fieroguru: ...eventually there will be a complete accessory drive kits for electric as well as mechanical water pumps and A/C and non-AC versions as well.
I am also planning to offer the service of doing all the modifications to the cradle including welding on all the mounts, so the buyers can avoid multiple test fits and other hassles.
Nice. That will allow at least the illusion that we did some of the work ourselves.
(I mentioned to you before that, after I had my engine swapped, I had to pull it out and go through it just to see what "made it tick". Not that I doubted the integrity of the swap - it was essentially bulletproof - I just needed to know something about it.)
While waiting on the prototype water manifold and before I finish the prototype mechanical water pump, I decided to play around with the stock water pump setup and find a solution that requires zero welding of aluminum.
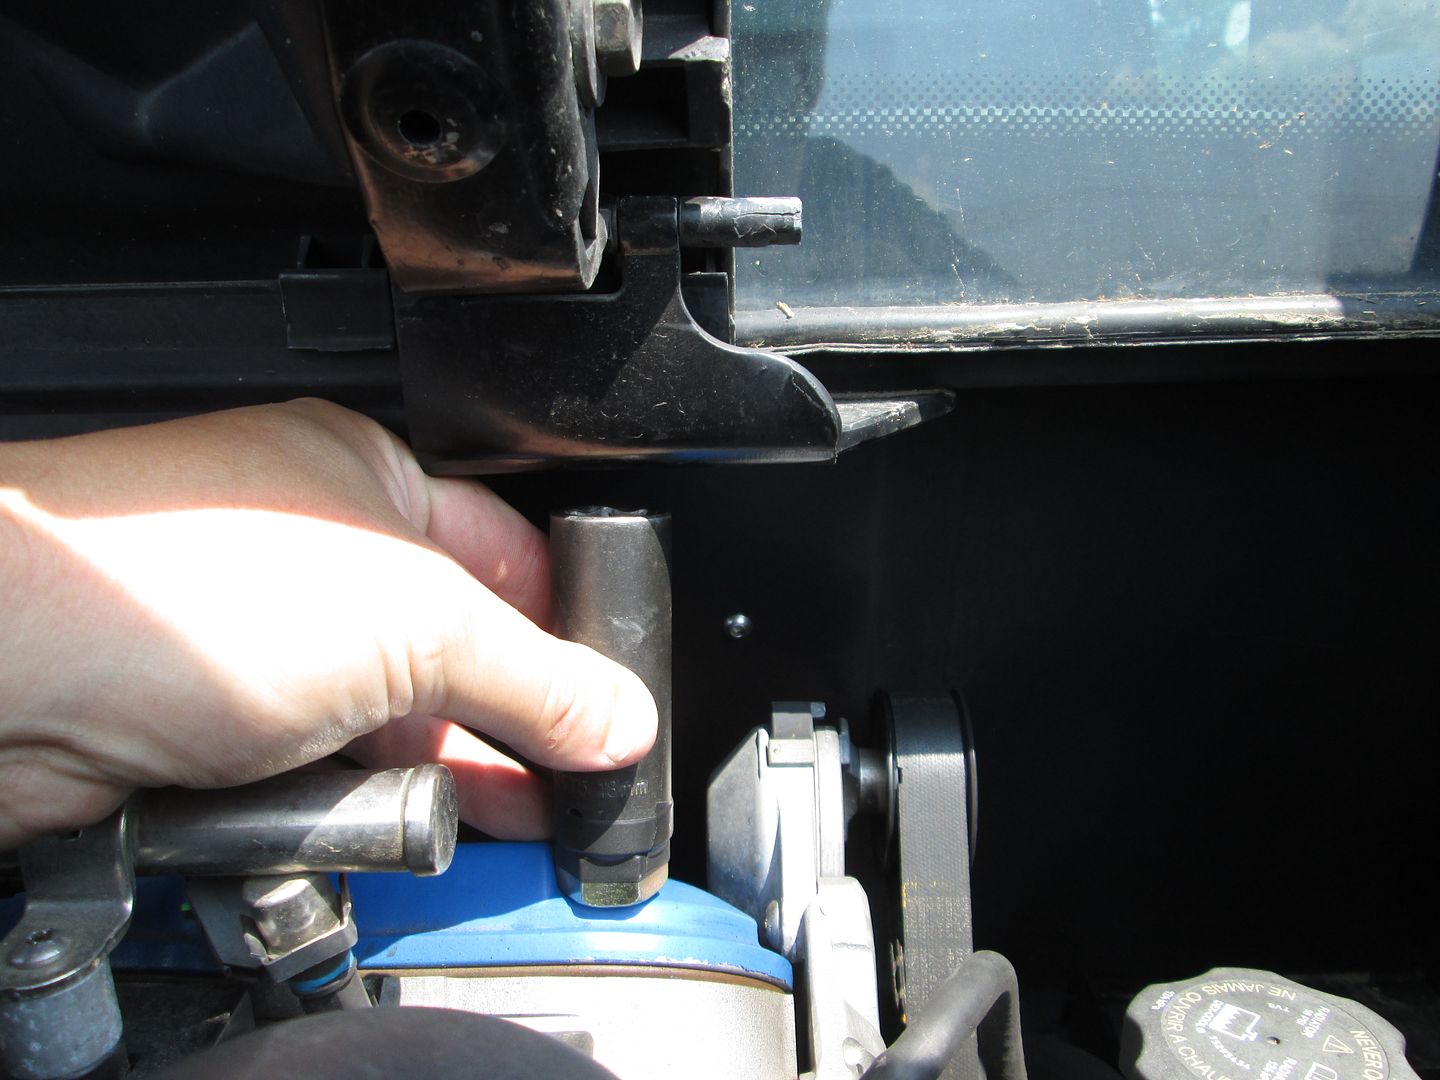
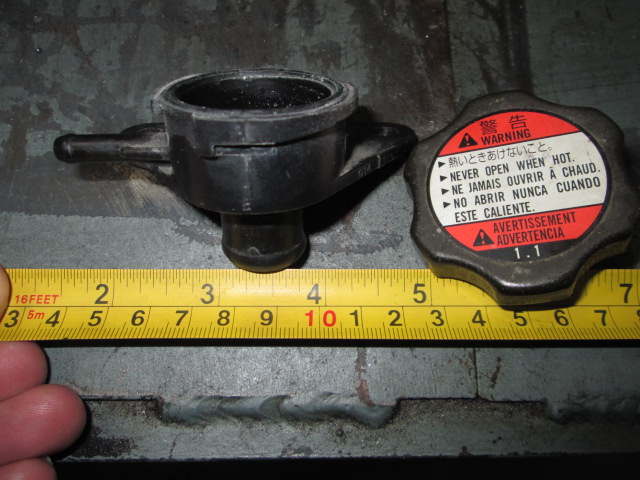
The largest and most challenging interference issue with the LS4 is the coolant fill interferes with the deck lid hinge box. Even when you trim the hinge box (a lot), the coolant fill cap can't be removed, which is why nearly all ls4 swaps using the stock water pump manifold have cut off the stock fill point and welded the hole shut (or welded on another fill point).
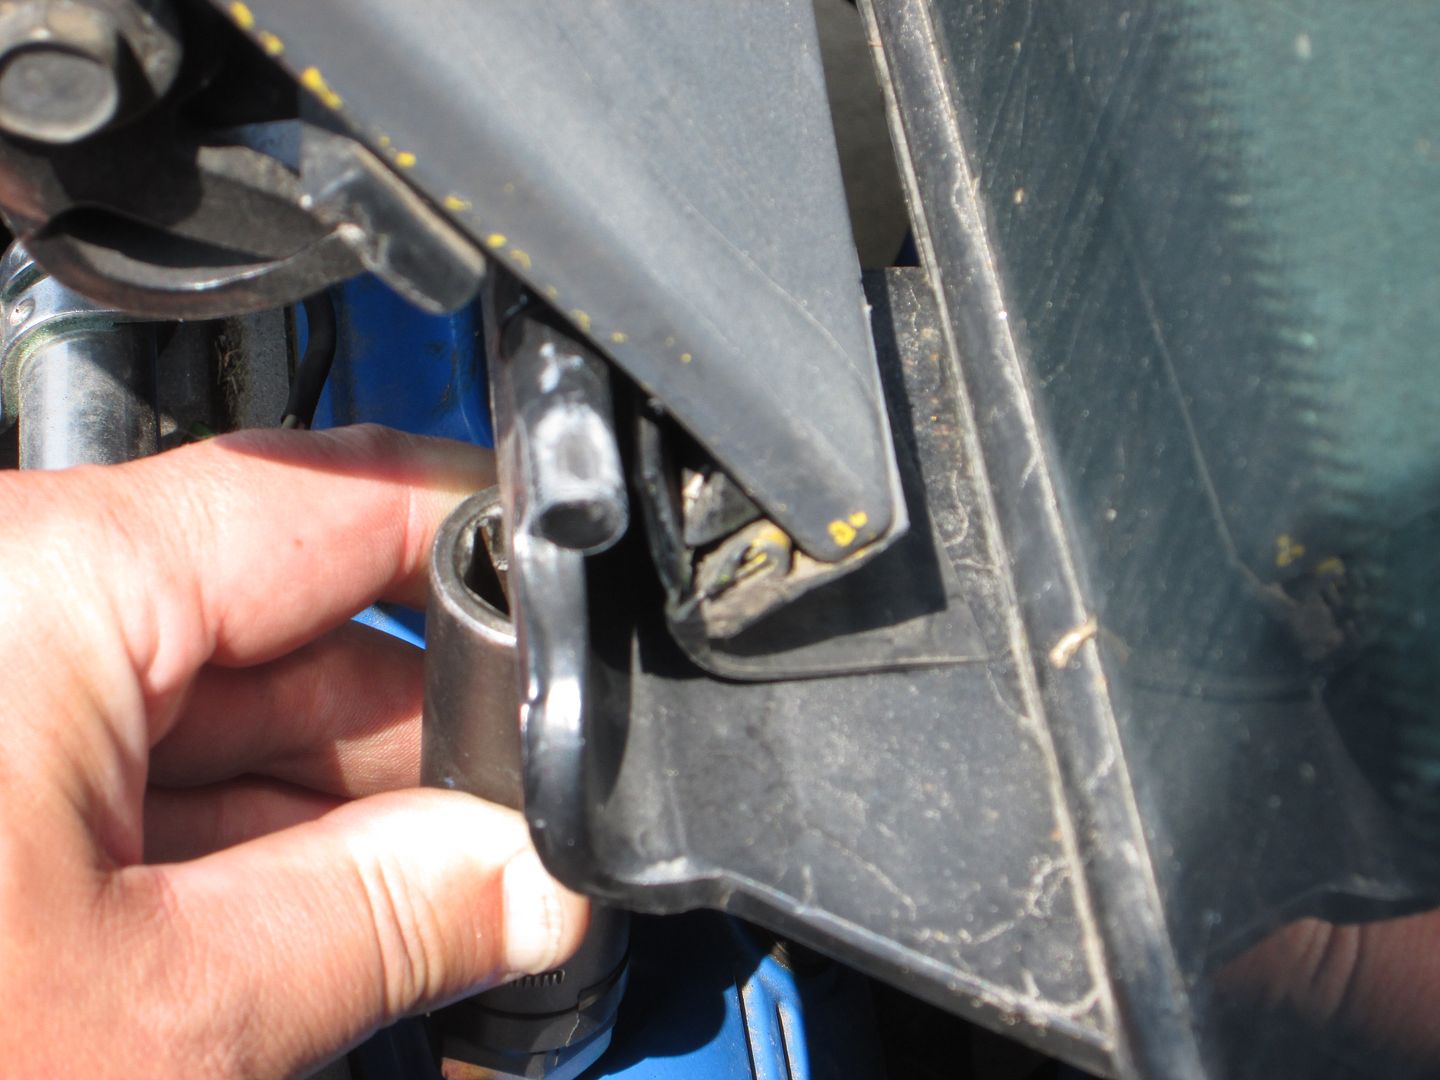
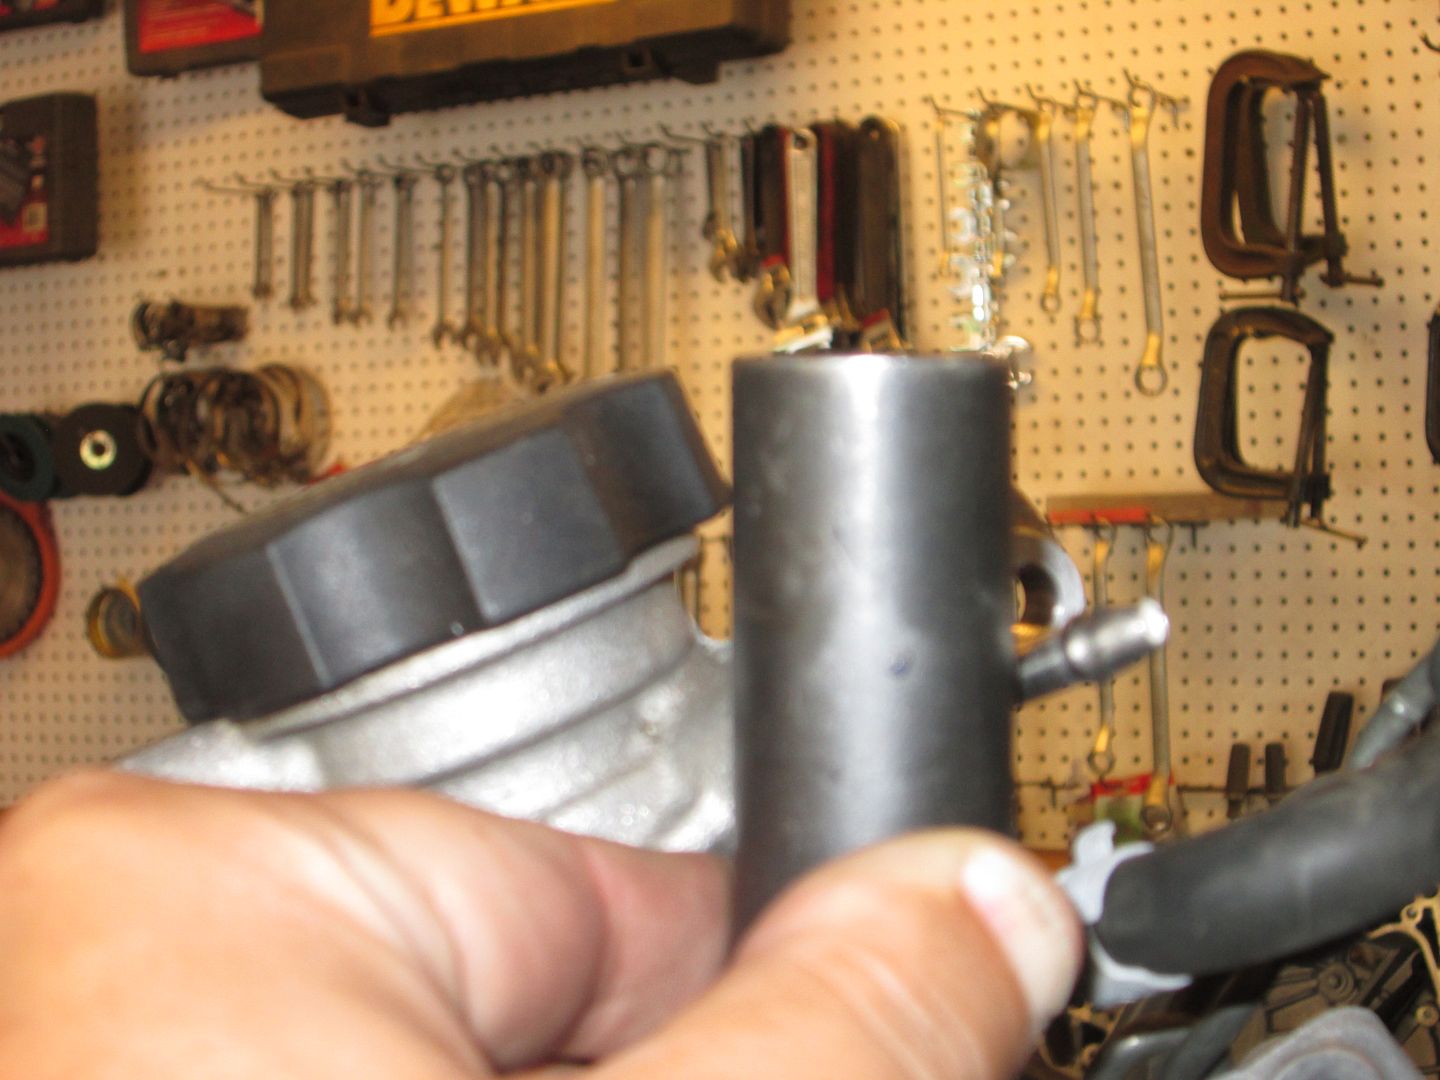
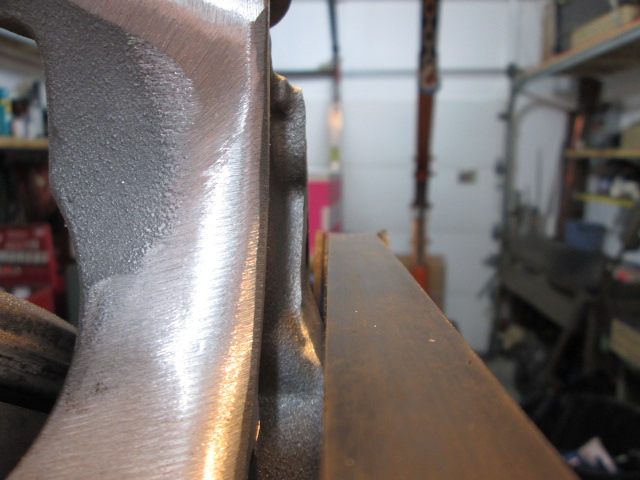
To get a feel for how tight the coolant fill is, here is a picture of a socket with a nut taped to it resting on the valve cover and under the horizontal part of the hinge. It clears the horizontal portion of the hinge by about 3/8".
Here is that same socket in the same position next to the stock coolant fill:
This DIY focused method will still require removing a significant portion of the deck lid hinge box. Or you can eliminate the hinge boxes entirely as detailed here: https://www.fiero.nl/forum/Forum1/HTML/085829.html
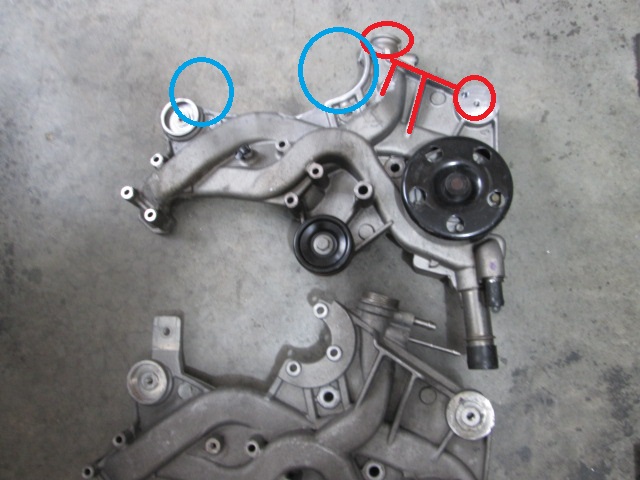
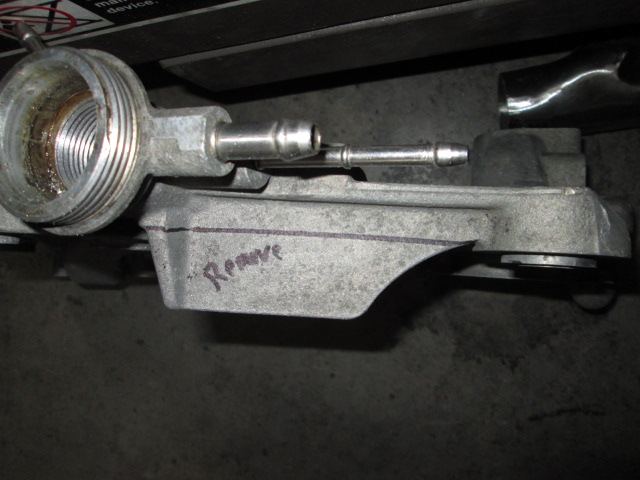
This picture shows a stock LS4 water pump manifold on the bottom and a modified one on top with some colored circles and lines. The blue circles show some optional modifications to remove excess portions of the water pump manifold (when not using the power steering pump). The red circles are modifications I would recommend doing.
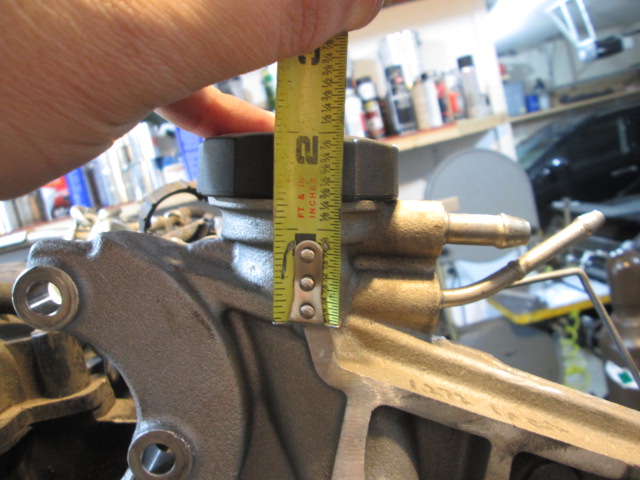
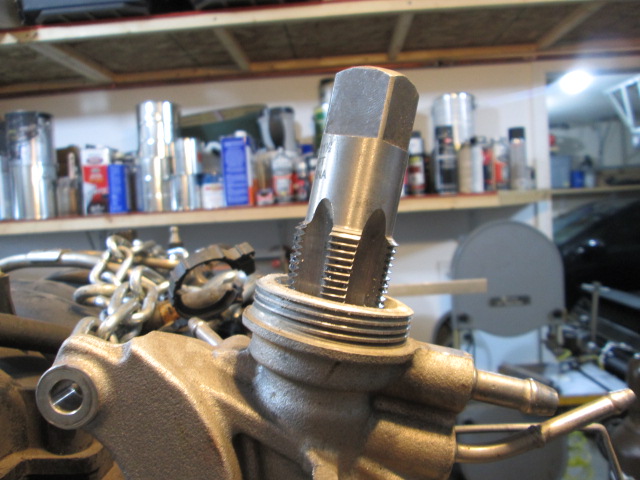
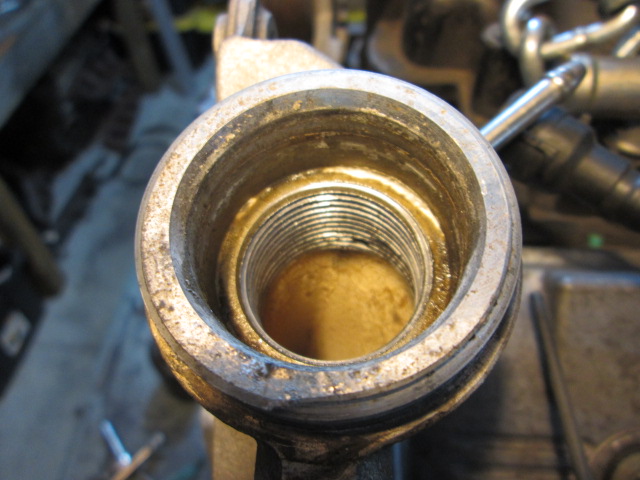
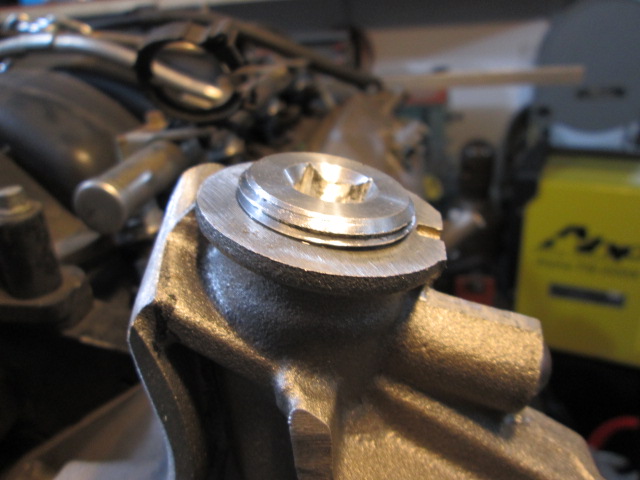
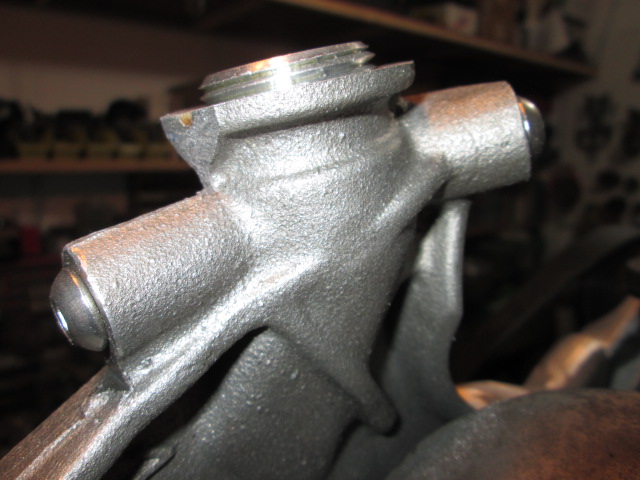
Coolant Fill: Here is how to remove it and reduce the overall height by 1". 1. Use a 1" NPT tap to tap the stock hole in the coolant fill. 2. Use a saws all to cut off the fill point level with the lower flange of the fill point. 3. Remove all the stainless steel coolant hose connections. 4. Tap the stock holes with a M8 tap. 5. Install the 1" NPT cap and M8 bolts to seal up the stock fill point. You can use one of the M8 bolts to bleed the air from this raised section when filling. 6. Optional, use the flapper disk to grind the cap down flush with the water pump housing.
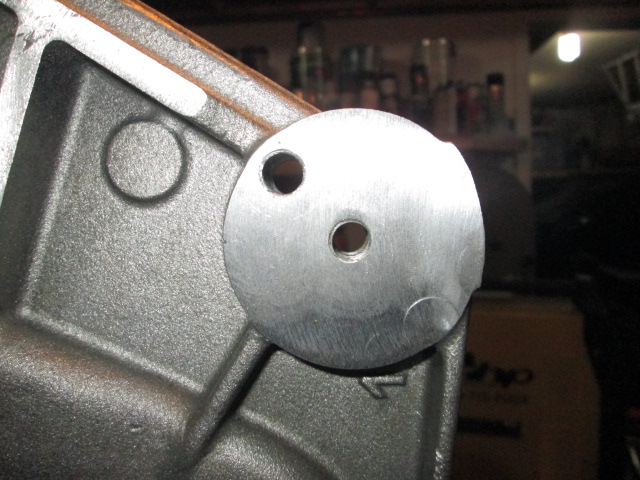
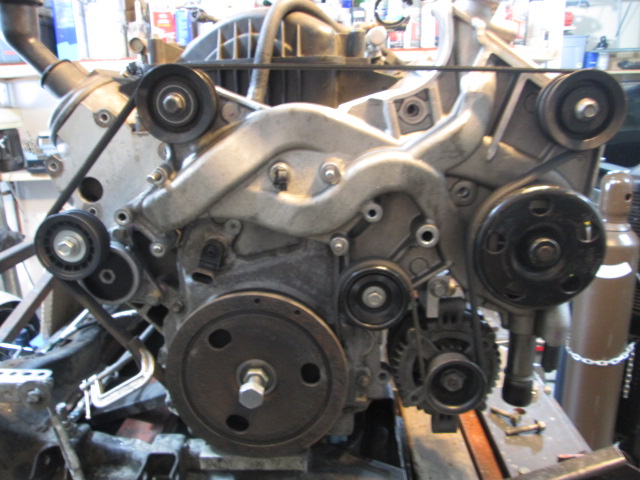
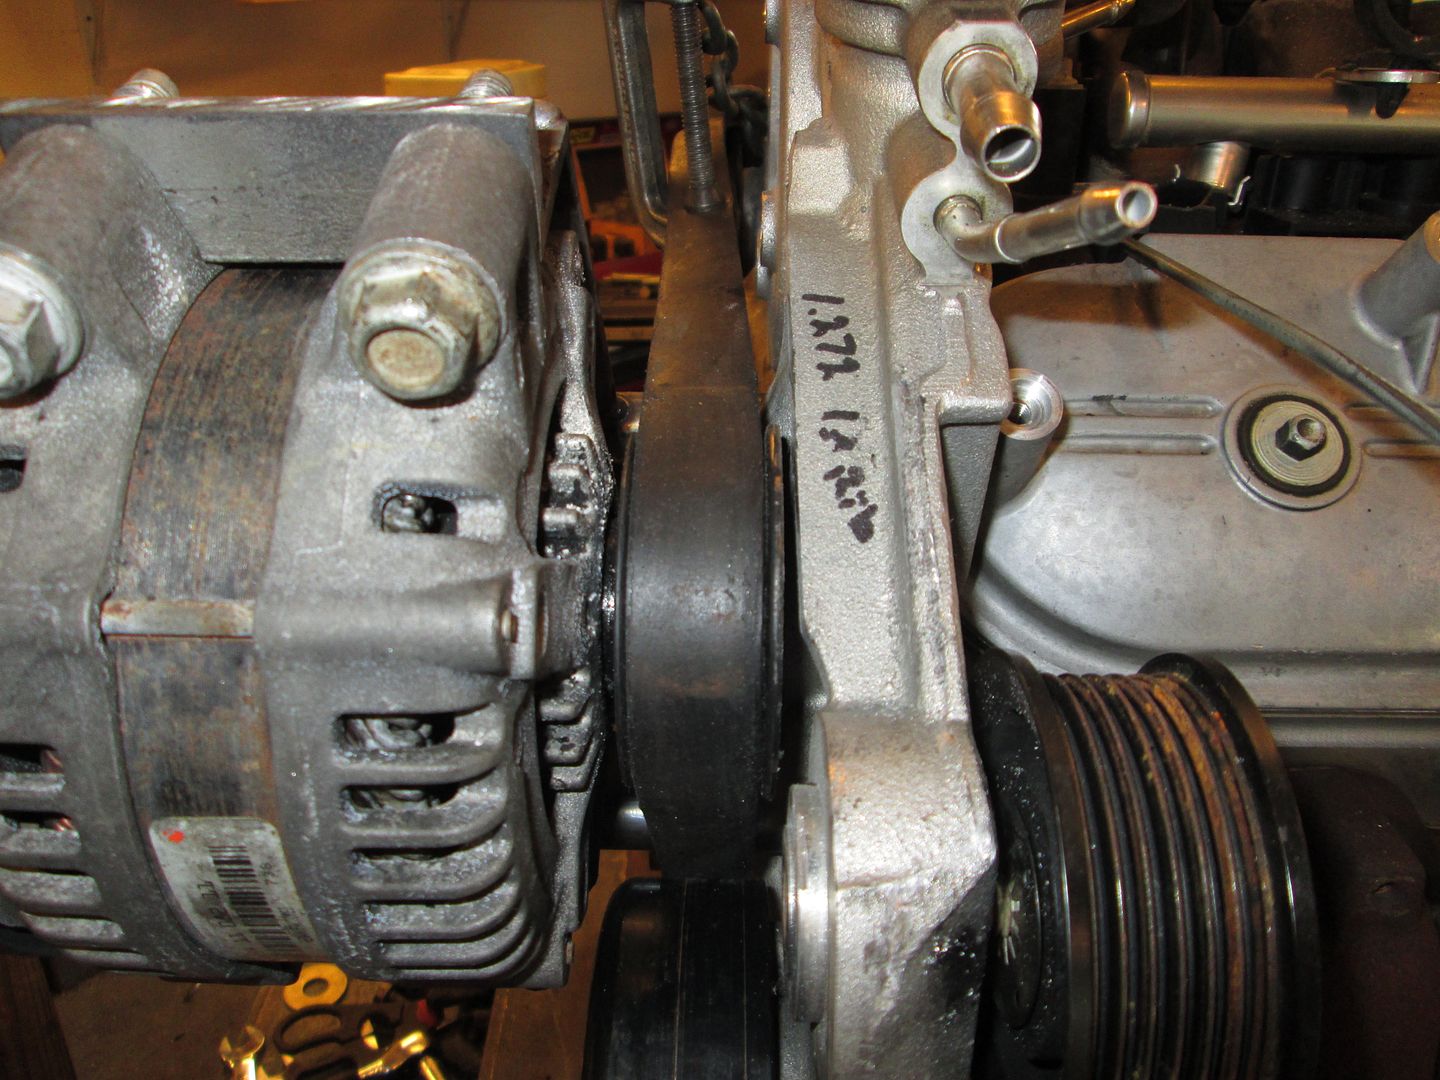
Idler Pulley Boss: Now some will say you don't need to do anything here, but to keep the belt path simple w/o running the power steering pump, I recommend relocating the idler pulley hole to the location shown below. The relocation accomplishes two things. 1. It gives you more clearance between the idler pulley and the firewall. 2. It raises the belt path up to clear the water pump manifold.
1. Use a flapper disk to grind down the raised boss. 2. Drill & tap the hole. 3. Use a .20" spacer to properly align the stock pulley.
Excess Ribbing: If you are not using the power steering pump and don't want to add and idler pulley in its place, by removing this portion of the reinforcing ribbing the belt path can span between the idler pulleys by each head w/o needing the PS pump or an idler. You need to make a small notch in the top ribbing to clear the relocated idler pulley, so while at that, just remove more.
1. Use a saws all and hand held grinder with a flapper disk to remove a portion of the 3 reinforcing ribs
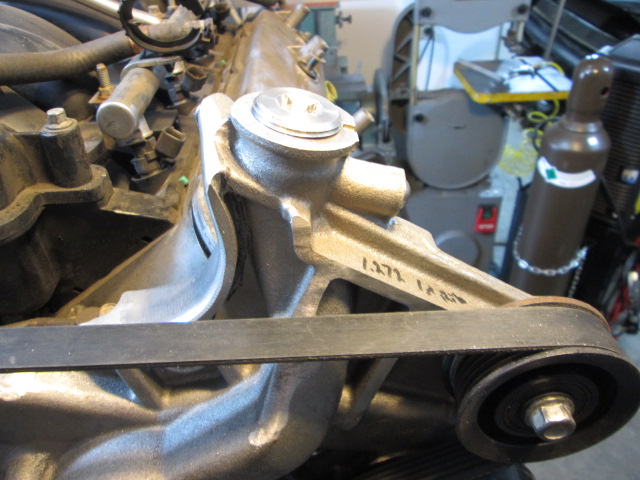
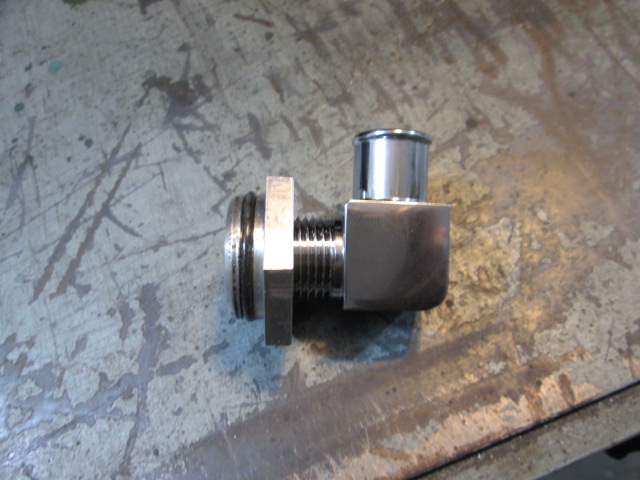
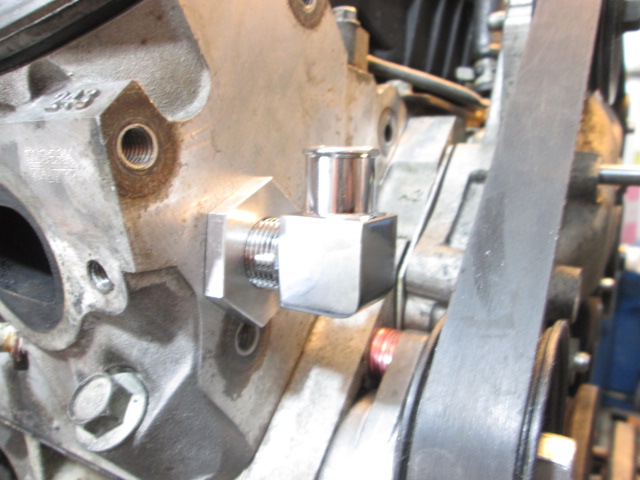
New Coolant Fill: So now that the coolant fill is capped... how do you fill the engine. I am still waiting on the hold down clamp and need to pick up some 3/4" heater hose, but this is the direction I am going. I will be selling the o-ring sealed cap that will replace the freeze plug, and possibly the entire assembly from o-ring cap to remote thermostat housing.
1. Knock out the freeze plug on the rear head by the idler pulley. 2. Install an o-ring sealed cap that is tapped for 1/2" NPT. 3. Install a 90 degree 3/4" heater hose barb with 1/2" NPT. 4. Run some 3/4" heater hose to remote fill point...
[This message has been edited by fieroguru (edited 12-24-2017).]
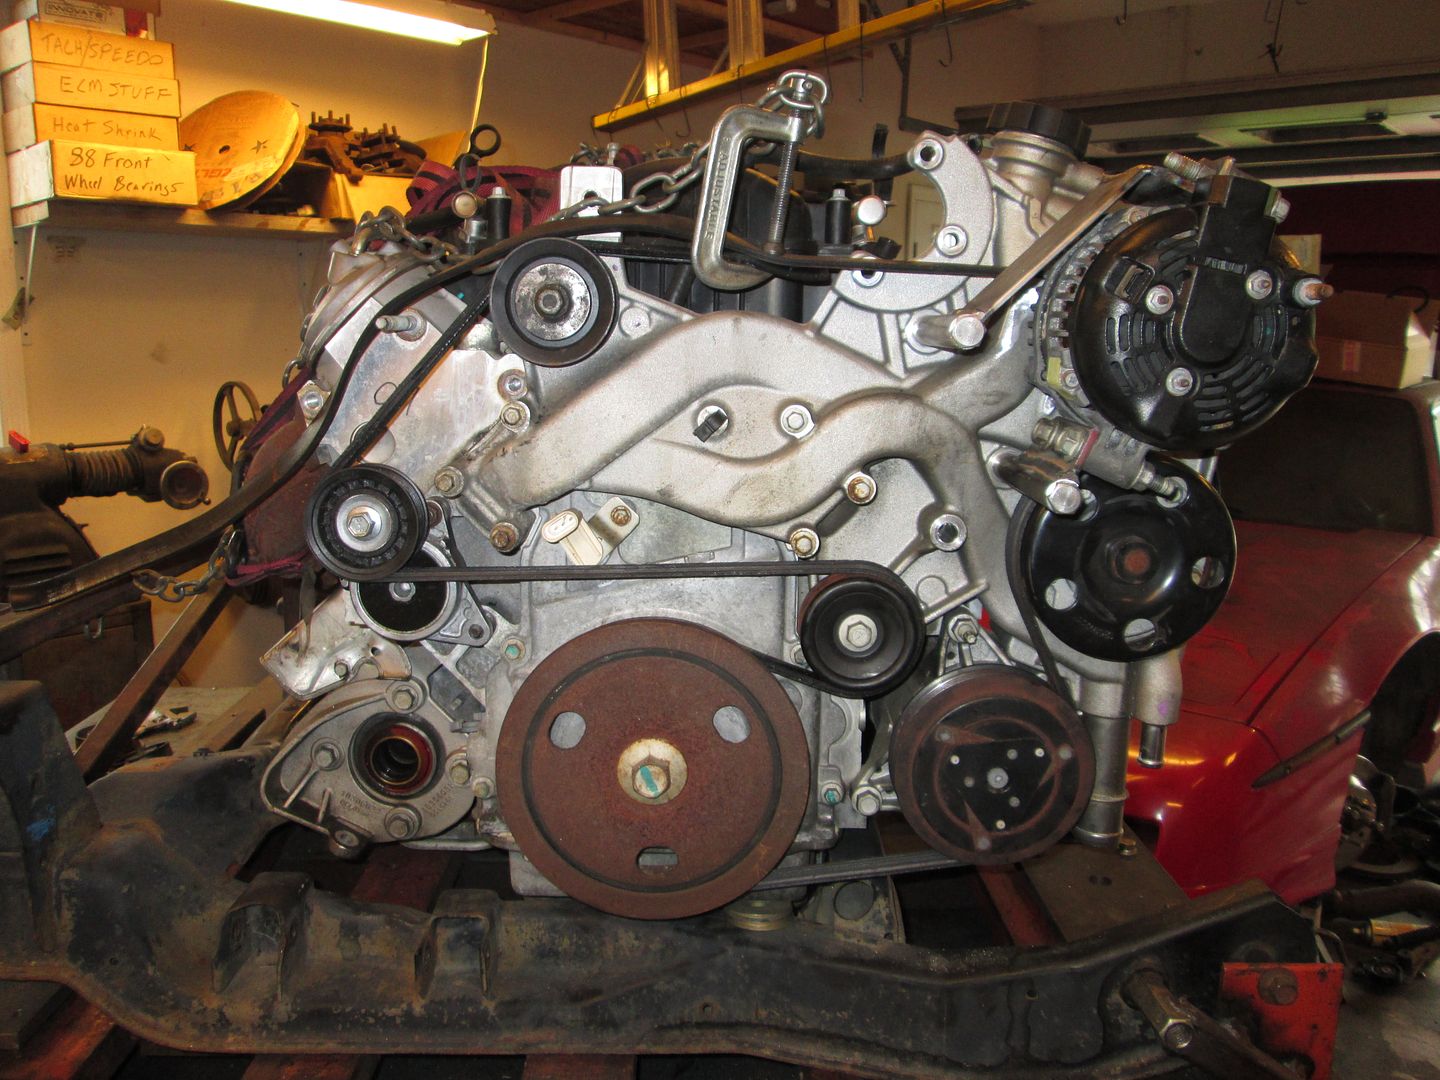
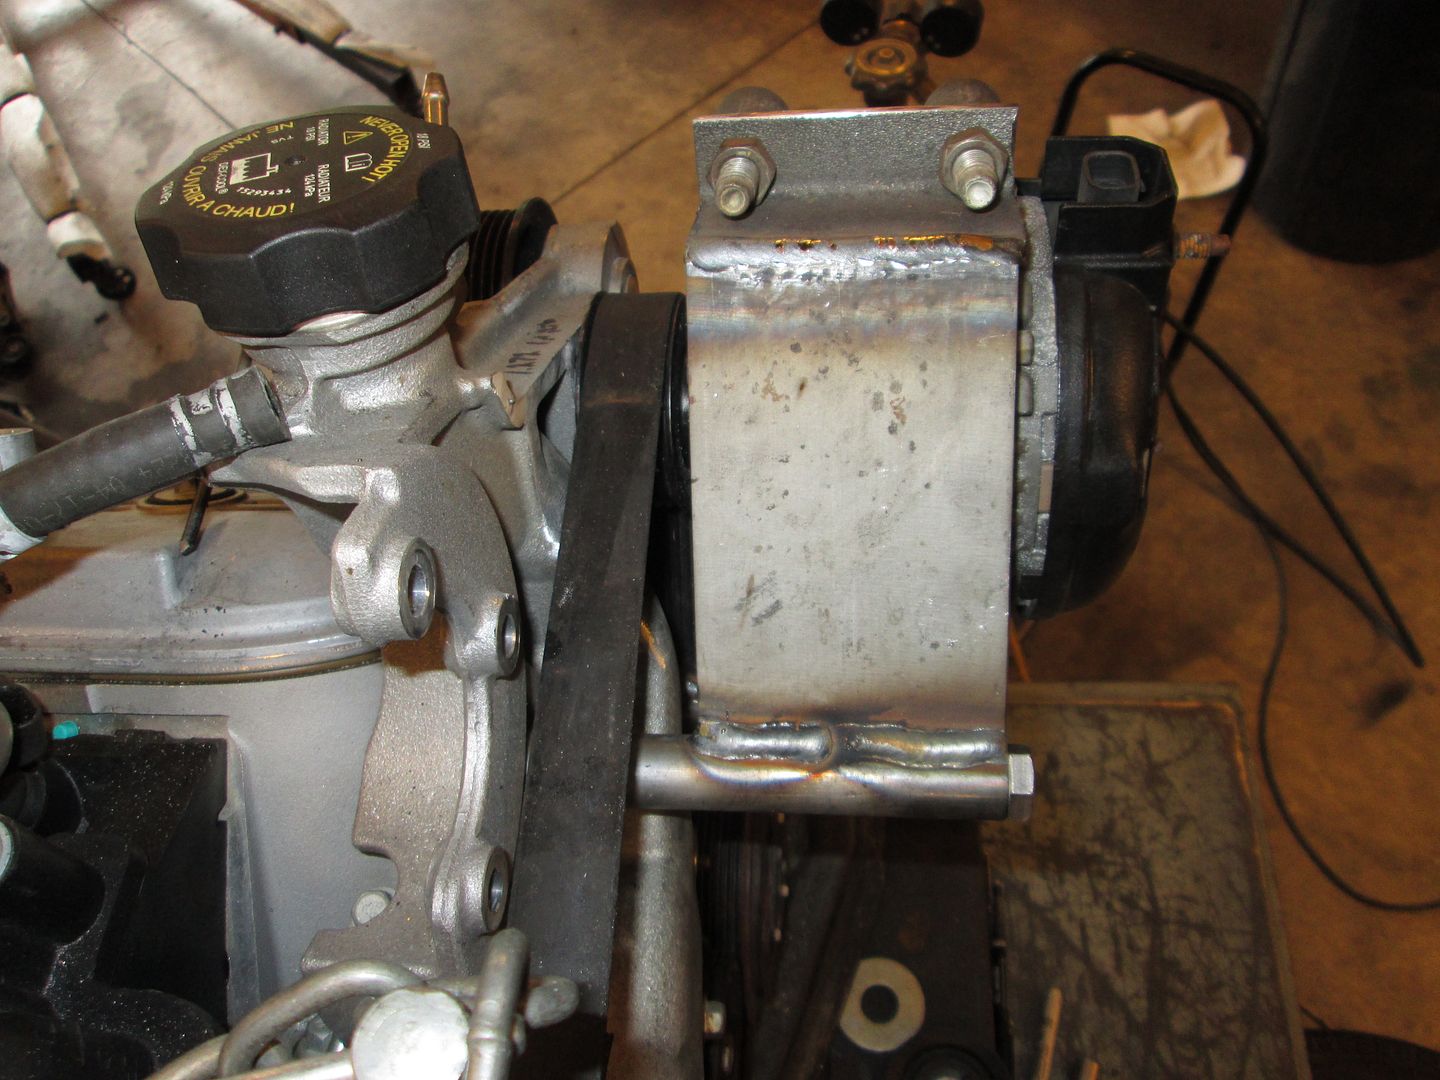
Now that there is a low cost DIY option for using the stock LS4 water pump manifold... I will also be offering alternator brackets and tensioner kits for AC as well as non-AC applications.
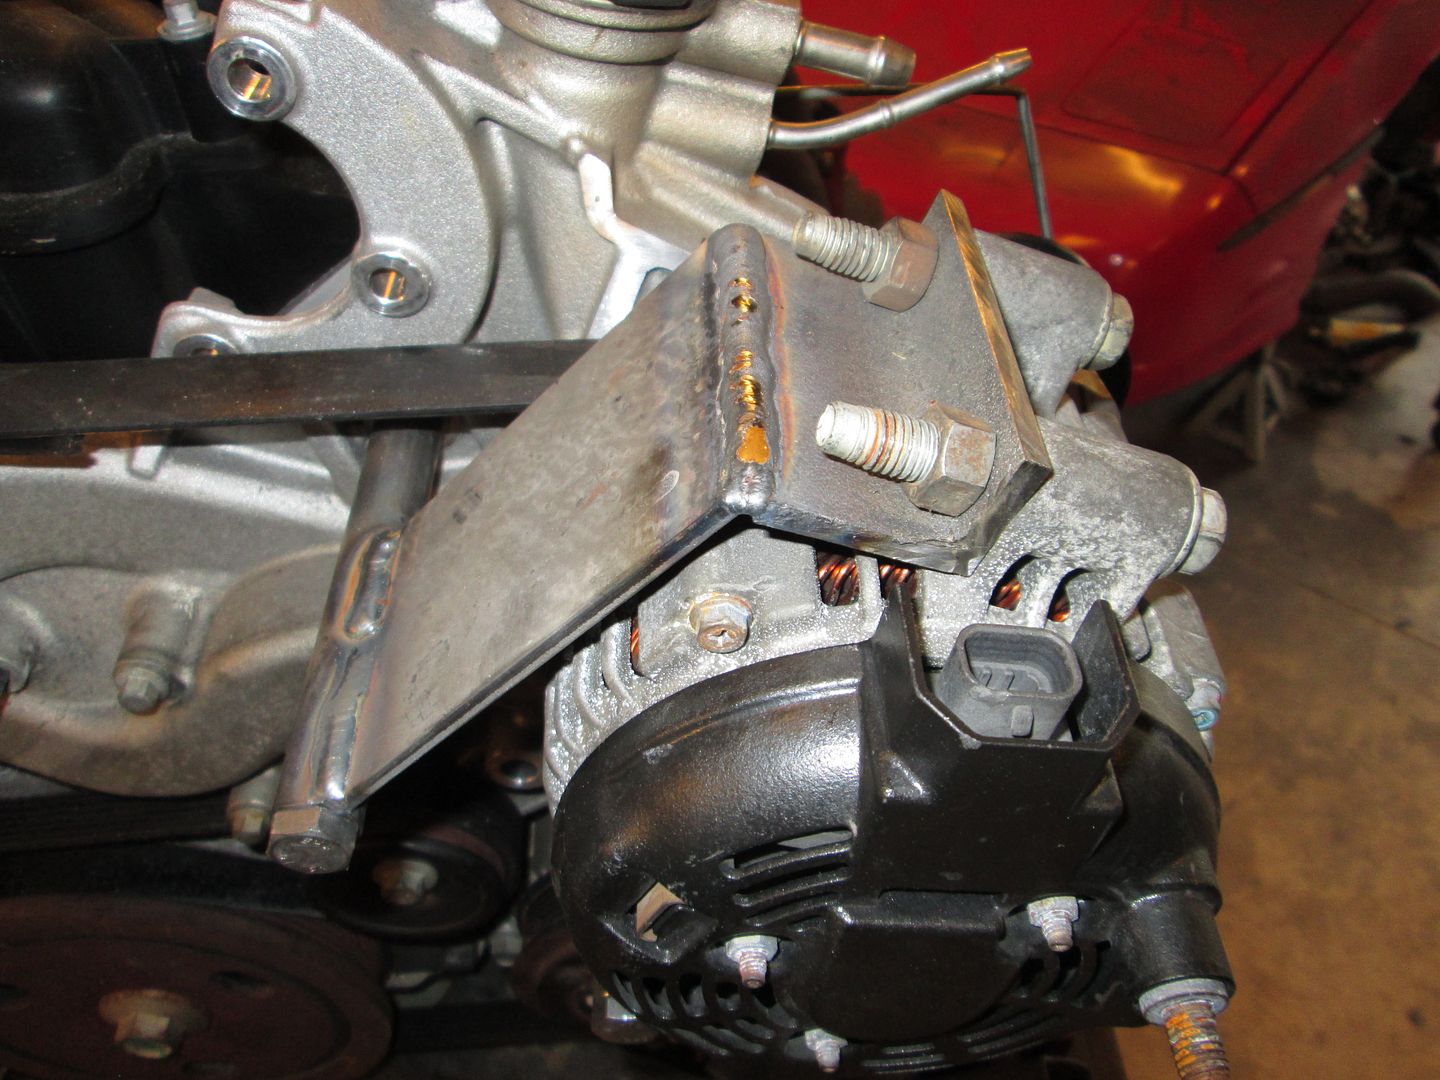
I have started working on the non-AC option. The alternator is relocated down where the AC compressor used to be. It is still a work in progress, but the prototype upper mount is nearly done (there will be a few tweaks to it for the production version). I know how to make the lower mount fit, just need to make the prototype....
About 3 years ago I had roughed in the AC option with a cantilevered alternator setup. I will be reworking this using as much aluminum as possible.
quote
Originally posted by fieroguru:
[This message has been edited by fieroguru (edited 12-24-2017).]
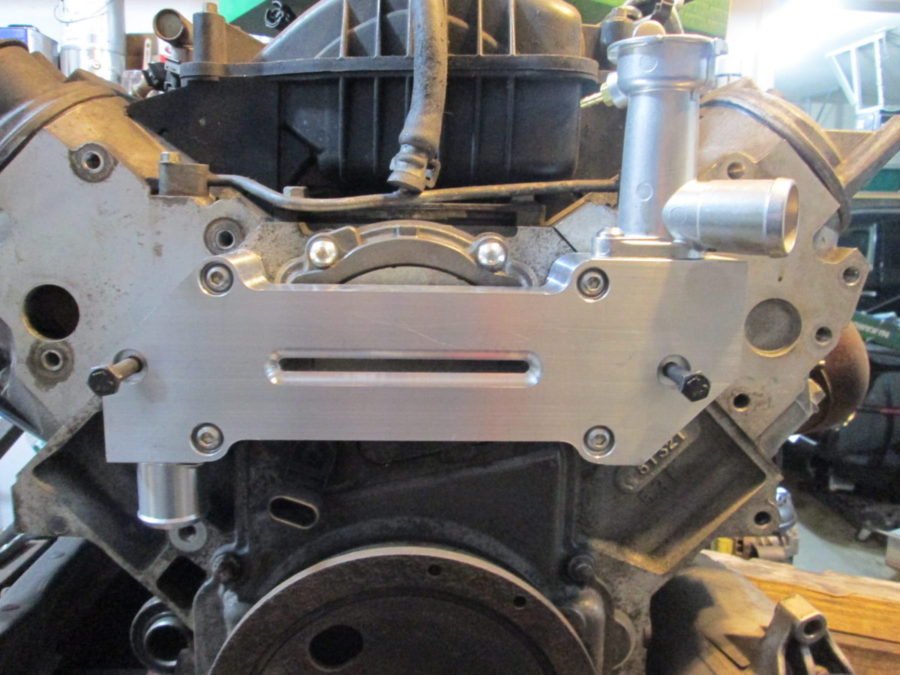
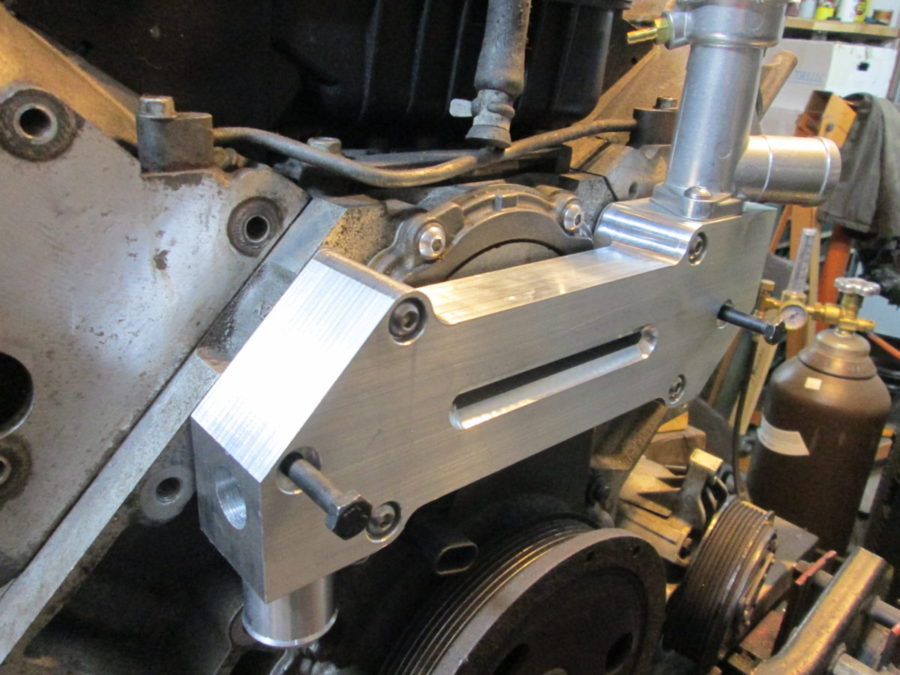
Started working on the prototype mechanical water pump. Here is the base plate mostly milled, I still need to finish the machine work at the bottom, make the cover plate and a couple of parts for the backside...
Started working on the prototype mechanical water pump. Here is the base plate mostly milled, I still need to finish the machine work at the bottom, make the cover plate and a couple of parts for the backside...
I know you've been busy working on water pump and different pulley configurations but I have been wondering what you have in mind for axles for the standardized 6 speed swap. I like to accumulate parts every time I have a chance to go to the yard. Hope all is well.
Originally posted by 2tone86gt: Bump for the awesomeness of this thread and the genious who created it!!
quote
Originally posted by Raydar: Now THAT is a thing of beauty.
Thanks guys!
quote
Originally posted by 2tone86gt: I have been wondering what you have in mind for axles for the standardized 6 speed swap. I like to accumulate parts every time I have a chance to go to the yard. Hope all is well.
I am planning to get custom axle shafts made to fit the Cobalt SS (Turbo) inner tripods and fiero outer CVs. Haven't researched vendors the the axle shafts yet.
Sorry for the lack of progress. My day job has been a little nuts with travel the last several weeks. Since mid December I have been traveling 3-4 days per week and it will likely continue until the end of Feb.
I haven't touched the LS4/F40 on the stand much this year. Day job still has be very busy with lots of travel and keeping up with orders for my current product line hasn't left much free time for R&D efforts. Unfortunately, I don't see the workload from the day job letting up anytime soon.
When I get back to making progress, I will post some pictures of it.
Not much has changed... still traveling 3-5 days per week and processing customer orders on weekends and other times when I am home. Those two items haven't left much free time to get back to this project. I am hoping to have some time to get some more prototypes done before the 35th... but I have a few other personal projects I want to have done for the 35th as well...
The day job continues to have me traveling all over... so progress is limited.
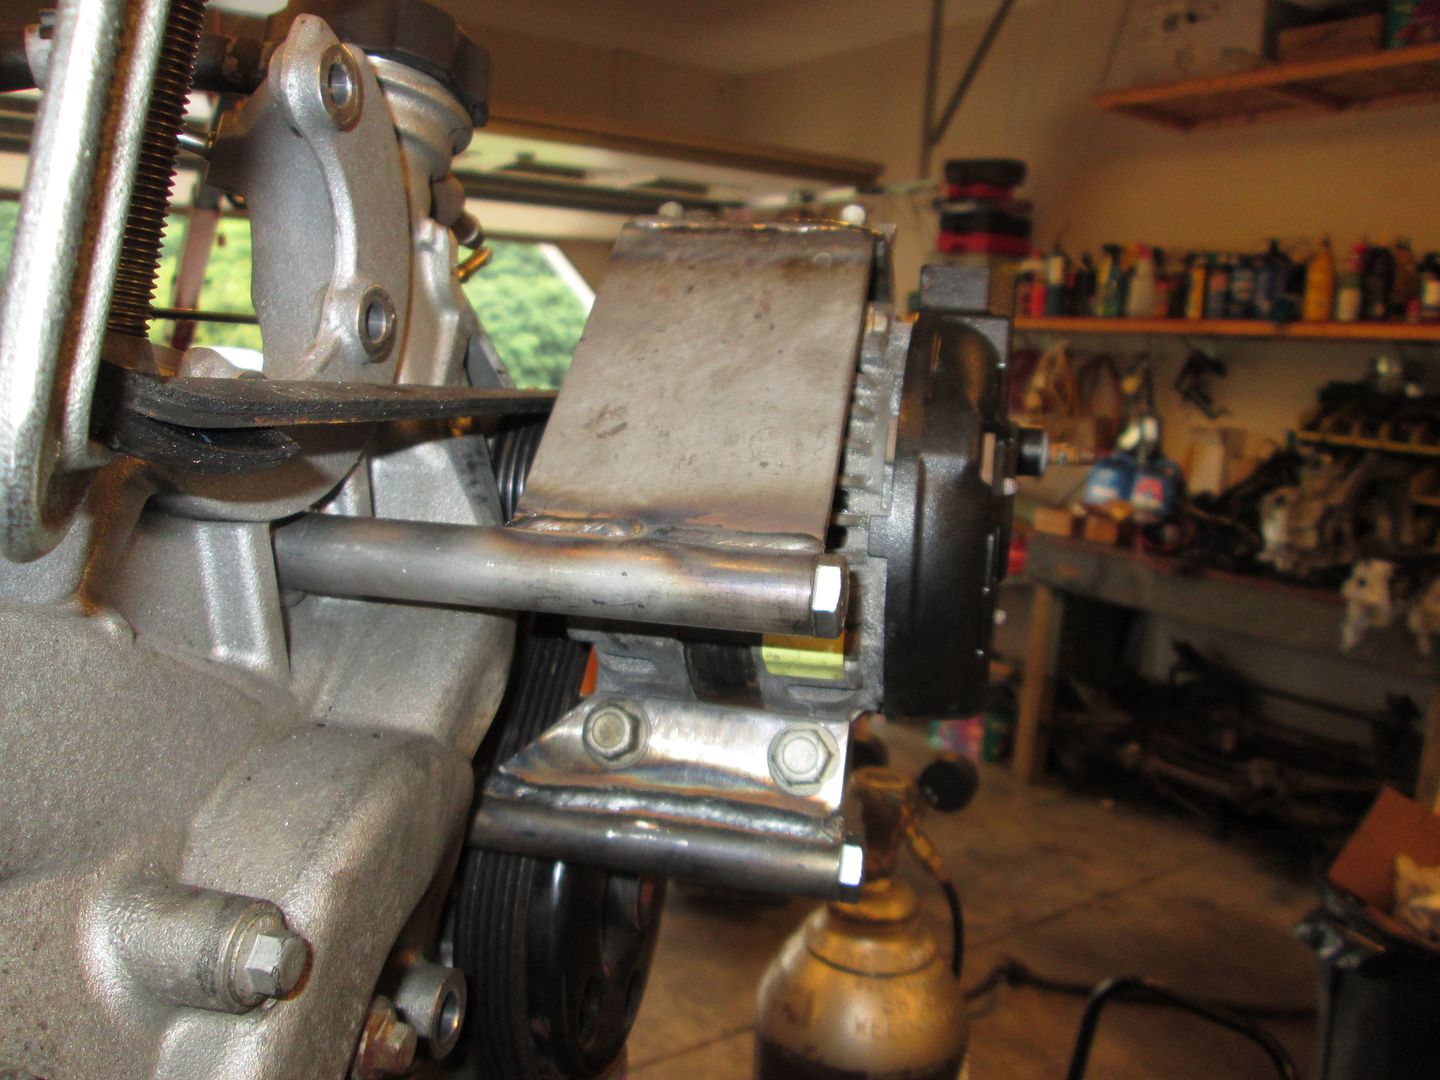
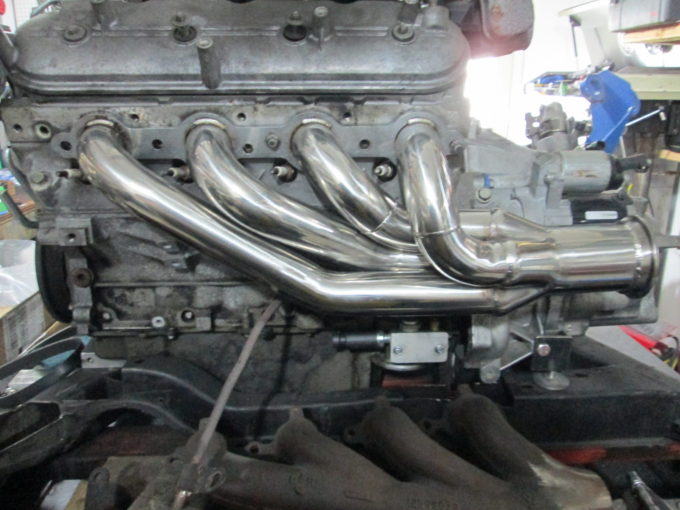
I have been collecting LS exhaust manifolds for R&D purposes and Ebay sells some dirt cheap stainless steel up and forward turbo headers for the LS engines. Like $88.93 for a set of 1 3/4" 304 stainless steel headers shipped to your door cheap... So I had to buy a set and see if they could be used in the down and rear orientation for Fiero swaps.
The short answer is not without "some work". For the life of me, I have no idea how they could have screwed up the header flange bolt pattern so bad. The port holes line up with the factory MLS gasket (which is good), but then the bolt holes are all out of whack by up to 1/8" and they are already oversized. The hole spacing is off at both ends, as well as rotated slightly where some need clearance at the 1:30 position and others need it at the 7:30 position.
They are pretty! Only 2 bolt holes used to attach the header, as only 2 bolt holes line up close enough for the bolts to fit.
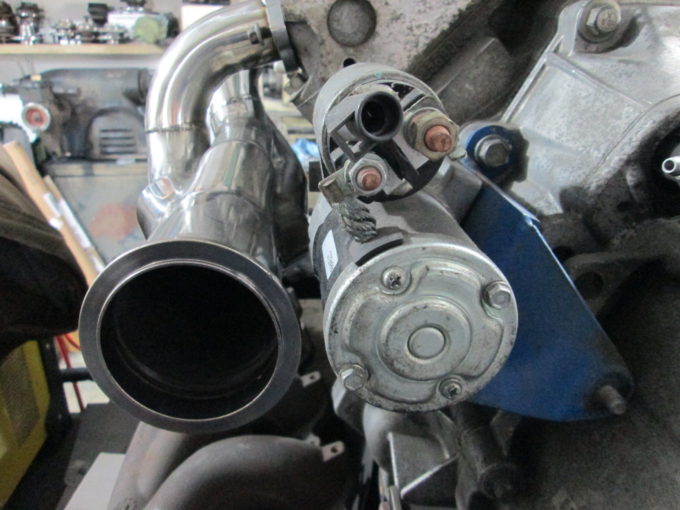
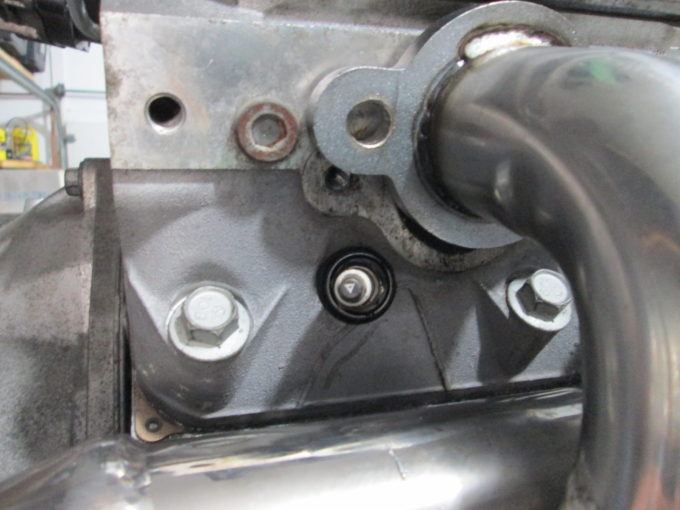
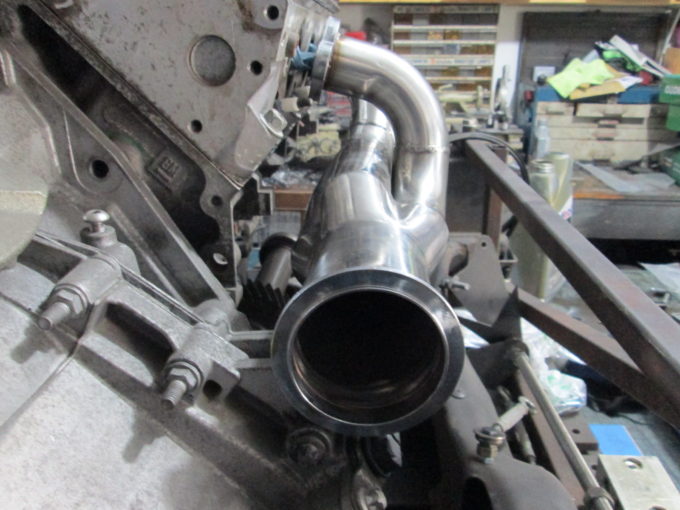
Clearance to the starter is close, but these are 3" collectors with v-bands which is overkill. I would recommend cutting the end of the collectors off and adding a 3" to 2.5" reducer cone which is more realistic and would improve clearance to the starter.
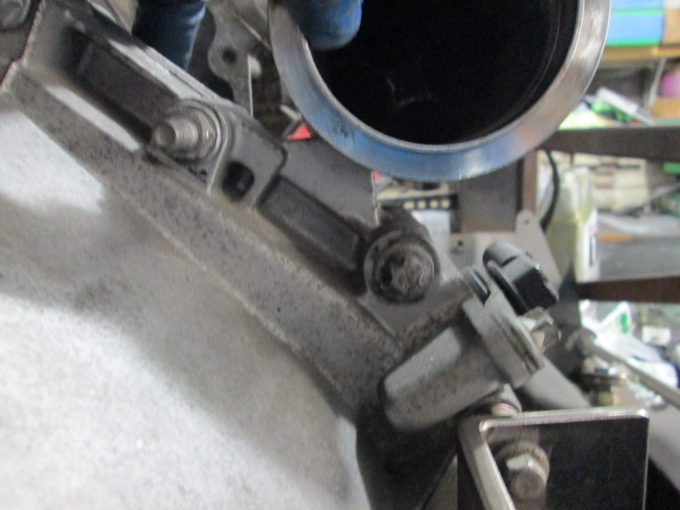
The rear side has the same bolt hole placement issue, but more importantly the 3" collector is too large to clear the F40 differential. Again I would cut the 3" collector off and reduce to 2.5" and likely add a 90 degree turn to allow running the exhaust in the stock fiero 2.8 format.
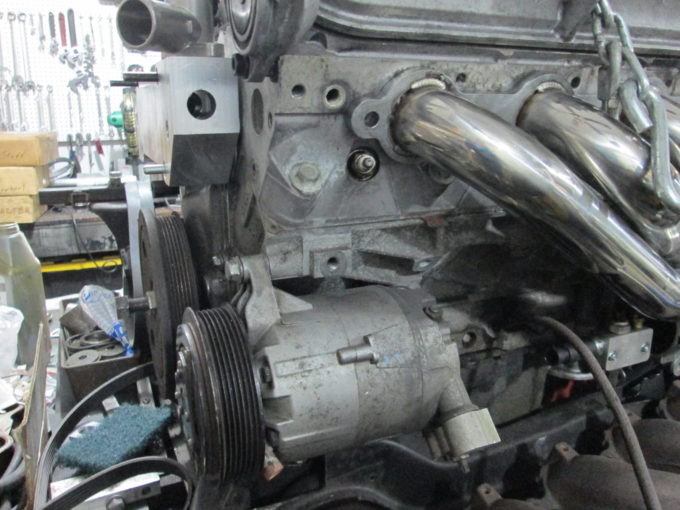
Besides the cheap purchase price and the good looks, the other potential benefit that might offset the work needed to use these headers is that they give you about an inch more clearance for the alternator.
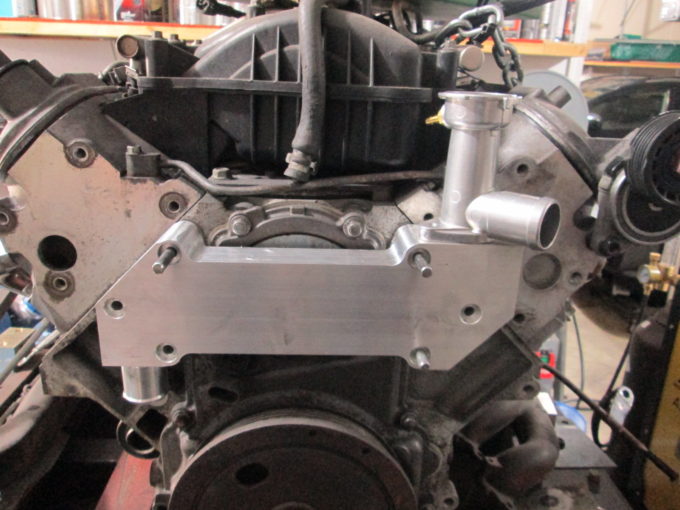
The other progress is I machined a 2nd prototype water manifold for use with an electric water pump.
It took 4 days with several hours per day to get it nearly finished. So I have something like 12-16 hrs in it so far. But I needed to make the 2nd for a few reasons: 1. So I can give a sample to the CNC machine shop in addition to all the drawings so they can quote making them. 2. Finalize the accessory drive for the electric water pump with A/C application 3. Install in my LS4/F40 car for long-term testing.
No one in their right mind would pull a perfectly good running 382 whp LS swap... but that is what I will be doing in the next few weeks. After almost 6 years and 48K miles, I am bored with the power and want to do the next round of upgrades.
The good news is that I will be able to use my 88 Fiero chassis for test fitting this 2nd swap and the accessory drive brackets and use the existing cradle and drivetrain to make the needed locating fixtures on my cradle jig, which will significantly speed up the design work for the engine and transmission mounts.
So don't be suprized when you see the car up in the air without an engine...
Following this now. Was prepping for a 3800sc F23 swap in my 87 GT, but just picked up a 2006 Impala SS with a bad trans for a killer deal. Now have to sell 3800 stuff and pull the LS4 from donor car to be mated to the F23. Will start with buying your starter bracket a clutch line adapter soon
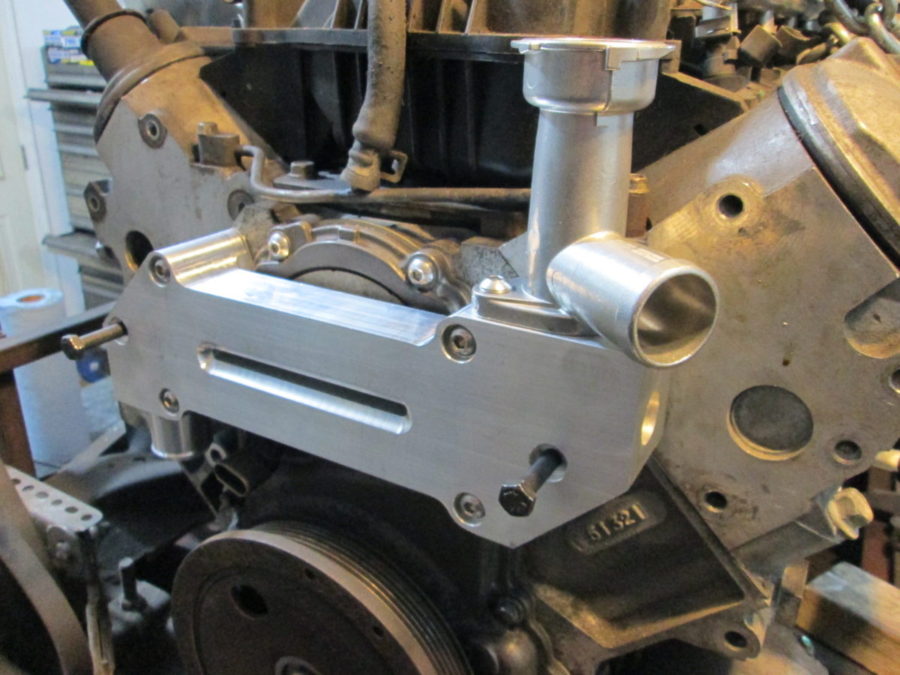
I had some time this weekend to finish up the machine work on the water manifold. While the LS4 and several other LS water pumps have the cool and hot passages running next to each other, I wanted to get a little separation between the two where possible. The 1/4" slot in the face goes all the way through and a 3/4 ball mill helped dress it up some.
I still need to do the final sanding and smoothing, but it is good for now. I haven't made the heater hose nipple as I want the accessory drive mocked up so I can make sure everything fits just right.
Speaking of the accessory drive, I positioned everything in autocad where it "should" fit, and ordered the material to make the brackets.
I had some time this weekend to finish up the machine work on the water manifold. While the LS4 and several other LS water pumps have the cool and hot passages running next to each other, I wanted to get a little separation between the two where possible.
They do it that way because it's not a big deal for cooling system performance. The temp difference is typically <10 degrees. Keep that in mind when you're weighing extra cost from manufacturing difficulty vs. added performance. Also, the Northstar water manifold has hot side, cold side and EGR run adjacent through its water manifold casting all the way across the engine.
Originally posted by Will: They do it that way because it's not a big deal for cooling system performance. The temp difference is typically <10 degrees. Keep that in mind when you're weighing extra cost from manufacturing difficulty vs. added performance. Also, the Northstar water manifold has hot side, cold side and EGR run adjacent through its water manifold casting all the way across the engine.
Yeah, I know the center opening isn't going to make a significant change, but if it costs a little extra on the CNC to not look like a big block of aluminum bolted to the front, then I think it is worth it.
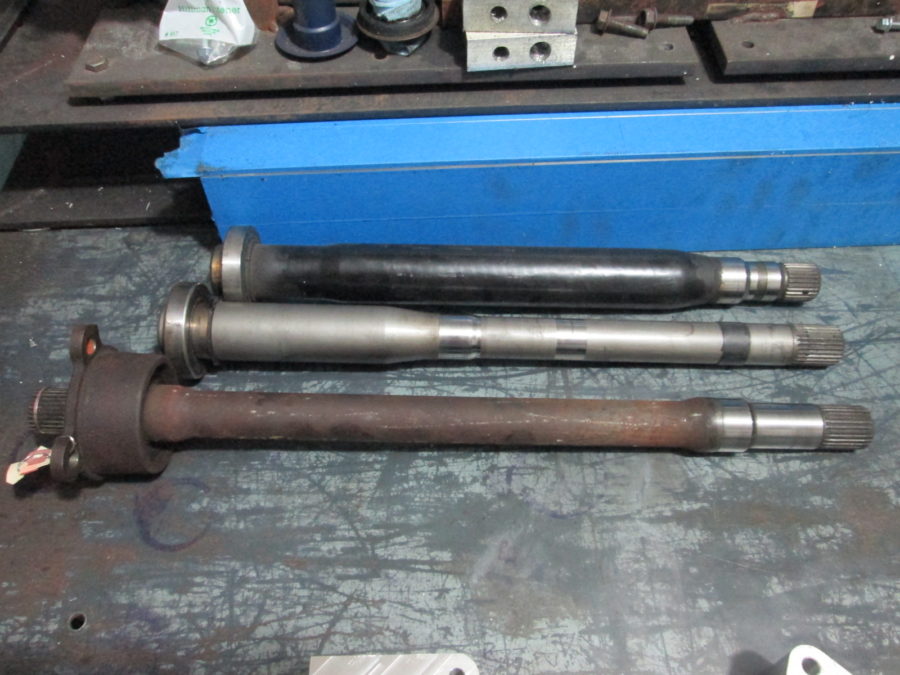
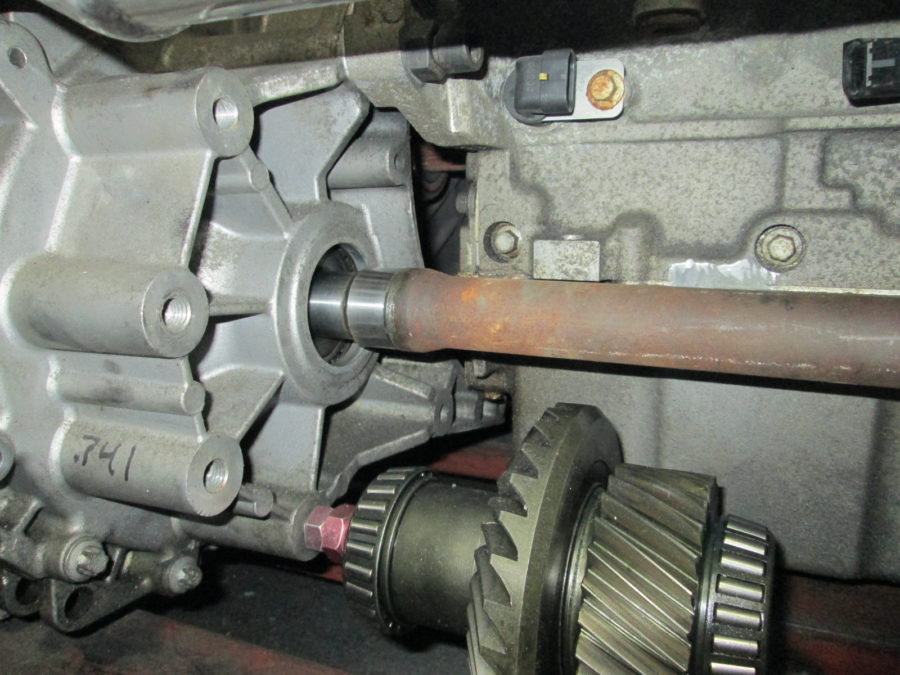
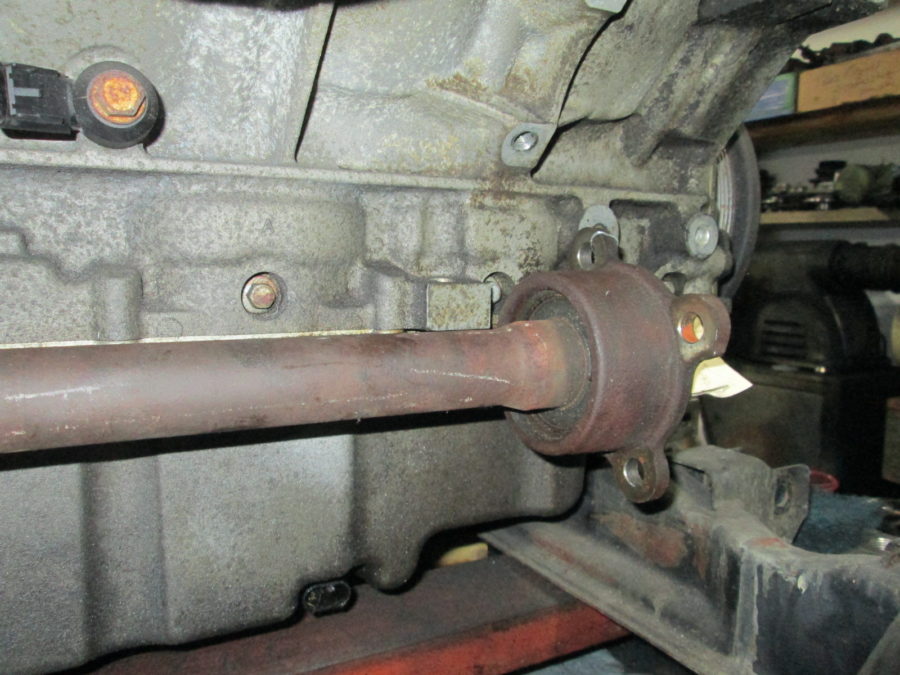
The 6T70+ transmission family uses the same 27 spline that the F40 uses, and the intermediate shafts are longer than the Saab version. This helps some, but the real axle issue is the driver side needing to be shorter. The longer intermediate shaft creates the "potential opportunity" where the two axles shafts from side to side could be the same (1 custom axle length vs. 2). It will take more research to verify this, but this is one of the things I find "interesting".
The 6T70+ intermediate shaft doesn't have the seal surface in the proper location, so either a new one will need to be pressed on or a seal extension housing made - neither are major challenges.
The other area worth further review is disassembling some of these 6T70+ axles as well as some other late model gm axles to see if things have become more standardized since the introduction of the F40, to allow mixing/matching parts and coming up with a combo for the driver side.
Yeah, I know the center opening isn't going to make a significant change, but if it costs a little extra on the CNC to not look like a big block of aluminum bolted to the front, then I think it is worth it.
LOL... there is that.
I'm thinking a brazed tubular aluminum water manifold would be a good way to knock about 10 lbs off a Northstar.
What are those other two intermediate shafts? Saab & G6?
[This message has been edited by Will (edited 01-22-2019).]
Originally posted by motoracer838: Guru, do you have a rough idea what your water manifold will cost? I like it better than what I've already got parts for.
Joe
I can't really price it out until I get the quote back from the CNC shop.