Pennock's Fiero Forum
  General Fiero Chat
  LS4 / F40 Swap #2 - fieroguru (Page 4)

Post New Topic  Post A Reply
Email This Page to Someone! | Printable Version

This topic is 6 pages long:  1   2   3   4   5   6 
Previous Page | Next Page
next newest topic | next oldest topic
LS4 / F40 Swap #2 - fieroguru by fieroguru
Started on: 08-03-2014 08:55 AM
Replies: 205 (13557 views)
Last post by: fieroguru on 11-28-2019 11:24 AM
Bob2112
Member
Posts: 127
From: Middle Tennessee
Registered: Nov 2015


Feedback score: N/A
Leave feedback

Rate this member

Report this Post02-13-2017 10:54 PM Click Here to See the Profile for Bob2112Send a Private Message to Bob2112Edit/Delete MessageReply w/QuoteDirect Link to This Post
I don't have a lot of experience (none really) with prototype building of tangible items, so forgive me if this is a stupid question, but is there a reason you are making this out of metal from the start and not something easier to work with to determine the size, look & feel, etc? I would think it would be easier to build a template out of wood or some other composite material.
IP: Logged
fieroguru
Member
Posts: 12130
From: Champaign, IL
Registered: Aug 2003


Feedback score:    (45)
Leave feedback


Total ratings: 258
Rate this member

Report this Post02-14-2017 06:46 PM Click Here to See the Profile for fieroguruSend a Private Message to fieroguruEdit/Delete MessageReply w/QuoteDirect Link to This Post
That is a good question...

Nearly all my R&D projects start with 16ga steel as it is quick to cut/drill/bend/form into the needed shape. Once the template is done, it is easy to take precise (+/-0.005") measurements from the part and draw the part in AutoCAD. Before I send the drawing to the machine shop for reproduction, I make a prototype from the drawing dimensions to validate their accuracy. Once I verify those, I send the drawing to the machine shop to reproduce. Once I am done with the 16ga template, I toss them on a shelf in case I need them later.

Wood isn't dimensionally stable over time, especially with changing humidity levels in a non-climate controlled garage, so getting the same level of precision would be very difficult if not impossible. There is also reduced ability to tap holes within wood as well. Plastic or composite could be an option, but metal fab and machining is my hobby, and I enjoy working with metal.

I didn't show them, but I made about 5 iterations of the 16ga templates to fine tune the 2D placement of the components. I switched to aluminum to dial in the precise 3D dimensions and create the 3D template/prototype for test fitting as well as to validate the ability to machine the part.

So in short, there normally is a method to my madness... I wouldn't say it is the best, but it works for me.
IP: Logged
madbrad01
Member
Posts: 209
From: Monaca, PA
Registered: Aug 2008


Feedback score: N/A
Leave feedback

Rate this member

Report this Post02-20-2017 09:08 AM Click Here to See the Profile for madbrad01Send a Private Message to madbrad01Edit/Delete MessageReply w/QuoteDirect Link to This Post
I guess life got in the way , i was so looking forward to see what got done on your project this weekend .
IP: Logged
KissMySSFiero
Member
Posts: 5541
From: Tarpon Springs, FL USA
Registered: Nov 2000


Feedback score:    (18)
Leave feedback


Total ratings: 111
Rate this member

Report this Post03-11-2017 04:03 PM Click Here to See the Profile for KissMySSFieroSend a Private Message to KissMySSFieroEdit/Delete MessageReply w/QuoteDirect Link to This Post
anything new progress happening?
IP: Logged
fieroguru
Member
Posts: 12130
From: Champaign, IL
Registered: Aug 2003


Feedback score:    (45)
Leave feedback


Total ratings: 258
Rate this member

Report this Post03-11-2017 06:18 PM Click Here to See the Profile for fieroguruSend a Private Message to fieroguruEdit/Delete MessageReply w/QuoteDirect Link to This Post
Been busy with customer orders and other stuff. Probably won't get back to this for a few weeks.
IP: Logged
KissMySSFiero
Member
Posts: 5541
From: Tarpon Springs, FL USA
Registered: Nov 2000


Feedback score:    (18)
Leave feedback


Total ratings: 111
Rate this member

Report this Post05-08-2017 07:15 PM Click Here to See the Profile for KissMySSFieroSend a Private Message to KissMySSFieroEdit/Delete MessageReply w/QuoteDirect Link to This Post
Anything new to report?
IP: Logged
fieroguru
Member
Posts: 12130
From: Champaign, IL
Registered: Aug 2003


Feedback score:    (45)
Leave feedback


Total ratings: 258
Rate this member

Report this Post05-08-2017 07:37 PM Click Here to See the Profile for fieroguruSend a Private Message to fieroguruEdit/Delete MessageReply w/QuoteDirect Link to This Post
Nothing new... my free time is being diverted to another project at the moment. Don't see myself doing anything with this until after the HRPT.
IP: Logged
fieroguru
Member
Posts: 12130
From: Champaign, IL
Registered: Aug 2003


Feedback score:    (45)
Leave feedback


Total ratings: 258
Rate this member

Report this Post09-10-2017 08:36 PM Click Here to See the Profile for fieroguruSend a Private Message to fieroguruEdit/Delete MessageReply w/QuoteDirect Link to This Post
Took a little longer to get back to this...

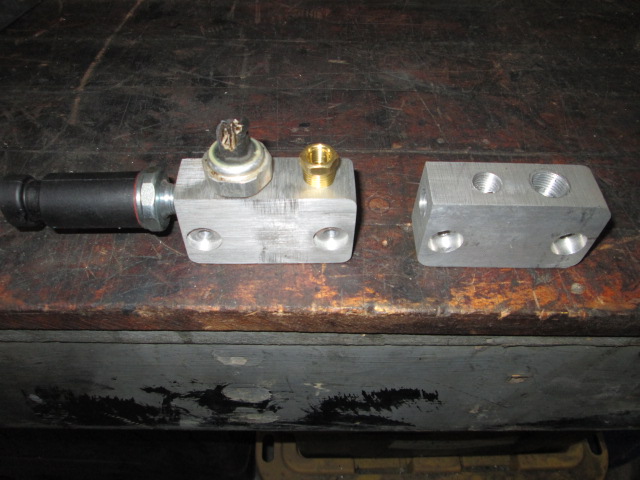
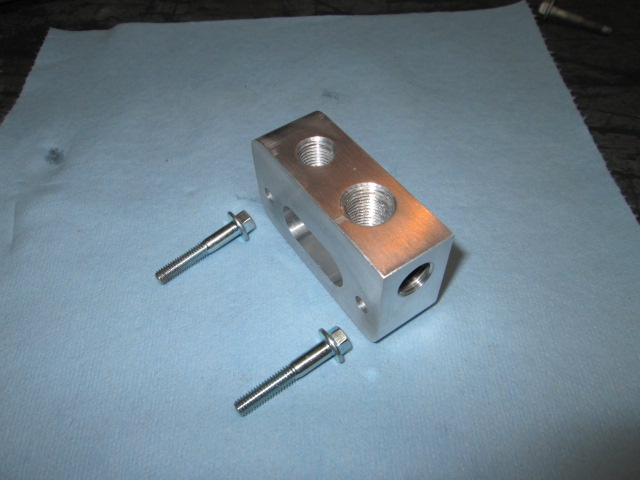
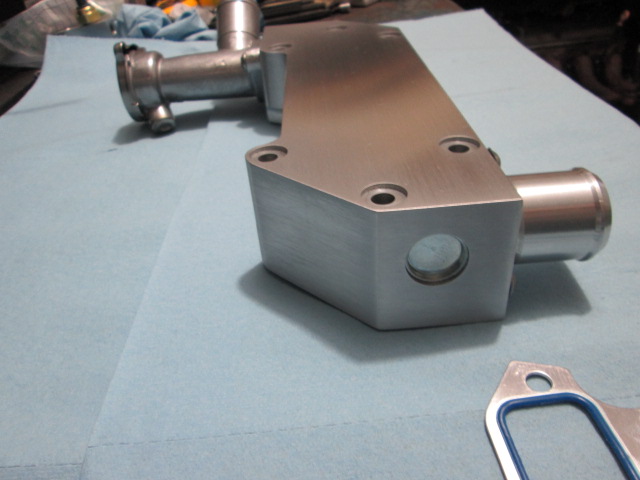
I continue to refine the oil pressure sending housing. I flipped the location of the stock LS4 oil sender and the spare 1/4 NPT (the new one is on the left). I have one more tweak to make to the drawing and I will send it off to be quoted.


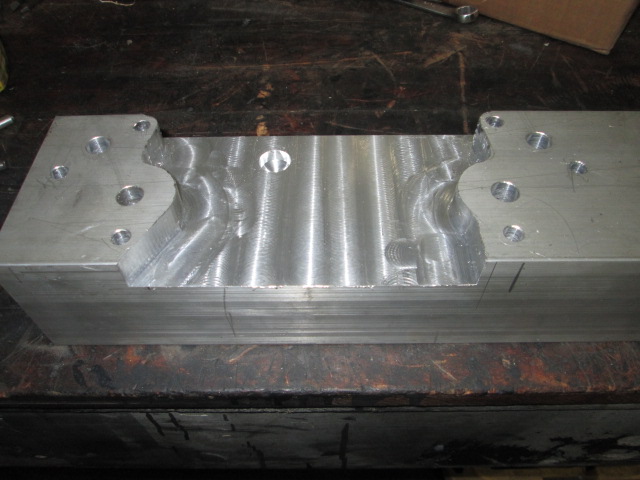
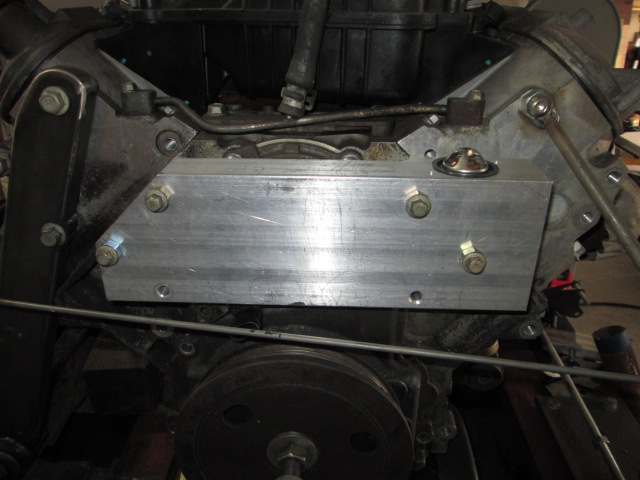
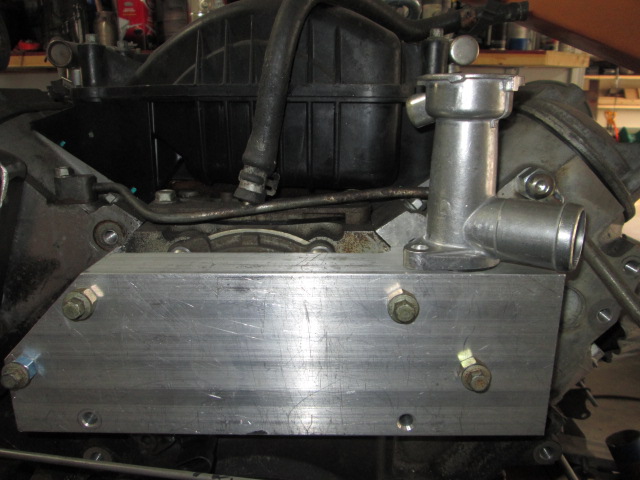
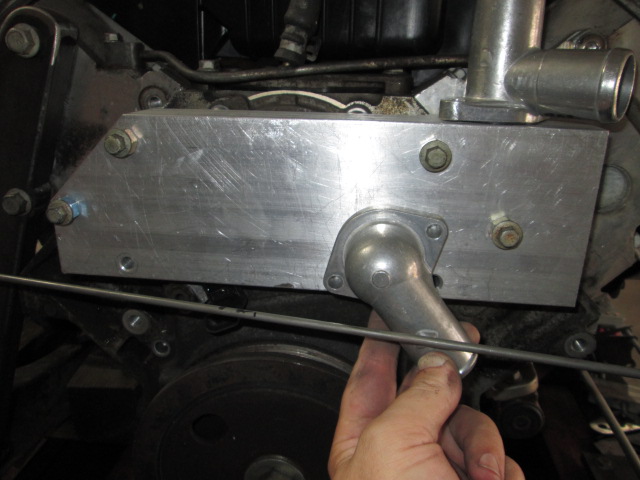
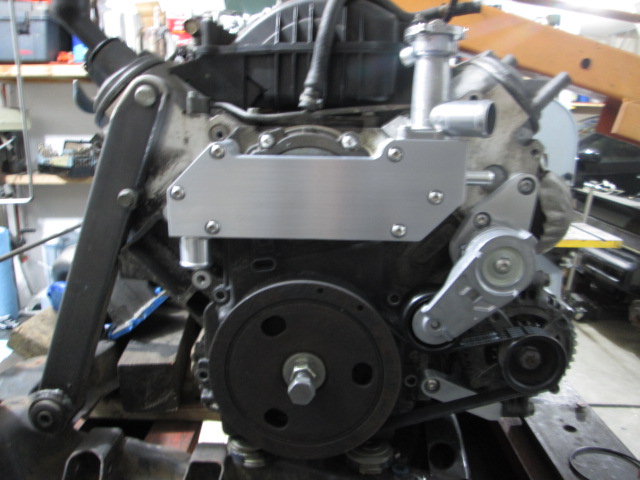
Since I am still bogged down with a few details on the custom CNC water pump and accessory bracket, I decided to work on a more simplified (relatively speaking) water manifold/thermostat housing to be used with an electric water pump. This should be speed up progress, create some other potential applications, and let me get a feel for CNC costs for this setup and the potential costs for the mechanical pump setup.


IP: Logged
qwikgta
Member
Posts: 4659
From: Virginia Beach, VA
Registered: Jan 2001


Feedback score:    (21)
Leave feedback


Total ratings: 84
Rate this member

Report this Post09-11-2017 11:44 AM Click Here to See the Profile for qwikgtaSend a Private Message to qwikgtaEdit/Delete MessageReply w/QuoteDirect Link to This Post
** LIKE **
IP: Logged
fieroguru
Member
Posts: 12130
From: Champaign, IL
Registered: Aug 2003


Feedback score:    (45)
Leave feedback


Total ratings: 258
Rate this member

Report this Post10-08-2017 04:52 PM Click Here to See the Profile for fieroguruSend a Private Message to fieroguruEdit/Delete MessageReply w/QuoteDirect Link to This Post
Here are some progress pics of the water manifold/thermostat housing for an electric water pump setup. There are still a few more details to work out, but it is getting close. The integrated fill point and thermostat housing will reduce hose clutter in the engine bay.

The 1/8" wire in front of the engine is the top edge of the frame rail from my LS4/F40 Fiero.


[This message has been edited by fieroguru (edited 10-08-2017).]

IP: Logged
fieroguru
Member
Posts: 12130
From: Champaign, IL
Registered: Aug 2003


Feedback score:    (45)
Leave feedback


Total ratings: 258
Rate this member

Report this Post10-13-2017 08:54 PM Click Here to See the Profile for fieroguruSend a Private Message to fieroguruEdit/Delete MessageReply w/QuoteDirect Link to This Post
Literally chipping away at it...

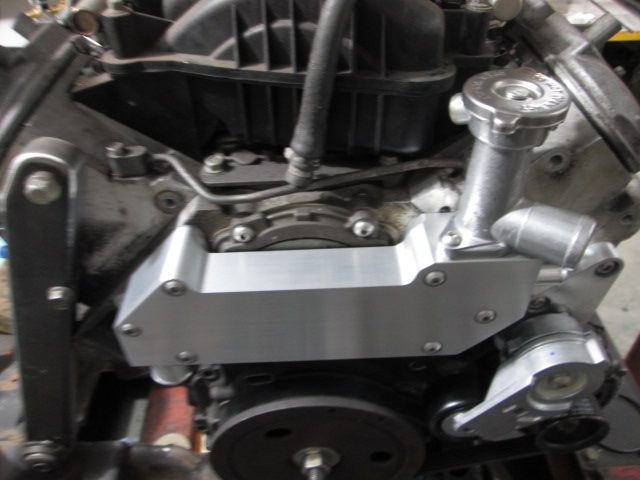
It is shallower than the LS4 balancer and currently under 6 lbs with all the inlets, outlets and thermostat. Still have a few more things to verify and continue to refine the shape.
IP: Logged
PFF
System Bot
Will
Member
Posts: 14226
From: Where you least expect me
Registered: Jun 2000


Feedback score: (1)
Leave feedback


Total ratings: 237
Rate this member

Report this Post10-14-2017 07:00 AM Click Here to See the Profile for WillSend a Private Message to WillEdit/Delete MessageReply w/QuoteDirect Link to This Post
 
quote
Originally posted by qwikgta:

Just wanted to add this pic. This shows the longer Cadillac tripot that gives the LS swaps the needed space for the ring gear.


Rob


What's the application for this tripot?

It's only necessary when using the 168 tooth ring gear, though.
IP: Logged
fieroguru
Member
Posts: 12130
From: Champaign, IL
Registered: Aug 2003


Feedback score:    (45)
Leave feedback


Total ratings: 258
Rate this member

Report this Post10-14-2017 10:03 AM Click Here to See the Profile for fieroguruSend a Private Message to fieroguruEdit/Delete MessageReply w/QuoteDirect Link to This Post
 
quote
Originally posted by Will:
What's the application for this tripot?
It's only necessary when using the 168 tooth ring gear, though.


The secondary benefit is the axle becomes 1" longer, if you have a need for a longer PS axle.

It is a two piece tripod. Somewhere in the 90s GM started focusing on using the same axles for both driver and passenger sides. To do this with the automatic, they started using a male/male stub shaft with the same female tripod from the driver side. I have seen the stub shaft referenced in some of my axle/CV documents, but never looked it up for a part number. Here is one such reference, but there are more:

[This message has been edited by fieroguru (edited 10-14-2017).]

IP: Logged
Will
Member
Posts: 14226
From: Where you least expect me
Registered: Jun 2000


Feedback score: (1)
Leave feedback


Total ratings: 237
Rate this member

Report this Post10-14-2017 12:02 PM Click Here to See the Profile for WillSend a Private Message to WillEdit/Delete MessageReply w/QuoteDirect Link to This Post
I know I've asked this before, but don't remember. What site is that screen cap from?
ETA: Err... just saw the mention of EMPI. What other sites do you use for this type of info?

GM did the same with the Getrag 284. That transmission has larger axle splines than the 282 or other GM FWD products of the era. The left axle includes a male/male REDUCER fitting which uses the normal female tripot with the same splines as the rest of the lineup. WTF would they specify the larger splines in the transmission and then neck them down for the axles? Weird.

The adapter shaft can of course be much better material than the tripots, which are soft as butter.

[This message has been edited by Will (edited 10-14-2017).]

IP: Logged
fieroguru
Member
Posts: 12130
From: Champaign, IL
Registered: Aug 2003


Feedback score:    (45)
Leave feedback


Total ratings: 258
Rate this member

Report this Post10-14-2017 07:27 PM Click Here to See the Profile for fieroguruSend a Private Message to fieroguruEdit/Delete MessageReply w/QuoteDirect Link to This Post
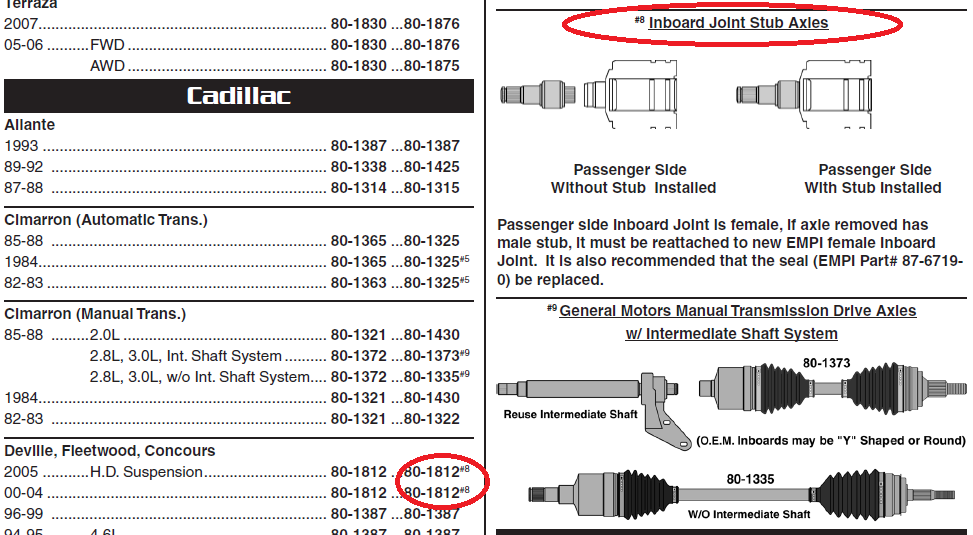
Back when EMPI offered downloadable catalogs for all their axles and CVs I downloaded them nearly every year from 2008 - 2011. The various catalogs are:
Axle Buyers Guide, Axle by Application, Interchange, CV Joint Application, CV Joint Illustration, CV joint by body style (tells you all the cars that share the same platform).

I also have downloaded the Interparts various catalogs for several years as well. Those catalogs are:
CV Axle Application, CV Joint Application, Numerical Listing for CV Axle, Numerical Listing for CV Joint, Cage/Race Application, Interchange with EMPI, and a Tech document

Rockford Constant Velocity:
Bare Axle Shafts by length and spline

Mark Williams axle catalog

Every few years I get into a axle/CV/tripod research mode and seek out all the current catalogs, but sadly many are just keeping their catalogs on line now.

IP: Logged
fieroguru
Member
Posts: 12130
From: Champaign, IL
Registered: Aug 2003


Feedback score:    (45)
Leave feedback


Total ratings: 258
Rate this member

Report this Post10-14-2017 07:33 PM Click Here to See the Profile for fieroguruSend a Private Message to fieroguruEdit/Delete MessageReply w/QuoteDirect Link to This Post

fieroguru

12130 posts
Member since Aug 2003
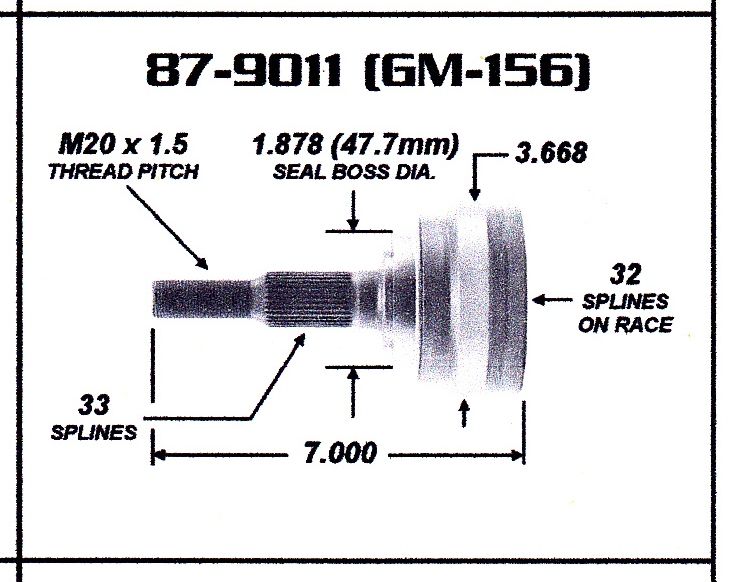
The EMPI CV Illustration catalog has a bunch of pictures like these (15 per page, 44 pages, so over 650+ from various mfg). This is the stock Fiero Outer CV - Manual transmisssion:


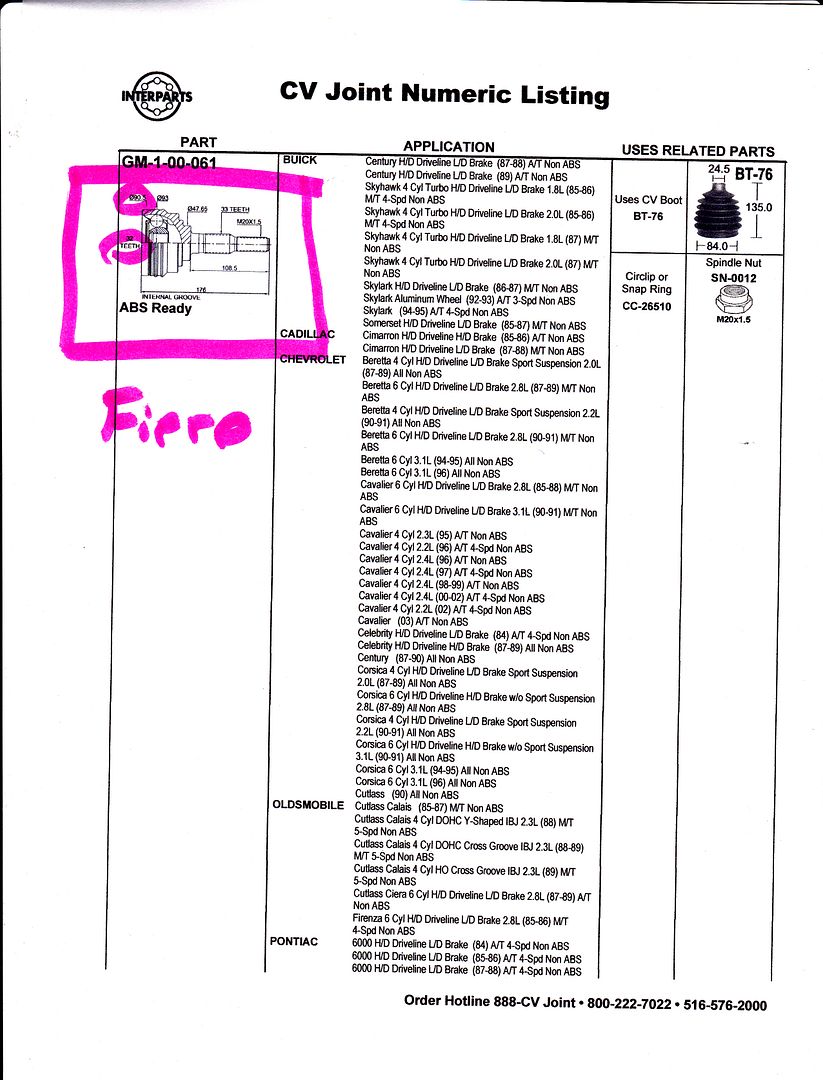
Interparts has a similar but different setup. Here they have the drawing details and list every application it is used in:

[This message has been edited by fieroguru (edited 10-14-2017).]

IP: Logged
Will
Member
Posts: 14226
From: Where you least expect me
Registered: Jun 2000


Feedback score: (1)
Leave feedback


Total ratings: 237
Rate this member

Report this Post10-14-2017 11:26 PM Click Here to See the Profile for WillSend a Private Message to WillEdit/Delete MessageReply w/QuoteDirect Link to This Post
I remember looking up the shafts on EMPI which led me to my finding that the drivers side axle from a FWD A-body with the heavy duty brakes is the right length to use on the passenger side of a Fiero with Type 2 intermediate shaft.

I just got these:


And am looking at Corvette wheel bearings, while trying to figure out how to assemble axles... possibly with these:
http://www.driveshaftshop.c...-porsche-930-cv-2196

[This message has been edited by Will (edited 10-29-2017).]

IP: Logged
fieroguru
Member
Posts: 12130
From: Champaign, IL
Registered: Aug 2003


Feedback score:    (45)
Leave feedback


Total ratings: 258
Rate this member

Report this Post10-30-2017 07:38 PM Click Here to See the Profile for fieroguruSend a Private Message to fieroguruEdit/Delete MessageReply w/QuoteDirect Link to This Post


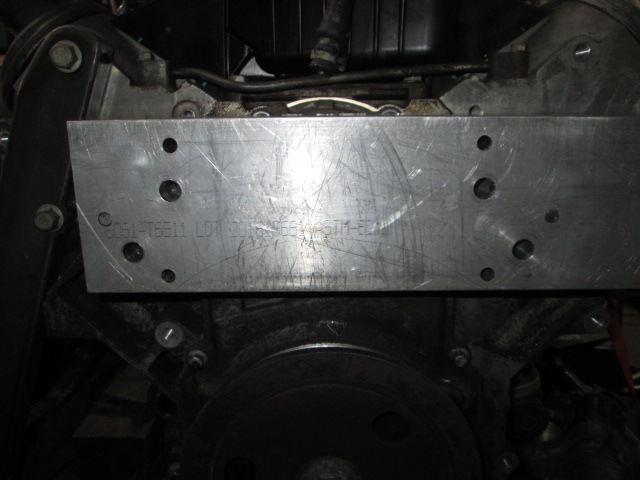
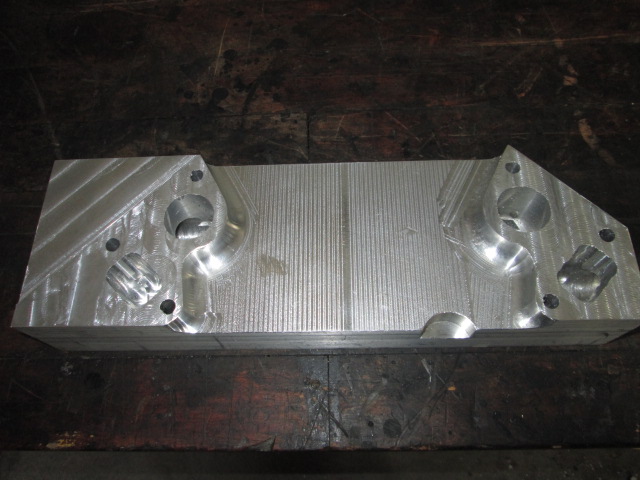
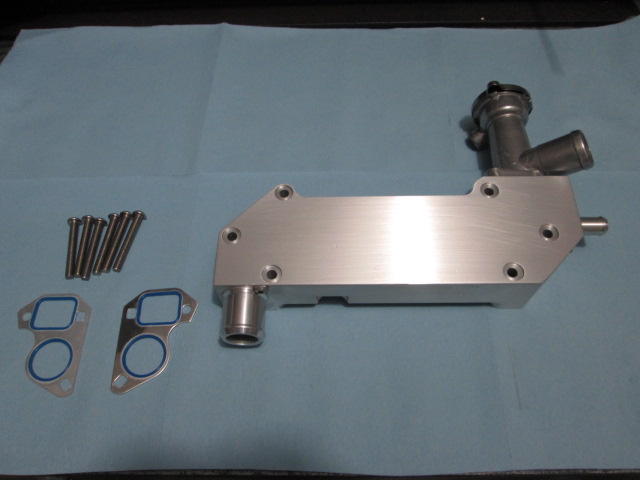
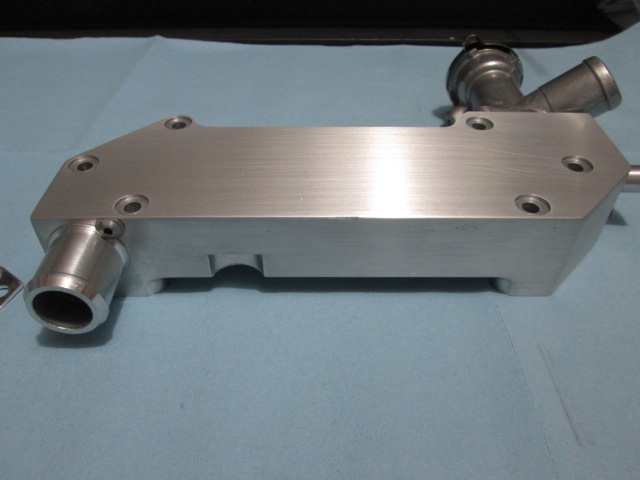
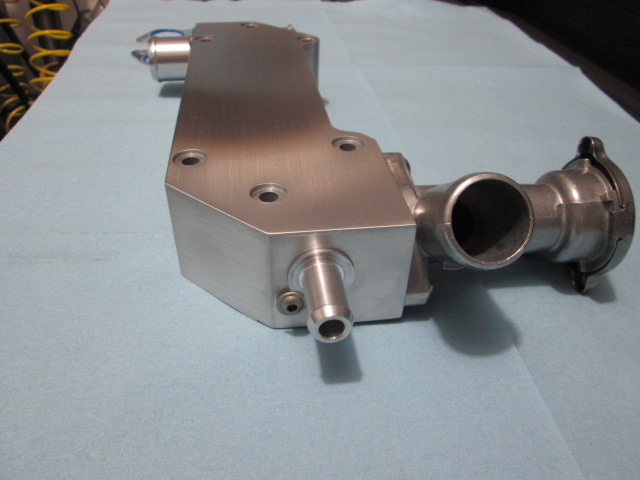
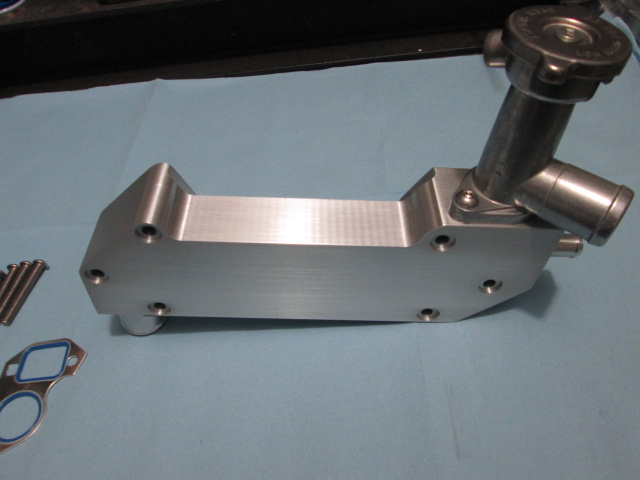
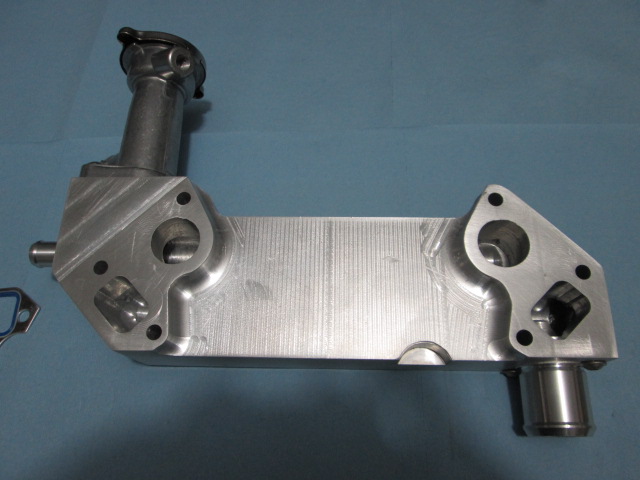
The LS(x) water manifold is pretty much done. Some key features of this setup:

  • Integrated thermostat & coolant fill to simplify install and reduce hose clutter in the engine bay
  • 2 1/8" from the face of the block - making it 1/2" shallower than the LS4 harmonic balancer for installations with minimal clearance
  • 5 lb 10 oz weight for the manifold, thermostat, inlet & outlet housings and fill cap
  • Coolant inlet from the bottom will keep that hose hidden while keeping the manifold compact
  • Inlet and outlet housings sealed to manifold body by o-rings
  • Water manifold body clears stock LS4 camshaft sensor


Now I just need to finish up the drawings and send them to the CNC machine shop for quoting...
Similar manifold setups with fewer features sell for around $350. I am hoping to keep my price point at this same level, but it will all depend on what the CNC pricing will be and how many I want to have made to start with.


IP: Logged
Bob2112
Member
Posts: 127
From: Middle Tennessee
Registered: Nov 2015


Feedback score: N/A
Leave feedback

Rate this member

Report this Post10-30-2017 07:44 PM Click Here to See the Profile for Bob2112Send a Private Message to Bob2112Edit/Delete MessageReply w/QuoteDirect Link to This Post
One for me! How's it look from the top?

------------------
New Moon Rising - 1988 Black Formula
My Blue Heaven - 1965 Mustang Coupe

IP: Logged
fieroguru
Member
Posts: 12130
From: Champaign, IL
Registered: Aug 2003


Feedback score:    (45)
Leave feedback


Total ratings: 258
Rate this member

Report this Post10-30-2017 09:07 PM Click Here to See the Profile for fieroguruSend a Private Message to fieroguruEdit/Delete MessageReply w/QuoteDirect Link to This Post
Here are a few more pics:


IP: Logged
Bob2112
Member
Posts: 127
From: Middle Tennessee
Registered: Nov 2015


Feedback score: N/A
Leave feedback

Rate this member

Report this Post10-30-2017 09:10 PM Click Here to See the Profile for Bob2112Send a Private Message to Bob2112Edit/Delete MessageReply w/QuoteDirect Link to This Post
Nice - seems like there might be enough real estate on the top of that for the word "Fiero" to be cut into or embossed on the metal.
IP: Logged
PFF
System Bot
KissMySSFiero
Member
Posts: 5541
From: Tarpon Springs, FL USA
Registered: Nov 2000


Feedback score:    (18)
Leave feedback


Total ratings: 111
Rate this member

Report this Post11-01-2017 01:20 PM Click Here to See the Profile for KissMySSFieroSend a Private Message to KissMySSFieroEdit/Delete MessageReply w/QuoteDirect Link to This Post
That looks nice. You may have a market in the Porsche LS swap market too.

IP: Logged
2tone86gt
Member
Posts: 230
From: Willow St. , Pa
Registered: Oct 2014


Feedback score: (3)
Leave feedback

Rate this member

Report this Post11-03-2017 10:45 AM Click Here to See the Profile for 2tone86gtSend a Private Message to 2tone86gtEdit/Delete MessageReply w/QuoteDirect Link to This Post
Nice work guru. Any chance you are still planning on making the belt driven water pump setup?
IP: Logged
fieroguru
Member
Posts: 12130
From: Champaign, IL
Registered: Aug 2003


Feedback score:    (45)
Leave feedback


Total ratings: 258
Rate this member

Report this Post11-03-2017 01:17 PM Click Here to See the Profile for fieroguruSend a Private Message to fieroguruEdit/Delete MessageReply w/QuoteDirect Link to This Post
 
quote
Originally posted by Bob2112:
Nice - seems like there might be enough real estate on the top of that for the word "Fiero" to be cut into or embossed on the metal.


Yes, that area is roughly 1.5 x 5 so there is plenty of room to put something there.

 
quote
Originally posted by KissMySSFiero:
That looks nice. You may have a market in the Porsche LS swap market too.


That certainly is a possibility!

 
quote
Originally posted by 2tone86gt:
Nice work guru. Any chance you are still planning on making the belt driven water pump setup?


Most certainly... I have a few options I am still working on, and another pump insert should arrive this weekend. One of these days I might line up all the thermostat housings I purchased for the water manifold project (there are around 10 of them). In the end I only used the one shown. The lower hose connection I designed and made as I wasn't real happy with the fitment or look of the others. The water pump inset coming will be #5 and that doesn't include the other LS & LT based water pumps I have on the shelf too.

BTW, I completed the cad drawings for the water manifold and have sent them off to be quoted. Hopefully the quoted price will be reasonable.
IP: Logged
Will
Member
Posts: 14226
From: Where you least expect me
Registered: Jun 2000


Feedback score: (1)
Leave feedback


Total ratings: 237
Rate this member

Report this Post11-03-2017 03:23 PM Click Here to See the Profile for WillSend a Private Message to WillEdit/Delete MessageReply w/QuoteDirect Link to This Post
Have you look at the Northstar thermostat and "housing"?
The housing is really just the nipple for connecting the lower radiator hose. They're both pretty cheap parts. They're designed to go on the inlet side of the waterpump and balance between recirculation and radiator water. The LS thermostats operate on the same principle, of course, but the Northstar is packaged slightly differently.
IP: Logged
fieroguru
Member
Posts: 12130
From: Champaign, IL
Registered: Aug 2003


Feedback score:    (45)
Leave feedback


Total ratings: 258
Rate this member

Report this Post11-04-2017 08:21 AM Click Here to See the Profile for fieroguruSend a Private Message to fieroguruEdit/Delete MessageReply w/QuoteDirect Link to This Post
 
quote
Originally posted by Will:
Have you look at the Northstar thermostat and "housing"?
The housing is really just the nipple for connecting the lower radiator hose. They're both pretty cheap parts. They're designed to go on the inlet side of the waterpump and balance between recirculation and radiator water. The LS thermostats operate on the same principle, of course, but the Northstar is packaged slightly differently.


I hadn't, but now have. It like most of the stock options are either not compact enough or clean looking. For me, the part need to function properly, look good doing it, be compact and clutter free.

My current LS4 was converted to have a thermostat on the exit side of the engine and use the 4 steam ports in the heads and the heater core loop as the bypass when the thermostat is closed. It works quite well, so I am taking the same path with this manifold setup, and will use the same approach with the belt driven one as well.
IP: Logged
fieroguru
Member
Posts: 12130
From: Champaign, IL
Registered: Aug 2003


Feedback score:    (45)
Leave feedback


Total ratings: 258
Rate this member

Report this Post11-04-2017 07:34 PM Click Here to See the Profile for fieroguruSend a Private Message to fieroguruEdit/Delete MessageReply w/QuoteDirect Link to This Post

fieroguru

12130 posts
Member since Aug 2003
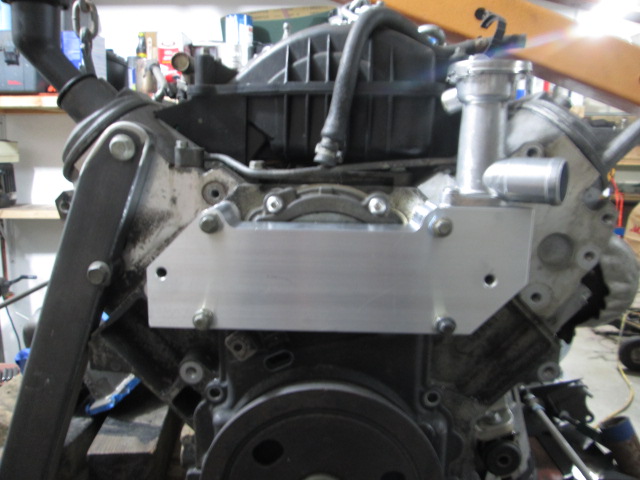
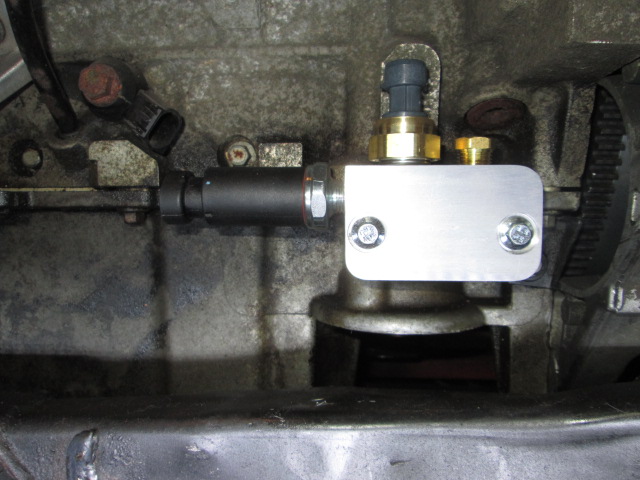
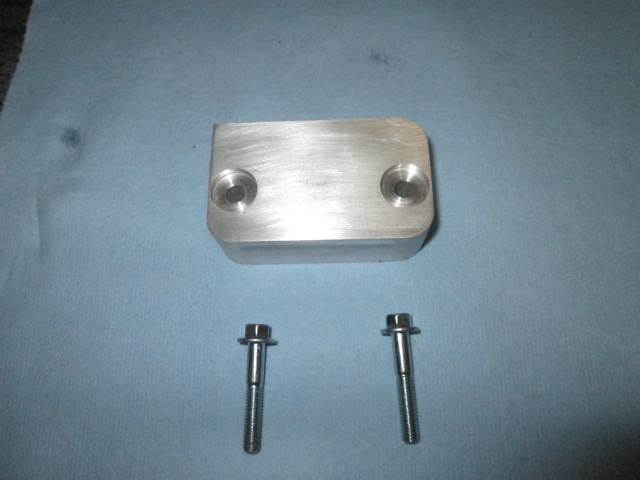
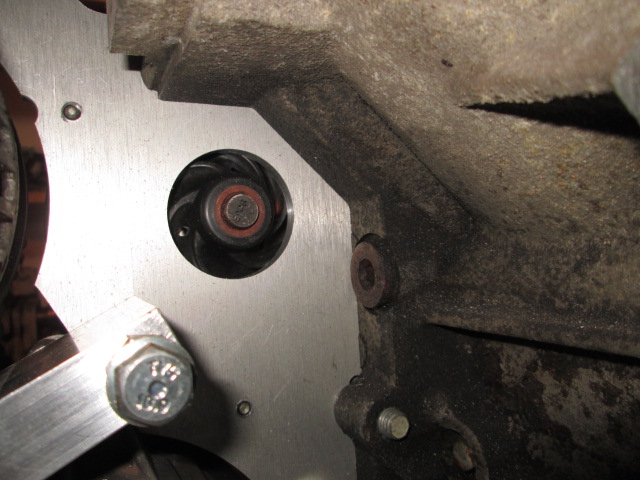
I got the quote back for the multi-port oil bypass plate and placed the initial order. It will take 3-4 weeks for them to arrive, so I went ahead and made up 4 today.

These bypass plates allow relocating the LS4 oil pressure sending unit off the valley cover (to clear other intake manifolds and reduce topside wiring) and is has two additional 1/4" NPT ports. One can be used to mount the stock Fiero oil pressure sender for the factory gauges and the 2nd one can be for some other purpose.

These bypass plates will have a brushed aluminum finish and come with a new gasket and longer bolts. Pricing will be $55 shipped in the US. Send me a PM if you want one, and I can always make more if needed.


IP: Logged
fieroguru
Member
Posts: 12130
From: Champaign, IL
Registered: Aug 2003


Feedback score:    (45)
Leave feedback


Total ratings: 258
Rate this member

Report this Post11-05-2017 07:11 PM Click Here to See the Profile for fieroguruSend a Private Message to fieroguruEdit/Delete MessageReply w/QuoteDirect Link to This Post
It was another productive weekend day.

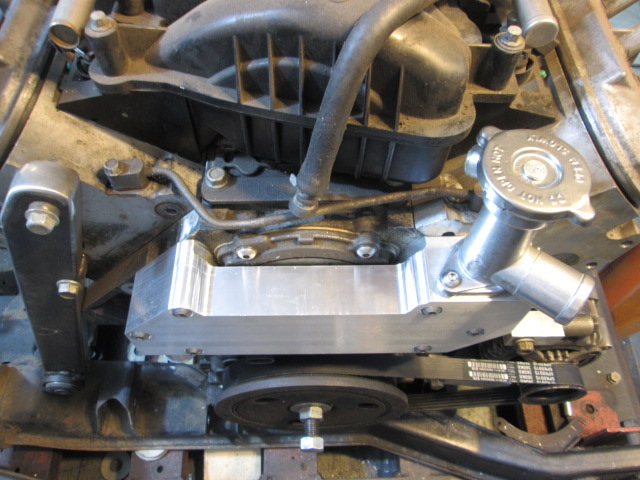
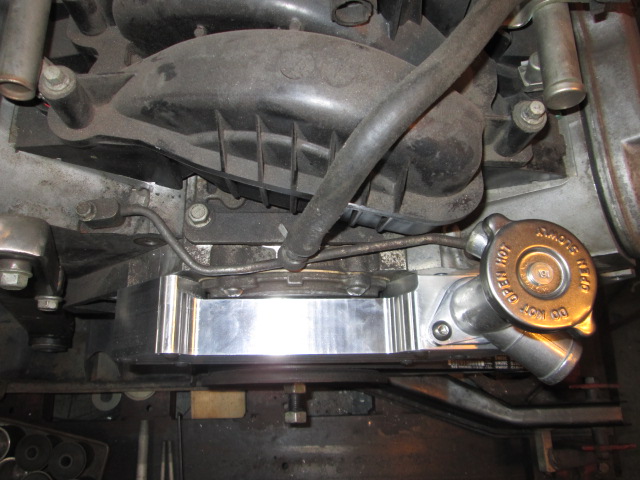
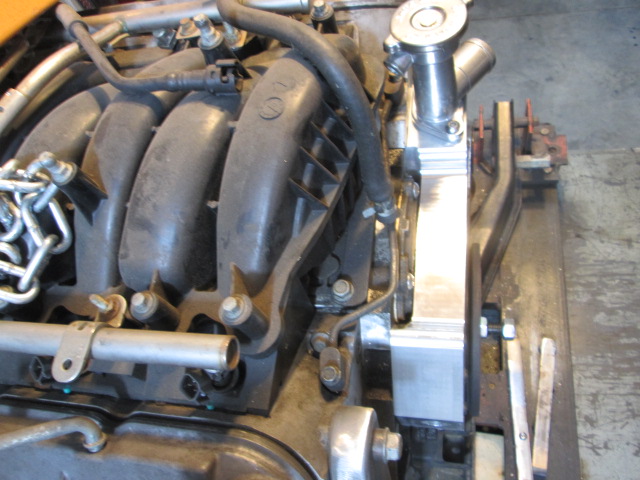
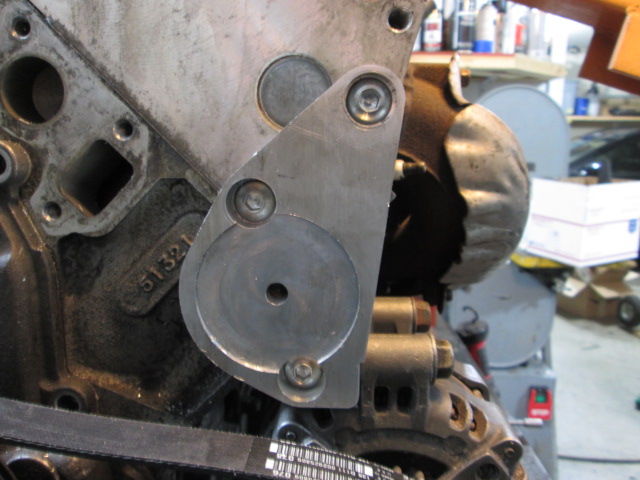
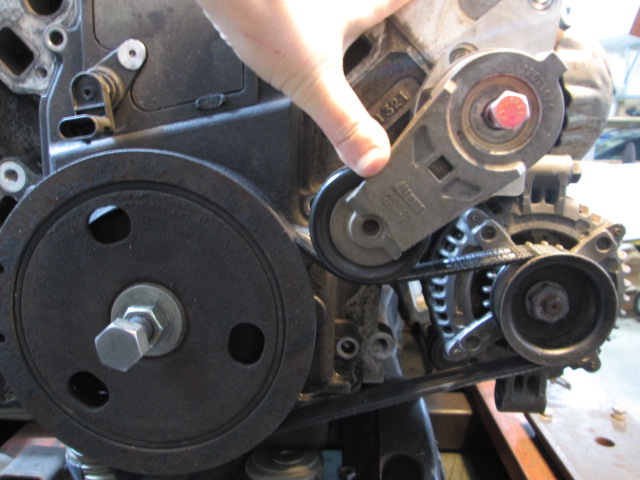
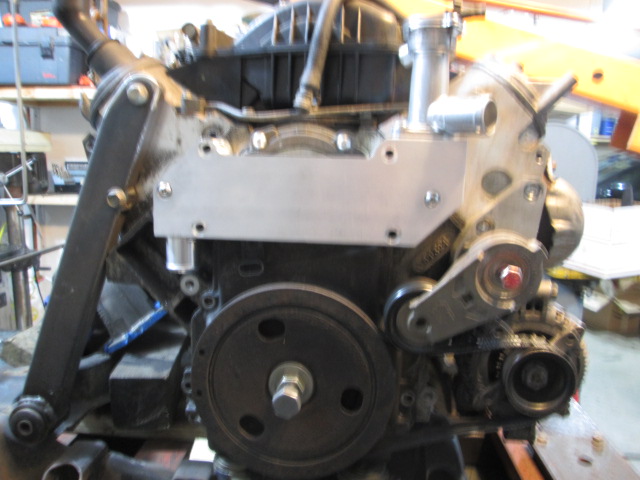
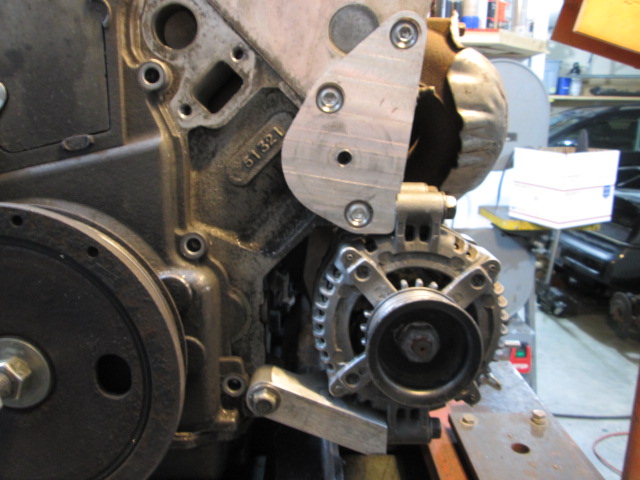
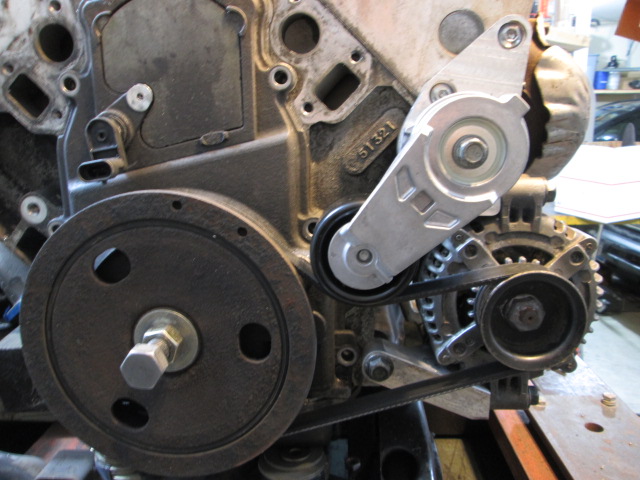
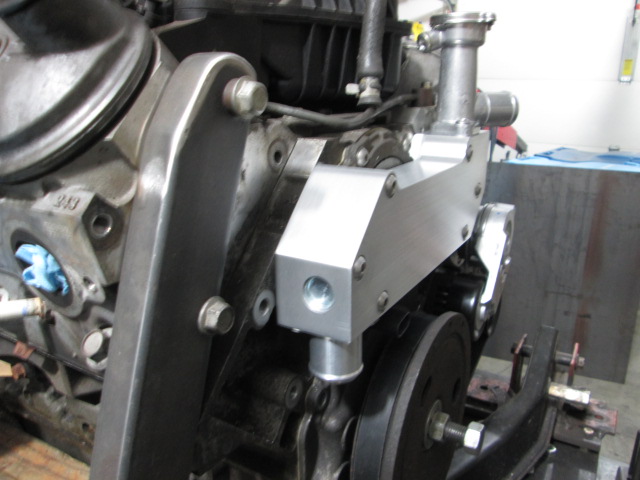
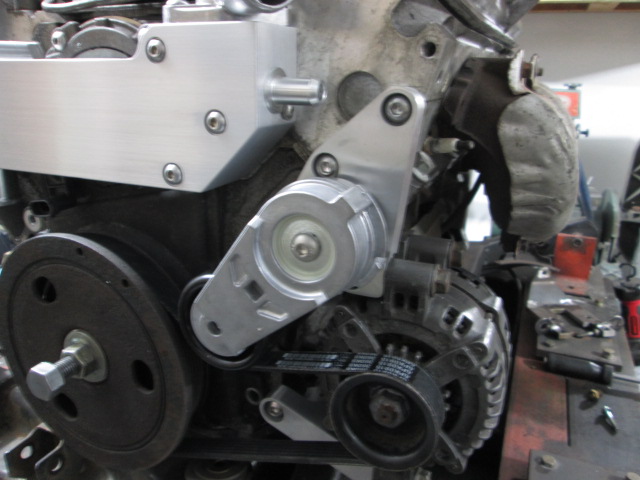
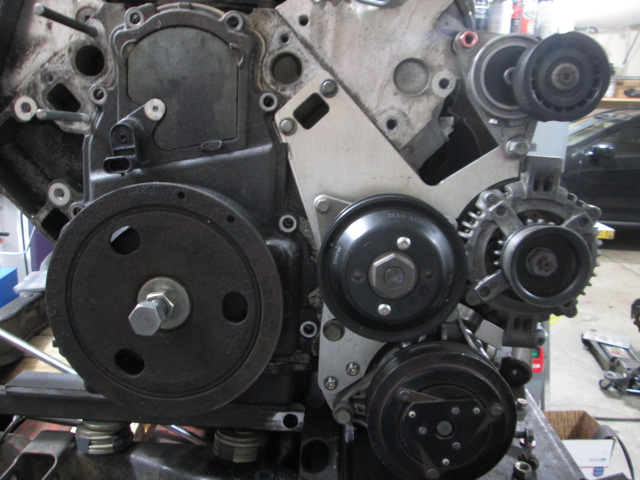
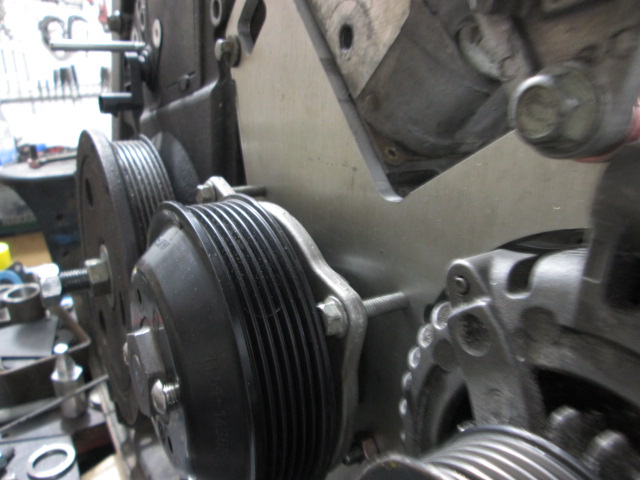
I was able to rough in the non-AC alternator bracket and tensioner. I am waiting on a new tensioner so I can set the proper depth of the recess. I think I will explore a slightly longer belt. This one just barely slides over the pulleys and I would like to get the idler better centered between the balancer and alternator. Once I have the belt and depth determined, then I will finish with the machine work and adjust the tensioner stop so that it sits within the factory tension marks.


While waiting on the tensioner, I will probably knock out the lower bracket (I moved the alternator position, so the previous lower bracket is now scrap - all part of the R&D efforts).
IP: Logged
fieroguru
Member
Posts: 12130
From: Champaign, IL
Registered: Aug 2003


Feedback score:    (45)
Leave feedback


Total ratings: 258
Rate this member

Report this Post11-11-2017 05:14 PM Click Here to See the Profile for fieroguruSend a Private Message to fieroguruEdit/Delete MessageReply w/QuoteDirect Link to This Post
The alternator only accessory drive is just about done. I need to pick up a 1/2" longer belt and then I can drill the hole for the tensioner locating pin.


IP: Logged
fieroguru
Member
Posts: 12130
From: Champaign, IL
Registered: Aug 2003


Feedback score:    (45)
Leave feedback


Total ratings: 258
Rate this member

Report this Post11-12-2017 06:39 PM Click Here to See the Profile for fieroguruSend a Private Message to fieroguruEdit/Delete MessageReply w/QuoteDirect Link to This Post
Here are some pictures of the finished coolant housing:


I also cleaned up the alternator brackets. So here are some installed pics of both:


IP: Logged
Bob2112
Member
Posts: 127
From: Middle Tennessee
Registered: Nov 2015


Feedback score: N/A
Leave feedback

Rate this member

Report this Post11-12-2017 11:50 PM Click Here to See the Profile for Bob2112Send a Private Message to Bob2112Edit/Delete MessageReply w/QuoteDirect Link to This Post
Looks great - did you get a quote back from the machine shop so you can decide on a for sale price?
IP: Logged
PFF
System Bot
fieroguru
Member
Posts: 12130
From: Champaign, IL
Registered: Aug 2003


Feedback score:    (45)
Leave feedback


Total ratings: 258
Rate this member

Report this Post11-13-2017 07:49 AM Click Here to See the Profile for fieroguruSend a Private Message to fieroguruEdit/Delete MessageReply w/QuoteDirect Link to This Post
 
quote
Originally posted by Bob2112:
Looks great - did you get a quote back from the machine shop so you can decide on a for sale price?


Thanks!

Not yet, but they are normally slow. I had to break the processes down into 12 individual machining steps to properly dimension everything, so it is a complicated piece to quote.
IP: Logged
qwikgta
Member
Posts: 4659
From: Virginia Beach, VA
Registered: Jan 2001


Feedback score:    (21)
Leave feedback


Total ratings: 84
Rate this member

Report this Post11-14-2017 02:08 AM Click Here to See the Profile for qwikgtaSend a Private Message to qwikgtaEdit/Delete MessageReply w/QuoteDirect Link to This Post
I see that this is for non a/c, is the plan to create a process to have a/c. I love what your doing and will be buying these parts when they are for sale, but on my daily driver, i want a/c. great stuff, keep it up.

Rob
IP: Logged
fieroguru
Member
Posts: 12130
From: Champaign, IL
Registered: Aug 2003


Feedback score:    (45)
Leave feedback


Total ratings: 258
Rate this member

Report this Post11-14-2017 06:10 AM Click Here to See the Profile for fieroguruSend a Private Message to fieroguruEdit/Delete MessageReply w/QuoteDirect Link to This Post
 
quote
Originally posted by qwikgta:

I see that this is for non a/c, is the plan to create a process to have a/c. I love what your doing and will be buying these parts when they are for sale, but on my daily driver, i want a/c. great stuff, keep it up.

Rob


Yes, I will be developing a setup for a mechanical water pump as well as A/C. Right now I am trying to knock out the easier/less complicated items.
IP: Logged
qwikgta
Member
Posts: 4659
From: Virginia Beach, VA
Registered: Jan 2001


Feedback score:    (21)
Leave feedback


Total ratings: 84
Rate this member

Report this Post11-14-2017 12:43 PM Click Here to See the Profile for qwikgtaSend a Private Message to qwikgtaEdit/Delete MessageReply w/QuoteDirect Link to This Post
thanks again.
IP: Logged
Spadesluck
Member
Posts: 2069
From: Georgia
Registered: Jul 2016


Feedback score:    (8)
Leave feedback

Rate this member

Report this Post11-14-2017 12:49 PM Click Here to See the Profile for SpadesluckSend a Private Message to SpadesluckEdit/Delete MessageReply w/QuoteDirect Link to This Post
Looking really nice.
IP: Logged
fieroguru
Member
Posts: 12130
From: Champaign, IL
Registered: Aug 2003


Feedback score:    (45)
Leave feedback


Total ratings: 258
Rate this member

Report this Post11-20-2017 06:57 PM Click Here to See the Profile for fieroguruSend a Private Message to fieroguruEdit/Delete MessageReply w/QuoteDirect Link to This Post
Here is something I have been working on for a while, but it finally is starting to look like "something". There are still some minor changes I want to make, then I have to mock it up and pull the LS4/F40 from my car to test fit, but it keeps getting closer...


In the drawing, the front/rear placement of the engine is the same as my 1st LS4/F40. For this swap, I would like to move the engine/transmission placement at least 1/2" further forward (shifts more weight to the front, gains more side to side clearance due to the taper of the frame rails, better lines up the factory indentation in the DS frame rail to the F40 transmission case, and better matches the location the auto would place it.

The elevation of the engine is about 0.44" higher than the original, and I want to get it back down to where there original one is, but I need to make a couple more notches to the front cradle cross-member to clear the transmission and AC mounting tab first (the relocated 2x3 cross-member really helped with clearance on the first swap!)

[This message has been edited by fieroguru (edited 11-21-2017).]

IP: Logged
fieroguru
Member
Posts: 12130
From: Champaign, IL
Registered: Aug 2003


Feedback score:    (45)
Leave feedback


Total ratings: 258
Rate this member

Report this Post11-24-2017 05:18 PM Click Here to See the Profile for fieroguruSend a Private Message to fieroguruEdit/Delete MessageReply w/QuoteDirect Link to This Post
I spent some time in front of the mill and started mocking up the mechanical water pump accessory drive. Everything is now positioned very close to where it should be, but I am waiting on the smooth pulley for the water pump and some 3/4" plate so I can make the actual water pump housing vs. the 1/4" plate in this mock-up. I changed a few things from the original drawing, and have some additional changes based on this mock-up...

The next step is doing some clearance work to the cradle to get everything into the desired position.


IP: Logged
qwikgta
Member
Posts: 4659
From: Virginia Beach, VA
Registered: Jan 2001


Feedback score:    (21)
Leave feedback


Total ratings: 84
Rate this member

Report this Post11-24-2017 11:16 PM Click Here to See the Profile for qwikgtaSend a Private Message to qwikgtaEdit/Delete MessageReply w/QuoteDirect Link to This Post
looking good.
IP: Logged
Bob2112
Member
Posts: 127
From: Middle Tennessee
Registered: Nov 2015


Feedback score: N/A
Leave feedback

Rate this member

Report this Post11-25-2017 11:53 AM Click Here to See the Profile for Bob2112Send a Private Message to Bob2112Edit/Delete MessageReply w/QuoteDirect Link to This Post
I can't recall, but have you already figured out what mechanical pump you will be using with the bracket?
IP: Logged
Previous Page | Next Page

This topic is 6 pages long:  1   2   3   4   5   6 
next newest topic | next oldest topic

All times are ET (US)

Post New Topic  Post A Reply
Hop to:

Contact Us | Back To Main Page

Advertizing on PFF | Fiero Parts Vendors
PFF Merchandise | Fiero Gallery | Ogre's Cave
Real-Time Chat | Fiero Related Auctions on eBay


Copyright (c) 1999, C. Pennock