Pennock's Fiero Forum Technical Discussion & Questions - Archive
my 89 Countach replica build thread / What trans do I have in my Lambo replica (Page 1)
T H I S I S A N A R C H I V E D T O P I C
my 89 Countach replica build thread / What trans do I have in my Lambo replica
I wanted to start a real build thread over here for my ongoing progress. I've had to re-register as I couldn't get my old screen name LamboWill to login properly.
Here goes...
The Beginning:
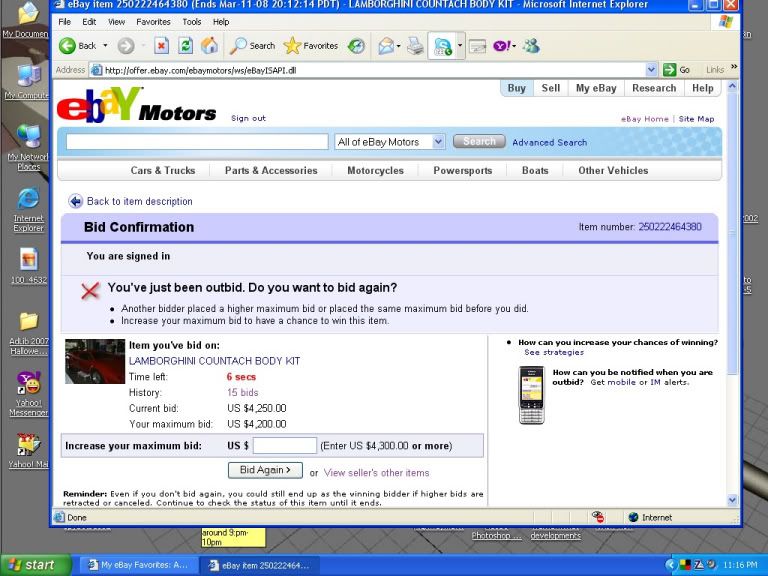
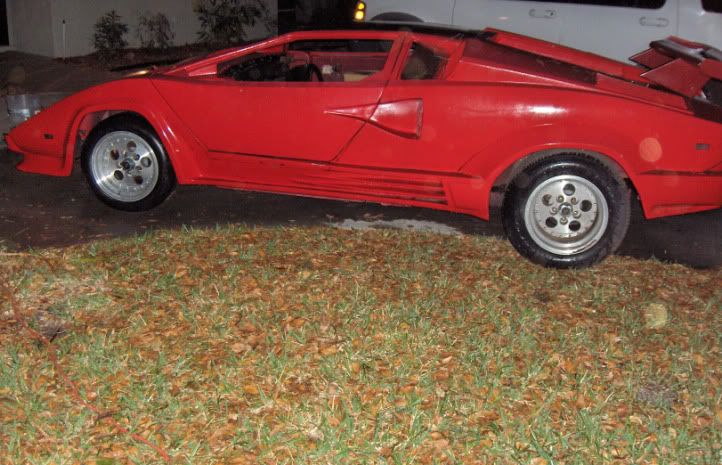
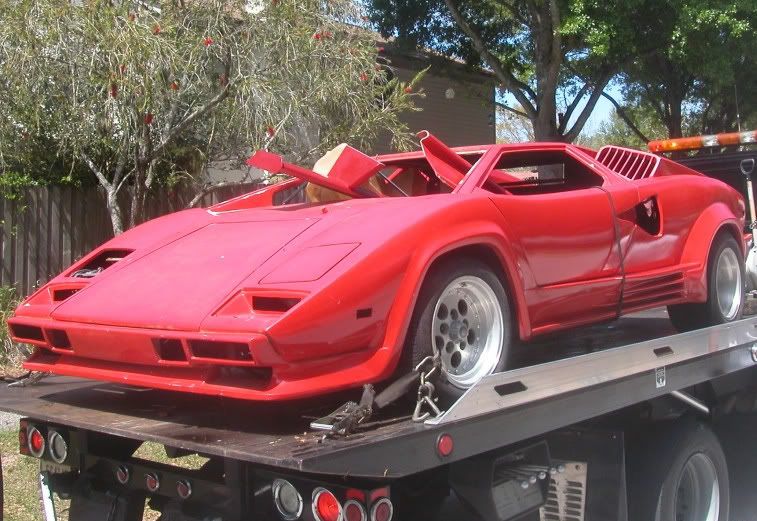
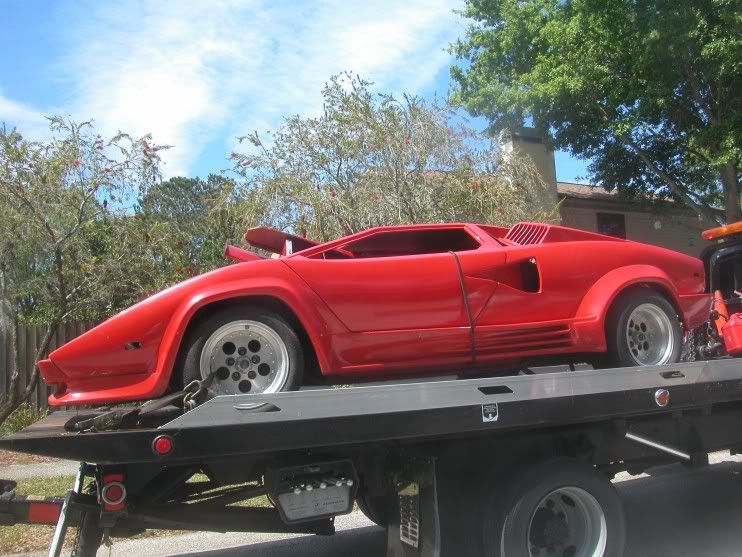
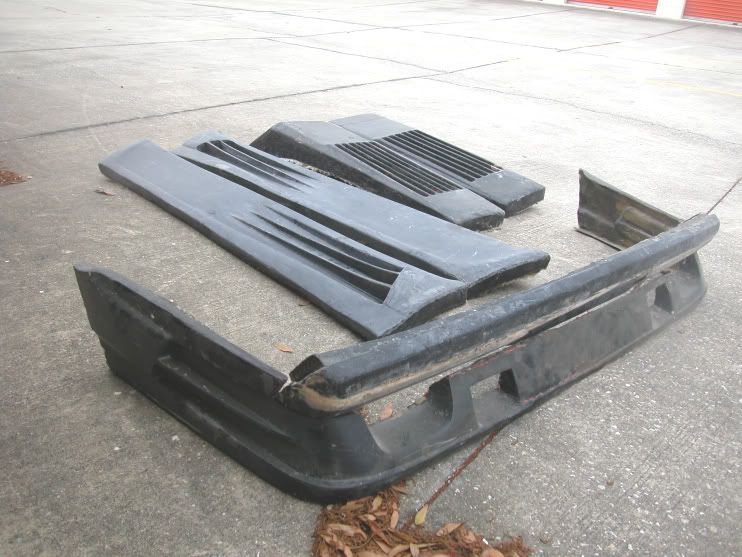
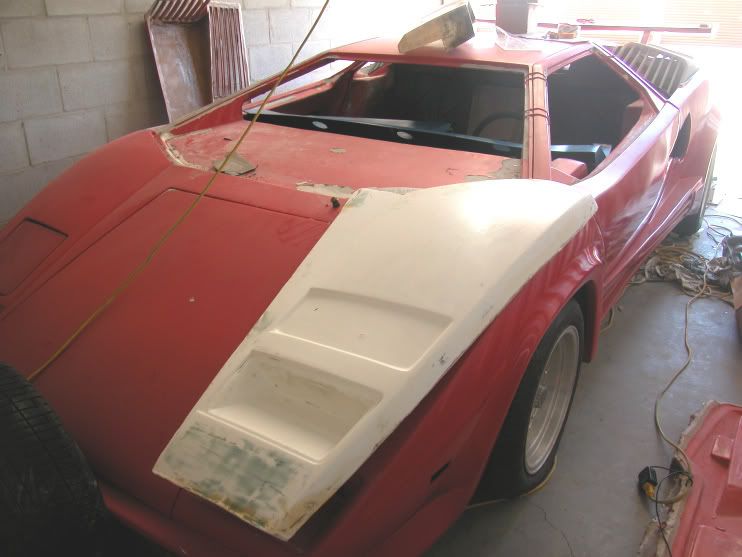
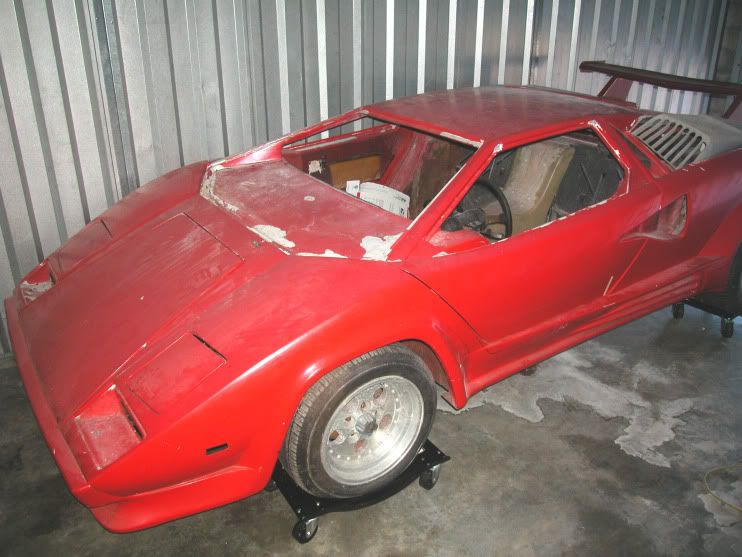
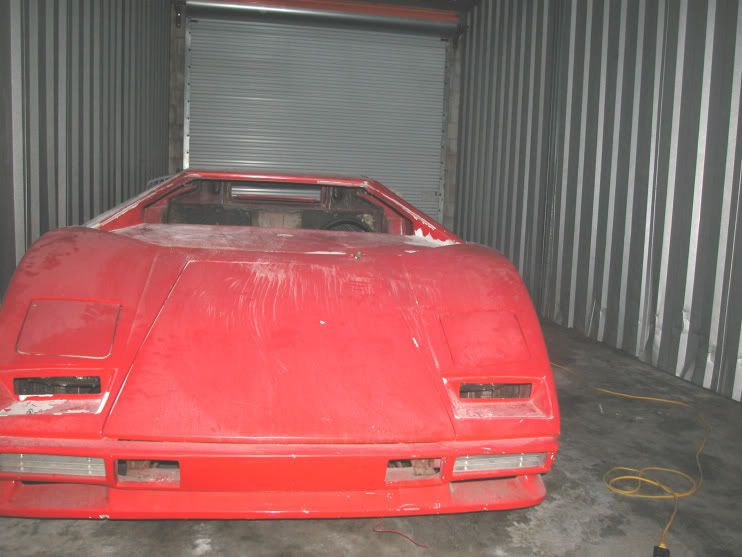
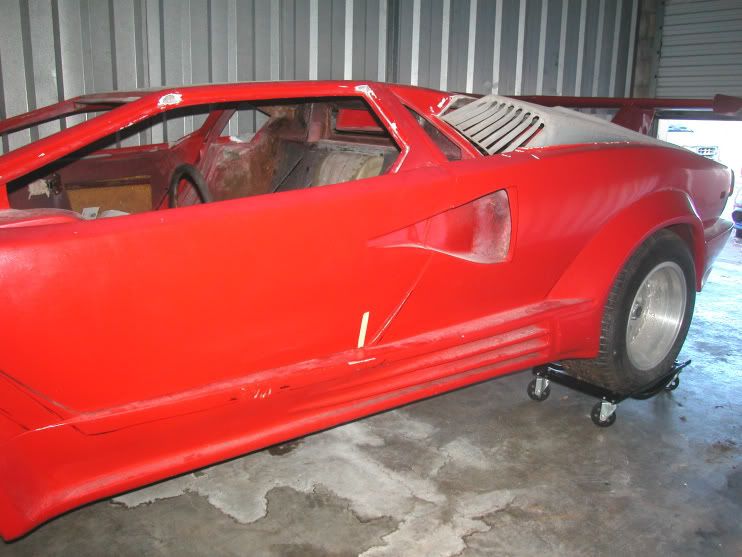
I got ahold of an incomplete lambo project March 2008. Actually, here's the whole story, condensed. I found a Countach kit on a fiero caught on Ebay so started watching the auction. The photos of the car were very dark so I couldn't make out much detail let alone the actual shape of the car. I emailed the seller and he sent me a couple more photographs showing more of what was being offered. It was an Anniversary Countach style replica but with the front and rear bumpers of an older style and tall airbox covers. It was however the correct wheelbase for a Countach and seemed to have a pretty nice overall line to it. I've shown the actual photo sent to me that made me decide this car had great possibilities. So I'm watching the auction day to day until the last couple minutes and then throw in a bid. A few seconds later, someone outbids me, so I bid again. We go back and forth like this bidding until the very end when he outbids me with 6 seconds to spare and I lose the auction by $50.00. for a total of $4,250 for the car. I even screen captured the horror for my lost dream car project. sad I know, but I really wanted this car. I contacted the seller as by now I had a good repor with him and tell him if this buyer backs out that I truly want the car. Ebay's auctions allow 13 days for the transaction to be finalized and as of yet, he still hadn't heard from the winning bidder three days later. When the seller finally heard from the bidder, he was looking to export the vehicle and things just kinda went down hill from there. He contacted me at the end of the 13 days as the winner still hadn't gotten his eggs together in one basket and asked if I still wanted the car. Needless to say, of course said I did. I arranged transport for the car and went with the truck to pick it up..sooo much cooler in person, I was looking at a Lamborghini, my Lamborghini... oh boy!. I took lots of pics of it getting loaded to the flat bed and on it, it was truly mine. I've since this time, been collecting all the parts I need to make this replica as nice as I can, my dream car. I saw a set of rare front Pirellis on Ebay and won them for 80 bucks plus shipping. I contacted the seller for final arrangements and he offered to drop em off as he lived close by. I didn't notice his location in the listing, but turned out he was about 35 minutes from me. Anyway, he dropped off the tires and we got to talking. As it turns out, he actually has an 89 Countach and was going to be showing it at a n Exotic Car Festival coming up in a couple weeks. I met him there after talking on the phone a few times and asked him if he'd be willing to assist me in my build by letting me take measurements and photos of his car, he said no problem, the rest has kinda been history. I 've been documenting his car to compare to mine and keep finding things I want to change to the exterior. This started my quest for finding as accurate a part detail as I could. It's an on going quest , but thanks to fellow builders and owners or fabricators of these cars like yourselves, I've almost obtained everything I need to "fix" my dream car. What I can't find, I make, just like everyone else, though I definitely have a lot of questions as to bodywork, not experienced enough for this, though I can make molds. My replica does have a few "Glaring" mistakes that I want to correct, you will see these in the photos..so here we go. enjoy the pics and progress as I struggle to build my dream car for me and my son.
IP: Logged
08:10 PM
PFF
System Bot
25thCountach Member
Posts: 121 From: Orlando Florida Registered: Mar 2010
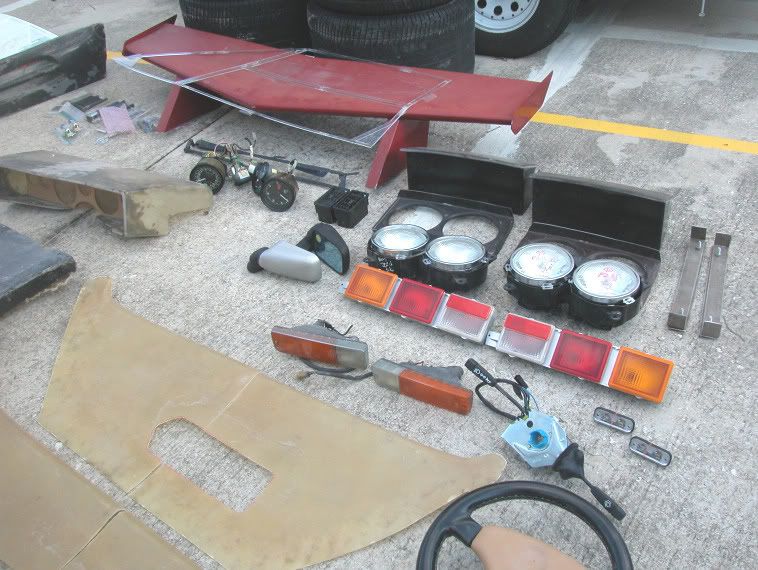
Over the last two years I've been sourcing the original cars marques used for the oem parts for the Countach. Ive amassed quite a list to date and it's always growing suffice to say I think there's a Fiat under the original Countach, lmao. Sure hope I can figure a way to use all this stuff
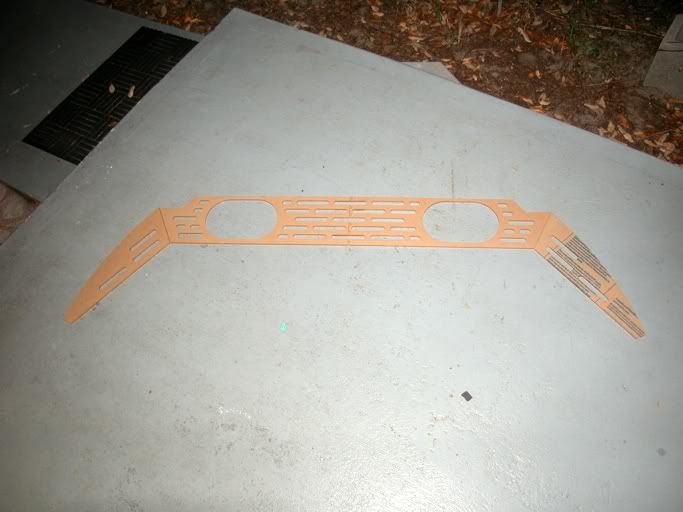
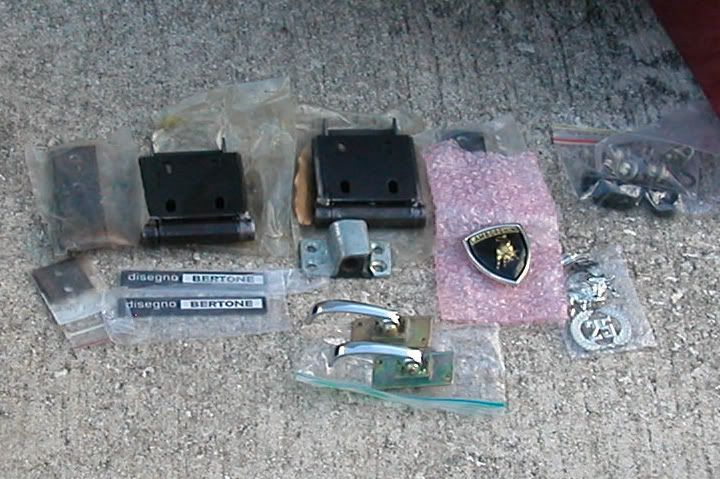
One of the areas that i never could see until I picked up the car was the front top of the fenders. I'm totally wanting to redo this area. I even have a friend that ran me a new fender and will be running the other side as well soon. I have light pods and a whole bunch of details and parts I've bought since the initial photographs. I'll post these now. I have done alot of research trying to find parts used for the real Countach and am hoping to use these with my build. Those big square black things in that one photo next to the emblems are my replacement door hinges. You can also see my Fiat 124 door pulls, same as used on the 89 Countach. upper right hand, you can barely make out the interior courtesy light switches off a fiat 124, again accurate to the real car. Right below the right hinge you can see the old mercedes door catch. This is also 100% real to the Countach. One note of interest, you have to find the angled ones or they won't catch the striker properly. I also included two photos of my replacement fender set on the car and off. The one photo you can see a cover placed in the recess, that is my friends old oem cover, he gave it to me as a gift after I made him new ones for his car. The rear tail lights are off an Alfa Alfetta, same kind used for the Countach. Next to the Subaru turn signal parking lamps, you can see a switch stalk. This is off an SD1 Rover, exactly the same stalk the Countach uses. I have a gentleman overseas that is going to help with steering parts as well as a true column shroud as well.. I have no idea if this is all doable here in the states, but is a popular steering set up abroad, might be in dream land here.
Will
[This message has been edited by 25thCountach (edited 04-12-2010).]
IP: Logged
08:53 PM
25thCountach Member
Posts: 121 From: Orlando Florida Registered: Mar 2010
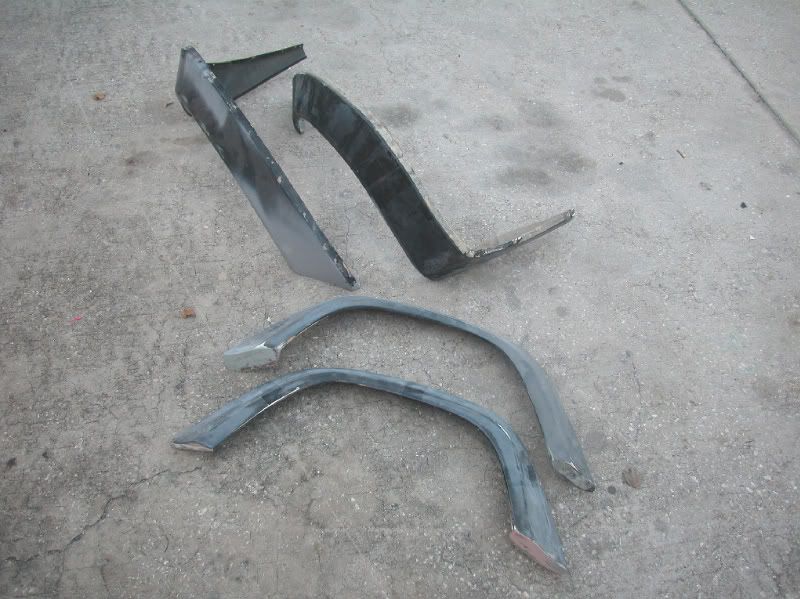
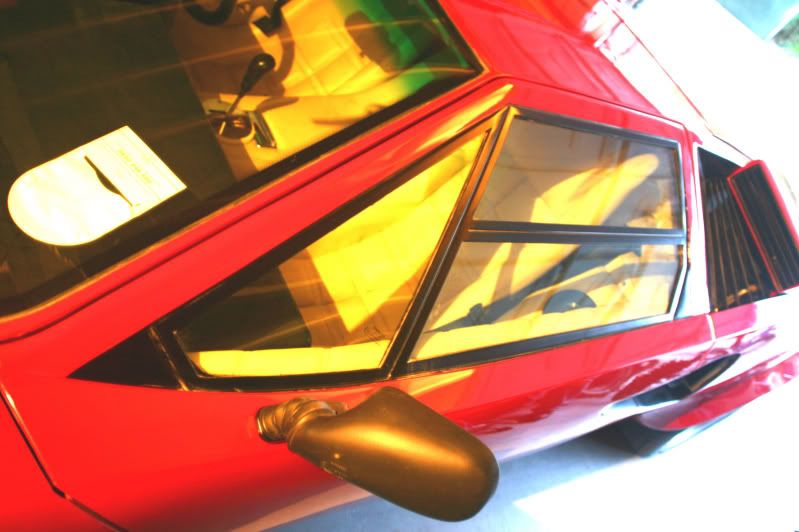
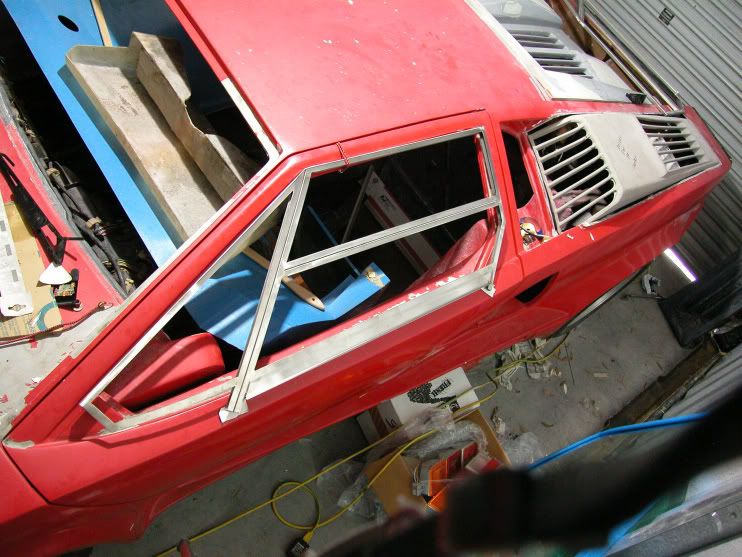
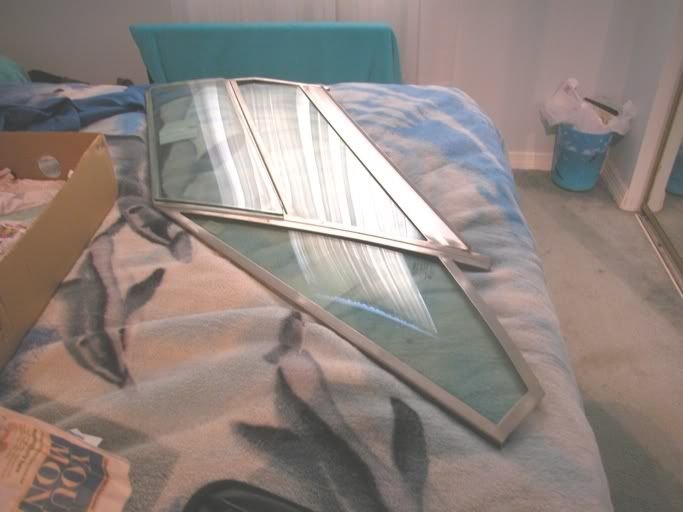
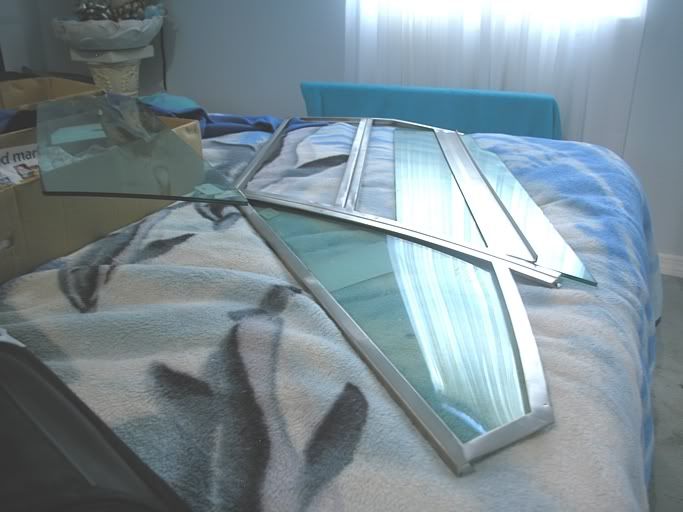
The gentleman that made the window frames in the photo below is making me a set as well. they are really well made. They are in stainless steel, allowing the lower window to be able to roll down. They are sized to a real Countach's dimensions, so should work fine for my build. If not, I guess I'll modify my door frame area to fit them. They do have the curve to them and are designed for curved window glass.
IP: Logged
11:42 AM
25thCountach Member
Posts: 121 From: Orlando Florida Registered: Mar 2010
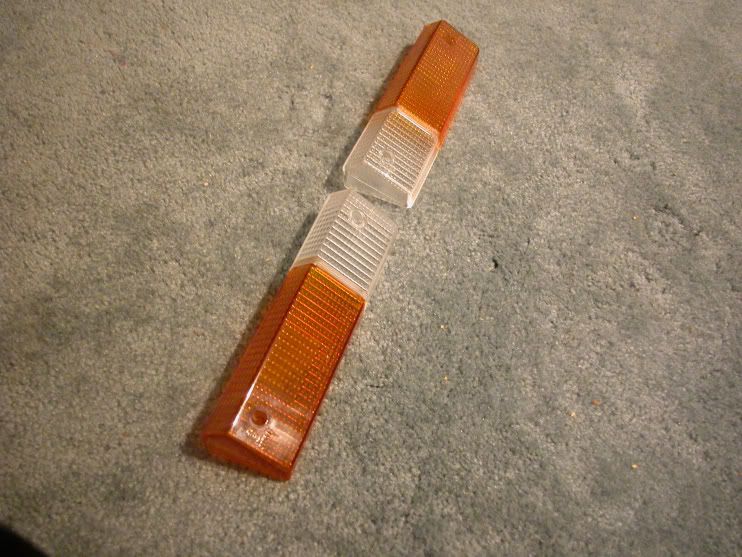
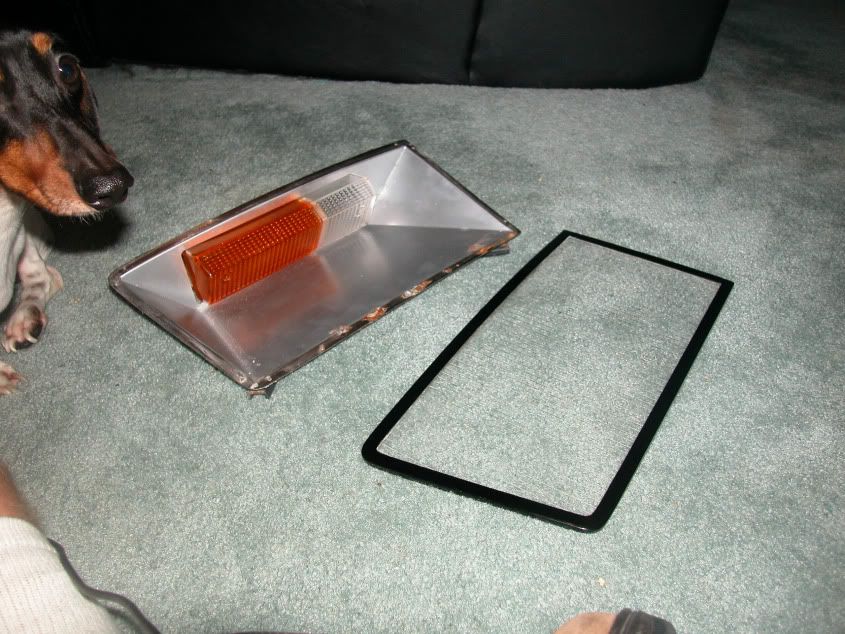
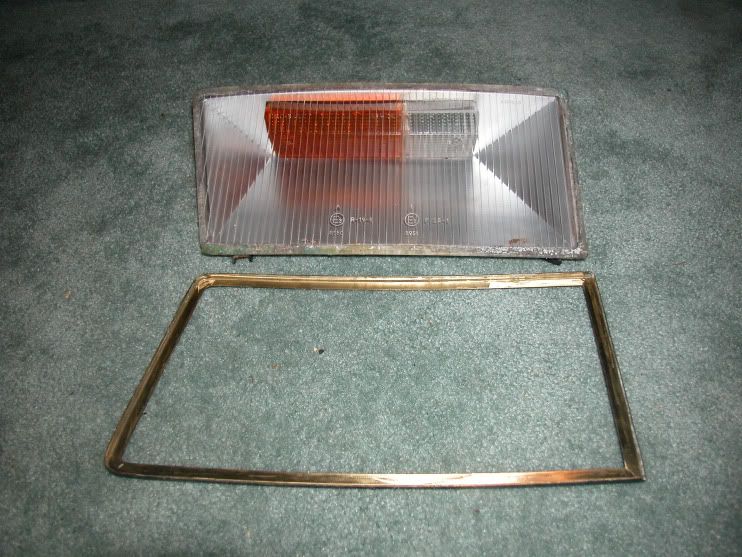
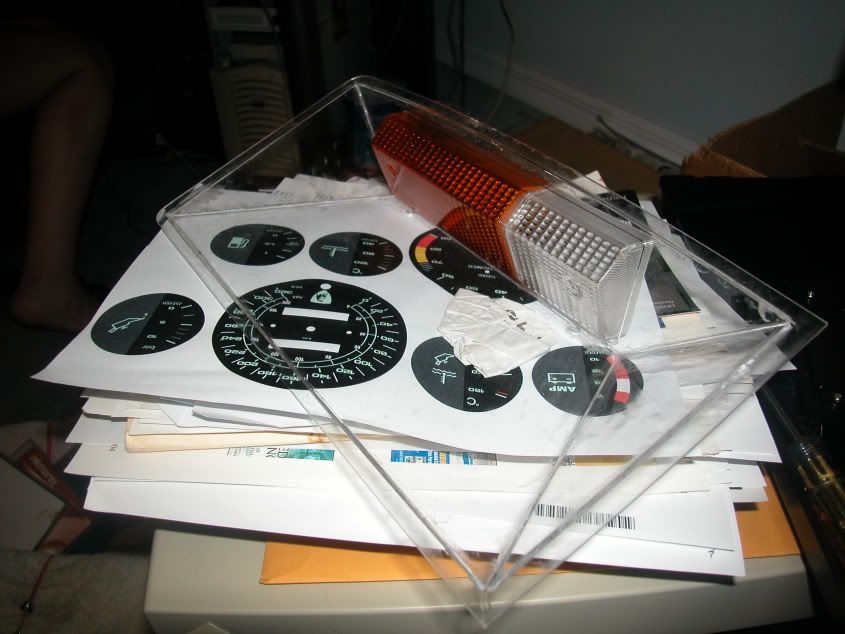
here's another hard to find part..the turn signal parking lamp lens, I purchased these lenses from Superformance in the UK for $24 each or thereabouts. I had a unique oppurtunity arise to help my friend with the 89 Countach. His turn signal buckets had pitted over the years and he had a cracked cover. He asked if I would help restore them for him. I agreed to give it a shot. I used silver solder and filled and filed smooth all the pits in the metal, then primed and painted the buckets with a platinum silver like the original color. I then made new turn signal parking light covers for his car. This of course gave me the pattern for both the bucket and the cover itself. I helped him and he in turn helped me, I had his permission to do this. Again, he even let me keep the old covers as a gift. here the pics.... ohh and my little helper Snoopy!
IP: Logged
11:45 AM
25thCountach Member
Posts: 121 From: Orlando Florida Registered: Mar 2010
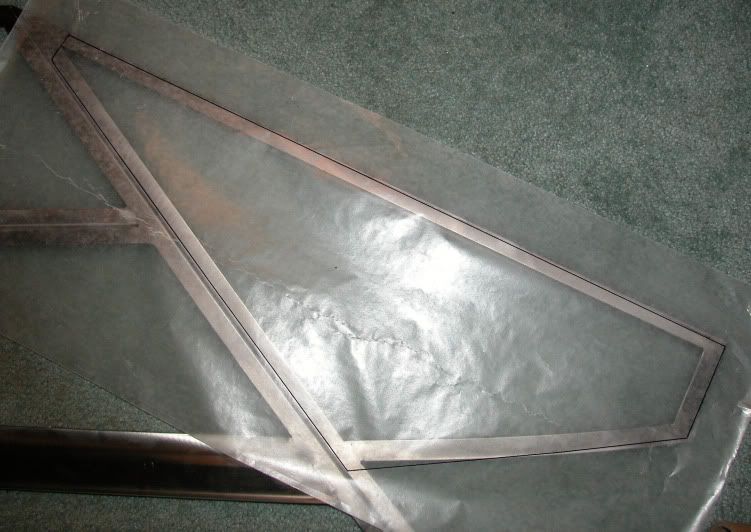
Ged Sweeny, maker of frames, came through with flying colors. They sure are what I hoped they'd be, very very nice! Here's some pics. As I suspected, I'll have to do a little modifying of my door opening, have to do that anyway, but these are amazing. They are designed so that the Toll window will roll down as it should...Sweet. The last photo shows me checking a wax paper template of the quarter-light front corner glass for the frame
IP: Logged
11:59 AM
25thCountach Member
Posts: 121 From: Orlando Florida Registered: Mar 2010
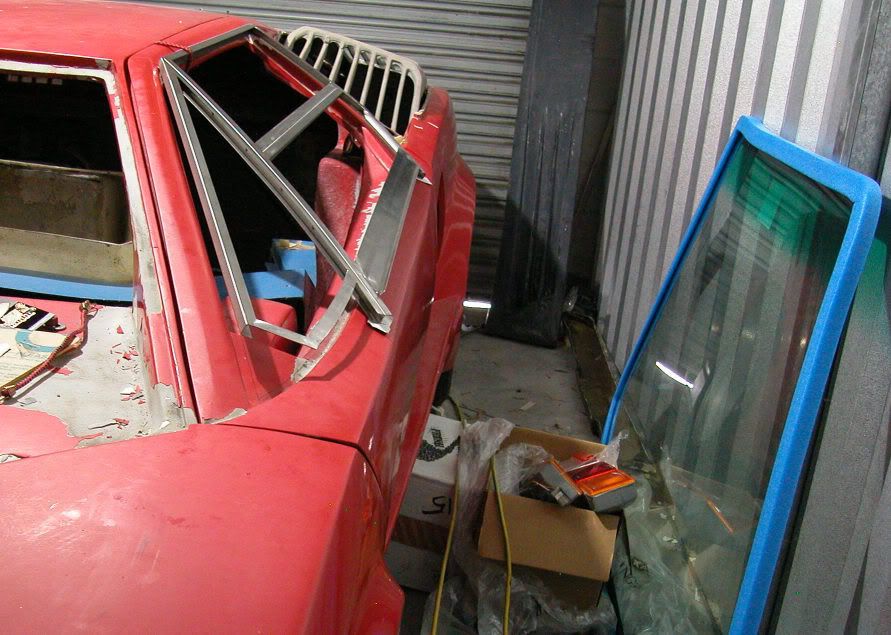
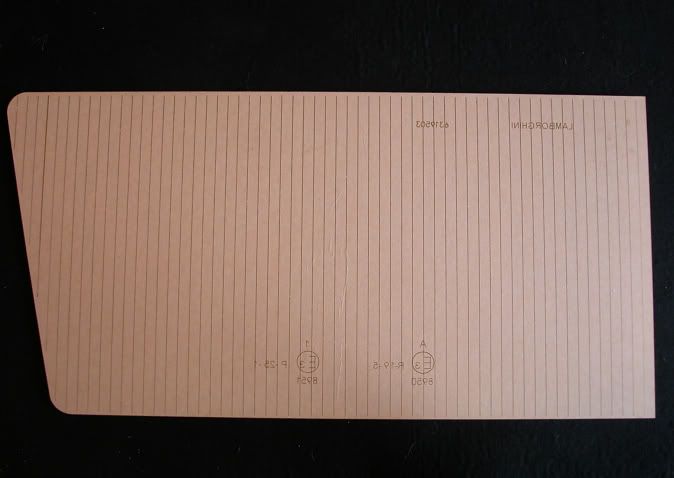
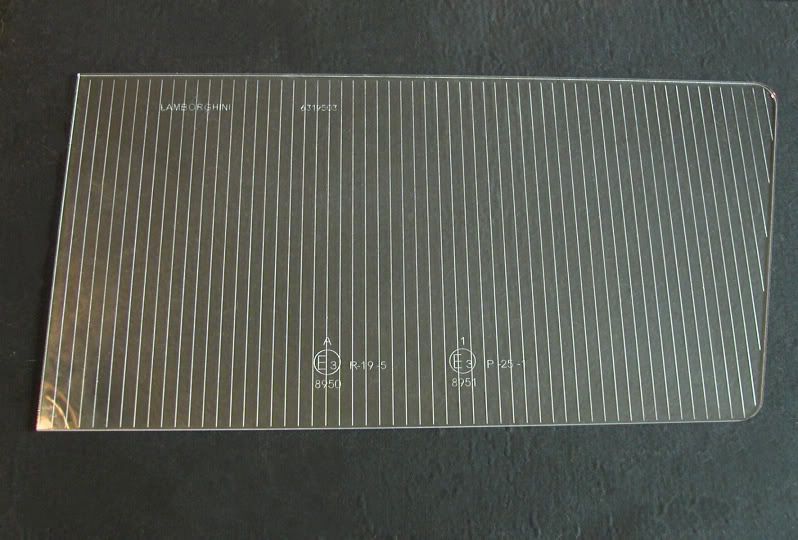
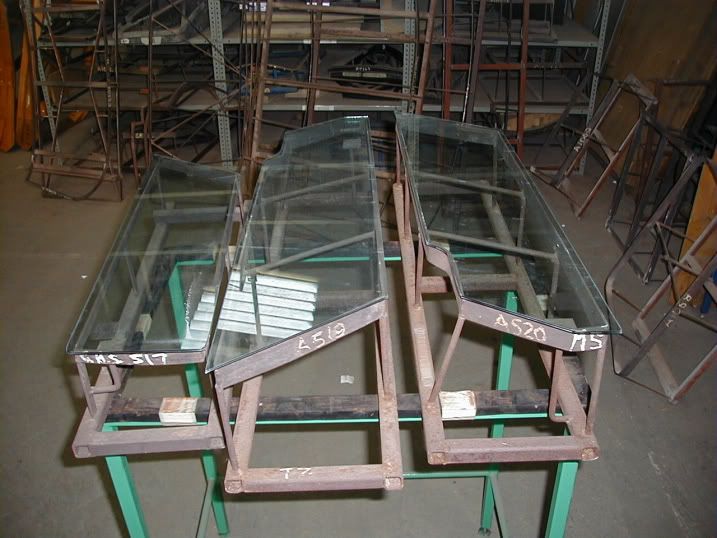
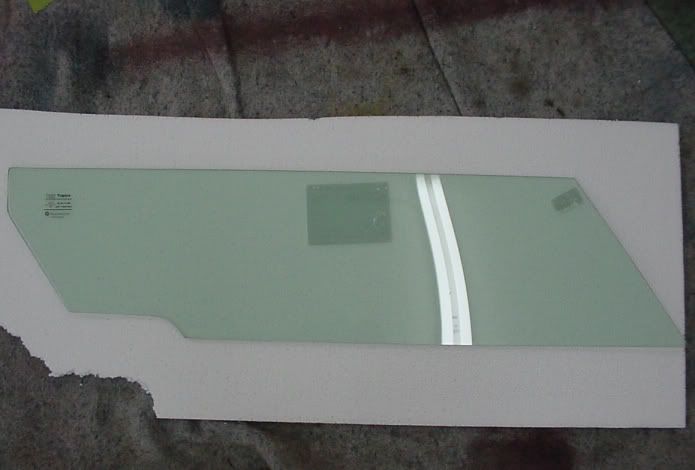
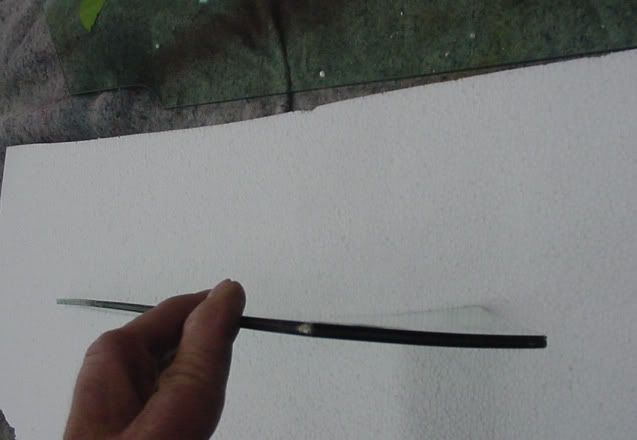
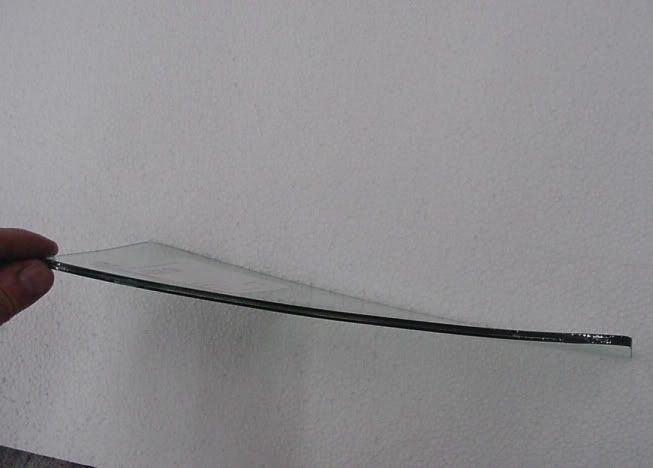
well at this point,things had been happening by leaps and bounds. First, as any Countach replica owner knows, it's super hard to have curved frames for your side windows, but next to impossible to have curved automotive safty glass, at least at a reasonable price. Trying to find Countach glass, curved is non existent. Well as it turns out, the same company that made my curved windscreen has the bending/checking jigs for making the old mirage curved side glass, including top, bottom, front quarter-lights, and rear quarter-lights behind the side windows and finally the rear engine bay glass. It even has the oem aqua tint to each piece. This tint will look fantastic with my white leatherette interior. Most of the buttons, switches and misc parts I've been collecting are oem Lamborghini, but without the Lamborghini Factory bag. for instance, though Lamborghini, the same switchgear I have is well over $1,000 dollars, I paid for the exact same gear, only $36 dollars. Steering wheel without boss is around $300.00 and an additional $50-$75.00 for the boss, I got mine for $40.00 including the boss. Those rear fog lights by Bosch found on the Anniversary model rear lower bumper are getting scarce, but I found them in Germany on Ebay for $4.00. I've seen them go for $75.00 each, and just forget what Lamborghini charges, something like $300 a side. The courtesy light switches oem are 39.00 apiece,mine were $4.00 for 7 of em. The fact is gang you can find almost any part you need by doing research on what kind of car they came from to begin with. My car build is going to be on a budget, but with oem style interior and exterior as it should be. My thoughts are with careful research and a little help, you can build a great car for a lot less. When I'm done with this build, you will be hard pressed to tell the difference inside and out between mine and the real car, at least this is my goal. My latest acquisition is another set of anniversary fiberglass parts. I now have all exterior panels and parts and most interior to complete my transition to an oem 89 Anniversary Countach. The finding of the curved side and rear glass and frames for the car to me is a major hurdle I found reliable sources for. I will pass on the information of these sources to anyone that needs it. My thoughts are, we are all here to build our dream car, anything we can do to help one another is the way it should be, some parts will need modifications, as I'm very attentive to the small details and shapes, comes with being a model maker. Cheers, William
IP: Logged
12:09 PM
25thCountach Member
Posts: 121 From: Orlando Florida Registered: Mar 2010
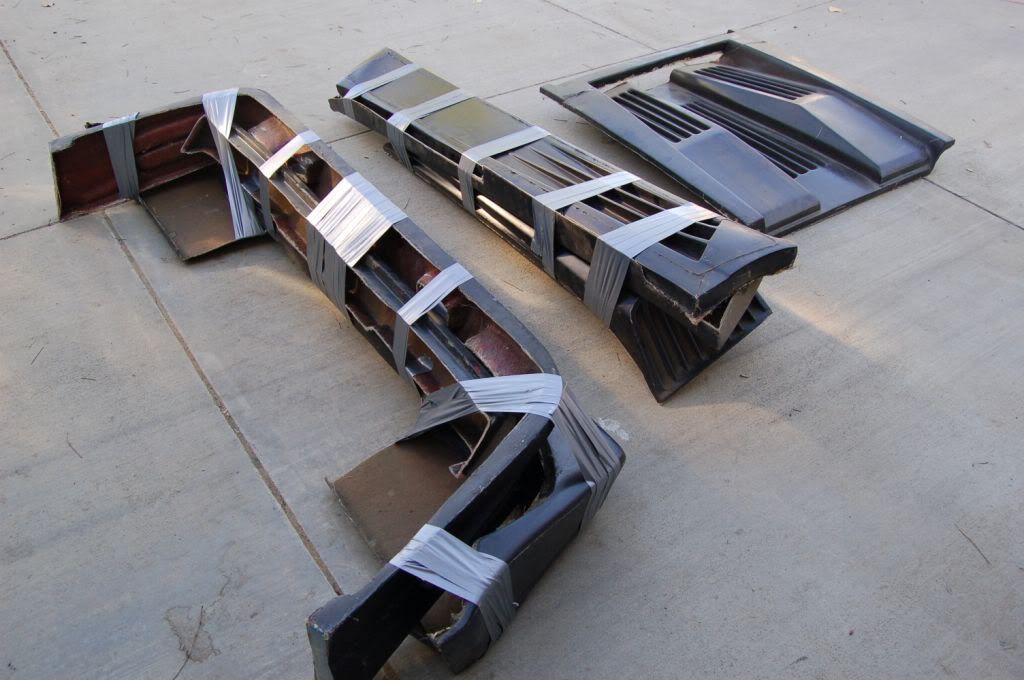
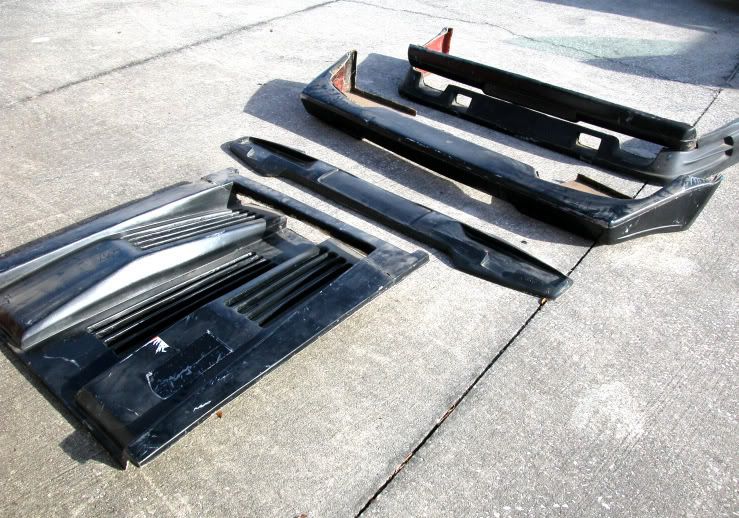
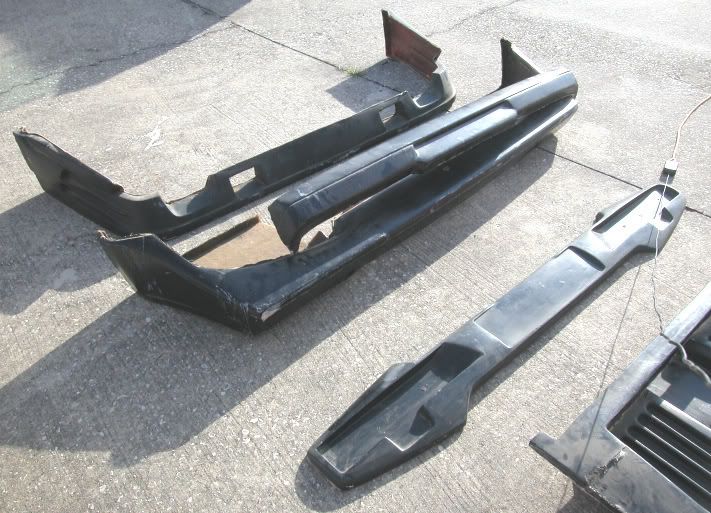
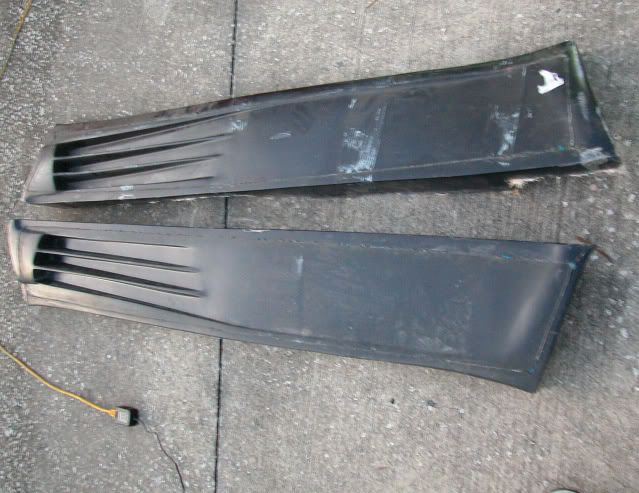
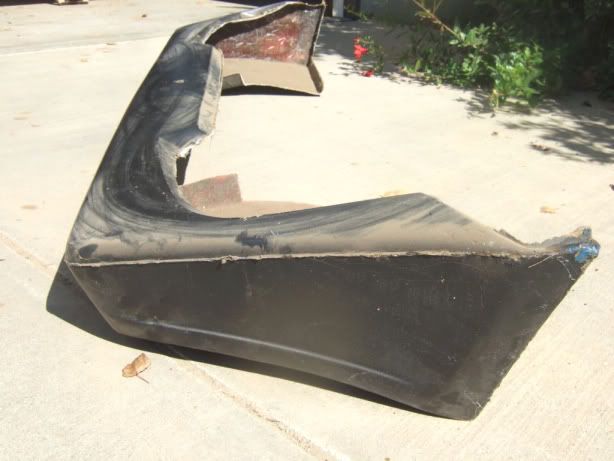
I found some more parts for the car, these being in much better shape than the ones I'd originally purchased. The bottom piece is my grail piece...the oem style rear lower bumper and its right !
William
IP: Logged
12:12 PM
25thCountach Member
Posts: 121 From: Orlando Florida Registered: Mar 2010
While still collecting parts, I made a discovery recently about the 25th lower panel sills or as we call em, rocker panels. On the 25th they have a bend to them on the upper edge starting behind the door going toward the rear wheel well flairs. So after learning this and seeing Marks car with them, I went up to his home and took lots of measurements to make mine correct. If they are, I'll mold them to have on hand in case I need another pair later. Incidentally, this is Andy's Mirage. It has both the glass and the side window frames I've shown here.
William
IP: Logged
12:15 PM
25thCountach Member
Posts: 121 From: Orlando Florida Registered: Mar 2010
Back to this rocker find...Here's my drawing I did showing this detail and the dimensions Mark allowed me to retrieve. this is from my series of CADS to show the piece.
William
IP: Logged
12:18 PM
PFF
System Bot
25thCountach Member
Posts: 121 From: Orlando Florida Registered: Mar 2010
Well I found out that my storage complex had larger units available so went from a small unit to a large one for about $37.00 a month more. Now I will have lots of room to do the build, here's some pics, this will be lots of fun, I hope.... ;D William
IP: Logged
12:21 PM
25thCountach Member
Posts: 121 From: Orlando Florida Registered: Mar 2010
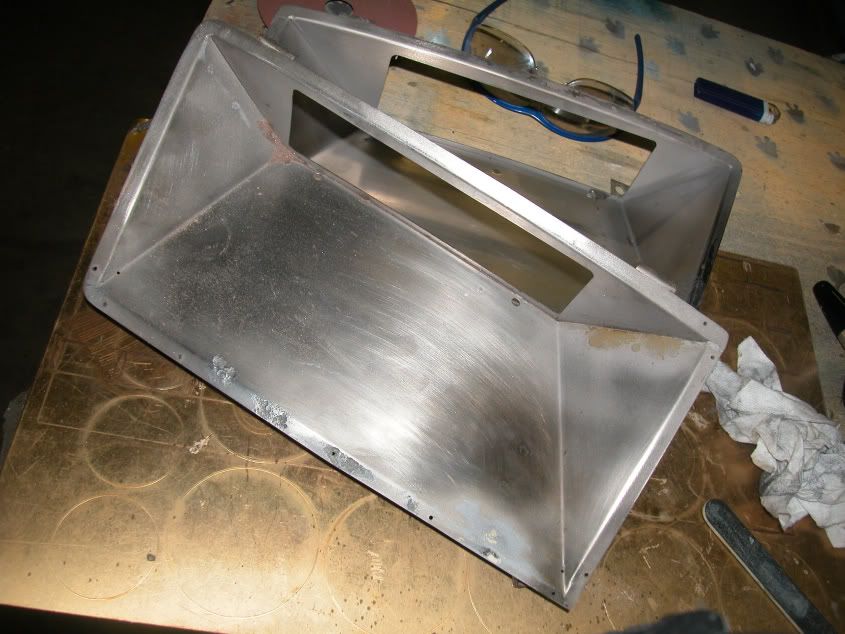
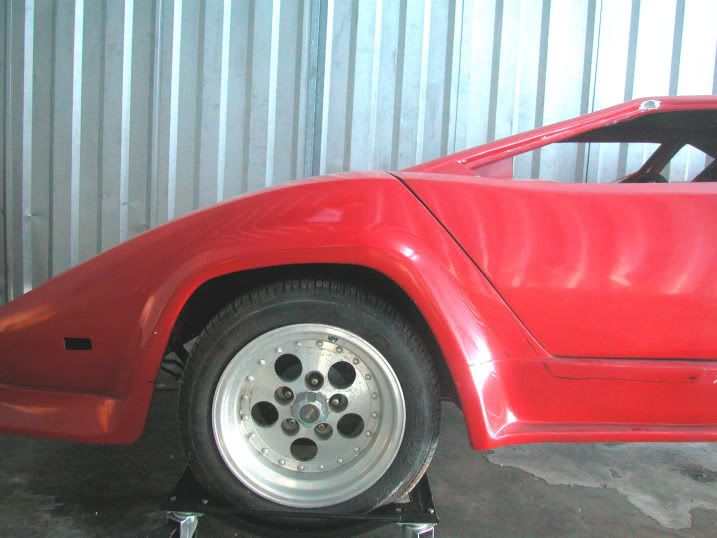
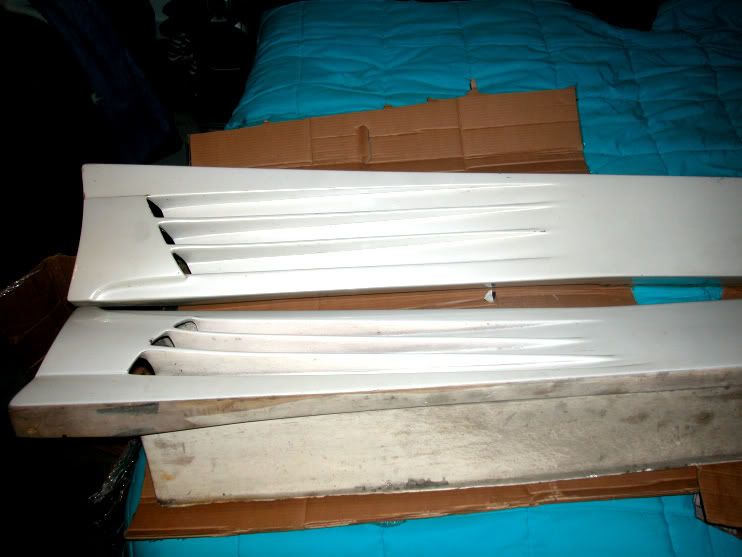
Alright, I should be picking up some almost 100% accurate rocker panels tonight to add final details to and mold. The Rockers have the correct bend in them for the 89 version and even the strakes and brake vents are correct Finally!. they just need a little more surface and curved shape on the rear and I need to add the running edge along the bottom before I mold them. I will document it of course with photos. Many thanks to Eric, for lending them to me off his car. He's also sending me the front and rear wheel flairs to mold as well. The front flairs of an 89 are slightly convex rather than concave like the older Countach's. I will modify the flairs with clay and remold them. Here's a photo of Eric's Rockers on Amos's car and the fix to the lateral raised edging along the bottom. The second set of red lines at the rear show how the rockers are at present and the photoshopped white extra area is the addition I will be making for them. The front flairs or spigots as Lamborghini calls them, on my replica, are molded in and feathered to the point of no edge where they should meet the body. This is totally inaccurate and a change I need to make. I'm showing two photos of this area with and without delineation of where and how the flair should look. The bottom photos show the difference between 89 Anniversary flairs and older Countach flairs.
Cheers, William
before after
1986 QV front Spigot ;D 1989 front Spigot ;D
IP: Logged
12:28 PM
25thCountach Member
Posts: 121 From: Orlando Florida Registered: Mar 2010
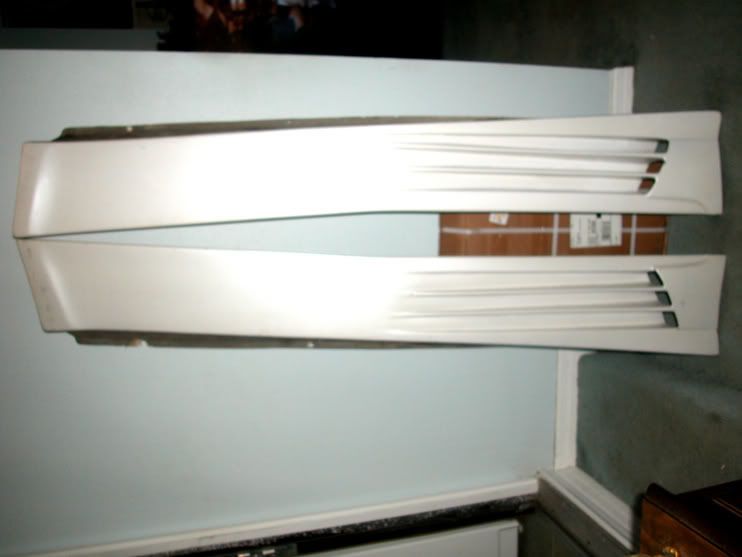
the Greyhound bus pulled up and I got to see the rockers get unloaded and taken over to express shipping storage pickup area. I went in and signed for them and took them home. Without exaggerating the weight, these things are quite heavy at approx 25 lbs apiece. I'm very happy overall with these panels, only a few things need fixing besides what I mentioned, but will wait to fix these areas on the first castings, so as not to modify these. Anyway, it's very easy to see the bend in the rockers I keep mentioning looking at these pics. I'm going to ask Mike B to help me on these molds to ensure they turn out right. So, for now, on to the photos..
I had just gotten home and they were still packed up
you can really see the bend in them in this last photo
Very nice. Don't let the lack of comments dissuade you from posting your progress... I'm sure there are lots of people like me just lurking in the background! Keep it up! I'll soon be joining you with my F355 N* build.
IP: Logged
12:51 PM
Eclipse Member
Posts: 2040 From: Woodstock, Ontario Canada Registered: Jun 2004
AWESOME!!! I will be following as well. Hey William you say your a model maker. Are you a hobby model maker or are you a Model Maker? As in it's your job. I ask because I am a Model Maker too as in it's my job. Cheers keep up the good work.
model maker, master pattern maker, mold maker...caster....that kinda thing thanks for the comments all
Will
Yep, me too and Rapid Prototyper. Cool. Nice to see another. I will be watching this thread. So on the front lenses you made did you just make a silicone tool off the original and cast a clear urethane like an Axson 521? Thanks for sharing.
[This message has been edited by Curlrup (edited 04-13-2010).]
IP: Logged
07:11 AM
25thCountach Member
Posts: 121 From: Orlando Florida Registered: Mar 2010
I'm lovin it! Been thinking on and off of doing a Countach as well, though no one makes a LP400. Saw one next to a LP500S at a show, the 400 just looked a little sexier, even with those skinny little tires Guess I will have to brush up on my fiberglassing. And finish my other kit first... like that will happen any time soon
IP: Logged
12:04 PM
25thCountach Member
Posts: 121 From: Orlando Florida Registered: Mar 2010
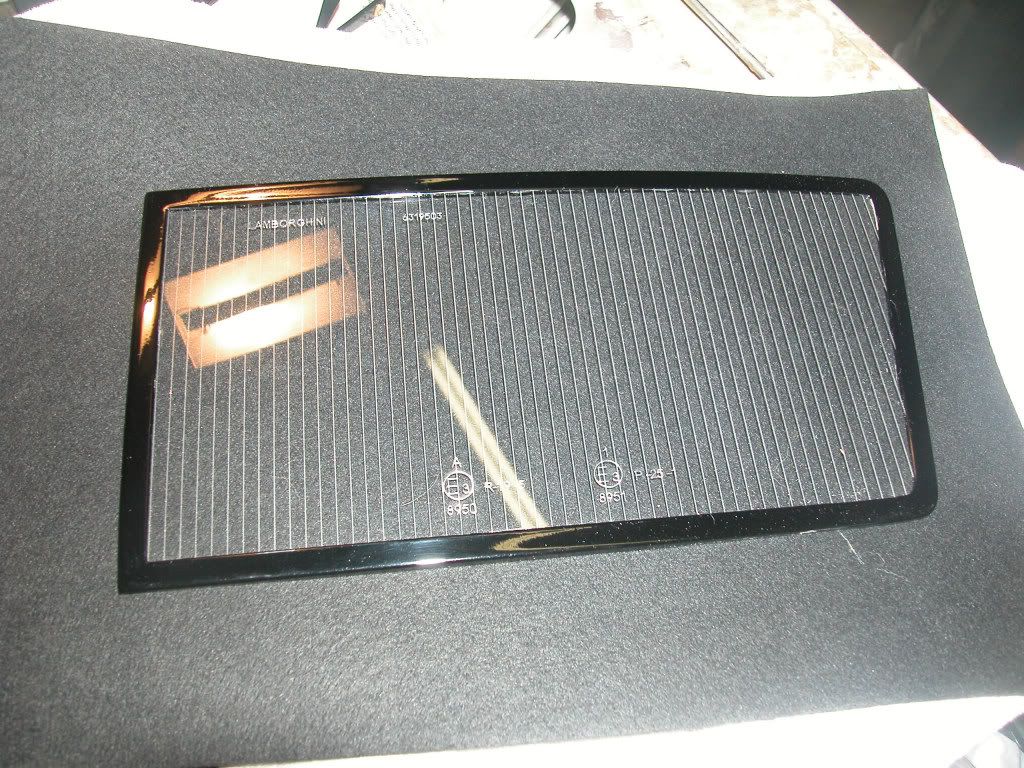
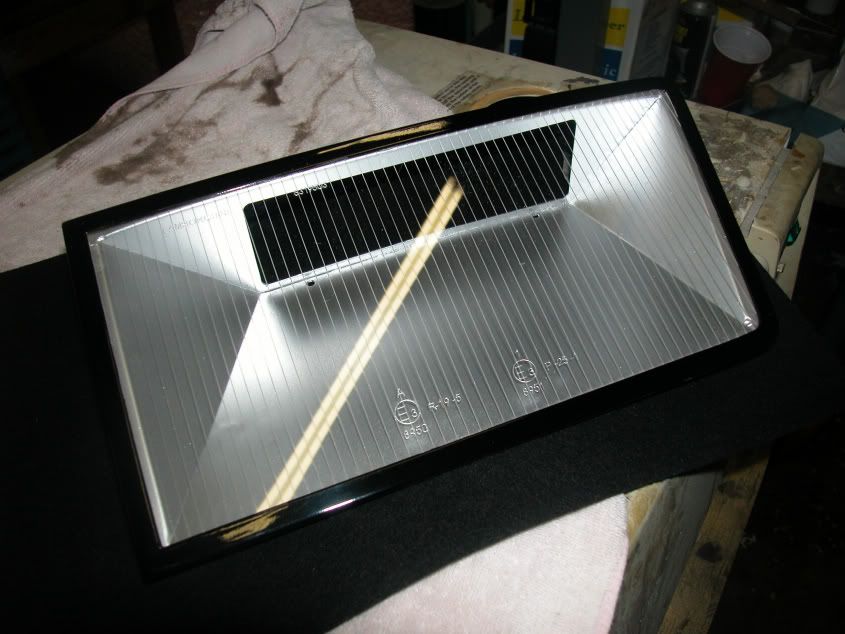
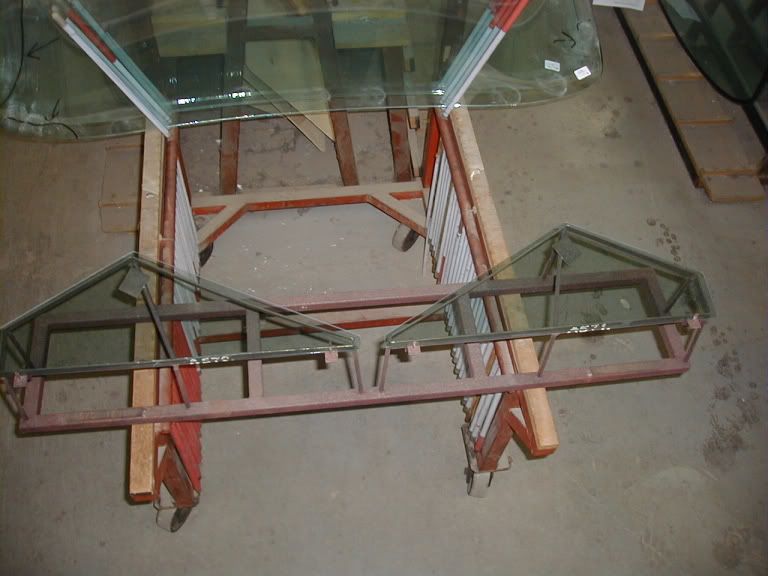
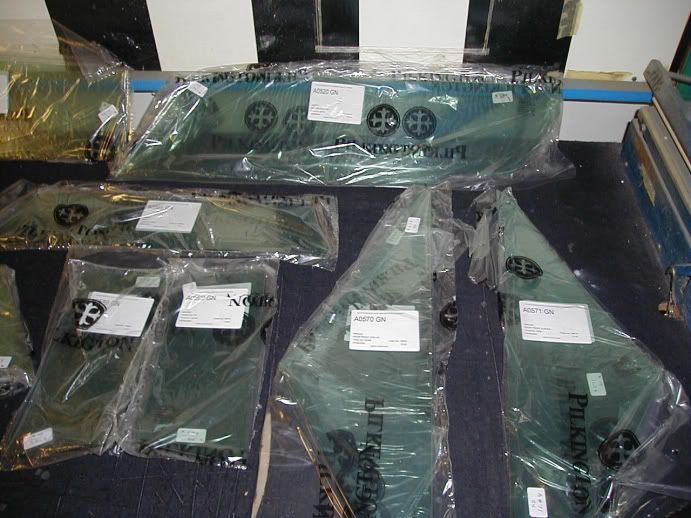
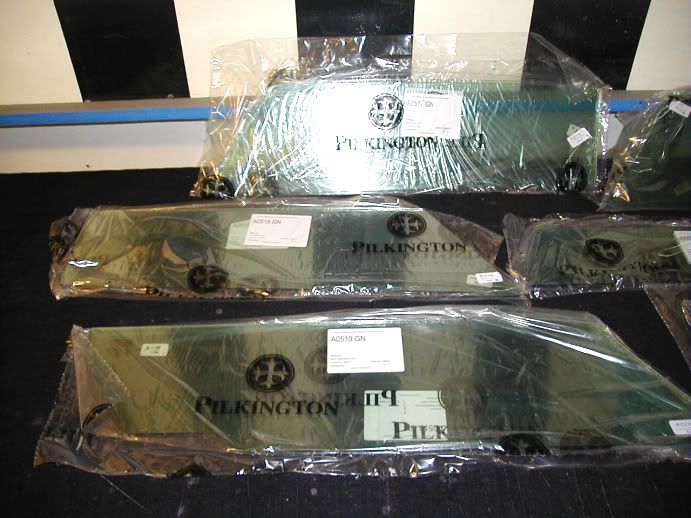
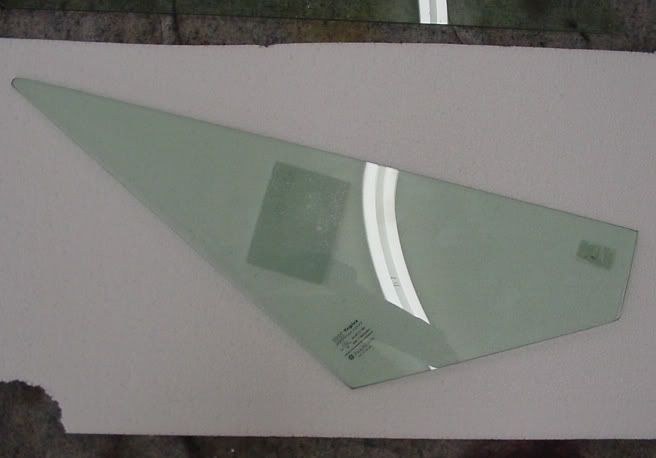
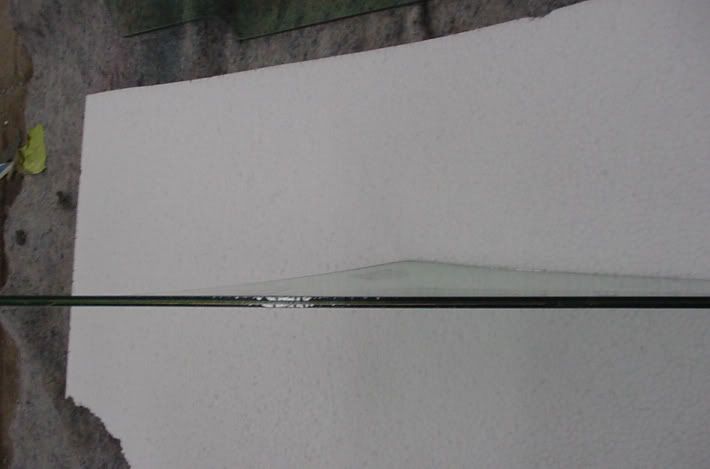
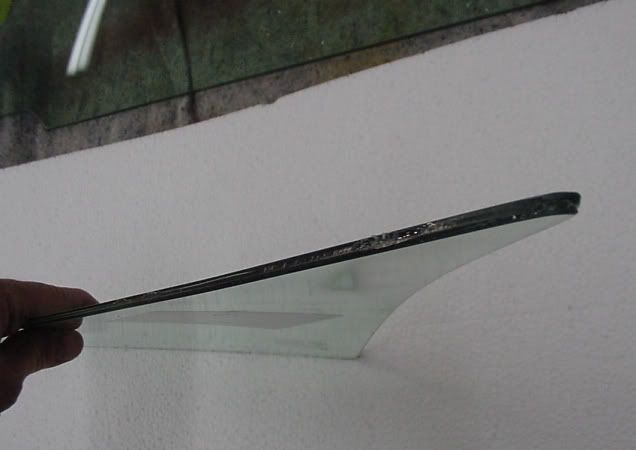
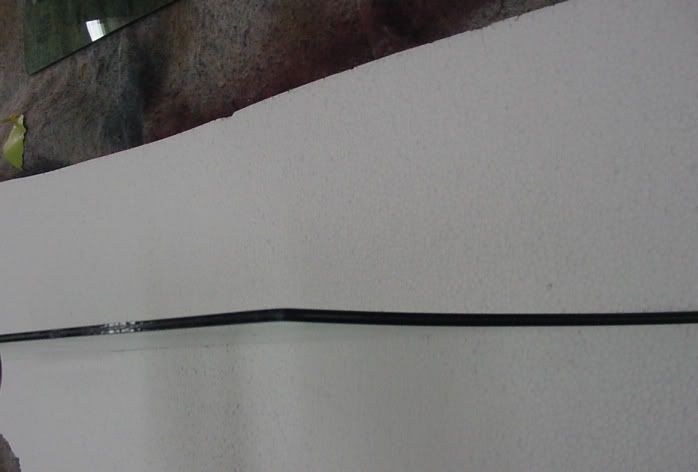
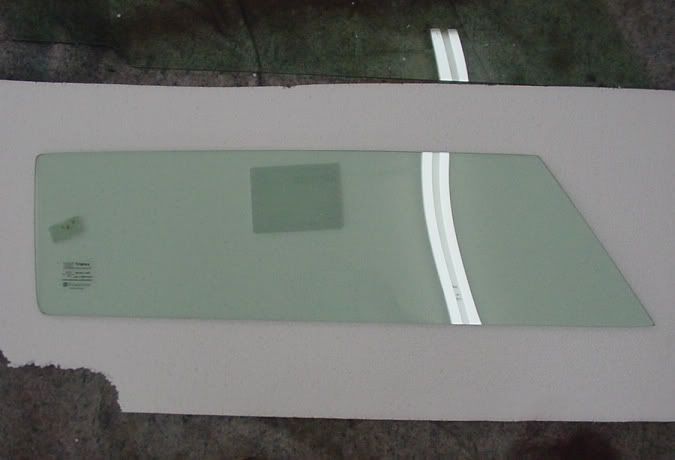
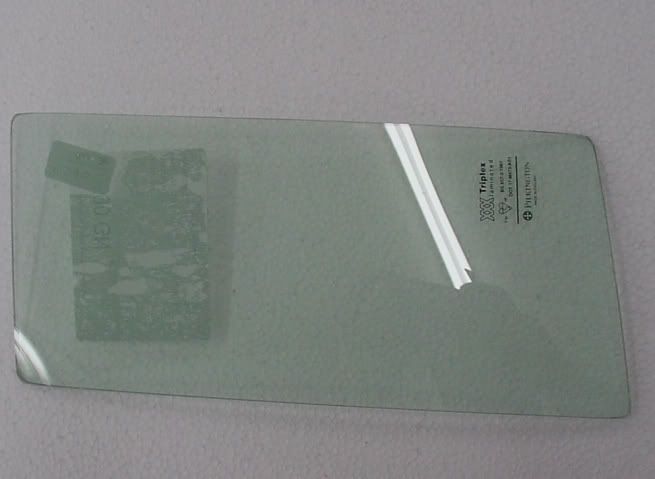
you gotta see this, they say a pic is worth a thousand words..just one word from me on this...WOW!!! I picked up my Glass this afternoon and just checked it to the frames I'd had custom made...
SWEET!
Will
[This message has been edited by 25thCountach (edited 04-13-2010).]
I have to admit those are very nice and if I could afford them, I'd probably get them. Since I can't, however, I've thought I might make my upper glass hinged so it rotates down to vertical, doubling over the lower glass. That way I could have a whole open panel. I figure since I'm not getting the OEM look why not try to have a more functional window. It seems like an awful lot of work to install power windows only to have it go down 1/2 way, but I totally understand wanting a stock look and function. If I can't make a folding glass work I may go with more of the prototype slider on the bottom panel, or maybe one of the panels just lifts out entirely, then maybe it could be stored in the sill area, assuming there's enough room. I haven't studied the logistics yet, but in theory it could work. I had also heard that the glass can be cut, I believe from a Dodge Stratus, but it's been so long since I heard that, I could be wrong about the car. Plus, cutting the glass isn't easy either. If I can't get someone to do it successfully I'll have to go with flat glass. To me that is one area that I don't mind compromising on.
IP: Logged
08:52 PM
25thCountach Member
Posts: 121 From: Orlando Florida Registered: Mar 2010
Will. I talked to the machine shop today, things are slow there, they expect to have the parts ready early next week. Once I get the parts back from them, I'll be able to finish up the caliper brackets and get everything crated up. Pics coming soon.
Joe
IP: Logged
10:47 PM
Apr 15th, 2010
25thCountach Member
Posts: 121 From: Orlando Florida Registered: Mar 2010
Okay so now I get why you were showing the wheel wells earlier. You obviously plan to cut off the ones that are smoothed into the body now (why? ) and replace them with correct ones, sweet!
IP: Logged
08:12 AM
motoracer838 Member
Posts: 3751 From: Edgewater Co. USofA Registered: Jan 2006
Okay so now I get why you were showing the wheel wells earlier. You obviously plan to cut off the ones that are smoothed into the body now (why? ) and replace them with correct ones, sweet!
John, he's being even more A/R (if that's possible) than I was when I did my plug.
Will, I just got a call from the machine shop to confirm a couple of dimentions on the front hubs, yeah they're working on the parts today!!!
Im watching this very closely.. I nearly bought a 25th anniversary kit for mine about 7 years ago.. But i just didnt have the resources to do a really really authentic nice one, so i decided not too.. (maby someday.) But the 25th anniversary Countach is one of my favorite cars ever! I know most people like the Diablo's, and Murcilago's ect ect.. But man, a solid black 25th anniversary Countach is one of the most evil looking cars ever made..
Lookin forward too seeing how this one turns out..
[This message has been edited by Jonesy (edited 04-17-2010).]
IP: Logged
08:32 PM
Apr 18th, 2010
25thCountach Member
Posts: 121 From: Orlando Florida Registered: Mar 2010
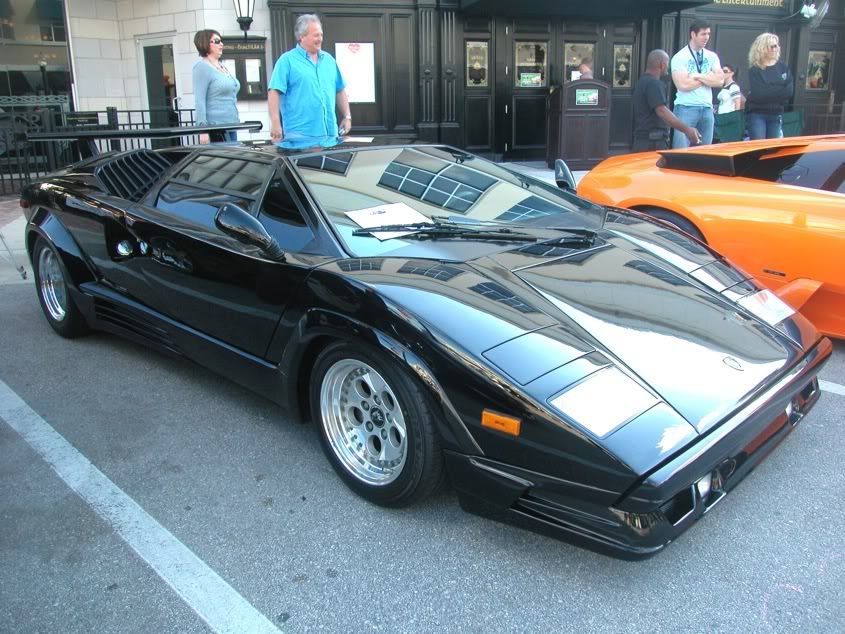
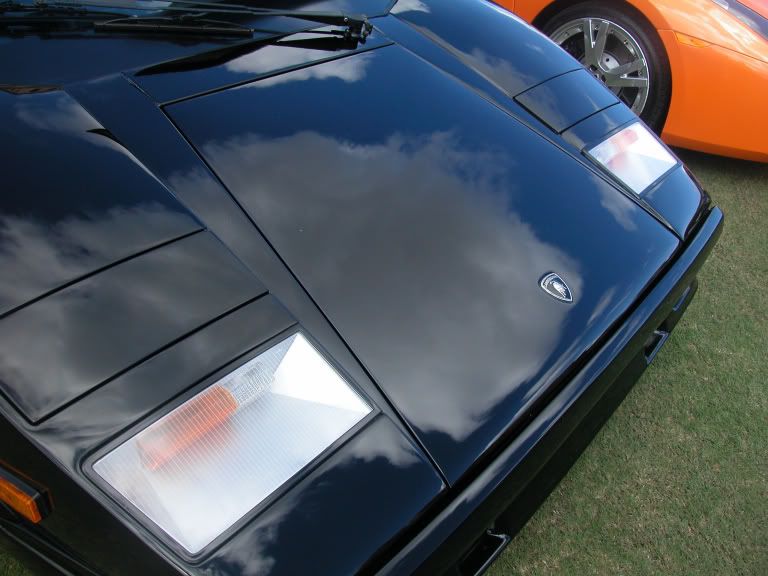
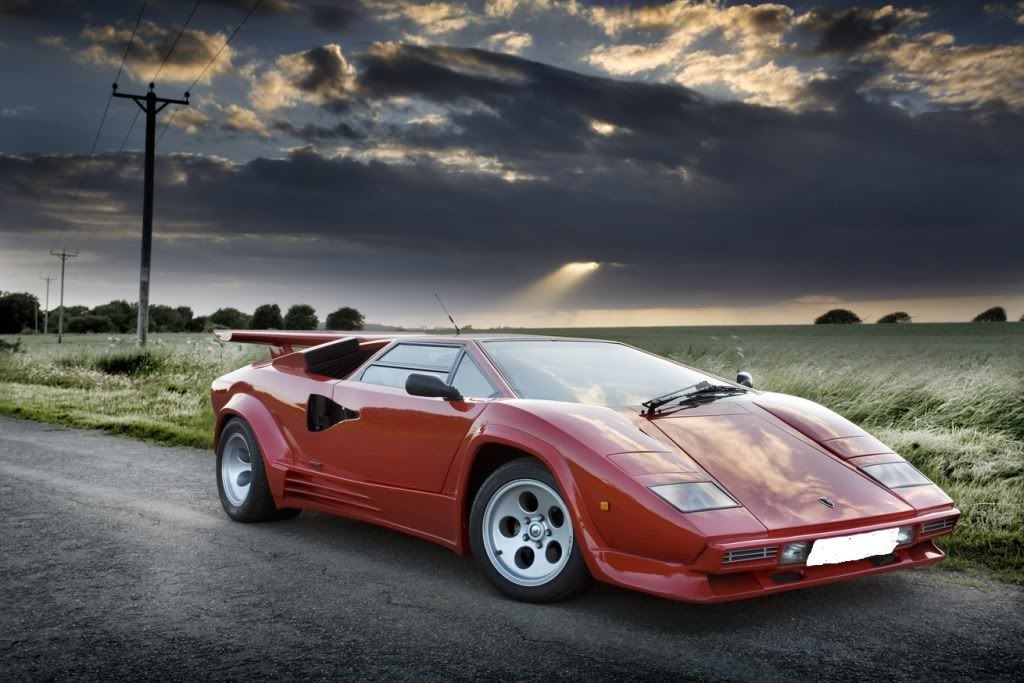
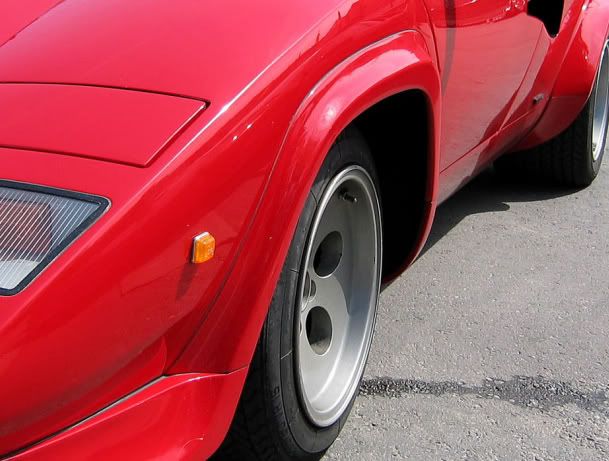
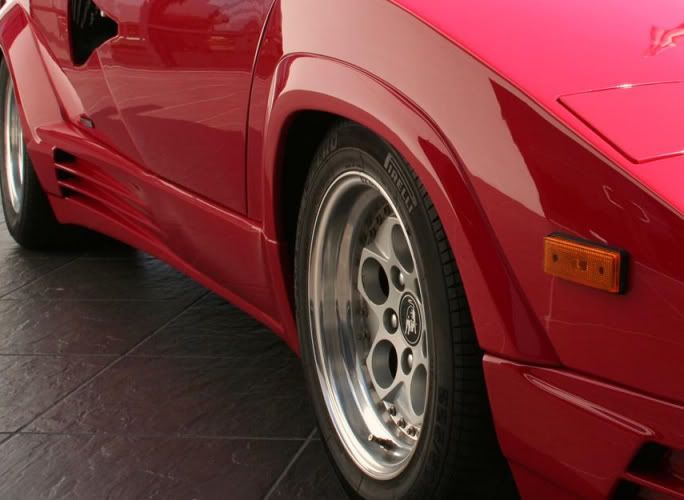
That's exactly why I posted those comparisons, to make my flairs correct and separate like the original. I agree, the Black Countach is amazing and also what I have my heart set on, but with a white leather interior. My friend Mark, whom I saw today, has been instrumental in helping me with my project as far as letting me take countless measurements and photos. His car took Platinum today at the Auto show, highest honor in the category, Lamborghini. Here's a great photo of his car...
Will
IP: Logged
01:10 AM
James Bond 007 Member
Posts: 8872 From: California.U.S.A. Registered: Dec 2002


 ...less baking inside lol