I trimmed about 1" off the rear manifold at the merge section with the crossover tube, now my 3" mandrel 180 degree bend will fit just fine, but I need my muffler to do much more with it.
While the engine was still in the chassis, I went ahead and made the brackets that will located the 500 connector and engine bulkhead pass through relative to the engine so the harness can mostly be built with the engine on the stand.
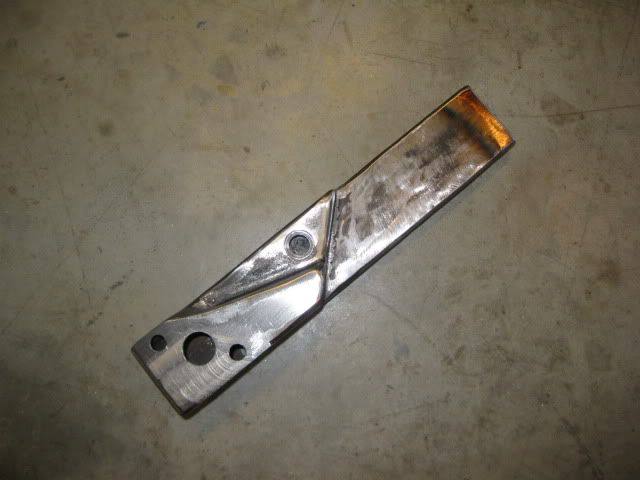
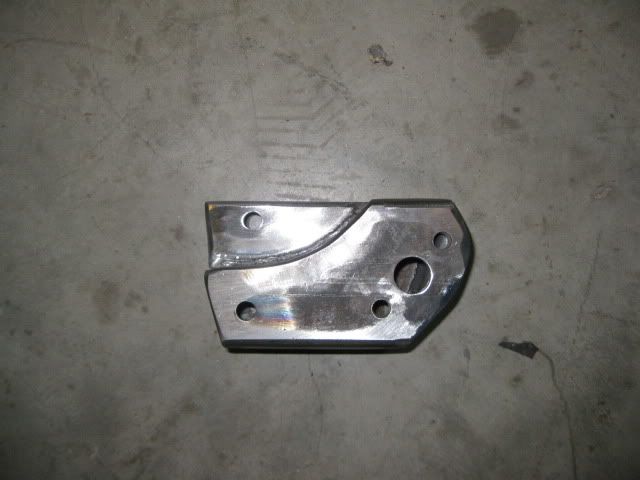
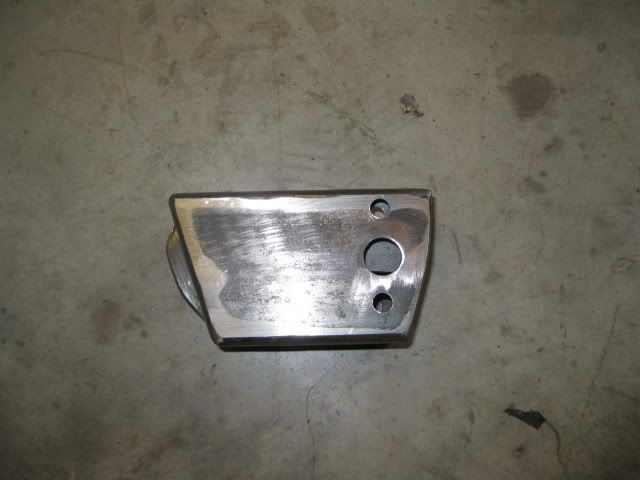
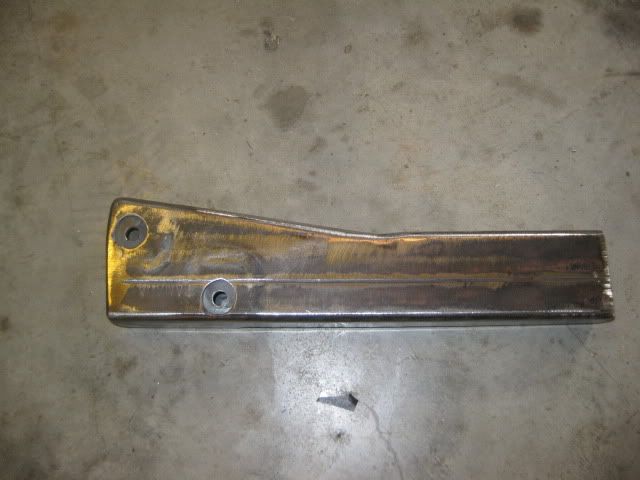
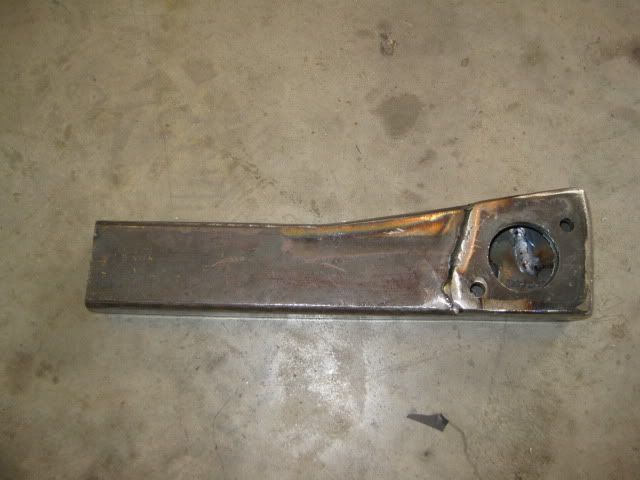
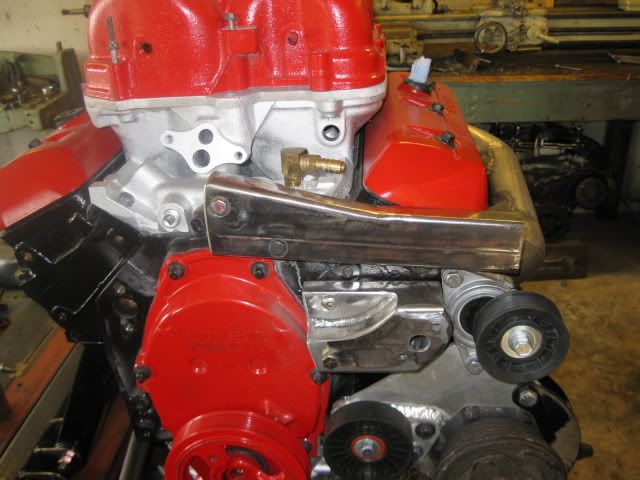
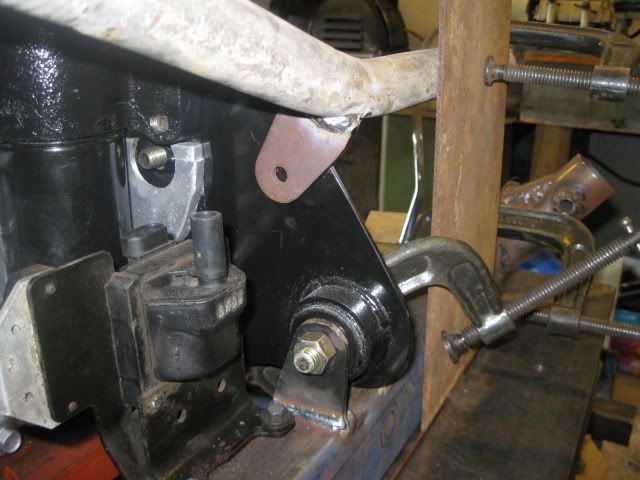
Then I took the engine/tranny/cradle back out and put it on the table and finished up the needed modifications to the rear offset housing so it would clear the larger timing cover of the 4.3:
It is a tight fit, but it fits. Now I need to finish up the front one (mosly just needs boxed in).
[This message has been edited by fieroguru (edited 06-12-2010).]
IP: Logged
01:01 PM
fieroguru Member
Posts: 12636 From: Champaign, IL Registered: Aug 2003
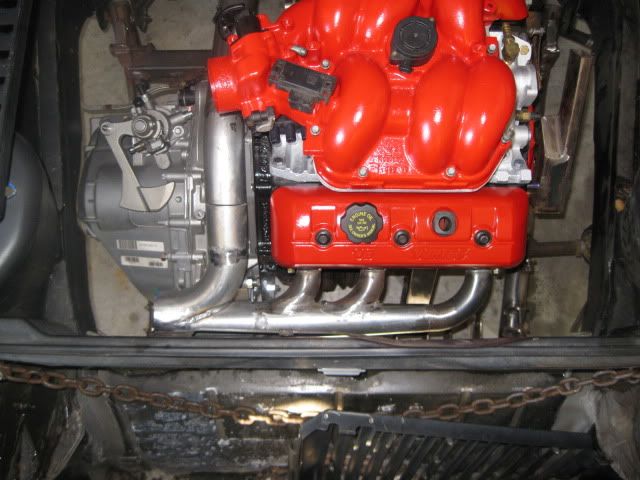
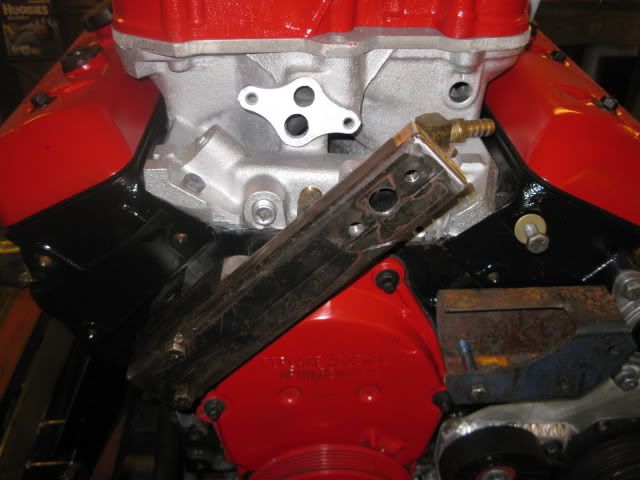
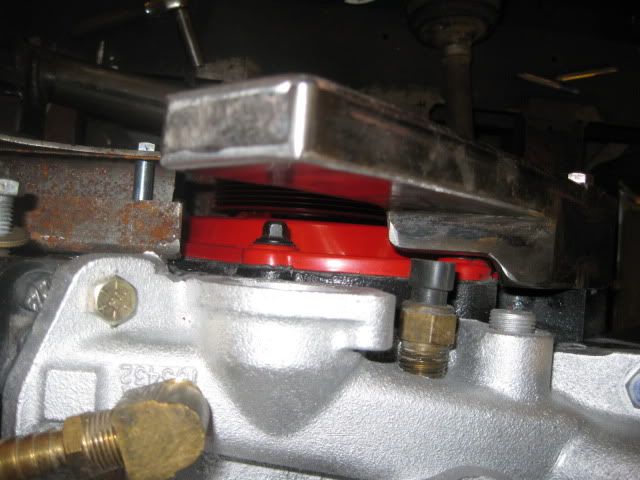
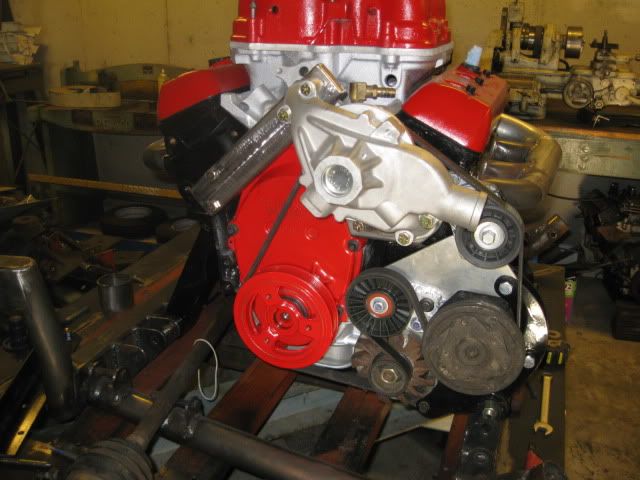
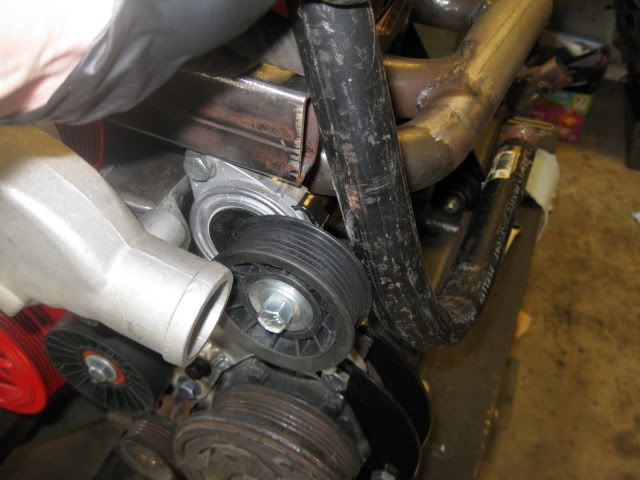
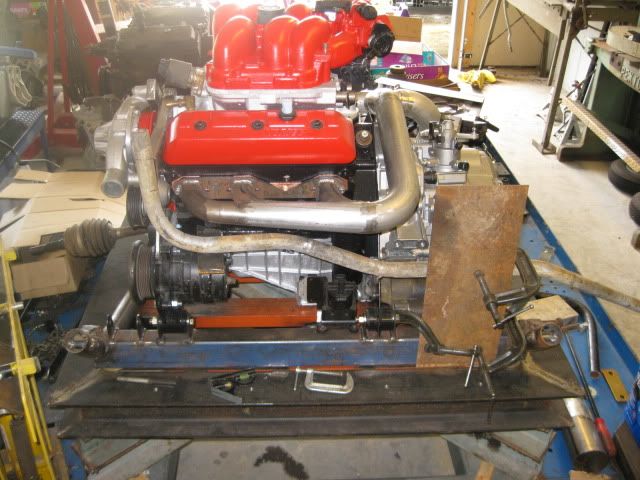
Just a few more tweaks and the accessory drive will be complete. The bolts for the water pump pulley need to be countersunk so they will clear the top bolt attaching the front offset housing to the block. Also need to move the water pump pulley about .040" away from the engine for near perfect alignment of pulleys , so I need to turn some material from the back side of the pulley.
IP: Logged
07:59 PM
Jun 13th, 2010
vortecfiero Member
Posts: 996 From: Toronto Area, Canada Registered: Feb 2002
nice to see this coming along ! i considered rotating the intake etc but felt it was too huge a project for me and im glad i passed on it lol switching to the vortec heads (not the L35s) isnt as big a gain as switching from the non L35s but with the right cam that engine will really perk up the stock L35 CPI HO cam is very similar to an edlbrock performer cam.. its pretty aggressive and should work well with the vortecs I will post a link to a thread on 4.3 cams when i find it lol
lookin good !
------------------
87 Fiero GT 5sp with Vortec L35 4300 Turbocharged V6 Bully Stage 2 clutch Syclone intake manifold and engine management with Moates adapter and chip burner Air/water intercooler and Devil's Own progressive water/alky injection 50lb injectors, 3 bar map sensor, Walboro fuel pump and Jabasco Intercooler pump LM1 wideband on custom manifolds and 3" stainless exhaust system T31 P trim T04B H3 turbo and a S10 caliper conversion. Murphy's Constant Matter will be damaged in direct proportion to its value Murphy's Law of Thermodynamics Things get worse under pressure. Arthur C. Clarke "Any significantly advanced technology is indistinguishable from magic"
[This message has been edited by vortecfiero (edited 06-13-2010).]
IP: Logged
10:55 AM
fieroguru Member
Posts: 12636 From: Champaign, IL Registered: Aug 2003
nice to see this coming along ! i considered rotating the intake etc but felt it was too huge a project for me and im glad i passed on it lol switching to the vortec heads (not the L35s) isnt as big a gain as switching from the non L35s but with the right cam that engine will really perk up the stock L35 CPI HO cam is very similar to an edlbrock performer cam.. its pretty aggressive and should work well with the vortecs I will post a link to a thread on 4.3 cams when i find it lol
lookin good !
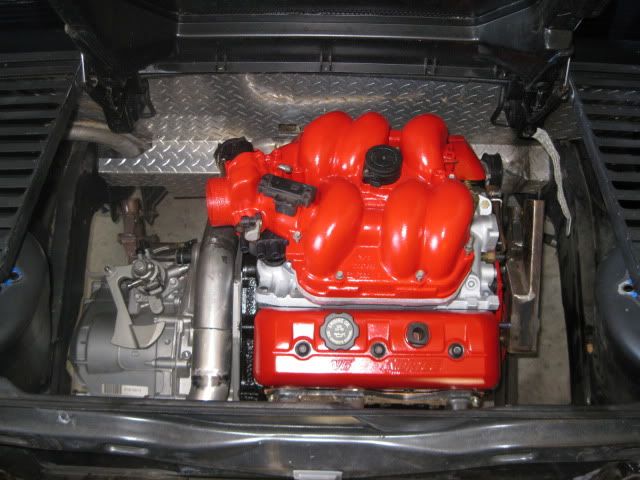
Yeah, flipping the intake was a major pain and probably not worth the effort... but I wanted it that way for the overall look and to help balance out the engine bay.
Once I get it in, running and am pleased with it, I will probably look for a more agressive cam but the balance shaft greatly reduces camshaft choices...
Know of anyone running one of the Ebay regrinds for the 4.3? They are inexpensive, compatible with the balance shaft and would be a moderate increase in lift and duration.
IP: Logged
11:46 AM
fieroguru Member
Posts: 12636 From: Champaign, IL Registered: Aug 2003
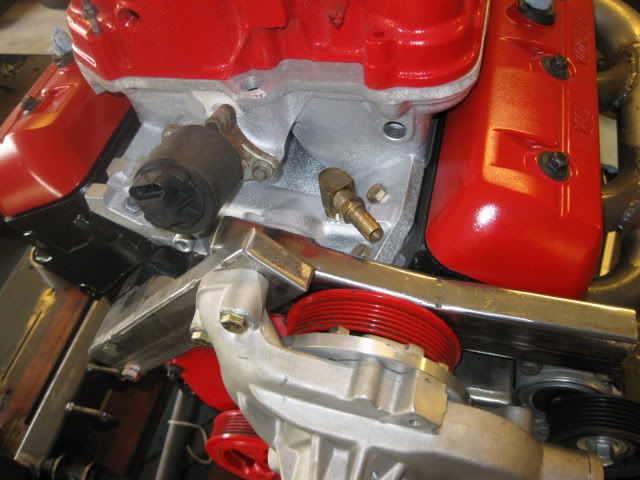
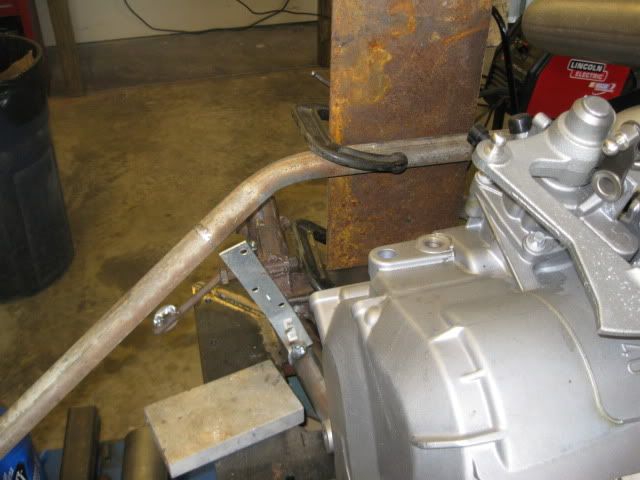
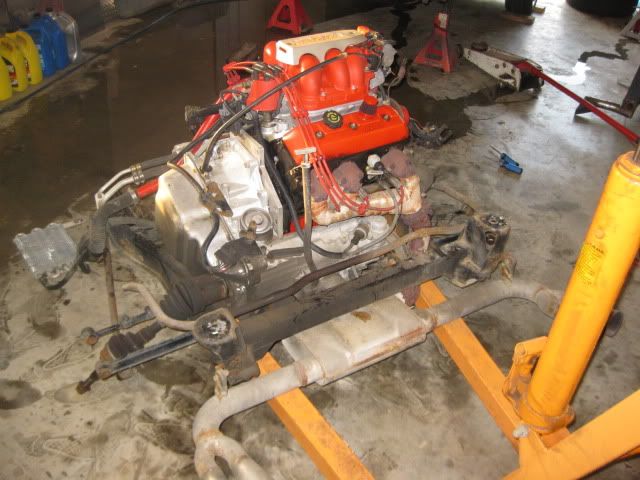
Here is the start for the coolant crossover tube/rear fill. It started as a 2x2 1/8 wall tube. Welded in a portion to make it 3" tall to seal against the thermostat housing and welded in a 1/8" spacer for the thermostat flange face so the rest of the tube would clear the head. Then cut the tube down its length to make it narrow enough (1 1/16") to clear the rear offset housing and the waterpump pulley. In the pic it is the proper width now, but still in 2 halves. I need to recess the bolt hole for the upper thermostate housing so the bolt head will clear the offset housing.
A fiero rear fill will be welded to this tube and some 1 1/4" round tube will be welded to the end and travel to the driver side of the engine bay.
[This message has been edited by fieroguru (edited 06-13-2010).]
IP: Logged
04:47 PM
Jun 14th, 2010
kennn Member
Posts: 272 From: Green Valley, AZ USA Registered: Apr 2006
With all the room on the passenger side, why didn't you mount the water pump at the normal location with spacers? You could still utilize the rear-mounted pulley, no? Maybe the timing cover would interfere with the pulley? I think I'm missing something obvious.
Ken
Edit to add: Really nice work and conception.
------------------ '88 Formula V6 '88 GT TPI V8
[This message has been edited by kennn (edited 06-14-2010).]
IP: Logged
04:02 PM
vortecfiero Member
Posts: 996 From: Toronto Area, Canada Registered: Feb 2002
With all the room on the passenger side, why didn't you mount the water pump at the normal location with spacers? You could still utilize the rear-mounted pulley, no? Maybe the timing cover would interfere with the pulley? I think I'm missing something obvious.
Ken
Edit to add: Really nice work and conception.
Thanks for the compliments!
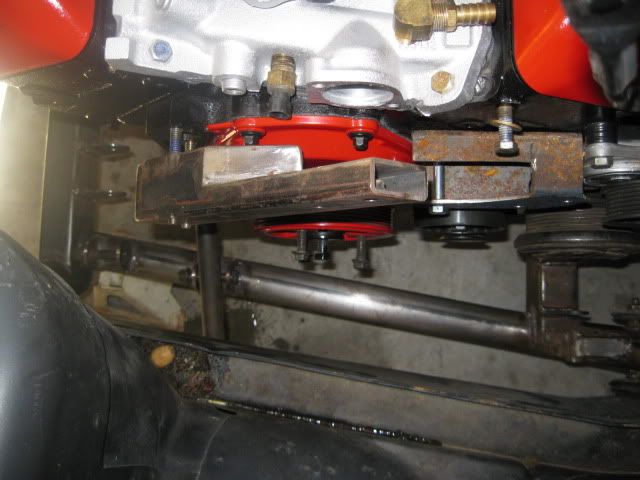
As for the extra space, you bet I could have gone an easier route because the 4.3 has plenty of room or taken the real easy route and just reused the one that is currently on the 4.3.
Guess I like to take the hard way... One of my goals with this swap is to truly make the conversion from 4.3 to SBC a near bolt-in process (except wiring, exhaust and and coolant). The water pump position and accessory drive currently on the 4.3, will also clear the passenger frame rail if/when I put a SBC in its place. The cradle even has the mount tabs for the engine mounts when they are installed on a SBC.
IP: Logged
07:35 PM
fieroguru Member
Posts: 12636 From: Champaign, IL Registered: Aug 2003
Wish I had researched the cams before I finished putting the engine together. I have a spare 94 CPI W vin 4.3 I could have stole the cam from and installed it in the 99 for a decent improvement in lift and duration for free...
But for the cost of another set of intake gaskets and some time, I could still use it...hmmmm
The last cam I quoted would be a nice improvement and probably the one I would want if I was to buy a new one.
IP: Logged
07:51 PM
fieroguru Member
Posts: 12636 From: Champaign, IL Registered: Aug 2003
The thermostat housing is mostly done - atleast till I locate a fiero coolant fill housing. I drilled the bolt holes on the front side to 3/4" and then welded another section of 1/8" to the back side. This will recess the bolt holes enough to clear everything and still leave enough room around it to get a socket on the head. Then welded up the seam, capped the end and ground everthing smooth.
The currenly open end will be welded into a section of tube that will make its way to the driver side coolant tube. The tube would be supported off the adapter plate and the only hose would be the section where it connects to the driver side coolant tube. Here is a rough mockup as a visual of what I am thinking:
Ordered the Flowtech Afterburner muffler today, so hopefully it will be here on Wednesday so I can finish up the exhaust (except the tips).
Also started to think about the cold air intake tube and the MAF. The CPI intake is 3" OD and the MAF is 3 1/2" so between the MAF and CPI intake I will need to taper the diameter down... while it curves. Probably just get another 180 of 3 1/2" tubing to get the right angle and then modify it so that it tapers to 3". I already have length of 3 1/2" from an old project, so I just need the 180 bend, but it will be a week or two till I can buy it.
IP: Logged
08:03 PM
PFF
System Bot
Jun 15th, 2010
fieroguru Member
Posts: 12636 From: Champaign, IL Registered: Aug 2003
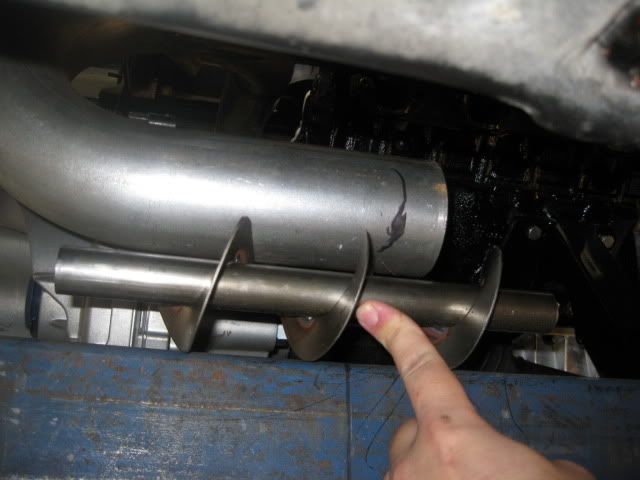
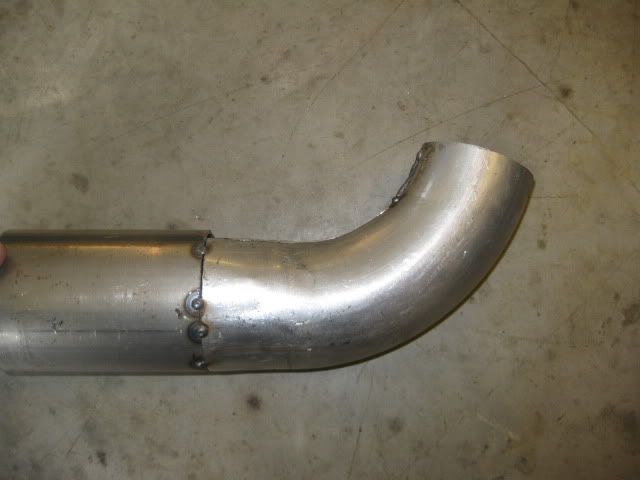
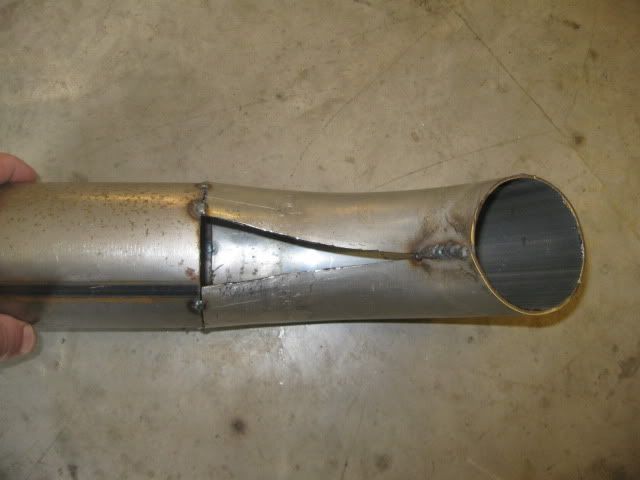
The muffler came in today so I was able to do some test fitting. Bad news is my original plan of having the exhaust go from the driver side, then to the passenger side and enter the muffler on the passenger side wasn't going to work... my 3" bends were not tight enough. So plan B is to enter the muffler from the driver side. This will shorten the overall length, but I think I still have just enough room to install the spiral silencer before the muffler.
Here is the 180 off the Y pipe (the bottom leg is level and square with the lower crossmember):
Here is a rough mockup of the spiral insert - I will probably cut down the center shaft some and the spiral will probably continue just a little into the muffler:
Muffler and the tubes for the tips (just a single J 180 bend cut at the center of the bend). With the muffler offset to make room for the spiral insert, these will fit perfectly.
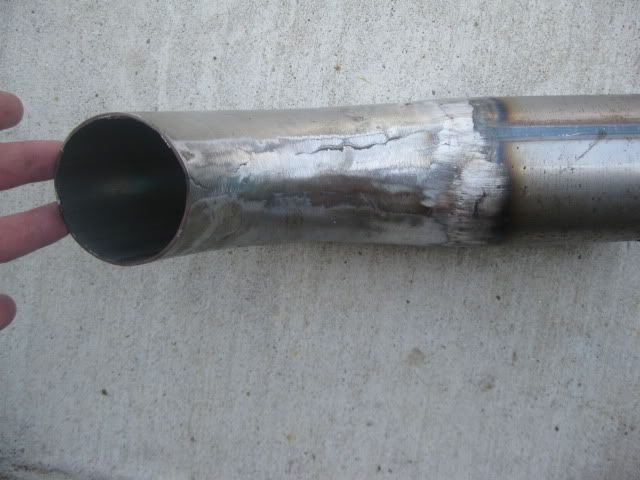
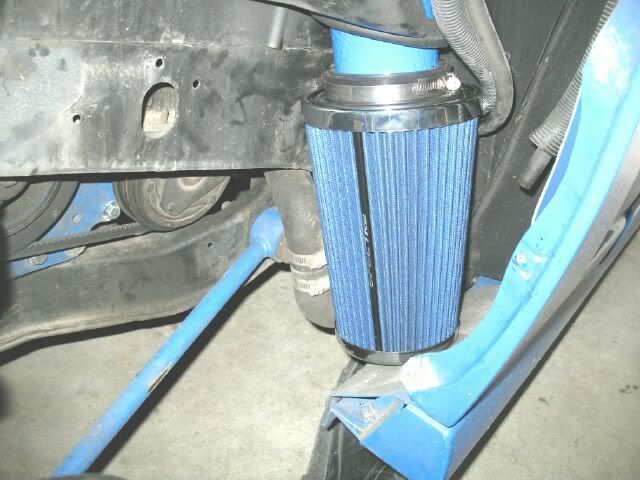
Not wanting to wait a couple of weeks before knocking out the cold air intake, I just took a left over 3" bend, sliced it down the center and bent it open till it was 3 1/2" OD and tacked that side to some 3 1/2" tubing to hold its shape. Then used a hose clamp to put the other end back to 3" OD and tacked it shut. Now I need to make a patch piece and weld it in place and the transition from the MAF to the throttle body will be complete.
IP: Logged
07:31 PM
Jun 19th, 2010
fieroguru Member
Posts: 12636 From: Champaign, IL Registered: Aug 2003
Finished welding the 3" 180 degree bend to the Y pipe, installed the spiral insert after I cut down the center tube to make it shorter and put it in the lathe to take about 1/16" off the OD so it would fit within the 3" tube. Then leveled/squared the muffler to the cradle and welded it into place (I had already confirmed this location clears the truck with plenty of room to spare. The 2 1/2" exit tubes are just slid into the ends... I will not finalize them until the engine/cradle is in the 88 coupe (my current mockup chassis has a GT fascia).
I still need to make the bracket that will bolt to the rear engine mount tube and support the weight of the muffler and exhaust tips.
Before I pulled the cradle/engine/tranny from the last mockup session, I went ahead and tacked a couple of pieces of steel to located the driver side coolant tube and the height of the driver side frame rails. Started
Moved on to fabbing up the coolant tube...
Still need to cut open the top of the tube and bend the walls around the upper box tubing and weld the seams.
I am going to be back in my home town for 2 weeks for work, so after today I will pack up everything for this swap and take it with me to continue progress.
IP: Logged
12:42 PM
katatak Member
Posts: 7136 From: Omaha, NE USA Registered: Apr 2008
I can't wait to see how thie runs when it's done. Do you have any plans for some dyno runs? Very curious as to what the RWHP will be.
Did you fab that spiral silencer for the exhaust or is it something that can be purchased?
You do amazing work!
Pat
Thanks for the compliments!
I do plan to dyno this engine to fine tune WOT. A buddy has HP tuners and the dyno shop I use is $75 for 1st hr and 5 pulls and $100/hr after that with the wide band readout. I did 18 pulls in 2 hrs tuning my SBC, but reflashing the OBD2 ecm will probably take longer than making changes with the moates ostrich emulator on 7730. I would like to see 190+ whp but won't know till I hit the dyno... Bone stock the 99 4.3 was rated at 180 hp (at the crank), the CPI engines were rated up to 195hp (more agressive cam). I will probably swap in the CPI cam before I install the engine one last time. The cam upgrade, low restriction exhaust and aluminum flywheel should all help contribute to a modest HP increase. The throttle body neck is probably the bottle neck on this setup
Well it appears the wire feed for my welded decided to stop working about 1/2 way through welding the coolant tube... so that put an end to the welding activities. I will have access to a couple of welders when I am back home, so not going to mess with the welder today. When I get back I will probably have an ET at work come by and see what is actually wrong with it.
So with that, I started putting all the parts back on the engine and packing up all the needed parts/goodies for my trip.
IP: Logged
03:58 PM
Jul 4th, 2010
fieroguru Member
Posts: 12636 From: Champaign, IL Registered: Aug 2003
Well I am finally back home and shouldn't need to travel for work for the remainder of the year.
While in Mattoon, I verified my wiring diagram for the 99 4.3, labeled some wires and put about 4" of shrink tube on the connector ends of all the circuits. Aside from that, I helped Russ tear into a 52ish COE cab for another mutual friend.
Yesterday, I spent some time cleaning up and organizing the garage. I took the 92-95 CPI cam out of my spare engine and then tore down the 99 one again for a cam swap. This is where things just didn't want to go my way... As I pulled the cam from the 99 block, 2 of the cam bearings came out with it... This effectively jams the cam about 1/4 out and 3/4in and it can't go either back in or out because the loose bearings. I was fortunate that some tin snips were able to get between the slots in the valley and cut the bearings in half and fall past the cam. Then I was able to finish removing the cam.
So now I get to remove the other 2 cam bearings and install a fresh set...
Also, took a look at my welder and either the circuit board is bad or the wire feed motor... looks like it needs to be sent in for repair.
IP: Logged
03:08 PM
Jul 6th, 2010
Isolde Member
Posts: 2504 From: North Logan, Utah, USA Registered: May 2008
I'm making progress on my own 4.3, using '96 Vortec heads. I have some pics and flow bench results from my porting and polishing, if anyone's interested. I chose a different cam, a Lunati 53503. It specs as 218/226 duration at 0.050", 112 lobe separation, 0.468/0.477" lift. It's ground with 4 degrees of advance. It is a hydraulic roller style. My next step will be installing the ARP-100-7201 studs, and a set of 1.52:1 intake rockers, with 1.60:1 exhaust rockers. There's NO machining required to install these studs, they're intended for this purpose and these heads.
I chose this cam and these rockers based on the flow bench results from my porting on these heads. I should get 300 HP at 5600 RPM, if the Extrude-Honed intake manifold permits, and 320 ft-lbs at 4200 rpm, with over 285 ft-lbs from 2600-5400. It should pass a tailpipe sniffer test. This is about the most cam that will pass.
[This message has been edited by Isolde (edited 07-06-2010).]
IP: Logged
09:08 AM
Jul 17th, 2010
fieroguru Member
Posts: 12636 From: Champaign, IL Registered: Aug 2003
After 2 weeks of evening swimming lessons for the girls, I am back to working on the 4.3 again. Finally put the new cam bearings in and the engine is going back together once more. No pics... they would just be repeats of previous pics.
I purchased another F40, so when I get this swap finished, I can get back to the V8 engine/F40 swap for the blue fiero...
IP: Logged
07:59 PM
Jul 24th, 2010
fieroguru Member
Posts: 12636 From: Champaign, IL Registered: Aug 2003
Also, finished welding up the 3 1/2" to 3" tapered bend. It will get rolled on under coating to help insulate it from the engine bay heat:
Do you specifically want it to be black, or....? I'd think under-coating wouldn't make that great of a thermal insulation, not to mention that it might melt in a hot engine bay. Theoretically, any way. Perhaps something more along the lines of header wrap, or a reflective insulating wrap like they use on air ducts and around hot water tanks/pipes? Just my $0.02.
IP: Logged
04:44 PM
PFF
System Bot
fieroguru Member
Posts: 12636 From: Champaign, IL Registered: Aug 2003
Do you specifically want it to be black, or....? I'd think under-coating wouldn't make that great of a thermal insulation, not to mention that it might melt in a hot engine bay. Theoretically, any way. Perhaps something more along the lines of header wrap, or a reflective insulating wrap like they use on air ducts and around hot water tanks/pipes? Just my $0.02.
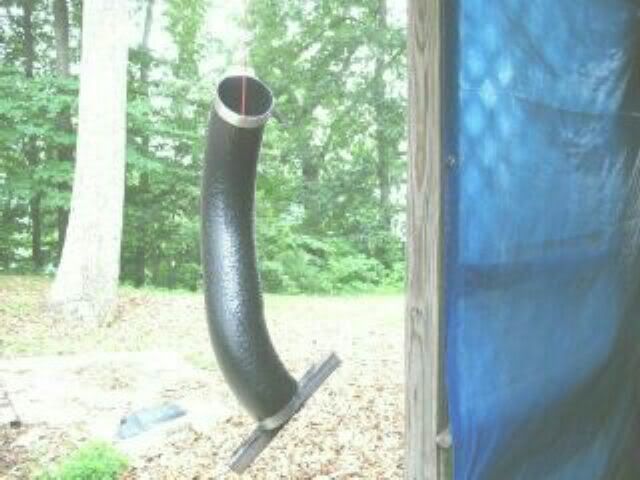
Here is my last cold air intake using this method:
The undercoating has a slight texture to it and can be painted red if I wanted to... I am not a big fan of the "look" of header wrap or other insulation products.
IP: Logged
04:55 PM
Jul 25th, 2010
Stubby79 Member
Posts: 7064 From: GFY county, FY. Registered: Aug 2008
Here is my last cold air intake using this method:
The undercoating has a slight texture to it and can be painted red if I wanted to... I am not a big fan of the "look" of header wrap or other insulation products.
If it has no issues with heat, I might have to try this myself. :-)
IP: Logged
09:47 AM
fieroguru Member
Posts: 12636 From: Champaign, IL Registered: Aug 2003
If it has no issues with heat, I might have to try this myself. :-)
Correction... roll on truck bed liner was used, not undercoating... Here is my original build thread when I built the blue one with before/after IAT readings (it worked pretty good). I pulled the engine in Dec 2009, so after 2 years it was showing no signs of degrading or melting even though that area of the engine bay was 160+ degrees on most summer drives. https://www.fiero.nl/forum/A...090907-2-083972.html
I am planning to have a heat shield over the cross over pipe to cut down on heat radiating on the intake and dist.
IP: Logged
12:38 PM
fieroguru Member
Posts: 12636 From: Champaign, IL Registered: Aug 2003
Took the 4.3/4T60 out for a drive yesterday and then spent more time tracking down the rattle. I took off the accessory belt and then used a piece of hose to find the loudest point... seems to be the torque converter area. It will be a month or two before I have the rest of the 4.3/F40 swap stuff completed, so I am planning to pull the 4.3/4T60 and fix it so I can keep driving the car (and saving gas $$$ vs my 17mpg truck).
For the 4.3/F40 swap I had already purchased a rebuilt AC compressor, 134 control valve, new accumulator and orafice tube, so I might just convert the AC system while I am at it... nice thing about the truck is the cold AC and I want to get it working in my fiero.
IP: Logged
12:45 PM
Aug 3rd, 2010
fieroguru Member
Posts: 12636 From: Champaign, IL Registered: Aug 2003
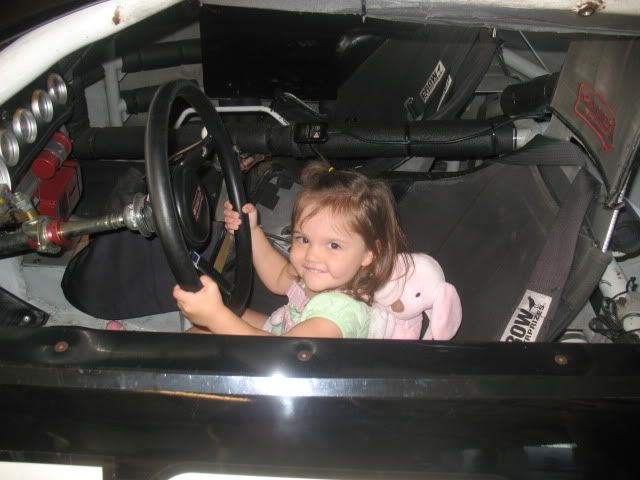
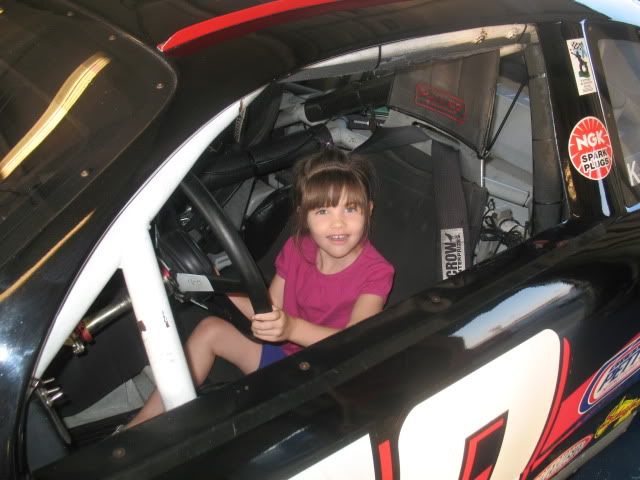
Turned 35 last week and Sara though I needed to learn how to drive... so she sent me off to Richard Petty Driving Experience at Kentucky Speedway....
Nothing like running 137mph on the track chasing down the instructor who is 3 car lengths in front... it was a lot of fun!
The girls also liked sitting in one of the cars in the garage:
Now back to the 4.3...
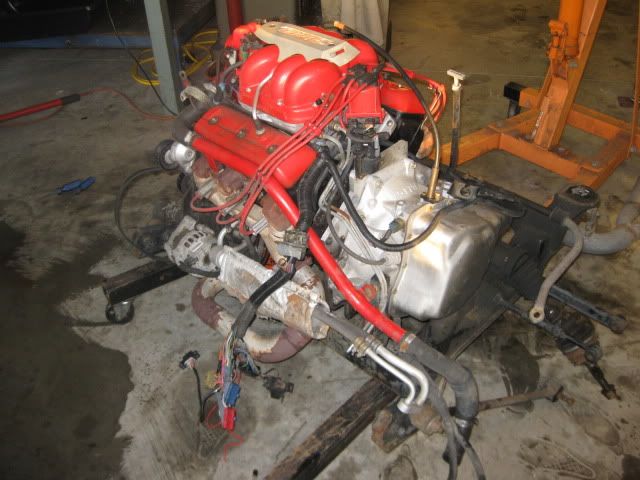
I decided to pull the old 4.3/4T60 back out of the car to fix the tranny rattle:
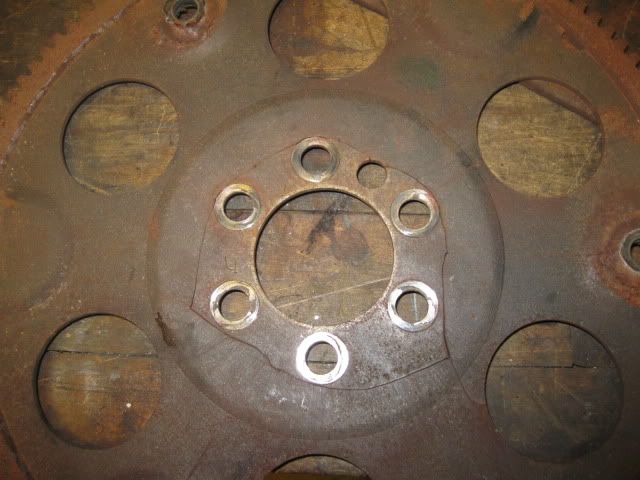
Later this week I will ge the engine/tranny seperated and see what is going on. The torque converter is bad and I suspect a cracked flex plate (the 4.3's are notrious for cracking them for some reason, and my custom one started life as a used 4.3 flex plate).
[This message has been edited by fieroguru (edited 08-03-2010).]
IP: Logged
09:05 PM
Raydar Member
Posts: 41559 From: Carrollton GA. Out in the... country. Registered: Oct 1999
The center section is 100% broken free, but some of the fracture lines are keeping the center where it should be. There are also cracks from the center to the larger circles in a couple of places. I have seen this countless times on the 4.3's in their original applications... time to build a new flex plate.
If the chain in the tranny was the major culprit, it would make noise when loading/unloading the tranny but that wasn't really the symptom. For the miles on it, it probably is streched some, but unless I find a screaming deal on another 4T60 in the next week... the tranny is going back in.
IP: Logged
06:39 PM
Aug 22nd, 2010
fieroguru Member
Posts: 12636 From: Champaign, IL Registered: Aug 2003
The original 4.3 and 4T60 are back in and running fine once more. The new flex plate and torque converter fixed all the racket and now the 4.3 has returned to daily driver duty. Took this opportunity to upgrade to a later style and more supported ECM running the $OD mask (which has lots of support).
Also took the opportunity to restore function to the AC system... it is nice to have cold AC in this car again...
I didn't have much luck in selling this older swap setup as a drop out, so I am planning to sell off this 4.3/4T60 swapped Fiero in a month or two and then puchase another 88 for the 4.3/F40 swap.
IP: Logged
06:57 PM
Oct 10th, 2010
fieroguru Member
Posts: 12636 From: Champaign, IL Registered: Aug 2003
The Red 88 coupe with the 4.3/4T60 has been sold...
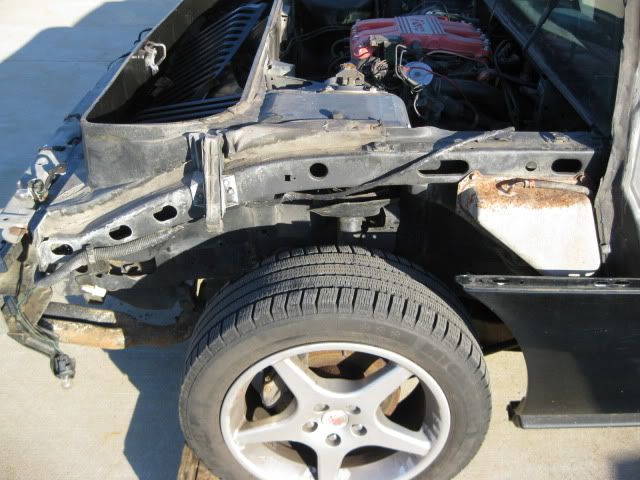
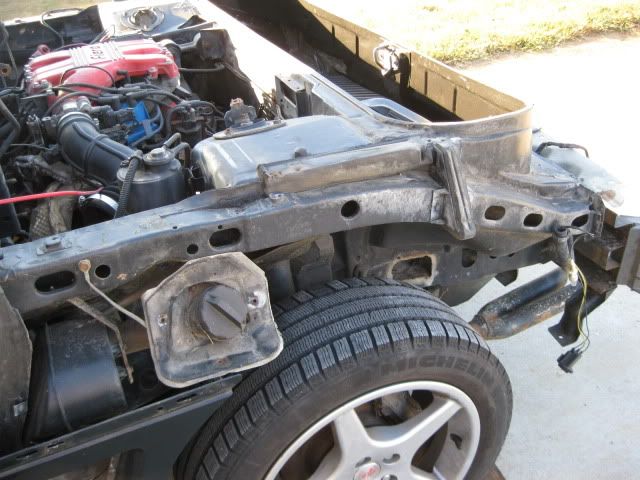
With the proceeds I purchased an 88 Formula/Getrag that will get the 4.3/F40. I purchased this car along with an 86 Fastback GT, so there will be some parts swapping going on before I part out the remainder of the 86. I have already named this new fiero Fast Notchie vs. calling it the Black 88. The best part about this 88 is the chassis and how pristine it is. Look at these upper frame rails!
Not bad for 177K miles on the road being enjoyed.
Need to start making room... there are 4 fieros/chassis down below and the sold one up top.
After about 1 1/2 year with no progress on the 4.3/F40 swap, while knee deep in LS4/F40 stuff and other 88 brake & handling upgrades in progress, I decided to abort the 4.3 project entirely. I just do not have the space to continue to store this combo until I get back to it, and really with my focus switching the the LS platform, I doubt I would ever get back to the 4.3.
So I gave everything to Jefrysuko and he picked it up yesterday.
I now have purged about everything SBC/4.3 related from my parts inventory.