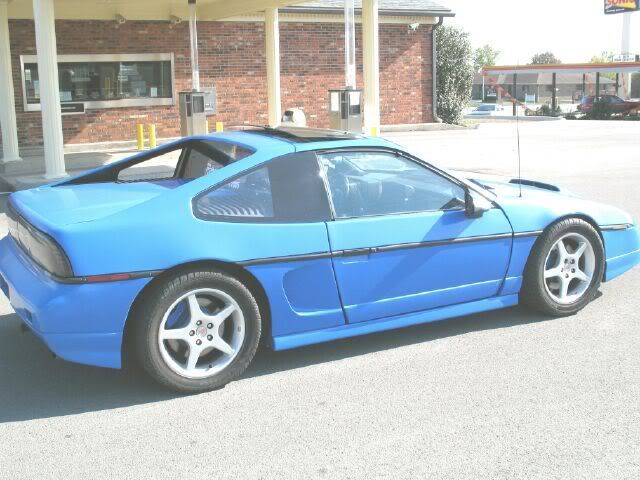
No updates this week... Just too cold to get motivated, so I spent the week pondering the next round up upgrades for the SBC car - and took it out for a couple of spins when it was over 40.
That TPI throttlebody on the CPI intake is interesting. Is the stock throttle body a restriction, or was it done for the challange of it?
He is turbo charging it and has done the injectors etc... that is a stock syclone throttle body I have a question for you.... could you find out sometime, no rush, how far up from the water neck mount surface is the trunk lid brace ? last time i measured it i left the passenger side vent off and it was easy to measure.
i may do the throttle body and injectors too if it will clear. thanks
the stock throttle body on the CPI will support over 400 hp when turbocharged (2.5 id will support 400 hp)
[This message has been edited by vortecfiero (edited 01-24-2008).]
IP: Logged
07:18 PM
blackrams Member
Posts: 33302 From: Covington, TN, USA Registered: Feb 2003
Paul, Realizing it's colder than a well digger's butt outside right now, what ya got planned for this weekend?
------------------ Ron
It's the Soldier, not the reporter Who has given us the freedom of the press. It's the Soldier, not the poet, Who has given us the freedom of speech. It's the Soldier, not the politicians That ensures our right to Life, Liberty and the Pursuit of Happiness. It's the Soldier who salutes the flag, Who serves beneath the flag, And whose coffin is draped by the flag.
IP: Logged
08:08 PM
Jan 25th, 2008
fieroguru Member
Posts: 12636 From: Champaign, IL Registered: Aug 2003
I have a question for you.... could you find out sometime, no rush, how far up from the water neck mount surface is the trunk lid brace ?
I can do that once the wiring is done and the engine goes back in.
quote
Originally posted by blackrams:
Paul, Realizing it's colder than a well digger's butt outside right now, what ya got planned for this weekend?
Nothing really planned. Had kicked around the idea of firing up the wood stove, cleaning up the garage (again) and start running the wires for the harness.
IP: Logged
07:15 AM
blackrams Member
Posts: 33302 From: Covington, TN, USA Registered: Feb 2003
Originally posted by fieroguru: Nothing really planned. Had kicked around the idea of firing up the wood stove, cleaning up the garage (again) and start running the wires for the harness.
Well, if ya get bored, load up yer helper and come on up.
------------------ Ron
It's the Soldier, not the reporter Who has given us the freedom of the press. It's the Soldier, not the poet, Who has given us the freedom of speech. It's the Soldier, not the politicians That ensures our right to Life, Liberty and the Pursuit of Happiness. It's the Soldier who salutes the flag, Who serves beneath the flag, And whose coffin is draped by the flag.
IP: Logged
08:23 AM
Jan 27th, 2008
fieroguru Member
Posts: 12636 From: Champaign, IL Registered: Aug 2003
The two coolant tubes were painted, but can not be installed with the wiring mock up brackets.
Wiring is one of my least favorite things to do, but progress is being made. The 500 connector was taped in its proper position and left another few inches of slack. Then ran the wires for the auto/shifter connector along the front valve cover/intake and connected to the tranny. These wires appear to be just the right length which saves some work.
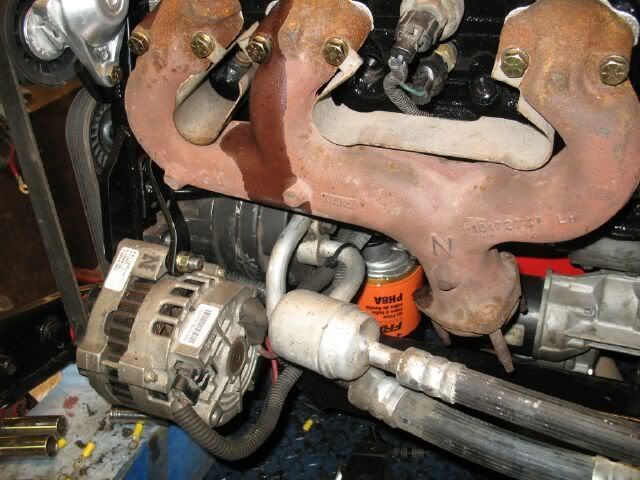
The wires to everything on the lower front side of the engine will run down the face of the engine behind the serpentine belt and between the AC compressor and the engine block. I will probably have to make a wire holder to keep them safe from the belt. The stock 2.8 battery cable to the starter will work as will the power cable to the Alternator (even though it is now on the front of the engine vs. the rear). Once those larger wires were set, the rest of the wires for the lower front of the engine were ran starting at the terminating end. The front side of the engine has: Knock Sensor, Fan Switch, Oil Press Switch, AC, Alternator, Starter. As the harness is built, the wires are wrapped in black tape and will eventually be covered with OEM wire looms (recycled from the demo'd harnesses).
No pics so far... I will take some pics once the wiring is complete - the goal is for the wires to be as non-visible as possible.
IP: Logged
04:47 PM
Jan 30th, 2008
ISE5150 Junior Member
Posts: 5 From: Jacksonville, FL. Registered: Aug 2005
I just want to write and thank you for the time your putting into the post. I have an 88 at home that I am going to install the 4.3 and I have to tell you this thread is going to be a lot of help. I can't wait to see what is in the future. Thanks again for a well detailed post. Anthony 88 GT auto Good Luck
------------------ "Do what you want, just don't get caught."
IP: Logged
02:58 AM
Feb 3rd, 2008
fieroguru Member
Posts: 12636 From: Champaign, IL Registered: Aug 2003
Not much new on the update front... Sara and Carrera were sick this week, so I spent most of the week tending to them.
I did get a couple hours in the garage today and hung up a couple more lights over the engine work table - helps a bunch! Then I did a little work on the harness. There will be room to run the harness between the valve cover and intake to keep it mostly hidden which makes me happy.
[This message has been edited by fieroguru (edited 02-03-2008).]
IP: Logged
05:08 PM
Feb 10th, 2008
fieroguru Member
Posts: 12636 From: Champaign, IL Registered: Aug 2003
I got a few hours in the garage this weekend and made more progress on the harness. Almost all the ternimations on the engine are complete and about all the wires are loomed. Just a little more work and the engine/500 end of the harness will be complete, then it will be time to work on the ECM/203/relays that will be in the center console. No pics until the wiring is complete.
IP: Logged
07:52 PM
Feb 13th, 2008
vortecfiero Member
Posts: 996 From: Toronto Area, Canada Registered: Feb 2002
87 Fiero GT 5sp with Vortec L35 4300 Turbocharged V6 Bully Stage 2 clutch Syclone intake manifold and engine management with Moates adapter and chip burner Air/water intercooler and Devil's Own progressive water/alky injection 50lb injectors, 3 bar map sensor, Walboro fuel pump and Jabasco Intercooler pump LM1 wideband on custom manifolds and 3" stainless exhaust system T31/T04B S4 turbo with a Super T61 in the box S10 caliper conversion. Murphy's Constant Matter will be damaged in direct proportion to its value Murphy's Law of Thermodynamics Things get worse under pressure. Arthur C. Clarke "Any significantly advanced technology is indistinguishable from magic"
IP: Logged
07:50 PM
Feb 23rd, 2008
fieroguru Member
Posts: 12636 From: Champaign, IL Registered: Aug 2003
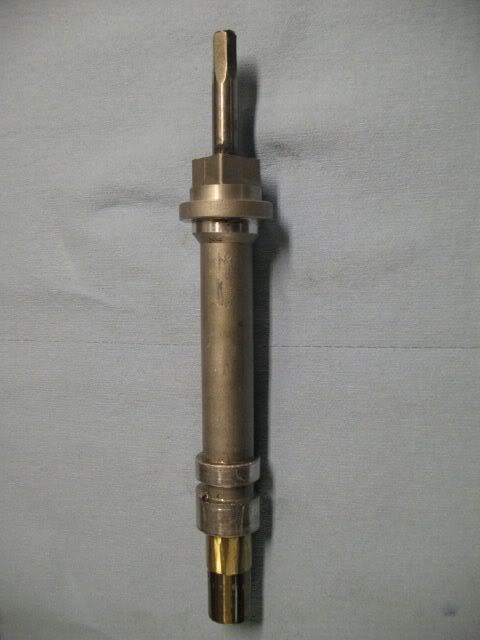
I finally got some shop time this weekend. An old SBC dist on the shelf was hacked up and made into this priming tool. Ground the teeth off the gear and ground a hex pattern on the other end so it would be easy to chuck into the hand drill.
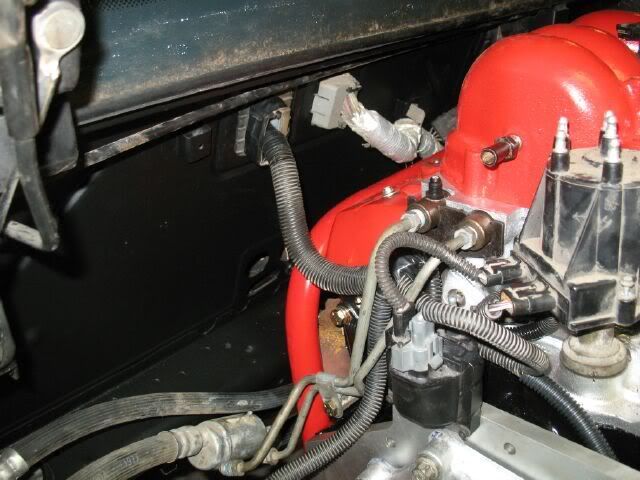
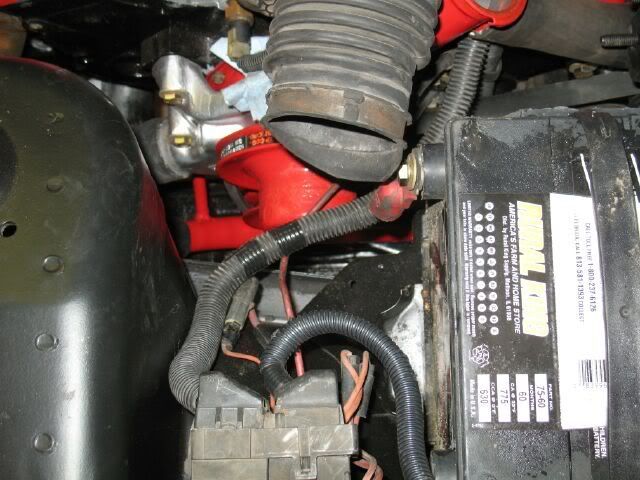
Once the engine was primmed (hasn't been ran in nearly 2 years) the dist was installed. Then I finished up all the terminations on the engine/tranny and installed the bulkhead connector in the proper location. I still need to tape up the ends of the looms, but this will give you an idea of the routing of the harness.
Here is the 500 connector end and the positive battery cable. The harness comes across from the chassis and half of it goes down the face of the engine (Starter, Alt, A/C, Oil, Temp Sender, and Knock sensor). These wires are attached to the engine to keep them clear of the belt. The EFI related wires (IAT, EGR, IAC, TPS, MAP, Injector, plenum valve, and 1st engine ground) join the harness at the corner of the front valve cover and run across the engine to the bellhousing side. I used one of the thin plastic looms from the 2.8 to make the harness narrow enough to fit between the intake and the side of the valve cover.
The harness from the rear of the engine (trunk side) contains the 2nd knock (yes, this 4.3 has a knock sensor per head), temp switch, VSS and O2. This harness runs across the top of the tranny and up the bell housing of the block and picks up the wires for the Coil and Dist and the 2nd engine ground .
You can also see the tranny shifter harness in the pic above, it travels down the tranny and picks up the TCC connector and joins the rest of the harness. At the corner of the valve cover, all the harness portions come together and the portion of the harness that needs to go to the ecm, 203 connector and ALDL go through the bulk head connector.
I still need to finish all the ECM and 203 connections, the 3rd chassis ground point in the center console, and mount the A/C, Fuel, and plemun valve relays in the center console.
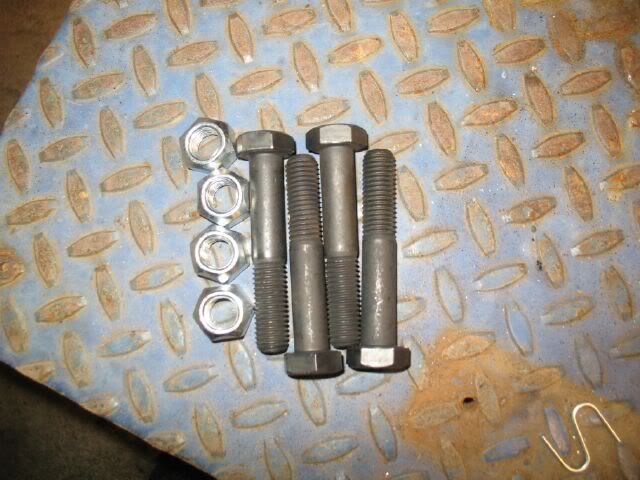
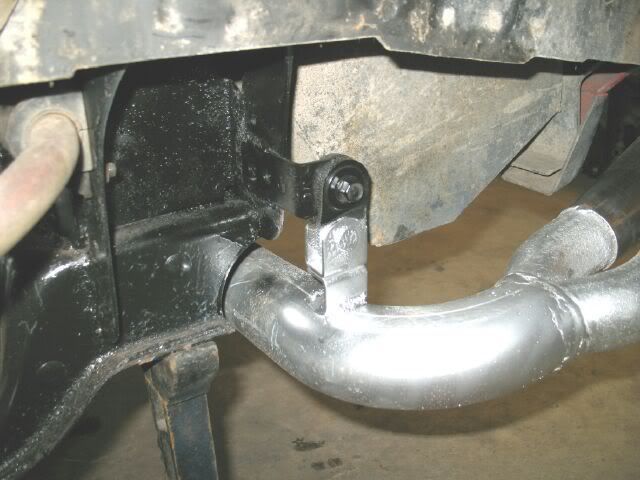
During the last week, I purchased the new bolts for the 4 mounts. The original ones were too long and I did not want to cut them down (88 suspension bolt and I might need them someday), so McMaster-Carr hooked me up with the M14 bolts and the self-locking nuts.
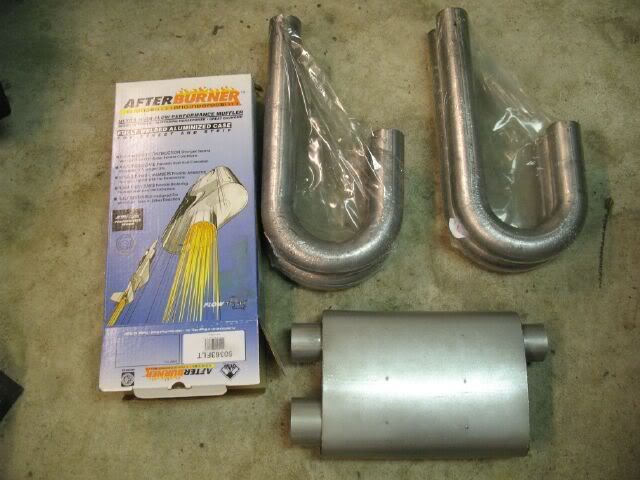
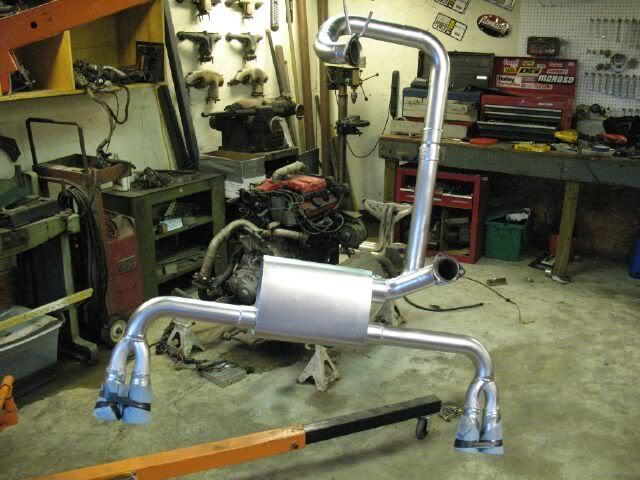
Summit Racing hooked me up with 4 Mandrel J-bends in 2 1/2" 16ga aluminized tubing and the 3" in dual 2 1/2" out Flowtech Afterburner muffler. This is the same muffler used on my SBC car, so the 4.3 will be alittle on the load side I think.
IP: Logged
02:41 PM
Feb 24th, 2008
fieroguru Member
Posts: 12636 From: Champaign, IL Registered: Aug 2003
Well I put the 4.3 back in the fiero hopefully for the last time... still lots of stuff to hookup but it is getting closer. Looks like I will be able to use the stock 4cly A/C lines (need to put the insulating sleeve back on).
I am about 75% done shortening/ternimating the ECM wires inside the car, but still need to finish the relays, 203 and ground. Maybe work will be kind this week and let be get home early so I can finish the wiring before next weekend.
IP: Logged
04:25 PM
PFF
System Bot
Russ544 Member
Posts: 2136 From: S.W. Oregon Registered: Jun 2003
looking awsome as usual. ain't wireing fun You might want to check this outfit next time you need mandrel bends. they just had a price increase, but are still sustantially less than anywhere else I've found so far. quick service also. http://www.magnumforce.com/ubend.asp
cheerio, Russ544
IP: Logged
06:54 PM
Feb 25th, 2008
fieroguru Member
Posts: 12636 From: Champaign, IL Registered: Aug 2003
Russ544, thanks for the compliment and the source for tubing. They are about $2 cheaper per bend, excluding shipping. I might have to try them out next time.
IP: Logged
08:42 AM
Mar 3rd, 2008
fieroguru Member
Posts: 12636 From: Champaign, IL Registered: Aug 2003
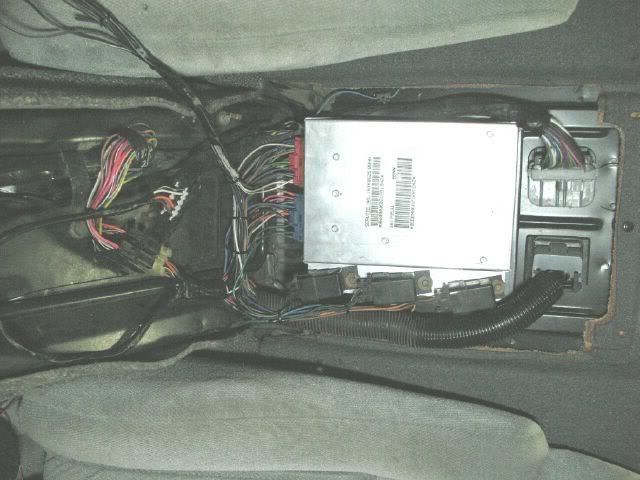
The wiring is getting very close to being complete. I just need to solder on the eyelit for the bundle of ground wires in the console. Other than that, the wiring is complete and here is a pic of inside the center console:
I need to work on getting the fuel lines connected and then the exhaust... then it will be close to starting it for the first time.
IP: Logged
06:48 PM
Mar 8th, 2008
fieroguru Member
Posts: 12636 From: Champaign, IL Registered: Aug 2003
Today was my daughter Carrera's 2nd birthday... so that took most of my time today. But, she takes daily naps, so I did get a couple hours in the garage.
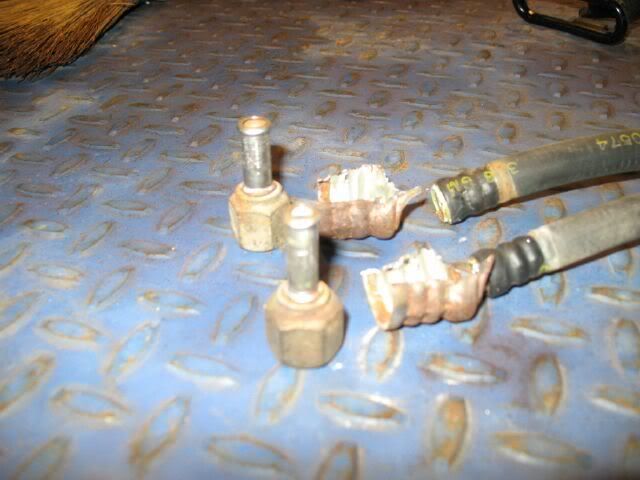
I cut the metal compression ends from the stock fuel lines. This left me with the hose barbs that will connect to the hard fuel lines at the intake. I also put a balloon flare on them to ensure the hoses will not slide off.
The fuel tanks was also removed to replace the current 5.7 TPI pump with a CPI rated pump (it runs at a higher pressure).
While the fuel tank is out I am planning to do a fuel tank capacity mod with the same end result as the one 84bill did but with a completely different approach: https://www.fiero.nl/forum/Forum2/HTML/082612.html
This car is an 88, so it has the expansion tank on the upper passenger frame rail.
IP: Logged
06:41 PM
Mar 9th, 2008
blackrams Member
Posts: 33302 From: Covington, TN, USA Registered: Feb 2003
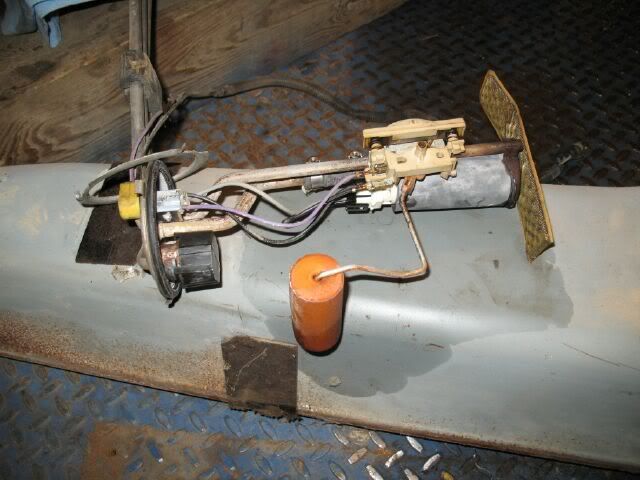
Here is my version of the 84bill fuel tank capacity increase... I call it the snorkle version... USE AT YOUR OWN RISK.
Fuel expands/contracts with changes in temperature and it is important to ensure there is enough room in the tank for it to expand or it could push fuel into the evap canister. Gasoline expands at a rate of 0.00069 per degree F. So a 100 degree change in temperature with a 12 gallon tank will require .828 gallons of additional space. Expecting a 100 degree change is probably extreme, but it provides a since of scale.
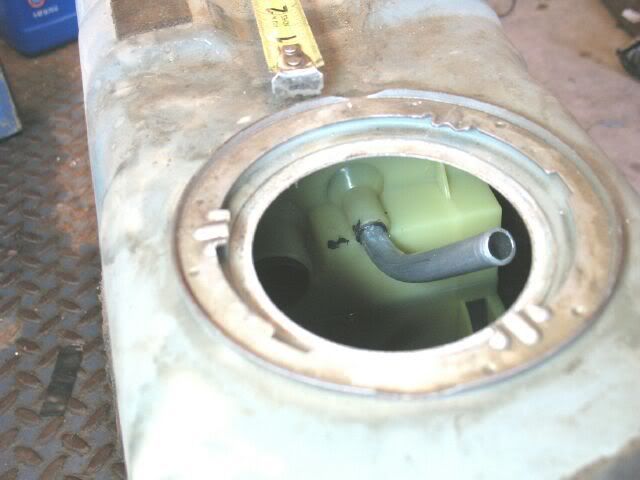
Since my car is an 88, it has an external expansion tank on the upper passenger frame rail (I never measured it, but it might be .5 gallon). The top of the fuel fill vent tube is about 3" from the top of the tank. This creates an air pocket about 3" x 7" x 20" which is room for about 1.8 gallons of fuel (1 gallon more than needed for a 100 degree change - and assuming there was no secondary expansion tank). The goal is to lessen the size of this air pocket and allow more fuel in the tank.
Step 1: Drop the tank and remove fuel pump. Step 2: Find someone with hands small enough to fit inside the fuel tank (my hands are now scraped and gouged, but I got the job done). Step 3: Use a round tapered punch and insert it into the vent tube. You want to work it around the inside of the vent to smooth out the entrance.
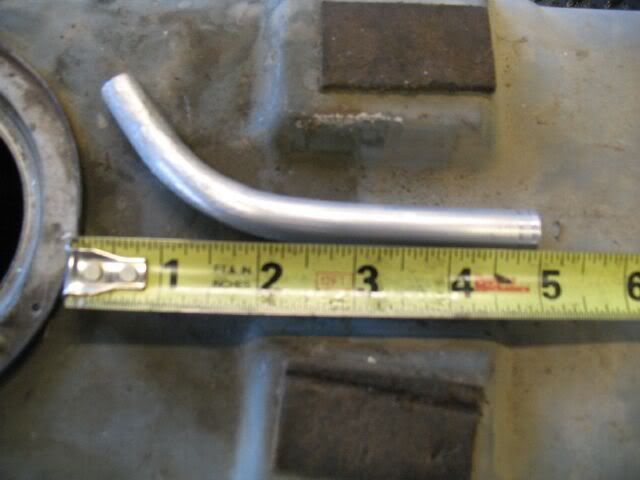
Step 4: get some 1/2" aluminum tube from Home Depot (about $5 for a 3 foot piece) and bend it to this general shape.
Step 5: File/sand the end that will go into the vent tube. It needs to be tapered so it will slide into the vent tube and be held in place tight (the pic above has one end tapered already).
Step 6: Drill the smallest hole that you can in the bottom of the bend.
Step 7: Apply a thin coating of RTV to the tapered end (make sure to stay away from the hole) and insert into place. Apply pressure while rotating and slide it in as far as possible and make sure the tube is held snugly into place.
With this mod, the top of the vent is now 1" from the top of the tank. This should allow me to fill the tank with 1.2 additional gallons of gas which is more than a 10% increase for $5 and a little time. This will leave about .6 gallons of air space in the tank + the approximate .5 gallons in the expansion tank for expansion of the fuel.
A potential problem with the snorkle concept is that once the fuel goes over the top, the fuel will go down the new vent tube and be trapped there. This may (or may not) hinder the next fill up. A quick application of the brakes once the tank was 3/4 tank or less would most likely clear the snorkle. However, the very small hole will allow the fuel to seep out of the vent tube once the fuel level in the tank drops below the vent. The hole will also allow the fuel to enter once the fuel level is above the vent tube, but I think the last 1.0 to 1.5 gallons of fuel will enter the tank before the small hole will allow enough fuel to fill the vent tube... just have to wait and see.
I also took the time to see how close the fuel pump was to the bottom of the tank. With a nail wire tied to the bottom of the pump and sticking out about 1.5" from the bottom, the assy was put back into the tank. The nail hits the bottom first and then is pushed up the side of the pump. Make sure the pump assy is properly seated in the tank and then remove being careful not to bump the nail. On my tank the pump is within about 1/4" of the bottom and that is close enough for me.
The next step is to get the fuel sender reading correctly... reading E when the tank is within a gallon of being empty, not with 2-3 gallons of fuel left.
[This message has been edited by fieroguru (edited 03-09-2008).]
IP: Logged
04:36 PM
Mar 16th, 2008
fieroguru Member
Posts: 12636 From: Champaign, IL Registered: Aug 2003
No pics for today, but I got the new CPI fuel pump installed, verified/adjusted the fuel sender, reinstalled the tank and completed the installation of the new fuel filter and fuel lines.
With the upper intake off, I pressurized the fuel lines to check for any leaks. When the pump was running it would reach almost 60 psi, but then fall off quickly once the pump stopped. Crimped off the return and the pressure would hold - bad pressure regulator. I swaped over the CPI injector (and regulator) from one of my spares and it was worse - pumped fuel out the regulator.
So I need to see if I can buy a rebuild kit for the regulator.
The rest of the day was spent cleaning up the garage... wiring crap all over the place.
IP: Logged
06:55 PM
Mar 26th, 2008
fieroguru Member
Posts: 12636 From: Champaign, IL Registered: Aug 2003
Is the 4.3 going to Pontiac? Sounds like you did well. Congrats.
Ron
I have not decided yet... Once I get the 4.3 running, it might be chosen to make the trip. The 4.3 would be more unique then the SBC, cost less for fuel on the trip and would have A/C! But the SBC car is just soo much fun to drive... It will be a tough decision.
IP: Logged
08:49 PM
Mar 27th, 2008
blackrams Member
Posts: 33302 From: Covington, TN, USA Registered: Feb 2003
Originally posted by fieroguru: I have not decided yet... Once I get the 4.3 running, it might be chosen to make the trip. The 4.3 would be more unique then the SBC, cost less for fuel on the trip and would have A/C! But the SBC car is just soo much fun to drive... It will be a tough decision.
Well, you know, there is a way for both to go.
Ron
IP: Logged
05:50 AM
Mar 29th, 2008
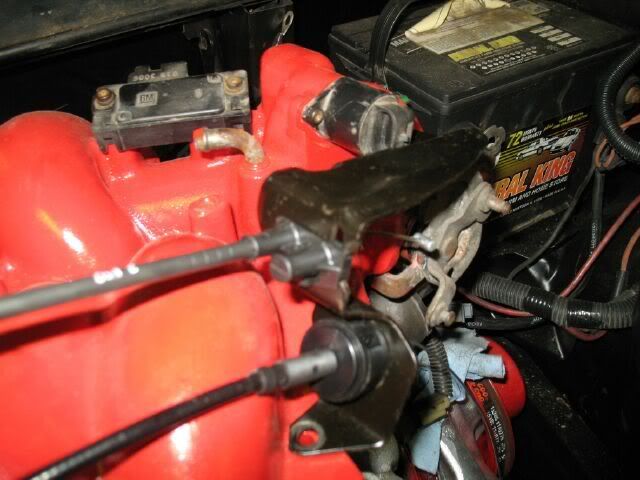
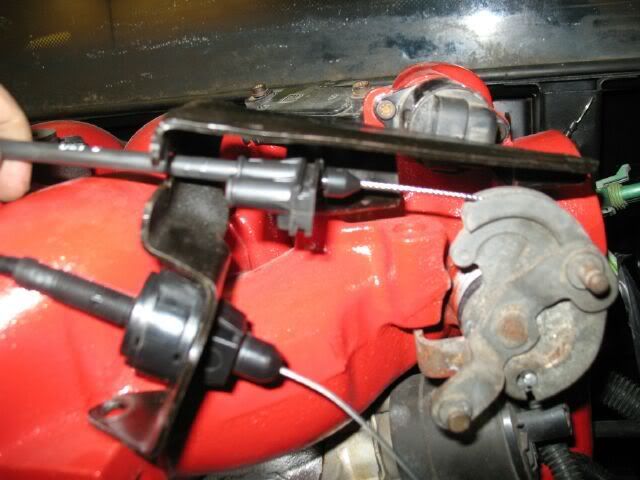
fieroguru Member
Posts: 12636 From: Champaign, IL Registered: Aug 2003
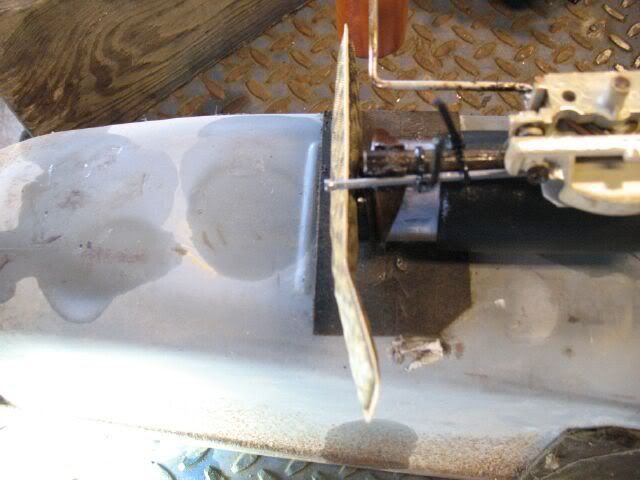
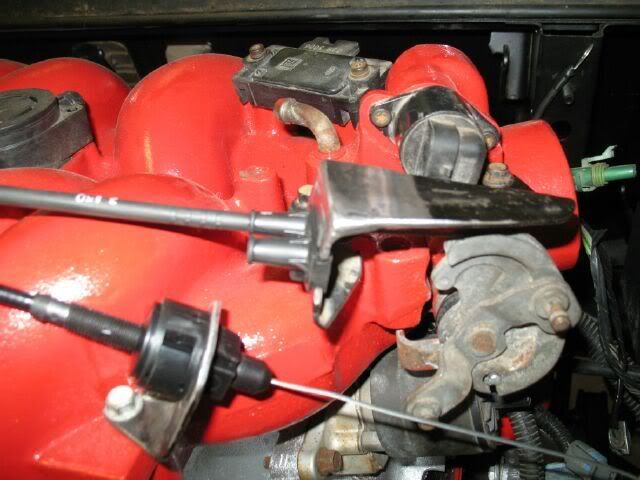
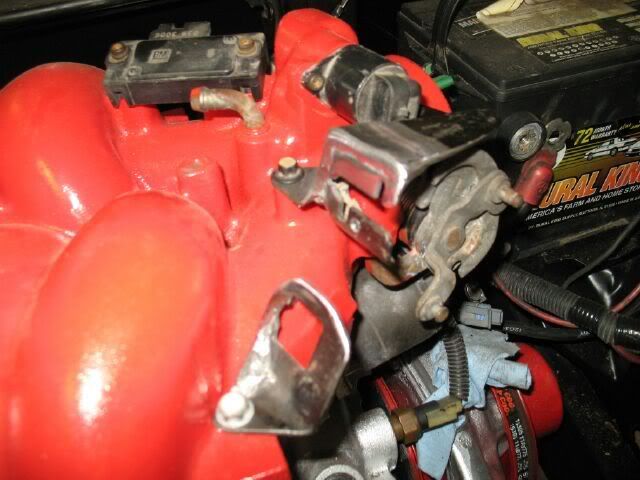
Fixed the throttle/TV bracket today. I separated the TV portion from the throttle portion. Then cut the last 1/2" of the throttle end, moved it forward the needed distance, welded it in place, and cleaned up the edges. For the TV bracket, I just added a small gusset to the inside edge since it no longer connects to the throttle bracket.
Before:
After:
[This message has been edited by fieroguru (edited 03-29-2008).]
IP: Logged
04:22 PM
Mar 30th, 2008
fieroguru Member
Posts: 12636 From: Champaign, IL Registered: Aug 2003
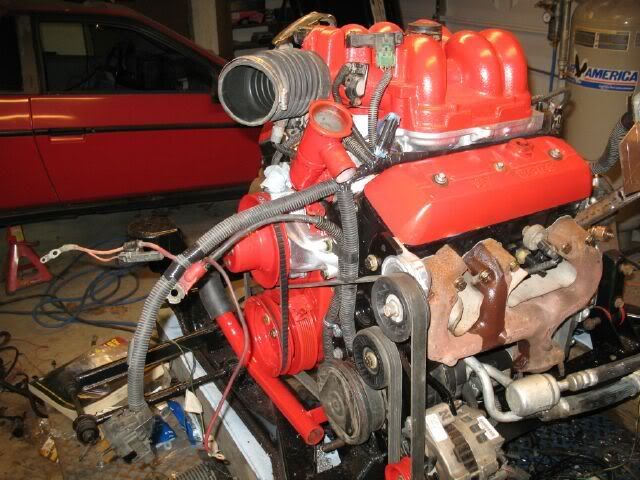
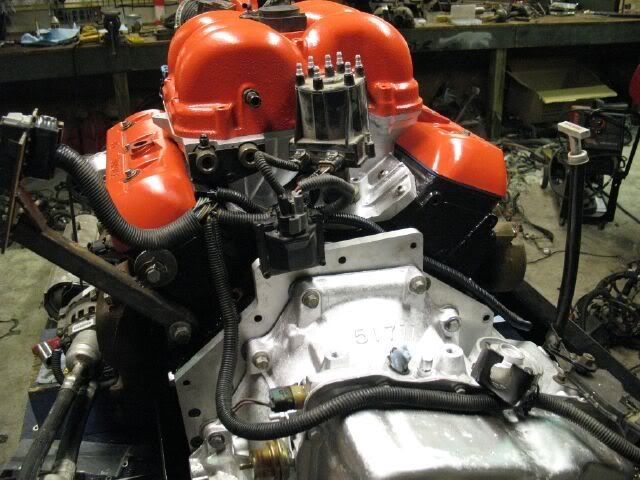
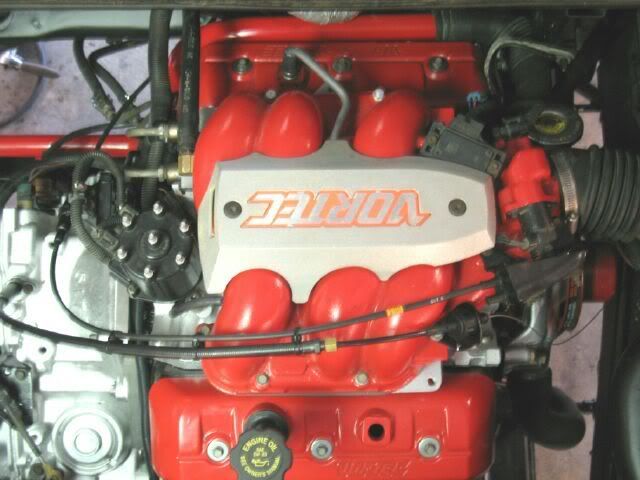
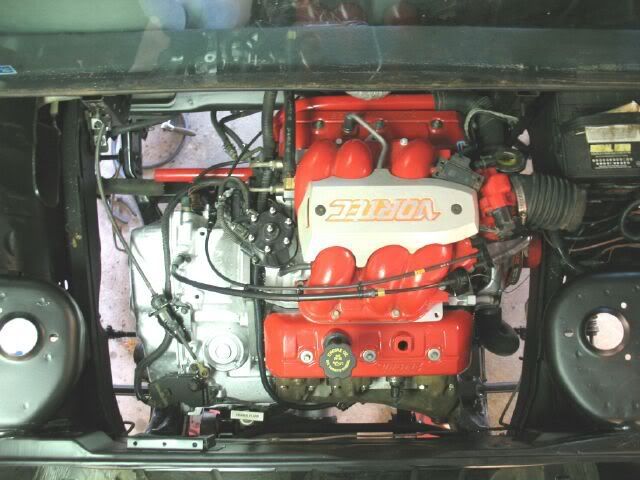
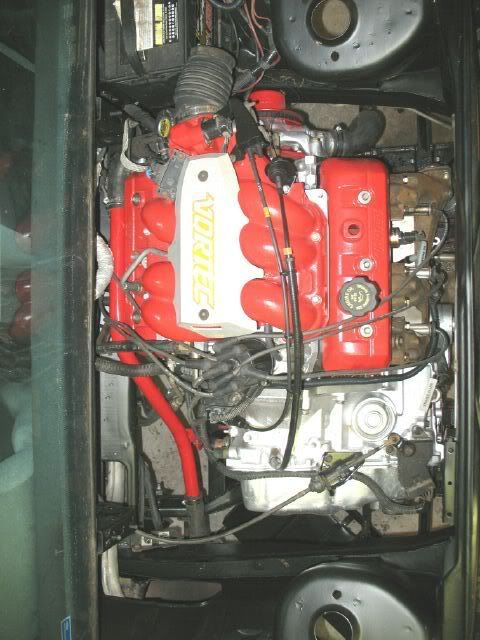
Fuel system - complete and leak free. Upper intake installed with new gasket. All upper intake sensors plugged back in. PCV tube bent from 3/8" aluminum and installed. Throttle cable installed. TV cable installed and adjusted the case length - still needs final adjustment to fine tune shift points. Vac line to brake booster connected. Vac line to tranny connected. Plugged the heater return on the top of the waterpump Connected the heater supply hose. Installed the oil fill
Here it is with the Vortec cover:
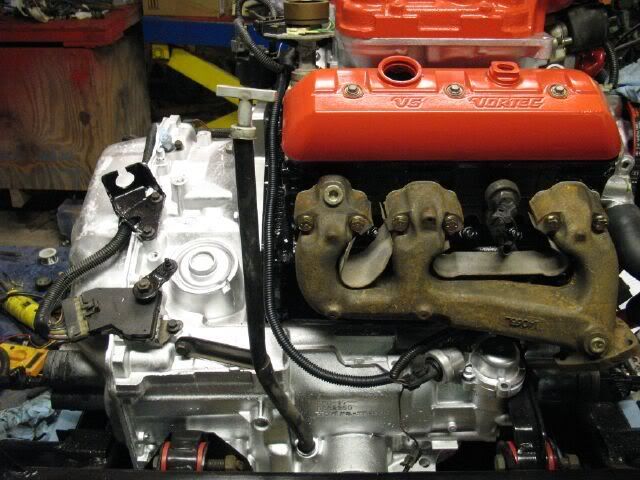
I need to finish installing the coolant hoses and clamps. Then I need to swap out the front exhaust manifold... I used the 3 bolt flanges for the exhaust pipes from my Bravada. They are the same size, but they will only fit the rear manifold (the new one). The front manifold must have come from a non-vortec engine since it is smaller. So the Bravada will lose yet another part (the driver side manifold). Then it will be time to start on the exhaust.
IP: Logged
01:46 PM
fieroguru Member
Posts: 12636 From: Champaign, IL Registered: Aug 2003
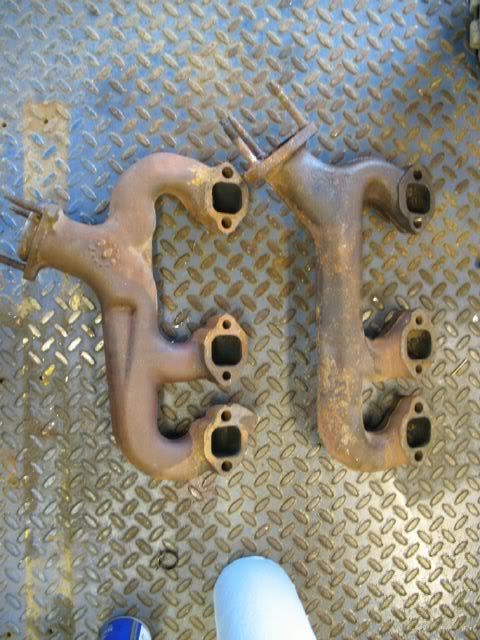
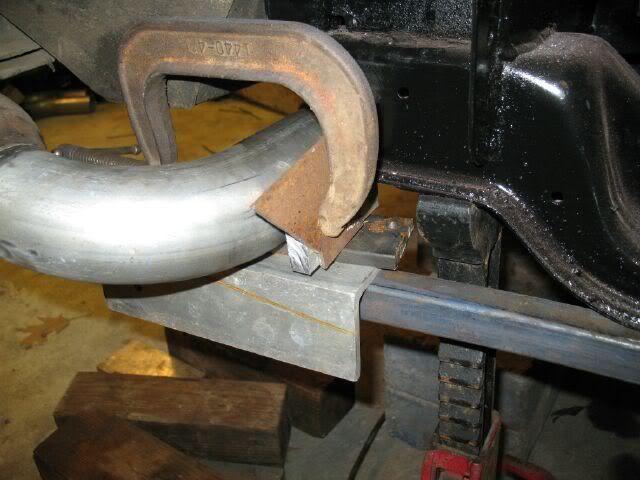
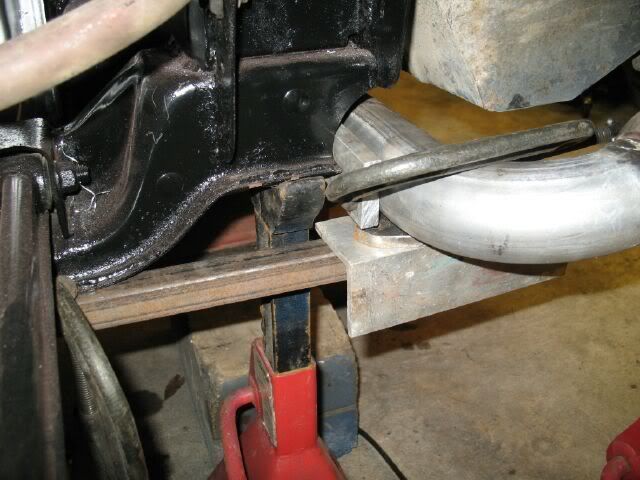
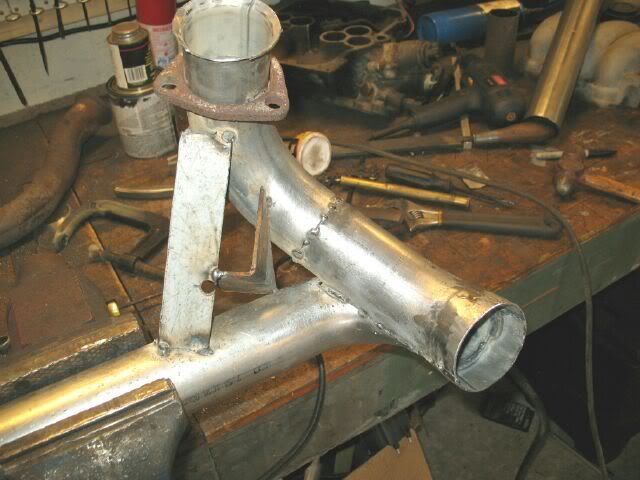
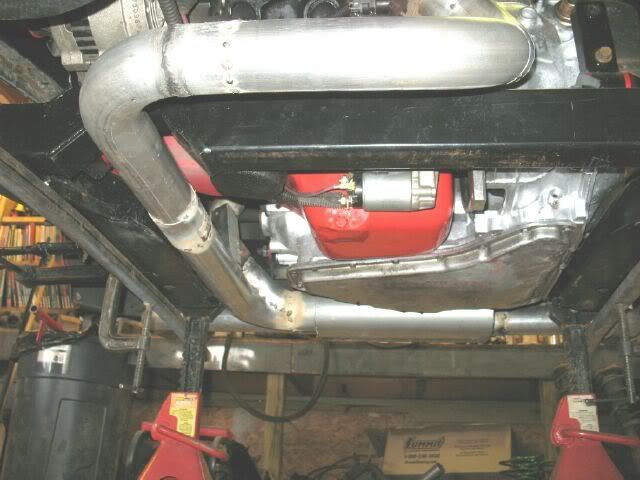
The Bravada gave up the driver side manifold and the front manifold was removed from the 4.3 in the Fiero (much easier than the Bravada). The one on the top is the Bravada's and the one at the bottom came from the 4.3 in the Fiero. Early on I dediced not to use the Bravada style since it would not clear the starter solinoid, but that was before I rotated it all the way down... now there is plenty of room. The only downside to using the Bravada is I will have to remake the coolant crossover... such is life. Good thing it is just 2 bends and 2 tabs.
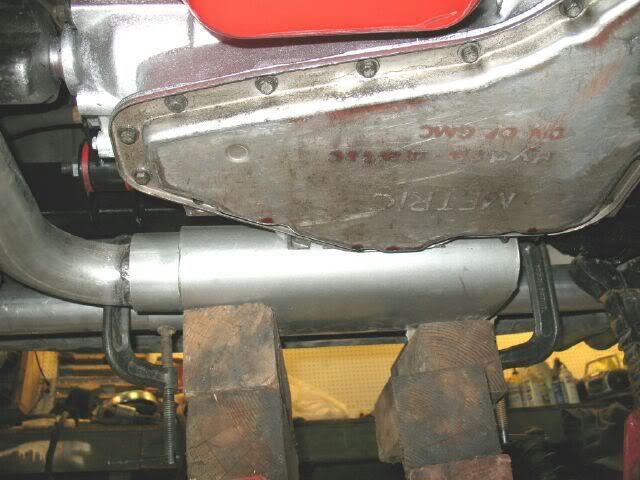
I spent the rest of the afternoon working on the exhaust. The exhaust will be build from multiple mandrel bends. The pipes coming off the manifolds are 2 1/2" and will merge together before entering the Flowtech Afterburner 3" in, dual 2 1/2" out muffler. Out of the muffler will be dual 2 1/2" pipes that will 90 back and have the stock GT megaphone tips attached. This exhaust will be very similar to my SBC car.
The tips are welded on, the 2 1/2" outlet pipes are cut to length (and c-clamped for now) and the muffler is sitting where it needs to be.
The 2 1/2" pipe from the front manifold is starting to come together. Notice the shelf to help guide the pipes general location and keep them square and level. You can also see the pipe from the muffler heading towards the front. I want to get these pipes tacked together and then start working on the rear down tube... it will be the tough one.
If the weather stays nice this week, I will try to get the exhaust done before next weekend.
IP: Logged
08:00 PM
blackrams Member
Posts: 33302 From: Covington, TN, USA Registered: Feb 2003
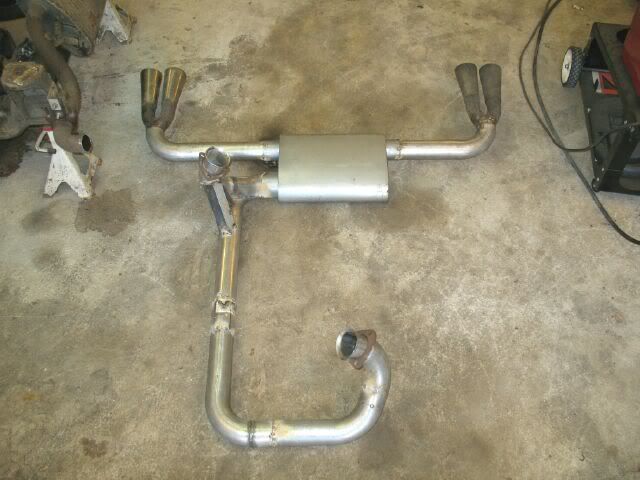
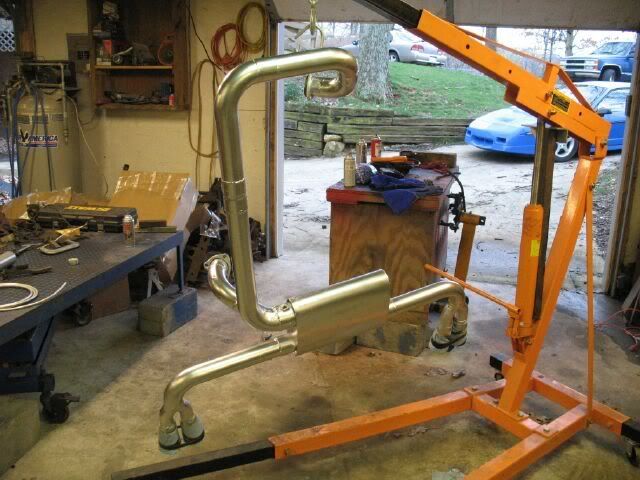
I had to pick up some more welding wire today... but still was able to get a little more mocking up done. The muffler placement side to side was determined as well as the spacing and angle of the tips then they were tacked together:
Then the rest of the evening was spent mocking up the "rests" to hold the muffler/tail pipes in the proper location. I used some 1x1 coming off the bottom of the cradle with some shims between them and the pipes. Then shims on the side between the pipes and the back of the cradle. Last some jack stands to control the angle of the tips.
IP: Logged
08:56 PM
Apr 2nd, 2008
fieroguru Member
Posts: 12636 From: Champaign, IL Registered: Aug 2003
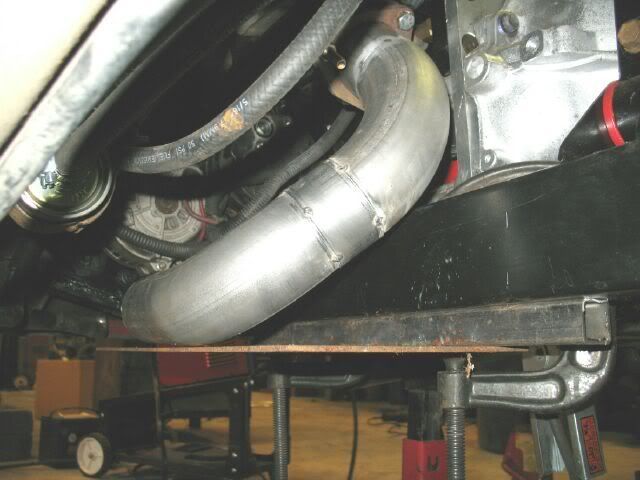
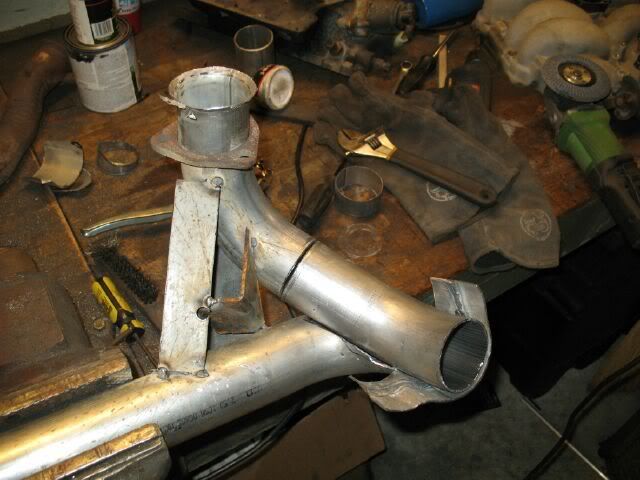
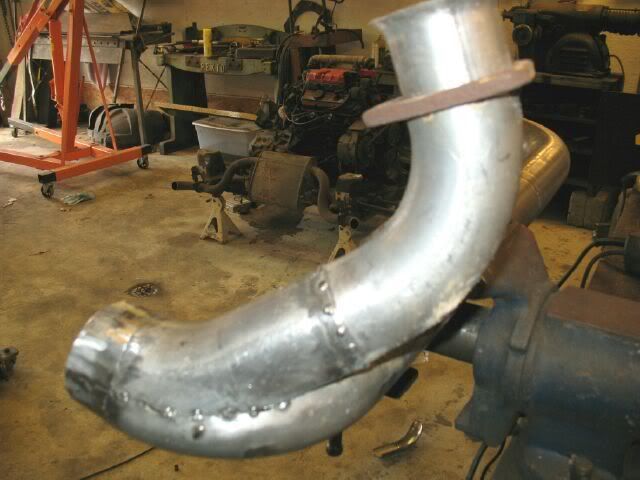
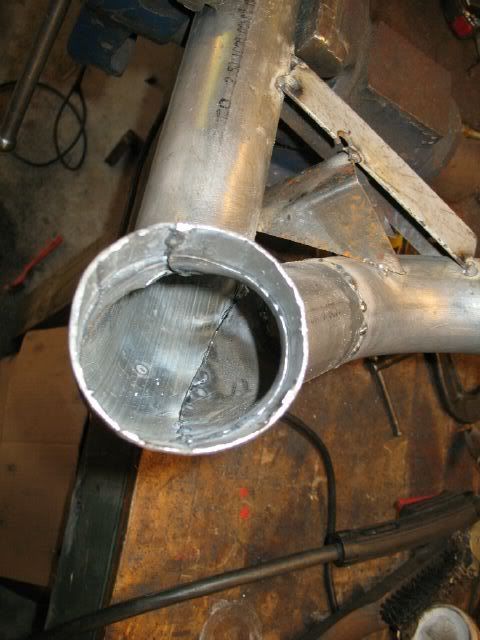
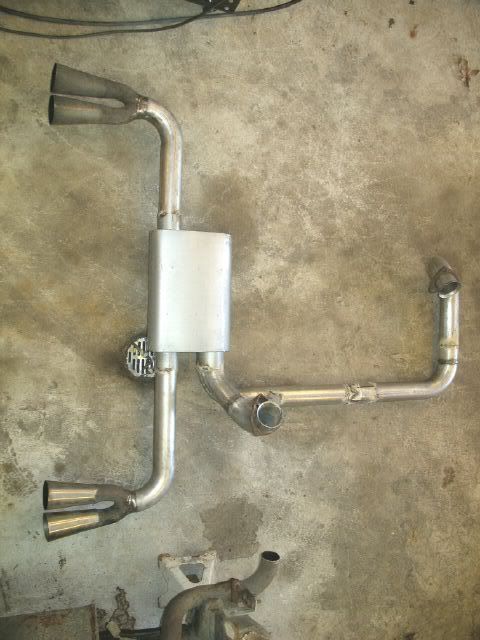
The rear down tube will be a 2 dayer....It started with the muffler in the proper place, then the front pipe in the right place, then the rear down pipe was roughed into shape and installed. Then multiple supports were tacked between the two exhaust pipes to keep the overall placement. Then out everything came again, more supports added and then the cutting began.
The front pipe was opened up to allow the rear pipe to enter it. The outline of the front tube was traced on the rear tube and then it will be cut open. Both tubes are 2 1/2" but at the muffler end it will be enlarged to 3" once it is all welded together.
IP: Logged
08:02 PM
Apr 6th, 2008
fieroguru Member
Posts: 12636 From: Champaign, IL Registered: Aug 2003
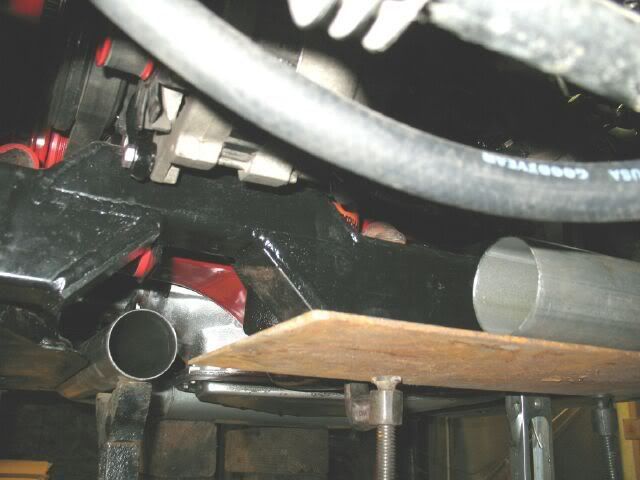
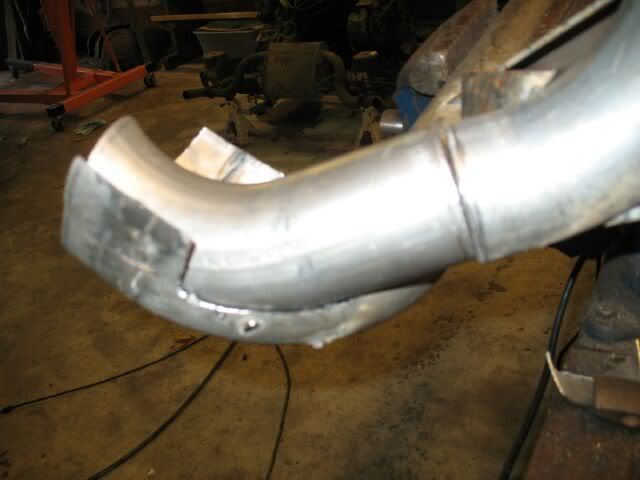
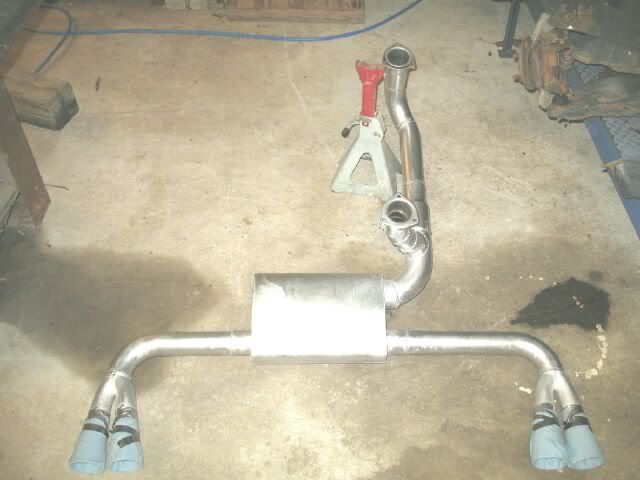
This morning I finished cutting and tacking the rear down tube and tacked the muffler to the tube. I need to make 1 last "L" bend and fabrication of the exhaust will be complete and time to weld it up.
IP: Logged
12:25 PM
fieroguru Member
Posts: 12636 From: Champaign, IL Registered: Aug 2003
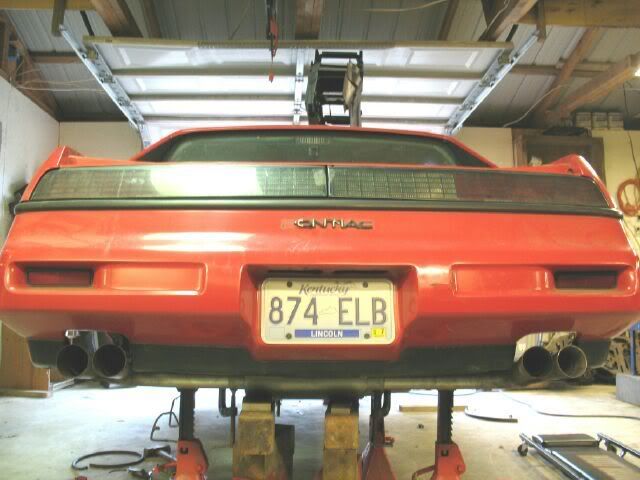
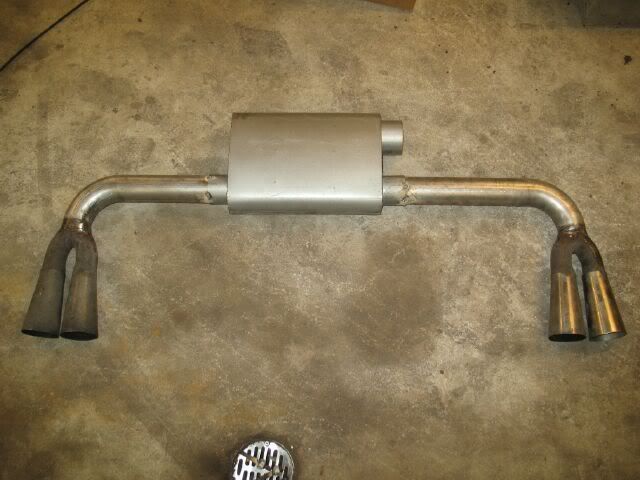
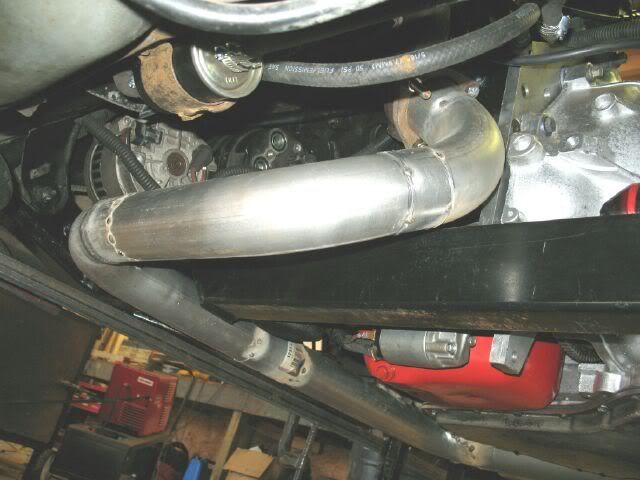
Overkill for the bone stock 4.3 CPI, but that is OK. I will be on the louder side with the 2 1/2" pipes and the 3" in dual 2 1/2" out muffler, but I like loud too!
It has a striking similarity to the exhaust on my SBC car and has a much nicer transition from the rear down tube to the muffler:
[This message has been edited by fieroguru (edited 04-06-2008).]
IP: Logged
03:06 PM
blackrams Member
Posts: 33302 From: Covington, TN, USA Registered: Feb 2003
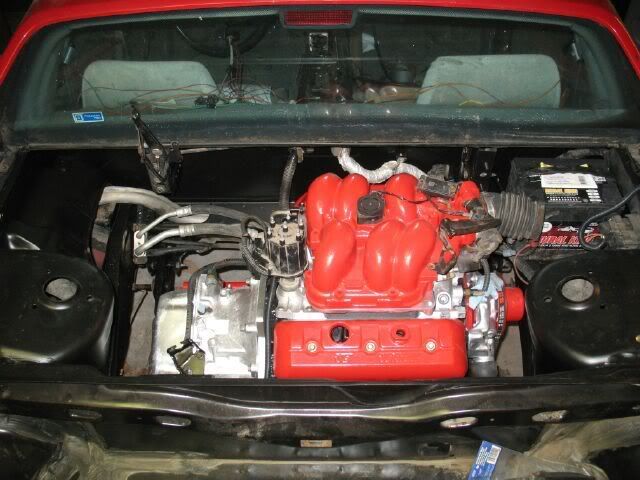
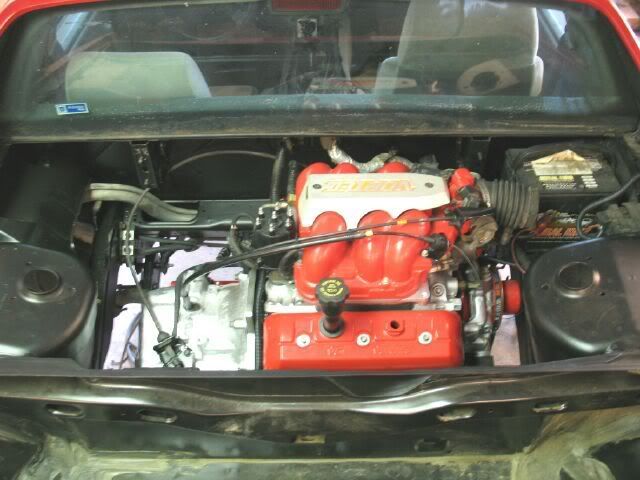
Well the good news is that I started the 4.3 up for the 1st time today! The engine was a lot quieter that I would have thought, but then again I was focusing on something else. The motor has what appears to be a rough spot. The starter struggles to turn the motor past it, and while running the motor knocks... so much for the $200 motor that has been sitting for 2+ years. It ran fine when I pulled it, but something is not right with it anymore. I guess I will just pull the 4.3 from the Bravada.
I also figured out that you can use the stock 2.8 fiero plug wires on the 4.3... it is a snug fit, but they work (reused the ones from the old 2.8 vs. buying new ones right now... but eventually I would like to have red plug wires and route them off the valve covers)
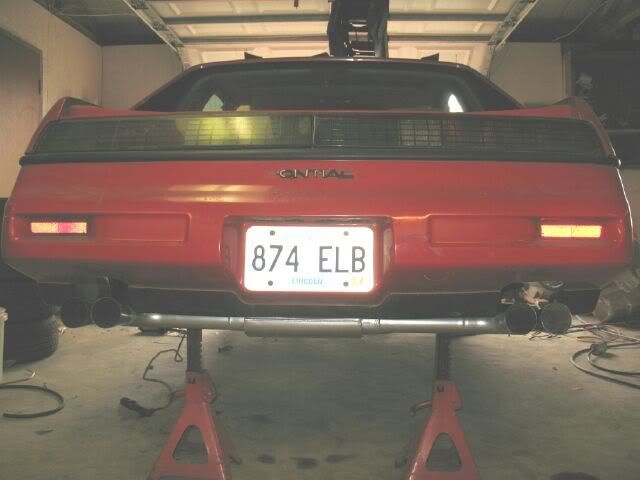
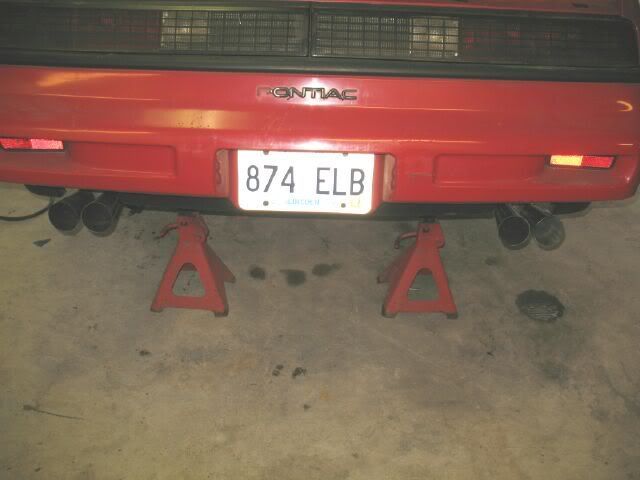
Here is what it looks like ready to run (except for an air filter and PVC filter):
[This message has been edited by fieroguru (edited 05-04-2008).]
IP: Logged
03:53 PM
fieroguru Member
Posts: 12636 From: Champaign, IL Registered: Aug 2003
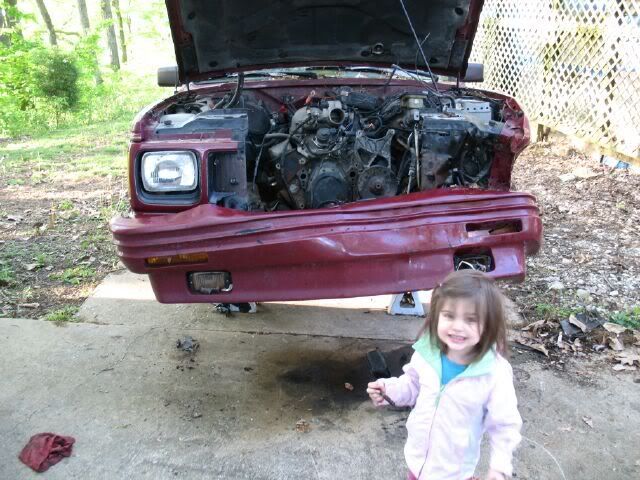
I spent the rest of the afternoon working towards pulling the 4.3 in the bravada. My wife wants it gone (been in the drive over a years since the deer incident) and I want to keep the front diff, front axles, transmission/AWD transfer case and the engine.
What I really do not like about these S10 based 4x4s is that you have to take 3+ things off to gain access to the bolt you need. Like the alternator/power steering aluminum bracket that bolts to the front of the engine - 1 bolt is blocked by the power steering pump, so it has to be removed. The bolts to remove the power steering pump are blocked by the power steering pulley, so it has to come off too and that is one tool I do not have (and the nearest open parts store is 19 miles away....) The exact same engine in a Van did not have this issue... oh well at least it does not have to go back together so I get to use the sawsall...
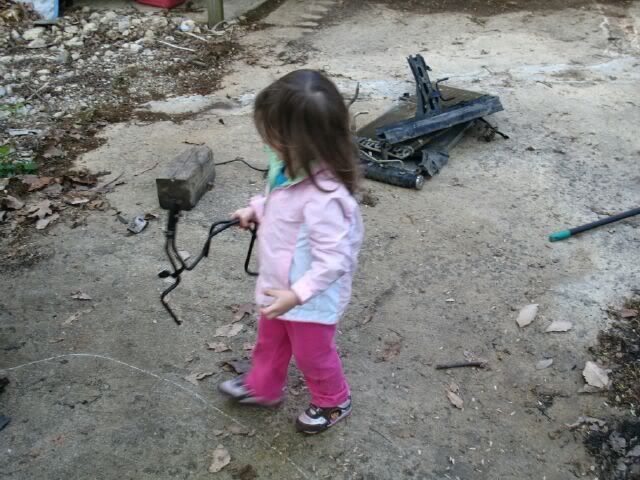
Carrera turned 2 in March and she decided to come out an help. She is quite talkative these days and kept saying "I fix it" and taking the removed parts back to the Bravada...she is daddy's girl!
IP: Logged
07:39 PM
Russ544 Member
Posts: 2136 From: S.W. Oregon Registered: Jun 2003
Well the good news is that I started the 4.3 up for the 1st time today! The engine was a lot quieter that I would have thought, but then again I was focusing on something else. The motor has what appears to be a rough spot. The starter struggles to turn the motor past it, and while running the motor knocks... so much for the $200 motor that has been sitting for 2+ years. It ran fine when I pulled it, but something is not right with it anymore. I guess I will just pull the 4.3 from the Bravada.
The "rough spot" could be carbon buildup on the combustion chamber/piston top. I've seen engines that have sat for a couple years get moisture in the carbon deposits, which swells it up enough to cause the simptoms you discrbe. if you know it ran good before, then I would strongly sugest you try a de-carbon before you go yanking it out and all.
cute kid you got there BTW. I'll bet she's a big help. if only they didn't grow up....................................