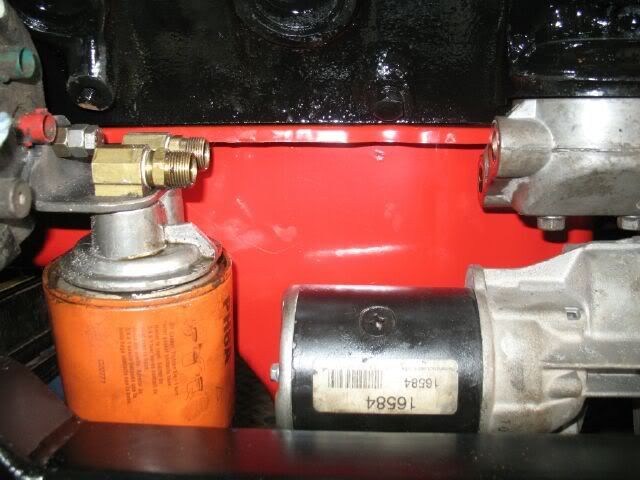
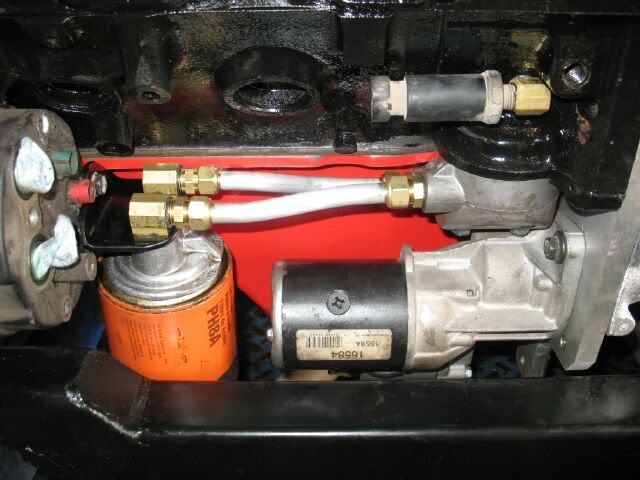
I went ahead and made a new mount for the remote oil filter. I used 3/16" steel and bent it into an "L", drilled 3 holes and shaped to fit. Now the oil lines are pretty much directly across from each other. There will need to be a couple of slight offsets in the lines, but they will look much better than the lines crossing over. An added benefit is the starter can now be removed without taking off the oil filter.
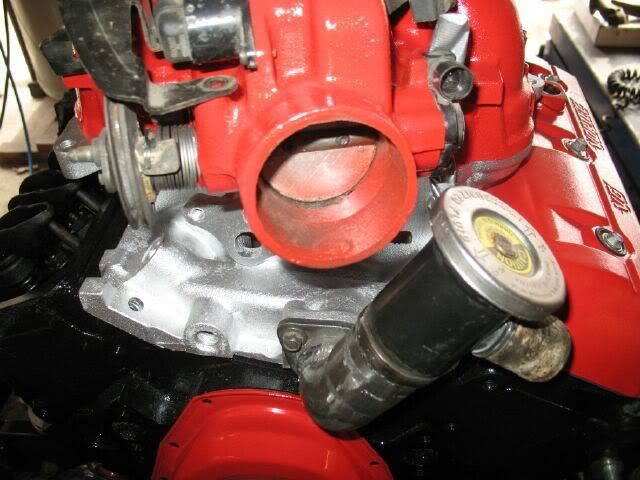
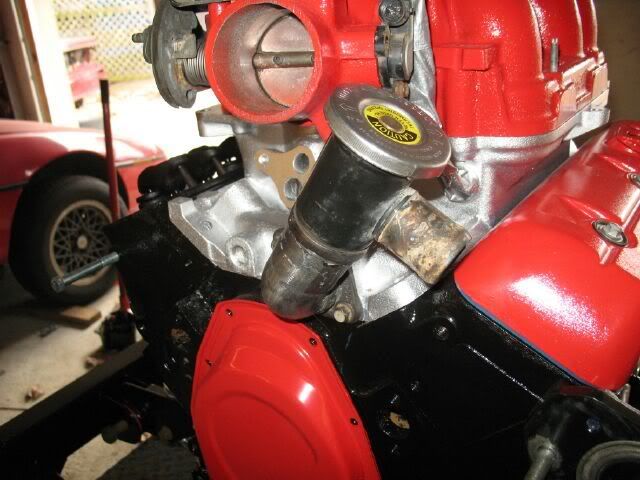
Decided it was time to fab up the coolant fill. I stole the 2.8 coolant fill from the pulled motor and the bolt holes on the flange were within 1/8" of the 4.3 flange. Little file work and it could be bolted the the 4.3 intake. Then it was a matter of cutting it, adding a 90 degree bend, and pointing the hose outlet in the right general direction. I can use either the 4.3 or the fiero thermostats, but using the fiero one would allow the heater outlet to be mounted in the bend of the coolant fill and help keep it out of sight (verses exiting right above the valve cover on the rear passenger corner). The 4 cylinder version might have been better to start with (already has flange on the side vs. bottom), but I did not have any laying around.
One of these days I will make the coolant tube that will run along the front valve cover and crossover to the driver side, under body coolant tube. This one wil be mounted to the engine (like the 2.8) vs. to the firewall like my SBC car.
IP: Logged
11:57 AM
Jan 2nd, 2008
blackrams Member
Posts: 33302 From: Covington, TN, USA Registered: Feb 2003
It's the Soldier, not the reporter Who has given us the freedom of the press. It's the Soldier, not the poet, Who has given us the freedom of speech. It's the Soldier, not the politicians That ensures our right to Life, Liberty and the Pursuit of Happiness. It's the Soldier who salutes the flag, Who serves beneath the flag, And whose coffin is draped by the flag.
IP: Logged
08:59 AM
fieroguru Member
Posts: 12636 From: Champaign, IL Registered: Aug 2003
Too cold to do much but collect some more parts. A trip to the parts store provided the seals, gaskets and timing set (bearing checked out good, so I left them alone) needed to finish putting the engine back together.
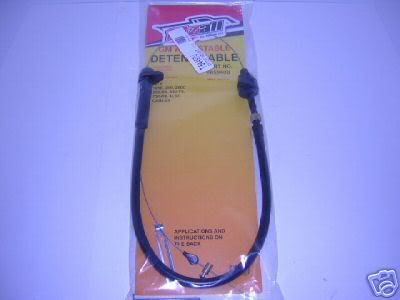
Also purchased a fully adjustable TV cable on ebay for the tranny. This is the FITZALL Universal Adjustable Detent Cable (M-T54497U) for the 125C, TH200, 200C, 200-4R, 440-T4, 700-R4, and the 4L60 Transmissions. $16.95 + shipping.
IP: Logged
06:07 PM
Jan 3rd, 2008
3.8 SC Member
Posts: 577 From: On the Great Lakes-Ohio Registered: Dec 2003
Pretty awsome swap you have going on there and nice machine work! I would have never thought to use a 4.3L. I am working on a V-6 swap of my own and I am interested in your plan for the exhaust. You say, that modifying the cradle, allows you to have more room for the exhaust. Could you explain that in more detail, please. I see the the manifolds are going towards the pulleys. This is the part, of your swap, that caught my eye. My V-6 has the cross-over pipe going over the transmission, right under the intake and I don't like that.
Thanks, Don Z.
IP: Logged
12:39 PM
fieroguru Member
Posts: 12636 From: Champaign, IL Registered: Aug 2003
Pretty awsome swap you have going on there and nice machine work!
You say, that modifying the cradle, allows you to have more room for the exhaust. Could you explain that in more detail, please.
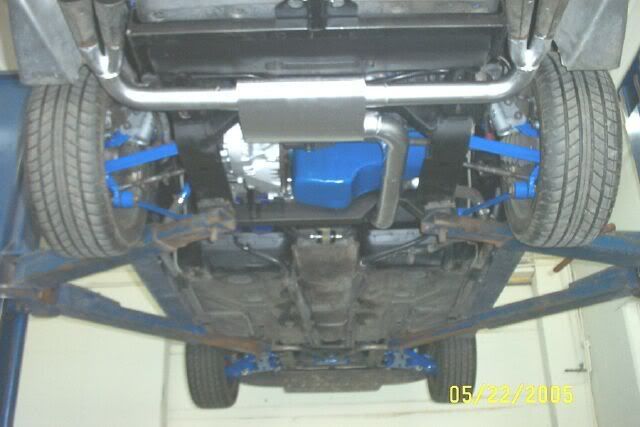
Thanks for the compliment! Raising the rear crossmember allows the muffler to lay flat between the frame rails and no longer has to fit between the cradle and trunk. Here is a pic of my SBC car with the 3" in dual 2 1/2" out camaro cross flow laying flat. Still has full size trunk. If I really wanted more trunk space, I could expand the trunk space to where the muffler used to be.
The exhaust on the 4.3 will be very similar to the SBC exhaust - pipe diameters will be smaller, but their will be two down pipes connecting together at the passenger rear of the car right before going into the muffler. The stock GT tips will be retained.
IP: Logged
01:23 PM
3.8 SC Member
Posts: 577 From: On the Great Lakes-Ohio Registered: Dec 2003
I like this build-up man! Definitely a great motor if you crave low-end torque, but don't want to go up to a V8.
Here's my built-up 4.3 Vortec TBI in my S-10.
Dynoflow Exhaust, Edelbrock Pro-flow filter, Accel 8.5mm ignition wires, 180 degree thermostat, replaced the mechanical fan with an electric setup, and I had the heads shaved a bit to increase compression. I basically only did mods that wouldn't hurt fuel economy, or would actually improve it. I need to go to cooler plugs this summer though.
You know, it might be a good idea in the future to consider an aluminum block and heads for weight reduction. GM performance parts sells aluminum versions of this engine (though not assembled, just the bare heads and block). I considered this engine for my 88 coupe before I picked the Ecotec instead. I'll look for the part numbers I wrote down.
------------------ Petty Officer Michael C Casaceli Aircraft Electronics Technician Second Class AIMD Brunswick (2007-present) Patrol Squadron Ten (2003-2007) United States Navy
[This message has been edited by fieroturbo (edited 01-04-2008).]
IP: Logged
02:43 AM
tabaka Member
Posts: 16 From: la center, WA Registered: Dec 2007
Correct, there is no emission testing where I live. Were there, I could always run the smaller cats on the down pipes or install a larger one where the muffler is. I have kicked around the idea of installing a cat on the 4.3 car... but it is not high on the list right now.
IP: Logged
12:45 PM
Jan 5th, 2008
fieroguru Member
Posts: 12636 From: Champaign, IL Registered: Aug 2003
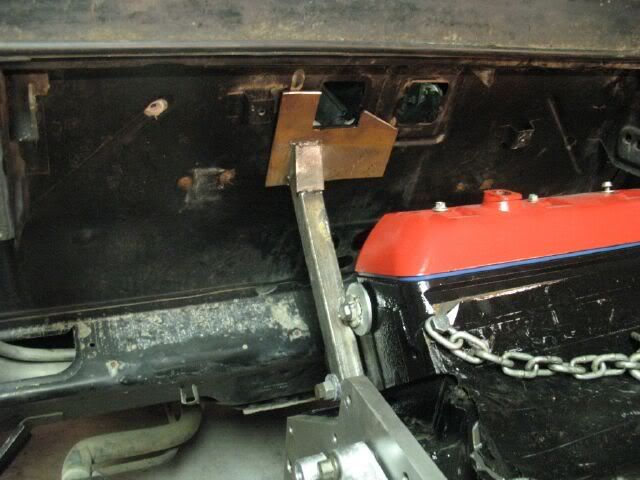
Today the dogbone bracket was removed and the engine was installed for the last mock up. Main purpose of the mock up was to fabricate some crude brackets that will allow the entire engine harness to be built with the engine on the bench...
Bulkhead connector bracket:
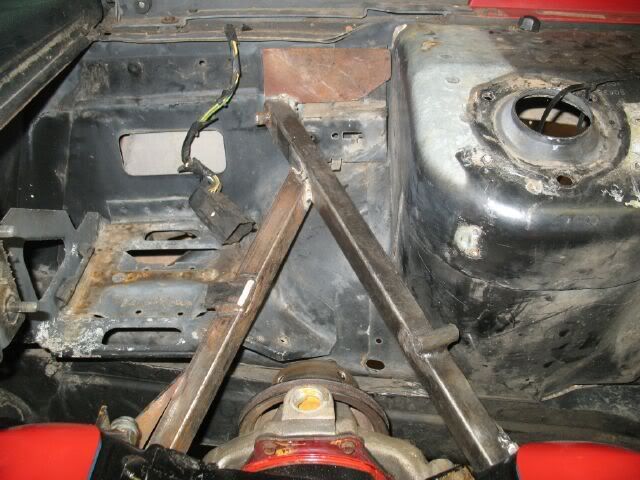
500 connector base:
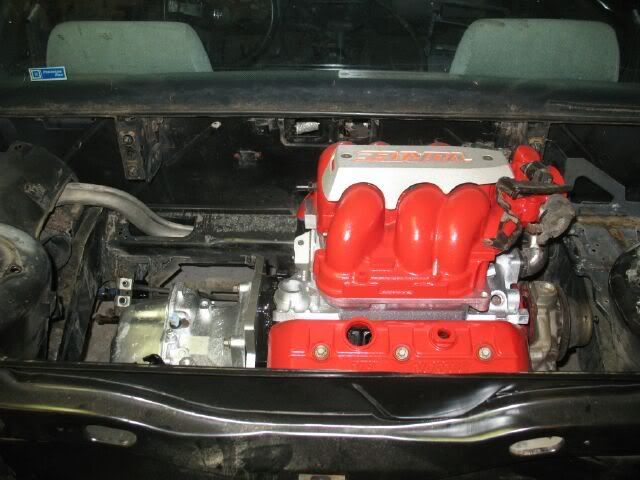
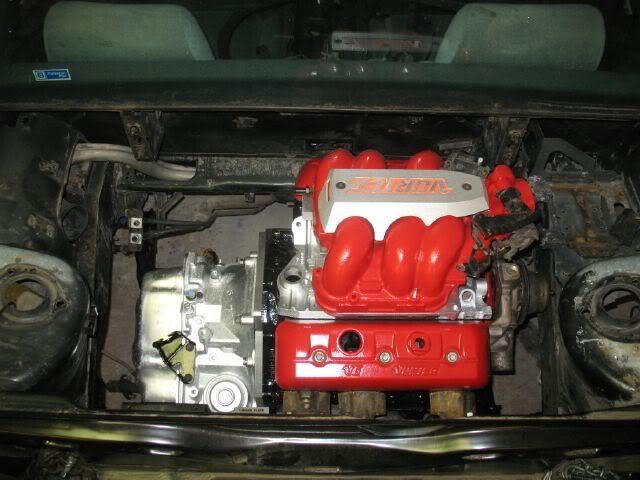
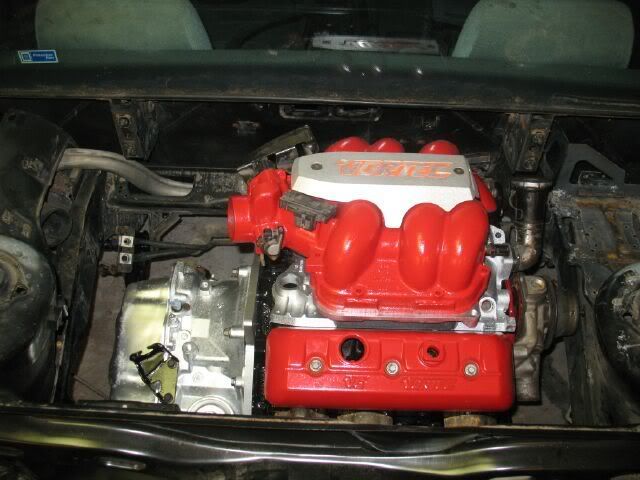
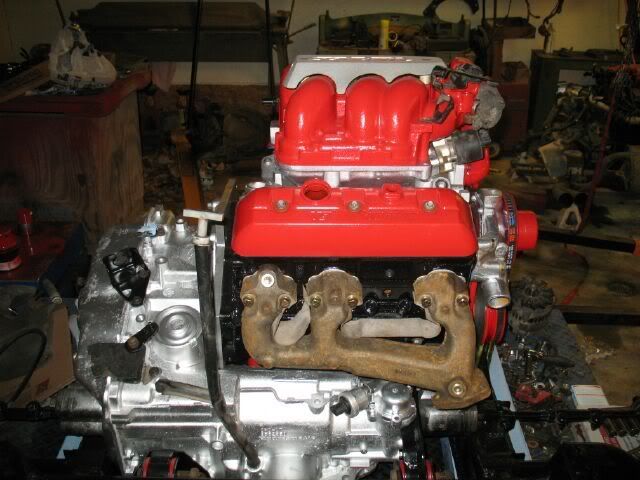
While the engine was in there, I took a few inspirational pics...
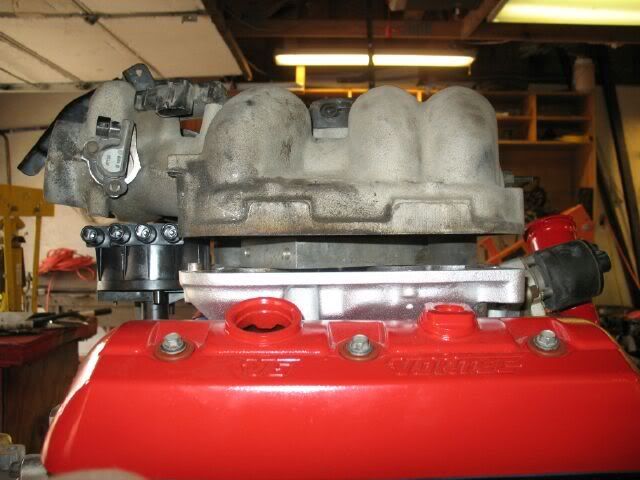
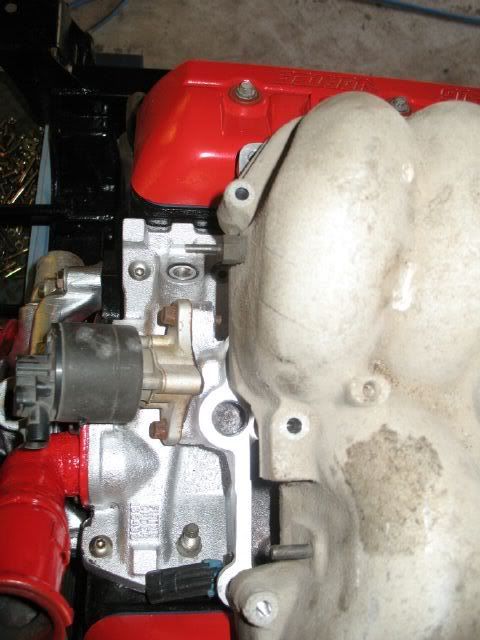
If I am able to make the the reversed intake work, it would look like this:
IP: Logged
04:21 PM
red84sematt Member
Posts: 1413 From: black river falls wisconsin usa Registered: Mar 2006
I like the intake, flipped around as well. Sure hope you can do it. What is causing the problem? Also, the silver cover on top of your intake, is it metal or plastic and are you staying with the wording that is on it or are you going to change it?
IP: Logged
03:37 AM
fieroguru Member
Posts: 12636 From: Champaign, IL Registered: Aug 2003
Thanks for the compliments. I too prefer the intake flipped. There are two known challanges with that method (and possibly a couple yet to be discovered).
1. The intake flange between the upper and lower halves is not symetrical, so flipping creates some holes and the bolt holes/bosses no longer line up. I need to get a piece of aluminum plate 12 x 13 and make an adapter plate to fill all the open areas and provide a method of bolting the two halves back together.
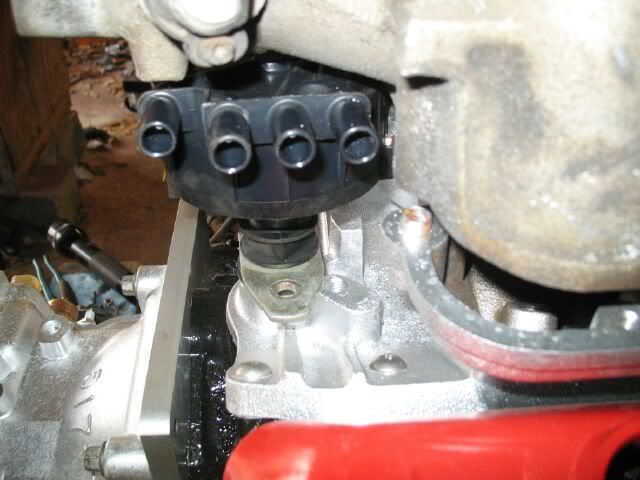
2. With the intake flipped, the neck of the throttle body will not clear the stock dist. The 96+ dist is a crab style and much lower, but I still need to come up with about 3/4" additional clearance for the 96+ dist to fit (height wise). Clearance to the side between the dist and the lower intake is still unconfirmed (I need to get a 96+ dist) The adapter plate between the two halves could be increased to 3/4" and that would provide all the extra height needed, but cutting out the needed contour in 3/4 aluminum would take me forever with the tools I have. I might mock it up with wood first just to see if it will work. Other options I have kicked around was cutting down the dist shaft and have it welded back up. If I could section the dist shaft by 1/2", then the adapter could be 1/4" (much easier for me to make) but I would have to farm out the dist work to have it done with the needed precision.
As for the plastic cover... I really want to put FIERO on the top of it. I will have to grind down the current text and glass over it to make it smooth. This mod is on the back burner until I get the engine up and running.
IP: Logged
07:57 AM
blackrams Member
Posts: 33302 From: Covington, TN, USA Registered: Feb 2003
Paul, In that you have to build an adaptor plate to reverse the intake any, could you gain the additional 3/4" you need to clear the distributor by making that adaptor taller, say 1.5 inches? Just a thought. Metal of that thickness wouldn't be cheap but I think it's do able.
Ron
[This message has been edited by blackrams (edited 01-06-2008).]
IP: Logged
09:51 AM
fieroguru Member
Posts: 12636 From: Champaign, IL Registered: Aug 2003
Today was a very productive day. Installed the new timing chain, the timing cover, oil pan, lower intake manifold, EGR valve and oil sender unit (over the starter vs. by the dist). Then the heater port was added to the collant fill neck and the old port on the intake pluged.
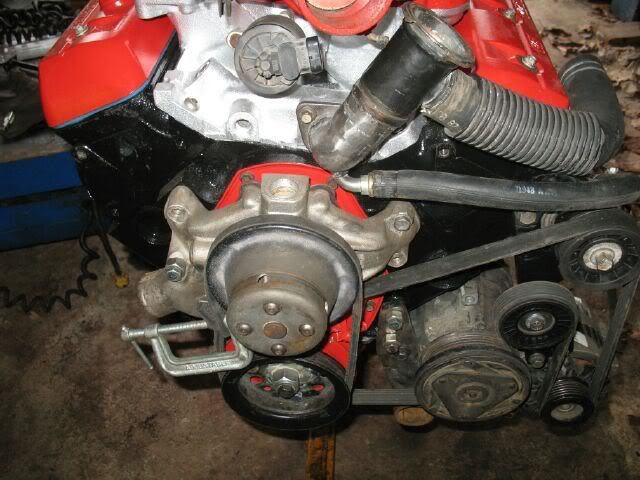
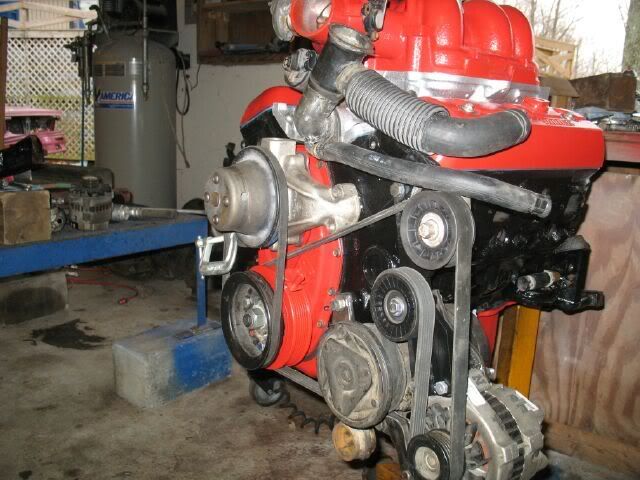
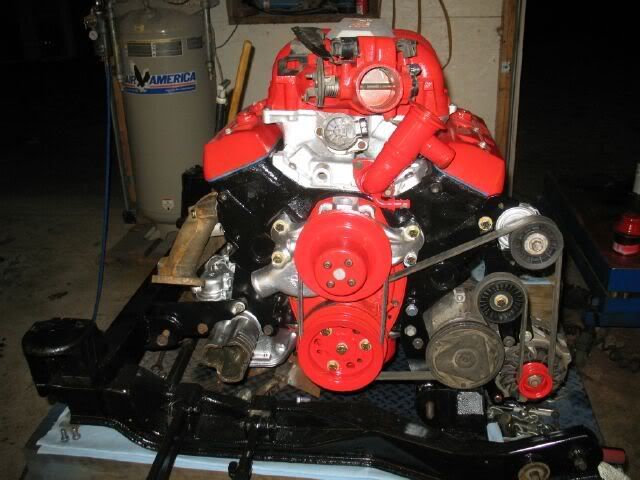
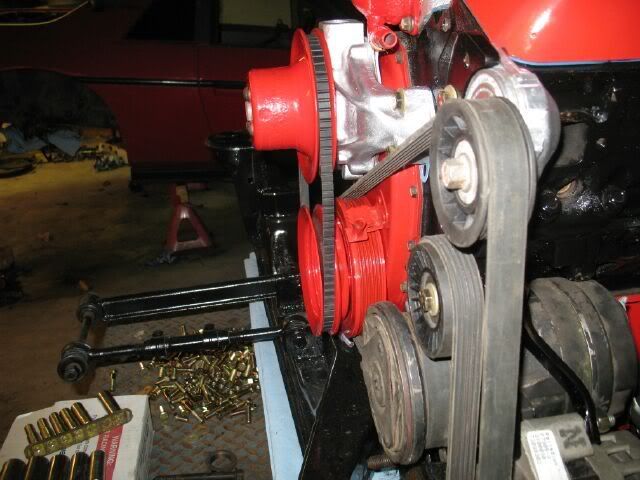
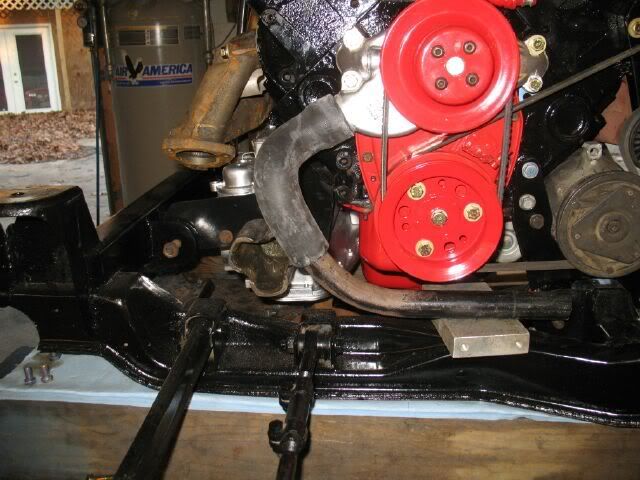
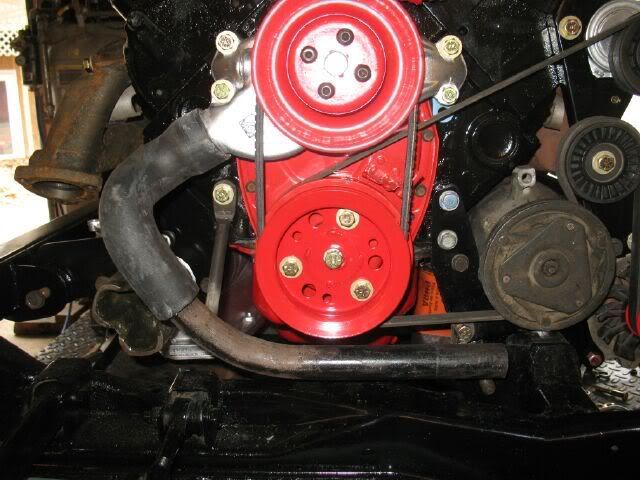
Last was to figure out the water pump belt drive. With this balancer, the crank snout is inset from the face of the balancer, so instead of the front pulley being centered with a lip inside the crank hole, it had to be centered about the crankshaft bolt. The lower crank pulley was one that was on the shelf (unknown origin). The center bore was 2" and I found just the right combination of washers to bush the hole down to the size of the crankshaft hole (7/16" I think). Welded those in and then drilled out the 3 holes to bolt to the crankshaft. With the 4.3 crankshaft washer (the big thick one) between the balancer and the pulley, the pulley lined up with water pump pulley. There was about 1/16" gap between the back side of the pulley and the face of the balancer, so 1 washer was welded to the backside of each of the 3 holes. The upper pulley came with the water pump, so it should be a stock item.
Here are a couple of shots of the complete accesspory drive. The water pump belt is one I had on the shelf, wrapped it tight and clamped the two ends together. I went to autozone and got a 15300 belt, but is was just a tad too short... I will have to get the next couple sizes larger.
Then the accessory drive was disassembled so I could paint all the brackets, pulleys, collant fill and everything else that was ready for paint.
The next couple of days are going to be in the 60's, so I need to clean the engine bay and get it painted. Then I will find a 96+ dist and mock up the flipped intake solution with a wood adapter as well as bending up the coolant tubes.
IP: Logged
07:36 PM
Jan 7th, 2008
fieroguru Member
Posts: 12636 From: Champaign, IL Registered: Aug 2003
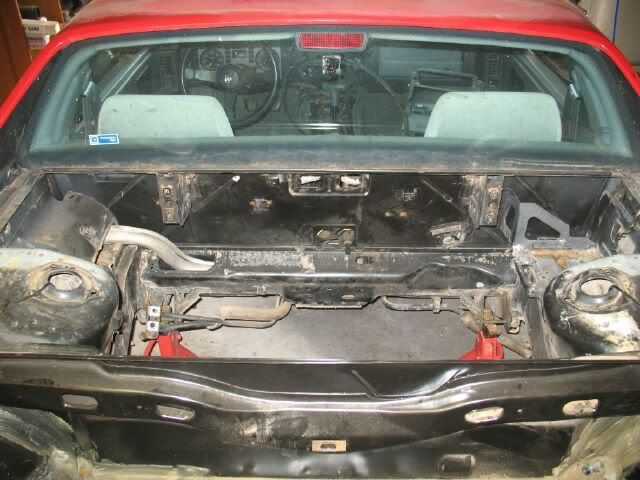
Near record temps today, so I burned half a vacation day to get the engine bad painted. Used the grinder to smooth down some of the spot welds where the brackets were removed and scotch brighted it twice. Here is what it looked like before the scotch brighting:
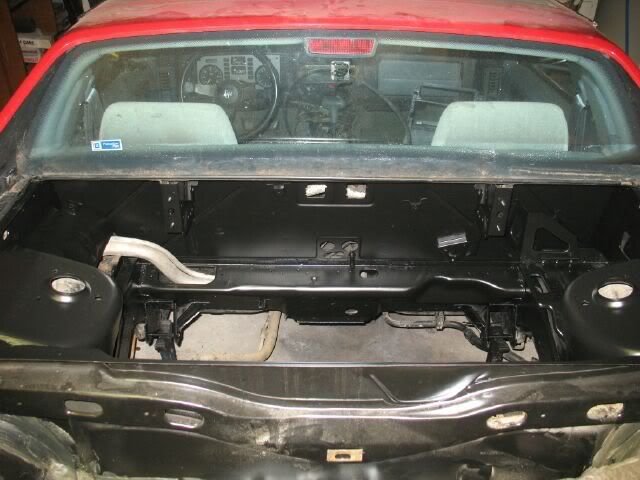
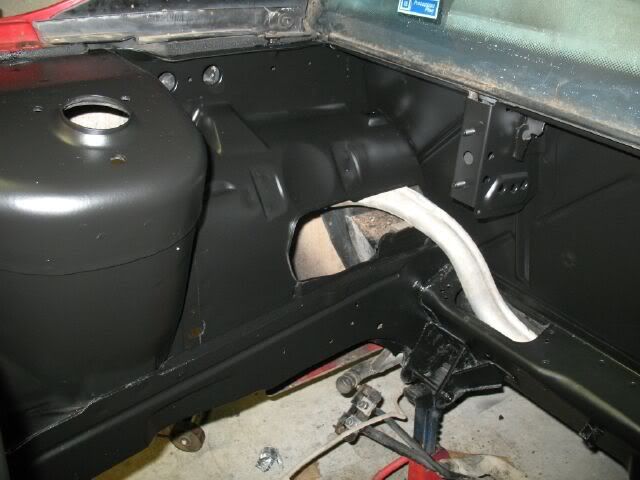
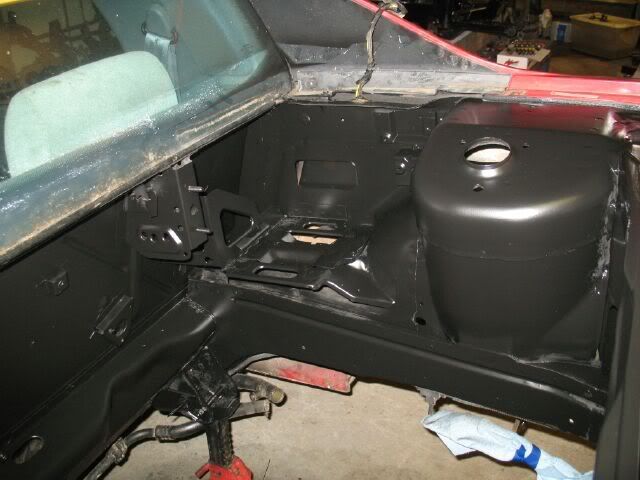
Here it is after being painted satin black:
While waiting for the engine bay to dry the engine was attached to the tranny/cradle for 1 last time (hopefully). Then the accessory drive was reassembled (with the right belt).
Still need to bend up the lines to the remote oil filter housing and then the front side of the engine can be fully assembled. Then it will be time to focus on collant lines and flipping the intake.
[This message has been edited by fieroguru (edited 01-07-2008).]
IP: Logged
07:39 PM
vortecfiero Member
Posts: 996 From: Toronto Area, Canada Registered: Feb 2002
by rotating the intake top you wont have to notch the passenger side brace on the deck lid
for the ignition... have you considered DIS ? the Syclone guys have done it
Avoiding the deck lid notch is one of the reasons for flipping the intake. 1. Looks - just looks better and more like a stock fiero engine 2. No decklid notch 3. Better path for cold air intake - battery in the way on the other side. 4. Can use the existing V6 throttle cable - 1 less part to buy (original TV cable might have worked too) 5. Vortec text on plenum cover lines up - until it is replaced with FIERO 6. Never been done before with the 4.3... at least in a Fiero.
I have not looked into DIS. I want to keep this thing relatively simple and minimize the ECM tuning. Plus I am cheap and getting tired of buying stuff for this car - every dollar on this 4.3 is 1 less for the SBC car.
IP: Logged
09:35 PM
Jan 8th, 2008
fieroguru Member
Posts: 12636 From: Champaign, IL Registered: Aug 2003
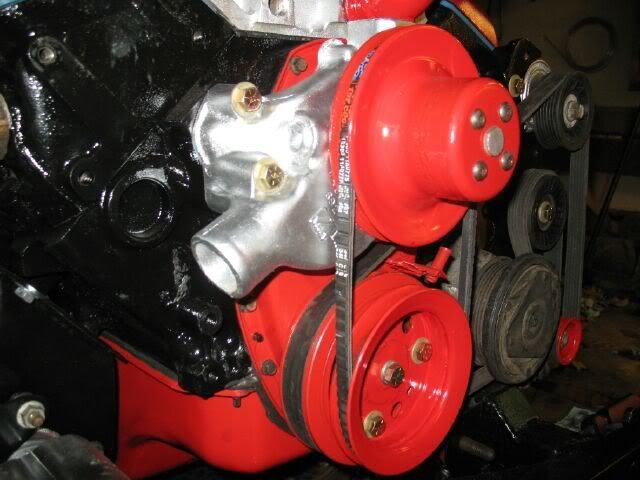
What are you using for a belt tensioner on that water pump belt? Is there a part missing from the pics?
I am not planning on running a tensioner (but if it ends up needing one, I do have a plan). The belt is fairly snug the way it is and with 180 degrees of wrap, the overall diameter of the pulleys, and the relatively small load on the water pump, the chance of slipage is pretty small. This is a fairly common setup on circle track cars (although some use 2 belts - but they also run higher RPM's).
When I tried to turn the water pump pulley, the entire engine would turn over without slipage.
IP: Logged
09:07 AM
vortecfiero Member
Posts: 996 From: Toronto Area, Canada Registered: Feb 2002
I am not planning on running a tensioner (but if it ends up needing one, I do have a plan). The belt is fairly snug the way it is and with 180 degrees of wrap, the overall diameter of the pulleys, and the relatively small load on the water pump, the chance of slipage is pretty small. This is a fairly common setup on circle track cars (although some use 2 belts - but they also run higher RPM's).
When I tried to turn the water pump pulley, the entire engine would turn over without slipage.
I saw that as well and agree... no tensioner needed.. i ran mine for a year or so with out one
IP: Logged
07:36 PM
blackrams Member
Posts: 33302 From: Covington, TN, USA Registered: Feb 2003
It's the Soldier, not the reporter Who has given us the freedom of the press. It's the Soldier, not the poet, Who has given us the freedom of speech. It's the Soldier, not the politicians That ensures our right to Life, Liberty and the Pursuit of Happiness. It's the Soldier who salutes the flag, Who serves beneath the flag, And whose coffin is draped by the flag.
IP: Logged
09:57 PM
Jan 12th, 2008
3.8 SC Member
Posts: 577 From: On the Great Lakes-Ohio Registered: Dec 2003
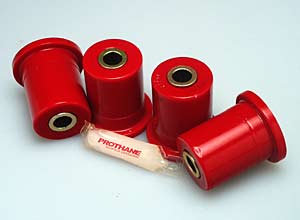
The more I look at your build thread, the more I like your cradle set-up! I hope you don't mind if I copy it. It's perfect for the exhaust and mounts. I am collecting the parts as I write this. One question - Do you think I can use the poly for the 84 to 87 rear control arms, to make my engine mounts? The reason I ask this, is that I have a few of these control arms laying around and the fact that 88 trailing arms are going to be a little hard to find.
Edit: 84 to 87 rear control arm bushings. A little different than the 88
Don Z.
[This message has been edited by 3.8 SC (edited 01-12-2008).]
IP: Logged
02:52 PM
fieroguru Member
Posts: 12636 From: Champaign, IL Registered: Aug 2003
Originally posted by 3.8 SC: The more I look at your build thread, the more I like your cradle set-up! I hope you don't mind if I copy it. It's perfect for the exhaust and mounts. I am collecting the parts as I write this. One question - Do you think I can use the poly for the 84 to 87 rear control arms, to make my engine mounts?
Thanks for the compliment and most certainly feel free to copy or even improve on it! I see no reason the 84-87 bushings would not work, aside from slight size difference, they will work the same. In fact they are probably better, the 88 trailing link bushings us a M14 bolt and the stock ones are too long (and I do not want to cut them - may need the stock bolts some day), so I have to buy some from McMaster-Carr.
IP: Logged
05:50 PM
fieroguru Member
Posts: 12636 From: Champaign, IL Registered: Aug 2003
The dist came in, so I spent some time messing with it.
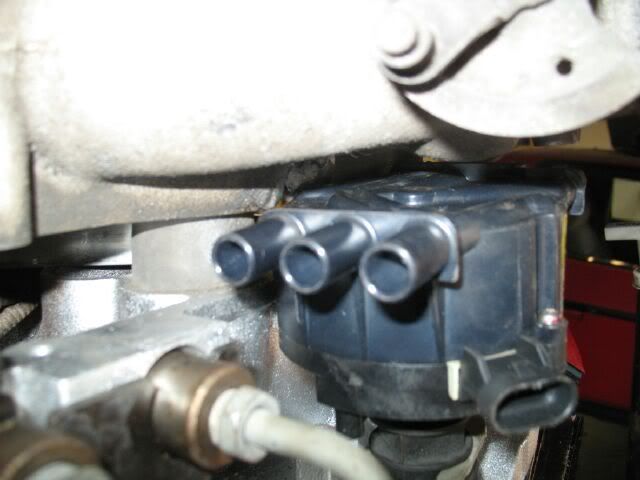
What I have learned so far: The housing of the dist is plastic, not aluminum (I will rule out cutting the shaft now). The EGR boss in the upper intake must be ground off (and sealed) to clear the dist. I think I could cap the lower EGR boss and drill the EGR port and plumb it to the center of the manifold to keep EGR function. The lower vacuum port on the throttle body needs to be removed to clear the dist. The dist will fit (shown with about a 1" spacer), but has very limited ability to be rotated. The hold down bolt will not line up with the boss in the intake for it. Getting the dist to line up on #1 with the engine at TDC is going to take some work/verifying. There are only 3 wires to the dist, but the original one has 6. This could be a major issue - need to check some wiring diagrams.
After messing with the dist, it was time to work on the coolant tubes. They are made from black pipe (3/4"). The front one is pretty much done except preparing it for paint.
The side one is still a work in progress. The pipe is bent to the general shape and connected to the water pump. I still need to figure out the mounting brackets for it.
I also picked up the needed fittings to finish up the oil lines. Also drilled and tapped the OEM bypass assemby for 3/8" pipe thread. The oil system should be completed on Sunday.
[This message has been edited by fieroguru (edited 01-12-2008).]
IP: Logged
06:20 PM
3.8 SC Member
Posts: 577 From: On the Great Lakes-Ohio Registered: Dec 2003
Ah! McMaster-Carr, I use them alot, mostly at work and they are about 30 minutes from me. As for my cradle, I just need to figure out the tie rods ends before I go cutting it up. One possible way, is to mount the tie-rod ends brackets to the side of the new cross member that I will be welding in. I just hope, I don't mess up the suspension geometry.
IP: Logged
08:44 PM
PFF
System Bot
Jan 13th, 2008
DIY_Stu Member
Posts: 2337 From: Republic of TX Registered: Jun 2007
The engine that dizzy comes from has a Crank Trigger. If you look at the timing cover you will see the location for the sensor. The crank trigger takes the place of the magnetic pick up on the dizzy. I think. I don't have diagrams or 1st hand knowledge of this though. But the engine that diz is for does have the crank sensor.
[This message has been edited by DIY_Stu (edited 01-13-2008).]
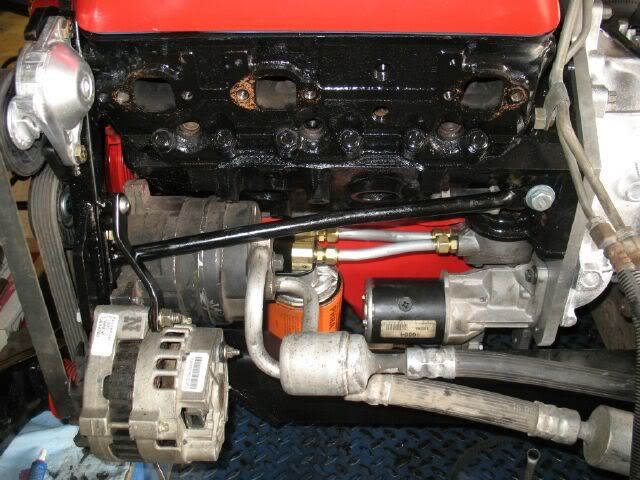
Here is the completed remote oil filter assy (and a good pic of the oil pressure sender). I am much happier with this than the one before with the lines crossing over:
Here is a pic of the accessory bracket stabilizer rod and the AC lines going back on. I pulled the lines out to clear the exhaust and to get some additional clearance from the + terminal on the alternator:
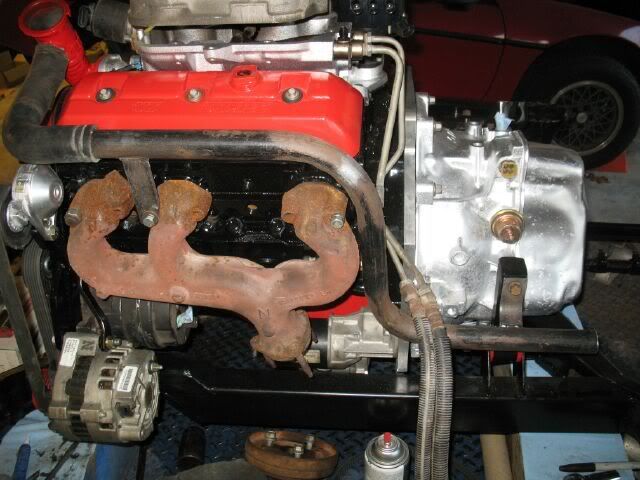
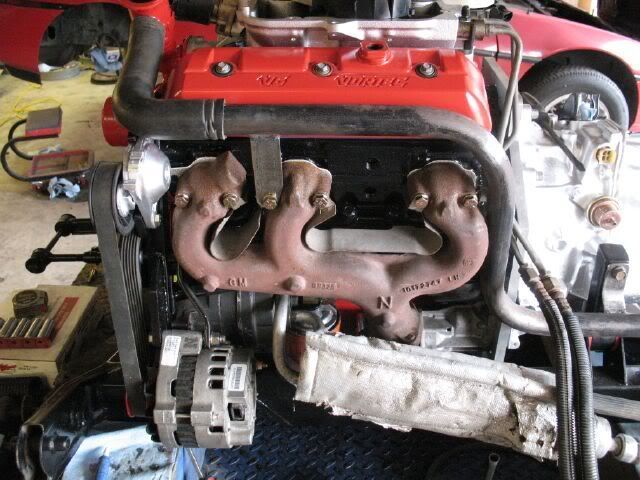
Here it is with the exhaust manifold and coolant tube - pretty much ready to go expcet painting the coolant tube (too cold to do it today):
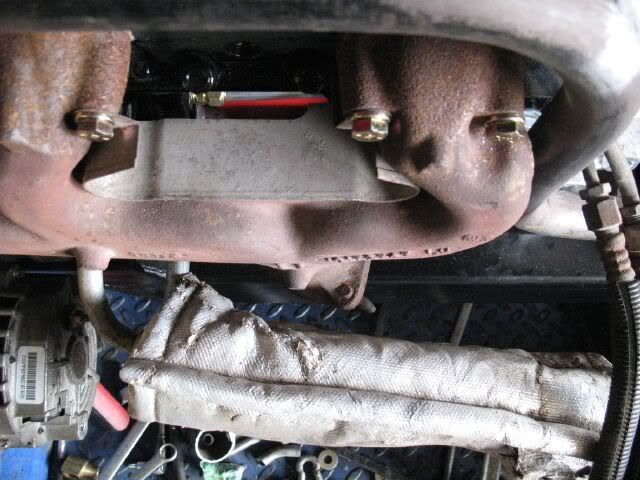
Here is the clearance between the AC lines (with insulated jacket) and the exhaust manifold:
Here is the front coolant tube with the support brackets welded on. There is a little more than 1" of clearance between the tube and the cradle:
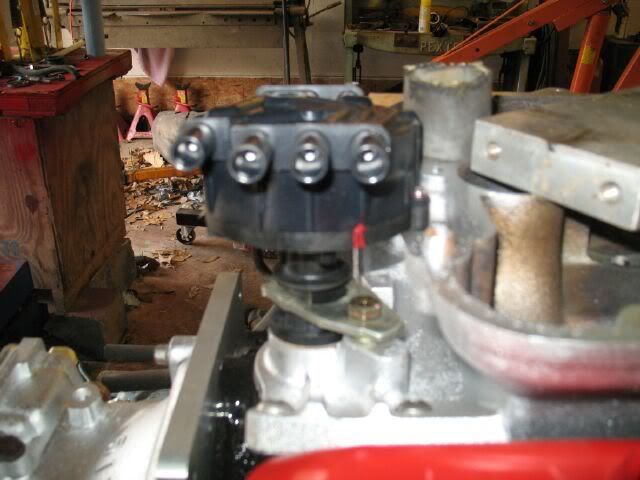
Then it was back to the Dist. I figured out that the dist had an upper and lower mounting surfaces with the flats to line up the distributor in different locations. The top one lines everything up nice.
I looked inside the dist and there is just about nothing in there, just a ring that blocks a sensor 50% of the time (probably to reference the crankshaft sensor and know which cylinder needs to fire). There is not enough room to gut the crab dist and swap the guts from the conventional dist into it, so I either have to do the mods to use the crab dist, or put the intake on the normal direction and use the original dist.
I need to do some more digging, but I suspect I will not be able to get the dist to work with my current ECM without some major help. If my current ECM will work with the crank trigger, then I would still need to buy the proper timing cover/reluctor wheel/sensor and spend more $$$. I could switch to the OBDII 4.3 ecm and easily get the dist to run, but then I would have issues since I am using a non-ecm controlled auto and would probably have to use the manual program and modify the trans to lockup in 4th internally. The intake flip is not looking good at this point, and I am pretty much to the wirng stage and need to finalize the intake orientation...
fieroguru What is that insulated jacket made from and where can I get one? Do you intend to use one on the oil lines, too? Thanks, Egor. cowan1984 You have a PM.
------------------ ____________________________________________ "Of all the things I have lost during my lifetime, I miss my mind the most."
IP: Logged
05:30 PM
fieroguru Member
Posts: 12636 From: Champaign, IL Registered: Aug 2003
Originally posted by Egor: fieroguru What is that insulated jacket made from and where can I get one? Do you intend to use one on the oil lines, too? Thanks, Egor.
The insulated jacket around the AC lines is the stock fiero 4 cylinder part. It is made from fiberglass and foil backed. I may even add an aluminum shield around it too - keeping the head away from the AC lines is of significant importance. Summit and Jegs sells heat shields for starters made from a similar, but thinner material. I am not planning on doing any insulating on the oil lines.
IP: Logged
07:57 PM
fieroguru Member
Posts: 12636 From: Champaign, IL Registered: Aug 2003
87 Fiero GT 5sp with Vortec L35 4300 Turbocharged V6 Bully Stage 2 clutch Syclone intake manifold and engine management with Moates adapter and chip burner Air/water intercooler and Devil's Own progressive water/alky injection 50lb injectors, 3 bar map sensor, Walboro fuel pump and Jabasco Intercooler pump LM1 wideband on custom manifolds and 3" stainless exhaust system T31/T04B S4 turbo with a Super T61 in the box S10 caliper conversion. Murphy's Constant Matter will be damaged in direct proportion to its value Murphy's Law of Thermodynamics Things get worse under pressure. Arthur C. Clarke "Any significantly advanced technology is indistinguishable from magic"
[This message has been edited by vortecfiero (edited 01-19-2008).]
IP: Logged
12:29 PM
Jan 20th, 2008
3.8 SC Member
Posts: 577 From: On the Great Lakes-Ohio Registered: Dec 2003
A bump and any updates! I went to the steel supply warehouse, on Friday. I got 14' of 2 X 3 steel tubing. It was cheaper to buy it, that way. I will start on the modifications as soon as I see double digits, in temperture.
Don Z.
IP: Logged
09:25 PM
Jan 21st, 2008
fieroguru Member
Posts: 12636 From: Champaign, IL Registered: Aug 2003
No updates this week... Just too cold to get motivated, so I spent the week pondering the next round up upgrades for the SBC car - and took it out for a couple of spins when it was over 40.
That TPI throttlebody on the CPI intake is interesting. Is the stock throttle body a restriction, or was it done for the challange of it?