I noticed that on the exhaust port you went to the flap wheel but not further. I noticed as I was learning, that a compressed paper bit put a very nice polish on the exhaust port.
There must be a reason you did not go the extra step.
Please give me your wisdom. Much of what you are doing will affect my next porting job coming this winter.
Arn
IP: Logged
10:40 AM
prostreet505 Member
Posts: 426 From: Wind Lake, WI 53185 Registered: May 2007
I noticed that on the exhaust port you went to the flap wheel but not further. I noticed as I was learning, that a compressed paper bit put a very nice polish on the exhaust port.
There must be a reason you did not go the extra step.
Please give me your wisdom. Much of what you are doing will affect my next porting job coming this winter.
Arn
I have heard that using the compressed paper bit does leave a nice polish to the port but, upon running the engine the paper polish does not hold up and have any lasting benefits. I do not know this to be true or not, it is just something that I heard. Plus this engine will mainly be used for street driving and an occasional trip to the 1/4 mile strip. The gains of the paper polish in my opinion would be very minimal. With the polish job on these heads and the headers and exhaust that will be run on this engine, it is going to breathe really well. The headers are 1 5/8 primary tubes that are going to dump into a 2 1/2 exhaust.
Craig
IP: Logged
11:47 PM
Jan 15th, 2008
87_special Member
Posts: 266 From: San Diego, CA Registered: Oct 2006
I applaud you for such and interesting, informative thread. I do realize that this is a budget build, but there are a few things that need to be discussed.
1. Engine Cleanliness. Just washing off the old oil and painting the exterior will not properly clean an engine. You really need to take out the 3 oil galley plugs on each side of the block. They are located around the cam. Then a good brushing or chemical cleaning is in order. That will insure that any sludge/build-up/debre is removed. These are the passages that feed oil to the bearings/lifters. If one is stopped up, you will starve oil to a certain part.
*A machine shop "cleaning" would involve removing all plugs and either soaking in chemicals or baking & shot blasting. This thoroughly cleans every oil/coolant passage, removes gaskets, removes rust deposites.
2. Not all engines will be in as good of shape as your's. I've seen many, many wore out sbc engines. Many used engines will have cylinder wear and will require machine work. You also got lucky that your crank is in very good shape.
3a. Lapping in the valves is in no way a substitute for a good valve-job. As stated above, your engine is in quite good shape with very little wear. Most sbc engines from the junkyard will require a valve-job. Lapping in the valves only does so much.
3b. Please, at the very least have those used heads magnafluxed for cracks. You wouldnt believe how many sbc heads I throw away a due to cracks in the combustion chamber. It's good insurance, I'd hate to have to remove a head in a v8 fiero.
I think that is about it. Like I said, you're doing a good thing here posting this information. I'm in no way flamming you at all. If it matters, I work at a machine shop and I've learned the right & wrong way to clean, prepare, and build and engine.
Good luck with the goals. -Joseph
IP: Logged
02:04 AM
KurtAKX Member
Posts: 4008 From: West Bloomfield, MI Registered: Feb 2002
After this engine is dynoed, I want to see the gains from doing nothing other than switching from the base heads (the same ones I had on my 305, btw) to the Vortec 305 heads along with a similar matching intake manifold. Vortec 305 heads are cheap too, because they are not the "popular" ones.
These L69 heads you are using are the same castings as the the regular LG4 165hp 305 version, but cut for bigger (up to 1.84"from standard somewhere around 1.72") intake valves, btw.
Those valves, the cam, and a few other minor details were what made a 165 hp LG4 into a 190 hp L69. Even the TBI guys on thirdgen.org will tell you these heads are in no way wonderful, especially in their pre-porting form.
It looks like you've gone a decent way into increasing the useability of these heads, without suggesting any radical porting moves that could end a lot of new guys in trouble. Kudos.
Like said above though, if you have the money to be putting a SBC into a Fiero, you better have the money to get a good multi-angle valve job and magnaflux done too. IMHO, those are just basic rules of the territory that apply to anyone undertaking a Chevy build, for any purpose.
IP: Logged
03:11 AM
prostreet505 Member
Posts: 426 From: Wind Lake, WI 53185 Registered: May 2007
I applaud you for such and interesting, informative thread. I do realize that this is a budget build, but there are a few things that need to be discussed.
1. Engine Cleanliness. Just washing off the old oil and painting the exterior will not properly clean an engine. You really need to take out the 3 oil galley plugs on each side of the block. They are located around the cam. Then a good brushing or chemical cleaning is in order. That will insure that any sludge/build-up/debre is removed. These are the passages that feed oil to the bearings/lifters. If one is stopped up, you will starve oil to a certain part.
*A machine shop "cleaning" would involve removing all plugs and either soaking in chemicals or baking & shot blasting. This thoroughly cleans every oil/coolant passage, removes gaskets, removes rust deposites.
2. Not all engines will be in as good of shape as your's. I've seen many, many wore out sbc engines. Many used engines will have cylinder wear and will require machine work. You also got lucky that your crank is in very good shape.
3a. Lapping in the valves is in no way a substitute for a good valve-job. As stated above, your engine is in quite good shape with very little wear. Most sbc engines from the junkyard will require a valve-job. Lapping in the valves only does so much.
3b. Please, at the very least have those used heads magnafluxed for cracks. You wouldnt believe how many sbc heads I throw away a due to cracks in the combustion chamber. It's good insurance, I'd hate to have to remove a head in a v8 fiero.
I think that is about it. Like I said, you're doing a good thing here posting this information. I'm in no way flamming you at all. If it matters, I work at a machine shop and I've learned the right & wrong way to clean, prepare, and build and engine.
Good luck with the goals. -Joseph
I'm not taking your post as a flame in any way, as I hope you don't take my comment that way. But your reply sounds like a sales pitch to try and get someone that knows nothing about engines to buy the complete job.
1. Engine Cleanliness. The exterior of the block was scrubbed with brake clean and a wire brush, then primed and painted. The interior of the block was inspected after disassembly, by me and there has been no evidence that there has been an oil distribution problem by the looks of the bearings and the crank and cam. So therefor I did not go into flushing the oil galleys.
2) I also have seen plenty of wore out sbc. With the build principles I am doing even a wore out sbc will greatly benifit from this build and will get many years of driving without an internal engine failure. I have built multiple engines in this fashion before and have had nothing but great results, one of which has aprox. 145000 miles on it and it is still going strong. Don't get me wrong there will be times that an engine has had a internal failure and machine work will be needed.
3a) Lapping the valves will get you a long way if done properly. And I never once said it is better than a good valve job, but lapping the valves in this fashion will give the builder years of trouble free valve sealing issues. Remember this is also a performance build, and after time the owner is going to get used to the performance level and want to get more out of the engine. Well we already have a nice carb, intake, camshaft, timing setup, distributor, and solid lower half. What is next in line for better performance? Better Heads!!! Edelbrock has a nice set of aluminum heads that will match the other parts that are already installed perfectly and up your performance level. So this I ask you, Why would I spend an extra $200.00 to $400.00 on a nice valve job when in 2 to 3 years I am going to want better performance and decide to get a set of aluminum heads and install them. Now I have a set of 305 heads with $400.00 stuck into them and I can't get $25.00 for them. That was money spent foolishly if you ask me.
3b) Have cast iron heads checked for cracks??? In my 16+ years in this field I have only seen 1 and I repeat 1 head that had a crack in it and it was due to a customer that drove the truck without any coolant for a long period of time while pulling a camper and he drove it untill the engine stopped. If you get a engine that hot to crack a cast iron head there is going to be more damage to the engine than just a cracked head.
I also do machine work on engines and I know what you can and cannot get away with while building a engine. Alot of what you have said is true in a company that has to offer a warranty on there workmanship.
I am not attacking your comments I am just stating my opinion based on what I have seen and what I have done in the past.
Craig
IP: Logged
11:45 PM
prostreet505 Member
Posts: 426 From: Wind Lake, WI 53185 Registered: May 2007
After this engine is dynoed, I want to see the gains from doing nothing other than switching from the base heads (the same ones I had on my 305, btw) to the Vortec 305 heads along with a similar matching intake manifold. Vortec 305 heads are cheap too, because they are not the "popular" ones.
These L69 heads you are using are the same castings as the the regular LG4 165hp 305 version, but cut for bigger (up to 1.84"from standard somewhere around 1.72") intake valves, btw.
Those valves, the cam, and a few other minor details were what made a 165 hp LG4 into a 190 hp L69. Even the TBI guys on thirdgen.org will tell you these heads are in no way wonderful, especially in their pre-porting form.
It looks like you've gone a decent way into increasing the useability of these heads, without suggesting any radical porting moves that could end a lot of new guys in trouble. Kudos.
Like said above though, if you have the money to be putting a SBC into a Fiero, you better have the money to get a good multi-angle valve job and magnaflux done too. IMHO, those are just basic rules of the territory that apply to anyone undertaking a Chevy build, for any purpose.
I never said these are great heads. I said that these heads flowed pretty well for there time. Just like the double hump heads, they flowed great for the time era. As for the valve job and magnaflux, read reply above to explain why valve machining was not done.
I happen to think that for the type of build and the parameters put up at the start of the thread, he is doing a perfect job.
to some of the comments, multiangle valve jobs are a waste of money on older heads, even with a port/polish. the gains are minimal,if any and when you put that into the $ per hp equation, not worth it. On a modern high flow head designed for multiangle valve jobs, it will make a differrence. This IS a budget build, remember. the teardown of the motor will yield alot of info on the state of the block, careful bearing inspection will show oiling problems. Seeing the factory crosshatch will indicate good care and proper fuel mix on a reasonable mileage motor. Cracks in heads? I too have to say they are rare in iron heads. I've seen a good mechanic build a motor with no shop service, and jcwhitney parts and out perform the original factory motor. So those with a tight budget should really learn from this thread, follow a plan like this and you wiull have a reliable long lasting motor with a nice kick in the performance department. again, nice job, and kudos for taking the time to post the pics and explain each step.
IP: Logged
06:44 AM
PFF
System Bot
prostreet505 Member
Posts: 426 From: Wind Lake, WI 53185 Registered: May 2007
I happen to think that for the type of build and the parameters put up at the start of the thread, he is doing a perfect job.
to some of the comments, multiangle valve jobs are a waste of money on older heads, even with a port/polish. the gains are minimal,if any and when you put that into the $ per hp equation, not worth it. On a modern high flow head designed for multiangle valve jobs, it will make a differrence. This IS a budget build, remember. the teardown of the motor will yield alot of info on the state of the block, careful bearing inspection will show oiling problems. Seeing the factory crosshatch will indicate good care and proper fuel mix on a reasonable mileage motor. Cracks in heads? I too have to say they are rare in iron heads. I've seen a good mechanic build a motor with no shop service, and jcwhitney parts and out perform the original factory motor. So those with a tight budget should really learn from this thread, follow a plan like this and you wiull have a reliable long lasting motor with a nice kick in the performance department. again, nice job, and kudos for taking the time to post the pics and explain each step.
I have to say thanks for the support on the valve issue and on this build in general. I have gotten alot of crap from this build. I am just trying to show people that you can build a decent performing engine yourself that won't break your pocket book. I am glad to see some of the responses and positive input from people giving advice and different techniques on how they have built some of their engines. This will be helpful information for the builder when they decide to look back on this thread for advice. To tell you the truth, there really has not been alot of flame ups in this thread. Which is a good thing. I don't know if everybody is laying back in the weeds waiting for the right moment to strike or if they are getting some usefull information from the thread. Thanks to everybody for the support.
Now back to the build:
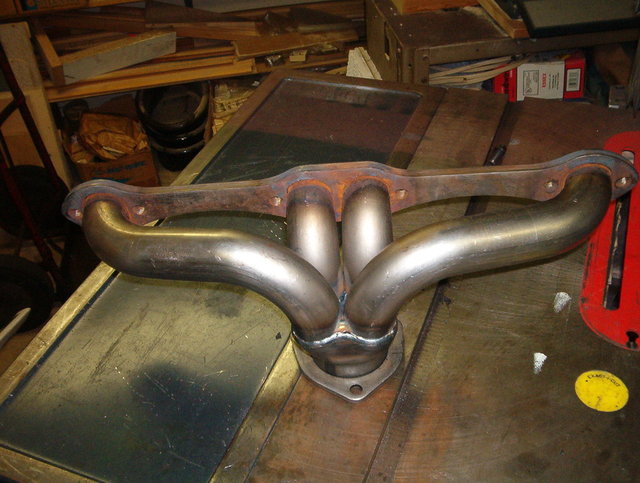
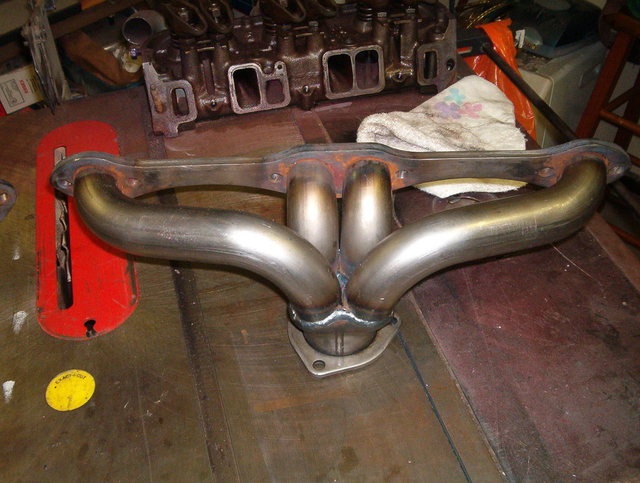
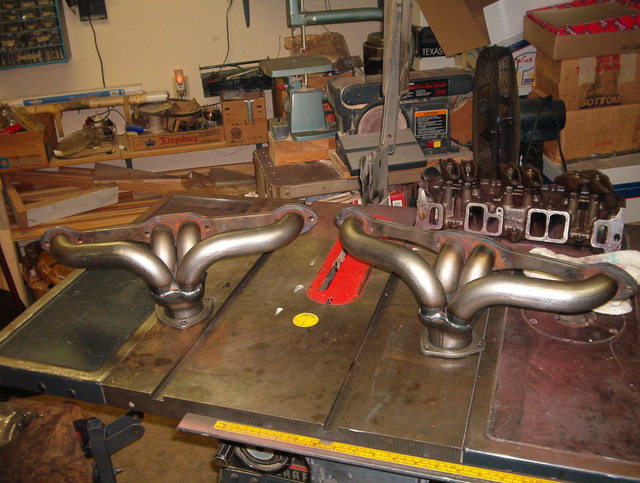
I was originaly going to fabricate my own headers, but then if someone is building the exact engine they would get different performance levels. So I decided to do a little research on some headers and found a set of headers made by patriot that will work pretty good on this build and still be able to work in the fiero. They came in 3 different styles, 1) Stainless Steel $384.00, 2) Ceramic Coated $253.00, 3) Raw Steel $150.00. I choose the raw steel because of the price. I am however to to ceramic paint them with High Temp Exhaust Ceramic Paint and they will look and hold up just like the ceramic coated headers for a fraction of the price. These headers have the 1 5/8 primary tubes that dump into a 2 1/2 collector. They stick out 5" from the head and are only 6" long They will also work with angle plug configurations and the ZZ4 D-Port heads.
The headers look good and are a good price for the build. Mandrel bent pieces to fab up a set would cost more. From a design perspective, if you went to a tuned header length in stead of the shorties, what would the net gain be? Are we talking, on the 305 maybe 10-15 hp?
Arn
IP: Logged
09:18 AM
prostreet505 Member
Posts: 426 From: Wind Lake, WI 53185 Registered: May 2007
The headers look good and are a good price for the build. Mandrel bent pieces to fab up a set would cost more. From a design perspective, if you went to a tuned header length in stead of the shorties, what would the net gain be? Are we talking, on the 305 maybe 10-15 hp?
Arn
I could make my own for cheaper. I have access to a place where I could bend my own primary tubes up out of 1 5/8 stainless stock, but I want everybody else to have access to the same parts that I am using on this build along with a close price range for parts. If I went with a tuned header for this application I could expect a gain of 20 hp give or take alittle, but a tuned header would give the engine a better torque curve. So in my personal opinion it would not be worth the money for someone to pay somebody to have a set of custom tuned headers made unless they are going to be dragging the car where their ET is going to be affected. You will not notice the loss in hp or torque with the headers that I chose to use if this engine is a daily driver.
First great thread. But I do have to ask something.
quote
I choose the raw steel because of the price. I am however to to ceramic paint them with High Temp Exhaust Ceramic Paint and they will look and hold up just like the ceramic coated headers for a fraction of the price.
What coating are you going to use? I tried the spray on type that you spray then run the motor to set the paint. It lasted a month. I cleaned the parts again and had the same results.
IP: Logged
07:55 AM
prostreet505 Member
Posts: 426 From: Wind Lake, WI 53185 Registered: May 2007
First great thread. But I do have to ask something.
What coating are you going to use? I tried the spray on type that you spray then run the motor to set the paint. It lasted a month. I cleaned the parts again and had the same results.
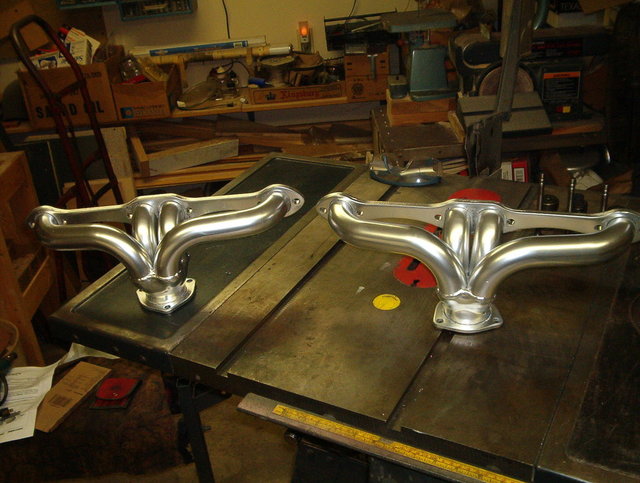
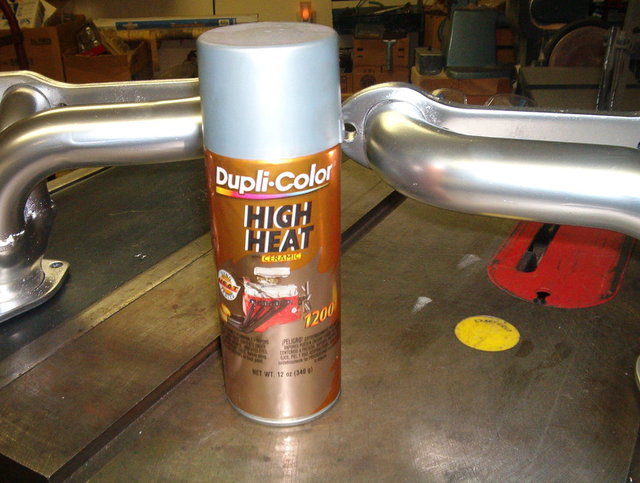
The paint I am going to be using is made by Dupli-Color and is called High Heat with Ceramic. It is good up to 1200 degrees. I have used this multiple times and I have never had a problem with it. I've painted alot of exhaust manifolds and headers with this paint and they still look like the day I painted them. I will post a pic of the can of paint and the finished headers this weekend.
Craig
IP: Logged
10:44 PM
Jan 19th, 2008
prostreet505 Member
Posts: 426 From: Wind Lake, WI 53185 Registered: May 2007
I have not forgot about this build. I have been busy with purchasing another shop that by summer should be up and running under the name of "Fieros Unlimited of Wisconsin", and have been busy with Dozol's build. I should have updates to this thread this weekend. I just wanted to let everbody know that I didn't forget about this thread.
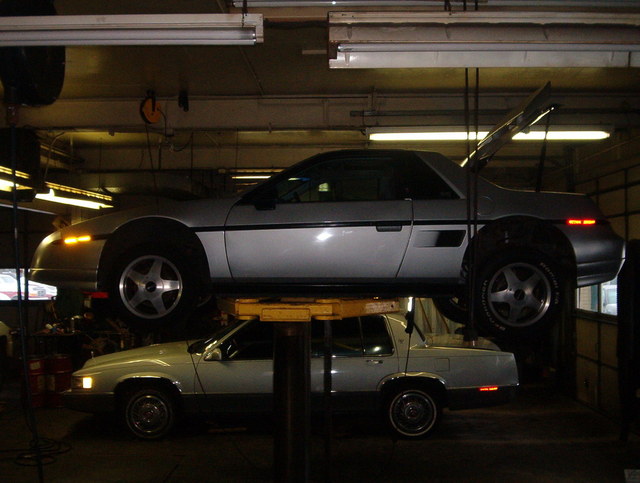
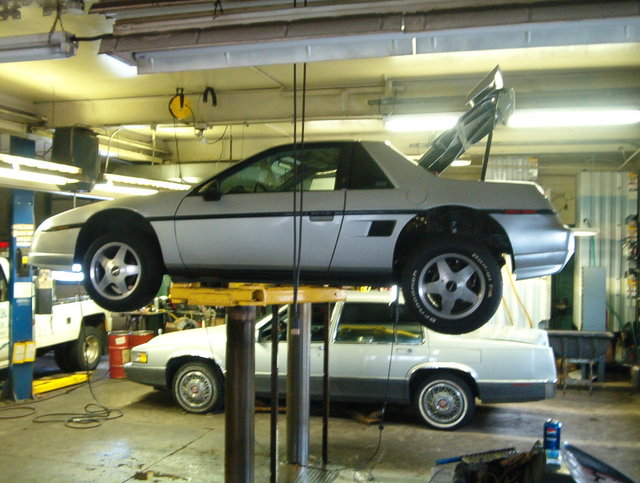
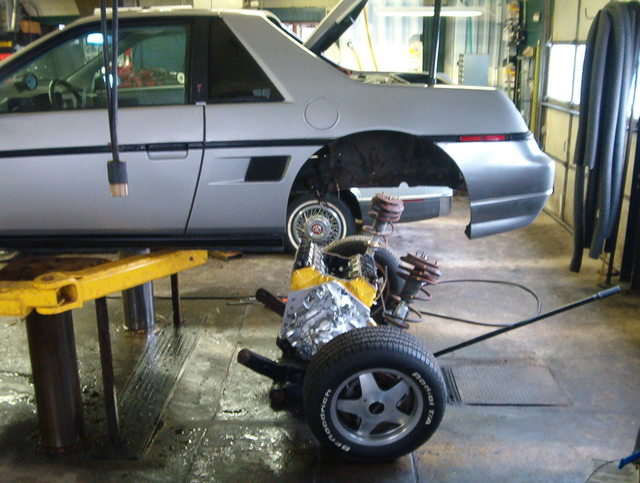
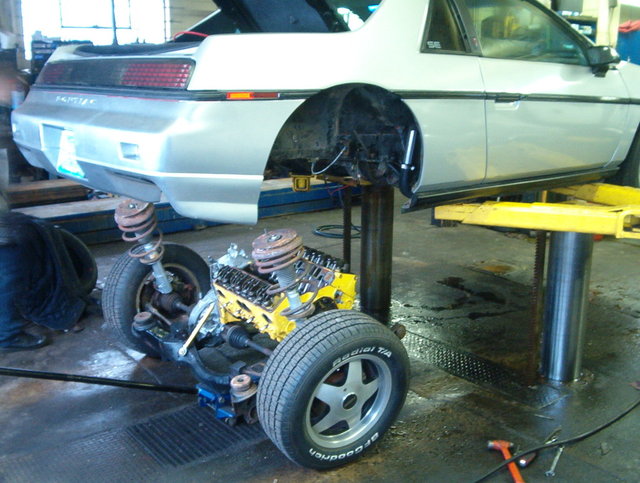
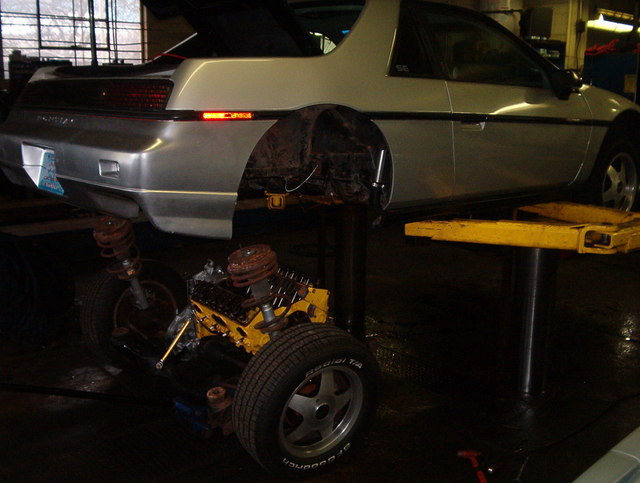
Sorry everybody, I have been super busy with dozol's build and work that I have not had much time to post pics of the engine. I will have some pics up this weekend of the finishing touches of the engine, but in the mean time here are some pics of the car that the engine will go into for the tuning and the dyno run. I had to remove the junk 350 out of the car:
Getting the car ready for the cradle drop:
Lifting the car off the cradle:
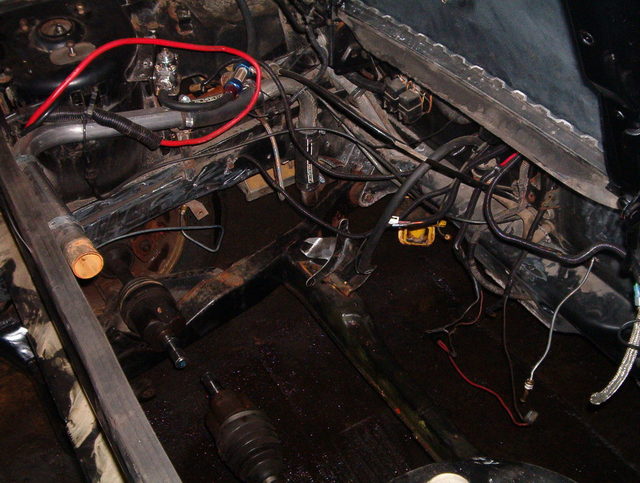
The cradle reinstalled and getting the engine compartment ready for total make over:
More to come...
Craig
IP: Logged
12:10 AM
Feb 24th, 2008
prostreet505 Member
Posts: 426 From: Wind Lake, WI 53185 Registered: May 2007
It has been awhile since I updated this thread, so I better update it before everybody forgets about it.
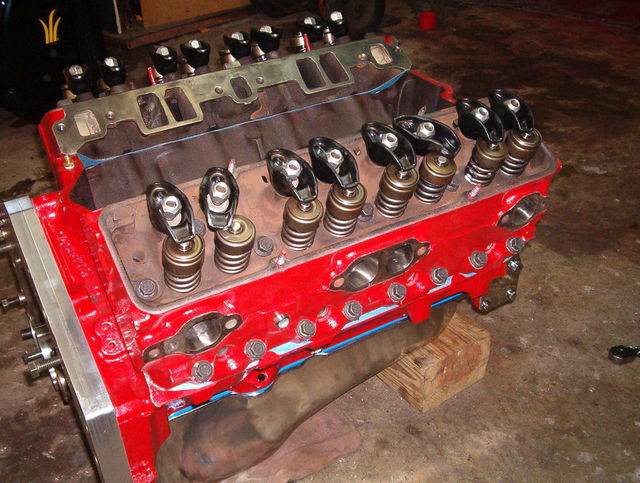
Since the work has been done to the heads I came across a good deal on new valves and new edelbrock sure seat valve springs. So I installed them onto the heads.
Now you want to install the new head gaskets, heads, and head bolts, and torque the head bolts to 65 ft lbs. Make sure you add sealer to the head bolts that go into coolant jackets and add alittle oil to the washer of the bolt. Also make sure you get the tightening sequence of the head bolts for your specific engine:
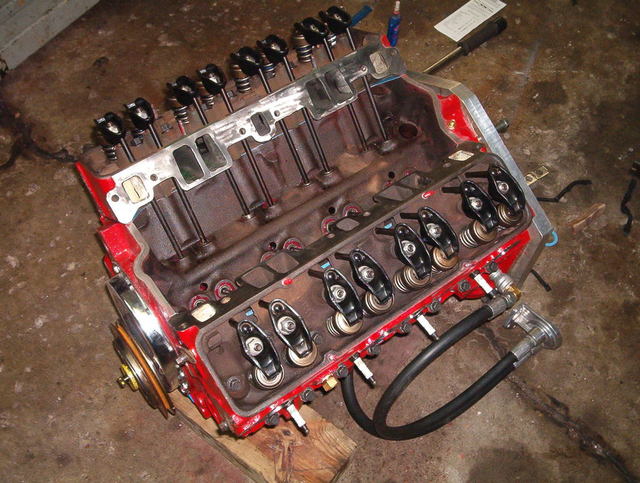
Now that the heads are installed you can install your lifters and push rods and set your valve lash:
� VALVE ADJUSTMENT 1. Turn the engine over until the No. 1 cylinder exhaust lifter starts to move up. At this point install adjusting nut on intake rocker arm and adjust to zero clearance between rocker arm and valve tip. From this point turn adjusting nut down (clockwise) 1/4 turn more for final adjustment. 2. Turn the engine over again until the intake lifter just stops coming down. At this point install adjusting nut on exhaust rocker arm and adjust to zero clearance between rocker arm and valve tip. From this point turn adjusting nut down (clockwise) 1/4 turn more for final adjustment. 3. The above procedure assures correct hydraulic lifter preload. Repeat this procedure for each of the other seven cylinders.
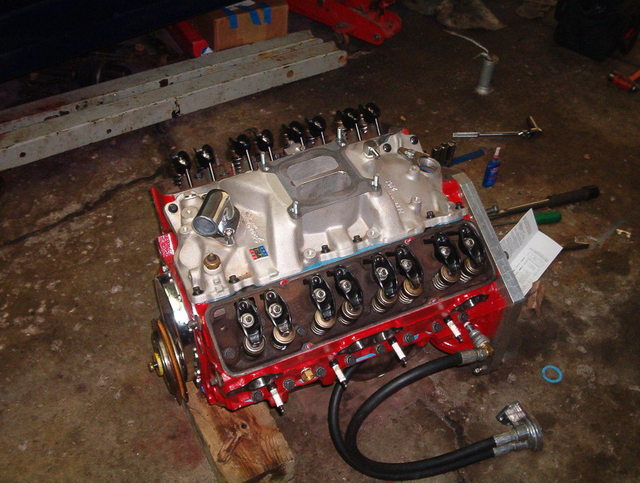
Now that your valve lash is set you can install your new intake gaskets and intake manifold and torque to 25 ft lbs. I use RTV for the intake end gaskets in place of the rubber end seals. The rubber end seals always seam to leak after a while. I also add sealer to the intake bolts that are by the coolant runners.
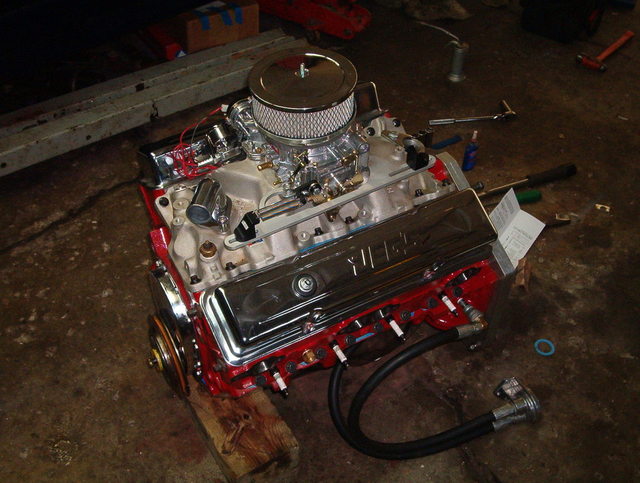
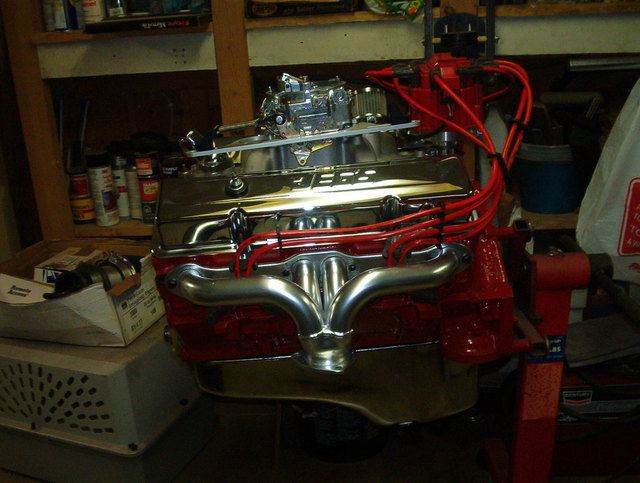
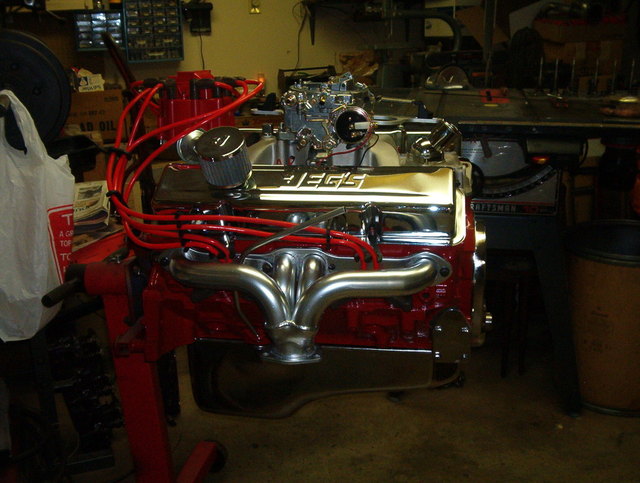
Now you can install the carb, valve covers, headers, and distibutor of your choice:
The engine on the stand before the heads and intake were torque down so I could make up the direct fit plug wires:
On the first start of the engine, you should run the engine above 2000 rpm for 30 min. Vary the engine speed between 2000 and 2500 rpm during the entire break-in period. This helps break in all the new parts.
You have just rebuilt your own engine.
Now comes the fun part. Installing it into the car and taking it over to the dyno once the engine has been totaly broken in.
Anyone what to take a quess what the hp. is going to be?
I will update the parts and price list at the begining of this thread later this week.
Craig
IP: Logged
11:21 PM
tjm4fun Member
Posts: 3781 From: Long Island, NY USA Registered: Feb 2006
A thing of beauty! nice job, will be good to see the final wrapup. I won't guess on the hp, would have to go back and re-read the whole thread for all the parts. btw what hp? at the wheel or the derived crank? maybe I'll guess later...
IP: Logged
11:56 PM
Feb 25th, 2008
prostreet505 Member
Posts: 426 From: Wind Lake, WI 53185 Registered: May 2007
Here is the updated price list so you don't have to go back through the thread to try and find it.
150.00 (engine) Junk Yard 4.00 (brake clean) Checker Auto Parts 4.99 x2 (engine paint) Checker Auto Parts 6.99 (anodized paint) Checker Auto Parts 6.00 (valve grinding compound) Checker Auto Parts 121.99 (intake) Jegs part #350-2101 166.99 (cam kit) Jegs part #350-7102 252.99 (carburetor) Jegs part #350-1405 129.99 (gear drive) Jegs part #555-20311 170.00 (re-ring kit) G-Force Auto "includes piston rings, all bearings, and all gaskets" 40.00 (1.5 long slot rocker arms) G-Force Auto 20.00 (push rods std lenth) G-Force Auto 53.00 (valve springs) Jegs part number #350-5703 50.00 (valves) Racers Outlet 10.00 (carb fuel line) Checker Auto Parts 18.00 ( fuel line fuel psi gauge) Jegs part #555-41040 14.00 ( timing cover) Jegs part # 778-66151 20.00 (oil pan) Ebay 20.00 (valve covers) Jegs part # 555-50101 45.00 (Pro-Comp distributor) Gr8 Hot Rods 8.00 (Dist. dress up kit) White Performance 12.00 ( swivel T-Stat housing) White Performance 70.00 (throttle bracket) Jegs part # 555-15230 50.00 (roll of spark plug wire) Federated Auto Parts 10.00 (spark plug boots and connectors) Federated Auto Parts 40.00 (cylinder hone) Federated Auto Parts 60.00 (ridge reamer) Federated Auto Parts 150.00 (makita rotary tool) 50.00 (carbide burr set) 40.00 (port & polish kit) 10.00 (engine assembly lube & grease) 20.00 (head bolts) Grand Total: $1828.93
If I forgot anything please let me know.
Craig
[This message has been edited by prostreet505 (edited 02-28-2008).]
IP: Logged
01:17 AM
linuxpowered88 Member
Posts: 1220 From: Johnson City , TN , USA Registered: Sep 2007
A thing of beauty! nice job, will be good to see the final wrapup. I won't guess on the hp, would have to go back and re-read the whole thread for all the parts. btw what hp? at the wheel or the derived crank? maybe I'll guess later...
Thanks, I was just curious what people thought this engine would produce at the wheels or at the crank.
quote
Originally posted by linuxpowered88:
looks good. Love this thread can't wait to see the dyno numbers. Maybe ill send you my 350 for more pep when im less broke lol
Thanks, You let me know what engine you have and what hp you want to get out of it and what your budget is, and I can build you a great engine.
Craig
IP: Logged
10:11 PM
Feb 26th, 2008
darkhorizon Member
Posts: 12279 From: Flint Michigan Registered: Jan 2006
My buddy did similar mods to his 305 in his Trans-Am and was able to get 287 peak rwhp which MUCH surpassed both of our expectations from rebuilding a carburetted 305 (arguably, the worst SBC). I'll call an optimistic 260-290hp.
IP: Logged
02:30 AM
linuxpowered88 Member
Posts: 1220 From: Johnson City , TN , USA Registered: Sep 2007
I think I could bet on the 300hp at crank so 260 at wheels. Thats a pretty impressive build. 45 Cubic inches wont make THAT much power difference if other things are similar setup. Displacement isnt anything without good flow. More flow more HP dont forget.
Seeing how I live my life a 1/4 mile at a time, I wouldnt mind seeing what it does at the track after the amazing dynojet dyno number is posted.
Is that a challenge? If it is, I accept. We don't have to go for any money, just the bragging rights is okay with me. The best 3 out of 5. We can set up a day in spring to meet at Great Lakes and make a day out of it. You see what I have into this engine. Thats what I will be running, no more, no less. You have my word on that!! Dyno numbers don't mean squat in my book if you don't know how to use the hp.
Originally posted by darkhorizon: Seeing how I live my life a 1/4 mile at a time, I wouldnt mind seeing what it does at the track after the amazing dynojet dyno number is posted.
quote
Originally posted by prostreet505: Is that a challenge? If it is, I accept.
Well, that just took an interesting twist. A real world budget build-up with a follow-on dragstrip proof run? Good on you, prostreet.
-fh
[This message has been edited by fierohobby (edited 02-27-2008).]
IP: Logged
11:16 AM
darkhorizon Member
Posts: 12279 From: Flint Michigan Registered: Jan 2006
I did not mean that as a challenge in the form of me vs you, even though I would entertain a friendly meeting and racing if I could afford it at the time.
All I was trying to say was I would be curious what it would run at the track, and you can provide proof of that in the form of video, time slips or the combination of the 2. The new wave of internet bench racing is a bit different then the older days of showing down at the track (or usually the street).
IP: Logged
02:08 PM
linuxpowered88 Member
Posts: 1220 From: Johnson City , TN , USA Registered: Sep 2007
I would entertain a friendly meeting and racing if I could afford it at the time.
I would pitch in if that is what it would take for you to stand up to one of your challenges. I for one was really dissappointed that you simply backed down to Archie like you did. I would have thought alot more of you if you would have simply stated that your challenge didn't involve any financial stakes but you still stood behind your challenge.
So let us know when you are going to stand behind one of your challenges and if I can make it I will buy you dinner or give you some gas money to help you afford it.
IP: Logged
07:23 PM
prostreet505 Member
Posts: 426 From: Wind Lake, WI 53185 Registered: May 2007
I did not mean that as a challenge in the form of me vs you, even though I would entertain a friendly meeting and racing if I could afford it at the time.
All I was trying to say was I would be curious what it would run at the track, and you can provide proof of that in the form of video, time slips or the combination of the 2. The new wave of internet bench racing is a bit different then the older days of showing down at the track (or usually the street).
I understand if you can't afford it at the time and you might be worried about something breaking and you have the chance of being stranded, but I would not leave you stranded at the track. I would tow you into the shop and have you up and running the next day at no charge to you. I don't hold a grudge against you, even though you tryed bashing the s**t out of me on your post on RFT. I just fiqured that this could have been a nice and friendly showdown of your 3800sc vs my sbc. If you can't do it at this time for whatever reasons you may have, maybe it will happen in the near future.
Just remember for your future posts DarkHorizon: If you are going to Talk the Talk, you better be able to Walk the Walk.
quote
Originally posted by darkhorizon:
Seeing how I live my life a 1/4 mile at a time, I wouldnt mind seeing what it does at the track after the amazing dynojet dyno number is posted.