ROTFLMAO. I'm thinking of having a local machine shop make an adapter to relocate the oil filter, someting like on the sbc conversions, but to fit the 4.X engines. I hate where the oil filter is on these things, no matter how many rags you use you still make a mess when changing the filter. Cheers Beers n Gears Joe I own pg 5
[This message has been edited by motoracer838 (edited 02-19-2006).]
IP: Logged
08:53 PM
crazyfieromike Member
Posts: 581 From: mentor ohio 44060 usa Registered: Mar 2002
Here's something that you don't read about every day. I've been obsessing over this swap for a year now and I've never heard this before, so here goes...
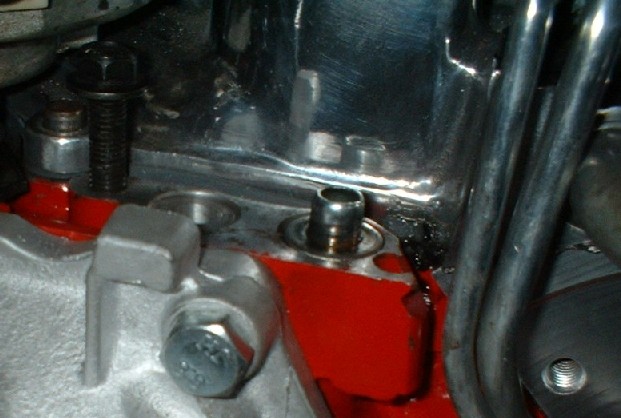
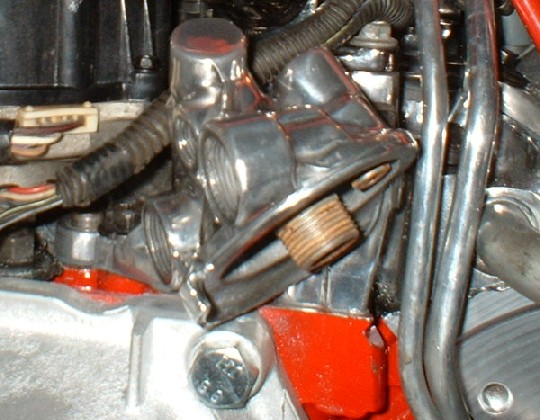
I finally got the oil filter valve assembly doodad thing clear coated. I had test fitted it before I put the Getrag on and it fit fine. So I went to put it on and found out that the Getrag has a big square chunk of aluminum right in the way for no apparent reason at all- I'm sure it helps the 2.8 somehow, but that's of very little interest to me. So I have to cut the square chunk off before I can put the oil filter thing on. Not a big deal, I had just never heard of this. I have two spare EYE-suzus in the garage and neither one of them have the square casting on them. All I can figure is that most 4.9 guys who have documented this swap used Isuzus and never ran into this Getrag specific thing.
i had that same block on my munsie 4 speed i had to cut it of when doing my swap .
IP: Logged
09:19 PM
GT Member
Posts: 911 From: Silver Spring, MD USA Registered: May 2003
I was re-reading this whole thread tonight and I came across something aaronus said about the LT1 throttle body. I didn't think it could really work at the time because of the ICS motor, but I took another look and it looks like the LT1 TB could bolt up to the upper Allante plenum with some new bolt holes and a new bracket for the ICS. I'm not sure what the TPS values are for the LT1 vs the Allante but I'm sure with a couple of resistors any difference could be overcome.
The stock LT1 bores seem to be 48mm. The Allante is 45 and 54. So, really the only TB I would be interested in would be a 54mm bored out unit. The stock LT1 unit would help off the line a bit but might choke the upper end. Something to think about...
-Rick
[This message has been edited by GT (edited 02-19-2006).]
IP: Logged
11:06 PM
Feb 20th, 2006
aaronrus Member
Posts: 870 From: bradenton, FL USA Registered: Nov 2003
I was re-reading this whole thread tonight and I came across something aaronus said about the LT1 throttle body. I didn't think it could really work at the time because of the ICS motor, but I took another look and it looks like the LT1 TB could bolt up to the upper Allante plenum with some new bolt holes and a new bracket for the ICS. I'm not sure what the TPS values are for the LT1 vs the Allante but I'm sure with a couple of resistors any difference could be overcome.
The stock LT1 bores seem to be 48mm. The Allante is 45 and 54. So, really the only TB I would be interested in would be a 54mm bored out unit. The stock LT1 unit would help off the line a bit but might choke the upper end. Something to think about...
-Rick
yeah, now thats what im talking about... i bet jon lagler knows if the tps is the same.. im willing to bet the values are, and if they arent, you can just have him change the hex values in the computer to match. if it doesnt fit exactly, might as well fabricate brackets!, hehehe. as far as upper end performance goes, thats where tuning comes in.. this whole thing will need new fuel and timing curves anyways, nothing about this is even remotely stock.. so what the hell, add the LT1 throttlebody..in fact, i think they sell even larger bored TB's on ebay as performace addons for the lt1 motors. somewhere in the neighborhood of dual 53 mm bores i think? the only difference with the LT1 TB is that it is single stage, not dual, the flaps open at the same time I believe, whereas the allante doesnt, but again, im sure all fo this can be compensated for with reprogramming the chip. the regular intake for the 4.9L is single stage, so perhaps parst of that program can be used.. ..
[This message has been edited by aaronrus (edited 02-20-2006).]
IP: Logged
11:39 PM
Feb 21st, 2006
GT Member
Posts: 911 From: Silver Spring, MD USA Registered: May 2003
I spoke to Bud at Bud's Outback today and he's of the impression that the LT1 TB could be made to work but I should get the engine running and tuned first before I make any more changes. And I wholeheartedly agree. Also he said that with my mods the engine should rev to 7000rpm. The problem is that the Caddy ECU maxes out in the tables at 6350rpm so I can't rev any higher. The 54mm LT1 TB will mostly help in the upper RPMs so until I switch to another computer that will let the engine rev it's sort of pointless to use the LT1 TB. Again, I agree. So. The 54mm LT1 TB is on the back burner for now...until I get it running right and feel the need for more power.
BTW, Bud's finishing up with those 1.7:1 rocker sets soon. I asked him about using the 1.7 roller rockers with Delta's max grind cam and my 1.94" valves and all the craziness I'm thinking about doing eventually. He said that I have to be careful with this engine because the head castings are too small to flow enough to make the kind of power I'm talking about. In order to open the exhausts up enough we'll hit the water jacket. So the heads CAN produce some power, but not CRAZY power.
So really if this engine's not powerful enough (which it SHOULD be), and the 1.7 roller rockers don't add enough power... it's time to switch to the ole SBC... I don't see that happening though!
IP: Logged
03:15 PM
Feb 23rd, 2006
aaronrus Member
Posts: 870 From: bradenton, FL USA Registered: Nov 2003
even if the engine CAN rev to 7 grand, which im sure it can, that doesnt mean you should run it up at 7 grand all day.. teh camshaft you put in there makes power from 1500 to 5500 rpm, after 5500, the power starts to drop off a bit, so revving to 7 grand is pointless, you actually lose performance. if revving that high is really that important to you, you can have jon lagler add rpm entries to the tables, but the reason the tables cap out at 6350( i thought it was 5800 ), is because the tps values max out at that RPM, i think. perhaps some others with experience can chime in here and explain this better than my speculations.
IP: Logged
11:36 PM
aaronrus Member
Posts: 870 From: bradenton, FL USA Registered: Nov 2003
even if the engine CAN rev to 7 grand, which im sure it can, that doesnt mean you should run it up at 7 grand all day.. teh camshaft you put in there makes power from 1500 to 5500 rpm, after 5500, the power starts to drop off a bit, so revving to 7 grand is pointless, you actually lose performance. if revving that high is really that important to you, you can have jon lagler add rpm entries to the tables, but the reason the tables cap out at 6350( i thought it was 5800 ), is because the tps values max out at that RPM, i think. perhaps some others with experience can chime in here and explain this better than my speculations.
IP: Logged
11:38 PM
Feb 24th, 2006
GT Member
Posts: 911 From: Silver Spring, MD USA Registered: May 2003
Jon's the one who said it won't rev any higher than 6350 because the Caddy tables don't go any higher.
I really don't need to rev this 5.0 to 7000. I want torque in the low to mid range, but I want it there stong throughout the whole intended range which means HP which means more flow. What I said was that BUD said that the larger TB would be useful higher in the revs. All I wanted this engine to do was rev to 6 grand and even then only occasionally. It was a revelation to me that Bud says it will rev to 7000. If a driver knows his engine and wants to shift to keep the car in it's peak power band, he will rarely take the engine to it's max rpm range. Even the TDC and N* start losing power at some point in the upper RPM range so it doesn't make much sense to run it to redline. My Honda V65 revs to 10,000. It doesn't start making real power until 5500 and then it's a rocket up through about 9500 where it starts dropping off a bit. So I never take it to redline.
The LT1 TB will be a cool and novel addition though. But I'll wait until I get the beast running and then play with the TB setup.
IP: Logged
10:57 AM
Mar 3rd, 2006
aaronrus Member
Posts: 870 From: bradenton, FL USA Registered: Nov 2003
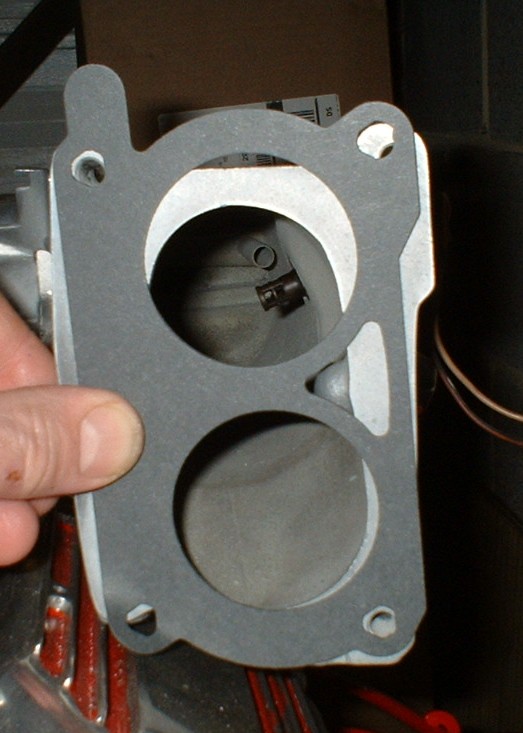
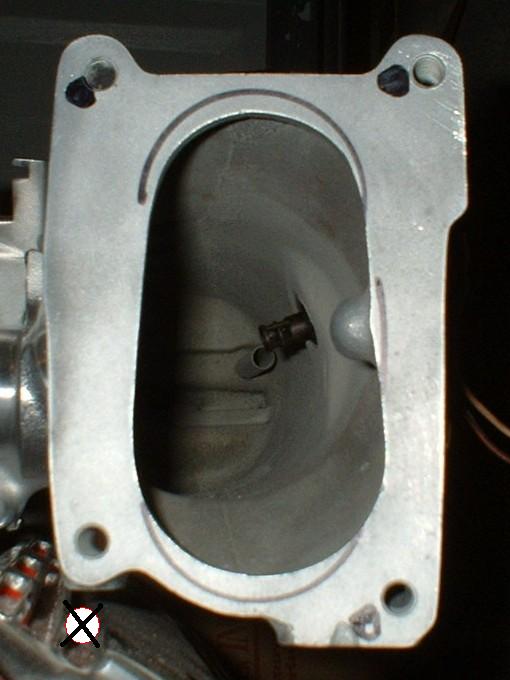
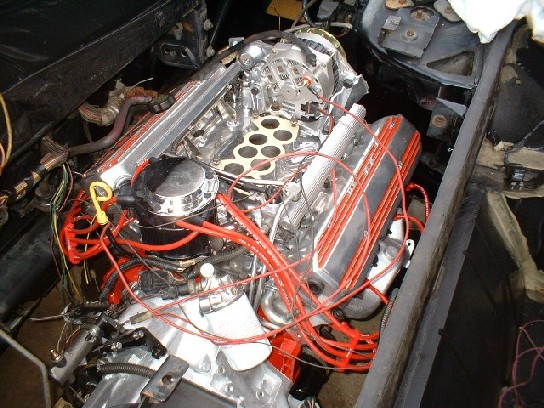
I got an LT1 TB gasket and even though I love the idea of the thing, it doesn't look like I have the 'skillz' to get it to work. It just doesn't fit:
I'd have to really hog out a lot to get the bores to fit, but more importantly I'd have to weld on more metal to get the bolt holes to line up. You can see in the second picture where the marker shows how much would have to come out. And you can see where the fourth bolt hole location doesn't even exist.
Definitely a project for WAY in the future...
IP: Logged
12:20 AM
Capt Fiero Member
Posts: 7658 From: British Columbia, Canada Registered: Feb 2000
Could you get me the casting numbers from the lower intake, the middle intake and if there is a number on the TB that too.
I went to an engine recycler and talked to them on Friday they had tons of 4.5 stuff but were unable to tell me if they had the "correct" 4.5 parts I wanted without a casting number.
IP: Logged
01:29 AM
PFF
System Bot
ducattiman Member
Posts: 674 From: TheNetherlands Registered: Mar 2003
Can u find maybe about 1/2 hard plastic or alumuim plate and make a adaptor and then taper the middle to flow with the manifold,,it is really not the hard to make it fit
IP: Logged
08:26 AM
GT Member
Posts: 911 From: Silver Spring, MD USA Registered: May 2003
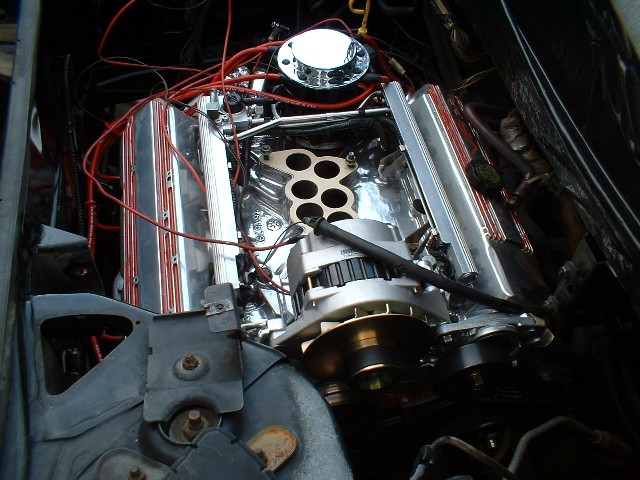
Great idea! Because there is actually a plate that has coolant running through it to stabilize the intake air temp. That plate coud be replaced with a custom piece that would transition rather well me thinks. Here's a picture of the stock piece:
IP: Logged
11:51 AM
Mar 12th, 2006
GT Member
Posts: 911 From: Silver Spring, MD USA Registered: May 2003
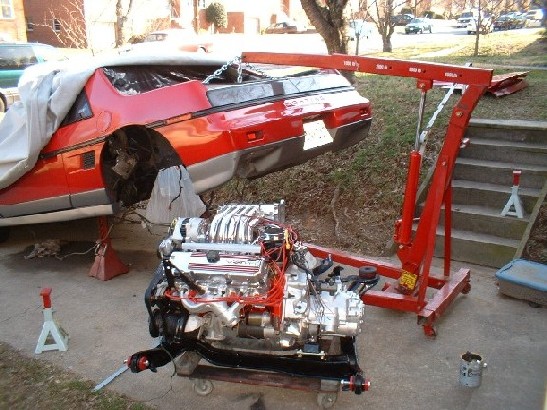
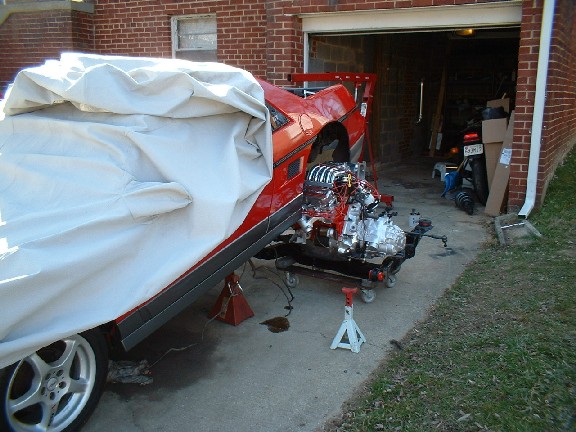
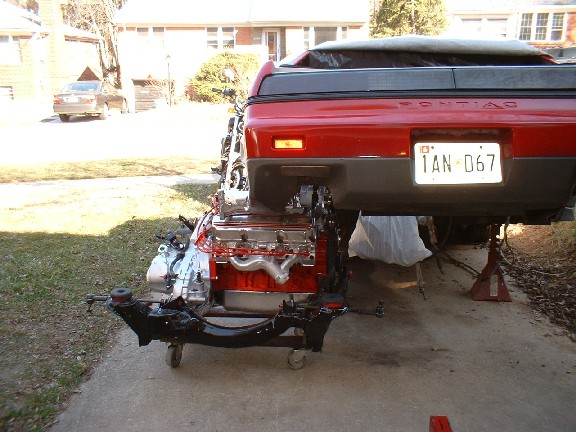
The day we've all been waiting for has finally arrived... I got the engine bolted in the car today with the help of fellow 4.9 owner Bill Horn.
A couple of notes on the install. With the Allante intake and alternator bracket there are a couple of things that don't fit:
1) The Allante alternator bracket hits the strut tower so the offending piece has to be cut off, not a big deal. 2) The upper intake plenum hits the dogbone mounting bracket that is welded to the Fiero chassis. I took the upper plenum off for now to get the engine in. I'll have to cut the bracket off in order to get the plenum back on.
Pictures:
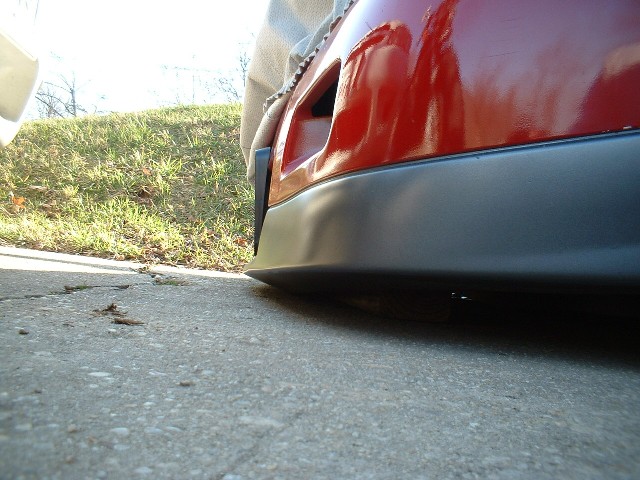
You can see that it's possible to get the engine under the car without the nose touching the ground. Don't know about other swaps but this one can be done with just a cherry picker and a pair of jackstands:
-Rick
[This message has been edited by GT (edited 03-12-2006).]
IP: Logged
01:12 AM
motoracer838 Member
Posts: 3751 From: Edgewater Co. USofA Registered: Jan 2006
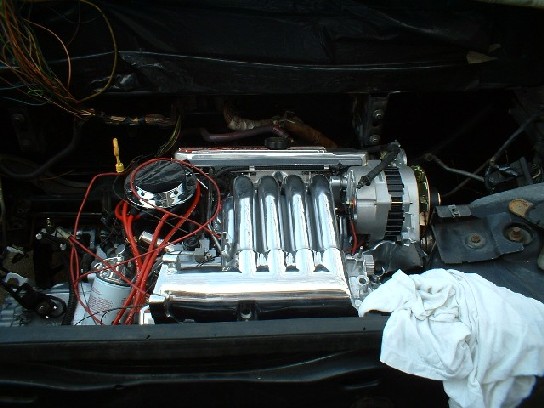
Part of the Allante alternator bracket hits the strut tower. I don't think it's an issue with the 4.9 alt bracket.
Decklid clearance is good with PBJ's front mount setup. Right now there's a little over 1/4" clearance. Once I get the decklid springs on there looks to be about 1/2"-5/8" clearance:
Egads it's dirty in that pic! All that will be painted for Carlisle...
-Rick
IP: Logged
06:12 PM
Mar 25th, 2006
motoracer838 Member
Posts: 3751 From: Edgewater Co. USofA Registered: Jan 2006
well, i would think you would want to switch to the 4.9L alternator bracket and alternator anyways, since the 4.9L alternator is 140 amps, as opposed to the allante's which is only 120 amps.
IP: Logged
03:02 PM
Apr 8th, 2006
FieroMaster88 Member
Posts: 7680 From: Mattawan, MI Registered: Nov 2000
I have hooked up the cooling lines, oil lines, fuel lines - all in stainless braided hose. The battery is moved to the front, I have a battery cable running from each battery terminal the length of the car. The positive runs to the starter and the negative runs directly to the block. Then there is a heavy guage ground jumpered from the block to the chassis, and a positive going from the starter to the junction block on the passenger side.
I was able to get the interior put back together (mostly) except for the center console. The radio works!!! Woo Hoo! I reinstalled my headlight assemblies with freshly rebuilt motors. They both go up and down quickly, quietly and in unison.
Yesterday I worked on wiring. So far I have hooked up the starter, alternator (which I may redo), the ICS, VSS, getrag backup light switch, distributor, and the fuel injectors.
I turned the key to see if the engine would turn over and it did!! Very exciting. Hopefully by next weekend I'll get all the sensors hooked up and be able to fire it up.
The bad:
Nothing... well, stainless braided hose is a PITA!!! And one of my new output seals on the Getrag may be leaking - I may have just spilled some when I filled it up. We'll see...
The ugly:
Still a lot of work to do. Once I get it running I'll need to check for leaks, knocks, ticking, etc. Then I'll have to have an exhaust put on or fabricate something to get it to Carlisle. It'll need an alignment as well. I'm not totally happy with the way the upper coolant hose is run. I'd like to get an extension so it'll go straight across the bay instead of sloping down. And I found a source for chrome plated plastic modular intake tubing that will look great with this engine. Plus I still need to install my rear antisway bar. Not a priority, but it would be nice to have on before they build the exhaust.
-Rick
[This message has been edited by GT (edited 04-17-2006).]
IP: Logged
09:21 AM
Apr 20th, 2006
GT Member
Posts: 911 From: Silver Spring, MD USA Registered: May 2003
HOLY FREAKIN' HELL, SHE STARTED!!!!! WOOHOOO!!!!!!!!!
I pissed away a couple of hours not being able to get it to start, so I went through all the systems and found that there was no spark. So I checked my distributor wiring and found that I had not hooked up a 12v+ to the coil. Once she had power, BLAM!! Started right up! Open exhaust manifolds too, the neighbors were cheering,
Still a lot of work to do, but it's alive, IT'S ALIVE!!!!! MWAH HA HA HA HAAAAAAA...
[This message has been edited by GT (edited 04-20-2006).]
IP: Logged
04:49 PM
motoracer838 Member
Posts: 3751 From: Edgewater Co. USofA Registered: Jan 2006
If your neighbors are anything like mine, I don't think cheering is exactly the right word to use. Congrats on getting it fired up, your almost there now. Go have a few beers. Joe
IP: Logged
06:34 PM
GT Member
Posts: 911 From: Silver Spring, MD USA Registered: May 2003
Hey Joe, I'm pretty lucky I guess. My one neighbor used to race Porsches back in the day and the others are all pretty cool. They've all seen me go through this engine swapping thing back in '98 when I did my 3800SC. As I recall I had a hard time getting that one to start at first too. I had built a 50hz signal generator to make the passkey work. But on the circuit board I had a pot because I wasn't sure of the exact value to get 50hz so I'd turn the pot a little, try to start it, turn the pot a little, try to start it, and so on. Finally it fired right up. Still didn't sound as cool at this V8...
It only ran for a few seconds today before I shut it off but man that thing sounded good.
Got a couple of gotchas, like how to send a signal to the temp guage, and how to hook up the A/C. Anybody have any ideas?
IP: Logged
09:02 PM
crazyfieromike Member
Posts: 581 From: mentor ohio 44060 usa Registered: Mar 2002
Rick; On the temp guage I added a Fiero temp sending unit to the housing that the heater hose connects to, by drilling and taping the housing. There is a three wire cts sender that will replace the standard cts and send a signal to both the ecm and the temp guage, I have no idea what the p/n for it is. Anybody know what it is?
As for the ac mine isn't hooked up yet but as summer aproches I need to do this.
It's good to know that you have good neighbors, the local crank lives across the street form me, and I have no doubt that she hated the days between my getting it running and taking it to the muffler shop to finish the exaust. iIt was almost a week between starting it and going to the muffler shop. I started it several times each evening Ha Ha, it sounded so good with the custom manifolds and y pipe that I couldn't help myself!! Cheers. Joe
due you buy chance have the part numbers for the coolent tubes (pipe to engine) and the hoses you used for the heater core lines
I used what Rockcrawl recommends on his site. The upper hose was from a 4 cylinder Fiero that goes to a T and a screw on cap, then I went from that to the t-stat housing with a straight piece of hose. The lower hose is the lower hose from a 4 cylinder Fiero. Heater hose on the back of the engine I just used a 3 foot length of 5/8 heater hose and on the front side I used the original heater hose. I used the Allante water pump outlet which puts the heater hose in a slightly different location than the stock 4.9, but it may work on yours as well. If not, a length of regular heater hose should do the trick nicely. Instead of trying to make a dirict route from outlet to inlet, you can use a longer piece and loop it to go the direction you need. Just don't loop it too tight or it'll crimp. Hope that helps. OBTW, Rockcrawl's site is http://www.fieroaddiction.com/caddy49e.html
quote
the local crank lives across the street form me, and I have no doubt that she hated the days between my getting it running and taking it to the muffler shop to finish the exaust. iIt was almost a week between starting it and going to the muffler shop. I started it several times each evening Ha Ha, it sounded so good with the custom manifolds and y pipe that I couldn't help myself!!
HA! Love it! Hysterical!
quote
NAPA # TS4020
It's what I'm using on my Allante intake.
David- I saw this advice that you gave on another thread so I went out and bought the 3 pin cts and pigtail at Carquest. I just don't know which pin goes to what. I tried boiling the 2 pin sensor (yellow and black wires) on the stove and the three pin sensor on the stove and measuring with an ohm meter and comparing the two to see if I could figure out which pins did what, but I guess I was in the sun too long yesterday and couldn't find the two pins on the 3 pinner that matched the resistance readings of the 2 pinner. Make sense? Could you please take a look at your sensor and let me know which pin (A,B,C) goes to which wire?
Rick
IP: Logged
07:53 AM
opm2000 Member
Posts: 1347 From: Versailles, Ky USA Heart of the Bluegrass Registered: Dec 2000
Thanks Kohburn, that means something coming from you. Tomorrow's the clutch system bleed . Converted from auto to stick so tomorrow could be a LOOOONG day...
I'm planning on using the same system you have for my belts. Just curious, how does this auto tensioner work? I looked at one the other day, I don't see a spot to put a ratchet on it and pull it back, is there a bolt or something loosen the tension? Thanks
IP: Logged
10:39 PM
Apr 23rd, 2006
GT Member
Posts: 911 From: Silver Spring, MD USA Registered: May 2003
The plastic pulley of the tensioner is attached to an arm which is spring loaded. So in order to remove the tension, you just turn the bolt in the center of the pulley which will turn the arm and release the tension.
IP: Logged
08:13 AM
GT Member
Posts: 911 From: Silver Spring, MD USA Registered: May 2003
Got the clutch hydraulics bled today. I have a new slave from CarQuest, a line from Ed Parks, and a rebuild kit on a second version master. I followed the directions on Archie's page and it worked great.
I ended up switching out the accelerator cable with a four cylinder version because my V6 cable wasn't nearly long enough. However, the 4 cylinder cable is maybe 3/4" too short so I'm thinking a bicycle or motorcycle chain link may be enough to extend it and make it work.
Once I get the throttle cable sorted out and set the timing I should be able to take her for a spin down the street- no exhaust yet. Sorry, I don't have a video camera with sound or a digital audio recorder. But the throttle response on this engine is incredible. There's none of this spooling up or down. You hit the throttle and immediately the engine spins up and then goes right back down.
IP: Logged
03:48 PM
Apr 24th, 2006
FieroMaster88 Member
Posts: 7680 From: Mattawan, MI Registered: Nov 2000


 So I have to cut the square chunk off before I can put the oil filter thing on. Not a big deal, I had just never heard of this. I have two spare EYE-suzus in the garage and neither one of them have the square casting on them. All I can figure is that most 4.9 guys who have documented this swap used Isuzus and never ran into this Getrag specific thing.