Thanks for the kind words Alex and Dennis. I don't know what to expect in the 1/4 mile. I know my 3800SC with 11lbs of boost ran a best of 13.1 in the quarter. I'm hoping this one will be capable of 12.9 or better... 12.9 would make me happy. But I really plan on babying this car when it's done (as far as that's possible ). So I may or may not make it to a track.
-Rick
IP: Logged
01:29 PM
crzyone Member
Posts: 3571 From: Alberta, Canada Registered: Dec 2000
Nice work so far! You might be the most modified 4.9 yet. One question, why did you go so large on the intake valves and not increase the exhaust? When I had the heads off my motor, the first thing I noticed was how small the exhaust was. You will still see a pretty significant increase in hp with the larger intake valves and heavier springs.
Nice motor!
IP: Logged
05:28 PM
GT Member
Posts: 911 From: Silver Spring, MD USA Registered: May 2003
Thanks Crzyone- I didn't set out to get this elaborate but things just kinda snowballed.
I was told by the head shop that the exhaust valve can be smaller than the intake because you have compression and the force from the explosion to push the air out of the chamber. On the intake side all you really have is atmospheric pressure filling the chamber. So for a street engine the emphasis should be on cramming as much air into the cylinder as you can. However there is a point where a larger exhaust valve is required or you will choke your engine. There are formulas you can use to figure out how large the exhaust valve must be in relation to the intake valve and the desired max RPM. I won't be intentionally going over 6,000 so it was calculated that a 1.5" exhaust valve would be large enough to allow the head to flow sufficiently up over 6k with a 1.94 intake and .450" lift. If you open the exhaust valve too much it can increase top end HP on a very high performance engine but you will lose bottom end torque. If I had gone up to 2.02" or larger intake valves, then a 1.6" exhaust valve would have been required and so on. The owner of the head shop said on race cars they like to get the intake valve and the intake port to have the same opening area and likewise for the exhaust. But that won't do well for a street engine since a street engine has to have a wide torque band. Hope that helps.
-Rick
[This message has been edited by GT (edited 06-04-2005).]
IP: Logged
06:38 PM
crzyone Member
Posts: 3571 From: Alberta, Canada Registered: Dec 2000
I remember the ASG Indy caddy motor had the heads shaved (or is it decked) to raise the compression since doing it to the block wasn't doable because of the liners. If you aren't going to use forced induction it's a thought, I just wouldn't suggest going over 10:1. I seem to recall pump gas isn't good for anything higher than that and I believe Keith Black (KB) makes hypereuctic pistons for this motor. I was hoping Jon (rockcrawl) would add more than 'wow' since he and PBJ have a bit of history with these swaps. But then you guys are probably exchanginging PMs and leaving us fans on the sidelines.
------------------ John DuRette Custom 85 ; 87 Coupe in the driveway. "Kinda makes you nostalgic for a Members Only jacket"
IP: Logged
10:52 PM
Jun 5th, 2005
GT Member
Posts: 911 From: Silver Spring, MD USA Registered: May 2003
Yes, Keith Black makes a set of high compression pistons for the 4.x engine and they run about $750 for the set. GM wants $250 A PIECE for N* pistons and $45 per piston for rings!! You can pick them up at you pull it yards really cheaply however. Luckily I got my new N* pistons and rings from Jon Lagler for a really good price. The N* pistons raise the compression ratio to somewhere between 10.5-11.0:1 depending on who you listen to. Then the chamber work I had done will lower it .2-.3 so I end up with compression somewhere between 10.2:1-10.8:1. Whatever it ends up being, it's on the high side for pump gas and I'll ALWAYS need super unleaded. I believe decking the heads .050" raises the compression on an otherwise stock engine to about 10.5:1. Pete and Jon are always welcome to join in if I leave anything out or post any incorrect information or for any other reason. As I said, they are the gurus at this, I'm just trying to document everything you can do to these motors for posterity. So thanks for mentioning compression John, it's an important aspect of combustion. I'm sure I'll leave things out here and there so I appreciate any tips or ideas from anyone who wants to leave them here.
-Rick
IP: Logged
01:43 AM
Jun 7th, 2005
rockcrawl Member
Posts: 2528 From: Lehigh Valley, PA Registered: Jul 2000
You'll need to grind the Allante block a little bit for the longer stroke of the 4.9 crank. If it is a '91 or later Allante it may already be machined to fit the 4.9 crank. Just make sure you check it before you start final assembly.
These engines will be happy with 93 octane at 10.5:1 CR.
IP: Logged
08:24 PM
GT Member
Posts: 911 From: Silver Spring, MD USA Registered: May 2003
Thanks Jon, that's a relief. It's a '92 Allante block so it should be OK. I'll check the rotation before I put the heads on.
I got a pair of left side '83 RWD 4.1 exhaust manifolds today. I've been told they flow a little better. I have some pictures to illustrate what the 4.1 manifolds look like compared to the 4.5/4.9 front manifolds that most folks use:
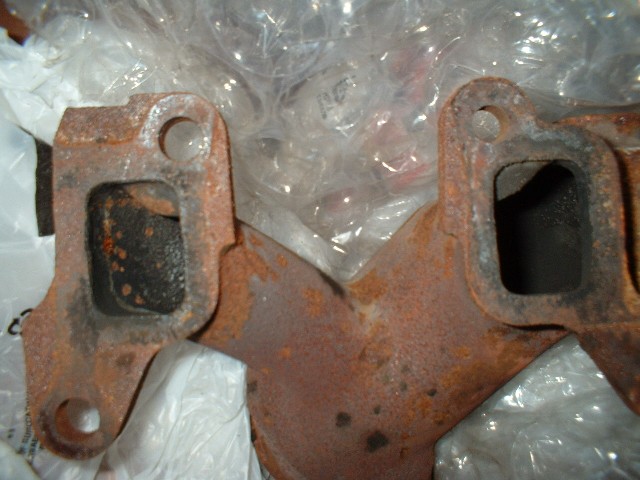
These are the ports from the 4.1 they are about 1-2mm larger in size than the exhaust ports on the heads (23x32mm).
These ports are from the front manifold from the Allante or other front 4.9 manifolds. They are roughly 2-3mm larger than the 4.9 head exhaust opening. So basically either one is large enough to flow what comes out of the head. But what's interesting is that the 4.9/4.5 manifolds have that obstrucion at the top whereas the 4.1 doesn't. Looks like a significant flow blockage for a free flowing engine.
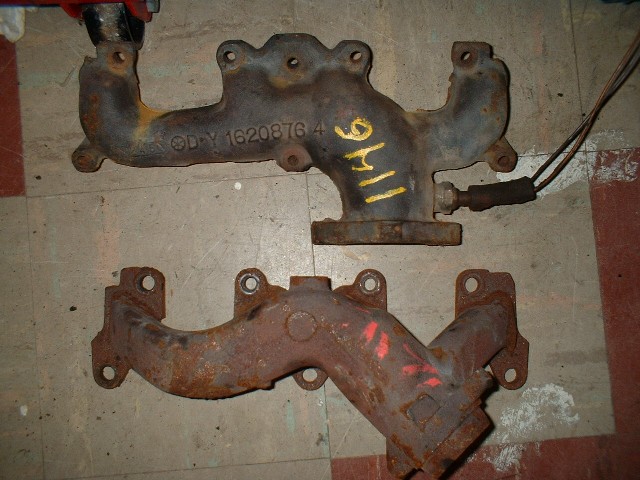
These two side by side show sort of how each flows. Here's where I hope some flow experts can jump in and let me know which manifold might be better than the other. I plan on building headers in the next year or two, but for now, I'd like to just get the best stock manifold. What do you think?
IP: Logged
09:15 PM
blakeinspace Member
Posts: 5923 From: Fort Worth, Texas Registered: Dec 2001
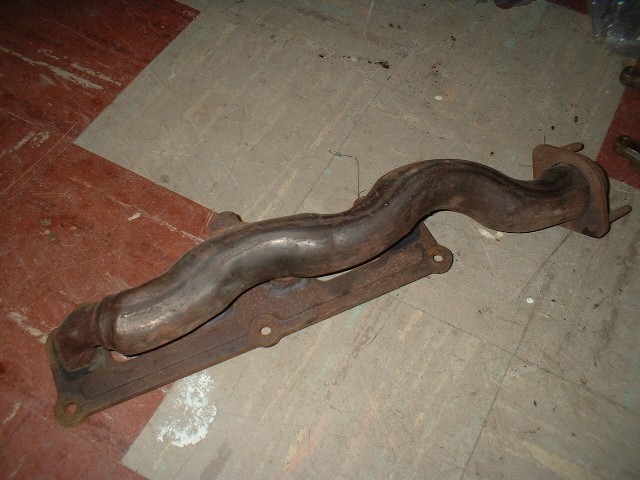
Just for the record, here are what the manifolds look like from the '87 4100 engine. They will fit the 4.9 but I don't know if they flow any better. I'll have to take them to a head shop and see if I can get a professional opinion. They're stainless tubing like the V6 Fiero but they're made a little better without the infamous restrictions that the Fiero V6 manifolds have. It might also depend on whether or not they fit in the configuration I intend to use them with, no crossover over the tranny.
[This message has been edited by GT (edited 08-01-2005).]
IP: Logged
11:30 PM
Jul 8th, 2005
GT Member
Posts: 911 From: Silver Spring, MD USA Registered: May 2003
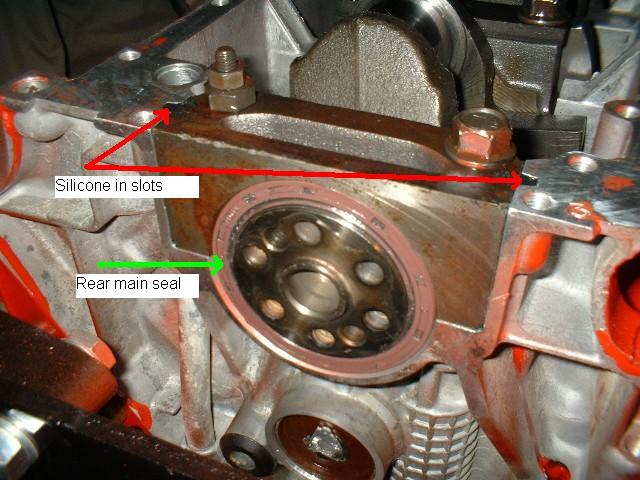
Here's a picture of the rear main and seal. If you have to replace the seal without removing the crank, you'll need a special tool to press it in. But since I'm installing a polished crank, I just put the seal on the end of the crank and carefully laid it all in there, then tightened the bolts to 85 lb/ft in increments of 30/30/25. You have to make sure the seal is perfectly perpendicular or it will leak. Main bolts should be clean and lubed with a light motor oil. There is a channel that runs along where the main cap and the block meet. This channel has to be completely filled with black RTV silicone sealant or the rear main will leak.
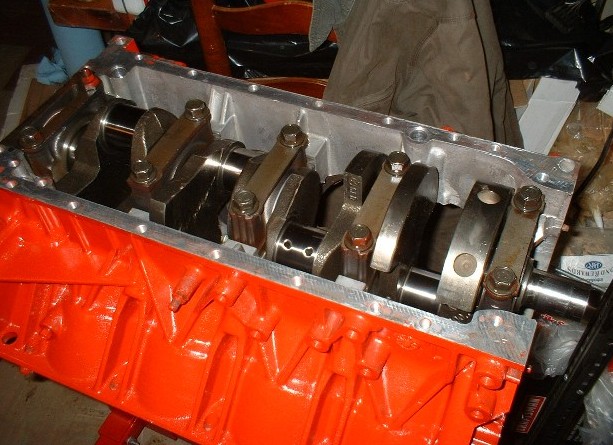
This is the 4.9 crank assembled in the '92 Allante 4.5 block. I used 20/50W Valvoline dinosaur oil to coat the main bearings. Bearing tabs fit into machined slots on the caps and block and go together on the same side, touching each other. Main bearings on these engine come in 4 different sizes which are stamped on the bearings. My bearings came with instructions indicating which bearings go where. The front bearing is slightly tighter because of the drive pulley tension. Positions 2&4 are the same. The center bearing is a thrust bearing. And the rear bearing is different still, to accomodate the rear seal and main cap shape..
[This message has been edited by GT (edited 08-01-2005).]
IP: Logged
10:36 PM
PFF
System Bot
GT Member
Posts: 911 From: Silver Spring, MD USA Registered: May 2003
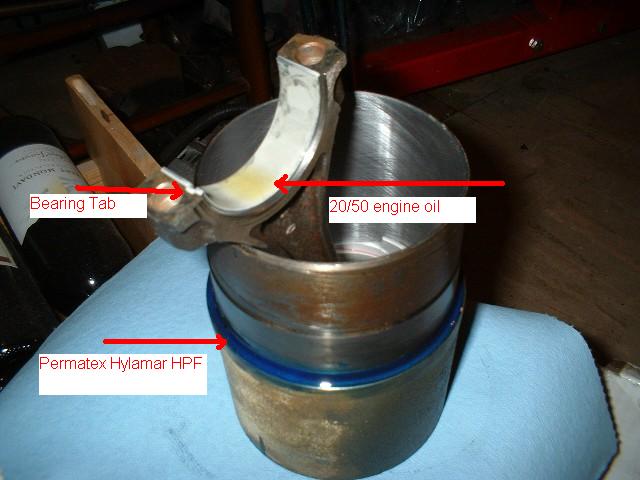
Here's the piston/ring/sleeve/rod assembly before it goes in. I put the bearing in the rod, lube it with engine oil, apply a bead of Permatex Hylomar around the o-ring, and pop it in the block, making sure not to nick the crank. The Hylomar never sets up and makes sure that there is never a breach between the coolant and the oil. It seals imperfections in the block or sleeve and allows for easy disassembly later on if necessary. The o-ring is supposed to do the trick but I've seen several cases where the factory stop leak had to seal where the o-ring didn't.
Seven more to go.
[This message has been edited by GT (edited 11-07-2005).]
IP: Logged
11:43 PM
Jul 9th, 2005
Master Tuner Akimoto Member
Posts: 2267 From: South Florida,USA Registered: Jul 2003
Suggestion :since you are doing a ground up rebuild what are you using for head gaskets ,instead of Felpro there is a performance version made by Victor Reinz that is virtually blow out proof it is the best on the market .
IP: Logged
12:11 AM
GT Member
Posts: 911 From: Silver Spring, MD USA Registered: May 2003
Thanks for the heads up MTA. My head gaskets came with my complete engine set and are made by ROL. I did a web search and noticed that Victor Reinz is an exclusive supplier to NASCAR so they must be good. Do you have a lead on where I might get a pair?
-Rick
[This message has been edited by GT (edited 07-09-2005).]
IP: Logged
12:34 AM
Master Tuner Akimoto Member
Posts: 2267 From: South Florida,USA Registered: Jul 2003
Most good speedshop can order them for you on special order I have a set somewhere that I will get the part # for you in Miami here I got mine from Murrays Speed and Custom will have a phone # just send a pm and remind me on monday.
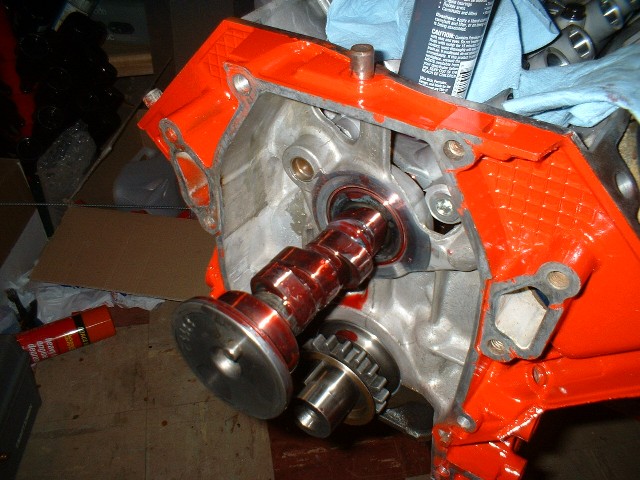
Here's a picture with all the N* pistons and .040" over 4.9 liners installed. The liners are sticking up over the deck sort of high, maybe .040-.060". It's within specs so I'm hoping when I torque the heads on it will push them down in the block. I've got piston #1 set at TDC and I'm going to try not to disturb it until I get the cam and distributor in. Next is the cam, timing chain, oil pump, and oil pan.
IP: Logged
06:09 PM
Master Tuner Akimoto Member
Posts: 2267 From: South Florida,USA Registered: Jul 2003
PM sent ,,,,,GT love that chevy color ,what are you using for lifters Rhodes has some vari lifters that works well with all cams
The fast leakdown of the Rhodes lifters will bring back the bottom end for engines with really big cams but even when adjusted perfectly they clack like hell. Crane used to or may still make a fast leakdown lifter called High Internsity that is quiet. I tried Rhodes lifters once on my Mopar and the ticking was so annoying that I scapped them after 200 miles. Ticking = excessive clearance and I feel uncomfortable with a valve train that slaps. My advise- call Crane as see if they still offer them but with high compression they might not work as well as they should.
Yes, Keith Black makes a set of high compression pistons for the 4.x engine and they run about $750 for the set. GM wants $250 A PIECE for N* pistons and $45 per piston for rings!! You can pick them up at you pull it yards really cheaply however. Luckily I got my new N* pistons and rings from Jon Lagler for a really good price. The N* pistons raise the compression ratio to somewhere between 10.5-11.0:1 depending on who you listen to. Then the chamber work I had done will lower it .2-.3 so I end up with compression somewhere between 10.2:1-10.8:1. Whatever it ends up being, it's on the high side for pump gas and I'll ALWAYS need super unleaded. I believe decking the heads .050" raises the compression on an otherwise stock engine to about 10.5:1. Pete and Jon are always welcome to join in if I leave anything out or post any incorrect information or for any other reason. As I said, they are the gurus at this, I'm just trying to document everything you can do to these motors for posterity. So thanks for mentioning compression John, it's an important aspect of combustion. I'm sure I'll leave things out here and there so I appreciate any tips or ideas from anyone who wants to leave them here.
-Rick
If any one needs some extra N* pistons.. I have 7 good N* pistons from a very low mileage 2000 N* block. The engine had 16k miles on it. it was involved i some kind of accident and the block had some slight damage to it. i have the complete heads, with cams and valvtrain, 7 pistons and connecting rods, the block with a crack/hole in it, the water pump assembly, flexplate, balancer, etc. anywas, email me at aaronrus@earthlink.net if interested. Ill make you a KILLER deal on them, as I want to get them out of my garage, ASAP.
IP: Logged
11:50 PM
Aug 1st, 2005
GT Member
Posts: 911 From: Silver Spring, MD USA Registered: May 2003
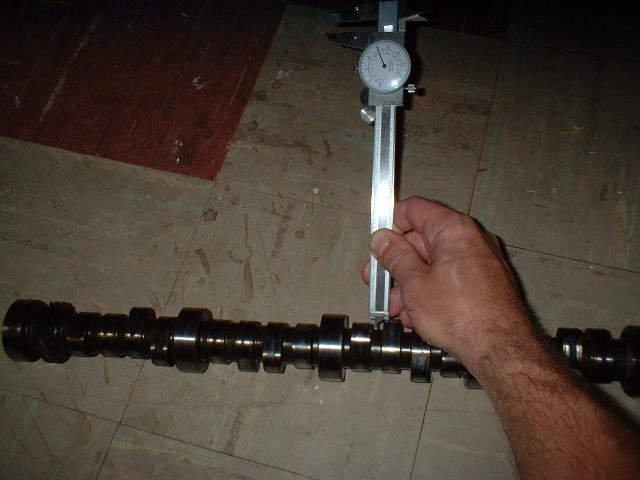
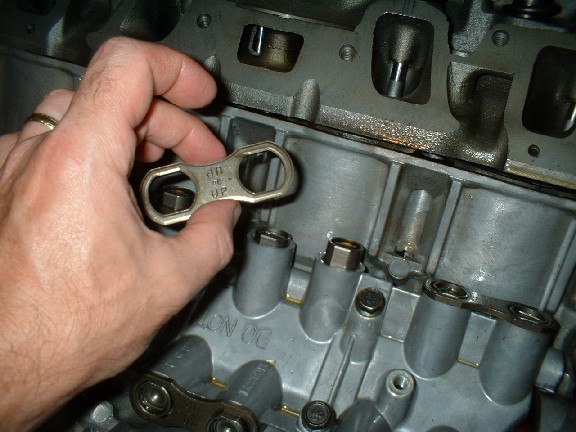
Not knowing much about cams, I tried to check the lift on my new and old cams by measuring the lobes like this:
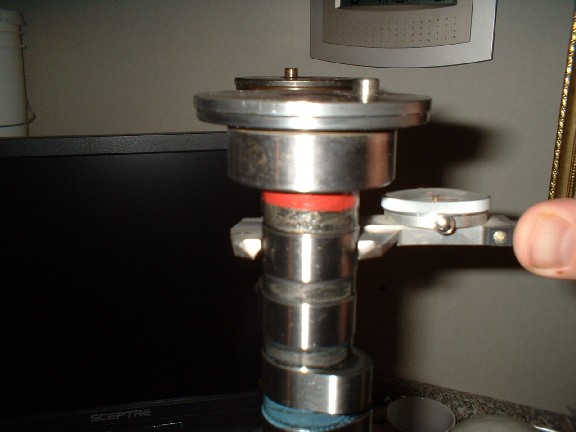
I came up with numbers that were all over the place with each lobe on my new cam and my old cam. So I called Delta to see what was going on. Turns out the proper way to measure cam lift is to measure the lobe base circle:
Then measure cam lobe:
... subtract the cam base circle number from the total lobe height number and multiply it by your rocker ratio to get total valve lift. So on my new cam the numbers were (1.530-1.220)*1.6=.496" total valve lift. On the stock cam the numbers were (1.580-1.350)*1.6=.368" total valve lift. There was an advertised difference on the stock cam of about .012" between intake and exhaust (the exhaust being the larger of the two) but lobe wear brought the two pretty close together on my cam. Hopefully after the kids go night-night, I'll be able to lube up the new cam and slide 'er in with some new lifters. More pics coming...
[This message has been edited by GT (edited 08-01-2005).]
IP: Logged
07:42 PM
PFF
System Bot
GT Member
Posts: 911 From: Silver Spring, MD USA Registered: May 2003
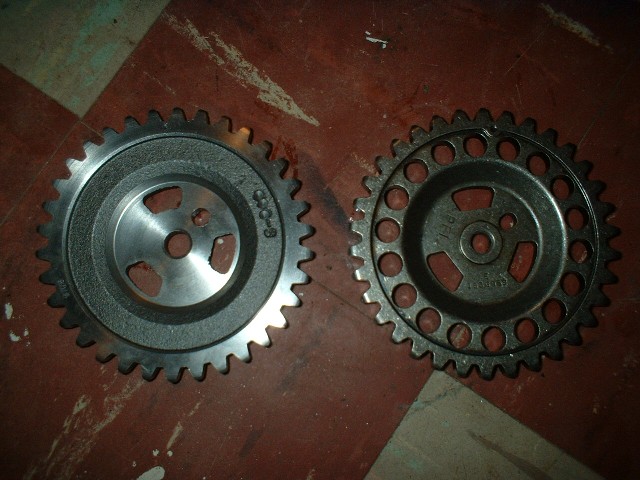
I decided to use the GM cam gear on the right because it was hardly worn at all and it is much lighter in weight than the one that came with my new chain.
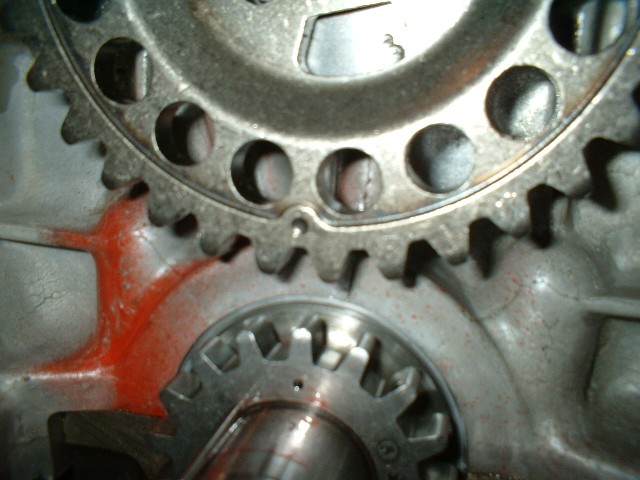
Here are the two timing marks that must be lined up perfectly in order to have the valves open and close at the proper time in relation to the crank.
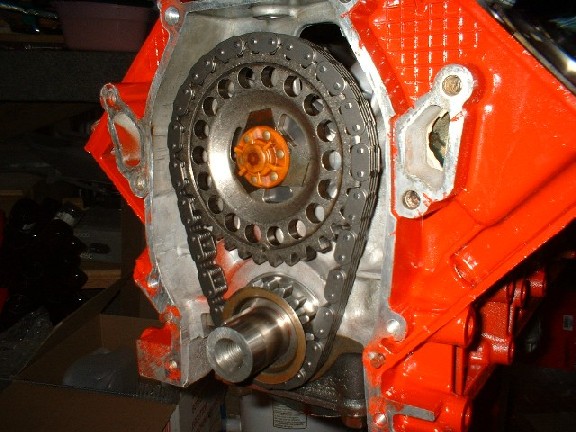
And here is the front of the block with the timing components installed:
Oh yeah, the cam gear bolt is 36lb/ft and the cam button just pops on.
[This message has been edited by GT (edited 08-01-2005).]
IP: Logged
10:10 PM
Aug 2nd, 2005
aaronrus Member
Posts: 870 From: bradenton, FL USA Registered: Nov 2003
I love this F-ing thread! Youve spared no expense when it comes to detail. I can't wait to see what the Dyno shows the output of this engine to be. I do have a question for you. You had said earlier in the thread that you were gonna buy a camshaft from Delta Cams that had .450 lift, however, when you measured it, it came out to have .496 lift.. what cuased this discrepancy? did you order a different cam than you originally discussed?
My other question is, how will you be improving the valvetrain? I have seen two contradicting theories on this, one from Rockcrawl, taken from his site, " The stock valve springs will coil bind at 1.3125", or .4175" cam lift. The spring retainers will also contact the valve seals at about .435" lift.",
and I have also seen in other threads on here where guys were getting close to .500 lift with the stock valvesprings, and the retainers dont contact the valve seals till beyond that number.. I am curious to know which is the most accurate, and I was hoping you could enlighten us with pictures and measurments. Thanks in advance.
We would not have the abundant variety of swaps without innovative mavericks. Yes it is nice to see people avoiding the beaten path and marching to their own drummer.
[This message has been edited by Unrivaled (edited 08-02-2005).]
IP: Logged
10:16 AM
GT Member
Posts: 911 From: Silver Spring, MD USA Registered: May 2003
Thanks guys, but I'm just trying to compile a roadmap of the less beaten path!
I called Delta and found some interesting information. And I had wondered about the descrepancy as well. If you refer to the formula above for determining total valve lift ((TL-LC)*RR) we find that Delta's books show the 4.9 as having a 1.5 rocker ratio. The Cadillac factory manual says the 4.9 has 1.6 rockers. Delta says it's lobe lift is .300" (I measured .310"). So if you take a lobe lift of .300 and multiply it times 1.5 you get .450" lift. Mine actually measures .310" multiplied times 1.6 and I get .496" total valve lift. So I'm wondering if this isn't the same cam that Jon used, but Delta somehow is using the wrong rocker info now to calculate lift for it?? But as I recall Jon had to modify his heads for his cam, but the folks at Delta say this cam is a direct bolt in. I'll know more when I bolt my heads down and check for piston to valve clearance and spring bind. The thing about this engine that's a little frustrating is that the heads are non adjustable. SBC valvetrains are adjustable so you can add a bigger cam and readjust the rocker nuts and away ya go. The 4.9 has no rocker adjustment. You torque the rocker nuts to spec and that's it. But it makes it much more expensive to create power because the valvetrain geometry has to be checked and rebuilt whenever you modify anything. For all I know, I may need longer pushrods when I get everything together.
I called the head shop that built my heads and told him that my lift will actually be a bit higher than the .450" figure that I had given him. He said that was OK because they always build in .060" leeway over and above for extra spring bind and pressure.
As far as the valvetrain goes, I used SBC double springs (There are some pictures and details near the bottom of the first page of this thread). The head shop had to machine the spring seats to get the proper height and pressure based on what my lift and valve stem length was going to be. Any competent performance head shop should be able to order you springs, valves, and keepers to make any cam work...within reason of course.
[This message has been edited by GT (edited 08-02-2005).]
IP: Logged
08:48 PM
aaronrus Member
Posts: 870 From: bradenton, FL USA Registered: Nov 2003
cool i look forward to finding out the results..I talked to adam goldsteain at ASG Indy a while back, he is the owner and project manager, and he was telling me that the stage 2 ASG 5.0L had close to .500 lift, around 280 duration, and they used the stock springs and they machined the fulcrums of the rocker amrs to allow for the extra lift. He said in an email to me," We were limited to just under .500 lift because we basically had to get the lift from cutting off the base of the lobe to increase net profile of the lobe."
IP: Logged
11:05 PM
Aug 3rd, 2005
aaronrus Member
Posts: 870 From: bradenton, FL USA Registered: Nov 2003
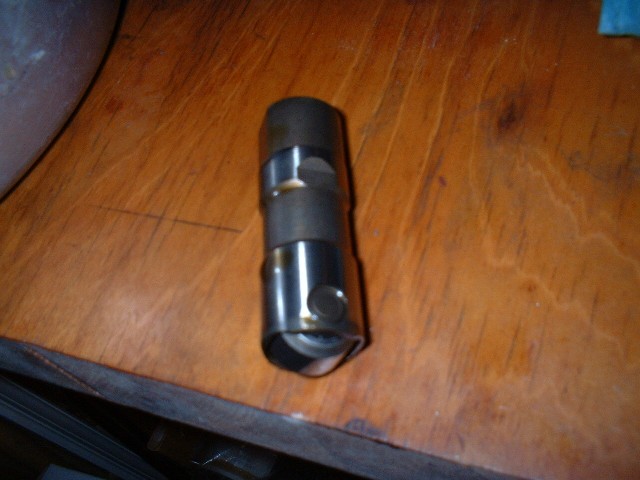
Here's one of the old lifters. They were probably all OK, but why take a chance? I bought a whole new set. While they're out, might as well replace 'em. I remember Cooter put a 4.x in his "manly van" and had lifter problems and regretted not installing new ones while it was out. I think they were like $8.00 a piece from www.newengineparts.com .
I soaked the new lifters in a bucket of 10w30 overnight to make sure they were penetrated with oil and slid them into the bores. Since it's a roller cam the lifters can't rotate like normal lifters so roller lifters have lifter guides that keep them in place. They in turn are held down by a big spring like plate which goes by the technical term "retainer" that bolts to the cam housing via two bolts. The two bolts are torqued to 15lb/ft. BTW, the lifter guides can be used as a sort of wrench to remove the lifter from the bore when disassembling the engine. Put the guide on a lifter, sort of twist the guide to get a grip on the lifter, and remove the lifter from the bore.
I just set my heads on the block to make room on my bench for my lager fermenting bucket! Your guess which is done first, the lager or the swap...
[This message has been edited by GT (edited 08-03-2005).]
IP: Logged
10:09 PM
Aug 9th, 2005
aaronrus Member
Posts: 870 From: bradenton, FL USA Registered: Nov 2003
I just got finished with taking one of these engines completely apart To my suprise these 4.9 blocks are very very light, The only thing I did not remove is the part that says DO NOT REMOVE LOL. This block was so light I was able to carry it around why I cleaned and cleaned the block
Anyway keep up the nice work + to you for the link and info to new parts on these. I just got finished painting my block in gloss black masking and protecting all the head bolt holes and other things that is not good for painting took forever.
------------------
4.9 under construction... To lay the smack down on any mid 80s truck that stands in my way. :)
IP: Logged
10:35 AM
PFF
System Bot
Aug 16th, 2005
aaronrus Member
Posts: 870 From: bradenton, FL USA Registered: Nov 2003
Sorry I've been slacking on this thread. But last week I got some quality time in with my car and engine so I should be posting more soon.
I'm using a Getrag. I was going to use an Isuzu but I ran across an 87GT with only 53k on it in the u-pull-it yard and picked up the Getrag and all related components for about $150. he he... more to come later.
IP: Logged
06:53 PM
cooguyfish Member
Posts: 2658 From: Hamilton, OH, USA Registered: Mar 2002
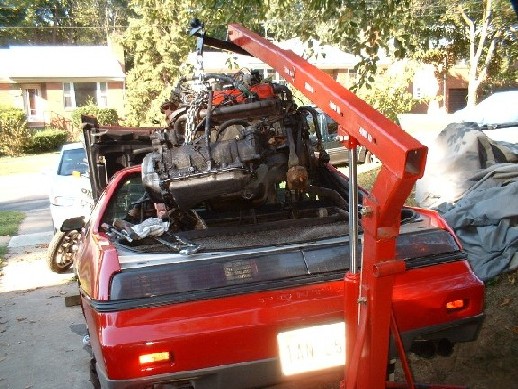
Over the last week or so I pulled my 2.8 out. I pulled the cradle out after I pulled the engine. It was much easier to get to the front bolts with the engine gone. I'm getting to old-ish to spend so much time on my back on the ground so It was easier to get to them from the top. I used a cheap electric impact wrench from Harbor Freight. I burned it up after the two front bolts, but they exchanged it for free.
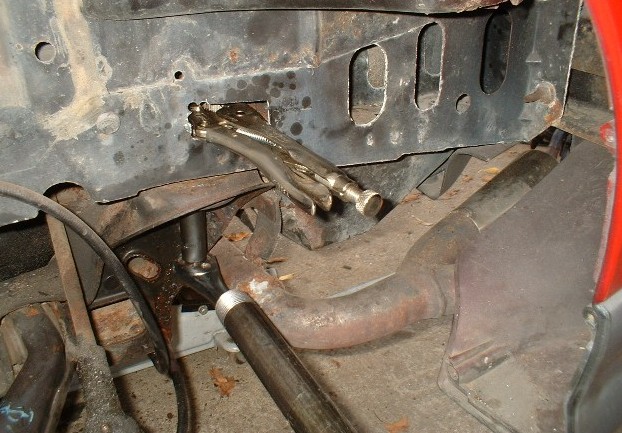
So the front cradle bolts came off pretty easily, but the rears gave me a hard time. Luckily I had Pennock's to refer to and was able to get them out. The driver's side nut broke loose up in the frame so I cut a hole and put vice grips on it to keep it from slipping:
I used a big ole 3 ft piece of pipe on a half inch Craftsman socket and was able to get enough torque to remove the bolt. The passenger side wasn't so easy. I turned the bolt with aforementioned pipe and the head broke off! This allowed me to get the cradle out but now I have a bolt welded up in my frame. I guess I'll have to either drill the bolt out or cut another hole in the side and use my handy-dandy $15.00 Harbor Freight electric Sawz-All to cut the bolt and nut off from the inside.
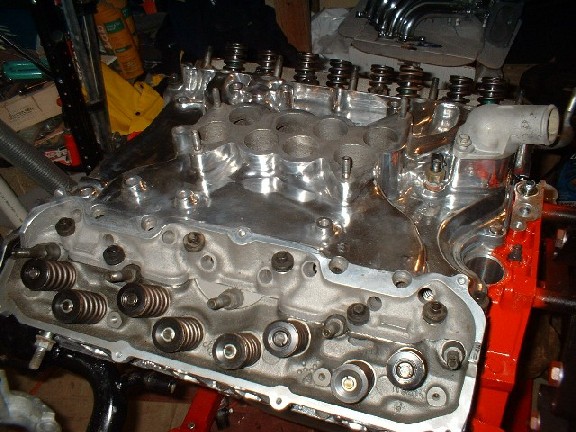
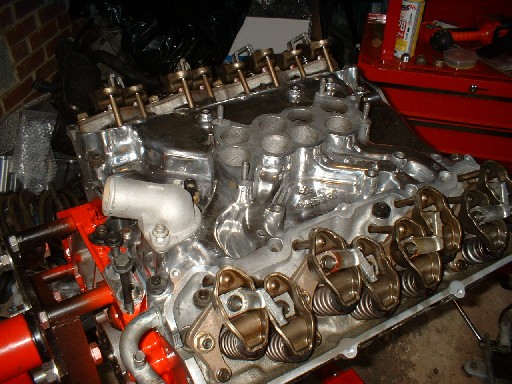
As far as the engine goes, I put the waterpump, intake, and the valvetrain together. I don't have the pictures here for the waterpump so I'll post them later but I do have some for the valvetrain assembly. This is the one part of the build where I sort of cheesed out and didn't do anything performance oriented like putting on 1.7 roller rockers or something but hopefully Rockcrawl or someone will speak up and offer what mods they've done for rockers.
I'll just sort of document how to put the lower intake and valvetrain together.
Before you put the lower intake on I recommend putting your pushrods into the tops of the lifters and push down lightly to get the feel of the spring load of the lifters. This way, after you put the intake on, you'll know what it feels like to have the pushrod properly in the lifter. You can't see the lifters once you put the intake on so it helps to know what to "feel" for.
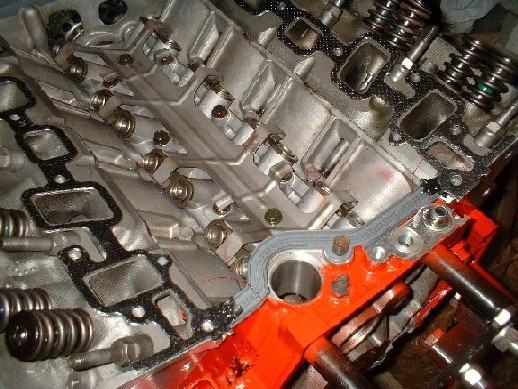
The lower intake requires four gaskets. One on each head and a rubber one on each end. The manual specifies that you smear some RTV in the corners to prevent leaking:
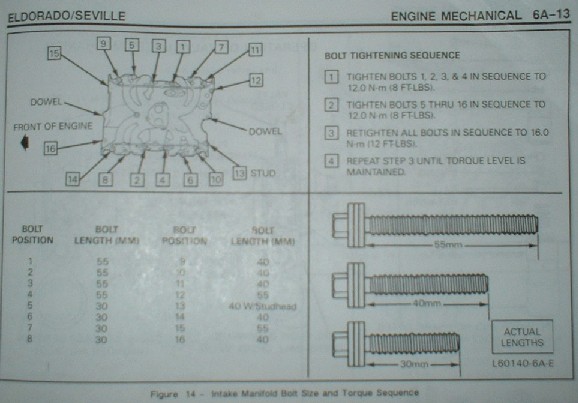
There is a very specific torque procedure for the intake and there are 3 different length bolts that have to be put in the right holes. Here's the diagram for how to install the bolts:
Here's what the finished intake looks like:
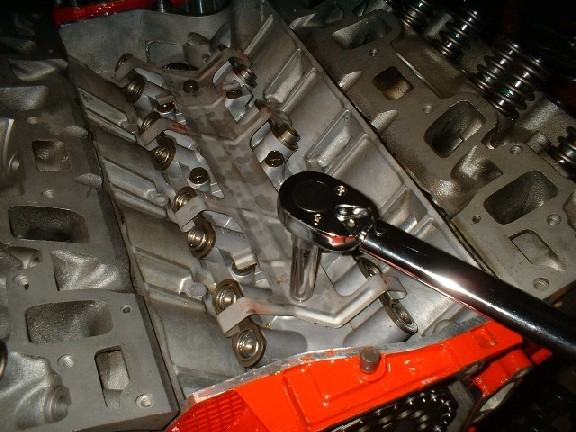
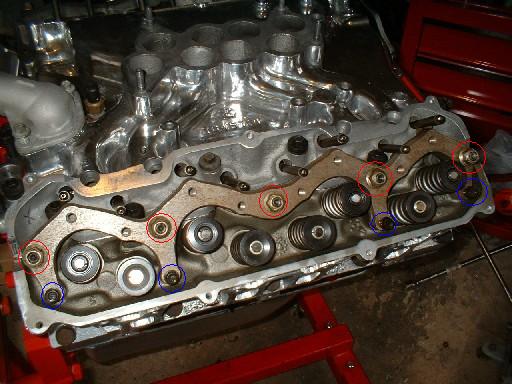
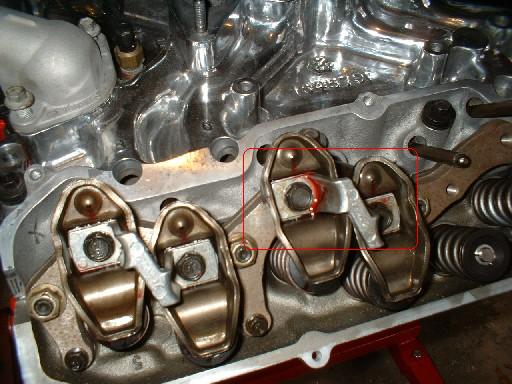
Next is the rocker supports. I bought a steel set from GM from an Allante. The ones that come stock are aluminum and will crack with the added lift that I'm going to have. So I got the steel ones. They are no longer available from GM but some dealers might have them in inventory. You can also get them from any 89-92 Allante 4.5. There are 5 nuts (red circled in photo below) and 4 bolts (blue circled in photo below) per head. The nuts are torqued to 27lb/ft and the bolts are torqued to 7 lb/ft:
[This message has been edited by GT (edited 09-21-2005).]
IP: Logged
08:23 AM
GT Member
Posts: 911 From: Silver Spring, MD USA Registered: May 2003
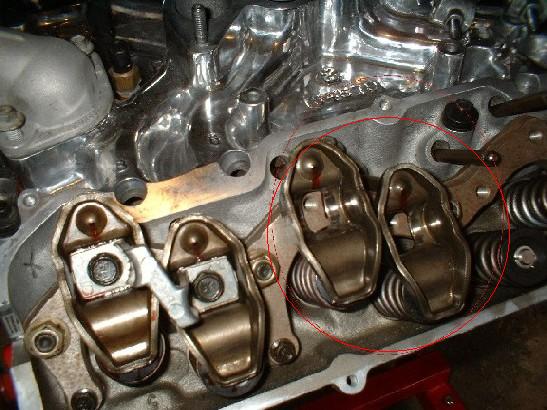
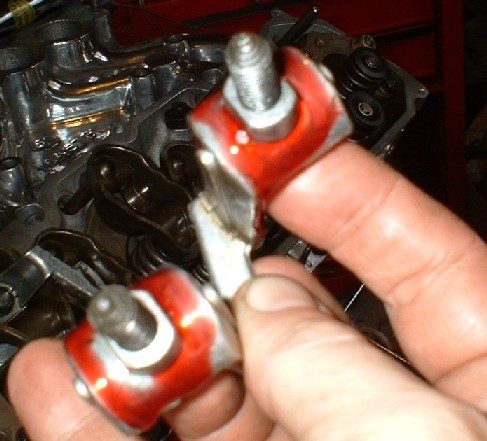
Next, I've been using assembly lube on anything that moves in the valvetrain. I've read countless times on Pennock's and elsewhere that on initial startup the 4.9 makes all kinds of noise and shows no oil in the top end until it runs for a couple of minutes. So I'd like to protect it as well as I can. The manual suggests using a high performance lubricant on the valvetrain. So I start by lubing and installing all of the pushrods into the holes in the intake, carefully feeling to make sure each one sits properly in it's lifter. Next I put lube on the business ends of the rocker:
Then I seat the rocker onto the exposed pushrod and smear the lube around on the valve tip to make sure all moving parts are lubed:
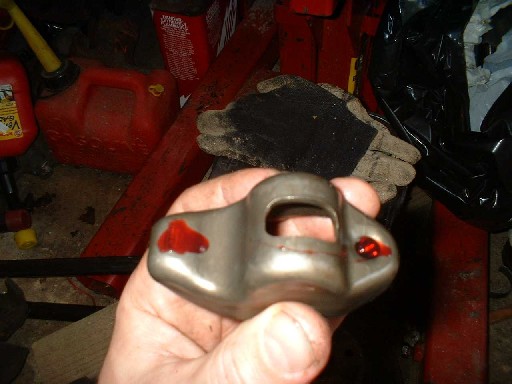
I then lube the friction side of the (I forget the technical term) hold down pivot and put it on, torquing the bolts to 22 lb/ft:
That's all there is to it, really. There's no adjustment. Hopefully when I fire it up the valves won't hit the pistons - higher lift, bigger valves, higher compression - might not be pretty. Then again, it might ROCK!
[This message has been edited by GT (edited 09-20-2005).]
IP: Logged
08:47 AM
Sep 21st, 2005
GT Member
Posts: 911 From: Silver Spring, MD USA Registered: May 2003
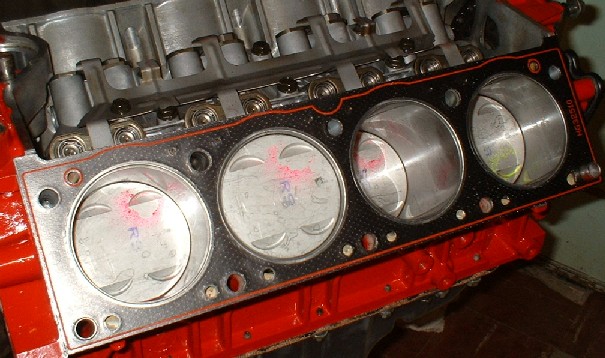
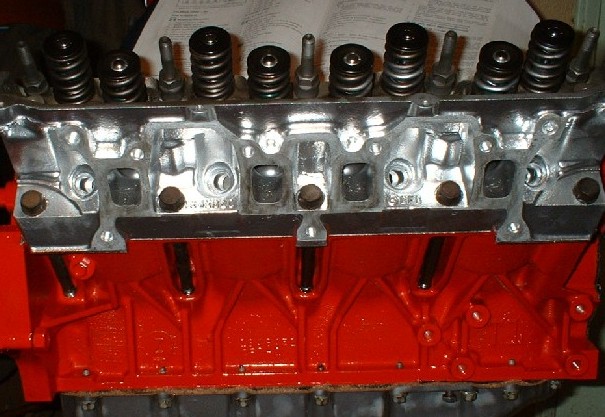
WOW! I totally forgot to show how to put on the heads!
Pretty easy. Just make sure your piston #1 is on top dead center so you can put in your distributor later on, put the gasket on the block:
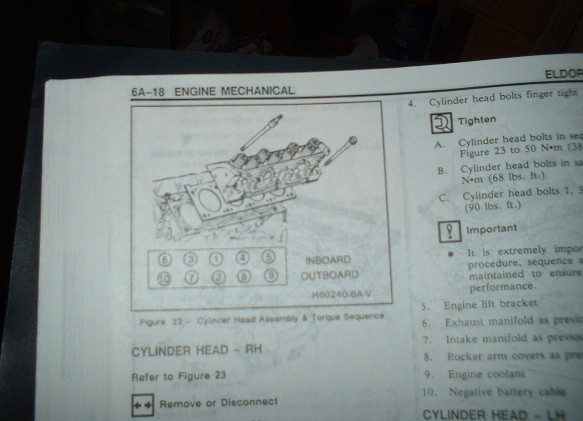
Make sure all bolts are clean or new. Apply assembly lube to the threads of each bolt and put them in. The upper 5 bolts act as double duty for your rocker studs so you'll need a deep socket for them. It is URGENTLY important that the head bolts be torqued in the correct sequence. Here are the torque specs for the head:
All bolts should be torqued in sequence as shown in the above drawing to the following specs: first torque all bolts to 38lb/ft. Then to 68lb/ft. Finally to 90lb/ft.
No silicone or other sealant should be used as the gaskets come with a sealant already impregnated. My gaskets said that they could be installed either side up.
IP: Logged
04:48 PM
RandomTask Member
Posts: 4547 From: Alexandria, VA Registered: Apr 2005


 ). So I may or may not make it to a track.


 I'm sure I'll leave things out here and there so I appreciate any tips or ideas from anyone who wants to leave them here.