Pennock's Fiero Forum
  Technical Discussion & Questions - Archive
  3100 v6 engine swap (Page 2)

T H I S   I S   A N   A R C H I V E D   T O P I C
  

Email This Page to Someone! | Printable Version

This topic is 6 pages long:  1   2   3   4   5   6 
Previous Page | Next Page
3100 v6 engine swap by redneck56
Started on: 10-24-2006 01:14 PM
Replies: 219
Last post by: redneck56 on 05-09-2007 12:56 AM
Kohburn
Member
Posts: 7349
From: Oriental, NC
Registered: Jul 2003


Feedback score: N/A
Leave feedback


Total ratings: 188
Rate this member

Report this Post10-31-2006 10:43 AM Click Here to See the Profile for KohburnSend a Private Message to KohburnDirect Link to This Post
 
quote
Originally posted by Joseph Upson:
I drilled a 2" hole in the side of the Cherry bomb adjacent to the side of the inner pipe that does not have perforations in it so the exhaust has to go around it to the opposite side that it entered and then through the perforations in the pipe and then out the ends and the tail pipes, I had to remove the fiberglass packing of course.


and this is for a turbo setup?

just a little helpful info - a 2.5" downpipe maxes out about 300hp - a 2" exhaust can only flow aout 63% as much air or about 180HP

i think it will really choke off your top end and limit your potential power
IP: Logged
redneck56
Member
Posts: 181
From: iowa
Registered: Oct 2006


Feedback score: N/A
Leave feedback

Rate this member

Report this Post10-31-2006 01:28 PM Click Here to See the Profile for redneck56Send a Private Message to redneck56Direct Link to This Post

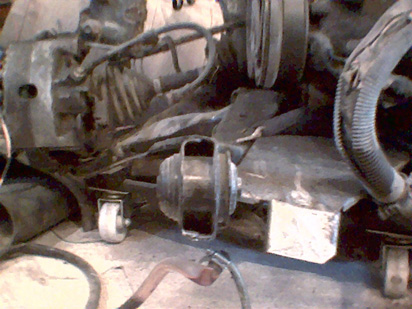
ls there a good place to put a thermostat cap that is like the fiero
from the pic you can see that it is very hard to get to the thermostat would it work to
weld up a T from the old one on the fiero to have some kind of filling place???

[This message has been edited by redneck56 (edited 10-31-2006).]

IP: Logged
Joseph Upson
Member
Posts: 4951
From:
Registered: Jan 2002


Feedback score: (2)
Leave feedback


Total ratings: 88
Rate this member

Report this Post10-31-2006 01:48 PM Click Here to See the Profile for Joseph UpsonSend a Private Message to Joseph UpsonDirect Link to This Post
You can buy short straight sections with radiator caps for what you are thinking about doing through Jeg's, Summit and probably any local hot rod shop.
IP: Logged
Joseph Upson
Member
Posts: 4951
From:
Registered: Jan 2002


Feedback score: (2)
Leave feedback


Total ratings: 88
Rate this member

Report this Post10-31-2006 02:03 PM Click Here to See the Profile for Joseph UpsonSend a Private Message to Joseph UpsonDirect Link to This Post

Joseph Upson

4951 posts
Member since Jan 2002
 
quote
Originally posted by Kohburn:


and this is for a turbo setup?

just a little helpful info - a 2.5" downpipe maxes out about 300hp - a 2" exhaust can only flow aout 63% as much air or about 180HP

i think it will really choke off your top end and limit your potential power


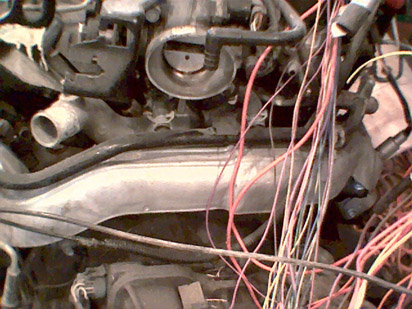
It's a temporary setup in place until the new engine goes in, I can't say much about whether or not it's a restriction given it's a short exhaust system for an engine seeing about 7 psi. The stock Fiero exhaust is 2" I measured the stock down pipe. According to the chart in Maximum boost it's good enough for a little over 200 hp. I will at some point disconnect the flow from the muffler and see if the performance changes any before the swap, I'm sure it will because it actually seems to get quieter as the load increases.

The greatest effect on power relative to what it had before is installing one of my smaller turbos .42 compressor, .48 turbine vs .60 compressor and .63 turbine. It's definately milder but part of that is because I'm not running the full 7 psi. and the air charge is a lot warmer to due to the reduced compressor efficiency. I'll probably leave it that way since I should be swapping it all out in December.
IP: Logged
Kohburn
Member
Posts: 7349
From: Oriental, NC
Registered: Jul 2003


Feedback score: N/A
Leave feedback


Total ratings: 188
Rate this member

Report this Post10-31-2006 10:11 PM Click Here to See the Profile for KohburnSend a Private Message to KohburnDirect Link to This Post
just to give you an idea the 3.4dohc's stock crossover pipe (only 3 cylinders) is 2.25" and they are 210hp.. just a suggestion
IP: Logged
redneck56
Member
Posts: 181
From: iowa
Registered: Oct 2006


Feedback score: N/A
Leave feedback

Rate this member

Report this Post11-01-2006 12:55 AM Click Here to See the Profile for redneck56Send a Private Message to redneck56Direct Link to This Post
good info .Found a shop close to me that will make what ever i want in the exhaust .
l was thinking of puting a smaller cat but with the larger pipe l will have just a one port i think it will work
as the lumina had just one
How to make it look like a SE exhaust Iin back HELP thanks

IP: Logged
Kohburn
Member
Posts: 7349
From: Oriental, NC
Registered: Jul 2003


Feedback score: N/A
Leave feedback


Total ratings: 188
Rate this member

Report this Post11-01-2006 10:39 AM Click Here to See the Profile for KohburnSend a Private Message to KohburnDirect Link to This Post
 
quote
Originally posted by redneck56:

good info .Found a shop close to me that will make what ever i want in the exhaust .
l was thinking of puting a smaller cat but with the larger pipe l will have just a one port i think it will work
as the lumina had just one
How to make it look like a SE exhaust Iin back HELP thanks


may be able to do a setup like this https://www.fiero.nl/forum/Archives/Archive-000002/HTML/20050410-1-046591.html
IP: Logged
redneck56
Member
Posts: 181
From: iowa
Registered: Oct 2006


Feedback score: N/A
Leave feedback

Rate this member

Report this Post11-01-2006 11:55 AM Click Here to See the Profile for redneck56Send a Private Message to redneck56Direct Link to This Post
THANKS !!!!!!! I that what i was looking for . great link that will help. looks like i can put it in my self.
HOW about fuel pumps ? as l will have to changs mine out .
are there any one that is noyt to hi in cost???
IP: Logged
redneck56
Member
Posts: 181
From: iowa
Registered: Oct 2006


Feedback score: N/A
Leave feedback

Rate this member

Report this Post11-01-2006 01:53 PM Click Here to See the Profile for redneck56Send a Private Message to redneck56Direct Link to This Post

redneck56

181 posts
Member since Oct 2006

Should i change them or leave pors== cons??
a better way just do not want to go back later and redo.
IP: Logged
darkhorizon
Member
Posts: 12279
From: Flint Michigan
Registered: Jan 2006


Feedback score: (1)
Leave feedback


Total ratings: 451
Rate this member

Report this Post11-01-2006 02:00 PM Click Here to See the Profile for darkhorizonSend a Private Message to darkhorizonDirect Link to This Post
those bushings are a pain, I have only changed them once, and they were a pain.

I replaced with poly bushings, not sure how they will end up feeling, but my 88 is solid and I like that.
IP: Logged
Kohburn
Member
Posts: 7349
From: Oriental, NC
Registered: Jul 2003


Feedback score: N/A
Leave feedback


Total ratings: 188
Rate this member

Report this Post11-01-2006 02:04 PM Click Here to See the Profile for KohburnSend a Private Message to KohburnDirect Link to This Post
 
quote
Originally posted by redneck56:

THANKS !!!!!!! I that what i was looking for . great link that will help. looks like i can put it in my self.
HOW about fuel pumps ? as l will have to changs mine out .
are there any one that is noyt to hi in cost???


the one from an early 90's vette will fit i believe - cheap alternative to the walbro
IP: Logged
PFF
System Bot
Kohburn
Member
Posts: 7349
From: Oriental, NC
Registered: Jul 2003


Feedback score: N/A
Leave feedback


Total ratings: 188
Rate this member

Report this Post11-01-2006 02:05 PM Click Here to See the Profile for KohburnSend a Private Message to KohburnDirect Link to This Post

Kohburn

7349 posts
Member since Jul 2003
 
quote
Originally posted by redneck56:


Should i change them or leave pors== cons??
a better way just do not want to go back later and redo.


I highly recommend replacing with poly or aluminum bushings (darrel morse)

the stiffer those bushings the better.
IP: Logged
FIEROFLYER
Member
Posts: 3974
From:
Registered: Oct 2002


Feedback score:    (13)
Leave feedback


Total ratings: 180
Rate this member

Report this Post11-01-2006 03:10 PM Click Here to See the Profile for FIEROFLYERSend a Private Message to FIEROFLYERDirect Link to This Post
The Fiero V6 fuel pump will run the 3100 with no problem at all. I found one photo from a while back of a 3100 swap I did using an engine from a 95 Grand Am GT. its on the site in the link below my sig. Dan

------------------


Signature compliments of F-I-E-R-O
2003 3800SC series II powered
www.photosled.com/showgallery.php/cat/631

IP: Logged
Joseph Upson
Member
Posts: 4951
From:
Registered: Jan 2002


Feedback score: (2)
Leave feedback


Total ratings: 88
Rate this member

Report this Post11-01-2006 03:36 PM Click Here to See the Profile for Joseph UpsonSend a Private Message to Joseph UpsonDirect Link to This Post
I would go with an OE pump specific for that engine or better for two reasons; the OE pumps are very dependable when not abused by starving from low fuel levels and because GM has switched to running higher fuel pressures than what the stock Fiero V6 pump was designed for and I believe that particular engine is included with static pressure readings around 56 psi. probably because of sequential fuel injection, more range from a single injector and better fuel atomization. You are already aware your 4 cylinder pump will not cut it.
IP: Logged
redneck56
Member
Posts: 181
From: iowa
Registered: Oct 2006


Feedback score: N/A
Leave feedback

Rate this member

Report this Post11-02-2006 01:00 AM Click Here to See the Profile for redneck56Send a Private Message to redneck56Direct Link to This Post
thanks. i have seen aluminum one on ebay seames to me they would be very easy to make ?
l have the aluminum and could make them in the shop at work any coment on it??

IP: Logged
Jake_Dragon
Member
Posts: 32851
From: USA
Registered: Jan 2001


Feedback score: (5)
Leave feedback


Total ratings: 403
Rate this member

Report this Post11-02-2006 07:19 AM Click Here to See the Profile for Jake_DragonSend a Private Message to Jake_DragonDirect Link to This Post
 
quote
Originally posted by redneck56:

thanks. i have seen aluminum one on ebay seames to me they would be very easy to make ?
l have the aluminum and could make them in the shop at work any coment on it??


https://www.fiero.nl/forum/Archives/Archive-000001/HTML/20050818-2-058497.html
IP: Logged
redneck56
Member
Posts: 181
From: iowa
Registered: Oct 2006


Feedback score: N/A
Leave feedback

Rate this member

Report this Post11-02-2006 11:19 AM Click Here to See the Profile for redneck56Send a Private Message to redneck56Direct Link to This Post
Thanks looks like this form has it all if you just look hard for it thanks
IP: Logged
redneck56
Member
Posts: 181
From: iowa
Registered: Oct 2006


Feedback score: N/A
Leave feedback

Rate this member

Report this Post11-02-2006 12:17 PM Click Here to See the Profile for redneck56Send a Private Message to redneck56Direct Link to This Post

redneck56

181 posts
Member since Oct 2006
Yes that is why im tryig to find out about the fuel pump .l have the one that came off the lumina. i think it will
work. lt looks all most the same. or for the money just get a new one??
IP: Logged
Jake_Dragon
Member
Posts: 32851
From: USA
Registered: Jan 2001


Feedback score: (5)
Leave feedback


Total ratings: 403
Rate this member

Report this Post11-02-2006 05:28 PM Click Here to See the Profile for Jake_DragonSend a Private Message to Jake_DragonDirect Link to This Post
I have a set from Darrel Morse and its night and day from rubber. I currently dont have any rubber left on the cradle, solid mounted everything.
IP: Logged
redneck56
Member
Posts: 181
From: iowa
Registered: Oct 2006


Feedback score: N/A
Leave feedback

Rate this member

Report this Post11-03-2006 01:56 AM Click Here to See the Profile for redneck56Send a Private Message to redneck56Direct Link to This Post
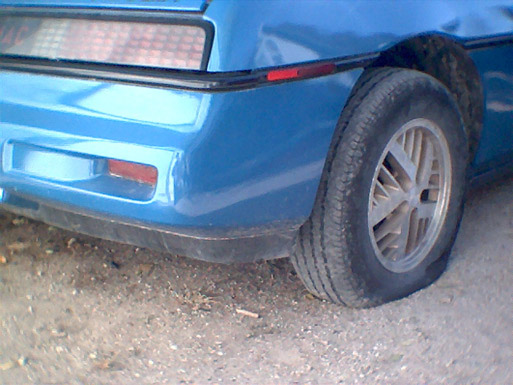
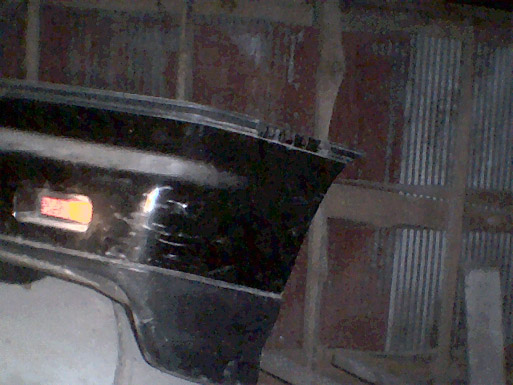
Thanks
As you can see from the first pic of my bumper it is a single exhaust is there some way to make dule??

or should just run both over to one side??
Now the 2nd pic l have this bumper in my barn but as you can see it is off a SE??
IS there a way to make the sides look like the one in the first pic

need a lot of input to find out what will work ????
HI if it will not work or will look right then l will just sell it shiping will be 40 to 60$$ some one need one???????
let me know on what you want to pay THANKS

[This message has been edited by redneck56 (edited 11-04-2006).]

IP: Logged
Joseph Upson
Member
Posts: 4951
From:
Registered: Jan 2002


Feedback score: (2)
Leave feedback


Total ratings: 88
Rate this member

Report this Post11-03-2006 06:00 AM Click Here to See the Profile for Joseph UpsonSend a Private Message to Joseph UpsonDirect Link to This Post
I just notched the opposite side of my base coupe bumper for dual exhaust.
IP: Logged
PFF
System Bot
redneck56
Member
Posts: 181
From: iowa
Registered: Oct 2006


Feedback score: N/A
Leave feedback

Rate this member

Report this Post11-04-2006 01:14 AM Click Here to See the Profile for redneck56Send a Private Message to redneck56Direct Link to This Post
Can i use my starter wires or will i need to ues the ones from the swap???
IP: Logged
redneck56
Member
Posts: 181
From: iowa
Registered: Oct 2006


Feedback score: N/A
Leave feedback

Rate this member

Report this Post11-04-2006 12:54 PM Click Here to See the Profile for redneck56Send a Private Message to redneck56Direct Link to This Post

redneck56

181 posts
Member since Oct 2006
HI any more on the bumper for dule set up thanks
IP: Logged
redneck56
Member
Posts: 181
From: iowa
Registered: Oct 2006


Feedback score: N/A
Leave feedback

Rate this member

Report this Post11-05-2006 10:29 PM Click Here to See the Profile for redneck56Send a Private Message to redneck56Direct Link to This Post
hi on your setup i do not see where you put in your coolent

or is it just knot the right angle???
IP: Logged
redneck56
Member
Posts: 181
From: iowa
Registered: Oct 2006


Feedback score: N/A
Leave feedback

Rate this member

Report this Post11-07-2006 02:27 AM Click Here to See the Profile for redneck56Send a Private Message to redneck56Direct Link to This Post
THANKS got the info on the 3100 pin outs will try to post some
thanks Dan
IP: Logged
redneck56
Member
Posts: 181
From: iowa
Registered: Oct 2006


Feedback score: N/A
Leave feedback

Rate this member

Report this Post11-08-2006 01:27 AM Click Here to See the Profile for redneck56Send a Private Message to redneck56Direct Link to This Post
HI starting my swap this weekend will have pic and ?????????
IP: Logged
redneck56
Member
Posts: 181
From: iowa
Registered: Oct 2006


Feedback score: N/A
Leave feedback

Rate this member

Report this Post11-09-2006 12:04 PM Click Here to See the Profile for redneck56Send a Private Message to redneck56Direct Link to This Post


Some of the wire mess help???????
IP: Logged
Rickady88GT
Member
Posts: 10648
From: Central CA
Registered: Dec 2002


Feedback score: N/A
Leave feedback


Total ratings: 202
Rate this member

Report this Post11-09-2006 09:03 PM Click Here to See the Profile for Rickady88GTSend a Private Message to Rickady88GTDirect Link to This Post
 
quote
Originally posted by redneck56:

hi on your setup i do not see where you put in your coolent

or is it just knot the right angle???


That is the engine swap I did a while back. It changed hands two or three times after me.

The coolant fill cap is on the driver side just under the rear window.
IP: Logged
redneck56
Member
Posts: 181
From: iowa
Registered: Oct 2006


Feedback score: N/A
Leave feedback

Rate this member

Report this Post11-12-2006 11:03 PM Click Here to See the Profile for redneck56Send a Private Message to redneck56Direct Link to This Post
HI i have started my swap .Have a ??????? for all of you out there after you have the car in the air
and on stands to get the motor out how do you move the car out of the way .As i do not have a
big garage have to move things around at each step of my swap ,
Has any one had this problem??????? HELP
thanks Gary
IP: Logged
KurtAKX
Member
Posts: 4008
From: West Bloomfield, MI
Registered: Feb 2002


Feedback score:    (9)
Leave feedback


Total ratings: 128
Rate this member

Report this Post11-13-2006 12:44 AM Click Here to See the Profile for KurtAKXSend a Private Message to KurtAKXDirect Link to This Post
 
quote
Originally posted by redneck56:

HI i have started my swap .Have a ??????? for all of you out there after you have the car in the air
and on stands to get the motor out how do you move the car out of the way .As i do not have a
big garage have to move things around at each step of my swap ,
Has any one had this problem??????? HELP
thanks Gary


You leave the car in place and unbolt the 4 cradle bolts and then drag the engine and trans and cradle and struts all out from under the car, typically sideways through one wheel well. If you are willing to lift the car higher, you can pull it straight back out.
IP: Logged
redneck56
Member
Posts: 181
From: iowa
Registered: Oct 2006


Feedback score: N/A
Leave feedback

Rate this member

Report this Post11-13-2006 01:14 AM Click Here to See the Profile for redneck56Send a Private Message to redneck56Direct Link to This Post
OK so when i start to raise the car would it be best to just unpluge the wires at the clips or off the motor and lable them so to swap the wires with the new motor
and how much room will i have???
IP: Logged
PFF
System Bot
FIEROFLYER
Member
Posts: 3974
From:
Registered: Oct 2002


Feedback score:    (13)
Leave feedback


Total ratings: 180
Rate this member

Report this Post11-13-2006 09:53 AM Click Here to See the Profile for FIEROFLYERSend a Private Message to FIEROFLYERDirect Link to This Post
Unplug youe engine harness first from the two main connectors the C500 is in the engine compartment. Then remove the console unplug the C203 connector and the ECM plugs, remove the sliding plastic piece on the firewall and push the piece out and shove the rest of the wiring along with the C203 out into the engine compartment. Now remove the engine.
Take the 3100 engine and tranny mount it to your craddle and put its harness on connecting every thing on the engine. Roroute the wires so the wiring matches where it needs to go on my last one I ran the wiring into the car and mounted the PCM behind the pass seat. Those two main Fiero connectors if you look up their diagrams you will see what ran through connector and what each pin is for. for example on 85 and up cars the C500 has the tach wire going through on pin C3 so take the white wire from the ignition module of the 3100 that is for the tach and route it so it reaches the C500 and solder it to pin C3. do the same with all the other wires in both the connectors till they are done. There will be some other wires not needed just remove them from the harness they will be for things like ABS or traction control or day time running lights.Take the rest of the wires mark them and feed them through the fire wall with the rest of the wires, then take apart the old piece that was used by the Fiero to feed through the firewall and reuse it with the new wires. The few left over wires will be pink ones for ignition power feeds these wires to the Fiero fuse box lower the box down you will see spots above to plug into for ignition power and connect these wires using in line fuses. Dan

------------------


Signature compliments of F-I-E-R-O
2003 3800SC series II powered
www.photosled.com/showgallery.php/cat/631

IP: Logged
redneck56
Member
Posts: 181
From: iowa
Registered: Oct 2006


Feedback score: N/A
Leave feedback

Rate this member

Report this Post11-14-2006 02:09 AM Click Here to See the Profile for redneck56Send a Private Message to redneck56Direct Link to This Post
Thanks for the help went to your link i see i need to add some more mounts.
l will have to make some like yours
OK back to the wiring the info you sent me looks like it talks about the pcm connector end .
top of page PCM60-way clear C2 details
pin 7 Brn/Wht will be brown wire with white tracer = low oil lamp--- insturument panel would that the oil senster wire .
Just a?? to see if im reading it right .
IP: Logged
FIEROFLYER
Member
Posts: 3974
From:
Registered: Oct 2002


Feedback score:    (13)
Leave feedback


Total ratings: 180
Rate this member

Report this Post11-14-2006 10:02 AM Click Here to See the Profile for FIEROFLYERSend a Private Message to FIEROFLYERDirect Link to This Post
There is two different oil and coolant wires on most to deal with one will be for the idiot light or warning light other would be for the actual gauge. I didn't keep a copy for my self when I got you the diagrams so I can't just look up some thing. will have to get another set and keep them for reference. But it usually is obvious which wire is for a light and which is for a gauge also on some there is a low oil level light this can be ignored or add in an extra bulb some where if you like. On newer vehicles GM seems to care more about how much oil is in the pan then how much oil pressure is in the engine. Plus mil light is service engine soon light and when wiring the alternator you do not have to go through the PCM if using an older alt it is easier to just bypass the PCM for the charging of the alt. Dan

------------------


Signature compliments of F-I-E-R-O
2003 3800SC series II powered
www.photosled.com/showgallery.php/cat/631

IP: Logged
redneck56
Member
Posts: 181
From: iowa
Registered: Oct 2006


Feedback score: N/A
Leave feedback

Rate this member

Report this Post11-14-2006 02:24 PM Click Here to See the Profile for redneck56Send a Private Message to redneck56Direct Link to This Post
I have just pulled the c203 wires from the ecm .
i will be useing the wire pluge that is lift in the car right??
IP: Logged
FIEROFLYER
Member
Posts: 3974
From:
Registered: Oct 2002


Feedback score:    (13)
Leave feedback


Total ratings: 180
Rate this member

Report this Post11-14-2006 06:32 PM Click Here to See the Profile for FIEROFLYERSend a Private Message to FIEROFLYERDirect Link to This Post
You will need both halves of the plug just cut off the wires on the ECM side leaving enough wire to work with then solder on the proper wire from the 3100 harness. Dan
IP: Logged
redneck56
Member
Posts: 181
From: iowa
Registered: Oct 2006


Feedback score: N/A
Leave feedback

Rate this member

Report this Post11-15-2006 01:25 AM Click Here to See the Profile for redneck56Send a Private Message to redneck56Direct Link to This Post
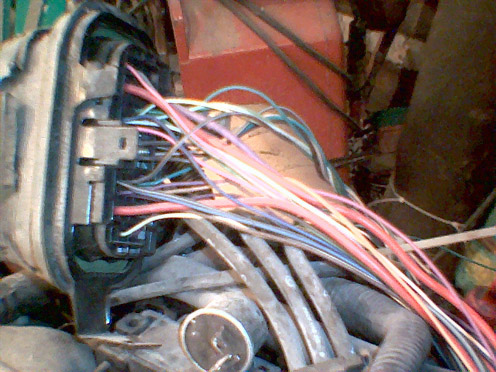
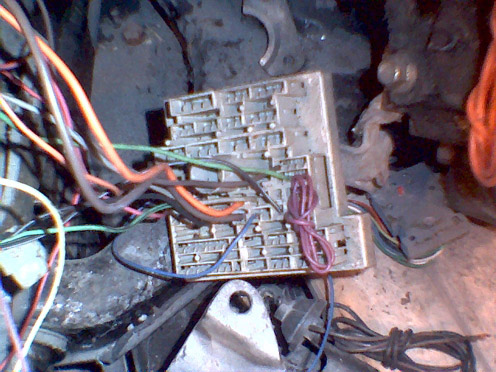
Ok i have the wires out as you can see from the pic that there is 3 plugs that went to the ecm
will i need all of the wires


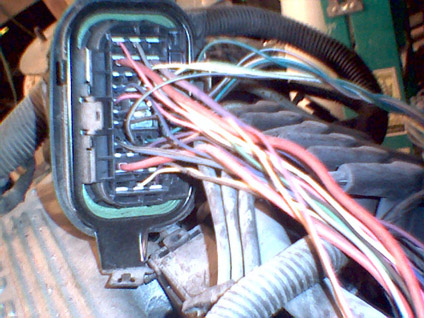
Fiero C203 connector

Pos. Wire color Circuit Description
A Tan/Black Upshift lamp Grounding this wire will make the upshift indicator come on.
B Orange Fuel Pump Positive feed for the fuel pump relay. Hot at all times fused 10A
C Brown/White SES lamp Grounding this wire will make the "Service Engine Soon" indicator come on
D Lt Blue A/C on Positive feed for the A/C compressor control relay coil. Hot when A/C is on.
E Tan Oil gage Connect to oil pressure sender, 90 ohms at max pressure
F Pink/Black ECM Ign. Positive feed for ECM. Hot in run, bulb test, or start. fused 10A.
G Yellow VSS high VSS input to speedometer. Connect to magnetic VSS or converted 4000 PPM signal from ECM. Note 3
H Brown VSS feed for ECM Feeds buffered VSS signal to ECM when a magnetic VSS is connected to speedometer. Note 3
J Pink TBI INJ1 Positive feed for injector. Hot in run, bulb test, or start. fused 5A
K Pink TBI INJ2 Positive feed for injector. Hot in run, bulb test, or start. fused 5A
L Tan/White Fuel pump Positive side of fuel pump, gets connected to the COM terminal of the fuel pump relay.
M Black VSSB ground Connect to ground
N Black A/C Power Positive feed for A/C compressor control relay contacts. Fused 25A
P Purple TCC Brake switch TCC brake. Hot in run, bulb test, or start only when brake pedal is NOT depressed.
R Purple VSS low VSS input to speedometer. Connect to magnetic VSS or to ground if using optical VSS and converter. Note 3


Notes
1. F is the switched power feed for the ECM, all switched 12 volt inputs on the ECM can be connected to this terminal. The constant 12 volt supply for the ECM comes from the rust colored fusible link with a single weatherpack disconnect at the terminal block near the battery.

2. J, & K are the positive feeds for the fuel injectors, One for each injector on TBI systems or one for each bank on PFI systems.

3. The Fiero speedometer system works differently than most other GM vehicles. Click HERE for more info.

got this from http://www.fieroaddiction.com/c203c500.html
now what do i look for on the 3100 pin out papers do not seem to mach?????
IP: Logged
FIEROFLYER
Member
Posts: 3974
From:
Registered: Oct 2002


Feedback score:    (13)
Leave feedback


Total ratings: 180
Rate this member

Report this Post11-15-2006 09:19 AM Click Here to See the Profile for FIEROFLYERSend a Private Message to FIEROFLYERDirect Link to This Post
The only thing you need from that photo is the C203 with some wire left on it. For PCM battery feed I usually run a wire up to the fuse box through an inline fuse as the PCM is already inside the car instead of through the harness all the way out to the C500. Get an OBD II data link connector and wire it in to reach the Fiero factory location and screw it into place. The wiring really is not that hard just worry about one wire at a time figure out where it needs to go and run it there. You may have to lengthen some wires to reach thats why I have a few broken up harnesses laying around so when I add wire it is the same colour and size. Dan
IP: Logged
redneck56
Member
Posts: 181
From: iowa
Registered: Oct 2006


Feedback score: N/A
Leave feedback

Rate this member

Report this Post11-15-2006 11:39 AM Click Here to See the Profile for redneck56Send a Private Message to redneck56Direct Link to This Post
This images is larger than 100K. Click to view.

This images is larger than 100K. Click to view.

This images is larger than 100K. Click to view.

What do i do with some of this the main wire should go to the c203
now the fues box the motor has 3 of them ????
and the gray pluge that has full pump i think???

[This message has been edited by redneck56 (edited 11-15-2006).]

IP: Logged
FIEROFLYER
Member
Posts: 3974
From:
Registered: Oct 2002


Feedback score:    (13)
Leave feedback


Total ratings: 180
Rate this member

Report this Post11-15-2006 02:08 PM Click Here to See the Profile for FIEROFLYERSend a Private Message to FIEROFLYERDirect Link to This Post
Cut those plugs off and toss em its the wiring you need. Dan
IP: Logged
Previous Page | Next Page

This topic is 6 pages long:  1   2   3   4   5   6 


All times are ET (US)

T H I S   I S   A N   A R C H I V E D   T O P I C
  

Contact Us | Back To Main Page

Advertizing on PFF | Fiero Parts Vendors
PFF Merchandise | Fiero Gallery | Ogre's Cave
Real-Time Chat | Fiero Related Auctions on eBay


Copyright (c) 1999, C. Pennock