Pennock's Fiero Forum
  Technical Discussion & Questions - Archive
  Dimensions for Solid Cradle Bushings

T H I S   I S   A N   A R C H I V E D   T O P I C
  

Email This Page to Someone! | Printable Version


Dimensions for Solid Cradle Bushings by jstricker
Started on: 12-28-2004 06:03 PM
Replies: 9
Last post by: RockChip on 02-25-2005 08:53 PM
jstricker
Member
Posts: 12956
From: Russell, KS USA
Registered: Apr 2002


Feedback score:    (11)
Leave feedback


Total ratings: 370
Rate this member

Report this Post12-28-2004 06:03 PM Click Here to See the Profile for jstrickerSend a Private Message to jstrickerDirect Link to This Post
Since we turn our own cradle bushings I've had several people PM me for the dimensions for the bushings. I thought about not giving them out because each cradle can be slightly different, but I decided that in the spirit of sharing information, I'd post the dimensions WE use when we make them.

If you have a machine shop turn these for you and they don't fit your cradle, don't blame me. We make ours very slightly (a couple of thousandths) oversize and then polish them to fit so keep that in mind. If you expect them to be a slap it in and forget it deal, well, it may be, but then again it may take some very slight machine work. I'm not responsible for you having them made to my specs and then having them not fit.

If you want a guarantee, plug and play deal, call Darrell Morse at 763-441-5679 and order a set. I've worked on cars with his and his machine work if top quality and I have nothing but praise for them.

All of the above said, here's what we do. First the front bushings. We start with 2.125" round stock. You can use steel if you want, but aluminum machines faster, is lighter, and works fine. I've also heard of people using Delrin, but have never tried that in the front mounts. The overall length of each bushing is 2.850". That's from outside to outside. You need to turn that down to 1.985" and leave a shoulder, full diameter, .2" wide. The center hole should be drilled 1/2" in diameter, if you use a good bit and drill it on a lathe. If you wobble out the hole, you probably want to start with something smaller. You push these in to the cradle from the OUTSIDE in. The shoulder, IOW, is on the OUTSIDE of the cradle. This locates your cradle precisely and the cradle can't move once it's in place. 1.985" is going to be a very snug fit in some of the shells that are left in some of the cradle bushings after you remove the rubber. This is why there is some variation, the inside of that bushing is NOT a precision fit. You need to make certain that you have ALL the rubber from the old bushing removed, leaving the steel shell in place. Normally, these will fit with some help from a plastic mallet AFTER you've left them in the freezer for 3 or 4 hours. Once they warm up, they aren't coming out on their own, but should never have to.

Now for the rear bushings. These can be either aluminum, steel, a high density plastic, or a combination. On my third set, we went the combination route and I like that very much and until I have a failure with it, will probably keep using that.

There are three pieces you need to machine for the rear mounts. The top, the bottom, and the center. I'll start with the center. You start with a 2" nominal OD piece of aluminum stock. If you have to, true it up in the lathe so that it's no larger than 2". That is a very tight fit, and you might want to make it a touch smaller, but I generally just die grind the cracle a few thousandths if it's too tight. You need to make two of these pieces, one for each side, exactly 2.00" long. Now on each piece, you need to mill, or grind, flats the full length of them to fit in the oval hole in the cradle. These flats need to be milled so that your width is 1.825". IOW, you need to mill off .0875" on each side. The sides need to be exactly opposite each other. A mill makes quick work of this but if you're very careful, you could probably do that by hand. Bore a 1/2" hole in the center of the pieces and you're done with them. The 1/2" hole is oversize for the bolt but any smaller and you'll play hell getting your back bolts started.

You now need the upper and lower pieces. Of the two, the upper is the most critical. To start, we use 3 1/2" round stock of something. Aluminum works fine, but we've been using delrin and it works very well and machines quickly. You need to bore the center of it to make a nice, snug fit on the 2" round you made the center pieces from, so we bore them about .003" oversize so they slip together. They need to be exactly 1.25" tall and should be faced flat on both sides. This is important to maintain your correct mounting angle of the cradle and since you're doing this to be precise in your suspension, get it right.

The lower piece is less critical. It is machined just like the top, bored to fit over the 2" center piece, but if you are going to use your stock bolts, it needs to be .750" tall. Making it that height leaves you 1/4" to make up with a large washer that you need to make that will be the same OD as the bushing material (3.5") and with a 7/16" hole in the washer to fit the bolt. We use 1/4" plate aluminum for that, but you could just cut a piece off of your round stock that you use (if you make the upper and lower pieces from aluminum) and use that if you want.

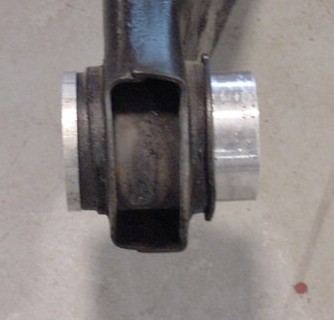
Here are two pictures. The first is the front bushings and you can see the slight shoulder on the outside. It doesn't take much an the shoulder will locate the cradle.

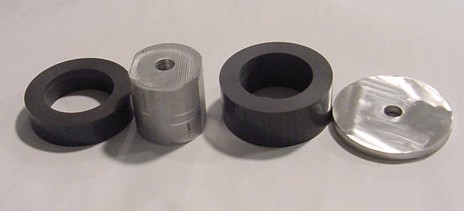
The second is of the pieces that make up the rear cradle bushings. You can see each piece and how they relate to one another. The height difference in the upper and lower piece isn't apparent in the picture, but it's a substantial difference.

Hope this is all clear enough, but there should be enough information for you to make your own, if you want. I do have to say, though, that unless you just enjoy the machine work, you're probably just as well off ordering a set of Morse bushings.

John Stricker

IP: Logged
PFF
System Bot
jstricker
Member
Posts: 12956
From: Russell, KS USA
Registered: Apr 2002


Feedback score:    (11)
Leave feedback


Total ratings: 370
Rate this member

Report this Post12-29-2004 07:16 PM Click Here to See the Profile for jstrickerSend a Private Message to jstrickerDirect Link to This Post
One bump so that anyone that wants the dimensions can find it.

John Stricker

IP: Logged
Jake_Dragon
Member
Posts: 32853
From: USA
Registered: Jan 2001


Feedback score: (5)
Leave feedback


Total ratings: 403
Rate this member

Report this Post12-29-2004 08:37 PM Click Here to See the Profile for Jake_DragonSend a Private Message to Jake_DragonDirect Link to This Post
Thanks, it never hurts to see new ideas
I plan on solid mounting both my cars, one is going to be done with a set from Darrell.
I already have them, the other car I’m going to make custom one off steel mounts.
There was a thread a couple years ago that had a cradle done up with steel mounts.
Once done there will be no going back.
IP: Logged
1986GTV8
Member
Posts: 1259
From: Orlando,FL,USA
Registered: Mar 2002


Feedback score: N/A
Leave feedback

Rate this member

Report this Post12-30-2004 02:01 PM Click Here to See the Profile for 1986GTV8Send a Private Message to 1986GTV8Direct Link to This Post
Great info.

A + for you.

I too will solid mount my cradle, but will grt them from darrell.

John

[This message has been edited by 1986GTV8 (edited 12-30-2004).]

IP: Logged
Kohburn
Member
Posts: 7349
From: Oriental, NC
Registered: Jul 2003


Feedback score: N/A
Leave feedback


Total ratings: 188
Rate this member

Report this Post02-25-2005 09:38 AM Click Here to See the Profile for KohburnSend a Private Message to KohburnDirect Link to This Post
I priced the materials out to about 50$ to order just enough to do the job.. but I am in a bit of a hurry so i'm probably going to order darrels
IP: Logged
Yellow-88
Member
Posts: 456
From: Coventry CT.
Registered: Feb 2005


Feedback score: N/A
Leave feedback

Rate this member

Report this Post02-25-2005 10:25 AM Click Here to See the Profile for Yellow-88Send a Private Message to Yellow-88Direct Link to This Post
What, if any is the advantage of solid mounting the rear cradle?

I use spherical rod ends, and I rubber mounted my 88 cradle, to isolate the nasty chassis noise. In measuring longitudinal chassis flex, I see little or no difference between solid, and rubber mounted.

What did I miss?

IP: Logged
Kohburn
Member
Posts: 7349
From: Oriental, NC
Registered: Jul 2003


Feedback score: N/A
Leave feedback


Total ratings: 188
Rate this member

Report this Post02-25-2005 01:35 PM Click Here to See the Profile for KohburnSend a Private Message to KohburnDirect Link to This Post
how did you rubber mount an 88 cradle?
IP: Logged
Yellow-88
Member
Posts: 456
From: Coventry CT.
Registered: Feb 2005


Feedback score: N/A
Leave feedback

Rate this member

Report this Post02-25-2005 02:37 PM Click Here to See the Profile for Yellow-88Send a Private Message to Yellow-88Direct Link to This Post
 
quote
Originally posted by Kohburn:

how did you rubber mount an 88 cradle?

The front is just hard neoprene bushings in 2” tube, very much like the early ones. The rear was a bit harder, but is basically hard neoprene in 3” tubes mounted vertically.

It seems to me that the cradle is rigid enough to do its job without the help of the body, and transmitted chassis noise is too annoying to ignore.

IP: Logged
ricreatr
Member
Posts: 586
From: Flint, mi
Registered: May 2004


Feedback score: N/A
Leave feedback

Rate this member

Report this Post02-25-2005 03:39 PM Click Here to See the Profile for ricreatrSend a Private Message to ricreatrDirect Link to This Post
thank you very much for sharing!
IP: Logged
RockChip
Member
Posts: 361
From: Osler, Saskatchewan, Canada
Registered: Nov 2002


Feedback score: N/A
Leave feedback

Rate this member

Report this Post02-25-2005 08:53 PM Click Here to See the Profile for RockChipSend a Private Message to RockChipDirect Link to This Post
Thanks for posting this, I had just started a thread on this topic. I would recomend buying a set, but I have a lathe so its probably easier for me to make a set instead of trying to get them across the border.

------------------
'86 Fiero GT 4spd, 3400 SFI , vented rear brakes, K&N filter, Cavalier seats, Celica GTS Rims, Mustang Scoop
'69 AMC Ambassador sst 2dr hardtop 390ci 3 spd B&M shift kit(315hp/427ftlbs)
'01 Yamaha YZ426F
'89 Acura Integra LS-winter beater

IP: Logged


All times are ET (US)

T H I S   I S   A N   A R C H I V E D   T O P I C
  

Contact Us | Back To Main Page

Advertizing on PFF | Fiero Parts Vendors
PFF Merchandise | Fiero Gallery | Ogre's Cave
Real-Time Chat | Fiero Related Auctions on eBay


Copyright (c) 1999, C. Pennock