|
| 3800sc Swap Complete Parts List (Page 2/11) |

|
Curtisk1060
|
DEC 25, 10:07 PM
|
|
|
I have not heard of most people re-designing the existing fuel pump circuit. I believe most have utilized the original circuit, especially the oil pressure switch and just upgraded the fuel pump fuse to a 15 amp. Some have replaced the original relay with a newer model, but the wiring has remained the same.. curtis
|
|

|
AustinH
|
DEC 25, 10:47 PM
|
|
WIRING HARNESS AND COMPUTER/ECU/PCM PROGRAMMING
NOTE: See programming/tuning video here - https://www.youtube.com/wat...index=33&pp=gAQBiAQB
NOTE: See Fuel/Spark Tuning video here - https://www.youtube.com/wat...kff2RlPWB_O&index=35
NOTE: You need to pull the entire engine harness off of the donor car. Nothing past the firewall is needed except for the OBDII port. You do not need the headlight harness.
-----Buying a harness-----
Want to buy a harness and PCM tune? I highly recommend this. Contact one of the below guys:
James L. Brown - https://www.facebook.com/Fiero3800harnesses/
Dan McIlmoyle - https://www.facebook.com/danny.mcilmoyle
West Coast Fiero (expensive!) - https://westcoastfiero.com/...ess-for-conversions/
And supply them with the following information, including programming:
Ship them your donor harness and donor computer (PCM/ECU)
Fiero Year/Model?
Year/Make/Model of donor car engine?
Transmission type?
Keep or delete EGR? (Check Local Laws)
Keep or delete EVAP system? (Check Local Laws)
Keep or delete rear O2 sensor after catalytic converter? (Check Local Laws)
Keep or delete Boost Bypass valves/solenoid?
Throttle Body and MAF type?
88 Fiero oil pressure sender 3-pin (only center pin used)
3 pin temp sensor (use the center pin for fiero gauge)
Keep or delete A/C pressure sensor connector near compressor connector?
Keep or delete Electronic cruise control?
Speedometer sensor buffer circuit
External or Internal transmission gear selection range switch?
MAP sensor type? (1-bar or 2-bar?)
Programming:
Delete ABS/TCS
Radiator fan activate at low temp (185?) and turn off at 180
Accommodate for type of MAF/TPS/IAC tables
Vehicle Speed Sensor programmed at:
24,713.7 ppm if using stock 215/60R15 rear tires
24,327.5 ppm if using specific 225/60r15 rear tires
VATS Security delete
Rev Limiter? (Up to ~6700 with XPZ camshaft)
Amount of timing to add? Determined by below
Camshaft type?
Supercharger type?
Supercharger pulley size?
Fuel type? (87/89/91/93 octane or E15 or E85?)
Cooling type if added? (Methanol injection, nitrous, intercooled?)
Head Gasket Type?
Compression Ratio?
Other modification type? (ported heads, ported supercharger, fuel injectors, exhaust system, valve springs, rocker ratio)
Here is a homemade spliced harness:

Video: Here is my engine bay with James L. Brown's harness
https://www.youtube.com/wat...kff2RlPWB_O&index=53

James L. Brown's harness routed properly through an engine bay:

[SIZE=3-----Building a harness-----[/SIZE]
NOTE: See programming/tuning video here - https://www.youtube.com/wat...index=33&pp=gAQBiAQB
See build 1 harness section for a parts list - https://www.fiero.nl/forum/.../HTML/139530.html#p5
Ryan Gick (Gmtuners/Sinister Performance) will sell you a tune if you are building your own harness. - https://www.gmtuners.com/ep...2wXDLObKJDCwUtgerhpI You can also contact him here: https://www.facebook.com/pr...p?id=100080110344101
Eppler Justin will sell you a tune if you are building your own harness. - https://www.facebook.com/justin.eppler/
Want to build your own harness? Below are diagrams for doing so. This thread does not supply any wire loom dimensions for laying out the harness - that is owned by harness makers above. It is possible to simply splice all of the connections that you need and lay out your own harness routings, but this is unreliable and messy. This guide will not help with that, but it will help with the final wiring diagram.
Harness building thread - https://www.fiero.nl/forum/Forum9/HTML/000026.html
Harness building thread - https://www.fiero.nl/forum/...070315-2-074653.html
Fieroinfo wiring diagram repository - https://www.fieroinfo.com/wiring/
Go to http://www.alldatadiy.com/ and buy a subscription to your donor car's information. You can find a PCM pinout diagram of PCM Connectors C1 (Blue) and C2 (Clear) that will be critical in aiding you with building the harness.
Here are some alternative examples of pinouts from several other cars: http://www.gearhead-efi.com...98-GM-V6-PCM-pinouts
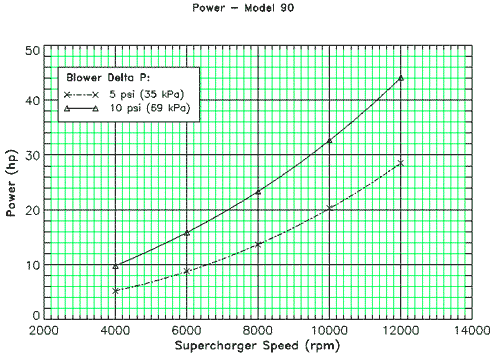
Below is an example of the PCM pinout diagram of a 2001 Bonneville SSEi. DO NOT USE THIS DIAGRAM IF YOU DID NOT BUY AN ENGINE FROM A 2001 BONNEVILLE SSEi; THEY WILL VARY SLIGHTLY!
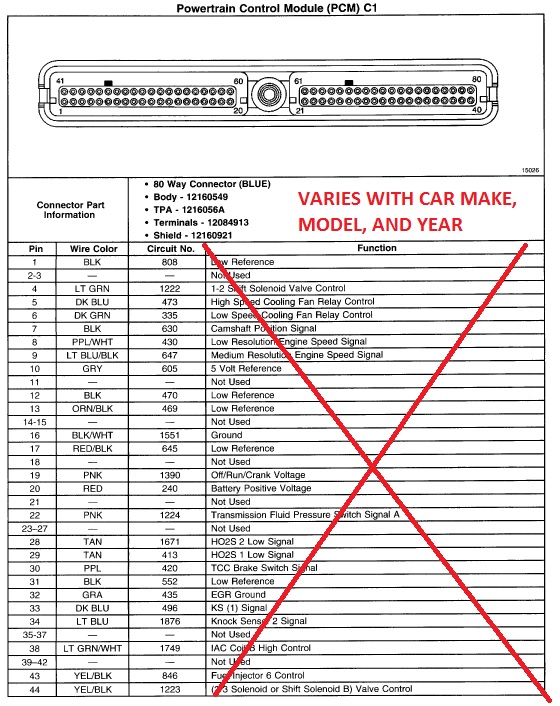
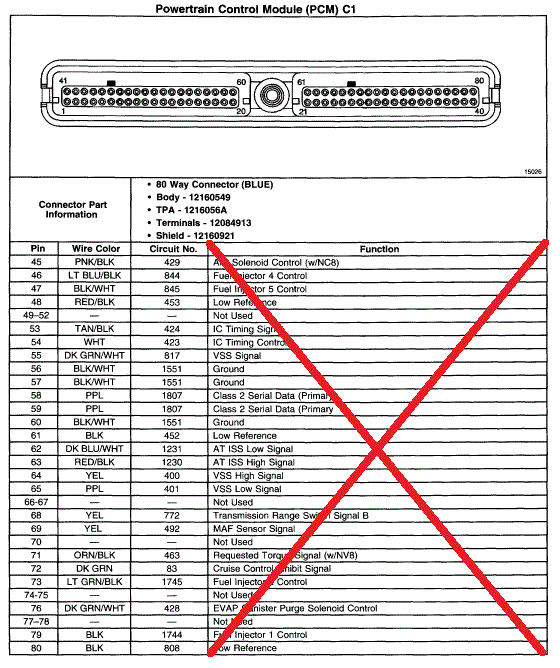
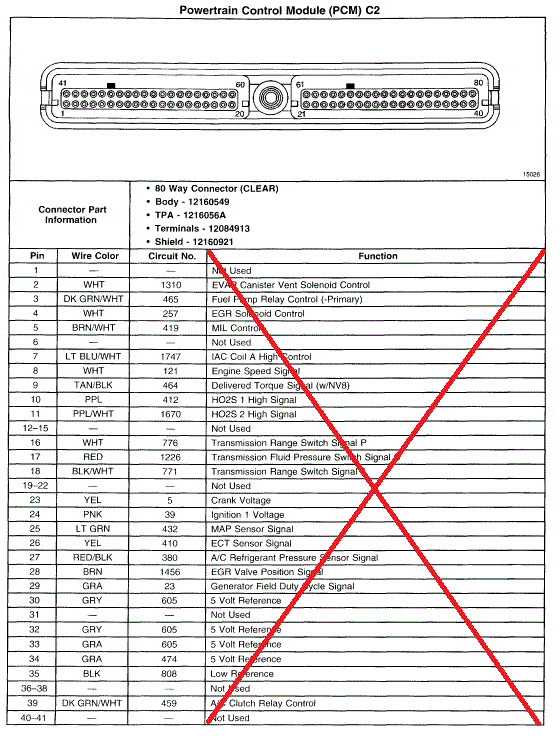
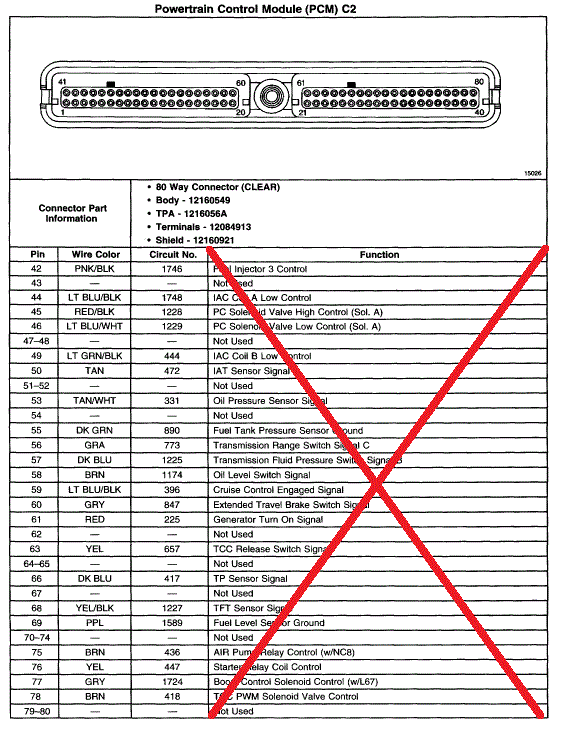
Many great wiring harness pin out charts already exist at GMTuners: http://www.gmtuners.com/files/index.htm
Consult Gmtuners for pinout list (this guide BELOW is specifically for a 1998-2002 GTP engine and transmission harness):
http://www.gmtuners.com/fil...o_L67_PCM_wiring.pdf
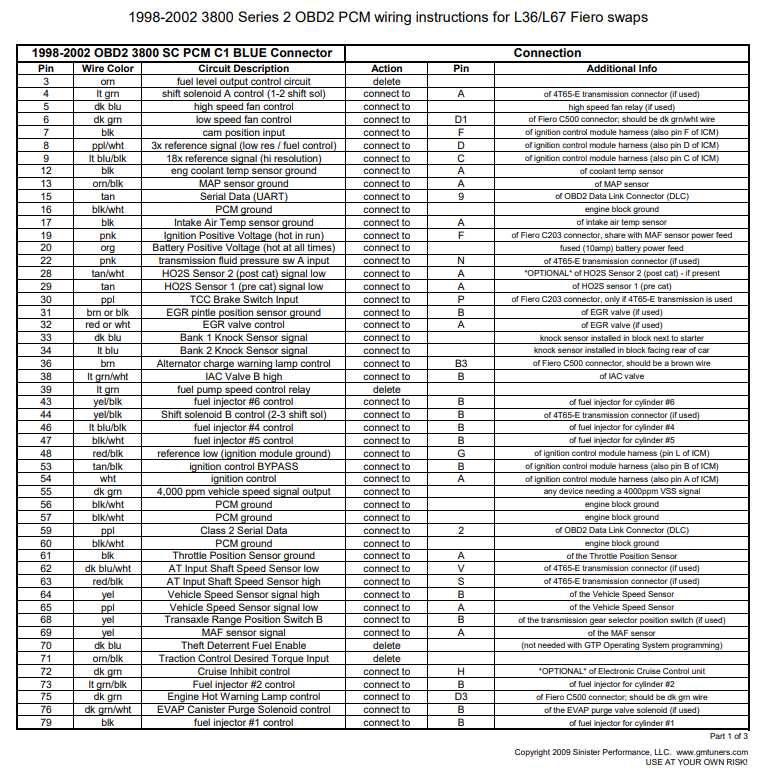
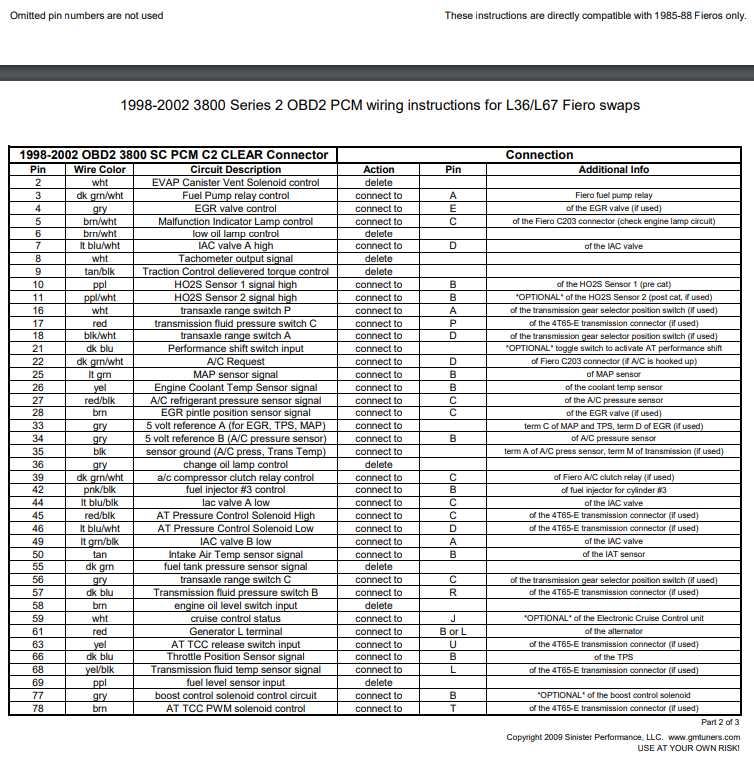
Harness wiring diagram for a 1998-2002 GTP harness that works 1985-1988 Fiero with a manual transmission:
NOTE: FOR A 1984 FIERO WIRING DIAGRAM, SEE HERE: https://www.fieroinfo.com/w...4_Wiring_Harness.jpg
NOTE: The pin connector guides above are much more thorough. The diagram below bare minimum.
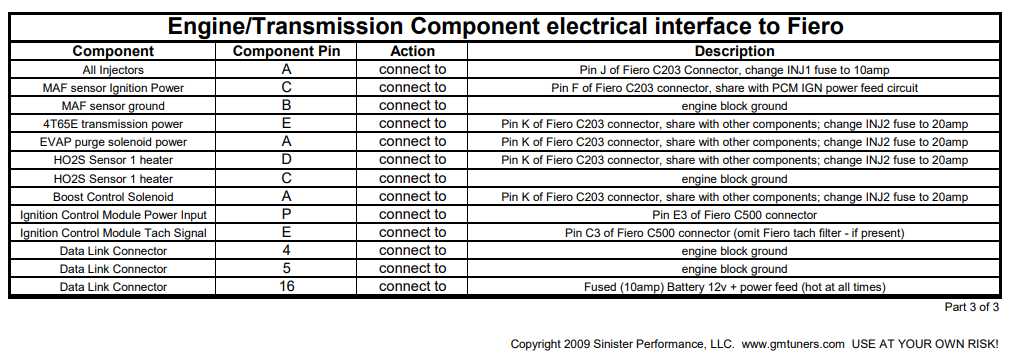
INSTRUCTIONS IN ADDITION TO THIS WIRING DIAGRAM BELOW:
1. For automatic harnesses:
a. Cut and ground the purple/white wire on C203 Pin R
b. Add the speedometer conversion buffer circuit shown below inline with the GTP computer connector C1 (blue) Pin 55 and the fiero C203 connector pin G
2. Change MIL (Malfunction Indicator Lamp/Engine Light) fuse to 10A
3. Change Fuel Pump Fuse to 15A or 20A
4. Change the Ignition Fuse to 20A
5. Connect C1 (Blue) connector pin 59 to pin 2 on the OBDII connector (diagram below) if you need to tune/scan your computer.
6. Wire up the 1988 Fiero Oil Pressure Gauge (on pin E of C203). Part #s in build 1 wiring harness section.

Speedometer Buffer Conversion Circuit (the input signal to the Fiero speedometer is incompatible with the 4t65e-HD transmission Vehicle Speed Sensor (VSS) output signal):
http://www.gmtuners.com/fiero/fmods.htm
NOTE: YOU MAY PURCHASE ONE OF THESE HERE: https://reddevilriver.com/h...peedo-buffer-circuit

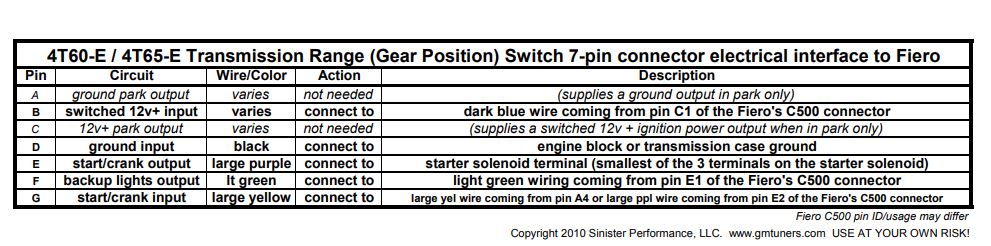
External Transmission Range Selector Switch for a 4t60/4t65/4t65e-hd transmission:
NOTE: You will need to purchase one of these and put it on your gear selector if you did not buy a GTP. You may also need the connector for it, available at Rockauto. See above build 1 Parts List.
OBDII Connector Pinout:
NOTE: The 3800sc Fiero only uses the "VPW" configuration on pins 2, 4, 5, and 16. Connect C1 (Blue) connector pin 59 to pin 2 on the OBDII connector

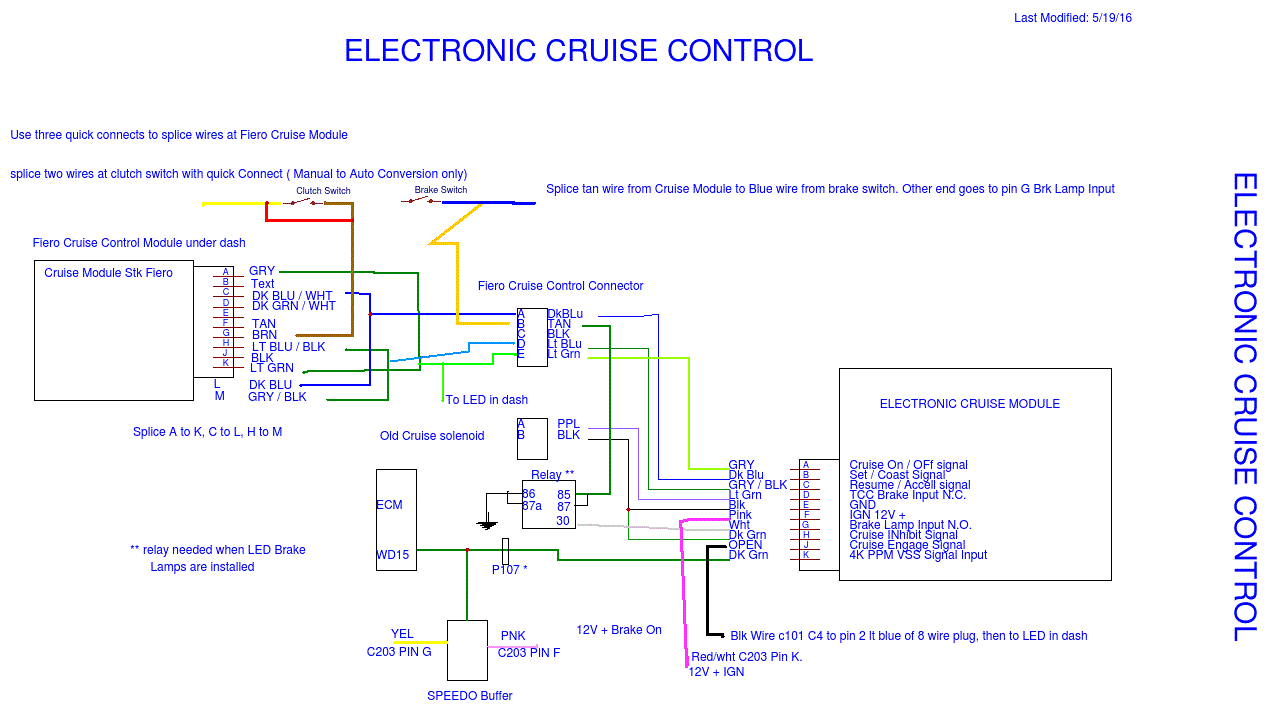
Optional: 3800 Electronic Cruise Control (can instead rig up the factory Fiero vacuum cruise to work by getting rid of the vacuum accumulator coffee can and plugging the vacuum line directly into the vacuum port on top of the supercharger, then see the Assembly Diagrams Section for mounting the cruise cable)
NOTE: See cruise diagram here if you did not have cruise from the factory: http://www.gmtuners.com/fil...ise_elect_cruise.pdf
NOTE: See alternative cruise diagram here: http://www.gmtuners.com/files/electcrz.zip
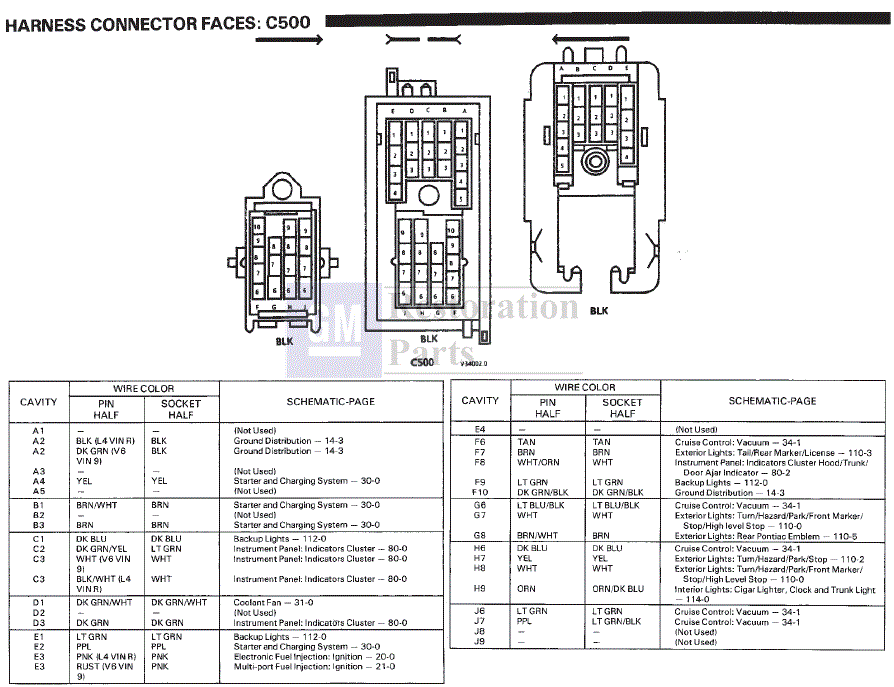
Stock Fiero C500 connector in engine bay:
A good pinout is located here: http://www.nathanbittinger....roaddiction/c203c500
Stock Fiero C203 Connector under center console
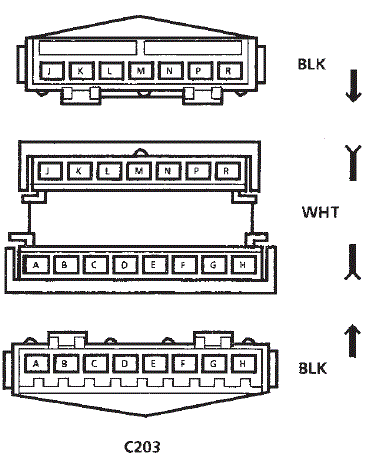
C203 and C500 connector pinouts, courtesy of http://www.gmtuners.com/files/index.htm
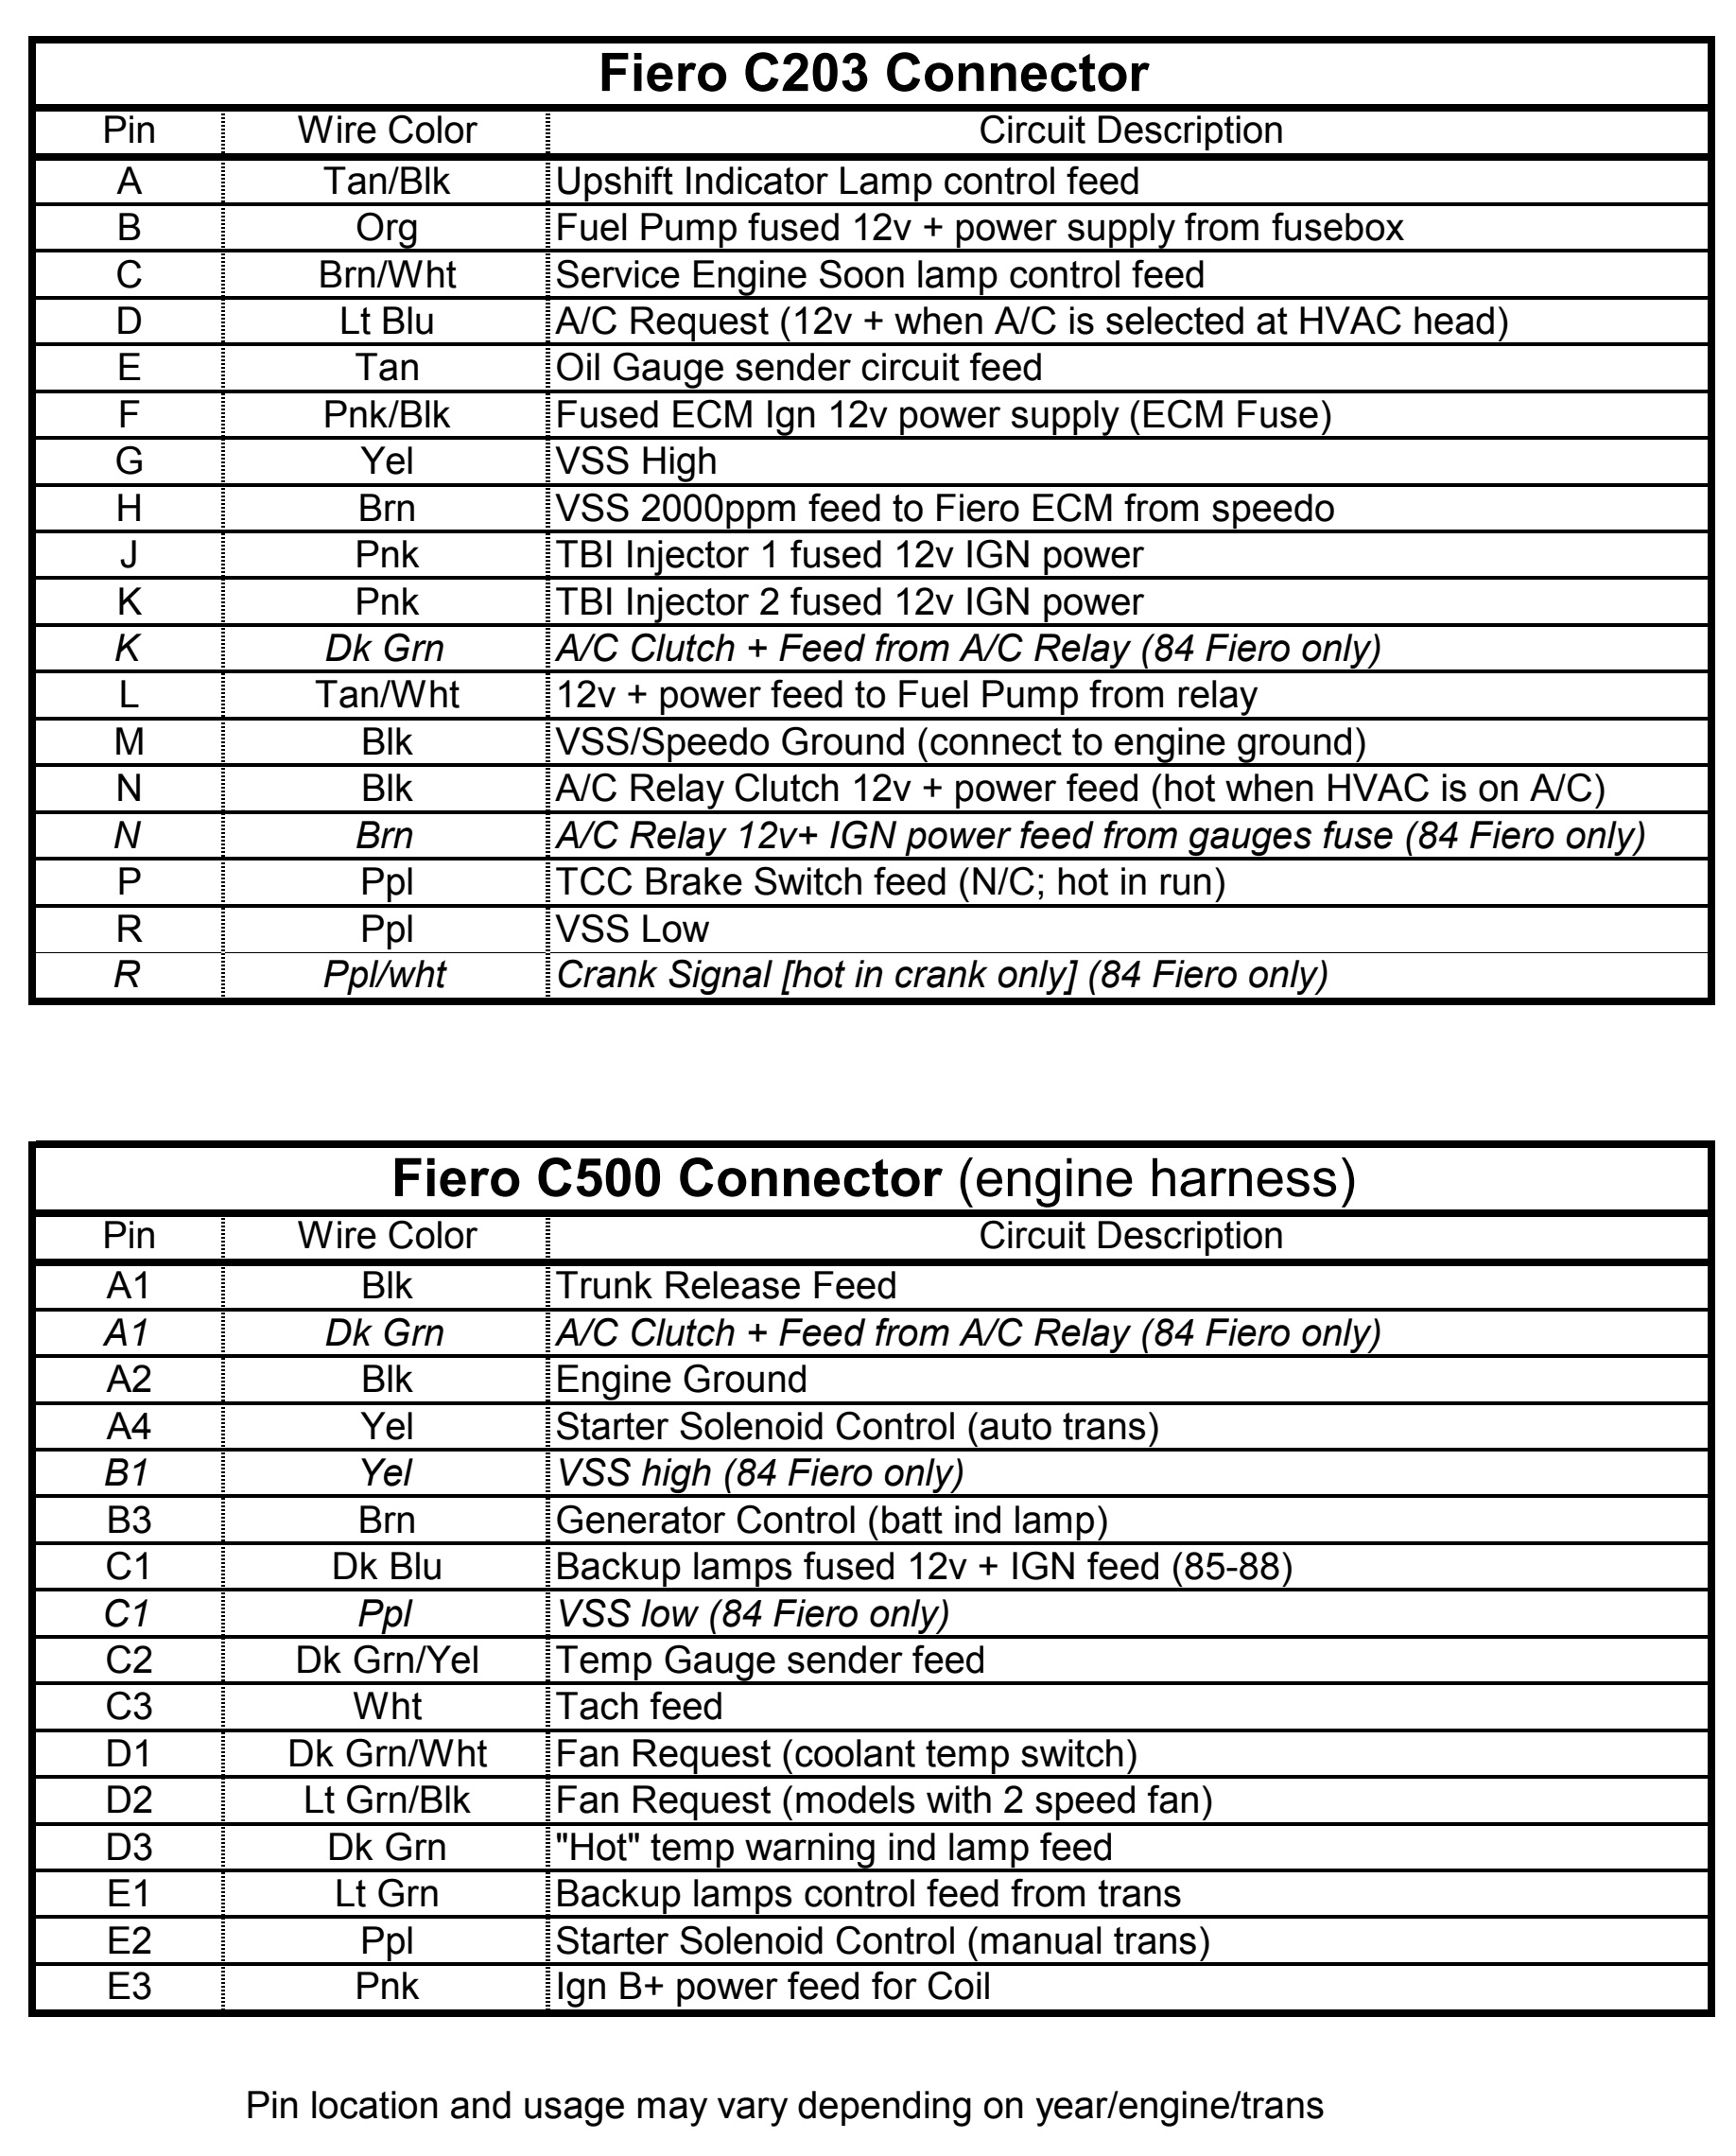
Optional: Fuel Pump Hot Wire, for supplying slightly more voltage to your fuel pump in high performance applications - http://www.gmtuners.com/fiero/hot_wire.htm
NOTE: If you bypass Pin B on the C203 Connector to hotwire in this way, you can re-use this wire on Pin B to permanently power the OBDII connector above.
NOTE: See build 2 for a much more in-depth hot wire.
NOTE: This diagram is much simpler than it looks. Just wire the relay pin 87 directly to the battery, the pump + directly to the relay pin 30, and pin 3 on C2 connector (Clear) to relay pin 86.

Video: How To Repin Or Replace Wires On The Main Engine Harness Connector:
https://www.youtube.com/wat...kff2RlPWB_O&index=19

-----
FieroAustin
1988 GT 3800SC Series III 2.8" Pulley
Amazon Recommendation Store for 3800s/Fieros/Tools https://amzn.to/3hNViaa
3800sc Instructions http://www.fiero.nl/forum/Forum2/HTML/139530.html
3800sc Instructions MOBILE https://drive.google.com/fi...JzC-2ZzbvLYMYE3QbmVq
eBay affiliate https://ebay.us/4yOWEw
Donate to me https://www.paypal.com/dona...siness=8AFWKBTBVSKTJ
Join channel membership https://www.youtube.com/FieroAustin/join
Subscribe https://www.youtube.com/fie...n?sub_confirmation=1
Consulting https://www.facebook.com/FieroAustin/
Facebook Subscribers Group https://www.facebook.com/be...pporter/FieroAustin/[This message has been edited by AustinH (edited 04-20-2024).]
|
|
|
|
AustinH
|
MAR 01, 11:05 AM
|
|
Disassembly, Reassembly and Final Fiero Installation Videos
All videos available in this playlist here - https://www.youtube.com/pla...IM_4I2qJnkff2RlPWB_O
-----Below this line is required for both build 1 and build 2-----
Video: Fiero Engine Removal:
https://www.youtube.com/wat...nkff2RlPWB_O&index=6

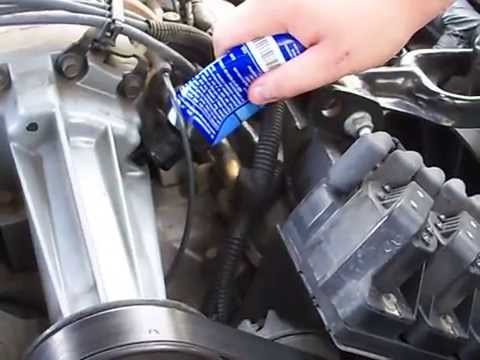
Video: How to replace the Fuel Pump:
https://www.youtube.com/wat...nkff2RlPWB_O&index=7

Video: How To Change The Supercharger Pulley Using The ZZP Pulley Puller:
https://www.youtube.com/wat...nkff2RlPWB_O&index=8

Video: How to change Supercharger Oil:
https://www.youtube.com/wat...nkff2RlPWB_O&index=9
Video: Boost bypass valve setup:
https://www.youtube.com/wat...kff2RlPWB_O&index=10

Video: How to Install oil sending unit, Thermostat & plugging water pump:
https://www.youtube.com/wat...kff2RlPWB_O&index=11

Video: How to install FieroRog Engine Brackets, Belts & Accessories in a 3800 Fiero:
https://www.youtube.com/wat...kff2RlPWB_O&index=12

Video: How to use the Fuel Line disconnect tool
https://www.youtube.com/wat...kff2RlPWB_O&index=13

Video: How to Install A Custom Fuel Rail & Swapping Valve Covers:
https://www.youtube.com/wat...kff2RlPWB_O&index=13

Video: How to build your own 3800sc Fiero Swap Axles:
https://www.youtube.com/wat...kff2RlPWB_O&index=14

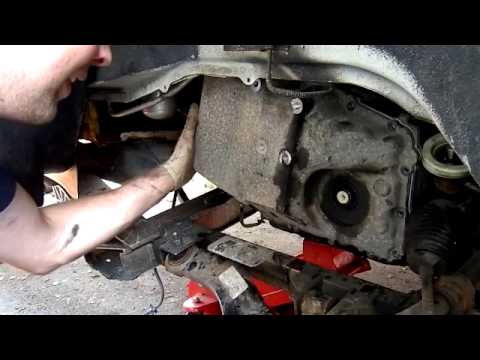
Video: How to install Transmission (you do NOT need to separate it unless you are modding it):
https://www.youtube.com/wat...kff2RlPWB_O&index=16

Video: Common shift solenoid problem how-to video:
https://www.youtube.com/wat...nkff2RlPWB_O&index=8
Video: Good 4t65 disassembly video here:
https://www.youtube.com/wat...kff2RlPWB_O&index=15

Video: 4t80e swap:
https://www.youtube.com/wat...nkff2RlPWB_O&index=8

Video: Mounting the 4t80e:
https://www.youtube.com/wat...kff2RlPWB_O&index=22

Video: What a 4T80 takes part 1:
https://www.youtube.com/wat...index=23&pp=gAQBiAQB

Video: What a 4T80 takes part 2:
https://www.youtube.com/wat...index=24&pp=gAQBiAQB

Video: How To Mount Engine to Trans/Install supercharger Belt
https://www.youtube.com/wat...kff2RlPWB_O&index=17

Video: How To Install an Injection Technology Wiring Harness
https://www.youtube.com/wat...kff2RlPWB_O&index=18

Video: How to hook up fuel lines, AC lines & hoses:
https://www.youtube.com/wat...kff2RlPWB_O&index=20

Video: Fiero Engine Bay for 3800 Swap Overview:
https://www.youtube.com/wat...kff2RlPWB_O&index=21

Video: Transmission Line hookups and POSI diff (found in build 2 only)
https://www.youtube.com/wat...kff2RlPWB_O&index=22

Video: Testing out Posi
https://www.youtube.com/wat...IM_4I2qJnkff2RlPWB_O

Video: How to install engine in car and hook up exhaust:
https://www.youtube.com/wat...kff2RlPWB_O&index=23

Video: Engine Bay Routings/Hookups 1:
https://www.youtube.com/wat...kff2RlPWB_O&index=24

Video: Engine Bay Routings/Hookups 2:
https://www.youtube.com/wat...kff2RlPWB_O&index=25

Video: Engine Bay Routings/Hookups 3:
https://www.youtube.com/wat...kff2RlPWB_O&index=26

Video: Tuning a 3800 with HPTuners for beginners:
https://www.youtube.com/wat...kff2RlPWB_O&index=34

Video: How to Perform the Crank Relearn Function in VCM Scanner | HP Tuners
https://www.youtube.com/wat...kff2RlPWB_O&index=35

Video: 3800 Fuel & Spark Timing Tuning in HPTuners:
https://www.youtube.com/wat...kff2RlPWB_O&index=35

Video: Cooling System Mods:
https://www.youtube.com/wat...kff2RlPWB_O&index=34

Video: Optional Bigger Radiator Install Video:
[URL=https://www.youtube.com/watch?v=xXfFXuZbTvM&list=PL9MEbquodF3isIM_4I2qJnkff2RlPWB_O&index=27]https://www.youtube.com/wat...kff2RlPWB_O&index=27

Video: Optional Bigger Radiator Fan Install Video:
https://www.youtube.com/wat...kff2RlPWB_O&index=28

-----Below this line is only required for build 2-----
IMPORTANT: BEFORE TEARING DOWN THE ENGINE, PLEASE WATCH THESE FACTORY SERVICE VIDEOS TO SAVE YOU SOME HEADACHES!
Video: Buick 3800 Engine Noise and Repair Techniques:
https://www.youtube.com/wat...kff2RlPWB_O&index=29

Video: Buick 3800 Engine Mechanical:
https://www.youtube.com/wat...kff2RlPWB_O&index=30

Video: Why you don’t want to disassemble the bottom end unless you know what you are doing (rods/pistons/crankshaft/bearings):
https://www.youtube.com/wat...kff2RlPWB_O&index=31

-----Disassembly of the engine-----
Video: How to tear down and rebuild the Lower Intake Manifold:
NOTE: I THOROUGHLY CLEANED OUT THE INSIDE OF MY LOWER INTAKE MANIFOLD BY SOAKING IN BRAKE CLEANER AND THEN TAKING IT TO A CAR WASH AND MANUALLY SPRAYING DOWN THOROUGHLY, INSPECTING, AND DRYING.
https://www.youtube.com/wat...kff2RlPWB_O&index=32

Video: How to tear down the "long block" (accessories, supercharger, intake, water pump, etc.).:
https://www.youtube.com/wat...kff2RlPWB_O&index=33

Video: Supercharger Repair Part 1
https://www.youtube.com/wat...kff2RlPWB_O&index=39

Video: Supercharger Repair Part 2
https://www.youtube.com/wat...kff2RlPWB_O&index=40

Video: Removing and Reinstalling harmonic balancer crankshaft pulley:
https://www.youtube.com/wat...kff2RlPWB_O&index=35

Video: Installing optional 5% overdrive harmonic balancer, crankshaft front cover oil seal, oil spacer bracket, AC compressor bypass pulley, and lightweight pulley system:
https://www.youtube.com/wat...kff2RlPWB_O&index=36

-----REMOVING AND PORTING CYLINDER HEADS-----
Video: How to disassemble cylinder heads with a valve spring compressor:
NOTE: You should drop your cylinder heads off at a machine shop, detailed later in this post. BE CAREFUL WITH THE CYLINDER HEAD DECK SURFACE. DO NOT SCRATCH THE BOTTOM OF THE HEADS. PLACE ON A LINT FREE CLOTH AND DO NOT PUT THEM ON THE GROUND OR A HARD SURFACE UNLESS YOU INTEND TO DECK THEM.
https://www.youtube.com/wat...kff2RlPWB_O&index=40

PREFACE: According to INTENSE Racing, stock cylinder heads will out-flow ANY M90 supercharged 3800 engine setup. There is virtually NO NEED to modify cylinder heads, UNLESS YOU RUN LIFT HIGHER THAN 0.525" intake/0.528" exhaust, DETEAILED BELOW.
NOTE: I would NOT attempt performing ANY of this at home. Take your cylinder heads to a machine shop. That being said, below is a collection of information about porting 3800 cylinder heads.
Here are the instructions I supplied a machine shop for porting my cylinder heads:
NOTE: Over 0.525" intake lift and 0.528" exhaust lift REQUIRES machining down valve guides. See this spreadsheet for required valve guide machining calculations - https://docs.google.com/spr...9-IzNmsOLhx3s6Z5IcjQ
NOTE: Assuming you have 1.65 rockers and not the stock 1.6 rockers
1. Machine 0.060" off top of intake valve guides to support XPZ Camshaft lift.
a. 1.65 rocker arm * 0.35375 XPZ camshaft intake lift = 0.5836875" total lift. Stock intake lift max is 0.525" (measure for yourself?) before intake valve runs into valve guide with stock retainers. 0.5836875"-0.525" = 0.0586875". Therefore, cut down top of valve guide by 0.060" to be safe.
2. Machine 0.030" off top of exhaust valve guides
a. 1.65 rocker arm * 0.335 XPZ camshaft exhaust lift = 0.55275" total lift. Stock exhaust lift max is 0.528" (measure for yourself?) before exhaust valve runs into valve guide with stock retainers. 0.55275"-0.528"= 0.02475". Therefore, cut down top of valve guide by 0.030" to be safe.
NOTE: LS Retainers add about 0.005" clearance, meaning max lift would be 0.530" intake / 0.533" exhaust, but to be safe this is not accounted for in my calculations.
3. Redrill and replace valve guides with Bronze oil lite guides (optional)
4. Valve job
a. widen valve seats for 1.83" intake valves (stock series 3 size; stock series 2 is 1.80"), 1.52" exhaust
b. Replace seats with hardened seats at custom 3 angle cut.
c. Back-cut valves with same 3 angle cut. Lap valves if necessary.
d. If not replacing seats with hardened seats, don't grind seat, but grind right up to it, without touching it, to maintain factory hardened seat.
5. Blend bowl smooth - remove casting mark and lips on radius
a. Street/strip port, Polish combustion chambers
b. Smooth short side radius
c. Don't drop port floor
6. Gasket Match Intake runners and Lower Intake Manifold
a. Don't gasket match exhaust. Keep the D-shape of exhaust ports (can widen a bit)
b. Polish runners
c. Blend in short side of intake
d. Be careful not to grind through walls.
7. Deck head surfaces and record thickness decked by. Need at least 50 Roughness Average (RA) on deck surface to properly seal Cometic Head Gaskets.
In addition to porting cylinder heads, on the engine block, measure each cylinder “out of hole” clearance, or the amount which a piston sticks out above the block deck when the crankshaft is at top dead center. Stock piston height should be between 0.012” to 0.025”. If the out of hole measurements for each piston are significantly different than one another, then consider decking the block. At this point, you will need to disassemble the bottom end. If re-using stock bottom end parts, keep every bolt/bearing/rod/piston/journal/cylinder matched with where it came from, including direction. Consider getting the engine inspected and blueprinted, the crankshaft ground, the rods conditioned, the rotating assembly balanced, having new oversized bearings installed afterwards, honing cylinders, and replacing piston rings with correct gap for your boost. Detailed in the next section.
Video: How to prepare deck surfaces and assemble cylinder heads
https://www.youtube.com/wat...kff2RlPWB_O&index=42

Video: Valve job video:
https://www.youtube.com/wat...kff2RlPWB_O&index=49

Video: Head Porting 1:
https://www.youtube.com/wat...kff2RlPWB_O&index=50

Video: Head Porting 2:
https://www.youtube.com/wat...kff2RlPWB_O&index=51

Video: Head Porting 3:
https://www.youtube.com/wat...kff2RlPWB_O&index=52

Video: Head porting example:
https://www.youtube.com/wat...kff2RlPWB_O&index=53

Video: How to lap / grind / regrind valves and valve seats:
https://www.youtube.com/wat...kff2RlPWB_O&index=54

-----INSPECTING THE BOTTOM END (crank/bearings/connecting rods/bearings/pistons/piston rings)-----
Video: How to remove front cover, balance pulley, timing chain, balance shaft, camshaft, etc.:
https://www.youtube.com/wat...kff2RlPWB_O&index=37

Video: How to remove front cover, balance pulley, timing chain, balance shaft, camshaft alternative:
https://www.youtube.com/wat...kff2RlPWB_O&index=38

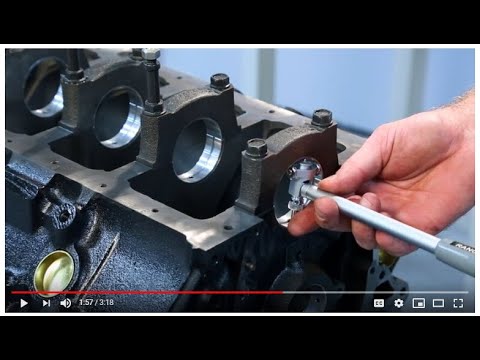
This is how to properly tear down the bottom end which is not covered in this guide. Here are the instructions I would provide a machine shop with for working with the bottom-end:
If the rotating assembly is in good shape, re-use all factory items and don't recondition.
1. Measure if block needs decked. .003" out of flat and 50 microinch RA surface or more required for decking. If not leave it. If so, deck block/heads and continue.
2. Disassemble pistons/rods.
3. Keep rods, rod bolts, rod bearings, crank bearings, and journals, etc matched to each other.
4. Clean pistons and rings with oil based solvent.
5. Check rings. Leave stock rings and don't hone if rings are OK. If rings are seized:
a. Replace rings (oversized?)
b. Gap rings. Adjust gap for 12-14.5 psi roots style supercharger boost (350 deg. Max)
c. Hone cylinder bores.
d. Oil and install pistons and rings.
6. Measure rods/bearings. If good, leave stock. If rods are worn:
a. Recondition rods, bore and find matched bearings (oversized?)
b. Clean rod bearing seats with alcohol
c. Oil inside of bearings but not in seat, work in oil to crank
d. Assemble rods to torque spec with matched bolts
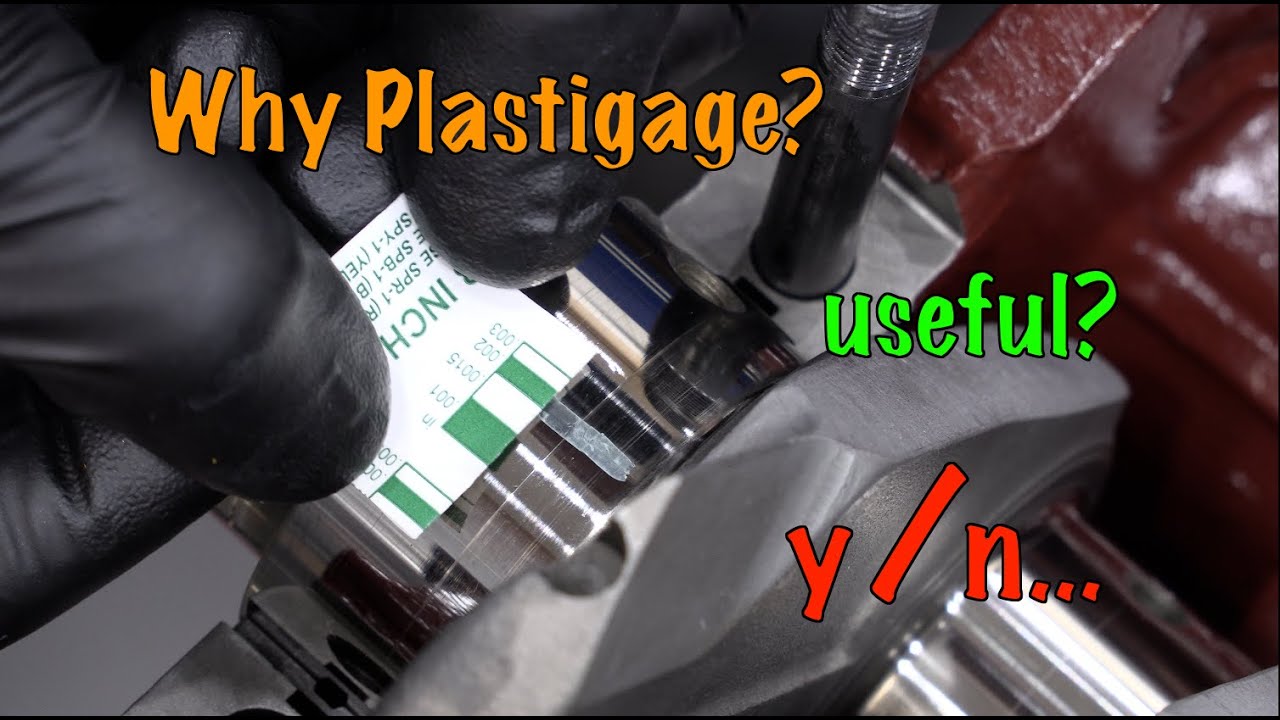
e. Measure play (plastigauge) to verify correct size bearing
f. Also do replace crank bearings (below).
7. Measure crank bearings for wear
a. If crank or rod bearings worn, replace with new bearings (oversize?)
b. Plastigauge new bearings once torqued and seated to verify correct size
c. Clean main seats with alcohol.
d. Oil inside of bearings, torque mains down and rotate crank with oil in inside of bearings.
8. Measure main seats. If round, leave. If out of round:
a. Re-bore mains. Select appropriate bearings
9. Measure crank journals. If out of round:
a. Machine journal to round
b. Replace bearings (oversized?)
10. Measure crankshaft thrust bearing play. Recondition if necessary
11. Check assembly for balance
a. If out of balance for 6,700RPM, then re-balance rotating assembly
i. Flexplate
ii. Torque Converter
iii. Crank
iv. Pistons
12. Replace front and rear main seals and covers, reinstall everything and torque
Video: Here is a decent video on inspecting the bottom end
NOTE: This video does not describe matching and conditioning rods parts. Before disassembling anything for yourself, if you're not an expert, JUST TAKE IT TO A MACHINE SHOP AND HAVE THEM DO EVERYTHING.
https://www.youtube.com/wat...kff2RlPWB_O&index=55
Video: Here is a in-depth video about measuring crankshaft and connecting rod journals.
https://www.youtube.com/wat...kff2RlPWB_O&index=56
-----RE-ASSEMBLY OF THE ENGINE-----
Video: ZZP How to install a camshaft and double roller timing chain:
https://www.youtube.com/wat...kff2RlPWB_O&index=39

Video: FACTORY SERVICE GUIDE for installing heads, valve train, balance shaft, intake manifold, valve covers, etc.:
https://www.youtube.com/wat...kff2RlPWB_O&index=41

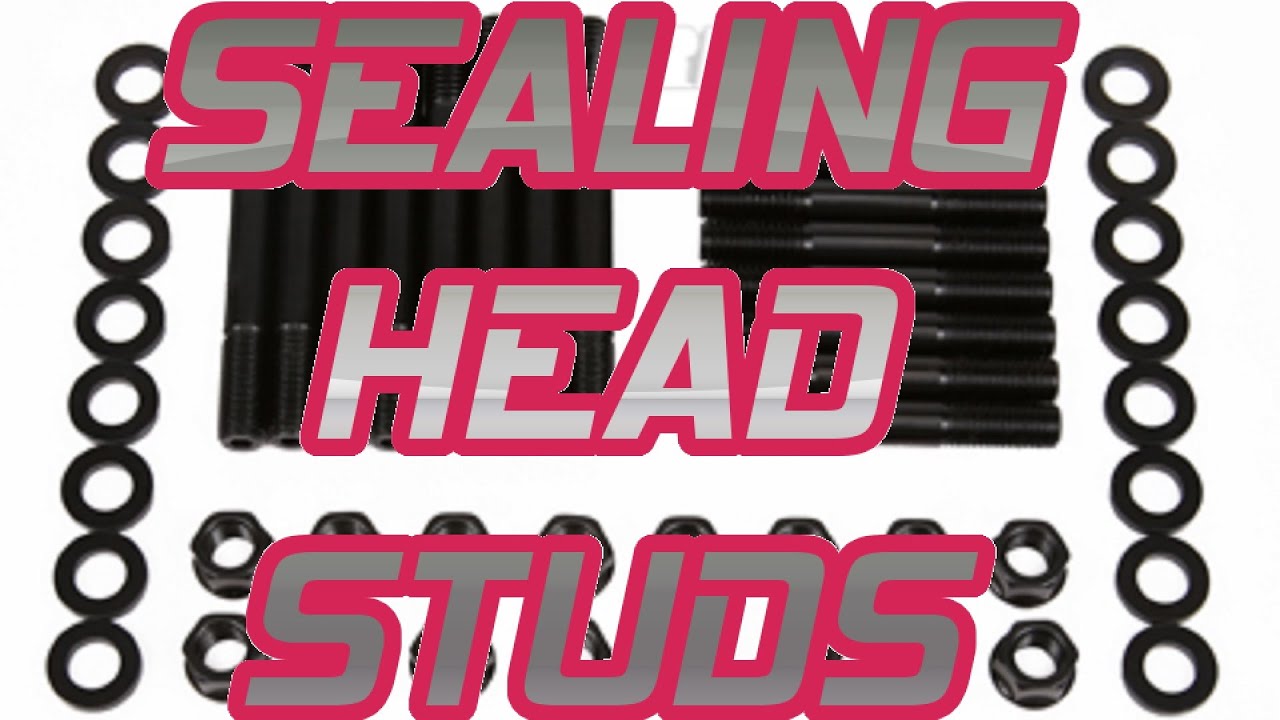
Video: Sealing Head Studs:
https://www.youtube.com/wat...kff2RlPWB_O&index=43
Video: ZZP Installing Heads:
https://www.youtube.com/wat...kff2RlPWB_O&index=44

-----MEASURING PUSHROD LENGTH WITH A PUSHROD LENGTH CHECKER-----
NOTE: This applies to engines with non-adjustable rocker arms:
Buy the pushrod length checker here - https://ebay.us/UXqjf3
1 - have your heads and head gasket on and torqued to spec, and valves/springs, camshaft and lifters installed
2 - put the length checker on a valve lifter through the hole in the head.
3 - Rotate the crankshaft with a 24mm socket and wrench, while pushing the pushrod length checker firmly down firmly to ensure that the lifter is making contact with the camshaft lobe, until the lifter is at its lowest point (when it is contacting the base circle on the camshaft).
4 - Bolt on the rocker arm and its pedestal until it is snug. do not over torque.
5 - unscrew the length checker until it makes firm contact with the rocker arm and has no play at all in it. make sure it is seated in the rocker arm cup and not binding on something else!
6 - take the rocker arm off and take the pushrod length checker out. measure the pushrod length checker on a caliper from end to end, careful not to twist it and change its length.
7 - repeat steps 2-6 several times on both heads for both intake valves and exhaust valves. Record each value and take and average for both intake and exhaust. EXHAUST AND INTAKE CAN BE DIFFERENT, DEPENDING ON YOUR CAMSHAFT!!!
8 - add the half of the lifter "squish," or the amount that the lifter preloads to each of your measured lengths. I am not sure what half of your squish/preload length is, but it will probably be between .025" and .075". Call the manufacturer for info or look up the specs.
9 - find a pushrod that is closest in length to your intake and exhaust pushrod measurement calculation and order them. I would advise getting a pushrod of no different length within 0.010" from your measurements if you can find one. As far as pushrod diameter goes, that is up to you. I run two different ones: One is a 3/8" thickness and the other is a 11/32" thickness, because that is what sizes i could find the right lengths for. You want a good balance of strength and lightweight pushrods, depending on how aggressive your camshaft is. You can't go wrong with anything ZZP sells although expensive:
https://zzperformance.com/p.../zzp-custom-pushrods
keep in mind that stock pushrod length is 7.029" if that is closer to your measurements than a 7.000" or a 7.050" pushrod. Do NOT re-use pushrods if you are changing your rockers. If you plan on keeping your stock rockers/pushrods/lifters, make sure to keep them matched to each other and each cylinder, to keep each with its respective wear patterns, and mark which direction the pushrod went. If you change ANY part (cam/lifters/pushrods/rockers), buy all new parts. Stock pushrods are 11/32" thick for a 3800.
Video: How to assemble cylinder heads, valve train (lifters/rockers/pushrods), intake manifold, supercharger, and throttle body:
NOTE: DO NOT USE ARP THREAD SEALANT SHOWN IN VIDEO. INSTEAD USE HIGH TEMP NON-HARDENING RTV SILOCONE.
https://www.youtube.com/wat...kff2RlPWB_O&index=45

Video: Supercharger mods:
https://www.youtube.com/wat...kff2RlPWB_O&index=57

Video: Intercooling, Plugging intake/supercharger/throttle body coolant ports:
https://www.youtube.com/wat...4dL8ruvZQL4pabfi1DyA

Video: Porting supercharger (Gen3 ONLY; similar concept can still apply to GenV but will not provide much benefit):
https://www.youtube.com/wat...kff2RlPWB_O&index=59

Video: Installing a Phenolic Spacer instead of Intercooler:
https://www.youtube.com/wat...kff2RlPWB_O&index=34

Video: E85 Conversion:
https://www.youtube.com/wat...kff2RlPWB_O&index=66

Video: How to assemble Custom Exhaust, Custom Fuel Rails, Accessories:
https://www.youtube.com/wat...kff2RlPWB_O&index=47

Video: How to wrap your exhaust with titanium exhaust wrap:
https://www.youtube.com/wat...kff2RlPWB_O&index=49

-----
FieroAustin
1988 GT 3800SC Series III 2.8" Pulley
Amazon Recommendation Store for 3800s/Fieros/Tools https://amzn.to/3hNViaa
3800sc Instructions http://www.fiero.nl/forum/Forum2/HTML/139530.html
3800sc Instructions MOBILE https://drive.google.com/fi...JzC-2ZzbvLYMYE3QbmVq
eBay affiliate https://ebay.us/4yOWEw
Donate to me https://www.paypal.com/dona...siness=8AFWKBTBVSKTJ
Join channel membership https://www.youtube.com/FieroAustin/join
Subscribe https://www.youtube.com/fie...n?sub_confirmation=1
Consulting https://www.facebook.com/FieroAustin/
Facebook Subscribers Group https://www.facebook.com/be...pporter/FieroAustin/[This message has been edited by AustinH (edited 04-25-2024).]
|
|
|
|
AustinH
|
MAR 01, 12:24 PM
|
|
|
|
|
AustinH
|
MAR 01, 06:41 PM
|
|
|
|
|
1MohrFiero
|
APR 09, 09:10 AM
|
|
|
I dont know how I missed this before. Thanks for the huge effort in documentation.
|
|
|
|
AustinH
|
APR 09, 10:09 AM
|
|
MY BUILD
CLICK HERE TO VIEW MOST OF THESE PARTS ON AMAZON
Here are the extra parts not included above that I also have on my build. NOT NECISSARY FOR THE ENGINE SWAPS!
Video: This shows in-depth modifications to the 3800 engine from this build thread:
https://www.youtube.com/wat...nkff2RlPWB_O&index=3

Not mentioned in video:
Removed engine bay insulation
ZZP Aluminum Vented Cooling Transmission Oil Pan http...tps://ebay.us/DoQ4Jh
Coilover conversion kit https://groundcontrolstore...._sid=a822b8a18&_ss=r
Battery Quick Disconnect https://amzn.to/3kOGXfF
Armrest - https://www.fiero.nl/cgi-bi...5991&style=printable
Poly tie rod boots - https://www.fierostore.com/...0%20%20RED&d=324&p=1
Modular pulley system
Alternate Aluminum 8-rib Pulley Set (If you want to mix and match for lightest setup, you only need the ribbed aluminum pulley from this set. Message him and he will make you a single aluminum ribbed idler, LET HIM KNOW YOU NEED IT MADE SPECIFIC FOR THIS BALANCER - HE NORMALL MAKES PULLEYS WITH TWO EXTRA RIBS ON END INSTEAD OF ONE ON EACH SIDE) - http://smoothflowpulleys.com/8_rib_L67_idlers.html
NEW Drag race modification vid - SEE DESCRIPTION FOR PARTS https://www.youtube.com/wat...4dL8ruvZQL4pabfi1DyA
Removed engine bay insulation
ZZP Aluminum Vented Cooling Transmission Oil Pan https://ebay.us/DoQ4Jh
Coilovers https://groundcontrolstore...._sid=a822b8a18&_ss=r
Battery Quick Disconnect https://amzn.to/3kOGXfF
Armrest https://www.fiero.nl/cgi-bi...orum=4&thread=055991
Poly tie rod boots https://www.fierostore.com/...0%20%20RED&d=324&p=1
Modular Pulley System http://smoothflowpulleys.co...ys.com/3800_MPS.html
Aluminum 8-rib Pulley Set http://smoothflowpulleys.co..._rib_L67_idlers.html
PARTS IN THIS VIDEO:
NOTE: I do run the build 2 list at https://www.fiero.nl/forum/...HTML/139530.html#p7, with the below in addition:
5% Overdrive Balancer Supercharger 8-rib https://amzn.to/3QzWBFp
AC Compressor Bypass Pulley https://amzn.to/3RUQtZA
Pulley vid - SEE DESCRIPTION FOR PARTS https://www.youtube.com/wat...4dL8ruvZQL4pabfi1DyA
Chin spoiler vid https://www.youtube.com/wat...4dL8ruvZQL4pabfi1DyA
Slim popup headlights https://www.youtube.com/wat...4dL8ruvZQL4pabfi1DyA
1988 Headlight Rebuild Kit https://www.fierostore.com/...%20%20PAIR&d=273&p=1
Radiator https://amzn.to/3bIcprb
Radiator install vid https://www.youtube.com/wat...4dL8ruvZQL4pabfi1DyA
Brake Booster vid https://www.youtube.com/wat...4dL8ruvZQL4pabfi1DyA
Stainless brake hoses https://www.fierostore.com/...px?s=56098&d=379&p=1
Wiper Arm https://amzn.to/3K2h19K
Wiper Arm https://amzn.to/3YbUbT3
Wiper Arm vid https://www.youtube.com/watch?v=1ga8LR3zO-Q
22-24" Drivers wiper on
20" Passengers wiper
Front Tires https://amzn.to/3o9kgRg
Tire Paint Vid https://www.youtube.com/wat...4dL8ruvZQL4pabfi1DyA
Tire paint https://amzn.to/3PEeSS3
88 stiffer shocks (could understeer) https://amzn.to/3RIEQ8x
84-87 stiffer shocks (could understeer) https://amzn.to/3Y0sX1z
KYB Excel-G Rear Struts https://amzn.to/3oahsTQ
KYB Strut Boot/Bump Stop https://amzn.to/3zizTMs
Strut install vid https://www.youtube.com/wat...4dL8ruvZQL4pabfi1DyA
Front Suspension install vid TBD!
1988 1" Lowering Ball Joints http://rodneydickman.com/pr....php?products_id=158
88 1" (closer to 7/8") longer sway bar end links for https://amzn.to/3RFAfUJ
Poly Front Sway Bar Bushings https://amzn.to/3odTC9O
Poly Rear Sway Bar Bushings https://amzn.to/3yLhgQ5
Vertical Door vid - SEE DESCRIPTION FOR PARTS https://www.youtube.com/wat...4dL8ruvZQL4pabfi1DyA
Steering wheel vid https://www.youtube.com/wat...4dL8ruvZQL4pabfi1DyA
Turbo Tachometer from sunbird vid https://www.youtube.com/wat...4dL8ruvZQL4pabfi1DyA
Speakers http://rodneydickman.com/pr....php?products_id=300
Brighter Lighbulbs http://rodneydickman.com/ad...hp?keywords=brighter
Side scoops (not exact in video) - https://www.fierosidescoops.com/
Rear Tires 235/60r15 https://amzn.to/3PfLkKL
Sail Panel https://ebay.us/BYGak0
Foxbody mustang hood scoop https://ebay.us/hCT4Js
Trunk Shock Kit http://rodneydickman.com/pr....php?products_id=113
Shifter Cable Repair Kit http://rodneydickman.com/pr....php?products_id=338
-----DRAG RACING-----
See these parts on Amazon - https://www.amazon.com/shop..._US&ref_=as_li_ss_tl
Video: See Fiero Drag Prep Video
https://www.youtube.com/wat...4dL8ruvZQL4pabfi1DyA

2023 NHRA Rulebook - https://nationaldragster.s3...ulebook_22_11_08.pdf
Metal Valve Stems (check fitment) - https://amzn.to/3pMuHPd
Shorter Open Lug Nuts (5x per wheel) - https://amzn.to/3YmTUuJ
Aluminum Valve Covers (for supercharged, methanol burning cars) - https://ebay.us/zrsiqF
Polished valve cover cap to match valve covers - https://amzn.to/3mxlF6t
Type ABC Fire Extinguisher - https://amzn.to/3XTwr5D
Fire Extinguisher Mount - https://amzn.to/3L55kAi
Ignition Wire Labels (2x) - https://amzn.to/3JiHyQc
Fiero Sail Panel Window - https://ebay.us/BYGak0
Sail Panel Installation Video - https://www.youtube.com/wat...4dL8ruvZQL4pabfi1DyA
HPTuners w/2 credits - https://zzperformance.com/p...riant=39878353748030
Battery Mount - https://amzn.to/44r7Ojd
Helmet (Snell SA2020) - https://amzn.to/3ISFpsU
Fire Jacket (SFI 3.2A/1) - https://amzn.to/3SWTZ7w
Hood vents (discontinued) - http://angelonearth.net/cus...iberglass/hoods.html
E85 Conversion / O2 Sensor install video - https://www.youtube.com/wat...IM_4I2qJnkff2RlPWB_O
Intercooler Kit (1x):
ZZP Stage 2.5 (will need cutting into decklid to fit supercharger snout, pairs nicely with a 1/4" phenolic spacer):
Gen 5 supercharger - https://ebay.us/HWxShY
Gen 3 supercharger - https://ebay.us/KNkzse
OR
ZZP Short Stack:
Gen 5 supercharger - https://ebay.us/avvZgM
Gen 3 supercharger - https://ebay.us/dtriFM
Battery Quick Disconnect - https://amzn.to/3kOGXfF
Weather Station - https://amzn.to/44jdlIL
Drag racing logbook - https://amzn.to/43qyWO2
Front Tires (street) - 195/65R15 98H Continental - https://amzn.to/3o9kgRg
SS Rear Drag Tires (235/60R15)- Mickey Thompson ET Street S/S (fits stock GT rims) - https://amzn.to/3kUUMZV
SS Bigger Rear Drag Tires (255/60R15)- Mickey Thompson ET Street S/S (fits stock GT rims) - https://amzn.to/3pWKsmy
R Bigger Rear Drag Tires (255/60R15)- Mickey Thompson ET Street R (fits stock GT rims) - https://amzn.to/3PVnhUi
Coil overs - https://groundcontrolstore....7-pontiac-fiero-rear
1988 Fiero Single adjustable front shocks for drag racing - https://amzn.to/3IOyL70
1984-1987 stiffer front shocks (competition engineering does not make a compatible length of 84-87 style shocks; these stiffer shocks may be better than stock however, they are what is used in the video) - https://amzn.to/3Y0sX1z
Electrical tape - https://amzn.to/3AfDNps
Posi traction differential Phantom Grips - https://ebay.us/nvhu2S
Car tire scales - https://amzn.to/3rto3hk
Tire chalk - https://amzn.to/3NVzJkB
TEST YOUR REACTION TIME - https://www.shoprpmoutlet.com/reaction.html
-----PARTS FROM OTHER HOW-TO VIDEOS-----
CLICK HERE TO VIEW MOST OF THESE PARTS ON AMAZON
See corresponding YouTube video descriptions for parts below:
Vertical Doors - https://www.youtube.com/wat...4dL8ruvZQL4pabfi1DyA
3800 Swap - https://www.youtube.com/wat...IM_4I2qJnkff2RlPWB_O
Tools - https://www.youtube.com/wat...IM_4I2qJnkff2RlPWB_O
Sail panels - https://www.youtube.com/wat...4dL8ruvZQL4pabfi1DyA
Mirror Motors - https://www.youtube.com/wat...4dL8ruvZQL4pabfi1DyA
Shocks - https://www.youtube.com/wat...4dL8ruvZQL4pabfi1DyA
Overdrive Balancer Pulley / AC Bypass Pulley - https://www.youtube.com/wat...4dL8ruvZQL4pabfi1DyA
88 Popup Headlights, Door Switch Boots, Badge - https://www.youtube.com/wat...4dL8ruvZQL4pabfi1DyA
Car Show Detailing - https://www.youtube.com/wat...4dL8ruvZQL4pabfi1DyA
Bluetooth/AUX Radios - https://www.youtube.com/wat...4dL8ruvZQL4pabfi1DyA
Radiator - https://www.youtube.com/wat...4dL8ruvZQL4pabfi1DyA
Speakers - https://www.youtube.com/wat...4dL8ruvZQL4pabfi1DyA
Tires & Tire Paint - https://www.youtube.com/wat...4dL8ruvZQL4pabfi1DyA
Struts - https://www.youtube.com/wat...4dL8ruvZQL4pabfi1DyA
Exhaust Tip Shield, Console Tray, Switch Plate, Ashtray Door & Seat Mechanism Cover - https://www.youtube.com/wat...4dL8ruvZQL4pabfi1DyA
88 Rear Suspension Bushings - https://www.youtube.com/wat...4dL8ruvZQL4pabfi1DyA
2022 Projects - https://www.youtube.com/wat...4dL8ruvZQL4pabfi1DyA
3800 Sealing Head Studs - https://www.youtube.com/wat...4dL8ruvZQL4pabfi1DyA
Window switches - https://www.youtube.com/wat...4dL8ruvZQL4pabfi1DyA
GT Tail Lenses - https://www.youtube.com/wat...4dL8ruvZQL4pabfi1DyA
Turbo Sunbird Tachometer for boosted cars - https://www.youtube.com/wat...4dL8ruvZQL4pabfi1DyA
Brake Booster Upgrade - https://www.youtube.com/wat...4dL8ruvZQL4pabfi1DyA
Dew Wipes/Window Felt Guides - https://www.youtube.com/wat...4dL8ruvZQL4pabfi1DyA
Slim Popup Headlights - https://www.youtube.com/wat...4dL8ruvZQL4pabfi1DyA
GT Chin Spoiler - https://www.youtube.com/wat...4dL8ruvZQL4pabfi1DyA
All Mods as of 2022 (see above) - https://www.youtube.com/wat...4dL8ruvZQL4pabfi1DyA
Drag Race Prep (see above) - https://www.youtube.com/wat...4dL8ruvZQL4pabfi1DyA
Intercooling - https://www.youtube.com/wat...kff2RlPWB_O&index=75
Cooling System Mods - https://www.youtube.com/wat...QL4pabfi1DyA&index=2
E85 Conversion / O2 Sensor install video - https://www.youtube.com/wat...IM_4I2qJnkff2RlPWB_O
Paint Project (TBD) - https://amzn.to/4bfSlGF
-----
FieroAustin
1988 GT 3800SC Series III 2.8" Pulley
Amazon Recommendation Store for 3800s/Fieros/Tools https://amzn.to/3hNViaa
3800sc Instructions http://www.fiero.nl/forum/Forum2/HTML/139530.html
3800sc Instructions MOBILE https://drive.google.com/fi...JzC-2ZzbvLYMYE3QbmVq
eBay affiliate https://ebay.us/4yOWEw
Donate to me https://www.paypal.com/dona...siness=8AFWKBTBVSKTJ
Join channel membership https://www.youtube.com/FieroAustin/join
Subscribe https://www.youtube.com/fie...n?sub_confirmation=1
Consulting https://www.facebook.com/FieroAustin/
Facebook Subscribers Group https://www.facebook.com/be...pporter/FieroAustin/[This message has been edited by AustinH (edited 04-08-2024).]
|
|
|
|
AustinH
|
APR 22, 01:08 AM
|
|
MY TOOLBOX
CLICK HERE TO VIEW MY NEW AMAZON STORE
Video: My toolbox
https://www.youtube.com/wat...kff2RlPWB_O&index=62

PART 1: CAR TOOLS
PART 2: SHOP TOOLS
PART 2.1: CONSUMMABLE CAR HARDWARE
PART 2.2: CAR WASHING
PART 2.3: ELECTRICAL TOOLS
PART 3: HOUSE PROJECT & OUTDOOR TOOLS
EVERY TOOL IN THIS VIDEO, IN ORDER:
* = essential
** = My favorite & essential
PART 1: CAR TOOLS
Click Here to jump to Youtube timestamp
**DeWalt 3/8" impact https://amzn.to/3uVaOVh
**DeWalt 1/2" impact https://amzn.to/3uZbMQJ
*3/8" drive screwdrivers https://amzn.to/3hArxcS
*3/8" drive allen hex bits https://amzn.to/3Abw77W
*3/8" drive Torx bits https://amzn.to/3EtXnkv
**Head lamp https://amzn.to/3Eu6mlT
**OBDLink MX+ OBD2 Bluetooth Scanner https://amzn.to/3nZm7It
*DeWalt Drill https://amzn.to/3E2qSso
Gator Grip universal socket https://amzn.to/3hSmTa4
*Wire Wheels https://amzn.to/3WW8Qk2
*Step Drill bits https://amzn.to/3cqIOCP
**Drill bits https://amzn.to/3A7yjNJ
*Drill to Screwdriver Adapter https://amzn.to/3g2DdER
*Screwdriver tips https://amzn.to/3Ew36GF
Drill bit gauge https://amzn.to/3WXU9wQ
*Hole Saws https://amzn.to/3TAyvM6
*Tool chest top (alt) https://amzn.to/3EtwCg9
*Tool chest bottom https://amzn.to/3g9vVPw
**Toolbox Labels https://amzn.to/3E4Yjub
**Vampliers w/hardened teeth https://amzn.to/3QndRy0
**Side Cutters https://amzn.to/3SKoihh
**Needle nose pliers & cutters https://amzn.to/3TwUUtJ
Long pliers https://amzn.to/3O5fyA1
Thin profile ratchet (alt) https://amzn.to/3US4atB
**Swivel/Flex Ratchets https://amzn.to/3X1jK7Y
**Socket extension, swivel, adapters https://amzn.to/3UO2lhg
Wobbler extensions https://amzn.to/3YOxOmb
*Wrenches https://amzn.to/3UU6CQl
*Wrench Organizers https://amzn.to/3EqIY8K
**Ratchet Wrenches https://amzn.to/3hFwjpB
*Swivel/Flex Head wrenches https://amzn.to/3ttev3s
Ratchet open end wrenches (tooth) SAE https://amzn.to/3zB8LY5
Ratchet open end wrenches (tooth) Metric https://amzn.to/3ErgZ8O
Line/Flare Nut Wrenches https://amzn.to/3JIMrjZ
*Sockets (alt) https://amzn.to/3URvQ1F
*Socket Organizers https://amzn.to/3Af8f3m
3/8" drive impact sockets https://amzn.to/3hyJsAB
1/2" drive impact sockets https://amzn.to/3X2fp4L
*Screwdrivers https://amzn.to/3A8CEjC
*Mini-screwdrivers https://amzn.to/3WZOvKD
Hooks/Pokers https://amzn.to/3WYNX7T
Nut drivers SAE https://amzn.to/3GiC7Qd
Nut drivers Metric https://amzn.to/3UX1Npi
**Endoscope bluetooth camera https://amzn.to/3Ag2D8P
Magnetic/hook work light https://amzn.to/3O4x087
**Flex head Magnet retrieval tool https://amzn.to/3EvUMqs
**Magnet retrievers https://amzn.to/3g30uGI
**Snake/claw retriever https://amzn.to/3E6ejMp
**Thermometer laser https://amzn.to/3ErKuYi
Flare tool for brake/transmission lines https://amzn.to/3AdjR7r
Ethanol Tester https://amzn.to/3UUjeag
Compression tester https://amzn.to/3UAQP9d
Greaser https://amzn.to/3E3K3BW
Adjustable ball joint/tie rod remover https://amzn.to/3g1aBvA
Riveter https://amzn.to/3AbUX7J
Torque Angle Meter https://amzn.to/3Aas3oc
*3/8" drive torque wrench https://amzn.to/3TzPdLQ
*1/2" drive torque wrench https://amzn.to/3Dh7wAQ
Thread Chaser for 7/16 head bolts https://amzn.to/3UVYXkH
Bolt extractors https://amzn.to/3UUaL6R
Better Bolt extractors https://amzn.to/3AepTnD
*Antifreeze freezing point tester https://amzn.to/3DZwBz0
Pump https://amzn.to/3hGltzB
**Oil Filter Wrench https://amzn.to/3QCbRlf
**Small Oil Filter Wrench https://amzn.to/3dbaufK
*Funnels/Oil Pan https://amzn.to/3UB4Cg3
Radiator funnel https://amzn.to/3bDVara
*Hose clamps https://amzn.to/3UNTkok
Spark plug crimp tool https://amzn.to/48OLRxs
Balancer puller/installer (NON-3800) https://amzn.to/3DiNMNp
Balancer puller (3800) https://amzn.to/3d6W9kh
Balancer installer (3800) https://amzn.to/3BAkl7W
*Spark plug gapper https://amzn.to/3EwdNch
Automotive fuses https://amzn.to/3Ad8uvG
**HPTuners w/credits https://amzn.to/3Tsw4LK
**HPTuners scanner only https://amzn.to/3WY2xfI
**Flashlight, magnetic https://amzn.to/3g8T1G1
**Trim piece remover https://amzn.to/3fZGuF4
Snap ring tool https://amzn.to/3UQL8nx
Pipe/Line cutter (small) https://amzn.to/3bAyCYl
Pipe/Line cutter https://amzn.to/3A3XUHN
Boot Clamp Installer https://amzn.to/3z4SkEo
**Vise Grips https://amzn.to/3WX3GV0
**Vise Grip C clamp https://amzn.to/3hGtIvx
*Heat gun https://amzn.to/3E1VFWd
*Tape measures https://amzn.to/3UR72qH
**Saws-all reciprocating saw https://amzn.to/3GrIAIF
**Angle Grinder https://amzn.to/3EvXAns
Nylon Bottle Brushes https://amzn.to/3EwmiEd
Wire brushes https://amzn.to/3Ev4WHE
Steel Wool https://amzn.to/3EwTB9Y
Scotch-Brite abrasive pad https://amzn.to/3UXbGDr
Markers https://amzn.to/3g9fp21
*Metallic Markers https://amzn.to/3TzxFPX
Paint markers https://amzn.to/3UR7PIb
Wax Pencils https://amzn.to/3TARt5g
Sparker https://amzn.to/3tsOGkc
Lighters https://amzn.to/3UxHhvD
**Deburr Tool https://amzn.to/3TAiF4n
Velcro https://amzn.to/3AeewMF
**Punches & cold chisels https://amzn.to/3E2qSbL
Wood chisels https://amzn.to/3OaB9Y8
*Files https://amzn.to/3fZ8SHp
Small Files https://amzn.to/3TzzrAk
**Allen Hex wrenches https://amzn.to/3tpWljl
**Magnet Bowls https://amzn.to/3AckMUY
Tap & die https://amzn.to/3O1Vvm4
*Metal Hacksaw https://amzn.to/3E3prKg
Wedge https://amzn.to/3O7lCbi
*Wood hammer https://amzn.to/3X07yo1
**Deadblow Hammers https://amzn.to/3TsFHKo
**Pry bars https://amzn.to/3p0QdM1
Crow bar https://amzn.to/3O0Lg1y
*1/2" drive breaker bar https://amzn.to/3G8ncb8
**C clamps (use on brake calipers) https://amzn.to/3E8JM0N
**6" caliper https://amzn.to/3vMaBEl
**12" caliper https://amzn.to/3WRD9s2
Oiling Can https://amzn.to/3Ezwpbh
*Slide hammer https://amzn.to/3TDbkko
*Spray bottles https://amzn.to/3hHuuIv
*Hot glue https://amzn.to/3X1ALPo
Blade Sharpener https://amzn.to/3UzvmxD
**Utility Knife https://amzn.to/3E8tOn6
*Razor Blades https://amzn.to/3TtiV5b
Plastic Razor Blades https://amzn.to/3OewnIZ
**Tin Snips https://amzn.to/3hDRQ1M
*Crescent Wrenches https://amzn.to/3tKMF37
*Channel locks https://amzn.to/3TOsDiN
Pipe Wrenches https://amzn.to/3UEPeiP
Bolt Cutters https://amzn.to/3EwDYiX
Torx Screwdrivers https://amzn.to/3hHUcNn
Safety/Tamper Torx bits https://amzn.to/3UWoWsi
O-rings https://amzn.to/3AcNGnV
Fuel line remover https://amzn.to/3cipRSP
Valve grinder https://amzn.to/3trJ6hX
**Oil Pan/Funnels https://amzn.to/3BK7vVm
Oil dry/absorbent https://amzn.to/3bIixQd
**Torch https://amzn.to/3G9FCIB
**Torch Fuel https://amzn.to/3Ge0lLs
**Dremel https://amzn.to/3UBi3wv
**Jack https://amzn.to/3JB48lk
*Jack Stands https://amzn.to/3PedjK0
**Creeper https://amzn.to/3Vb44xB
**Stool https://amzn.to/3UWhb5g
Engine Stand https://amzn.to/3hFOb3F
Wheel dollies https://amzn.to/3ErwIES
Cherry picker/hoist https://amzn.to/3hxYzdv
*Shop vac https://amzn.to/3GdgEb7
Shop light stand https://amzn.to/3X02ujB
**Shop light https://amzn.to/3USowD1
**Ultra bright bulbs https://amzn.to/3E3xTJi
Light bulb plug adapter https://amzn.to/3AmU8ZF
Light Socket Splitter/Twin Adapter https://amzn.to/3E9V84E
**Bench light https://amzn.to/3O6MMiF
*Battery Charger https://amzn.to/3TEdj89
*Jumpers https://amzn.to/3Tymk2y
*Car Toolbox https://amzn.to/3UE3Yyn
*5gal Gas Tank https://amzn.to/3tB2lpb
Propane Heater https://amzn.to/3TA8f4D
Bug lantern https://amzn.to/3E1BGXH
Radio https://amzn.to/3UA50eM
*Air Compressor https://amzn.to/3hJLuy4
Compressor Dryer https://amzn.to/3Evd62X
Compressor Dryer Hose 1 https://amzn.to/3tsjoK8
Compressor Dryer Hose 2 https://amzn.to/3EtCUMD
*Hose Reel https://amzn.to/3Euj43Q
**Tire Filler https://amzn.to/3US6tgk
*Tire Gauge https://amzn.to/3UXUbmu
**Air sprayer https://amzn.to/3TEfxV3
*1/2" right angle ratchet https://amzn.to/3Eymgf5
**3/8" right angle ratchet https://amzn.to/3RCchKO
Air impact hammer/chisels https://amzn.to/3hOaBiY
**Bench vise https://amzn.to/3E8Dga9
Plastic draining bin w/wheels https://amzn.to/3TA2x2Q
Car fender mat https://amzn.to/3US8vwY
Drill press
Lathe
CNC Mill
Majax mobile car lift
Welder multipurpose 120/240 https://amzn.to/3g8MoUg
Feeler Gauge https://amzn.to/45e8d8P
PART 2: SHOP TOOLS
Click Here to jump to Youtube timestamp
**Extension cord reel https://amzn.to/3tnP3fX
*Extension Cord https://amzn.to/3g8TisM
Chain https://amzn.to/3X2x1NL
**Blower https://amzn.to/3Ty7k4F
*Zip Ties https://amzn.to/3UXH2tW
Bungee cord https://amzn.to/3ExxFvC
Come along winch https://amzn.to/3tuBrzn
*Tape dispenser https://amzn.to/3O3jTE9
*Sandpaper low grit https://amzn.to/3g0GowV
*Sandpaper high grit https://amzn.to/3UDQz9t
*Duct Tape https://amzn.to/3AjjMhV
**Collapsible folding table https://amzn.to/3X47jsk
**Parts organizer https://amzn.to/3hJWThn
**Storage shelves https://amzn.to/3V0PN6x
**Storage Totes w/wheels & handles https://amzn.to/3gcCfWu
Sawhorses folding https://amzn.to/3AbHcpq
*Broom https://amzn.to/3GgUNje
*Trash bin https://amzn.to/3EwvYyh
**Neodymium Magnets https://amzn.to/3BdlFfX
Magnifying Glass https://amzn.to/3Ag43QD
PART 2.1: CONSUMMABLE CAR HARDWARE
Click Here to jump to Youtube timestamp
Gloves https://amzn.to/3tr2Wdj
*Dust mask https://amzn.to/3UE6sN9
**Cut resistant gloves https://amzn.to/3UyEy5g
*Ear muffs https://amzn.to/3UUQUEv
**Ear plugs (band) https://amzn.to/3UHXYET
**Kroil penetrating oil https://amzn.to/3UZoNUC
MAF Cleaner https://amzn.to/3AfaOT4
**Brake Cleaner https://amzn.to/3BA4J4H
Penetrating Oil https://amzn.to/3vOcEYO
*Penetrating Oil/lube (stays wet) https://amzn.to/3bAybNH
**Anti-seize lube https://amzn.to/3PrgAGs
**Shop Towels Lint Free https://amzn.to/3exyWrO
*Gasket/epoxy remover https://amzn.to/3qxcwJX
Grey Gasket Maker https://amzn.to/3hE2FB0
**Black Gasket Maker https://amzn.to/3EyH6Ll
**5 minute epoxy https://amzn.to/3hHeS8b
Red Loctite https://amzn.to/3USscW1
Blue Loctite https://amzn.to/3V1Ce6B
Valve Grinding Compound (progressive) https://amzn.to/3TFFvr8
Pipe thread/lock compound https://amzn.to/3U3wUzZ
**Super Glue https://amzn.to/3EfGby2
Moly Powder https://amzn.to/3eiOVd3
Camshaft/Lifter lube https://amzn.to/3Ew1xsh
Air tool oil https://amzn.to/3hB6KWt
Grease for assembly https://amzn.to/3UEQrqg
Engine break-in oil https://amzn.to/3O6vfY4
**Isopropyl Alcohol https://amzn.to/3UN15Ls
**Acetone https://amzn.to/3USt6kM
*Fuel injector cleaner https://amzn.to/3Gy6Wk3
*Brake Fluid Dot 3/4 https://amzn.to/3EbiczF
2 cycle oil https://amzn.to/3O5RxZE
*Power steering fluid https://amzn.to/3GeeoR5
Antifreeze Universal https://amzn.to/3AkE5M1
Lighter fluid https://amzn.to/3Gd94xn
PART 2.2: CAR WASHING
Click Here to jump to Youtube timestamp
**Duster for shows https://amzn.to/3g3lIEk
*Scratch free cloth https://amzn.to/3hE4EVY
*Wash mitt https://amzn.to/3TCzCLi
**Wax/grease remover https://amzn.to/3b6AojA
*Goo gone https://amzn.to/3onOa4p
**Iron remover https://amzn.to/3O3Upq8
*Rubbing Compound https://amzn.to/3UG8vjW
*Wash & Wax https://amzn.to/3Gghsfm
Metal polish https://amzn.to/3UYkw3S
*Car Polish https://amzn.to/3X4Ikou
Ice spray wax https://amzn.to/3AcXw9C
Tire shine https://amzn.to/3PH8d97
**Vinegar https://amzn.to/3g6KWBU
Buffer/waxer/polisher https://amzn.to/3tt8sMz
PART 2.3: ELECTRICAL TOOLS
Click Here to jump to Youtube timestamp
Function generator https://amzn.to/3UUCoge
Oscilloscope https://amzn.to/3g6LeJ0
*Wire nuts https://amzn.to/3txQSae
**AC Voltage tester https://amzn.to/3AeNUuV
**Helping hands soldering station https://amzn.to/3g7ofgI
**Flux/braid https://amzn.to/3EbWcFb
Flux https://amzn.to/3E9SYlg
**Solder Vacuum https://amzn.to/3UGJiG7
*Electrical tape https://amzn.to/3AfDNps
**Wire strippers/crimpers https://amzn.to/3B7Td0x
Wire stripper https://amzn.to/3g3o8mo
*Wire stripper https://amzn.to/3X0iHW6
*Needle nose pliers/cutters https://amzn.to/3TwUUtJ
Crimp connectors (heat shrink) - https://www.amazon.com/dp/B..._US&ref_=as_li_ss_tl
Electrical components, breadboard https://amzn.to/3hMaCEj
*Parts organizer https://amzn.to/3hL8M6N
*Heat shrink https://amzn.to/3UEcCNh
**Soldering station https://amzn.to/3qwd99O
**DC Power Supply https://amzn.to/3X74dUy
**Digital Multimeter https://amzn.to/3X2jdCZ
**Multimeter probe/clips https://amzn.to/3tujIrX
PART 3: HOUSE PROJECT & OUTDOOR TOOLS
Click Here to jump to Youtube timestamp
Concrete hammer drill https://amzn.to/3EylFd8
**Nail pullers tack hammer https://amzn.to/3E7adDS
**Circular saw https://amzn.to/3tw4eUk
**Orbital sander https://amzn.to/3g6vgys
*Electric Nailer/Stapler https://amzn.to/3O4F0pB
Hand stapler https://amzn.to/3Qsaiqa
Staple Remover https://amzn.to/3vLSJtz
9/16 Staples (divergent with point) https://amzn.to/3A2OnR6
*Caulker https://amzn.to/3UYp8qI
*C clamps https://amzn.to/3GhUxAy
**Quick wood clamps https://amzn.to/3UEXkb6
Square https://amzn.to/3O4xLhj
**Combination square https://amzn.to/3AhuK7L
Drywall square https://amzn.to/3UAzqO0
Laser level https://amzn.to/3TBlmCH
*24" level https://amzn.to/3X5dWug
48" level https://amzn.to/3USzU1O
Drywall rasp https://amzn.to/3ts78cK
Paint scrapers/putty knives https://amzn.to/3Oaczqo
Wood rasp https://amzn.to/3AhvbyV
Wood hacksaw https://amzn.to/3tvLtQT
Coping Saw https://amzn.to/3UWBLmh
Wire brushes https://amzn.to/3Ex4tEZ
**String Trimmer/Weed Eater https://amzn.to/3V0Wi9n
*Tire/Ball pump https://amzn.to/3EyoBqa
**Pump sprayer https://amzn.to/3USBaTb
Seed spreader https://amzn.to/3O83UV5
*Electric Power washer https://amzn.to/3X6xw9t
**Folding ladder https://amzn.to/3OlL79f
**Step Stool https://amzn.to/3O7o7ur
Oscillator Tool DCS354B https://amzn.to/3hG4iOJ
Chainsaw DCCS677B https://amzn.to/3tsFQTC
Leaf Blower DCBL772B https://amzn.to/3WXgwT0
*Snow shovel https://amzn.to/3E7KBqC
Not Mentioned:
Honing Tool https://www.brushresearch.com/brushes.php?c1=1
Dust/paint respirator https://amzn.to/3TA7fxy
Painting/Drywall equipment
Drywall saw https://amzn.to/3UPDhXu
Sledgehammer, pickaxe, hoe, garden rake, rake, pitchfork, shovel, lawnmower, snowblower
Torque Screwdriver https://amzn.to/3B2PksO
Jigsaw https://amzn.to/3WHYYK7
Flexible Extensions https://amzn.to/3jJc4Z1
Car Ramps https://amzn.to/3jKMz9P
Router https://amzn.to/3WFsJLP
Oxygen Sensor Socket https://amzn.to/41Opbtz
-----
FieroAustin
1988 GT 3800SC Series III 2.8" Pulley
Amazon Recommendation Store for 3800s/Fieros/Tools https://amzn.to/3hNViaa
3800sc Instructions http://www.fiero.nl/forum/Forum2/HTML/139530.html
3800sc Instructions MOBILE https://drive.google.com/fi...JzC-2ZzbvLYMYE3QbmVq
eBay affiliate https://ebay.us/4yOWEw
Donate to me https://www.paypal.com/dona...siness=8AFWKBTBVSKTJ
Join channel membership https://www.youtube.com/FieroAustin/join
Subscribe https://www.youtube.com/fie...n?sub_confirmation=1
Consulting https://www.facebook.com/FieroAustin/
Facebook Subscribers Group https://www.facebook.com/be...pporter/FieroAustin/[This message has been edited by AustinH (edited 03-26-2024).]
|
|
|
|
longjonsilver
|
MAY 17, 09:36 PM
|
|
Thanks Austin: lots of good information here. Everybody's swap is different, so the more info we get the more options we have to choose from and the better decisions we make. The electrical diagrams you posted are especially helpful, as are your videos on youtube.
thanks again
jon------------------
I'm the original owner of a white ' 84 2M4 purchased Dec 10, 1983 from Pontiac. Always garaged, no rust, 4-wheel drifts are fun! 3800 SC swap to come!
|
|
|
|
0z
|
MAR 14, 09:52 PM
|
|
|
|
|