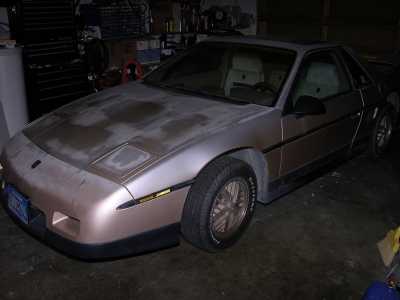
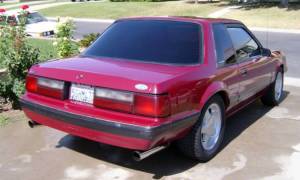
After spending almost a year restoring my little red car, I'm starting on another one. Hadn't planned on getting another one right away, but this nice '86 SE came along; it's a perfect candidate and the price was right.
The paint is shot (what else is new?) but the body is straight and no parts are missing. It's got 67,000 miles on it and was well-maintained all its life. Any repairs were professionally done - everything about this car is just like it was when the factory made it.
It's got every option except the rear window defogger - it's a V6 with the Muncie 4-speed.
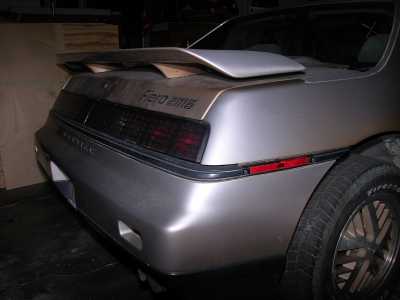
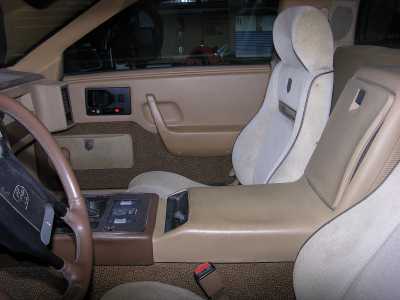
It spent the last couple of years parked in a field so it's pretty dirty; I took some pictures of it "as received" so we can follow its progress.
Anyway, this is what it looks like on the outside:
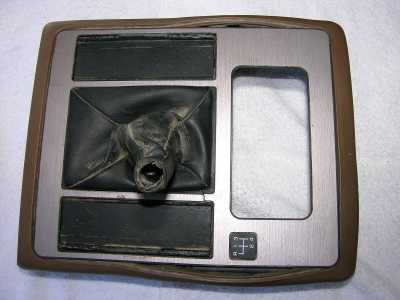
The interior is just as dirty, but it hasn't been animalized:
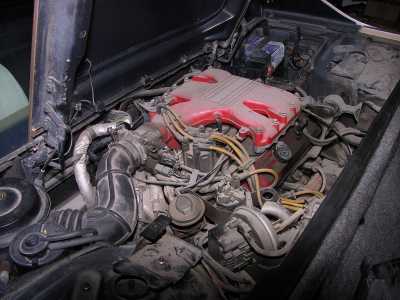
Engine compartment has a fine layer of dust protecting the parts:
Before it came home I had to make some repairs - replaced the gas tank (hole in bottom) and the left side halfshaft (futzed). Only other "major" problem is that it needs a new clutch.
I'll try to document the restore process on this one a little better than I did with the last one.
IP: Logged
01:18 AM
PFF
System Bot
88fieroformula Member
Posts: 662 From: Bakersfield, Ca, United States Registered: Aug 2003
Thanks! The first step of the process will start tomorrow; cleaning it up and making a list of everything that I can find that's not right. I'll also be doing some shopping for clutch parts - nothing but the best here because - well, it's a Fiero clutch and nobody wants to do it twice. Once I find the right parts at a good price I'll get those ordered and work up enough ambition to pull the transaxle and change the clutch.
Too bad about the wheels; those factory gold wheels are almost perfect and the tires are nearly new. It's going to be hard to change them out for something larger and fatter without feeling wasteful (sigh).
IP: Logged
01:52 AM
DRA Member
Posts: 4543 From: Martinez, Ga, USA Registered: Oct 1999
After doing my research, I chose a new "Brute Power" clutch set and ordered it today along with some new transaxle output shaft seals. Rock Auto comes through again with the best price and the 5% discount code from my other thread helped out too.
I'm going to try the service manual procedure for removing the transaxle; if it works like they say it does it should save a day of work. I'll find out soon enough...
IP: Logged
11:09 PM
Feb 10th, 2005
Whuffo Member
Posts: 3000 From: San Jose, CA Registered: Jul 2003
While researching Fiero clutches I learned a few things. One is that there's two different sizes of clutches used in Fieros: 1984 cars and all V6 Fieros came with a 9 1/8" clutch, 1985 and later 4 cylinder Fieros came with a 8 1/2" clutch. The parts are interchangeable, so if you're replacing the clutch in a 2M4 you might want to order the larger clutch disc and pressure plate.
Another is that the throwout bearings are specific to each transaxle, not the engine or model year.
And finally, cars with the Muncie 4-speed transaxle have a pilot bearing; the 5-speed transaxles don't use a pilot bearing.
IP: Logged
04:40 PM
Feb 12th, 2005
Whuffo Member
Posts: 3000 From: San Jose, CA Registered: Jul 2003
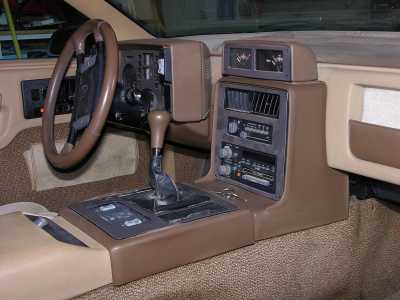
Decided to get busy on some of the interior repairs today; something to do while I wait for parts to come in.
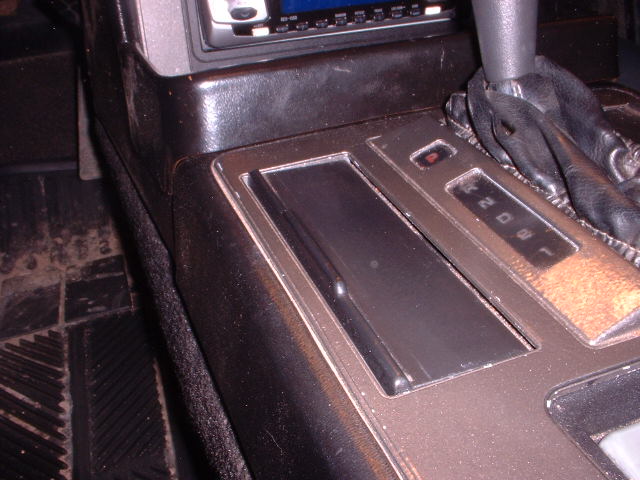
So let's get that shift console out of there and see what we've got: Doesn't look quite so nice when you take a close look - time to break it down and see what it's going to take to make it right again:
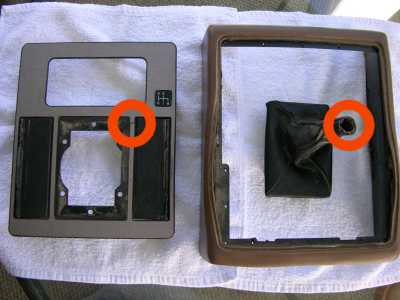
Well - besides the usual blown-out foam surround there's a broken trim panel and the top of the boot looks shredded. Can't do much with that trim panel; need to find a replacement for that part.
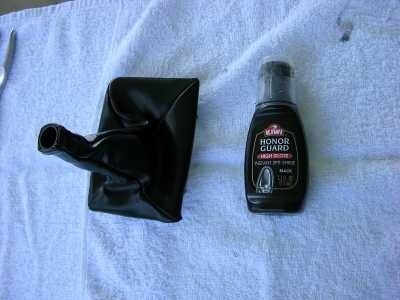
The boot is saveable, though - the top is trimmed by a plastic ring that was inserted from the top; this pins down the rough edges and gives it a trimmed look. Found the ring about halfway down the boot, extracted it and reinstalled it at the top; it helps to stretch the top out a bit so that you can get that ring back into place. Gave the boot a good thorough cleaning; soft brush, soap and water. Then it got a coat of liquid shoe polish to restore the factory shine:
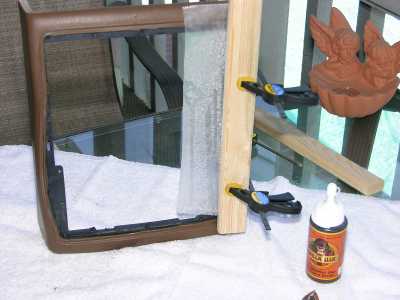
Next step was to start the process of reforming the shift surround. Clean it up good; soft brush, soap and water again. Pick out any loose foam, clean it again. Now, one side at a time, shoot some Gorilla Glue into the loose seams, clamp it up and let it cure for about 6 hours. As the glue starts to react and harden, it foams up to about 4 times its original volume; this will fill in the rough spots and provide a good repair. Here we go with the first bad seam:
Note the pieces of wood to hold the seams in the right shape, and the piece of wax paper to help avoid permanently gluing the board to the shift surround. Proper clamping is critical here; gotta hold the joint in the right shape as the glue foams. Any mistakes here will be permanent, so take your time and get it right.
I still need to figure out what to do about the sleazy looking ashtray doors; they should be saveable but I'm not quite sure how yet. And that trim plate is going to have to be replaced; hope I can find one of those in good shape from someone who doesn't think it's made of gold...
IP: Logged
03:39 PM
Feb 13th, 2005
USFiero Member
Posts: 4879 From: Everywhere and Middle of Nowhere Registered: Mar 2002
the ashtray doors.... ive redone about 4 pairs and on all of them i scrubbed them with simple green and a green scratchy pad, BE CAREFULL when removing and installing them they are brittle then i re-painted them with the Krylon BBQ paint, they turned out real nice, and held up 100%
here is a pic, it was just taken in the garage which is pretty dark so all the camera flash made all the dittle dirt show up ALOT more than it looks in person , and the spots on the ashtray door arnt really there in person just a bad camera, they look great in person
------------------ Rich AIM: ONE FAST 2M8: 86se V6 Gold 86se 355 SBC, 92 BMW 325i
IP: Logged
01:03 AM
Whuffo Member
Posts: 3000 From: San Jose, CA Registered: Jul 2003
Thanks for the tip on the ashtray doors - that appears to be the best way to restore them.
Gluing and clamping on the shift surround continues; at 4 or 5 hours per joint it'll take a few days to get them all.
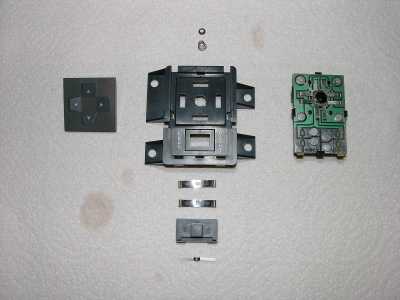
While the glue was drying I took a look at the mirror and window switches. The windows were working (sorta - it's a Fiero, you know) but the mirror control was futzed. Couldn't move the slide switch and it'd only move in one direction on the mirror it was stuck on. First step was to check on a new part. $45.00 seems a bit steep, time to get busy.
When you pull the connector off of the back of the mirror control, you'll see a press-on fastener holding the stem of the rocker switch (see it? down in that hole right there). Just clip the side of that fastener with some side cutters and it flies off in pieces - careful, don't let the spring get away. Once that's off, the rocker will fall off in your hands. Next step is to pop out the back of the switch by gently unsnapping the lock tabs around its perimeter. Do this over a towel so the loose parts don't get away. Clean the contacts well (I used Brakleen) and burninsh the contacts by inserting a piece of type paper betwen the contacts, apply gentle pressure to the contacts and holding it while you withdraw the paper. Repeat until the paper comes out clean, then flush the contacts with solvent one more time.
OK, here's the obligatory exploded view:
Examine the contacts carefully - if they are burned or pitted then just toss the parts in the trash and order a new switch. I'll bet your contacts are perfect like mine were, though. The problem with these switches is the unfortunate vertical mounting and unsealed construction - all the dirt, dust, ash, cola, etc. that lands there gets into the switch. The grease on the contacts collects it and when the buildup gets so thick that the contacts don't make contact anymore, the switch fails. Cleaning and lubing the switch is all it takes to restore it.
OK, next step is to lightly (just a thin smear) lubricate the contacts with dielectric grease or Vaseline. As the contacts move, they rub against the circuit board (self cleaning action); without lube the contacts will wear out very quickly.
All that's left to do now is put it all back together. Hold the switch housing upside down while you load the slider and it's spring / contacts then snap the contact board back into place. Put the rocker back into place, slip the spring over its stem and - hey, we clipped the fastner and it flew into pieces a few paragraphs back...
No problem; grab a 6/32 machine nut and thread it onto the end of the stem. Thread it down to the line where the old fastener was located and we're done. Plug it back into the car and try it out; mine works perfectly now.
The power window switches are a bit easier - there are holes on both sides down at the contact level. Spray cleaning solvent through the holes as you work the switch; flush it out good. Then use a toothpick to work a little dielectric grease into the switch as you work it. That should do it; if they don't work right now, it's time to replace them. Otherwise, all that's left are cosmetics - the visible part tends to oxidize and look nasty over time. I used a buffing wheel and a little white polishing compund with my Dremel to shine those rockers up again. Now they look and work like new.
Right you are - and that's an excellent description of how to do a thorough job. My switches were still working well; they just looked nasty due to oxidation. Figured that I'd flush and lube them while I had them out for good measure - the primary reason for working on them was to buff out the rockers so they'd look nice again.
IP: Logged
07:12 PM
Whuffo Member
Posts: 3000 From: San Jose, CA Registered: Jul 2003
Spent some time today pulling out the instrument cluster and giving everything a good cleaning. Polished the lens with some Scratch-X so it's nice and crystal clear again. Thought about repainting the pointers but I'll let that wait until I can find a good 120 MPH speedometer from someone who doesn't think they're made of gold. When I get that part, I'll scrape and repaint all the needles so it looks like new again. In the maantime, I've got a full set of working instruments and I can see them; looked pretty nasty before.
Discovered that the accessory position on the ignition switch doesn't work. The key turns to that position, but nothing happens. Anyone know what causes this - bad switch, bad rack, out of adjustment? Everything turns on when the key is on; only the accessory position is dead.
Anyway, I was testing the radio and found that the front speakers are weak - have to crank the fader most of the way to the front to get any sound from them. And the subwoofer speaker is blown, so that'll need to be replaced too. I'm going to have to think about where I'm going to go with the sound system in this car - I'd like to keep it original, but the factory stereo isn't all that good. No matter what, I'm going to keep the subwoofer so I'll do some research to find out what fits in the housing and works well; nobody will know if there's a non-stock speaker in that housing.
Edit: Found out what the problem was with the ignition switch - it was a bad switch. Replacing it fixed the problem.
[This message has been edited by Whuffo (edited 04-24-2005).]
IP: Logged
07:26 PM
Electrathon Member
Posts: 5241 From: Gresham, OR USA Registered: Dec 2002
Originally posted by Whuffo: Thought about repainting the pointers but I'll let that wait until I can find a good 120 MPH speedometer from someone who doesn't think they're made of gold.
Discovered that the accessory position on the ignition switch doesn't work. The key turns to that position, but nothing happens. Anyone know what causes this - bad switch, bad rack, out of adjustment? Everything turns on when the key is on; only the accessory position is dead.
And the subwoofer speaker is blown, so that'll need to be replaced too. I'm going to have to think about where I'm going to go with the sound system in this car - I'd like to keep it original, but the factory stereo isn't all that good. No matter what, I'm going to keep the subwoofer so I'll do some research to find out what fits in the housing and works well; nobody will know if there's a non-stock speaker in that housing.
LOL I agree, 120 speed-o's are very tough to find at a good price. Sometimes they do show up in the u-pull-it yard, they do not know the differance.
Try pulling out the ignition lock and turning the cam backwards with a pair of pliars. Often times the lock cylinders will bind a little and you will not even know that it is not turning fully backwards. This would be a good time to get an ignition lock that uses the same key as your door lock, one less key to keep track of.
The speaker that rodney sells is a great speaker, it is almost a perfect fit. He includes a gasket to make it fit prefect.
IP: Logged
11:40 PM
USFiero Member
Posts: 4879 From: Everywhere and Middle of Nowhere Registered: Mar 2002
I was feeling pretty cocky after disassembling the ash tray doors on the 85, painting and clearcoating them (I wanted them to match the trim not stay black) and reassembling them without breaking them. for the 87 I thought I'd do the same and managed to crack both the tray doors. they are now held together with Gorilla Glue. wish I'd seen your suggestion on reassembling the power mirror switch, it wa better than the washer and soldering iron tip trick I'm using... with more Gorilla Glue. I painted some of the components to match the interior for fun. I did the 120 MPH speedo conversion myself using a $10 white gauge conversion from Ebay and switching the 6.33 Mhz crystal to a 4.43 Mhz to match the 120 one. I wrote up a Word document to keep track of it. PM me if you want a copy e-mailed to ya.
[This message has been edited by USFiero (edited 02-13-2005).]
IP: Logged
11:43 PM
Feb 14th, 2005
Whuffo Member
Posts: 3000 From: San Jose, CA Registered: Jul 2003
Did some detailed research on the subwoofer speaker. Everyone knows about Rodney's replacment and the GM Restoration Parts one that the Fiero Store sells. But I'll bet you didn't know that the original factory part is still available...
It's GM part number 16042082 and GM Parts Direct lists it at $27.44
I had a list of things to buy, so I put in an order at GMPD today; $133 for parts that would have cost over $200 at the Fiero Store. The secret to the shipping and handling at GM Parts Direct is that they add $15 per order, plus the actual cost of the shipping. Best to save up your GM parts ordering and get it all at once so the $15 gets spread out over multiple parts.
UPDATE: The 22P book is wrong on this part number - don't order it unless you want a dash speaker.
[This message has been edited by Whuffo (edited 03-08-2005).]
IP: Logged
07:12 PM
Feb 15th, 2005
Whuffo Member
Posts: 3000 From: San Jose, CA Registered: Jul 2003
Did a little shopping on my way home from Valentine's dinner; picked up a couple of yards of "light saddle'" headliner fabric (one for me, one for some other nice person TBD) and a can of Scotch 8088 glue. Nothing better than 8088 for headliners, it's got a good strong bond and takes high temperatures without letting go. Still need to come up with a couple more items before the weekend; 4 quarts of synchromesh fluid and a replacment alternator; the voltage regulator in this one has bit the big one.
I'm still considering the possibilities on the alternator. I could just stick a new regulator and a set of brushes in it. Or I could get a rebuilt at the local parts store or auto electric shop. If I replace it, I could install a '88 alternator; that's a much better unit than the earlier models. Still got a few days to make a decision on this one. I'm leaning towards changing to the newer CS alternator but it may be difficult without a matching core to trade in...
IP: Logged
01:12 AM
Feb 16th, 2005
Whuffo Member
Posts: 3000 From: San Jose, CA Registered: Jul 2003
Found a '88 alternator at my local Fiero-friendly parts store for less than $40; what a deal! I'll run over there tonight and pick it up and the pigtail lead I'll need to convert the wiring in this car to use the newer alternator.
Clutch parts arrived today - all new parts, they look very nice. It'll be interesting to see how the old clutch failed; it's broken, not worn out. Best guess is that one of the springs got away from the clutch disc - but I won't know for sure until I see it with my own eyes. I'll probably start doing some preparatory work in the evenings this week; PB Blaster on the cradle bolts, start disconnecting things, get ready to pull the transaxle this weekend.
IP: Logged
06:21 PM
Feb 17th, 2005
Whuffo Member
Posts: 3000 From: San Jose, CA Registered: Jul 2003
Rats; I had just spent some time writing up a nice long message full of useful info. Pointed the mouse to the "submit reply" button and the power went off.
Anyway, when I went to pick up the alternator I found that what their book said was right for a Fiero wasn't even close to correct. Did some more checking around and discovered that the only good quality rebuilt I could find was a AC-Delco rebuilt for $135. So I did some checking to see what other Delco alternators could be fitted to my Fiero; the 12SI unit came in hundreds of variations that differ only in the pulley or the way the housing is clocked. So I started researching what was close enough so that I could change the pulley / reclock the case and have what I needed. While doing this an idea occured to me - if I've got the pulley off and the case unbolted, why not just replace the bad regulator in this one and freshen it up?
Checked my local AutoZone to see if they had Delco alternator parts and found that they stocked the voltage regulator for $20 and something called a "rebuild kit" for $10. The regulator was a Wells part - they were the OEM for GM on this part so it should be just as good as factory new. Went to the store and asked to see the rebuild kit; I was hoping it included brushes and bearings. Surprise; it has brushes, brush springs, bearings - and a diode trio - and a voltage regulator. A Wells regulator; all of this for $9.99 Gimme! If you've got a SI alternator in your Fiero (pre 87 2M4 and pre 88 2M6) then the part number for the rebuild kit is GMA01.
Also bought their entire stock of synchromesh fluid, all 3 quarts of it. Still need one more quart to refill the tranny after I'm done changing the clutch. Looks like I've got almost everything I need to get this car up and running around; time to get busy!
[This message has been edited by Whuffo (edited 02-17-2005).]
IP: Logged
11:42 PM
Feb 19th, 2005
Whuffo Member
Posts: 3000 From: San Jose, CA Registered: Jul 2003
Busy day today. Finished reforming the console / glovebox, working on other tasks while the glue set up.
Pulled the alternator (easy - who keeps saying this is hard to do?), broke it down and cleaned the parts. Put it back together with the rebuild kit parts in it; the kit had all the right parts and everthing fit perfectly. While disassembling it, I found that the bearings were rough and the brushes were pretty well used - if the regulator hadn't died, something else would have shortly. Also noticed that thie alternator was a AC Delco rebuilt, so apparently the previous owner had it replaced at the dealer some time in the past.
Got a good start on breaking things down to get the clutch out. Got all the topside items disconnected (shift cables, clutch, etc), put the car up on jackstands and discovered that my 30MM socket isn't deep enough to remove the axle nuts. I'll have to borrow a socket to get those off. Oh well; soaked the cradle bolts with PB Blaster and I'll get back to it tomorrow.
IP: Logged
09:31 PM
Feb 20th, 2005
Whuffo Member
Posts: 3000 From: San Jose, CA Registered: Jul 2003
Did a little more this evening; used some Folex carpet spot remover to clean the nasty looking spots on the carpet; this stuff works GREAT. Now that the cruddy spots are cleaned up, I can see what kind of condtition the carpet is in. There's one small cigarette burn on the drivers side; this can be "disappeared" pretty easily. The spot on the drivers side under the wheel well pad that gets shredded is barely fuzzy on this one - that's also pretty easy to correct when it's this light. Looks like the factory carpet will survive; a good shampoo job and it'll be good as new again. I'll do that while the seats are out for their new covers.
Stopped by Kragen and picked up a 30MM axle nut socket. Something tells me I'll want one of these again in the future, so I might as well add one to my toolbox now. Looks like tomorrow is going to be another busy day...
IP: Logged
01:17 AM
PFF
System Bot
Feb 22nd, 2005
Whuffo Member
Posts: 3000 From: San Jose, CA Registered: Jul 2003
Didn't have any time yesterday to work on the car but I did have a couple of hours tonight. More progress towards getting the old clutch out; removed the right rear suspension and axle, disconnected parking brake, drained the transaxle, etc. One more evening of wrenching and I'ill be ready to unbolt the tranny and get it out of there.
Cracked the cradle bolts in the back; no problem. Front cradle bolts are a different story - they're frozen tight. Applied another liberal dose of PB Blaster and applied a little percussion to help it along; maybe tomorrow they'll be more cooperative.
Decided to check on my GM Parts Direct order today - a week after placing the order they show all the items as "special order" and "in progress" - nothing has been shipped yet. Checked to see if they'd charged my credit card yet - nope. Wonder how long it'll be before they either say they don't have the parts or ship them?
IP: Logged
12:59 AM
Feb 24th, 2005
USFiero Member
Posts: 4879 From: Everywhere and Middle of Nowhere Registered: Mar 2002
Okay, here's a <BUMP> and the LATEST Rockauto.com DISCOUNT CODE! (You put this number in the 'How did you hear about us?' spot on the order form for 5% off. It's it good until April 26th: 191053189854
IP: Logged
10:09 AM
Feb 25th, 2005
Whuffo Member
Posts: 3000 From: San Jose, CA Registered: Jul 2003
Work on the clutch replacement project is plodding along; working full time means I don't have as many hours to work on the Fiero as I'd like.
At this point, the cradle is down and all that I need to do is unbolt the bellhousing and wrestle the tranny out of there. Then I'll finally get to see what happened to the clutch...
IP: Logged
07:44 PM
87 Dream Fiero Junior Member
Posts: 1 From: Lomita, CA. United States Registered: Feb 2005
OK, I'm back from my short vacation - went on a cruise to Mexico - and am now getting back to work on the Fiero. Unbolted the bellhousing, gave the tranny a twist and a pull and out it came. That was much easier than I expected; hope it goes back in as easily.
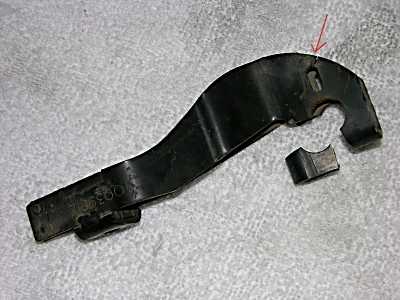
After looking the clutch parts over, it's now possible to determine what went wrong. The initial failure was the clutch arm; the stamped steel clutch arm that's known to be troublesome. This one cracked in three places:
As the arm was breaking down, the clutch was very hard to disengage - and wouldn't disengage fully. The slipping as the engine idled, etc got things pretty hot. Hot enough to discolor the pressure plate and flywheel:
Finally, the arm lost its grip to where it wouldn't disengage the clutch at all - the arm would rotate until it hit the case and stop. The PO kept stomping on the clutch hoping it'd work until they bent the clutch pedal and banjo rod. Somebody tried to fix it by replacing the clutch master cylinder, but gave up after that. A couple more stomps on the clutch pedal did that new master cylinder in, too.
The flywheel is OK; it'll need to be resurfaced but the heat damage is minor and will clean up fine. Everything else in the bell housing is toasted.
So here's what that stupid clutch arm cost: New clutch pedal New clutch master cylinder New clutch set (disc, pressure plate, T.O. bearing) and a new clutch arm, of course.
Not to mention a whole bunch of labor to tear this thing down and replace the parts...
Next step is to get the flywheel to the machinist and start cleaning parts. I hope it goes back together quicker than it came apart.
IP: Logged
11:27 PM
Whuffo Member
Posts: 3000 From: San Jose, CA Registered: Jul 2003
To show our appreciation, we would like to give you and your friends a special discount on auto parts.
Here's how it works:
- You give this discount code: 192473109727 to friends, neighbors, relatives, the guy at the corner garage--anyone you know who works on cars or trucks. - When someone (including yourself) places an order at www.rockauto.com and enters your discount code in the "How did you hear about us" line of the shopping cart, he or she will receive an immediate 5% discount on that order. - The discount code expires on May 3, 2005; so don't wait!
You may use this discount code as often as you wish until it expires, but only one discount code can be used per order.
**Each month we see people who put the word "discount" in front of their code and do not get the discount. Please enter ONLY the discount code.**
IP: Logged
11:31 PM
Whuffo Member
Posts: 3000 From: San Jose, CA Registered: Jul 2003
Found that my order from GM Parts Direct arrived while I was away; everything I ordered arrived but there is a problem with the subwoofer speaker. I looked the part number up in the 22P guide and ordered that - but what came is a dash speaker (one of the 4X10 ones) instead. I'll have to do some more research to find out who made the mistake; if it was me then I'm stuck with an unwanted extra dash speaker 'cause they don't accept returns on special order items.
IP: Logged
11:35 PM
Mar 8th, 2005
Whuffo Member
Posts: 3000 From: San Jose, CA Registered: Jul 2003
Double checked the part number for the subwoofer in the 22P guide - that's the part number I ordered from GM Parts Direct - and matched it against my copy of the order. No problem there, so I looked at the box the dash speaker came in and it has the same part number on it. Hmpf; either the 22P is wrong or somebody boxed the wrong part.
Wrote a nice letter to GM Parts Direct customer service explaining the situation and asking how we could work this problem out; I'm out $30 for something I didn't want.
Got a rude reply from them; not returnable, you ordered the wrong part.
That wasn't very nice of them at all. I think I'll give GM Customer Care a call tomorrow and have a little chat with them about Flow Chevrolet / Flow Buick / GM Parts Direct's customer service and how it is you can order parts from the official GM parts book and get something different - and not be able to return it. If GM Customer Care isn't interested, then I'll just have to give my bank a call about that credit card charge. That'll catch their attention...
IP: Logged
10:32 PM
Mar 9th, 2005
Whuffo Member
Posts: 3000 From: San Jose, CA Registered: Jul 2003
A shipment from The Fiero Store arrived today; new cast iron clutch arm and a bunch of gaskets to replace the ones in the exhaust system that got disturbed during the process. The flywheel should be back from the machine shop tomorrow - and then I'll have everything I need to put the drivetrain back together with all the bad parts replaced. Looks like I'll be busy this weekend...
Since GM isn't going to be any help with the subwoofer speaker, I've been looking into other options. Yes, I know about Rodney's replacement and the one the Fiero Store sells. I think I'll try something different, though - I'll take a whack at rebuilding the one I have. All it needs is to have the foam surround replaced; I ordered the necessary supplies today. I'll take pictures and document the speaker rebuild when I get to that part of the project - first thing to do is get this car to where it can be driven.
Did some detailed research on the subwoofer speaker. Everyone knows about Rodney's replacment and the GM Restoration Parts one that the Fiero Store sells. But I'll bet you didn't know that the original factory part is still available...
It's GM part number 16042082 and GM Parts Direct lists it at $27.44
I had a list of things to buy, so I put in an order at GMPD today; $133 for parts that would have cost over $200 at the Fiero Store. The secret to the shipping and handling at GM Parts Direct is that they add $15 per order, plus the actual cost of the shipping. Best to save up your GM parts ordering and get it all at once so the $15 gets spread out over multiple parts.
UPDATE: The 22P book is wrong on this part number - don't order it unless you want a dash speaker.
Actually you did order the wrong speaker. you must have gone by the illustration green page in the p-22 only. where it is listed wrong with the illustration number. But, If you had looked in the white pages (group 9.650 page 9-21) you might have noticed the subwoofer speaker is listed with a part number 16041072 Description: RDO FRT (5 1/4 RND 4 ohm (subwoofer) sorry, but It looks like you may need to eat the speaker purchase. FD
------------------ Over 1,000 NEW NOS Fiero Parts In Stock Ready To Ship World Wide! http://www.fierodave.com/ New Email Address: fierodave@ charter.net
IP: Logged
05:44 AM
Mar 12th, 2005
Whuffo Member
Posts: 3000 From: San Jose, CA Registered: Jul 2003
I also discovered that the wrong part number actually gets the upgraded dash speaker (for the premium sound system). That's handy to know - I need to replace those too. Anyway, it's not a total loss - but the rude and insulting "customer service" at GM Parts Direct still isn't excusable.
The subwoofer problem was solved by rebuilding the original speaker; see my thread in the Technical section called "Whuffo rebuilds a subwoofer speaker" for details.
IP: Logged
01:35 AM
Whuffo Member
Posts: 3000 From: San Jose, CA Registered: Jul 2003
Spending some quality time today putting the drivetrain back together. Got the flywheel and clutch set installed and the rest of the parts are clean and ready to reassemble. Just need to change the output shaft seals on the transaxle and it'll be ready to reinstall. So far so good...
IP: Logged
04:39 PM
Whuffo Member
Posts: 3000 From: San Jose, CA Registered: Jul 2003
Got as far as reinstalling the transaxle and ran out of luck. Wrestled with it for a couple of hours but just couldn't get it lined up (sigh). Oh well; tomorrow's another day...
IP: Logged
10:39 PM
fierobear Member
Posts: 27116 From: Safe in the Carolinas Registered: Aug 2000
Got as far as reinstalling the transaxle and ran out of luck. Wrestled with it for a couple of hours but just couldn't get it lined up (sigh). Oh well; tomorrow's another day...
Here is how I solve that problem. Hook up a remote starter, and bump the starter while providing gentle forward pressure on the tranny. After one or two bumps of the remote starter, it should pop right in. I've used this method several times, and it works every time.
It is also helpful to hang the tranny from two long bolts (about 6" long) in the top bolt holes. The 88 18mm forward cradle bolts work great, but since this is an 86, you'll need to find a substitute. If you can find bolts that will work, getting the tranny back in is a one-man job.
IP: Logged
11:49 PM
Mar 14th, 2005
Whuffo Member
Posts: 3000 From: San Jose, CA Registered: Jul 2003
Brian came over with his tranny jack today and after some fancy adapter-making we were able to wiggle it into place. It was touch and go for a while, but finally got that satisfying "thunk" as things fall into place came - whew!
Bolted the cradle back into the car, reinstalled the left rear suspension and got started putting the transmission mounts back in. Front one went OK, but when I was looking up into the spot where the rear one goes I notice that there were a couple of bolts missing from the exhaust manifold. Missing? Probed the holes and determined that the bolts are broken off flush with the head. Bummer. At least it's the rear manifold so it's not as bad as it could be.
Still lots to do but it's coming along nicely - time to order some more parts...
IP: Logged
01:10 AM
Fastback 86 Member
Posts: 7849 From: Los Angeles, CA Registered: Sep 2003
Made some more progress last night; the half shafts are back in place and the rear suspension reassembled, the engine and tranny are back on their mounts. Doesn't sound like much but there were some interesting moments that took extra time.
Tonight's the monthly Golden Gate Fieros meeting so instead of working on the Fiero tonight I'll spend the evening talking with others about Fieros.
One thing I discovered while I was taking it apart was that the nuts that fasten the front transaxle mount to the cradle were missing. I don't have any spares - anyone got a couple of extras?
IP: Logged
06:26 PM
Mar 18th, 2005
Whuffo Member
Posts: 3000 From: San Jose, CA Registered: Jul 2003
Discovered that Orchard Supply Hardware has expanded their selection of metric hardware; picked up 3 of the locknuts and washers that fit the front mount for less than $2.00 - so now I can bolt that mount down. It's been "nutless" for years; some time in the past the front mount was unbolted and never bolted back down again. Wonder what the PO thought about that noise in the back?
Did a couple other small things last night, making slow progress during the week due to full-time job. I'm waiting for a shipment from Rodney - if that arrives today I should be able to get this car on the road again this weekend.