Pennock's Fiero Forum
  The Construction Zone
  1986 Fiero SE 3.4L pushrod build up (Page 4)

Post New Topic  Post A Reply
Email This Page to Someone! | Printable Version

This topic is 6 pages long:  1   2   3   4   5   6 
Previous Page | Next Page
next newest topic | next oldest topic
1986 Fiero SE 3.4L pushrod build up by justinchristie
Started on: 12-18-2008 02:49 PM
Replies: 232 (29111 views)
Last post by: justinchristie on 01-31-2016 04:49 PM
justinchristie
Member
Posts: 547
From: Clarington, Ontario, Canada
Registered: Sep 2006


Feedback score:    (12)
Leave feedback

Rate this member

Report this Post02-13-2011 01:10 AM Click Here to See the Profile for justinchristieClick Here to visit justinchristie's HomePageSend a Private Message to justinchristieEdit/Delete MessageReply w/QuoteDirect Link to This Post
Adding the steering column cover was pretty straight forward. I needed to trim the edges off, and drill two holes at the top to hold it in place.

Other than that, the stock mounting locations were used.


------------------
1986 Pontiac Fiero SE 3.4L | The Fiero Blog (Since April 2000)
-----------------------------------------------------------
My Portfolio site | JustinChristie.ca

[This message has been edited by justinchristie (edited 03-19-2015).]

IP: Logged
kellisor20
Member
Posts: 212
From: Seneca, SC, US
Registered: Aug 2010


Feedback score: N/A
Leave feedback

Rate this member

Report this Post02-17-2011 01:36 AM Click Here to See the Profile for kellisor20Send a Private Message to kellisor20Edit/Delete MessageReply w/QuoteDirect Link to This Post
Great build i'm following along closely. I'll toss in my two cents though. That dash would look amazing with black suede over it. That way it would show any curves like the paint would, but it would require less work. From what it sounds like, you want that kind of look i'm guessing. Anyways good luck and I wish I had that front bumper!

------------------
86 2.8 gt

IP: Logged
justinchristie
Member
Posts: 547
From: Clarington, Ontario, Canada
Registered: Sep 2006


Feedback score:    (12)
Leave feedback

Rate this member

Report this Post02-23-2011 11:17 AM Click Here to See the Profile for justinchristieClick Here to visit justinchristie's HomePageSend a Private Message to justinchristieEdit/Delete MessageReply w/QuoteDirect Link to This Post
I've started asking around locally about getting the dash upholstered. I'm getting some quotes around the $1300-$1500 range to have:

- dash + center console upholstered in leatherette
- headliner/visors upholstered in leatherette
- door skins and armrest upholstered in leatherette

Does that $$$ number sound reasonable?

One of the quotes is from a reputable upholstery shop that does good work too - ive seen their previous installs and it's quite good.

------------------
1986 Pontiac Fiero SE 3.4L | The Fiero Blog (Since April 2000)
-----------------------------------------------------------
My Portfolio site | JustinChristie.ca

IP: Logged
justinchristie
Member
Posts: 547
From: Clarington, Ontario, Canada
Registered: Sep 2006


Feedback score:    (12)
Leave feedback

Rate this member

Report this Post03-01-2011 12:07 AM Click Here to See the Profile for justinchristieClick Here to visit justinchristie's HomePageSend a Private Message to justinchristieEdit/Delete MessageReply w/QuoteDirect Link to This Post
I spent the last three hours adding additional support for the fiberglass centre console – a.k.a. the armrest.

It involved fabricating a metal bracket and a fiberglass ledge.

I also mounted the shifter boot – this boot is just used as a mockup. I have a nice Rodney Dickman leather boot that will take it’s place when I preform the final install.


------------------
1986 Pontiac Fiero SE 3.4L | The Fiero Blog (Since April 2000)
-----------------------------------------------------------
My Portfolio site | JustinChristie.ca

[This message has been edited by justinchristie (edited 03-19-2015).]

IP: Logged
justinchristie
Member
Posts: 547
From: Clarington, Ontario, Canada
Registered: Sep 2006


Feedback score:    (12)
Leave feedback

Rate this member

Report this Post03-06-2011 10:25 PM Click Here to See the Profile for justinchristieClick Here to visit justinchristie's HomePageSend a Private Message to justinchristieEdit/Delete MessageReply w/QuoteDirect Link to This Post
This was one of the easier installs I have done over the past year – no fabrication was required.

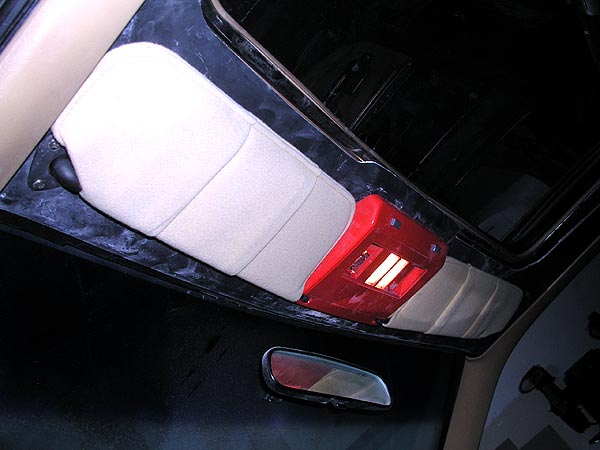
This is the Fiero Store fiberglass headliner. I acquired this almost 4 years ago and it’s been sitting in my basement waiting to be installed.

All the holes are pre-marked, so it was just a matter of drilling them out, and then installing it – it took only 1 hour.

This will eventually be upholstered in leatherette.


------------------
1986 Pontiac Fiero SE 3.4L | The Fiero Blog (Since April 2000)
-----------------------------------------------------------
My Portfolio site | JustinChristie.ca

[This message has been edited by justinchristie (edited 03-19-2015).]

IP: Logged
justinchristie
Member
Posts: 547
From: Clarington, Ontario, Canada
Registered: Sep 2006


Feedback score:    (12)
Leave feedback

Rate this member

Report this Post03-18-2011 08:25 PM Click Here to See the Profile for justinchristieClick Here to visit justinchristie's HomePageSend a Private Message to justinchristieEdit/Delete MessageReply w/QuoteDirect Link to This Post
Iinstalled the driver’s side PISA door panel. It took about 2 hours and was quite easy.

The only problem is that the interior armrest covers the HVAC vent on the dash. I will need to make a custom cut to the armrest – this should allow better airflow from the vent.


------------------
1986 Pontiac Fiero SE 3.4L | The Fiero Blog (Since April 2000)
-----------------------------------------------------------
My Portfolio site | JustinChristie.ca

[This message has been edited by justinchristie (edited 03-19-2015).]

IP: Logged
Fiero2m8
Member
Posts: 1928
From: Niagara, Ontario, Canada
Registered: Feb 2006


Feedback score:    (10)
Leave feedback

Rate this member

Report this Post03-18-2011 11:24 PM Click Here to See the Profile for Fiero2m8Click Here to visit Fiero2m8's HomePageSend a Private Message to Fiero2m8Edit/Delete MessageReply w/QuoteDirect Link to This Post
Looks like you've been busy Justin!
I was born in Oshawa and my brother's name is Justin.
Since I still have family there I'll send you a PM when I'm up on the north shore...would like to see the project.

Fiero2m8

------------------

Indy Northstar-Stretch ~ LT1-NOS Roadster

IP: Logged
justinchristie
Member
Posts: 547
From: Clarington, Ontario, Canada
Registered: Sep 2006


Feedback score:    (12)
Leave feedback

Rate this member

Report this Post03-21-2011 02:07 PM Click Here to See the Profile for justinchristieClick Here to visit justinchristie's HomePageSend a Private Message to justinchristieEdit/Delete MessageReply w/QuoteDirect Link to This Post
 
quote
Originally posted by Fiero2m8:

Looks like you've been busy Justin!
I was born in Oshawa and my brother's name is Justin.
Since I still have family there I'll send you a PM when I'm up on the north shore...would like to see the project.

Fiero2m8


For sure you can stop by, ...but only on one condition, ....you need to stop by with the stretchie-NorthStar swap so I can see it!

------------------
1986 Pontiac Fiero SE 3.4L | The Fiero Blog (Since April 2000)
-----------------------------------------------------------
My Portfolio site | JustinChristie.ca

IP: Logged
justinchristie
Member
Posts: 547
From: Clarington, Ontario, Canada
Registered: Sep 2006


Feedback score:    (12)
Leave feedback

Rate this member

Report this Post04-10-2011 11:47 AM Click Here to See the Profile for justinchristieClick Here to visit justinchristie's HomePageSend a Private Message to justinchristieEdit/Delete MessageReply w/QuoteDirect Link to This Post
The fabrication stage of the door panels is complete.

All that is required now is upholstery and sound padding.


------------------
1986 Pontiac Fiero SE 3.4L | The Fiero Blog (Since April 2000)
-----------------------------------------------------------
My Portfolio site | JustinChristie.ca

[This message has been edited by justinchristie (edited 03-19-2015).]

IP: Logged
justinchristie
Member
Posts: 547
From: Clarington, Ontario, Canada
Registered: Sep 2006


Feedback score:    (12)
Leave feedback

Rate this member

Report this Post04-10-2011 11:59 AM Click Here to See the Profile for justinchristieClick Here to visit justinchristie's HomePageSend a Private Message to justinchristieEdit/Delete MessageReply w/QuoteDirect Link to This Post

justinchristie

547 posts
Member since Sep 2006
I did a paint test with one of the mock-up pillar pieces I have.

So far the best solution for interior paint is:

- Wipe down the piece with paint thinner;
- Scuff with 3M abrasive pad (lightly);
- One thin coat of clear primer (duplicolor) specifically made for plastic paint adhesion;
- Paint 3 thin layers of flat black; and
- Paint 2 layers of semi-gloss clear coat (must be UV protection paint).

The above receipe seems to produce a solid paint job that is scratch resistant.


------------------
1986 Pontiac Fiero SE 3.4L | The Fiero Blog (Since April 2000)
-----------------------------------------------------------
My Portfolio site | JustinChristie.ca

[This message has been edited by justinchristie (edited 03-19-2015).]

IP: Logged
justinchristie
Member
Posts: 547
From: Clarington, Ontario, Canada
Registered: Sep 2006


Feedback score:    (12)
Leave feedback

Rate this member

Report this Post04-10-2011 01:35 PM Click Here to See the Profile for justinchristieClick Here to visit justinchristie's HomePageSend a Private Message to justinchristieEdit/Delete MessageReply w/QuoteDirect Link to This Post

justinchristie

547 posts
Member since Sep 2006
I decided to fix the dash gap with fiberglass, rather than rely on upholstery to cover up the misalignment.

Duct-tape was used to form the shape, and act as a removable barrier.

It turned out quite well.


------------------
1986 Pontiac Fiero SE 3.4L | The Fiero Blog (Since April 2000)
-----------------------------------------------------------
My Portfolio site | JustinChristie.ca

[This message has been edited by justinchristie (edited 03-19-2015).]

IP: Logged
PFF
System Bot
justinchristie
Member
Posts: 547
From: Clarington, Ontario, Canada
Registered: Sep 2006


Feedback score:    (12)
Leave feedback

Rate this member

Report this Post04-11-2011 01:22 PM Click Here to See the Profile for justinchristieClick Here to visit justinchristie's HomePageSend a Private Message to justinchristieEdit/Delete MessageReply w/QuoteDirect Link to This Post
After the fiberglass cured, I pulled off the duct-tape and trimmed the edges.

It will require a little more sanding and body-filler to finish, …but I’m quite pleased with how it turned out.


------------------
1986 Pontiac Fiero SE 3.4L | The Fiero Blog (Since April 2000)
-----------------------------------------------------------
My Portfolio site | JustinChristie.ca

[This message has been edited by justinchristie (edited 03-19-2015).]

IP: Logged
justinchristie
Member
Posts: 547
From: Clarington, Ontario, Canada
Registered: Sep 2006


Feedback score:    (12)
Leave feedback

Rate this member

Report this Post04-19-2011 03:20 PM Click Here to See the Profile for justinchristieClick Here to visit justinchristie's HomePageSend a Private Message to justinchristieEdit/Delete MessageReply w/QuoteDirect Link to This Post
I dismantled the custom interior pieces from the chassis. It involved almost 2 months of custom fabrication to install the new interior, and it took a mere 20 minutes to uninstall everything.

A few more pieces need to be installed on the dash, …but the upholstery stage is not that far away.


------------------
1986 Pontiac Fiero SE 3.4L | The Fiero Blog (Since April 2000)
-----------------------------------------------------------
My Portfolio site | JustinChristie.ca

[This message has been edited by justinchristie (edited 03-19-2015).]

IP: Logged
justinchristie
Member
Posts: 547
From: Clarington, Ontario, Canada
Registered: Sep 2006


Feedback score:    (12)
Leave feedback

Rate this member

Report this Post05-01-2011 05:55 PM Click Here to See the Profile for justinchristieClick Here to visit justinchristie's HomePageSend a Private Message to justinchristieEdit/Delete MessageReply w/QuoteDirect Link to This Post
The original harness was cut for a custom stereo installation.

I used a stock harness I pulled from a local yard to repair it back to OEM.


------------------
1986 Pontiac Fiero SE 3.4L | The Fiero Blog (Since April 2000)
-----------------------------------------------------------
My Portfolio site | JustinChristie.ca

[This message has been edited by justinchristie (edited 03-19-2015).]

IP: Logged
justinchristie
Member
Posts: 547
From: Clarington, Ontario, Canada
Registered: Sep 2006


Feedback score:    (12)
Leave feedback

Rate this member

Report this Post05-01-2011 05:58 PM Click Here to See the Profile for justinchristieClick Here to visit justinchristie's HomePageSend a Private Message to justinchristieEdit/Delete MessageReply w/QuoteDirect Link to This Post

justinchristie

547 posts
Member since Sep 2006
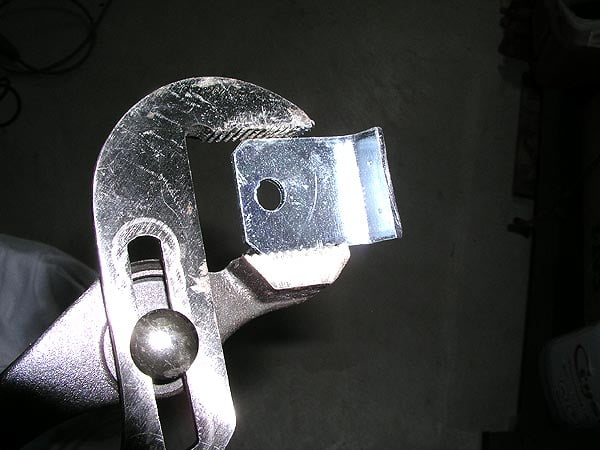
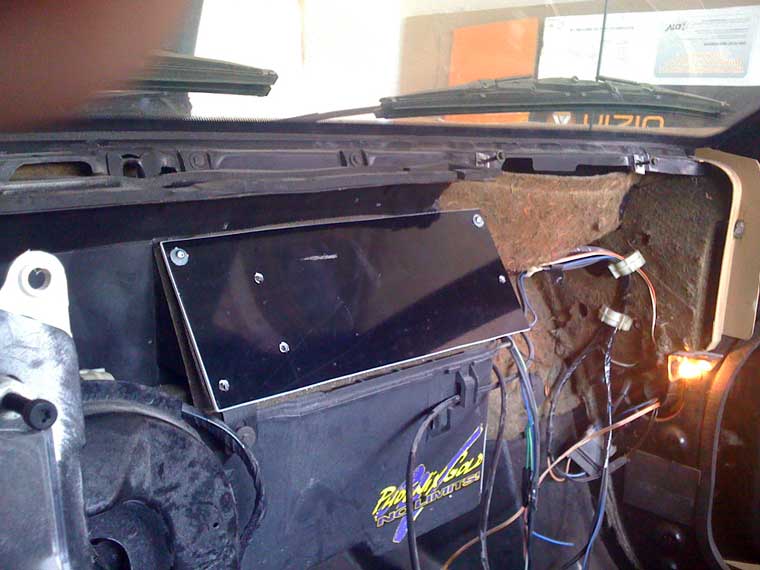
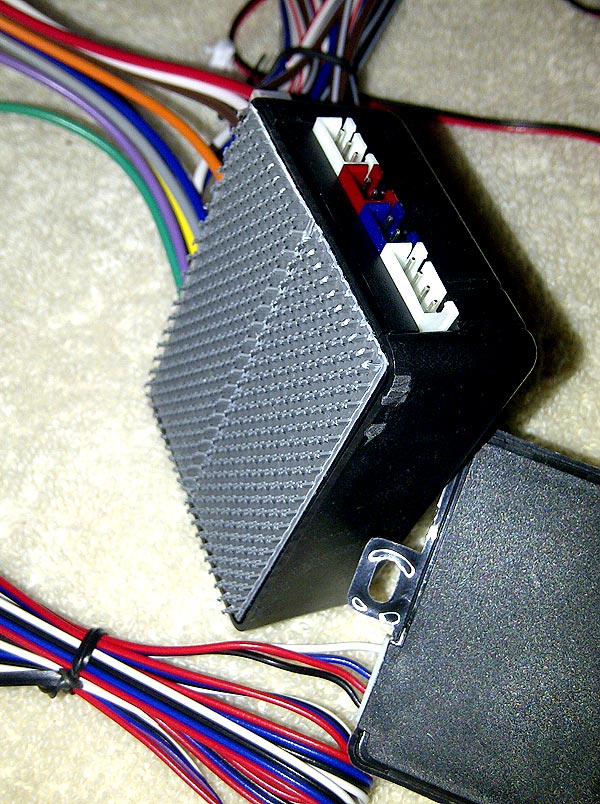
Since I am installing the PISA Fiero dash, I have some room to add an electrical junction box. This junction box will act as a future expansion for interior electronics.

I used an existing bracket I pulled from the Fiero and welded it onto another bracket. This will serve as a mounting point for the junction box.

Stay tuned, I’ll post more info on this as I continue the interior installation…


------------------
1986 Pontiac Fiero SE 3.4L | The Fiero Blog (Since April 2000)
-----------------------------------------------------------
My Portfolio site | JustinChristie.ca

[This message has been edited by justinchristie (edited 03-19-2015).]

IP: Logged
justinchristie
Member
Posts: 547
From: Clarington, Ontario, Canada
Registered: Sep 2006


Feedback score:    (12)
Leave feedback

Rate this member

Report this Post05-01-2011 06:00 PM Click Here to See the Profile for justinchristieClick Here to visit justinchristie's HomePageSend a Private Message to justinchristieEdit/Delete MessageReply w/QuoteDirect Link to This Post

justinchristie

547 posts
Member since Sep 2006
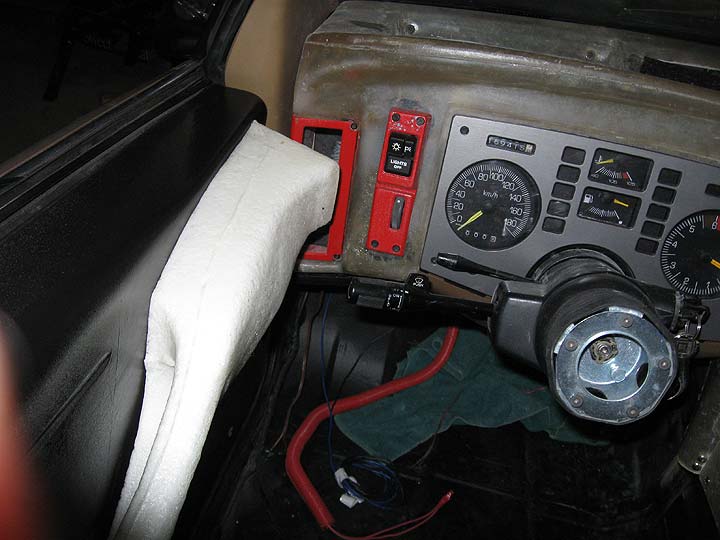
I’ve decided against the installation the stock HVAC system – it was causing fitment issues with the PISA dash.

So I’m going to run a custom venting system using vacuum tubing.

More details to follow….


------------------
1986 Pontiac Fiero SE 3.4L | The Fiero Blog (Since April 2000)
-----------------------------------------------------------
My Portfolio site | JustinChristie.ca

[This message has been edited by justinchristie (edited 03-19-2015).]

IP: Logged
justinchristie
Member
Posts: 547
From: Clarington, Ontario, Canada
Registered: Sep 2006


Feedback score:    (12)
Leave feedback

Rate this member

Report this Post05-01-2011 06:02 PM Click Here to See the Profile for justinchristieClick Here to visit justinchristie's HomePageSend a Private Message to justinchristieEdit/Delete MessageReply w/QuoteDirect Link to This Post

justinchristie

547 posts
Member since Sep 2006
It took a while for me to think about how I was going to mount the glove box door.

I found a set of 1″ brass hinges (at Canadian Tire) that were small enough to be hidden, …but big enough to provide support strength.

The brackets required a notch to be cut out – this allowed a flush mount.

The end result was quite good – installation took 1 hour.


------------------
1986 Pontiac Fiero SE 3.4L | The Fiero Blog (Since April 2000)
-----------------------------------------------------------
My Portfolio site | JustinChristie.ca

[This message has been edited by justinchristie (edited 03-19-2015).]

IP: Logged
justinchristie
Member
Posts: 547
From: Clarington, Ontario, Canada
Registered: Sep 2006


Feedback score:    (12)
Leave feedback

Rate this member

Report this Post05-15-2011 12:56 AM Click Here to See the Profile for justinchristieClick Here to visit justinchristie's HomePageSend a Private Message to justinchristieEdit/Delete MessageReply w/QuoteDirect Link to This Post
It took me a while to think of how I was going to keep the glove box door secured during driving. The solution was simple – VELCRO.


------------------
1986 Pontiac Fiero SE 3.4L | The Fiero Blog (Since April 2000)
-----------------------------------------------------------
My Portfolio site | JustinChristie.ca

[This message has been edited by justinchristie (edited 03-19-2015).]

IP: Logged
justinchristie
Member
Posts: 547
From: Clarington, Ontario, Canada
Registered: Sep 2006


Feedback score:    (12)
Leave feedback

Rate this member

Report this Post05-24-2011 09:02 AM Click Here to See the Profile for justinchristieClick Here to visit justinchristie's HomePageSend a Private Message to justinchristieEdit/Delete MessageReply w/QuoteDirect Link to This Post
Not the prettiest application of fiberglass, but it works!

A fresh coat of paint always makes it look better.


------------------
1986 Pontiac Fiero SE 3.4L | The Fiero Blog (Since April 2000)
-----------------------------------------------------------
My Portfolio site | JustinChristie.ca

[This message has been edited by justinchristie (edited 03-19-2015).]

IP: Logged
justinchristie
Member
Posts: 547
From: Clarington, Ontario, Canada
Registered: Sep 2006


Feedback score:    (12)
Leave feedback

Rate this member

Report this Post05-26-2011 09:02 AM Click Here to See the Profile for justinchristieClick Here to visit justinchristie's HomePageSend a Private Message to justinchristieEdit/Delete MessageReply w/QuoteDirect Link to This Post
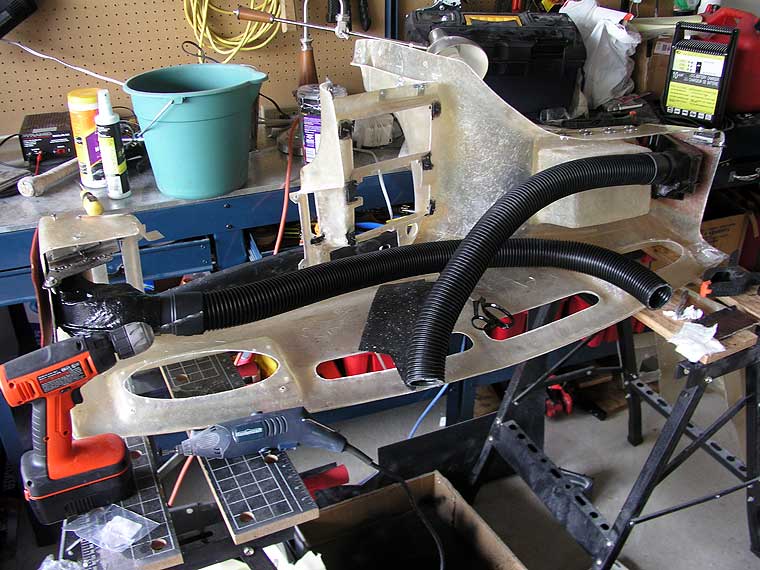
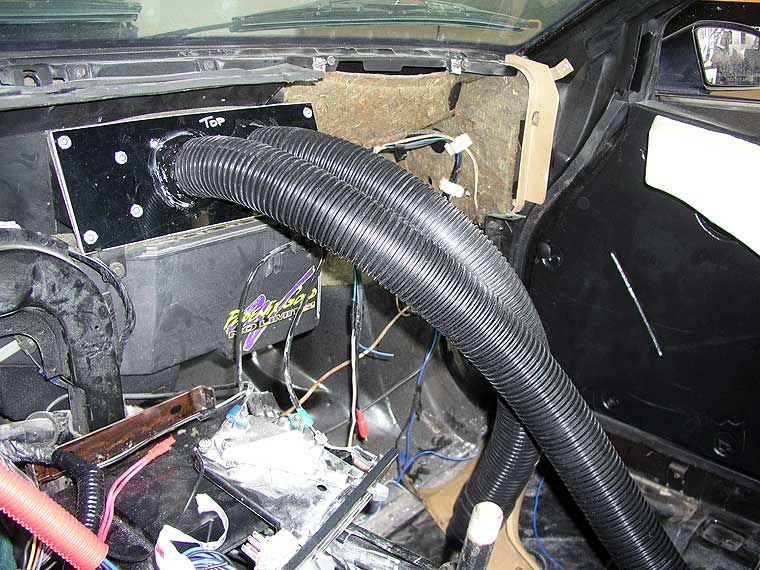
The ducts were secured to the fiberglass dash using something called a Chicago nut/bolt fastener – they are also called barrel nuts/bolts. They have a very low profile, so it won’t interfere with the upholstery or the trim pieces.

The couplers I glassed in are being used to connect a 2.5″ hose for the HVAC system.


------------------
1986 Pontiac Fiero SE 3.4L | The Fiero Blog (Since April 2000)
-----------------------------------------------------------
My Portfolio site | JustinChristie.ca

[This message has been edited by justinchristie (edited 03-19-2015).]

IP: Logged
justinchristie
Member
Posts: 547
From: Clarington, Ontario, Canada
Registered: Sep 2006


Feedback score:    (12)
Leave feedback

Rate this member

Report this Post06-01-2011 10:49 AM Click Here to See the Profile for justinchristieClick Here to visit justinchristie's HomePageSend a Private Message to justinchristieEdit/Delete MessageReply w/QuoteDirect Link to This Post
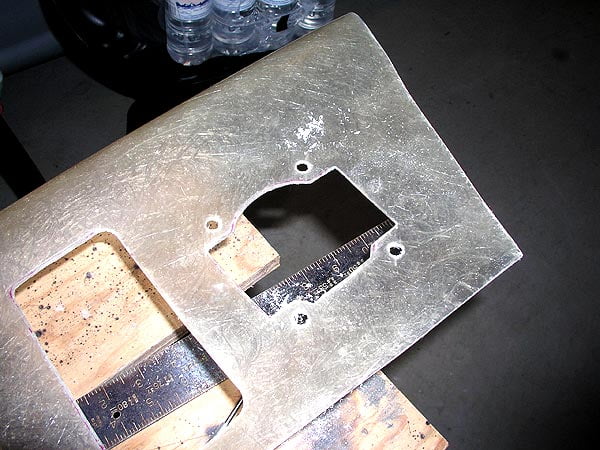
I have completed the installation of the HVAC system.

The 2.5″ SHOP-VAC tubing was used to run the air-flow, and a plate (made of fiberglass) was fabricated – this allowed the tubes to mount to the stock HVAC outlet.

This was a time consuming modification – 6.5 hours total.


------------------
1986 Pontiac Fiero SE 3.4L | The Fiero Blog (Since April 2000)
-----------------------------------------------------------
My Portfolio site | JustinChristie.ca

[This message has been edited by justinchristie (edited 03-19-2015).]

IP: Logged
PFF
System Bot
fishhuntandride
Junior Member
Posts: 1
From: oak harbor
Registered: Jun 2011


Feedback score: N/A
Leave feedback

Rate this member

Report this Post06-01-2011 05:00 PM Click Here to See the Profile for fishhuntandrideSend a Private Message to fishhuntandrideEdit/Delete MessageReply w/QuoteDirect Link to This Post
 
quote
Originally posted by justinchristie:

Oh, I also picked up these from Princess Auto for $14.99.

Since I’m installing the 4″ LED tail light conversion on the Fiero, I will be losing the reverse lights.

They also come with a remote control switch, but I won’t be using it because the lights are wired in directly to the reverse switch. I imagine I will find another use for the remote switch though.

I test fitted them, and they should work great in the rear bumper.


how do you get the decklid off without they kkey? and side fenders?
IP: Logged
justinchristie
Member
Posts: 547
From: Clarington, Ontario, Canada
Registered: Sep 2006


Feedback score:    (12)
Leave feedback

Rate this member

Report this Post06-03-2011 09:47 AM Click Here to See the Profile for justinchristieClick Here to visit justinchristie's HomePageSend a Private Message to justinchristieEdit/Delete MessageReply w/QuoteDirect Link to This Post
The Velcro option was not working well. So I came up with another solution – MAGNETS.

I used epoxy to glue a 9″ piece of metal to the glove box door, and I secured 4 magnets to the internal adjuster plate.


------------------
1986 Pontiac Fiero SE 3.4L | The Fiero Blog (Since April 2000)
-----------------------------------------------------------
My Portfolio site | JustinChristie.ca

[This message has been edited by justinchristie (edited 03-19-2015).]

IP: Logged
justinchristie
Member
Posts: 547
From: Clarington, Ontario, Canada
Registered: Sep 2006


Feedback score:    (12)
Leave feedback

Rate this member

Report this Post06-06-2011 08:40 AM Click Here to See the Profile for justinchristieClick Here to visit justinchristie's HomePageSend a Private Message to justinchristieEdit/Delete MessageReply w/QuoteDirect Link to This Post
I attached 18 gauge metal tabs to the back of the dash – I used 22 gauge metal before, but the screws for the trim were stripping it too easily.

I also attached tabs to mount the speakers and speaker covers.

JB weld was used to secure the metal to the fiberglass.


------------------
1986 Pontiac Fiero SE 3.4L | The Fiero Blog (Since April 2000)
-----------------------------------------------------------
My Portfolio site | JustinChristie.ca

[This message has been edited by justinchristie (edited 03-19-2015).]

IP: Logged
justinchristie
Member
Posts: 547
From: Clarington, Ontario, Canada
Registered: Sep 2006


Feedback score:    (12)
Leave feedback

Rate this member

Report this Post06-09-2011 06:59 PM Click Here to See the Profile for justinchristieClick Here to visit justinchristie's HomePageSend a Private Message to justinchristieEdit/Delete MessageReply w/QuoteDirect Link to This Post
I’m just finishing off a few outstanding items:

- Completion of the glove box with magnets.
- Addition of a multi-switch plate inside the glove box – I will wire additional lighting (for car shows) to these switches in the future.
- Completed the speaker mounts.
- Levelled the dash gap piece with Bondo.

It is almost ready to go out the door.


------------------
1986 Pontiac Fiero SE 3.4L | The Fiero Blog (Since April 2000)
-----------------------------------------------------------
My Portfolio site | JustinChristie.ca

[This message has been edited by justinchristie (edited 03-19-2015).]

IP: Logged
justinchristie
Member
Posts: 547
From: Clarington, Ontario, Canada
Registered: Sep 2006


Feedback score:    (12)
Leave feedback

Rate this member

Report this Post06-15-2011 09:15 AM Click Here to See the Profile for justinchristieClick Here to visit justinchristie's HomePageSend a Private Message to justinchristieEdit/Delete MessageReply w/QuoteDirect Link to This Post
The dash, headliner, door panels, and rear wall piece are at the shop being upholstered. I should have some photos within the next week or so to show the progress.

------------------
1986 Pontiac Fiero SE 3.4L | The Fiero Blog (Since April 2000)
-----------------------------------------------------------
My Portfolio site | JustinChristie.ca

IP: Logged
Sourmug
Member
Posts: 4538
From: Calgary, Alberta, Canada
Registered: Sep 2002


Feedback score:    (29)
Leave feedback


Total ratings: 144
Rate this member

Report this Post06-15-2011 02:24 PM Click Here to See the Profile for SourmugSend a Private Message to SourmugEdit/Delete MessageReply w/QuoteDirect Link to This Post
Soat's your opinion of hte PISA dash now that you have had experience with it?

Thanks
Nolan
IP: Logged
justinchristie
Member
Posts: 547
From: Clarington, Ontario, Canada
Registered: Sep 2006


Feedback score:    (12)
Leave feedback

Rate this member

Report this Post06-15-2011 09:47 PM Click Here to See the Profile for justinchristieClick Here to visit justinchristie's HomePageSend a Private Message to justinchristieEdit/Delete MessageReply w/QuoteDirect Link to This Post
 
quote
Originally posted by Sourmug:

Soat's your opinion of hte PISA dash now that you have had experience with it?

Thanks
Nolan


On a scale of 1 to 10, i'd give it about an 8 for installation. It is well built and the fiberglass is nice and thick, but it is not a simple 1-2-3 install - everything on it is custom fabrication. Fabricated mounting, fabricated fitment, trail and error, custom everything...

If I had to do it again I would probably just stick to the stock dash and possibly custom upholster everything that is stock.

On the other hand, ...I have something that is quite unique and totally transforms the interior.

I dunno, if I were to describe it in one word, the answer would be: WORK.

...followed closely by another word: PATIENCE.

...followed by words three and four: MANY HOURS.

I probably have about 35 hours labor into this dash.

------------------
1986 Pontiac Fiero SE 3.4L | The Fiero Blog (Since April 2000)
-----------------------------------------------------------
My Portfolio site | JustinChristie.ca

IP: Logged
Sourmug
Member
Posts: 4538
From: Calgary, Alberta, Canada
Registered: Sep 2002


Feedback score:    (29)
Leave feedback


Total ratings: 144
Rate this member

Report this Post06-16-2011 05:10 PM Click Here to See the Profile for SourmugSend a Private Message to SourmugEdit/Delete MessageReply w/QuoteDirect Link to This Post
I see that I can't spell.

Thanks for your response.

Nolan
IP: Logged
justinchristie
Member
Posts: 547
From: Clarington, Ontario, Canada
Registered: Sep 2006


Feedback score:    (12)
Leave feedback

Rate this member

Report this Post06-17-2011 11:33 AM Click Here to See the Profile for justinchristieClick Here to visit justinchristie's HomePageSend a Private Message to justinchristieEdit/Delete MessageReply w/QuoteDirect Link to This Post
No problem Nolan!

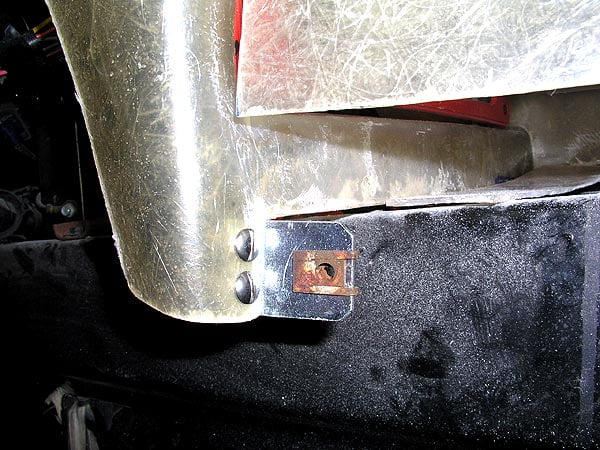
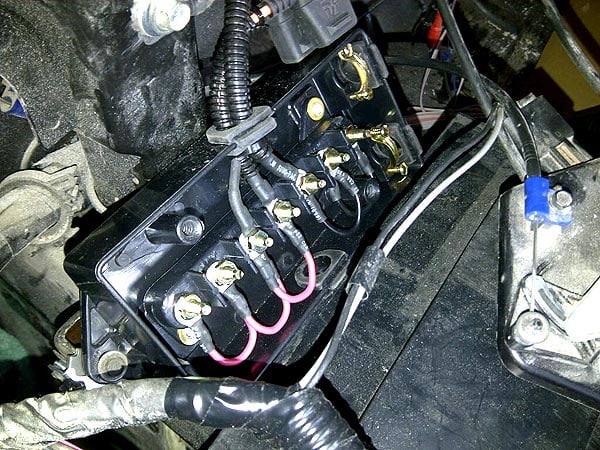
I have completed the installation of the custom junction box to the Fiero chassis.

This will allow easy electrical hookup for the aftermarket accessories.


------------------
1986 Pontiac Fiero SE 3.4L | The Fiero Blog (Since April 2000)
-----------------------------------------------------------
My Portfolio site | JustinChristie.ca

[This message has been edited by justinchristie (edited 03-19-2015).]

IP: Logged
justinchristie
Member
Posts: 547
From: Clarington, Ontario, Canada
Registered: Sep 2006


Feedback score:    (12)
Leave feedback

Rate this member

Report this Post06-20-2011 10:00 AM Click Here to See the Profile for justinchristieClick Here to visit justinchristie's HomePageSend a Private Message to justinchristieEdit/Delete MessageReply w/QuoteDirect Link to This Post
I began painting the interior pieces for the Fiero. I used the Dupli-color plastic adhesive first, then a coat of matte-black Tremclad.

I’m using the same recipe that I tested here: http://www.justinchristie.c...erior-paint-testing/


------------------
1986 Pontiac Fiero SE 3.4L | The Fiero Blog (Since April 2000)
-----------------------------------------------------------
My Portfolio site | JustinChristie.ca

[This message has been edited by justinchristie (edited 03-19-2015).]

IP: Logged
PFF
System Bot
justinchristie
Member
Posts: 547
From: Clarington, Ontario, Canada
Registered: Sep 2006


Feedback score:    (12)
Leave feedback

Rate this member

Report this Post07-04-2011 12:29 PM Click Here to See the Profile for justinchristieClick Here to visit justinchristie's HomePageSend a Private Message to justinchristieEdit/Delete MessageReply w/QuoteDirect Link to This Post
This was not as hard as I thought it would be. There was a previous alarm system installed in the Fiero, so most of the wires were pre-marked for tapping. Plus I did research before hand.

The alarm is working perfectly. Now I just need to make the wiring look "pretty".


------------------
1986 Pontiac Fiero SE 3.4L | The Fiero Blog (Since April 2000)
-----------------------------------------------------------
My Portfolio site | JustinChristie.ca

[This message has been edited by justinchristie (edited 03-19-2015).]

IP: Logged
doublec4
Member
Posts: 8289
From: Oakville, Ontario, Canada
Registered: Jun 2003


Feedback score:    (20)
Leave feedback


Total ratings: 150
Rate this member

Report this Post07-04-2011 04:25 PM Click Here to See the Profile for doublec4Send a Private Message to doublec4Edit/Delete MessageReply w/QuoteDirect Link to This Post
Anything back from upholstery yet?

IP: Logged
CommanderKeen
Member
Posts: 651
From: WA
Registered: Sep 2004


Feedback score: N/A
Leave feedback

Rate this member

Report this Post07-04-2011 05:22 PM Click Here to See the Profile for CommanderKeenSend a Private Message to CommanderKeenEdit/Delete MessageReply w/QuoteDirect Link to This Post
bump...
IP: Logged
justinchristie
Member
Posts: 547
From: Clarington, Ontario, Canada
Registered: Sep 2006


Feedback score:    (12)
Leave feedback

Rate this member

Report this Post07-05-2011 11:41 AM Click Here to See the Profile for justinchristieClick Here to visit justinchristie's HomePageSend a Private Message to justinchristieEdit/Delete MessageReply w/QuoteDirect Link to This Post
 
quote
Originally posted by doublec4:

Anything back from upholstery yet?


I'm picking up the pieces this week, they are almost done. I had a sneak peek 2 weeks ago when they were starting it, ...and I was really excited at what I saw.

I will post photos when i get them back.
IP: Logged
justinchristie
Member
Posts: 547
From: Clarington, Ontario, Canada
Registered: Sep 2006


Feedback score:    (12)
Leave feedback

Rate this member

Report this Post07-07-2011 09:35 AM Click Here to See the Profile for justinchristieClick Here to visit justinchristie's HomePageSend a Private Message to justinchristieEdit/Delete MessageReply w/QuoteDirect Link to This Post
Today I finished mounting the alarm system siren. I used an aluminum bracket to attach it to the chassis.

I also mounted three custom LED switches (purchased last year) to the interior power window plate. I will run the fog lights to one of the switches. The other two will be there for future expansion (accessories, electronics, etc).


[This message has been edited by justinchristie (edited 03-19-2015).]

IP: Logged
justinchristie
Member
Posts: 547
From: Clarington, Ontario, Canada
Registered: Sep 2006


Feedback score:    (12)
Leave feedback

Rate this member

Report this Post07-12-2011 08:55 AM Click Here to See the Profile for justinchristieClick Here to visit justinchristie's HomePageSend a Private Message to justinchristieEdit/Delete MessageReply w/QuoteDirect Link to This Post
I have completed the wiring of the alarm system. With all the black wire-loom, it looks like something from a sci-fi movie.

I have also started painting the dash support pieces to match the rest of the interior trim.


[This message has been edited by justinchristie (edited 03-19-2015).]

IP: Logged
justinchristie
Member
Posts: 547
From: Clarington, Ontario, Canada
Registered: Sep 2006


Feedback score:    (12)
Leave feedback

Rate this member

Report this Post07-15-2011 09:43 AM Click Here to See the Profile for justinchristieClick Here to visit justinchristie's HomePageSend a Private Message to justinchristieEdit/Delete MessageReply w/QuoteDirect Link to This Post
The interior pieces came back from upholstery, and all I can say is WOW. I can’t wait to get these installed!

The pictures don’t do them justice.


[This message has been edited by justinchristie (edited 03-19-2015).]

IP: Logged
CommanderKeen
Member
Posts: 651
From: WA
Registered: Sep 2004


Feedback score: N/A
Leave feedback

Rate this member

Report this Post07-15-2011 10:45 AM Click Here to See the Profile for CommanderKeenSend a Private Message to CommanderKeenEdit/Delete MessageReply w/QuoteDirect Link to This Post
Looks great. Big +1 for the vacum tubing HVAC, saved me alot of work tryig to re-do the airbox. Awesome build and one of my favorite threads.
IP: Logged
justinchristie
Member
Posts: 547
From: Clarington, Ontario, Canada
Registered: Sep 2006


Feedback score:    (12)
Leave feedback

Rate this member

Report this Post07-21-2011 10:34 AM Click Here to See the Profile for justinchristieClick Here to visit justinchristie's HomePageSend a Private Message to justinchristieEdit/Delete MessageReply w/QuoteDirect Link to This Post
 
quote
Originally posted by CommanderKeen:

Looks great. Big +1 for the vacum tubing HVAC, saved me alot of work tryig to re-do the airbox. Awesome build and one of my favorite threads.


Thanks man!

IP: Logged
Previous Page | Next Page

This topic is 6 pages long:  1   2   3   4   5   6 
next newest topic | next oldest topic

All times are ET (US)

Post New Topic  Post A Reply
Hop to:

Contact Us | Back To Main Page

Advertizing on PFF | Fiero Parts Vendors
PFF Merchandise | Fiero Gallery | Ogre's Cave
Real-Time Chat | Fiero Related Auctions on eBay


Copyright (c) 1999, C. Pennock