Pennock's Fiero Forum
  The Construction Zone
  Rebuild of Indy Fiero #163 Super Duty 4 (Page 2)

Post New Topic  Post A Reply
Email This Page to Someone! | Printable Version

This topic is 7 pages long:  1   2   3   4   5   6   7 
Previous Page | Next Page
next newest topic | next oldest topic
Rebuild of Indy Fiero #163 Super Duty 4 by fierosound
Started on: 11-03-2008 08:53 AM
Replies: 274 (60688 views)
Last post by: fierosound on 09-24-2023 07:44 PM
fierosound
Member
Posts: 15141
From: Calgary, Canada
Registered: Nov 1999


Feedback score: N/A
Leave feedback


Total ratings: 286
Rate this member

Report this Post11-17-2008 04:05 PM Click Here to See the Profile for fierosoundClick Here to visit fierosound's HomePageSend a Private Message to fierosoundEdit/Delete MessageReply w/QuoteDirect Link to This Post
 
quote
Originally posted by The_Stickman2:

I am SOOO jealous.


- but you have this to work with. What's the status on your engine? Can you update your thread?

//www.fiero.nl/forum/Forum1/HTML/069905.html

[This message has been edited by fierosound (edited 11-17-2008).]

IP: Logged
KurtAKX
Member
Posts: 4008
From: West Bloomfield, MI
Registered: Feb 2002


Feedback score:    (9)
Leave feedback


Total ratings: 128
Rate this member

Report this Post11-17-2008 05:38 PM Click Here to See the Profile for KurtAKXSend a Private Message to KurtAKXEdit/Delete MessageReply w/QuoteDirect Link to This Post
 
quote
Originally posted by fierosound:
The distributor's centrifugal advance was tailored to bring in 38* by 2800rpm and limited to 52* total with vacuum advance.


That's like waaaaay waaaaaayy more timing than I would expect. Is there an explanation?
IP: Logged
fierosound
Member
Posts: 15141
From: Calgary, Canada
Registered: Nov 1999


Feedback score: N/A
Leave feedback


Total ratings: 286
Rate this member

Report this Post11-17-2008 07:17 PM Click Here to See the Profile for fierosoundClick Here to visit fierosound's HomePageSend a Private Message to fierosoundEdit/Delete MessageReply w/QuoteDirect Link to This Post
 
quote
Originally posted by KurtAKX:

That's like waaaaay waaaaaayy more timing than I would expect. Is there an explanation?


In a computerized system, the ECM handles all of this. All you do is set base timing.

The SD4 guide calls for 34-38 degrees total advance (base + centrifugal advance).
Race applications would not bother with a vaccum advance distributor, but I have the the vacuum advance for part throttle/highway cruise.
Seems to work fine. Lots of articles around dealing with non-computerized HEI ignition:

http://www.chevyhiperforman...wto/97438/index.html
http://www.73-87.com/7387garage/drivetrain/hei.htm
http://www.chevyhiperforman...s_modules/index.html

[This message has been edited by fierosound (edited 03-04-2019).]

IP: Logged
fierosound
Member
Posts: 15141
From: Calgary, Canada
Registered: Nov 1999


Feedback score: N/A
Leave feedback


Total ratings: 286
Rate this member

Report this Post11-20-2008 08:35 AM Click Here to See the Profile for fierosoundClick Here to visit fierosound's HomePageSend a Private Message to fierosoundEdit/Delete MessageReply w/QuoteDirect Link to This Post
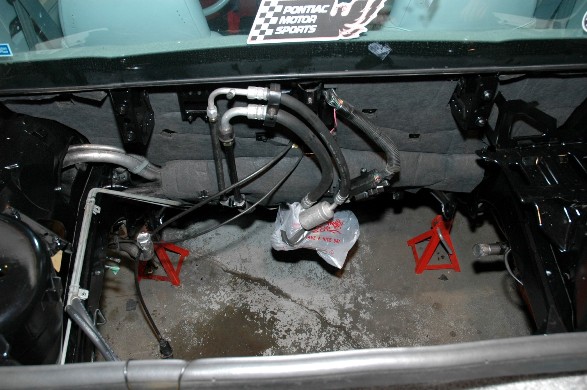
Engine is in the car!! What'cha think? Looks good to me

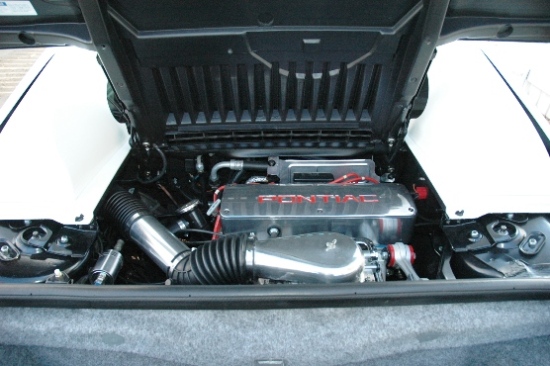
A general view of the engine as installed. I managed to find and ceramic coated the heat shield for the upper firewall that protects the A/C hoses,
wiring and electrical connector going through the bulkhead. In later years, this electrical connector was moved next to the battery.
This heat shield is different for A/C and non-A/C cars.


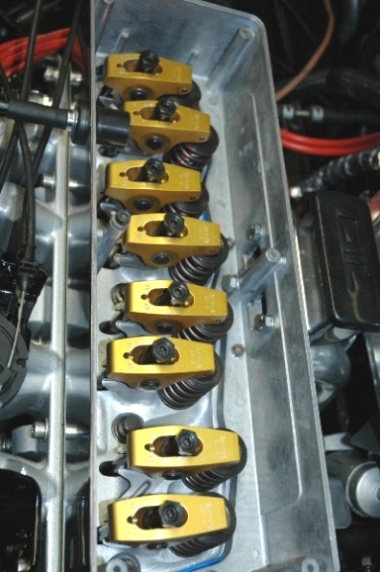
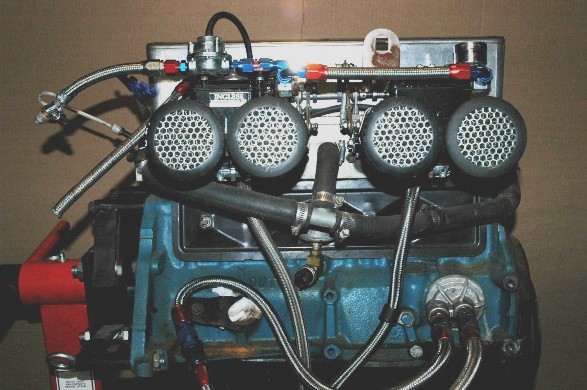
The only engine parts we reused were the Crane Gold Race 1.7 roller rockers.


When the head was rebuilt, the hole at the front of the head was plugged and a stock thermostat housing was installed in the factory location at the back of the head.
This allowed use of a stock coolant hose instead of the junk hose/adapters/bypass setup that came with the car.


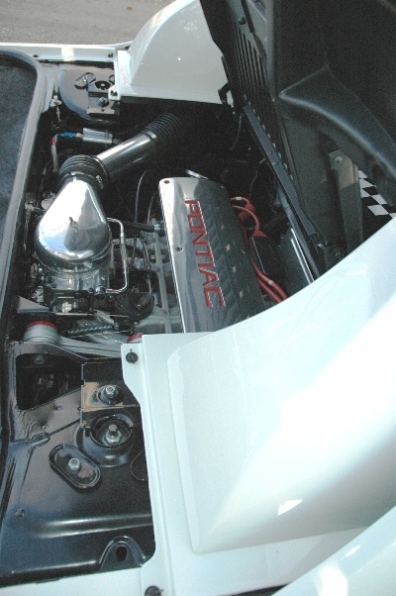
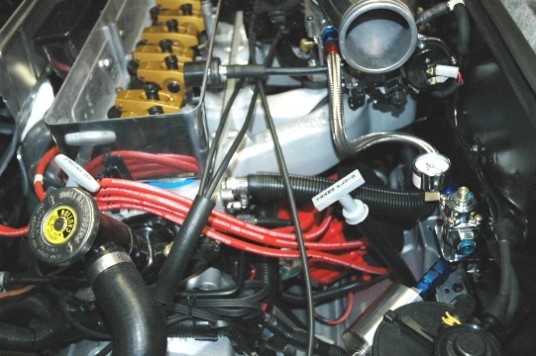
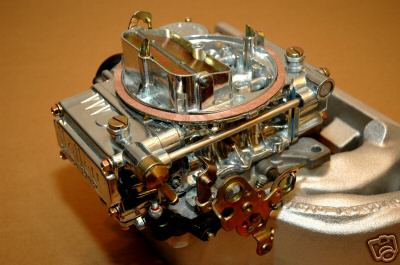
A new AC Delco pump (TBI uses 14 lbs) had been installed in the fuel tank. In order to use a carburetor, the fuel pressure needs to be cut to 5 lbs,
so a Holley adjustable fuel pressure regulator was installed after the fuel filter. Because of the closeness to the trunk firewall,
a Holley carburetor will not fit due to its overhanging fuel bowls.


There's only about 1-inch of clearance past the end of manifold, so in order to use a Holley, the trunk wall would need modification.
This would be similar to what was done on the actual Pace Car to accommodate the air cleaner, but you can see how tight everything is.


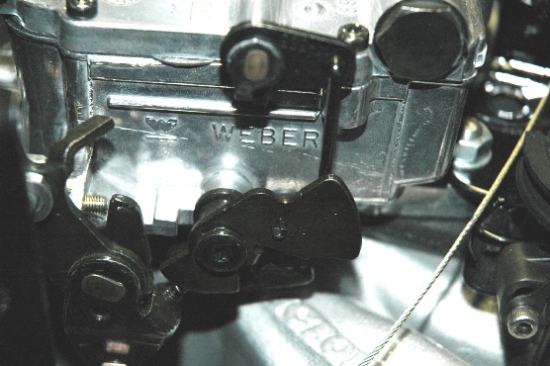
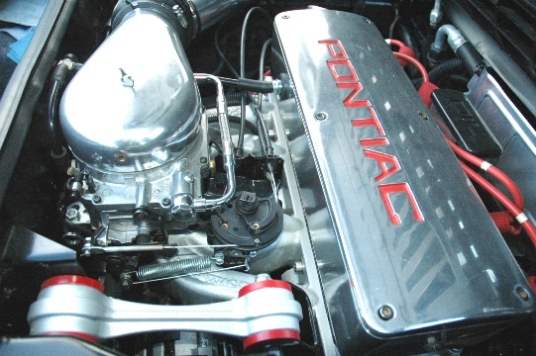
I decided to use an Edelbrock AVS 4-bbl carburetor because its body arrangement fits.
It is a 500cfm carb but that's the smallest they make (a little too big, but more on that later).
Edelbrock Performer/Thunder carbs are essentially clones of the Carter Super-Quad AFB/AVS series of carburetors.
The Edelbrock carbs are cast by Weber these days.


Part numbers
Edelbrock Thunder AVS carb PN 1803
Holley adjustable fuel pressure regulator PN HLY-12-803
Holley fuel pressure gauge PN 26-500
AC Delco fuel pump PN EP386

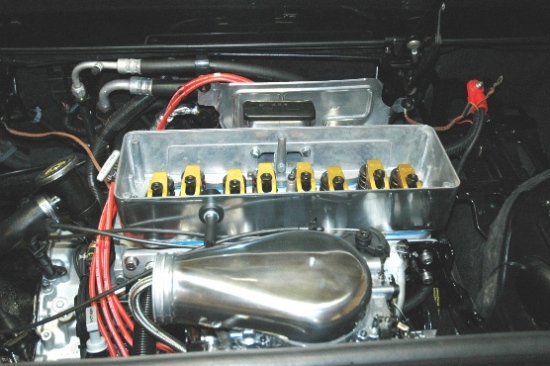
Here's where the installer of the SD4 seemed to give up when they installed the engine with the Weber sidedraft carbs.
The carb requires connection for the throttle cable, cruise cable and transmission TV cable and the Webers only had a bracket for the throttle cable.
In addition, a TPS is also required on the throttle for the ECM to control torque convertor lockup. There's no "off the shelf" brackets for any of this.


For my carb setup, I decided to adapt and modify the "throttle wheel" setup GM had used with 87 and up TBI Duke engines.
An 87 Fiero throttle cable, cruise cable and TV cable all connect to this wheeled contraption and only 1 cable then attaches to the carb's throttle.
This simplifies everything!


The wheel also gives you a 90-degree turn, allowing the control cables to run between the valve cover and carburetor.
A TPS was also attached to the bracket and connected to the carburetor's throttle.


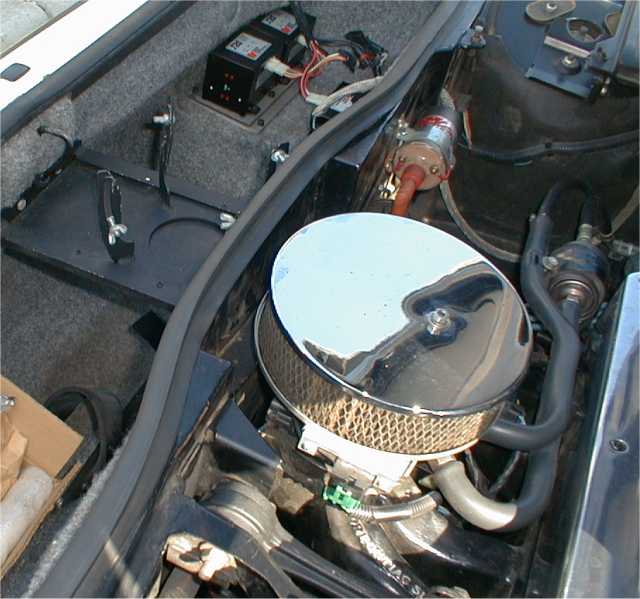
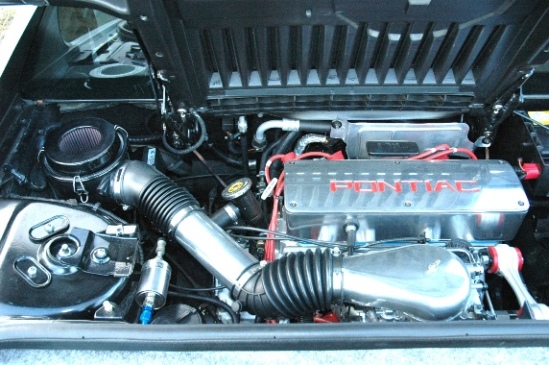
An open-topped air cleaner from a Cavalier Z24 was mounted in the same area where the air cleaner is located in later model V6 Fieros.
The stock cruise control parts (vacuum canister, diaphram, solenoid etc) were removed and a less bulky Delco electronic cruise unit was installed below the air cleaner.


Some wrecking yard searching yielded two flex air pipes to connect the 3" aluminum tube that is plumbed from the air cleaner to the ATI carb bonnet


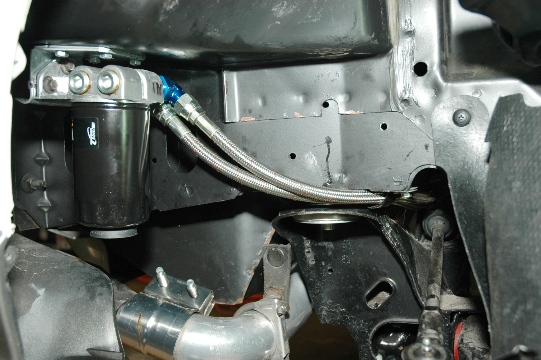
Getting at the Duke's oil filter has always been a problem. From above, it's basically under the alternator and unreachable.
From below, it's not bad with a manual transmission and bloody awful with an automatic (likely why 88's had the filter IN the oil pan).
It's IMPOSSIBLE with the added length of the 4T60 4-speed auto. You can't even see the oil filter!


A Trans-Dapt remote oil filter adapter had already been installed on the engine and I decided to make good use of it.
There's a way to keep these from leaking. I bought the remote oil filter bracket, mounted it, and got new braided lines made up to connect it.


I decided to put it in the right wheelwell beneath the "shelf" on the trunk's right hand side. Braided lines carry oil to/from the engine.
This location make oil filter changes much easier. The wheelwell liner/splash shield protects the installation from road debris and the filter can be reached from below the bumper with an extension.

It's also not a big deal to pull the tire and a portion of the wheelwell liner if needed. I do my own oil changes - can't trust anybody with this

UPDATE: Removed remote filter stuff when I switched to a Getrag 5-speed. The stock filter location is OK with a manual transmission.

Part numbers
Trans-Dapt remote oil fiter - spin-on bypass PN 1050
Trans-Dapt remote filter bracket PN 1045
WIX oil filter PN 51516

[This message has been edited by fierosound (edited 03-04-2019).]

IP: Logged
Toddster
Member
Posts: 20871
From: Roswell, Georgia
Registered: May 2001


Feedback score:    (41)
Leave feedback


Total ratings: 503
Rate this member

Report this Post11-20-2008 09:25 AM Click Here to See the Profile for ToddsterSend a Private Message to ToddsterEdit/Delete MessageReply w/QuoteDirect Link to This Post
This thread ROCKS!
IP: Logged
fierosound
Member
Posts: 15141
From: Calgary, Canada
Registered: Nov 1999


Feedback score: N/A
Leave feedback


Total ratings: 286
Rate this member

Report this Post11-20-2008 10:17 AM Click Here to See the Profile for fierosoundClick Here to visit fierosound's HomePageSend a Private Message to fierosoundEdit/Delete MessageReply w/QuoteDirect Link to This Post
 
quote
Originally posted by Toddster:

This thread ROCKS!


Thank you! I think some people are too shy or awed to say anything!

I've seen more comments on somebody's new shifter knob.

Engine finished and the car was on the road in August 2007

[This message has been edited by fierosound (edited 06-23-2012).]

IP: Logged
fiero67
Member
Posts: 2397
From: Maine
Registered: Jan 2003


Feedback score:    (13)
Leave feedback


Total ratings: 107
Rate this member

Report this Post11-20-2008 06:45 PM Click Here to See the Profile for fiero67Send a Private Message to fiero67Edit/Delete MessageReply w/QuoteDirect Link to This Post
wow...this thread is on my favorites list. You do really great and detailed work! John
IP: Logged
Toddster
Member
Posts: 20871
From: Roswell, Georgia
Registered: May 2001


Feedback score:    (41)
Leave feedback


Total ratings: 503
Rate this member

Report this Post11-20-2008 09:41 PM Click Here to See the Profile for ToddsterSend a Private Message to ToddsterEdit/Delete MessageReply w/QuoteDirect Link to This Post
Is that air scoop from a Caddy 4.9?
IP: Logged
Curlrup
Member
Posts: 2590
From: Havre De Grace, MD
Registered: Apr 2007


Feedback score:    (6)
Leave feedback

Rate this member

Report this Post11-20-2008 11:49 PM Click Here to See the Profile for CurlrupSend a Private Message to CurlrupEdit/Delete MessageReply w/QuoteDirect Link to This Post
I want one!!! I will pay you $20 to make one for me. That is $20 whole dollars to do anything you want with.
IP: Logged
Bradley Jay
Member
Posts: 794
From: Redlands, CA
Registered: Jun 2008


Feedback score: (3)
Leave feedback

Rate this member

Report this Post11-21-2008 01:05 AM Click Here to See the Profile for Bradley JaySend a Private Message to Bradley JayEdit/Delete MessageReply w/QuoteDirect Link to This Post
Looks great in that engine bay. Is this going to be a trailer queen?
IP: Logged
fierosound
Member
Posts: 15141
From: Calgary, Canada
Registered: Nov 1999


Feedback score: N/A
Leave feedback


Total ratings: 286
Rate this member

Report this Post11-21-2008 08:26 AM Click Here to See the Profile for fierosoundClick Here to visit fierosound's HomePageSend a Private Message to fierosoundEdit/Delete MessageReply w/QuoteDirect Link to This Post
 
quote
Originally posted by Bradley Jay:

Looks great in that engine bay. Is this going to be a trailer queen?


Nope. I had originally planned to drive it to the 25th Anniversary Show - but the Indy wasn't ready on time.

[This message has been edited by fierosound (edited 11-21-2008).]

IP: Logged
PFF
System Bot
fierosound
Member
Posts: 15141
From: Calgary, Canada
Registered: Nov 1999


Feedback score: N/A
Leave feedback


Total ratings: 286
Rate this member

Report this Post11-21-2008 08:54 AM Click Here to See the Profile for fierosoundClick Here to visit fierosound's HomePageSend a Private Message to fierosoundEdit/Delete MessageReply w/QuoteDirect Link to This Post

fierosound

15141 posts
Member since Nov 1999
 
quote
Originally posted by Toddster:

Is that air scoop from a Caddy 4.9?


Nope.

 
quote
Originally posted by fierosound:

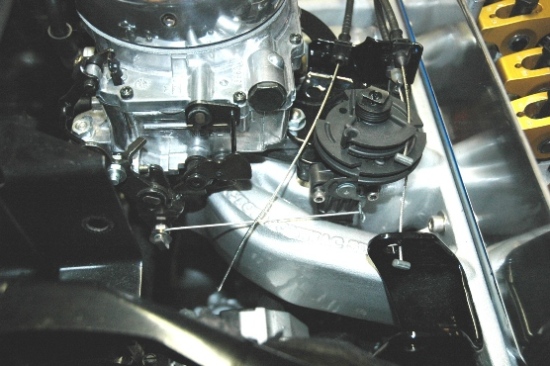
An ATI polished aluminum carb bonnet will be directing air into the carburetor. This item is originally intended for use in supercharged or turbocharged blow-through carburetor applications.


It’s an ATI carb bonnet with a 3-inch inlet. I got it directly from ATI although there’s similar items on eBay and from www.summitracing.com (search for Plenum)

Carb bonnet “history” http://www.vs57.com/bonnets.htm

[This message has been edited by fierosound (edited 11-22-2008).]

IP: Logged
fierosound
Member
Posts: 15141
From: Calgary, Canada
Registered: Nov 1999


Feedback score: N/A
Leave feedback


Total ratings: 286
Rate this member

Report this Post11-21-2008 08:58 AM Click Here to See the Profile for fierosoundClick Here to visit fierosound's HomePageSend a Private Message to fierosoundEdit/Delete MessageReply w/QuoteDirect Link to This Post

fierosound

15141 posts
Member since Nov 1999
 
quote
Originally posted by Curlrup:

I want one!!! I will pay you $20 to make one for me. That is $20 whole dollars to do anything you want with.


Thanks - but they show up on ebay

IP: Logged
Curlrup
Member
Posts: 2590
From: Havre De Grace, MD
Registered: Apr 2007


Feedback score:    (6)
Leave feedback

Rate this member

Report this Post11-21-2008 08:59 AM Click Here to See the Profile for CurlrupSend a Private Message to CurlrupEdit/Delete MessageReply w/QuoteDirect Link to This Post
 
quote
Originally posted by fierosound:


Thanks - but they show up on ebay


For 20 dollars??
IP: Logged
fierosound
Member
Posts: 15141
From: Calgary, Canada
Registered: Nov 1999


Feedback score: N/A
Leave feedback


Total ratings: 286
Rate this member

Report this Post11-21-2008 09:04 AM Click Here to See the Profile for fierosoundClick Here to visit fierosound's HomePageSend a Private Message to fierosoundEdit/Delete MessageReply w/QuoteDirect Link to This Post
 
quote
Originally posted by Curlrup:

For 20 dollars??


Just a little more: http://cgi.ebay.com/ebaymot...C39%3A1%7C240%3A1318
IP: Logged
fierosound
Member
Posts: 15141
From: Calgary, Canada
Registered: Nov 1999


Feedback score: N/A
Leave feedback


Total ratings: 286
Rate this member

Report this Post11-24-2008 08:56 AM Click Here to See the Profile for fierosoundClick Here to visit fierosound's HomePageSend a Private Message to fierosoundEdit/Delete MessageReply w/QuoteDirect Link to This Post
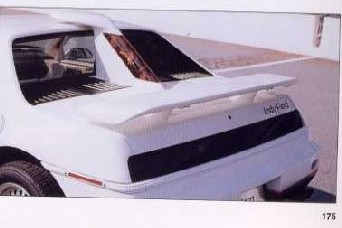
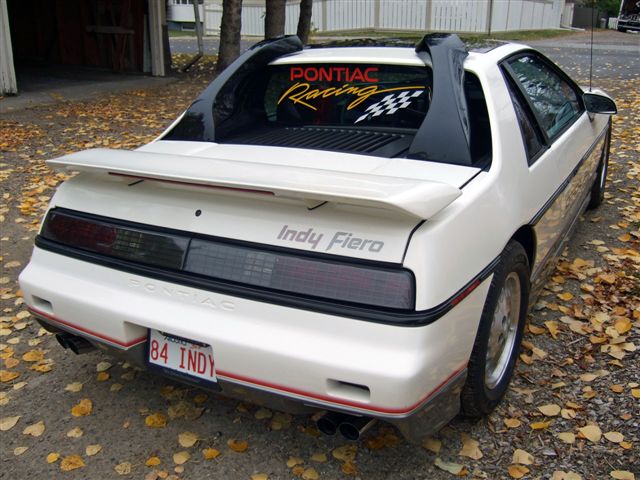
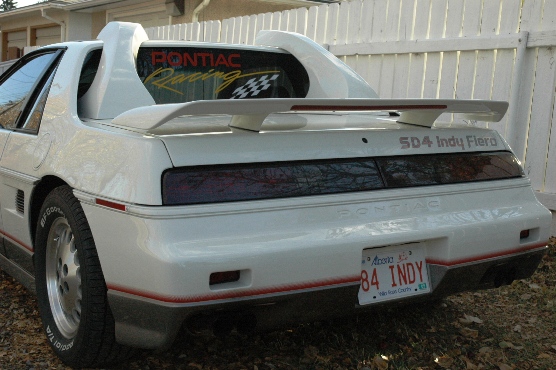
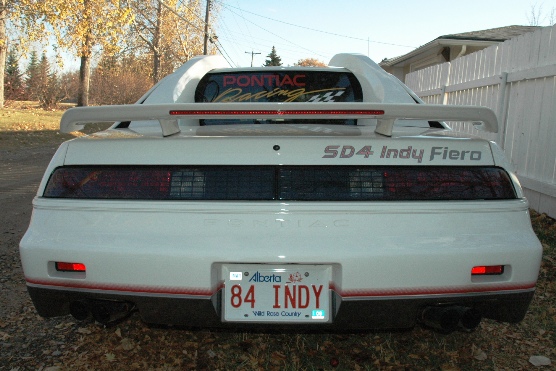
Indy scoop or not??? An Indy scoop is more for appearance than anything else.
Had I found an Indy scoop with working strobes - I would have considered using it because of it's novelty appeal.


Otherwise, the scoop does not lend itself easily to being functional and makes it a pain to open the decklid.
It also looks dumb sitting over top of the central decklid grill.
I would have changed over to a solid decklid and the louvered side vents had I found a strobe-lighted Indy scoop.

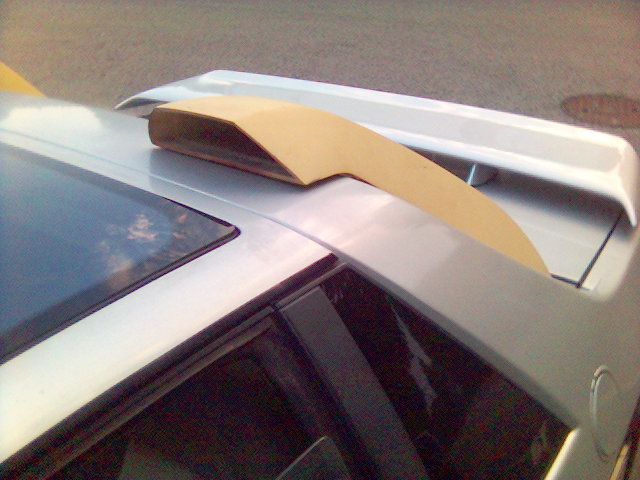
Personally, I liked the look of the dual over-the-roof Fi-Air-O scoops better.
These come up on eBay every now and then, and I managed to snag a pair painted gloss black.


Both sides can be made functional and they aren't a hindrance everytime you want to open the decklid.
They definitely catch people's attention sticking over the roof like Mickey Mouse "ears".


The scoop on the left, feeds directly into the open-topped Cavalier Z24 air cleaner I mounted below it.
The one on the right feeds cool air into the engine bay beside the battery.
With the central grill allowing heat out, the engine heat gets well vented with the car moving.


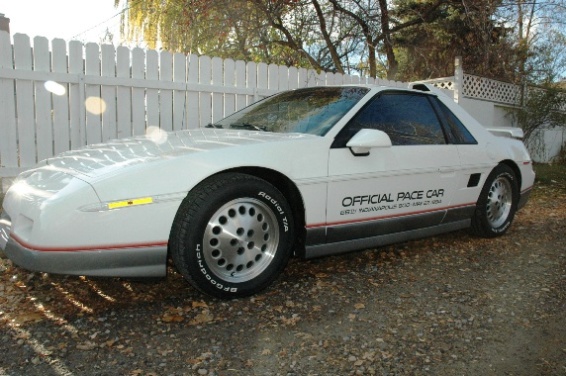
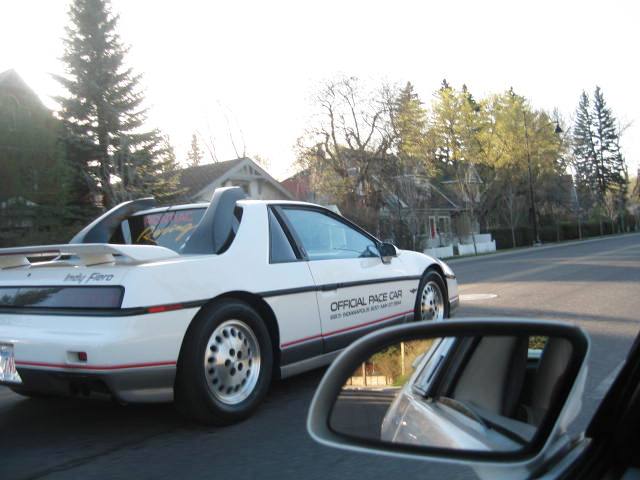
The previous owner sold the original Indy wheels. Rather than looking for another Indy set, I decided to find and install a set of 15"x6" Dodge Daytona wheels.
I like the look of these better anyway. These are the only wheels, OEM or aftermarket, that come closest in appearance to the actual Pace Car wheels.


They have a smooth polished center disk, with a series of 16 holes along the outer edge and are also a vintage that doesn't look out of place for a 1984 car.
They were installed with all new lug nuts, wheel locks and black lug caps. I used the GT tire sizing of P205/60R15/front and P215/60R15/rear.

Goodyear tires would have been standard, but they did not have the correct size tires with Raised White Letters (RWL).


Firestone Indy 500 would have been really cool too, but again they didn't have RWL in the sizes required.


I settled on BF Goodrich Radial T/A tires, about the ONLY brand tires with RWL in a complete range of sizes, including GT sizing: P205/60R15/front and P215/60R15/rear.
While I'd never use RWL on my GT, I think the white letters on a white "race car look" Indy is a nice combination. It just "looks right" to me


Most people seem to agree, because you can't stop anywhere - not even a red light - without people wanting to engage in a conversation about the Indy.

Of course, even after looking at the door decal, they still ask "What year is it"? DOH!!!

[This message has been edited by fierosound (edited 03-04-2019).]

IP: Logged
blackrams
Member
Posts: 31839
From: Hattiesburg, MS, USA
Registered: Feb 2003


Feedback score:    (9)
Leave feedback


Total ratings: 229
Rate this member

Report this Post11-24-2008 02:29 PM Click Here to See the Profile for blackramsSend a Private Message to blackramsEdit/Delete MessageReply w/QuoteDirect Link to This Post
You chose well on the wheel selection.

Ron
IP: Logged
fierosound
Member
Posts: 15141
From: Calgary, Canada
Registered: Nov 1999


Feedback score: N/A
Leave feedback


Total ratings: 286
Rate this member

Report this Post11-24-2008 02:43 PM Click Here to See the Profile for fierosoundClick Here to visit fierosound's HomePageSend a Private Message to fierosoundEdit/Delete MessageReply w/QuoteDirect Link to This Post
 
quote
Originally posted by blackrams:

You chose well on the wheel selection.


Thanks. I figured only Indy wheels or these Daytona wheels would do. The Indy screams 1984.

It just wouldn't look right with the latest 2009 model 17-inch, 10-spoke, "crab design" wheels.

IP: Logged
KurtAKX
Member
Posts: 4008
From: West Bloomfield, MI
Registered: Feb 2002


Feedback score:    (9)
Leave feedback


Total ratings: 128
Rate this member

Report this Post11-24-2008 05:32 PM Click Here to See the Profile for KurtAKXSend a Private Message to KurtAKXEdit/Delete MessageReply w/QuoteDirect Link to This Post
where are the running/driving videos? You've got the same head, same compression, and almost exactly the same cam I'm going with, so I'm eager to hear it run.
IP: Logged
hklvette
Member
Posts: 1439
From: Roanoke, VA
Registered: Nov 2007


Feedback score: N/A
Leave feedback

Rate this member

Report this Post11-24-2008 07:27 PM Click Here to See the Profile for hklvetteSend a Private Message to hklvetteEdit/Delete MessageReply w/QuoteDirect Link to This Post
That car is flat-out Schmokin'! I love it! If only my base '86 looked half that good...
IP: Logged
Santa Nic
Junior Member
Posts: 9
From: Calgary AB
Registered: Nov 2008


Feedback score: N/A
Leave feedback

Rate this member

Report this Post11-25-2008 08:46 PM Click Here to See the Profile for Santa NicSend a Private Message to Santa NicEdit/Delete MessageReply w/QuoteDirect Link to This Post
Tony, having seen the car from the pick up moment, I am extremely impressed with the outcome. Having talked to you many times during reconstruction, and sometimes helping, I still did not know the extend of the work you did. I would not, however, have expected anything less from you. JOB WELL DONE. My hat is of to you........... Santa Nic
IP: Logged
PFF
System Bot
fierosound
Member
Posts: 15141
From: Calgary, Canada
Registered: Nov 1999


Feedback score: N/A
Leave feedback


Total ratings: 286
Rate this member

Report this Post11-26-2008 08:38 AM Click Here to See the Profile for fierosoundClick Here to visit fierosound's HomePageSend a Private Message to fierosoundEdit/Delete MessageReply w/QuoteDirect Link to This Post
Thanks guys. But at this point, it doesn't look quite as good as the photos if you walk around it in person.
As I learned the HARD WAY (expensive too) even a "20 foot car" CAN be made to look great in photographs.
You only use the "right" photos from clever angles that highlight the good points and deliberately HIDE the car's flaws.

This Indy was nowhere "near mint" by any stretch of the imagination (except in Chester's) and neither was the paint.
The car had been in an accident, the damage poorly repaired (or not at all), the clear coat was etched from tree sap and there were many other flaws in the paint and body - none of which was even hinted at.

Sales pitch here: //www.fiero.nl/forum/A...070315-4-032634.html

[This message has been edited by fierosound (edited 03-04-2019).]

IP: Logged
Hudini
Member
Posts: 9029
From: Tennessee
Registered: Feb 2006


Feedback score: N/A
Leave feedback


Total ratings: 165
Rate this member

Report this Post11-26-2008 09:01 AM Click Here to See the Profile for HudiniSend a Private Message to HudiniEdit/Delete MessageReply w/QuoteDirect Link to This Post
Very nice build. Looks like your hard work paid off.

You said earlier the carb was too big?

Would it be possible to turn the Holley so the bowls are left/right instead of front/back?
IP: Logged
whodeanie
Member
Posts: 3819
From: woodstock,Ga.,USA
Registered: Jan 2008


Feedback score:    (14)
Leave feedback


Total ratings: 120
Rate this member

Report this Post11-26-2008 09:25 AM Click Here to See the Profile for whodeanieClick Here to visit whodeanie's HomePageSend a Private Message to whodeanieEdit/Delete MessageReply w/QuoteDirect Link to This Post
looking good keep us posted.
IP: Logged
fierosound
Member
Posts: 15141
From: Calgary, Canada
Registered: Nov 1999


Feedback score: N/A
Leave feedback


Total ratings: 286
Rate this member

Report this Post11-26-2008 10:19 AM Click Here to See the Profile for fierosoundClick Here to visit fierosound's HomePageSend a Private Message to fierosoundEdit/Delete MessageReply w/QuoteDirect Link to This Post
 
quote
Originally posted by Hudini:

Would it be possible to turn the Holley so the bowls are left/right instead of front/back?


Yup, but you would have uneven fuel distribution. You'd have both primaries "closer to one end" of the engine - either cylinders 1&2 or 3&4.

I've found another carb that should be more suitable. Just haven't installed it yet. More on this later.

[This message has been edited by fierosound (edited 11-26-2008).]

IP: Logged
hye_4_life
Member
Posts: 469
From: Clovis, CA
Registered: Jul 2008


Feedback score:    (15)
Leave feedback

Rate this member

Report this Post11-27-2008 04:27 AM Click Here to See the Profile for hye_4_lifeSend a Private Message to hye_4_lifeEdit/Delete MessageReply w/QuoteDirect Link to This Post
 
quote
Originally posted by fierosound:

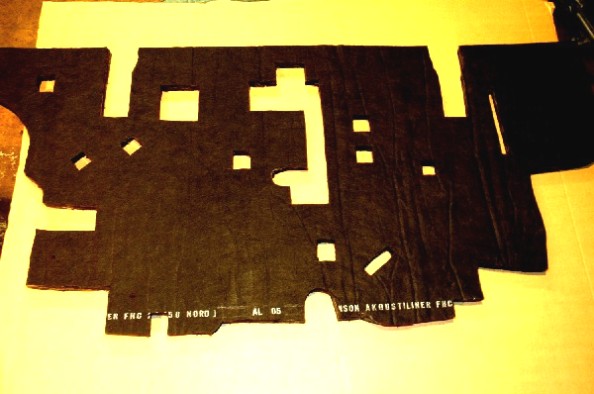
In the meantime, I also got the engine bay ready. The old ratty insulation was removed, everything scrubbed down and paint touched up as needed, before new OEM looking insulation went in.


What did you use for the OEM looking insulation?
IP: Logged
fierosound
Member
Posts: 15141
From: Calgary, Canada
Registered: Nov 1999


Feedback score: N/A
Leave feedback


Total ratings: 286
Rate this member

Report this Post11-27-2008 09:00 AM Click Here to See the Profile for fierosoundClick Here to visit fierosound's HomePageSend a Private Message to fierosoundEdit/Delete MessageReply w/QuoteDirect Link to This Post
 
quote
Originally posted by hye_4_life:

What did you use for the OEM looking insulation?


Manson Akousti-liner. It's a commercial duct insulation.
//www.fiero.nl/forum/A...070315-1-059476.html

[This message has been edited by fierosound (edited 11-27-2008).]

IP: Logged
fierosound
Member
Posts: 15141
From: Calgary, Canada
Registered: Nov 1999


Feedback score: N/A
Leave feedback


Total ratings: 286
Rate this member

Report this Post11-28-2008 08:42 AM Click Here to See the Profile for fierosoundClick Here to visit fierosound's HomePageSend a Private Message to fierosoundEdit/Delete MessageReply w/QuoteDirect Link to This Post
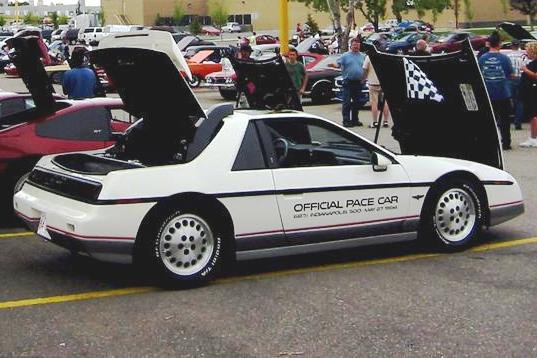
The final touches, just done in September 2008. NEW PAINT!!
A long hard road since I had received the car in August 2006.

New paint was the ONE THING I thought I wouldn't have to do.
The paint is the single most expensive NEW thing when restoring a vehicle (you don't use Maaco on something like this).
Cost almost as much as buying the car in the first place (and I overpaid for the car! )

The Indy had under 19,000 miles and was pitched as being "nearly mint", but in reality, the car had body damage from an undisclosed accident,
the clear coat was etched and there were many other flaws in the paint that made it necessary to repaint the entire car.

Pictures as I got it here: //www.fiero.nl/forum/Forum2/HTML/095615.html

The underside of the hood and decklid had already been repainted when I had the necessary repairs done on them, so only the exterior bodywork and all doorjambs (edges) were to be painted.
To assure the best paint coverage, I stripped the car of the moldings, mirrors, ground effects, gas filler etc. and transported these in a box to the shop.

Here's the car as it came off the trailer back from the paint shop.


It would take me another 2 weeks to put it back together, realigning fenders and several panels including the driver's door to get the gaps "just right".
All the parts that were dismantled: the scoops, decklid side panels, mirrors, gas filler door, moldings and miscellaneous "small bits" were reassembled and reattached to the Indy with all new hardware.

The rear tail-lights had also been completely disassembled for cleanup and reconditioning, prior to reassembly and reinstallation on the car while it was away being painted.


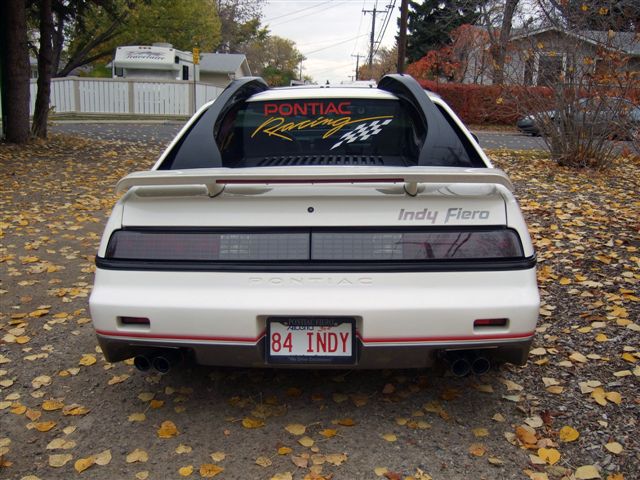
As you can see, I repainted the car with all white moldings as on the Indy #1 Pace Car.
With the door decals and red fader stripe, the black molding just seemed to become a "distraction".
The white moldings give the car a cleaner look. A medium tint was applied to the door's window glass.

All new decals from Paul at www.fierosails.com were applied. I used the Dark Grey Pace Car door decals.
The faded Pontiac Arrow emblems in the sail panels were replaced with NOS pieces from www.fierowarehouse.com .


I found a pair of NEW Wing Emblems for the front fenders. I just hadn't installed them yet when I took these pictures.


Paul also made the 3-color Pontiac Racing decal that is applied to the rear window and stands out sharply against the dark rear window tint
and he worked with me to design the SD4 on the Indy Fiero decal on the rear decklid (it only looks crooked in the pictures).
I later removed the SD4 - so it just has the stock Indy Fiero now.


Wing LED install here: //www.fiero.nl/forum/Forum3/HTML/000078.html

The engine is nicely framed by the white decklid side panels and scoops.


I'm still having issues with the fit of the molding around the new windshield and haven't applied the PONTIAC windshield decal yet for that reason.

It's been a lot of work and money

...but you know you've got something when you see an older couple in a Bentley convertible checking you out.

[This message has been edited by fierosound (edited 09-02-2023).]

IP: Logged
Santa Nic
Junior Member
Posts: 9
From: Calgary AB
Registered: Nov 2008


Feedback score: N/A
Leave feedback

Rate this member

Report this Post11-28-2008 06:26 PM Click Here to See the Profile for Santa NicSend a Private Message to Santa NicEdit/Delete MessageReply w/QuoteDirect Link to This Post
I recently came in the possetion of a 1986 Fiero GT fastback, had three at one time before that and I am ashamed to park any of mine in the same parking lot as either of Tony's cars. I am proud to know Tony and watch him do the quality work he does. You should see his Bike! It is stock, but looks like it came out the factory and was detailed after that. Thanks Tony...........
IP: Logged
Raydar
Member
Posts: 40685
From: Carrollton GA. Out in the... country.
Registered: Oct 1999


Feedback score:    (13)
Leave feedback


Total ratings: 460
Rate this member

Report this Post11-28-2008 10:21 PM Click Here to See the Profile for RaydarSend a Private Message to RaydarEdit/Delete MessageReply w/QuoteDirect Link to This Post
I have been watching this thread with interest.
I saw Tony's other car (at the 20th) and if was flawless.

This one appears to be nothing less.

Bravo!

IP: Logged
fierosound
Member
Posts: 15141
From: Calgary, Canada
Registered: Nov 1999


Feedback score: N/A
Leave feedback


Total ratings: 286
Rate this member

Report this Post11-29-2008 12:02 PM Click Here to See the Profile for fierosoundClick Here to visit fierosound's HomePageSend a Private Message to fierosoundEdit/Delete MessageReply w/QuoteDirect Link to This Post
 
quote
Originally posted by Raydar:

I have been watching this thread with interest. I saw Tony's other car (at the 20th) and if was flawless.

This one appears to be nothing less. Bravo!


Thank you. I can only imagine the work involved in those totally stripped "rotisserie" car restorations. Thankfully, I didn't have to go that far. But it still amazes me when I see an engine swap where the "new" engine went in the engine bay without any effort to clean either of them up first. A few cans of spray paint aren't that expensive!

I thought by outlining the steps taken in this build, I could show the results from going just the extra step of cleaning up the engine bay and painting everything that goes on the cradle before it goes back in the car. At the same time, it's easy to cleanup the wiring harnesses and make any changes necessary to hide them for a less cluttered look. Even small details like installing hose clamps so the adjuster is UNDER the hose out of sight (all you see is the stainless steel band) helps reduce clutter.

This bit of extra work can make anything look like a "new engine under the hood". It makes the difference between a mediocre job and something you can take to car shows.

[This message has been edited by fierosound (edited 11-30-2008).]

IP: Logged
PFF
System Bot
KurtAKX
Member
Posts: 4008
From: West Bloomfield, MI
Registered: Feb 2002


Feedback score:    (9)
Leave feedback


Total ratings: 128
Rate this member

Report this Post11-29-2008 10:41 PM Click Here to See the Profile for KurtAKXSend a Private Message to KurtAKXEdit/Delete MessageReply w/QuoteDirect Link to This Post
 
quote
Originally posted by KurtAKX:

where are the running/driving videos? You've got the same head, same compression, and almost exactly the same cam I'm going with, so I'm eager to hear it run.


bump.
IP: Logged
fierosound
Member
Posts: 15141
From: Calgary, Canada
Registered: Nov 1999


Feedback score: N/A
Leave feedback


Total ratings: 286
Rate this member

Report this Post11-30-2008 12:04 PM Click Here to See the Profile for fierosoundClick Here to visit fierosound's HomePageSend a Private Message to fierosoundEdit/Delete MessageReply w/QuoteDirect Link to This Post
 
quote
Originally posted by KurtAKX:

where are the running/driving videos? You've got the same head, same compression, and almost exactly the same cam I'm going with, so I'm eager to hear it run.


Sorry. Don't have any, otherwise I'd have posted them.
IP: Logged
fierosound
Member
Posts: 15141
From: Calgary, Canada
Registered: Nov 1999


Feedback score: N/A
Leave feedback


Total ratings: 286
Rate this member

Report this Post12-02-2008 08:46 AM Click Here to See the Profile for fierosoundClick Here to visit fierosound's HomePageSend a Private Message to fierosoundEdit/Delete MessageReply w/QuoteDirect Link to This Post
 
quote
Originally posted by Raydar:

I have been watching this thread with interest.
I saw Tony's other car (at the 20th) and if was flawless.

This one appears to be nothing less.


It may look good now, but based on what I had to start with,
it would have cost A LOT LESS to start with a “good” Indy and get a brand new SD4 engine.

I would have looked for something like John’s (rarew66) Indy for $10,000
https://www.fiero.nl/forum/...090907-1-061948.html

and bought a complete new SD4 engine from Kansas Racing Products for $12,500 (archived site)
https://web.archive.org/web...roducts/Welcome.html

I would have saved myself thousands of dollars....

[This message has been edited by fierosound (edited 09-02-2023).]

IP: Logged
Santa Nic
Junior Member
Posts: 9
From: Calgary AB
Registered: Nov 2008


Feedback score: N/A
Leave feedback

Rate this member

Report this Post12-04-2008 01:39 AM Click Here to See the Profile for Santa NicSend a Private Message to Santa NicEdit/Delete MessageReply w/QuoteDirect Link to This Post
I am glad you were able to spend the money to make this car right. It was worth the effort
IP: Logged
30+mpg
Member
Posts: 4049
From: Russellville, AR
Registered: Feb 2002


Feedback score: (2)
Leave feedback


Total ratings: 97
Rate this member

Report this Post12-05-2008 08:10 PM Click Here to See the Profile for 30+mpgSend a Private Message to 30+mpgEdit/Delete MessageReply w/QuoteDirect Link to This Post
Great thread about fixing problems. Now that you have most of the problems fixed, tell us a little bit about how it starts, runs, sounds drives, handles accelerates, makes you feel, etc.
IP: Logged
fierosound
Member
Posts: 15141
From: Calgary, Canada
Registered: Nov 1999


Feedback score: N/A
Leave feedback


Total ratings: 286
Rate this member

Report this Post12-06-2008 12:36 PM Click Here to See the Profile for fierosoundClick Here to visit fierosound's HomePageSend a Private Message to fierosoundEdit/Delete MessageReply w/QuoteDirect Link to This Post
 
quote
Originally posted by 30+mpg:

Great thread about fixing problems. Now that you have most of the problems fixed, tell us a little bit about how it starts, runs, sounds drives, handles accelerates, makes you feel, etc.


Still working making it run/drive as good as it looks. Not fully broken in, so don't ask for dyno or 1/4 mile times.

Starts OK, idles like crap, cruises good, WOT is terrible - falls on it's face. TERRIBLE mileage - you can watch the fuel gauge needle move as you drive. Loud as hell, handles like crap, and can't get ECM to control TCC properly. Makes me feel sick to over how much went into this, and often wish I never bought it - since it wasn't really what I THOUGHT I was getting. Thanks Chester.

I already HAVE solutions for all the problems and they WILL be solved. It's "small potatoes" compared to the work I've already done over 2 years, but WINTER has arrived and I can't really work on it very often now.

But I do have a Delco electronic cruise control setup working with the stock Fiero VSS using a Delco buffer/amplifier.
I'll post details on that next week (need to get pictures).

[This message has been edited by fierosound (edited 12-06-2008).]

IP: Logged
fierosound
Member
Posts: 15141
From: Calgary, Canada
Registered: Nov 1999


Feedback score: N/A
Leave feedback


Total ratings: 286
Rate this member

Report this Post12-06-2008 05:24 PM Click Here to See the Profile for fierosoundClick Here to visit fierosound's HomePageSend a Private Message to fierosoundEdit/Delete MessageReply w/QuoteDirect Link to This Post

fierosound

15141 posts
Member since Nov 1999
This car is cursed!! Spark plug #3 has stripped the aluminum head!!

I used anti-seize and always clean the plug's threads and plug hole threads before reinstalling plugs.
I am EXTREMELY careful, and use a small hose on the spark plug to run them to avoid cross threading.
I then use a ratchet to seat them, and then use a torque wrench so as not to overtighten them.
bsolutely not sure how in hell this happened!!

Anyway - now have to look at my options on how to fix this.
A shop fixed a problem like this on my last van (previous owner cross threaded it) without pulling the head.

Has anyone used a repair kit that theogre mentioned here?
//www.fiero.nl/forum/A...030204-2-026893.html

Repair video here http://www.timesert.com/html/howtosp.html

This isn't a "disaster" but it will be a royal pain in the you-know-what...

Update - 1 hour later - Have a kit in my hands already...

[This message has been edited by fierosound (edited 09-02-2023).]

IP: Logged
BillS
Member
Posts: 636
From:
Registered: Apr 2000


Feedback score: N/A
Leave feedback

Rate this member

Report this Post12-06-2008 05:44 PM Click Here to See the Profile for BillSSend a Private Message to BillSEdit/Delete MessageReply w/QuoteDirect Link to This Post
Ouch - stripping a thread is not nice.

You can install a helicoil, or berret yet a threaded insert, and you CAN try it with the haed on the car, collecting the swarf with a lump of grease on the tap but it always makes me nervous. Pulling the head is the best way, but if you don't, I suppose the softer alloy swarf is less likely to cause problems if it does go though than steel or iron. Good luck.
IP: Logged
fierosound
Member
Posts: 15141
From: Calgary, Canada
Registered: Nov 1999


Feedback score: N/A
Leave feedback


Total ratings: 286
Rate this member

Report this Post12-06-2008 05:58 PM Click Here to See the Profile for fierosoundClick Here to visit fierosound's HomePageSend a Private Message to fierosoundEdit/Delete MessageReply w/QuoteDirect Link to This Post
 
quote
Originally posted by BillS:

...collecting the swarf with a lump of grease on the tap but it always makes me nervous.


Good idea from theorge in the above thread. Light grease on the cutter with this method should do well.

------------------------------------------------------------------------------------------------------------------------------------------

Remove the carb. Remove the plug.

Connect a shop vac so it blows air into the intake manifold. It doesn't have to be a perfect seal. just good enough to make most of the air go into the motor.

Rotate the motor so the intake valve opens on the cylinder you need to work. This will let the shop vac blow air out the plug hole.

Now work the plug hole over and install the Helicoil kit according to directions. Wear goggles because the shop vac will be spitting things at you.

[This message has been edited by fierosound (edited 12-06-2008).]

IP: Logged
Previous Page | Next Page

This topic is 7 pages long:  1   2   3   4   5   6   7 
next newest topic | next oldest topic

All times are ET (US)

Post New Topic  Post A Reply
Hop to:

Contact Us | Back To Main Page

Advertizing on PFF | Fiero Parts Vendors
PFF Merchandise | Fiero Gallery | Ogre's Cave
Real-Time Chat | Fiero Related Auctions on eBay


Copyright (c) 1999, C. Pennock