I'll be in town but I have tons to do. I'll PM you my cell # in case you have questions. I'm happy to help, just give me a call.
Can't wait to hear it run. Since your heading to the junk yard anyway you might want to look for some other cars that have HEI ignitions and tachs. You should be able to find the coil connectors you need and won't need to mod one. I looked but didn't have any luck which is why I ended up using a second caddy one. The yard near me is really inconsistant with the exception of 4.x caddys.
Congrats Darren, sounds like your very close. Later.
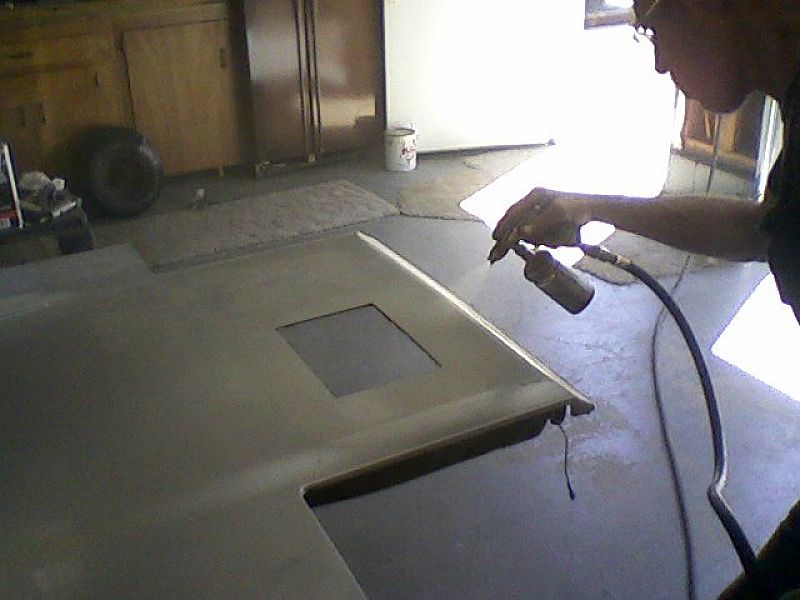
I forgot my camera last time I was down. To bad too. It was a very productive weekend.
I finally got the car out for some real test drives. Everything went pretty smooth. It drove better then I expected. The speedo is not working though. Actually I'm not sure if Aaron did the conversion to my chip to directly run the speedo or not. I'm going to try adding one of Rockcrawls conversion circuits (I bought it almost a year ago) and see if I can get that working. As a last resort I will go with VSS to PCM to Speedo connected in series. Hopefully the circuit will work.
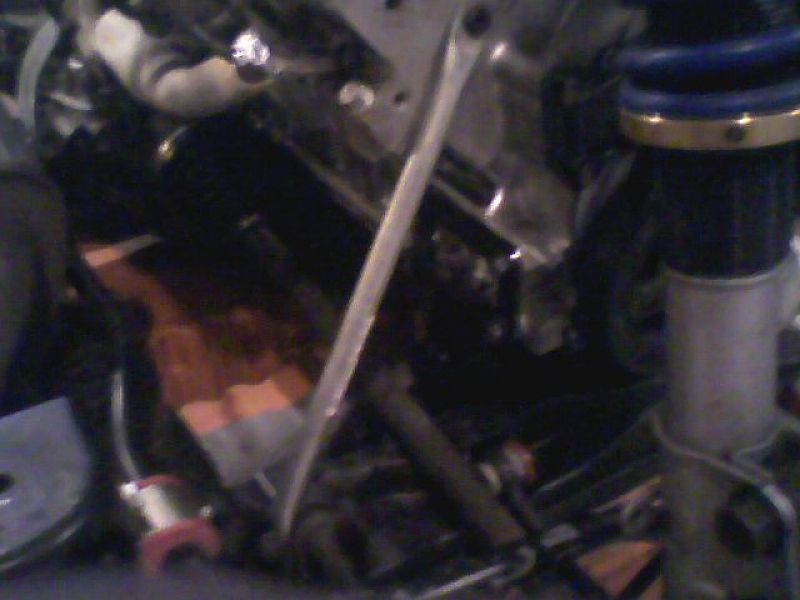
The car drove so well on the test drives I decided to start puting it back together. I later installed most of the rest of the interior pieces. The new seats went in also... Damn, they look good! New locks were installed for the deck and doors, center skeleton was put back in the car, heater controls and rear view mirror were robbed from parts car, PCV vent was added, purge canister wired in and vaccume lines re-arranged back to factory specs per the service manual. I also discovered that it was not a belt chirp I was hearing. Come to find out the alternator has a bad bearing in it. Course that was after I had already re-made the tentioner bracket. The altenator/starter rebuilders up the street say they have a replacement bearing for me so I won't have to replace the whole alternator. I will give me a chance to rebuild it fully anyway. I know there are many other things I got done but I can't think of them right now.
After finishing up all this stuff it was time to pack up for the trip home. I got everything put away and decided to move the car outside. It now seems to idle better then it ever had before.
Of course, now the car has developed a new problem. I seems to be because the RPM's drop so fast when letting off the gas. The PCM can't compensate fast enough and the car dies. If I ease off the gas it in not a problem. I think I was just taking it easy on the first couple drives so it never got a chance to do it. I'm going to try grounding C10 and F7 now and see if that doesn't solve the problem as per MickeyMoose suggestion in the "building a 4.9 swap harness" thread (pg 4).
I will also be doing the tach modification and will dial it in with a scanner. I'll post a small write up on how to do this when I get it working. I broke down and bought the scanner since I need to pull the codes and check sensor readouts. Now I'm in kind of a hurry and have to get this car going. My daily driver is dying fast.
I will still be working to get the BCM, ECC, and FDC working in the car but things are not going very smooth for this right now. I can't get the displays to light. They need 16v and my understanding is that came from the BCM. Once I get it figured out we will have the ability to do an idle/tps learn to dial everything in further aswell as all the other things you can do with this system. I'll keep you all posted.
Oh, one more thing. My headlights do not come up. I believe the isolation relay is bad in this car. I think there is an extra on the parts car... hopefully. This car needs to be on the road by 6-2 so that I can take it up to Arlington on 6-7. I think I might just make it.
[This message has been edited by Fieroseverywhere (edited 03-13-2009).]
Ok. Its been a long time since I updated this thread. And for good reason.
I've spent the last two months working out the bugs to get this car running right. PCM is now getting the VSS signal it needs. Also fixed several other error codes. Tach has been modified, new tires, and so many other things done I can't begin to list them all. Everything is working perfect with one exception....
Aarons chip was garbage. #51 PROM error shows on the scanner anytime I use this chip. Car also only runs in limp mode with it. He said that he would do another chip for me to correct this problem. I now haven't heard from him since a few days before the second chip showed up to him. Its been a month and a half.
For this reason the car still sits parked and can't pass emmisions. Everything else is ready to go.
Since Aaron wont respond to e-mail or phone calls I have gone ahead and ordered a new chip from Rockcrawl (Jon of fieroaddiction.com). I should have done this from the beginning. I would recommend to anyone else needing a 4.9 chip... do the same. Jon responded to the order in less then 24 hours even though he is on the road for the 25th anniversary show. There just is no replacement for reliability.
Dispite this annoying problem I put almost 1000 miles on the car. Its pretty quick, even in limp mode. I feel the clutch and motor are now full broken in and really fully ready. The isuzu tranny is already going and a the original 85 4speed is going in eventually.
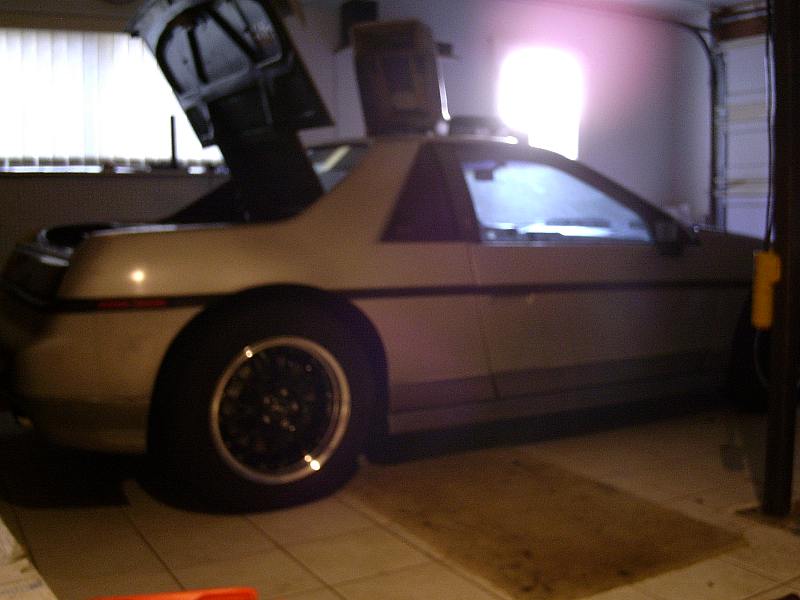
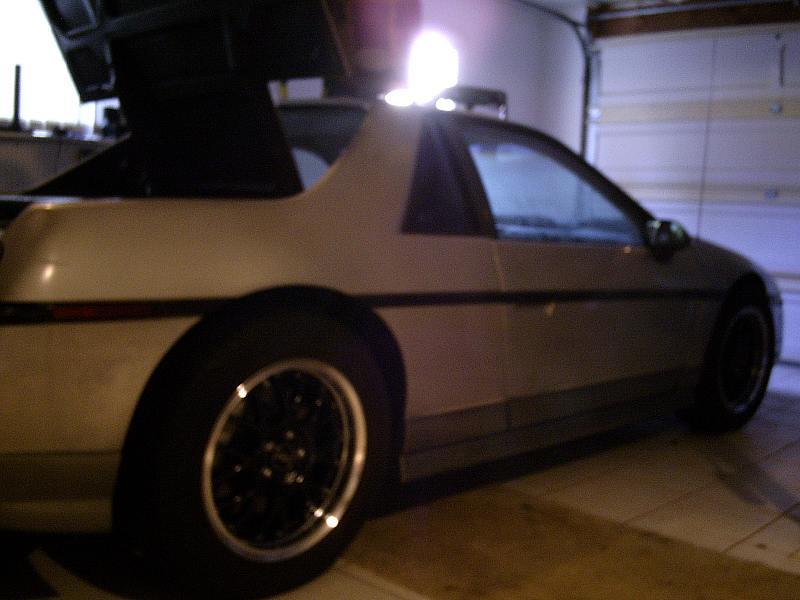
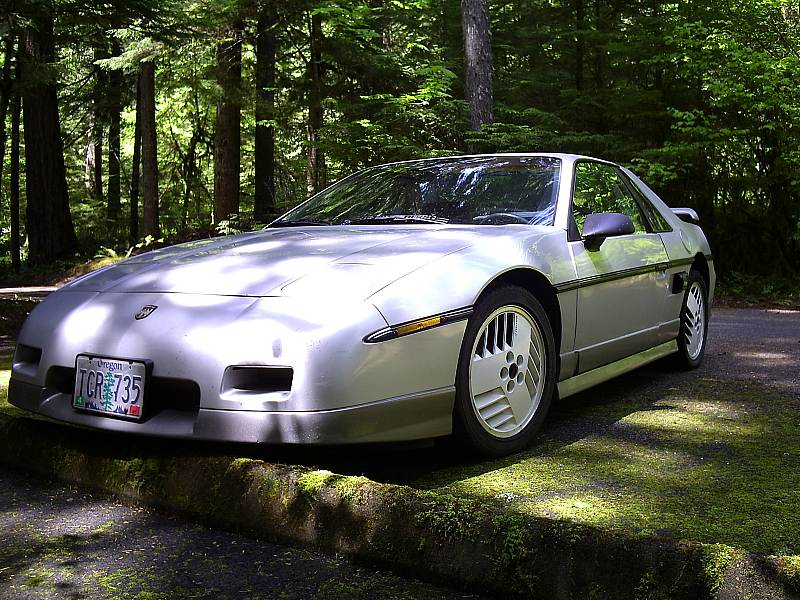
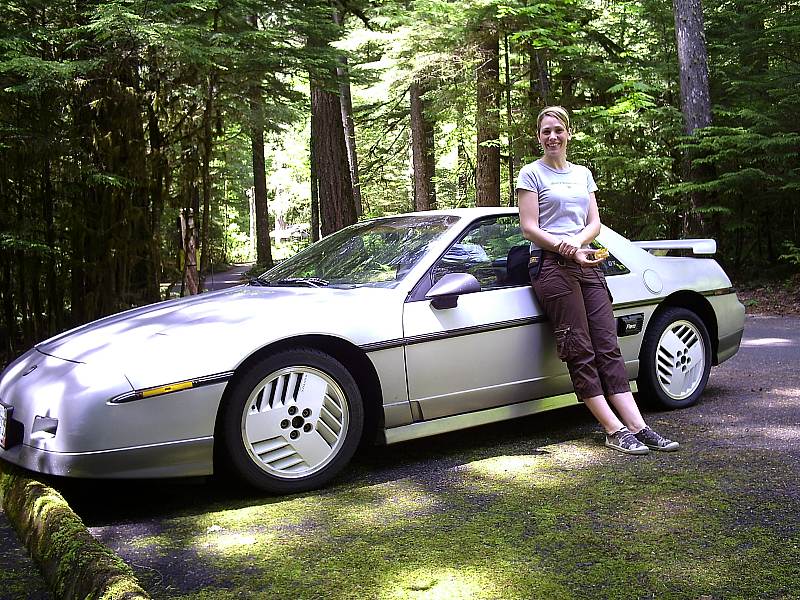
EDIT: To add a couple pics I got on one of the little drives I got to take... These were taken mid June. Long before most problems were fixed and new tires were added. I'll post updated pics shortly.
[This message has been edited by Fieroseverywhere (edited 03-13-2009).]
Unfortunately not much good to report. Aaron did finally come through with the chip. Rockcrawls chip also showed up a couple days later. Replacing the chip fixed almost all of the problems with this car. No more check engine light and it passed emmissions with no problems at all. In fact the emmissions guy was very suprised at just how clean this engine ran. I was very happy with the results. I had fun with the car for a very short period of time.
Now the bad: First thing I need to replace the head gasket. Unfortunately the engine got over heated before I knew about the coolant system tabs. Long story short the gasket wont seal and leaks coolant into a cylinder. Its a slow leak but its deffanately there. But wait, there's more...
Having the chip fixed and the car no longer running in "limp mode" brought a whole heap of new problems. First up, the clutch could no longer handle the power the enging was producing. Anything above 4000 RPM and it would slip. The isuzu is also getting close to dying. The Synchros are going out. Then it gets worse. The clutch goes out. And yet another SPEC 3 loses a spring. At the moment the car is still driveable.. barely. Course I have to drive it 125 miles in its current condition to get it to the shop. Shouldn't be too much of a problem though. Its HWY the whole way. Once in 5th it will stay there til I reach my destination. I've done this once before when my stock 85SE V6 clutch lost a spring. I know I can make it again.
The original plan was to just install a new clutch (clutchnet), flywheel (LSC performance), switch to a V6 4spd (3.65 final), change the headgasket, and add a head to cradle brace to keep the engine more stable.
Still deciding on the trans for sure. Found a great deal and I am purchasing a F40 trans for 450 delivered in a couple weeks. I will start working on the swap shortly after that. We'll see where this path takes me. I'll do everything I can myself and go to Archie for anything I can't do. Shouldn't be much if anything. Maybe someday I will actually be able to take my car out for a real drive. Someday... Guess I can be patient for a little bit longer. Two years of planing and saving a little over a year actually building it. Later.
[This message has been edited by Fieroseverywhere (edited 09-08-2008).]
hey its nice to see im not the only one in oregon crazy enuf to put more money into my fiero then it will ever sell for sorry to hear about the problems your having. but thats an awsome build. come check my build i live in salem. https://www.fiero.nl/forum/Forum2/HTML/087040.html maybe when i get the chance to go to a fiero meet i can see your car in person.
Woo hooo! Finally I'm getting my own garage!!! It even comes with a house. Probably moving in at the end of the month. I will finally be able to get the clutch replaced. I've been tinkering with the car a bit also.
I've been working on a few of the small details to pass the time. I fixed the drivers window that was out of allignment and would not seal. Ended up being a missing window stop and the little round bumper on the front bottom edge of the window. Replaced both parts with parts car pieces and adjusted it. The car is now actually secure and the window works as it should.
I also modified the radio\HVAC surround to accept the aux gauges since I never had any luck finding the correct piece. I'm happy enough with it to keep it til I find the right part.
I also installed the stereo again. Its the Alpine that came with the car. Works OK but I'm really not a big fan of it. It aint broke though so I aint fixing it. The previous owner had replaced the 4x10 dash speakers with 4x6 component plates. I went ahead and decided to use them. I had to make adapter plates since then were just bouncing there held in by 2 screws each. Not sure what I'm going to do about rear speakers yet. Being an 85 it doesn't have rear pillar speakers. The seats I got do not have headrest speakers either. I'll figure something out. It actually sounds OK with only the front speakers and I can make due.... for now.
I also started to install the auto dim mirror I got out of my engine doner caddy. I got stopped short since I'm still trying to figure out a way to remove the old mirror mounting tab. Don't want to break the window and its still a bit too cold to heat the window much. Don't want to break it. That glue is strong. If anyone has any tricks I'm all ears.
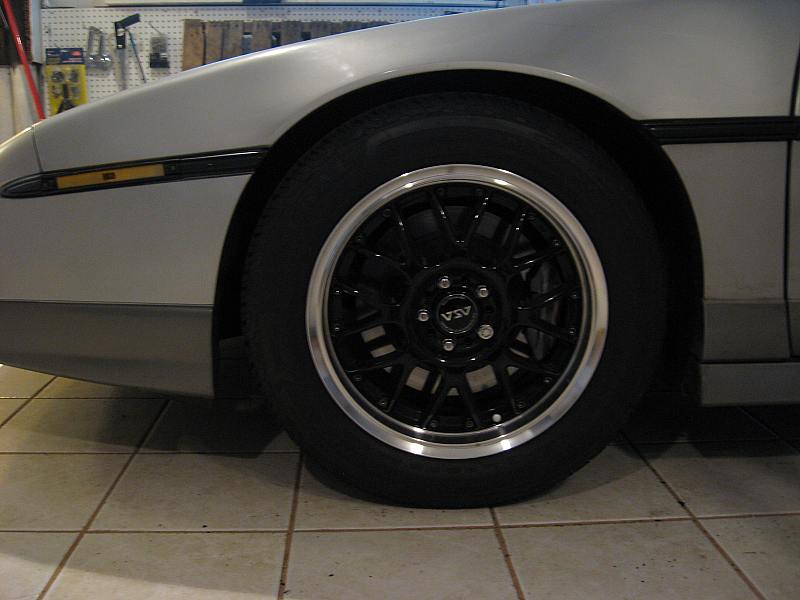
Tirerack.com finally decided to order up the ASA AR1's in a 16". 16x7.5 to be exact. They are currently not listed for the fiero in a 16". If you want a set you'll have to call them and request everything you need. I preordered a set back in Janurary and they were going to come in second week of April. Boy did I get a suprise when they called me and said they showed up a month and a half earlier then expected. They are in transit now and should be here on Monday.
This car is not dead yet and its vacation is almost over. I'll be posting more pics soon. I also talk too much.
hey its nice to see im not the only one in oregon crazy enuf to put more money into my fiero then it will ever sell for sorry to hear about the problems your having. but thats an awsome build. come check my build i live in salem. https://www.fiero.nl/forum/Forum2/HTML/087040.html maybe when i get the chance to go to a fiero meet i can see your car in person.
Wow. Don't know how I missed this post. From all the way back in september.
I may not be able to sell it for what I put into it but honestly i don't care. I have relatively little in it considering what I get out of it. It my car and nobody else can have it. It'll have to be pryed from my dead fingers.
Good to see some other Oregon members doing some fun stuff. Going to check out your thread....
[This message has been edited by Fieroseverywhere (edited 03-13-2009).]
Wheels showed up today. 16x7.5 +38mm offset. They weight in at 18lbs each. I'll edit this post with pics as soon as I can. The house inspection is tonight so it will be later before I can get to it.
Also got the trunk plates for the fastback conversion. With the exception of the GT windows I have all the pieces to do this conversion now.
Well I can now post pics again. Thats the good news. I'll get pics of the wheels up momentarily.
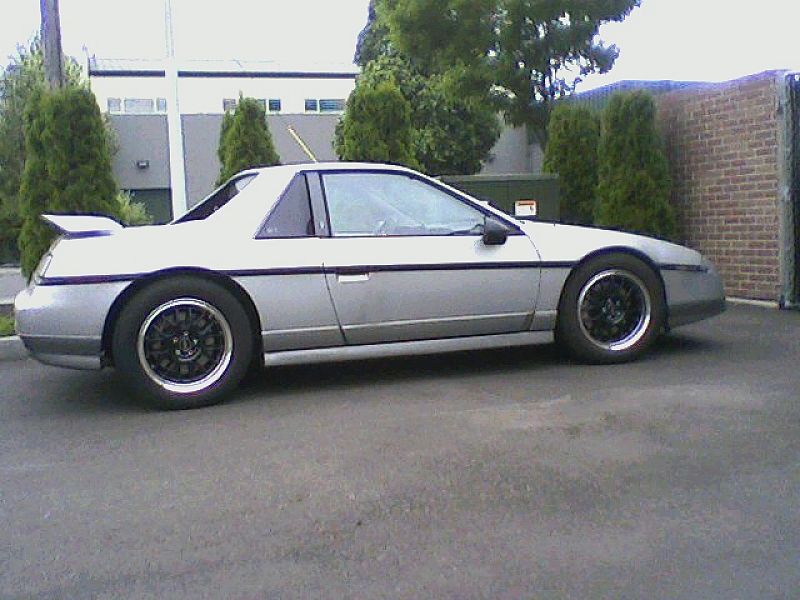
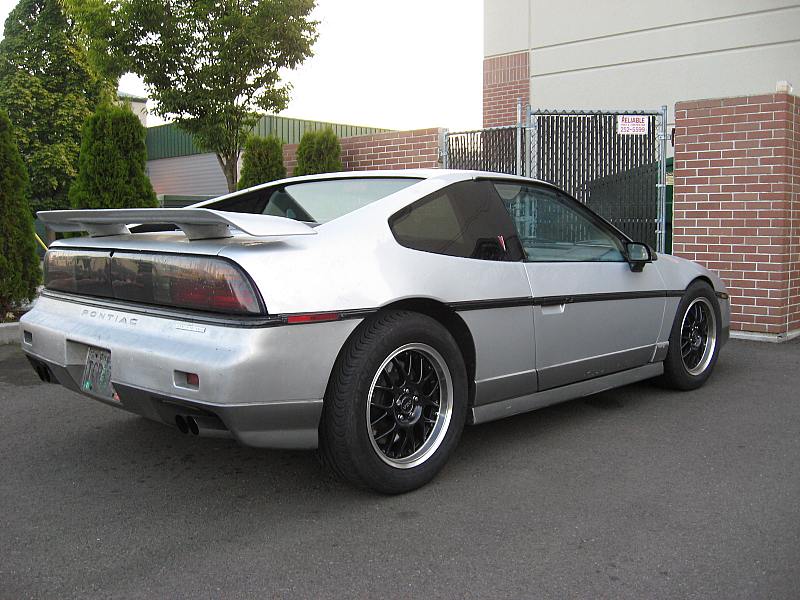
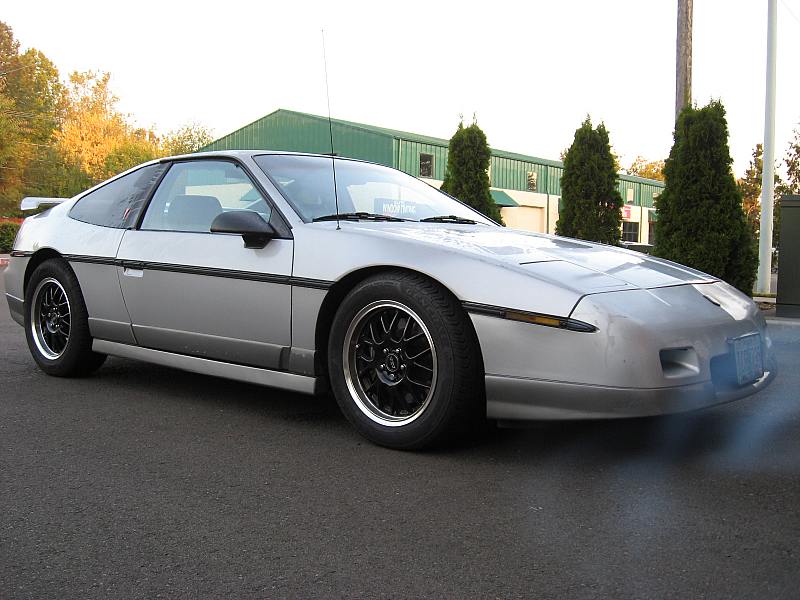
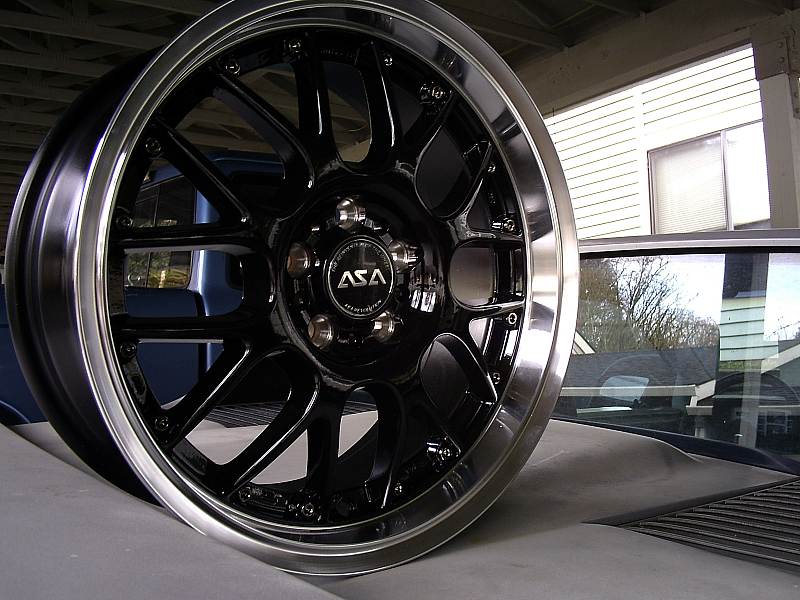
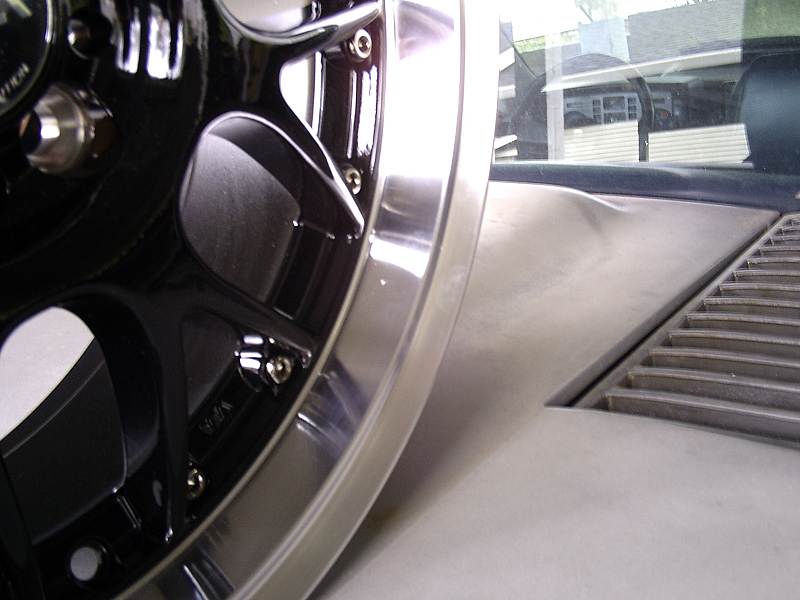
The bad news, and reason I didn't get the pics posted yesterday, is Tirerack screwed up. The wheels they sent me are indeed the wrong size. They are actually a 16x7 +38mm. They misrepresented the product and in fact ASA does not even make this wheel in a 7 1/2 wide. I'm actually pretty pissed about it as you can imagine. I'm still deciding if I want to keep them or not. They will fit but not like I was planing. In fact they will sit 6mm further in (~1/4in). I know I'm probably the only one that will even notice but I'm still annoyed. The only good thing is they are lighter (~1/2lb each wheel). Well here are the pics anyways. I still love the wheels...
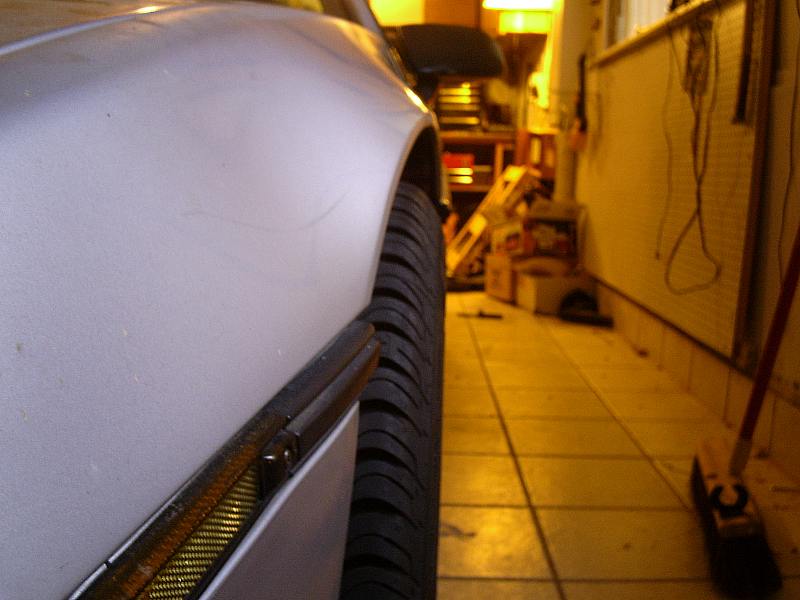
While they are not exactly what I thought I was buying I still like them. They'll still fit and should look good. Actually I was suprised at the size of the lip on them. Pretty good for a 16" wheel and they remain lightweight. Lighter then the original fiero wheels at 18lbs each (actual weight). They are a ton lighter then the ugly white wheels my cars been sporting since I got it (first pic, original post).
I'd love to hear some opinions if anyone has one. Later.
EDIT: Pics fixed.
[This message has been edited by Fieroseverywhere (edited 03-17-2009).]
Oops. Forgot I changed the directory after I posted them. I'm still figuring this whole server thing out. PIP quit working for me a few months back and nothing I have done has worked to fix it. Had to go another route. All of my pics from now on are hosted courtesy of captfiero.com. YOU ROCK DAVID!!!
[This message has been edited by Fieroseverywhere (edited 03-17-2009).]
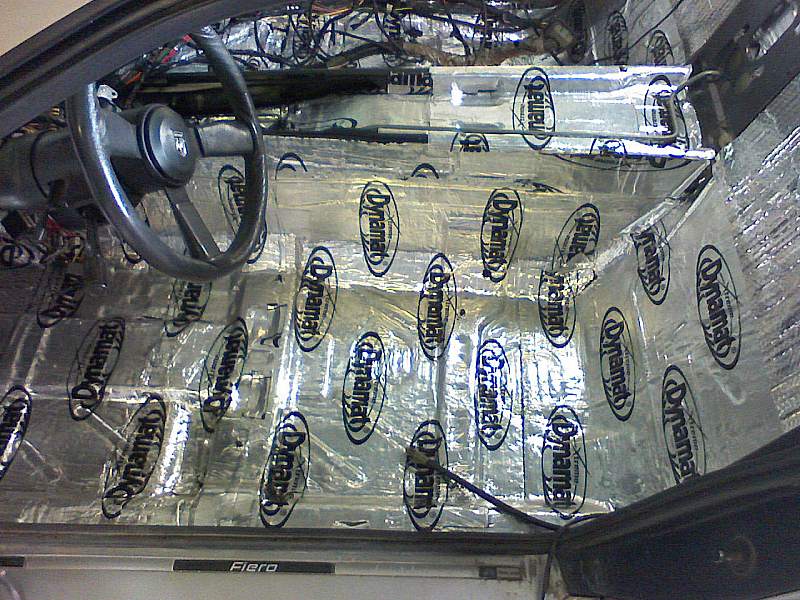
How much of a difference did you notice once you had all the Dynamat intalled? Big or small difference? Worth the money? Please be honest.
It think it made a big difference. Its the quietest fiero I have driven yet, besides the exhaust note. As long as you get a good price on it (best prices at amazon.com) its worth the money. I'm actually going to add more to the roof and doors.
[This message has been edited by Fieroseverywhere (edited 03-18-2009).]
Those sure are pretty rims that you have there. I have never been a fan of all chrome, or shiney bling bling wheels. I really think that all lips should look like your though. The black sets it off nicely. Nice choice.
Dynamat is a great product. It really does make a difference in interior noise levels. I have yet to do my car, but rest assured that I will. I have a ton of tire noise that comes through while driving these Washington roads. I have also read a lot about making the interior quieter. You may want to look at Home Depot, or Lowes for a shower instilation mat for the doors. It is a thick rubber substrate that goes down between the floor and tiling. It is fairly cheap, and I hear that it works well for doors.
I'm not a fan of the huge wheels either. Besides looking just rediculously huge in comparison to the fiero (IMO) they usually weigh a ton more then I want. 18lbs was the absolute max wheel weight I was looking for. I'm trying to keep unsprung weight the same or less then the stock fiero and I want to compensate for the brake upgrade adding 2-3lbs per wheel.
That shower mat sounds good. Thanks for the heads up I'll give it a look and see what I can come up with.
Hey there. I just read your whole build thread. What a great looking build. Sorry to hear about all of the problems. Did you ever fix the head gaskets or install the F40 trans? I am looking forward to seeing her one day. Any plans to attend the Arlington event in June? Just a great looking build. Good luck to you.
Hey there. I just read your whole build thread. What a great looking build. Sorry to hear about all of the problems. Did you ever fix the head gaskets or install the F40 trans? I am looking forward to seeing her one day. Any plans to attend the Arlington event in June? Just a great looking build. Good luck to you.
Yea lots of problems over the last 2 years I've been working on it. I haven't really touched the car since about September. Been working on getting a house and garage. Since that is all coming together I will be starting work back up in the near future.
I have a compression tester and will be checking compression soon to verify a head gasket leak. With any luck I won't find a problem and will narrow it down to a coolant leak somewhere else (fingers crossed). The coolant is not getting into the oil so its either getting burned up in the cylinders or I've got a leak somewhere that I can't see.
I've decided to go a different route on the trans. Total cost of the F40 install is more then I spent building the engine, upgrading the suspension, and doing the brakes so I feel it isn't worth it yet. I will be installing the 3.65 four speed back in as it should be plenty strong for the spirited driving I plan to do with this car. I actually like the 4 speed and can't wait to get it in there. It will be better then the isuzu that is in the car now by far. If I can get everything done in between working on the new house I will be attending the Arlington event this year. I was dissapointed to miss it last year. We'll see how things go.
[This message has been edited by Fieroseverywhere (edited 03-19-2009).]
I like the wheels. Check the bolts around the outer edge - they just push in and a few of mine were loos upon arrival.
Got any other pics? I have yet to see these wheels on any other fiero (at least in this finish). I thought I was the first. Maybe I still am for the 16".
[This message has been edited by Fieroseverywhere (edited 03-19-2009).]
They are 16 inch? I don't see them listed on tire rack...I only see them with 15 and 17
16x7 +38mm offset, 18lbs each. Look up "2007 Pontiac Vibe" and you will find them. I keep telling Tirerack that they fit a fiero also but they won't update their site. If you order a set just make sure to get the correct centering rings for a fiero.
This fiero is now parked in the new garage. I tried to take it down to get the wheels installed but the transmission decided that was the best time to die (grinding from differential). I managed to limp back to the apartment and get it into a spot. About a week later I called a tow truck to move it to the house. Got a bunch of work to do on the house before we move in about 2.5 weeks. I'll get back to this car as soon as possible but first I need to properly equip my garage.
[This message has been edited by Fieroseverywhere (edited 04-17-2009).]
Update coming very soon. Garage equipped for work on fieros. New clutch, flywheel, and trans installed. Buttoning up the rest of the reinstall. Lots of pics taken, will post them up soon...
EDIT: Oh yea. Almost forgot. Wheels are installed!
[This message has been edited by Fieroseverywhere (edited 06-15-2009).]
Big update coming very soon. My camera broke taking most of my pics from the last few months with it. Since I will be dropping the cradle one last time I figured I would borrow another camera and make sure to get a good update. The car has changed a ton since the last pics were posted so expect big changes. See you in a few days.
EDIT: One big thing I wanted to mention. NO HEADGASKET LEAK!!!! Ended up being some other really stupid things. I'll post details later.
[This message has been edited by Fieroseverywhere (edited 10-09-2009).]
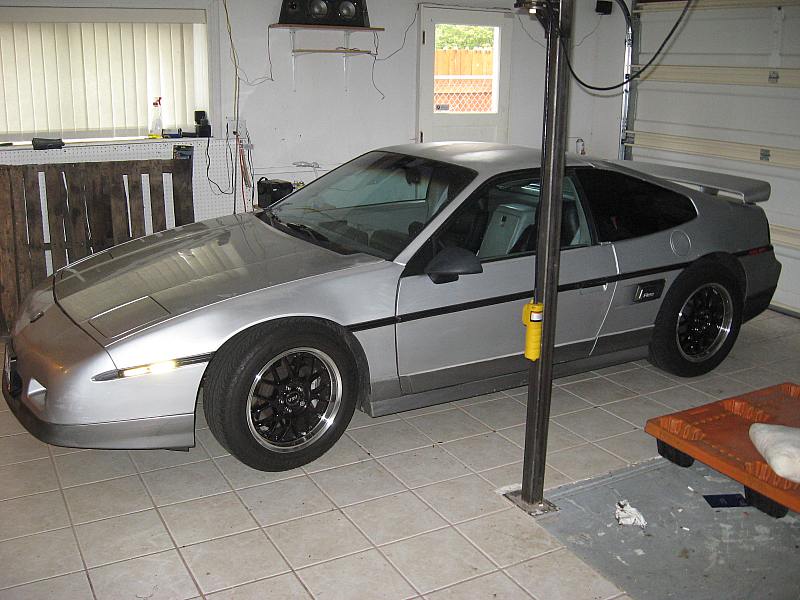
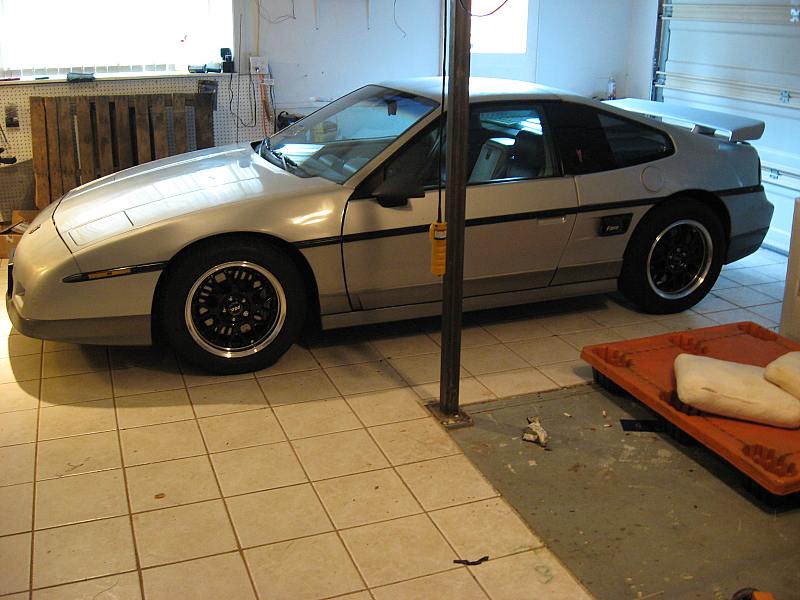
Finally have the time to do as promised and post an update. It's time to get all you guys up to speed on where the car is now. To sumarize... Different body style, different trans, and many, many, many other changes cosmetic and otherwise. I wont list them all but lets see who is paying attention enough to catch them.
I wanted to mention that I had a camera die in process and lost many pics. I saved what I could. There are also some camera phone pics from when I was between digital cameras. Most didn't come out well and are blurry at best. The best pics are from a borrowed camera. Most of the more current pics fall into this group.
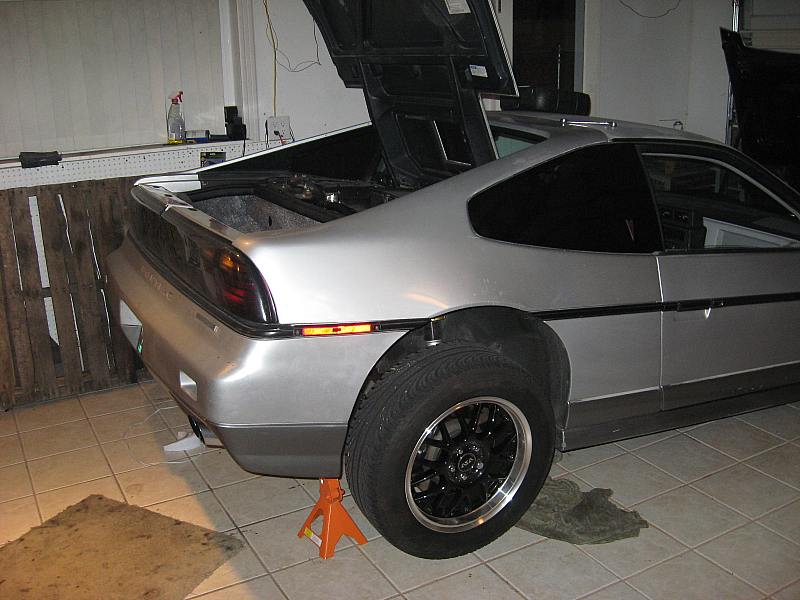
Lets go back in time a bit. Since I have had several requests I will start with pics of the wheels mounted.
The wheel well gap is reduced by lowering springs in the front, coilovers in the rear, and larger diameter tires being used. The offset of the wheels also worked out perfectly as you can see by these next two pics.
I tired to save what I could but this is the only pic I now have of this car with the new wheels as a notchback. Too bad, I really liked the look. All others were lost thanks to the broken camera.
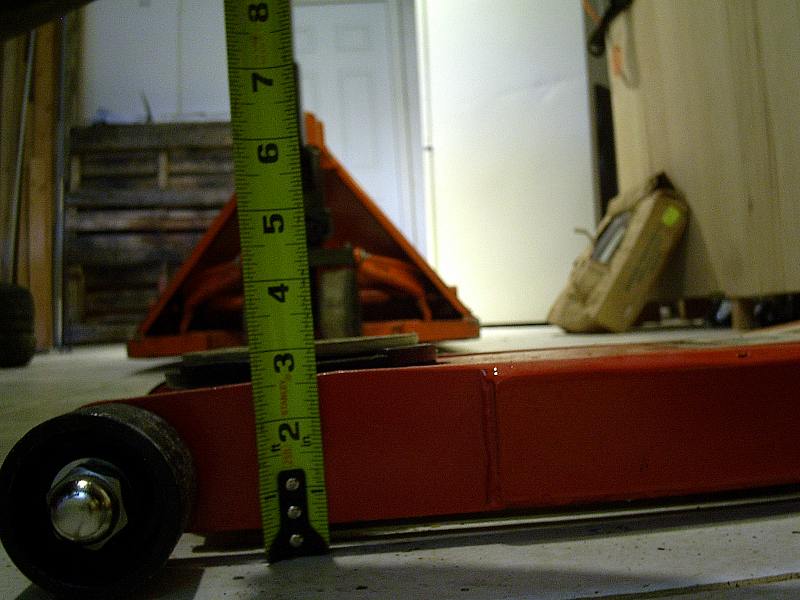
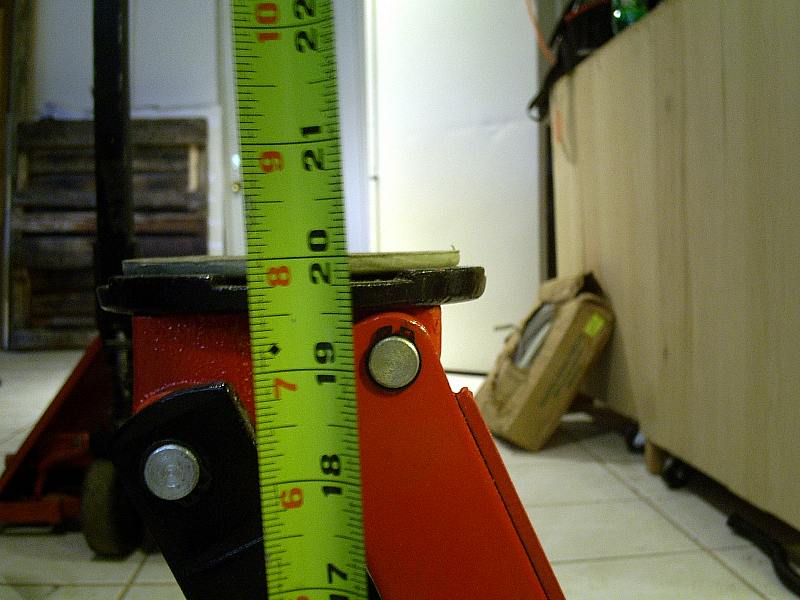
Last update we were working on getting a house with a garage. That wen't well and now we have been happy home owners for about 6 months. I needed to purchase several tools to do any further work on this car. I didn't have a floor jack or engine hoist along with several other things that I don't recall at the moment.
For the floor jack I was looking for something special. It took me a while but I finally found what I was looking for. Ultra low rise, long frame floor jack. 3" lowered saddle height, 20" lift, 41" long. Its one of my favorite items in the garage and works perfectly for my needs. Pm me if you would like more info. EDIT:
quote
This jack was a tough find. I was looking for something extra long, very low rise, but still had a decent lift to it. This was literally the only thing on the market. It is built by one manufacturer, don't recall the name at the moment. This company does not sell them to the public. They only sell to three different distributors that I have found.
All three distributors list it under their own part number and paint it their own color. The particular one I got is an Advanced tool design ATD-7325. Red as you saw in the thread. They go on sale now and again and/or sometimes ship for free. They are heavy at ~120lbs so shipping is a killer if you don't get it free. I paid $247 with free shipping from amazon.com. A search through google shopping usually finds the lowest price the fastest.
It also lists under part number Omega 29023. They call it "magic lift". This one is supposedly black but same jack by same manufacturer.
The third I was able to find has the same part number as Omega above. Its sold by Northerntool.com. They call it the "blackhawk" 29023. Usually red but I've also seen it in blue from them.
Even at $247 I think it was worth every penny but thats still a lot of money for a floor jack. Hope this helps those who are interested. Later
Don't forget the really expensive, super low rise creeper. I made this one custom. I also picked up an electric hoist. Dad and I built the mount for it. Pics later in this post.
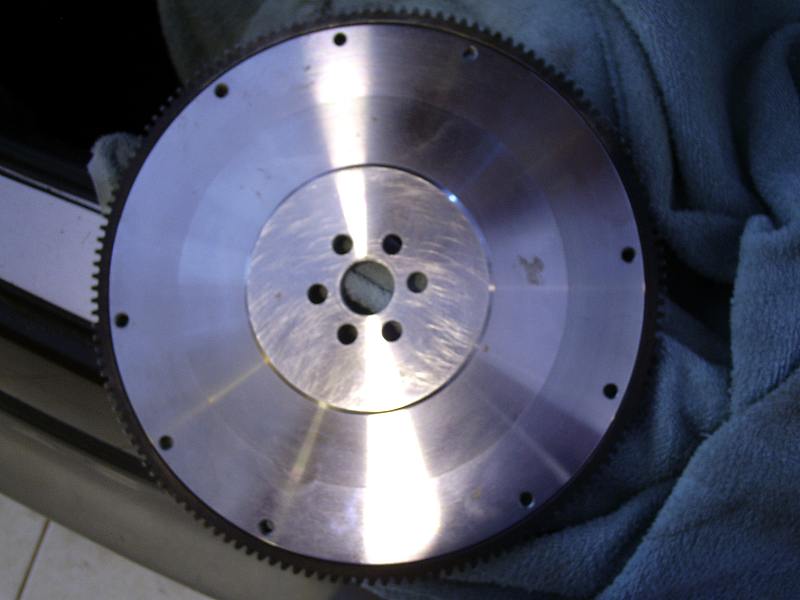
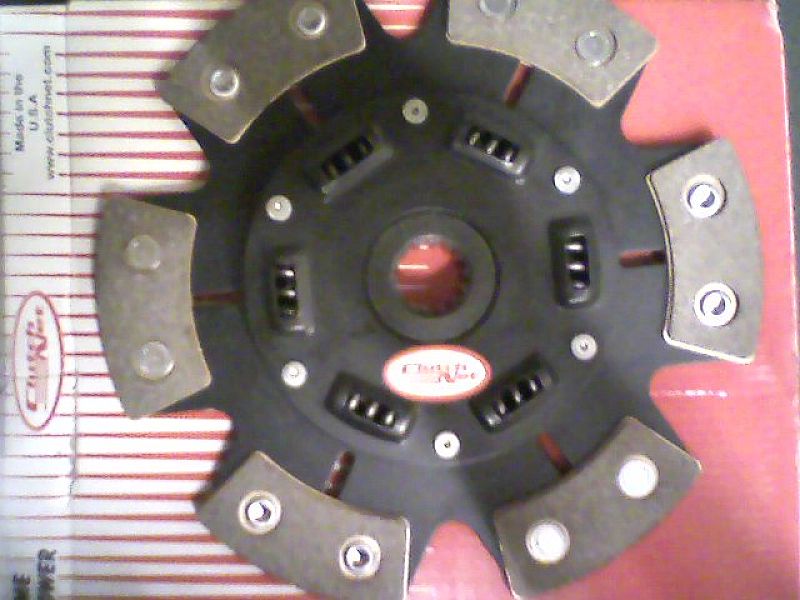
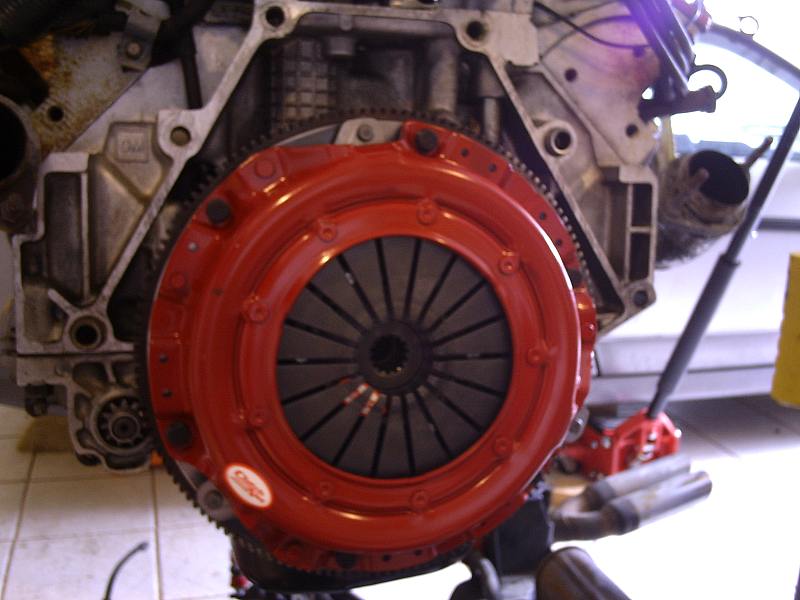
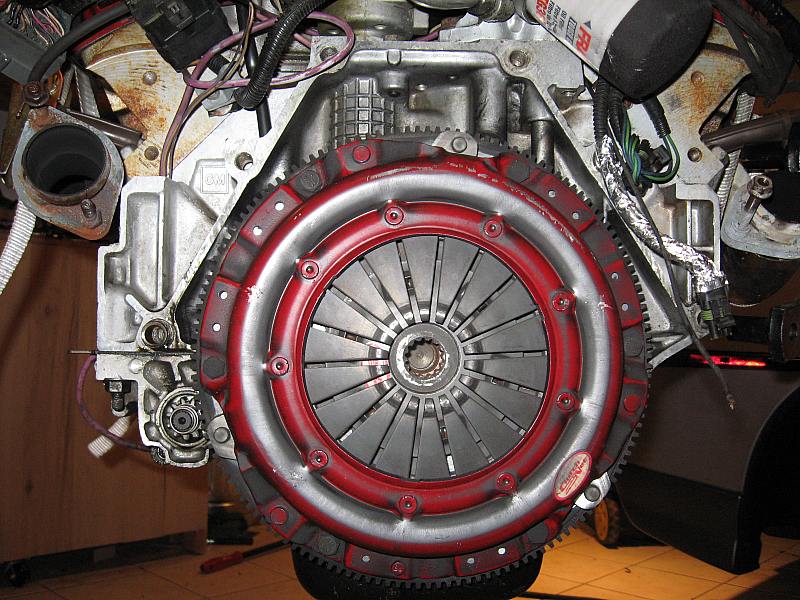
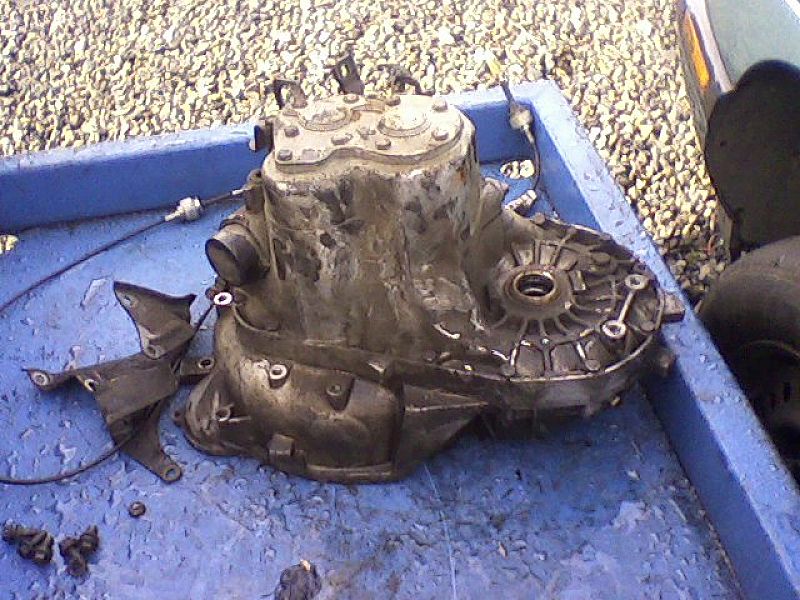
The next major project for this car was to change out the broken Isuzu transaxel. I believe the differential was stripped 180 degrees but honestly I never opened it up to check. It just wasn't that important. I ended up re-installing the original muncie 4 speed which to this day still works like a champ. Not the best gas mileage but the added strength made it worth it to install. I also wen't with a new LSC performance flywheel (Thanks Tom! ) and new clutchnet clutch. The SPEC 3 clutch I used did not hold and I wasn't going to re-install it.
Flywheel The scratches are just from it being stoned to remove the machining burrs.
Clutch : Clutchnet red level 2 pressure plate, 6 puck sprung hub ceramic disc. Stiffer then the SPEC in traffic but holds the power unlike the SPEC did.
This trans swap was farily straight forward. The biggest PITA was that I had to modify my crossover pipe to clear the new shift cable location. I don't have a welder so this was done with a MAPP gas torch and lots of trial and error. I also had to remove this machining boss because of clearance issues with the 4.9 oil filter housing. I don't have any other pics of this install remaining unfortunately. Thats OK though cause this trans is going away in the very near future. I'll post details when they are available. I've put about 2500 miles on the car with this muncie 4 speed and new clutch/flywheel setup. It never missed a beat and I would not hesitate to use it again in another 4.9 swap.
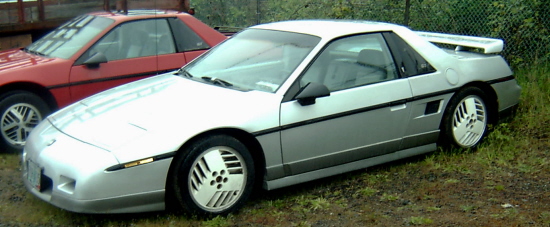
One of the next major changes to the car was a fastback conversion. This played into my intake idea. I will post pics of that later also. These are the only remaining pics of the conversion.
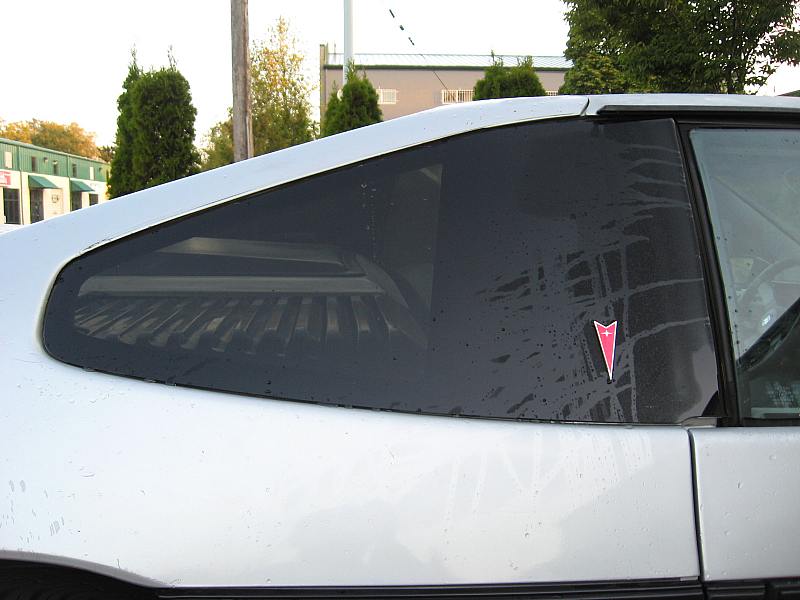
I didn't have quarter windows so I had to order up a set. I got them from kahines.com off of his ebay sale. $116 shipped to my door. never have a seem such a good price on a good quality window. I am very happy with them. The Pontiac arrowheads are from an early Grand am/prix. Don't recall the year exactly.
Once the conversion was done worked basically stopped for a while. I spent the next couple months actually getting to enjoy the car. I drove everywhere and worked out some of the bugs in the install. Long story short she runs better then she looks now.
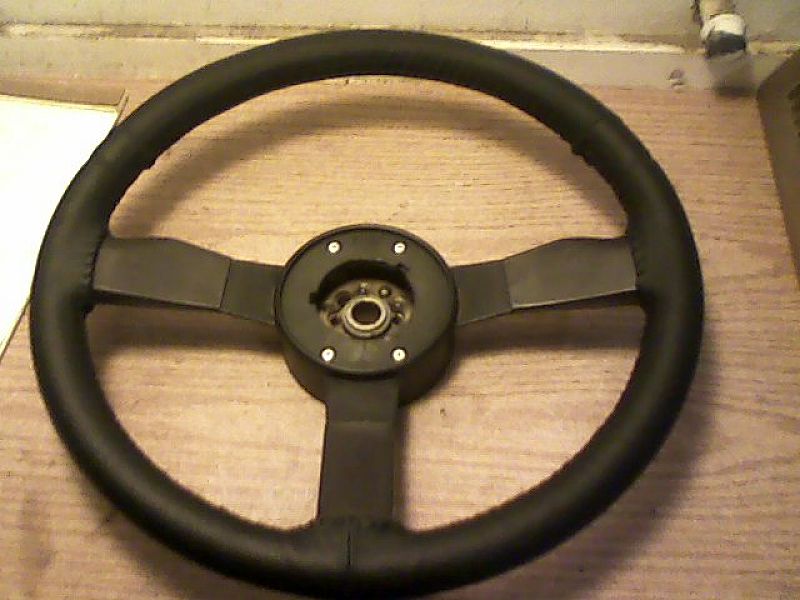
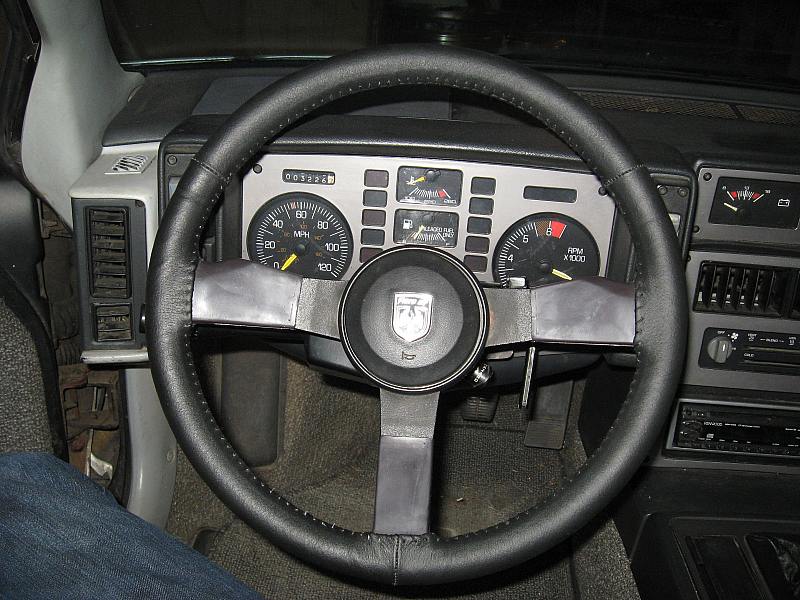
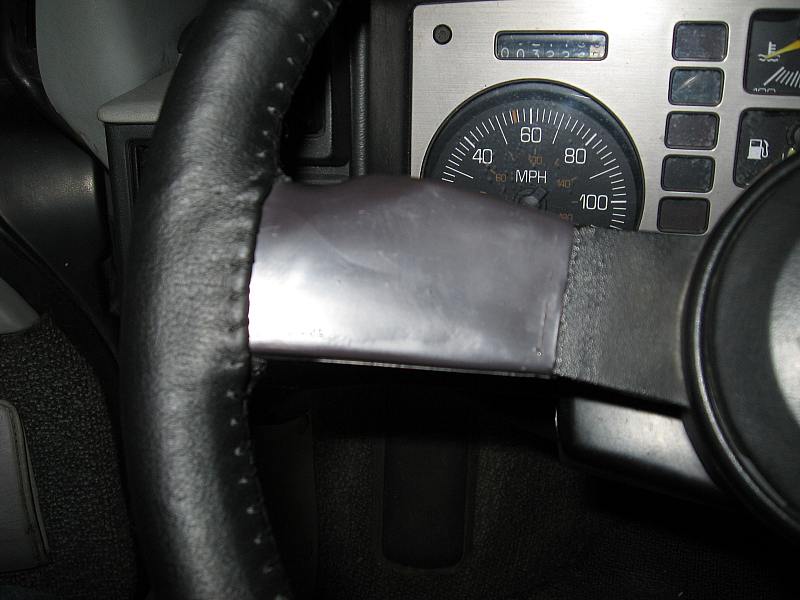
At some point I got sick of getting the sticky stuff from the steering wheel on my hands. For the time being I removed the old leather and foam (at that point it was liquid and ver sticky). I stiched on a leather cover bought at a local auto parts store. Its nothing special but will work well til I have time to make a new leather cover. I will make a template when I do this and share it with the forum. As you can see it is missing the parts that cover the spokes. This is why I will be making a new one at a later date. For now though at least my hands don't get sticky from driving.
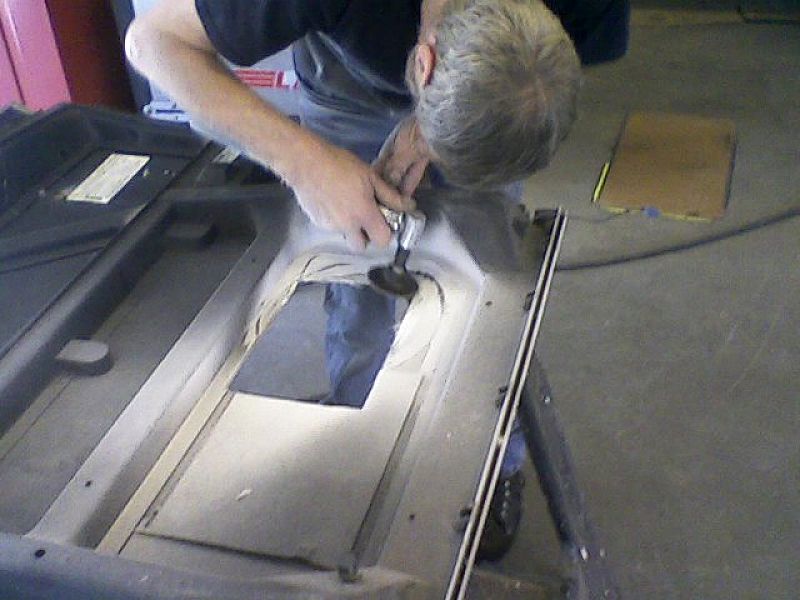
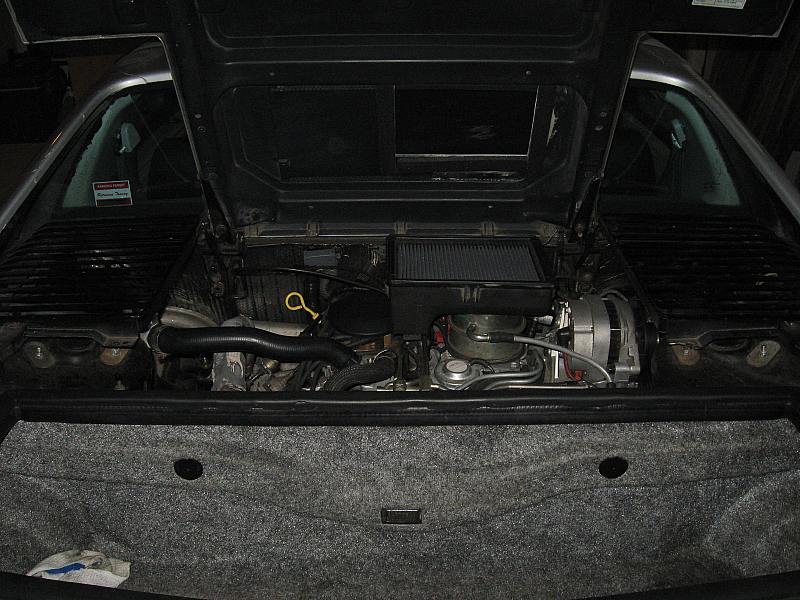
The next big project was the repair of the fastback decklid and custom intake. This was a fun project and I love the results.
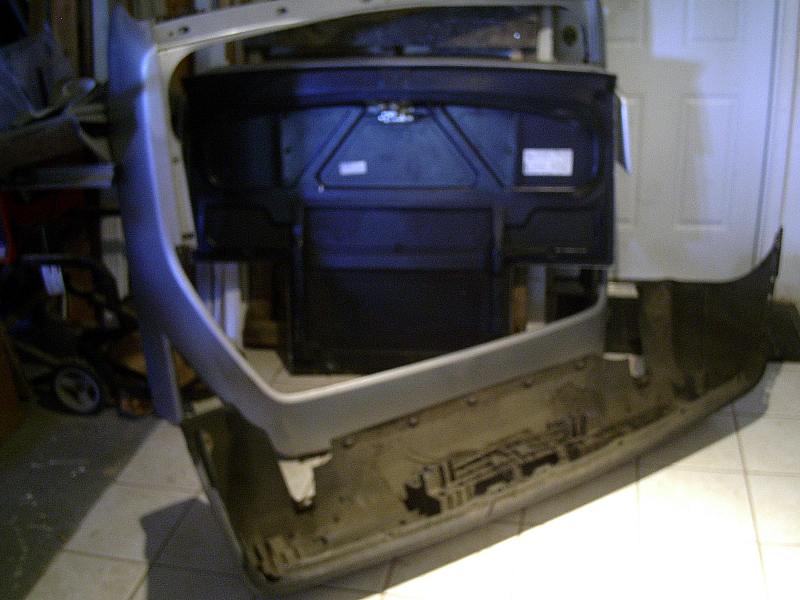
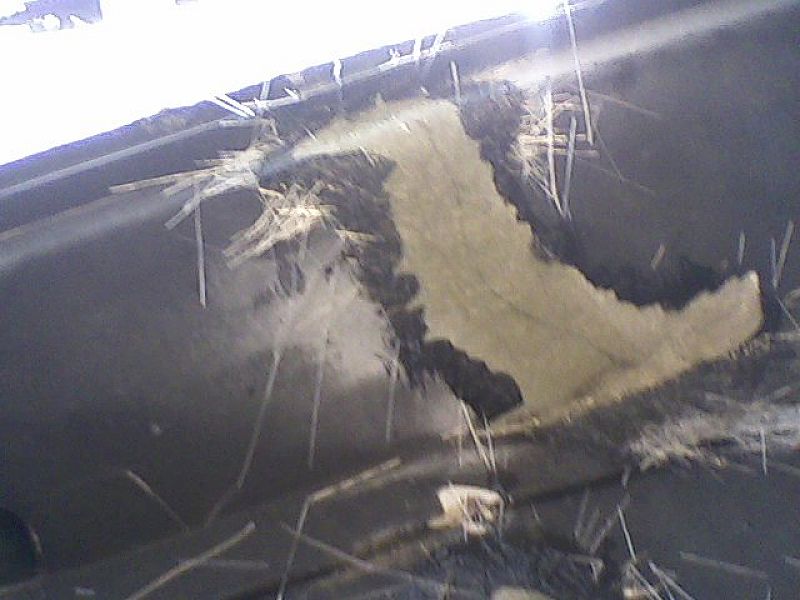
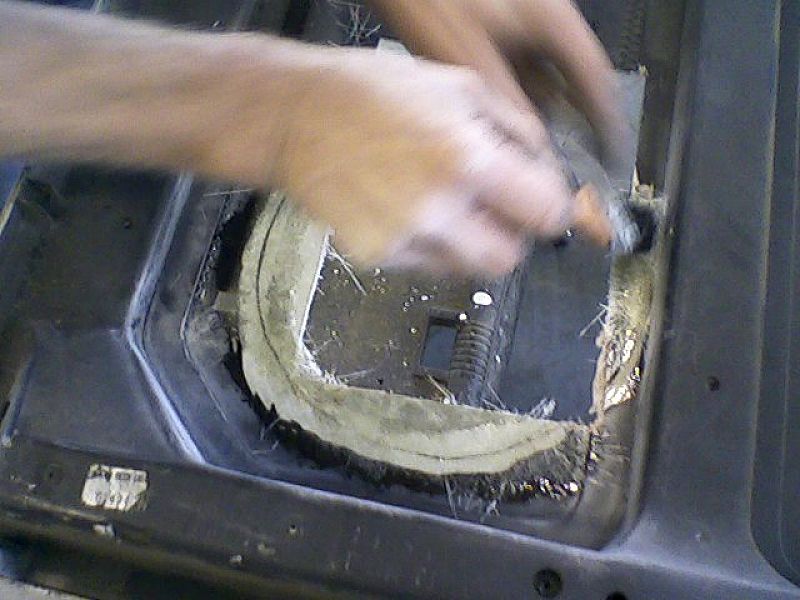
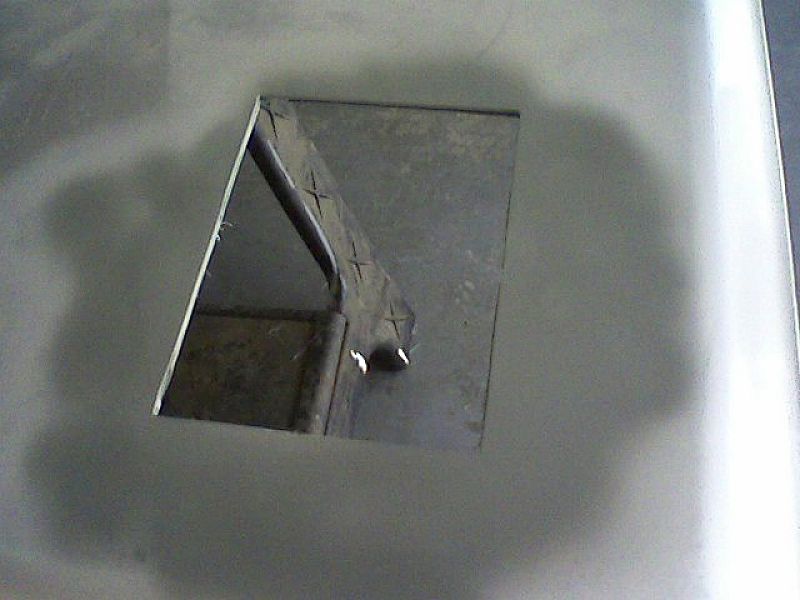
A little background on the fastback conversion pieces. They were purchased off of a california 87GT. They were already silver which was a big plus. They had some problems though. At some point when the previous owner had them the wing had been forcefully removed. This put some nasty cracks in the decklid and tore out most of the windstand mounting holes. While repairing the holes and cracks we also cut a hole in the decklid, built and installed the new intake, and did some temporary touchup work to the paint. Its not a perfect match but looks better then straight SMC. There will be many more body mods before it gets a full paint job.
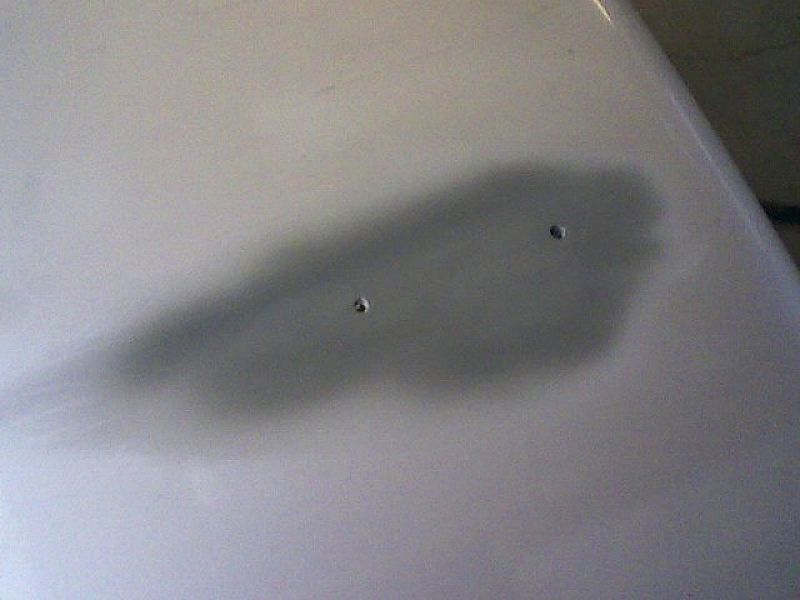
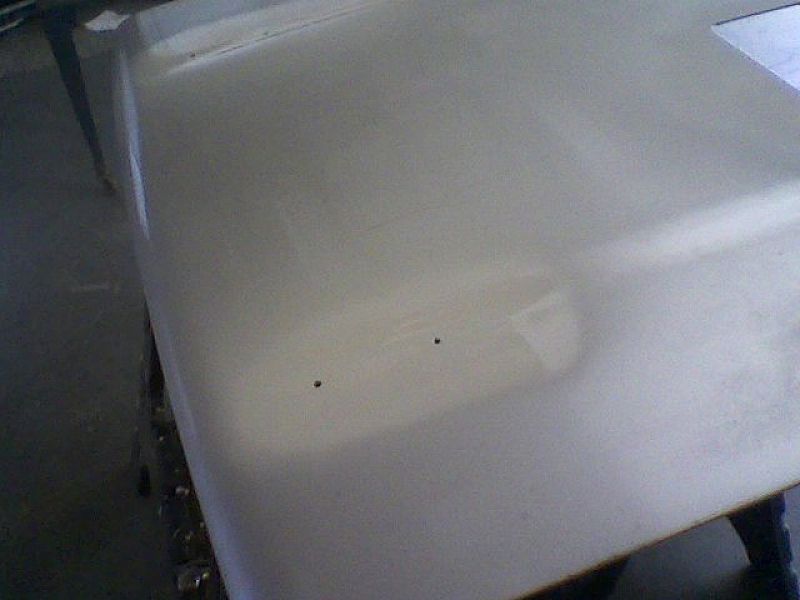
Wing mounting hole repair
Cracks in decklid (only remaining pic)
Intake build. The original plan was to use a velosity stack air cleaner and draw air direclty through the decklid. The first attempt didn't so very well. Let just say I'm a novice body guy (hehe, novice is an overstatement, I suck! ). I also decided that the velosity stack was not going to work and did a complete redesign at the last minute. This meant extra body work which I guess just gave me more practice. Dad stepped in to help which I really appreciate. He's got a lot more experiance with this kind of stuff.
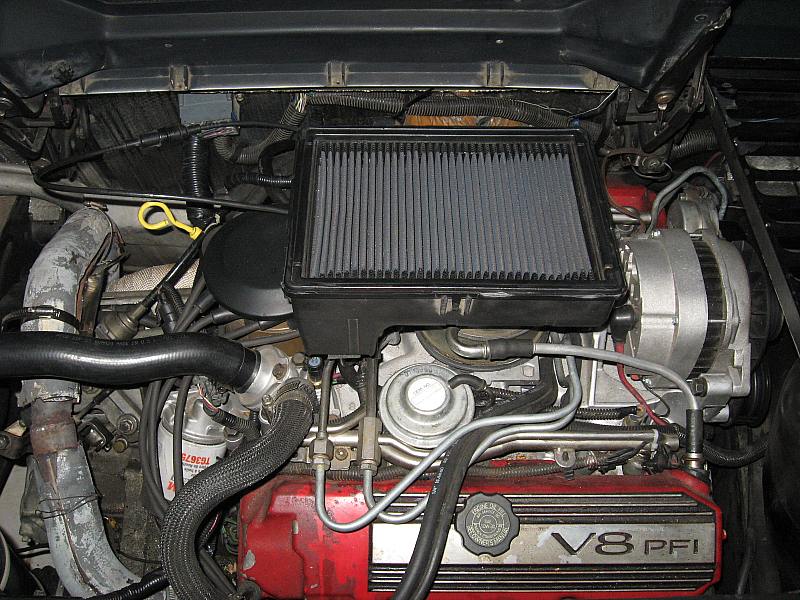
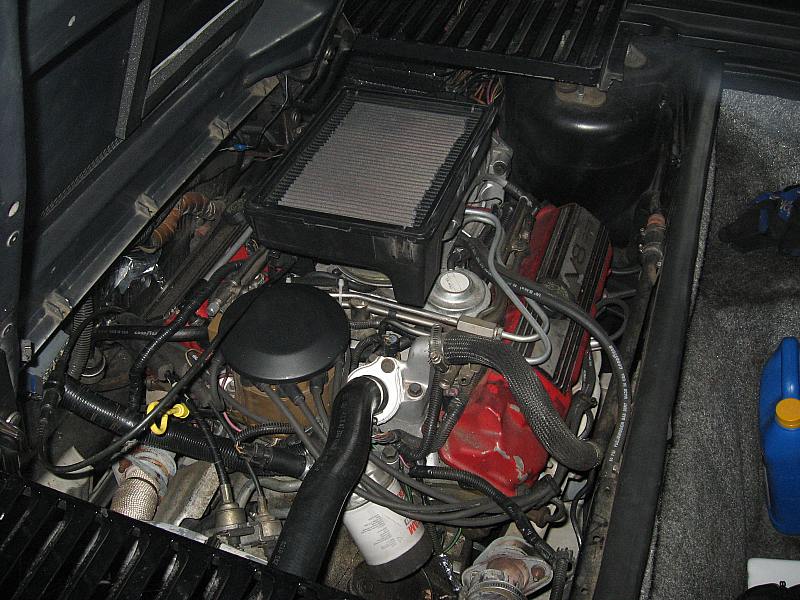
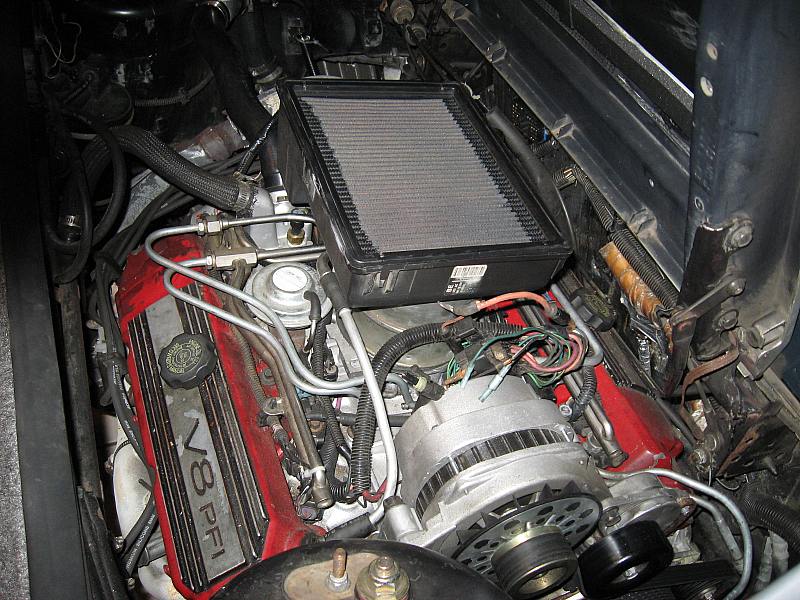
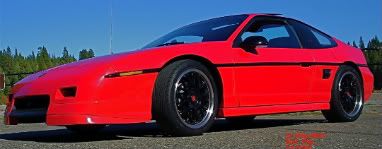
These pics of the intake are more recent. Better refined then the original setup. The air filter is an actual K&N filter for a 4.9. The intake box is slightly modified and came off of a Delta 88. I don't recall the year. It may not be the prettiest setup but it functions and sounds fantastic so I'm happy with it for now. If I decide to do something else later I already have the hole partly cut for a decklid vent so no real loss.
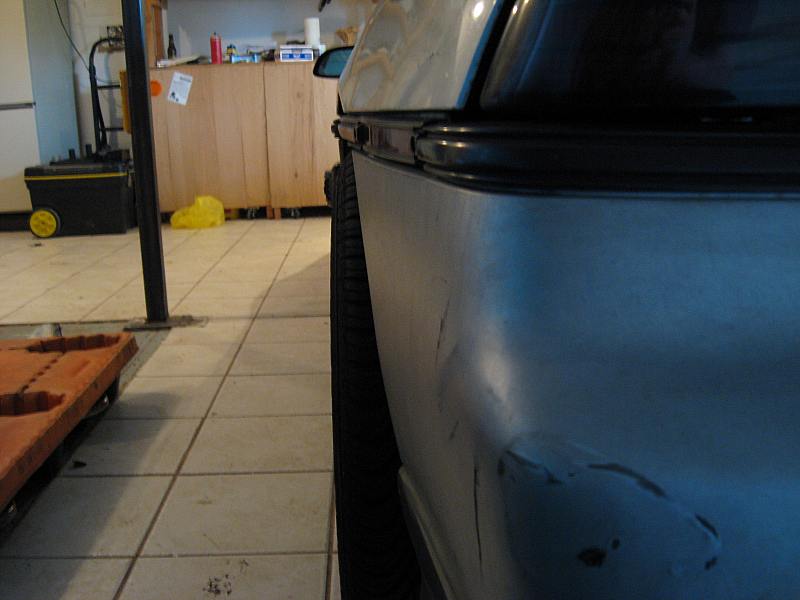
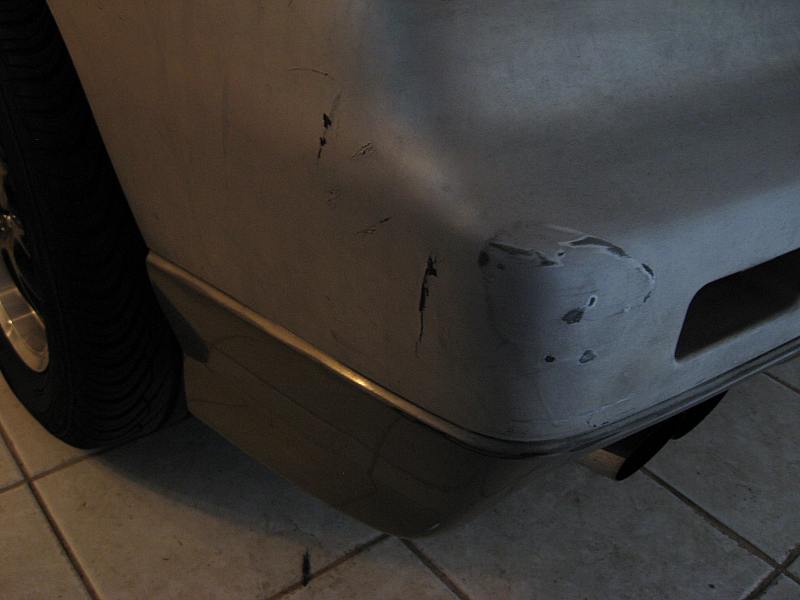
I wen't back to driving the car for a while. One day while waiting to pull out of a store parking lot some %$#%@*& lady backs into me. She did not even check her mirror and floored it to get out of the spot. There was only about 9 feet between me and where she was parked so you can imagine how fast she pulled out. There is no signifacant damage. She just cracked the fascia and bent the support underneath slightly. Still, I was pissed!!
I have to stop for now but have about 30 more pics to post. I will get back to it tonight it I have time. Hope you enjoy. Its no mega $$ build. Just a guy with a vision, some basic mechanical/electrical ability, and the desire to do something that is my own. Later.
[This message has been edited by Fieroseverywhere (edited 09-21-2024).]
Lets if I can finish catching up this thread to the actual progress. I will make an attempt but it is late and I can't promise anything.
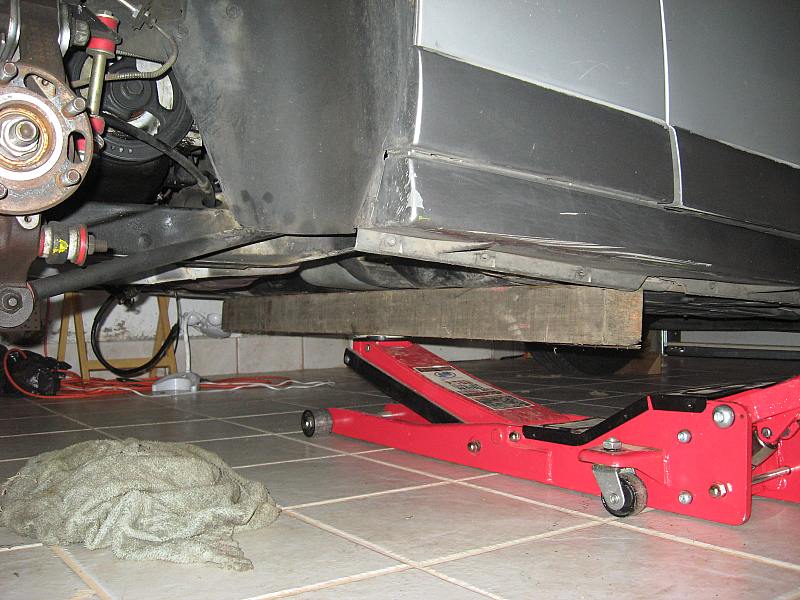
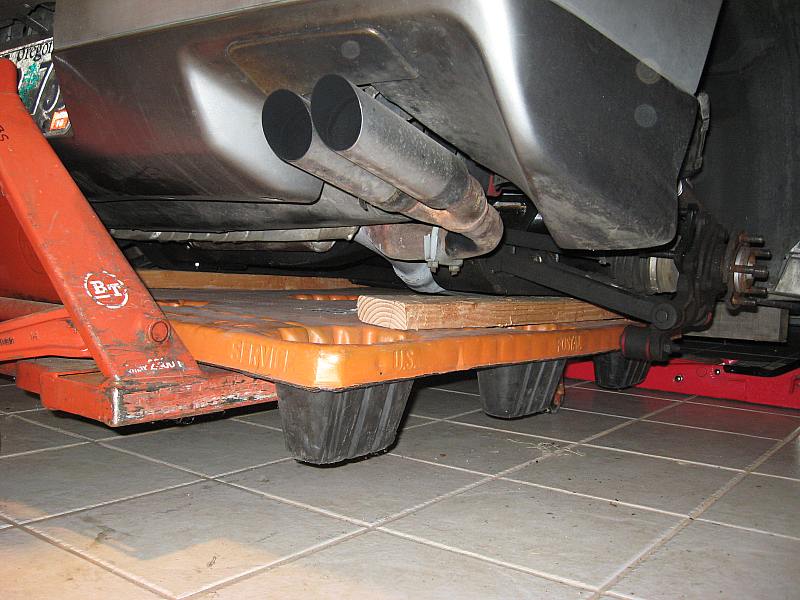
The next major work the car got was what should have been a couple simple gasket changes. Of course it didn't turn out to be all that simple. I had a stripped bolt hole for the water inlet. This gave me a slow coolant leak which ended up on the belt and made it squeal. It really bothered me but I knew it was a big job so it took me a while to get to it. It meant dropping the cradle and doing the work outside of the car. A few people have asked me to post my way of dropping the cradle so I took this as an opportunity to do just that. Lets see if I can explain...
***CRADLE DROP - FIEROSEVERYWHERE STYLE***
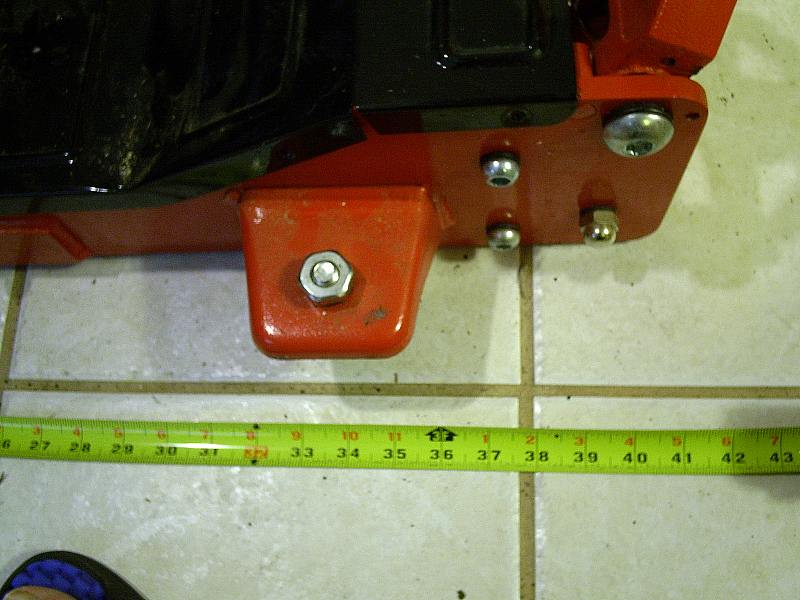
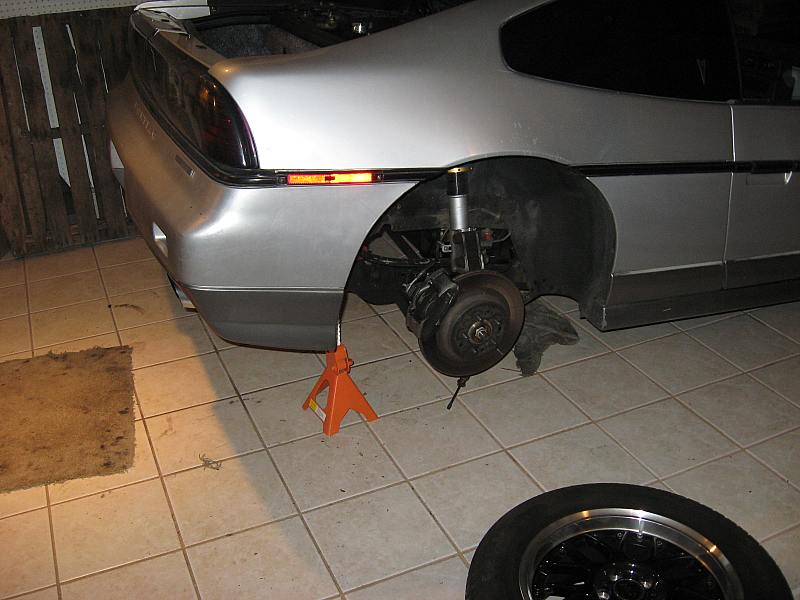
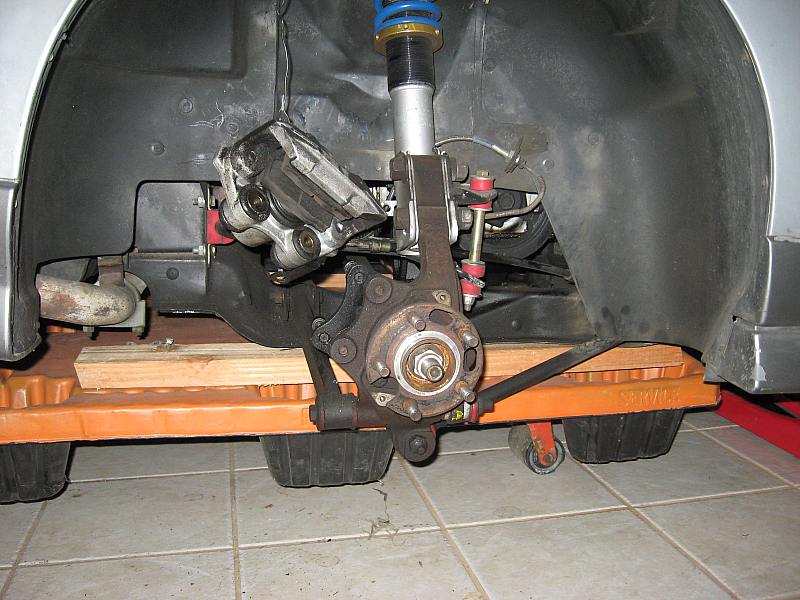
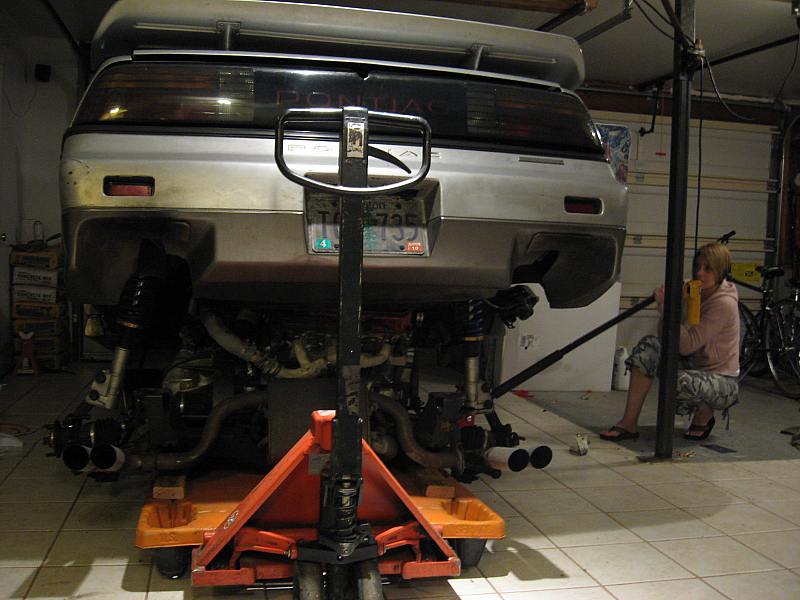
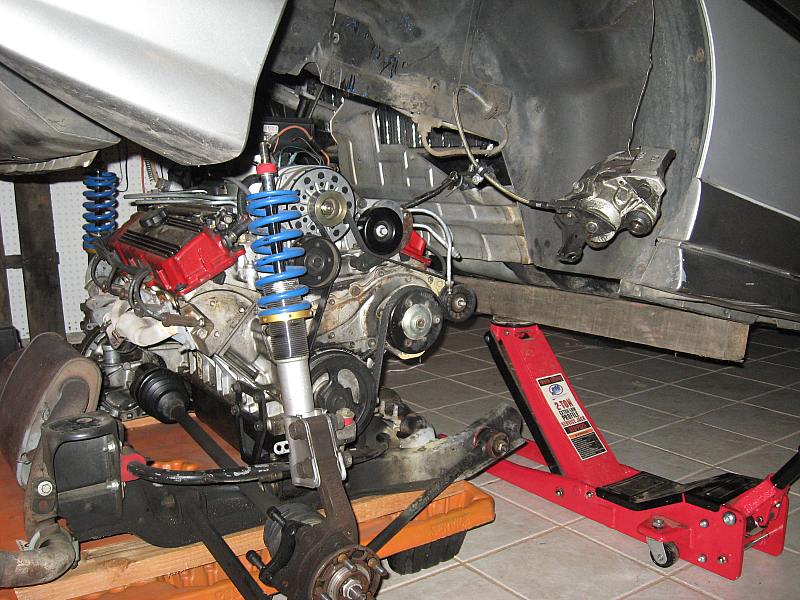
First thing I disconnect everything from the top. Drain oil and coolant, disconnect negative battery cable, fuel lines, wiring harness, top coolant outlet hose, heater core outlet, shift cables, oil cooler lines, slave cylinder, the two vapor canister hoses, decklid hinge and transmission grounds, brake booster vacume hose, and throttle cable all from the top. I have my wiring harness setup through a quick disconnect so there is no need to touch the interior. Once done I move to the bottom where I remove the wheels, get the lower coolant hose, heater core hose, starter power wire (from front mounted battery), hang the brake calipers out of the way, and disconnect the e-brake cables at the cradle. I also disconnect the struts from the towers. Don't forget to chock the front wheels.
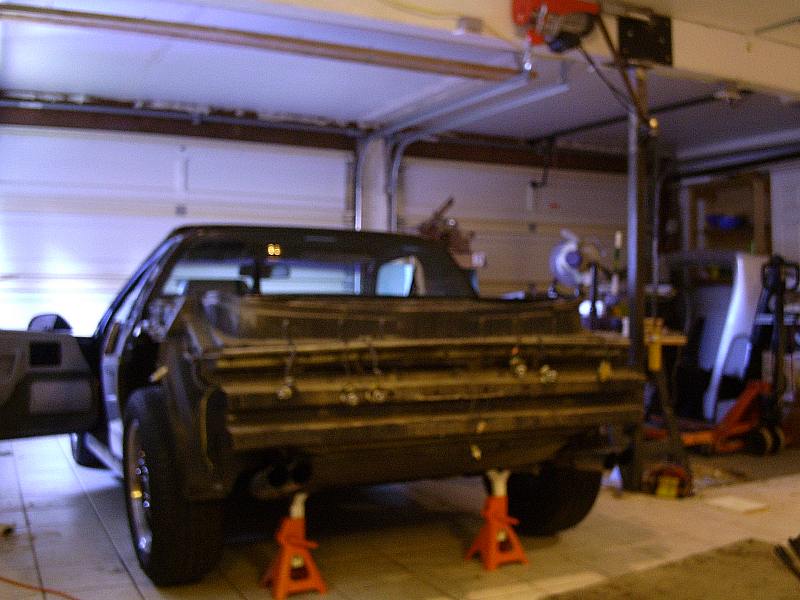
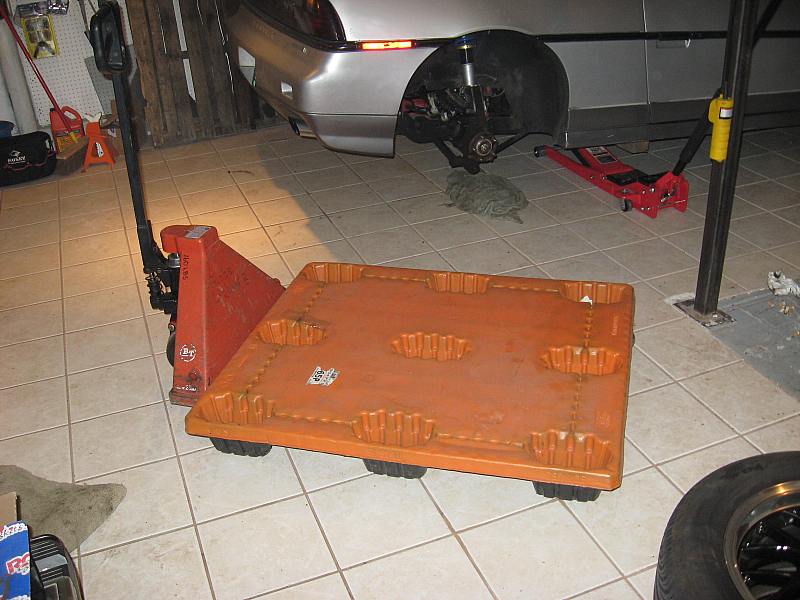
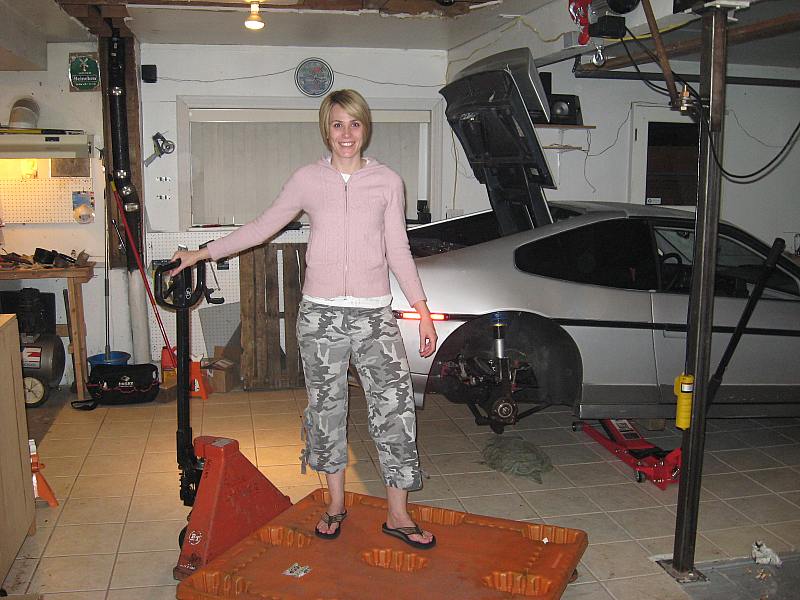
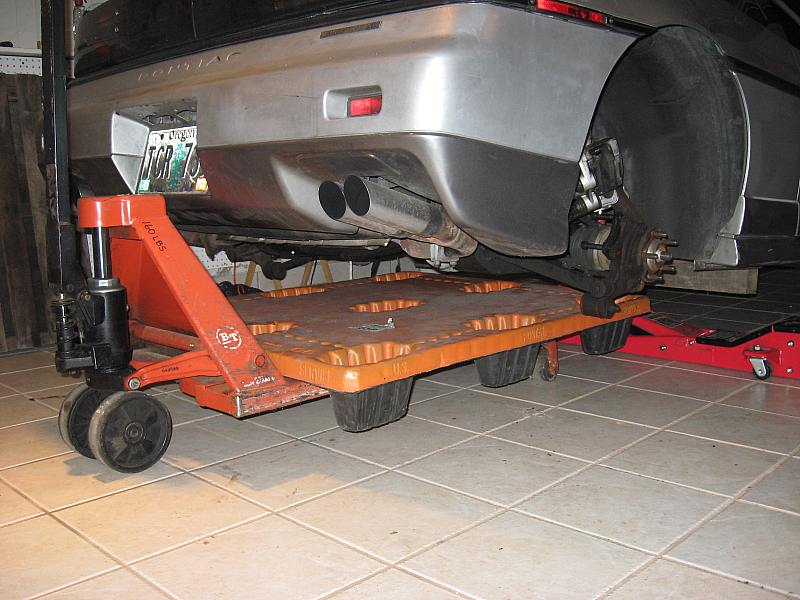
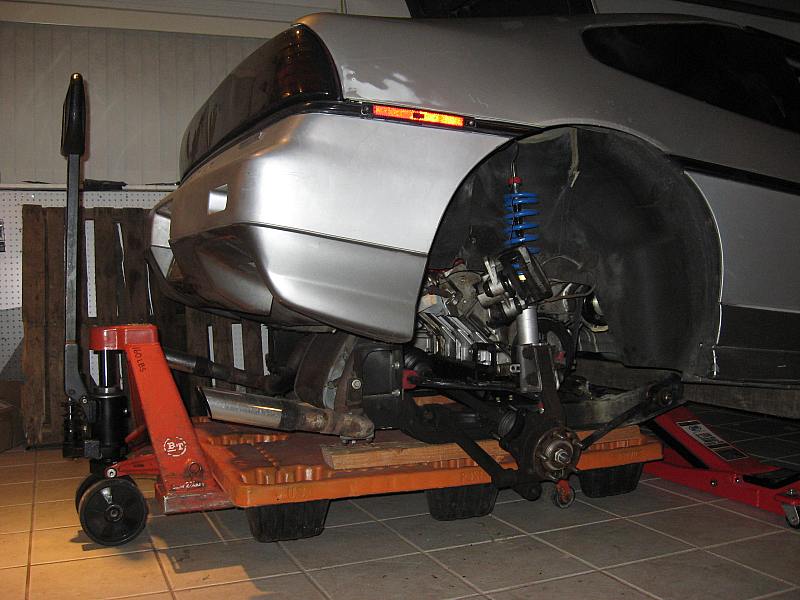
Next I move the jack into position. Now you see the reason why I was looking for this particular type of jack. The 4x4 is exactly 56" in case anyone is interested. With the jack in position I move over my pallet jack. This is what I use to pull out the cradle. Nothing I have found works better. The lovely Marla assisted this time. With the car resting fully on the pallet jack I unbolt the cradle and let it sit. Rear bolts first to level the cradle. Since you can adjust the floor jack and pallet jack independently getting the front cradle bolts out is a snap. Now is the time to raise the car off of the cradle. Marla worked the jack while I continue to check everything and make sure nothing is catching (brake hoses mostly). The car tends to come towards the jack to you have to be pay extra attention to the passenger side strut (or whatever side the jack is on). Slowly but surely all it revealed. Once the car is high enough simply roll out the palletjack. Simple as pie. The car is then set back down on jack stands for safety. That is a cradle drop Fieroseverywhere style. Total time by myself is ~2.5 hours. With a good helper 1.5 hours. It quick, efficiant, and quite safe.
I just had to grab this pic.
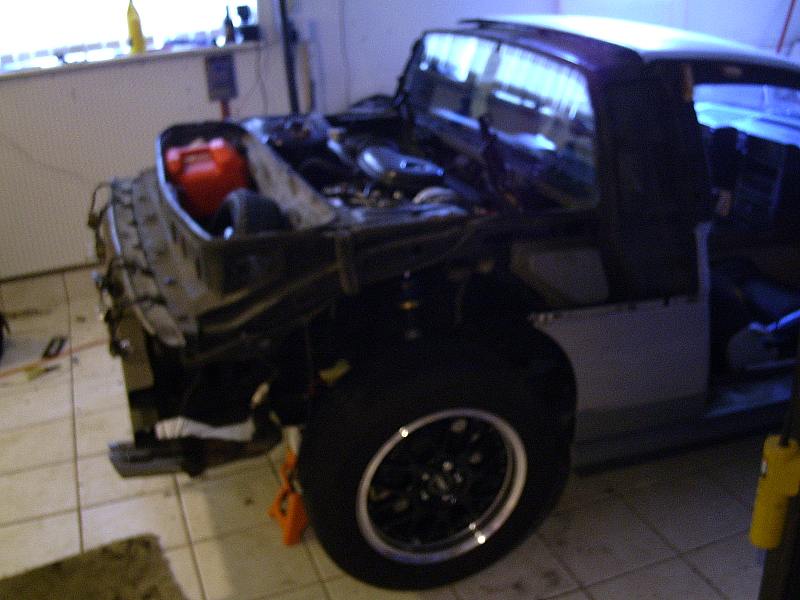
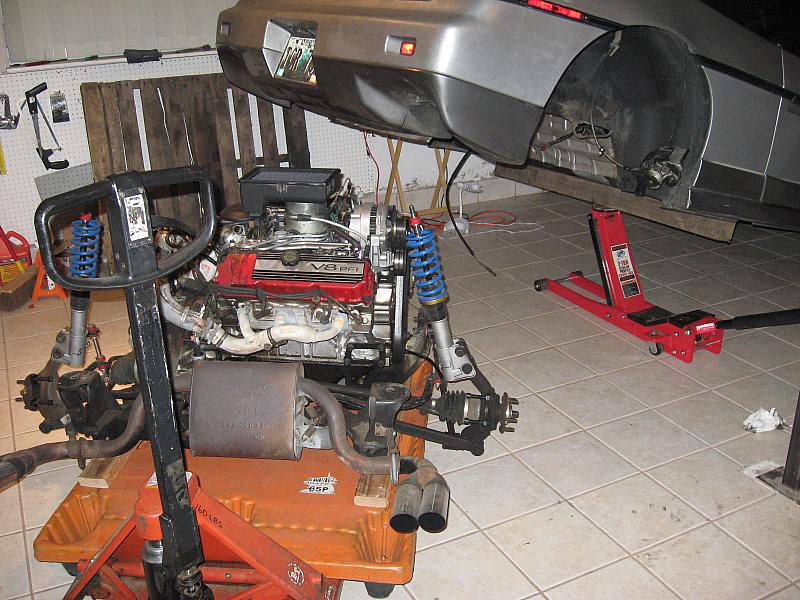
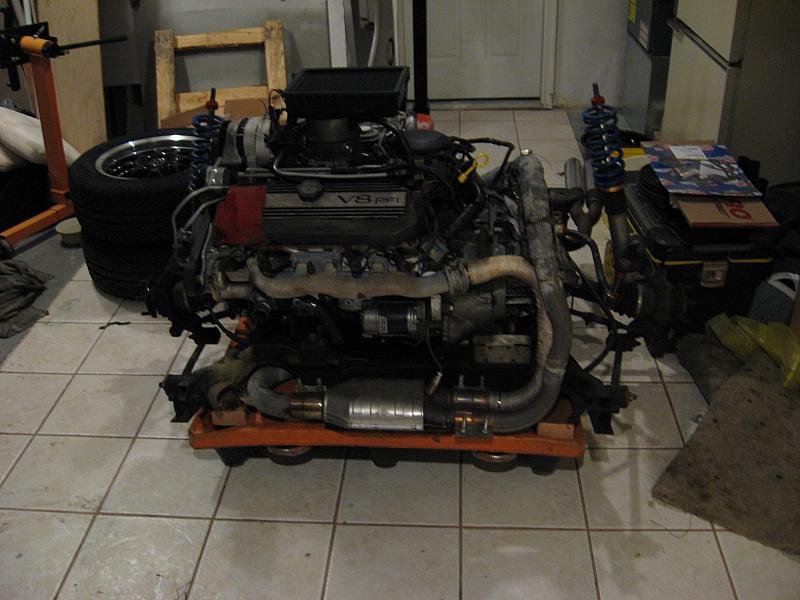
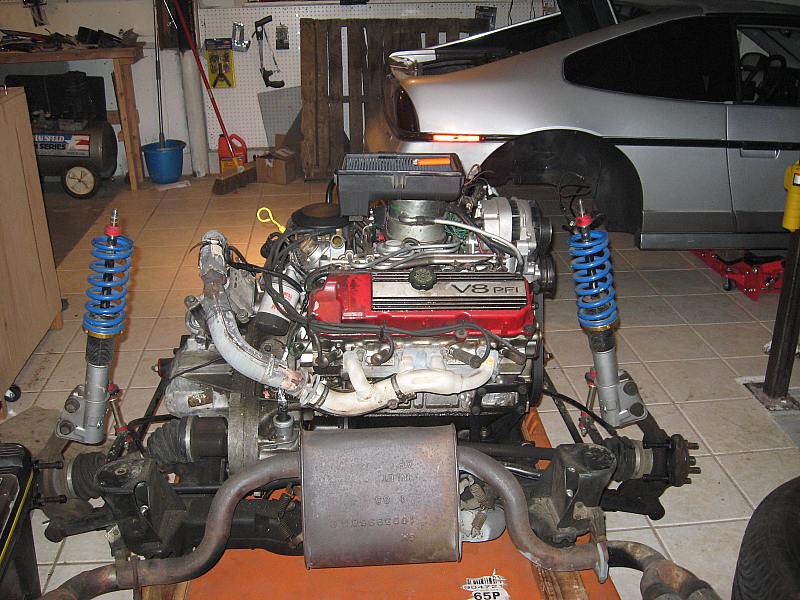
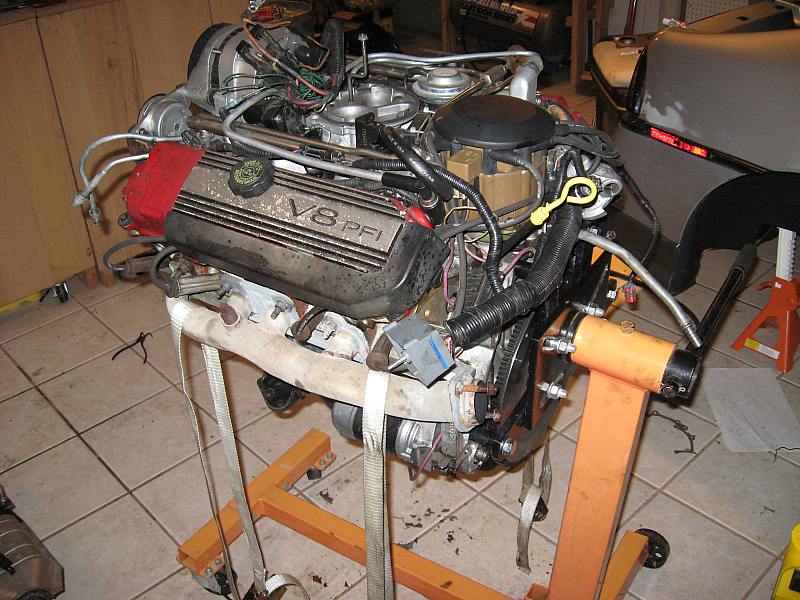
Next up it was time to start the actual work on the engine. It sits nicely on the now portable cradle.
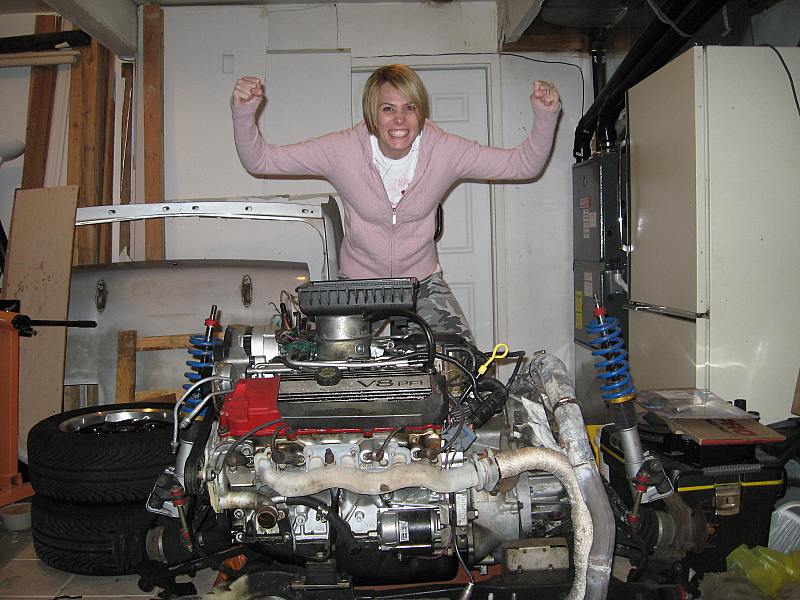
Hehe. Forgot about this pic. Marla's funny!
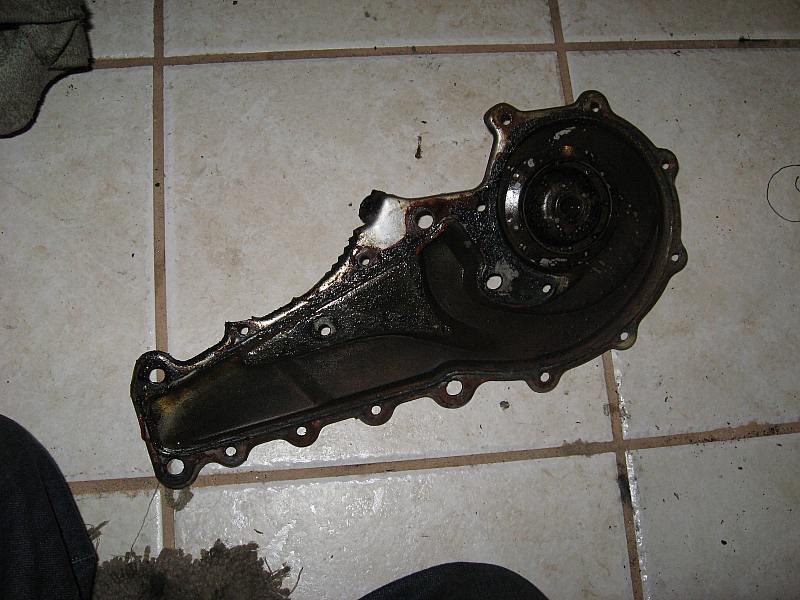
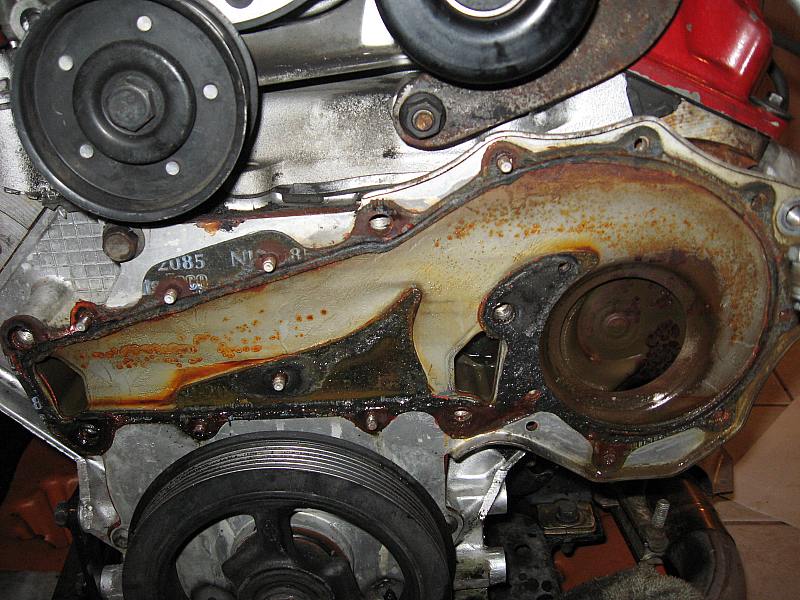
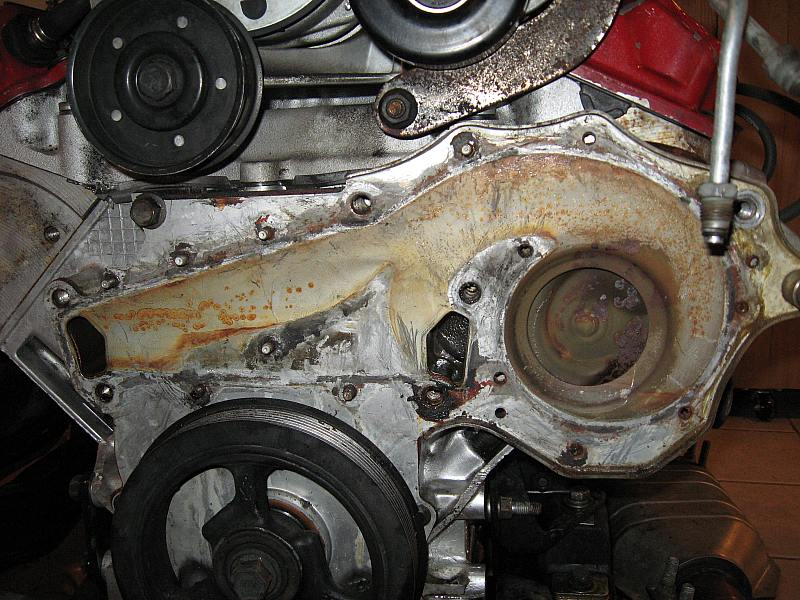
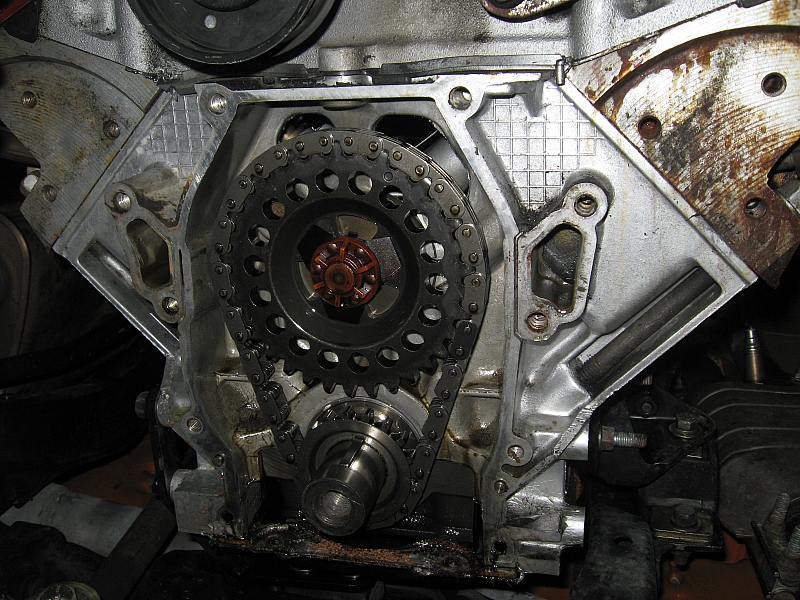
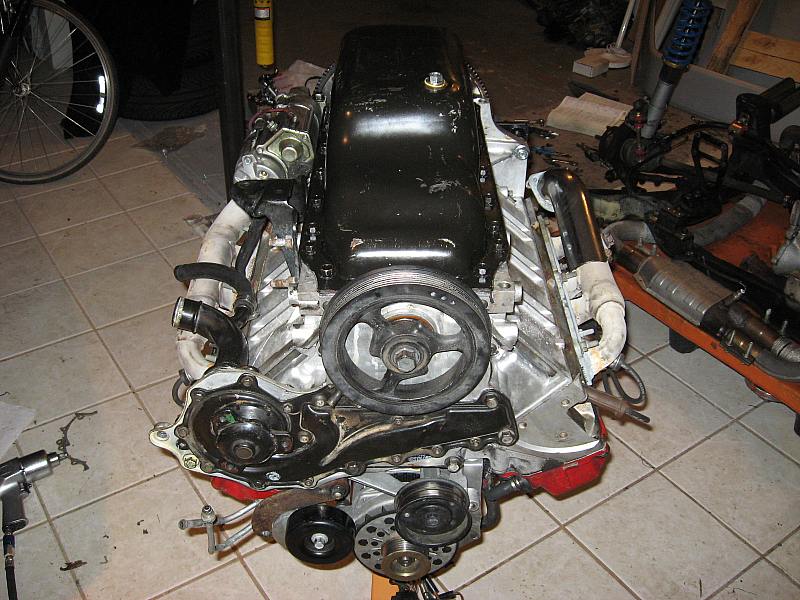
Next I removed the waterpump hoping to get to the water inlet. No such luck though. You can take off the inlet but you can't scrape the gasket area to clean it up. I ended up having the remove the whole timing cover. After cleanup it all went back together with new gaskets and some RTV. The waterpump and timing cover were starting to rust. The pump and water inlet were replaced. Timing cover straightened. Under the timing cover looked great though.
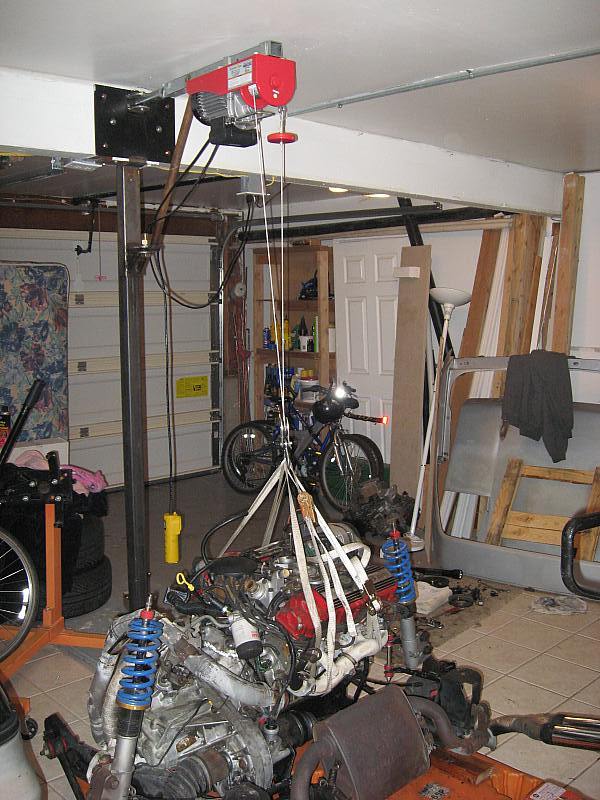
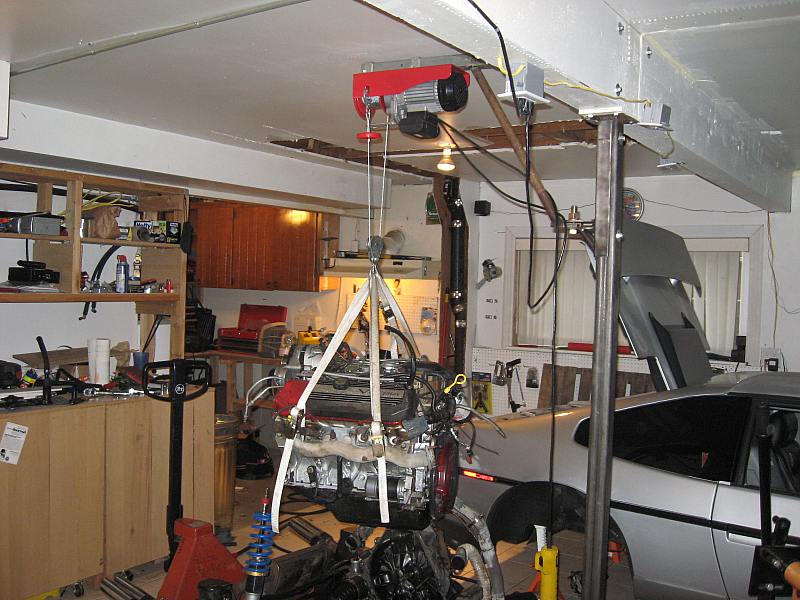
I also wanted to replace the oilpan gasket. There is not quite enough room to do this in the car. Remember that electric hoist I talked about earlier? The motor itself can lift a max of 880 lbs. The mount we made, which swivels , should be able to hold about 1000. It was able to lift the engine, trans, cradle and entire rear suspension. Thats all I will ever need it to do.
I was suprised at how dirty the clutch got in just a couple thousand miles. It did have a slow oil leak, new flywheel, and new clutch to break in.
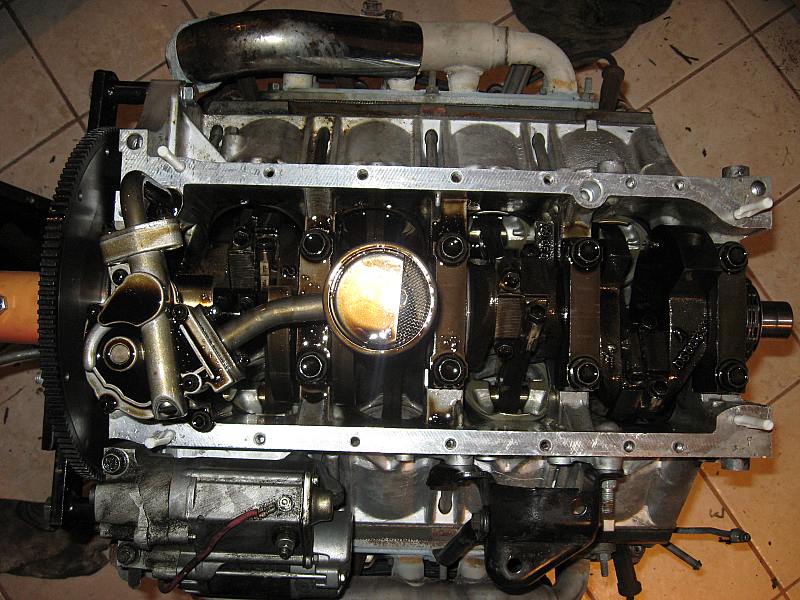
Onto the engine stand. Everything looks good here. The gasket was shot. Back together with a fresh gasket. Much better quality gasket this time.
Back onto the cradle. At some point I also built this extremely simple torque strut. It works very well and even though its solid mounted I didn't notice any extra vibration. Sorry, only pic I have at the moment.
The car was put back together and driven for a few hundred more miles. At this exact moment the cradle is about 1/2 way out again. I recently got my hands on a getrag 5 speed. Should have it changed out shortly. But thats an update for another day. I'm pretty sure this will be the first 4.9 to run with 3 different fiero manual transmissions. I can't want for the getrag. Possible future project? Hmmm.......... Some of my favorite pics...
Before and after. Amazing how much can change in just a couple short years.
[This message has been edited by Fieroseverywhere (edited 12-08-2009).]
Very Nice Air Filter set up. So you will be adding a scoop to the decklid?
Absolutely. We both know how much rain we get here in the NW. Without a scoop my engine would be dead in no time. I went without one for as long as I could. I really liked the look without a scoop. As soon as it started raining though I had to add something. Until I finish the rest of the body work and make the real scoop I am using an ABS Mustang scoop. Guess I haven't posted any pics. I don't like it much so I'm eager to fiberglass the new one.
So did you get that Tach modded yet? Just want to make sure that trim pot I sent you worked.
That's a pretty awesome way of mounting your air cleaner, very classy! The wheels came out roughly how I was expecting them to look, and has definitely made up my mind on the rims for mine. Keep up the good work!
I've had a few inquiries about the floor jack. So to keep from answering the same PM's several times I decided to put the info here for future reference...
quote
This jack was a tough find. I was looking for something extra long, very low rise, but still had a decent lift to it. This was literally the only thing on the market. It is built by one manufacturer, don't recall the name at the moment. This company does not sell them to the public. They only sell to three different distributors that I have found.
All three distributors list it under their own part number and paint it their own color. The particular one I got is an Advanced tool design ATD-7325. Red as you saw in the thread. They go on sale now and again and/or sometimes ship for free. They are heavy at ~120lbs so shipping is a killer if you don't get it free. I paid $247 with free shipping from amazon.com. A search through google shopping usually finds the lowest price the fastest.
It also lists under part number Omega 29023. They call it "magic lift". This one is supposedly black but same jack by same manufacturer.
The third I was able to find has the same part number as Omega above. Its sold by Northerntool.com. They call it the "blackhawk" 29023. Usually red but I've also seen it in blue from them.
That's a pretty awesome way of mounting your air cleaner, very classy! The wheels came out roughly how I was expecting them to look, and has definitely made up my mind on the rims for mine. Keep up the good work!
Thanks! The air cleaner was an idea I had since I saw the first 4.9 swap. It just made sense with the throttle body being directly on top of the motor.
quote
Originally posted by CC Rider:
awesome work
Thanks. So you have to tell me. Where did you get the center caps for your wheels?
Getrag installed. Actually, installed twice now. The first attempt ended up with a no 3rd or 4th gear. That problem ended up being the retaining pin for the 3/4 shift fork. It was all dropped back out again to replace the pin.
Got it all installed a second time only to find out the 3rd gear syncho is shot. I figure the previous owner drove it with a bad synchro and that eventually the vibration from grinding into 3rd shook the retaining pin out of place.
The trans will be getting a full rebuild in the near future. I'll post an update shortly after that. Someday I may just be able to get in a drive this car. So many problems to date I can't even keep track. The 3600 miles I've managed to get on it have made it all worth while though. Wish me luck on the rebuild... please.
When you lift the car up with the jack in the middle like that, does the nose get crushed on the ground?!
Actually, it doesn't. The jack also lifts the front suspension slightly(takes the load off it) so the nose never actually touches the ground. My only experiance with the nose hitting the ground was from years ago when I used to lift from the back of the car. This left all the weight on the front suspension and compressed it further. Thats a really good question. I should add that to the post.
[This message has been edited by Fieroseverywhere (edited 01-30-2010).]


 New locks were installed for the deck and doors, center skeleton was put back in the car, heater controls and rear view mirror were robbed from parts car, PCV vent was added, purge canister wired in and vaccume lines re-arranged back to factory specs per the service manual. I also discovered that it was not a belt chirp I was hearing. Come to find out the alternator has a bad bearing in it. Course that was after I had already re-made the tentioner bracket. The altenator/starter rebuilders up the street say they have a replacement bearing for me so I won't have to replace the whole alternator. I will give me a chance to rebuild it fully anyway. I know there are many other things I got done but I can't think of them right now.
 At the moment the car is still driveable.. barely. Course I have to drive it 125 miles in its current condition to get it to the shop. Shouldn't be too much of a problem though. Its HWY the whole way. Once in 5th it will stay there til I reach my destination. I've done this once before when my stock 85SE V6 clutch lost a spring. I know I can make it again.
 Probably moving in at the end of the month. I will finally be able to get the clutch replaced. I've been tinkering with the car a bit also.

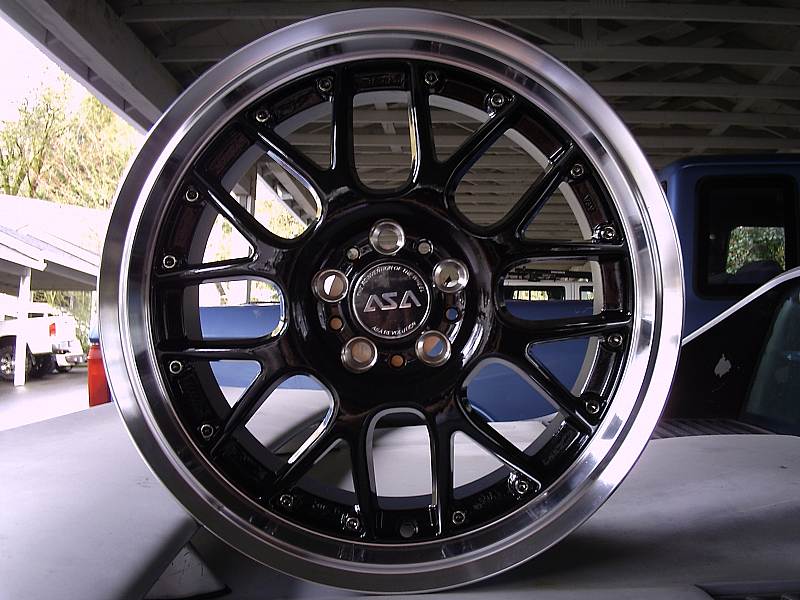

 I have never been a fan of all chrome, or shiney bling bling wheels. I really think that all lips should look like your though. The black sets it off nicely. Nice choice.