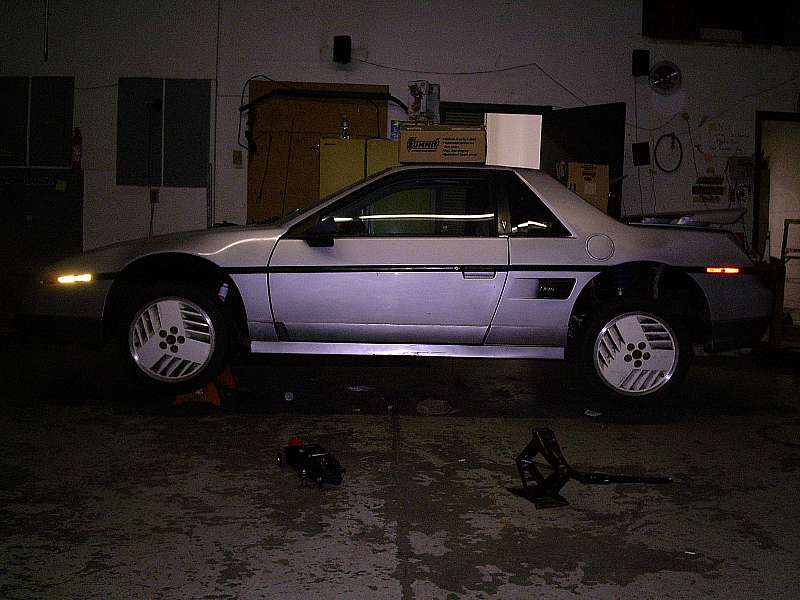
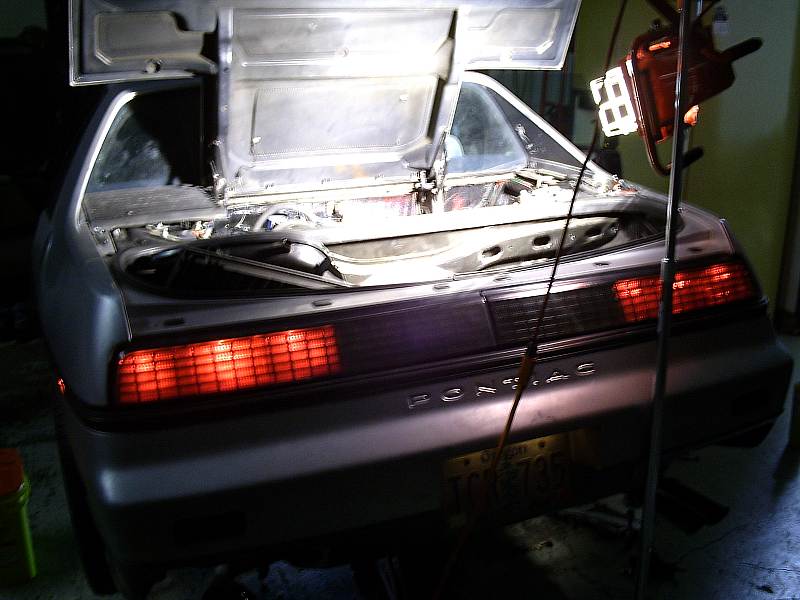
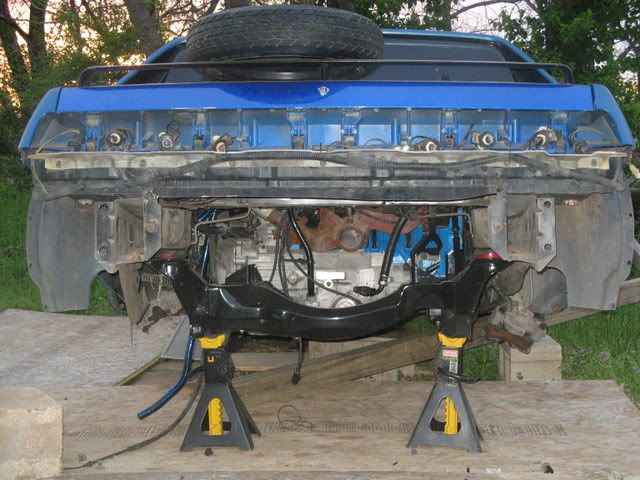
I'm thinking this is good for a new ride height. Ha! Yea, right. Car is going up into the air for one a the last few times.
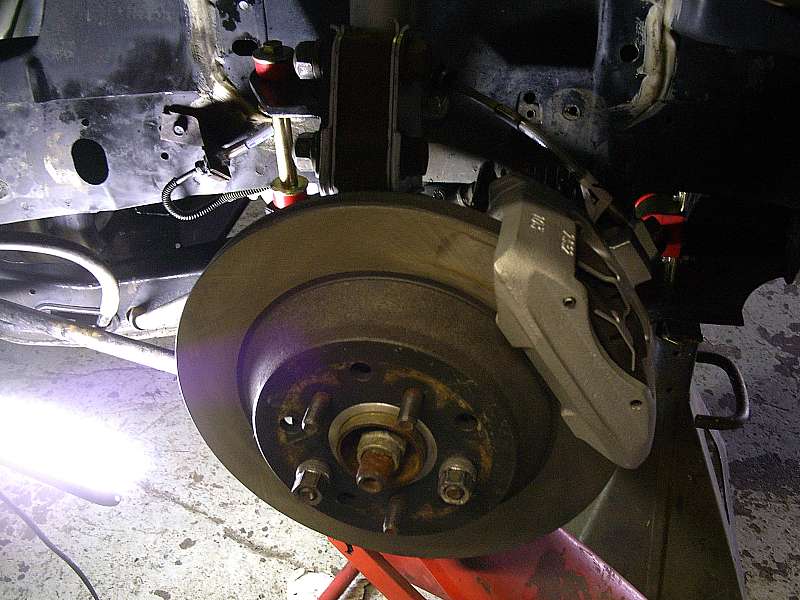
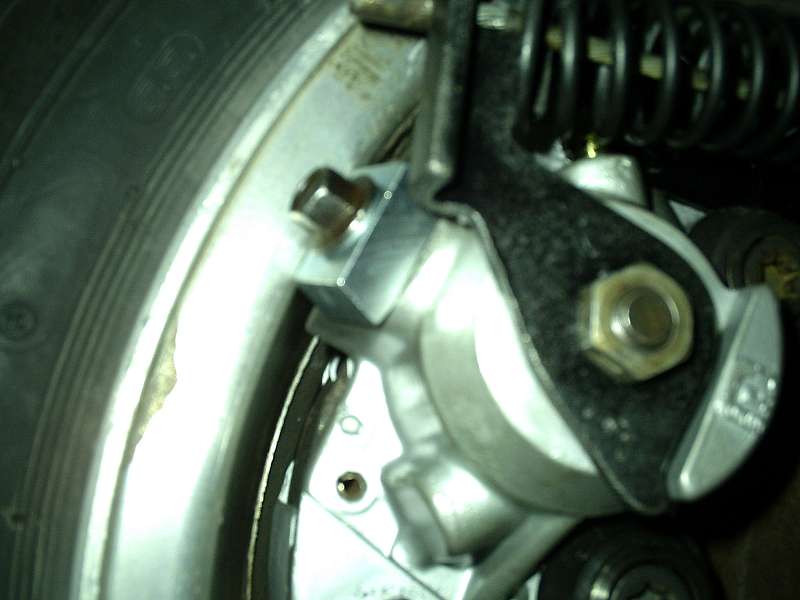
I mounted the front calipers and attached the brake lines. They went on without a hitch in any way. It was actually a little boring. Looks good though.
While I was doing that dad was working on removing the old rear brake lines. He apparently had a "special pair of pliers" that he usually uses for that job. He never mentioned them while I was tearing my knuckles last time. With some heat (mapp gas) and some WD40 he was done in no time.
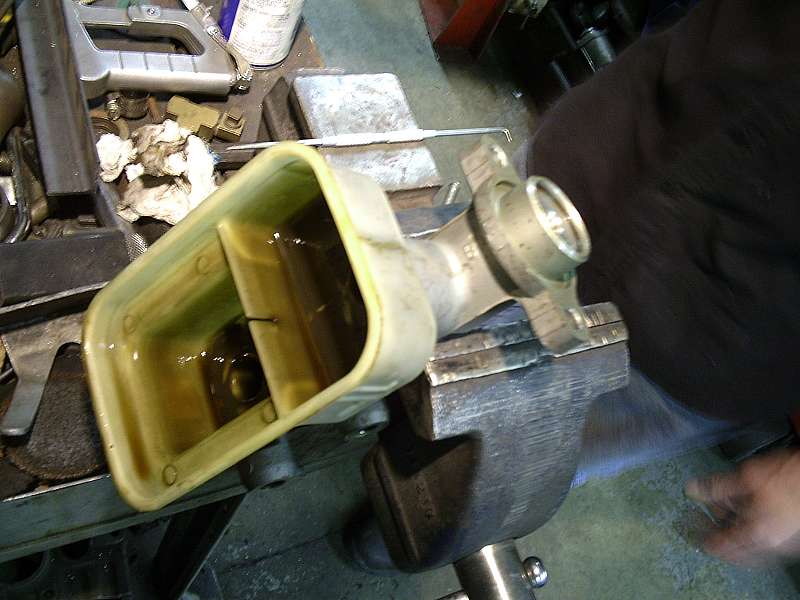
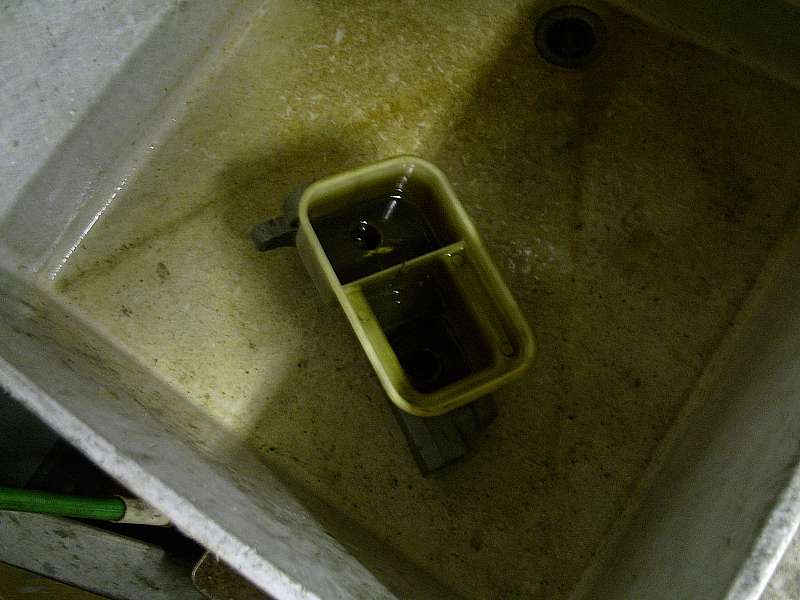
Once the calipers were mounted and everything torqued down, and double checked front and rear, I removed the master cylinder. I was in desperate need on cleaning and we wanted to use DOT 5 for the brake fluid. The master was taken to the shop next door and dissassembled, cleaned, and put back together. Looks like I forgot to get a picture of the finished product.
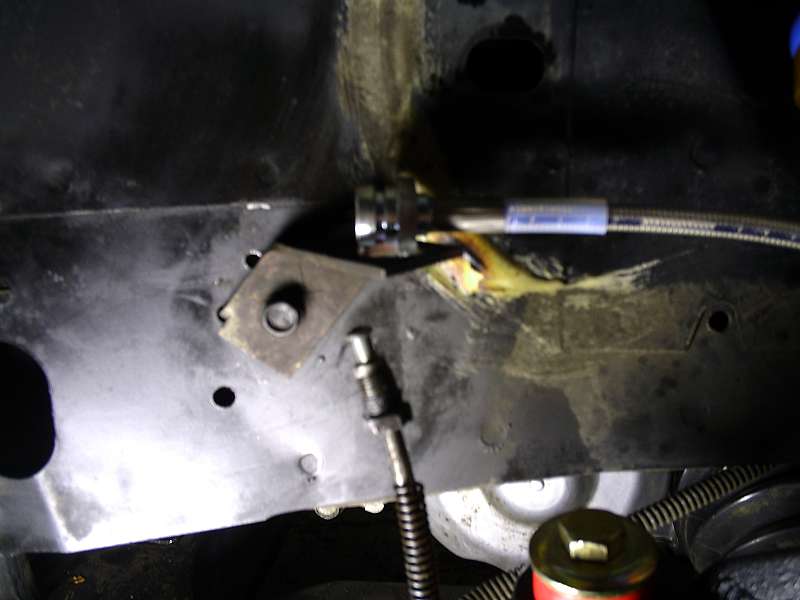
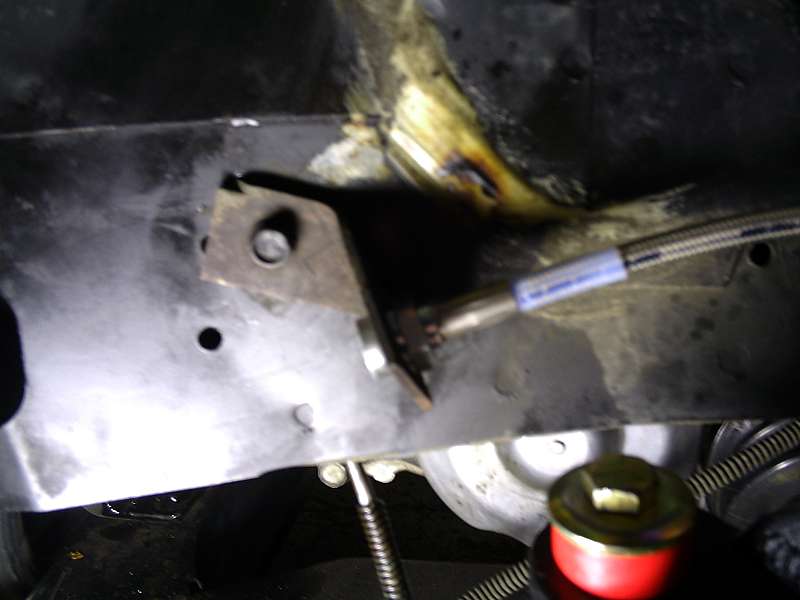
I took it back over and installed it. Then the rear lines were installed. This was a little trickier then the front. The lines were stlightly too short to reach in the stock position. I simply turned the mounting bracket and rebent the hard line a bit. It was very easy and not even worth worring about. Drilled one whole and mounted everything else as usual. I double check with a floor jack that they would not be a problem and full suspension up-travel. No worries.
The whole system was them blead and pressure checked (leak down test). Everything tested out well and they have perfect travel and feel to them. One other thing... Those Solo Bleeders are great! I will be using them on all of the fieros from now on. They let the air and fluid out but don't let it back in so it is very easy to do all by yourself. Since I had help I got the see them in action. DOT 5 does not eat paint like DOT 3 does so there is little worry about spilling a little. It also has a higher boiling point. The clutch system was also blead and refilled with DOT 5. I was suprised at how soft the SPEC clutch is. It should be a good clutch for street use. We'll make the final adjustments later when the car ready to get on the road.
I tried out a set of 86-87GT wheels. Unfortunately, in my application, they did not fit on the rear. I did not even bother to try them on the front. They may fit using stock brake lines but since the Russel brakes were already done I didn't check for sure.
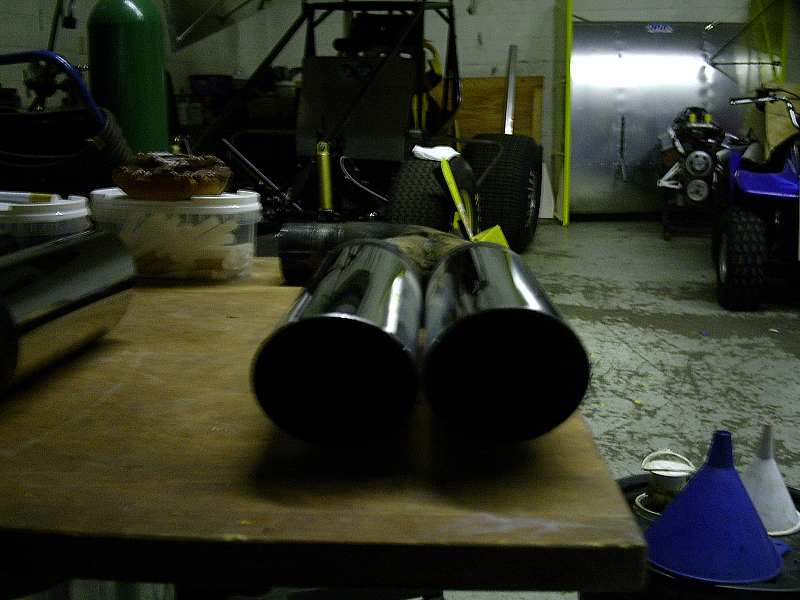
We decided to make a final adjustment to the exhaust system. The cat was sitting about a 1/2 below the cradle from out initial build of it. Both pipes were moved and shotened to bring up the cat. The whole system was them wrapped with black header wrap to help keep the heat in the pipes and out of the engine bay. Damn, it looks good on the car.
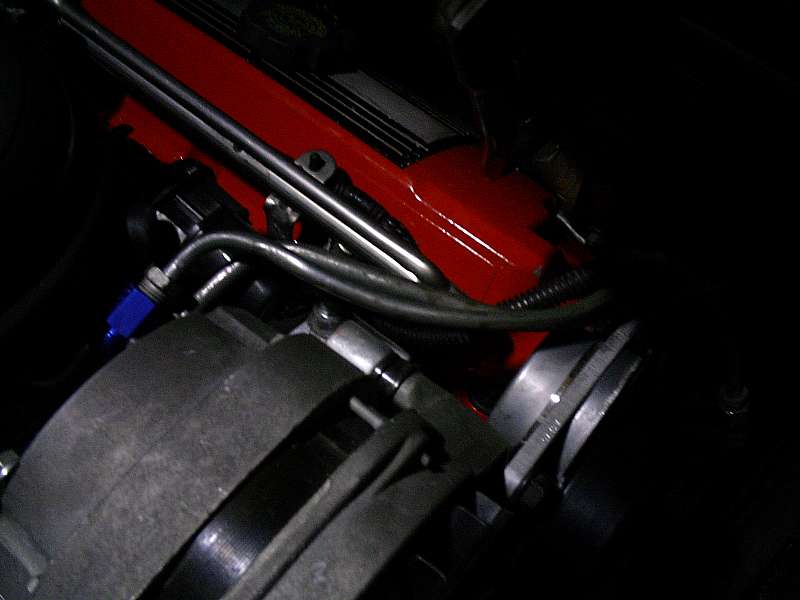
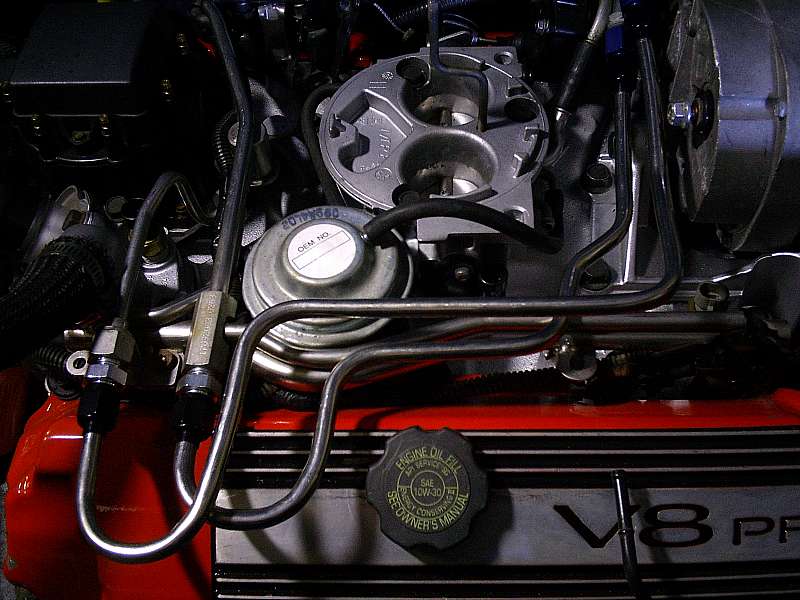
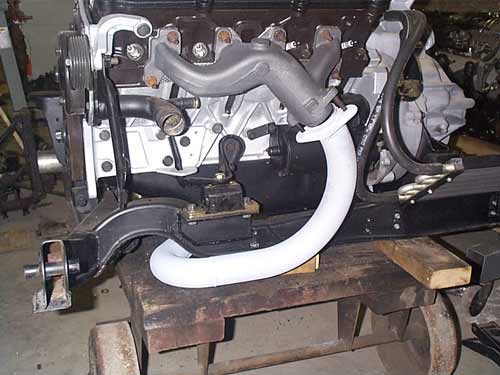
Next we got started on the plumbing. I worked on the coolant lines while dad started work on the fuel lines. For the fuel lines we are using stock fiero V6 hard lines adapted to short sections of stainless 4 adapters and -6AN tube fittings and ferrels are used to adapt the fiero hard lines and caddy fuel rail. The flex in the system is the stock rubber tubing. Dad bent the tubing and attached the lines. It turned out pretty good even though dad is not very good with the tubing bender. Dad did a good job but would like to see something a little different. I have another 18ft of the line so I may come up with something a little different for the final product. I may get a couple different fittings and run it directly to the fiero flex lines. If anyone wants the part numbers of the fittings and line used let me know and I'll post them.
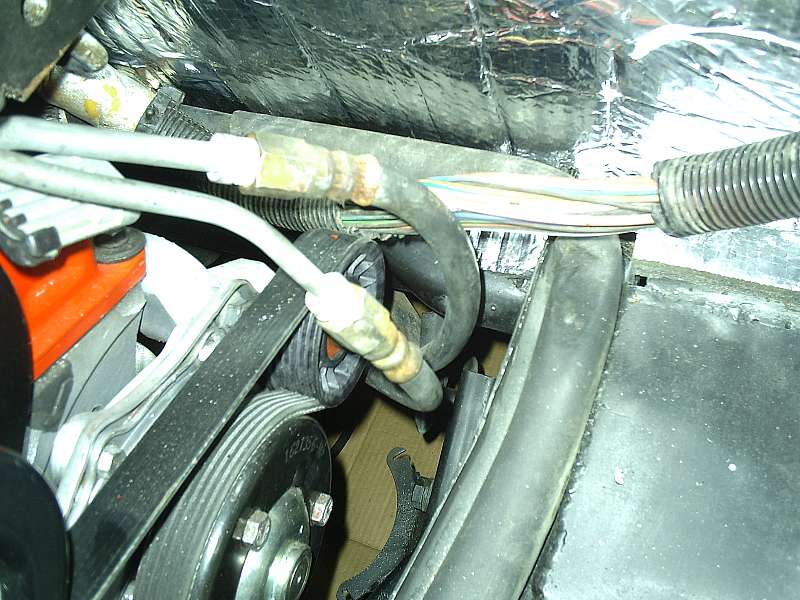
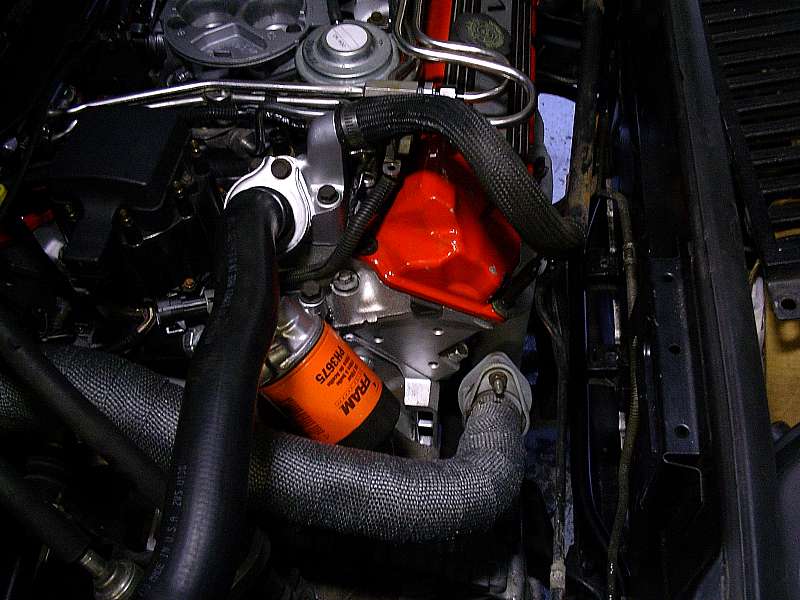
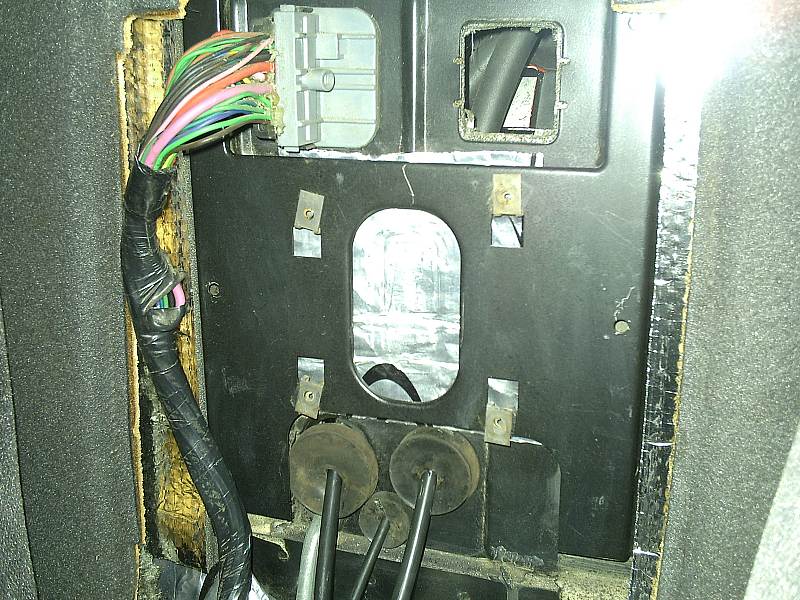
I worked on the coolant line for a while. Though there is only 4 places to attach the hose, each one had to be modified in some way to make it work. For the main hose from drivers side coolant tube (inlet) I used a stock 2.5 fiero line (drivers side 85). It was then attached to another short section of hose elbow that was cut off the passenger side 2.5 hose. It was connected to the CSR inline filler. The part number is in my rebuild thread. I used a radiator cap with a temp gauge in it to cap it off. The whole in the filler for the overflow tube was also plugged. I fixed the filler and the 2.5 hose to the engine bay wall using two rubberized mounting clamps. The last section of hose that goes to the engine is the upper section of the caddy hose I believe. Honestly I can't remember where I got it from.
Some of the un-pictured things that were done was the connection of the heater core lines. 5/8 hose was used for these and a gentle bending of the fiero under car hard lines was required for what we felt was proper clearanse of the front exhaust manifold. The conection to the water pump was made. The conection that goes to the thermostat housing was run through the stock fiero tube that runs along the frame rail by the stock battery mounting location. The connection to the trunk wall was also a stock fiero tube. I believe it sits on the firewall in a stock fiero. There is a vaccum line that is brazed to it along with a couple mounting tabs. The end was cut off and flared and a 2"1/2"x5/8" section of hose was used to connect the two tubes. The vaccum tube part was retained and may be used to conect the vaccum canister later. This tube has not been attached to the trunk side wall yet as you can barely make out in the pics. The last section of hose is stock caddy hose. It is an adapter hose that has two different sized ends. Using this hose is probably the best solution IMO so if pull a 4.9 don't forget to grab it.
The passenger side coolant tube was also from the same 85 2.5 car. The last 90 degree bend in the hose was cut off and used as the connection to the inline filler on the other side. After the hose was cut it fit with no other modifications.
Some of the vaccum lines were attached but soon time ran out and it was time to clean up and go home.
Oops. Girlfriend just called... Seems she locked her keys in the car and I have to go get her. Be back soon to finish the update...
[This message has been edited by Fieroseverywhere (edited 02-17-2008).]
Wow. It was a crazy weekend. Got so much exciting stuff to talk about I don't know where to begin.
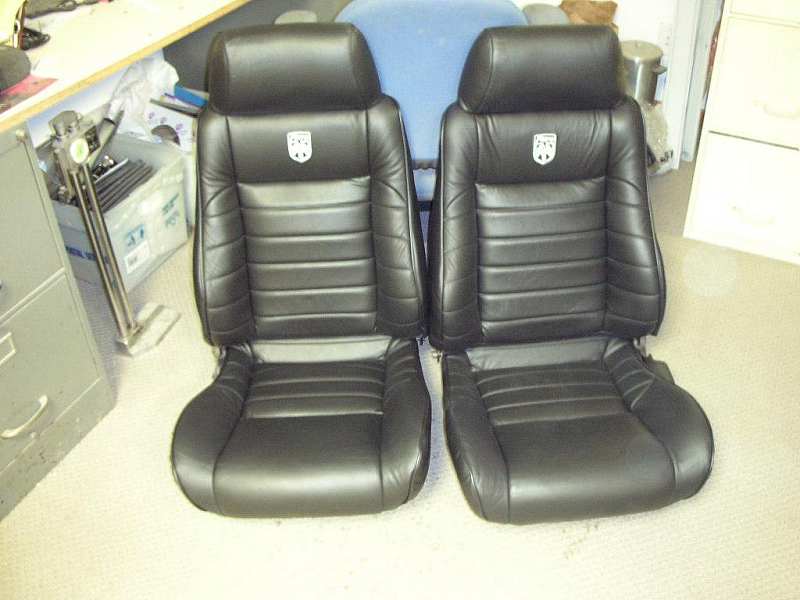
The most exciting part right now is.... I am buying the Mr Mikes seats from Troyboy. What was once in perfect union will soon be in "perfect union" with my car. I'm still in shock, but very happy. I can tell you I look just like this smiley right now. Here is a pic that Troy had posted in his thread. I'll get more when the seats come in. They are the style and color I would have picked if I bought from Mr Mike myself so it could not be more perfect for me. Well, they could have had seat speakers or the cut-outs for them but its OK. I will do something else instead. Maybe I'll use those chiseled holes in the firewall for something afterall.
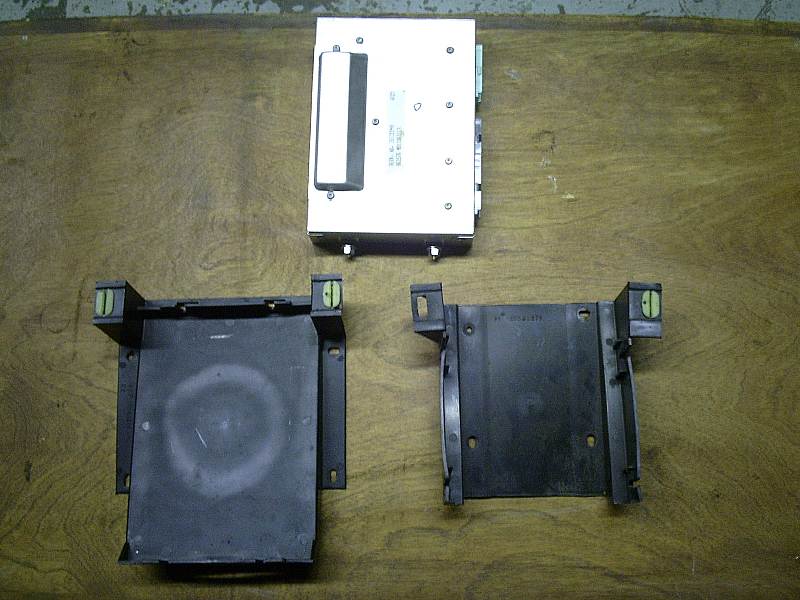
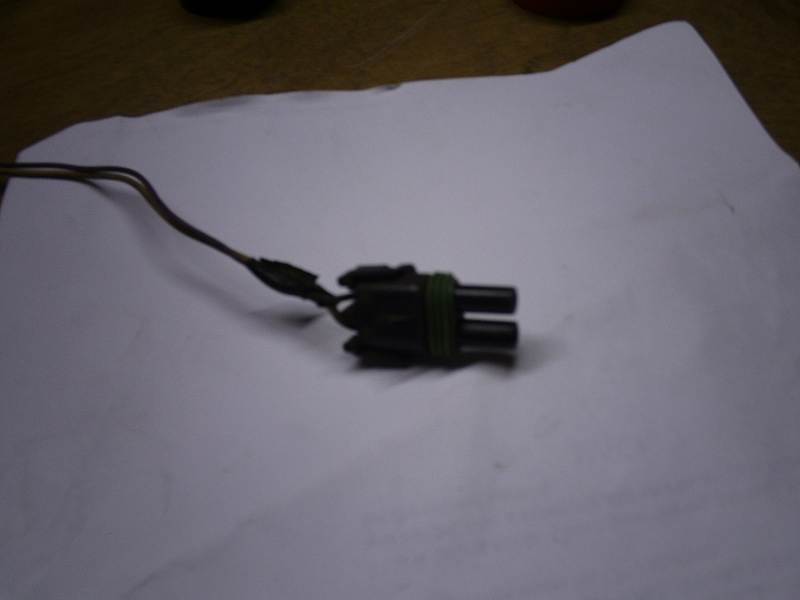
I did have some bad news this weekend. I found out yesterday that what I thought was the 4.9 ECM actually turned out to be the BCM. Seems to be a pretty common mistake now. I found a new one at the wrecking yard and have since remidied that problem. Its funny the Caddy BCM looks almost identical to the fiero ECM. The caddy ECM looks like this for future referance. You want the ones with Serv. # 16132240. 91 to early 93 according to Aaron. Aaron's chips work with these ones. Make sure the one you pull has 3 plugs. One green plug and two black.
When pulling it from a caddy it is located on the passenger side behind the glove box, on the firewall, towards the passenger fender. They are mounted lower then the glove box. After doing it a couple times I can tell you it is MUCH easier to get at it from under the dash and NOT through the glove box. Below are a couple of shots of the ECM as it sat in the 91 deville. I also pulled an extra chip from a 91 seville ECM. It sits a bit differently in a 91 seville and are actually easier to get at FYI. I thought it would be a good idea for tuning purposes. I can send one chip off while the other is still in the car. Sorry I didn't get pics of the seville. To pull the 91 deville you remove the cover under the dash, remove the single 10mm nut on the left side of the ECM (as pictured below, second pic, lower left), and once unplugged it will drop out the bottom. In a seville it is similar but you have to pull it down half-way before you can remove the nut. It also drops out the bottom. When done this way they are very simple to get to. For the wiring you can take apart the connector that goes to the engine wiring harness. It is located next to the ECM and is also in the pic below (top left, second pic, grey connector). One 7mm bolt holds it together. Where I cut the ECM harness in the ECM pic above should be plenty of wire to get the job done. I cut it above the tunnel just beyond the ALDL plug. If you take your time you can pull the engine and ECM harnesses out in one unit and make wiring even easier. The only cut needed is the one I did next to the ALDL plug. Thats it. Everything else needed will come out by being unbolted or un-clipped. Mine will be a bit harder since I had to learn this along the way and will be wiring mine in a way that will hide as many wires as possible. I also made some unnecissary cuts to the wires for asthetic purposes. I can't remember where the vats is as I never had any intention of using it or trying to bypass it. Sorry I can't help there. One other tip I can give if pulling the harness from a wrecking yard. Pull the dash and get at all the wiring you can. The wiring and loom under the dash will be in almost perfect condition since it has been inside the car its whole life. The engine bay stuff will be filthy (they always are) and possibly broken or eaten away by battery acid. This may seem like a bunch of work but can pay off in the long run if you happen to need additional connectors, wire, good loom in assorted lengths, or modules. There is a factory keyless entry module in some caddy's that works with this ECM amungst other items.
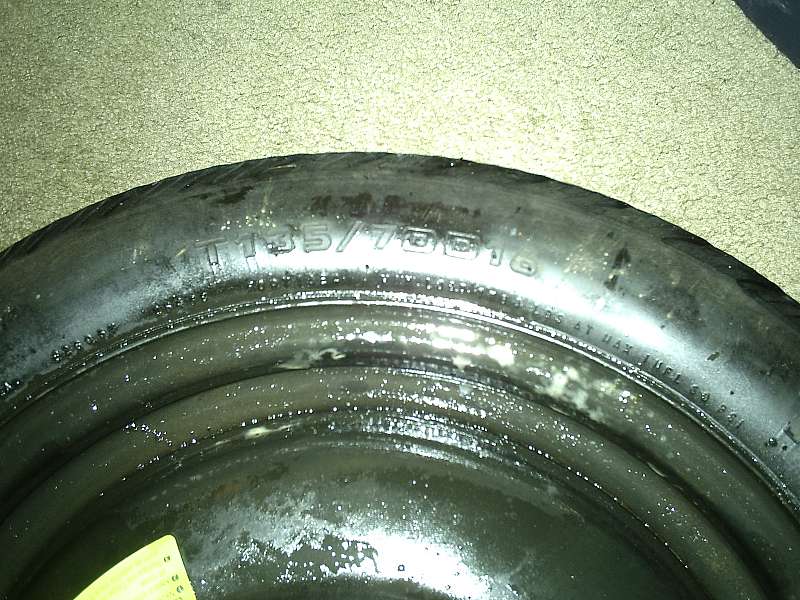
I also managed to find a compact spare that I am pretty sure will work with the vette rotors. It came from a 96 Subaru Legacy. It is a 16x4 compact spare with a 135/70-16 tire on it. Bolt pattern is correct and the center bore looks to be correct as best as I can tell from my metric tape measure. I did try it out on the fiero that was at the yard and it fit great. I was only able to try it out on the rear of an 88 coupe though (this eliminates the rear as a problem with my particular build. ). Until I get a chance to try it out on the car next weekend I won't know for sure if it will work or not. Clearance is my biggest concern right now but it "should" be fine. For 10 bucks its worth it to find out for sure.
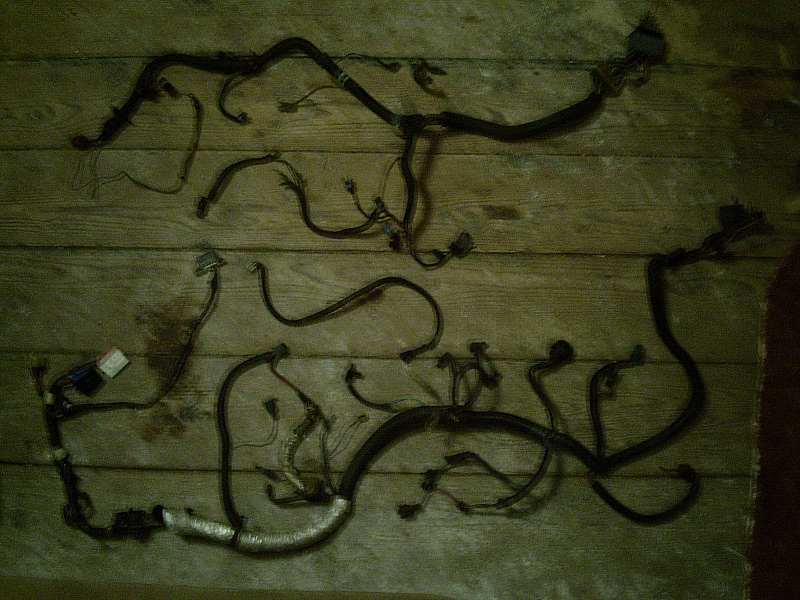
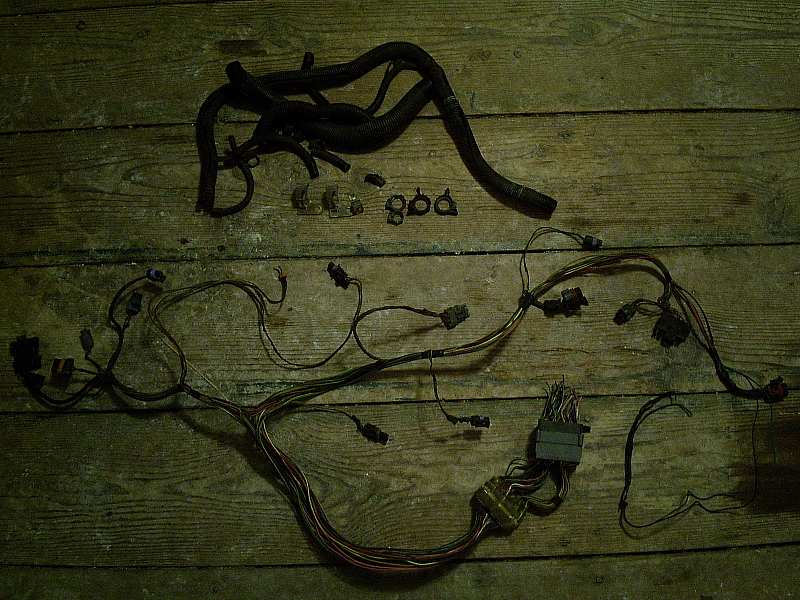
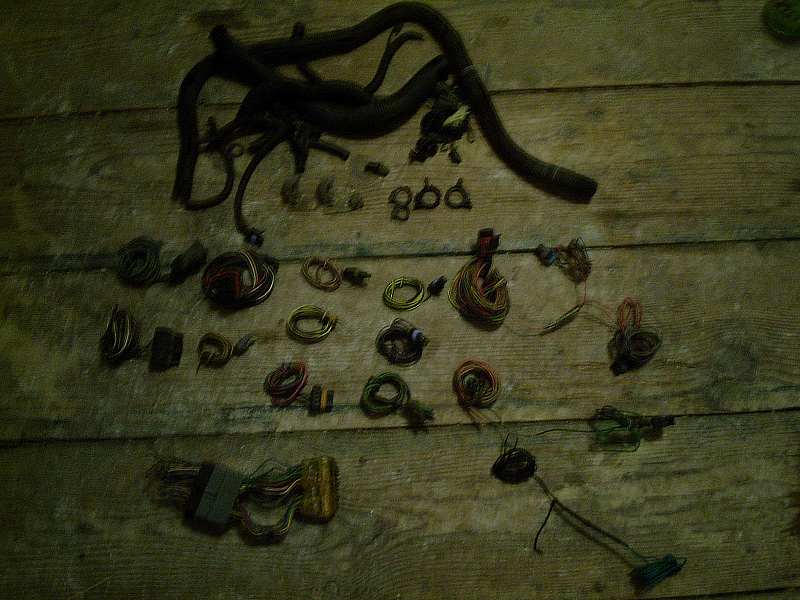
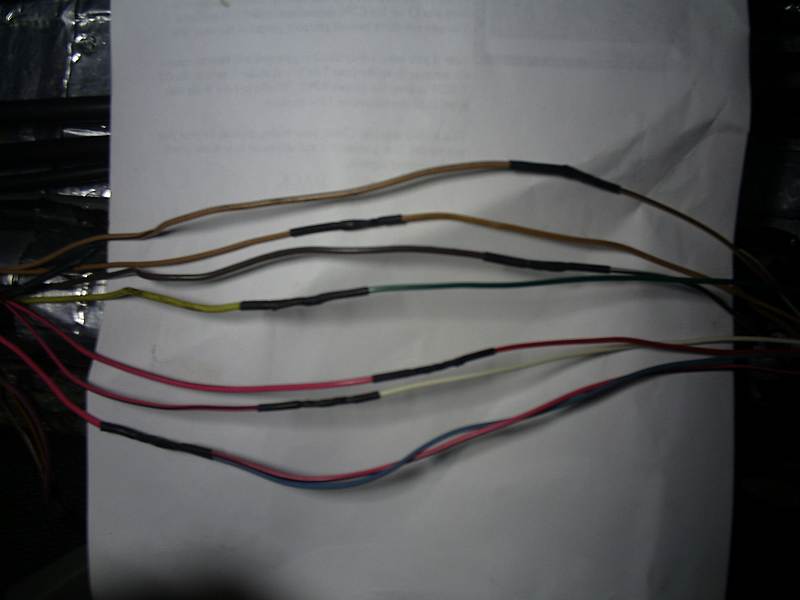
I also got started on the wiring by tearing apart the 4.9 harness. I seperated each connector and cut them with as much wire as possible on each one. I cut them right at the caddy passthrough connector. I then coiled everything up for next weekend when the wiring starts. This is not necissary unless, like me, you want to hide as many wires as possible. I have seen others actually use the caddy harness as it is and route it around the engine bay to hide all the wires. There are many ways to do it and personal preferance is what makes yours unique. Here is what I have so far... 4.9 harness on top 2.5 fiero harness on bottom. 4.9 harness 4.9 harness with loom, mounting tabs, and some tape removed. Here is the finished job. Everything coiled and ready to be run the way I see fit. The two connections on the right have fusable lins in them which I did not break apart. Hopefully I will be able to keep them intact for this install. I will route everything one connector at a time to get it the best I can and hopefully have it look factory when done.
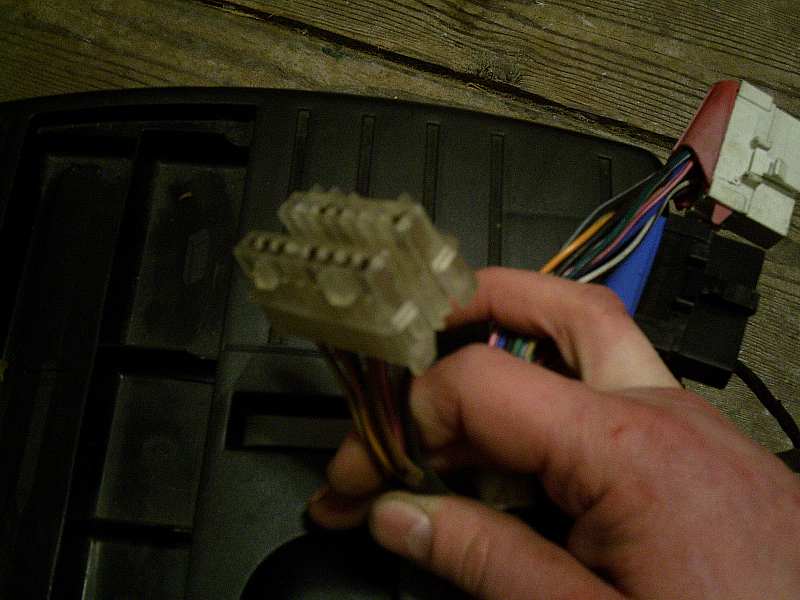
I harvested the c203 connector, fiero passthrough connector, and c500 connector from the 2.5 harness. Here is a pic of the c203. Again I kept as much wiring intact as possible just in case. I did not find any wires that went directly from the c500 to the c203 on this harness. I'll find out next week if any need to be added. Wires were cut at the passthrough and fiero ECM plugs to keep as much as possible. If one were so inclined one could freeze the harness and break the glue inside of the passthrough for more wiring, especially coming from the c203 connector (a hammer works well). At the moment I see no reason to do that though.
I also contacted Aaron about the chip and will be sending out the seville chip I got for programing tomorrow. Even if I do finish wiring the car this coming weekend I doubt the chip will be done and make it back in time. So starting the car will have to wait for a bit longer. I won't rush the wiring either way. It will be triple checking everything as I go to help avoid those startup wiring issues.
One other thing to add. Dad just picked himself up a new set of tubing benders with all the proper tools (flares, bead flares, crimps) to do true 4.9 to V6 fiero fuel line. We will be re-making the fuel lines to go directly from the caddy fuel rail to the V6 fiero rubber lines. We now have all the proper tools to do the job right. We are tossing around the idea of making up and selling sets of pre-bent stainless fuel lines. If you are interested let me know so we can make a final decision on whether to make them or not. For those interested I will be testing the first set on my car so you can see how they are made and if they are something you would be interested in. IMO, the stainless steel lines will look 1000% better then and braided line does. It also won't cut your fingers and will take the install work out of the job. The quickly done short sections that we did earlier in this thread will show something for now. They should also be less $ to make them especially if we are able to re-use the caddy and fiero fittings like we should be able to. I can also make them using -6AM fittings. 4 adapters will be needed if done this way (~40 dollars). There are benefits and drawback to both methods. Input would be great to help me decide the best route to go.
More to come soon. Getting real close now.
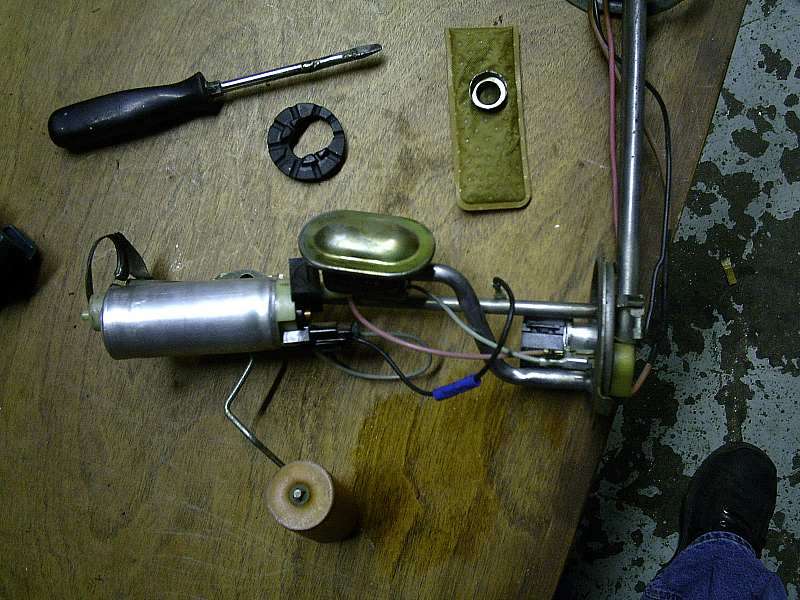
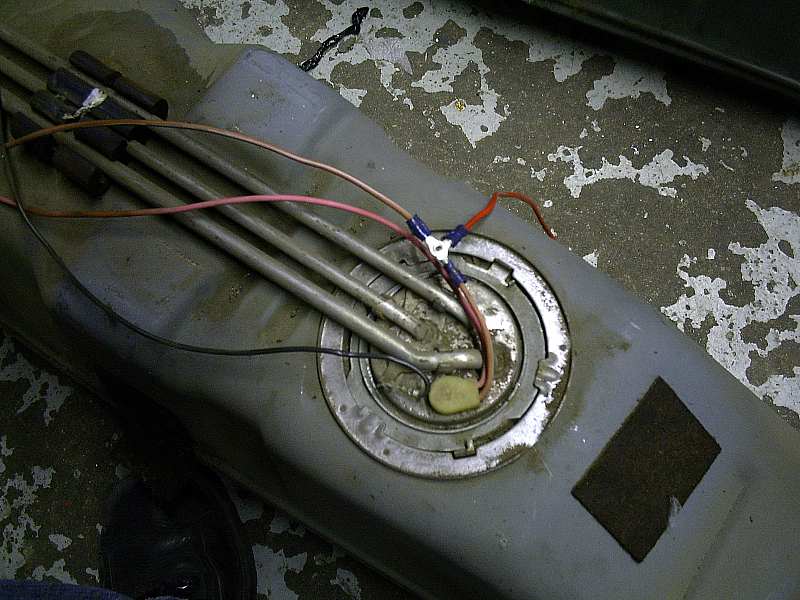
EDIT: Forgot one thing. A new mod is being added to the car. While at the yard and looking at the 88 coupe I noticed that the gas tank was already out of the car. Apparently they pull all tanks when the cars come in. 25 bucks and its mine. It had the pump and sending unit in it still. This is the 11.9 gal 87-88 tank. I will be grabbing it tomorrow and doing this conversion also. I have not decided yet but I may upgrade the pump while everything is out. Guess that pretty much covers it for what can possibly be rebuilt on this car. With the exception of the steering components that is, everything else has been gone through. I will get to those later, if needed. Later.
[This message has been edited by Fieroseverywhere (edited 02-24-2008).]
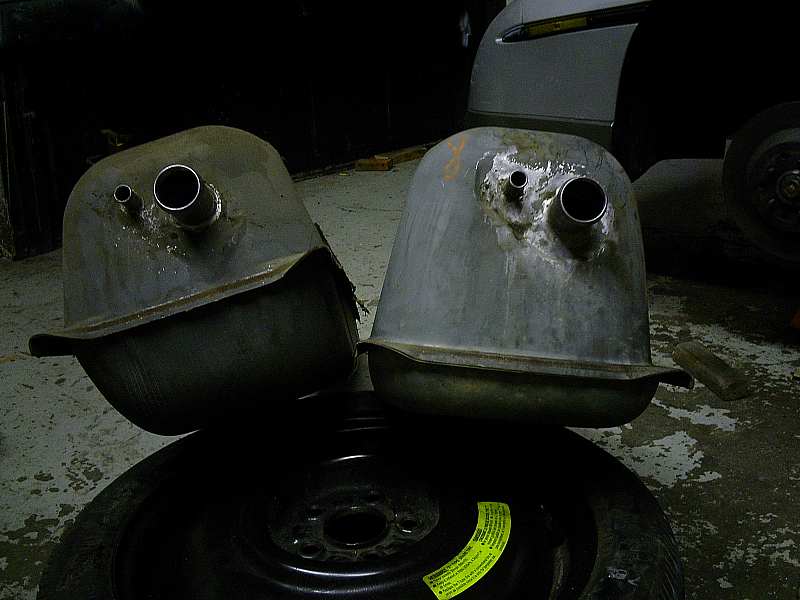
Next up I swapped the gas tanks. This is not a hard job though it is time consuming. Not quite sure why some people think the larger tanks don't fit in early cars either. Oh well. For some reason, that I still can't figure out, one of the previous owners had spliced into the fuel pump power wire. Since there was no reason for it to be there I took it out and reattached the wire. It was also a good thing that I dropped the tank. The fuel pump had been replaced but they did not put in the rubber piece that the pupm sits on. This and they used a cheap pump without the rubber sleeve to help with the sound. Both of these problems were corrected before the pump was re-installed.
As for the tank swap, it was not a tough. I re-used the stock 84-86 rear tank strap. It was a perfect fit and needed to modification at all. The front strap was a different story. I had both the 84-86 and 87-88 front straps and both were too short to work. Since I also had an 87-88 rear strap I decided to shorten it to complete the install. I cut it right past the folded part at the end. Folded it over again and re-drilled a new hole. Thats it for the install of the larger tank in an earlier car. If you decide to do this I would recommed starting with another 84-86 rear strap to modify. They are a bit different and much easier to work with and find.
Dad had done some work on the exhaust while I was away. He re-shaped the under car pipe to better fit it into position. He also managed to give himself a nasty cut on his right hand. Aparently that heat shield for the trunk is very sharp when you are trying to put on the exhaust springs and the pliers slip. I felt bad about it being Dad it didn't slow him down, the swelling never went down either. Dad had only tacked the pipe so it had to be removed to be fully welded. While it was out we welded on the stock fiero spring tab also. The pipe was zinc primered and finally wrapped with the left over exaust wrap. There was not enough to do the whole pipe so just the center section that runs under the oil pan was done.
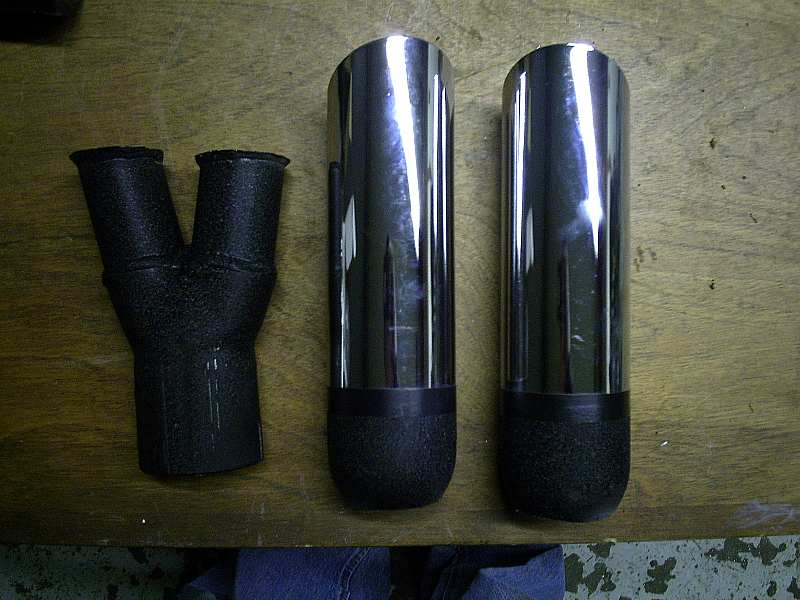
Work started on the exhaust tips. We quickly decided that the resonator tips I bought were not going to work the way they were. Problem was they used 1.75" pipe in the "Y" portion of it. I believe this will too restrictive for what is suppose to be dual 2.5 outlets. This section was removed and a set of SE V6/Formula tips were used to make the new tips. All 4 resonators were cut off and welded on the the cut sections of the fiero tips. Here are some shots of the process. Keep in mind they still need to be painted and polished. We used exhaust hangers for a fiero though neither of us could tell you which year. Some tweeking was required. The exhaust is comeplete and on the car but will still need to be adjusted to be perfect. I'll post pics when the job is done.
Thats it for the pics this time but I did get a lot of the small details done...
-Cooling system is done and double checked. All hose clamps tight and overflow tank installed. Radiator hold down removed, cleaned and re-installed. Rubber shroud re-installed. -Front tub, jack mount, jack, and washer fluid tank were installed. Basically everything under the hood. -Positive battery cable run from front mount battery tray to starter and on to the c500 connection. We used everything provided by Norm with his kit. Worked perfectly and I think there will be enough left over for the negative cable. -Coilovers were raised about and inch to adjust ride height and give the car a slightly "raked" look. -Temporary rear cradle bolts were replaced with the correct ones from the junk yard 88. The front cradle bolts were also finally tightened for the first time since this install started. The motor should not be coming out again bafore its on the road. -The ball bolts (whatever they are called) that attach the shift cables to the transmission were replaced with the correct ones. The isuzu cables did not have any when I got'em and the ones I had were the wrong size. The 88 also robbed of these. This was the first chance to get a feel for Rodneys shifter and I LOVE IT!!. Nice short throw and a positive snap into gear. This is going to be one very nice shifting car when its on the road. No matter how long the tranny lasts. -The EGR silonoid was installed in what I think is the stock position. I made a vacume line to go to the EGR using a 90 degree rubber elbow to a piece of plastic vacume line to a straight rubber piece. All parts we re-used caddy parts. I'll post pics later.
While back at the house later that night I worked more on prepping the wiring harness. The c203 was double check to make sure the wire color and position was correct. So far so good. The ECM connectors were also double checked. I removed the un-necissary wires including everything related to cruise control, AC, and auto tranny. The c500 was double checked to make sure it had enough wires for the install. Sice I pulled it from a 2.5 I wasn't sure. Now all the wiring is ready to go for the next trip down.
I sent off the chip last week to Aaron (stickpony on this forum) to be programed. It should be back within the next week.
The seats will be here tomorrow and I will post pics when I can. I still look like this when I think about them.
Its getting very close now. I was trying to get everything done that was under the hood and under the car. Except for the oil cooler lines that was accomplished. Hopefully there will be a startup video very soon. Later.
EDIT: Someone had asked that I post the part number for the fuel fittings that I had used. I was having trouble finding the invoice. Found it with the car then... left it there. I will give Dad a call tomorrow and have him give me the numbers. I will post them with the seat pics. Everything was found on summitracing.com FYI. Its best to search by department-plumbing.
Stock fitting sizes are... Caddy fuel rail: Two male 14mm saginaw O-ring fitting. Both sides are the same size. Fiero V6 flex lines: One male 14mm saginaw O-ring fitting for return. One male 16mm saginaw O-ring for pressure.
If you choose to re-use the fiero V6 hard lines you will need female fittings for the fiero ones.
You can get adapters in these sizes if you choose to go with AN style connections. -6 AN is the size you want. You also have a choice of hard line , braided stainless and others. I prefer hard line cause I think it looks better and the -6AN fittings are much cheaper. 6 dollars total compared to 40. Stainless hard line is also cheaper then braided. I also recommed NOT using alluminum line if you can avoid it. Not for fuel at least. If you can't bend tube, go braded.
I will use the lines I have at first but eventually I will re-make them without the fiero hard lines in there. I will make them out of the same stainless tubing but use the stock fiero and caddy fittings for space savings. I checked out Dads new tool. Every crimp, flare, and bulge you can think of is in there. He even made a couple just for fun. We can re-make fiero lines easily now. 4.9 swap lines will not be much of a problem either. I'm working out some details to see what we can come up with. Anyone interested?
[This message has been edited by Fieroseverywhere (edited 07-27-2010).]
Damn. Just found something I missed for the tank swap.
I forgot the expansion tank. It had me a bit confused while I was working on it. Aparently when the previous owner put in the 88 V6 motor they also changed out the sending unit. The 87-88 sending units are different in that they have a extra tube coming out that connects to the expansion tank. When I looked under the car there was one tube hanging down that didn't go anywhere. I figured it was a vent not really thinking much about it. Wonder if the previous owner had a problem with dissapearing gas?
Good thing I figured it out. Could have been a nasty fire with the cat so close by and me switching to a tank that needs an external expansion tank. It feels good to save a fiero like this one. With all the little problems fixed its going to be a pretty nice car. Previous owners suck!
[This message has been edited by Fieroseverywhere (edited 03-02-2008).]
Update time again. Been a busy week so its a little late in coming.
First thing I had to do was finish up the tank swap. For this I needed to install the expansion tank and lines. It is not a direct swap in this case either since the 84-86 cars did not have or need the expansion tank. The tank mounts on the passenger side under the rear inner fender well. On the 87 and 88 cars there are holes drilled for the tank. 84-86 do not have these so you have to put them in. Without removing the rear clip you cant get all 3 drilled. 2 should work just fine for now. I will add the third when I do the fastback conversion. Other then the mounting holes it fits without any other trouble.
There are some other differences you have to take into consideration when doing the tank swap. On the passenger side near (under) the battery tray is a hole in the sheetmetal on the 87-88 cars. This hole is there for the lines that run to and from the expansion tank. You have to drill or cut out a hole there for the lines to go through. There is no other way that I found. I chose to drill a hole and used a rubber gromit to seal it and protect steel lines.
There are 2 lines that run to and from the tank. One line goes to the tank and connects to the sending unit line. This the line that the expanding fuel travels through to get to the expansion tank. It is the larger and lowermost of the two lines coming out of the tank.
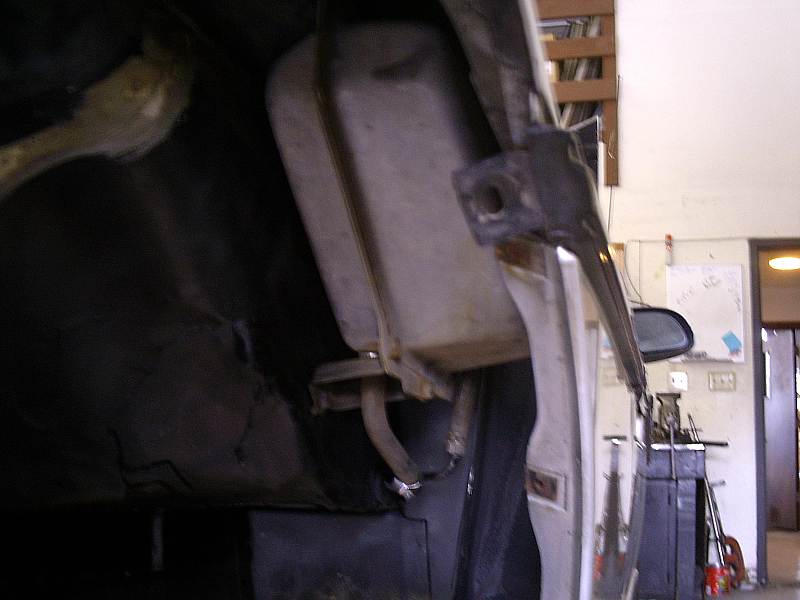
The second line runs to the Vapor (purge) canister. I'll be adding this later. I'll be using the ECM controled caddy one. Anyways for this second line you can run it in the stock poition without a problem. Course I couldn't. I am relocating the vapor canister to where the stock fiero cruise usually is. This meant that I had to do some major bending to the line to run it around the opposite side of the engine bay. It runs right up to the trunk wall and connects to other line pictured above that runs with the coolant line for the heater core.
Thats it for the 84-86 to 87-88 tank swap. Sounds like alot but its really not a big deal. I'll summarize...
-Main tank: Use 84-86 rear tank strap for rear. I used a modified 87-88 rear strap for the front. I cut off, fold and redrill strap to fit front. Main tank done. -Expansion tank: Drill mounting holes. Drill hole for lines to pass through. Attach tank and lines, add vapor canister. Done. Hope this helps some out there who have wondered how hard it would be.
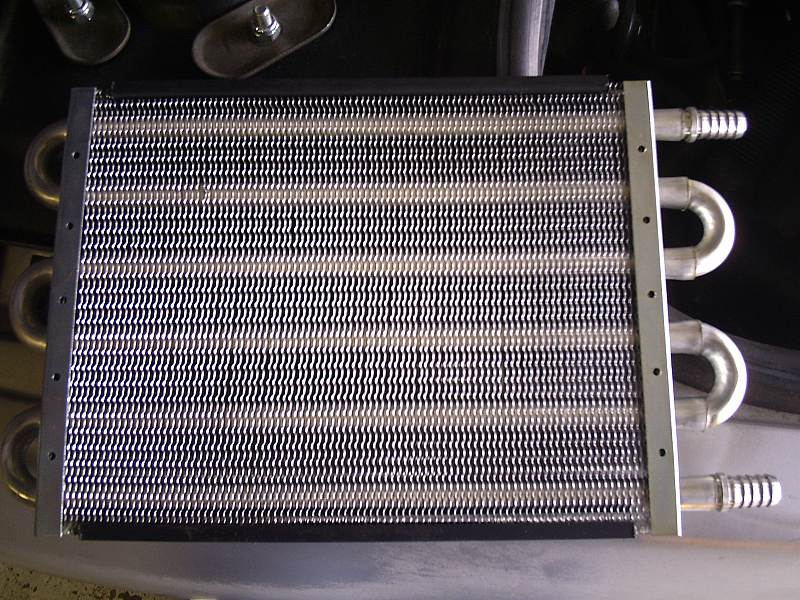
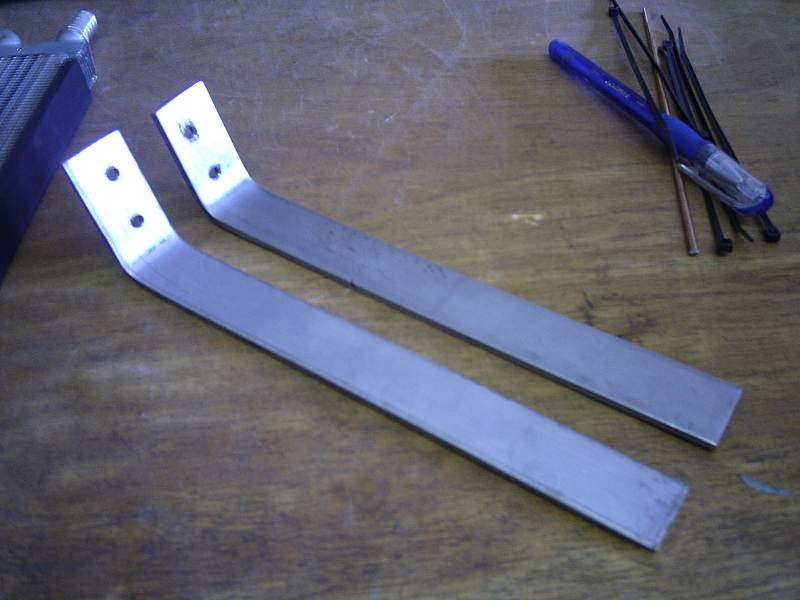
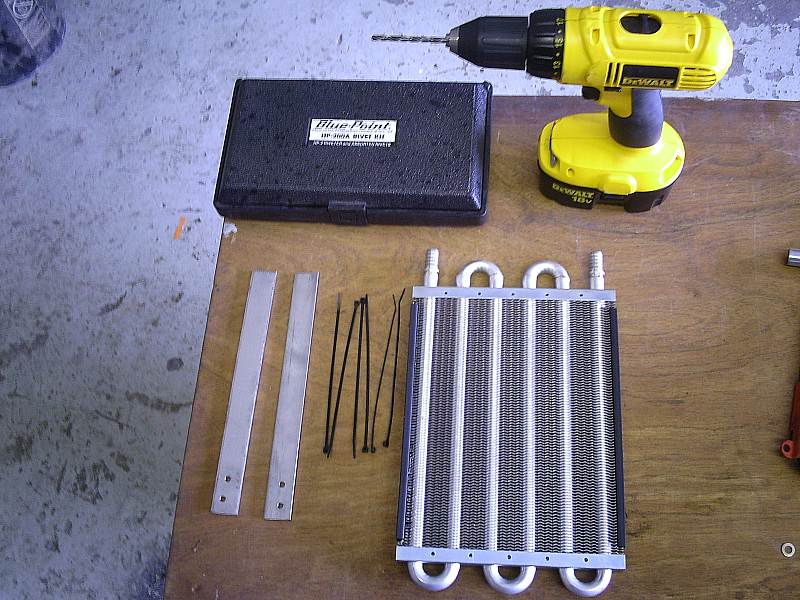
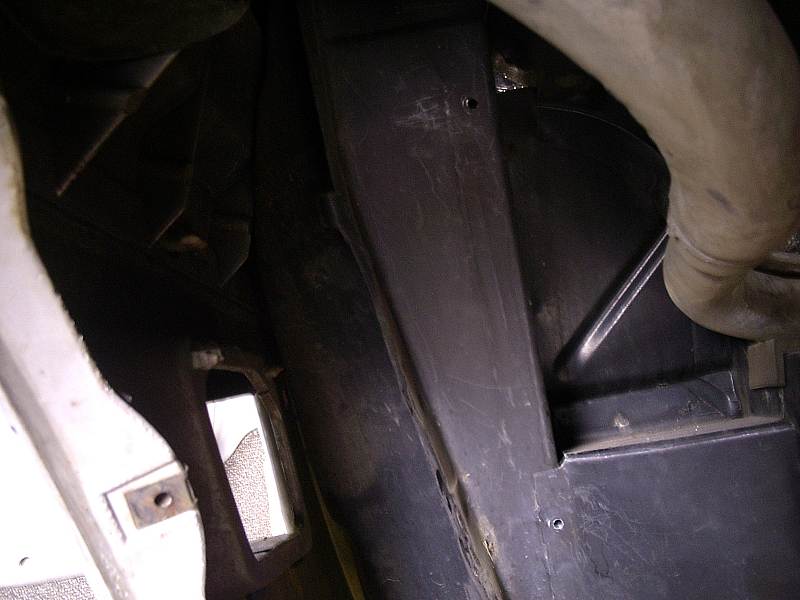
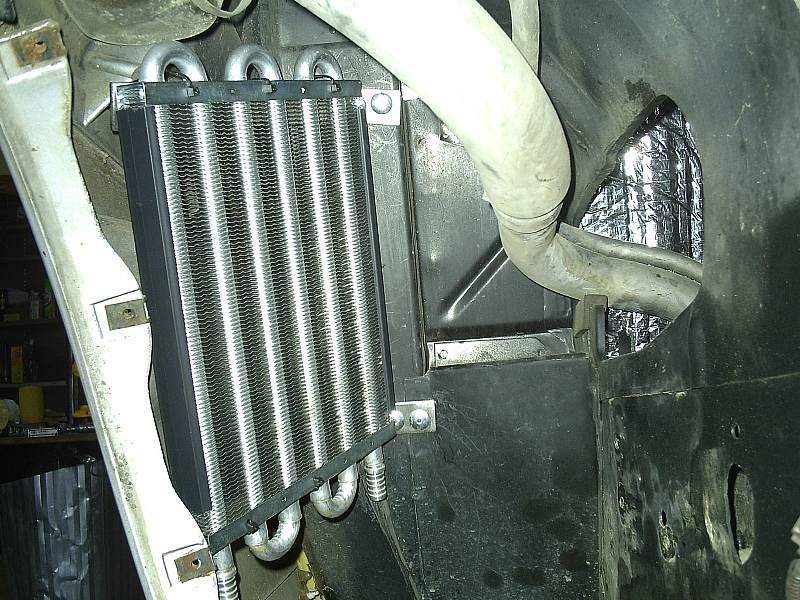
Next up I finished up mounting the oil cooler. I decided to mount it under the drivers side quarter panel.
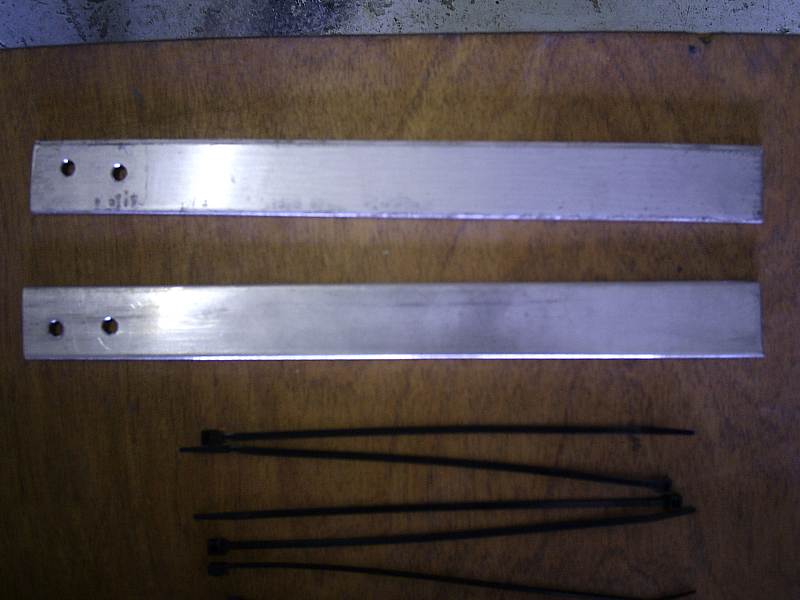
We decided to make some mounting brackets out of some scrap stainless we had lying around. It was one piece 1" wide and 19" long cut in half. Bends were made and the holes were drilled. Nothing special and you will never see it once the inner fenders are installed. Looks pretty good in there. Would look even better with a better scoop.
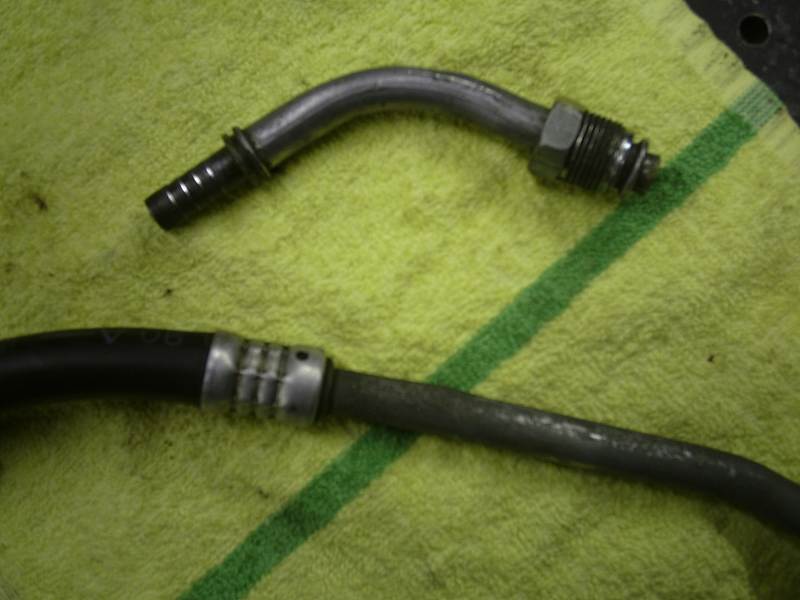
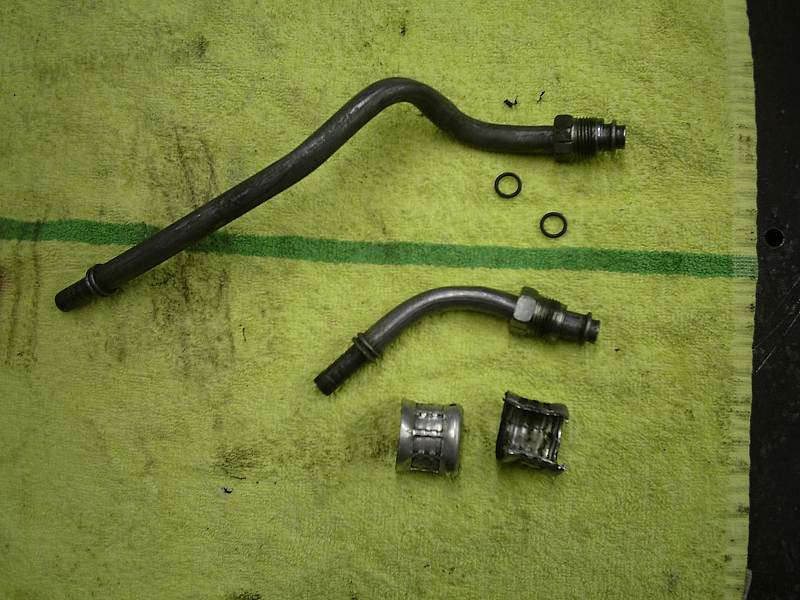
The lines that run to it were easy also. I had grabbed an assortment of oil lines from the caddies at the yard so we found two of those that would work. Both had to bent slightly to clear the exhaust, shift cables, and slave bracket. The ones we used were close just needed a bit of tweaking. 5/8 rubber pressure line was used to connect to the oil cooler. About $3 dollars total.
Car is pretty much ready to drive. So I started on the wiring.
First thing I did here was mount the ECM. This is not as simple as you might think. The 85 ECM holder did not work. The caddy ECM mounts perfectly in an 87-88 Duke ECM holder. If you don't have one, you'll need it. Here is a pic of the ECM and the two holders. You want the one on the left.
There is a difference in how they mount. Nothing more then drilling 4 holes. I used self tapping screws. Made it a snap.
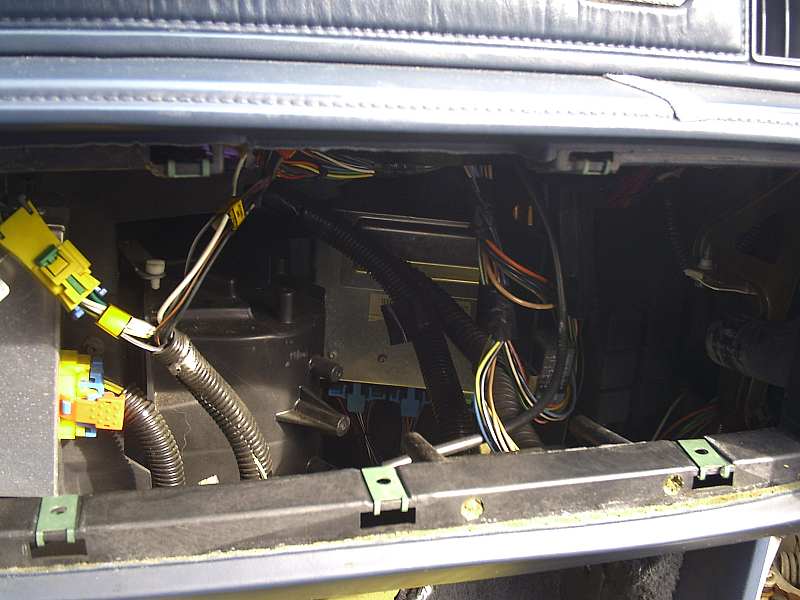
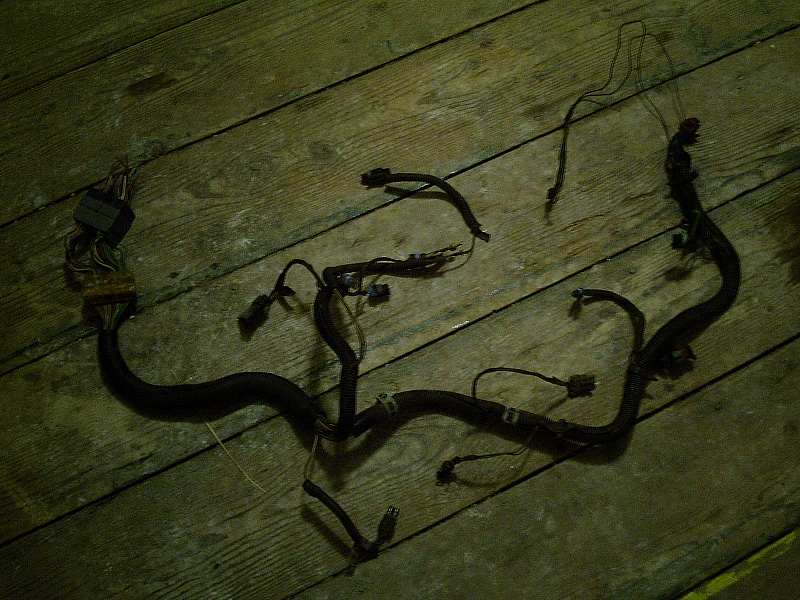
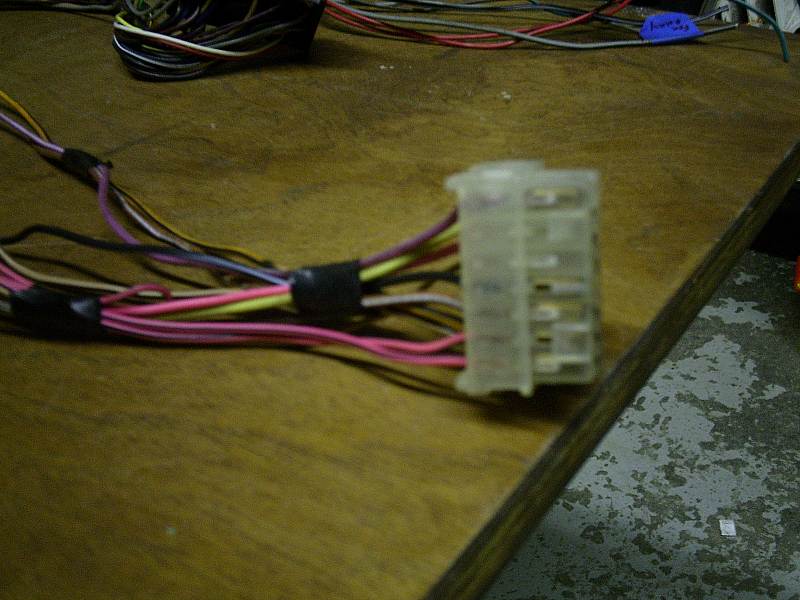
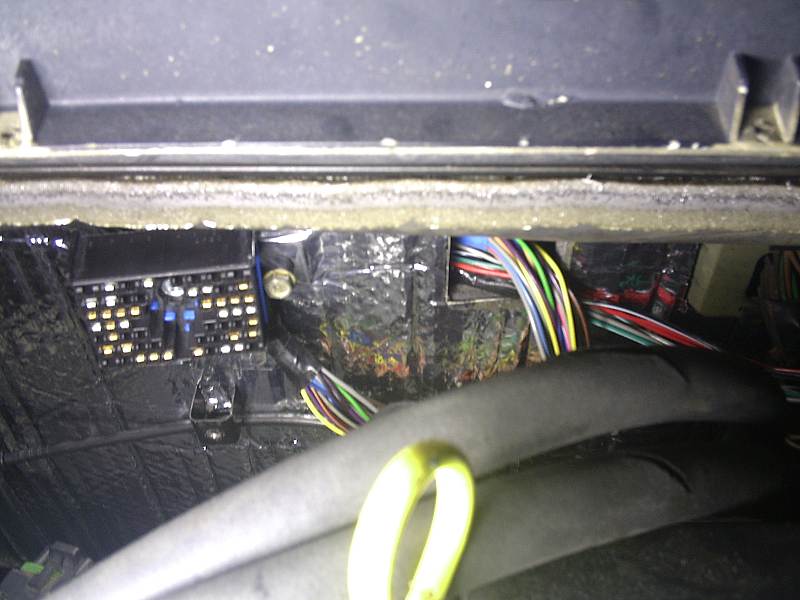
With the ECM mounted I went at the harness. I am using the caddy engine to dash connector as a quick disconnect for the engine. This makes my harness look a bit different but the same wires go to the same spots. Here is what you need for the interior. I connected all the wires together but had not cut anything to length in this pic. That was done in the car.
3 ECM plugs. Should be 2 black ond one green. I used a 91 deville ECM so all the pins were correct and all I had to do was remove the ones that I was not using. Cruise, AC, auto tranny, VATS... all gone. Fiero C203 connector. Everything needed is already there. Double check the pins but there is little to worry about. I think there were 12 wires total ALDL connector.
Soldering iron, solder, flux, and heat shrink tubing. I used a small butane torch that happens to have a soldering tip. Works great and its cordless. You can also heat the shrink tubing without missing a step. $25 at wal*mart. I've had this one for years.
C203 first. With the ECM mounted I was able to cut all the wires to length and solder the connections. Make sure to slip the shrink tube on before soldering. One at a time.... just takes time. I'm not going into the details of which pin to which pin here. I will do a 4.9 wiring thread when it runs and is complete.
With the c203 done I moved to the engine bay. Since I am using the caddy connector I was able to do that on the bench. I went at the connectors one at a time cutting each one to length. I routed the wiring as hidded as possible. Here is a list of the connectors my particular install took.
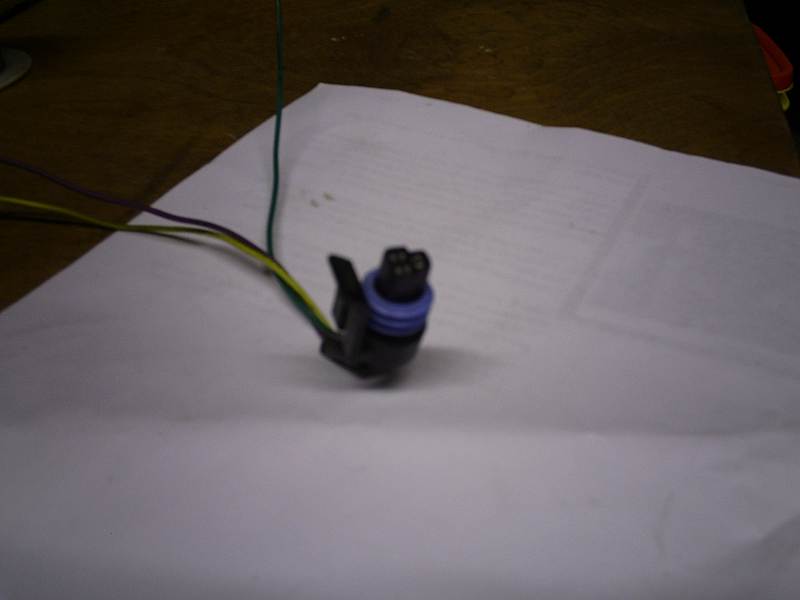
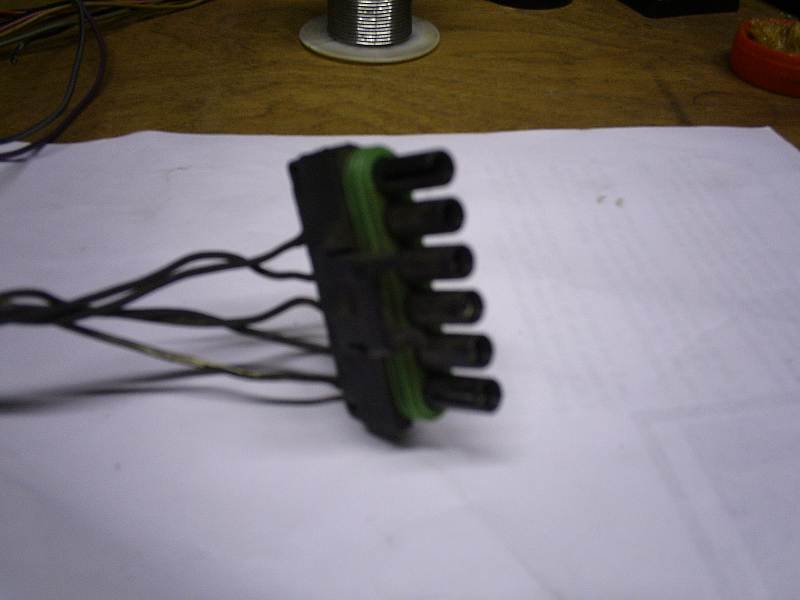
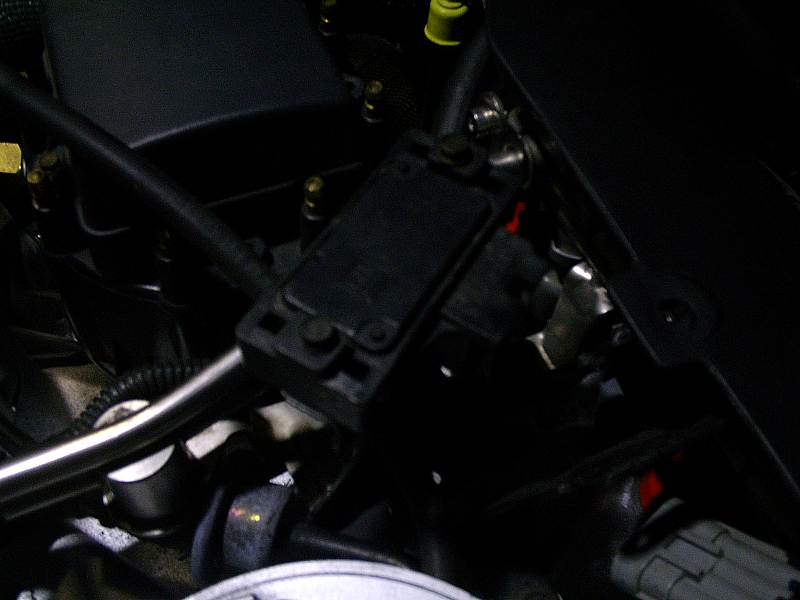
Oil pressure sensor. This is the caddy connector. If you use an 88 fiero sender it will plug right in and screw into the caddy oil filter housing. This is the easiest way by far. You can use an 85-87 sender also but you will need to connector to go with it. VSS connector. The Reverse light connector for Isuzu and Getrag trans also looks the same. EGR silonoild Coolant temp sender. This is a 3 wire unit out of a 92 Cavalier. 2 of the wires to to the ECM the other goes to the gauge via the C500. The TPS connector looks identical. It just has different color wires. Plug to distributor. Final mounting position on the MAP sensor. MAP sensor. Fuel injector connector. This has 10 wires total. 8 for the injectors and 2 for power. Mounting position of the caddy C225 connector. I will also add the fiero passthrough connector.
I'll have to come back and edit this post later when I have my notes handy. Can't remember off the top of my head now.
I did not start on the C500 connector yet. I will be doing that next weekend so stay tuned. A first start should follow that shortly. Later.
[This message has been edited by Fieroseverywhere (edited 12-08-2009).]
1. what all parts did you need for the brake upgrade? 2. why did you install the expansion tank? i put an 87 gas tank in my 86.. do i need the expansion thing?
1. what all parts did you need for the brake upgrade? 2. why did you install the expansion tank? i put an 87 gas tank in my 86.. do i need the expansion thing?
1. Parts needed for the brake upgrade the way I did it are...
4- 88-95 front 12" vette rotors. These need to be drilled with the fiero bolt pattern. You will also need some concentric rings to finish it off. 4- Caliper adapter brackets. Mine a setup kinda different since I have the 88 cradle swap done. The front not only move the caliper out them also adapt the 88 calipers to the 84-87 front end. The rear brackets just move the calipers out. 4- 88 fiero calipers. Thats it for the parts list. You can re-use everything else. I bought mine as a kit from fieroaddiction.com. ~$650 total cost including machined hubs, brackets, rings, used calipers, stainless hoses, and rebuild kits for them. The e-brake look so nice cause of the cradle swap.
2. Yes, you should have the expansion tank in there. In the 84-86 tanks the expansion is internal. When they switched to the 87-88 tanks they went with an external one and added the purge canister to let the vapor out. When you fill your tank and the gas expands it has nowhere to go. This creates extra pressure in your tank. If its working, its working. I'd just be a little leary of it myself. I figure Pontiac used one for a reason so I'd better too. Better to be safe then sorry I figure. I don't like to play around when fuel is concerned. Good luck.
How the repair job coming along?
[This message has been edited by Fieroseverywhere (edited 12-08-2009).]
Ok. Going down this weekend to continue the build. I will be leaving tonight.
First off I finally got a set of the ST front springs. These will raise the car a bit in the front. Hopefully enough to get a jack under it. Should ride better on the street also. I'll make a final decision on which spring to use once I get a chance to test drive them. If I like the ST springs better I will need to get some coilover springs to match better. I will probably use the extra set on another fiero but selling them may be option also.
I got a hold of a caddy purge canister so I will wire that in also. Also got the correct connector for the charge light on the alternator. I'll finish up the wiring this weekend and when the chip comes we should all get a chance to hear it run. Also got a domelight that I can put in the car.
I was hoping for the first start this weekend but unfortunately Aaron did not come through with the chip yet. I'ts going to have to wait yet again until the next trip down. It'll probably show up tomorrow when I am out of town. I do have a second chip in the car. Problem is I did not wire the car to bypass VATS so starting it will be pointless.
It wil give me a chance to get some cleanup work done. I want to paint the rotors and still need to plug the holes from the blower motor in the trunk. There is plenty to keep me busy it's just a bit disappointing. I'll post what I have when I get back into town on sunday. Stay tuned.
Any updates? I've got to know. It's been awhile, is the car on the road? Drooling fans want to know...
Cordailly, Kevin kevinsullivan@horacemann.com
Hey Kevin,
Unfortunately, the car is not on the road yet. Limited time has kept this one going. The good news is it is very, very close.
Wiring is done with the exception of the temp light and purge canister. Even wired in a battery in the front compartment. We filled it with oil and primed the system. No leaks. Woo hoo. I put a couple gallons of gas in her. No leaks. Woo hoo again. Put a gallon of coolant in the radiator. No leaks there either so far. We'll didn't pressure test it yet. With the radiator filled I moved to the inline filler at the rear. This is where we found the first problem...
Oops. We forgot to put the block drain plugs back in during the rebuild. Grabbed a couple we had around and plugged the holes and continued filling with coolant. No more leaks there. But then we came accross another problem... We got a leak near the waterpump. Its a pretty nasty one too. We put on a pressure tester, pumped it up to 4psi and had a nice stream of coolant shooting up. Its actually leaking on the top left side of the pump. I think it is from when we had to take the cover off because we forgot the end cap for the cam. We'll get that sorted out next trip and then it will be ready to start for sure this time. Since it so close I'll be going down weekly until it is on the road. I'll keep you guys posted on how it goes.
I'll post the last 3 pics of the completed wiring harness later. Still need to loom it all but the wires tucked away very nicely. The C500 was very simple. I'll still be doing a 4.9 wiring thread in the near future. Just need to make sure everything works before I get into that. Keep your eyes peeled next sunday. I "should" be posting a first start video. Maybe I'll even get a first test drive video also. Fingers crossed. Short of the one leak and the absence of the chip this car is ready to run. Wish me luck!
Still doing the wiring on mine. I have almost every thing wired, I am just shortening, lengthning, and getting it all in the loom and running where it's supposed to go. The engine is in the bay at the moment, but I will still have it out a few more times.
Still doing the wiring on mine. I have almost every thing wired, I am just shortening, lengthning, and getting it all in the loom and running where it's supposed to go. The engine is in the bay at the moment, but I will still have it out a few more times.
Can't wait to see the video of the start up.
Take care, and keep us posted, Darren
Hey Darren.
It still hasn't sunk in yet. I've been working on this car so long its hard to believe that the time is so close to actually driving it. Once its started I'll be able to take it back to my Dads house. Then I can work all night to finish it. Woo hoo! I will no longer be limited to shop hours.
On a side note I got the chip today. Apparently it showed up last week but it got sent around the company before finding its way back to me. Once the leak is fixed I will pressure test it again just to be sure. Then... its time. I'll keep you guys posted on how everything goes. Hopefully as problem free as possible.
Hows the new little one doing Darren? I just got to meet my 10 year old daughter for the first time this past weekend. After 8 years of searching... I found her and I couldn't be happier! She is a total tom-boy and really wants to learn how to work on cars so she is going to be there to help out. There is so much going on. This is going to be a great weekend!
If all goes well I should be driving it home on the 12th once the DMV stuff is figured out. I got the title but will need a trip permit to get it home so I can get the emmissions testing done. There is no testing where Dad lives so I have to take it home first. The first long test drive will be 125 miles so keep your fingers crossed. Stay tuned.
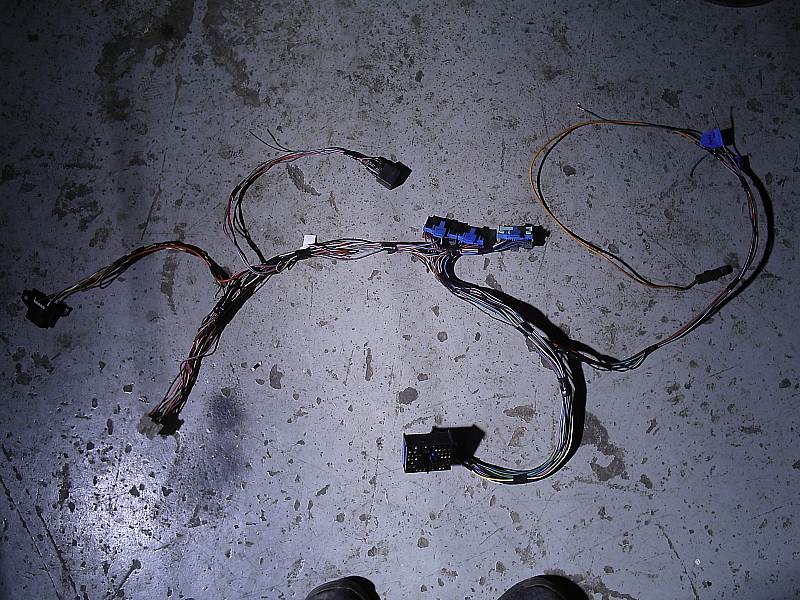
Alright. Gonna get these last 3 pics of the wiring harness out there for you guys. I will still need to add the two wires for the purge canister but everything needed to make it run is there and done.
Complete harness minus loom.
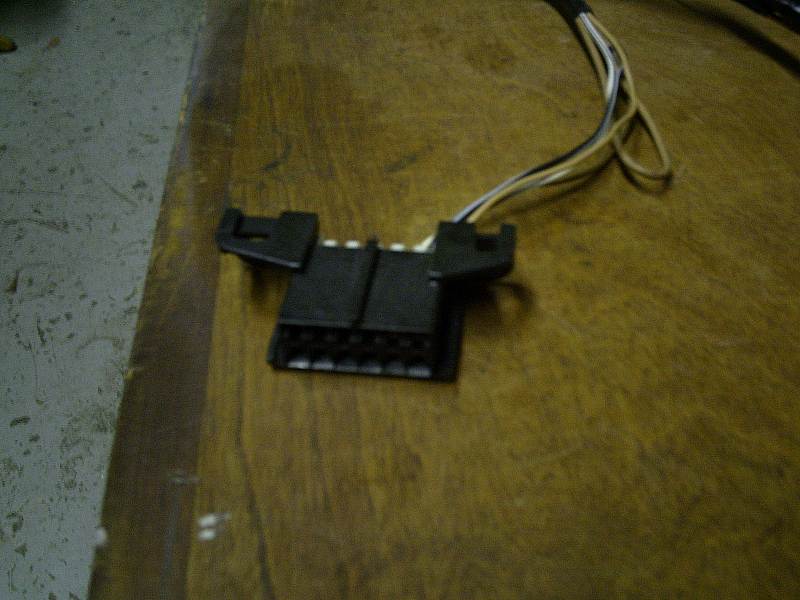
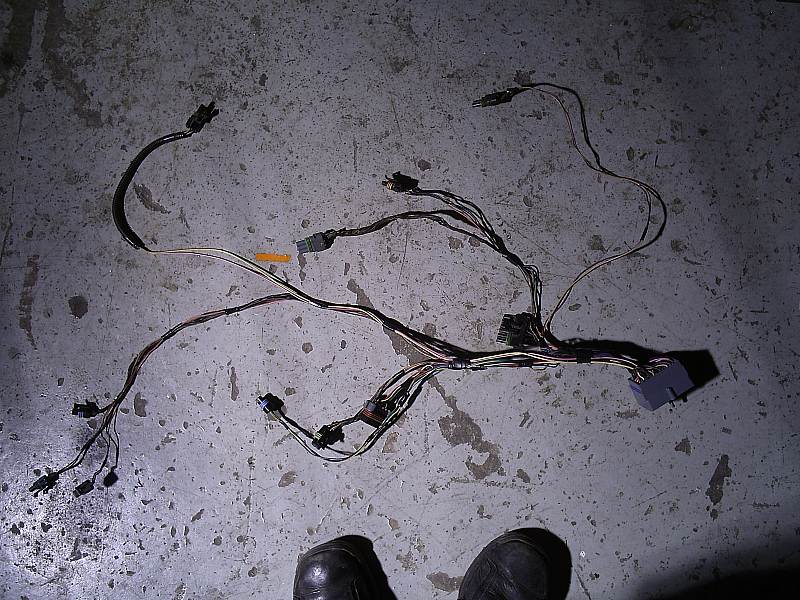
ECM/c203/caddy engine to dash connector. I used the caddy fuel pump relay since I had several around. I wired it into the interior and it will mount under the center console. I didn't have a fiero relay handy and the mount for it in the car was cut out by the previous owner when they installed the firewall speakers. You can see it there next to the ALDL connector. I added a fuel pump prime wire to the ALDL also. Once this harness is in the car it should never have to come out again. I can drop the motor and it will stay put. No more touching the interior to remove the motor. The wires you see that are not connected to anything are the ECM constant power, ground, and fan relays 1 and 2. Those are wired into the car by way of the C500 and bypass the engine to dash connector. Fieros with AC have a 2 speed radiator fan. Mine didn't.
Engine to caddy engine to dash conector. Wires were tucked away as best as possible while also making the harness easy to remove. All wires were cut to length and soldered/heat-shrinked (shrunk? ). As you can see there is very little in the way of connectors that need to be done. I routed then straight down the left side of the engine (as it sit in the fiero), and along the fuel rail (EGR silonoid, TPS, and IAT only). Once loomed it should be very clean looking.
The C500 was pretty simple and rockcrawls pinouts were dead on for me. Not much to worry about here. The few small mods that need to be done are... -Connect a tach wire to the coil. I used an extra caddy coil power connector for this. I shaved off the piece of plastic that keeps it from being used on the tach side. Soldered up the white wire from the C500 and was done. -The alternator wire is WAY too long. Also I can say that an 85 2.5 harness has the wrong size loop to fit the caddy alternator. I don't know about other years but it was for me. I added a new loop and shortened the wire. Cut almost 2' off. -The alternator charge wire (brown) needs to be connected to the caddy alternator connector. The fieros one doesn't fit. Its also WAY too long. Trim it down and change connectors. -In A1 of the C500 you may find a black wire. Its not listed on rockcrawls pinouts. Its the wire for the decklid release FYI. Goes straight to the wire that runs through the decklid. Connector will vary depending on years but any connector will work as long as you have both sides. If you solder it together you will have a hard time removing the decklid. I used a simple connector I found in the shop since the one on the car had been cut off. No wonders we couldn't get the decklid to pop and had to drill out the lock.
Some of the other wires were shortened but most were just connected. Thats it. Its really just time consuming. There is nothing difficult about it.
The chip showed up today. It had a nice detour around the company before finding its way back to me. Should have had it on thursday. Oh well, everything else is done now and this weekend will be dedicated to the first start. I just remembered that I still need to modify the tach. Got the stuff, just got to do it. Later guys.
[This message has been edited by Fieroseverywhere (edited 04-01-2008).]
Dang Man, that's crazy about finding your daughter after all these years. That is really cool. My daughter is 5 weeks old now and hasn't stopped crying for anything other than food. She's really neat though. I should be truthful and say that it seems like the last few nights she has been sleeping a little more, so I think we might be getting to the end of the sleepless nights. My boy is 4 and he is really having fun having a sister around. We're all doing really well.
As for the car, I have all day help Friday and Saturday on my house, so I might take a few hours on Saturday and have my friend help me run wires and try to get that done. It's close now, but what I have left would go a lot faster with another person, so we might try to knock it out for a few hours if we get enough done on the house.
I have my side scoops getting made as we speak. I am hoping to pay for them late this week and get them sometime in the next week or so. I'll show pics when they get here. I am selling my wifes car now that we got here something newer and nicer. With what money I get from her car, which is about $300 (it's a POS) I will be getting the 2 rims I still need. So far I have 2 rims and 3 tires. Wierd story, but when you get a good deal, you have to take it.
That's about all for now, but keep us updated.
Darren
Yea. I'm still in shock about finding her. 8 years of searching finally came up with something. I knew what city she lived it for all that time but didn't have a number or anyone to contact about it. Happy as a clam now!
Glad to hear the new little one is doing well. Don't worry, you'll start getting some sleep soon.
Keep me posted on the scoops and progress of your car. I can't wait to see what you've come up with. Its gonna be very nice. What is the story on the wheels and tires? You got me curious now.
While I'm at it I have a slight update to do...
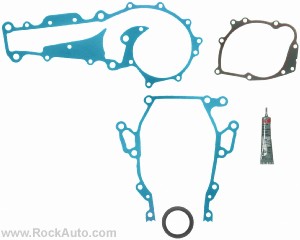
First off I just ordered a timing cover gasket set today. It whould be at the auto parts store near where the car is tomorrow. I picked it up just to be covered in case I need to replace the gaskets after I've removed the water pump to try to fix the leak. At least I'll have some experiance in taking off a water pump while the engine is in the car. Guess there is one bright side to it. I'll do a write up on it for those who are interested.
I have confirmed the plans to bring the car home. It will probably be on the 21st instead of the 12th. I have to work on the 12th so can't take that weekend off. I requested the 18th off and switched schedules with someone for the 21st. This will give me a 4 day weekend. I hope to have the car running this weekend so I can drive it back to my Dads house from the shop. Then I'll have the 4 day weekend to get everything road worthy at the house where I can work all night if needed. Should be able to get some test drives in that weekend also. Monday the 21st I will put the final touches on it and go down to the DMV for the trip permit. Then I go for the final test drive 125 miles home. Hope everything goes smoothly for this. Wish me luck.
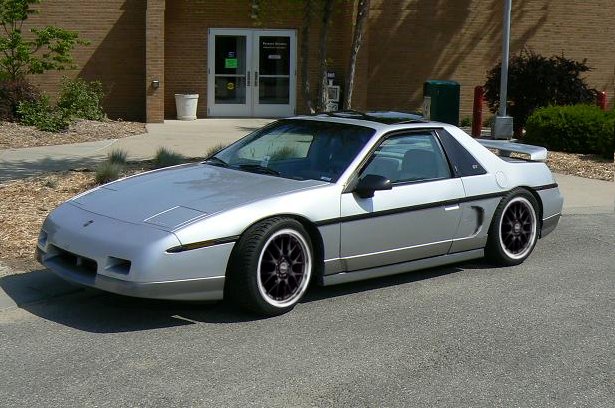
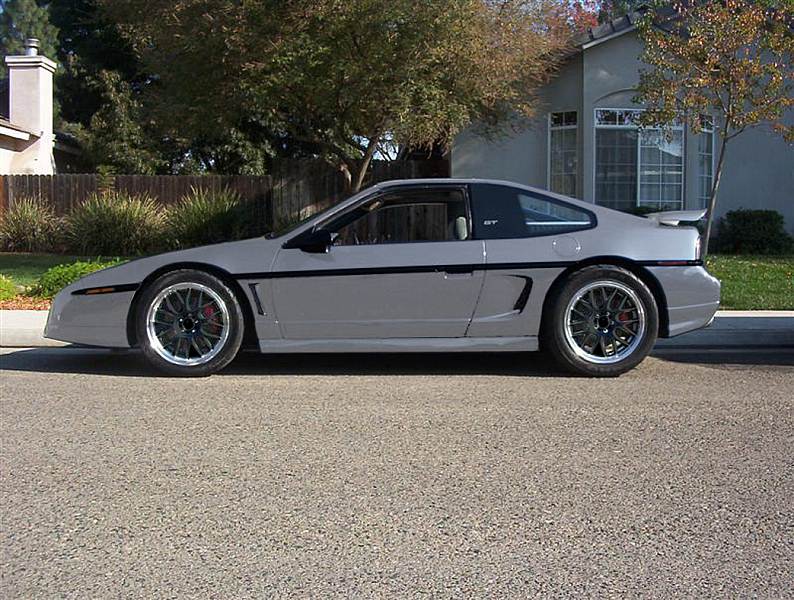
One other thing while I'm at it. Here are a couple photoshops of the car with the new wheels on it. It confimed for me that those are THE wheels for this car. Its gonna look great! I'll have to do the fast back conversion later to here are the photoshops as both body styles. Thank you HC and Unboundmo for the excellant work. Notchie. Fastback. I borrowed a pic of Rickady88GT's car. Unboundmo did a color change on the car and the wheels for me. Rickady used the same wheels but in silver with different sized tires then I'm going to use.
For those who are interested the wheels fit the bill perfectly. They are ASA AR1's in black. 17x7+38mm front and 17x8+35mm rear. The 3mm difference covers the extra width of the vette rotors too. They weigh in at around 21lbs each (same as fiero 14's) and cost ~$135 each. Price, offset, color and staggared widths are just what I was looking for. Just wish they would have made them in 16's with the staggared widths. Still deciding on the tires but they will probably cost more then the wheels. Sizes will be 225/45-17 front and 245/45-17 rear. I chose these sizes cause there are tons of choices. 60 through tirerack.com alone. Ordering everything very soon. Rear wheels are backordered for a while but they will show up eventually.
What do you guys think?
[This message has been edited by Fieroseverywhere (edited 04-03-2008).]
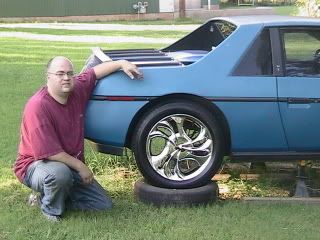
I can't remember what size tires I got, but they are really nice and have all the tread still on them. I was wanting HELO AX 17" rims for mine and a guy in Tulsa had one Helo, and 2 Hokutu Racing Rims that looked exactly like the HELO's. A little different, but if they were on different sides of the car, no one would ever notice. He said that was what this guy had done. So if they all came from the same car, and I knew the Helo fit, then the Hokutu's should fit as well, right? Wrong. The Helo's have 2 bolt patters, and the car that these came off of were the other set of holes. Didn't find this out till I drove an hour and a half to get there. We had agreed on $150 for the three rims, and all had the great tires on them as well, so I did end up buying all of it, and still made off like a bandit, buut I now have 2 rims that I can't use, and I'm not having any luck selling on craigslst as of yet.
So for $150 I got one of the rims that cost around $175 each, as well as 3 really good expensive tires as well. I'm not complaining. When I'm at the storage unit, I'll try to remember to get the tire sizes. They look really good I think. Here's a pic of the one sitting in the wheel well, not mounted.
I went out and looked at the tires, and they are Firestone Firehawk LH P235/50 R17 95V rated tires. Again, 3 of these and 3 rims, one of which I can use for $150. I looked at Sears and these tires sell for $199 each! Man am I a happy camper. And they really look good to I think, shold give the car a good look and stance.
My wiring is starting get cleaned up every day now. I have a 4 day weekend starting tomorrow to work on the house, but I will probably do some on the car as well. I'll post what I get done, if it's anything worth mentioning. I am trying to have mine running my Memorial Day. I think that's the 24th of May. I still need fuel, trans cooler, oil cooler, big brakes finished, water lines run, battery box installed, battery cables run, driver's seat finished and the entire exhaust made up. Still a long list of stuff. Hope I make it.
Well since you're not posting what you've been up to, I'll hijack the thread for today and tell you what I have going on.
I ordered:
3.5 Infinity speakers for the headrests. Now I need to uncover my sewing machine and get the seats finished. Dynomax Highflo Cat Radiator Cap Summit digital ignition box My Scoops are being made as we speak Emailed the guy who I'm getting my Spintech from
I finished:
Installing my auto trans cooler lines from the rad to the rear. Those Suck! Finished more wiring Installed most of the Cruise system. Mine never had it. cut out the tub and installed the front battery box I am in the middle of rebuilding the rear Seville calipers. They are getting painted black.
This weekend is supposed to be nice and I hope to finish: Cutting out the trunk removing the rear fascia finish installing the front tub Run the Battery cables finish the plumbing of the water hoses More of the wiring finished decide on mounting position of the Ignition box. And what ever else I can get to.
Got a bunch done last time I was down. Though that was 10 days ago. The car still is not running. The problem was the place that was suppose to have my gasket kit didn't come through for me. I left Sunday morning and the kit showed up Monday morning. So that part was a bust and stopped progress to a point.
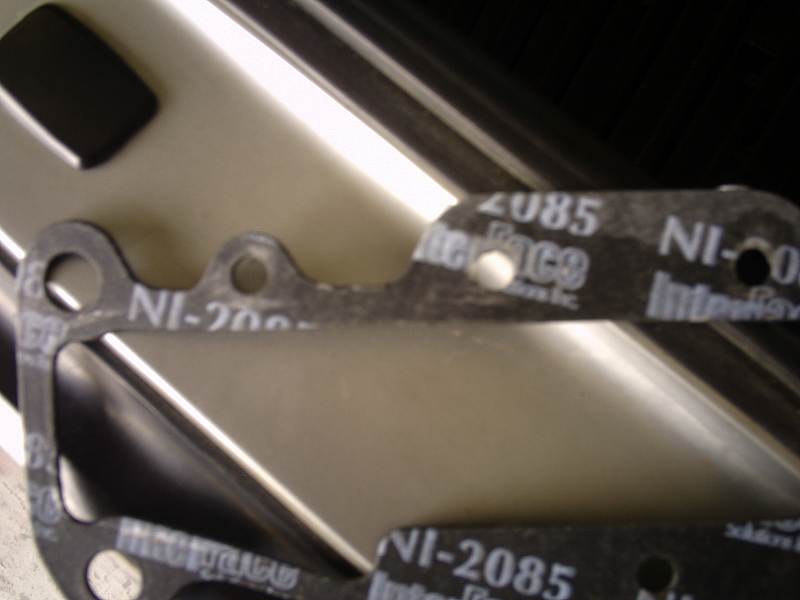
First think we did was take off the waterpump and timing cover. This is a much simpler job then doing a fiero waterpump. I did have to lower the cradle to do it. I threw the jack under it and removed the rear bolts only. I only had to drop it about 3" to get at the crank pully. That has to come off to remove the timing cover. These are the gaskets we have to replace. Timing cover gasket kit. Includes waterpump, timing cover, and water inlet. Fel-pro part # TCS55222 You can get it from rockauto for about 20. I got it up the street for ~15. If your just doing the waterpump there is no need to lower the cradle. Dad took everything next door and I haven't seen it since.
Me and my daughter got started on the rest of the car. After her help with the waterpump she got the job of installing the chip. She was very excited cause its such an important piece. Meanwhile I grab the battery we put on the trickle charger a couple weeks before. Its still wasn't very good so a new battery will be in order also. It had enough juice to test everything though.
She has power! I have never seen this car with any kind of power before this day. Over a year working on it and not once. Most of the lights work. Headlights dont go up but they go down so the gears seem to be good. I'll take a look at them later and make them work. Its probably something simple. Both lights turn on which is a good thing since then are not original either. Someone bought the 30 dollar e-bay special ones for it. For some reason, which I haven't look into yet, the dash lights in the cluster don't work. Of course, its not bolted down, so that could have something to do with it. Every other light in the car works, idiot lights are good. I got a check engine light and bulb test for everything. Aux gauge pod has power and the temp gauge moved. I double checked for any loose wires and tested some circuits to make sure everything else that should have power, did. Everything looked good. Turned on the key, hear the fuel pump relay click on... but no pump. I double checked the wiring diagrams and realized I forgot a wire.. alright, studied them for a while. Oops. I think I have it figured out but still have to make the connection.
Soon after the battery died. Thats about it for this trip. I only had one day and it was pretty much done from the beginning. Had lots of fun with my daughter though! We made sure to take a couple pics of her in the sprint car too. One crazy, one smiling, of course.
I'm heading down tomorrow night for the final push to roadworthyness (Is that a word? ). I'm taking friday through monday off to get this thing on the road. Once running (hopefully friday) it will be moved (hehe, driven. ) back to the garage at Dads house. There I can work til I pass out if I need to. 2 days and, if needed, nights to get everything else ready. Then Monday morning the DMV opens and I can get the trip permit to take it home. I plan to take the rest of monday to work on.... Testdriving it of course. Thats the plan and I'm sticking to it! Later
There you go Darren!
Hehe. I just saw you post above this one. Somehow I missed it before starting this update. Nice, looks like we might even get these two running on the same weekend. Cant wait to hear it and see those scoops your coming up with.
[This message has been edited by Fieroseverywhere (edited 04-17-2008).]
It was a good weekend. Lots of frusteration but overall a good weekend.
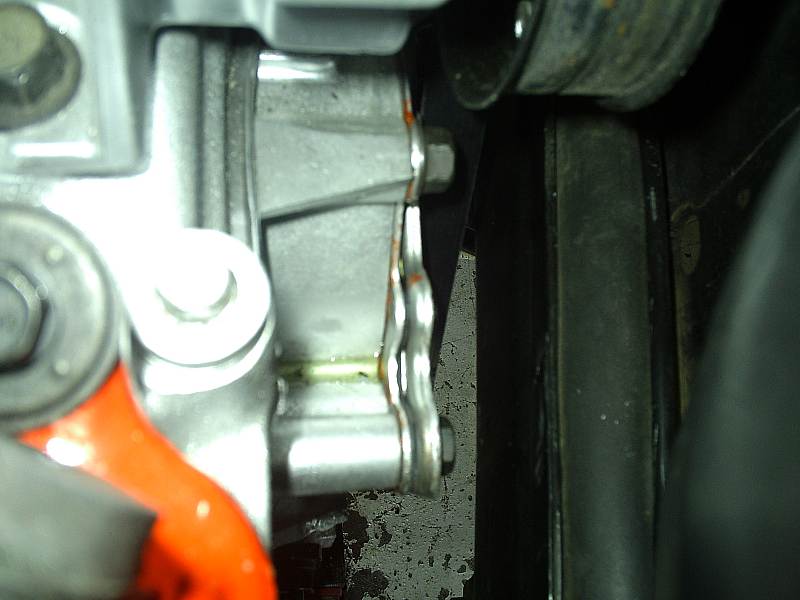
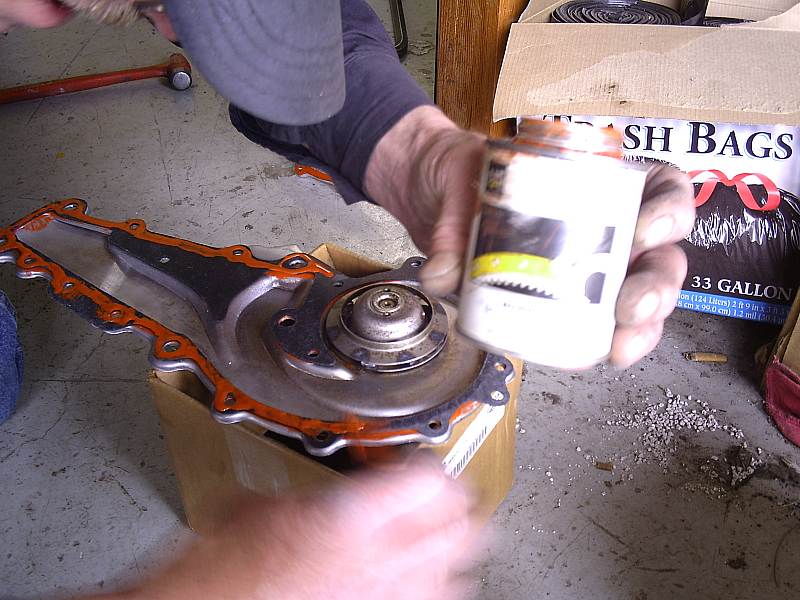
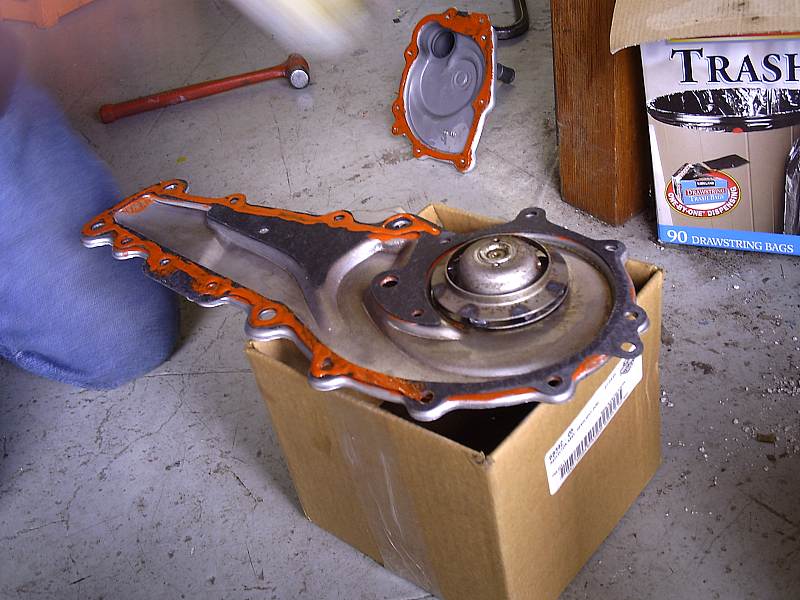
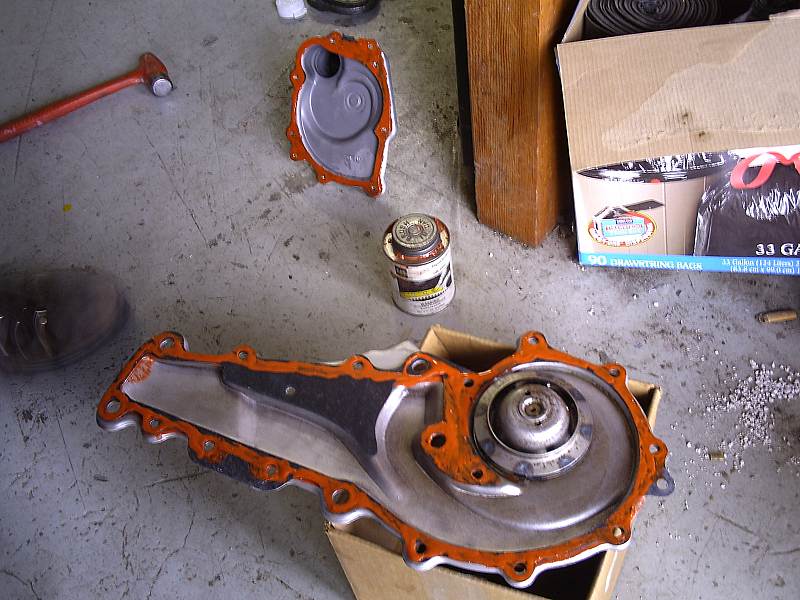
First up we finished up replacing the gaskets I mentioned above. Course that didn't fix the problem. First we had one leak, after replacing the gasket we had two. Here is where the first leak was... The leak we were fixing was better, but still leaking. The timing cover stayed on but the water inlet and water pump had to come back off. The gaskets were cleaned and inspected. This revealed the problem. Looks like when the previous owner of the caddy replaced the water pump, they over torqued a couple of the bolts. Since the 4.9 water pump is made out of stamped steel, it made some leaks appear. Here is what the gasket looked like... We confirmed and fixed the problem with a feeler gauge on the steel table. Stamped steel may be cheap but at least its easy to fix.
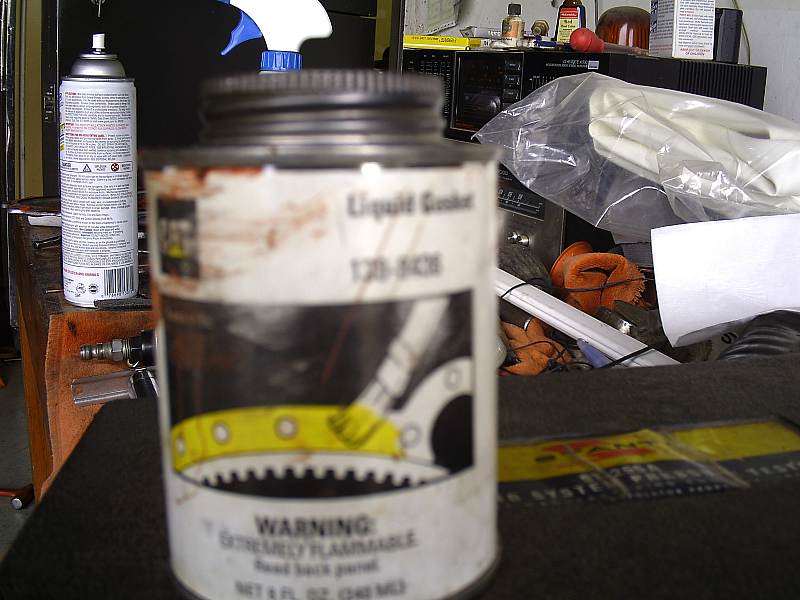
We put everything back together and decided not to take any chances. Some of you tractor motor guys ( ) might get a kick out of this. Cat Red liquid gasket maker.
Both sides or every gasket were covered as everything was stuck back together. This stuff works great. I will never change another 4.9 waterpump without this stuff. We put a little on the thremostat gasket also since we were seeing some blow-by there. We pressure tested the system yet again (#8 I think. ). This time we got it up to 16lbs. Cooling system is done. It took almost 4 hours but its done. Whew.
Next up I had to figure out why the fuel pump was not working. I added the wire I had forgot last time and tried it again. Nothing. I started running checks to find where the problem was. Basically it lead me to think that there was a dead short at the tank so.... I had to drop the tank yet again. While it was out we tested the fuel pump by connecting it directly to a battery. It worked and seemed to be puting out good pressure. We went back to the wiring. Everything had continuety (sp?) and the ground was good. The relay, fuse, and all the wiring is good. After scratching out heads for about 5 min we find the problem...
Aparently when I had to fix the patch job the previous owner did to the power wire for the fuel pump, I didn't get them secured well enough and the one wire was pinched between the tunnel and sending unit. Oops.
I got it put back together. I did a few other things too get it ready to start. Just the final details, I don't remember all of it. That was it for friday.
It runs and I have 4 videos to prove it. Are you guys ready for this????
.... To be continued....
[This message has been edited by Fieroseverywhere (edited 04-22-2008).]
Glad to hear you got the problems fixed. I didn't get near as much done as you did. My trans colling tubrs are giving me fits still, but oh well. Here's the trunk removed, looking all toothless.
I have an exhaust question that you might be able to answer. I have never done an exhaust system, and don't know a lot about them. What is the stock size of the outlet on the caddy? Is there an aftermarket part that can bolt on to that hole? The hole is dead center in the pic on the rear echaust manifold. These are 91 Deville manifolds. If so is that what is called a collector? Or is that just a term used on headers? Is a stock manifold a type of header?? I'm so confused!! If there isn't an aftermarket part that could be bought, do you have the original part that came off the manifold you could sell me as well as a foot or so of the pipe that is connected to it, and I will just start my system from there. I had thought of going around the front of the engine in more the way that you are to keep it more in the stock location, but going out the back will be easier for me and since I have the trunk out, I have the room.
Thanks in advance for any info.
And now back to the Continuing saga of Fiero Argento Signora,
Darren
I only wish I had all the problems figured out. Actually it kept getting worse as the weekend progressed. The good thing is it runs. Once it get a few other things figured out it will run good. It sounds really good when it working.
Ok. I'll answer what I can.
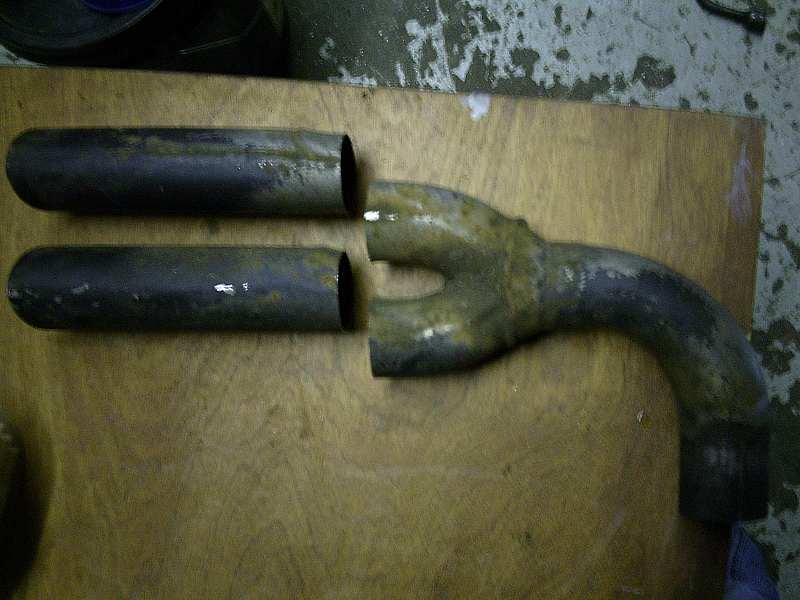
-Stock size of caddy outlet... 2.5" -You could probably find what you need at an exhaust shop to bolt it up. All you really need is a flange to fit the manifold. Or if you can wait a couple weeks I do have the original caddy one that I can send to you. Maybe I can get it out sooner. Its has about a foot of pipe on it. - A collector is the point where both manifolds or headers meet. Usually in the "Y" pipe. I guess in this case that manifold is also the collector.
I have to run to work. I'll be back later to post some vids and help with what I can. Later Darren.
[This message has been edited by Fieroseverywhere (edited 04-22-2008).]
Yes I want it. Please send it when you can. PM Me and let me know what you want for it and shipping to OKC,OK 73131
A few weeks will work. I won't get it turned over any sooner than that. If I do head out to pull a part and find one before then, I will let you know so you don't waste your time, but I am not finding the time to get down there much lately.
Hang in there, you will get everything worked out. Did you get it home yet? I know you got t started, but I wasn't sure if you made the trip home with it or not.
Later, Darren
I'll give my Dad a call and see if he can dig it out for me. I'll let you know in the next couple of days. I don't want anything for it but I'll let you know what shipping is.
No, its not home yet. I realized I didn't have locks for it so there was no point. It hasn't been test driven yet either. I have 2 weeks to find out the problem so I can fix it. I'll explain later tonight. I don't want to give away too much yet. I got the videos uploaded last night so I'll update this thread after work.
[This message has been edited by Fieroseverywhere (edited 04-23-2008).]
The first vid was the first real start of the engine since the rebuild. It had been fired up once before for about 10 sec so technically the second start.
Dad forgot to tighten the water pump pully bolts (well, two of them). That was most of the racket you could hear. Exhaust sounds suprisingly good though. It ran for about a minute before we had to shut it down. The idle never came down. We needed to brake in the cam at a high idle anyway.
The second video was for the third start. The waterpump pully bolts are now tight. She fired right back up. See if you can spot the fire.
Still idling high. Lots of high temp paint, zinc primer, and steam coming out on top of the engine bay on top of the smoke. I remembered that the screw for the ISC was not the original. It was too long and had to be shortened. I don't know how the previous owner could have made it work. If you didn't see it the fire was just a papertowel on the under car pipe. Oops. No burned wires of any other problems. We also set the timing with a light while it was running.
About 5 minutes after we shut it off my daughter showed up with her grandmother. She got to hold the camera at the beginning of this vid. Dad went over to his shop to fix the ISC screw.
She's funny. The car is idling now and sounds much better. Shortly after this video the temporary fuel lines decide they are done. We tried to fix them a couple of times but those alluminum fittings are worthless IMO. Saturday was nearing the end anyway. I replaced the trunk carpet with some out of an early coupe. I packed up everything that needed to go with the car and called it a day. I also temporarily attached the gauges, installed the inner fenderwells and did a few other odds and ends to start getting the car ready to move.
I took sunday off and took my daughter to do some lazer tag. We had a blast.
Monday morning it was time to get this car moving. We remade the fuel lines. Dad did the fittings and I bend the lines where I wanted. I routed them between the ISC and alternator bracket. Looks very clean now. I also relocated the MAP sensor so I could use the stock intake for a while. The tube is from an 85 2.5 fiero. The EGR silinoid was moved also for a cleaner look. I put on most of the loom for the wiring. I still have some work there to finalize everything but it came out very good. It was time to take the first test drive. When we fired it up again It sounded like we lost a cylinder. It had to be moved out of the shop so I drove it like that around the building and backed it in. I could tell it is going to be a fun car even with only a 15 sec test drive. Eventually we found the ground wire for the ECM had broken at the loop. Not completely, but enough to cause a problem. Once I replaced it everything worked great again. It was running very near perfect.
But it was short lived. It developed another problem.
Time was short and I had to start the drive home. So here is where I'm stuck at the moment. Maybe someone can help me out?
Car starts and idles perfect. When you give it gas though it bogs down and tries to die. It won't take ANY throttle. Everything was working perfectly for a little while. I'm leaning towards the loss of the MAP or possibly another sensor. I really don't know for sure right now. I can't run any tests since the car is so far away either. I didn't get a chance to check it again once it cooled so I don't even know if its heat related. Anyone have any ideas?
All in all it was a good weekend. It sounds great and its running. I'll get the rest figured out later and finally get my test drives. I'll get more pics and vids later when I can make it back down. Hopefully have the first real test drive on video also. We'll see. Later.
[This message has been edited by Fieroseverywhere (edited 12-08-2009).]
Glad to hear you got it figured out. And I am also really glad to see the videos. That was really cool. I let my son watch them and told him that you were doing the same thing that we are doing and that is what ours is going to sound like. He got really excited and wanted to know if it was going to be silver like that one. I told him no, that ours was going to stay blue and look really cool. Then he said could we paint it like a rainbow..................
I think I'll take him hunting this weekend and up his rations of beef jerky and pork rinds. I hope that knocks that rainbow idea out of his head once and for all.
you never know whats going to come out of a 4 year olds head. Seriously he cracks me up all the time.
Keep the videos coming. Especially of a good launch when you get it out.
Later, Darren
I still can't believe the pump died right after we finally got it all running right. It figures! Rainbow. Hehe. Thats great. Have someone photoshop a really bad rainbow fiero for you. I'm sure that will stop that idea in its tracks. I actually think yours will sound better. The much shorter exhaust will make a big defference. I can't wait to hear it fire up. Your gonna take a video right?
I'm gonna do some thing different with the exhaust tips. Looking at the videos I realize how restrictive they actually are. Supposedly dual 2.5 tips but the exhaust doesn't get to use the 2.5 at all. That center hole is way to small. I'll try opening up the ends a bit and help the flow. Then we'll see what it sounds like.
I'm gonna fix this thing into submission I swear it. I have the days (well day and a 1/2) off of work planed out already. I'll be heading down again on friday 5-2. I should have a few hours to replace the pump that day and until monday evening to test drive and work out any other bugs that come up. Wish me luck. Later Darren, Caalon
[This message has been edited by Fieroseverywhere (edited 04-24-2008).]
First thing I did was pull the O2 sensor. It turned out to be a Bosch. In the trash it went. I picked up a new Delco one at a local dealership. Then all of a sudden it wasn't running nearly as rich as it used to be. Imagine that.
Once the O2 was replace I had to pull all of the spark plugs and clean them. Most of them had fouled out at that point and I couldn't tell which ones were still good. Once cleaned they were re-installed. It fired right up.
Then the next problem showed its ugly little head. It wouldn't idle right. It just kept hunting and still wouldn't take much throttle. After a few hours of looking I found the problem..... I missed a wire. And a pretty important one at that. The power wire for the EGR silonoid. Actually I only missed part of the wire. From the caddy C225 to the PCM. Thats why I had such a hard time tracking it down. I added it in a presto. Runs like a champ and finally sounds like it should.
We adjusted the timing and idle again and I did a few other touches to the car. Then I took it for a little test drive. Felt good. Tons more power then the 2.8. The clutch is pretty touchy being new and all but everything else felt good. Brakes worked better then I had hoped. I only put my foot in it once in first gear. Wow! Me likes!
I got a couple more clips. Much better IMO.
The squeeling is a bad bearing in the alternator. It will be replaced later.
Exhaust clip.
There are still some bugs to work out but overall its much better. Still a touch on the rich side but not to the point that is fouling out plugs anymore. I'll keep you guys posted on the progress.
[This message has been edited by Fieroseverywhere (edited 12-08-2009).]
First up I wanted to make sure I have everything to finish the brake upgrade. This stuff I ordered from summitracing.com 1 set - Russel Braided stainless brake lines. Summit part # - RUS-692110 - $99.88 (these are fiero specific, NOT a universal kit.) They are DOT approved and I feel a better brand then the Oscelot the fierostore sells. If you need costom lengths WCF is your best option. 1 set - Poly sway bar end links. 2.625" (2 5/8"(all fiero end links are the same size) center sleeve length. Summit part # - ENS-9-8117R - $15.39 for red. Use last digit "G" for black. 1 set - Poly sway bar frame bushings. 23mm ID greasable Summit part # ENS-9-5158R (again "G" for black)- $15.95 Also picked up a Permacool p/n 691 Oil cooler (summit part # PRM-691). I am going to see which way will work the best and weight the differenced over using the auto radiator. ~$45
Ordered from fierostore.com 2 pair - 88 caliper bolts. $9.90 2 pair - Solo bleeder for calipers. $19.90 1 fiero side scoop for permacool oil cooler. To direct air towards the cooler which will be mounted inside the scoop. ~$22
Parts should be here next week sometime. I will post pics when they come in. Questions? Caliper rebuild kits are here also.
sounds really good now! I have pulled off of mine, but I will still try to get it started Memorial Day weekend. Are you getting to drive it every day yet? I'm sooooo jealous.
I figure he must be a man of few words. Or in this case... none.
quote
Originally posted by Darren's 87 coupe:
sounds really good now! I have pulled off of mine, but I will still try to get it started Memorial Day weekend. Are you getting to drive it every day yet? I'm sooooo jealous.
Talk at you later, keep it coming,
Darren
It sounds much better. I still have a ways to go before I can drive it "officially" on the street. Not that I don't test drive it every chance I get. Though much better its still running rich at idle. Not fouling out the plugs anymore but still rich but only at idle. It won't pass emmissions like that since all they test for is idle. The belt chirp drives me crazy everytime I watch the videos. I'm going to have to re-make the tentioner bracket to tighten it up a bit. The interior is still in pieces too. I want to get some more Dynomat before I put it back together. April was a really bad month and completely killed all savings I had so its slow moving once again. I have lots to keep me busy in the meantime and should be back on my feet in a week or two. Lucky for me I had some savings or I'd be living in this car right now.
I'm heading down this weekend again for some more quality time with my daughter and the 4.9. Maybe I'll even put the seatbelts back in for the next test drive. I started writing a to-do list today and finally stopped on line 35 or so. Guess there is still a bunch that needs done. I just wish the previous owners had taken a little better care of the car. Good thing I practically stripped it down to the frame for this build.
Thanks for the pick me up guys. That jack@$$ on you-tube has been giving me all kinds of crap. Even though he cant post his comments without my approval that doesn't stop him from sending them to me. What a sh!thead. Like I'd even bother using a 4.9 for drag racing, or a fiero for that matter. I was tempted to remove the videos and move to another host. I may still do that. Anyways...
I'll update again probably on monday night. We'll see how far I can get this weekend. I'll try to get a test drive video also. Later Darren, you too Rich.
EDIT: Hey Darren, do you still need that exhaust flange? I spaced it last time I was down there. I'll set a reminder if you do just in case.
[This message has been edited by Fieroseverywhere (edited 05-13-2008).]
Don't send it yet, I think now that I will probably go the same route you did now that I have talked it over with Aaron. I agree it makes more since to do it that way, but just saw the easy way out and wanted to take it, but I'll try to make it work like you did.
Don't send it yet, I think now that I will probably go the same route you did now that I have talked it over with Aaron. I agree it makes more since to do it that way, but just saw the easy way out and wanted to take it, but I'll try to make it work like you did.
Have fun on the test drives.
Darren
I'm not entirely happy with my exhaust setup. At least from the cat back. The 4.9 oilpan leaves little room for 2.5' undercar pipe when mounted on an 88 cradle. You may have more space on the earlier cradle but I would deffinately look into it further before you make your final decision. I'm now going to have to modify my cradle to get enough clearance to run the pipe the way I want to. I scraped the hell out of it on the first test drive just getting out of the driveway. I know the car is too low right now but the exhaust shouldn't be the first thing to hit the ground.
It was a hard choice for me since I had to use a cat and refuse to cut my trunk. A part of me wishes I had just gone with the seville/eldorado manifolds and run the pipe like Jon did on his site. Problem is he didn't use a cat in this setup. This might be a better approach for you since you are already at that stage. I can't remember if you need a cat or not. You already have the seville chip right? I know where a couple sets of those manifolds are in the yard up the street if your interested. I go down there every couple of weeks anyways and could pull a set for you if your interested.
I know my car will get done the way I want it to eventually. I just have to keep figuring it out along the way. I do have a plan to make it work the way I want now but it gonna be a bunch more work to get it done.
[This message has been edited by Fieroseverywhere (edited 05-14-2008).]
-Connect a tach wire to the coil. I used an extra caddy coil power connector for this. I shaved off the piece of plastic that keeps it from being used on the tach side. Soldered up the white wire from the C500 and was done. Can you take a picture of what you mean on this part? I'm not sure if I am missing a connector on the distributor or not.
Still unsure of how to connect the tach wire to the coil. Also unsure of the heavy pink (on an 87) ignition wire E3 from the C500. How do you hook this up?
The heavy pink wire from E3 is your coil power wire. The white wire from C3 also connects to the coil. It is your tach signal wire that eventually goes to the tach. Aparently the diagrams posted above dont have listed. I'm working on adjusting the diagrams for use in a fiero. They both plug into the coil near the top of the dist cap right next to each other. If you take the coil cover off you will see where the wires go. The dist cap should be marked with which one is which. If its not a delco cap then it might not. The wires coming out of the coil should be red and white also. It may have red and yellow wires if the coil's not original.
The connector you need (x2) should be in your wiring stuff somewhere but may not since its not actually part of the engine harness. It will only fit into the power side in its un-modified state. Its an 18" section of pink wire with a single wire white square connector on one end and a single wire black round connector on the other end. (hehe, hows that for a description? ) The wire probably has some loom on it. It may be in your pile of wire. I'm sure you have one. Find that connector and you should know exactly what I mean. I just used a second one from the junkyard and cut off the plastic ridge that kept me from using it on the tach side.
I'll just tried to get my dad to take a pic for me but he wouldn't do it since it's raining. Guess he's afraid he might melt, but I know he's NOT that sweet. I'll post it as soon as he sends me the pic. The car will be on the road "officially" next weekend. Then I can take all the pics you want or need myself at that point. If you need I can grab you a couple of those connectors from the yard this weekend, modify the one and send them to you.
Are you going to be on here most of the weekend? I'm having a few guys over on Sunday, and they really want to get the engine to turn over. I might have some last minute questions. If we don't get it started they might be coming back over on monday. I'm trying to get the last few things bought today and tomorrow, as well as a trip to pull a part. SO i hope to have everything ready to go on sunday morning and that night I might actually have some video up for you to see and hear.
Then I hope to have it running on the street by the end of June. I would still need to finish the exhaust, brakes, neaten up the wires, and get the tag up to date as well as get some insurance on it. After all that then I need to get it painted by the end of July to take it to Detroit. That's a lot to get done. Thanks for all the help you've been so far.


 Ha! Yea, right.
 Looks good though.
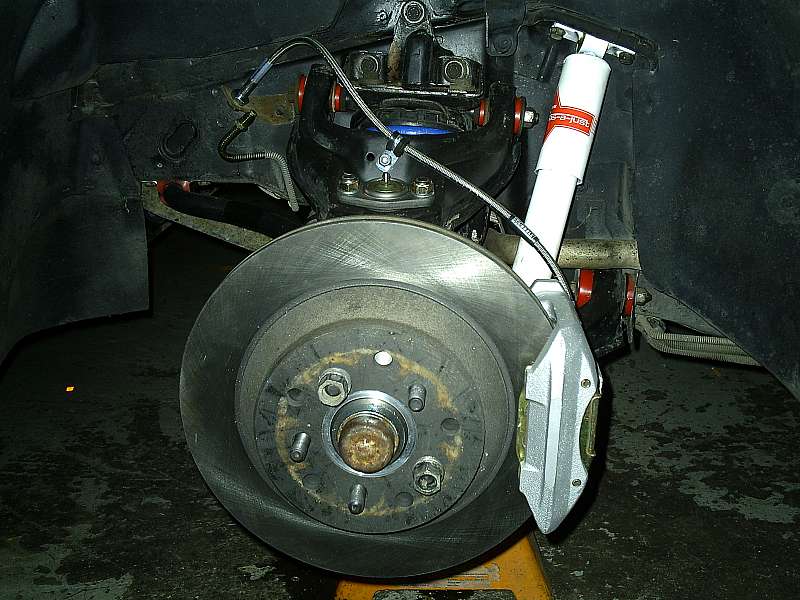
 With some heat (mapp gas) and some WD40 he was done in no time.
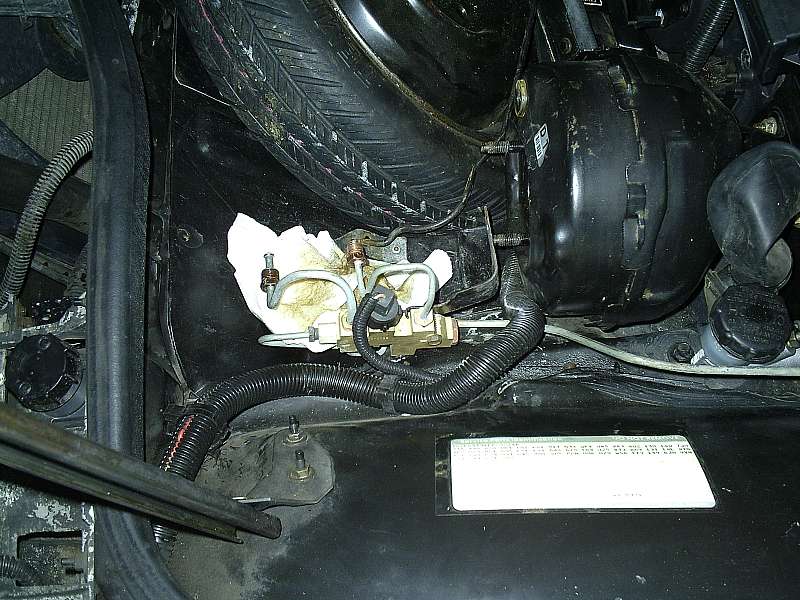


 Seems to be a pretty common mistake now. I found a new one at the wrecking yard and have since remidied that problem. Its funny the Caddy BCM looks almost identical to the fiero ECM. The caddy ECM looks like this for future referance. You want the ones with Serv. # 16132240. 91 to early 93 according to Aaron. Aaron's chips work with these ones.
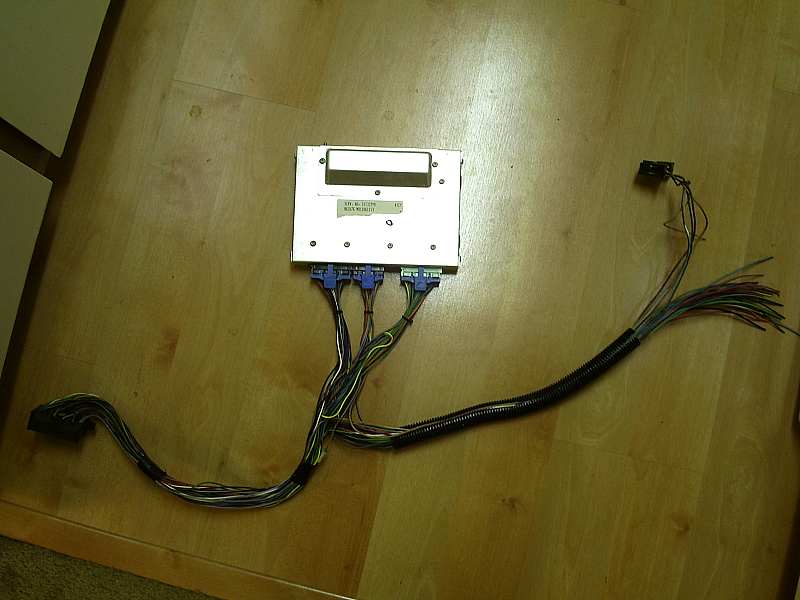


 It feels good to save a fiero like this one. With all the little problems fixed its going to be a pretty nice car. Previous owners suck!


 Thats the plan and I'm sticking to it! Later


 ) The wire probably has some loom on it. It may be in your pile of wire. I'm sure you have one.


