My favourite part of the instructions is this paragraph at the end -
"DO NOT LISTEN TO: A. YOUR BUDDY! B. YOUR BUDDY�S FRIEND! C. THE LOCAL NITROUS GURU! D. ANY ARTICLE IN ANY MAGAZINE If you follow the foregoing suggestions, your NX system will operate trouble free and provide years of thrills. ABOVE ALL REMEMBER TO RACE SAFE AND HAVE FUN!!!!!!!!!!!!!!!!!!!!!!!!!!!!!!!!"
Good Advice in my book - we've all heard Nitrous horror stories
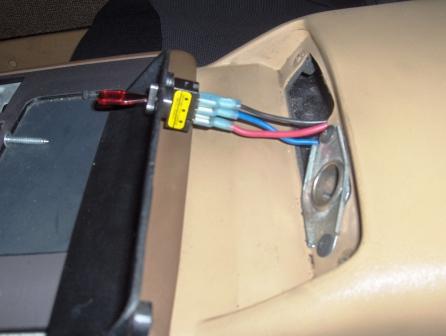
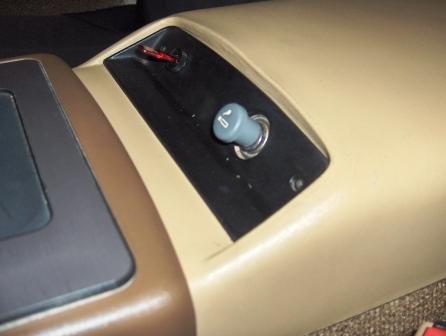
Here is a couple shots of the arming switch. I mounted it in the console and will probably change it over to a red lighted rocker switch I found in the garage today, as it is less obtrusive than the one that came in the kit:
I also called Mark, the owner of Street and Performance who sold me the 92/93 LT1 ODBI ECM/harness. Since I couldn't get the tach or speedo working, I finally called for his advice.
For the tach, he says I need a digital interface - not quite sure what that is but of course he sells them... not sure if I should be buying it from Arizona or if I can buy it locally though. That might explain why I couldn't get a tach signal off that white wire or with a tach filter off the white coil wire either. I tried connecting the tach wire (white) from the ECM to the MSD RPM box and it is supposed to show rpm while the engine is running and it never went above 0rpm, so it doesn't work on that either.
For the speedo, he recommended plugging in the VSS plug from his harness in the governor and splicing the Fiero yellow to his purple wire and the Fiero purple to his yellow (reversed). I temporarily did that (see below) and the speedo still didn't work I am trying to dig up my V8 Archie video, but so far no luck finding it. I do remember that he splices both together before plugging in though. Could I possibly have the wrong wires? I don't really see any other purple and yellow ones though. The reason I ask is because the purple Fiero wire has 12V on it when IGN is on - should it? When I had Purple to Purple and yellow to yellow connected at the VSS, the turn signal / backup light fuse blew! I might also have a problem in the VSS itself, but I haven't tried replacing it yet. I think it is working because the engine runs/drives better when it is plugged in from the LT1 computer.
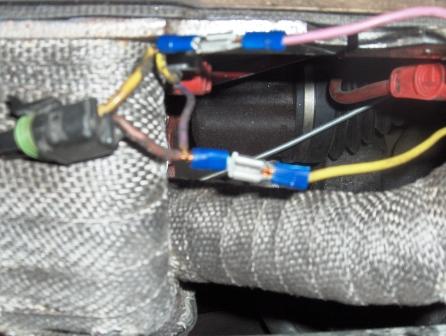
VSS plug:
Wiring setup as suggested by Mark, owner of Street and Performance:
I explained that I had replaced the pulse style generator in the governor for the green gear driven one that the Fiero came with. He said either with work with his ECM but I do need the Fiero style one for the speedo to work.
No fuses are blown anywhere, so I am running out of things to check. It going to be tricky removing the governor cap with the header collector right there but I'm going to try next week.
On another note, while I was poking around the wires, I found and labelled the fan control wire and the temperature idiot light wire. If I didn't sell my iron duke for $200 I might still have had the sensors I needed for them - at least they are labelled for a future date.
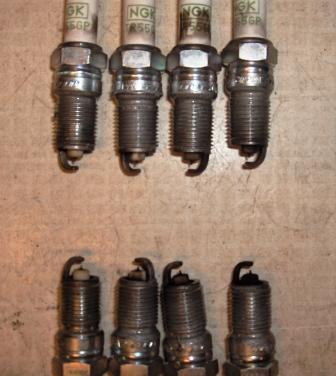
I also ordered a set of Nitrous plugs NGK TR6 as the NGK TR55's won't be a cold enough range. While I was at KC auto parts, I found aluminum collector gaskets as the paper ones leaked and burnt. I picked up grade 8 bolt and metal lock nuts at Nut and Bolt Supply and will let the muffler shop install them for free next week since the catalytic burn mark on my chest is still there...
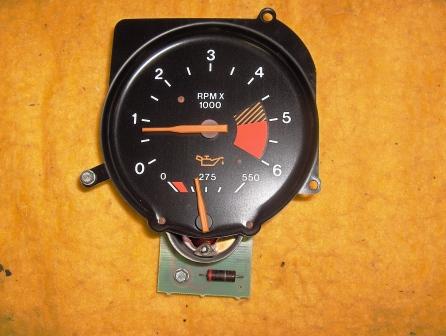
Last thing I got today before the cruise night was picking up the capacitors to modify the tach. I bought them at The Source (Radio Shack) in a variety pack that will get me the 0.0064 micro farads I need. I realize that it isn't the most accurate way of doing it, but with an automatic trans and the digital window switch, I'll be fine.
My son thought putting this on was a good idea, althought it kinda gives people a heads up - not sure if it will stay on yet...
No shots from the cruise night as my camera battery died and I ordered 2 new ones, but I lost my voice talking about the car. My son couldn't believe the crowd around a car that isn't even close to being finished
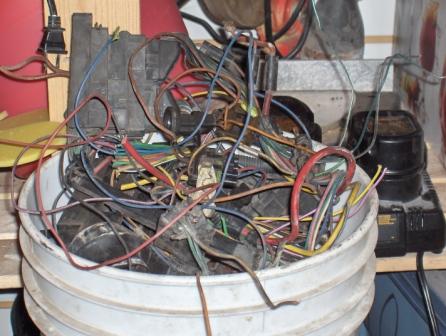
Sorry for all the questions! I actually don't mind if they go unanswered - I feel better already just ranting and venting Everytime I run into a snag, I work on something I like better for a awhile before a new strategy comes together. However, I'm still not a fan of electrical wiring and it obviously shows - this is when I think of the Mercruiser engine I almost bought for this swap
Instead I have this bucket-O-wire!
Fiero2m8 is getting the weekend off as I'm heading up north to a family party.
Cheers!
[This message has been edited by Fiero2m8 (edited 09-18-2006).]
YES, PAGE 5! I KNEW IF I MADE THE POST LONG ENOUGH I MIGHT GET MY OWN PAGE THIS TIME There, you've be warned it's long...
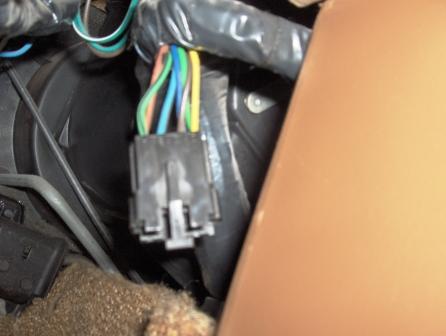
When I was under the dash I found this plug near the back of the radio. Is this the plug for the addtional aux guages? I have a 1986 Sport coupe.
I also found a spare plug above the rear window defroster - what option (that I don't have) is that for?
Ryan,
I'm not sure if that's the aux guage plug or not. My car is an 85, so I didn't have that one when I added the guages, but for what it's worth, there are only 5 or 6 wires max going to the aux gauges (ground, +12, the two signals, dimmer control, maybe one more?). That connector looks like it has at least 6 wires coming from it. Does your car have cruise? I discovered a spare connector under my dash behind the console this winter when I had it all apart. I looked through the wiring diagrams and found that it was related to the cruise control option that my car doesn't have.
The extra connector above the defrost is where the rear decklid release goes. Nice thing is that you can add the option by getting the switch in the car, relay and trunk wiring and solenoid. That's what I've read anyway; my car came with it so I've never done it. It's supposed to be an incredibly easy mod. I'm sure an archive search should turn something up.
Hope this helps! Also wish I could help with your VSS troubles but that's well beyond this amateur
Andrew
[This message has been edited by 85SE (edited 08-29-2006).]
Thanks Andrew! I checked out the hatch situation and I now have the 85GT single wire setup on the current decklid but I also have a 4 wire decklid as a spare. When I run across the dash switch, I should be able to get it working... Also, my car doesn't have cruise, A/C, power windows or locks etc. so that plug maybe for cruise although if I look hard enough, I probably will find the correct plug.
Before the cruise night I got a couple mods done today:
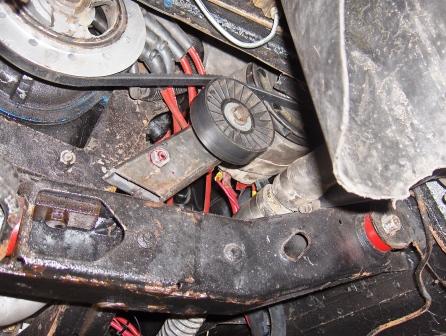
I noticed that my v-belt still vibrated at very high rpm - it wasn't a problem before the rebuild but my redline is now about 1500 rpm higher than stock, so I decided to try the idler pulley mod. I used the LT1 idler pulley that came with my motor and bolted it to Archie's front engine mount using a piece of scrap 1x2" of steel to position the pulley in alignment midway between the harmonic balancer and the Fiero alternator. It involved using a 15390 belt (15/32 x 39") or one inch longer than I had used last year. Here is the picture of it after completion:
I also noticed that even though Archie's strut bar is mounted at the adapter plate, the front of the motor still tries to torque rearward under heavy load. Since I have very limited clearance to the frame rail (barely enough to get a new belt on) I wanted to do something to strengthen that area.
This is what I came up with:
It is a stock four cylinder Fiero dogbone bolted to the cylinder head through the shock tower and also bolted to the frame rail. Now the motor doesn't move at all which should be good for the axles and the belt clearance. The only thing that can move now is the front wheels leaving the ground
I tried hooking up the tach wire from the LT1 ODBI ECM (4000 pulse/mile) to my MSD digital window switch input and I don't get any rpm readings, so the problem may be bigger than I first thought.
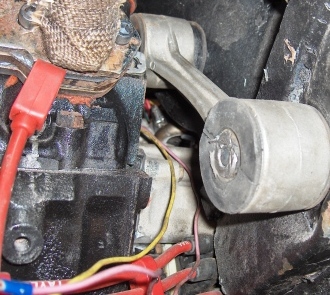
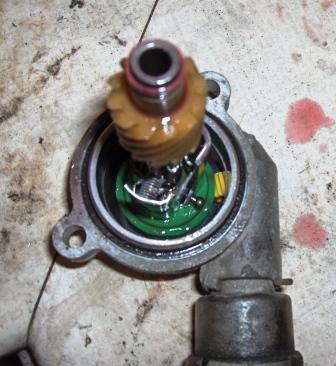
Yesterday I removed the VSS / governor assembly to make sure everything mechanicallly is moving fine. They appear to be fine. I was glad that the header clearance was a non-issue as once the bolts were removed, it could be swivelled slightly to remove the assembly:
Next I removed the NGK TR55 plugs and discovered a couple problems:
1. The number #2 wire was slightly off the optispark distributor causing a misfire and a rough idle.
My new colder NGK TR6 plugs were installed and gapped to .035" for the Nitrous application. 2. The front (normally driver's side bank) was running very rich due to a header / collector gasket leak (burnout)
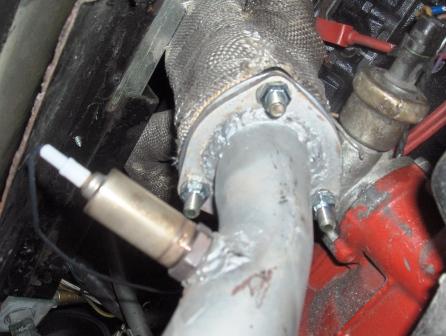
I replaced both gaskets with dead soft aluminum ones for a permanent fix - the shop recommended installing them with metal locknuts. I picked up grade 8 bolts and metal lock nuts in place of the ones in the package. I also had the grind the collector flange flat first as it was warpped from a previous overtightening mistake.
Checked again after the engine was up to operating temp and resnugged nuts and let them cool - finally no exhaust leaks Sounds much better and it most importantly solved the rich condition (the O2 sensor was fooled into thinking the bank was lean due to the leak causing the ECM to richen the mixture for safety)!
Fiero2m8
[This message has been edited by Fiero2m8 (edited 09-03-2006).]
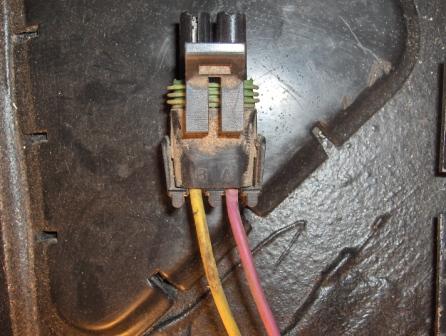
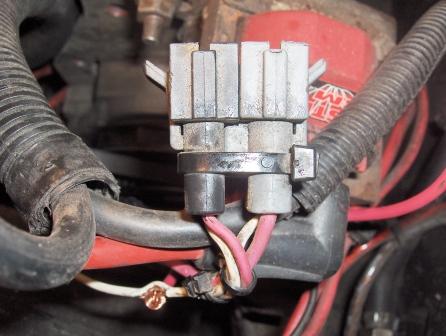
Today I called MSD in Texas (915-857-5200) for tech support getting the digital window switch working. They suggested grabbing the white wire input from the negative (tach wire) on the coil. Since the LT1 coil / coil driver is different than most cylinder type coils I had experience with, I called Street and Performance in Arizona (479-394-571) to ensure I was tapping into the correct white wire. They were also helpful and said the white wire I needed was not on the coil driver plug, but the white wire on the grey half of the coil plug. In this picture it is the white wire on the right side of the plug:
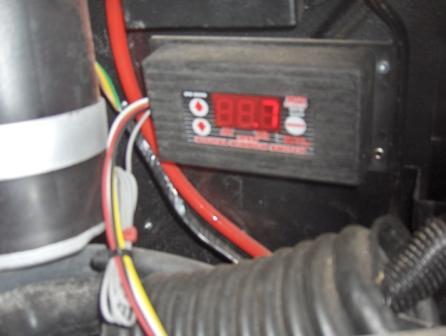
Success Here is a shot of the Fiero idling - the .7 represents 700rpm.
I successfully tested the Nitrous solenoids and they worked, so I should be able to test the spray on my next test drive I am going to get some rpm on and off setting suggestions from Nitrous Express first though - I am thinking 3000-6000 should be the right range.
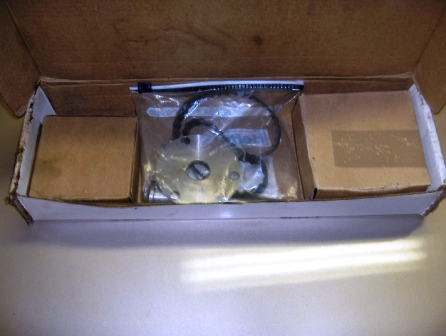
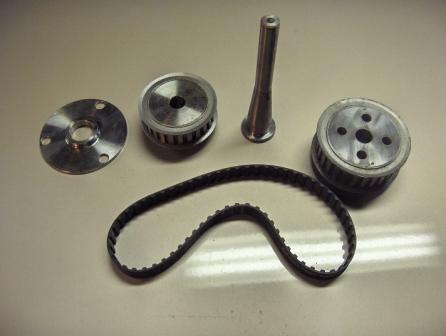
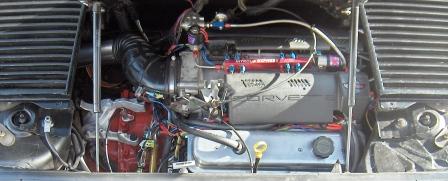
Here are a couple pictures of Archie's water pump belt drive for GKDINC as requested (sorry I accidently deleted your email)
I didn't use it as part of V8-Archie's deluxe auto kit because I was using the LT1's stock pump:
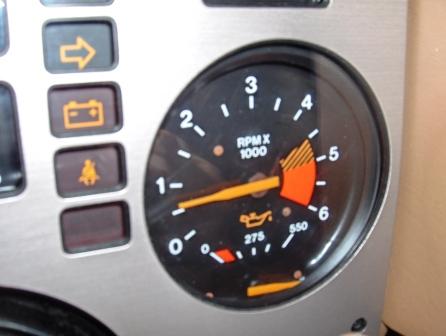
Since I reinstalled the tach with the V8 conversion mod, I tried hooking up the tach filter and stock Fiero tach wire to the LT1 coil, but unfortunately it still didn't work. It reads just under 1000rpm while cranking but quickly goes to 0rpm when the key is released as shown in the picture while cranking:
I also still haven't got the speedo working despite following advice I received. I did however find a 4K pulse electric speedo wire exiting the LT1 computer that I thought I may be able to splice into the Fiero harness's yellow or purple wire near the VSS? Not sure if that output is capatible with the Fiero speedo, but it would probably run an aftermarket or electric speedo from a newer GM car. I would rather use the Fiero speedo if possible, so if anyone has ideas how to wire it correctly, send me a PM or post. Seems funny that I got this far in the build without getting stumped so more wiring diagram research is required I guess
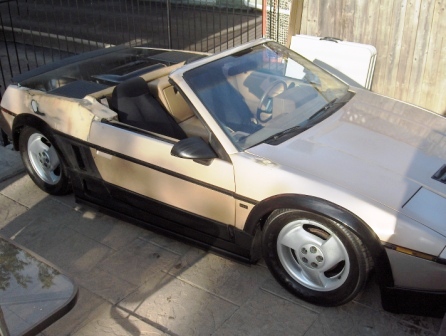
Here are a few shots of the car cleaned up a little for tonight's cruise night:
The engine compartment was looking pretty good in the sunlight after it's first proper detailing job:
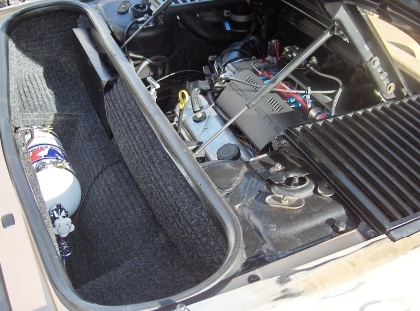
Even the front compartment was cleaned even though I usually don't leave it open at shows:
Hey, my sunroof still fits, so when I sell it, I can deliver it too
My friend was still trying to convince my wife Kim that people are 3 rows deep checking the engine swap out at cruise nights - she didn't believe him until she stopped by at one this week
About 100 new faces tonight in Niagara Falls, but they wouldn't stand still enough for the night setting on my camera
I also experimented with the ground effects again but they don't look right to me. I think they will be removed again even though they hide the x-frame completely.
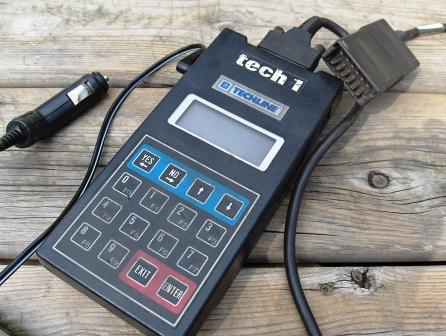
I was very lucky to borrow a GM Tech I handheld scanner from the local dealer, so I am going the use that and Data Master I downloaded to determine why the engine is running rich and the exhaust is hotter than normal. I was post more details this week.
Ryan
P.S. I switched the Nitrous jets to #24 NO and #20 Fuel (150 HP) and let the system do its thing tonight for the first time in 2nd gear - I WAS SPEECHLESS . If you're never experienced a sprayed car before, I highly recommend going for a ride in one, or better yet drive it !!!
I read in the Haynes maual for the 1993 LT1 about the EGR system which was previously blocked off.
Here is a quote from the book "Common engine problems associated with the EGR system are rough idling or stalling at idle, rough engine performance during light throttle application and stalling during deceleration."
Since I still had the EGR system parts, I decided to reinstall them as I had experienced these symptoms a couple times and general consensus is that there is not a significant HP gain without EGR.
I followed the diagram is this link with the exception of the EGR tube - the local muffler shop installed a stainless one for me at no charge from the rear of the intake manifold (now at the front of the motor) to the left (driver's side) header collector.
The previous owner had put some JB Weld where the vacuum line connects to the valve, so we carefully drilled it out so it is functional again. So far it has improved cold engine idle and stalling
Great build up! Once again a great buildup with lots of tips>
quote
Originally posted by Fiero2m8:
The previous owner had put some JB Weld where the vacuum line connects to the valve, so we carefully drilled it out so it is functional again. So far it has improved cold engine idle and stalling
In Canada, or Ontario at least, all emission equipment that came with the vehicle is supposed to be present before a drive clean test. I guess this was a way to appear stock, but they probably would had have to reprogram the ECM so it didn't throw a DTC code relating to the EGR system.
I'm going to continue to post every fix for the benefit of the search feature on the forum. Hey, I'm learning by fire here too
Thanks again GoKart...
[This message has been edited by Fiero2m8 (edited 09-18-2006).]
The results of my GM Tech I are available and I will post them if anyone is interested. Even though I didn't have any DTC codes, I checked all output tests and misc tests.
I have come to the conclusion that my rich conditon is caused by oversized Accel injectors. Acutally they are the right size for my horsepower based on this calculation for my nitrous setup 9.5:1 compression with wet kit that doesn't relay on injectors for added fuel delivery when on the spray.
Injector flow (lbs/hr) = Engine HP (Normally aspirated for wet NO kit) * 0.07 (Nitrous compression)
26.25 = 375 * 0.07
I have 26 lb/hr injectors in which should be good for my setup but the PCM thinks the stock 22lb/hr injectors are still installed! I know that the computer can compensate up to 15% but I am over that, so I conclude that I need someone to burn me a new 1993 F-body ODBI chip based on the info below. I've also added the cam specs that I mentioned earlier in the thread that I would post.
Info for chip programmer:
This is a custom application I will tell you everything about my fresh rebuild and installed setup. Details of my finished project in desperate need of a proper tune:
Chassis: 1986 Fiero sport coupe FORMER drivetrain - 2.5L 4 cyl THI25C Auto trans w/ODBI
LT1 Computer: Street and Performance chipped 1992/1993 computer for stock LT1 engine 260HP (4 square plug style), 3 speed stock Fiero auto TH125c trans, 26" diameter tires, emissions on, VATS removed etc. Piggybacked to Fiero harness as per V8Archie method.
Engine: 1995/1996 iron head 2 bolt main LT1 from Impala SS or Caprice 9C1? - not sure of exact year (had MAF but I removed, has vented optispark, water pump without bottom right front port)
Fresh performance rebuild - approx 375HP:
Bored 65 over approx 364 cu in or 6.0 L Balanced stock crank Wiseco Pro Tru Forged pistons 4.0600 bore, comp height 1.5605 Ported / Polished stock heads - do not have flow numbers or valve sizes yet but should be able to get specs from engine builder Stroker Performance Stock spec rockers, lifters, new valves Crane Cam Intake 228 / Exhaust 232 at 50 thou. Lift - Lobe separation 114 - Straight up Shorty hugger headers with dual 2" exhaust approx 30" length each with twin cats and muffler tips. Accel 26 lb/hr fuel injectors Stock 48mm TB with TB coolant bypass 3"x30" CAI in stainless with IAT installed and K&N cone filter Stock 1996 LT1 intake reversed on block EGR hooked up, MAF removed TPS, IAC, IAT, CTS, Oil pressure sensor, knock sensors, all new except MAP sensor Optispark and MSD blaster coil new with Taylor 8mm wires NGK TR6 plugs Nitrous Express 100-300HP LT1 Pro (direct port wet kit) installed with 150 HP jets installed (#24 NO #20 fuel) as per Nitrous Express jetting chart. Holley 255lph (Walbro) in tank fuel pump with stock regulator (41-47psi) Performance High flow Oil Pump
Transmission Rebuild:
1990 Cadillac STS (Northstar) 4T60 - (non elec.) 4-speed overdrive transaxle Rebuilt with hardened parts where available 333 Final Drive installed 1675rpm 10" Torque converter (new) - theory is that it will act like 600rpm higher approx 2300 stall when mated to torque of LT1 (also want to minimize broken axles) 37/32 sprockets / chain (3.73 Overall ratio) 2 wire trans plug TV cable Fixed Vacuum Modulator - hose from intake manifold
Misc. info:
Motor currently runs very rich/hot. I believe this is due to the stock 22lb injectors replaced with 26lb Accel injectors and performance rebuild with only stock LT1 tune Running 94 Octane all the time Nitrous activated by MSD Digital window switch and WOT switch. Window was suggested to me on at 2500-3000 rpm and off at 5500-6000 rpm. Approx 9.5:1 compression 180 degree thermostat - 4 core rad with trans cooler and fan in operated manually currently - motor stays at 190 F after idling 5-10 minutes. I currently have a GM Tech 1 and downloaded Data Master version 3.5 that I can use to gain more data No codes flash other than 12 when pins a/b jumped New O2 sensors are 93 Z28 spec - 2 both before cats one wire sensors (non-heated) VSS is Fiero elect gear driven - Speedo not working Tach wire on LT1 does not successfully operate Fiero tach - tach mod from 4 to 8 cyl completed 2 Knock sensors - no knock detected at idle - spark advance is 20-21 degrees. Future plan to add MSD digital 6 box to retard timing on larger sprays i.e.. 200 Idle currently hunts from 700 to 1000 rpm. Hard start when engine hot Misses develop quickly with rich condition and fouls plugs quickly. Left drivers 1,3,5,7 bank currently 100 degrees hotter than right as per laser handheld temp gauge - burnt paper collector gasket - replaced both with aluminium ones - problem also existed before rebuild.
If anyone knows a good programmer in Canada let me know - here are a couple links I found on some U.S. guys - let me know if they're good....
What's going on - I haven't posted in a week due to laptop issues. The new one is up and running so I've got some updates for you.
Tuning update:
After speaking with Mark at Street and Performance, I chose to keep dealing with them for the following reasons:
1) They required the most data in order to program and burn the chip 2) I agreed with his assessment of the data that the rich / hot exhaust problem is mainly at idle. 3) The ECM is going to fuel enrichment mode due to a lack of vacuum / map reading at idle. 4) That the low vacuum at idle is mainly due to the performance cam I am using. 5) The original chip was his best guess to get me close for a stock LT1/TH125c but now it's anything but stock! He still offered to do the chip at no charge since I couldn't provide an original data sheet when I ordered the ECM (motor not installed etc)
Since I didn't want to wait longer and would be without the car - he is going to burn a new chip and I will send him the old one back after I swap the new one in. (He has my CC# in case I don't return the old one)
Here is the data sheet I filled out using the GM Tech 1 scan tool and a vacuum gauge:
Some interesting stuff the Scanner told me:
A) Even with the low gearing, I am only revving 2100rpm at 100km (62mph) in overdrive using 25.6 diameter tires. B) The speedo was only off 3% using his guess based on my tires and the stock TH125 - 62mph was actually 59mph on my GPS. C) Spark advance was 21 degrees at idle with no Knock Retard D) Running temp maintained at 190 degrees after it went into closed loop mode E) Idle long term fuel trim dropped down to minimum 108 quickly after resetting trim to 128 on both banks. F) O2 sensors functioning within specs when tested G) TPS 0.64 V at idle H) System voltage at 12.1 - 12.6V until I added a 4 gauge ground wire from the negative battery to the engine block - now 13.5 - 14.1 volts.
They are burning the new chip tomorrow in Arizona they think I will have it Thursday or Friday up here in Canada.
Here is a great link of theirs for the LT1/LT4 - great TECH info for anyone else is considering the LT1 swap including harness instructions for the ECM.
Saturday was the first day ALL the guages on my Fiero worked at the same time since the swap.
First I got the fuel guage working, then the temp gauge using the new LT1 sensor in the rear head. The oil pressure guage worked once I connected the correct white wire from the new ECM to the white Fiero oil gauge wire.
That left the speedo and tach (the big gauges in the dash).
Here what I did to get them up and running....
Speedo - downloaded a diagram of the VSS system shown here:
I don't have cruise, so I needed to find the yellow and purple wires running to the instrument cluster. I ended up running new wires from the C203 connector below the Fiero ECM location in the console to the governor. The new wires were spliced into the new purple and yellow wires that go to the LT1 ECM matched yellow/yellow and purple/purple at the governor. At the C203 connector, again purple/purple and yellow/yellow were spliced. Now gauge works well and no VSS trouble codes shows up!
For the Tach, I first did the tach mod using the easy capacitor method of soldering in 64 micro farads using 2 - 22's and 2 - 1's in parallel to make 64. I used a cordless low heat/instant heat handheld that did a very nice job. I finally convinced myself that I had the wrong white wire from the Fiero harness and downloaded a pinout diagram for the C500 connector (engine harness connector on passenger shock tower area in bay). Even though all the diagrams on the net and in my Haynes manual were white, mine was BLACK! I had predispositioned in my mind it had to be white, which drove me crazy until I decided to start from scratch. Turns out this black wire probably went to the Fiero Tach Filter which low and behold had black wire connected to it Since I had sold the iron duke and didn't have another car to look at, I didn't remember this key information.
Below is a scan of my worksheet and pictures of the C203 and C500 connectors - I didn't agree with 100% of the info on it, so I made notes and labelled all my wires while going through the connector rows/columns. Perhaps different years, engines, or options have slightly different pinouts?
C203 connector
C500 connector
I can hardly believe that I may be ready to finally wrap the harness wiring! A few wires I will keep handy for future wiring projects include decklid solenoid, fan control, hot engine idiot light and an Ign-on 12V+ wire I could mount an engine compartment light to on a switch for night viewing.
btw... you are going to find that the line you pluged on the water pump.. (the line that goes nowhere in Wiston's pic) is REALY needed....
quote
Originally posted by Fiero2m8:
Thanks Chuck - I think that explains it. I pulled the old pump out of the box that came with my iron head LT1 and as mentioned nothing at that port location on the housing - not even a plug. However when I ordered the replacement pump I got one for an F-body that did have the aluminum heads...
Ryan
Hey Chuck,
I stumbled across this picture tonight confirming my hunch that the pumps are different on the Vette and Imapala versus F-bodies - I'll sleep better now
Yep, solid mount the front of the motor and the tranny.
I do have Archie's front solid mount and the trans braced with a solid strut bar. The top front of the motor still tries to twist rearward. I'll post what I try next.
Still totally amazed at the work you have put into this swap. Not being quite as ambitious as you are, I am in the midst of my own LT1 with 4T60 install but with a carbed motor. You indicated that you had issues with the rear header as far as clearance and had installed a 3/4 inch spacer to help move the exhaust outlet far enough away from the speedometer housing to clear. In your pictures I can see just how close it is. I can't seem to locate any shorty headers that will allow this side to work, even with 3/4 and 1.5 inch spacers. I have tried some stock Corvette tubular headers, quite short but still too close, regular block huggers, Sanderson C90, and a couple of others with no idea of origin.
How did you modify the header to allow the clearance? I have gone through all my spare headers and many cast exhaust manifolds trying to gain sufficient clearance to get by my sppedometer housing, which looks identical to yours. Thanks for all the work you have done and for the boost to those of us not quite as intuitive as you are.
I do have Archie's front solid mount and the trans braced with a solid strut bar. The top front of the motor still tries to twist rearward. I'll post what I try next.
If your lucky you will only break bolts. The tranny is moving around and stressing your mounts thats why they are failing. Its also putting a lot of stress on your tranny and could cause it to fail as well. Its a bad idea to mix the type of mounts you use, the car I pulled my V8 kit out of had mixed mounts and the front tranny mount was toast. Once it let go the rest of them started to fail. Good luck
How did you modify the header to allow the clearance? I have gone through all my spare headers and many cast exhaust manifolds trying to gain sufficient clearance to get by my sppedometer housing, which looks identical to yours. Thanks for all the work you have done and for the boost to those of us not quite as intuitive as you are.
I took a standard SBC hugger header and cut the tubes at a 30 degree angle about an inch from the flange. Then I had the muffler shop flip the flange over and reweld the tubes. When you are done the angle that normally went towards the block now goes at the same angle away from the block (kind of like a mirror image).
Here's the progress today - my son Andrew convinced me to chop the top and paint the new roadster model for him - he also wants to swap motors with a Corvette model he has
Looks like I'd better get pros to paint my car At least he says it "looks awesome"
Fiero2m8
[This message has been edited by Fiero2m8 (edited 09-24-2006).]
Update from yesterday's troubleshooting of a fuel pump that wouldn't shut off after ignition was turned off.
Did a search and found that most often it is a fuel pump relay or the oil pressure sending unit.
1) Unplugged the FPR - still kept running 2) Unplugged the oil sender - stopped 3) Going to replace both so I have a spare relay, since it wasn't easily available, and I can't swap it with the A/C relay in a future test like you can with a stock Fiero.
I believe I damaged the Oil pressure sensor when I accidently had it connected to a Tach signal wire from the ECM that has now been corrected.
Here is a shot of the GM part # for my relay and the ALDL connector right below it in the trunk:
Replacing the Oil pressure sensor ending up being a bigger job than I planned due to a lack of access!
Access to the Sensor was blocked by the IAC motor on the bottom of the throttle body. Normally it wouldn't be a problem unless your intake is reversed like mine. I tried removing the IAC but one of the two T-20 torx screws wouldn't clear the body of the Oil pressure sensor:
This meant removing the Throttle Body was necessary - it is held on by 4-10mm bolts. The most time consuming part was cleaning the gasket surface using gasket remover etc. in order to prep for a new one. Here is a view from the rear showing the hose connections, the top one provides crankcase vent to the rear valve cover. The middle one is a purge line for the vaccuum canister and the bottom one is capped, as I don't need coolant to warm the TB, as this car won't be winter driven. I took the time to clean the throttle plates with some brake cleaner while it is off:
With the TB removed, it is a direct swap of the sensors - the new one had sealant already on the threads. Notice the arrangement of the two 90 degree fittings to keep it clear of the other sensors on the TB.
The hose in the centre goes to the PCV valve on the side of the intake manifold - if anyone needs info on anything else in these pics, let me know.
When I pick up a new TB to Intake gasket tomorrow, I should be back in business.
Well sometimes you just have to get off your butt and go out to the garage Here are the steps as I discovered them:
1. Disconnect negative at battery (mine is in a sheet metal box in the front compartment)
2. Remove protective cover from ECM - (mine is homemade that fits in the trunk)
3. Remove 4 chip cover screws and gasket with 1/4" nut driver
4. Released two clips at ends of old chip and pull straight out
5. Chips can only go in one way due to keyed top centre and bottom left notches - in this case stickers were 180 degrees different between chips. Align notches and push chip in until you hear two clicks (the locking tabs moving back into place)
6. Re-install gasket/covers and battery negative.
Someone will search this one day and give me a + rating
Tonight I got all the harness wrapped using 1/4", 3/8",1/2", & 3/4" split loom. Not the best stuff, but it was cheap and will do for now. I had to make sure it stays well clear of the heat sources, so it doesn't melt:
On another note, I could smell gas, and it looks like I have a very small leak coming from under one of the support straps on the fuel tank. I'm not really surprised given the number of times this original gas tank has been R/R over the last couple years.
I've also designed a solution to solve the melting knock sensor on the left bank, as it was too close to the header flange. I should have those pictures by the weekend.
Always something, so I'll get at those items once I get the rear of the Fiero on car ramps again. Bet you can tell I'm avoiding the dreaded bodywork
Well I went for a long test drive to get the ECM to learn some of its new programming. Haven't changed the plugs yet which may be partly fouled, but the car is definitely idling better with the new chip. I think I'm getting there with the tuning, but I still have to deal with high MAP (low vacuum) at idle and high IAC counts. The best news is the rich condition at idle is finally gone and the long term fuel trim stays near 128.
I plan to change the oil and plugs and then take some new readings with the scanner and try my new Datamaster Software with the laptop to log some data.
The bad news of the day is my Powermaster 9000 starter solenoid crapped out when I got home and I had to push it into the garage (first push since the rebuild)
This is the crap starter that I have killed two solenoids with:
Not sure how many teeth the Fiero auto flexplate has - that info would help for ordering purposes or does anyone know how many teeth the Powermaster 9000 is designed for?
On second thought, this was my second Powermaster 9000 in 2 years so I refuse to buy another!!!
What are my options? I did a search and the PMR-9004 seems like an upgrade with better gearing, but I was worried it may be larger, not to mention it's still a Powermaster Space is a premium with Archie auto setups. What do you SBC V8 guys using Archie's kit like the best? I'm sure that relocating the new battery to the front compartment didn't help any either... My LT1 is build with 10-10.5:1 compression and it complained while cranking with anything less than a full battery charge - matters got worse during hot starts!
From the number of questions increasing on this site, there seems to be renewed interest in using the 4 speed automatic overdrive transmissions. You may have just started a great trend. If not, well then the rest of us that are in the midst of building one will continue to re-read every word as often as possible. I learn more everytime I read that thread.
Thanks Andy, plus for you (4T60 swap) - the funny thing is most of the questions are coming from me PFF is great and I wish I knew about it before I registered earlier this year.
I looked back a few posts and realized I should provide some updates: First to get the car on jack stands - I used 6 this time since the motor / trans are heavy and I didn't want to get squished
Since the fuel drip was so minor, it took a while to pinpoint the leak. Eventually I cleaned this area up enough to create a pinhole so I knew what area to repair. It was in one of the recessed areas, not under the strap as I previously had guessed.
This is the product I used for the repair as recommended by the muffler shop. It is amazing stuff that dries quickly and allows you to build layers up on itself. The best part is that since it is designed to fix holes in lawnmower gas tanks etc. it is not affected by gasoline! Case in point - when I sanded and cleaned the area to be repaired, a tiny stream of fuel was peeing out and a small dab on my finger stopped the leak within a second. After 10 minutes I filled in the recess area with Seal - All temporarily held in with a piece of duct tape. I've seen this stuff used on seams too. I've also used cold weld in the past, but it only works when the tank is empty. Try it on a minor leak - it's like $5 and our tanks are getting old without an easy source for replacements...
My Knock Sensor project didn't go exactly as planned. The 1994 iron head LT1 uses 2 sensors 1 almost touches the 4T60 tailshaft making plugging it in tricky and the other side burnt during my running rich problem after the rebuild. My idea was to 90 it out of the way with pipe threads but I didn't have clearance to install this without removing the header Since it didn't melt before the rich problem, I elected to replace it as before, but I wrapped the plug with some header tape as an extra precaution shown here:
The new sensor has sealant already on the threads, but make sure you're ready for a quick swap or you'll be wearing coolant at engine temp
I'm also a member on CamaroZ28.com and often research their LT1/LT4 tech and Nitrous pages for good info. One of the problems I had lately with the idle was a very high IAC reading around 80 when 20-40 would be ideal. With my new cam, it is looking for more intake air at idle, so I followed this procedure to correct it:
1. With the engine idling and the scanner on, I adjusted the throttle stop screw out (opening butterfly valves) until my IAC count was around 30 (my IAC learned # was 32)
2. Next I had to remove the TPS sensor as it was now at .9 volts and 5% open on the scanner. To correct it back to the middle of its 0.2 - 0.9 volt idle range, I drilled the holes into slots to allow rotational adjustment:
3. Then I reinstalled the sensor and set it at 0.58 volts with throttle position at 0% per scanner reading from ECM.
Well I found an engine shop in Fonthill that keeps the starters in stock for $150 so I picked one up to try it out. I also called Archie about the Powermaster 9004 12:1 compression starter to see if it fits. As usual, Archie is great to share ideas with but he wasn't sure about the 9004 model. I decided to order one up, so I can have a look at one in my hands vs. the Powermaster 9000 According the supplier's tech desk, the only dimension different is the length at 1 inch longer which shouldn't be an issue. I will post results of my findings when I check it out this week.
I also finally got an exact compression ratio from Rod at Stroker Performance. The compression was lowered to 9.8:1 for the nitrous application, so I shouldn't really need the most expensive starter you can buy. On the other hand, we are driving smaller flexplates than most SBC's, so that may be a factor as it would change the overall gearing.
In the meantime, I took some pictures of my no name far east starter that looks identical to the Powermaster 9000. The shop I got it from uses one to start big blocks on his dyno several times a week over the last 6 months, so I am hoping it will be good value and a 10 min drive if I ever need another one in a pinch.
Here is the starter out of the box right after I remounted the starter block 180 degrees for a V8 Archie automatic application:
On the test fit, I figured out where I would have to notch the block to clear the engine cradle - there was already a notch on the opposite corner but since I flipped it around, I needed to cut my own with a hacksaw:
In my case, 2 shims provided the best alignment and removing the shim between the starter and the block bought it a little closer to the flexplate:
The top bolt goes through Archie's sleeved hole and is a snug fit, while I bored the lower a little to allow for vertical tweaking:
Here is a shot of the remote oil filter adapter with the starter removed:
And one showing the clearance after the starter is reinstalled:
Last is the electrical connections, + terminal consists of:
1. battery positive cable (red) 2. LT1 computer power wire (black) 3. Battery charging wire - from alternator
and the small terminal takes the starter wire from the park/neutral plug on the transmission (Purple wire that is +12V when key in "start" position)
Feel free to ask questions if I've missed anything here...
P.S. The car starts easily and quickly now, but is noisy due to a worn flexplate that we forgot to replace - I will pick up a new one this winter to have on hand the next time the cradle is lowered from the engine bay for any reason.
Fiero2m8
[This message has been edited by Fiero2m8 (edited 09-30-2006).]
Not much happening on the build lately as it's parked for the winter. I did some research on how to fix the pesky oil leak at the water pump drive. Here are a couple threads on it:
A few updates for the die hard build thread junkies
Weather was good here last week, so I drove out to GM dealership that I know the owner of. Their bodyshop has agreed to mask and paint any base / clear of my choice this spring when the bodywork is done. Cost is $500 - for 2 hours prep and they supply materials.
Today I had a glass shop visit the garage and Rick removed my cracked windshield at no charge. Once the car is painted he is returning to install a new one for $300 CDN. in the spring - he only needs 48hrs notice to order the glass / moulding. In the meantime I need to replace or repair the body trim surround that is broken.
Lately I've been reading up on bodywork / prep and still haven't decided whether to mold in my flairs and skirts yet.
Also today I ordered the light tan leatherette seats from Mr. Mikes - another winter project that should be here in about a week. I'll post pictures when they arrive - here is the online order form I used.
Yep quite a bit - it would look quite a bit better with some of that exhaust hidden. Here was my first attempt but I didn't like the result enough to keep it on:
Since I can't get a jack under the car easily, I have been backing onto car ramps to work under the engine bay. I guess I'd better finalize all the mods soon so I can work on finishing the prep work...
The front spoiler is off a 1990 Crysler Daytona Turbo. The width is perfect for a bumper pad car but the sides had the be shortened due to less overhang on the the Fiero. Currently the seam is covered by a small adhesive bodyside moulding, but I am considering moulding it in flush like Bonzo. Although I'm a little worried about touching a curb and cracking it after paint...
Just like last year, I decided that January 2nd would be a good day to start back on my Fiero project.
Santa brought me a set of the Tan Leatherette seat covers - Thanks Mr. Mike as everything arrived as expected and undamaged. The DVD is not only informative but entertaining
Thanks again Mike as I know we were talking about the idea of an all leatherette tan seat for several months. They will certainly be roadster friendly in the event they do get damp, and the pricing was similar the The Big Fiero book prices - roll back!
Project started by removing the old seats by removing the 4 - 13mm nuts and then removing the tracks, seat covers and remaining hardware. I am not going to detail every task as Mr. Mikes video covers everything. Of course, as always, if you have any specific questions, feel free to ask away...
Here are a few shots of the seats after removal and disassembly:
Interior with seats unbolted:
Seats with black seat covers removed:
Tracks:
Hardware:
New seats in box:
Tan Leatherette upper cover with Fiero stitching:
Hopefully finished install to look similar to F-I-E-R-O forum member using Mr. Mike's Leather:


 not sure if I should be buying it from Arizona or if I can buy it locally though. That might explain why I couldn't get a tach signal off that white wire or with a tach filter off the white coil wire either.