Pennock's Fiero Forum
  The Construction Zone
  Dash build (Page 5)

Post New Topic  Post A Reply
Email This Page to Someone! | Printable Version

This topic is 7 pages long:  1   2   3   4   5   6   7 
Previous Page | Next Page
next newest topic | next oldest topic
Dash build by TXGOOD
Started on: 02-21-2007 07:50 AM
Replies: 272 (36478 views)
Last post by: bcrider1 on 02-05-2011 06:25 PM
TXGOOD
Member
Posts: 5410
From: Austin, Texas
Registered: Feb 2006


Feedback score:    (58)
Leave feedback


Total ratings: 87
Rate this member

Report this Post03-03-2009 08:11 PM Click Here to See the Profile for TXGOODClick Here to visit TXGOOD's HomePageSend a Private Message to TXGOODEdit/Delete MessageReply w/QuoteDirect Link to This Post
That was my car, but I sold it a while back.
I would be happy to answer any question you might have about how I did it.
Mike
IP: Logged
blkpearl
Member
Posts: 367
From: SanDog,CA,US
Registered: Oct 2004


Feedback score: (1)
Leave feedback

Rate this member

Report this Post03-04-2009 12:42 AM Click Here to See the Profile for blkpearlClick Here to visit blkpearl's HomePageSend a Private Message to blkpearlEdit/Delete MessageReply w/QuoteDirect Link to This Post
I would like to know how you made the basic part of the "big" or large part of the dash. Is it some wood and then cardboard taped over it?
IP: Logged
TXGOOD
Member
Posts: 5410
From: Austin, Texas
Registered: Feb 2006


Feedback score:    (58)
Leave feedback


Total ratings: 87
Rate this member

Report this Post03-04-2009 07:33 AM Click Here to See the Profile for TXGOODClick Here to visit TXGOOD's HomePageSend a Private Message to TXGOODEdit/Delete MessageReply w/QuoteDirect Link to This Post
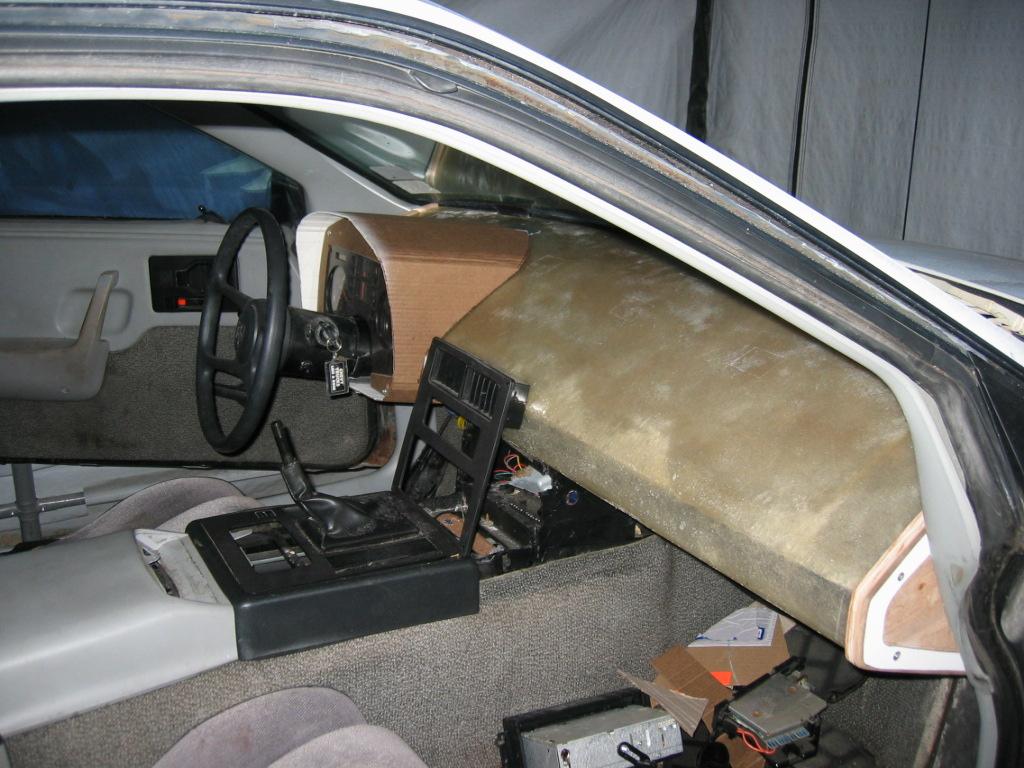
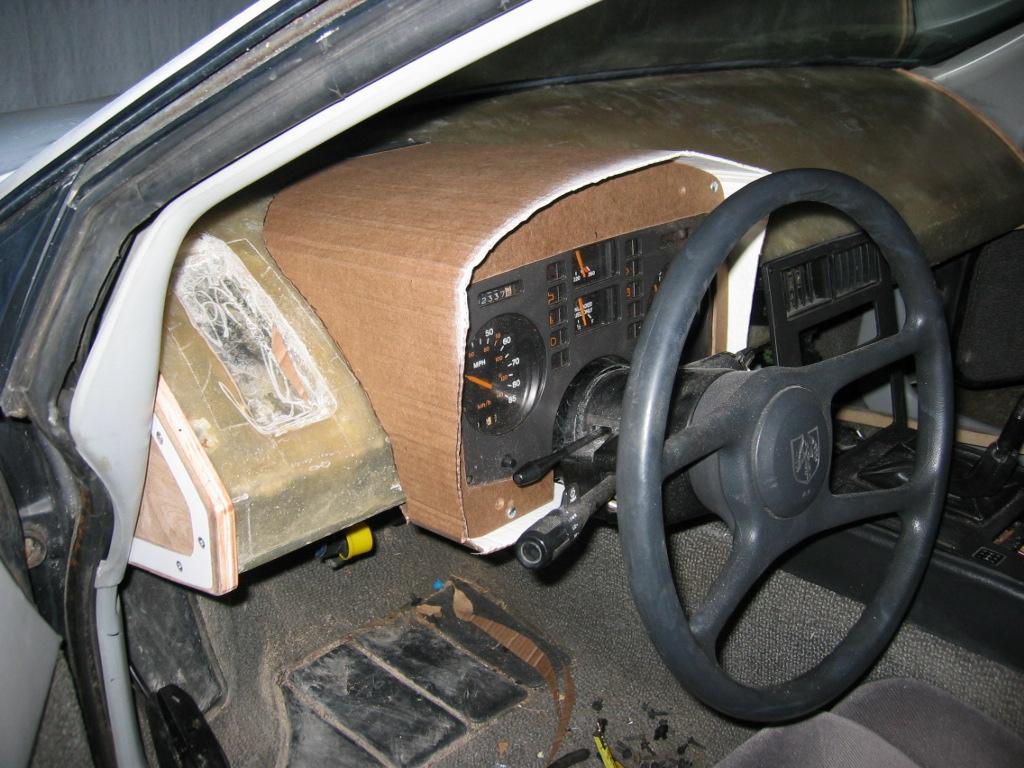
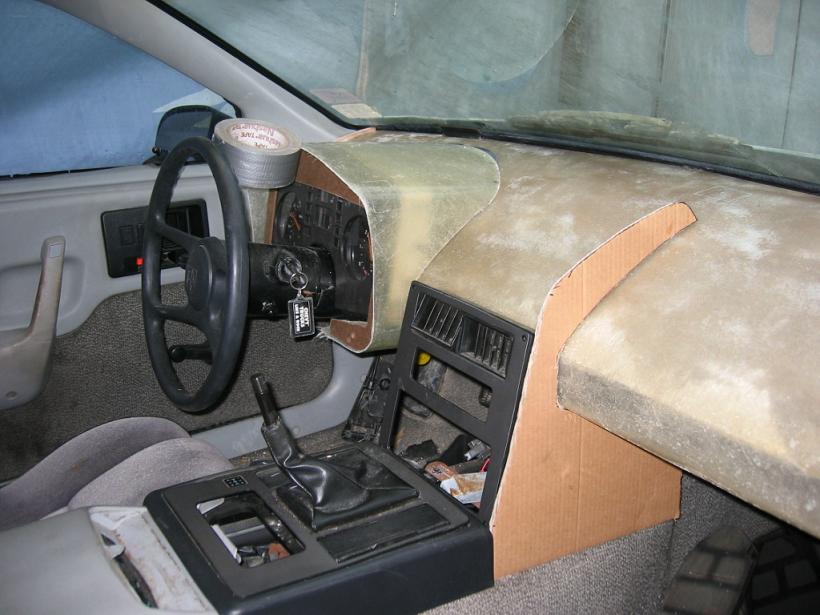
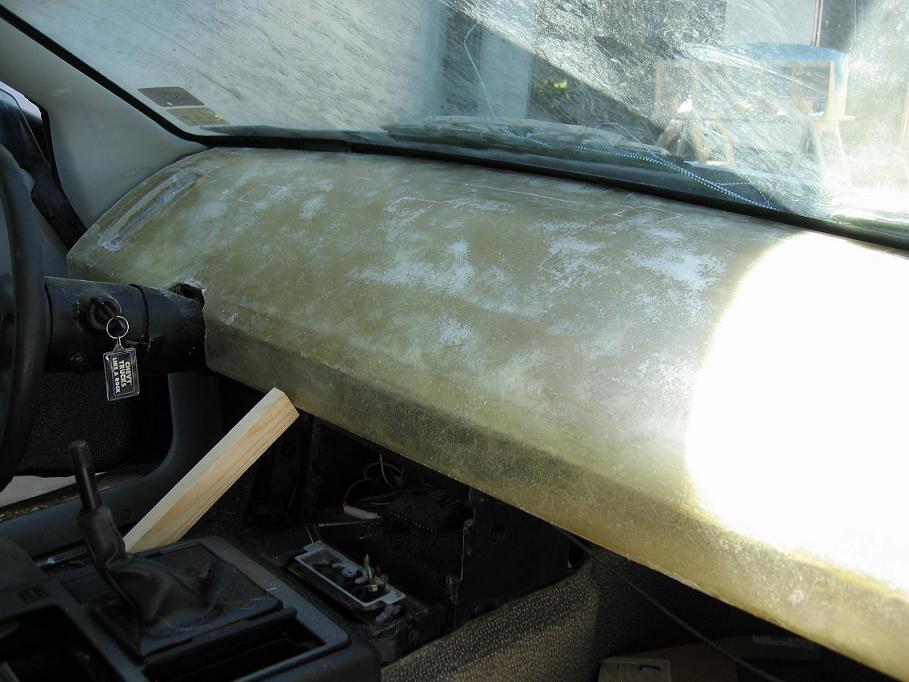
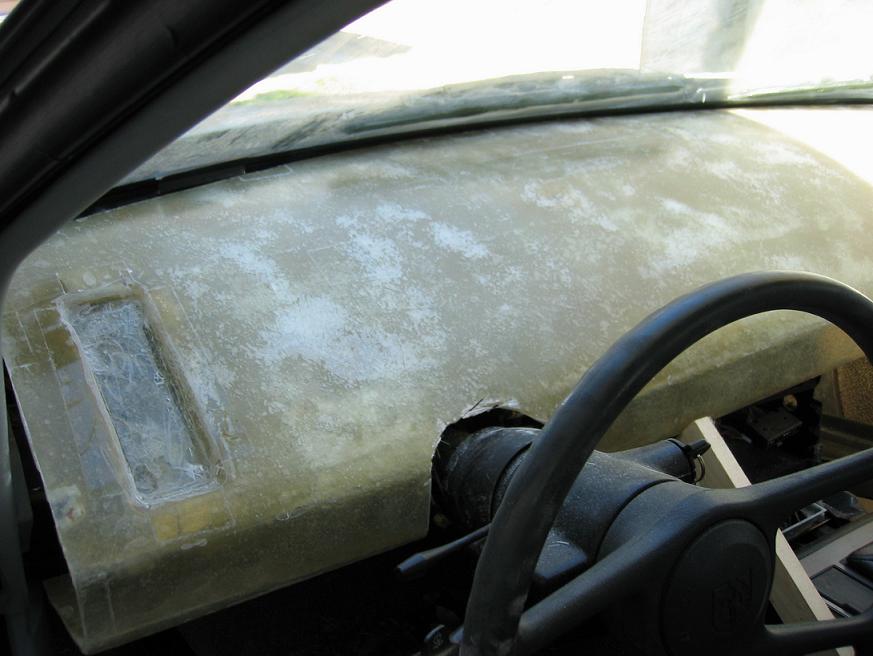
I cut the ends of the dash out of 3/4" plywood and then just took a single large piece of cardboard with the "ridges" I guess you would call them running lengthways, and hot glued and stapled it to the ends. Then I just layed fiberglass matt over the top and the inside to sandwich the cardboard and used body filler to smooth it followed by glazing putty to really get it smooth. Then used 1/4" vinyl top foam for padding and that was about it. It only took one layer of fiberglass matt to strengthen it, so it was lighter than the stock dash. Looking back, I think for ease a person could basically take a stock dash, cut what he doesn`t want off of it, and then just start hot glueing pieces of cardboard to it until he gets the basic shape, and then use body filler to smooth out any transitions in the separate pieces. I mainly built mine the way I did to keep from having to sew any when installing the vinyl.
IP: Logged
mmeyer86gt/gtp
Member
Posts: 3853
From: galt, ca
Registered: Sep 2001


Feedback score:    (161)
Leave feedback


Total ratings: 73
Rate this member

Report this Post03-19-2009 09:22 PM Click Here to See the Profile for mmeyer86gt/gtpSend a Private Message to mmeyer86gt/gtpEdit/Delete MessageReply w/QuoteDirect Link to This Post
I might have a nice shifter for you if your interested. Stock shift handle covered in black leather with red stitching!
IP: Logged
Australian
Member
Posts: 4701
From: Sydney Australia
Registered: Sep 2004


Feedback score: (3)
Leave feedback

Rate this member

Report this Post10-07-2009 06:48 AM Click Here to See the Profile for AustralianClick Here to visit Australian's HomePageSend a Private Message to AustralianEdit/Delete MessageReply w/QuoteDirect Link to This Post
Great thread bump for all those that originally missed/forget as it is very worthy of a viewing by all.
IP: Logged
IVANNATINKLE
Member
Posts: 913
From: Kansas United states
Registered: Jun 2009


Feedback score: (1)
Leave feedback

Rate this member

Report this Post11-26-2009 05:02 PM Click Here to See the Profile for IVANNATINKLESend a Private Message to IVANNATINKLEEdit/Delete MessageReply w/QuoteDirect Link to This Post
bump going to do my dash some what like this one thanks to this guy i have a basic idea!! thanks
IP: Logged
IVANNATINKLE
Member
Posts: 913
From: Kansas United states
Registered: Jun 2009


Feedback score: (1)
Leave feedback

Rate this member

Report this Post11-26-2009 05:09 PM Click Here to See the Profile for IVANNATINKLESend a Private Message to IVANNATINKLEEdit/Delete MessageReply w/QuoteDirect Link to This Post

IVANNATINKLE

913 posts
Member since Jun 2009
also how did you get your vents to work
IP: Logged
TXGOOD
Member
Posts: 5410
From: Austin, Texas
Registered: Feb 2006


Feedback score:    (58)
Leave feedback


Total ratings: 87
Rate this member

Report this Post11-26-2009 10:55 PM Click Here to See the Profile for TXGOODClick Here to visit TXGOOD's HomePageSend a Private Message to TXGOODEdit/Delete MessageReply w/QuoteDirect Link to This Post
I made a plate that I attached to the ac air box which had two outlets.
I then split them with a Y and ran a pair of hoses to the center left and drivers vent and center right and the passenger side vent.
As an afterthought I would have done the ac vents a little different because they basically blew straight up into the windsheild.
IP: Logged
IVANNATINKLE
Member
Posts: 913
From: Kansas United states
Registered: Jun 2009


Feedback score: (1)
Leave feedback

Rate this member

Report this Post11-27-2009 08:32 AM Click Here to See the Profile for IVANNATINKLESend a Private Message to IVANNATINKLEEdit/Delete MessageReply w/QuoteDirect Link to This Post
well my car has ac delete so i just need it for the heat in the winter so its gotta work lol. so now did you just do all of that over the stock dash or did you make a cardboaard template and the plywood things
IP: Logged
TXGOOD
Member
Posts: 5410
From: Austin, Texas
Registered: Feb 2006


Feedback score:    (58)
Leave feedback


Total ratings: 87
Rate this member

Report this Post11-27-2009 11:36 AM Click Here to See the Profile for TXGOODClick Here to visit TXGOOD's HomePageSend a Private Message to TXGOODEdit/Delete MessageReply w/QuoteDirect Link to This Post
I just cut the ends out of plywood and then just bent the cardboard lengthwise around the ends.
You can get very creative with cardboard and a glue gun.
Then when you get the basic shape, just fiberglass it and smooth the seams and such with filler.
The only reason I stayed with the basic wedge shape is so it would be easier to cover with vinyl without having to sew any seams.
If you wanted to take the time to really get the surface smooth you could go all out on the design and then just paint it with some kind of textured paint.
IP: Logged
07Hoffmannd
Member
Posts: 404
From: St. Louis, Mo. U.S.A
Registered: Apr 2008


Feedback score: N/A
Leave feedback

Rate this member

Report this Post11-30-2009 11:58 PM Click Here to See the Profile for 07HoffmanndSend a Private Message to 07HoffmanndEdit/Delete MessageReply w/QuoteDirect Link to This Post
wow. that was some good craftsmanship. looked good. always a fan of the extra elbow pad. just one question.... where do you keep your cups?
IP: Logged
PFF
System Bot
TXGOOD
Member
Posts: 5410
From: Austin, Texas
Registered: Feb 2006


Feedback score:    (58)
Leave feedback


Total ratings: 87
Rate this member

Report this Post12-01-2009 08:06 AM Click Here to See the Profile for TXGOODClick Here to visit TXGOOD's HomePageSend a Private Message to TXGOODEdit/Delete MessageReply w/QuoteDirect Link to This Post
IP: Logged
Quad GT
Member
Posts: 1612
From: Toronto, Ontario, Canada
Registered: Aug 2002


Feedback score:    (8)
Leave feedback

Rate this member

Report this Post12-06-2009 02:18 PM Click Here to See the Profile for Quad GTSend a Private Message to Quad GTEdit/Delete MessageReply w/QuoteDirect Link to This Post
Thats a fantastic looking dash! Just wondering why you didn't put in the aux. gauges like the ones in the first picture. Have you considered about taking orders and making some for members on here, that might offset some of your costs.
IP: Logged
TXGOOD
Member
Posts: 5410
From: Austin, Texas
Registered: Feb 2006


Feedback score:    (58)
Leave feedback


Total ratings: 87
Rate this member

Report this Post12-06-2009 09:06 PM Click Here to See the Profile for TXGOODClick Here to visit TXGOOD's HomePageSend a Private Message to TXGOODEdit/Delete MessageReply w/QuoteDirect Link to This Post
My car didn`t have aux gauges.
It was a 1985 GT.
I probably wouldn`t build a dash for resale because I have found that some of the members on here have
expressed interest in products that other members were making but when it came time to buy, it didn`t happen.
I just don`t think I could make an upholstered dash cheap enough for people to be interested.
Plus, other members make dashes for sale, but you still have a lot of work to get them operable and I don`t think a lot of members
want to spend money just to have to do a lot more fabrication to get the dash to work.
I am trying to work on a dash cover that is similar to the Pisa dash cover except I have an idea to make it not as
bulky and cheaper.
But, it`s slow going, so I will more than likely get a couple made and then try to sell them.
Mike
IP: Logged
Quad GT
Member
Posts: 1612
From: Toronto, Ontario, Canada
Registered: Aug 2002


Feedback score:    (8)
Leave feedback

Rate this member

Report this Post12-06-2009 09:44 PM Click Here to See the Profile for Quad GTSend a Private Message to Quad GTEdit/Delete MessageReply w/QuoteDirect Link to This Post
Where in Austin do you live? I was just in Austin to see the Longhorns play 3 weeks ago, too bad I didnt see your thread may be I could have come by and checked out your work in person.

Count me in as one of the people that wants a dash with aux gauges minus the glove box.
IP: Logged
rogergarrison
Member
Posts: 49601
From: A Western Caribbean Island/ Columbus, Ohio
Registered: Apr 99


Feedback score: N/A
Leave feedback


Total ratings: 551
Rate this member

Report this Post01-13-2010 04:30 PM Click Here to See the Profile for rogergarrisonSend a Private Message to rogergarrisonEdit/Delete MessageReply w/QuoteDirect Link to This Post
 
quote
Originally posted by F-I-E-R-O:

I've tried to do the pillar trim with vinyl and the one thing that I can say about it is that using a nice thin version is a big help. It makes getting the trim to adhere to the curves much easier. Yes, the rear trim is going to be a PITA! Lots more curves to deal with. Almost seems like the best way to do it is to vacuum form it on- now to figure out how to build one... This is definitely one project that I will be trying again.


Use a commercial heat gun to soften it to stretch around curves better. Harbor Freight has them for $15 with 2 heat settings. Ive also found naugahyde seems to stretch more than regular vinyls. Be careful with the heat, you can burn or melt it if you get it too hot.

IP: Logged
grkboy707
Member
Posts: 3019
From: Kingsville, MD
Registered: May 2009


Feedback score: (2)
Leave feedback

Rate this member

Report this Post01-15-2010 06:35 AM Click Here to See the Profile for grkboy707Send a Private Message to grkboy707Edit/Delete MessageReply w/QuoteDirect Link to This Post
Its threads like this that make me wonder why I changed my mind on a dash build.. Very nice work!
IP: Logged
TXGOOD
Member
Posts: 5410
From: Austin, Texas
Registered: Feb 2006


Feedback score:    (58)
Leave feedback


Total ratings: 87
Rate this member

Report this Post01-15-2010 10:06 AM Click Here to See the Profile for TXGOODClick Here to visit TXGOOD's HomePageSend a Private Message to TXGOODEdit/Delete MessageReply w/QuoteDirect Link to This Post
Thanks, I would in the far future like to develop a kit that would be based on this design, that would be a bolt in with very minimal
fabrication required at a reasonable price.
There are some good designs for aftermarket dashes out there but they almost all require a LOT of fabrication to make ready.
There is one dash that is very nice and very professional looking but I think financially it`s way over what most Fiero owners want
to pay.
I am still working on a dash pad that just covers the top of the dash, but the cold and wet weather here in Texas has sort of put
a hold on that, as I don`t have a very large building to work in and I still have fiberglass work to do.
Mike
IP: Logged
TXGOOD
Member
Posts: 5410
From: Austin, Texas
Registered: Feb 2006


Feedback score:    (58)
Leave feedback


Total ratings: 87
Rate this member

Report this Post02-15-2010 02:38 PM Click Here to See the Profile for TXGOODClick Here to visit TXGOOD's HomePageSend a Private Message to TXGOODEdit/Delete MessageReply w/QuoteDirect Link to This Post
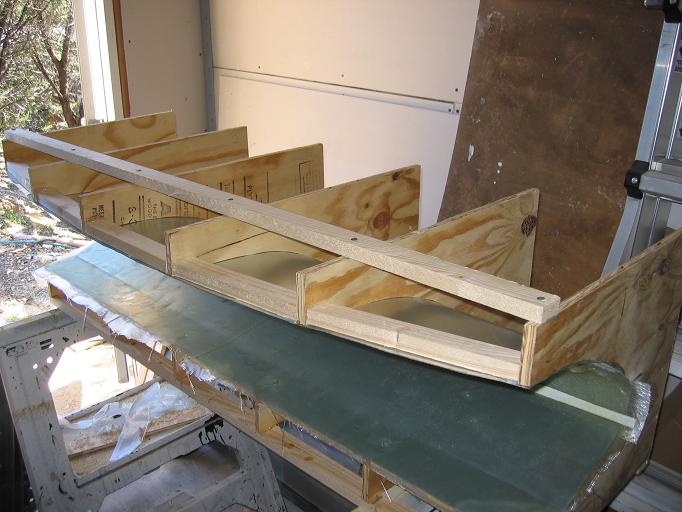
I thought I would post on this thread because it is a continuation of what I have wanted to do.
I am working on a dash similar to this one I did before with the exception of this time I am making forms
and patterns of everything in case anyone is interested once I get it refined.
Here is my form with the first couple of layers of fiberglass layed up.

IP: Logged
ARFiero
Member
Posts: 1262
From: Savannah, GA
Registered: May 2008


Feedback score:    (9)
Leave feedback

Rate this member

Report this Post02-18-2010 12:52 AM Click Here to See the Profile for ARFieroSend a Private Message to ARFieroEdit/Delete MessageReply w/QuoteDirect Link to This Post
Mike are you planning on going to the Round-up this year? Hope to see you there. Again I won't be bringing a Fiero..seems they don't like it if you drive it with all the body panels off. Hope to see you there.

Shelby
IP: Logged
TXGOOD
Member
Posts: 5410
From: Austin, Texas
Registered: Feb 2006


Feedback score:    (58)
Leave feedback


Total ratings: 87
Rate this member

Report this Post02-18-2010 06:05 AM Click Here to See the Profile for TXGOODClick Here to visit TXGOOD's HomePageSend a Private Message to TXGOODEdit/Delete MessageReply w/QuoteDirect Link to This Post
I would like to go, but I don`t want to say too soon because the last couple of times my plans have fallen through.
I won`t be in a Fiero either because mine is no where close to being done.
IP: Logged
PFF
System Bot
TXGOOD
Member
Posts: 5410
From: Austin, Texas
Registered: Feb 2006


Feedback score:    (58)
Leave feedback


Total ratings: 87
Rate this member

Report this Post02-21-2010 02:11 PM Click Here to See the Profile for TXGOODClick Here to visit TXGOOD's HomePageSend a Private Message to TXGOODEdit/Delete MessageReply w/QuoteDirect Link to This Post
I pulled my dash out of the mold and now I`m starting to cut it to fit.
I`m making templates for everything so I can do another if I want.
Mike


The pocket is where the light switch will go.


IP: Logged
grkboy707
Member
Posts: 3019
From: Kingsville, MD
Registered: May 2009


Feedback score: (2)
Leave feedback

Rate this member

Report this Post02-22-2010 06:45 AM Click Here to See the Profile for grkboy707Send a Private Message to grkboy707Edit/Delete MessageReply w/QuoteDirect Link to This Post
Cool! I never quite understood your setup, but now, I finally get it!
IP: Logged
TXGOOD
Member
Posts: 5410
From: Austin, Texas
Registered: Feb 2006


Feedback score:    (58)
Leave feedback


Total ratings: 87
Rate this member

Report this Post02-22-2010 07:35 AM Click Here to See the Profile for TXGOODClick Here to visit TXGOOD's HomePageSend a Private Message to TXGOODEdit/Delete MessageReply w/QuoteDirect Link to This Post
Thanks, I need to fine tune some of the specifics of the dash shell and then cut out all of the holes I need for the various switches, etc that go into it.
I found a very valuable lesson with working with different resins.
I have worked with fiberglass a few times on and off through the years but nothing that really required more than a quart or so.
Thus, I have always bought it from Home Depot or a parts store.
I will tell you this, if you use a good polyester resin from a proper fiberglass supplier you will never use the cheap stuff again.
There is a world of difference in the molassis looking cheap stuff and the cooking oil consistancy of the good stuff.
IP: Logged
Sofa King
Member
Posts: 929
From:
Registered: Aug 2008


Feedback score: N/A
Leave feedback

Rate this member

Report this Post02-22-2010 10:02 AM Click Here to See the Profile for Sofa KingSend a Private Message to Sofa KingEdit/Delete MessageReply w/QuoteDirect Link to This Post
Looks good! Do you have drawings / plans or are you doing eveything as you go?
IP: Logged
TXGOOD
Member
Posts: 5410
From: Austin, Texas
Registered: Feb 2006


Feedback score:    (58)
Leave feedback


Total ratings: 87
Rate this member

Report this Post02-22-2010 10:22 AM Click Here to See the Profile for TXGOODClick Here to visit TXGOOD's HomePageSend a Private Message to TXGOODEdit/Delete MessageReply w/QuoteDirect Link to This Post
I`m still using the dash I built before as a base idea, but I have changed it up some.
Most of the ideas I come up with as I go, but the emphasis is always on being able to wrap the vinyl and get it to lay right without having a sewing machine.
Unlike most of the dashes out there that require a lot of fabrication I`m trying to make this one as bolt in as I can.

IP: Logged
TXGOOD
Member
Posts: 5410
From: Austin, Texas
Registered: Feb 2006


Feedback score:    (58)
Leave feedback


Total ratings: 87
Rate this member

Report this Post03-04-2010 08:47 PM Click Here to See the Profile for TXGOODClick Here to visit TXGOOD's HomePageSend a Private Message to TXGOODEdit/Delete MessageReply w/QuoteDirect Link to This Post
I have started the mock-up for my instrument pod to make a mold for the fiberglass.


IP: Logged
TXGOOD
Member
Posts: 5410
From: Austin, Texas
Registered: Feb 2006


Feedback score:    (58)
Leave feedback


Total ratings: 87
Rate this member

Report this Post03-07-2010 06:32 PM Click Here to See the Profile for TXGOODClick Here to visit TXGOOD's HomePageSend a Private Message to TXGOODEdit/Delete MessageReply w/QuoteDirect Link to This Post
I got the dash pod fiberglassed and next I will be forming the console sides.

IP: Logged
aeffertz
Member
Posts: 798
From: Ladysmith, WI
Registered: Feb 2009


Feedback score:    (6)
Leave feedback

Rate this member

Report this Post03-07-2010 07:03 PM Click Here to See the Profile for aeffertzSend a Private Message to aeffertzEdit/Delete MessageReply w/QuoteDirect Link to This Post
Wow, very creative!
I like how you can still use the stock gauge cluster, yet everything looks more modern.
IP: Logged
TXGOOD
Member
Posts: 5410
From: Austin, Texas
Registered: Feb 2006


Feedback score:    (58)
Leave feedback


Total ratings: 87
Rate this member

Report this Post03-07-2010 08:08 PM Click Here to See the Profile for TXGOODClick Here to visit TXGOOD's HomePageSend a Private Message to TXGOODEdit/Delete MessageReply w/QuoteDirect Link to This Post
Thanks, I think I`m going to flatten out the top part of the console where it comes off the upper part of the dash, because I`m going to step the GT gauges that are above the the air vents.
Mike
IP: Logged
IVANNATINKLE
Member
Posts: 913
From: Kansas United states
Registered: Jun 2009


Feedback score: (1)
Leave feedback

Rate this member

Report this Post03-07-2010 09:22 PM Click Here to See the Profile for IVANNATINKLESend a Private Message to IVANNATINKLEEdit/Delete MessageReply w/QuoteDirect Link to This Post
looks good so far!
IP: Logged
PFF
System Bot
Squeaky
Member
Posts: 162
From: Edmonton, AB
Registered: Sep 2009


Feedback score: (3)
Leave feedback

Rate this member

Report this Post03-07-2010 11:23 PM Click Here to See the Profile for SqueakySend a Private Message to SqueakyEdit/Delete MessageReply w/QuoteDirect Link to This Post
 
quote
Originally posted by aeffertz:

Wow, very creative!
I like how you can still use the stock gauge cluster, yet everything looks more modern.


Agreed!
Do you have any plans on doing some glass work to "modernize" the door panels?

IP: Logged
TXGOOD
Member
Posts: 5410
From: Austin, Texas
Registered: Feb 2006


Feedback score:    (58)
Leave feedback


Total ratings: 87
Rate this member

Report this Post03-08-2010 07:30 AM Click Here to See the Profile for TXGOODClick Here to visit TXGOOD's HomePageSend a Private Message to TXGOODEdit/Delete MessageReply w/QuoteDirect Link to This Post
I haven`t really thought too much on door panels.
Right now I`m concentrating on making the dash as bolt in as I can.
I am going to rework the bottom part of the shell for the instrument cluster.
I have to leave the top the way it is so it will clear the cluster, but on the bottom I`m going to
pull it up a bit, because I have more room underneath.
I still haven`t figured out yet, where to put the speakers, so I may make a bolt on bottom part of the door
panel that will house the speakers.

[This message has been edited by TXGOOD (edited 03-08-2010).]

IP: Logged
Sofa King
Member
Posts: 929
From:
Registered: Aug 2008


Feedback score: N/A
Leave feedback

Rate this member

Report this Post03-08-2010 09:41 AM Click Here to See the Profile for Sofa KingSend a Private Message to Sofa KingEdit/Delete MessageReply w/QuoteDirect Link to This Post
I'm really enjoying this build. You're doing fantastic work! I'm really looking forward to the finished product! Do you have any pics of how you made the dash plug?
IP: Logged
TXGOOD
Member
Posts: 5410
From: Austin, Texas
Registered: Feb 2006


Feedback score:    (58)
Leave feedback


Total ratings: 87
Rate this member

Report this Post03-08-2010 09:50 AM Click Here to See the Profile for TXGOODClick Here to visit TXGOOD's HomePageSend a Private Message to TXGOODEdit/Delete MessageReply w/QuoteDirect Link to This Post
The pics of the "plug" I made are further up this page.
I used sheet metal in a plywood framework because I have yet to make a fiberglass plug and this way I
can save on not having to buy tooling gel coat.
With the sheet metal I just put a coat of Partall wax and the cured fiberglass comes right out.
I can`t really do different angles with sheetmetal, but then without stiching I wouldn`t be able to lay
the vinyl with compound angles either.
Mike

[This message has been edited by TXGOOD (edited 03-08-2010).]

IP: Logged
Quad GT
Member
Posts: 1612
From: Toronto, Ontario, Canada
Registered: Aug 2002


Feedback score:    (8)
Leave feedback

Rate this member

Report this Post03-08-2010 11:18 AM Click Here to See the Profile for Quad GTSend a Private Message to Quad GTEdit/Delete MessageReply w/QuoteDirect Link to This Post
Dont forget about the aux gauges, some of us have them lol
IP: Logged
TXGOOD
Member
Posts: 5410
From: Austin, Texas
Registered: Feb 2006


Feedback score:    (58)
Leave feedback


Total ratings: 87
Rate this member

Report this Post03-08-2010 11:31 AM Click Here to See the Profile for TXGOODClick Here to visit TXGOOD's HomePageSend a Private Message to TXGOODEdit/Delete MessageReply w/QuoteDirect Link to This Post
I am going to make two versions just to see how it will work.
Both of the middle parts of the console will start out at the top the same, but on the one with gauges it will step down slightly
behind the ac vents for the gauges to fit in.
IP: Logged
Sofa King
Member
Posts: 929
From:
Registered: Aug 2008


Feedback score: N/A
Leave feedback

Rate this member

Report this Post03-08-2010 04:20 PM Click Here to See the Profile for Sofa KingSend a Private Message to Sofa KingEdit/Delete MessageReply w/QuoteDirect Link to This Post
TX,

What about the spaces around the dash cluster? Will you be utilizing that space for anything?

Also, with the tilt of the radio / ac cover plate you might lose space between the top and bottoms of the openings. Have you measured the difference? Are you going to tilt everything to match?

[This message has been edited by Sofa King (edited 03-08-2010).]

IP: Logged
TXGOOD
Member
Posts: 5410
From: Austin, Texas
Registered: Feb 2006


Feedback score:    (58)
Leave feedback


Total ratings: 87
Rate this member

Report this Post03-08-2010 04:31 PM Click Here to See the Profile for TXGOODClick Here to visit TXGOOD's HomePageSend a Private Message to TXGOODEdit/Delete MessageReply w/QuoteDirect Link to This Post
I`m going to pull the bottom of the surround up a little to make it smaller.
I was thinking of maybe cutting out the center section of where it curves over the surround and putting some wire
mesh just for effect.
I could have made it flat across the top, but I think it looks better curved.
As far as the plastic skeleton where the radio, etc goes, I was going to leave it, but I had no up and down
adjustment for all of the controls, so I just cut it out.
The only two things I have had to cut out so far have been the top ears off of the gauge cluster, and the
part of the plastic skeleton that holds the radio and ac controls.
The console is pretty straight forward, but I`m not looking forward to installing the glove box or the air box for the ac vents.

[This message has been edited by TXGOOD (edited 03-08-2010).]

IP: Logged
IVANNATINKLE
Member
Posts: 913
From: Kansas United states
Registered: Jun 2009


Feedback score: (1)
Leave feedback

Rate this member

Report this Post03-08-2010 06:54 PM Click Here to See the Profile for IVANNATINKLESend a Private Message to IVANNATINKLEEdit/Delete MessageReply w/QuoteDirect Link to This Post
Wow I hope I either have another one or iget to keep mine untill these come out! Looking awesome I like the speaker on the door idea as well when I had planned to build my own I was going to use your first as a referance and do the speakers on the doors, can't wait to see this beast done!
IP: Logged
Previous Page | Next Page

This topic is 7 pages long:  1   2   3   4   5   6   7 
next newest topic | next oldest topic

All times are ET (US)

Post New Topic  Post A Reply
Hop to:

Contact Us | Back To Main Page

Advertizing on PFF | Fiero Parts Vendors
PFF Merchandise | Fiero Gallery | Ogre's Cave
Real-Time Chat | Fiero Related Auctions on eBay


Copyright (c) 1999, C. Pennock