So after a while of finding time here and there to work on the project, I finally got the car fired up. The swap is by no means done but I really only have about a solid day of working with parts that I need to finish it. I figured I'd spend this evening to a lessons learned/build thread. I'll create posts in this thread detailing what I did and explaining my reasoning for the more intricate items. You by no means have to do this route, but should be a solid starting point/understanding what's involved. I have the design files for all the items I had to get fabricated (eg tone ring/engine mounts/MAF sensor adapter) that I'll gladly forward to anyone wanting them or ideally, any vendor who wants them so they can produce them for the community.
Background: To me, the 3800 is old and tired. GM has been making the 3.6L for a while now and with a significant amount more HP than the 3800 and lighter, I was interested. The fact that it revs fairly high to me, just makes it seem like a better choice for a Fiero.
So let's talk about the basics:
Price: The biggest question I foresee that will drive this swap is cost. I wanted a swap to replace the commonality of the 3800 (which bolts straight to a Fiero trans) and I've already done a 3800 swap. This swap is more expensive. While sourcing a LFX engine is lightyears easier, there are other items that drive the cost. I opted to do a manual trans. Auto trans *may* be cheaper, but there will more than likely be technical hurdles you'll have to overcome that I didn't have to.
If I had to make a list of the big items *I* purchased that are absolutely necessary for this swap, I'd go like this (and you may be able to find cheaper):
TOTAL: ~$6000 Engine (w/ harness, ECU, exhaust headers cut ~3" after O2 sensors and accel pedal): $1000 (CL) Transmission (with intermediary shaft): $300 (FB Marketplace) Clutch/FW: $1100 (interwebs) ECU Reprogram: $150 (Sinister fiero) Tone Ring: $130 (Xeometry) Tone ring mount: $60 (Grainger) Axles: $800* (The Driveshaft Shop) Mounts: $400 (Linsells and est if you don't have access to a CNC plasma like I do) Trans Cables/Adapters - $500 (Fiero Guru) Misc (hoses, fittings, cables, etc) - budget $3000.
*See below as you can do this for half the cost.
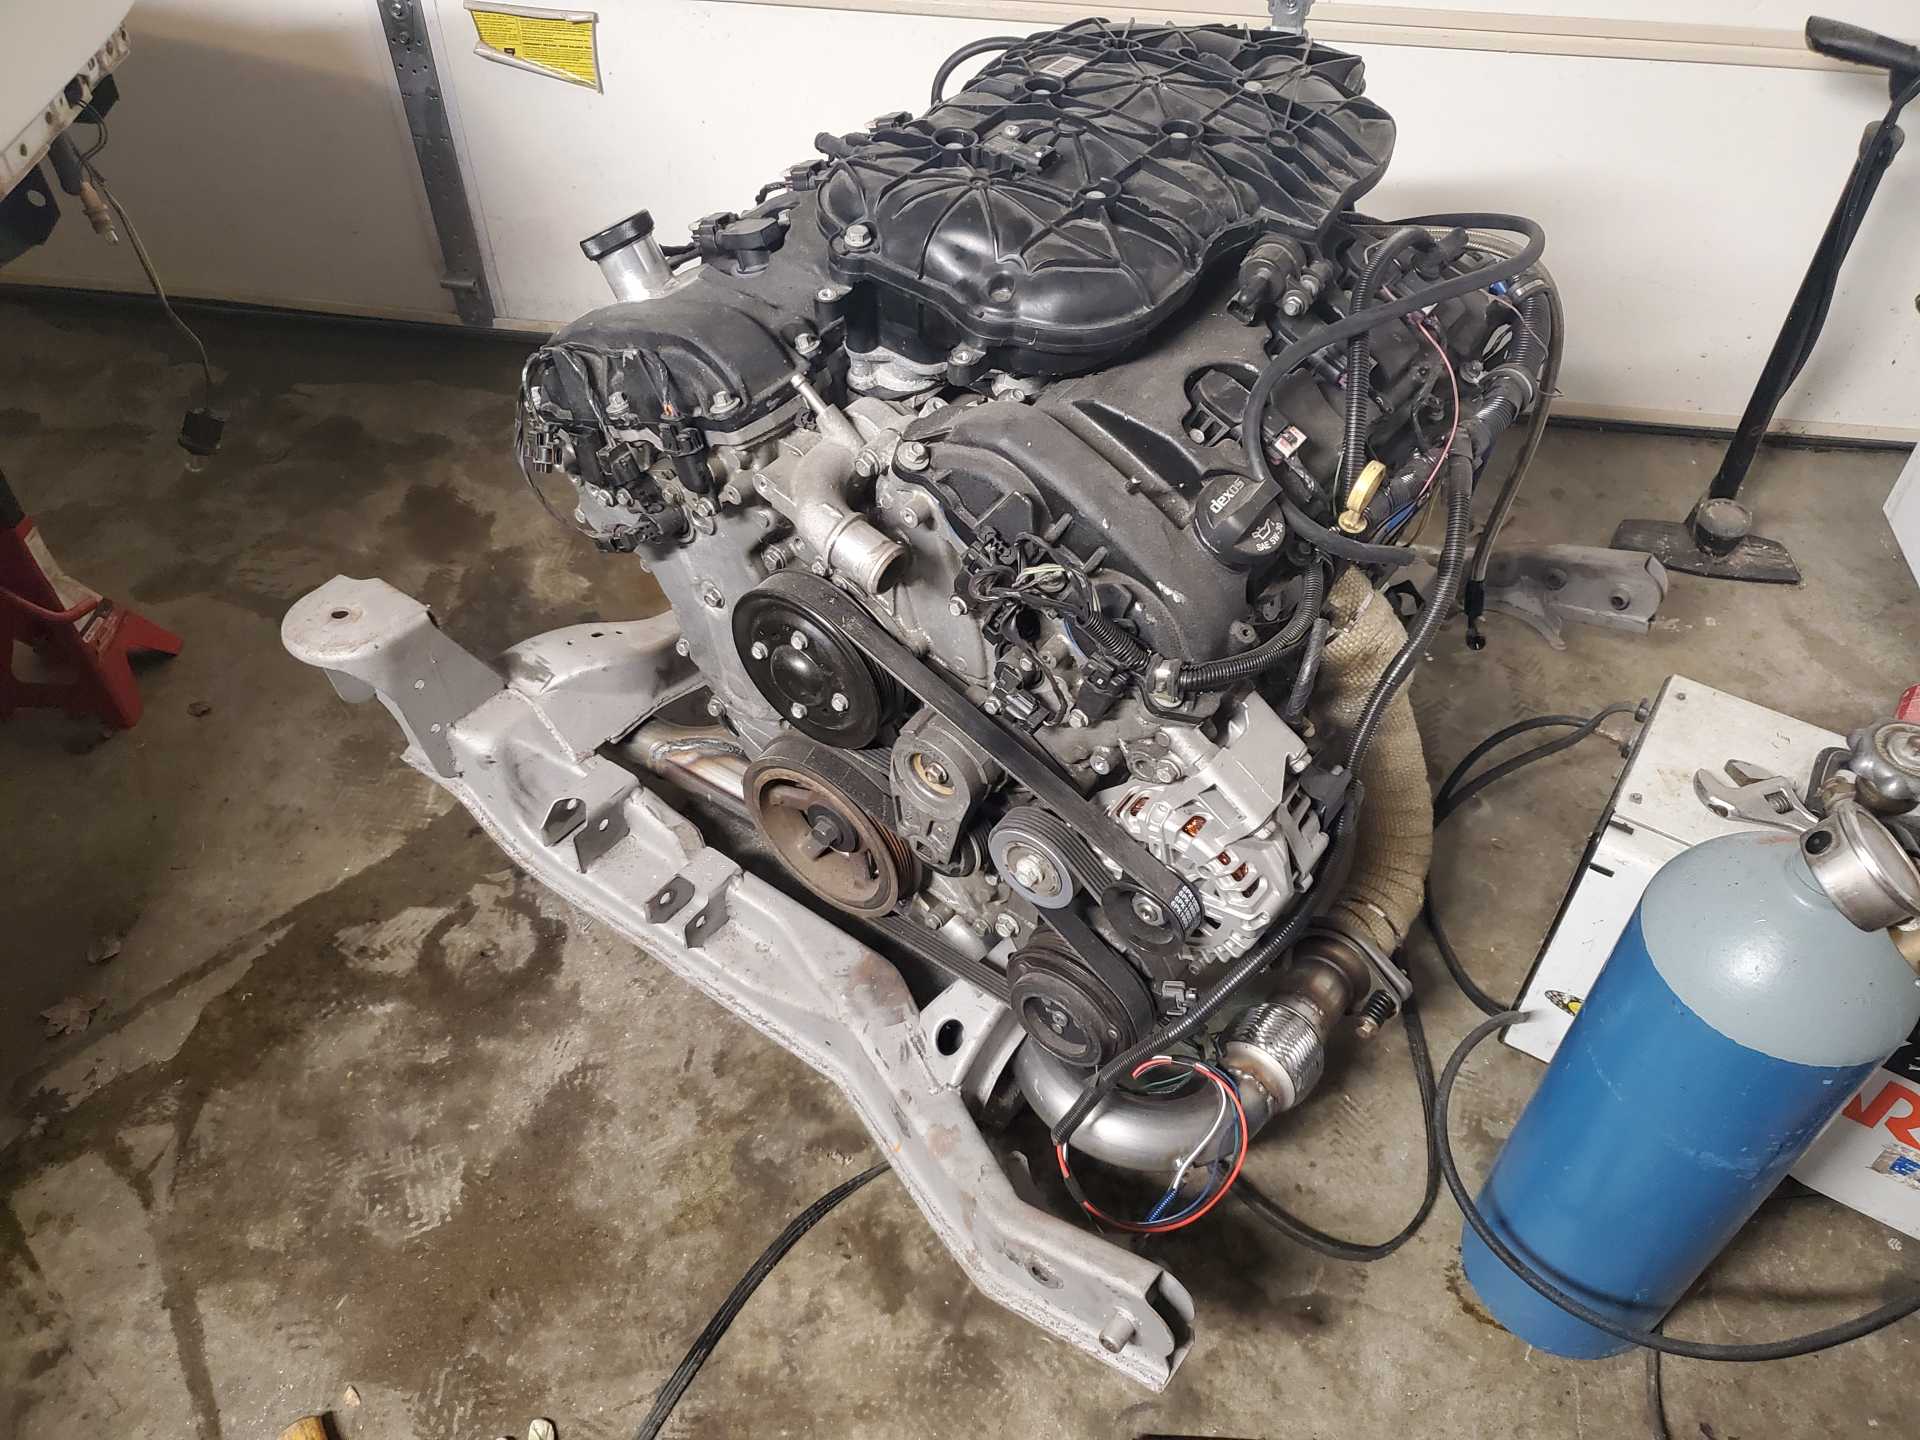
Skill level: I'm fairly competent and while this swap was straight forward, there are some challenges. Since some of the parts will need to be fabricated, outside your normal tool set, you'll need a welder/grinder/chop saw/extra beer to overcome the occasional "Crap". You'll need to work with shops (like Xeometry) to get parts fabricated. If you have access to a CNC Plasma as I do, that will help a bunch. Engine - Source a LFX out of an Impala; this will make your life way easier. I was fixated on the Camaro's higher HP. It's all in the intake which you will be way easier to source after. The ONLY accessory that's worth anything off the Camaro LFX is the AC compressor due to it being a two wire setup and easily being integrated into the Fiero platform. If you go Camaro LFX, you'll have to replace all the other accessories, brackets, cooling tubes, oil filter housing, etc. On top of the price premium for the engine being from a Camaro, you'll have to throw another $400+ at it to get it in the configuration that will work - TL;DR - Get a LFX out of an Impala.
Transmission/Clutch - I chose a 6 speed out of 2007 Saab. You'll need the intermediary shaft so try and get that when you source your trans. For clutch/FW I went w/ a SPEC stage 3+ and a billet steel as my longer term plans for this car include building a motor and boosting it to ~600hp. While the engine and trans both share the same bolt pattern, the Saab trans misses some holes on the oil pan. I *think* this can be resolved w/ the Impala oil pan (I'm still running the Camaros) but this is low on the to do list to resolve. Also, make sure you get the connector for the reverse sensor else you'll have to source that as well. This simply ties into the C500 connector in place of the Fiero sensor. Finally, I utilized Fiero Guru's F40 shift cables/reverse lockout/hydraulic adapter to make hooking up to it as pain free as possible. Could you make these yourself? Sure, but spending the money on his stuff will save you TONS of grief/time; it's something you should fully plan on giving him money for.
ECU - I had Sinister reprogram my ECU (again from a Camaro). I'm uncertain if you'd if the ECU would work out of other platforms that run the LFX but I don't see why they wouldn't. I had him delete all the EVAP stuff/secondary O2's/anything else that would prevent the ECU from running.
Harness - More difficult than the 3800 as there are more wires (cam phasers and coil on plug.) You'll also have to pick up a relay box (EG Eaton 15305-2) for all the items the ECU controls on the engine (eg O2 sensors). The vehicles the LFX come out of have this massive relay box w/ a PCB; you'll basically have to replace this. I took my initial stab at this but due to time contraints, I found a company (Keisler Automation - https://www.keislerautomati...fx-universal-wiring) that built a stand alone harness (from a 2019 cadillac XTS) that all you have to do is tie in power, ground, starter trigger, and ignition power. I spent $1000 on this harness but again, this was because wiring isn't my strong suit and I'm pressed for time as I have kid #2 due in a couple weeks.
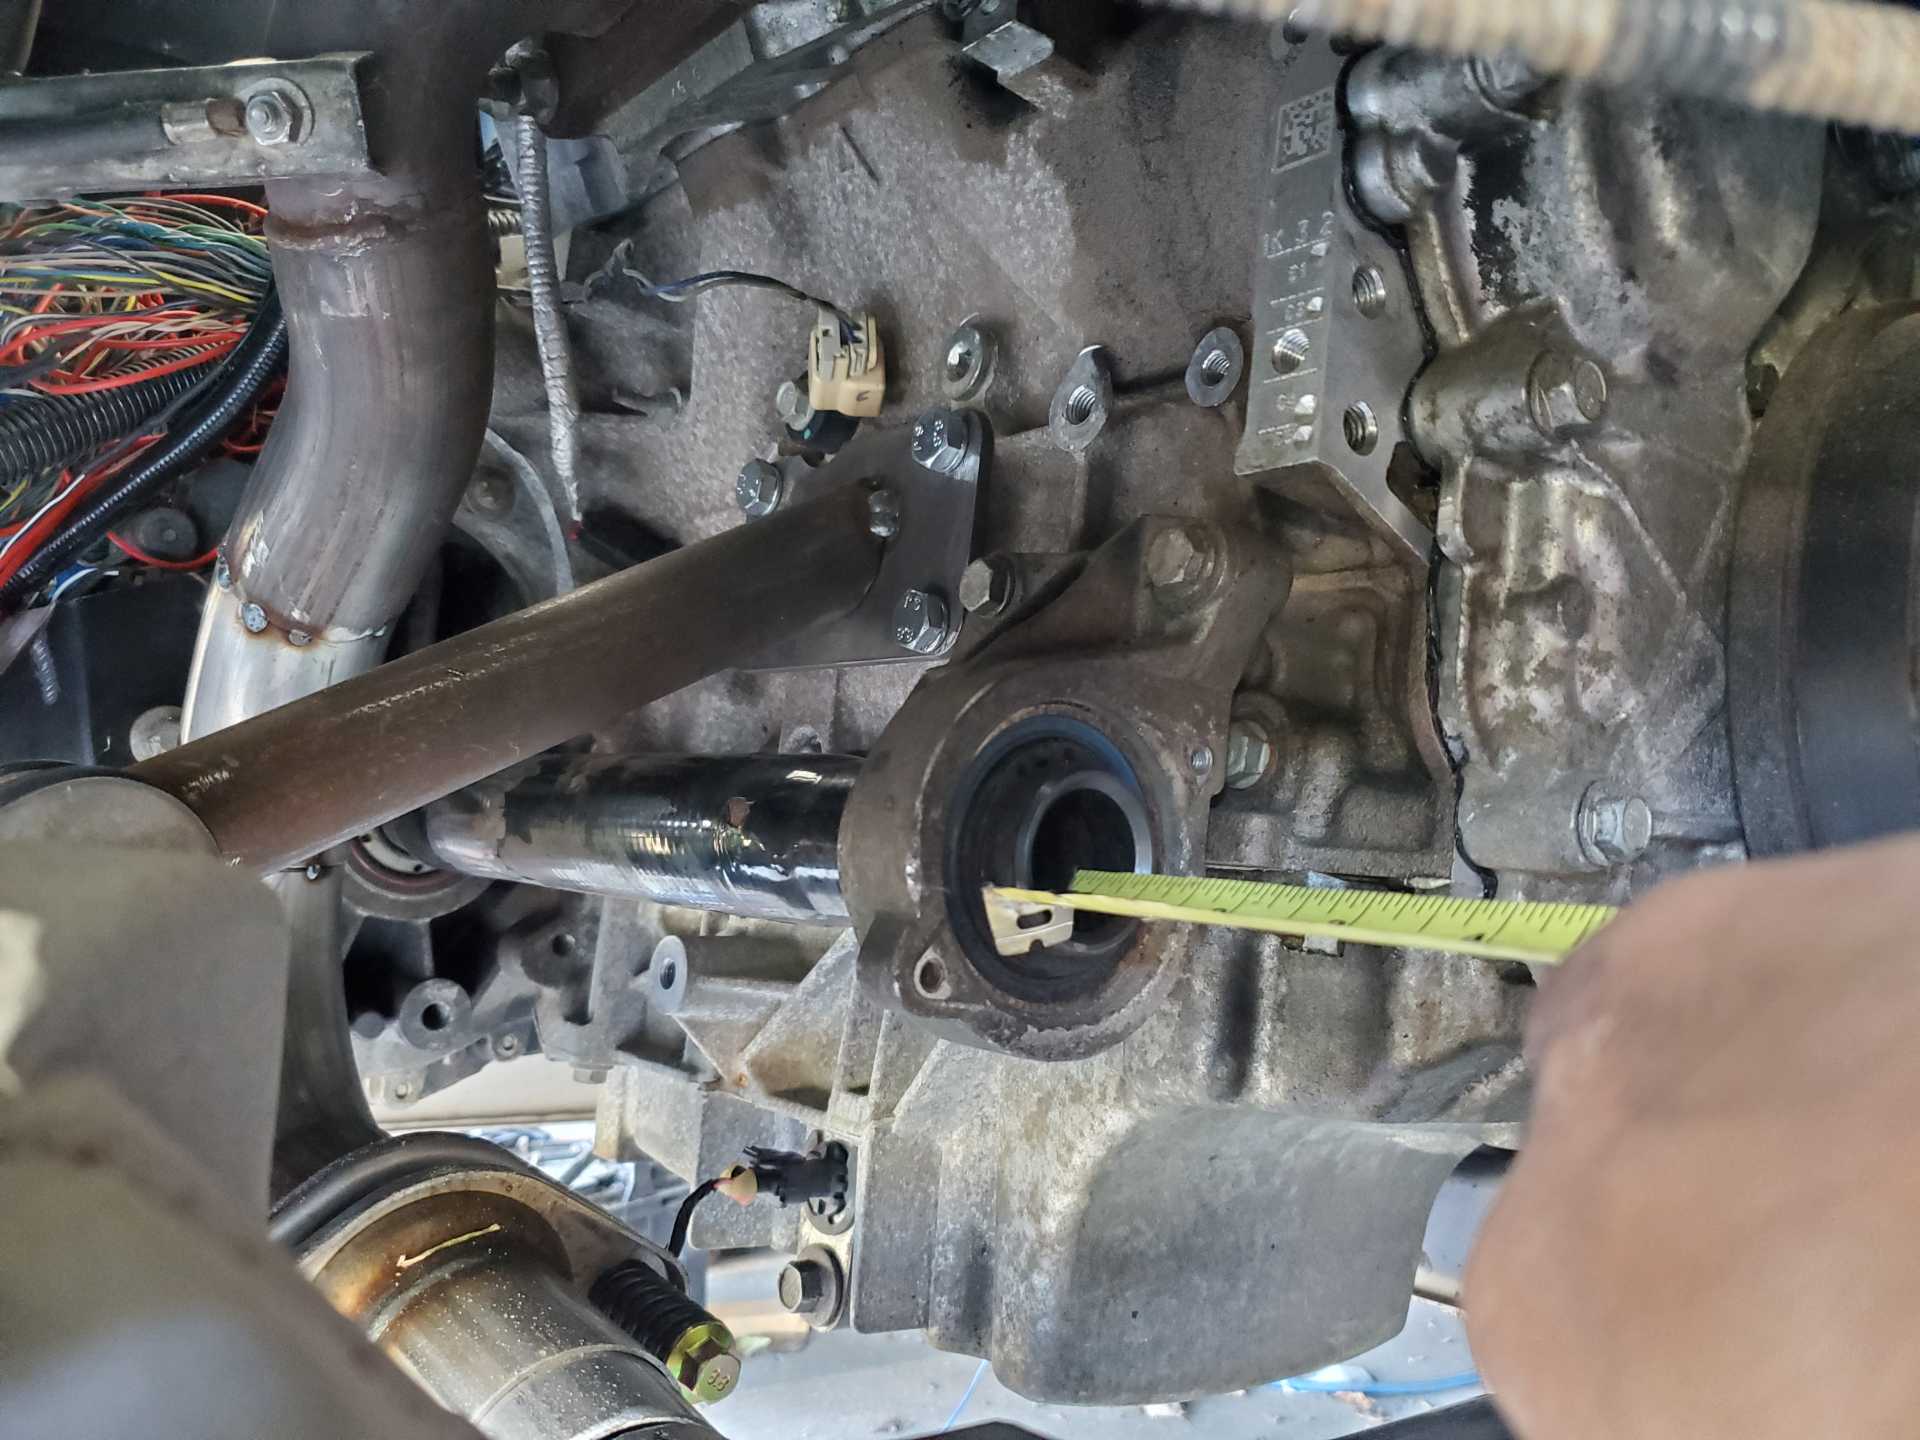
Engine/Trans Mounts - Linsells can help you with the trans side. Because I didn't care to do the driveline yo-yo game, I bought his trans mounts. With the engine attached to the trans, I secured the trans to the cradle and attached the engine mount plates I fabricated (again, I can forward these plates to anyone/vendor that wants them) and got the engine level on the cradle. I used this to figure out where the brackets would go that I would weld to the cradle. I used some universal bushing assemblies from Summit (PN: MRE-BA200) on the cradle side. I trimmed the cradle mounts to fit the contour of the cradle. And tacked them in place. I then measured the distance between the bushing and the mount plate on the engine. I coped some 1.5" x .120 DOM tubing on end and best using a protractor, figured out the angle and angle cut the other end to the engine plate. The pic below should help describe this; I did the same thing for the other (front) side of the cradle.
Exhaust - This is one area where the LFX shines. Routing the exhaust is easy. Since the exhaust manifold is integrated into the head, it only has a one tube for each bank. You'll want the header from your donor vehicle as well as it's a transition from an oval on the head to a 2.25" round. I then bought QTY 4 304 SS" "U-J" bends to cut it where I wanted. I bought some flanges/flex tubing to route it where the stock exhaust sorta goes. I also purchased some tabs and springs to attach the tubing to the right side spring hooks and the exhaust. Finally I wrapped the "headers" in header wrap.
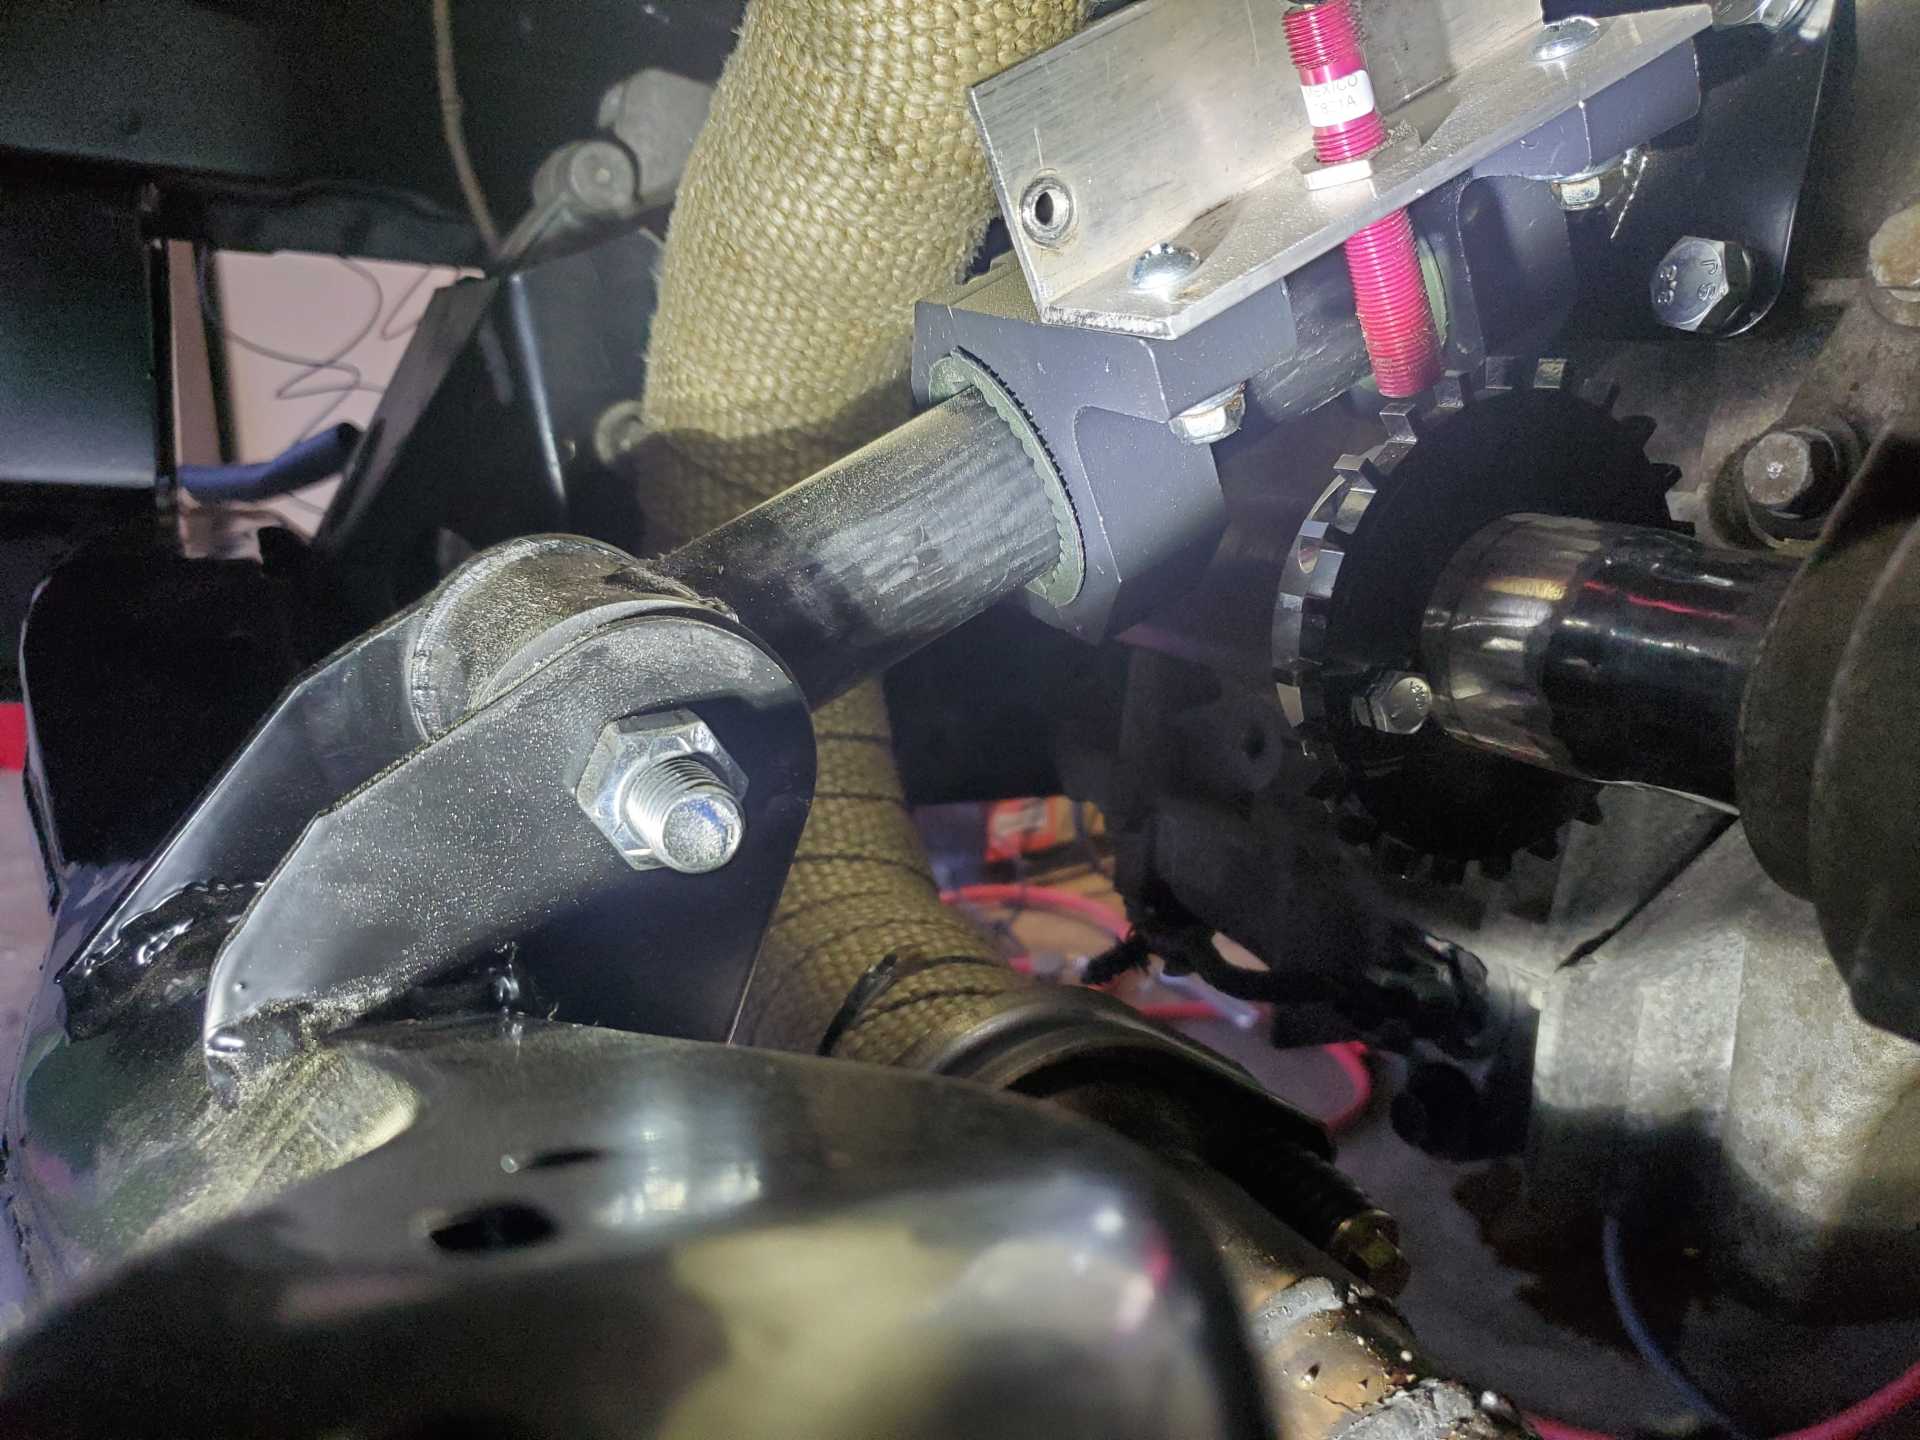
Tone ring - The one thing that can't be tuned out is that the ECU -needs- a pulse from the driveline to tell it the vehicle is moving. If it doesn't get this, the ECU thinks something is broken and it will go into limp mode. Unfortunately the Saab pulls the signal off the wheels and the F40 doesn't have the provision for a VSS. I found this on summit: Autotune offers a kit (HERE or do what I did, find the sensor they are using based off the picture and buy the pull up resistor separately and make the kit for half price. I then identified a 45mm shaft collar off grainger HERE to attach to the intermediary shaft. I also designed a tone ring based off the hall effect data sheet specs and had xeometry manufacture it. I drilled and tapped the collar to accommodate. The thing I don't like about this setup is the collar is not symmetric; the bolts the clamp it down are on one side. I'm -hoping- this off balance won't impart a vibration but we shall see. Finally, I bought some 1.5" aluminum light bar clamps off of Amazon (like $12) and attached it to the engine mount I fabricated earlier. I use a piece of angle aluminum between the two and placed the hall effect sensor in between. This is the end result.
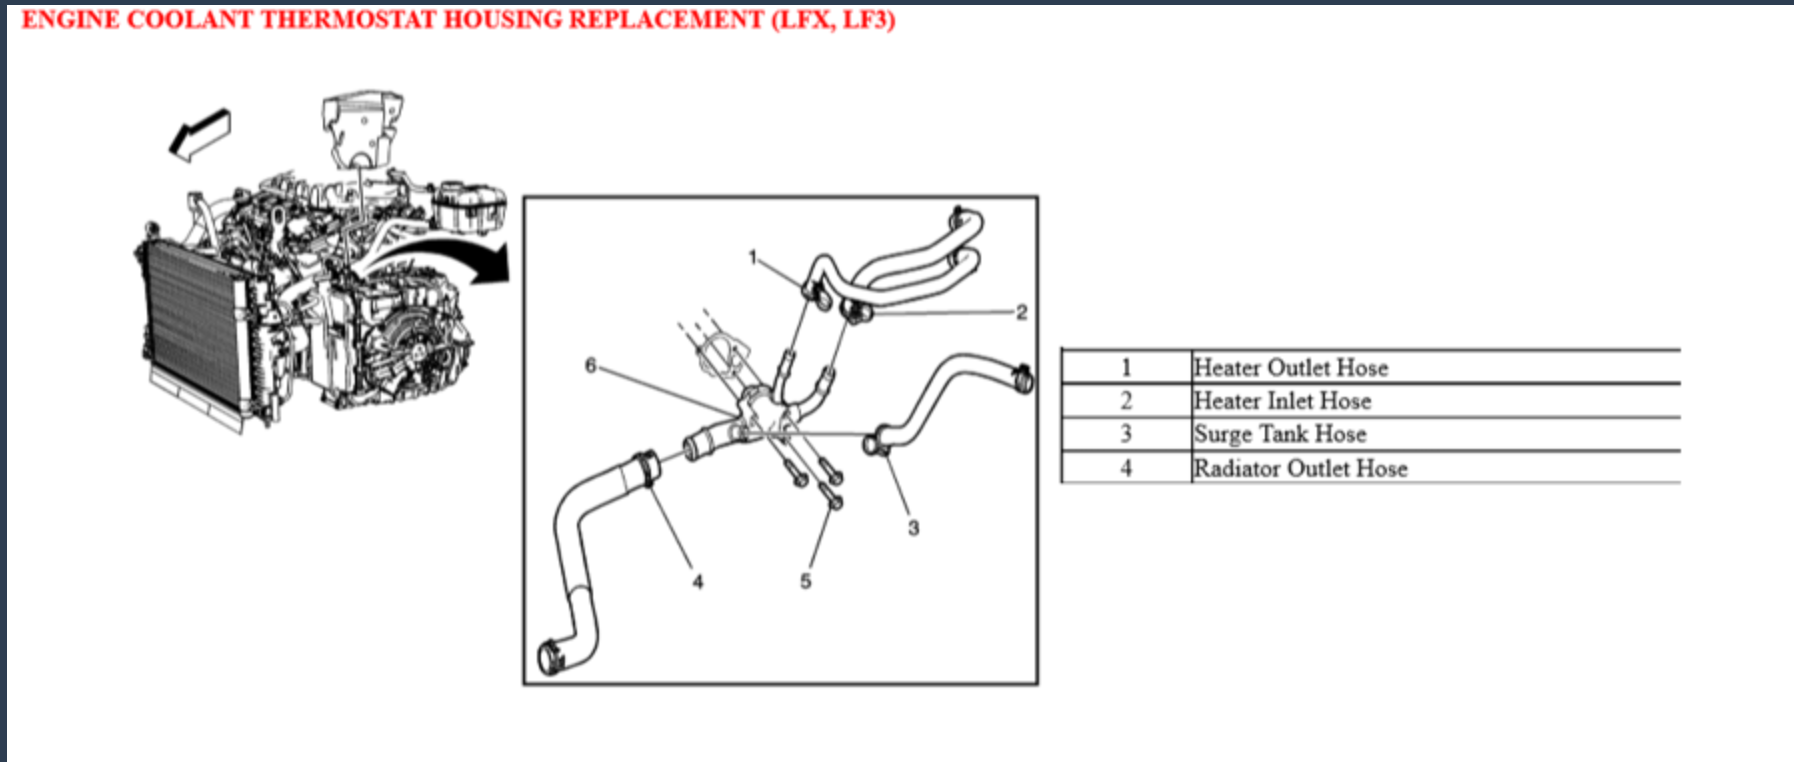
Cooling - Again, you'll want the impala setup for this. If you notice on the above picture detailing the exhaust, the coolant actually leaves the front of the engine with a sharp turn towards the front of the cradel. On the Camaro's, this coolant neck goes straight outward and would go straight into the strut tower. On the rear side of the engine, the camaro's use some setup to bring bring all the tubes forward. This picture was posted on Daryls build thread that really helped describe the impala's setup:
88's kind of suck for this due to the heater tubing jotting off to the passenger side. I went ahead and capped off the heater core to coolant tube line that's on the '88's, cut the heater core lines early, and ran the hose.
I also picked up the coolant reservoir tank from a 2012 Chevy Cruze (with mounting bracket) for $40 for both. This tank makes tying in super easy; just one hose to the thermostat housing, and the other to the neck on the front of the motor.
I utilized QTY 2 Dayco 72126 hoses to the coolant tubes which fit perfectly.
The final thing (that I haven't done yet), is that since the cooling is reverse from the LFX than the stock fiero, you'll have to switch the way it goes into the radiator. My -original- intent was to get a custom radiator with the inlet/outlet's reverse. . . After looking at this for a bit, I decided I'm going to cut the coolant tubes and turn them inward then weld them back up. I have champion radiator on order and once it get's in, I'll document this.
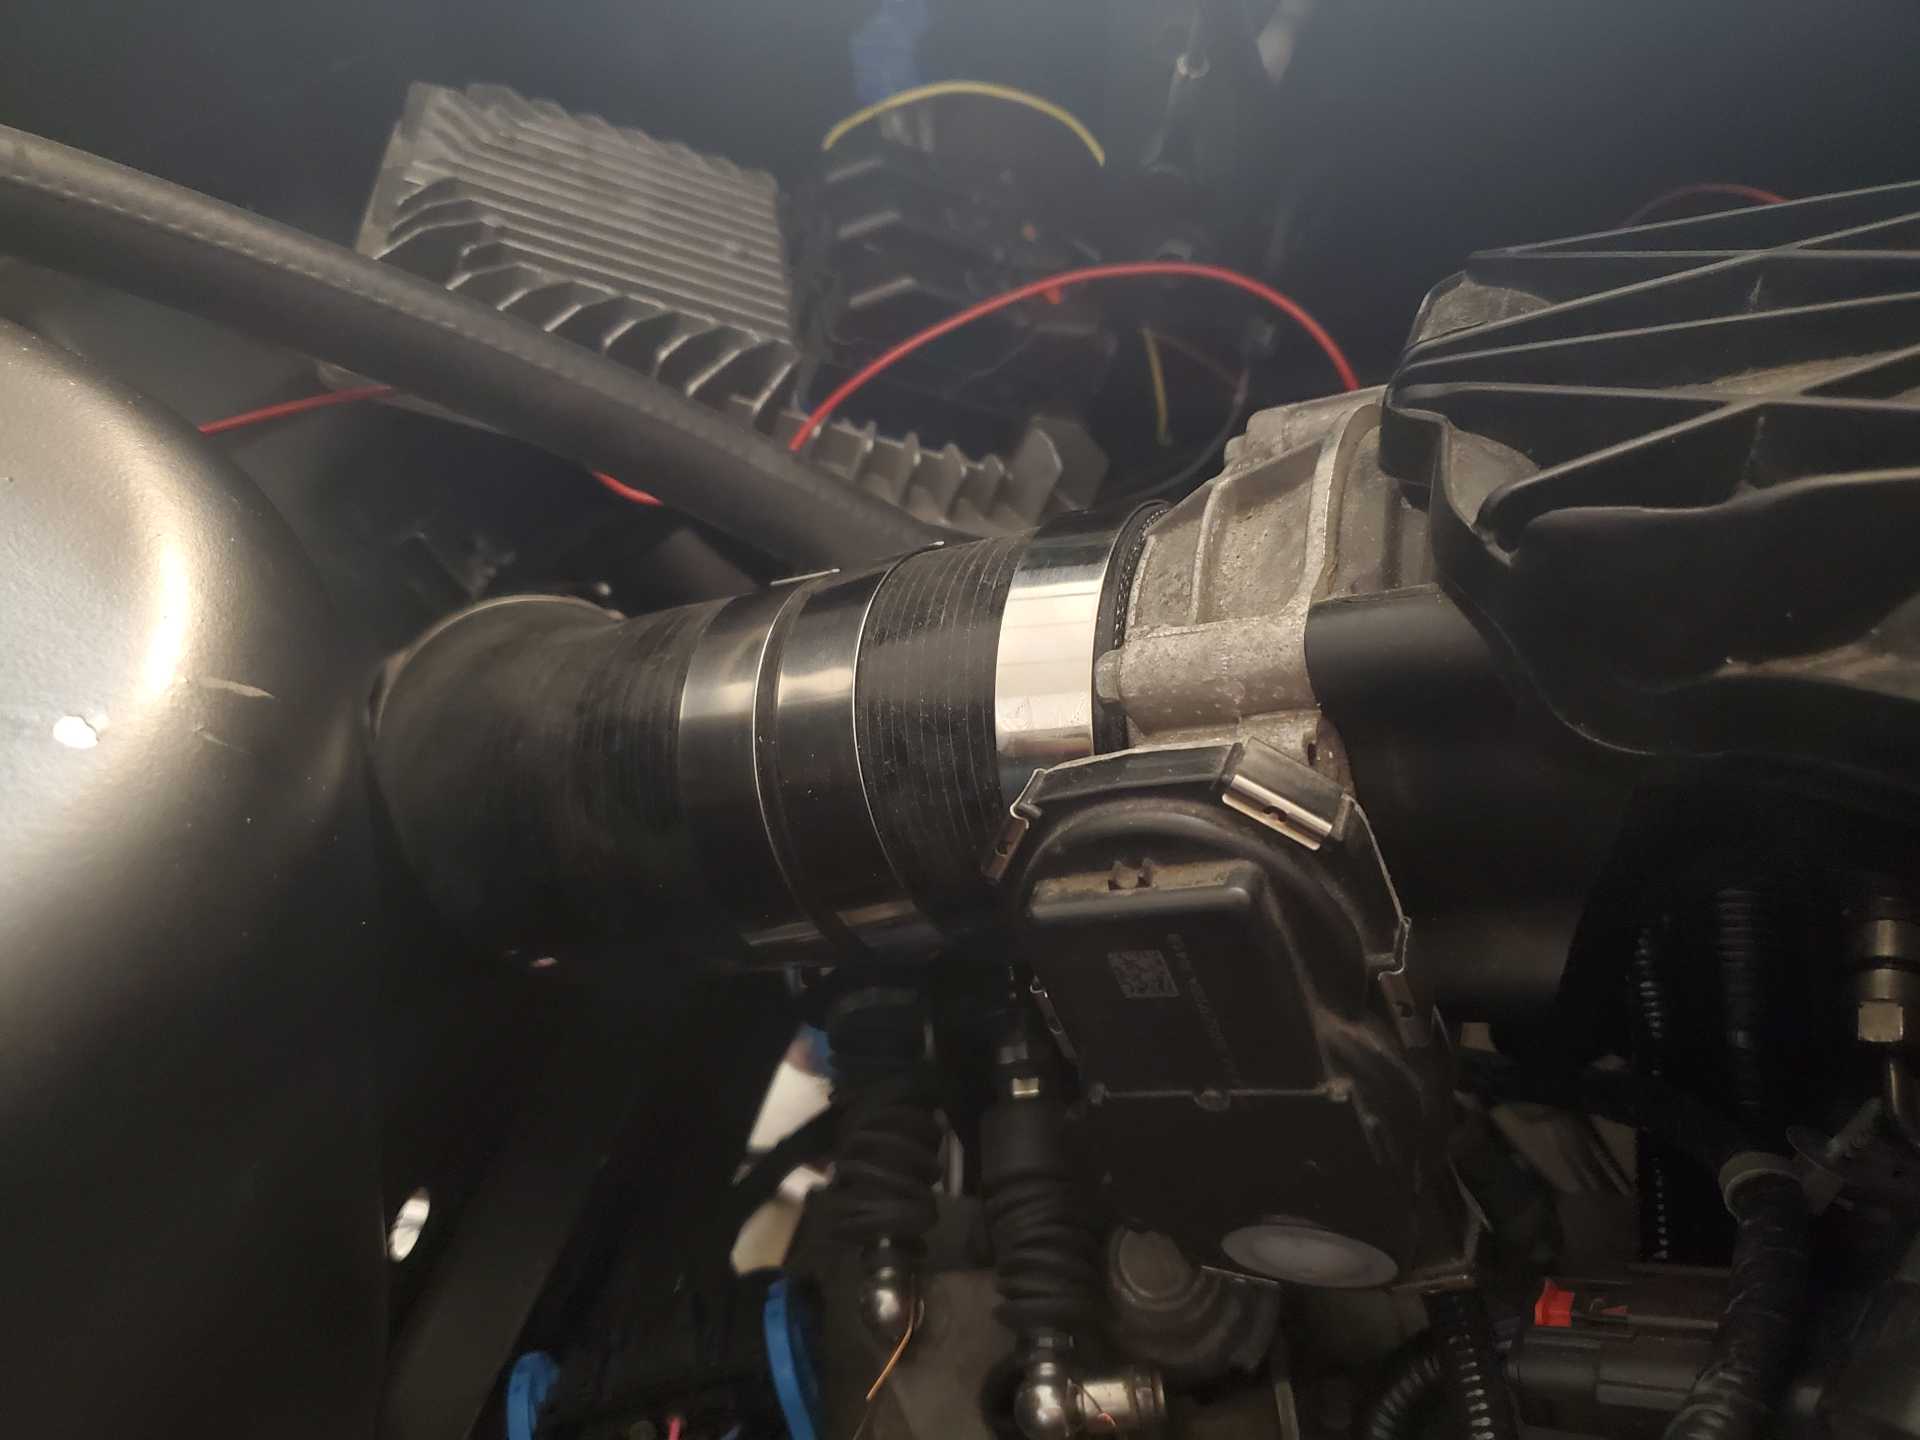
Intake - The intake on the LFX is reversible; I flipped my intake 180*. I had to do some gentle clearancing with a dremel on some the ribbing on the throat of the intake to clear the high pressure pump, but it was pretty simple. I then used some couples and a 45* bend to aim it towards the stock intake location. I had to cut out some material from where the stock intake penetrates the wheel well to get it to fit. Finally, on the intake tubing, I 3D printed a piece that I sealed and secured to the intake piping for the MAF sensor.
Axles - This is somewhat a frustration for me. I went with a company located in NC called "The Driveshaft Shop" (TDS). I've had my axles on order for 3 months now and they keep getting delayed. You *could* use the driver side CV axle from a 2007 Cobalt SS; the passenger side simply won't work (the axle is too short). That stated, it doesn't doesn't sit perfectly on the seal on the inside of the knuckles that protect the wheel bearing. For this, I sent TDS the Saab inners and the Fiero outers, provided some measurements, and am waiting for them to return the axles. This should be <$800 once I settle up. That stated, you can send them (or a lot of other companies for that matter) the dimensions you need for the shaft itself and have that built. I got some quotes for $400. Because I didn't want to make any errors on this, I chose the more expensive route.
Gauges - I'm cheating here. I'm not using the stock Fiero gauges. The ECU for the LFX using a CAN system; there's no way to get this coupled into the Fiero gauges. Theoretically, you should be able to program an arduino to read the data and feed the gauges, but that's work I don't want to do. Instead, I dropped $2k on the AiM PDM 08 system. There are MUCH cheaper options out there or <$50 if you're good at programming an arduino.
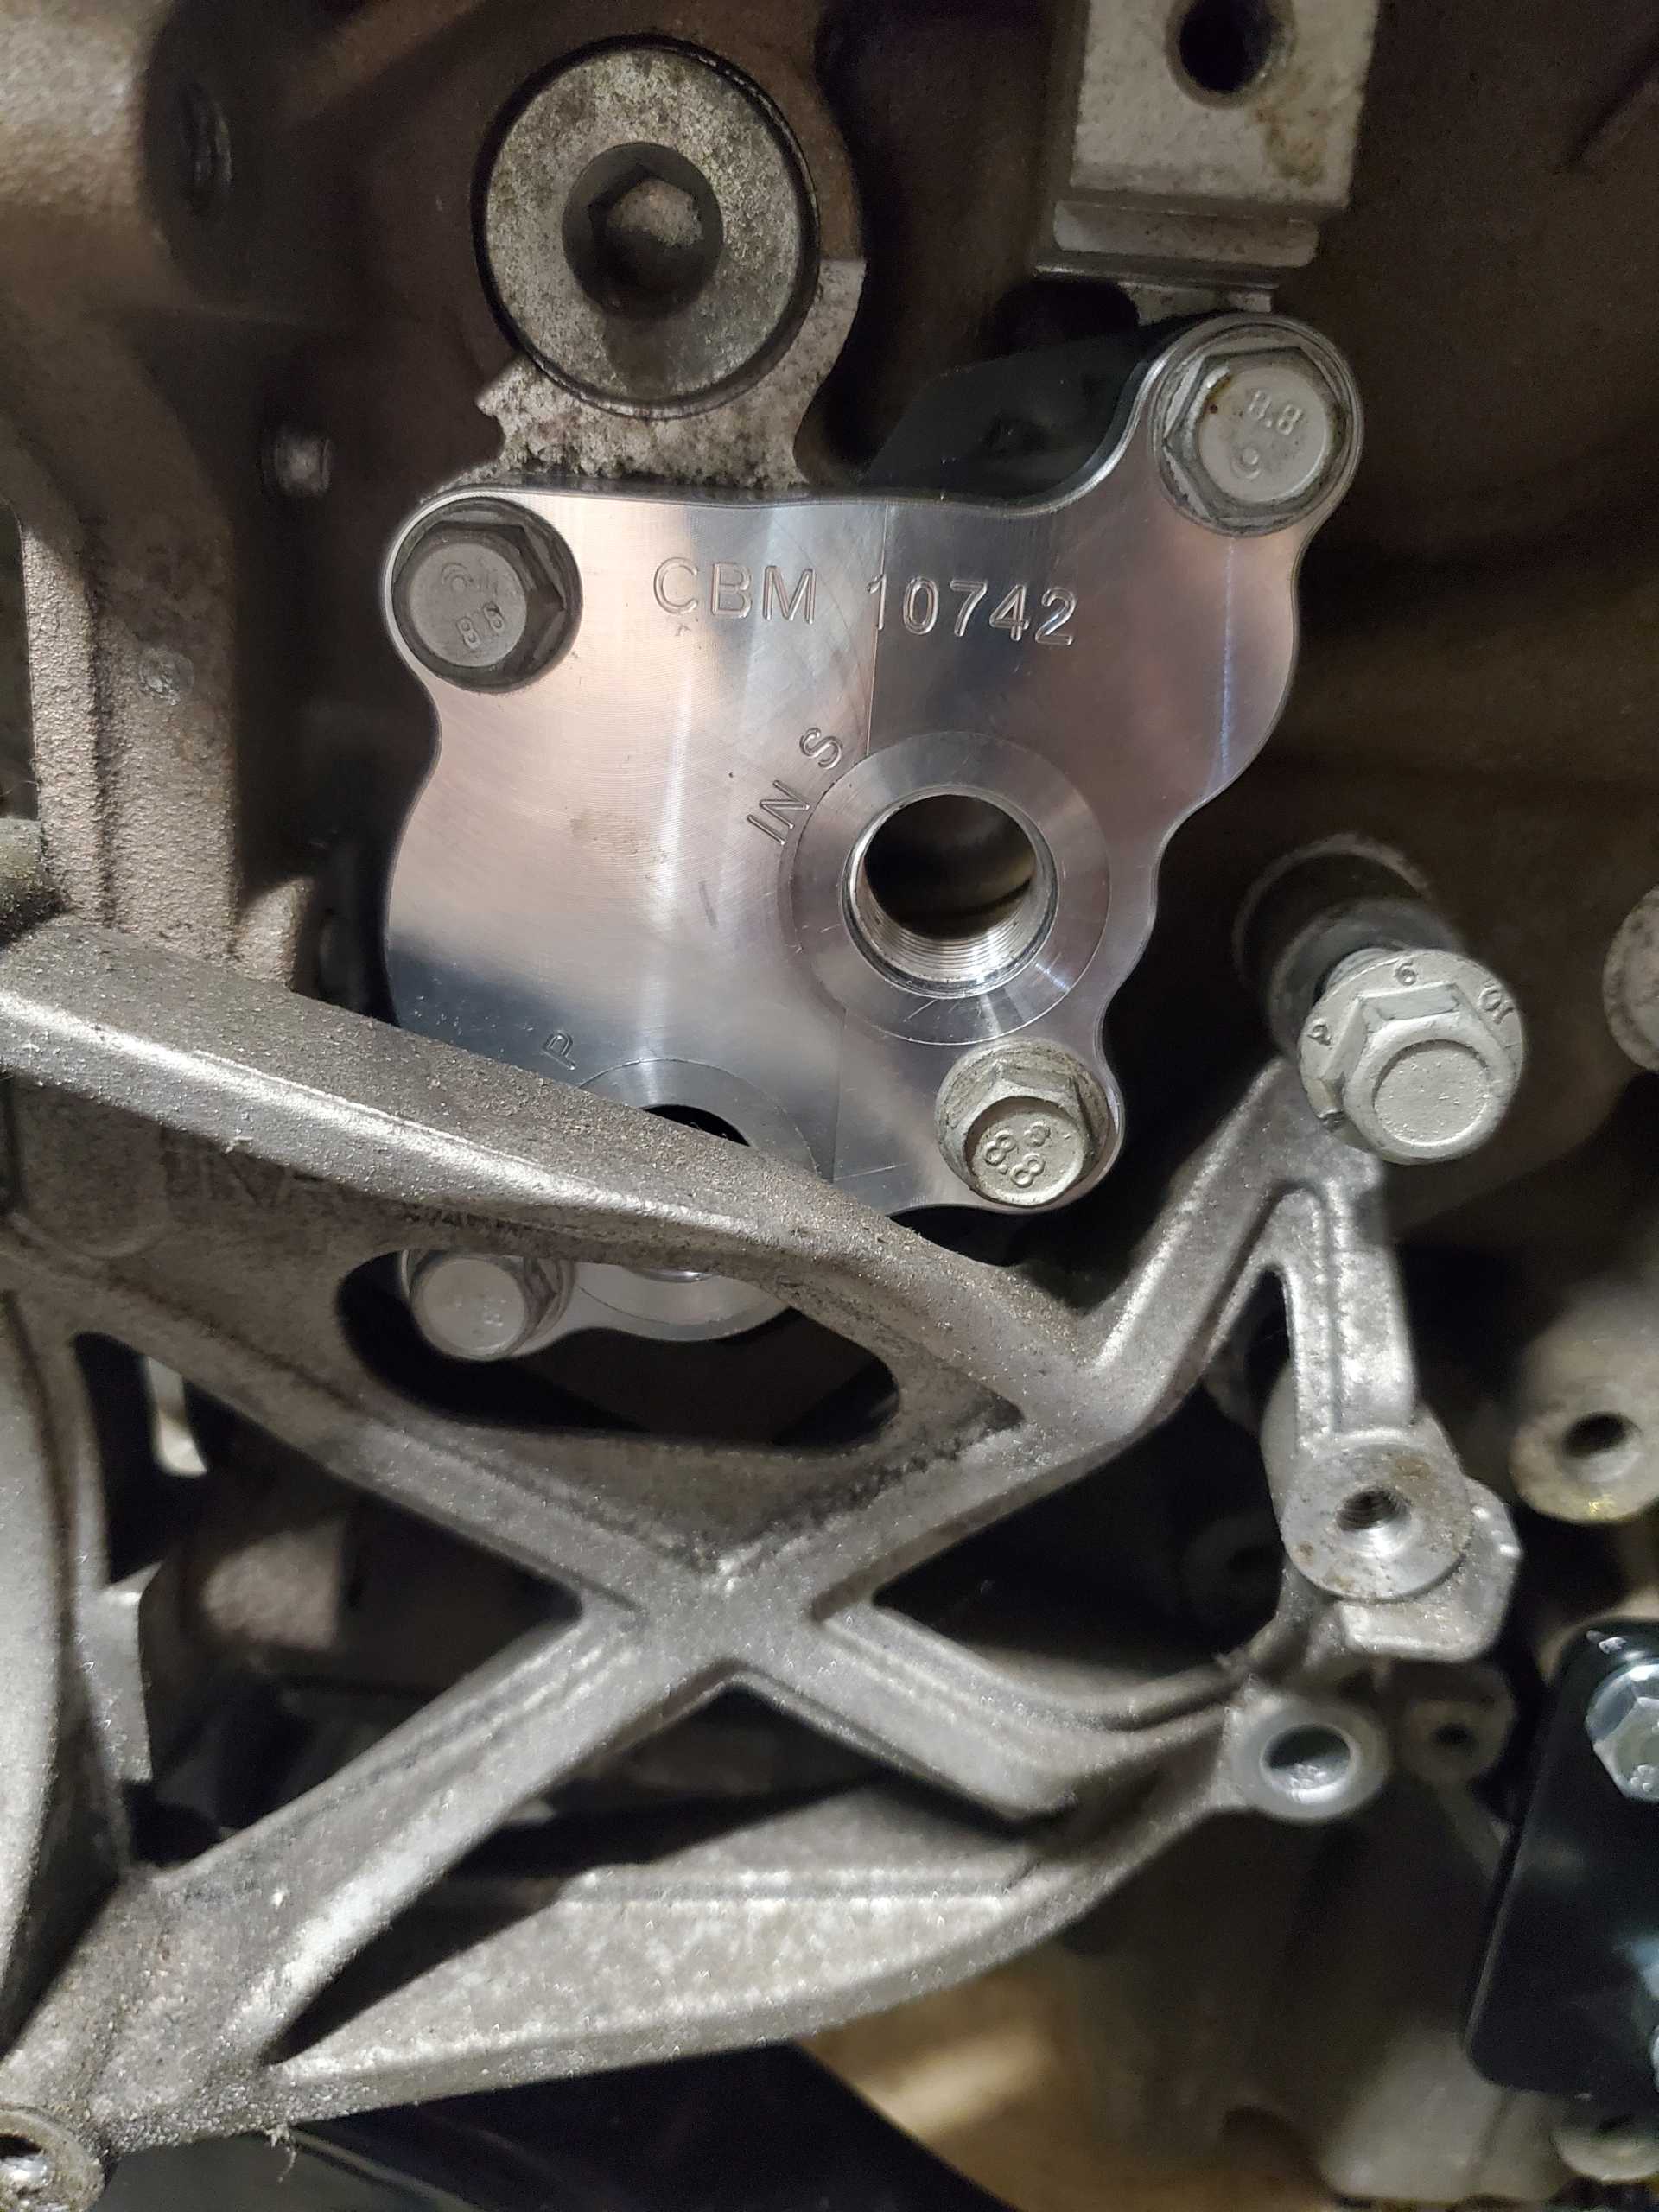
Oil- This is a little bit of a pain. I wanted a remote setup. The Camaro oil filter setup goes straight up and is a cartridge. This will not work as it will hit the firewall. The impala setup puts the oil filter "extremely" (slightest of interference) with the AC compressor. Since I wanted a remote filter (since I'll need a feed anway for turbos) I decided to get a relocation kit from a company in CA called CBM. The issue with the adapter plate is it puts one of the fittings right in the way of the AC bracket. Behind the plate, cast into the block is a channel so you could technically put the fitting anywhere along this channel. If have this part designed; right now it's a matter of firing up my 3D printer and printing a prototype to make sure it works before I get it fabricated.
Oil fill. The oil fills for the impala and Camaro are on the wrong side for us. It's right by the firewall and would be a huge PITA to use. While the Impala valve covers are plastic, the Camaro's are aluminum. They are not reversible BTW (they're specific to L and R banks) I purchased a universal oil filler neck off amazon and welded this onto the valve cover.
To be continued. . .
[This message has been edited by RandomTask (edited 04-17-2021).]
Great thread, and excellent job. I will agree that this swap makes sense being lighter, provides more horsepower, and uses more modern technology. Using regular gas with 11.6:1 C/R is a very good feature. The only negative that I see with the LFX is that the engine is big and will not fit in the Fiero engine compartment without cutting out the trunk. It is also a drive by wire engine and has some unique features like its requirement for Dexos oil. This swap has been around for a while being done in other vehicles and its nice to see it being put in a Fiero.
------------------ " THE BLACK PARALYZER" -87GT 3800SC Series III engine, custom ZZP /Frozen Boost Intercooler setup, 3.4" Pulley, Northstar TB, LS1 MAF, 3" Spintech/Hedman Exhaust, P-log Manifold, Autolite 104's, MSD wires, Custom CAI, 4T65eHD w. custom axles, Champion Radiator, S10 Brake Booster, HP Tuners VCM Suite. "THE COLUSSUS" 87GT - ALL OUT 3.4L Turbocharged engine, Garrett Hybrid Turbo, MSD ign., modified TH125H " ON THE LOOSE WITHOUT THE JUICE "
Great thread, and excellent job. I will agree that this swap makes sense being lighter, provides more horsepower, and uses more modern technology. Using regular gas with 11.6:1 C/R is a very good feature. The only negative that I see with the LFX is that the engine is big and will not fit in the Fiero engine compartment without cutting out the trunk. It is also a drive by wire engine and has some unique features like its requirement for Dexos oil. This swap has been around for a while being done in other vehicles and its nice to see it being put in a Fiero.
Thanks. Couple things; no trunk cutting required. This motor actually has more clearance than the 3.4TDC from what I've seen. That and so many oils are Dexos certified the thought didn't even cross my mind.
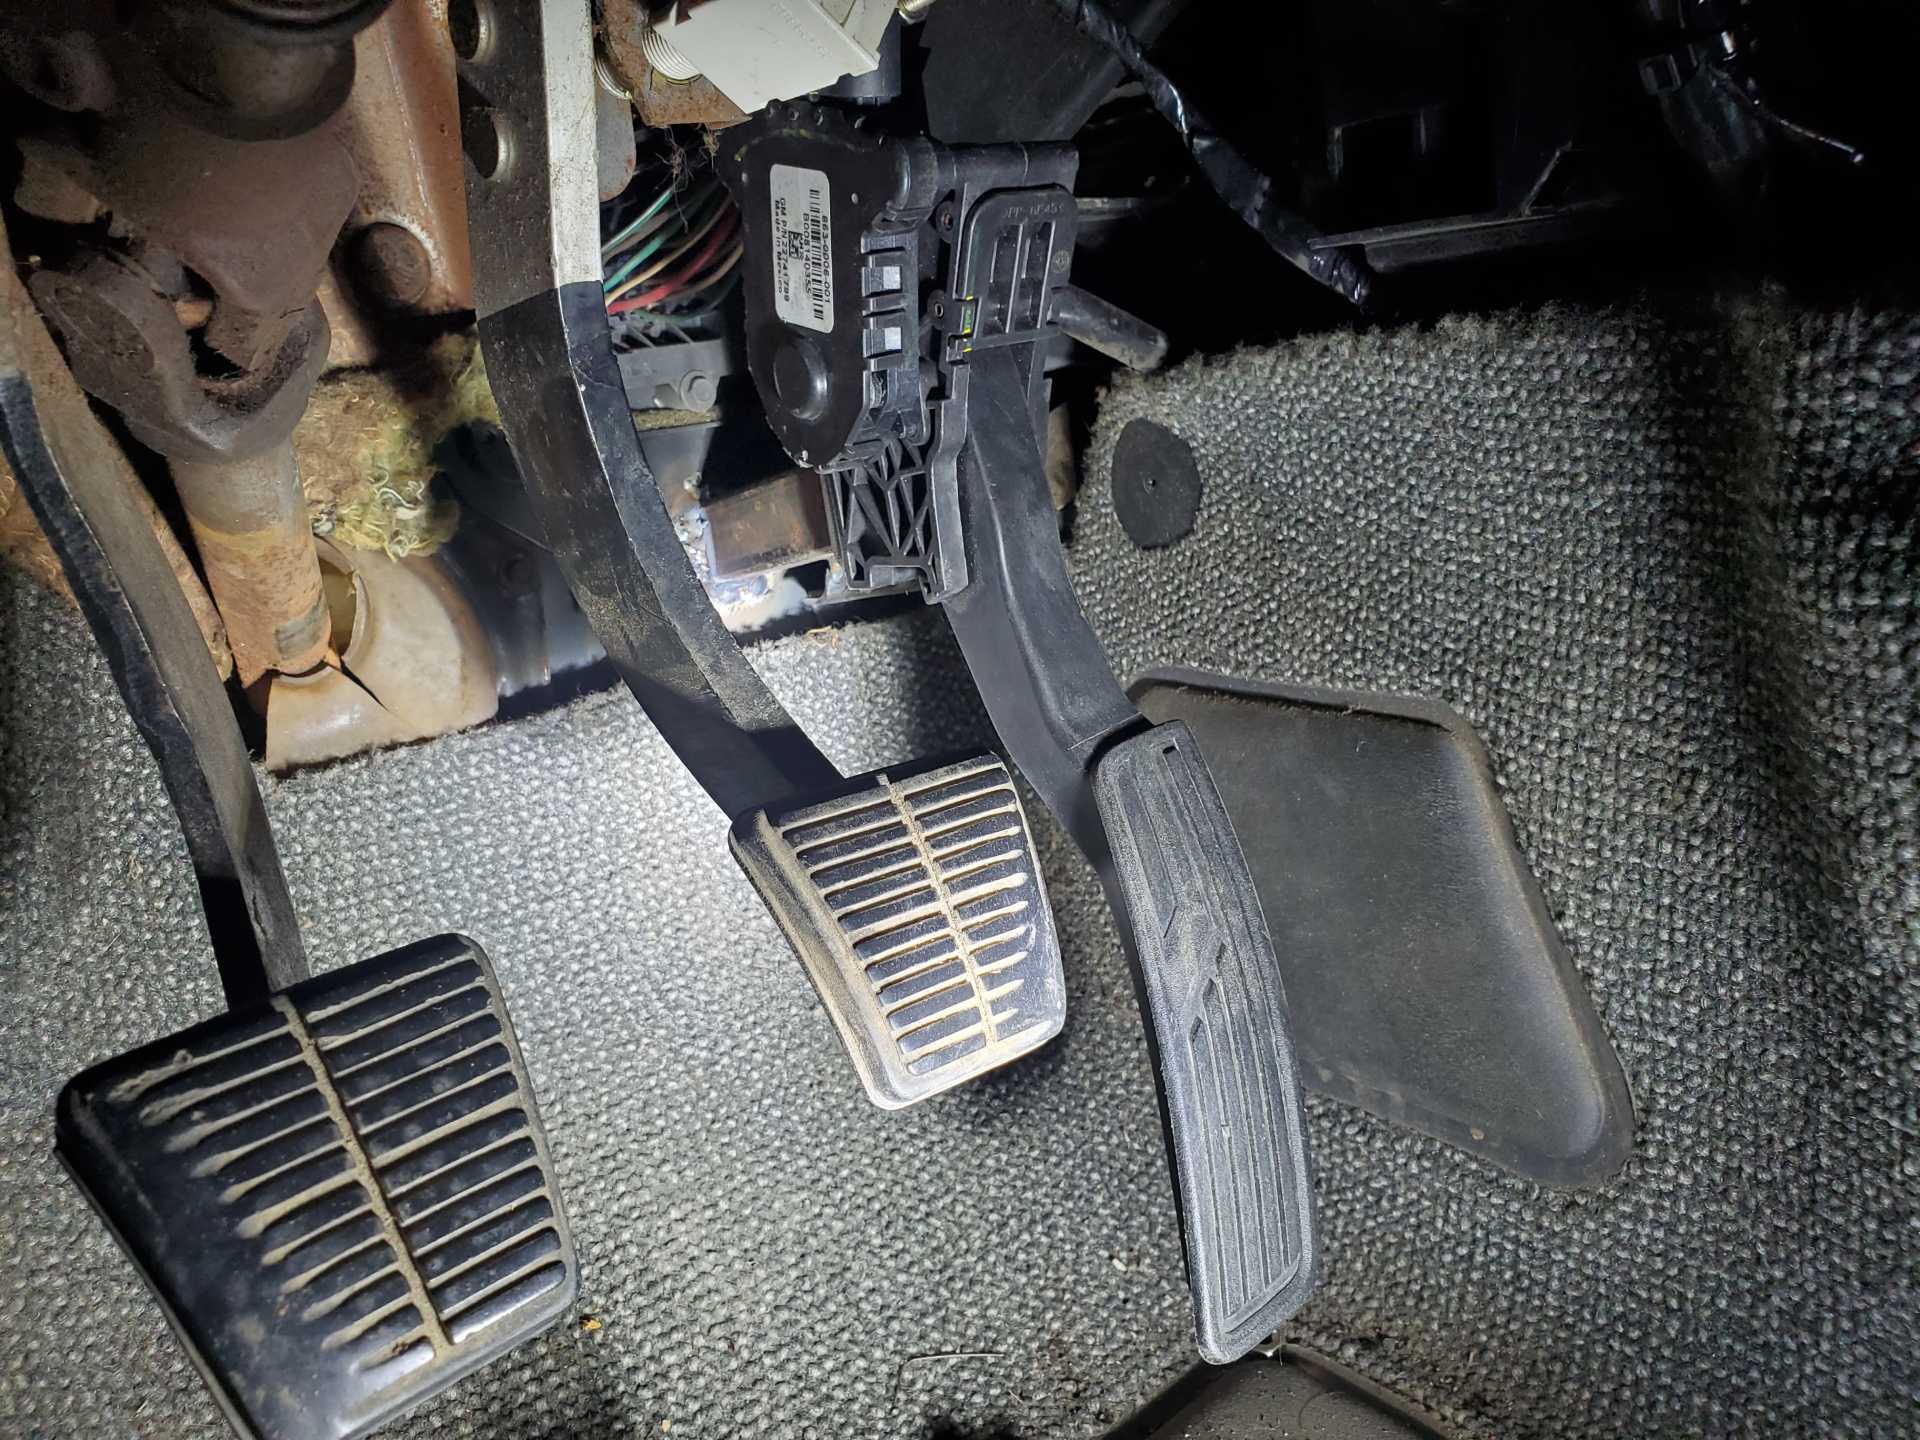
Speaking of drive by wire, this was yet another thing I needed to resolve. I again, had a plate CNC cut to mount the pedal to (from the donor vehicle). I then used some 1" square steel and tacked it in place. I checked it out to see if I liked the position, adjusted accordingly, then zipped everything up. This is also a point where I say how excited I'm for my new garage that's about to get built. The circuit for the current garage is at the opposite side of the house than the breaker panel. If you turn my 120v hobart all the way up, it will trip the breaker. . . which sucks. New garage will have 220 v and I can finally start using my synchrowave again.
Anyway I simply ran the wires up and through the center tunnel. I know this picture makes the pedal look close to the brake pedal but it's really not.
This picture does remind me I need to replace my steering column grommet . . anyone know where to get a replacement?
[This message has been edited by RandomTask (edited 04-19-2021).]
Very nice. I like the solutions you came up with. It may be the transmission mount that causes the axle to be too short. Although I'm not as far along as you, I do have the engine/transmission unit custom mounted in what must be a slightly different position. The Cobalt SS axles were both just fine. Your recommendation to use the Impala rather than the Camaro version of the LFX is a good idea. As far as the reduced hp for the Impala, are you sure the intake is the whole story there? I wondered if the Camaro's less restrictive exhaust may be responsible for at least some of that difference? Also, again since it isn't running yet, I don't know for certain, but the Impala A/C compressor doesn't interfere with the stock Impala oil filter. It is a variable compressor, but can be easily modified to be a non variable compressor. (Per a video online) I hope it works. I'll let you know. Finally, I want to congratulate you for an awesome swap. Hope mine turns out as nice.
By the way, someone should market an LFX Swap Kit. I think this will be the go-to swap going forward. It is about the same weight as the stock engine/transmission setup with way more that twice the hp in a way more modern package than anything else available. If a person wants even more power, the LF3 or LF4 are solid options.
Background: To me, the 3800 is old and tired. GM has been making the 3.6L for a while now and with a significant amount more HP than the 3800 and lighter, I was interested. The fact that it revs fairly high to me, just makes it seem like a better choice for a Fiero.
I'm thinking of swapping a 3.6 V6 into my BMW, for similar reasons. The biggest engine available in the E46 BMW was a 3 liter straight-6, with just over 220 HP. I could swap in an engine from an M3, but that would be stupid-expensive, and the M3 engine is about 100 lb heavier (iron block).
Or I could swap in a GM 3.6 V6 which weighs less than the BMW 3.0 L6, and makes about 70 more HP. Hmmm...
Anyway, I didn't mean to derail your thread. Are you going to take video of the engine running?
Great thread, and excellent job. I will agree that this swap makes sense being lighter, provides more horsepower, and uses more modern technology. Using regular gas with 11.6:1 C/R is a very good feature. The only negative that I see with the LFX is that the engine is big and will not fit in the Fiero engine compartment without cutting out the trunk. It is also a drive by wire engine and has some unique features like its requirement for Dexos oil. This swap has been around for a while being done in other vehicles and its nice to see it being put in a Fiero.
The engine is quite compact, for what it is...... and much smaller than the LQ1 DOHC, specifically the heads and the cam drive system, to the point where the decklid hinges do not have to be cut with room to move it side to side based on the axle solution chosen. Definitely no trunk cutting necessary.... maybe if you went with the LF3/LF4 turbo OE turbo layout but definitely not with the LFX. The heads are miniscule as compared to the LQ1 heads, then again aren't most all heads small compared to the LQ1. Mine is offset 2" from the stock layout and no decklid hinge box cutting necessary. IMHO, the only limiting factor of this swap is the lack of prevalence of the Saab Aero F40 6 speed transmission with its GM Global bolt pattern and it's stump pulling 1st gear. (which can be addressed but at a cost)
Regarding the Dexos.... from what I've read, GM did a large amount of research and development regarding the Dexos specification. Dexos specifies a particular set of characteristics that these DI, VVT engines require to maintain their expected level of performance and reduce warranty claims, i.e. reliability. Small price to pay for a 3.6L V6 with 300hp+ These are "not" the 2.8-3.4 60 degree or 3800 V6s from before...
So I realized I'm out of stainless wire so I can't weld stuff up until that get's in. Oops.
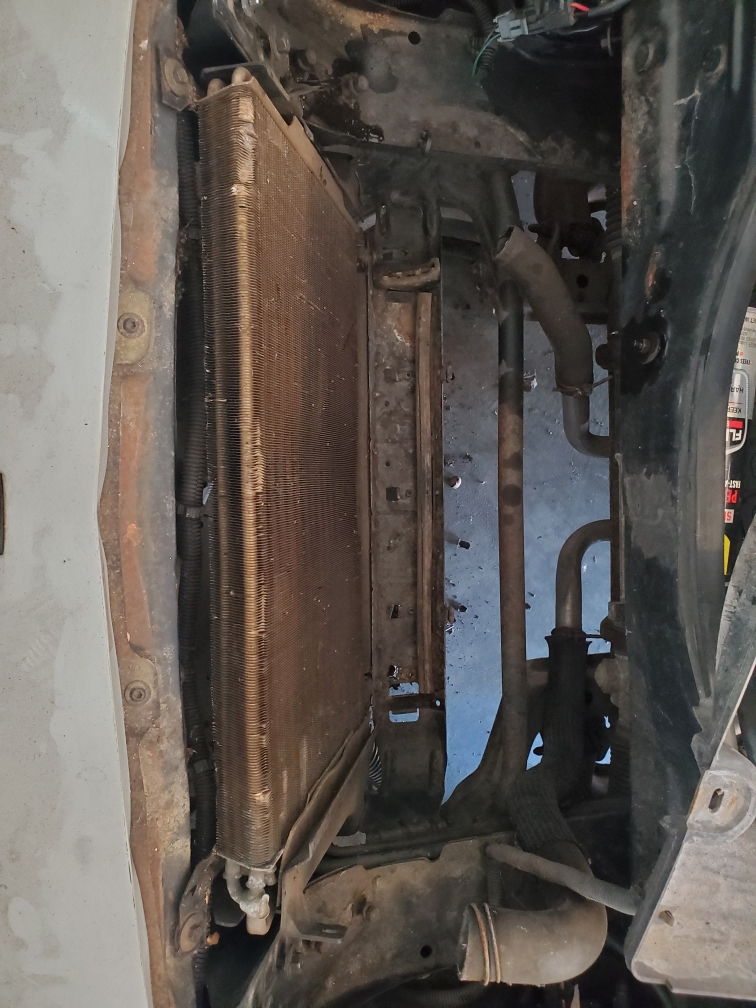
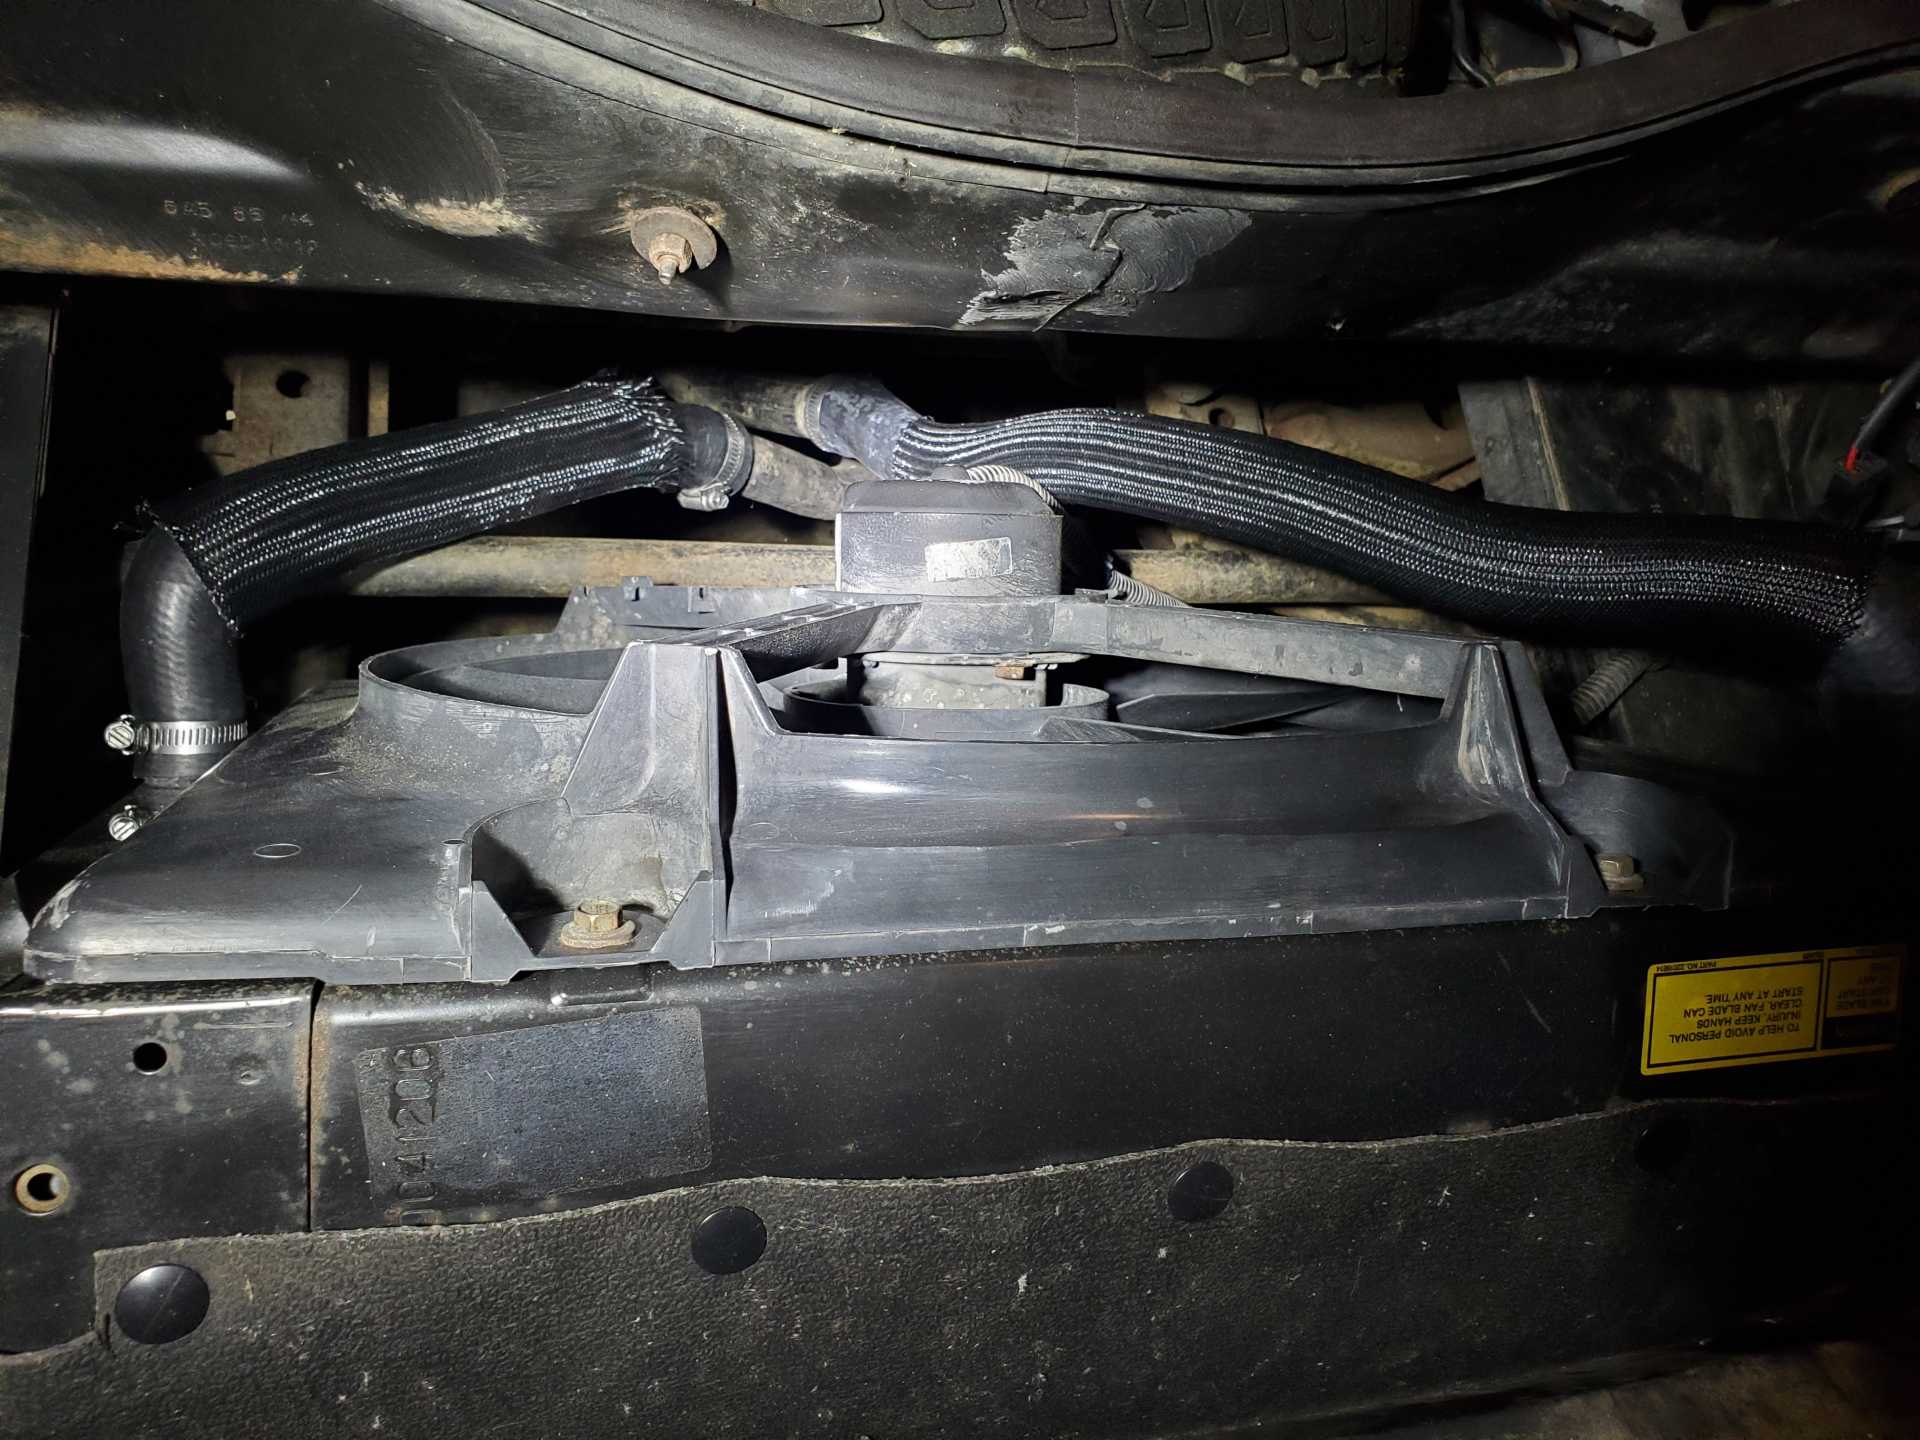
That stated, started taking things apart and moving things where I wanted them to be. Pulled the radiator and cleaned everything up; pre-cleaning:
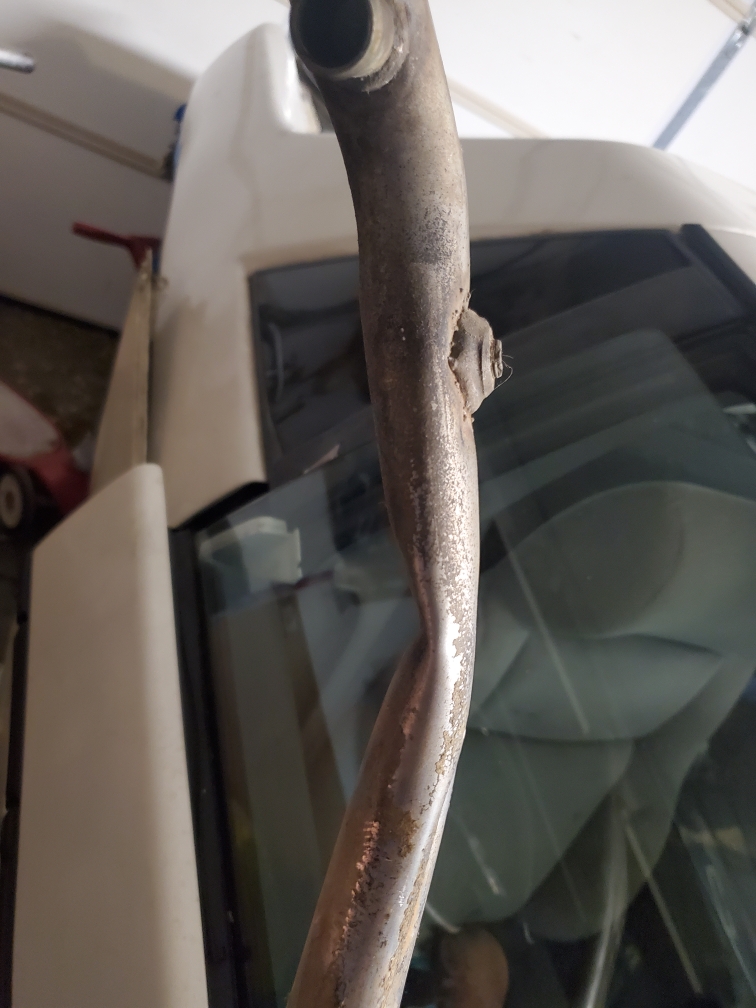
Pulled the passenger coolant tube. I knew I'd need to fix this going in so I already have a replacement section to weld in. I sectioned this piece to see how bad it actually was. . . It was bad. . .
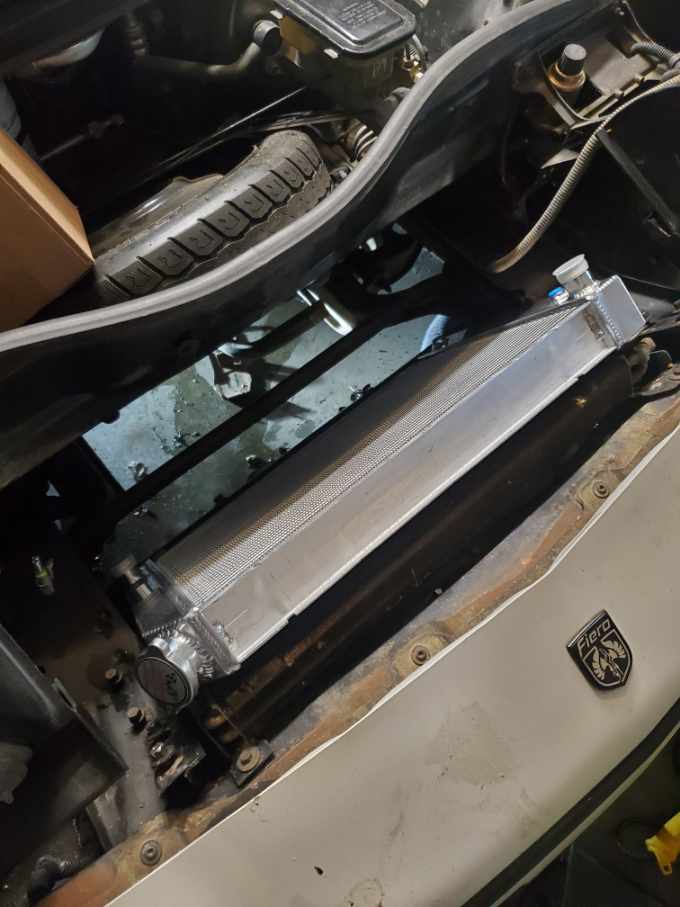
And putting the new radiator in place. I'm super tempted to replace the AC condenser at this point but don't feel like spending the $300 on it yet so I'm going to hold off. Once the SS mig wire comes in, I'll go ahead with finishing cutting the coolant tubes then welding them back into the orientation I need.
So I realized I'm out of stainless wire so I can't weld stuff up until that get's in. Oops.
Pulled the passenger coolant tube. I knew I'd need to fix this going in so I already have a replacement section to weld in. I sectioned this piece to see how bad it actually was. . . It was bad. . .
-Chop it right at the buckle -Form each side of the cut round -Butt weld back together -???? -Profit!
-Chop it right at the buckle -Form each side of the cut round -Butt weld back together -???? -Profit!
Use a tig if you can with those pipes unless you are far better than using a mig than I. I cleaned, solarfluxed, and practiced on a similar size stainless pipe, and these 30+ year old lower grade stainless pipes gave me fits repairing mine. Burned through easily and weld kept going porous on me. I finally got it sealed but the weld is so bad I'm going to cut it and tig on a section instead.
Use a tig if you can with those pipes unless you are far better than using a mig than I. I cleaned, solarfluxed, and practiced on a similar size stainless pipe, and these 30+ year old lower grade stainless pipes gave me fits repairing mine. Burned through easily and weld kept going porous on me. I finally got it sealed but the weld is so bad I'm going to cut it and tig on a section instead.
I had a really good welder to the repair on my pipes, so I can't comment on how easy or difficult they are to weld. Butt welding thin wall tubing is already a varsity skill.
I had a really good welder to the repair on my pipes, so I can't comment on how easy or difficult they are to weld. Butt welding thin wall tubing is already a varsity skill.
While a lot easier on TIG to butt weld, you can do it on a MIG if you pay attention. Obviously, make sure you're using the right filler as well as tri gas (He/Ar/Co2) and make sure everything is nice and clean.
I initially tried using an exhaust expander to try and expand some of the pipe so I can slip the replacement in/over the other but unfortunately, the pipe expander broke trying to do this. I think the material is just too strong to expand
Goto Napa, they have sockets with a tapered face that you can use as a mandrel to shape the pipe, just remember to put a long bolt through the socket to use as a slide hammer to extract the socket.
So ran into a little bit of a setback. Went to fire up the car; ran fine for about 10 seconds then cut off and couldn't get it fired back up. Realized my fuel pump wasn't on. Checked the relay; it worked but pump wasn't turning on. Checked the fuse and it was blown. Replaced the fuse with the relay manually engaged and you could hear the pump run, dead head to a stop, then saw the fuse pop again. (something about electric motors hitting max current at 0 rpm)
Car has funky throttle response (as in not running right). It would appear that since the pressure is too high, the ECU is trying to compensate and is simply running too short a pulse to deliver any fuel. I just bought a fuel pressure gauge as well a universal regulator so I can set it to 55psi and forget about it. I'll have to plumb that in. Boo.
[This message has been edited by RandomTask (edited 04-29-2021).]
So ran into a little bit of a setback. Went to fire up the car; ran fine for about 10 seconds then cut off and couldn't get it fired back up. Realized my fuel pump wasn't on. Checked the relay; it worked but pump wasn't turning on. Checked the fuse and it was blown. Replaced the fuse with the relay manually engaged and you could hear the pump run, dead head to a stop, then saw the fuse pop again. (something about electric motors hitting max current at 0 rpm)
Car has funky throttle response (as in not running right). It would appear that since the pressure is too high, the ECU is trying to compensate and is simply running too short a pulse to deliver any fuel. I just bought a fuel pressure gauge as well a universal regulator so I can set it to 55psi and forget about it. I'll have to plumb that in. Boo.
Well something's dead-heading the pump, so I would not expect the engine to run correctly. Is your regulator malfunctioning? I had a BMW E30 in which the return line to the tank was clogged solid. I had to replace the tank. That's not a need for tank replacement in a Fiero, but do some checking to see if it's the regulator or not.
[This message has been edited by Will (edited 04-30-2021).]
Well something's dead-heading the pump, so I would not expect the engine to run correctly. Is your regulator malfunctioning? I had a BMW E30 in which the return line to the tank was clogged solid. I had to replace the tank. That's not a need for tank replacement in a Fiero, but do some checking to see if it's the regulator or not.
Currently there is no return and thus, no regulator. The "lift" pump feeds the high pressure pump. I'm installing a regulator on the lift pump circuit. So the fuel pump will feed through a filter, into a regulator. I'll set that regulator to ~55psi. That regulator will have a feed to the high pressure pump and also a return back to the tank. The high pressure pump then feeds the fuel rail and has it's own return system; basically I'm going to make sure there's a constant 55psi to the high pressure pump. I'm utilizing a walboro 255 unit so basically, it's feeding as much as it can so ~100psi, which is no bueno.
Currently there is no return and thus, no regulator. The "lift" pump feeds the high pressure pump. I'm installing a regulator on the lift pump circuit. So the fuel pump will feed through a filter, into a regulator. I'll set that regulator to ~55psi. That regulator will have a feed to the high pressure pump and also a return back to the tank. The high pressure pump then feeds the fuel rail and has it's own return system; basically I'm going to make sure there's a constant 55psi to the high pressure pump. I'm utilizing a walboro 255 unit so basically, it's feeding as much as it can so ~100psi, which is no bueno.
Ok, so the stock ECM is supposed to PWM the fuel pump, right? I @$$ume there's a reason why you didn't wire it up for that to work?
Yes, the high pressure pumps do not have input regulation, so they essentially dead-head the lift pump without something else in the system.
With my LF3/LF4 install, which effectively is the LFX, as referenced, seen, and stated in the 2016 ATS Factory Service Manual, just with altered heads and beefed up internals. I have my fuel system wired up although uninstalled to match the OEM layout.
The fuel system for the V6 E36 and E96 ECUs, Camaro/ATS LFX and LF3/LF4 ATSV has a fuel pump controller module or FPCM separate from the ECU. The E36/E96 ECU sends a canbus signal to the FPCM based off of fuel pressure sensors that commands on demand the FPCM to PWM the fuel pressure from a PWM fuel pump to the HPFP with no return line.
I 'think' the non-FPCM setups, such as some of the transverse lfx setups, send the canbus signal to a PWM fuel pump via the Body Control Module, at least that's the best I could ascertain researching wiring diagrams. I chose to wire my setup to mimic the V6 Camaro/ATS/ATS-V setup.
Note: The FPCM, if not the one with the ECU, has to be 'paired' with the ECU through a dealer or GM Tech-II software or current equivalent.
I have seen no return lines in any of the LFX LF3 LF4 setups I've researched thus far. If anyone has please post. The PWM only gives the HPFP what it needs based on sensor input with no return line.
[This message has been edited by msweldon (edited 05-01-2021).]
Anyway, regulator should be here today or tomorrow. Also waiting for the last of the coolant hoses to get in. Was able to move the coolant tube ends the way I wanted. Welded fairly easily with only one blow through.
Yup. Cut them, rotated 90*. Had to weld in about a 4.5" extension on the driver side so it would clear the passenger side tube.
Since I was going with a 3 core radiator anyway, I decided to have the radiator inet and outlet switched to opposite sides. Made the process pretty easy. I also moved the reservoir location to the engine compartment.
Anyway, regulator should be here today or tomorrow. Also waiting for the last of the coolant hoses to get in. Was able to move the coolant tube ends the way I wanted. Welded fairly easily with only one blow through.
Being a bit harsh on yourself, don't you think? I considered using the Impala fuel pump and controller, but decided that simpler was better. Guess I'll see for sure when I get to the point where I turn the key.
Being a bit harsh on yourself, don't you think? I considered using the Impala fuel pump and controller, but decided that simpler was better. Guess I'll see for sure when I get to the point where I turn the key.
agreed, you're tackling a swap that has only been done a handful of times, and not documented often either.
------------------ "I am not what you so glibly call to be a civilized man. I have broken with society for reasons which I alone am able to appreciate. I am therefore not subject to it's stupid laws, and I ask you to never allude to them in my presence again."
Being a bit harsh on yourself, don't you think? I considered using the Impala fuel pump and controller, but decided that simpler was better. Guess I'll see for sure when I get to the point where I turn the key.
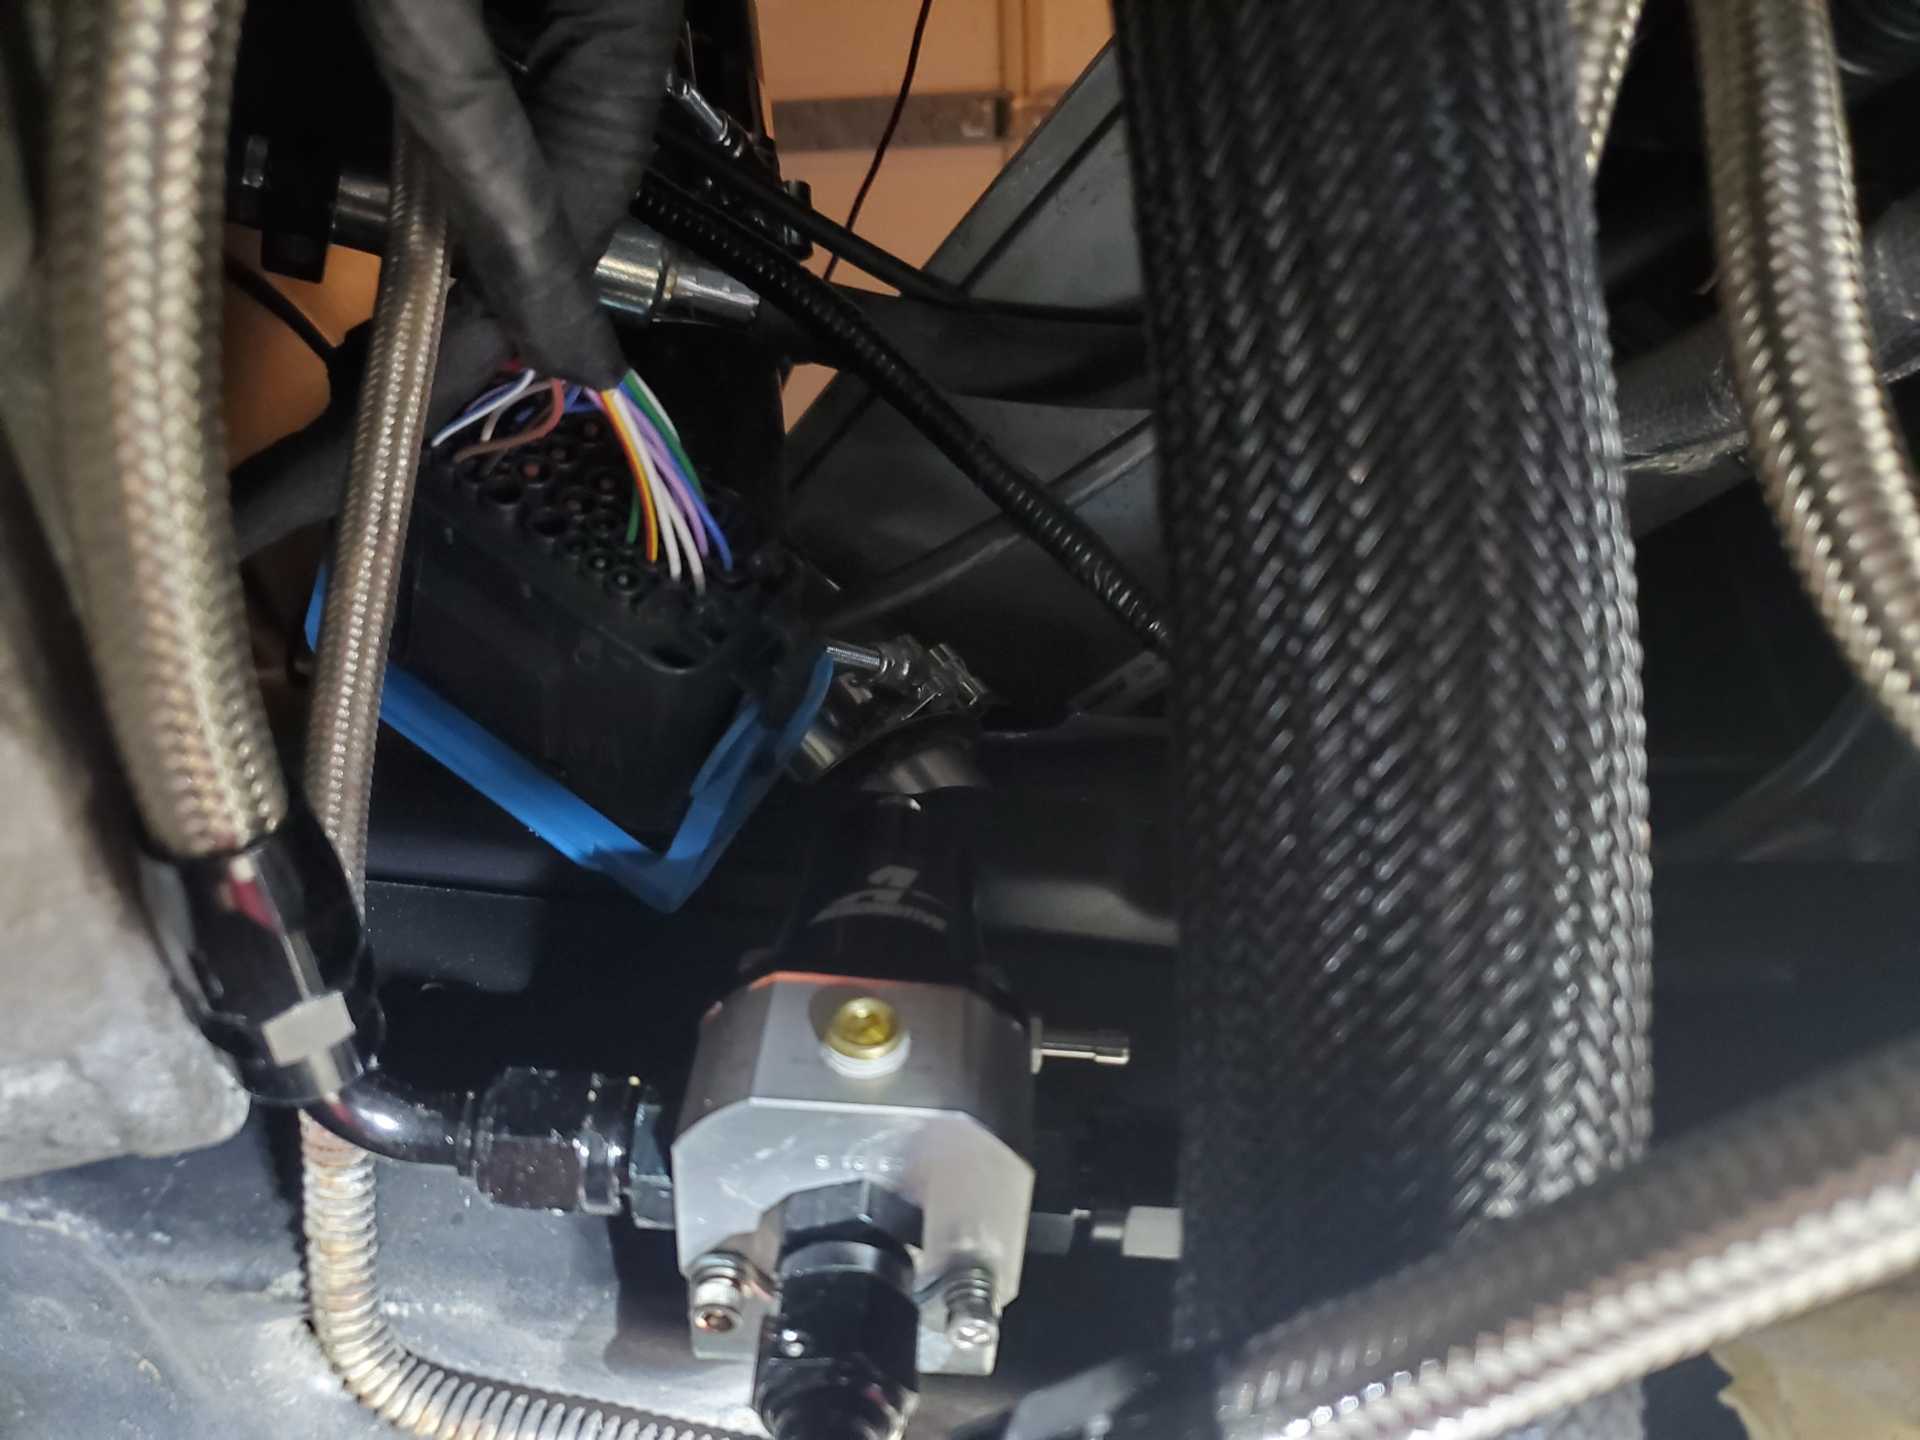
Ha, I should have simply thought it through and it would have popped some flags. I just finished installing an aeromotive regulator. Your setup seems clutch, I just like the adjustabikity of mine especially when I go high boost. As of now, the only two things I'm waiting on are the axles (still) from the drive shaft shop and an ecu/relay mount bracket I designed and ordered off xometry. DSS said my axles should be shipped this week... so we'll see.
I would put a hose on the regulators reference port, and route it downstream of the air filter, that was nothing can clog the port.
------------------ "I am not what you so glibly call to be a civilized man. I have broken with society for reasons which I alone am able to appreciate. I am therefore not subject to it's stupid laws, and I ask you to never allude to them in my presence again."
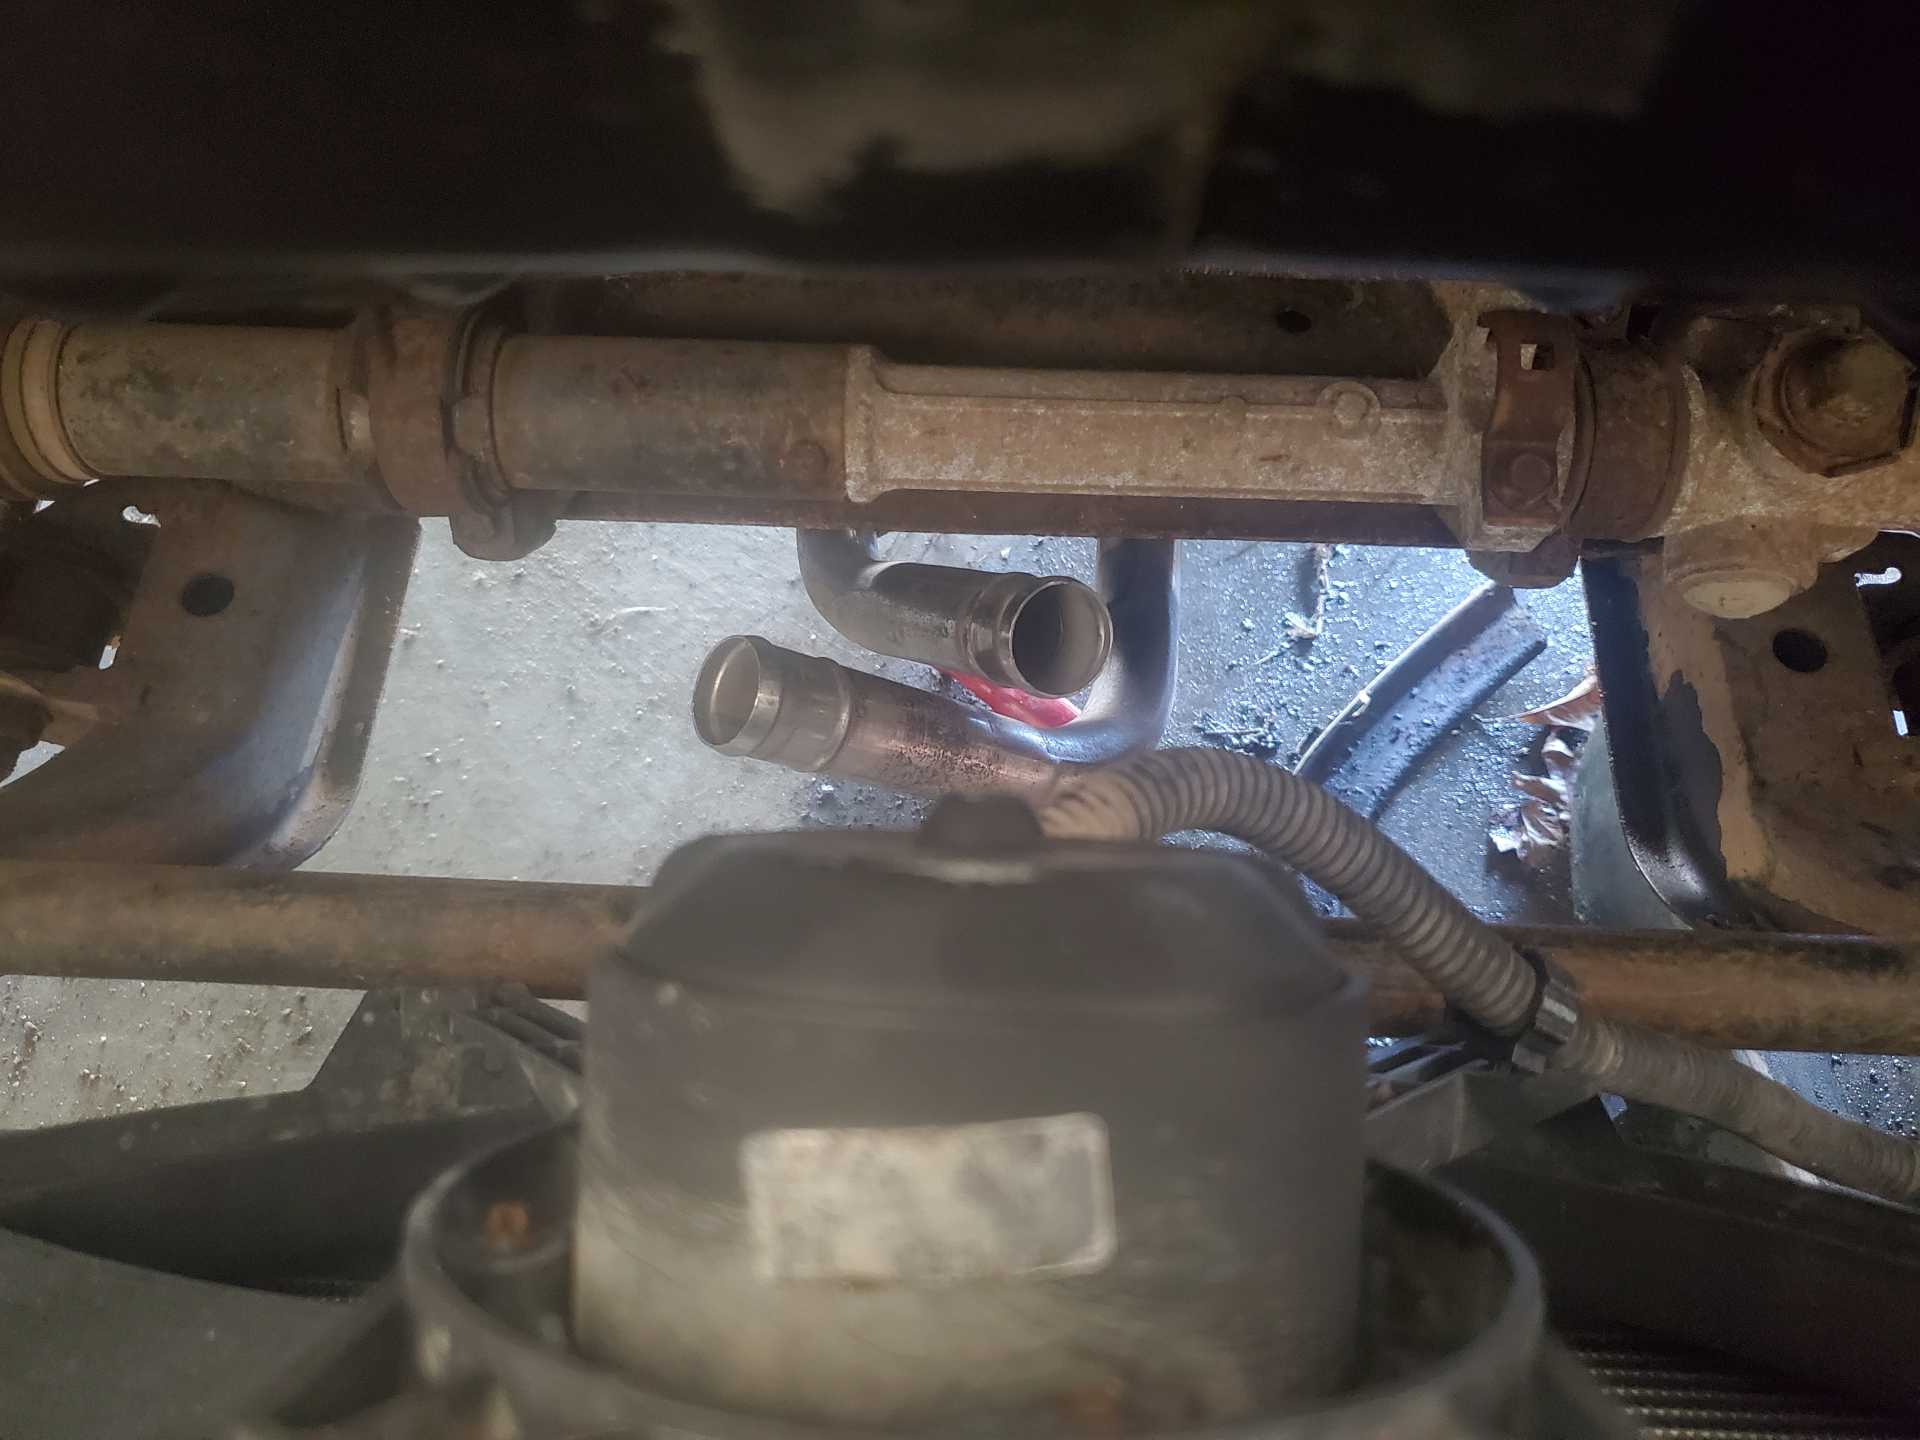
The clutch line at the transmission as well as an Isuzu shift cable are in the pick, so along the DS frame rail in front of the transmission.
I can see shift cables and such like, but was actually looking for confirmation and some thoughts about why he put it there and routed things that way... looks more complicated than it needs to be.
I can see shift cables and such like, but was actually looking for confirmation and some thoughts about why he put it there and routed things that way... looks more complicated than it needs to be.
Because there's really no other place to put it. I have my inline fuel filter; the (fuel) line then runs behind my remote oil filter. After that, it's the AC lines. For such, it was the only place I could put it.
So cooling system is done, fuel pressure set. When you fire car up cold, it runs like a champ. As soon as it gets into closed loop, it runs like ass. Unresponsive, backfiring, etc. Need to run some diagnostics and figure out whats causing it to go ape **** .